

Page 1
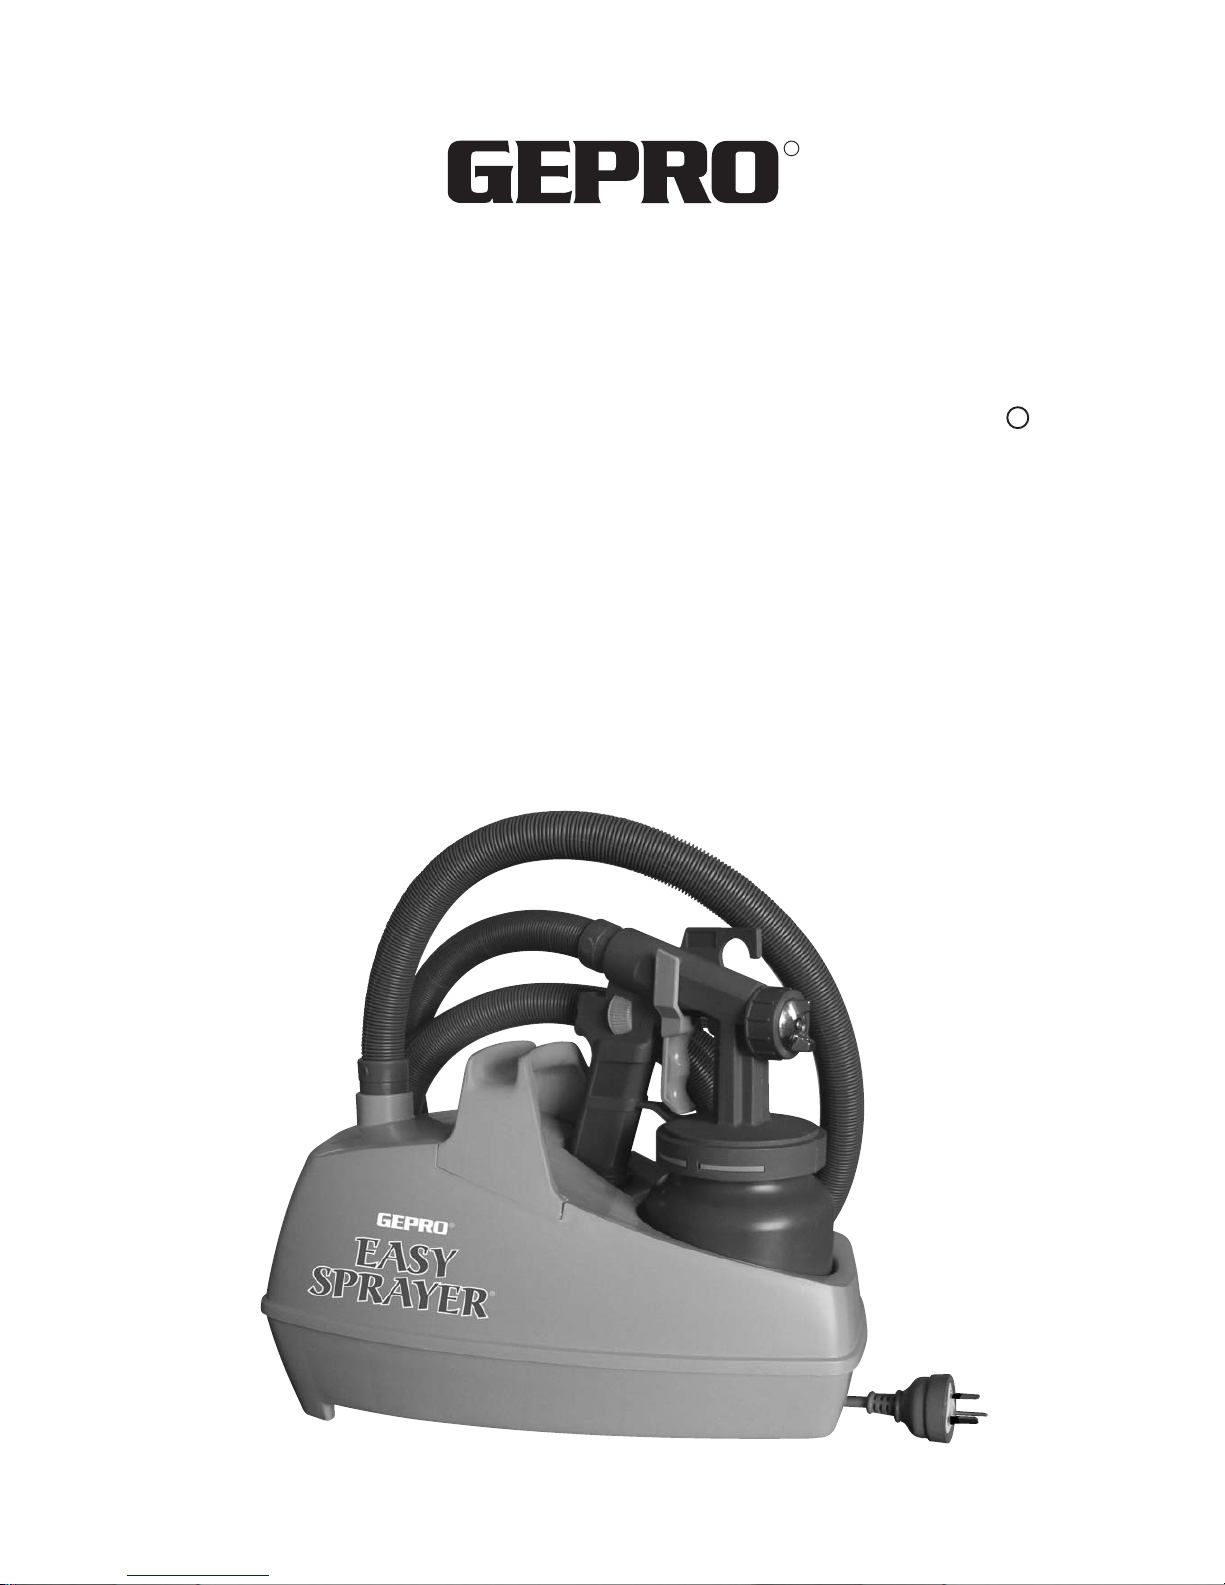
EASY
EASY
SPRAYER
SPRAYER
EASY
SPRAYER
HIGH VOLUME LOW PRESSURE SPRAY PAINT OUTFIT
SPRAY PAINTING MADE EASY
R
R
Page 2
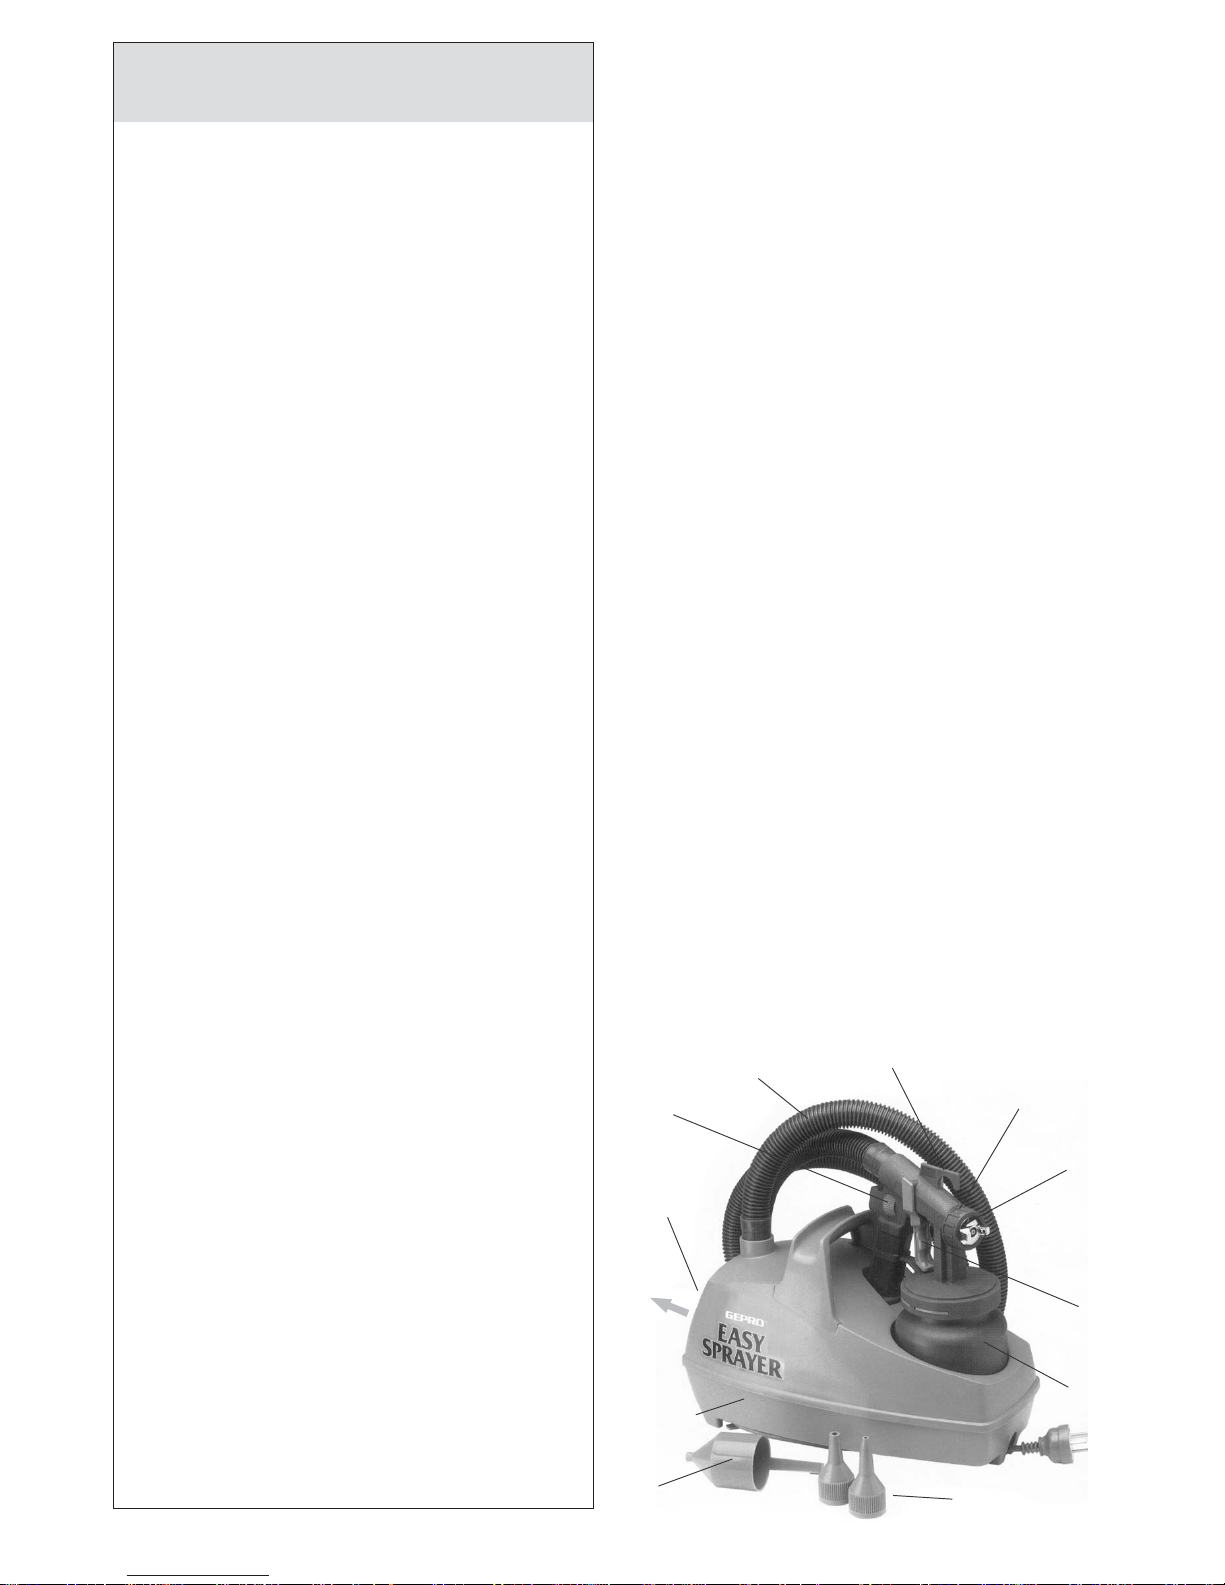
TABLE OF CONTENTS
Page
Preparing Surfaces 3
Setting Up to Paint 3
Preparing the Paint 3
Warning 3
Adjusting the Air Cap 4
Adjusting the Paint Control 4
Spray Painting Techniques 5
Care of Equipment 6
Cautionary Notes 6
Trouble Shooting 7
Specifications 8
Spare Parts and Accessories 8
Warranty 8
INTRODUCTION
Congratulations on your purchase of the GEPRO
Easy Sprayer Paint Outfit. It will save you time, money
and aching wrists.
Efficiency describes Easy Sprayer perfectly. Now those
tiresome large surface area painting jobs can be cut
down to size.
Even if you have no experience you can quickly learn to
use the GEPRO Easy Sprayer Paint Outfit by reading
these instructions and then practicing on paper or other
scrap material. The GEPRO Easy Sprayer Paint Outfit
is ideal for painting furniture, fences, decking, woodwork
and metalwork.
Your Easy Sprayer Paint Outfit comes complete ready to
start spray painting. The unit includes:-
- Blower unit
- Spray gun with 900ml paint container
- 3 metres of air hose
- Operating instructions
- Thinning cup
- Inflating nozzles
- Spare 900ml paint pot with lid
The GEPRO Easy Sprayer Paint Outfit fulfills most of
the functions of a paint brush - with considerably
greater ease and avoidance of paint wastage.
Whether the surface is large, small, flat or irregular, Easy
Sprayer delivers a finish free from brush marks and other
imperfections. The paint covers the surface with
thoroughness that even the most careful brushing often
fails to accomplish.
With the Easy Sprayer you can easily reach those
hard-to-get-at places a brush can reach only with the
greatest difficulty.
In conjunction with good materials, a little care and
common sense, the Easy Sprayer offers you the means to
ensure first-class finishes; whether painting your house,
fence, furniture or any of the many items that a bright,
lustrous finish so greatly improves.
Air Intake
and Exhaust
Thinning Cup
Blower Unit
Paint Control
Air Hose
Hook for Hanging
Retaining Nut
Air Cap
Trigger
Paint
Container
Inflating Nozzles
Exhaust
Air
2
Page 3
GETTING STARTED
Prepare the surface to be painted
First class results depend largely on surface preparation.
- Remove flaking paint.
- Wash down to remove grease.
- Sand to provide a smooth surface.
- Remove dust.
Touch up any bare spots with primer or undercoat. Mask
off with paper and adhesive tape on any sections which
are not to be painted.
A
lternatively, use a handheld mask made from metal or
stiff cardboard. Cover nearby objects and furniture with
a painter's drop sheet.
If painting outdoors, choose a still day to avoid paint
spray being carried and dust being blown onto the
freshly painted surface. Cover nearby objects. A mask is
necessary on many occasions to prevent overspray
falling onto previously painted surfaces. It can easily be
constructed from tin or stout cardboard, and enables a
clean cut-off effect to be obtained.
Set up the blower unit
Uncoil the power lead and plug into the power point or
extension lead.
See back page for storage of power cord.
Switch on at the outlet but leave the blower unit itself
switched off.
Place the blower unit so that the exhaust air from the
grill at the back will not blow on the surface
being painted.
Keep the blower away from the paint fumes and dust.
GETTING STARTED
Most domestic paints are
supplied at brushing
consistency and must be
thinned before spraying.
(Stir in tinters before thinning).
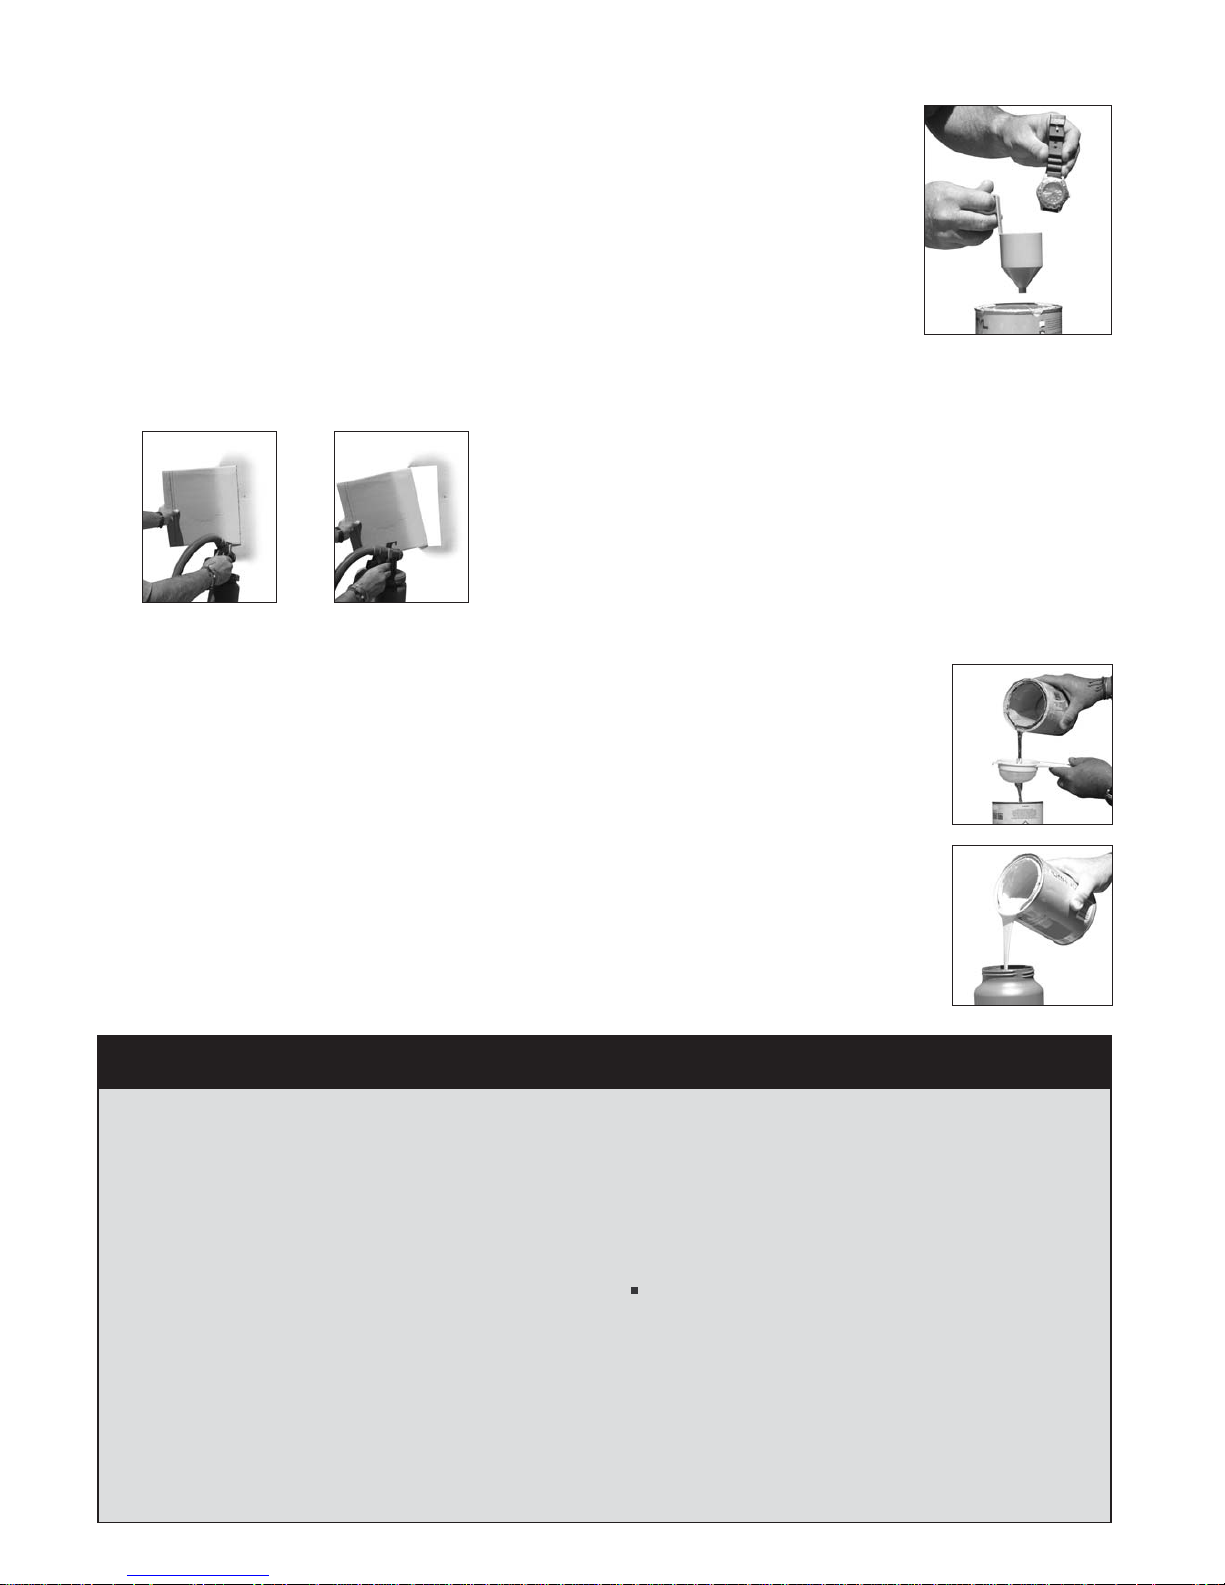
Stir the paint until thoroughly
mixed using a scooping action
with a flat stick such as an old
school ruler.
Test the consistency as follows:
Completely submerge the thinning cup in the paint.
Lift clear of the surface and note the time in seconds that
it takes the full cup to drain.
The time should be about 30 to 35 seconds. If the time is
less than 30 seconds no thinning is required. If more
than 35 seconds, thin the paint to the required
consistency, by adding the correct thinner, a small
amount at a time.
Note: If the paint used is extremely viscous it is
important to check with the paint manufacturer to
ascertain the level to which the paint can be thinned.
Make sure the thinner is well mixed in before checking
the consistency.
Strain the paint
After thinning, strain the paint
through a fine metal sieve or
nylon stocking to remove
particles which could block
the spray gun.
(Do not use paints with
loose fibres).
Fill the paint container
Check the paint container
is clean.
Fill to the shoulder level and
screw tightly onto the spray gun.
- Take extreme care and ensure no solvent can get into the unit.
- The unit must be switched off and unplugged while cleaning.
- Do not use if the unit is dropped or has been involved in an
accidental fall.
- Do not tamper with electrical motor, switch wiring or plug.
- Do not poke fingers or object through hose outlet, air intake
or exhaust.
USING VOLATILE FLAMMABLE SOLVENTS
- Extreme care must be take when using volatile flammable solvents
and the following instructions must be adhered to.
- Do not spray near naked flame.
- Do not spray in a confined place.
- No spills are splashed on the the gun or blower unit.
- Always keep the blower unit, the air intake & exhaust area away
from the spray area.
- Only use solvent recommended by the paint suppliers & always
follow the instructions of the manufacturer.
- Always recap the solvent container.
- Do not store solvent with gun.
WARNING
- Never hold the gun horizontally or it may allow paint or solvent to
run down the hose and get into the blower unit.
- Ensure the air intake & exhaust is not restricted or blocked eg: Do
not place the air intake & exhaust against the wall. Do not cover the
air intake & exhaust.
- Never spray the blower unit with the paint or solvent.
- To minimize entry of the paint or solvent into the blower unit always
place the intake & exhaust away from from the area to be painted.
- When refilling the paint container always ensure no spills or splashes
on the gun or blower unit.
- When cleaning the unit never spray the blower unit with the
cleaning agent.
- Ensure adequate ventilation at all time when using the unit.
- Always use a respirator when spraying toxic paint.
- Never immerse the gun or the blower unit into the cleaning agent.
- Ensure the unit is turned off and unplugged before commencing
cleaning. Wipe the excess paint from the gun, blower unit &
corrugated hose using a cloth lightly soaked in solvent.
- Do not use the unit until it is completely dry.
3
Page 4
Adjust the air cap
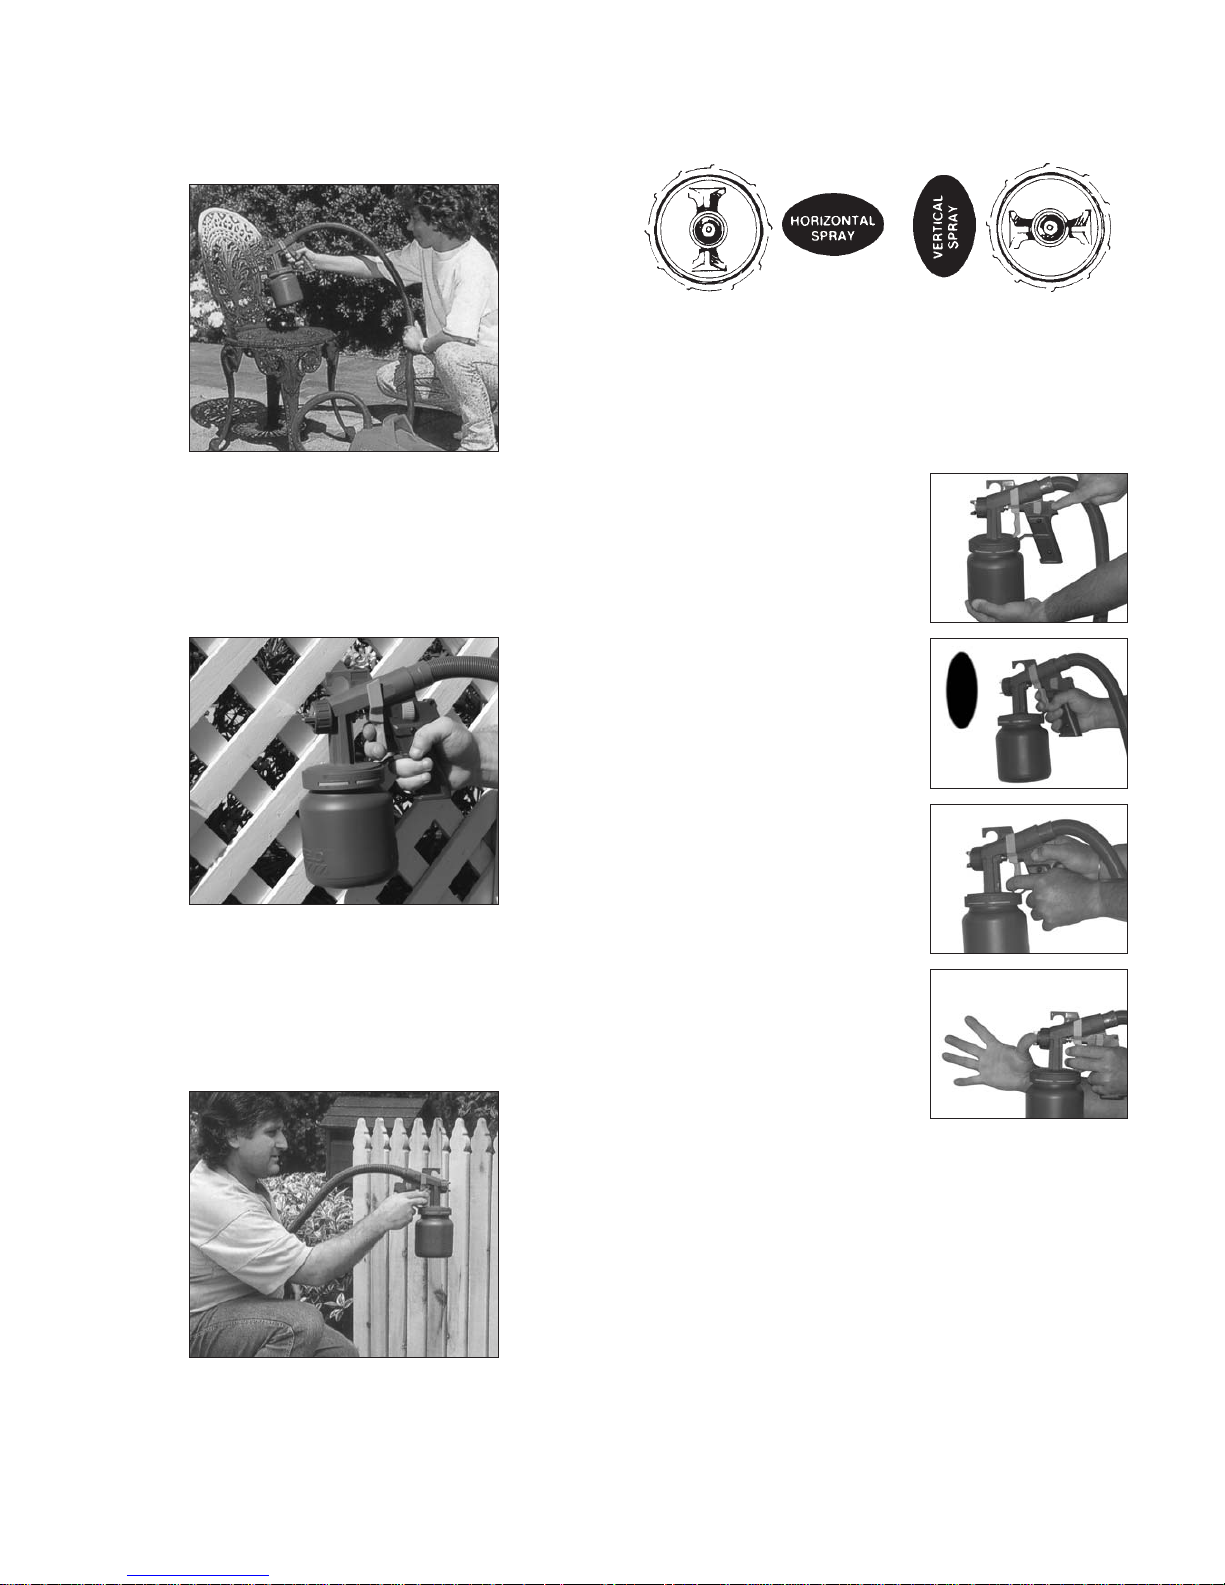
Slacken off the retaining ring slightly and turn the air-cap
to the required position to produce a horizontal or
vertical spray pattern.
The horizontal spray is generally used when painting up
and down and vertical spray when painting across.
Switch on the blower unit
Note that air flows from the nozzle at all times.
Paint will flow only when the trigger is pressed.
Adjust the paint control
This knob adjusts the amount
of paint released through the
nozzle when the trigger is
pressed.
To set the paint control, spray
a test pattern onto a sheet of
paper or scrap material placed in
an upright position.
To do this, first turn the paint
control fully clockwise then
unscrew about 4 turns
(clockwise as you face the
work).
Hold the gun with the nozzle
about 15 to 20 cm from the
surface. Squeeze the trigger
briefly.
Do this several times, adjusting the paint control each
time until the spray pattern has the required width and
produces a good wet coat without runs. Carry out a final
test by squeezing the trigger and moving the gun parallel
to the surface work to check that a good smooth
coat is applied. Adjust your speed of movement and the
paint control if necessary. Overlap each new pass by
about one third to give even coverage. (See diagram on
opposite page).
When spraying a large surface such as a wall, screw out
the paint control to give a wider fan pattern, without
going so far that you get coarse splattering spray.
When spraying a narrow surface, such as a chair leg,
screw in the paint control to give a spray about the same
width as the leg. Also, move the spray gun slightly closer
to the work.
4
Page 5
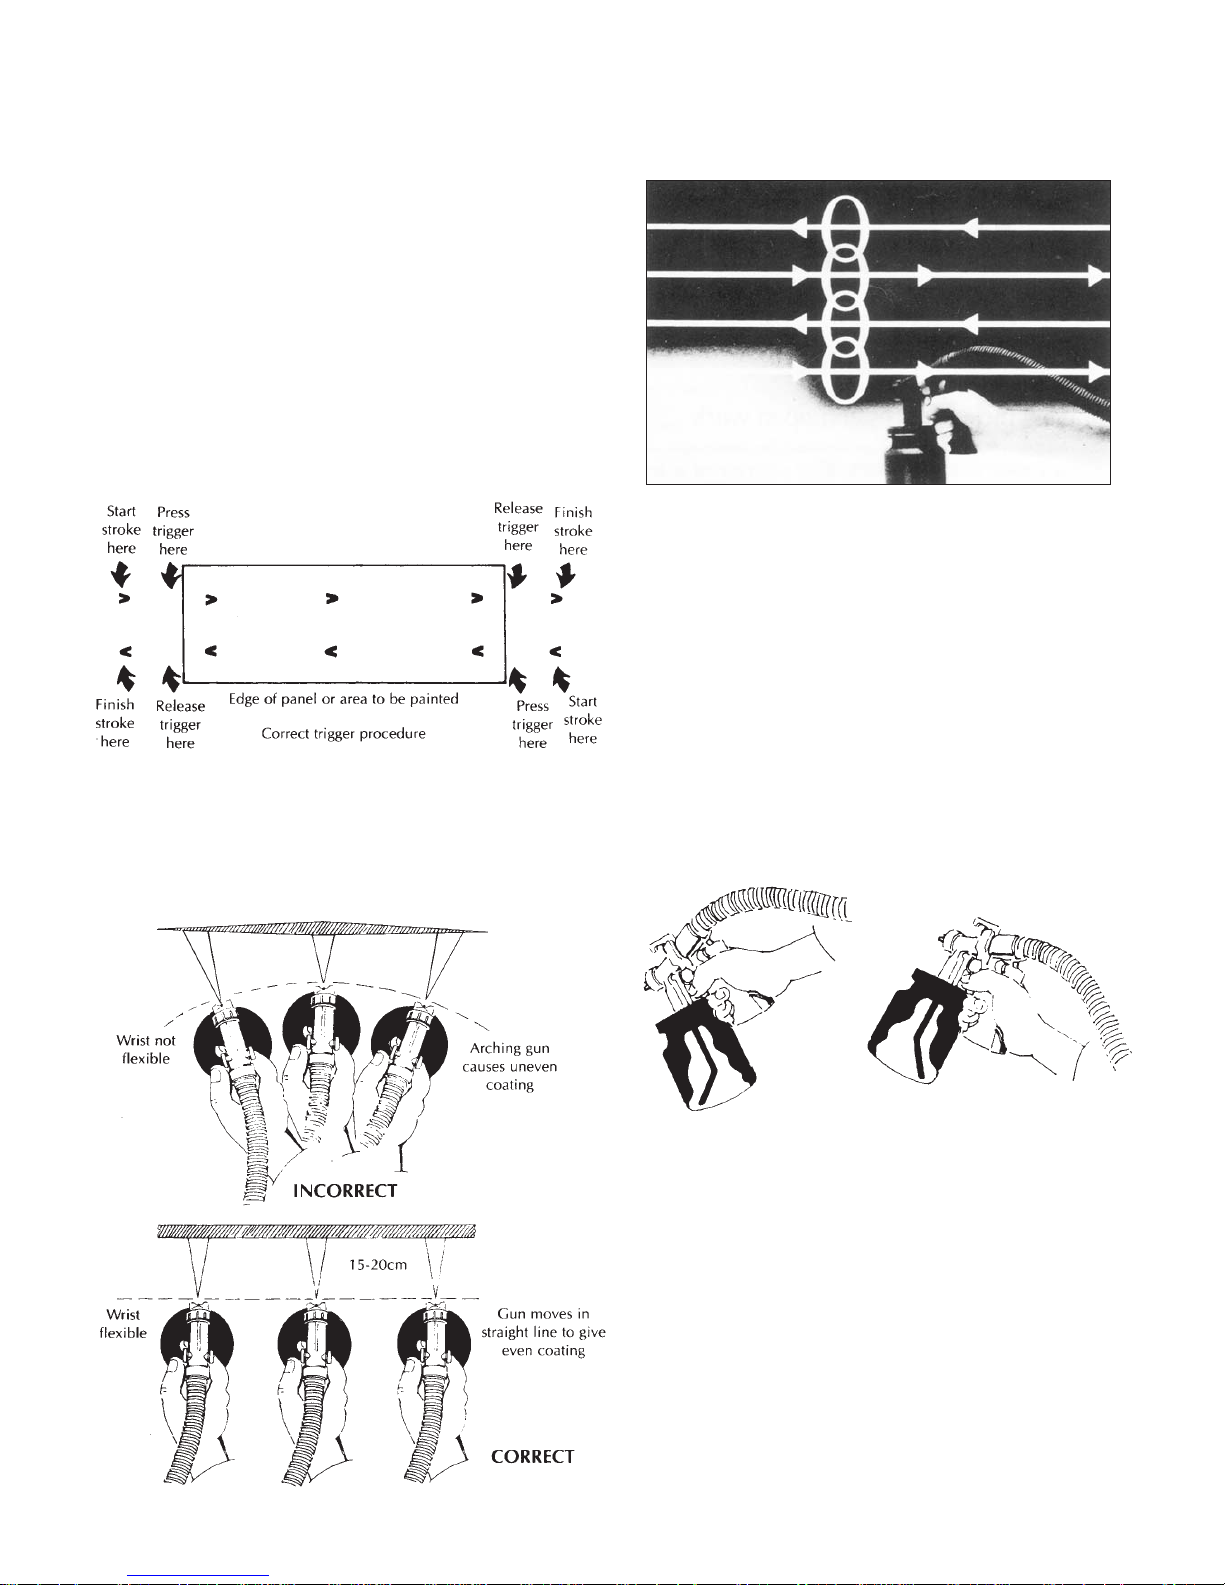
HANDLING THE
SPRAY GUN
Hold the gun about 15 to 20cm from the
work (about the span of your hand)
If the gun is held to close excessive paint is deposited
and the gun must be moved faster to prevent sags and
runs. Holding the gun too far away causes a dry spray
giving a rough sandy effect.
Trigger the gun ON at the beginning of
each stroke and OFF at the end
Always use this method to avoid any build up of paint at
the end of the stroke due to the gun standing still. Begin
the stroke, then pull the trigger as soon as you pass the far
edge of the panel. The speed of the stroke should be
constant.
Move the gun parallel to the work
and at right angles to the surface
Tilting the gun up and down or moving in a curve results
in an uneven paint deposit.
Overlap each preceding pass by about one third
This ensures an even coating. The spray pattern is
specially designed with an oval shape so that when the
narrow ends of the pattern are overlapped, a uniform
coat results.
Spraying long work
You can spray a long panel or wall with either vertical or
horizontal strokes.
The horizontal stroke is usually easier as it is a more
natural action. Spray in sections up to one metre long,
triggering off at the end of each stroke to avoid build up
of paint. (see above).
Each new section should overlap the previous one
slightly to make an invisible join.
Spraying a horizontal surface
Make sure the paint tube is pointing towards the front of
the container when spraying from above (eg. table top)
and pointing towards the rear of the container when
spraying overhead (eg. ceilings).
Hold the gun nearly at right angles to the work*. Start
at the far edge and commence stroking from left to
right working towards you.
When finished, return the paint tube to the normal front
position.
* Note: When spraying down on to a horizontal surface
hold the gun at less than right angles to the work to
avoid paint running up into the head of the gun from
the container.
5
Page 6
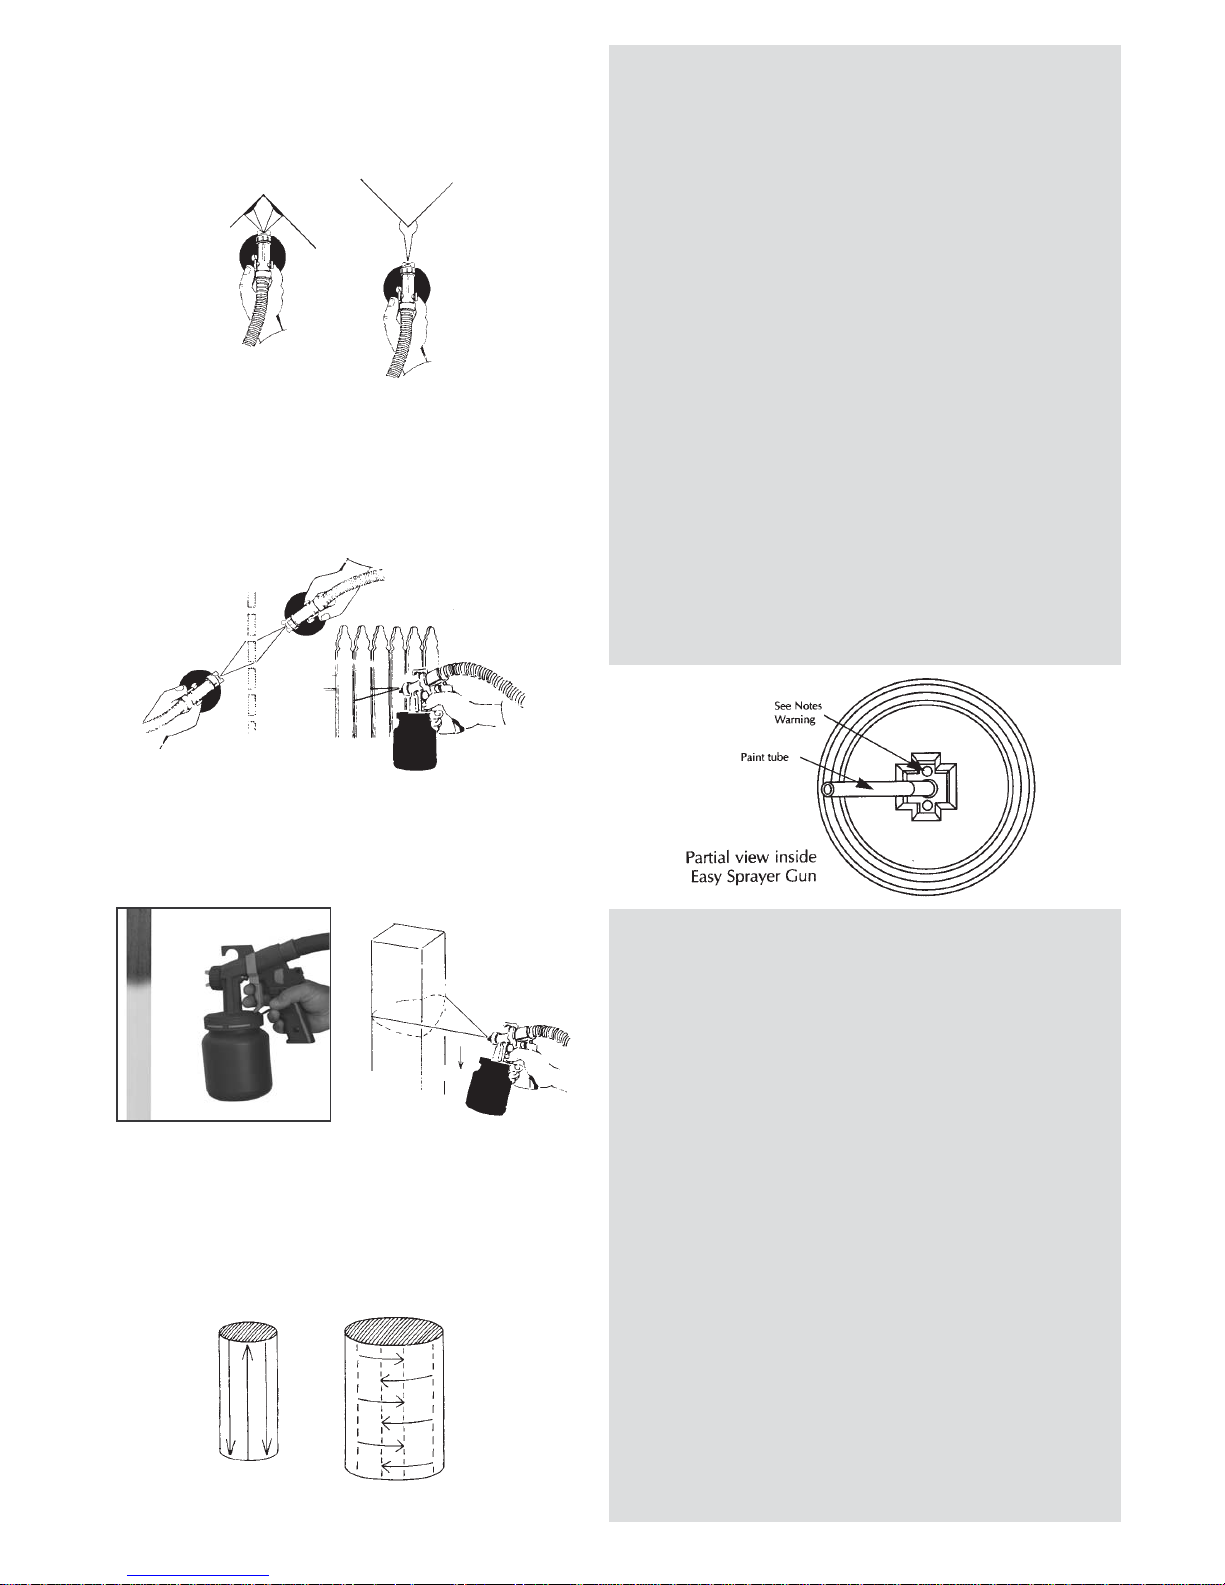
Spraying Corners
Holding the gun pointed at the corner, spray both
surfaces at once. This reduces overspray falling on
adjacent surfaces.
Spraying picket fences and open work
Place a large piece of cardboard behind the fence to
catch any spray passing through. Spray each picket at an
angle to cover the front and one edge, then from the
other side spray the back plus the other edge.
Spraying slender work
Screw in the paint control to achieve the narrow spray
pattern and spray two adjacent surfaces at once.
Spraying round work
For cylinders up to about a metre high and wide, spray up
and down using a horizontal spray pattern. For larger
cylinders spay around the cylinder in sections using a
vertical spray pattern. (See "Spraying long work").
CARE OF EQUIPMENT
- Paint tube should always be pressed firmly into place.
- Ensure that lid washer is in place when replacing paint
container. Then twist paint container firmly into main gun body.
- Do not force paint adjustment screw. Forced adjustment is not
necessary and may damage the gun voiding the warranty.
Before attaching or detaching the paint container ensure that the
air supply and power are turned off. Keep the threads on the container
and spray gun clean to allow an airtight seal when the container is
screwed into place.
IMPORTANT:
Clean the gun immediately after use as follows:
Turn off the air supply, remove and empty the paint container.
Hold the gun with paint tube over a paint container and
squeeze the trigger, this will allow paint in paint tube to run out.
Use the appropriate solvent for the paint and a rag or brush, clean the
paint tube, inside surfaces of the lid, the paint container, the air cap and
the nozzle. Remove the retaining nut being careful not to damage any
of the holes in the air cap or nozzle. If holes have become clogged,
never use a wire or other metallic instrument to clear them: they are
drilled to precision tolerance and any enlargement or distortion by the
abrasive action of an instrument will permanently affect the spray
pattern and void the warranty.
Replace the air cap and retaining unit. Place a small quantity of
solvent in the container, and spray through until clean. Wipe all
excess paint from the gun and wipe over the blower unit.
A further requirement may be to clean the hole situated inside the
gun (see below).
This hole, through prolonged periods of intermittent use may clog
up with dry paint making spraying very difficult. Ideally use solvent
or long piece of timber dowel, being careful not to damage or enlarge
the hole.
Note: Periodic inspection for efficient and problem free work is
required in this area.
Before putting the spray gun away, place a drop of oil on the
shank of the needle between the trigger and the front of the gun.
Inspect the lid washer to ensure that it is in place and undamaged.
Replace, if it becomes perished or distorted.
The spraygun needle assembly must always be clean. Paint allowed to
dry will block the flow of paint and produce a poor or no spray pattern
at all. To Clean the needle assembly remove the air cap and screw, the
fluid tip is now visable (brass tapered nut with central hole), using a
18mm ring spanner or socket unscrew anticlockwise, the needle tip
and fluid tip can now be throughly cleaned.
Note: Paint left to dry in the spraygun is not covered under warranty.
This is the responsibility of the operator.
CAUTION
Always use a respirator when spraying toxic paint
If in doubt contact the paint manufacturer to ascertain if a respirator is required.
DON'T
1. Dismantle the rest of the gun more than is necessary.
This only causes excessive wear on threads and other parts.
2. Immerse the whole gun in solvent or thinners. This removes oil,
causes packing glands to dry out and the lid washer as well.
3. Drop the gun and expect it to be unaffected. If you do have such an
accident, carefully check the spray pattern to see that the
nozzle assembly had not been damaged.
The power unit is sealed at the factory. for safety reasons, electrical repairs should
only be performed by qualified technicians. Defective units should be returned to
GEPRO Approved Repair Agent.
6
Page 7
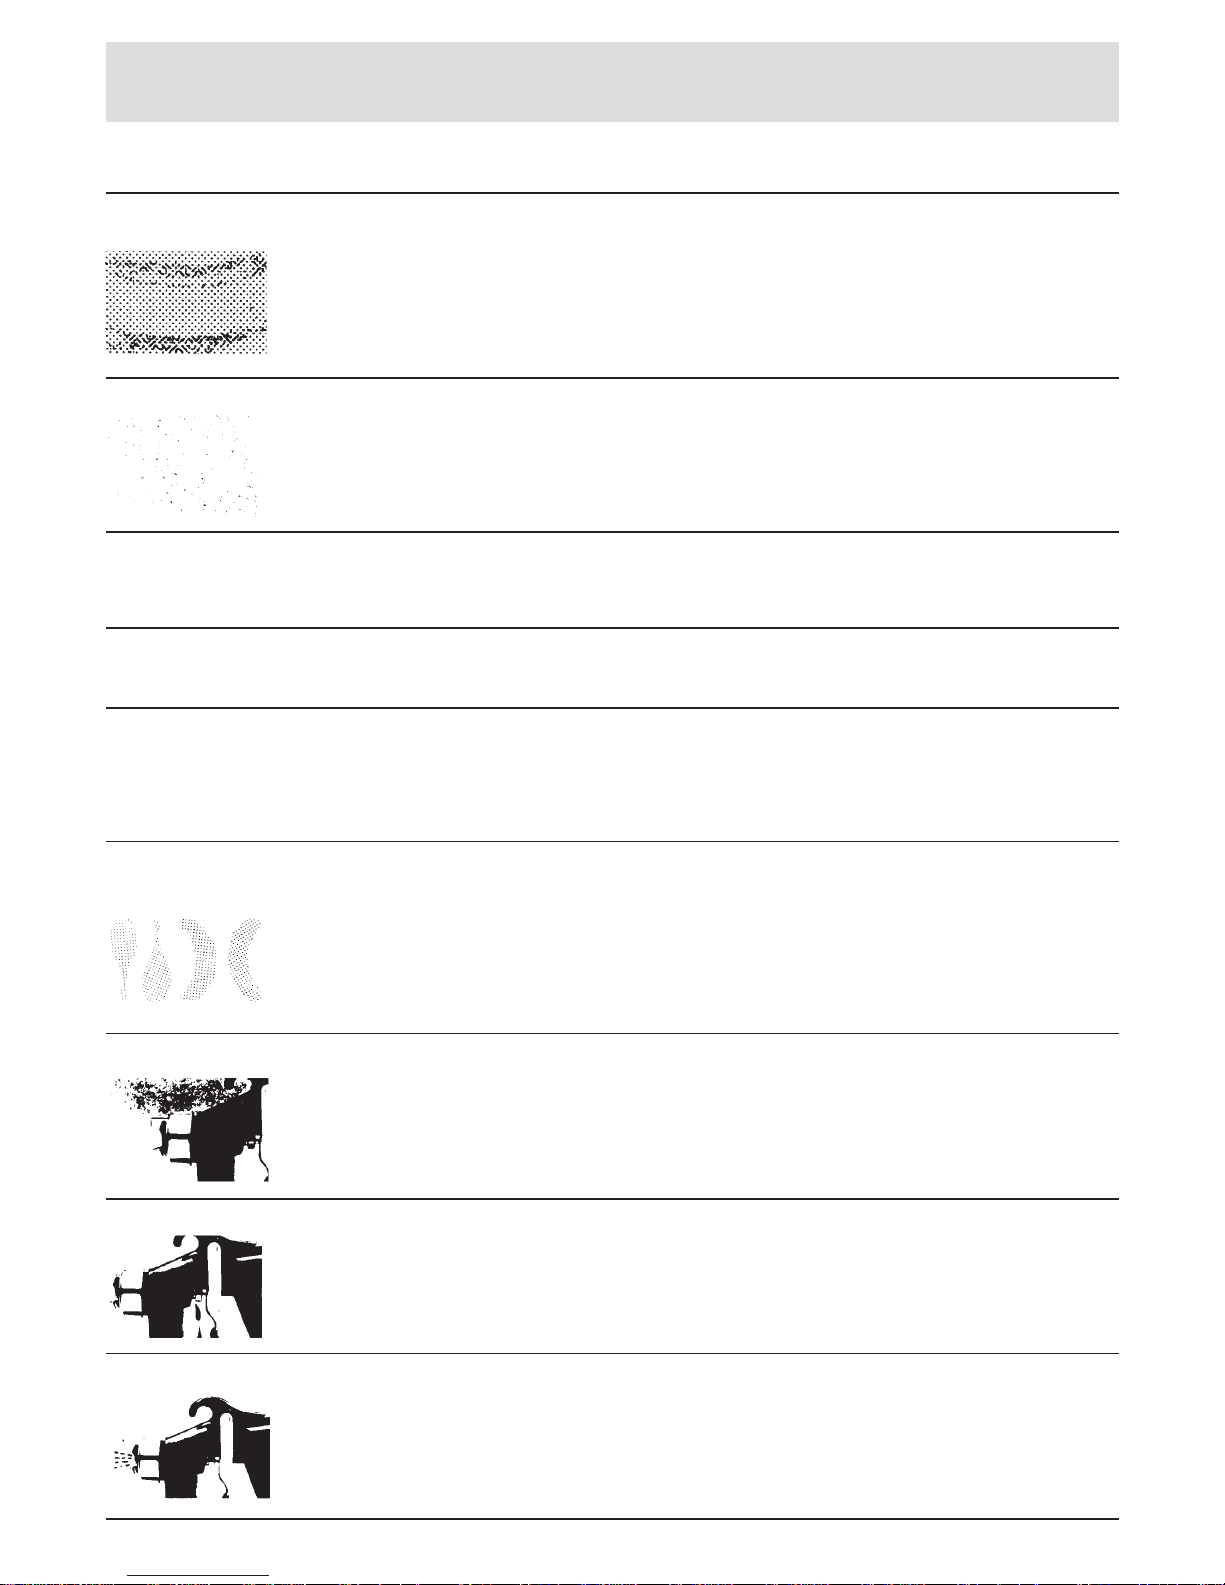
TROUBLE CAUSE REMEDY
Sags or Runs Too much paint Screw in paint control
Gun moved too slowly Move gun faster
Paint to thin Add unthinned paint to give correct time through
thinning cup
Gun held at incorrect angle or too close Hold gun at right angle to surface and at a distance of
15 to 20cm
Spray overlapped too much Overlap spray about one third width of pattern
Dry Spray Insufficient paint coming from the spray gun Adjust paint control
Gun held too far from surface Hold gun about 15 to 20cm surface or closer for
small objects
Overspray from a preceding section when gun is not Hold gun at right angles to surface
held at right angles to surface
Spray patterns not properly overlapped Prepare surface carefully
Striped or Uneven Surface Tilting the gun Hold the gun at right angles to surface
Dirt or burrs on air cap or paint tip cause heavy top & bottom pattern
Clean or replace air cap or paint tip
Spray patterns not properly overlapped Overlap by one third
Spitting or Spraying Lumps Solid particles in paint Strain paint
loose paint tube Ensure paint tube is firmly pushed into place
Weak or No Spray Low volume of paint from container due to blocked air Clean passageway
passageway in spray gun body (3mm hole between air inlet-port and container)
Paint not thinned enough Add the appropriate solvent to the paint a small amount at a time
Lid washer missing Replace lid washer
Top or Bottom-heavy Pattern or Horn holes partially blocked Determine whether obstruction is on air cap or paint
Heavy Right or Left Side Pattern tip, by making test pattern, rotating cap half turn and
spraying again. If the defect is inverted, obstruction is
on air cap
Obstruction on paint tip or Clean air cap with non metallic instrument. If
Dirt on air cap seat or paint tip seat obstruction is on paint tip, check for fine burring which
can be removed with 600 wet or dry sandpaper, or for
dried paint inside opening (wash off)
Fluttering Spray Lack of paint Refill container
Blocked paint passages Clean
Damaged paint nozzle or needle Clean needle set or replace is neccessary
Paint Leaking from Gland Nut Loose gland nut Tighten
Worn gland washer Replace
Pain Leaking from Front of Gun Needle not seated correctly due to:
Worn or damaged paint nozzle Replace
Dirt or dried paint in nozzle Clean
Gland washer done up to tight, preventing needle Loosen
from seating
Broken Spring Replace
Scored or damaged needle Replace
TROUBLESHOOTING
7
Page 8
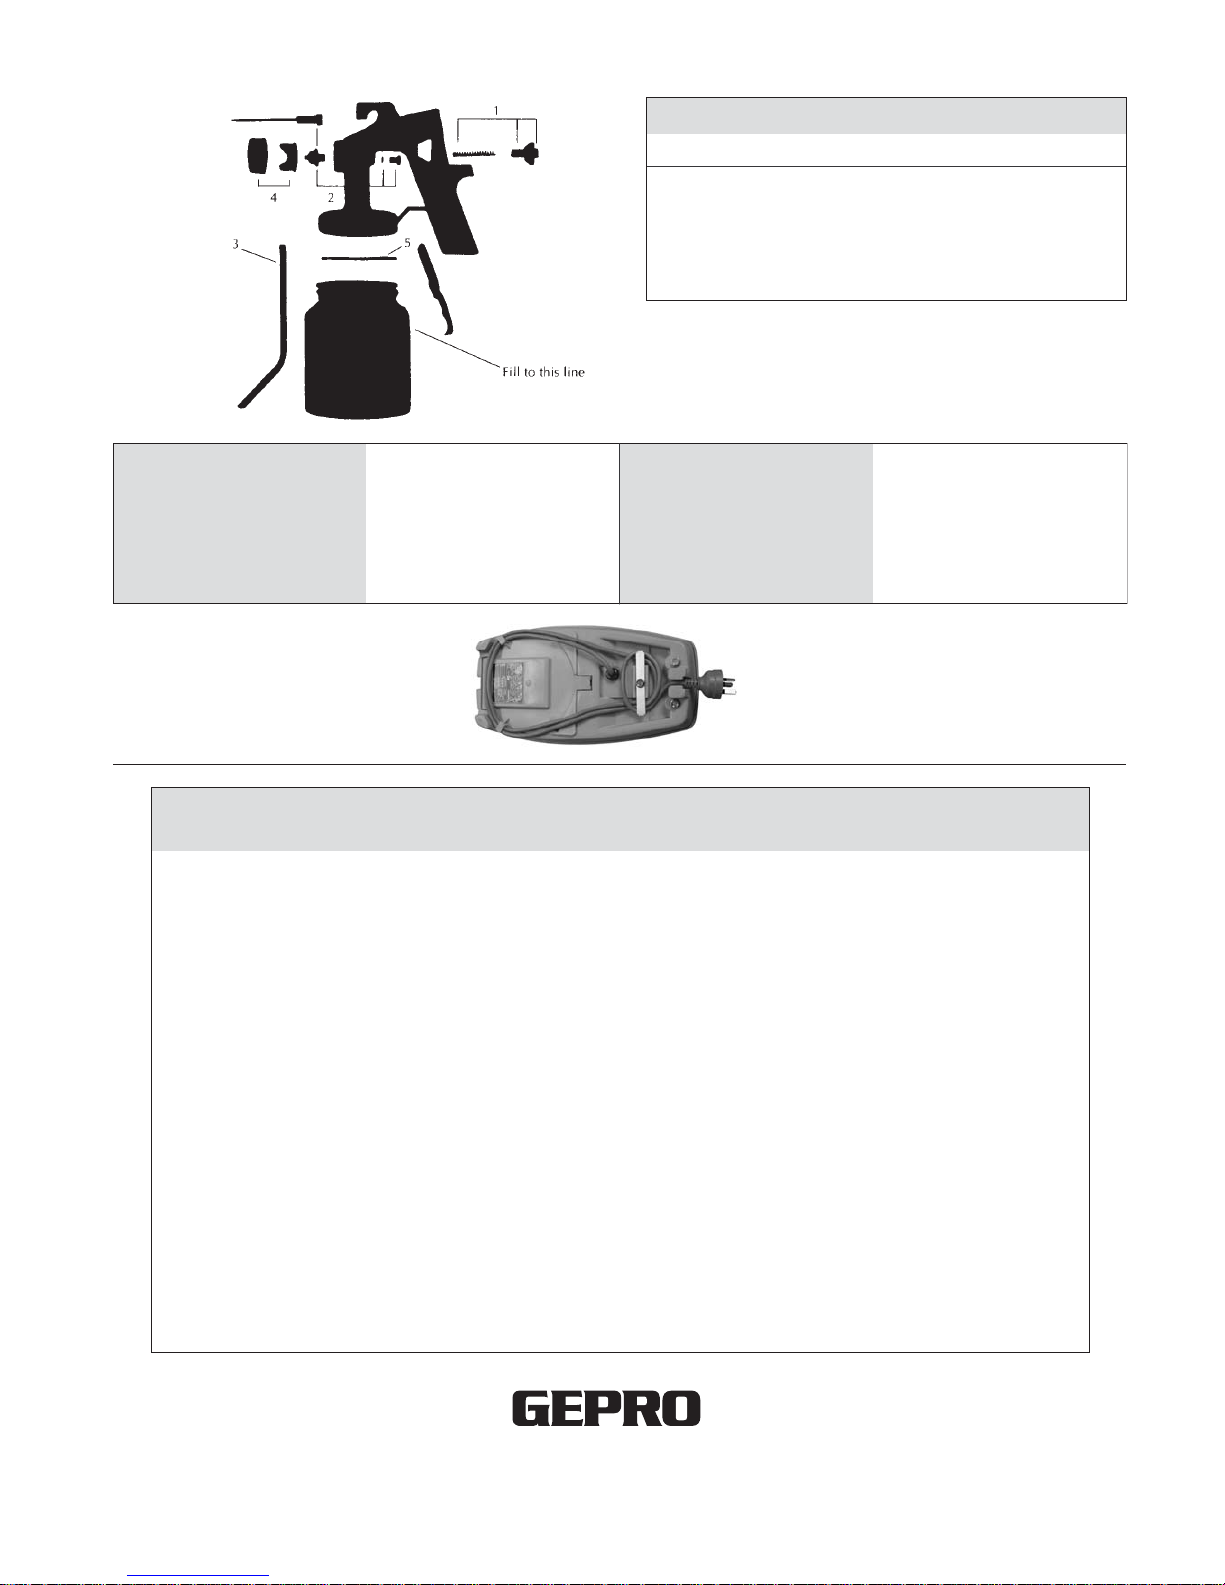
SPECIFICATIONS & PARTS LIST
WARRANTY STATEMENT Easy Sprayer Spray Paint Outfit
Congratulations on the purchase of your new GEPRO
Easy Sprayer painting outfit.
Providing that you take good care through regular
maintainence and cleaning procedures your GEPRO
Easy Sprayer will give you many years of trouble free
use. It is of utmost importance you read, understand and
practice the instructions that have been provided with
this machine. Proof of purchase must be provided when
making any claim for warranty.
1. The Trade Practices Act 1974 (Commonwealth) and
similar State and Territory legislation relating to the
supply of goods and services, protects consumer's
interests by ensuring that customers are entitled in
certain situations to the benifit of various conditions,
warranties, guarantees, rights and remedies (including
warranties as to merchantability and fitness for purpose)
associated with the supply of good and services.
A consumer should seek legal advice as to the
nature and extent of these protected interests. In some
circumstances the supplier of goods and services may
legally stipulate that the said conditions, guarantees,
rights and remedies are limited or entirely excluded.
The warranties set out in clause 2 shall be additional to
any non excludable warranties to which the customer
may be entitled pursuant to any statue.
2. Subject to Clause 3, GEPRO gives the following
warranties to the customer:
Insofar as they are manufactured or imported by
GEPRO Goods will, upon, be of
merchantable quality and reasonable fit for the purpose
or purposes for which they are supplied by GEPRO.
GEPRO will repair or, at its option, replace those of
the goods which, upon examination, are found by
GEPRO to be defective in workmanship and/or materials.
3. The Warranty in Clause 2:
Is conditional upon:
The customer notifying GEPRO in writing of its
claim within Seven (7) days of becoming aware of the
basis thereof, and at its own expense returning the
goods which are the subject of the claim to GEPRO.
The equipment being used in accordance with
Manufacturer's Operating manuals, and under
competent supervision.
Does not apply to:
Components not of GEPRO manufacture, which are
contained within the goods.
Obsolete goods sold at auction, secondhand goods and
prototype goods.
Breakdown or malfunction caused by accident, misuse
or normal wear and tear.
Repair or replacement made other than by GEPRO
or it's Accredited Agents, unless by prior arrangements
with GEPRO.
4. GEPRO hereby declares that, to the extent permitted
by law, it hereby limits its liability in respect of the
supply of good which are not of a kind ordinarily
acquired for personal, domestic or household use or
consumption to any one or more of the following (the
choice of which shall be at the option of GEPRO):
The replacement of the goods or the supply of
equivalent goods.
The repair of goods
The payment of the cost of replacing the goods or
acquiring equivalent goods.
The payment of the cost of having the goods repaired.
5. Except as provided in Clause 2 to 4 above, to the
extent permitted by statute. GEPRO hereby excludes
all liability for any loss, damage, death or injury of any
kind whatsoever occaisioned to Customer in respect of
the supply of goods including direct, indirect
consequential or incidental loss, damage or injury of
any kind.
2 YEAR LIMITED WARRANTY
The GEPRO Easy Sprayer is covered by a two (2) year
from original date of purchase, domestic (home use)
limited warranty which protects the owner from faulty parts
or workmanship, selected parts as listed below are
deemed consumable, that is, they will wear with extended
use and are covered by a seperate six (6) month use
warranty.
A six (6) month warranty is provided to cover the
following parts from "NORMAL" use.
* Needle assembly * Air cap and nut * Lid washers
Warranty on commercial or industrial use is reduced to 30
days from purchase for faulty parts and workmanship and
excludes the following parts.
* Needle assembly * Air cap and nut * Lid washers
Warranty DOES NOT cover
* The Easy Sprayer for any other application other than
what it is designed for.
* Damage through abuse or neglect.
* Block spray guns through lack of cleaning and
maintainence.
* Worn components through extend use.
Item Part No.
1 Paint Control Adjusting Screw 410697
2 Needle Assembly 410698
3 Paint Tube 410699
4 Aircap and Nut 416038
5 Lid Washers 410696
PARTS LIST
Materials: Blower Unit - polypropylene Power required: 240 Volts, 1100 Watts
Spray Gun - nylon 5 Amps
Air Hose - PVC Weight: Spray gun , blower
Air supply 315 litres/minute and hose
(10.9 cfm) 4.1kg, packed 4.4kg
15.5kPa (2.2 p.s.i.)
Accessories
Spray Gun (complete) 416040
Paint Container 410694
Thinning Cup 410695
Replacement Hose 3 metre 416041
Power Cord Storage
Caution: Power cord must be fully
extended during operation.
Manufactured by
GEPRO PTY LTD
Unit 3, 78 - 80 Bayfield Road, Bayswater Victoria 3153, Australia
In the interest of continuous improvement GEPRO PTY LTD reserves the
right to change the specifications or design of any of it's products without prior notice
Made in Tiawan
Copyright 2004
8
Customer Service Centre
1800 350 001
GEPRO Website Address
www.gepro.com.au
Page 9
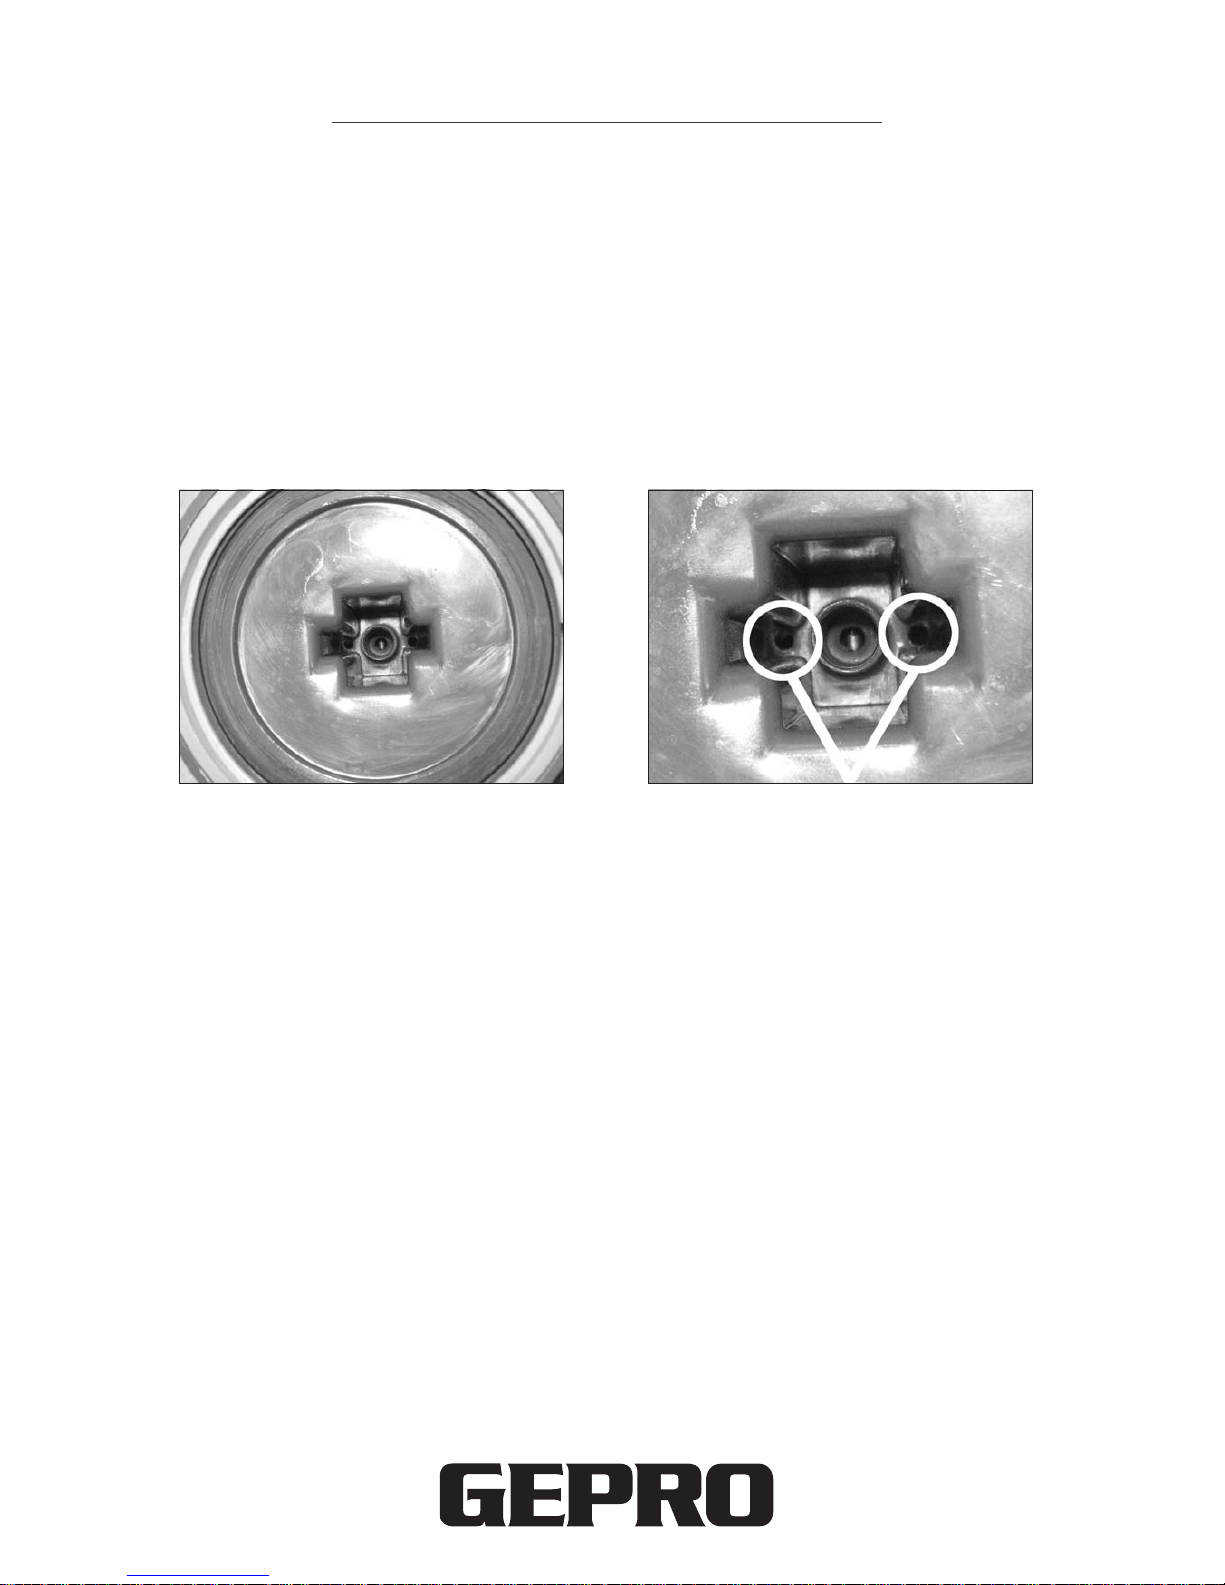
Gun Not Spraying?
It could be that the two holes inside the lid have become blocked. To unblock
unscrew paint container from the gun. Pull out paint Pick Up Stem from the
Gun Body. On either side of this hole there are two smaller holes (refer to
Figure 2). One or both of these holes may be blocked with dry paint.
To clean, use a long piece of timber dowel or wire (a straightened wire coat
hanger is ideal) to unblock the dry paint by prodding holes till paint loosens.
Be careful not to damage or enlarge these holes.
This procedure should be carried out every time especially if using fast
drying paints.
For further information please contact the GEPRO Customer Service
Centre on 1800 350 001
WARNING
Read and observe the following safety instructions before using this product to avoid
personal injury. It is important to read the instructions manual to understand the
applications, limitations and potential hazzards associated with the paint outfit.
A
DDITIONAL SAFETY INSTRUCTIONS
1. Ensure the power source conforms to requirements on the name plate of the blower unit
2. Always wear safety equipment such as goggles, ear protection, respirator, gloves and
protective clothing and footwear while operating this unit.
3. If using and extention cord, check it for any damage before using.
4. Before connecting the blower to mains power make sure the machine is in the OFF position
5. Only use this machine in a well ventilated area.
6. Never immerse the blower unit in water.
7. Never point the spray at people or animals.
8. Always turn the unit off when refilling or removing the spray gun.
9. Never leave the unit on and unsupervised.
10. Do not allow children to operate this unit.
11. Spraying solvents - refer to warning on page three (3) of manual.
12. Only use this machine for the use it is intended.
13. Never spray paint onto or into the air take of the blower unit.
14. Never cover the air intake vents.
15. Never leave paint in the spray gun when storing.
IMPORTANT NOTICE
 Loading...