

Page 1

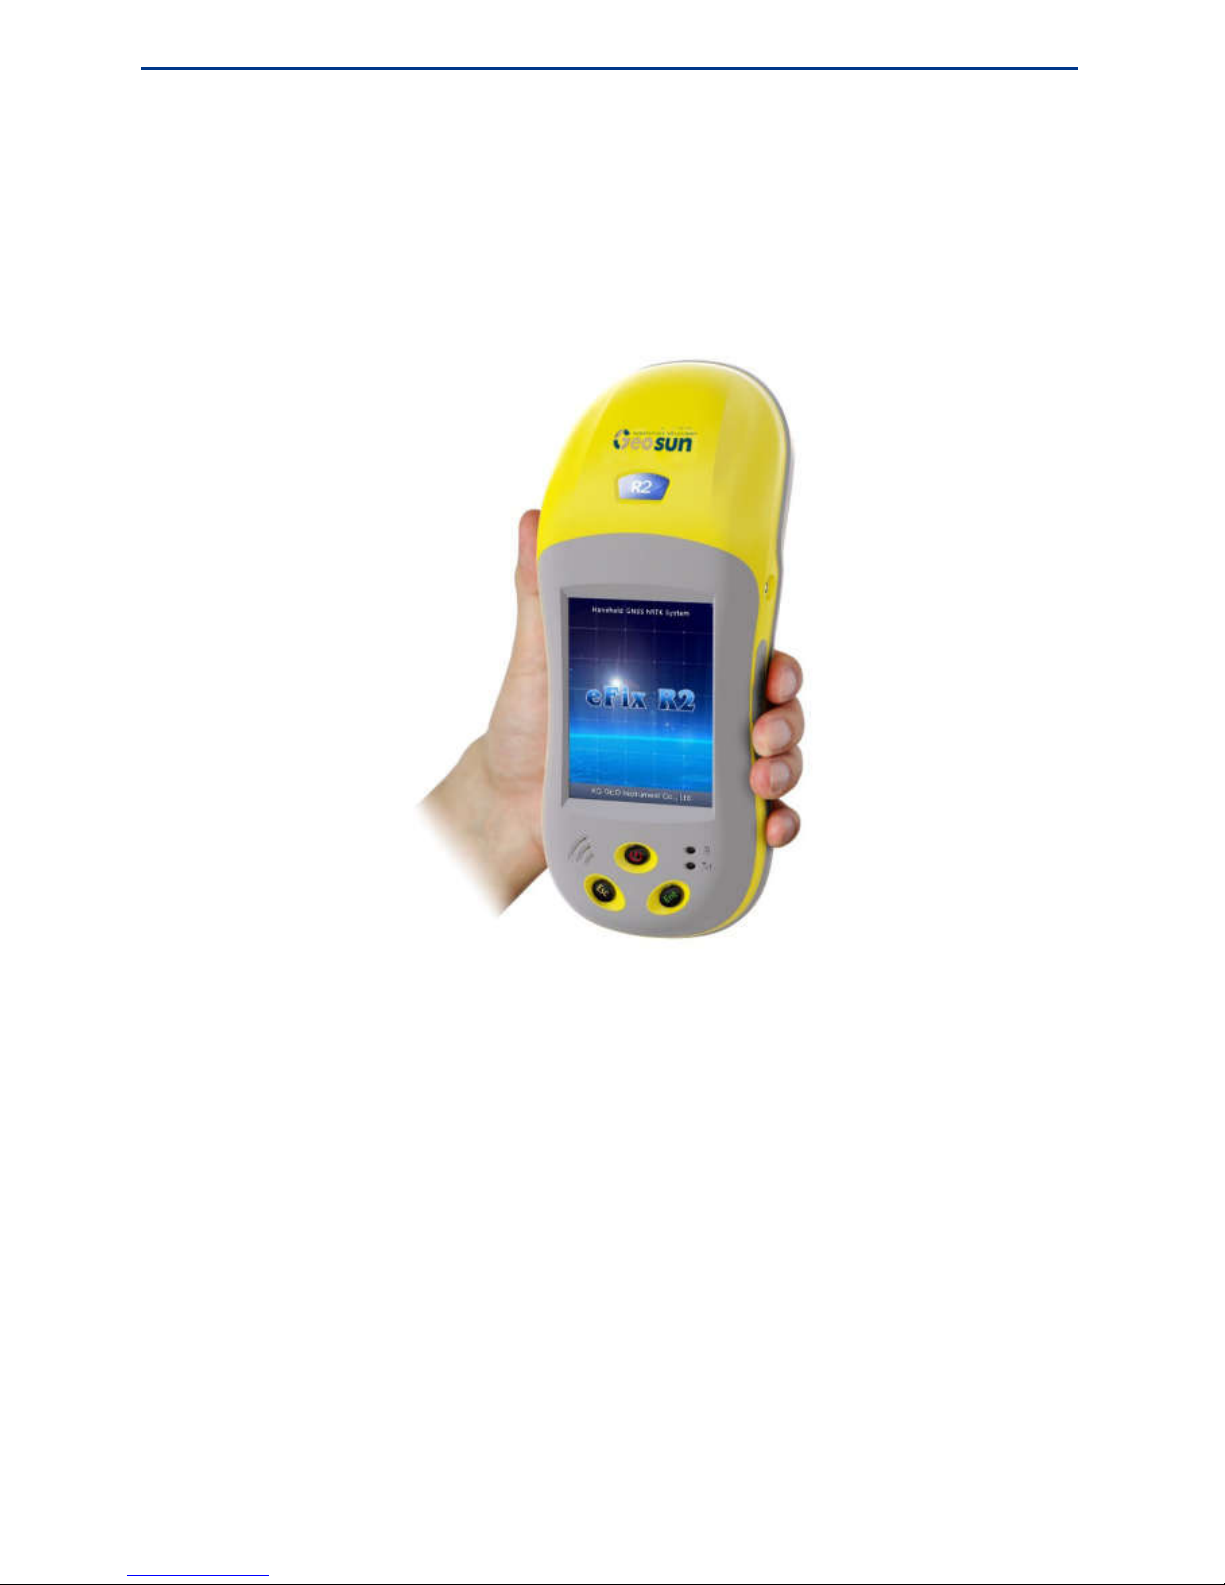
eFix R2 Series
Hardware Operating Instructions
(For eFix R2E and eFix R2G)
Wuhan Geosun Information Technology Co.,Ltd
Page 2

About
Welcome to use
eFix
R2 series. This book describes how to install, set up and use
eFix
R2E and
eFix
R2G. Please refer to gPac User’s Manual for more information about GPac,
the multi-function GNSS data collecting & processing software embedded in the
eFix
R2
series.
Please read the instructions before start!
Copyright © 2011
Wuhan Geosun Information Technology Co.,Ltd
. All rights reserved.
For more information, please visit:
Http://www.geosun-gnss.com
.cn
Page 3

i
Contents
Overview .......................................................................................................................................................... 1
eFix R2 Series Overview ....................................................................................................................... 2
Innovative Technologies ........................................................................................................................ 3
Configuration Advantages ..................................................................................................................... 4
Notice .................................................................................................................................................... 5
Technical Parameters ........................................................................................................................................ 6
System Configuration ............................................................................................................................ 7
GPS Receiver ........................................................................................................................................ 7
Network Communications ..................................................................................................................... 7
Positioning Accuracy ............................................................................................................................. 8
Interfaces ............................................................................................................................................... 8
Power Supply ........................................................................................................................................ 8
Physics .................................................................................................................................................. 8
Application Function ............................................................................................................................. 9
Electric Specifications ........................................................................................................................... 9
eFix R2 Series Introduction ............................................................................................................................ 10
Front View ........................................................................................................................................... 11
Back View ........................................................................................................................................... 12
Interfaces ............................................................................................................................................. 13
Main Parts ........................................................................................................................................... 14
Base Station Standard Configuration List ............................................................................................ 16
Rover Standard Configuration List ...................................................................................................... 17
Basic Operations............................................................................................................................................. 18
Taking Out and Putting Back the Touch Pen ........................................................................................ 19
Power On ............................................................................................................................................. 20
Power Off ............................................................................................................................................ 20
Stylus Property Settings ....................................................................................................................... 20
Power Management ............................................................................................................................. 22
Charging ................................................................................................................................... 22
Smart Charging ......................................................................................................................... 23
Check the Remaining Power ..................................................................................................... 23
Power Saving Mode .................................................................................................................. 24
Installing the Micro SD Card ............................................................................................................... 25
Installing the SIM Card ....................................................................................................................... 26
Serial Port Settings .............................................................................................................................. 27
Bluetooth and WiFi Settings ................................................................................................................ 27
Bluetooth Settings .................................................................................................................... 28
Bluetooth Dial-up Connection .................................................................................................. 31
Page 4

ii
WiFi Settings ............................................................................................................................ 34
Using the Electronic Compass ............................................................................................................. 36
Restoring WinCE System .................................................................................................................... 37
Installing, Uninstalling or Updating GPac Software ............................................................................ 37
Upgrading the Firmware ...................................................................................................................... 37
Connecting to PC ............................................................................................................................................ 40
Installing Microsoft ActiveSync .......................................................................................................... 41
Hardware Connection Setup with PC .................................................................................................. 41
Microsoft ActiveSync Automatic Connection ...................................................................................... 42
Visiting eFix R2 Series Handheld ........................................................................................................ 42
Operation Mode and Configuration ................................................................................................................ 44
Single Point Positioning ...................................................................................................................... 45
Wide Area Differential ......................................................................................................................... 45
CORS Differential ............................................................................................................................... 45
RTK Positioning .................................................................................................................................. 46
Setting up Base Station ............................................................................................................. 47
Setting up the Rover (External GNSS Antenna Mode) ............................................................. 50
Handheld Rover (Built-in GNSS Antenna Mode) ..................................................................... 51
Post-Differential Dynamic Positioning ................................................................................................ 51
High-Precision Large-Range Static Control Network .......................................................................... 52
Data Communication ...................................................................................................................................... 53
GPRS/3G(WCDMA) Communication Mode....................................................................................... 54
Radio Communication Mode ............................................................................................................... 54
Troubleshooting .............................................................................................................................................. 56
Common Troubleshooting ................................................................................................................... 57
ActiveSync Common Issues ................................................................................................................ 58
Appendix: Radio Instructions ......................................................................................................................... 59
PDL Radio Features ............................................................................................................................. 60
Transmitting Radio Introduction .......................................................................................................... 61
Receiving Radio Introduction .............................................................................................................. 62
Factory Default Frequency List ........................................................................................................... 63
Radio Notices ...................................................................................................................................... 64
Index .............................................................................................................................................................. 65
Contact Us ...................................................................................................................................................... 67
Page 5

1
Overview
eFix R2 Series Overview
Innovative Technologies
Configuration Advantages
Notice
C H A P T E R
1
Page 6

eFix R2 Series Hardware Operating Instructions
2
eFix R2 Series Overview
Geosun eFix R2 series handheld is a high-accuracy and high-performance handheld GNSS
RTK system, which provides powerful and flexible solutions for GNSS applications.
Integrated with many proven technologies, eFix R2 series supports large size image data
and hundreds megabyte level vector data loading, and can seamlessly connect various main
stream GIS platforms. It is able to offer humanized, stable and reliable high-accuracy
dynamic/static real-time/post-processing positioning service, and can be widely used in
high-accuracy RTK surveying, high-accuracy large-area static control network building and
field data collection.
High-accuracy eFix R2 series handheld, with mature built-in GPRS network transmission
technology, helps users to easily achieve real-time data transmission. It blends into the U
disk file management and supports dragging files to download. It also has audio annotation,
audio alarm and prompts as well as audio record and image annotation features. It
completely meets user’s fieldwork needs. Using three-proof design, meeting industrial
temperature requirements, and with built-in shield casting reinforced body, eFix R2 series
handheld can easily cope with the extreme field environment.
eFix R2 series includes eFix R2E and eFix R2G. This book describes the technical
parameters and operation instructions of eFix R2E and eFix R2G. The module
configurations of eFix R2E and eFix R2G are shown in the following table, in which √
means configured, × means not available.
Module gRob R2E gRob R2G
Camera √ √
Bluetooth, WiFi √ √
GPRS √ ×
3G/WCDMA × √
Electronic Compass √ √
3.7 Inches Touch Screen √ √
Note: The product nameplate is on the back of the handheld. The first 4 characters of
the SN show the model of eFix R2 series, e.g. “ER2E” represents eFix R2E, “ER2G”
represents eFix R2G.
Page 7

Overview
3
Innovative Technologies
Integration of main processor and handset
As a new generation of highly integrated handheld GNSS RTK device, with a stable
and accurate data processing module, and practical engineering tools for
implementation, eFix R2 series can realize high-accuracy RTK by connecting with an
external GNSS antenna. Meanwhile, even just with the built-in GNSS antenna,
centimeter-level positioning accuracy could be easily reached. eFix R2 series has
actually stable performance and is easy to carry with.
Flexible, Diversified Wireless Communication Technology
3G High-speed Remote Wireless Communication Technology
Support high-speed multi-media business, and can process multiple media
format, such as image, music, video streaming and etc.
GPRS Data Transmission
With mature GPRS data transmission technology, the data transmission and
communication can be even more smoothly without distance limitation,
which is especially suitable for urban or mountainous area where the
broadcasting signal is subject to be blocked.
Integrated Bluetooth and WiFi Wireless Communications
Built-in Bluetooth and WiFi wireless communication modules easily realize
short distance wireless data transmission.
Integrated 3D Electronic Compass
With the built-in electronic compass which can be an effective assistance to the
GPS fieldwork, it’s possible for eFix R2 series to provide the accurate direction
for users even with pool satellite signals, in low-speed or in static status.
Intelligent Audio Technology
Support audio annotation, audio record, audio prompt, status warning, and etc.
U Disc File Management
Easy U disc storage style is adopted for file management. Without any special
software, just the plug-and-play operation enables users to download and manage the
files of the handheld conveniently.
Ultra-Long-Distance RTK Operation Technology
Ultra-long-distance RTK operation technology breaks the distance limitation of
traditional RTK operation, enabling your handheld more cost-effective.
Page 8

eFix R2 Series Hardware Operating Instructions
4
Configuration Advantages
Integrated Handheld Design
Highly integrated design, all built-in key components, ABS + PC material shell,
withstand 1.5 meters natural falling. Industrial three-proof standard: waterproof,
shockproof and dustproof.
Professional Software Support
gPac software of Geosun is a professional GNSS data acquisition and processing
software suite, which adopts unique high-precision data processing algorithm and
contains many optional application modules. With GPac, you can easily handle the
point, line, area, annotation and other geographic and images, and realize seamlessly
integration of fieldwork and office work.
Built-in Large Capacity Lithium-ion Battery
The built-in 7.4V/4400mAh large capacity battery supports continuous working for
up to 8 hours in GNSS mode while 6 hours in GNSS + GPRS/3G (WCDMA) mode.
Wide range of power input voltage: 10-15V.
Power Adapter
Power adapter provides 12V/3A output and charges the Lithium-ion battery by the
host built-in rechargeable circuit. Short charging time, high efficiency, automatically
disconnected when full charged. For the first three times, the battery must be empty
and then be charged for 12 hours continuously. Later on, 6~8 hours charging is
enough.
Data Communication
Support GPRS/3G (WCDMA) wireless communication which breaks the distance
limitation. Enable data transmitting and receiving freely in areas where GPRS/3G
(WCDMA) is available.
Handheld Bracket - Carbon Fiber Centering Pole
1 m sectional carbon fiber centering pole, lightweight, practical, and a high precision
leveling bubble is attached. Professional handheld bracket can fix the handheld from
all-directional, easy to convert angle.
Operating Mode
Users can input data via the touch screen or keyboard, easy to operate.
Page 9

Overview
5
Notice
Although eFix R2 series handheld is made of corrosion-resistant and impact-resistant
materials, but this kind of sophisticated instrument still needs careful usage and
maintenance. Please preserve the handheld in dry environment as possible. To improve the
stability and service life, the handheld should avoid being exposed to extreme environment,
such as being used in damp, high temperature, low temperature, corrosive gas or liquid, etc.
To ensure the continuity and quality of the satellite tracking, the space over observation
site should be as open as possible, without large obstacles over 15° elevating angle. To
reduce various electromagnetic interference to GNSS satellite signal, please make sure
no strong electromagnetic interference in 200m range around the observation site, such
as TV tower, microwave station, high-voltage transmission. To avoid or to reduce the
multipath influence, the site should be set far away from the terrain and ground features
where the electromagnetic wave signal reflection is strong, such as high buildings,
large area waters, etc.
Warnings:
This equipment contains ESDS (Electrostatic Discharge Sensitive Device), with
level C of electrostatic anti-interference test. To touch, move, or plug the
equipment please follow the ESD (electro-static discharge) instructions.
Must be used and preserved in the stipulated temperature range. For details,
please refer to the chapter Technical Parameters below.
Page 10

6
Technical Parameters
System Configuration
GPS Receiver
Network Communications
Positioning Accuracy
Interfaces
Power Supply
Physics
Application Function
Electric Specifications
C H A P T E R
2
Page 11

Technical Parameters
7
This chapter describes the technical parameters of Geosun eFix R2 series. The
specifications are subject to change without notice.
System Configuration
Operating System: Windows CE 6.0
CPU 1GHz, memory 512 MB , Flash memory 512 MB
Extension: Built-in sealed Micro SD card slot, support massive storage expansion up
to 32GB
Display: 3.7 inches outdoor highlight color touch screen
Power consumption: 3W
GPS Receiver
GPS: L1 C/A, L2 P(Y), L2C, L1 and L2 carrier phase
SBAS: WAAS, EGNOS, MSAS
1 Hz, 2 Hz, 5 Hz, 10 Hz, 20Hz positioning output (1Hz in default)
Advanced user-defined measurement GNSS technology, extremely low noise GNSS
carrier phase measurements
GLONASS: Synchronous tracking L1 C/A, L1P, L2 C/A (GLONASS M only) and
L2P
Navigation output format support: ASCII: NMEA-0183 and binary system
Differential format support: CMR, CMR+, RTCM 2.1, RTCM 2.2, RTCM 2.3, RTCM
3.0, RTCM 3.1
Network Communications
eFix R2E is integrated with four-band (850/900/1800/1900GSM) GSM network
communication module
gFix R2G is integrated with 3G / WCDMA wireless network communication module
Built-in Bluetooth and WiFi wireless communication module, easily realize short
distance wireless communication
Page 12

eFix R2 Series Hardware Operating Instructions
8
Positioning Accuracy
Static positioning (external antenna):
Horizontal: ±(2.5 mm+1×10⁻⁶ D)
Vertical: ±(5.0 mm+1×10⁻⁶ D)
RTK positioning (external antenna):
Horizontal: ±(10 mm+1×10⁻⁶ D)
Vertical: ±(20 mm+1×10⁻⁶ D)
RTK positioning (built-in antenna):
Horizontal: ±(20 mm+1×10⁻⁶ D)
Vertical: ±(30 mm+1×10⁻⁶ D)
Interfaces
One external antenna port
One power supply, serial port and USB sharing port
One SIM card slot
One Micro SD card slot
Power Supply
Battery: Built-in 7.4V/4400 mAh Lithium-ion battery supports continuous working for
up to 8 hours in GNSS mode while 6 hours in GNSS + GPRS/3G (WCDMA) mode.
Input voltage: DC 10~15V, can switch automatically between built-in battery and
external power.
Physics
Size: 223×98×49mm
Weight: 950g
Operating temperature: -20℃ ~ 60℃
Storage temperature: -40℃ ~ 80℃
Humidity: 95% non-condensing
Waterproof & shockproof: IP67
Anti-shock: Can withstand 1.5 meters natural fall
Page 13

Technical Parameters
9
Application Function
Built-in electronic compass, an effective assistance to the GPS fieldwork
Video: Built-in 5 mega-pixel digital camera, support image annotation function
Audio: Built-in microphone and speaker, support audio annotation, operation prompt
and alarm function.
Electric Specifications
Level C of electrostatic anti-interference test
Page 14

10
eFix R2 Series Introduction
Front View
Back View
Interfaces
Main Parts
Base Station Standard Configuration List
Rover Standard Configuration List
C H A P T E R
3
Page 15
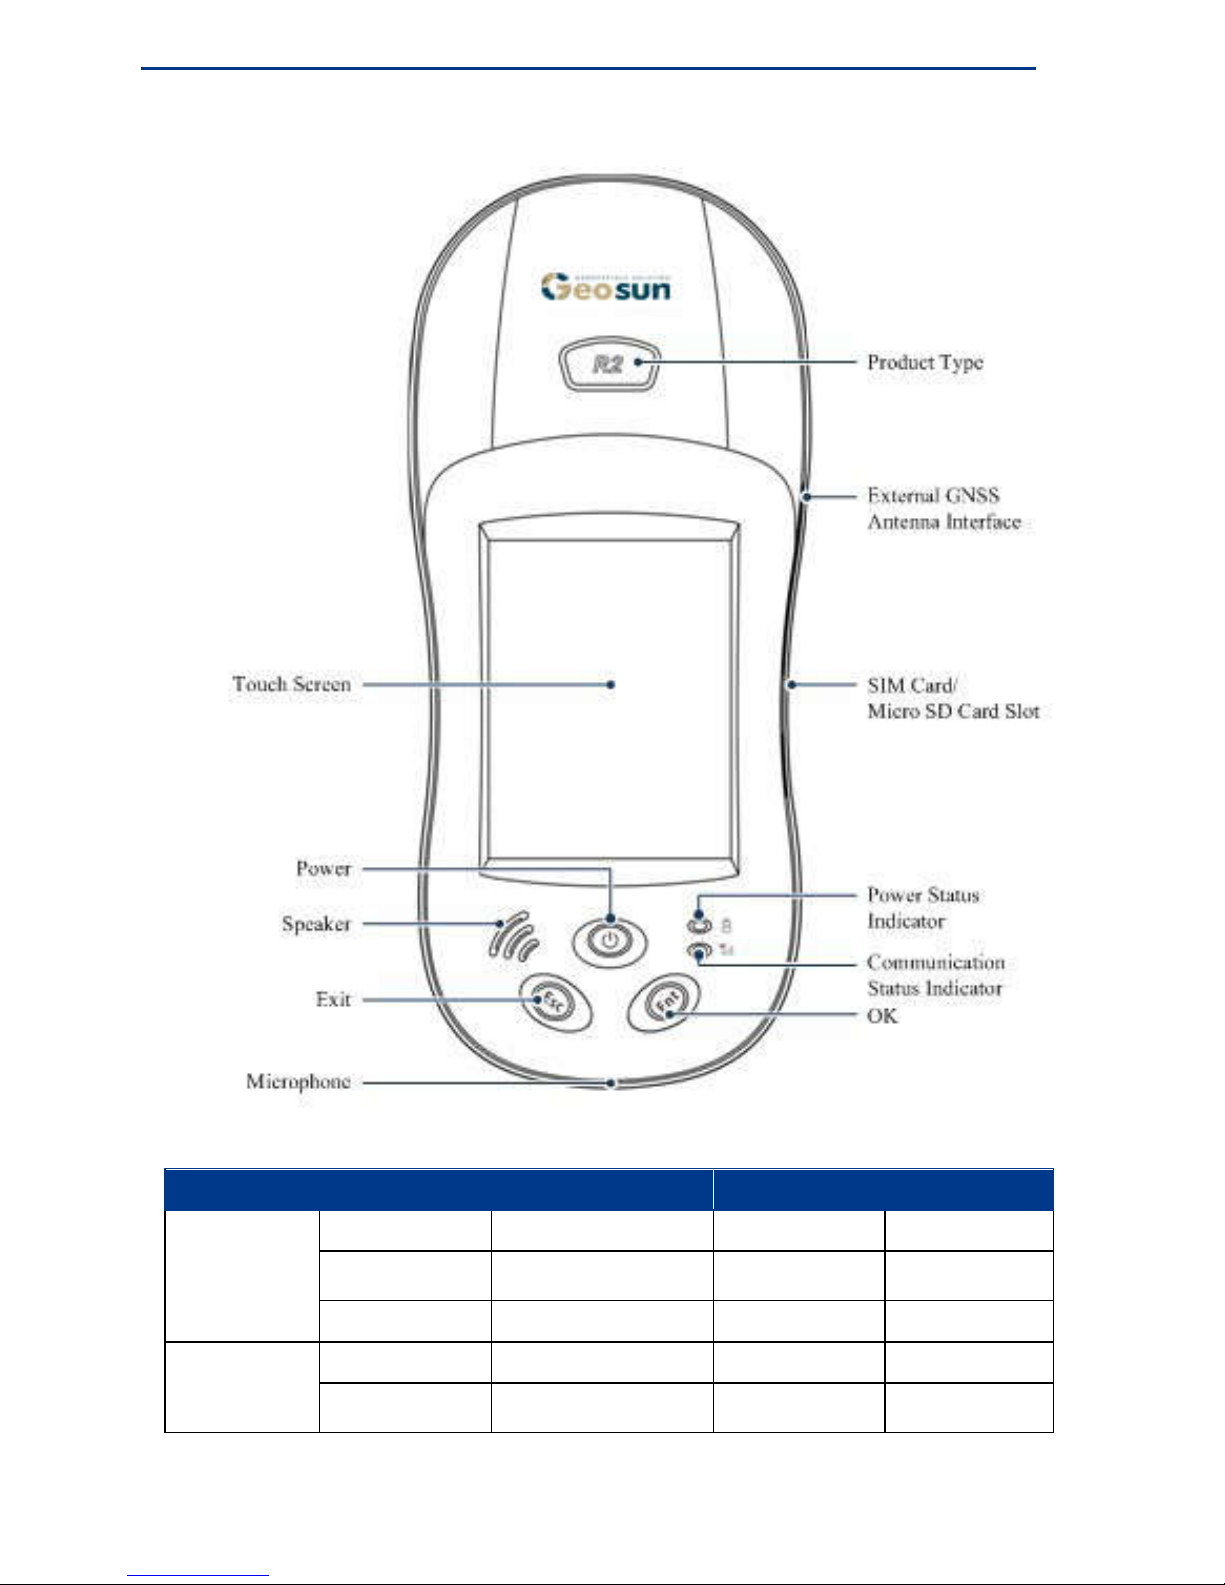
eFix R2 Series Introduction
11
Front View
Power Status Indicator Communication Status Indicator
Charging
Start Charging Red Radio Mode Red
Status: 80%
Flashes alternately in
red and orange
GPRS/3G Green
Fully charged Orange Bluetooth Orange
Discharging
(While
Working)
Fully charged Green WiFi Flashes in green
Status: 20%
Flashes slowly in
green
None Extinguish
Page 16
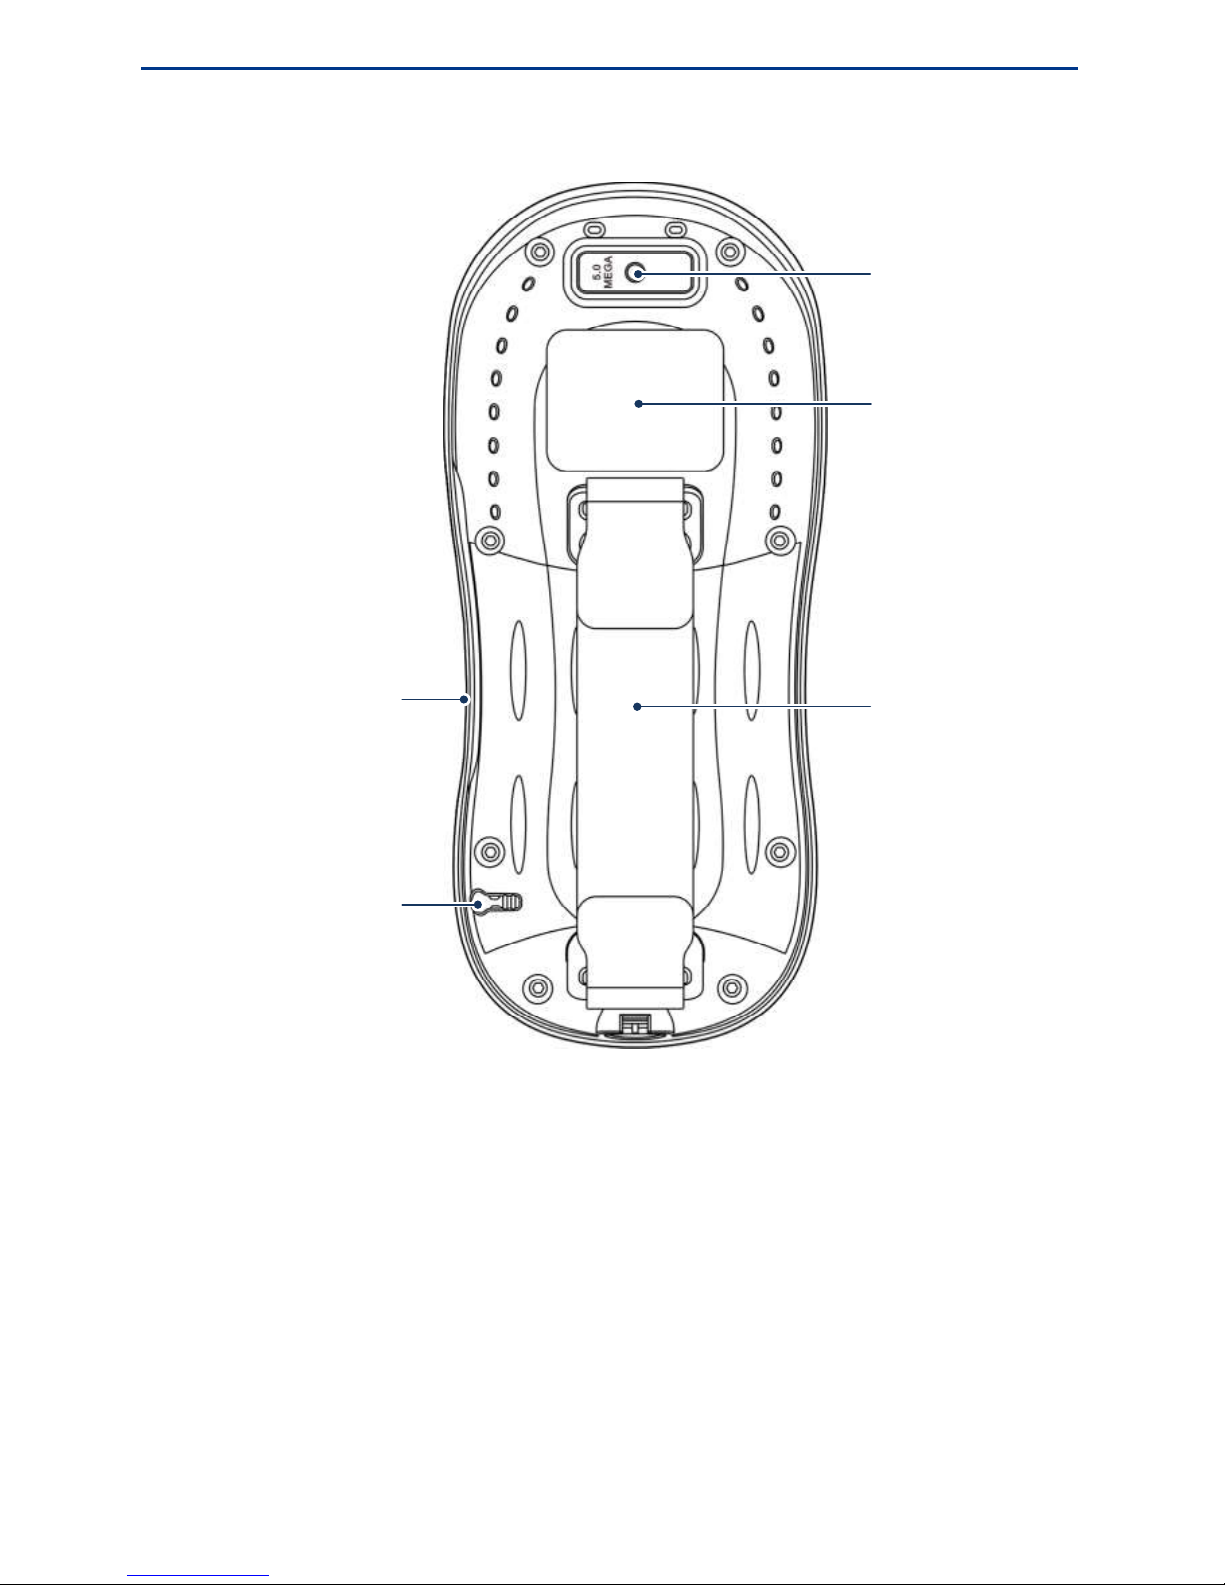
eFix R2 Series Hardware Operating Instructions
12
Back View
Camera
SIM Card/
Micro SD Card Slot
Touch Pen
Belt
Nameplate
Page 17
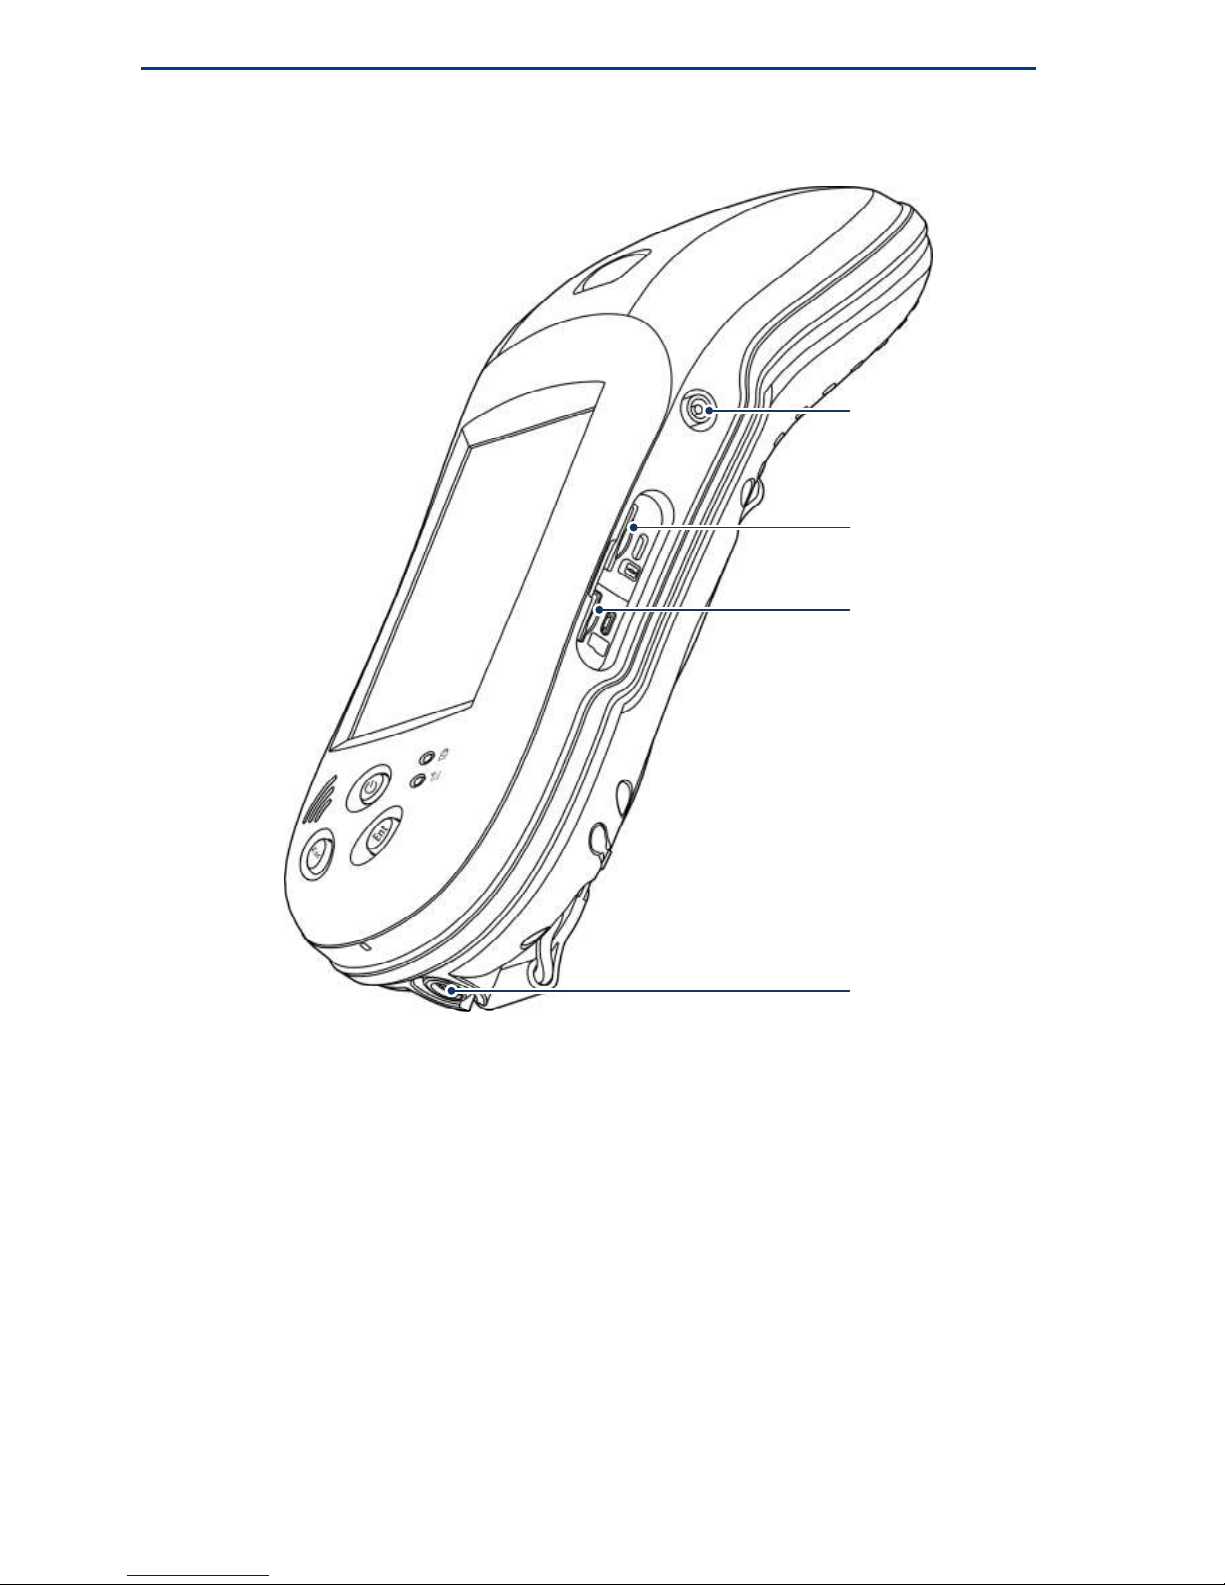
eFix R2 Series Introduction
13
Interfaces
Micro SD Card Slot
SIM Card Slot
I/O Interface
External GNSS
Antenna Interface
Page 18
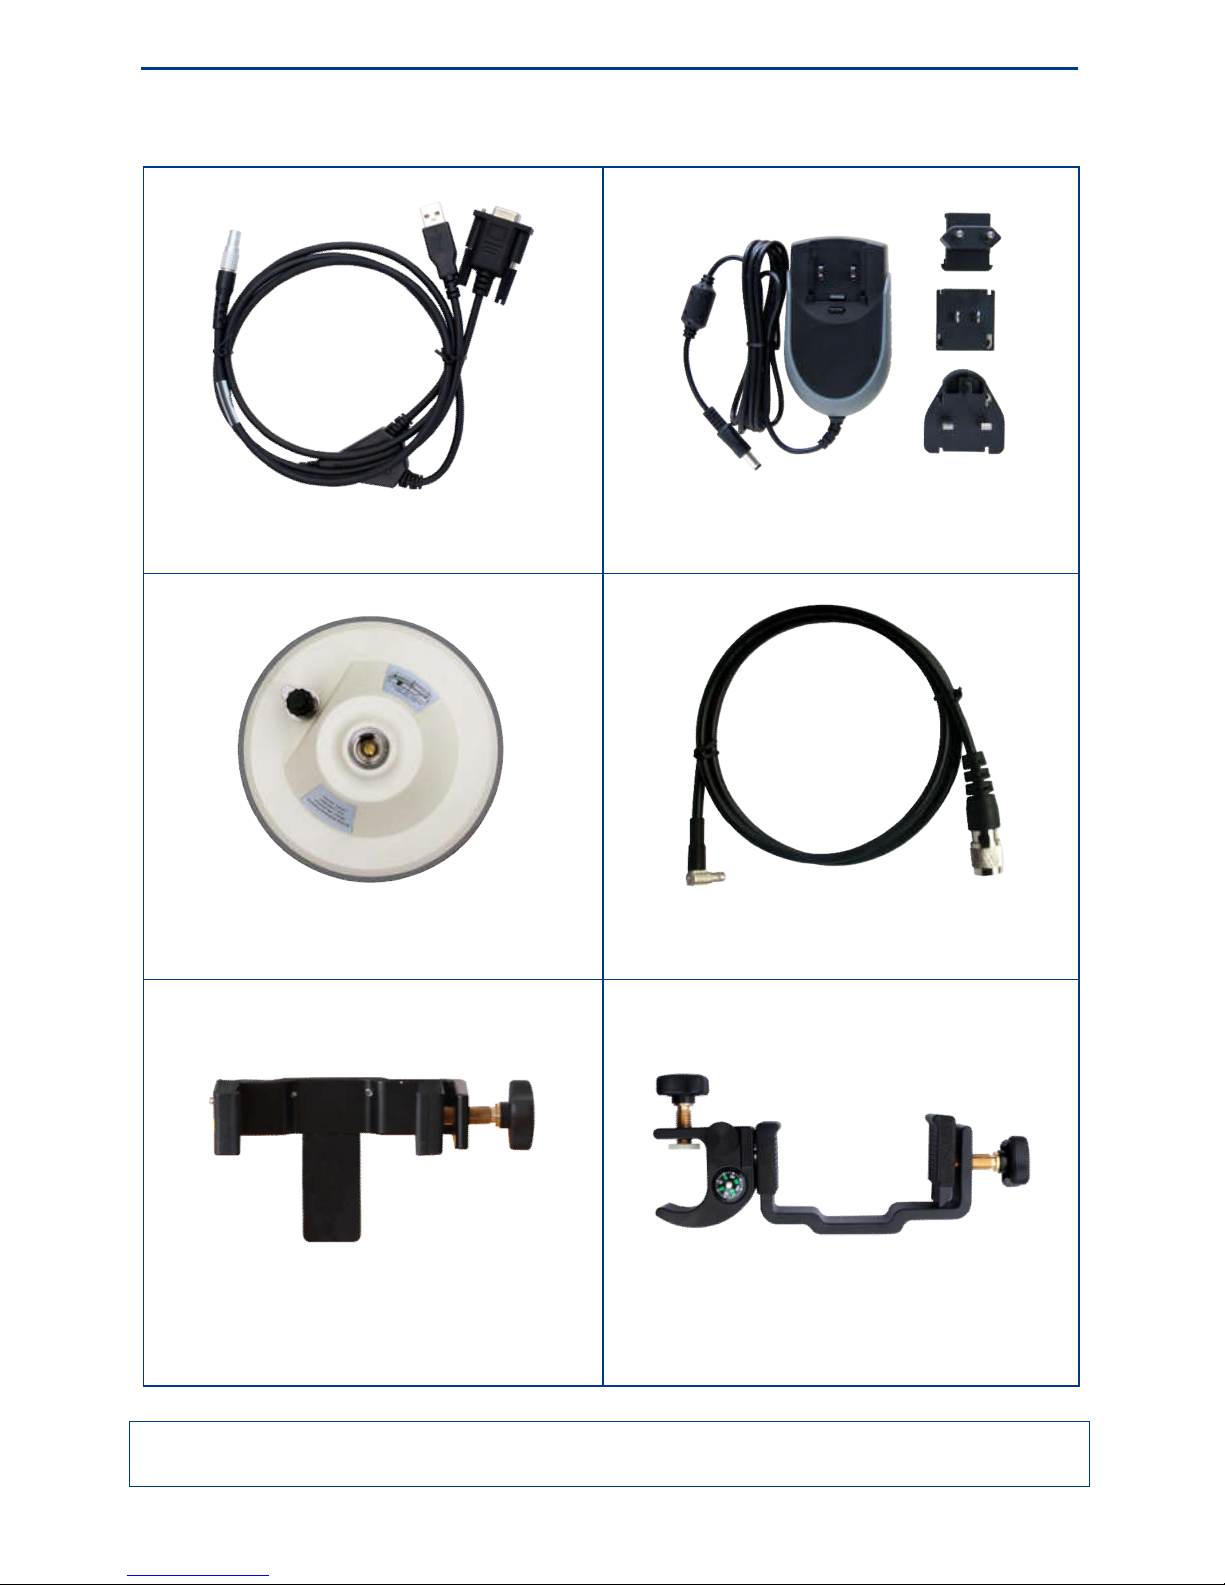
eFix R2 Series Hardware Operating Instructions
14
Main Parts
Data Cable Charger & Adapter*
GNSS External Antenna External Antenna Connecting Cable
Handheld Bracket to Tripod Handheld Bracket to Centering Pole
* We will choose the suitable power plug (USA, England or Europe type, etc.) for you
according to your specific power configuration
Page 19
eFix R2 Series Introduction
15
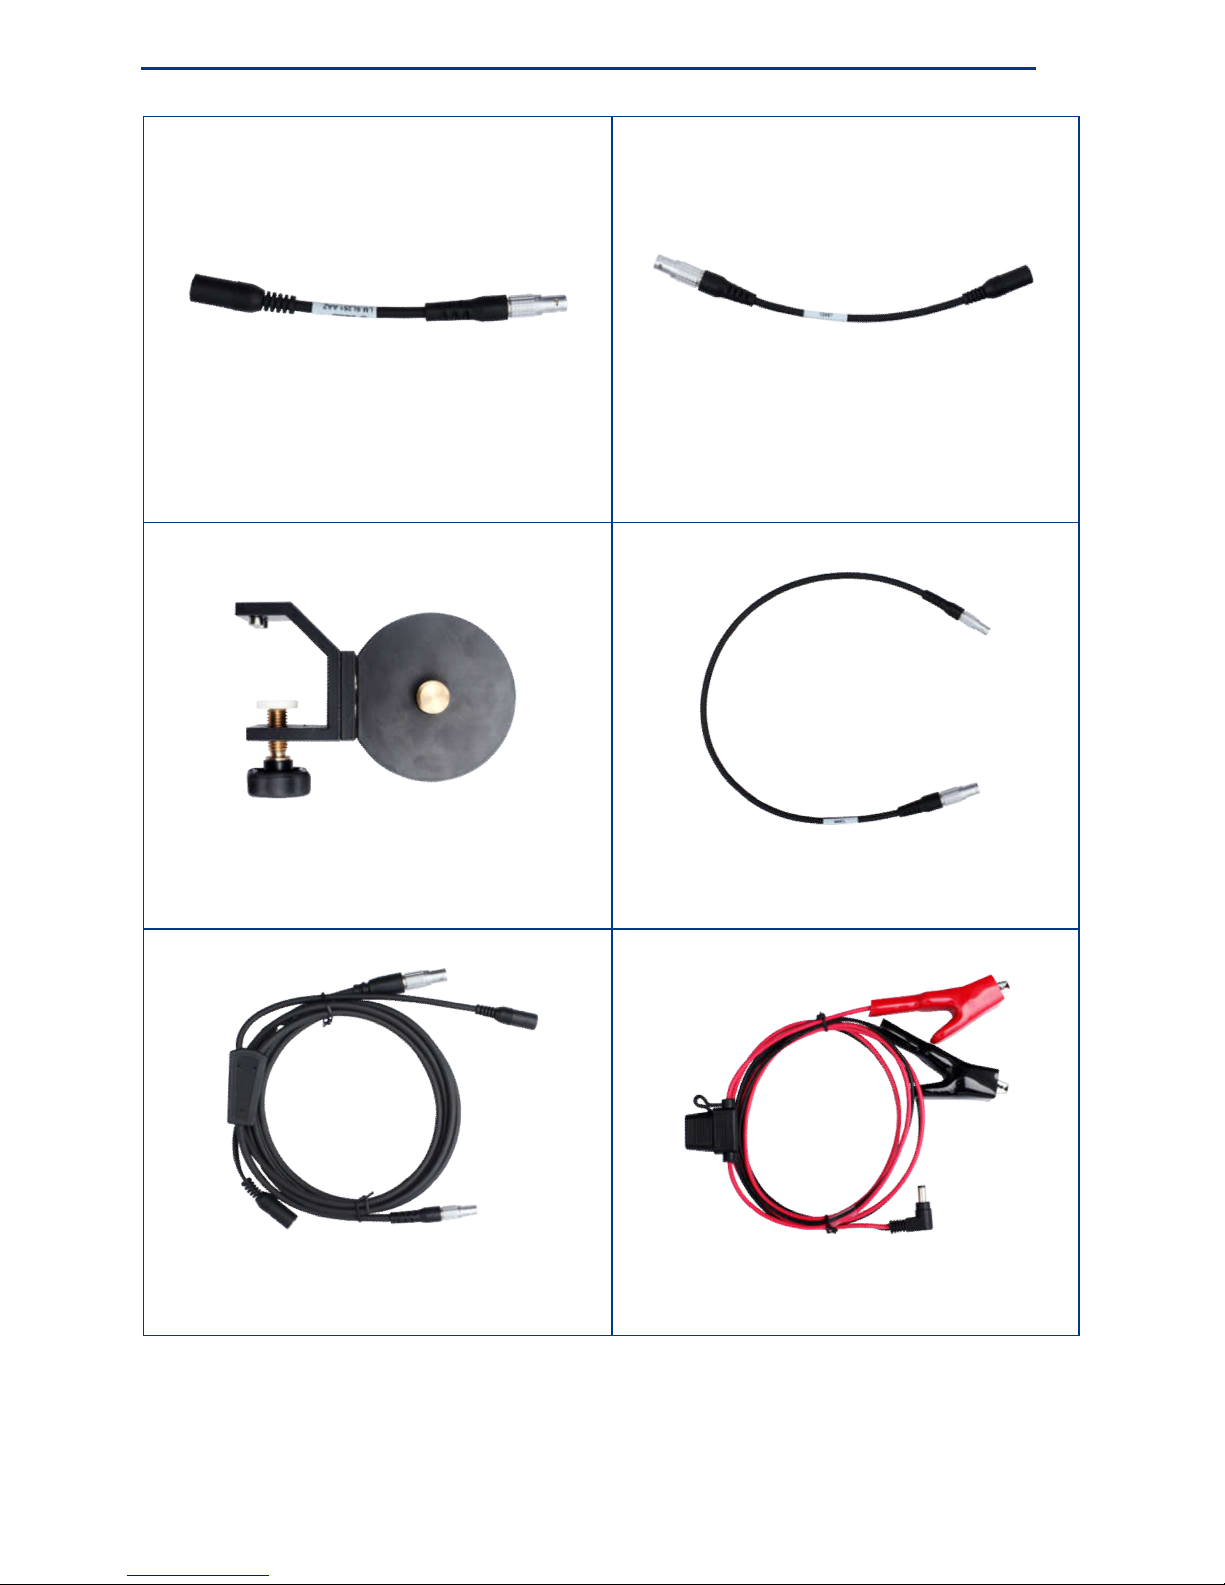
Power Charging Cable for Handheld Power Charging Cable for Receiving Radio
Receiving Radio Bracket Handheld Connecting Cable for Receiving Radio
Transmitting Radio Power and Connecting Cable Transmitting Radio Power Cable
Page 20

eFix R2 Series Hardware Operating Instructions
16
Base Station Standard Configuration List
Configuration Item Number
eFix R2 Series Handheld 1
Charger & Adapter 1
External Antenna Connecting Cable 2
Data Cable (USB plug + serial port_D-sub9 female) 1
Power Charging Cable for Handheld 1
Micro SD Card (2G Byte, Flash Type) 1
External GNSS Antenna 1
Touch Pen 2
Handheld Bracket to Tripod 1
Caravel PP/Net Software Dongle 1
PDL High-Power Transmitting Radio 1
Transmitting Radio Antenna 1
Transmitting Radio Connecting Cable (For Communication
Link between Transmitting Radio and R2 Series Base Station)
1
Transmitting Radio Power Charging Cable (For Transmitting
Radio Charging)
1
Transmitting Radio Antenna Telescopic Pole 1
Fuse (Installed in Transmitting Radio Power Cable) 5
GEOSUN CD (Containing all GEOSUN catalogues, software,
manual, video)
1
eFix R2 Series Bag 1
eFix R2 Series Case 1
Page 21

eFix R2 Series Introduction
17
Rover Standard Configuration List
Configuration Item Number
eFix R2 Series Handheld 1
Charger & Adapter 1
External Antenna Connecting Cable 2
Data Cable (USB plug +serial port_D-sub9 female) 1
Power Charging Cable for Handheld 1
Micro SD Card (2G Byte, Flash type) 1
External GNSS Antenna 1
Touch Pen 2
eFix R2 Series Centering Pole 1
eFix R2 Series Handheld Bracket to Centering Pole 1
eFix R2 Series Centering Pole Bag 1
PDL Receiving Radio 1
Receiving Radio Antenna 1
Receiving Radio Connecting Cable (For Communication Link
between Receiving Radio and R2 Series Rover)
1
Receiving Radio Power Charging Cable (For Receiving Radio
Charging)
1
Receiving Radio Bracket 1
Caravel PP/Net Software Dongle 1
GEOSUN CD (Containing all GEOSUN catalogues, software,
manual, video)
1
eFix R2 Series Bag 1
eFix R2 Series Carry Case 1
Page 22

18
Basic Operations
Taking Out and Putting Back the Touch Pen
Power On
Power Off
Stylus Property Settings
Power Management
Installing the Micro SD Card
Installing the SIM Card
Serial Port Settings
Bluetooth and WiFi Settings
Using the Electronic Compass
Restoring WinCE System
Installing, Uninstalling or Updating gPac Software
Upgrading the Firmware
C H A P T E R
4
Page 23
Basic Operations
19
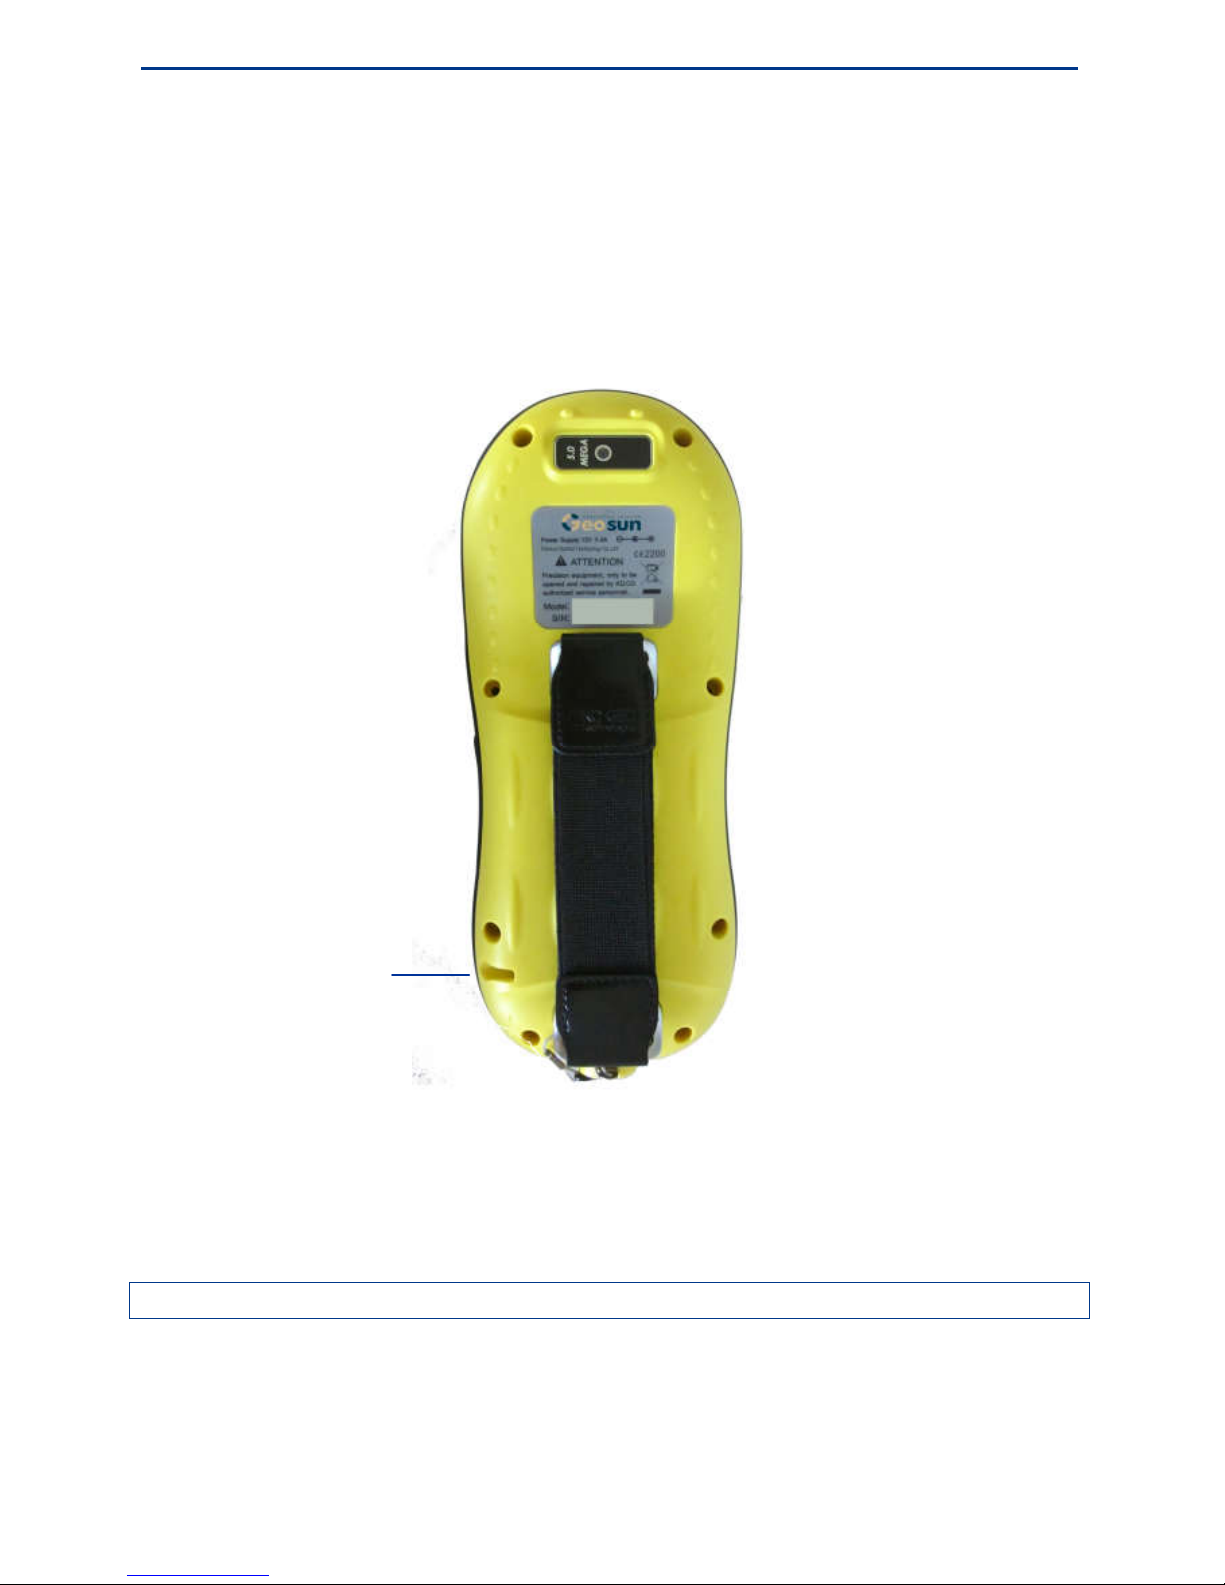
Taking Out and Putting Back the Touch Pen
1. The touch pen is in the pen slot at the back of the handheld, gently pull the touch pen
cap, and take it out, as shown below.
2. To put back the touch pen, make the cap towards the outside, and then push it until the
top of the pen reaches the end of the slot.
Note: Please take out and put back the touch pen gently!
Touch Pen
Page 24
eFix R2 Series Hardware Operating Instructions
20
Power On
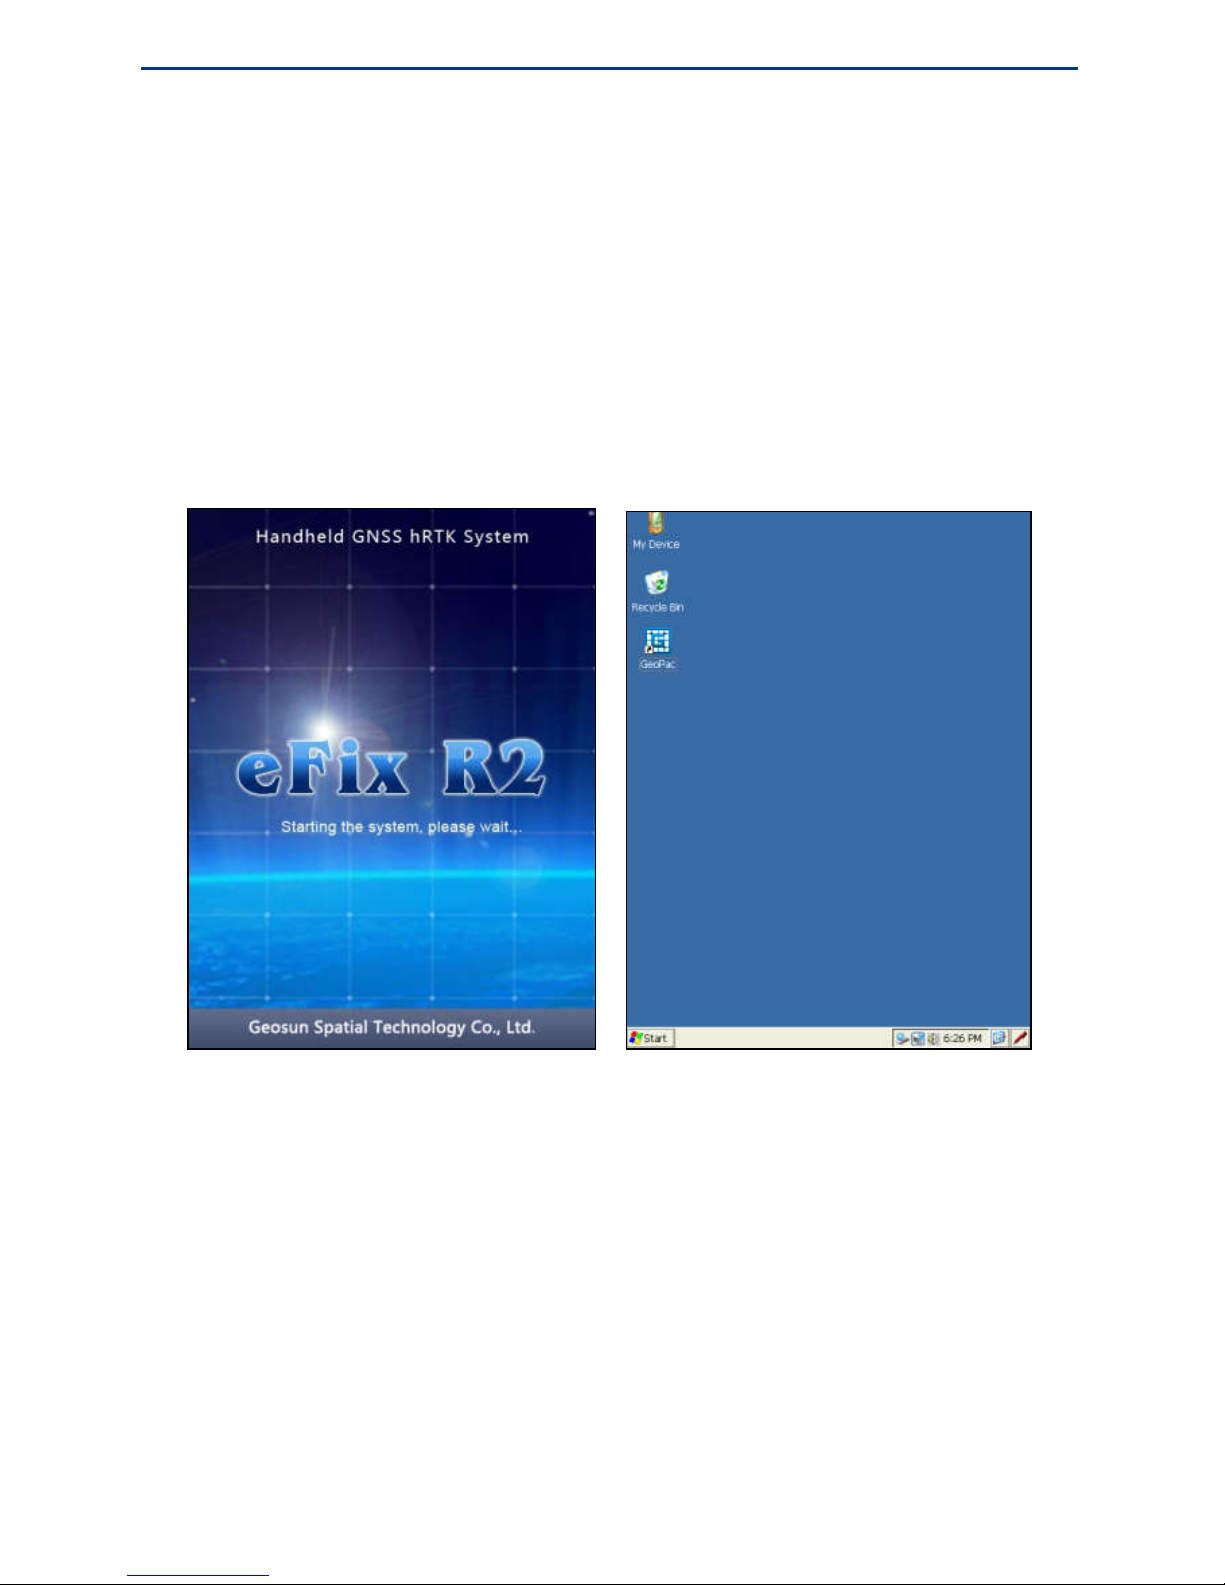
1. Press the power button for 2 seconds, the handheld will turn on and load WinCE
system automatically, as shown below left. The start process will last for about 10
seconds, please be patient.
2. When the start process is completed, the desktop of WinCE system will be shown as
below right.
Power Off
There are two ways to turn off the handheld:
1. Press the power button for more than 3 seconds.
2. Tap Start>Suspend menu item in WinCE system desktop.
Stylus Property Settings
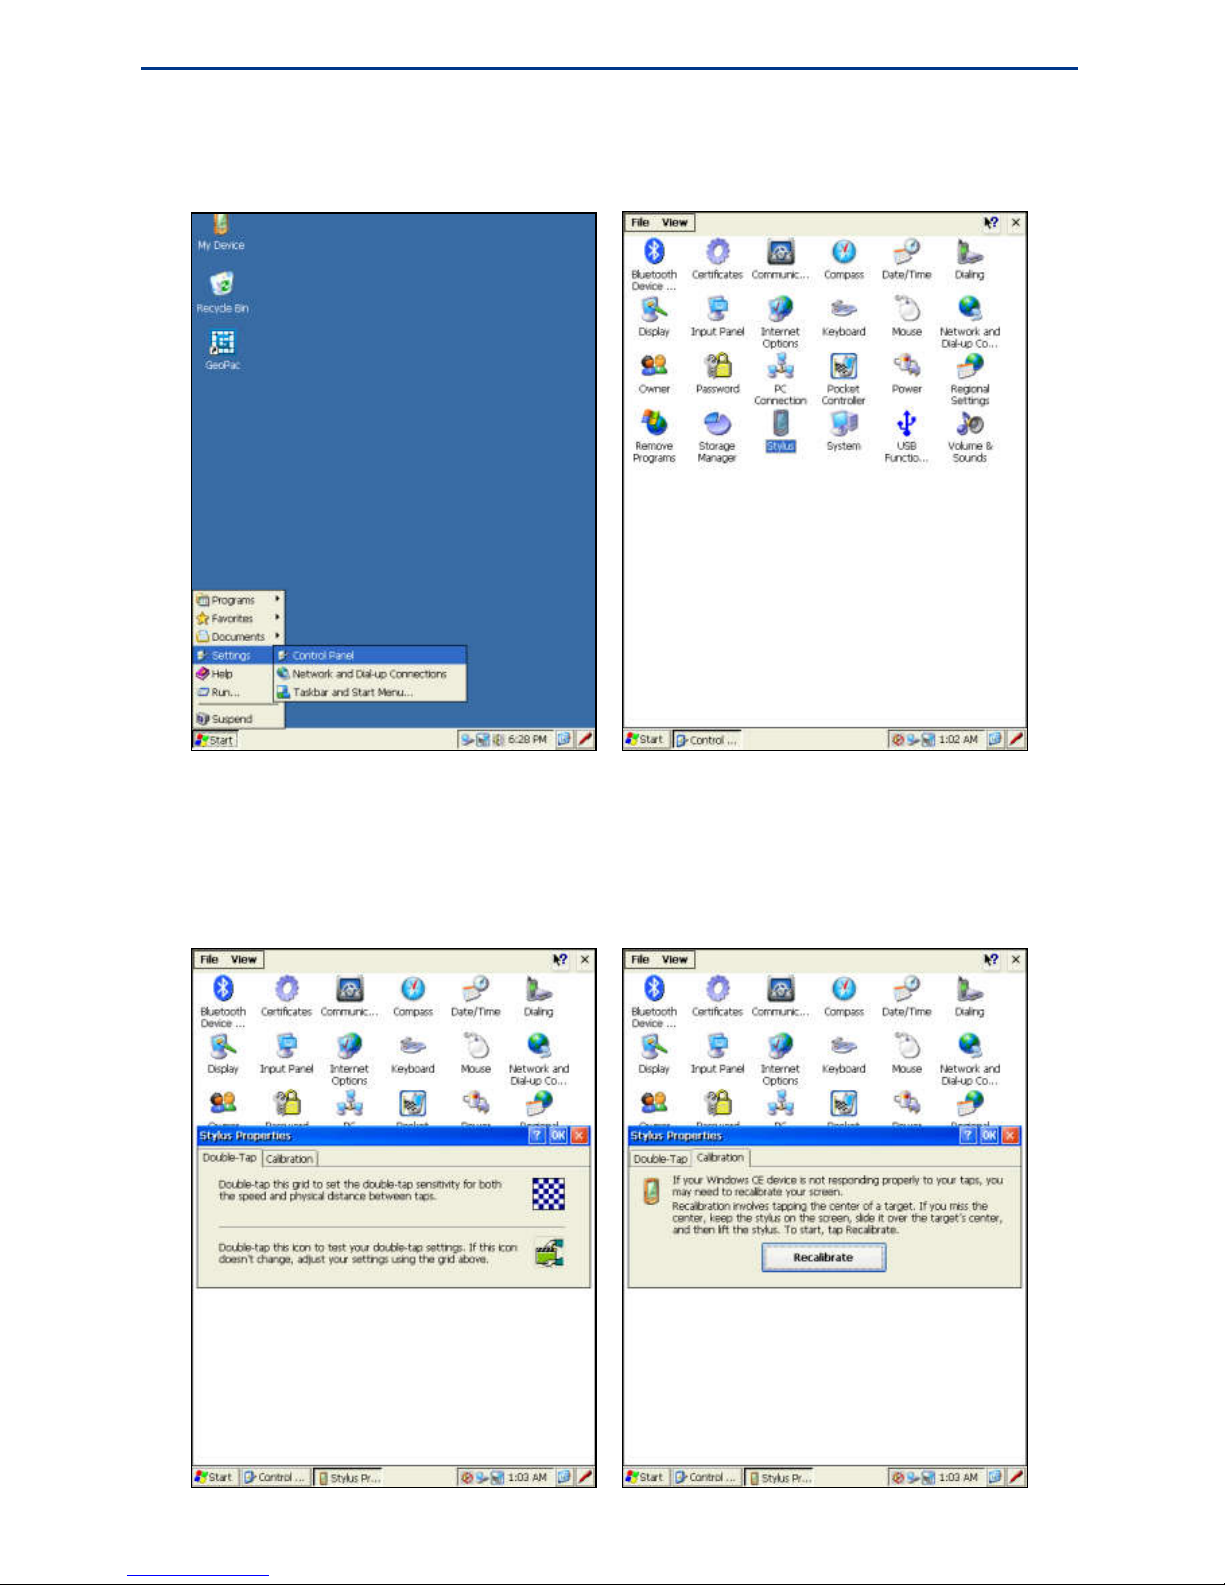
1. Tap the Start>Settings>Control Panel menu item to open the Control Panel dialog
box, as shown below left.
Page 25
Basic Operations
21
2. Tap the Stylus icon in Control Panel dialog box to open the Stylus Properties dialog
box, as shown below right.
3. Set the double-tap speed. Double tap the grid pattern to set double-tap speed and
double tap the file icon to test the double tap setting in Double-Tap page, as shown below
left.
Page 26

eFix R2 Series Hardware Operating Instructions
22
4. Calibrate the touch screen. Tap the Recalibrate button to open Calibration page, as
shown above right. Follow the instructions on the top of the screen to calibrate the touch
screen.
Power Management
Charging
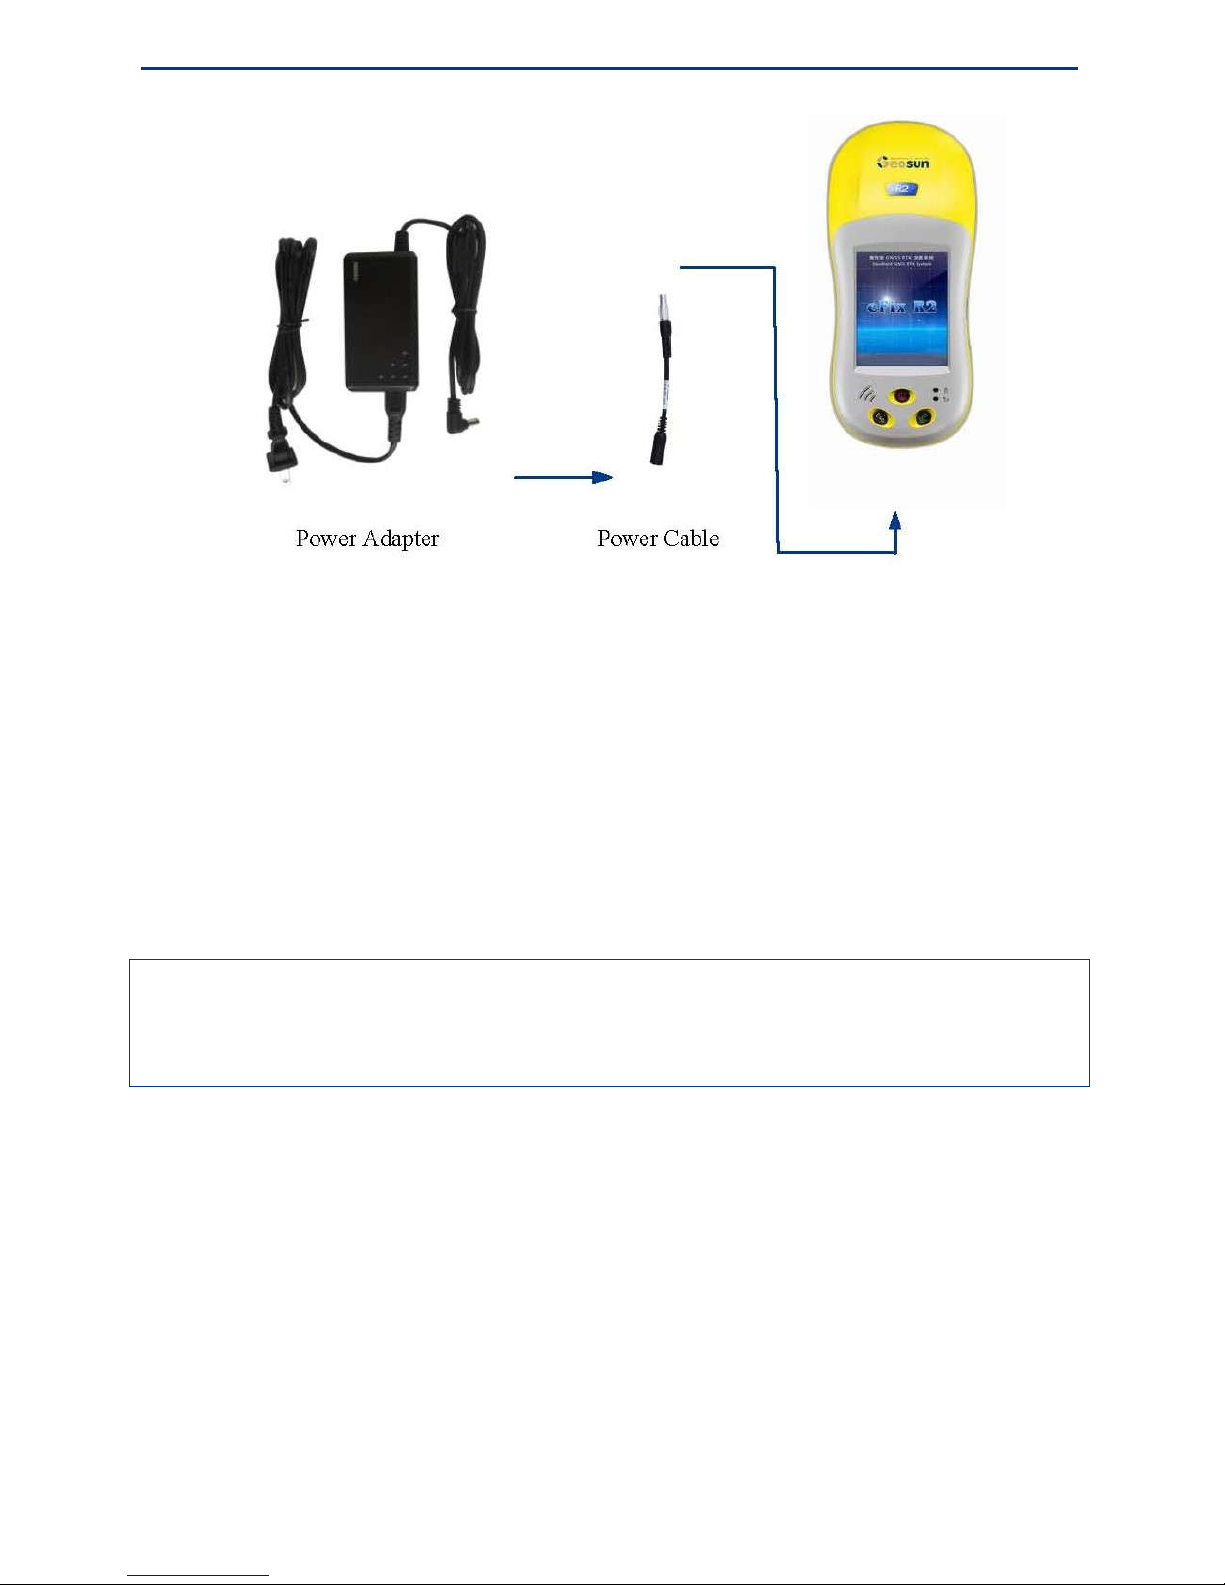
Connect the power adapter to the power cable, and then connect the other Lemo port of the
power cable to the I/O port of the handheld, as shown below. The handheld will be on
charging once the power is connected.
Page 27
Basic Operations
23
Special charger should be used for eFix R2 series and the charging shall be done only in
certain temperature range (0 ℃ ~ 40 ℃).
Methods and requirements: Commonly there will be some power left in the battery before
users start to use it. Please firstly run out of all the power before first charging. Please
charge the handheld for 12 hours continuously for the first three times, and later on 6 to 8
hours charging is enough. When the handheld is not used for a long time, Please make sure
the battery is charged once a month to keep its performance.
Warning: Do not disassemble or replace the battery by yourself or the forthcoming quality
issues will not be guaranteed. Please go to the maintenance station or contact the dealer if
there is any issue of the battery.
Smart Charging
In order to help users to identify the charging status, eFix R2 series offers the smart and fast
charging tool in the embedded GPac software. For more details, please refer to GPac User’s
Manual.
Check the Remaining Power
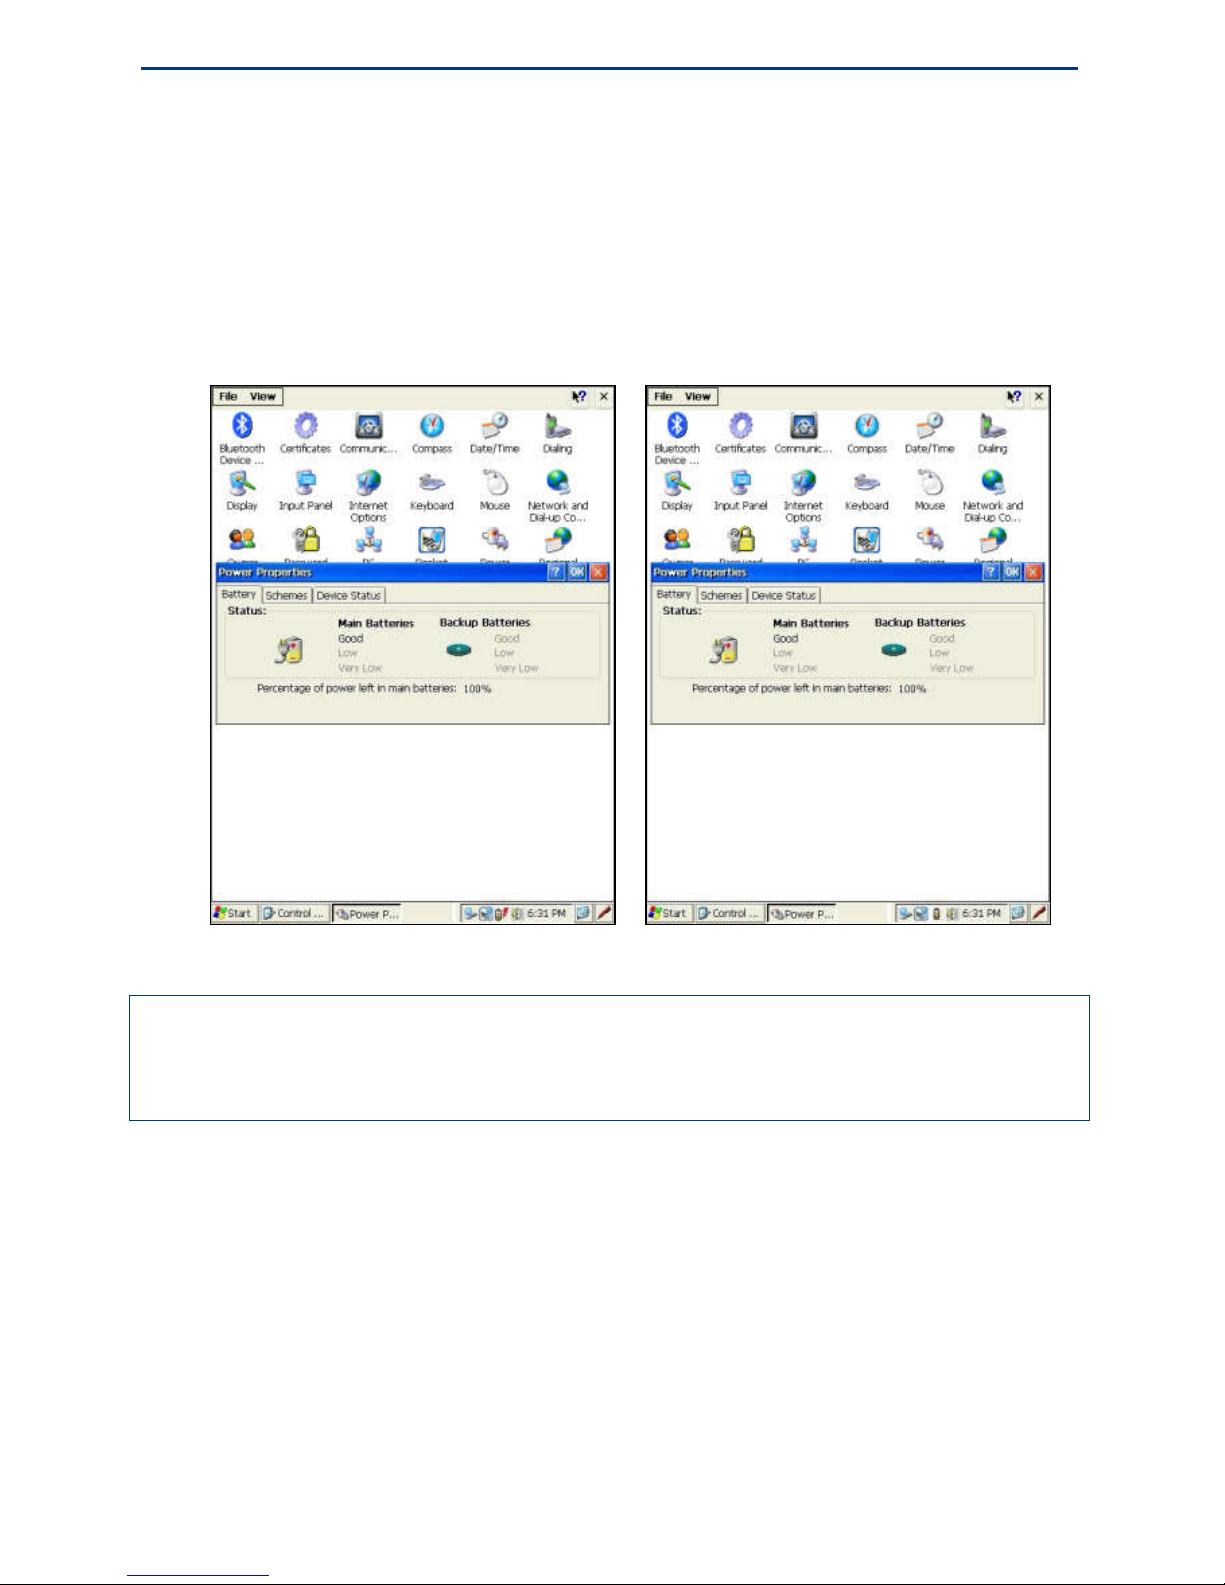
Tap the Start>Settings>Control Panel>Power properties item to check the remaining
Page 28
eFix R2 Series Hardware Operating Instructions
24
power. If the remaining power shown in Main batteries area is 100%, but on the task bar,
the battery icon is along with a lightning signal, then it means the battery is not yet fully
charged, as shown below left. If the charging is stopped at this time, the remaining power
(shown in this dialog box) may be reduced to 85%.
Only when the power part shown in Main batteries area is as Good and 100%, the battery is
really fully charged, as shown below right.
Note: This is because the charging voltage detected by WinCE is a little higher than the real
battery voltage. Constant pressure charging is important for full charging. Please complete
the whole charging process to ensure the working time.
Power Saving Mode
In default condition, screen backlighting will be turned off automatically if no operation
(press keys or tap touch screen) has been carried out within 1 minute. The system will enter
the standby mode if no operation has been carried out within 30 minutes, or be power off if
no operation within 2 hours.
Page 29
Basic Operations
25
Installing the Micro SD Card
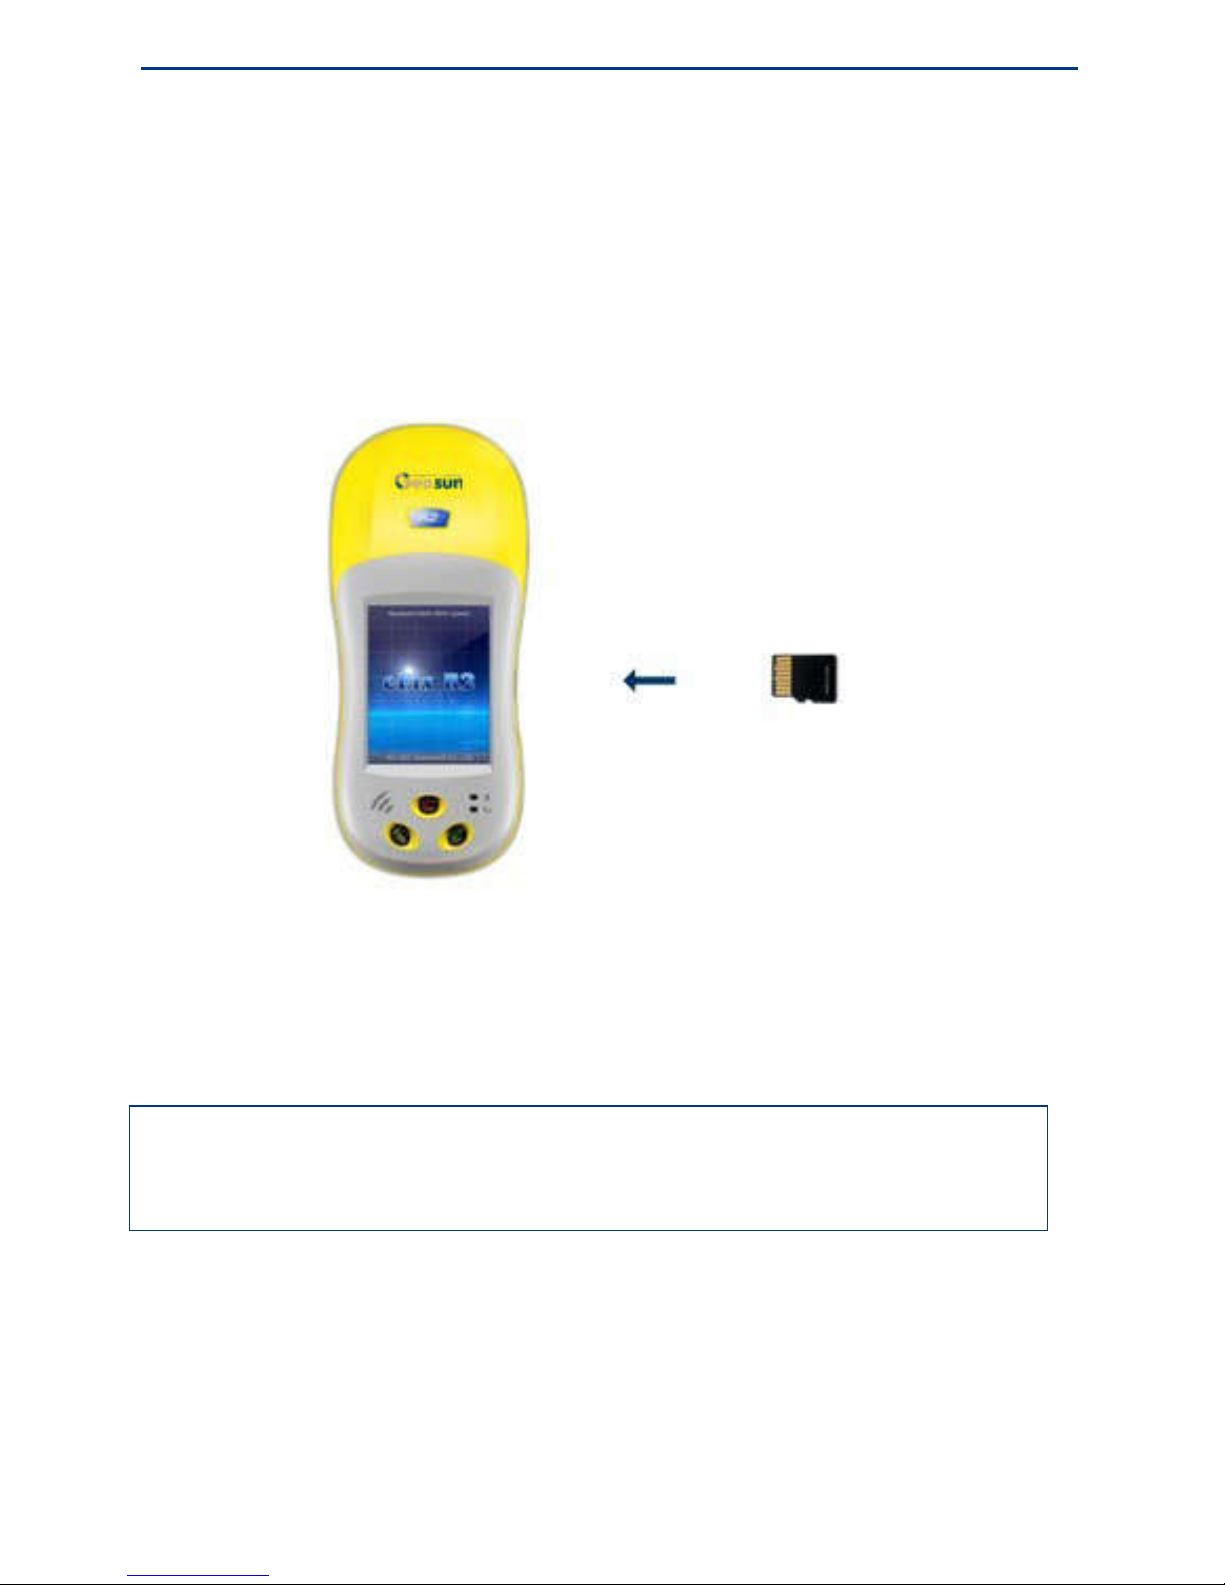
1. Open the soft rectangular plug at the right side of the handheld, you can find the Micro
SD card slot.
2. Put the Micro SD card upside down (the metal surface upward) as shown below, then
push the card into the slot till the card is completely inside, and then close the plug.
3. You can remove the Micro SD card by lightly pressing the card to make it half pop-out,
and then pull it out gently.
Note: Micro SD card (TF card) is a small-size external flash memory card. It is usually used in
cell phone, PDA etc. Ordinary SD card is larger than Micro SD card, and is not suitable
for R2 series handheld. Please be sure not to mix them up.
Page 30
eFix R2 Series Hardware Operating Instructions
26
Installing the SIM Card
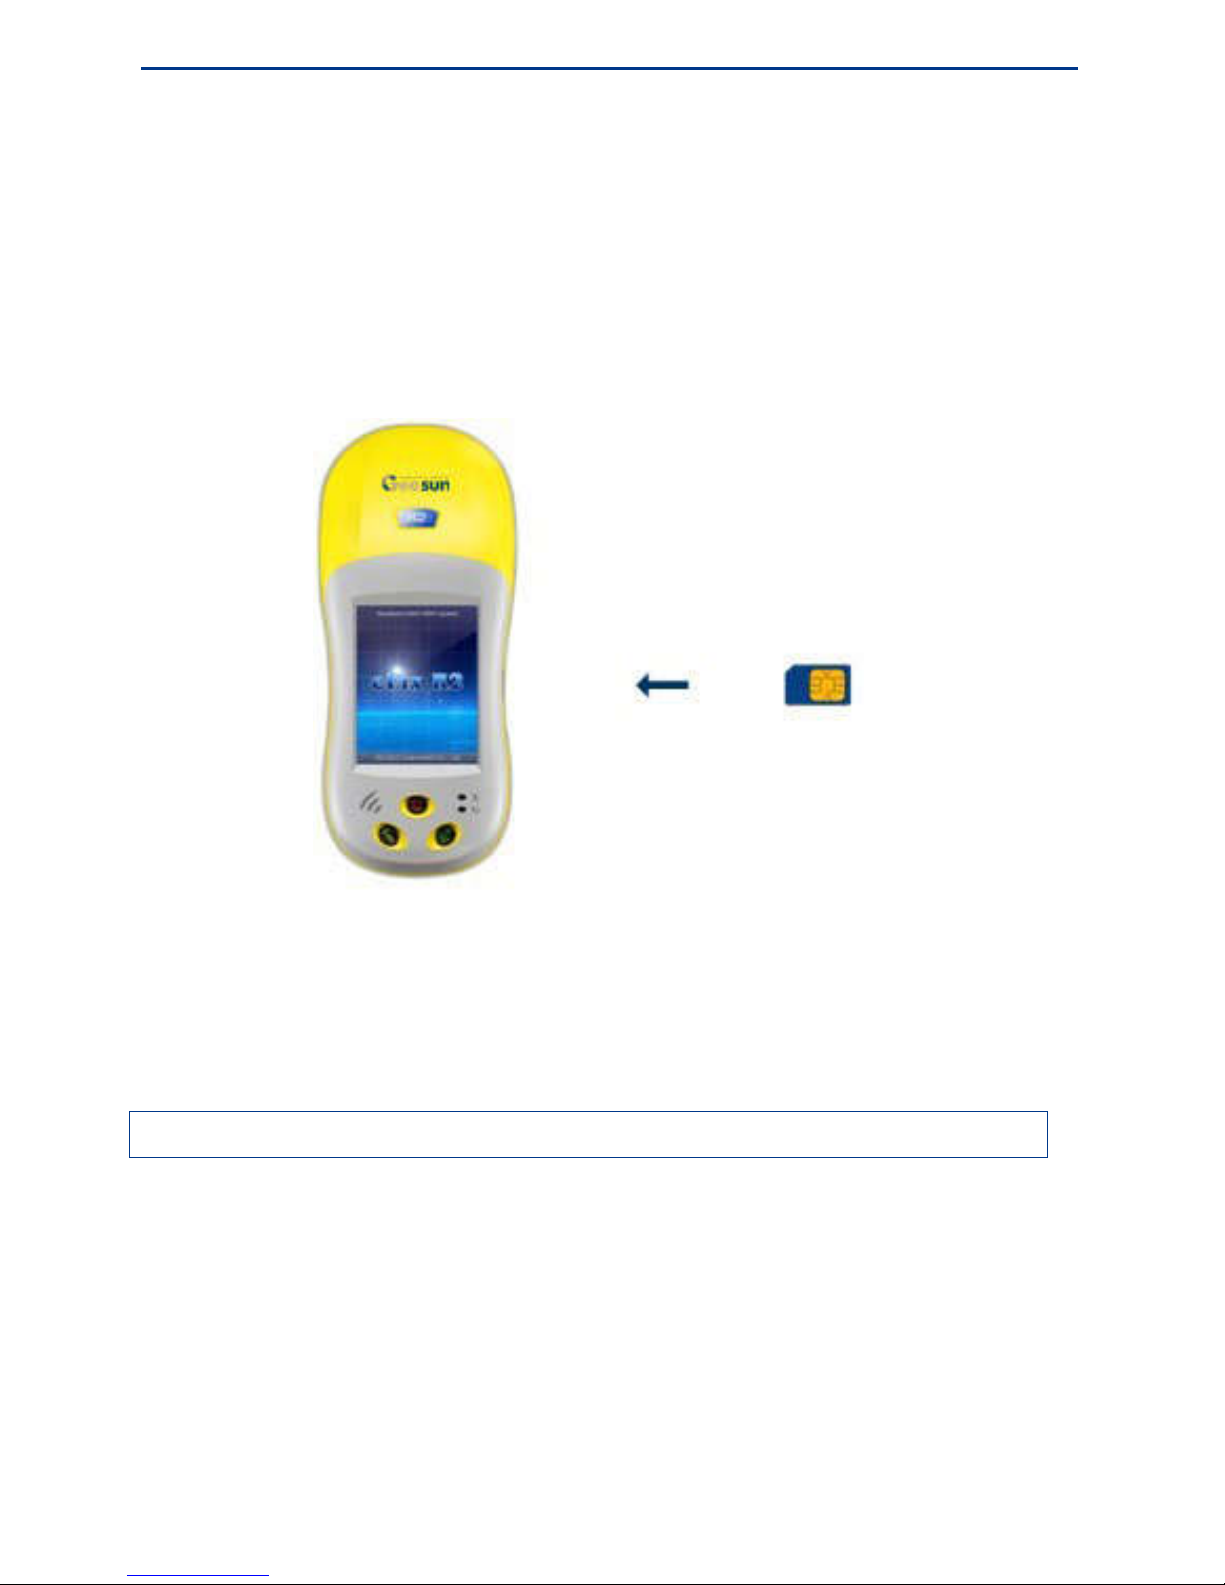
1. Open the soft rectangular plug at the right side of the handheld, you can find the SIM
card slot.
2. Put the SIM card upside down (the metal surface upward) as shown below, then push
the card into the slot till the card is completely inside. And then close the plug.
3. You can remove the Micro SD card by lightly pressing the card to make it half pop-out,
and then pull it out gently.
Note: Please close the plug to isolate the handheld from water and dust.
Page 31
Basic Operations
27
Serial Port Settings
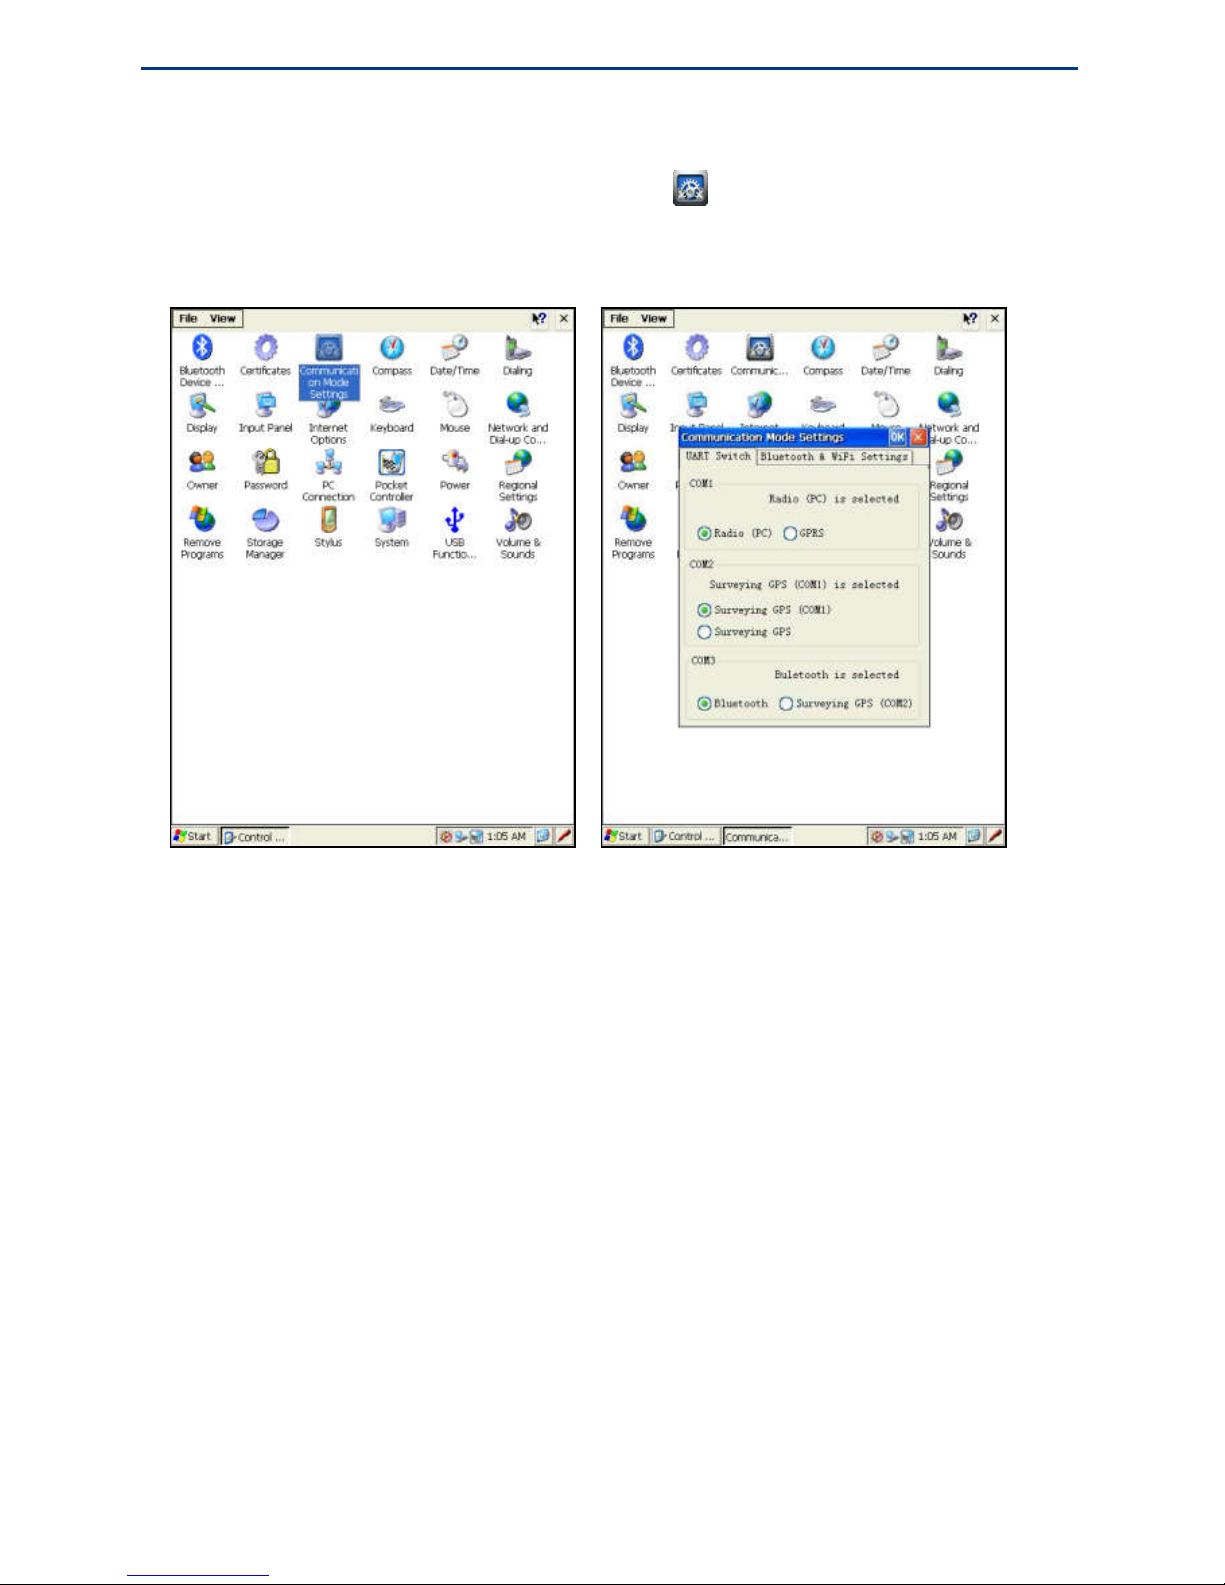
Double tap the Communication Mode Settings icon in the Control Panel, as shown
below left, then the Communication Mode Settings dialog box appears. Users can define the
functions of the three serial ports in this dialog, as shown below right.
Serial port 1 can be set as radio (PC) or GPRS. The default is radio (PC).
Serial port 2 can be set as surveying GPS (COM1) or navigation GPS (COM1).
The default is surveying GPS (COM1).
Serial port 3 can be set as Bluetooth or surveying GPS (COM2). The default is
Bluetooth.
Bluetooth and WiFi Settings
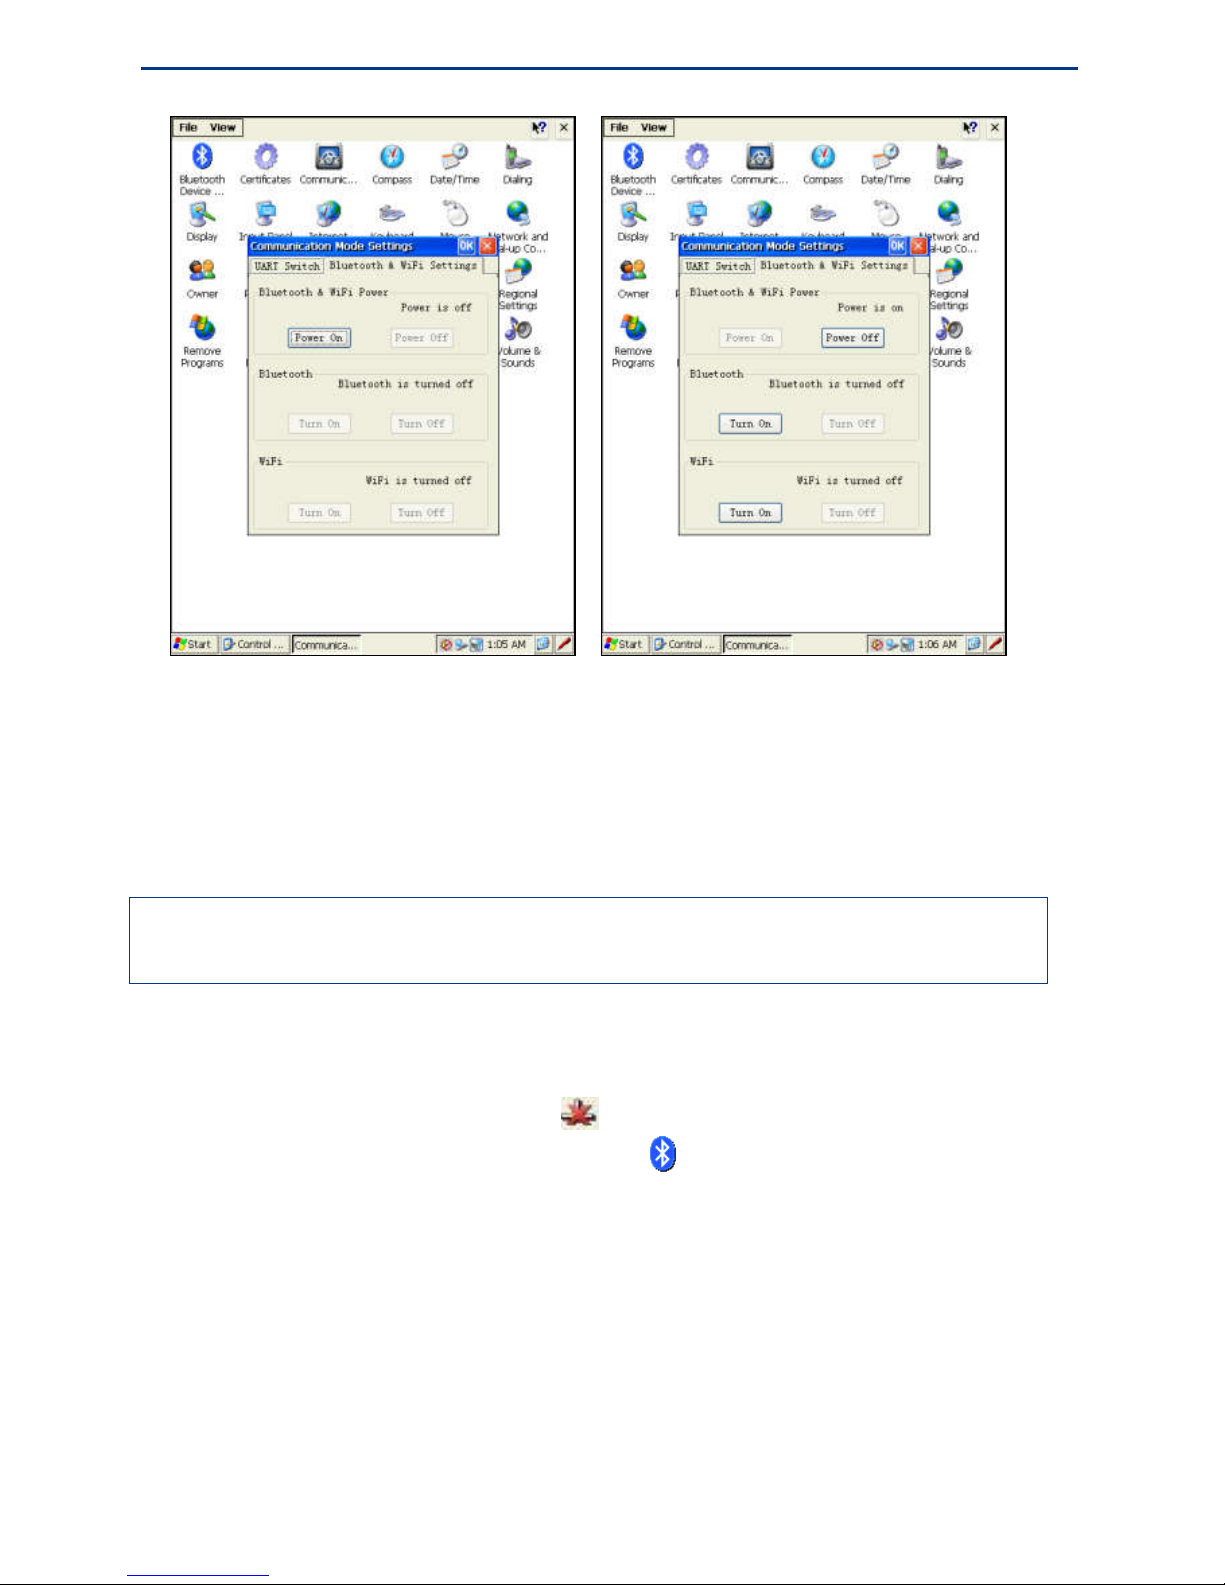
Tap the Bluetooth & WiFi Settings tag in the Communication Mode Settings dialog box, the
Bluetooth & WiFi Settings interface appears, as shown below left.
Both Bluetooth and WiFi are disabled in default. To use Bluetooth or WiFi, you need to tap
the Power On button in the Bluetooth & WiFi Power area, to turn on the power of
Bluetooth and WiFi. Thus the Turn On buttons of Bluetooth and WiFi are activated, as
shown below right.
Page 32
eFix R2 Series Hardware Operating Instructions
28
Tap the Turn On button in the Bluetooth area you can enable the Bluetooth. When the
Bluetooth is enabled, you can tap the Turn Off button in the Bluetooth area to disable it.
Similarly, Tap the Turn On button in the WiFi area you can enable the WiFi. When the WiFi
is enabled, you can tap the Turn Off button in the WiFi area to disable it.
Note: Tap the Power Off button in the Bluetooth & WiFi Power area, both the Bluetooth
and WiFi will be disabled.
Bluetooth Settings
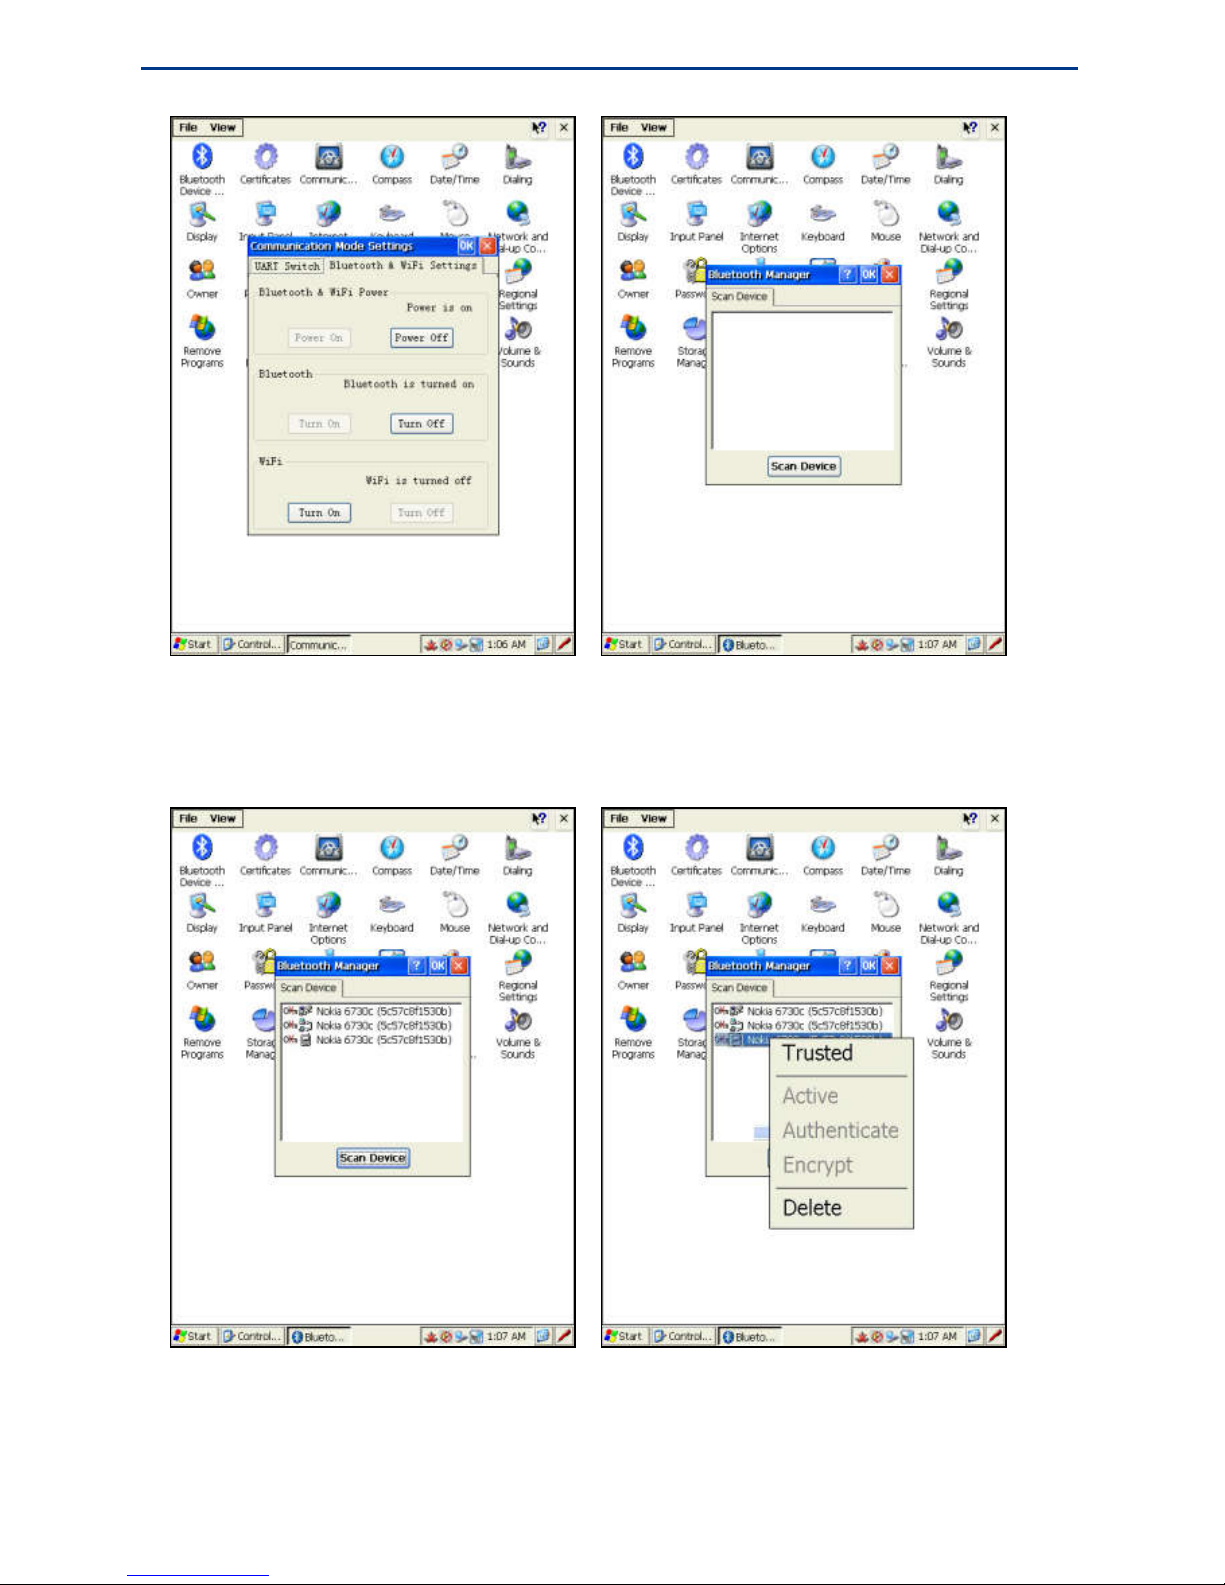
When the Bluetooth is enabled, the icon appears in the task bar, as shown below left.
Double tap the Bluetooth Device Properties icon in the Control Panel, pops up the
Bluetooth Management interface, as shown below right.
Page 33
Basic Operations
29
Tap the Scan Device button, the handheld begins to scan Bluetooth devices within 10
meters, and shows them in the Scan Device page, as shown below left. Double tap the
device to connect, select the Trusted item in the appeared menu, as shown below right.
Page 34
eFix R2 Series Hardware Operating Instructions
30
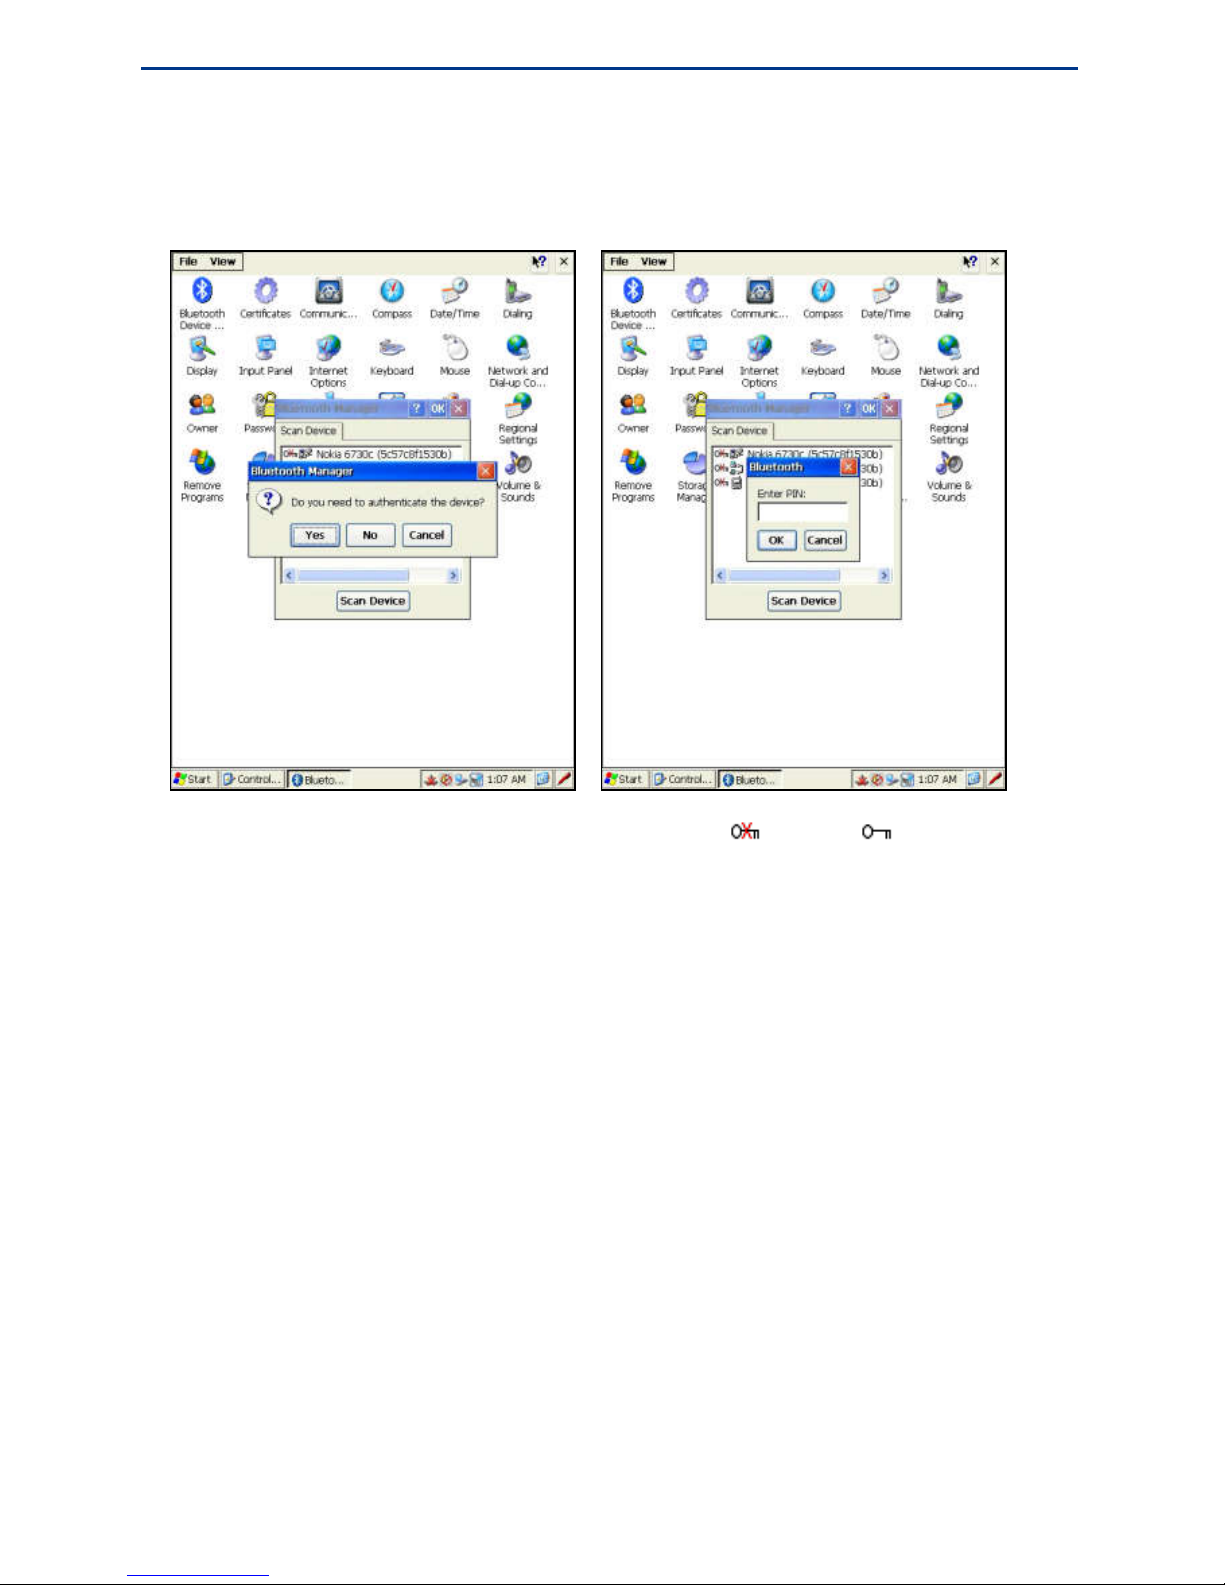
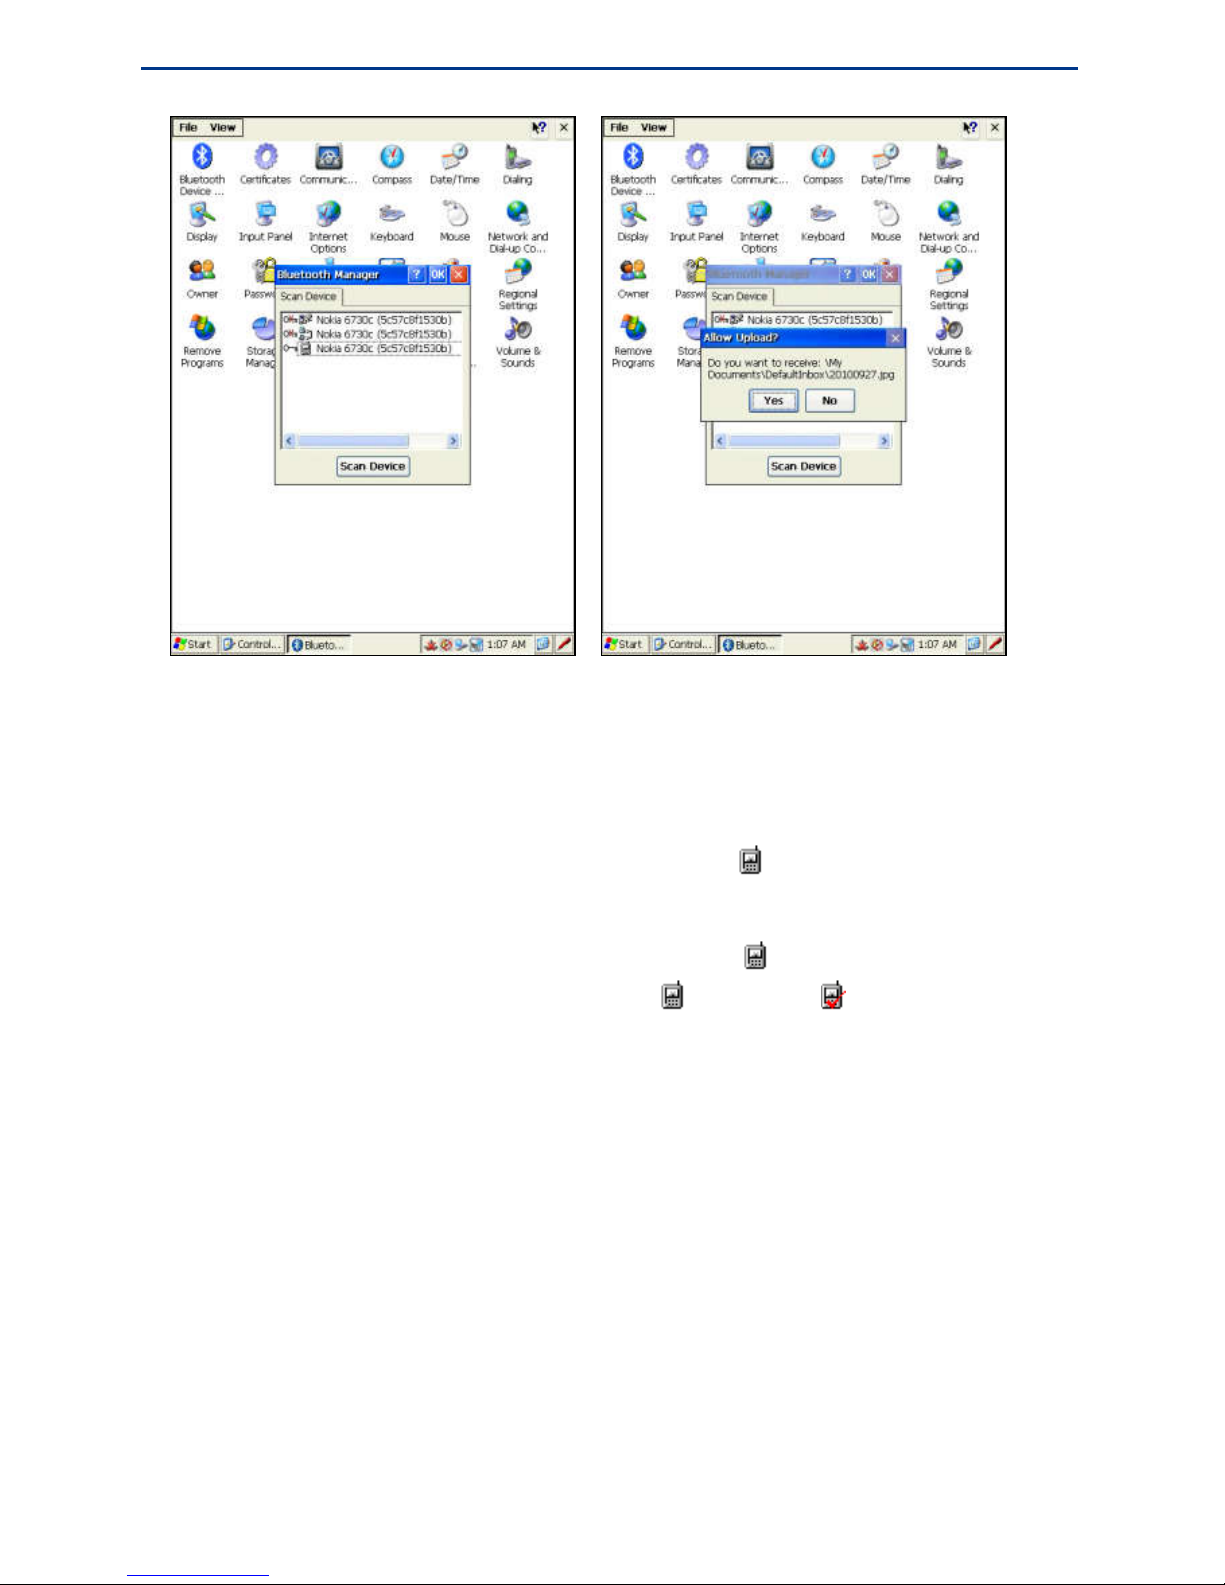
The Bluetooth Manager dialog box appears, as shown below left, tap the Yes button. Input
the matching password (user-defined) in the appeared dialog box, tap the OK button, and
then wait for inputting the matching password of the other device
When the other device finishes confirmation, the symbol turns to , which means
the matching is successful, as shown below left. After the matching is successfully set up, if
a file is transmitted from the other device, the Bluetooth file transmission window pops up
automatically, as shown below right. Tap the Yes button to start download. The file will be
saved to My Device\My Documents\DefaultInbox\.
Page 35
Basic Operations
31
Bluetooth Dial-up Connection
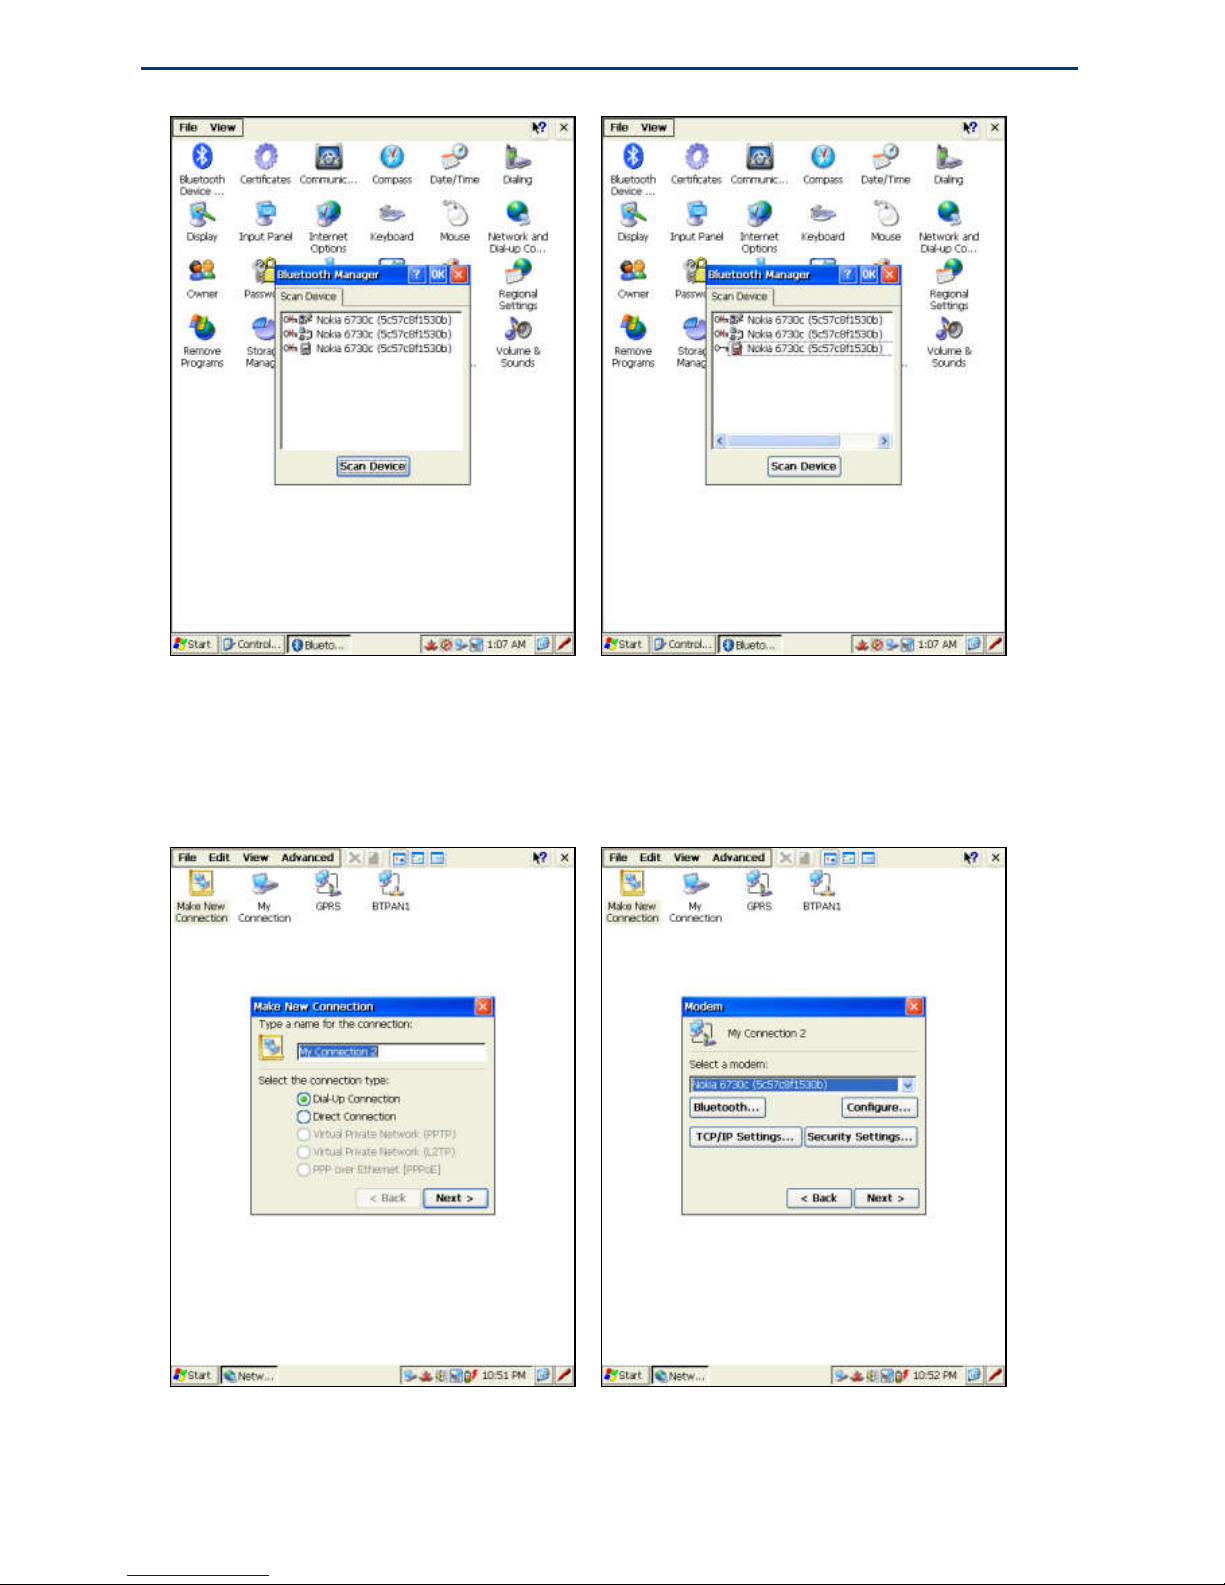
Usually, while scanning the devices, several items will be shown for the same device. For
example, the Nokia device shows in the left picture below. To implement its Bluetooth
Dial-up function, please double tap the item with the icon ahead, select the Trusted
item, and input the matching password.
1. When the matching is successful, double tap the icon item, and select the Active
menu item in the popup menu. Then the icon will turn to . Now please tap the
OK button.
Page 36
eFix R2 Series Hardware Operating Instructions
32
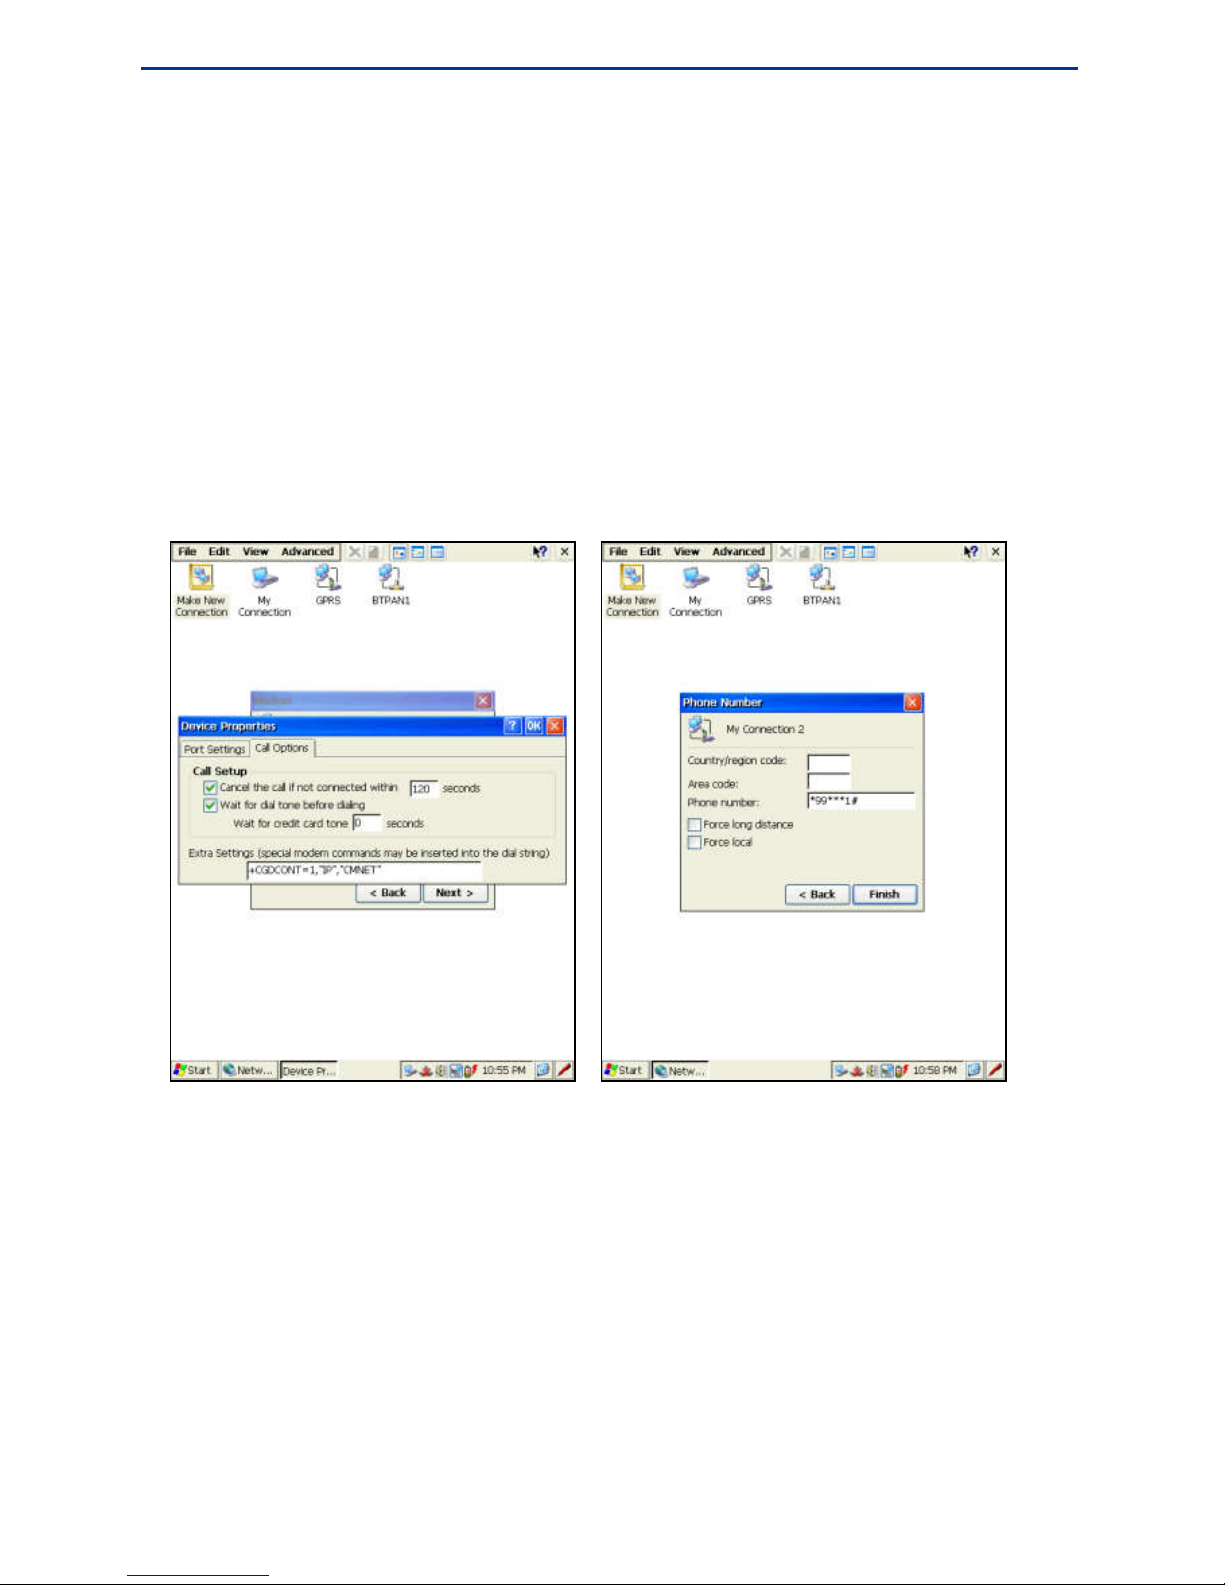
2. Select Start > Settings > Network and Dial-up Connections > Make New Connection,
pops up the Make New Connection dialog box, as shown below left. Input the
connection name, Select Dial-Up Connection, and tap the Next button. Then the
Modem dialog box will pop up, as shown below right.
Page 37
Basic Operations
33
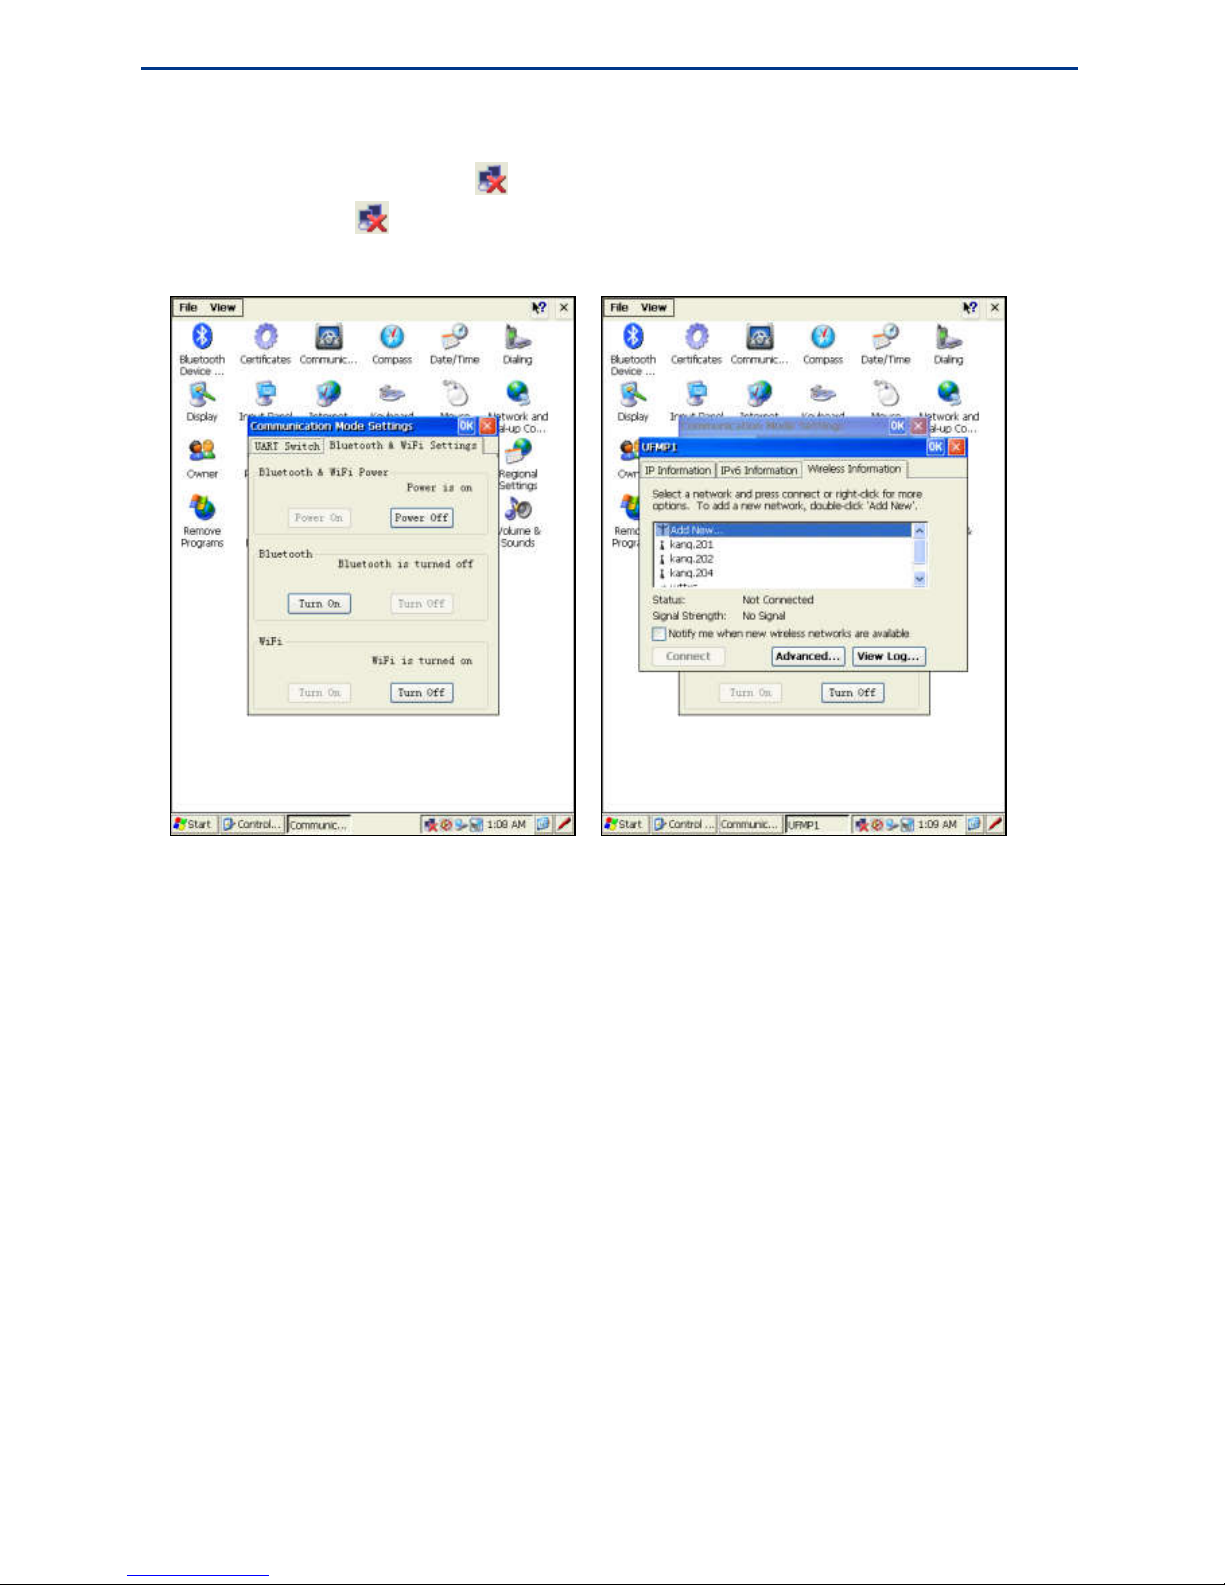
3. Select the matching device in the Modem dialog box, and tap the Configure button.
Then a Bluetooth authority request will appear in the other device. When the request is
accepted by the other device, pops up the Device Properties dialog box, as shown
below left. In the Call Options page, input the APN provided by GPRS providers in
the Extra Settings edit box.
4. Tap the OK button to go back to the Modem interface. Tap the Next button, the Phone
Number dialog box appears. Input the country code, local area code, phone number
*99***1# (this “*99***1#” is just an example for Chinese APN “CMNET”. For more
exact information of different countries, please contact your local APN company), as
shown below right. Then tap the Finish button.
Page 38
eFix R2 Series Hardware Operating Instructions
34
WiFi Settings
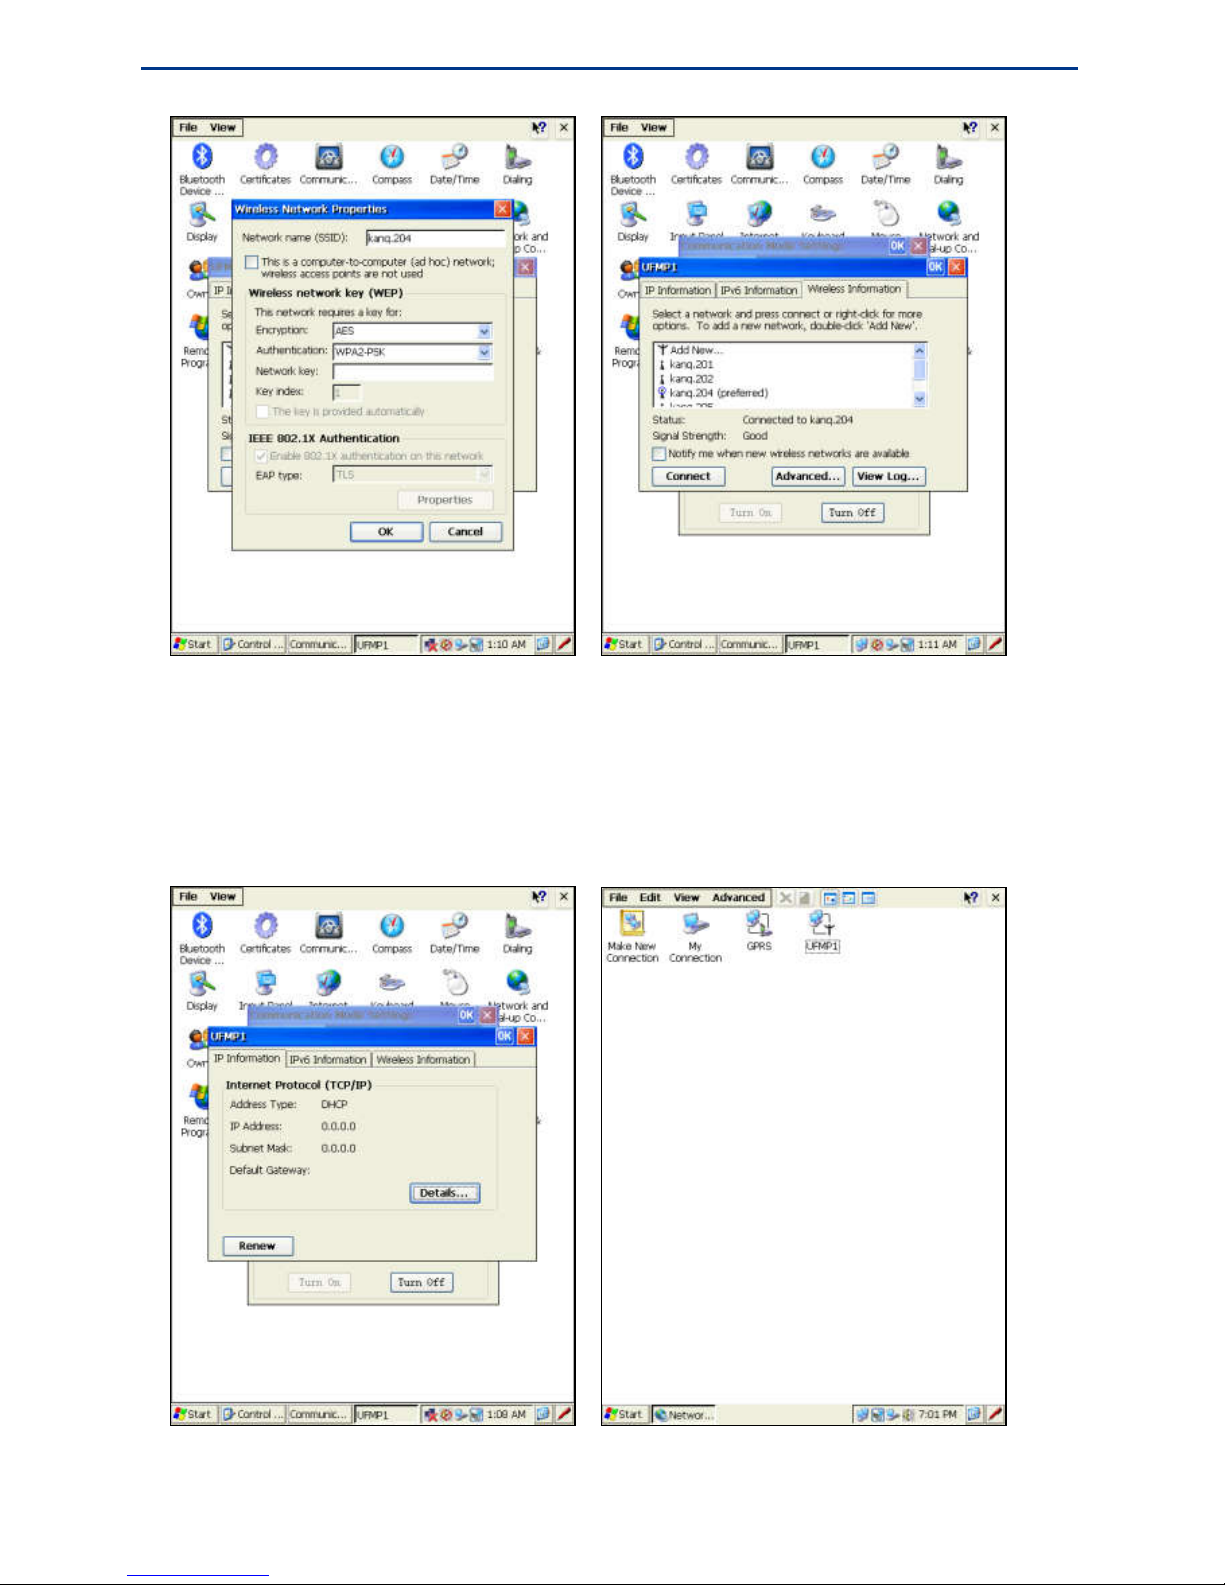
When WiFi is enabled, the icon appears in the task bar, as shown below left.
Double tap the icon , the UFMP1 dialog box appears, tap the Wireless Information
tag, as shown below right.
The system will search surrounding WiFi networks automatically, and list them in the
Wireless Information page. Double tap the WiFi network to connect, pops up the
Wireless Network Properties dialog box, as shown below left. Select the encryption
method and the authentication type, input the network password, and tap the OK button
to finish. Users can check the signal status and signal strength in the Wireless
Information page, and check the assigned IP address in the IP Information page.
Page 39
Basic Operations
35
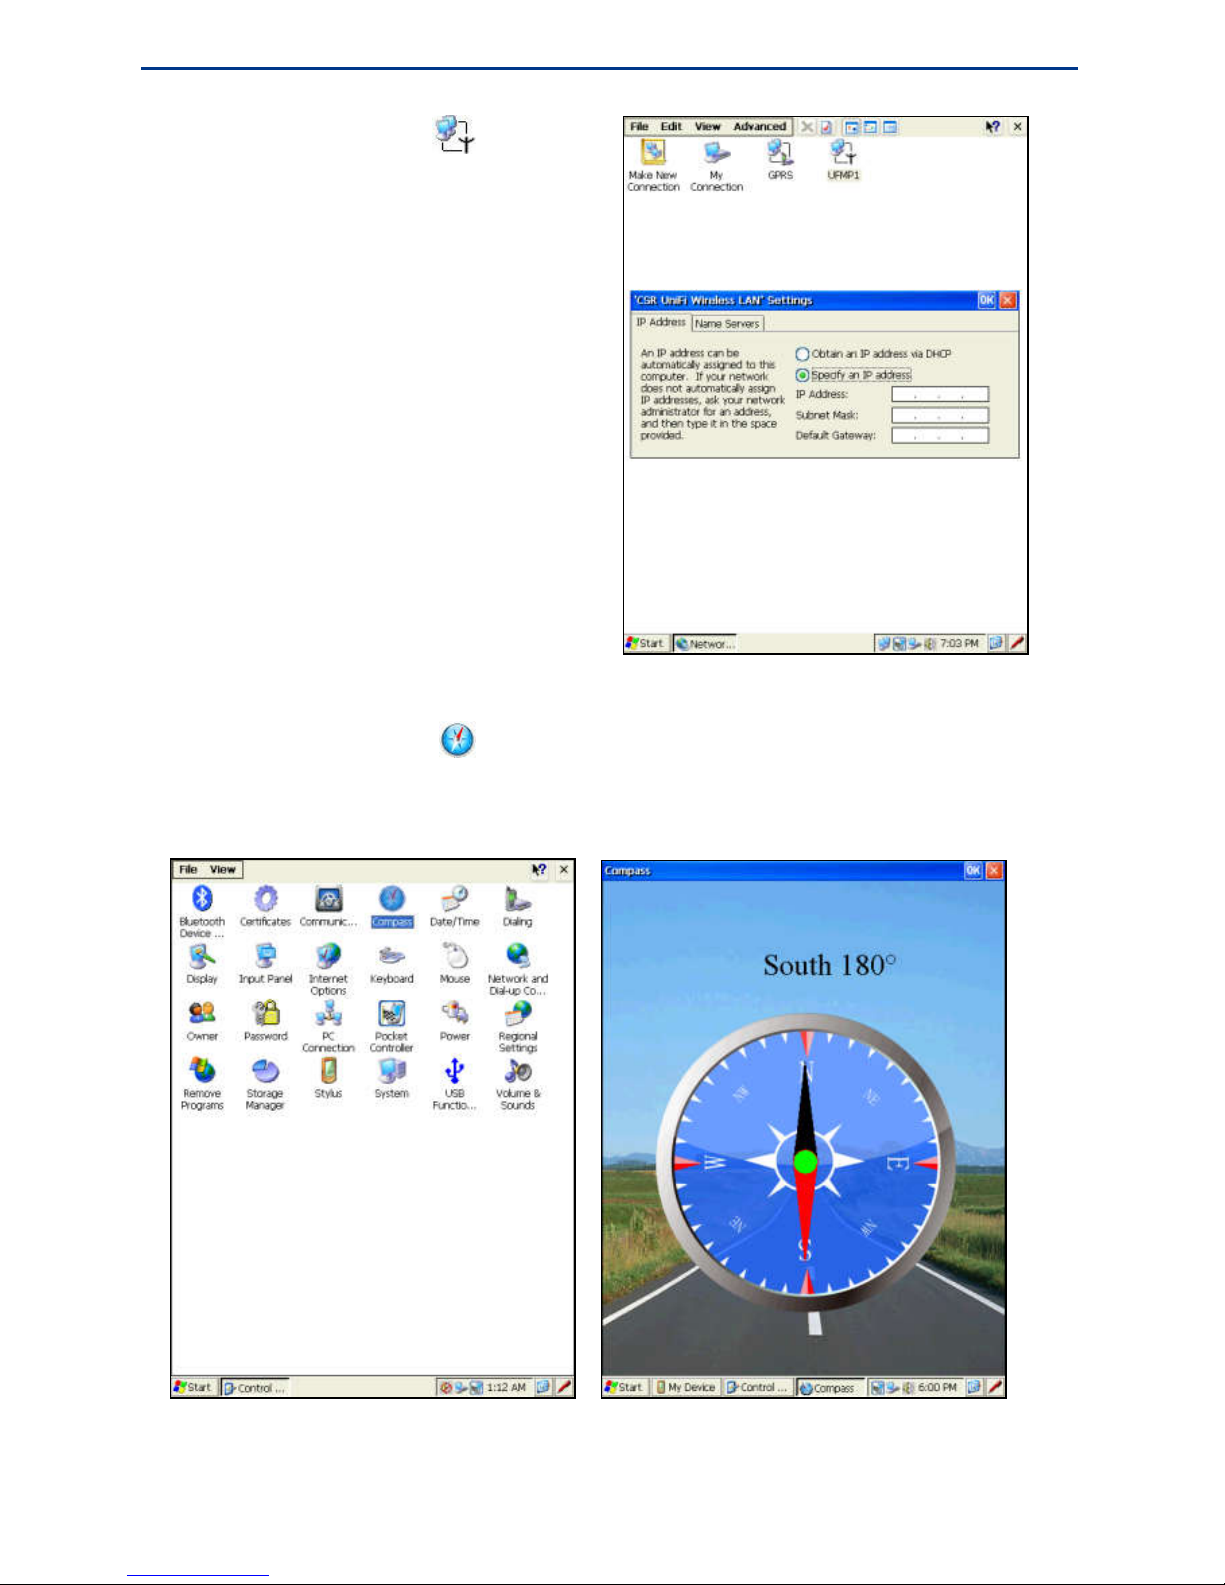
If the IP address in the IP information page is 0.0.0.0, as shown below left, it means the
wireless network is not able to assign IP address automatically. You need to consult the
network manager to get a specific IP address, and configure it manually. The specific
operations are as follows: Select Start > Settings > Network and Dial-up Connections,
pops up a dialog box as shown below right.
Page 40
eFix R2 Series Hardware Operating Instructions
36
Double tap the UFMP1 icon , pops up
the right dialog box. Select “Specify an IP
address”, input the IP address, subnet mask
and default gateway, tap the OK button to
finish.
Using the Electronic Compass
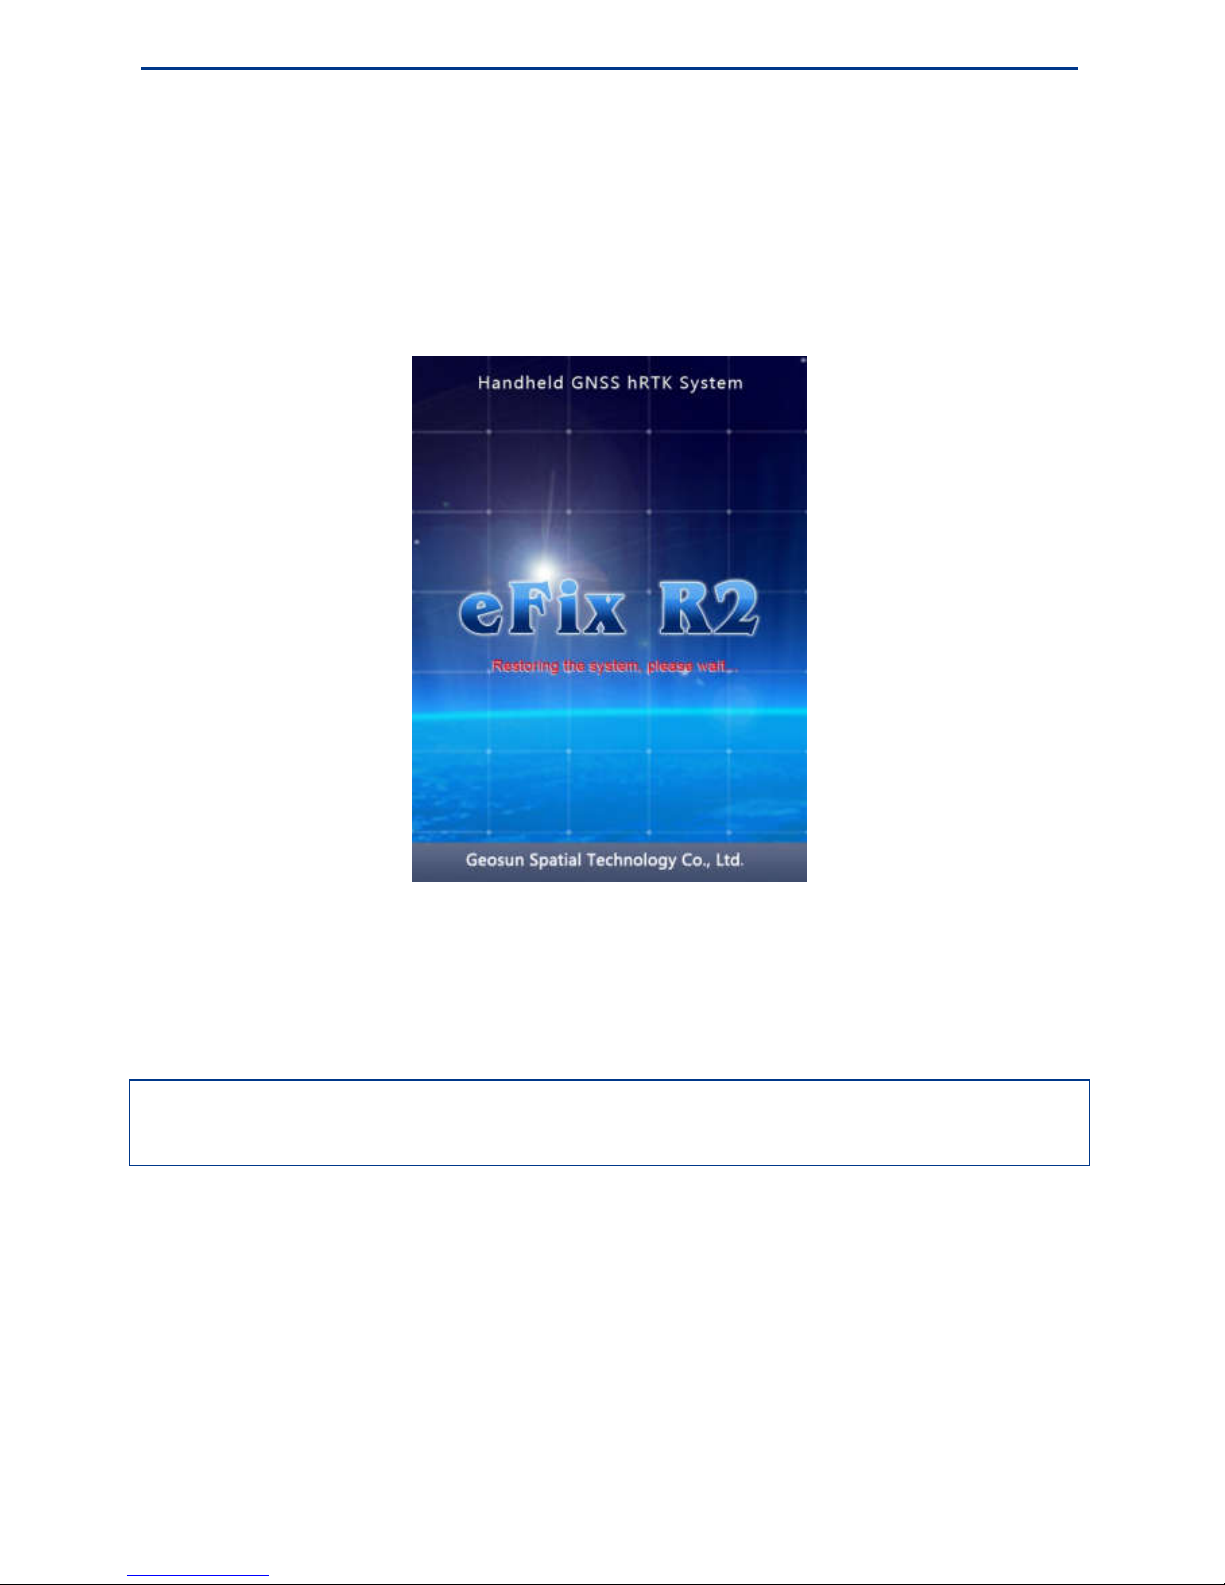
1. Find the Compass icon in the Control Panel interface, as shown below left.
2. Double click the Compass icon, the compass interface appears, as shown below
right.
The electronic compass is able to provide the accurate direction for user even with poor
satellite signals or in low-speed or static status.
Page 41
Basic Operations
37
Restoring WinCE System
Make sure the backup of software and data have been done before restoring WinCE system.
In the power off status, keep pressing the “ENT” button and press the power button, then
the handheld will turn on and the interface of “Restoring the system, please wait…” will be
shown as below.
This operation will restore all data and settings to the initial status of handheld except
Micro SD. Please note: the software GPac will be deleted. Reinstallation is required to
perform any field work.
Warning: To avoid data lost, please do not try this operation if it’s not necessary. Make sure
the backup of software and data have been done before this operation.
Installing, Uninstalling or Updating GPac Software
For details, please refer to the GPac User’s Manual.
Upgrading the Firmware
Method 1:
1. Connect R2 series to PC with data cable. For details, please refer to chapter:
Page 42
eFix R2 Series Hardware Operating Instructions
38
Connecting to PC.
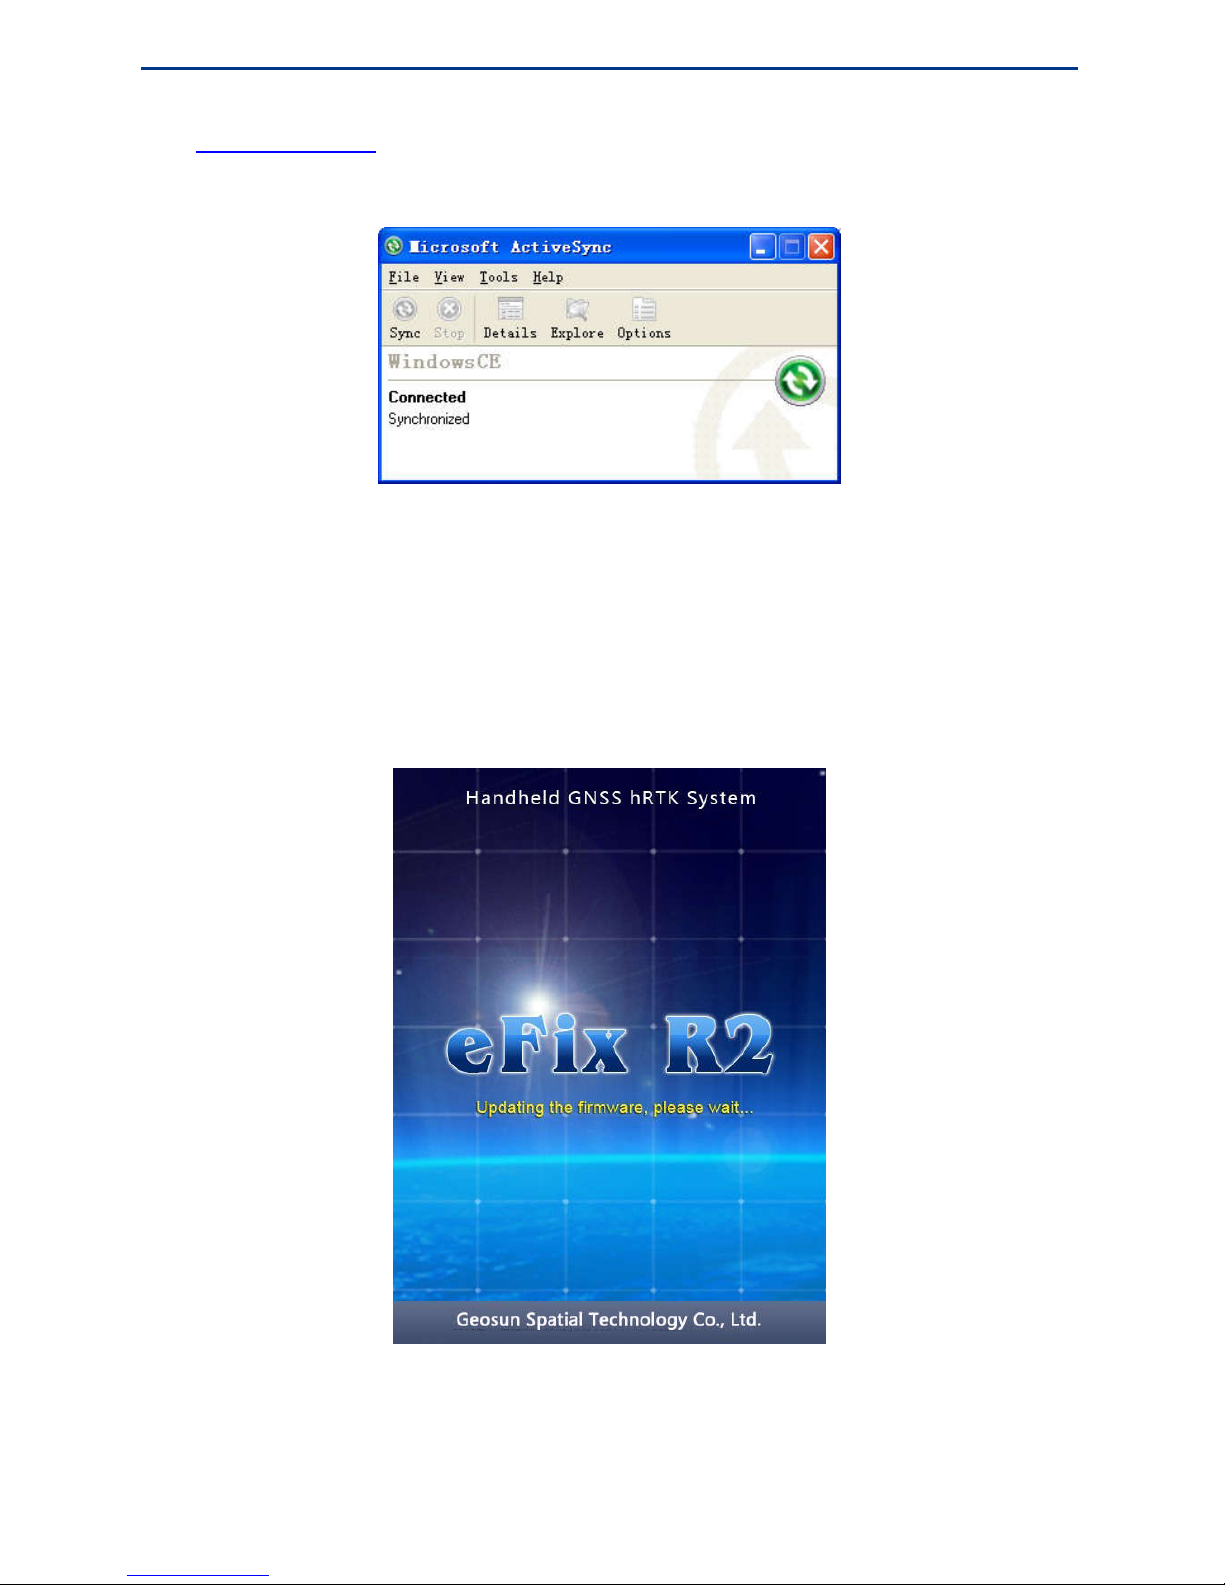
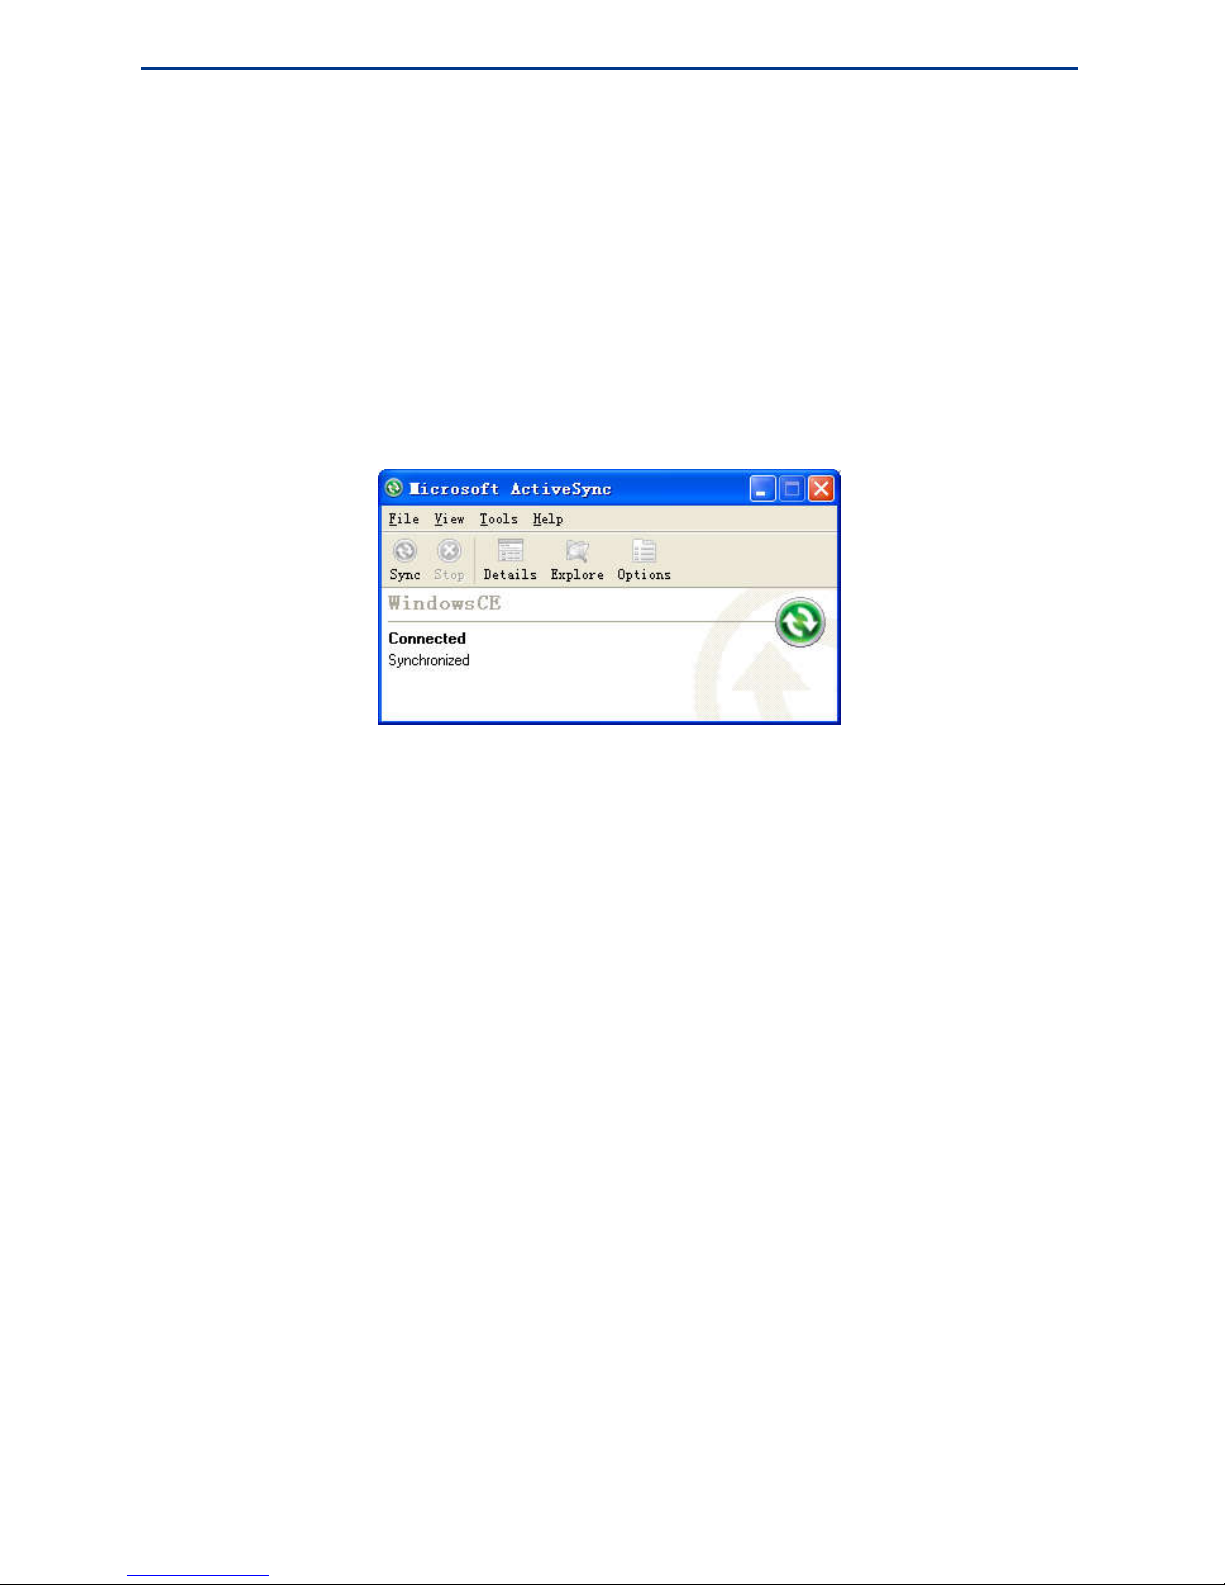
2. After Microsoft ActiveSync is connected to handheld as below:
3. Click the Explore button of Microsoft ActiveSync to open R2 series resource browser.
Copy the latest version firmware file to “Storage Card”.
4. In the power off status, keep pressing the “ESC” button and press the power button,
the handheld will turn on and the interface of “Updating the firmware, please wait…”
will be shown as below. Then the handheld will be upgraded to the latest version of
firmware in Micro SD card.
Method 2:
Page 43

Basic Operations
39
You can also insert the Micro SD card into Micro SD card reader, and then insert the reader
to the USB interface of a PC. Copy firmware file to the Micro SD card, and insert it into
handheld. Then by the above method, you can also complete grading firmware.
Note: If there are several versions of the firmware for the correct type of handheld, the
system will be upgraded to the latest one. Also please make sure there is no other kind of
firmware for different type of handheld such as V2 series and R2 series, or the system will
mistake.
Page 44

40
Connecting to PC
Installing Microsoft ActiveSync
Hardware Connection Setup with PC
Microsoft ActiveSync Automatic Connection
Visiting eFix R2 Series Handheld
C H A P T E R
5
Page 45
Connecting To PC
41
Installing Microsoft ActiveSync
eFix R2 series is compatible with ActiveSync 4.5 or later. You can download the latest
version from the Microsoft website at:
http://www.microsoft.com/download/en/details.aspx?id=15
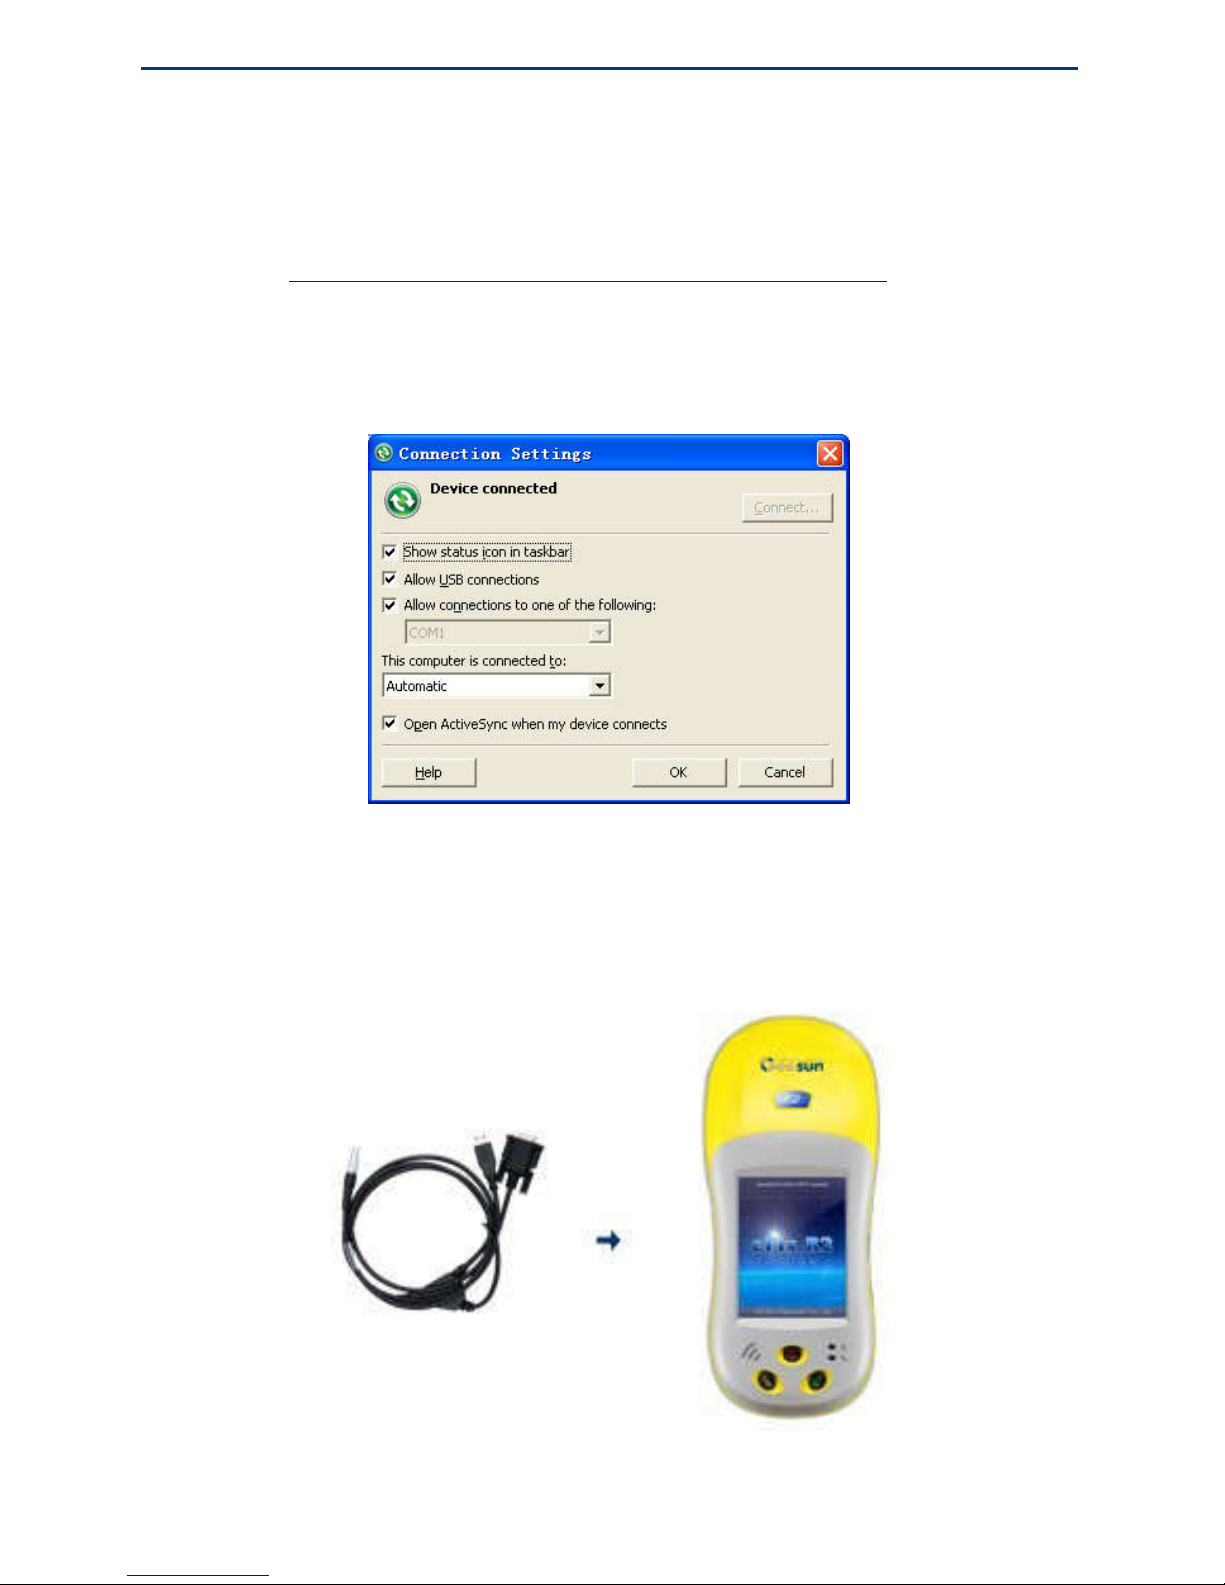
After installing the Microsoft ActiveSync, click the Start > Program menu item, find and
run Microsoft ActiveSync. In the pop-up Connection Settings dialog box, choose Allow
USB Connections option, shown as below.
Hardware Connection Setup with PC
Power on eFix R2 series firstly, entering WinCE system. Connect eFix R2 series and the
USB interface of PC via USB cable shown as below:
Page 46
eFix R2 Series Hardware Operating Instructions
42
Microsoft ActiveSync Automatic Connection
After the data cable has been connected, Microsoft ActiveSync on the computer will
recognize the handheld device and connect automatically. Then select “No” if it asks “Set
up a Partnership Yes or No?” and click Next, the connection will be completed successfully.
If it is the first time of connection, the driver will be required. Find the driver in the CD in
the handheld goods package. Follow the tips to install the driver of WinCE. The interface
of Microsoft ActiveSync is shown as below.
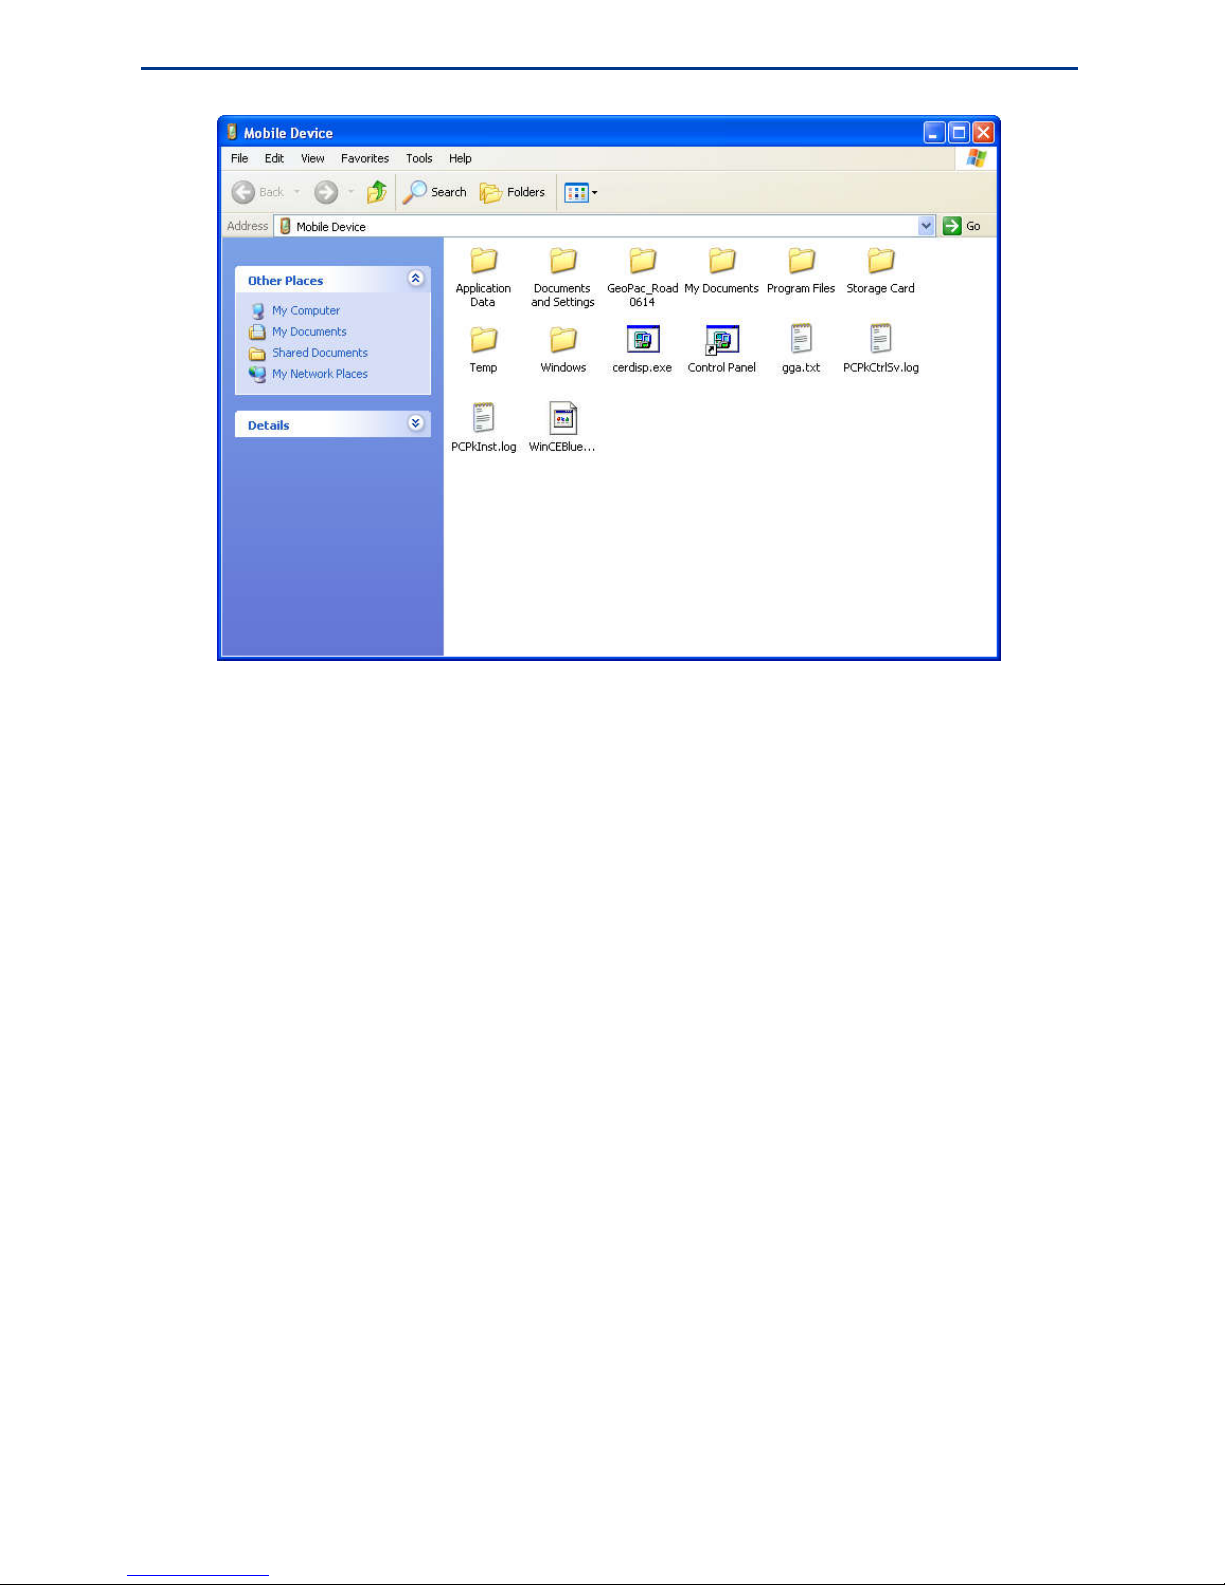
Visiting eFix R2 Series Handheld
After first successful connection, the Microsoft ActiveSync will automatically connect R2
series to PC with data cable. The mobile device can be seen in Windows resource manager.
Double click it, and you can visit eFix R2 series handheld. Users can add or delete files
saved in eFix R2 series by PC operation. Users can also download the handheld data files to
PC conveniently. WinCE resource browser interface is shown as the following picture.
Page 47
Connecting To PC
43
Page 48

44
Operation Mode and Configuration
Single Point Positioning
Wide Area Differential
CORS Differential
RTK Positioning
Post-Differential Dynamic Positioning
High-Precision Large-Range Static Control Network
C H A P T E R
6
Page 49

Operation Mode and Configuration
45
Single Point Positioning
With either the external GNSS antenna or only the built-in antenna, Geosun eFix R2 series
can be used alone for single-point dynamic positioning, and the positioning accuracy can
reach decimeter level as the best. Furthermore, decimeter and even centimeter accuracy can
be achieved by post-processing software Caravel PP.
Caravel PP is high-precision GNSS post-processing positioning and velocity determination
software developed by Geosun. It can provide dynamic/static differential positioning and
dynamic/static precise single-point positioning. With the global advanced proprietary
single-epoch ambiguity resolution algorithm, as well as several exclusive core technologies,
Caravel PP has been proven to be preeminent and robust in various applications.
Wide Area Differential
Wide area differential means to get precise positioning by satellite broadcast system and the
GPS correction data provided by ground stations. Geosun eFix R2 series can receive
wide-area differential signals. By differential technology it can provide the decimeter level
high-precision coordinate data without purchasing additional equipment or paying any fee.
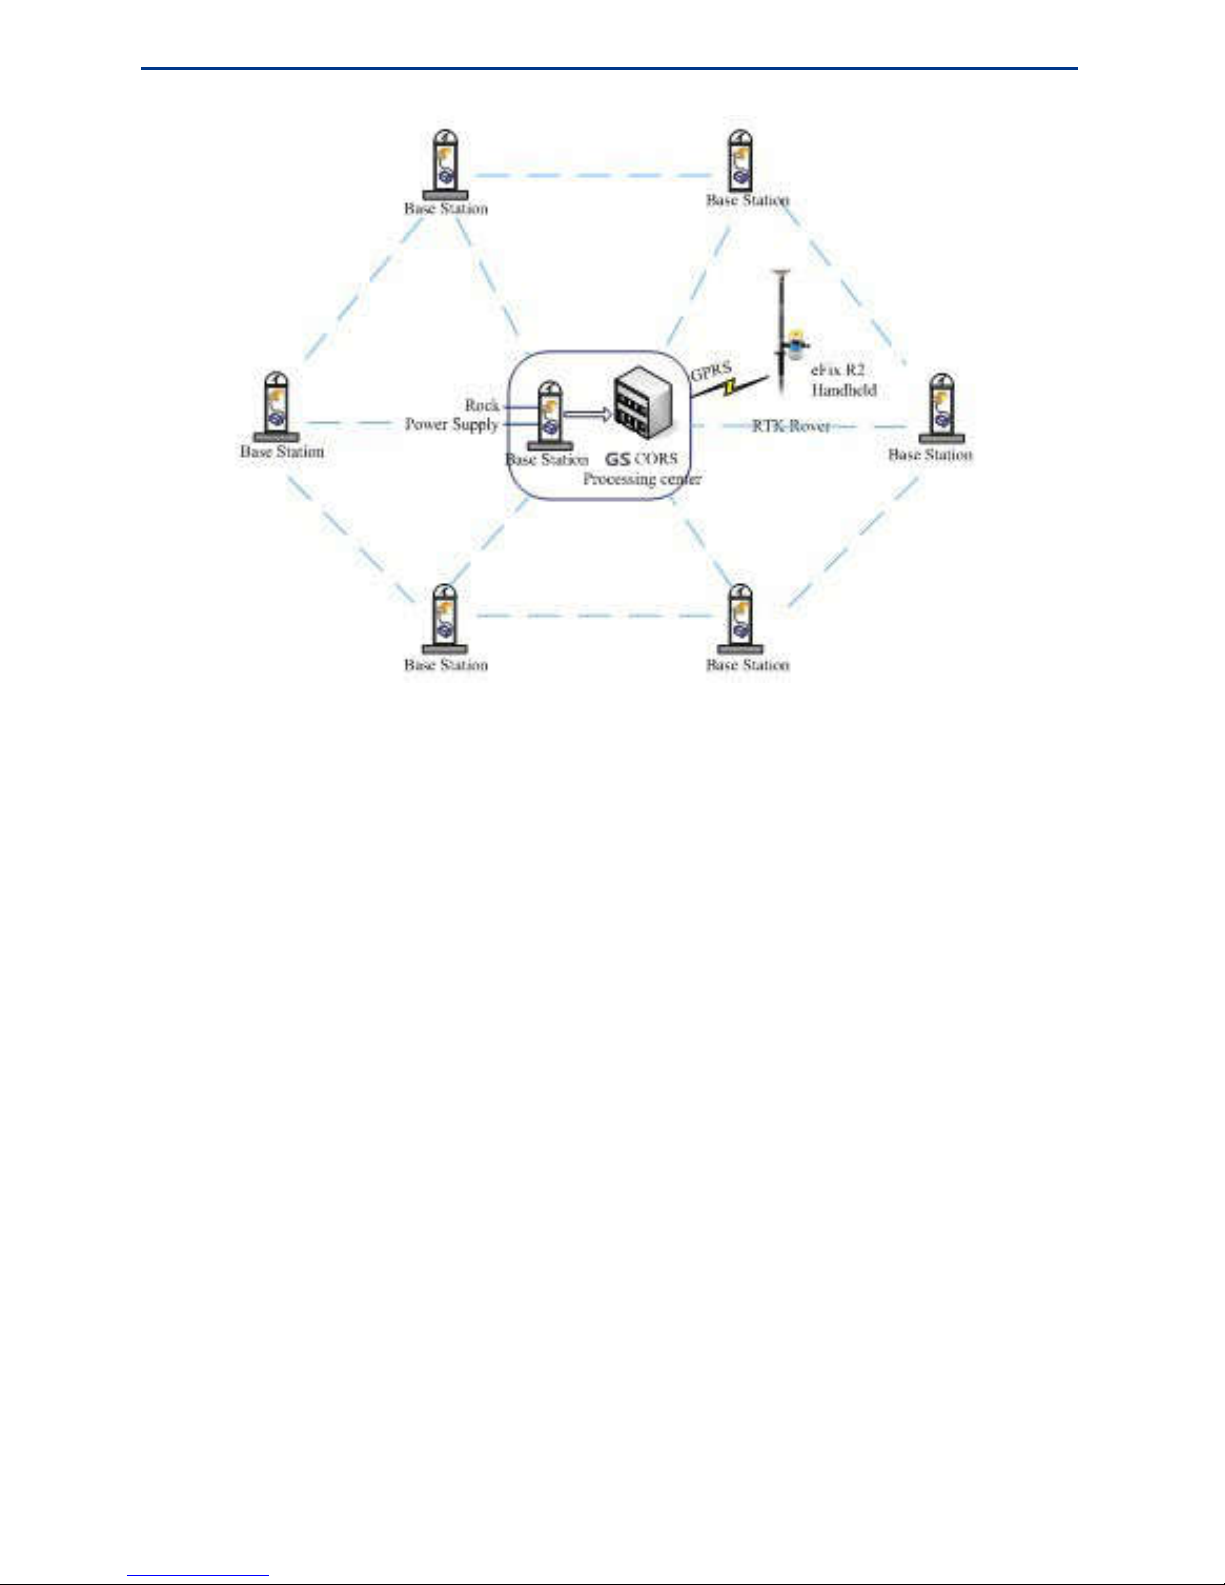
CORS Differential
CORS (Continuously Operating Reference Station) is a continuous-running network system
of base stations, strategically located throughout participating states, applying technologies
of modern computers, data communication and internet (LAN / WAN) to provide different
types of exact GPS observations (carrier phase, pseudo-range), various correction data,
status information, and other related GPS services in real time to different types and
different level of users with different needs.
With this technology, eFix R2 series handheld can carry out long-distance RTK surveying
with centimeter-level accuracy.
In the CORS system, eFix R2 series handheld operation diagram is as below:
Page 50
eFix R2 Series Hardware Operating Instructions
46
RTK Positioning
Post-processing is needed in traditional GPS surveying, such as static, rapid static and
dynamic surveying, to get centimeter-level accuracy. But Geosun eFix R2 series system is
able to obtain real-time centimeter-level positioning accuracy in the field. With the carrier
phase dynamic real-time differential (Real-Time Kinematic) technology, eFix R2 series
brings new working methods for the construction stakeout, topographic mapping, various
control surveying and etc., and greatly improves the fieldwork efficiency.
Geosun eFix R2 series RTK system is composed of at least two R2 series handhelds. One is
used as base station while another or the others is (are) as rover (s). The base receiver and
the rover receiver are exchangeable.
Using eFix R2 series for RTK survey, the differential data link can be by either UHF radio
or GPRS/3G (WCDMA) (through such as GS server). For the latter, users only need to
purchase an ordinary phone card (SIM card), then connect to GS Server through the GPRS
network link to achieve data communication, which method is very simple and inexpensive.
Page 51
Operation Mode and Configuration
47
Setting up Base Station
Base station can be mounted on a known point or unknown points. (Note: If you want to
use the conversion parameters calculated before, the location of the base station should be
the same with the last site. Open the project built last time, set up the base station, and then
you just need to modify the base station antenna height and make sure the base station is
transmitting differential signals. The rover can work directly without calculating the
conversion parameters.)
The location of base station must meet the following requirements:
Open environment, no large shelter objects above 15 degrees elevation mask angle;
No electromagnetic interference (No microwave stations, radar stations, cell phone
signal stations and etc. within 200 meters, and no high-voltage lines within 50
meters);
Away from terrain and ground objects that reflect electromagnetic signals strongly,
such as high-rise building, water area and so on.
In radio working mode, the base station should be set up at a high place and there
shouldn’t be large shelter objects between base station and rover.
At least two known points (The known point can be coordinates of any coordinate
system. To check the correctness of the known points, three or more known points are
needed.)
The basic operations to set up base station are as follows:
1. Set up the tripod.
2. Install the GNSS antenna on the tripod.
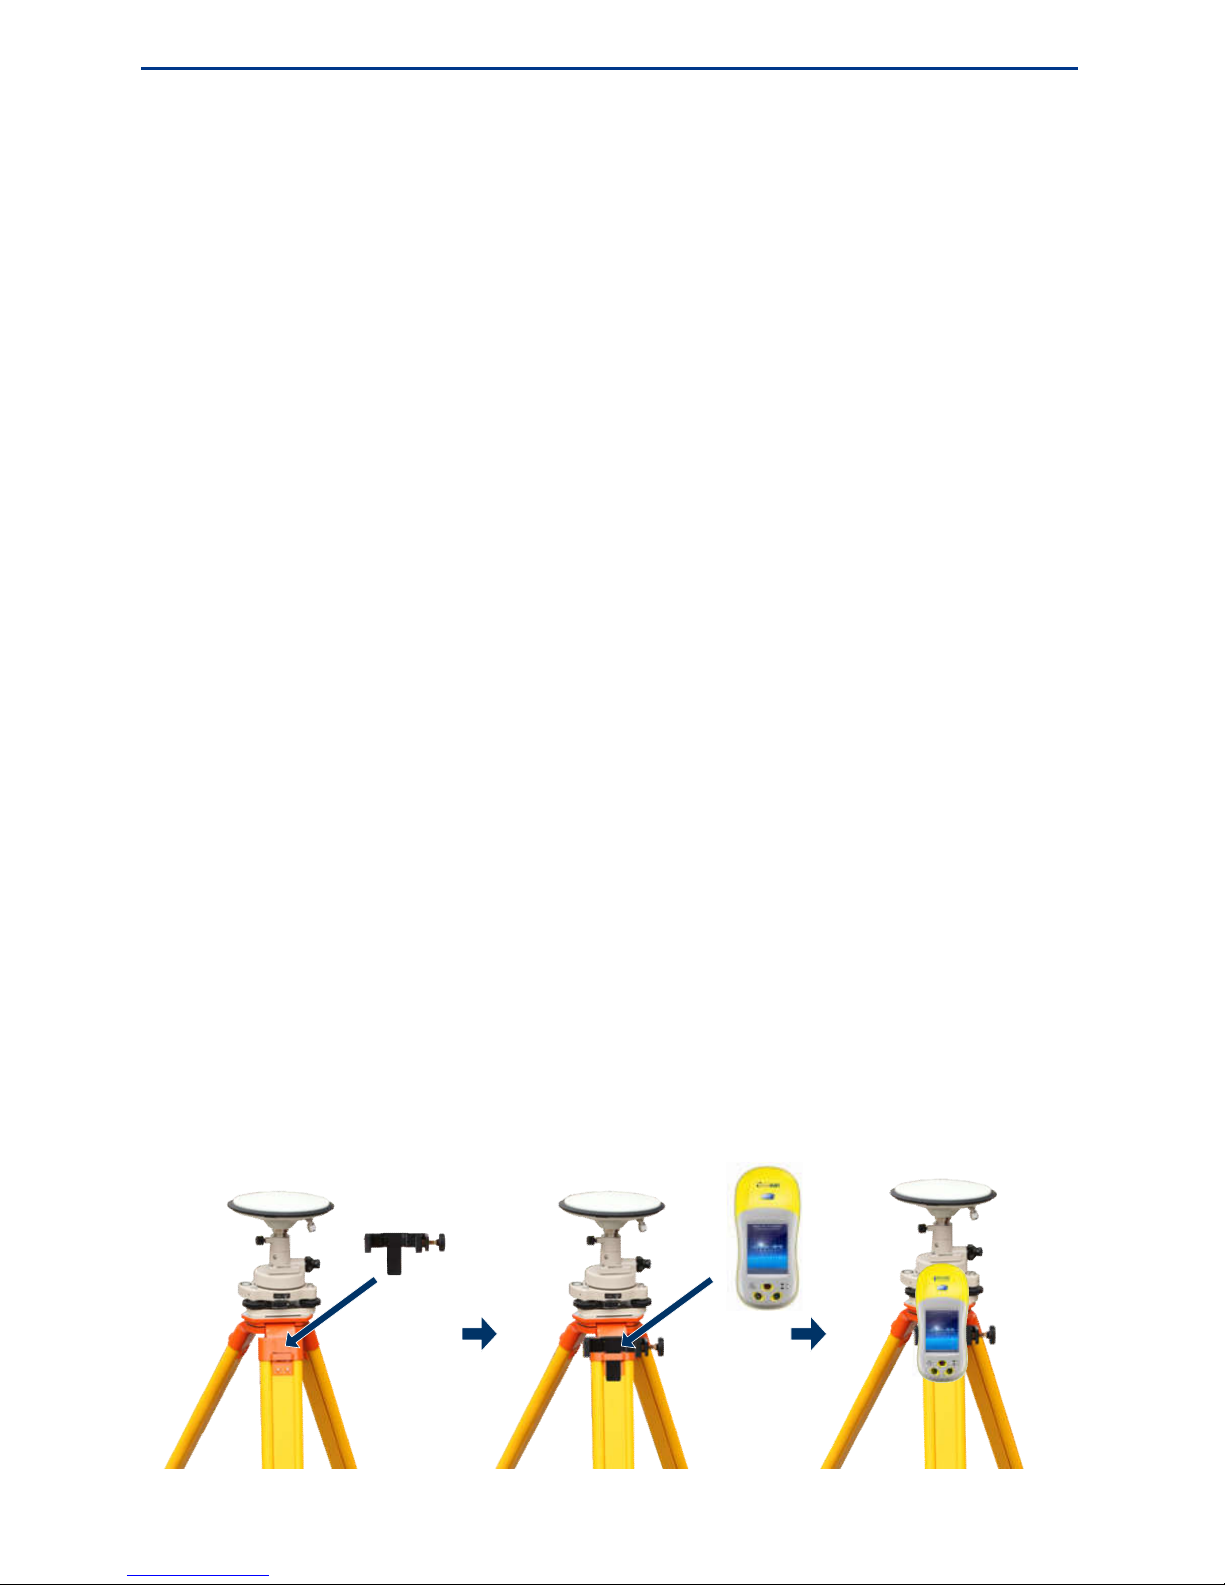
3. Fix the base station handheld. First fix the tripod handheld bracket on the tripod, then
put the handheld into the bracket; tighten it, as shown below.
Page 52
eFix R2 Series Hardware Operating Instructions
48
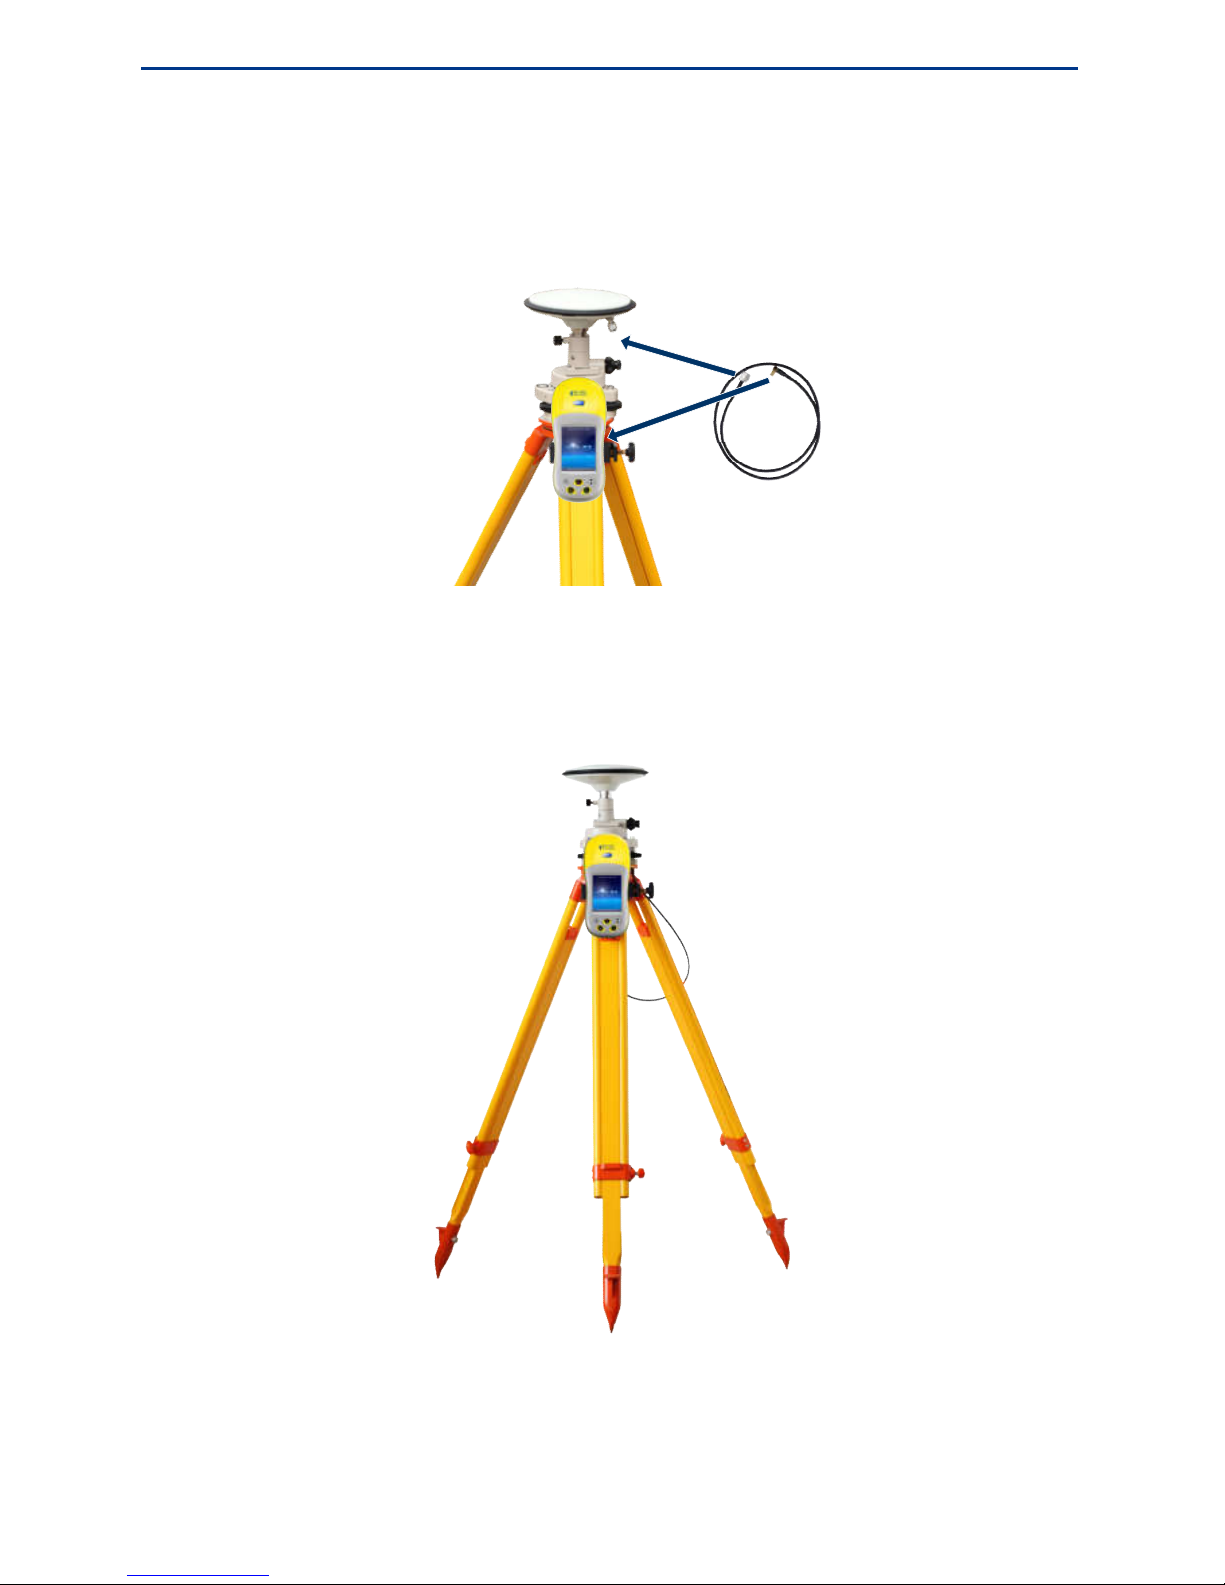
4. Connect the external GNSS antenna to handheld
Connect the external GNSS antenna to handheld by external antenna connecting cable, as
shown below.
When the antenna is connected, the base station setup of GPRS/3G communication mode is
done, as shown below.
Base Station (GPRS/3G Mode)
Page 53
Operation Mode and Configuration
49
5. Install the transmitting radio
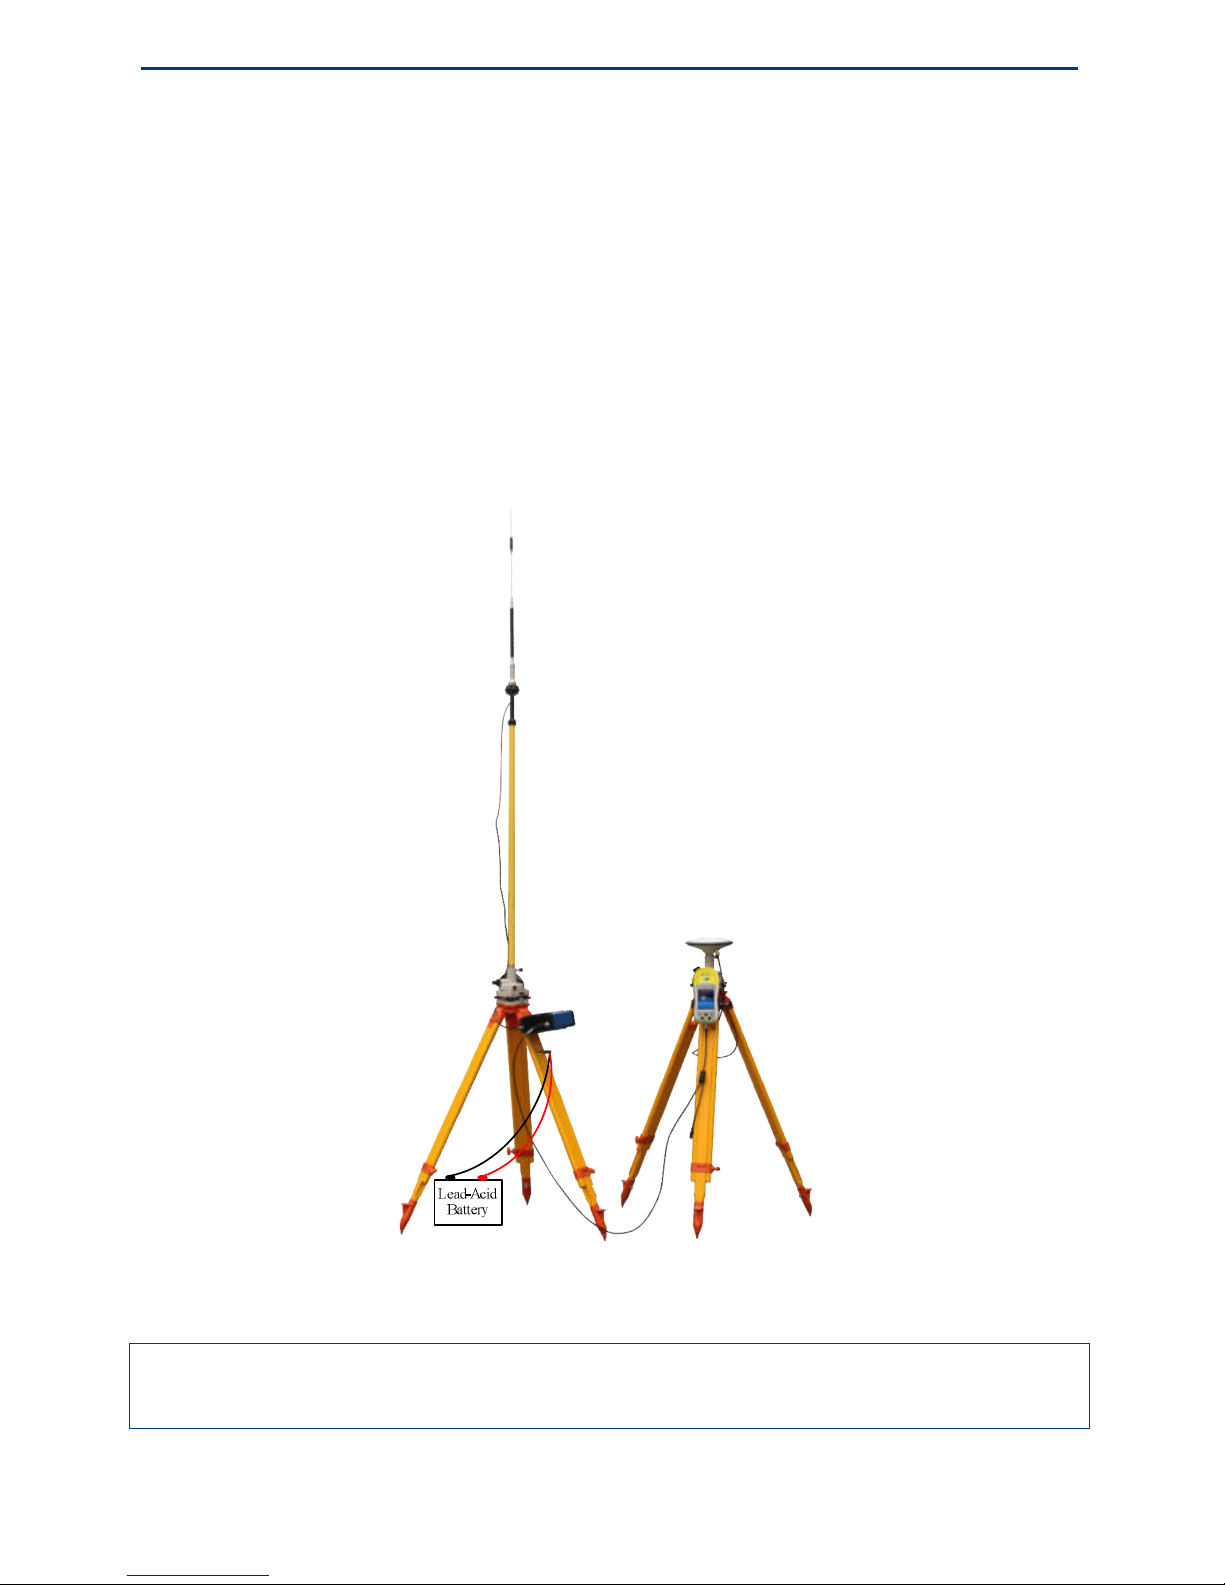
If radio communication mode is required, you need to install the external transmitting radio.
The radio transmitting antenna set up on a tripod should be placed on a high place. And
there should be at least three meters far between the handheld tripod and the transmitting
radio antenna.
After installing the transmitting radio antenna, fix the transmitting radio on the tripod, then
connect transmitting radio and lead-acid battery by the transmitting radio power cable, then
connect transmitting radio and handheld by the transmitting radio communication cable.
The base station in radio communication mode is done and shown as below.
Base Station (Radio Communication Mode)
Note: Lead-acid battery is not available in the standard package. Please select a 12V/38Ah
lead-acid battery as the power supply of the external radio by yourself.
Page 54
eFix R2 Series Hardware Operating Instructions
50
Setting up the Rover (External GNSS Antenna Mode)
1. Connect the centering pole.
2. Install the GNSS antenna onto the centering pole.
3. Fix the handheld.
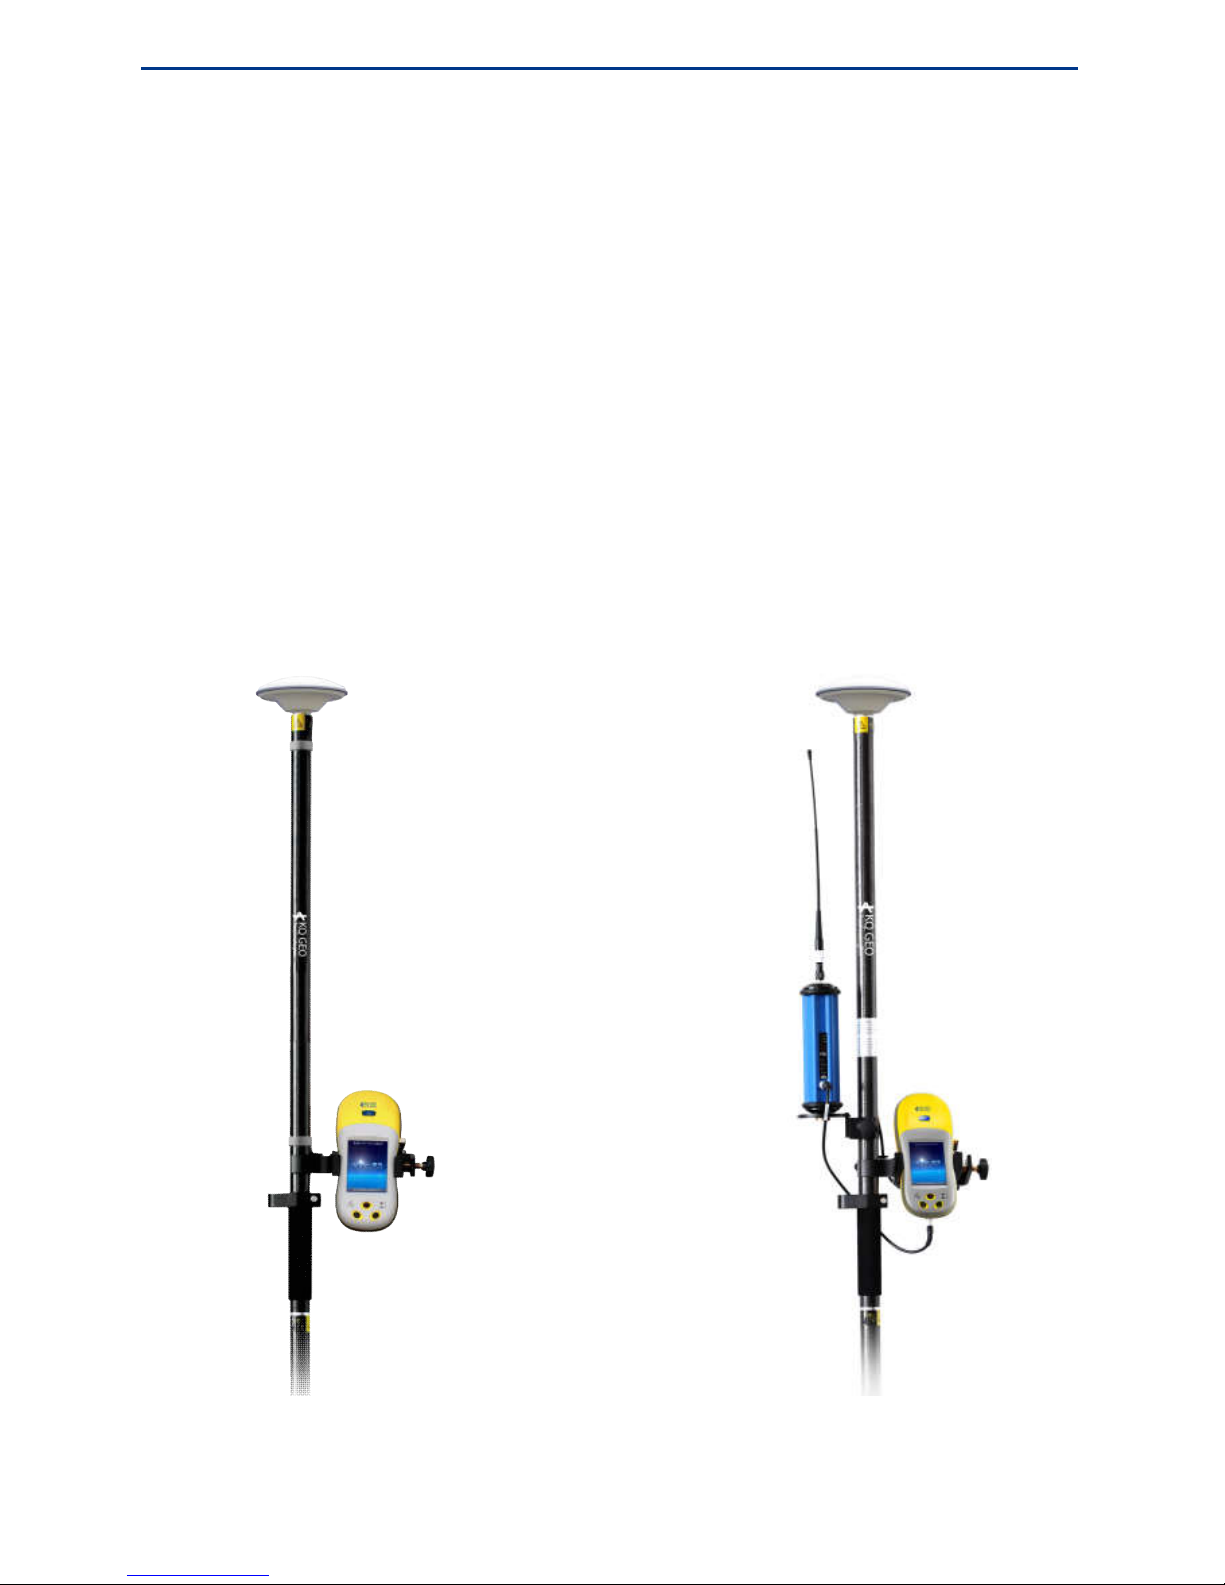
Fix the centering pole handheld bracket to the pole, and then fix the handheld to the
bracket. The rover with external GNSS antenna of GPRS/3G communication mode is
as shown below left.
4. Install the receiving radio
In radio working mode, you need to install the receiving radio. Firstly fix the receiving
radio bracket to the pole, and then fix the receiving radio to the receiving radio bracket.
Rover with external GNSS antenna of radio communication mode is as shown below
right.
Rover Rover
(External GNSS Antenna, GPRS/3G Mode) (External GNSS Antenna, Radio Mode)
Page 55
Operation Mode and Configuration
51
Handheld Rover (Built-in GNSS Antenna Mode)
Use the built-in antenna to receive GNSS signals, eFix R2 series can carry out positioning
operation in your hands, without connecting cables, easy to use, as shown below.
Rover
(Built-in Antenna, GPRS/3G Mode)
Post-Differential Dynamic Positioning
For areas where real-time communication is difficult between base station and rover,
high-precision differential dynamic positioning can be realized by post-processing. In this
work mode, base and rover just need to save the fieldwork observation data. After back to
the office, using Geosun Caravel PP software to process the data, you can get the
centimeter-level accuracy differential positioning results.
Page 56
eFix R2 Series Hardware Operating Instructions
52
High-Precision Large-Range Static Control Network
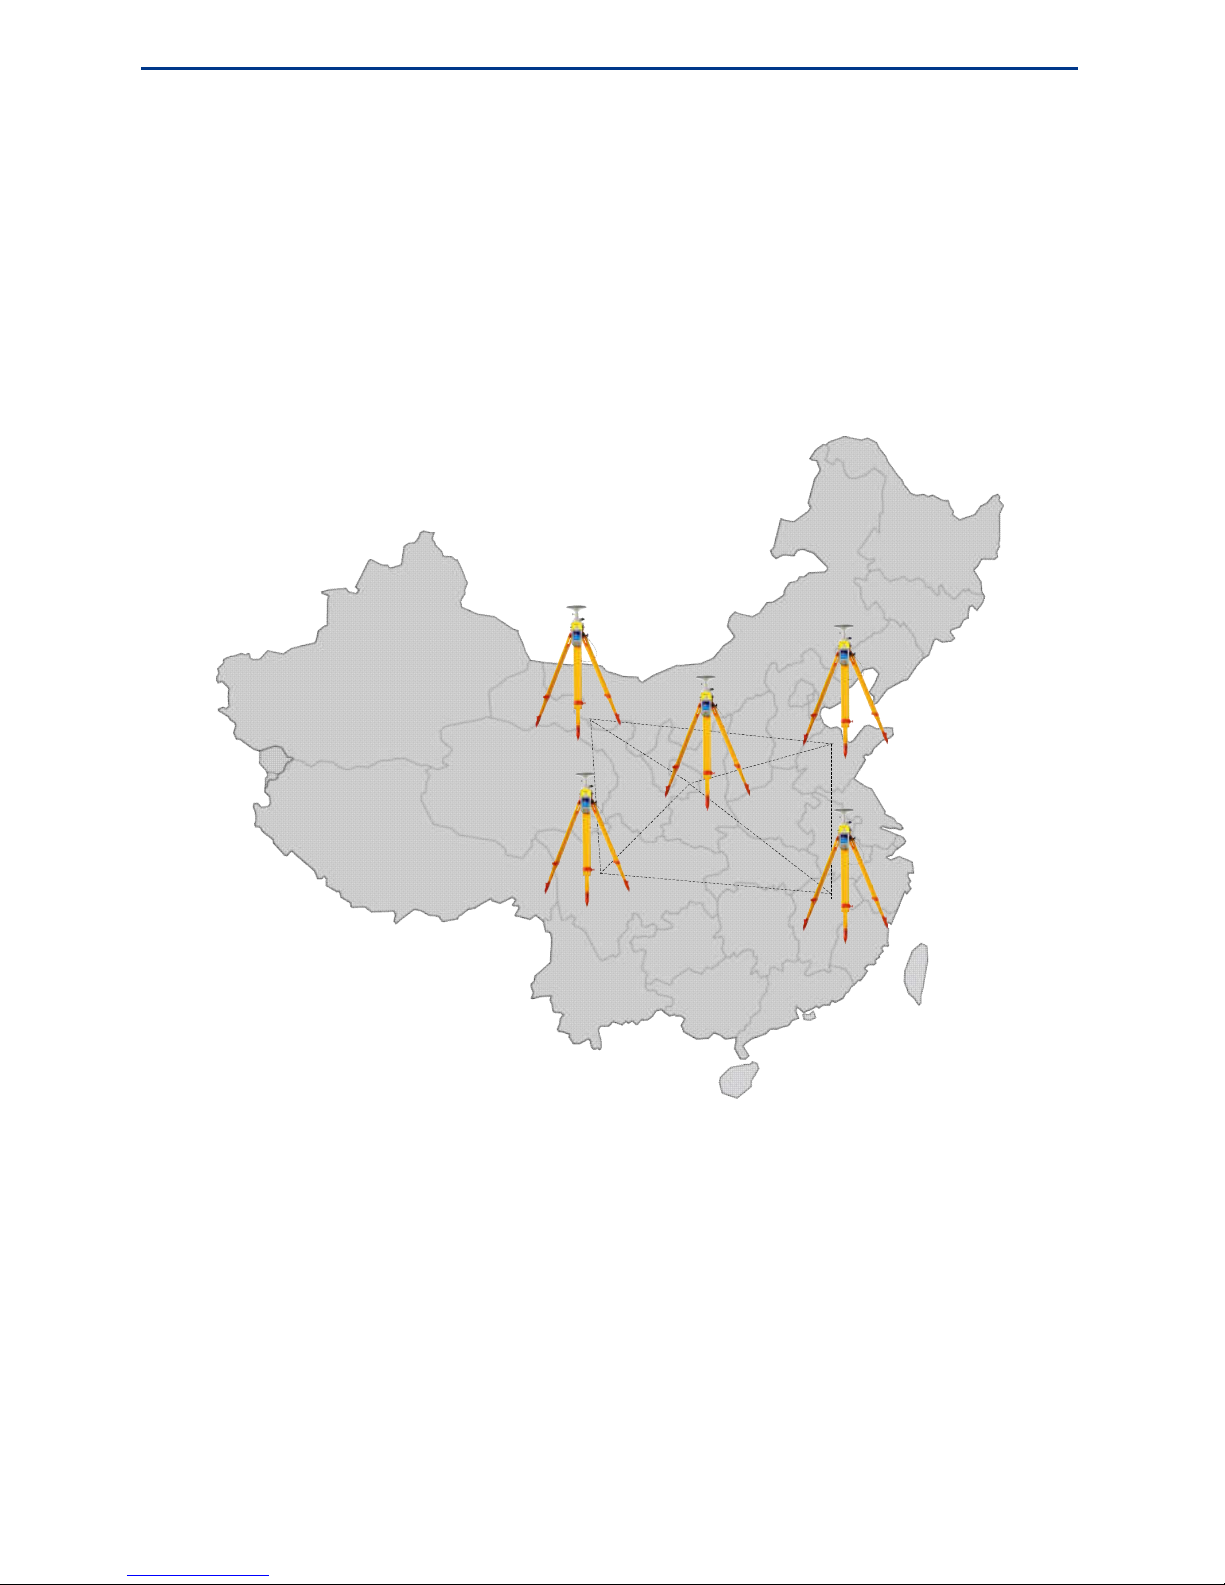
With two or more eFix R2 series handhelds, users can build a high-precision static control
network, which can achieve millimeter-level accuracy results after processing the collected
data of 1~2 hours by post-processing software Caravel Net. The longest baseline of the
control network can be up to 500km. The operation diagram of high-precision static control
network composed by eFix R2 series is shown as below.
Page 57

53
Data Communication
GPRS/3G(WCDMA) Communication Mode
Radio Communication Mode
C H A P T E R
7
Page 58
eFix R2 Series Hardware Operating Instructions
54
GPRS/3G(WCDMA) Communication Mode
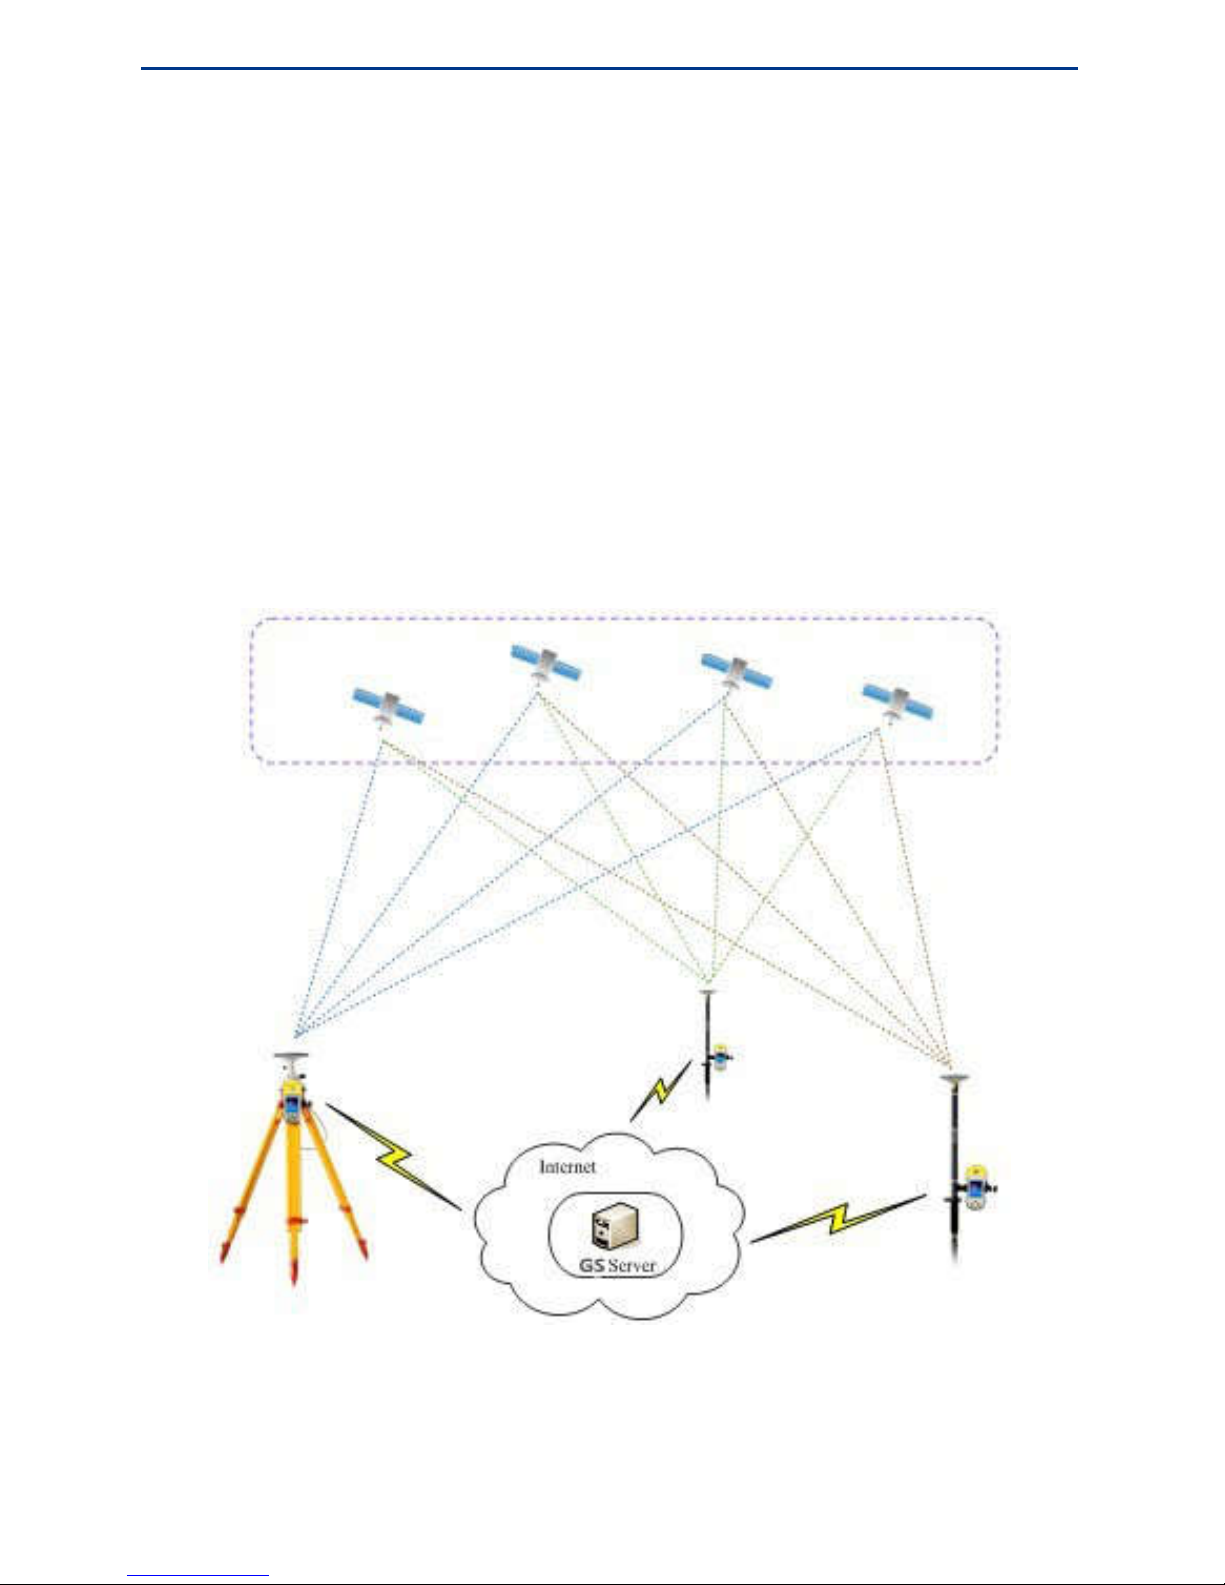
With the GPRS/3G (WCDMA) wireless high speed data transmission technology,
GPRS/3G (WCDMA) communication has wide network coverage and no limitation on data
transmission distance. With the strong anti-interference ability, it can guarantee data
transmission well even in the complex environments of city.
With the built-in GPRS/3G (WCDMA) communication modem, eFix R2 series is small in
size, light in weight, and easy to connect. Users can easily carry out high-precision RTK
survey with CORS support or by self-build base station with GS Server data retransmission
service provided by Geosun.
The diagram of eFix R2 series operating system in GPRS/3G (WCDMA) communication
mode is shown as below:
Radio Communication Mode
Radio communication can be used for high precision RTK operation in remote areas where
the GPRS signal is weak or none, or areas where the GPRS signal tower is damaged
Page 59
Data Communication
55
because of geological disasters such as floods, earthquakes and etc. eFix R2 series users can
choose to purchase the PDL radio. For details about PDL radio, please refer to appendix:
Radio Instructions.
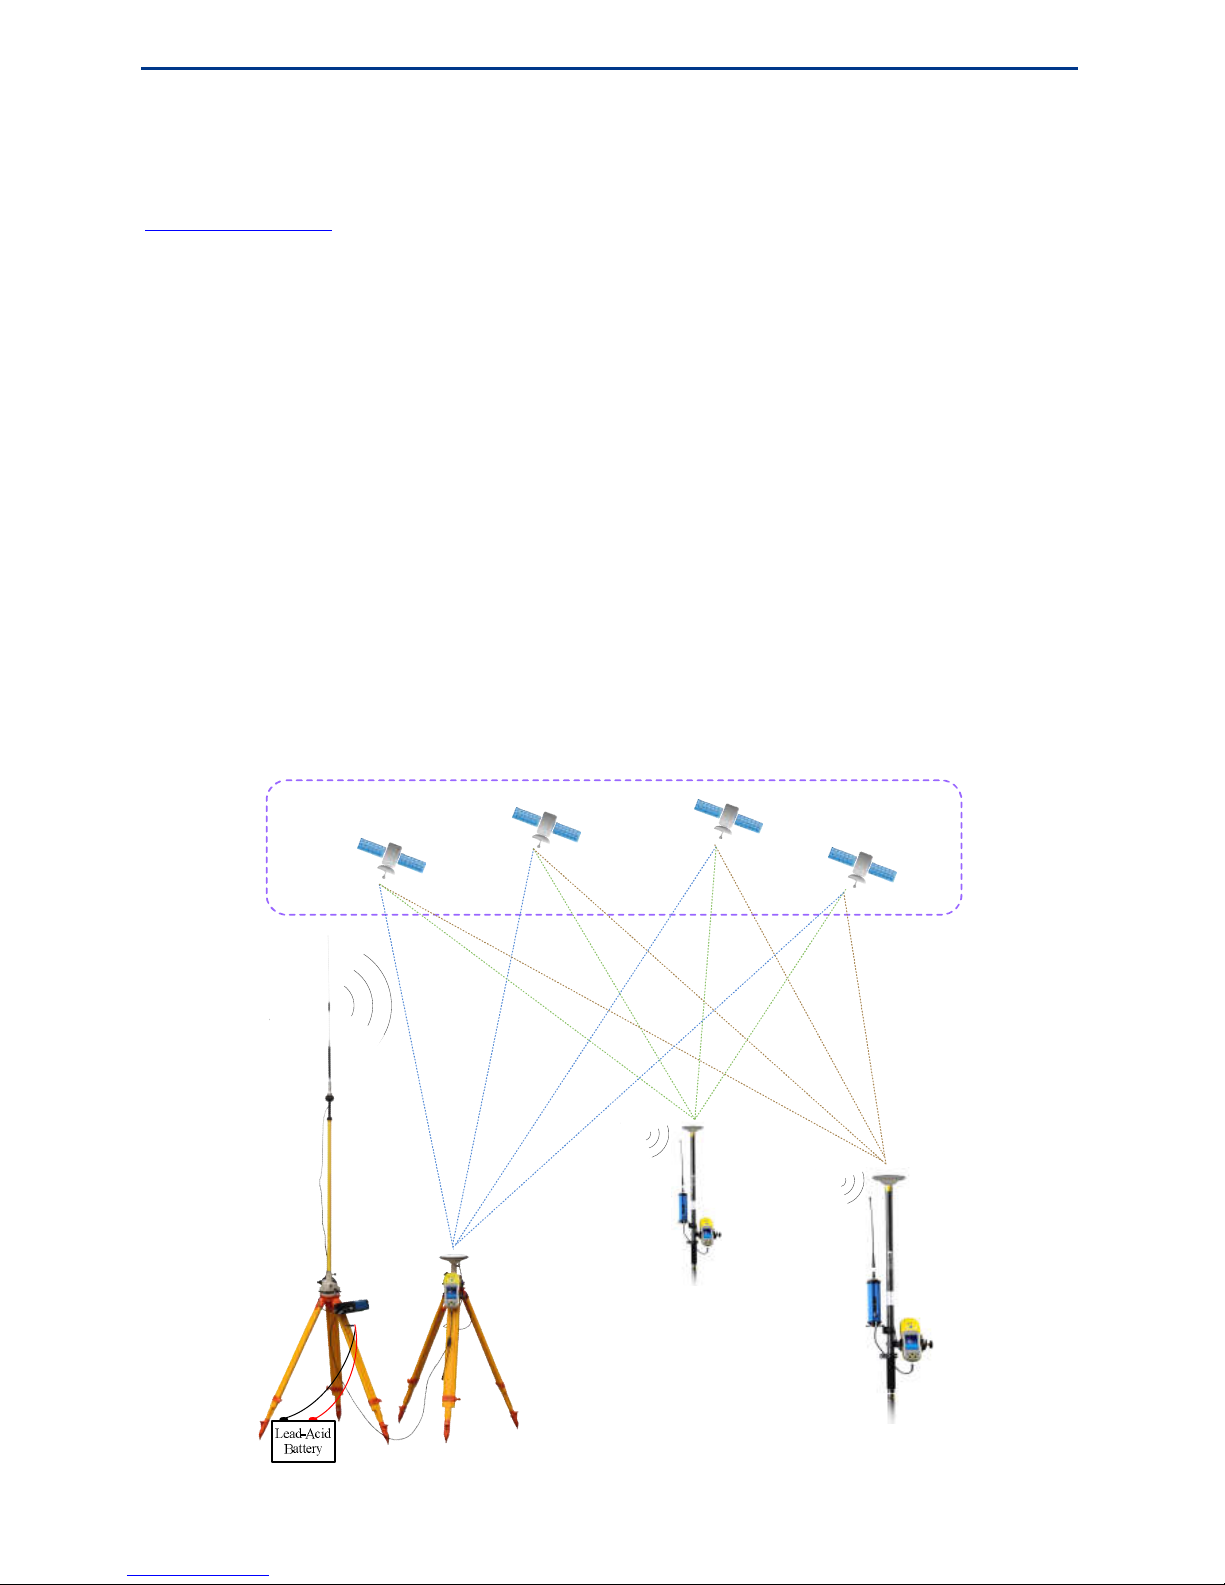
PDL radio provides high-speed, long distance, anti-interference wireless data link for
differential GPS and real-time tracking RTK systems in fieldwork surveying and mapping
operations. The performance characteristics are as below:
Fast Data Transmission Rate: Default serial port baud rate: 38400bps; Default
Over-the-Air data rate: 9600 bps
Enhanced User Interface: Channel display and buttons
Intelligent Protocols: Forward error correction(FEC), automatic transmitting radio
and receiving radio technology
Rugged Construction: Specially designed for GPS/RTK field operations
Backward Compatible: Interoperable with RDDR, RFM, TRIMBLE and other
products
The eFix R2 series operating system of radio communications mode is as shown below.
Page 60

56
Troubleshooting
Common Troubleshooting
ActiveSync Common Issues
C H A P T E R
8
Page 61

Troubleshooting
57
Common Troubleshooting
Issue Cause Solution
Can’t turn on. Low battery. Recharge the battery.
Working temperature is beyond the
allowed range (-20 ℃ ~ 60 ℃).
Bring the handheld into the environment where
the temperature is in the allowed range.
Crash in using. Excessive operations were in
processing in the handheld in a short
time.
Restart the handheld.
The screen is
black.
In order to prevent battery power loss,
the screen will automatically be black
if there is no operation within one
minute.
Press any button or tap the screen.
The handheld does not turn on. Press the power button to turn on the handheld.
The handheld runs out of power. Recharge the battery.
The screen
doesn't respond
to one-tap.
No calibration of the touch screen. Realign the touch screen.
The screen
doesn't respond
to double-tap.
The current double-tap speed is too
fast or too slow.
Reset the double-tap speed.
The handheld
can’t be
charged.
The internal temperature has risen
above 40 ℃.
Temporarily turn off the handheld, recharging
when the temperature drops to the allowed
range.
Keep far away from the heat source, such as
sunshine. The handheld will charge
automatically when the temperature drops into
the allowed range.
The internal temperature has fallen
below 0 ℃.
Charge the handheld when the internal
temperature is over 0 ℃.
Can't recognize
the storage card.
The storage card has not been inserted
properly.
Carefully take out the card, and then insert it
into the card slot gently.
The gold finger (metal part of the
card) is dirty.
Use cotton swab with alcohol to wipe it clean
before use.
Unable to
connect to
computer.
Data cable is not connected properly. Check and connect the data cable.
The synchronization software has not
been installed on the computer.
Install the synchronization software
ActiveSync.
Satellite signal
is poor.
Located in tunnel, under viaduct or
near large area waters which affects
the satellite signal.
Change location to improve receiving signals.
The GPRS
dial-up fails or
the network is
abnormal.
SIM card has not been inserted
properly.
Carefully take out the card, and then insert it
into the card slot gently.
The flow of the SIM card is not open
or has been used up.
Contact the GPRS operator to open the flow.
The local network signal is weak. Go to other places with strong signal to
re-establish the communication.
Electromagnetic interference exists
around, such as television tower,
microwave station, high voltage
transmission line, etc.
Be away from the area with strong
electromagnetic interference.
APN setting is not right. Set the APN according to the SIM card. Please
refer to GPac User’s Manual for details.
The Bluetooth
dial-up fails.
The device for dial-up can’t offer the
icon item.
Use other device for dial-up connection.
Page 62

eFix R2 Series Hardware Operating Instructions
58
ActiveSync Common Issues
Issue Cause Solution
ActiveSync
fails to
connect to the
handheld
automatically.
The connection is not
initiated
automatically.
In ActiveSync dialog box, select File > Connection Settings and
then tap Connect.
An incompatible
version of ActiveSync
is installed.
ActiveSync 4.5 and later is compatible with gRob R2 series. You
can download the latest version from the Microsoft website at
http://www.microsoft.com/download/en/details.aspx?id=15
The connection is not
enabled in
ActiveSync.
Check "Allowing the USB connection" in File > Connection
Settings.
Microsoft USB driver
is not installed.
Install Microsoft USB driver.
If the issue you encounter still cannot be solved, please contact us. Geosun will offer you
excellent after-sales service.
Page 63

59
Appendix: Radio Instructions
PDL Radio Features
Transmitting Radio Introduction
Receiving Radio Introduction
Factory Default Frequency Table
Radio Notices
A P P E N D I X
9
Page 64

eFix R2 Series Hardware Operating Instructions
60
PDL radio, as shown right, is a high-performance radio
that is specially designed for surveying.
PDL Radio Features
Fast Over-the-Air Data Rate: Serial port default baud rate: 38400bps, Air
transmission default rate: 9600 bps
Reduced latency provides better GPS position information
Lower power consumption allows longer field operation
Greater throughput handles both GPS and GLONASS
Selectable RF output power level
Enhanced User Interface: Channel display and buttons
View and change radio channel
Monitor charge status and other parameters
Intelligent Protocols: Forward error correction (FEC), automatic transmitting radio
and receiving radio technology
FEC provides improved noise immunity and range
Transmitting radio automatically selects channel
Receiving radio automatically locks base station
Rugged Construction: Specially designed for GPS/RTK field operations
Double shock-resistant mounted electronics improve reliability
Water tight operation stands up to bad weather conditions
Built-in mounts simplify tripod and pole mounting
Backward Compatible: Interoperable with RDDR, RFM and TRIMBLE products
Benefit by the latest technology with your existing equipment
Facilitate GPS equipment mix and march
Provide upgrade path for existing installations
Page 65
Appendix: Radio Instructions
61
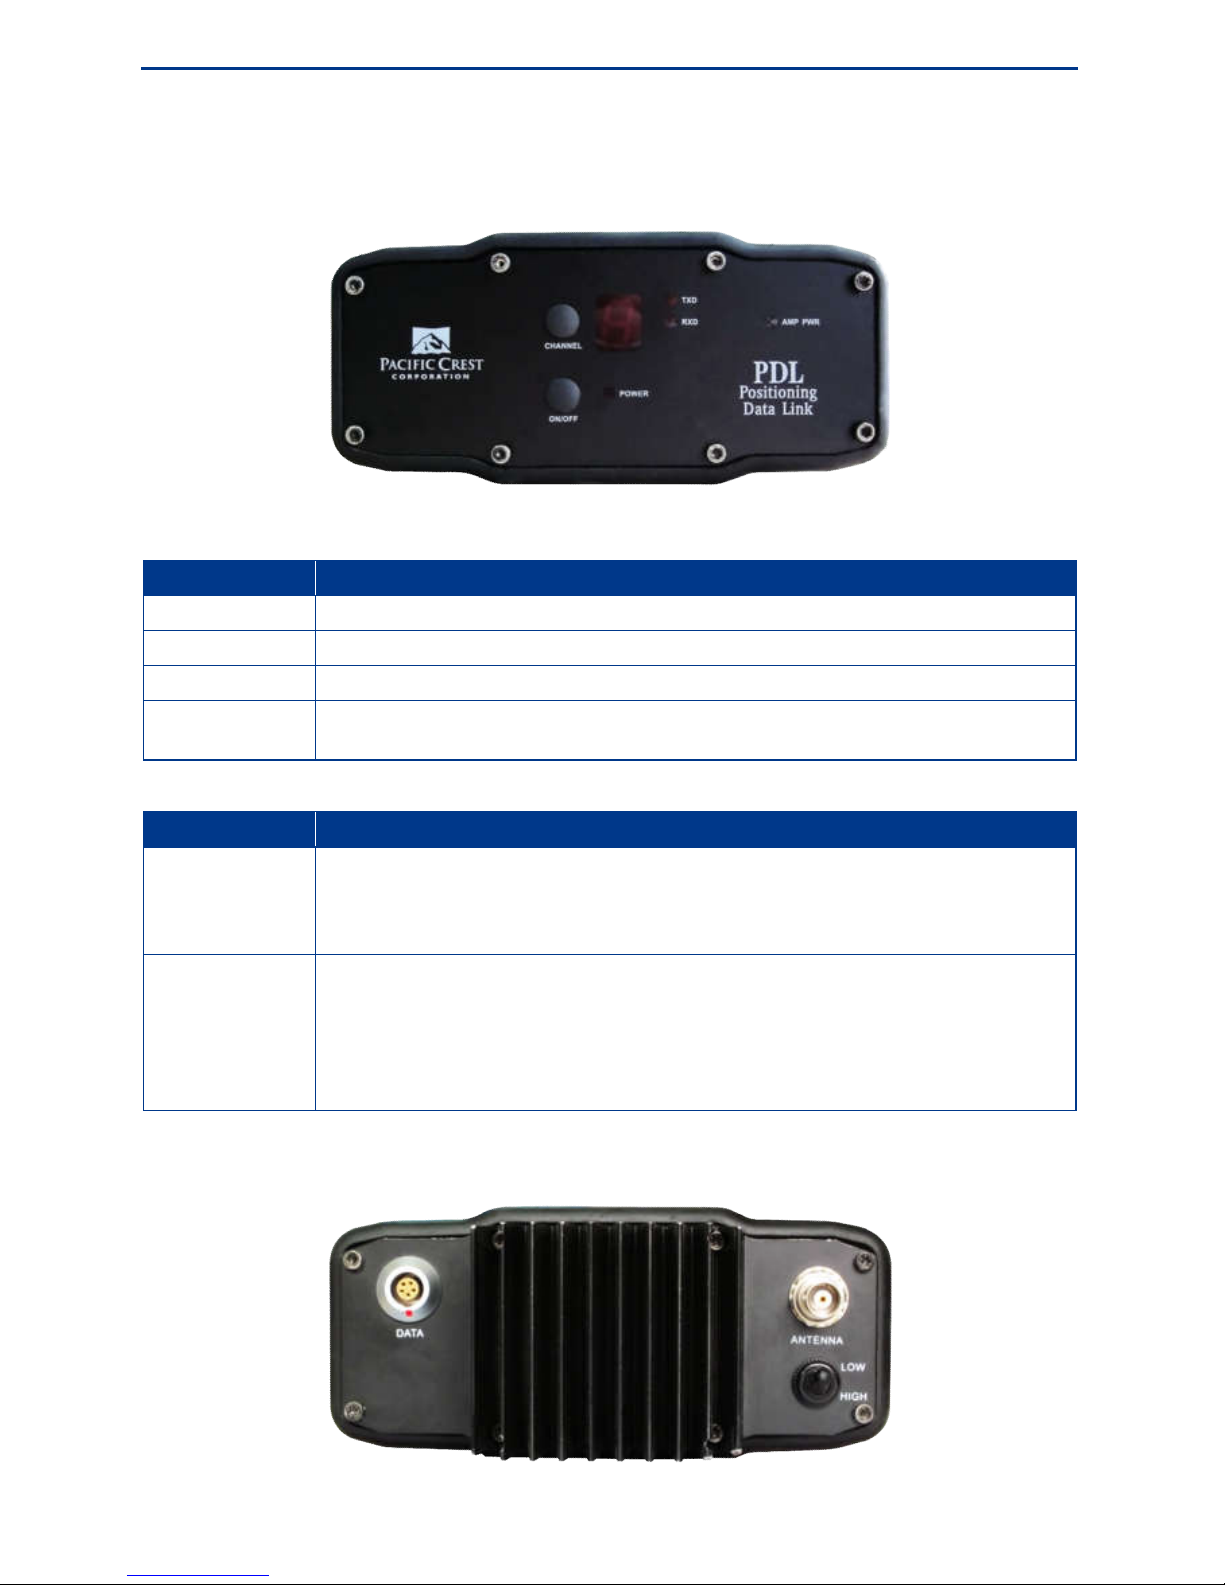
Transmitting Radio Introduction
Front Panel
Indicator Description
POWER Power indicator
TXD Transmitting indicator
RXD Receiving indicator
AMP PWR RF power output high/low indicator. When lit, it indicates that the RF output power is
set high. When black, it indicates that the RF output power is set low.
Button Description
ON/OFF
Power switch. Turn the PDL station on by pressing the ON/OFF button and holding it
until the channel display indicator is lit. Turn off the PDL station by pressing the
ON/OFF button until the display goes black. There is a one-second turn-off delay in
the power button to prevent inadvertent turn-off.
CHANNEL
The CHANNEL button is used to display and change the channel. Press the
CHANNEL button momentarily to display the selected channel. To change the
channel, press the CHANNEL button once to light the display, and then again to
change the channel. Use the CHANNEL button to select the "b" setting. With "b"
selected, the PDL will be placed in transmitting mode. This mode selects the channel
for transmission automatically.
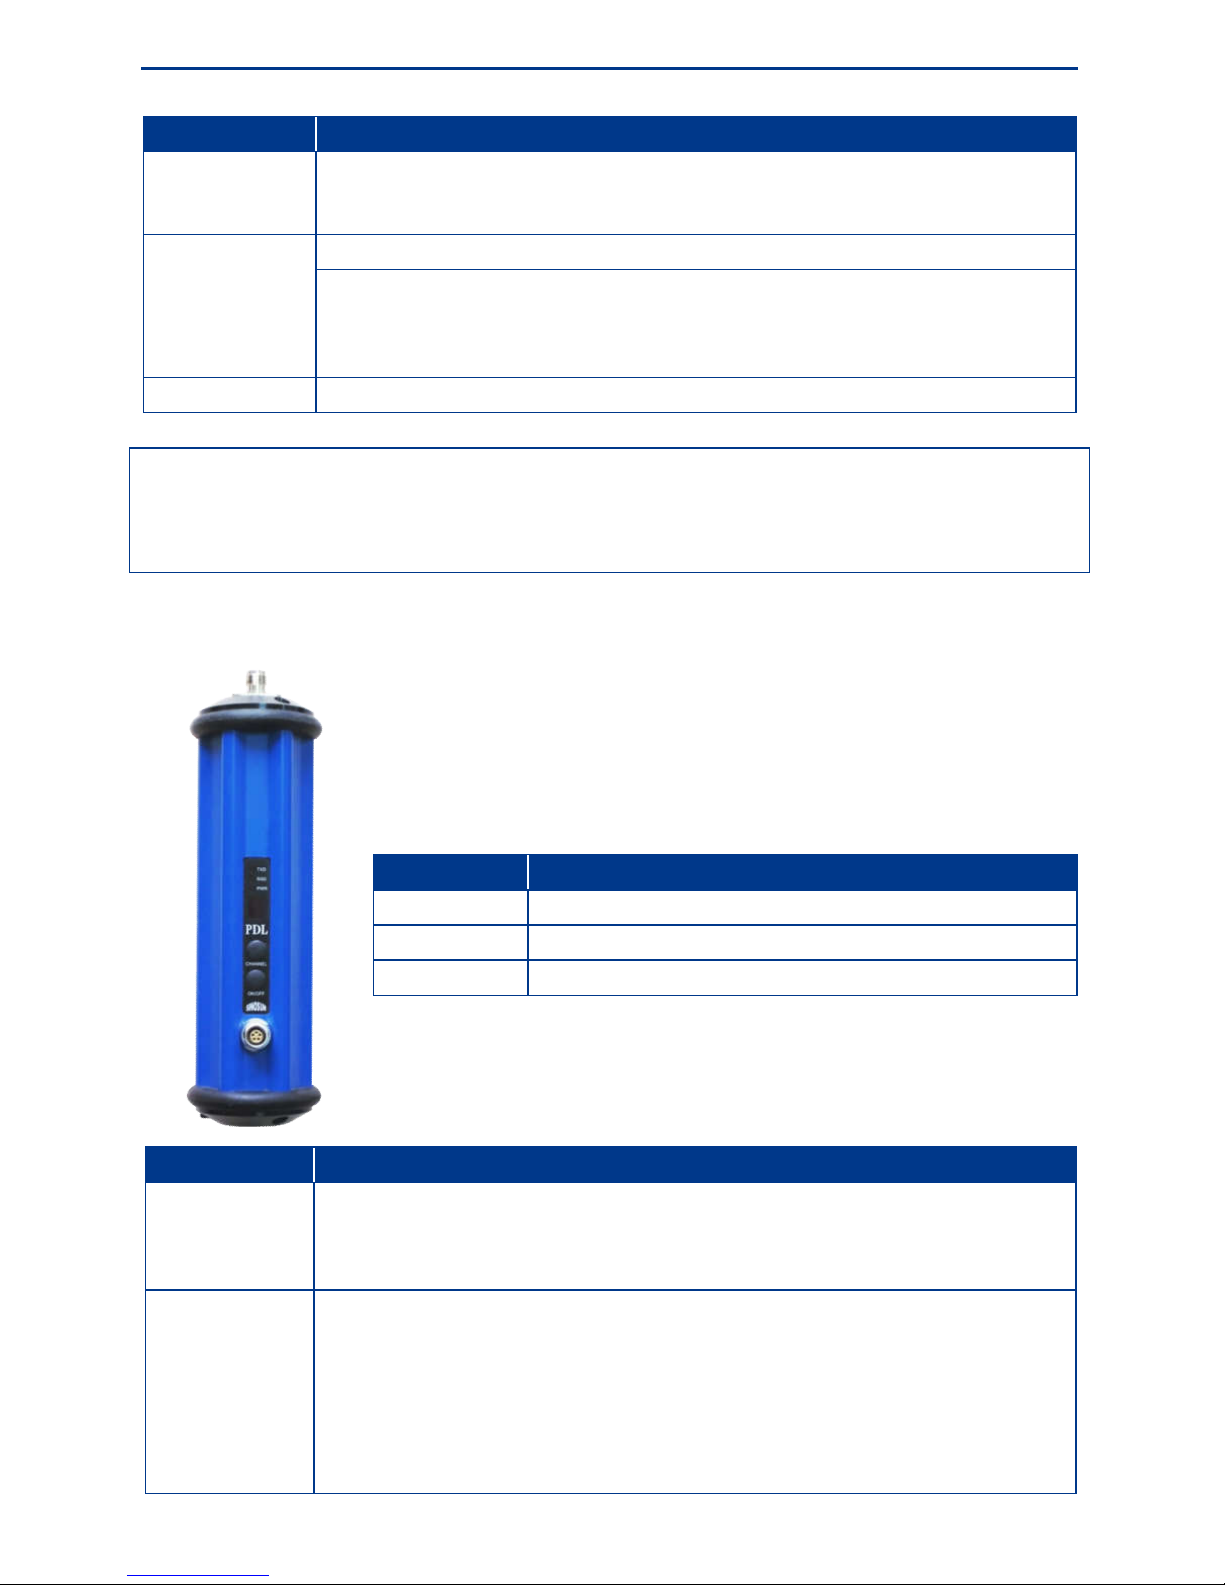
Back Panel
Page 66
eFix R2 Series Hardware Operating Instructions
62
Button/Interface
Description
HIGH/LOW RF power output level selector switch. This toggle switch selects high power output in
the HIGH position when the action range is within 8km, while low power output in
the LOW position when the action range is within 3km.
DATA Data connector
Power connector with dedicated power cable. Transmitting radio requires current
(6A), voltage (10.5-16V) DC. 12V/38Ah battery is recommended as power supply.
While connecting the power supply, note that red means positive, black means
negative.
ANTENNA Antenna connector
Note: Select high RF power output for situations where long range is required. For short
range applications, select low RF power to reduce power consumption and minimize
interference with co-channel users.
Receiving Radio Introduction
Button/Interface
Description
ON/OFF Power switch. Turn the PDL station on by pressing the ON/OFF button and holding it
until the channel display indicator is lit. Turn off the PDL station by pressing the
ON/OFF button until the display goes black. There is a one-second turn-off delay in
the power button to prevent inadvertent turn-off.
CHANNEL The CHANNEL button is used to display and change the channel. Press the
CHANNEL button momentarily to display the selected channel. To change the
channel, press the CHANNEL button once to light the display, and then again to
change the channel. Use the CHANNEL button to select the "r" setting. With "r"
selected, the PDL will be placed in receiving mode. This mode automatically selects
the channel being used by the transmitting radio. If you are operating in an area with
more than one PDL transmitting radios working, you should manually select the
channel of operation to assure proper operation.
Indicator
Description
TXD Transmitting indicator (factory reserved module)
RXD Receiving indicator
PWR Power indicator
Page 67

Appendix: Radio Instructions
63
Button/Interface
Description
Data/Power
Connector
Data connector
Power connector. The receiving radio is designed with built-in Lithium-ion battery and
charging circuit. 12V power supply is recommended for charging.
Factory Default Frequency List
Channel 460M-Band Transmitting Frequency (MHz)
460M-Band Receiving Frequency (MHz)
0 464.5500 464.5500
1 464.5000 464.5000
2 464.6000 464.6000
3 464.4500 464.4500
4 464.6500 464.6500
5 464.4000 464.4000
6 464.7000 464.7000
7 464.3500 464.3500
8 464.7500 464.7500
9 undefined undefined
10 undefined undefined
11 undefined undefined
12 undefined undefined
13 undefined undefined
14 undefined undefined
15 undefined undefined
Radio frequency range: 450MHz-470MHz, center frequency: 460MHz.
Standard channel spacing: 0.050MHz.
Users can customize the frequency of the 16 channels.
Note: Make sure the transmitting radio and the receiving radio are in the same channel.
Please change the channel to ensure optimal data transmission quality in areas of severe
electromagnetic interference.
Page 68

eFix R2 Series Hardware Operating Instructions
64
Radio Notices
1. The RF power switch of transmitting radio selects high power output in the HIGH
position while the action range is within 8km, selects low power output in the LOW
position while the action range is within 3km.
2. The input voltage range of PDL transmitting radio and receiving radio: 10.5V - 16V,
and the standard input voltage is 12V.
3.
The PDL enclosure is rugged extruded aluminum with integrated heat sink fins. The
enclosure is painted with weather resistant powder coat blue paint. Black bumpers are
integrated with front and rear gaskets to provide shock protection and watertight
operation. The enclosure is not designed to withstand submersion and must not be
allowed to sit in standing water.
4. The PDL enclosure and heat sink may become very hot during operation. This is
normal depending on the ambient temperature, RF power selection and transmission
duty cycle. Turn off the unit and allow it to cool prior to handling.
5. In the receiving radio has a built-in charger that monitors and controls the charging of
the internal battery. The internal battery quickly charges in less than 4 hours, and can
be charged with the supplied charger, or from an external 12 volt supply. We
recommend charging the internal battery at room temperature. Charging is inhibited if
the ambient temperature is below 0° C or above 40° C.
Warning: The internal battery must not be subject to operating temperatures below -20° C.
Subjecting the battery to conditions below -20° C will produce permanent battery damage,
and is not covered by the warranty.
Page 69

Index
65
Index
3G High-speed Remote Wireless
Communication, 3
Application Function, 9
Audio, 9
Back View, 12
base station, 47
base station of radio communication mode,
48
Base Station Standard Configuration, 16
Battery, 4, 8
Bluetooth Settings, 27
built-in antenna, 50
Calibrate the touch screen, 21
Caravel Net, 51
Caravel PP, 44, 50
carrier phase dynamic real-time differential
technology, 45
charging, 4, 22
Compass, 36
CORS Differential, 44
Data Chain, 4
data link, 45
Differential format, 7
Display, 7
double-tap speed, 21
gRob R2, 2, 45
gRob R2 operating system, 53, 54
external GPS antenna, 47
Front View, 11
GPac, 4, 37
GNSS data acquisition and processing
software suite, 4
GNSS RTK system, 2
GPRS communication mode, 47, 49, 53
GPRS Data Transmission, 3
GPS correction data, 44
GPS Receiver, 7
Handheld Bracket, 4
Handheld Rover, 50
Hardware Connection with PC, 41
high-accuracy RTK, 2
High-Precise Large-Range Static Control
Network, 51
Install the transmitting radio, 48
Installing Micro SD Card, 25
Installing Microsoft ActiveSync, 41
Installing SIM Card, 26
integrated design, 4
Interfaces, 8, 13
GS Server data retransmission service, 53
Main Parts, 14
Micro SD card, 7
Microsoft ActiveSync, 41, 42
Navigation output format, 7
Network Communications, 7
Notice, 5
Operating System, 7
Operation temperature, 8
PDL radio, 54, 59
Physics, 8
Positioning Accuracy, 8
Post-Differential Dynamic Positioning, 50
Power Adapter, 4
Power consumption, 7
Power off, 20
Page 70

eFix R2 Series Hardware Operating Instructions
66
Power on, 20
Power Saving Mode, 24
Radio Communication Mode, 49, 53
receiving radio, 49, 61
Remaining Power, 23
Restoring WinCE System, 37
Rover Standard Configuration, 17
RTK Positioning, 45
Serial Port Settings, 27
Setting Up Base Station, 46
Setting up the Rove, 49
single point dynamic positioning, 44
Single Point Positioning, 44
Smart Charging, 23
static control network, 2
Stylus Property, 20
technical parameters, 7
Touch Pen, 19
transmitting radio, 48, 60
Troubleshooting, 56
Ultra-long-distance RTK, 3
Upgrading Firmware, 37
Video, 9
Visiting gRob R2 Handheld, 42
Wide Area Differential, 44
WiFi Settings, 27
WinCE system, 20
Page 71

Index
67
Contact Us
Thank you for using our eFix R2 series. We will do our best to provide you the best
pre-sales and after-sales service. Please feel free to contact us for any usage condition
or advices about eFix R2 series.
Wuhan Geosun Information Technology Co.,Ltd
Add: 5F West Research building, No.312 Luoyu Rd Hongshan District, Wuhan 430070,
China.
Tel: +86 (0)27-87504895
Fax: +86 (0)27-87504895
Email: [email protected]
.cn
Website: Http://www.geosun-gnss.com
.cn
 Loading...