

Page 1
ASSEMBLY INSTRUCTIONS
DESK
ASSEMBLY
REQU
IREMENTS
Thank you for purchasing our product!
Please refer and use this assembly instruction to assemble the product.
Contact our customer service department in case there are any missing or damage parts or hardware.
2
HOURS
Assembly Time
(Approx
imate)
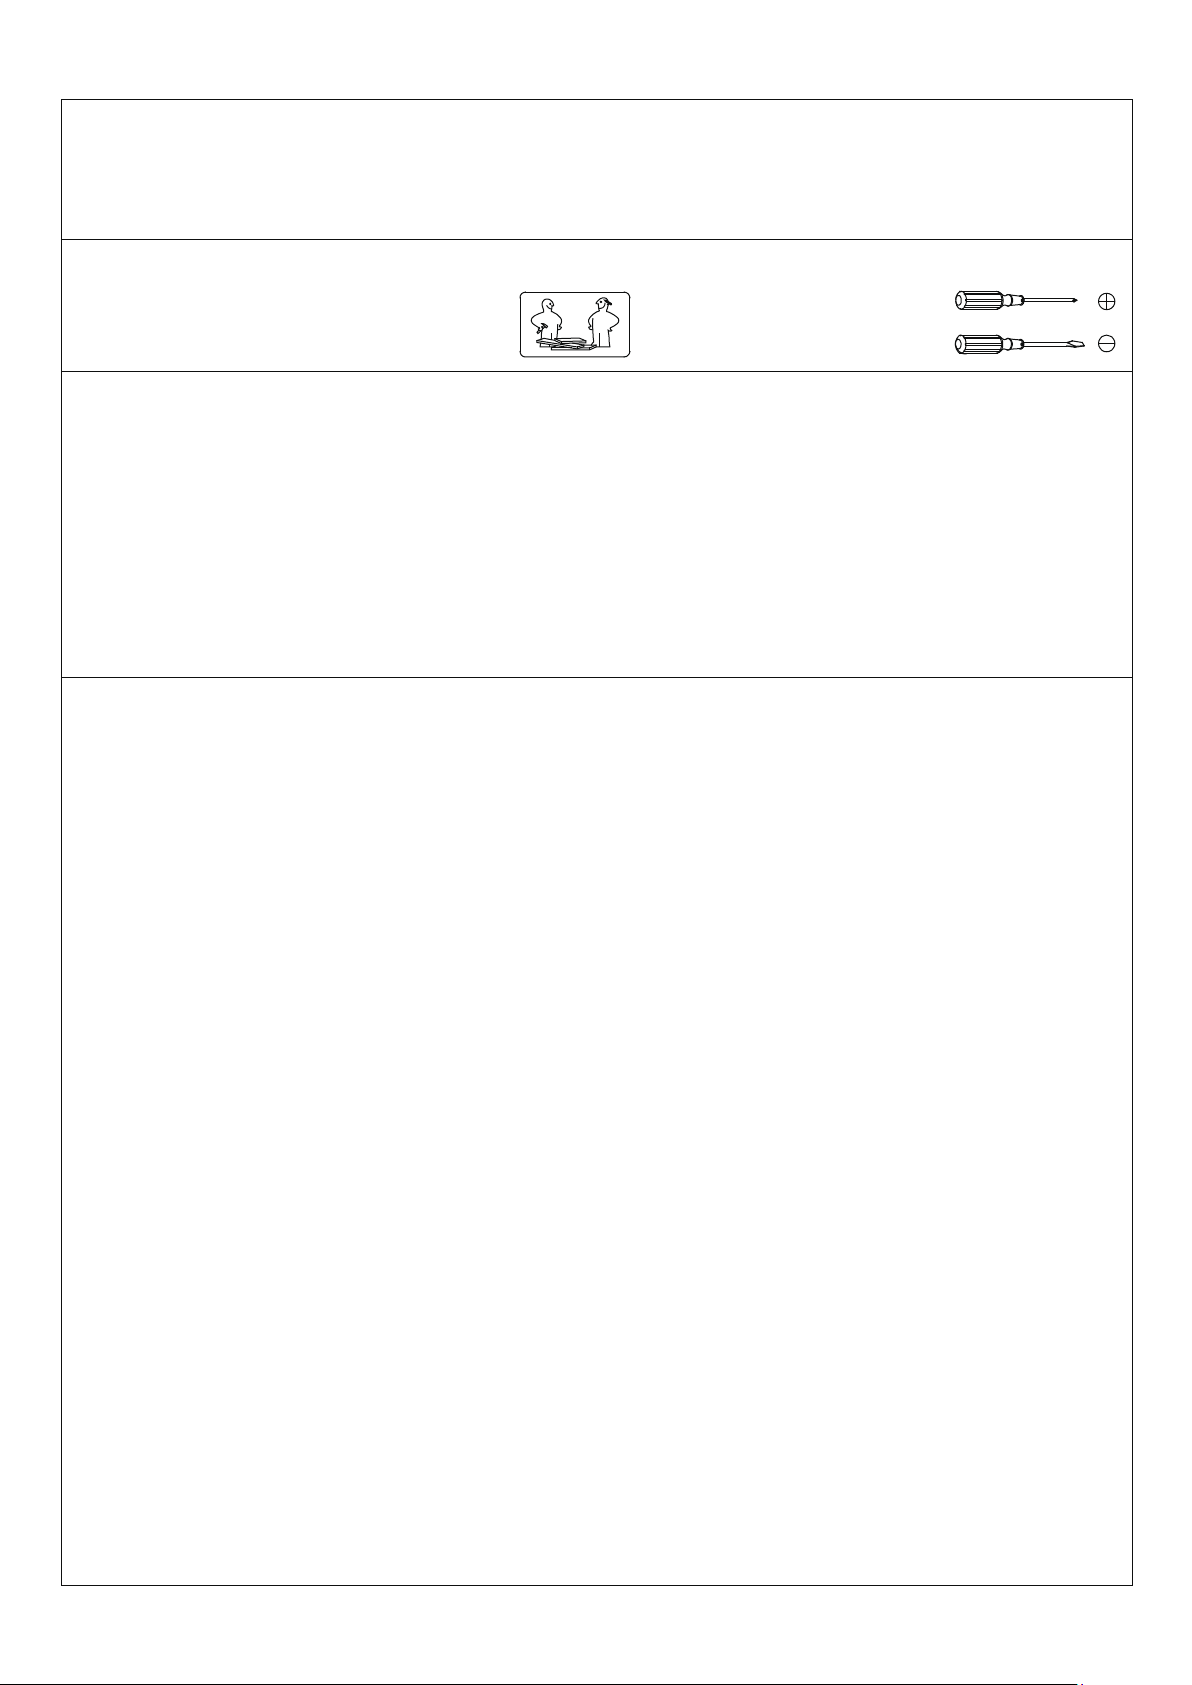
2 -Person Assembly Tools Required (Not Provided):
Phillips Screwdriver
at Head Screwdriver
Fl
We appreciate your business!
ASSEMBLY PREPARATION
1
. Remove all packaging materials, staples and packing straps from the carton.
2. Refer to Parts and Hardware Lists. Ensure all the parts and quatities are correct before assembling the product.
Contact customer service for missing parts.
3. Place all wooden parts on a clean, flat and soft surface (e.g. carpet or rug) to prevent parts from getting scratched.
SAFETY PRECAUTION:
1. KEEP ALL HARDWARE PARTS OUT OF REACH OF CHILDREN.
2. DISPOSE PLASTIC PACKAGING MATERIAL IMMEDIATELY TO AVOID ANY RISK OF SUFFOCATION TO
CHILDREN AND ANIMALS.
TIPS FOR ASSEMBLY:
1. Allow ample room for assembly and in close proximity to where product will be placed.
2. Assemble the product on a surface that does not scratch or damage the exterior gloss and finish of the furniture.
3. Identify all of the parts, hardware and quantities required for each step.
4. During assembly, do not over-tighten any fittings as this may cause damage.
5. DO NOT USE POWER TOOLS TO ASSEMBLE THIS PRODUCT.
6. Always place the product on a flat, level surface.
7. Do not sit or stand on the partially assembled product; only use the product for which it is intended.
CARE AND MAINTENANCE
- Use a slightly damp cloth to clean the product. Do not use bleach or abrasive cleaning material.
- Check all the fittings periodically and re-tighten as necessary. Do not use the product if any of the parts is
damaged or broken.
- Never allow any kind of liquid to remain on your furniture. Absorption can cause wood to warp or delaminate.
- Do not place hot items (e.g. hot drinks) directly onto the wood surface.
- Do not drag and/or pull the furniture.
This product is for indoor and household use only - not for com
mercial use.
Made In China
1/9
Page 2
ASSEMBLY INSTRUCTIONS
DESK
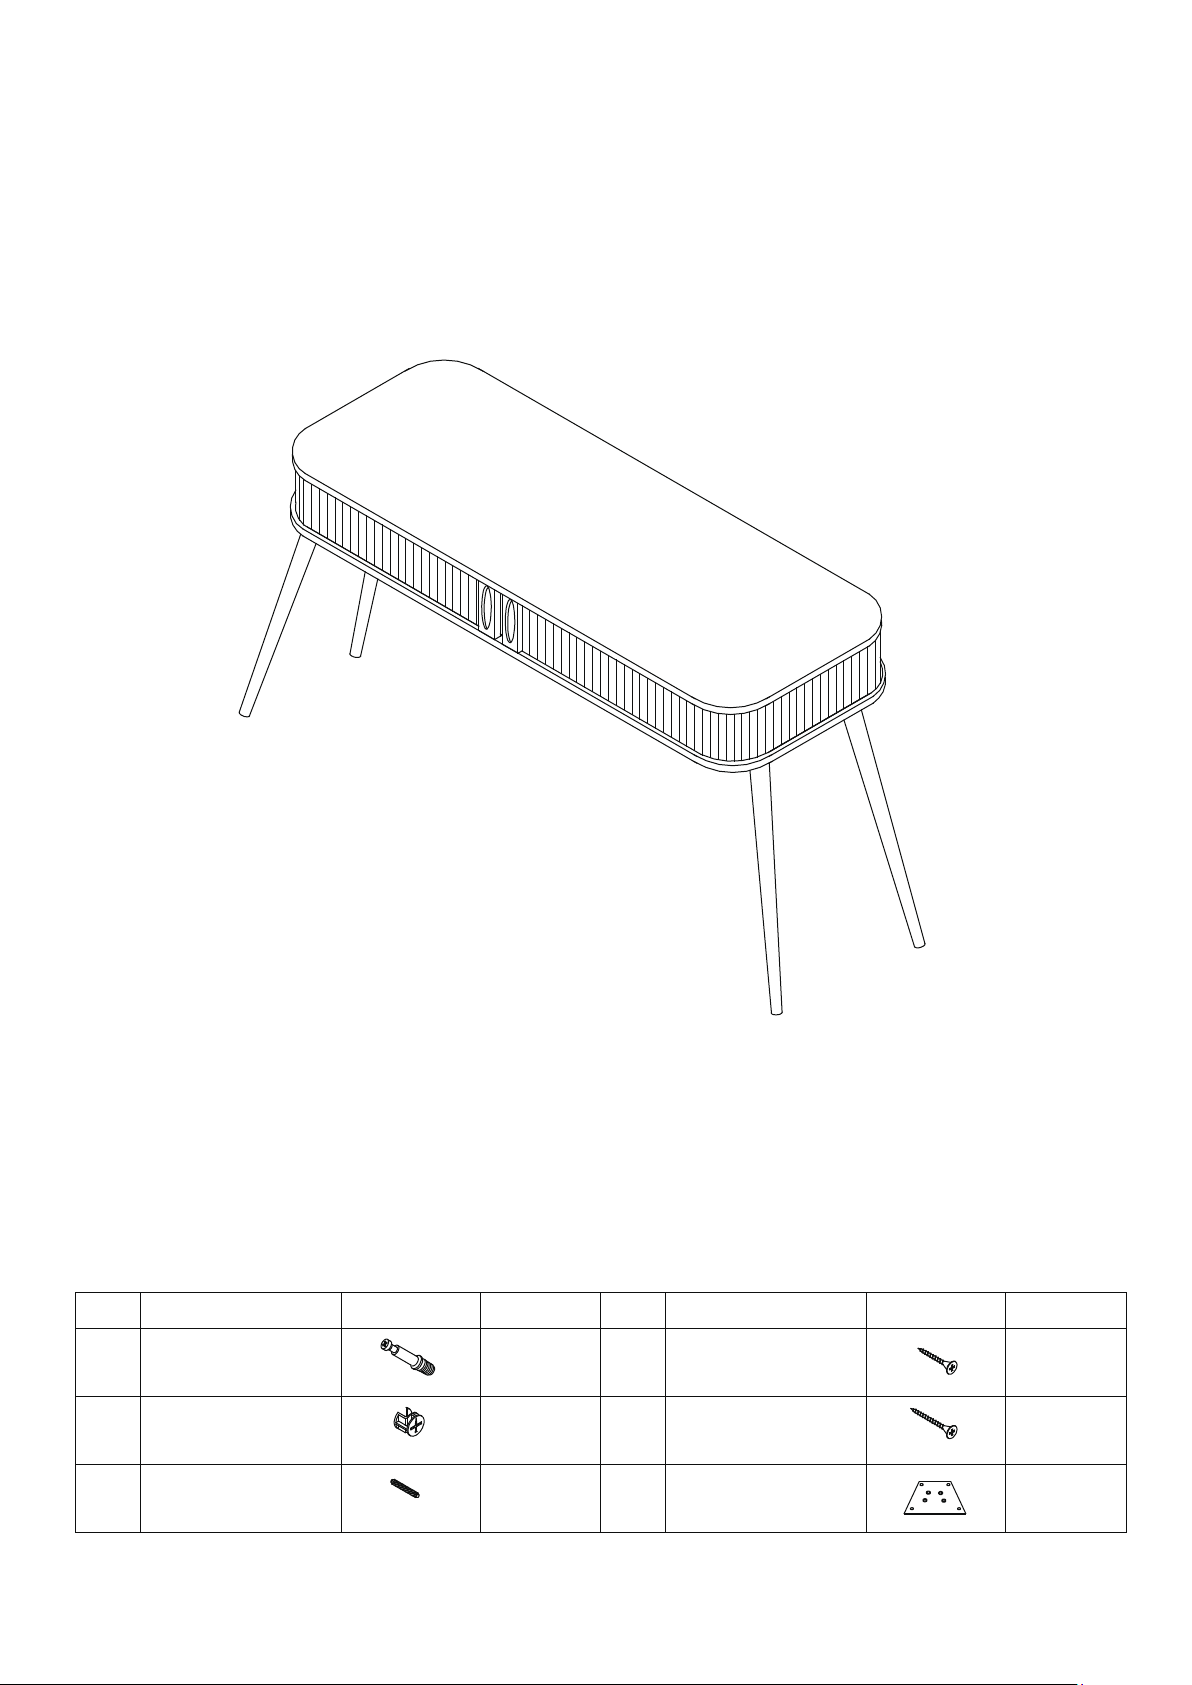
ITEM PART
A
B
C
DESCRIPTION DESCRIPTION
Cam-bolt
6*35mm
Cam-lock
Wood Dowel
15*12mm
8*30mm
Hardware List
QTY
16 pcs
16 pcs
16 pcs
ITEM PART
D
E
F
Metal Base Plate
Screw
Screw
QTY
16 pcs
4*25mm
26 pcs
4*35mm
4 pcs
2/9
Page 3
ASSEMBLY INSTRUCTIONS
DESK
Parts List
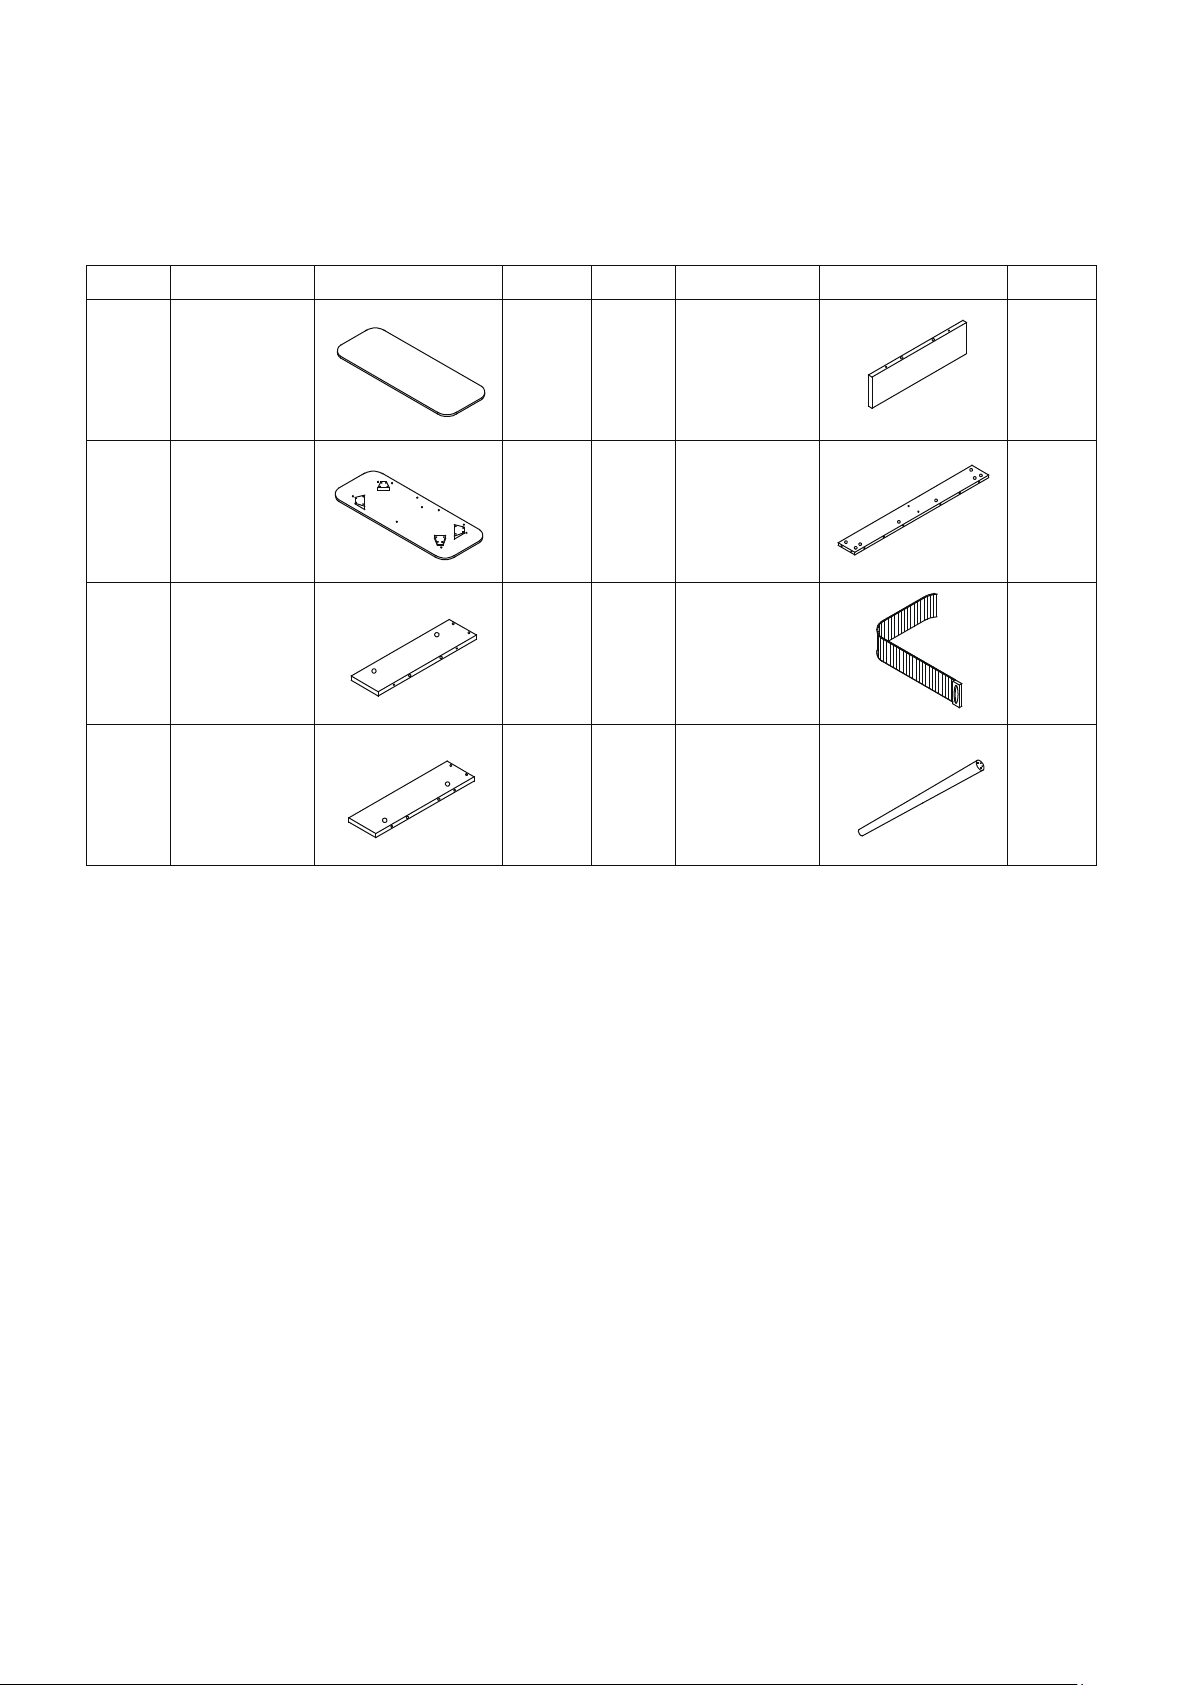
ITEM PART
1
DESCRIPTION DESCRIPTION
Top Panel
2
3
4
Bottom Panel
Left Side
Panel
Right Side
Panel
QTY
1 pc
1 pc
1 pc
1 pc
ITEM PART
5
6
7
8
Divide Panel
Back Panel
Slide Door
Leg
QTY
1 pc
1 pc
2 pcs
4 pcs
3/9
Page 4
ASSEMBLY INSTRUCTIONS
DESK
Parts List
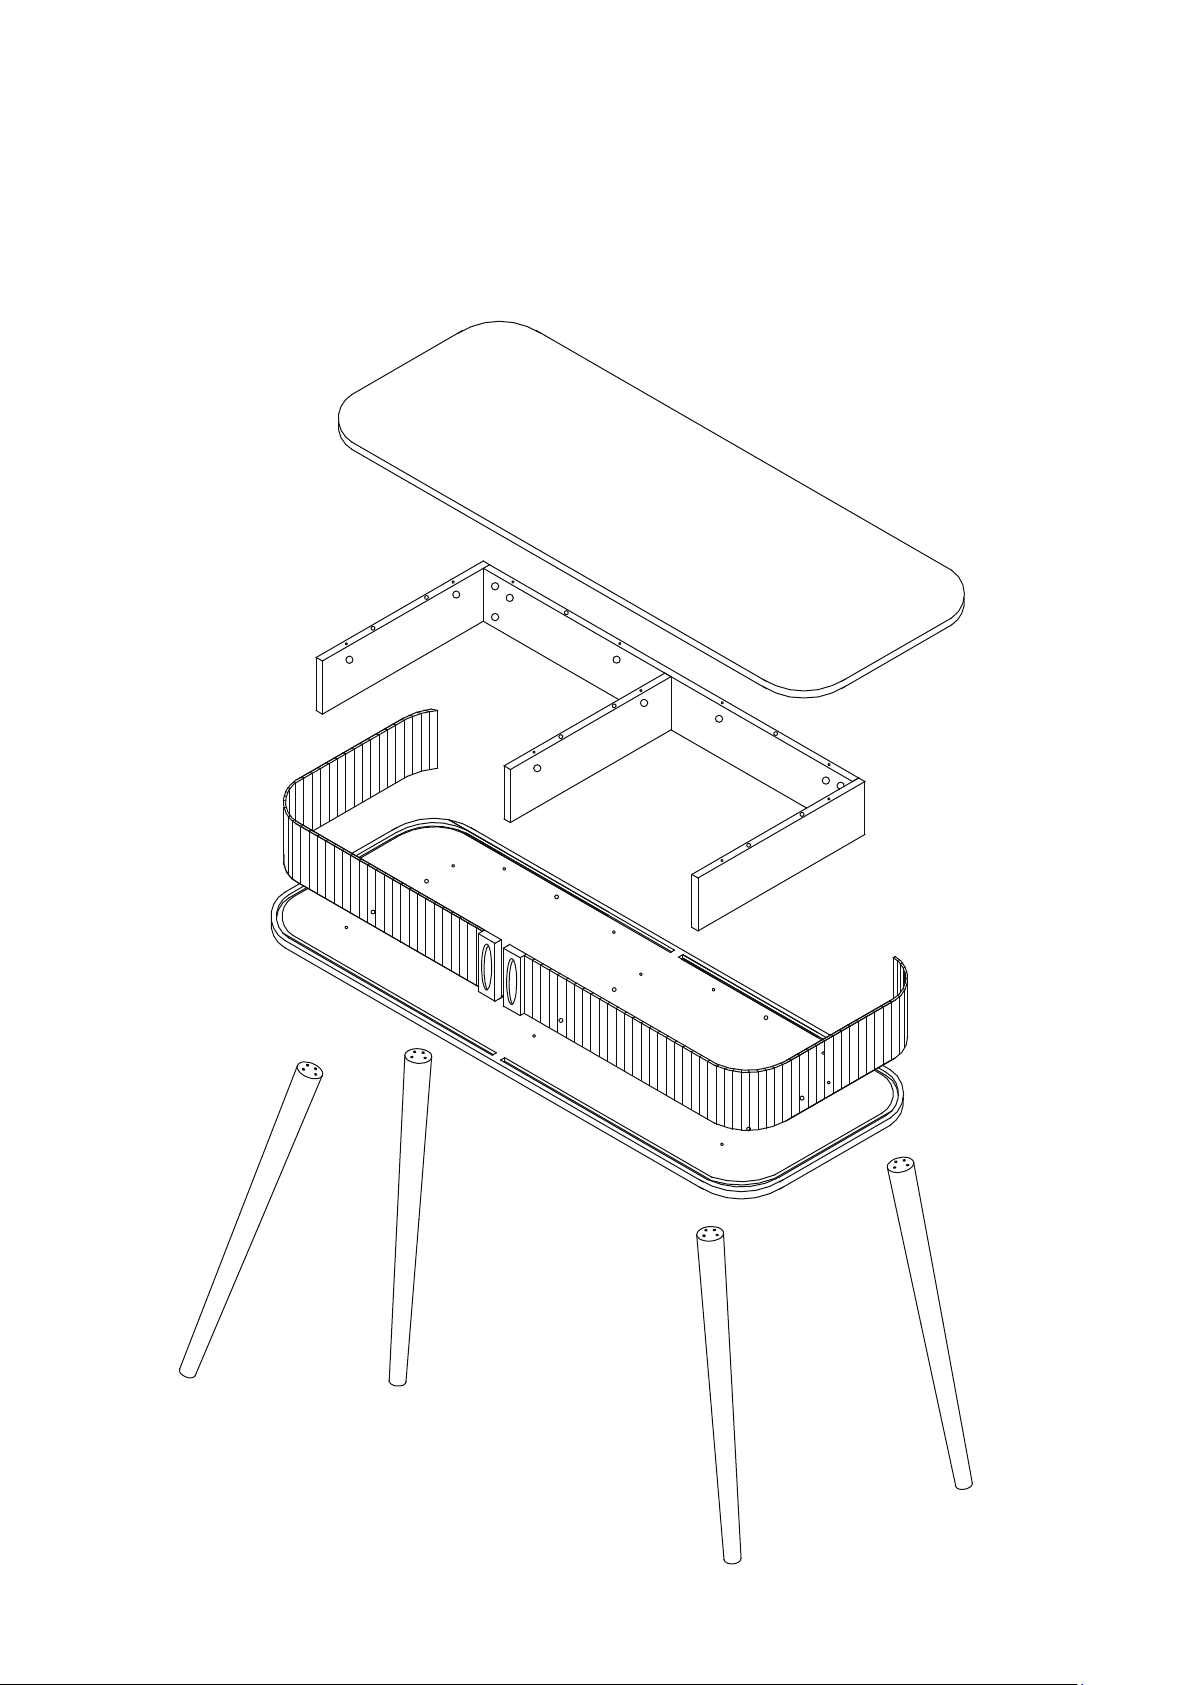
Assembly Overview
1
3
7
2
5
6
4
7
8
8
8
8
4/9
Page 5
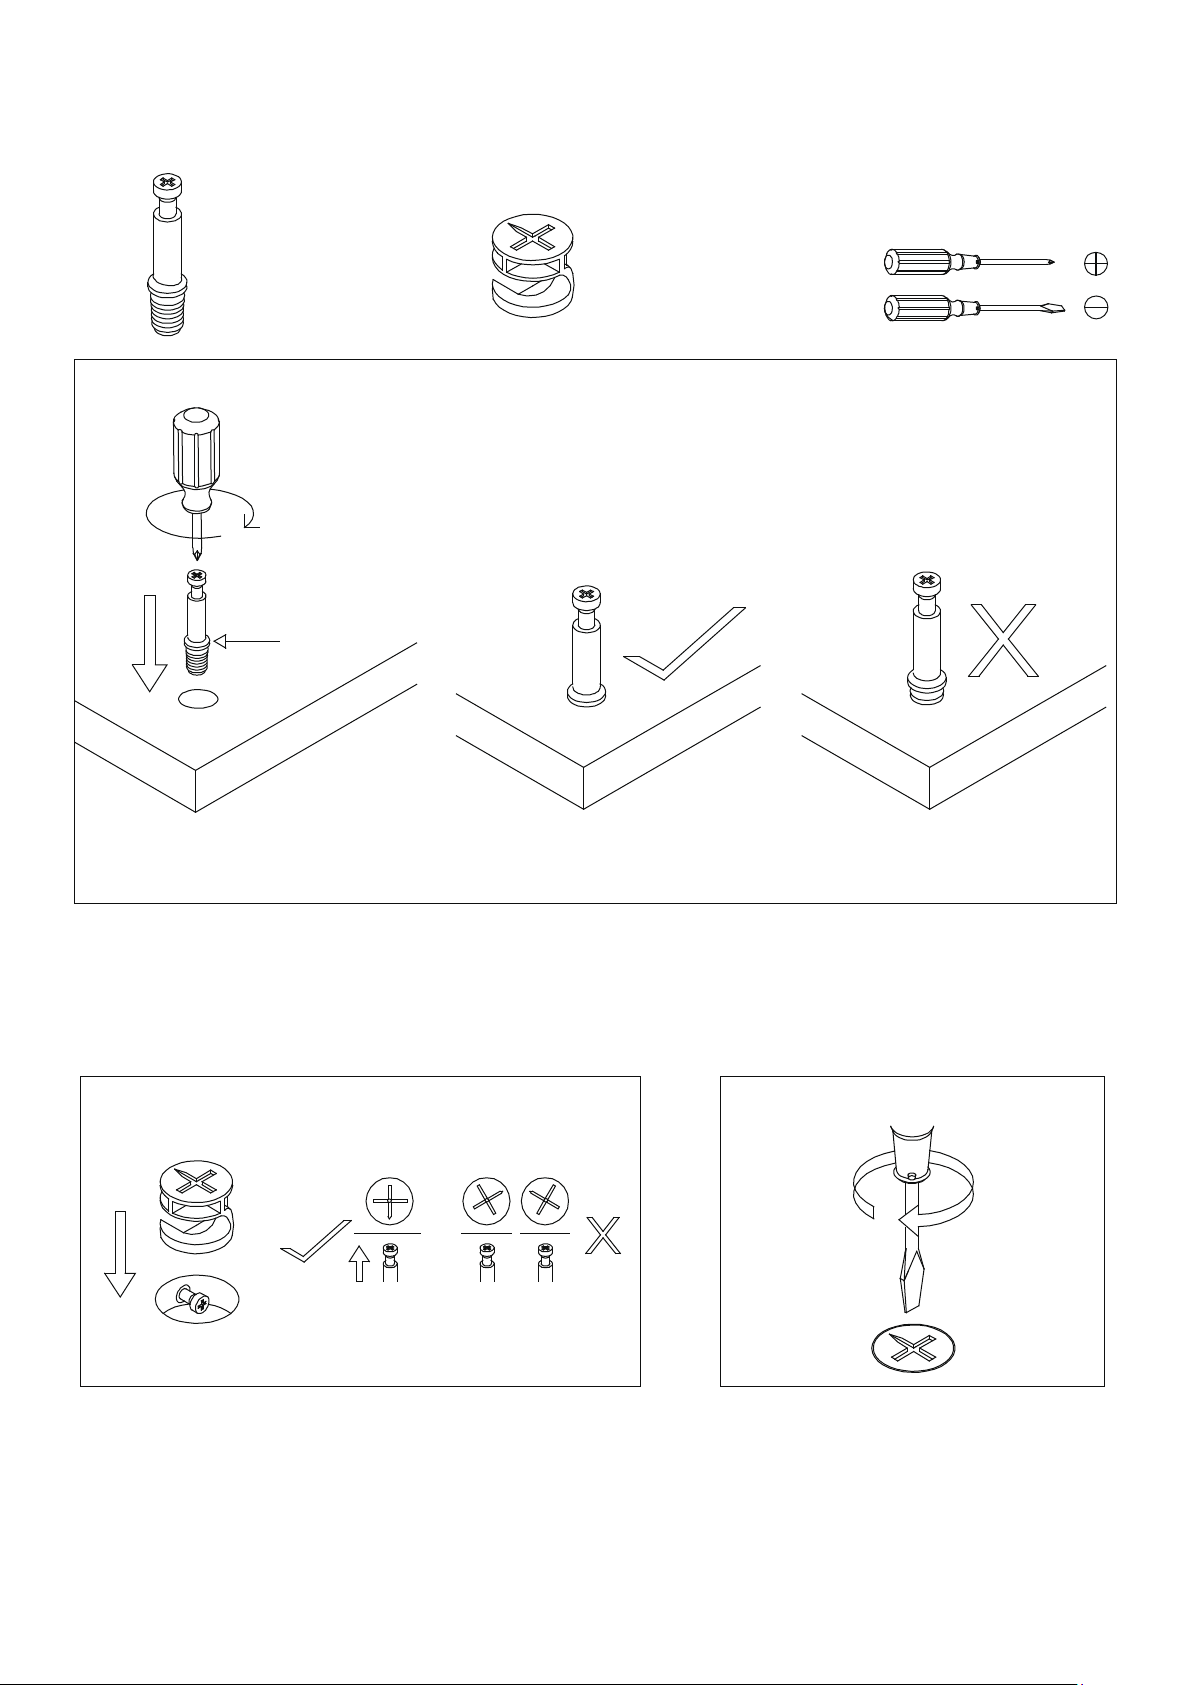
Instructions For Fastening
CAM-BOLT AND CAM-LOCK
CAM-BOLT CAM-LOCK
INSERTING AND TIGHTENING CAM-BOLT
SHOULDER
Tools Required
ANEL
P
Place Cam-bolt on pre-drilled
hole and screw in vertically.
Place Cam-bolt to the designated pre-drilled holes on the panel. Use a Phillips Screwdriver to
tighten Cam-bolt vertically until shoulder is flushed (on the same level) with panel. Do not
over-tighten or under-tighten.
Shoulder is flushed (on the
same level) with the panel.
INSERTING CAM-LOCK
CORRECT
WRONG
ANEL
P
Shoulder is above the panel.
TIGHTENING CAM-LOCK
ANEL
P
Cam-bolt head
needs to be in centre
Align the arrow on the Cam-lock to the Cam-bolt
head and insert the Cam-lock. Ensure it is flushed
with the panel.
Use a Flat-head Screwdriver to turn
Cam-lock clockwise so it locks onto
the head of the Cam- bolt. Turn until
it is snug (about one half of a turn)
-- over-tightening could damage
Cam-lock or/and Cam-bolt.
5/9
Page 6
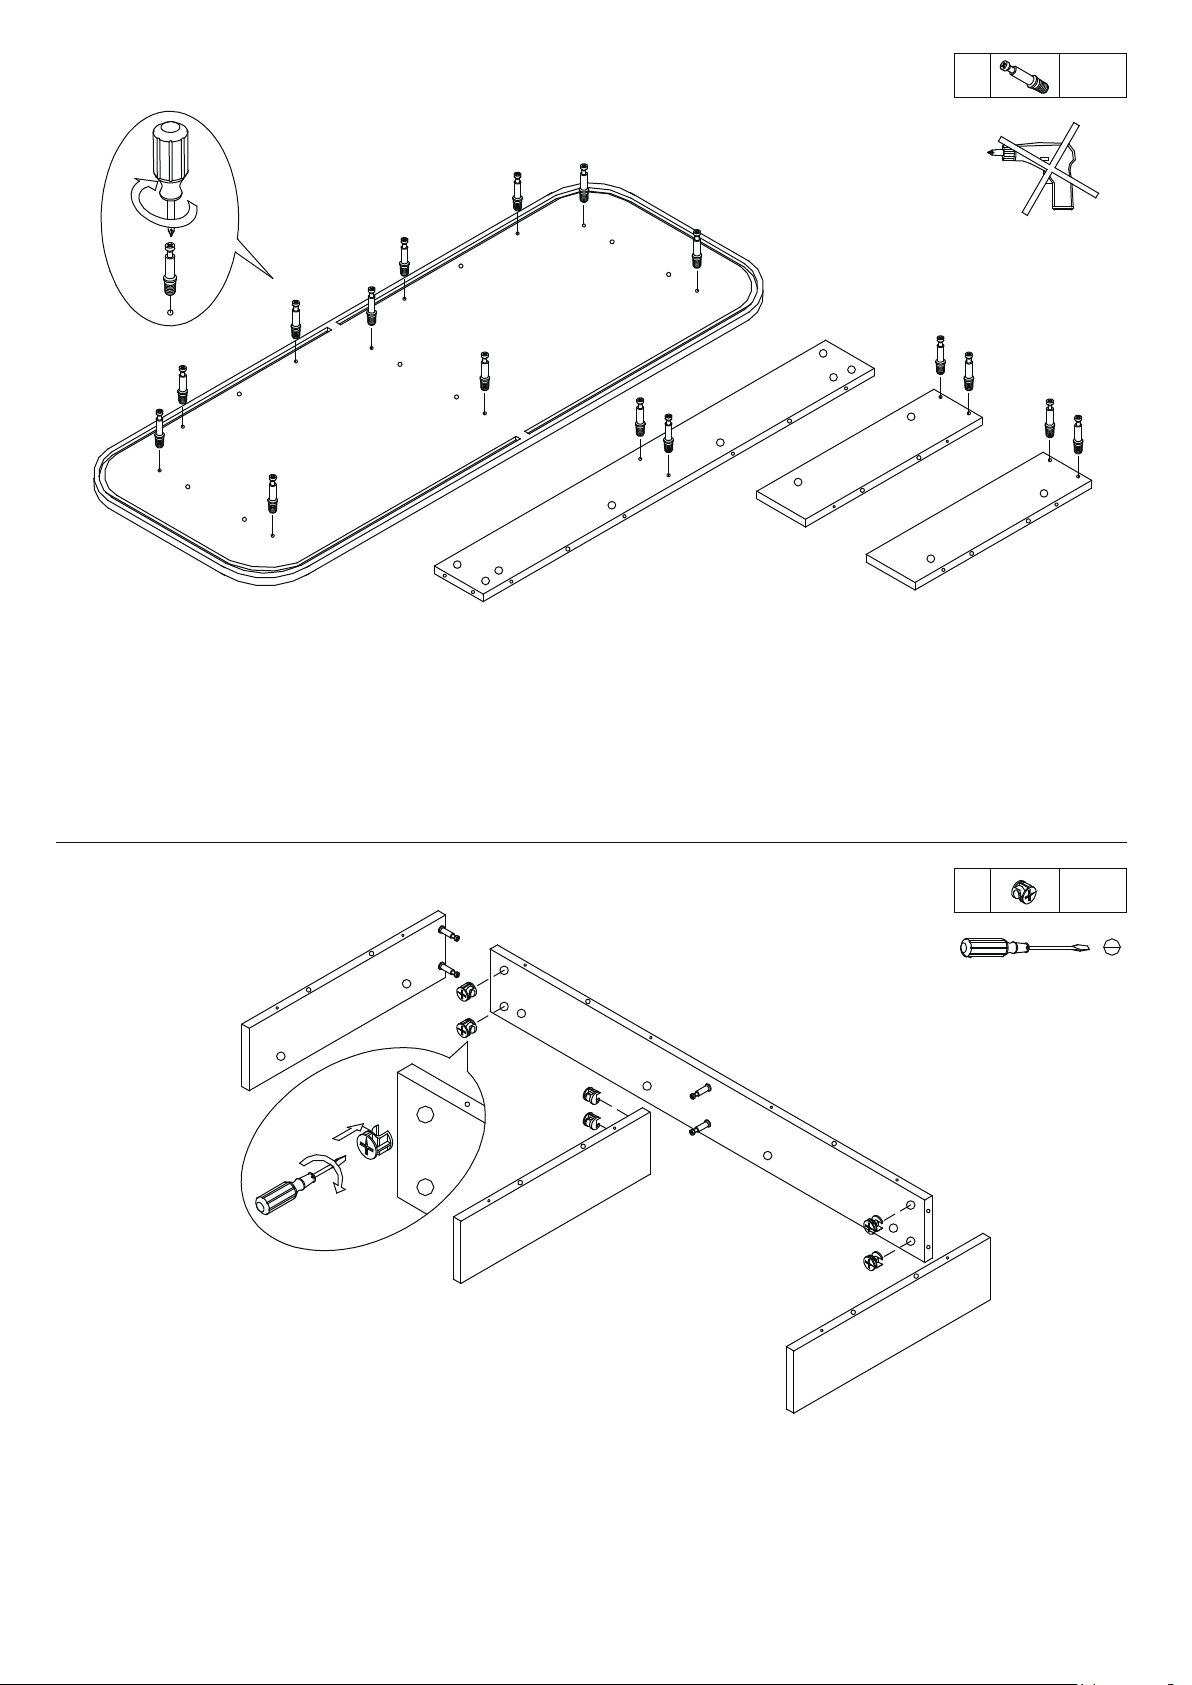
STEP 1
16 pcsA
DO NOT USE POWER TOOLS
A
A
A
A
1
A
6
3
4
a) Lay Top Panel (1) bottom-side up, and for the Left Side Panel (3), Right Side Panel (4) and
Back Panel, lay the inside-surface facing up as shown on a material that does not scratch the
parts.
b) Place Cam-bolt (A) on the designated pre-drilled holes on (1), (3), (4) and (6) as shown. Use a
Phillips screwdriver to drive cam-bolts. Refer to Page 5 for Instructions on fastening Cam-bolt.
STEP 2
4
B
6
6 pcsB
B
B
5
B
Refer to Page 5 for
instructions on
fastening cam-lock.
a) Attach Left Side Panel (3), Right Side Panel (4) and Divide Panel (5) to Back Panel (6) via
Cam-bolts as shown. (Note: all the holes for wood dowels and screws are on the top edge
of each part as shown.)
b) Insert Cam-lock (B) into designated holes and turn clockwise to lock Cam-bolt to fasten
(3), (4) and (5).
3
6/9
Page 7
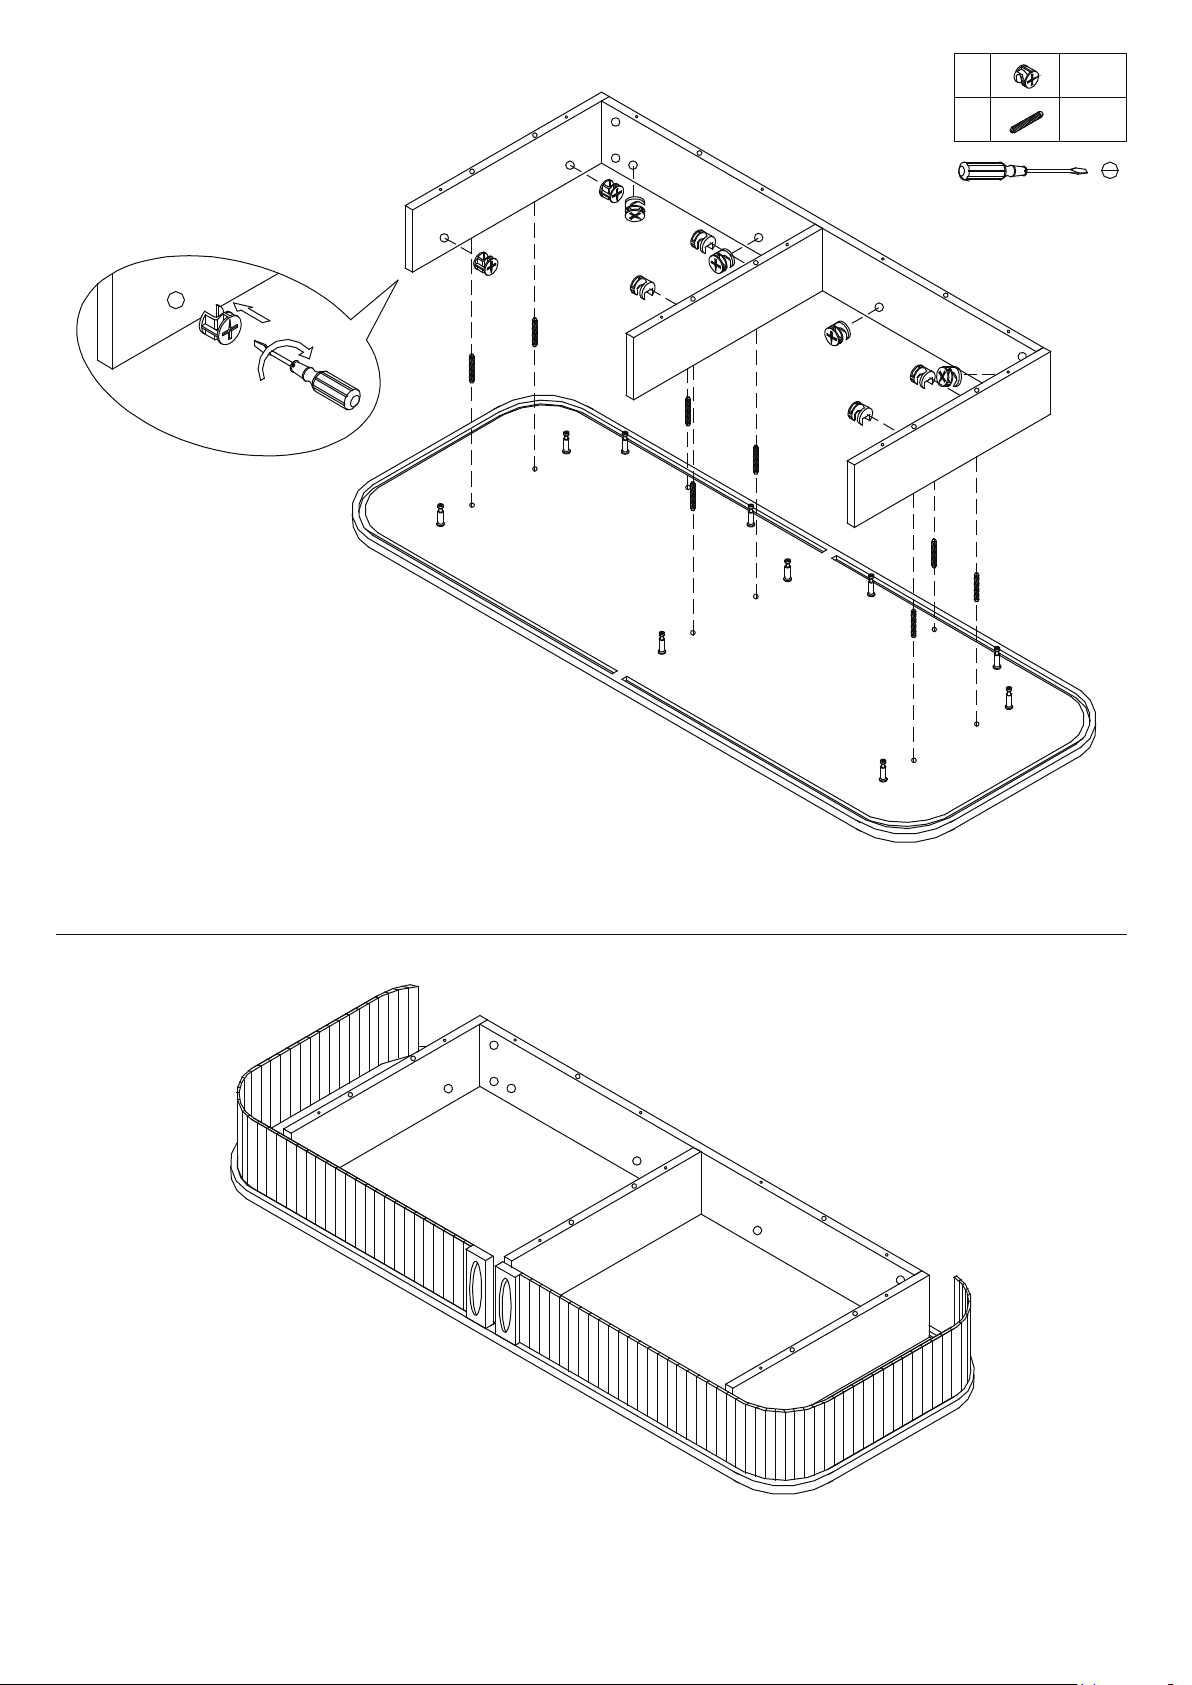
STEP 3
4
5
B
1
a) Place Top Panel (1) bottom-side
up, as shown, on a material that does
not scratch its exterior surface.
b) Insert Wood Dowel (C) into designated holes
on the bottom-side of (1) as shown.
c) Attach Side, Divide and Back Panels (3, 4, 5 & 6) from
STEP 2 to (1) via Cam-bolts and Wood Dowels.
d) Insert Cam-lock (B) into designated holes on (3, 4, 5 & 6) then
turn clockwise to lock onto Cam-bolt.
6
3
B
10 pcs
8 pcsC
STEP 4
7
Fit Slide Door (7) into the groove on bottom-side of Top Panel (1) as shown.
7
7/9
Page 8
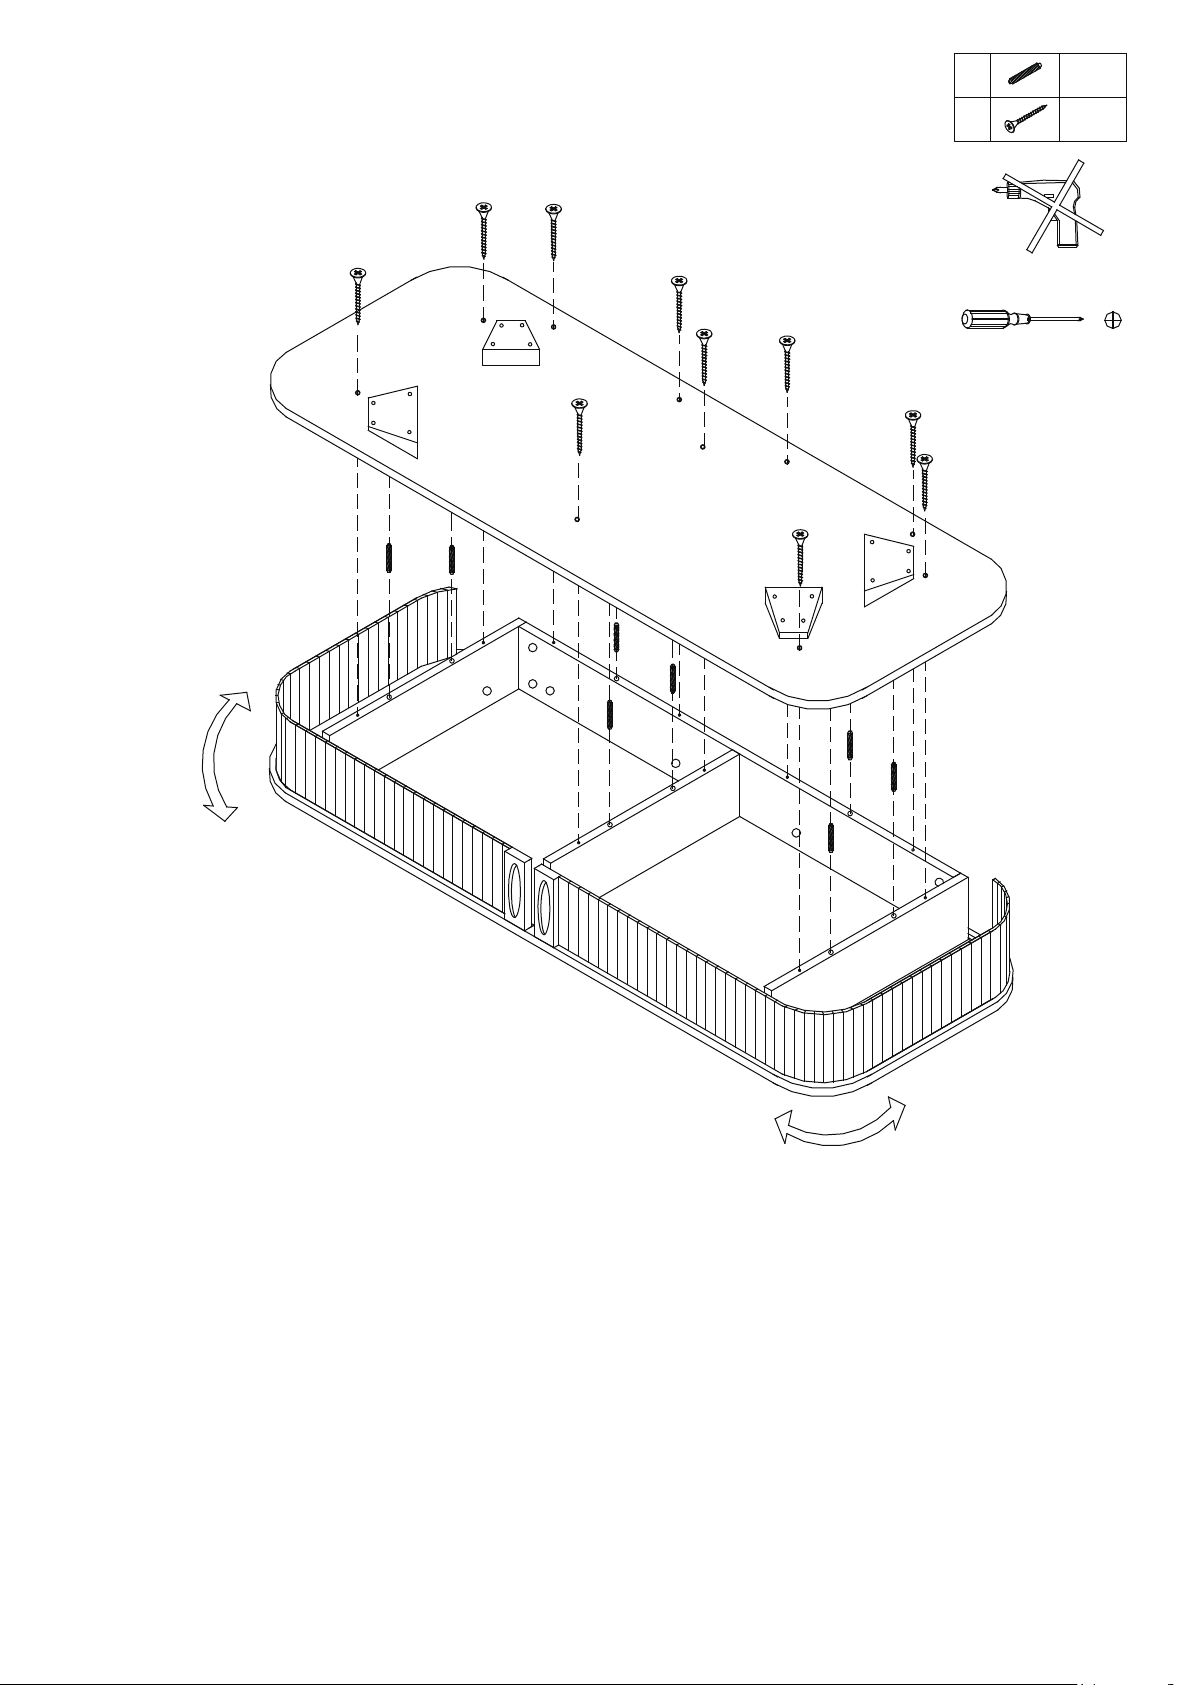
STEP 5
C
8 pcs
7
2
E
DO NOT USE POWER TOOLS
10 pcs
4
6
5
7
3
a) Insert Wood Dowel (C) into designated holes on top edge of Left & Right Side Panels,
Divide Panel and Back Panels (3, 4, 5 & 6) as shown.
b) Attach Bottom Panel (2) bottom-side up to (3, 4, 5 & 6) via Wood Dowels, and also fit Slide
Door (7) into the groove on the under-side of (2). Note: sliding (7) backwards and forward
can help it to be inserted into the groove.
c) When Slide Door (7) is fully in place, use Screw (E) to loosely fasten (2) to (3, 4, 5 & 6).
d) Tighten (2) completely when all the screws are in place.
8/9
Page 9
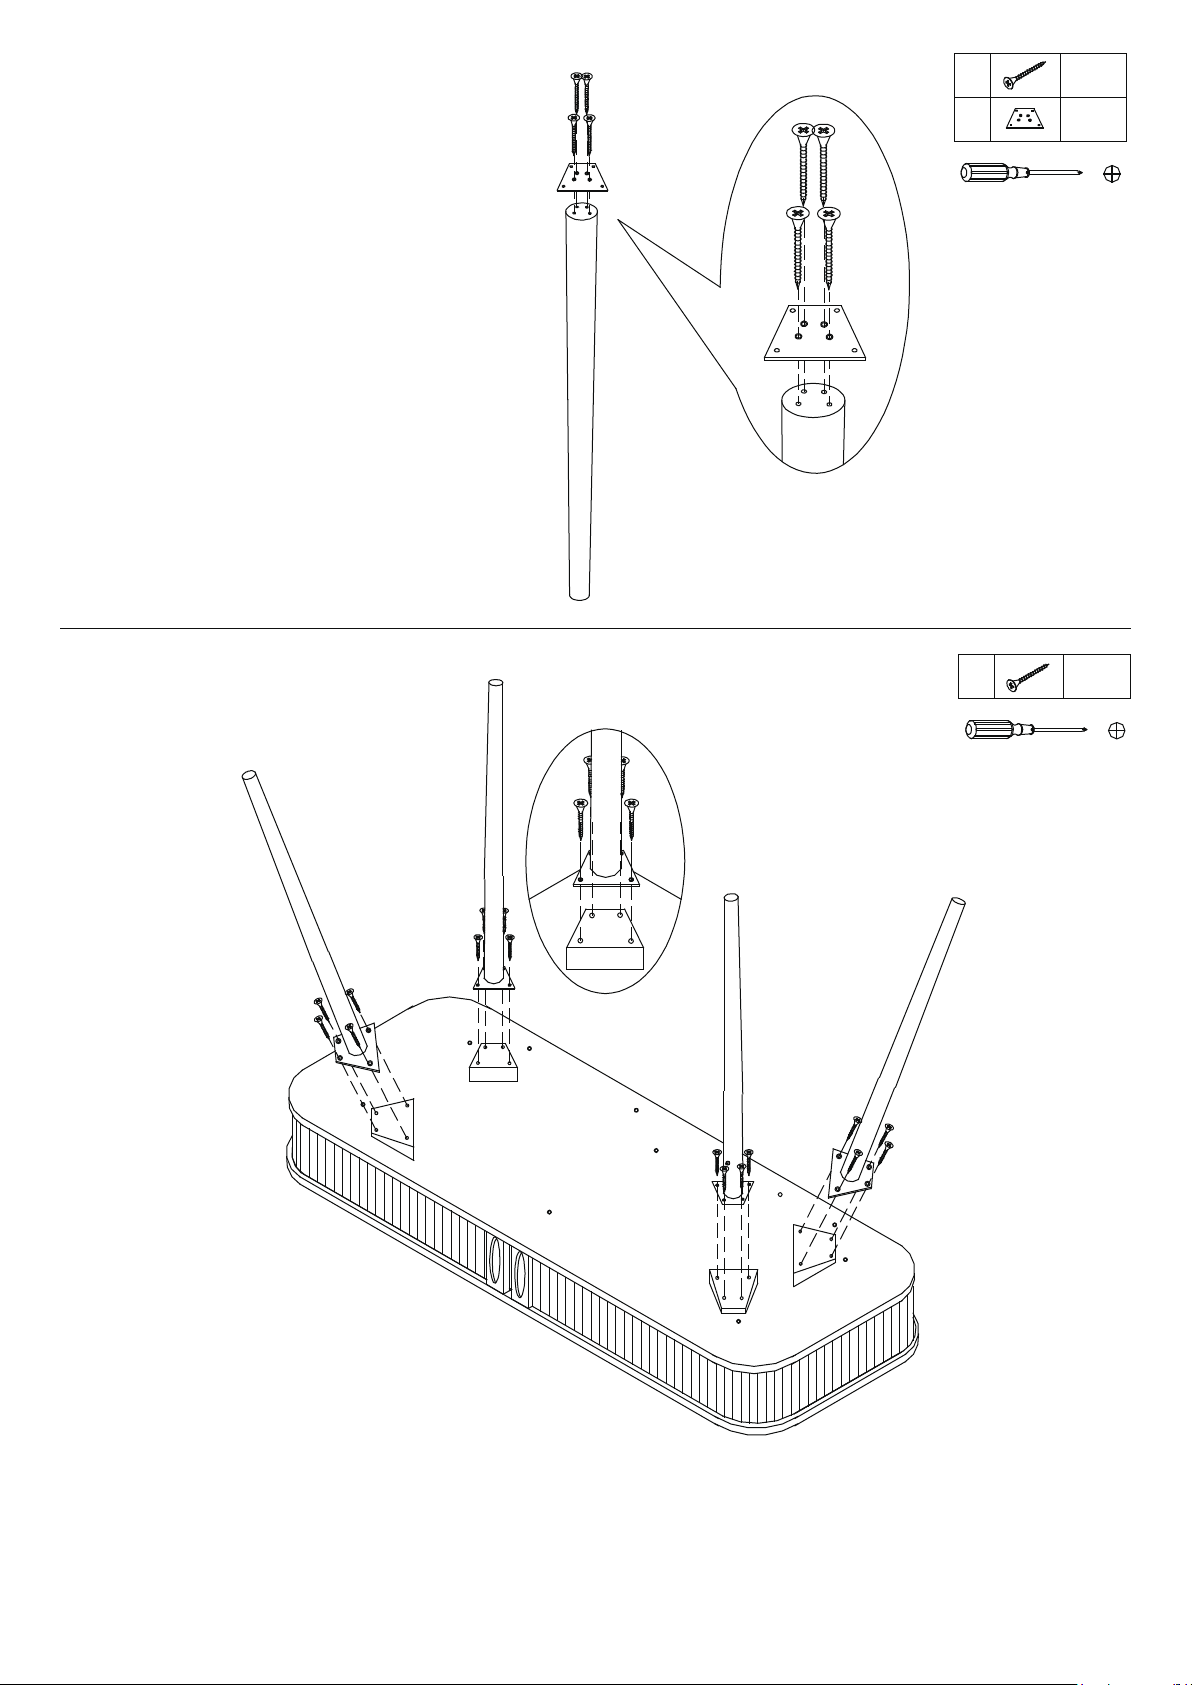
STEP 6
a) Align the 4 inner screw holes on Metal
Base Plate (F) to designated screw
holes on Leg (8).
b) Fasten Metal Base Plate (F) to Leg (8)
using Screw (E). Do not tighten (E)
completely until all the screws are in
place.
F
E
8
E
8
F
F
X 4
16 pcsE
4 pcs
STEP 7
8
8
wood block
8
D
F
8
8
D
16 pcs
a) Align screw holes on Metal Base Plate (F) to designated screw holes on wood block.
b) Fasten Leg (8) to wood block via with Screw (D). Do not tighten (D) completely until all the
screws are in place.
c) Turn the desk right-side up.
The assembly of the desk is complete.
9/9
 Loading...