

Page 1
SmartTemp Grill
Instructions & Warranty
GR24001AU_IB_V3_180618
Part No. T22-9000805
GR24001AU
Page 2

IMPORTANT SAFEGUARDS
When using electrical appliances, basic safety precautions should always be followed.
1. To protect against electrical hazards do not immerse the power cord, plug or grill in water or any
other liquid.
2. Do not use in the bathroom or near any source of water.
3. Do not use outdoors.
4. Always use the appliances handles as some parts will be hot. The temperature of accessible
surfaces/parts may become very hot when the appliance is operating.
5. Do not touch the hot cooking surfaces.
6. This appliance is not intended for use by persons (including children) with reduced physical, sensory or
mental capabilities, or lack of experience and knowledge, unless they have been given supervision or
instruction concerning use of the appliance by a person responsible for their safety.
7. Always turn off and unplug from the power outlet before cleaning the appliance.
8. To disconnect, turn off the wall power outlet, then grasp the plug and remove from wall power
socket. Never pull by the cord.
9. Do not operate this appliance with a damaged cord or plug or after the appliance has
malfunctioned, or been dropped or damaged in any manner. Contact Customer service for
replacement, examination, repair or adjustment.
10. There are no user serviceable parts. If the power cord or appliance is damaged, it must be replaced or
repaired by the manufacturer or similarly qualified person in order to avoid a hazard.
11. Do not use on an inclined plane or unstable surface.
12. Do not move the appliance when in use.
13. Do not cover the appliance when in use.
14. Take care when opening the lid of the appliance, there may be some steam.
15. Always take care when removing food after cooking as it is hot.
16. Food may burn. Always monitor when using this appliance.
17. Do not use the appliance near or below any curtains or other combustible materials.
18. Keep the appliance and the power cord away from the edge of tables or countertops and out of
reach of children and persons with disabilities.
19. Do not cook food wrapped in plastic film or polythene bags. It will cause a fire hazard.
20. Always clean the appliance after use.
21. Follow the instructions when cleaning this appliance.
22. Do not place on or near any heat sources.
23. Do not leave the appliance unattended when in use.
24. Do not use appliance for other than its intended purpose.
25. This appliance is not a toy. Children should be supervised to ensure they do not play with the appliance.
26. This appliance is not intended to be operated by means of an external timer or separate remote
control system.
27. For added safety, electrical appliances should be connected to a power outlet that is protected by
a residual current device (RCD), also often referred to as a ‘Safety Switch’. Your switchboard may
already incorporate an RCD. If unsure, call an electrician for verification and fitting if necessary.
27. This appliance is intended to be used in household and similar applications such as:
- staff kitchen areas in shops, offices and other working environments;
- by clients in hotels, motels and other residential type environments;
- bed and breakfast environments.
SAVE THESE INSTRUCTIONS
THIS APPLIANCE IS FOR HOUSEHOLD USE ONLY
2 3
Page 3
Congratulations on the purchase of your George Foreman Grill. Each unit is
g
f
i
g
g
k
manufactured to ensure safety and reliability. Before using the appliance for the rst
time, please read the instruction book carefully and keep it for future reference. Pass it
on if you pass on the appliance.
When using electrical appliances, basic safety precautions should always be followed.
The surfaces of the appliance will get hot
The surface of the appliance will get hot
e
f
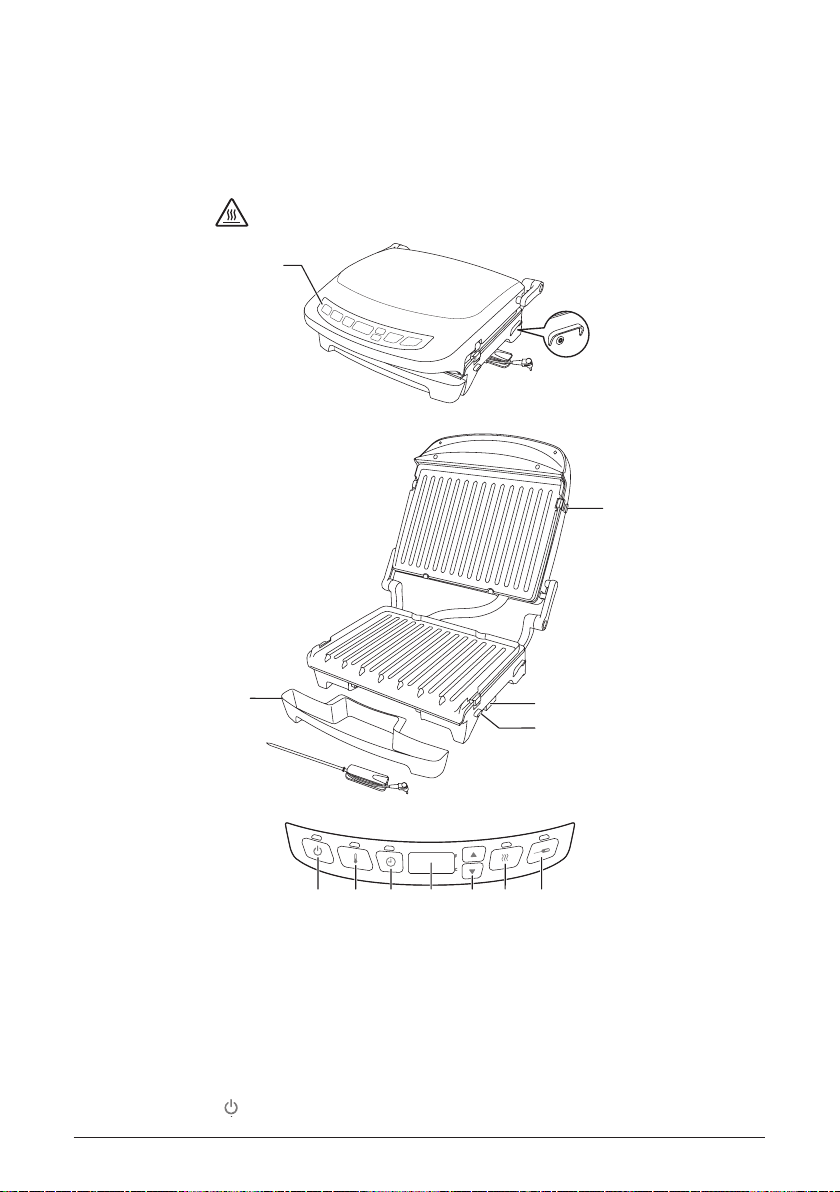
PARTS
1. Control panel
2. Probe connector
3. Plate release buttons
4. Probe storage
5. Drip tray
6. Probe
7. On/off button ( )
j
i
g
k
l onm r s t
8. Temperature button
9. Timer button
10. Display
11. Adjust buttons
12. Sear/Steak button
13. Probe select button
Page 4
A B
C
D
E F
BEFORE USING YOUR GRILL
• Remove any packaging and labels from the appliance.
• Wipe the exterior and cooking plates with a damp cloth to remove any dust.
• Place the grill on a stable, level, heat-resistant surface, in a well ventilated area, with
the lid closed.
• Plug the power cord into a wall power outlet and switch the outlet on.
• Press the ON button
• The grill will heat to 175 degrees (default temperature), when the grill reaches
operating temperature, the grill will emit 3 beeps and the LED will ash and change
to green.
Note: When using your grill for the rst time, the unit may emit a ne smoke
vapour and scent. This is normal and is caused by the rst heating of the new
elements and new cooking plates.
• Press the on/off button, switch the power off at the wall power outlet, allow the grill
to cool then wipe over the cooking plates once again using a damp cloth.
• Select the sear function and allow the unit to nish cycle - the light will turn green
and you will hear three beeps.
FLAT FOR SANDWICHES OR TILTED FOR GRILLING?
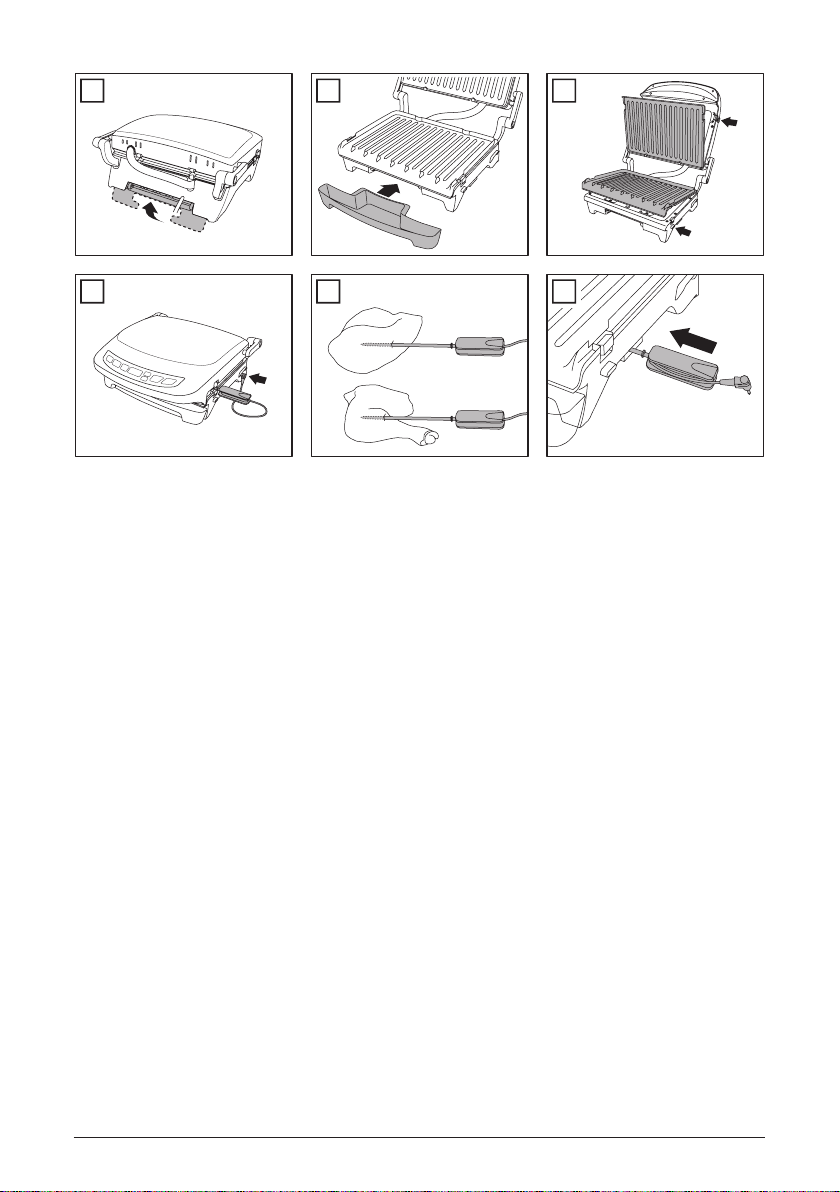
• You may raise the rear foot to tilt the grill and speed the ow of fat into the drip tray,
or leave it at to prevent llings such as melting cheese moving towards the front of
the grill (FIG A).
• Grill meat, burgers, anything that exudes fat, on the tilt.
• Grill sandwiches, panini, foods with uid llings like melting cheese, on the at.
• Centre the drip tray under the front of the grill, to catch run-off.
4 5
Page 5

BASIC GRILLING
Use the basic grilling function for simple grilling, panini, sandwiches, etc.
• Sit your grill on a stable, level, heat-resistant surface, away from cupboards,
curtains, etc.
• Slide the drip tray between the two runners underneath the front of your grill (FIG
B). Slide the tray all the way in. The drip tray will collect any fat or juices that run off
the plates during cooking.
• Decided whether you want the grill level or tilted.
1. Plug the grill in. The grill will beep and the red power light will ash slowly.
2. Press the 2 button. If you don’t press the 2 button within 2 minutes, your grill will
enter sleep mode and the red power light will stop ashing. Press the 2 button
again to wake your grill.
3. The light above the temperature ( ) button will come on and the display will show
175 (default). The default temperature units are in ºC.
4. Set the temperature you require using the u and d buttons. The range is from
150ºC to 220ºC in 5º increments.
5. While your grill is heating up, the light above the temperature button will light up red,
and the gures on the display will ash. When your grill has reached the selected
temperature, the light will turn green, the display will stop ashing and your grill
will beep three times. During cooking, this sequence will be repeated as your grill
maintains the temperature. This is normal.
6. When the selected temperature has been reached place the food onto the grill and
close the lid.
7. When you have nished cooking press the 2 button then unplug the grill.
• You can adjust the temperature at any time using the u and d buttons.
• Check that the food is cooked. If you’re in any doubt, cook it a bit more.
• Wear oven gloves or similar protection.
• Remove the cooked food with wooden or plastic tools.
• The hinge is articulated to cope with thick or oddly shaped foods.
• The grill plates should be roughly parallel, to avoid uneven cooking.
• When necessary, use an oven glove and empty the drip tray. Wipe it with kitchen
paper then replace it under the front of the grill.
Page 6

SEAR FUNCTION
The sear function raises the temperature to 260ºC for 90 seconds. The sear function
works best with close-grained red meat like beef, lamb, venison, buffalo, bison, etc., cut
into steaks (across the grain of the meat). The meat should be between 5 mm and 25
mm thick.
1. Press the 2 button.
2. Press the sear (P) button. The light above the sear button will light up red and the
display will show 260.
3. When your grill has reached the sear temperature, the light will turn green, the
display will stop ashing and your grill will beep three times.
4. Wear an oven glove and open the grill. Place the food onto the bottom grill plate,
then close the grill.
5. Wait till the grill beeps again (after 90 seconds) then open the grill
6. You can repeat the sear function four times one after the other but if you try to use
it more than this the display will show “EAA “ (ERRor). Press the 2 button and allow
your grill to cool for 10 minutes before using the sear function again.
7. At the end of the sear function, your grill will revert to the previously set temperature.
However, it will take time to cool down.
8. To cancel the sear function at any time, press the 2 button.
The outside surfaces of the food will be seared to a deep brown, while the inside should
be rare to medium rare (depending on the thickness of the food).
You now have the option of removing the food right away, (for rare or medium), or leaving
it to cook at the default temperature for a little longer if you want the meat more well
done.
Tips for perfect steaks
• Ideally, steak should be 12 - 15 mm thick (llet steaks can be thicker).
• Always allow the steaks to come up to room temperature before cooking. Don’t try
to cook them straight from the fridge.
• Pat the steaks dry with kitchen paper before placing on the grill.
• Season just before cooking. Be sparing with the salt or leave it out altogether (you
can always add salt for avour after cooking). Adding salt before cooking can draw
water to the surface of the steak where it will boil during cooking. The steak will be
steamed rather than seared, and will be grey instead of brown.
• Resting steaks after cooking is crucial for the best results. Allow them to rest for a
minimum of 3 minutes before serving. Correct resting allows the juices within the
meat to be reabsorbed giving a tasty, succulent steak.
6 7
Page 7

TEMPERATURE PROBE FUNCTION
Many people judge if meat is cooked by touch or sight, or from the length of the cooking
time. The use of the temperature probe has several benets over these methods:
• Provide consistent, repeatable results
• Prevent overcooking
• Prevent under cooked food
• Eliminate guesswork
In use, the sharp point of the temperature probe is inserted into the food and the other
end is connected to your grill. The probe constantly sends the internal temperature of
the food to your grill where it is compared to a target temperature you have previously
set. Once reached, your grill will sound an alarm and switch off.
1. Connect the temperature probe to your grill (FIG D).
2. Press the 2 button.
3. Set the cooking temperature you require using the u and d buttons and allow your
grill to heat up.
4. Press the probe ( ) button. The light above the probe button will light up red and
the display will show 75 (default).
5. Set the probe temperature you require using the u and d buttons. The range is
from 48ºC to 81ºC in 3º increments.
6. Insert the temperature probe into the food and carefully place the food onto the
preheated grill. Make sure that the probe doesn’t affect the lid closing or that the
cable isn’t pinched when the lid is closed.
7. During cooking, the display will alternate between showing the target temperature
you have set and the temperature that the probe is actually reading. When the
internal temperature of the food matches the target temperature, the light above the
probe button will turn green and your grill will beep ve times. The heaters of your
grill will switch off when the target temperature is reached but since cooking will
continue due to the residual heat, remove the food as soon as possible.
8. To cancel the function at any time, press the 2 button.
• If you forget to plug in the probe the display will show “NO PAB ” (NO PRoBe) and
your grill will beep.
• The probe will become HOT during use.
• Always insert the probe into the thickest part of the meat away from any bone or fat
which can give a false reading (FIG E).
• For the most accurate temperature reading, make sure that the probe is placed as
central as possible between the upper and lower surfaces of the meat.
• Before and after use, clean the probe with warm soapy water, rinse and dry.
• Store the probe by wrapping the cable between the two halves of the handle and
inserting it into the recess on the side of your grill (FIG F).
Note: The temperature probe is a guide but you have to make up your own mind as
to whether food is safe or not. Temperature probe recommended only for those foods
listed on page 9.
Page 8

TIMER FUNCTION
Using the timer is optional. It doesn’t turn your grill off, it simply beeps ve times to tell
you the time is up. Use the timer with the basic grilling function. To set the timer:
1. Switch on your grill and set the desired temperature. Allow it to heat up until the light
above the temperature button turns green.
2. Press the timer button the light above the button will come on and the display will
ash 5:00 (default). Use the u and d buttons to set the desired time. The time can
be set from 30 seconds minute to 19 minutes 30 seconds in 30 second increments.
If you don’t press either button within 5 seconds, the grill will revert to temperature
mode.
3. The display will stop ashing and the timer will start to count down 5 seconds after
you last press the u and d button.
4. When the timer reaches zero, the grill will beep ve times and the display will ash
0:00. Remember that your grill is still active and you must remove the food to avoid
overcooking it.
5. To cancel the timer function at any time, press and hold the timer button for three
seconds. Your grill will revert to the basic grilling function.
ADVANCED COOKING
You can use the temperature probe feature to control exactly how you like your steak to
be cooked. To cook a medium-rare or medium-well done steak, do the following:
1. Prepare the steak and insert the probe. Connect the probe to the grill.
2. Press the 2 button.
3. Set the temperature to 220ºC using the u and d buttons.
4. Press the probe ( ) button. The light above the probe button will light up red and
the display will show 75 (default).
5. Use the u and d buttons to set the desired probe temperature (refer to the
COOKING TIMES AND FOOD SAFETY table).
6. Press the sear (P) button. The light above the sear button will light up red and the
display will show 260.
7. Wait until the light above the sear button turns green and the grill beeps three times.
The light above the probe button will also light up red.
8. Open the grill and place the steak, with the probe inserted, onto the grill plate then
close the lid.
9. When the steak is cooked, the light above the probe button will turn green and your
grill will beep ve times.
10. Immediately open the grill and remove the steak.
8 9
Page 9

COOKING TIMES AND FOOD SAFETY
The following times should be used purely as a guide. They are for fresh or fully
defrosted food.
Food Time
(mins)
MEAT
Steak: rare - 51ºC 220ºC
Steak: medium rare - 57ºC 220ºC
Steak: medium - 63ºC 220ºC
Steak: medium well - 69ºC 220ºC
Steak: well done - 72ºC 220ºC
Venison: rare 57ºC 220ºC
Venison: medium rare 63ºC 220ºC
Veal - - - Use the same settings as for steak
Pork chops/steaks - 75ºC 220ºC
Lamb leg steak: medium - 69ºC 220ºC
Lamb leg steak: well
done
Lamb chop: medium - 63ºC 220ºC
Lamb chop: well done - 78ºC 220ºC
Duck breast: medium - 66ºC 220ºC
Duck breast: well done - 72ºC 220ºC
Chicken breast - 75ºC 220ºC
Sausages - 75ºC 220ºC
Burgers - 75ºC 220ºC
Bacon 3-5 - 220ºC
Probe
Temp.
- 78ºC 220ºC
Grill
Temp.
Notes
Insert probe lengthways down the centre of the
sausage
Page 10

Food Time
(mins)
FISH
Salmon 3-5 - 200ºC
Prawns 1-2 - 200ºC
Flat fish 2-6 - 200ºC Plaice, Sole, etc.
Round fish 3-8 - 200ºC Haddock, Cod, etc.
Tuna / swordfish 5-10 - 200ºC
VEGETABLES
Peppers 4-6 - 220ºC
Aubergine 6-8 - 220ºC Sliced
Asparagus 3-4 - 220ºC
Carrots 5-7 - 220ºC Sliced
Courgette 1-3 - 220ºC Sliced
Tomatoes 2-3 - 220ºC Halved
Onions 5-6 - 220ºC Cut into wedges
Mushrooms 3-6 - 220ºC Whole, flat mushrooms
Corn on the cob 4-6 - 220ºC
OTHER
Haloumi 2-4 - 200ºC
Probe
Temp.
Grill
Temp.
Notes
• When cooking frozen foods, add 2-3 minutes for seafood and 3-6 minutes for meat
and poultry (depending on the thickness and density of the food).
• Cook sh till the esh is opaque throughout.
• If you aren’t using the temperature probe, cook poultry, pork, burgers, etc., until the
juices run clear.
• When cooking pre-packed foods, follow any guidelines on the package or label.
10 11
Page 11

CLEANING
CAUTION: Always unplug from the wall power outlet and allow the grill to cool
before cleaning.
Do not immerse the grill in water or in any other liquid.
• Before cleaning, switch off the power and remove the plug from the wall power
outlet.
• Place the drip tray under the front of the grill.
CAUTION: Take extra care when cleaning the cooking plates, making sure the
grill lid does not close accidently and cause injury. Hold the grill open using the
handle when cleaning the cooking plates.
• Wipe the cooking plates with paper towel to clean off any excess fat or food.
• To remove the plates, press the release button found on each side of the top and
bottom grill plates.
• Hand wash the plates in warm soapy water or alternatively place in dishwasher.
CAUTION: Do not use scouring pads, scrapers, or metal objects to clean the
cooking plates. They will damage the surface.
• Remove the drip tray and wash in warm soapy water using a soft sponge, nylon
brush or soft sponge. Rinse and dry thoroughly.
• Alternatively place the drip tray in the dishwasher.
• To clean the grill exterior, wipe with a cloth dampened in warm soapy water. Wipe
dry with paper towel.
STORAGE
• Ensure that the grill is switched off and the plug is removed from the power outlet.
• Ensure all parts have been cleaned and dried thoroughly before storing.
• Once the grill has cooled wrap the cord around the guides in the base of the grill
and store in a clean, dry place.
Page 12

Spectrum Brands Australia Pty Ltd
Locked Bag 3004 Braeside
Victoria 3195 Australia
Customer Service in Australia
TollFree: 1800 623 118
Email: info@spectrumbrands.com.au
Website: www.spectrumbrands.com.au
Spectrum Brands New Zealand Ltd
PO Box 9817 Newmarket
Auckland 1149 New Zealand
Customer Service in New Zealand
TollFree: 0800 736 776
Email: service@spectrumbrands.co.nz
Website: www.spectrumbrands.co.nz
Spectrum Brands Australia Pty Ltd and Spectrum Brands New Zealand Ltd
Warranty Against Defects
In this warranty:
Australian Consumer Law means the Australian consumer law set out in Schedule 2 to the
Competition and Consumer Act 2010;
CGA means the New Zealand Consumer Guarantees Act 1993;
Goods means the product or equipment which was accompanied by this warranty and
purchased in Australia or New Zealand, as the case may be;
Manufacturer, We or us means:
1. for Goods purchased in Australia, Spectrum Brands Australia Pty Ltd ABN, 78 007 070 573;
or
2. for Goods purchased in New Zealand, Spectrum Brands New Zealand Ltd, as the case
may be, contact details as set out at the end of this warranty;
Supplier means the authorised distributor or retailer of the Goods that sold you the Goods in
Australia or in New Zealand; and
You means you, the original end-user purchaser of the Goods.
1. Our goods come with guarantees that cannot be excluded under the Australian Consumer
Law, or the CGA. You are entitled to a replacement or refund for a major failure and
compensation for any other reasonably foreseeable loss or damage. You are also entitled
to have the goods repaired or replaced if the goods fail to be of acceptable quality and the
failure does not amount to a major failure.
2. The benefits provided by this Warranty are in addition to all other rights and remedies in
respect of the Goods which the consumer has under either the Australian Consumer Law
or the CGA. The original purchaser of the Goods is provided with the following Warranty
subject to the Warranty Conditions:
3. We warrant the Goods for all parts defective in workmanship or materials for
a (Warranty Period) period of 2 years from the date of purchase.
If the Goods prove defective within the Warranty Period by reason of improper workmanship
or material, we may, at our own discretion, repair or replace the Goods without charge.
12 13
Page 13

Warranty Conditions
4. The Goods must be used in accordance with the manufacturer’s instructions. This
Warranty does not apply should the defect in or failure of the Goods be attributable
to misuse, abuse, accident or non-observance of manufacturer’s instructions on the
part of the user. As far as the law permits, the manufacturer does not accept liability
for any direct or consequential loss, damage or other expense caused by or arising
out of any failure to use the Goods in accordance with the manufacturer’s instructions.
5. Exhaustible components (such as batteries, filters and brushes) of the Goods are
included under this Warranty only where there is a defect in workmanship or materials
used.
6. The warranty granted under clause 3 is limited to repair or replacement only.
7. Any parts of the Goods replaced during repairs or any product replaced remain the
property of the manufacturer. In the event of the Goods being replaced during the
Warranty Period, the warranty on the replacement Goods will expire on the same
date as for the Warranty Period on the original Goods which are replaced.
8. In order to claim under the warranty granted under clause 3 you must:
(a) Retain this warranty with your receipt/proof of purchase; and
(b) Return the Goods to us at the relevant address or to the Supplier by prepaid
freight within the Warranty Period accompanied with (i) the legible and unmodified
original proof of purchase, which clearly indicates the name and address of the
Supplier, the date and place of purchase, the product name or other product serial
number and (ii) this warranty.
9. This warranty is immediately void if:
(a) Any serial number or appliance plate is removed or defaced;
(b) The Goods have been serviced or otherwise repaired by a person not authorised
to do so by us or where non approved replaced parts are used.
10. The Goods are designed for domestic use only. The Goods must be connected to the
electrical voltage requirements as specified in the ratings label located on the Goods.
11. This warranty does not cover the cost of claiming under the warranty or transport
of the Goods to and from the Supplier or us.
12. This warranty is only valid and enforceable in Australia against Spectrum Brands
Australia Pty Ltd and in New Zealand against Spectrum Brands New Zealand Ltd.
Contact us or the Supplier for further details.
Register your product online
If you live in Australia please visit: www.spectrumbrands.com.au/warranty
If you live in New Zealand Please visit: www.spectrumbrands.co.nz/warranty
Registration of your warranty is not compulsory, it gives us a record of your purchase
AND entitles you to receive these benefits: Product information; Hints and tips; Recipes
and news; Information on special price offers and promotions.
Any questions? Please contact Customer Service for advice.
Warranty Conditions
4. The Goods must be used in accordance with the manufacturer’s instructions. This
Warranty does not apply should the defect in or failure of the Goods be attributable
to misuse, abuse, accident or non-observance of manufacturer’s instructions on the
part of the user. As far as the law permits, the manufacturer does not accept liability
for any direct or consequential loss, damage or other expense caused by or arising
out of any failure to use the Goods in accordance with the manufacturer’s instructions.
5. Exhaustible components (such as batteries, filters and brushes) of the Goods are
included under this Warranty only where there is a defect in workmanship or materials
used.
6. The warranty granted under clause 3 is limited to repair or replacement only.
7. Any parts of the Goods replaced during repairs or any product replaced remain the
property of the manufacturer. In the event of the Goods being replaced during the
Warranty Period, the warranty on the replacement Goods will expire on the same
date as for the Warranty Period on the original Goods which are replaced.
8. In order to claim under the warranty granted under clause 3 you must:
(a) Retain this warranty with your receipt/proof of purchase; and
(b) Return the Goods to us at the relevant address or to the Supplier by prepaid
freight within the Warranty Period accompanied with (i) the legible and unmodified
original proof of purchase, which clearly indicates the name and address of the
Supplier, the date and place of purchase, the product name or other product serial
number and (ii) this warranty.
9. This warranty is immediately void if:
10. The Goods are designed for domestic use only. The Goods must be connected to the
11. This warranty does not cover the cost of claiming under the warranty or transport
12. This warranty is only valid and enforceable in Australia against Spectrum Brands
Contact us or the Supplier for further details.
Register your product online
If you live in Australia please visit: www.spectrumbrands.com.au/warranty
If you live in New Zealand Please visit: www.spectrumbrands.co.nz/warranty
Registration of your warranty is not compulsory, it gives us a record of your purchase
AND entitles you to receive these benefits: Product information; Hints and tips; Recipes
and news; Information on special price offers and promotions.
Any questions? Please contact Customer Service for advice.
(a) Any serial number or appliance plate is removed or defaced;
(b) The Goods have been serviced or otherwise repaired by a person not authorised
to do so by us or where non approved replaced parts are used.
electrical voltage requirements as specified in the ratings label located on the Goods.
of the Goods to and from the Supplier or us.
Australia Pty Ltd and in New Zealand against Spectrum Brands New Zealand Ltd.
Page 14

NOTES:
14 15
Page 15

NOTES:
Page 16

www.georgeforeman.com.au
www.georgeforeman.co.nz
GEORGE FOREMAN and logo are trade marks of Spectrum Brands, Inc., or one of its subsidiaries.
©2018 Spectrum Brands, Inc.
 Loading...