

Page 1

CONVERTIBLE EASY
TO CLEAN GRILL
Instructions & Warranty
GRP10_IB_RB_FA_280515
GRP10
Page 2

Spectrum Brands Australia Pty Ltd
Warranty Conditions
4. The Goods must be used in accordance with the manufacturer’s instructions. This Warranty
does not apply should the defect in or failure of the Goods be attributable
to misuse, abuse, accident or non-observance of manufacturer’s instructions on the part of
the user. As far as the law permits, the manufacturer does not accept liability for any direct or
consequential loss, damage or other expense caused by or arising out of any failure to use
the Goods in accordance with the manufacturer’s instructions.
5. Exhaustible components (such as batteries, lters and brushes) of the Goods are included
under this Warranty only where there is a defect in workmanship or materials used.
6. The warranty granted under clause 3 is limited to repair or replacement only.
7. Any parts of the Goods replaced during repairs or any product replaced remain the property
of the manufacturer. In the event of the Goods being replaced during the Warranty Period,
the warranty on the replacement Goods will expire on the same
date as for the Warranty Period on the original Goods which are replaced.
8. In order to claim under the warranty granted under clause 3 you must:
(a) Retain this warranty with your receipt/proof of purchase; and
(b) Return the Goods to us at the relevant address or to the Supplier by prepaid freight
9. This warranty is immediately void if:
(a) Any serial number or appliance plate is removed or defaced;
(b) The Goods have been serviced or otherwise repaired by a person not authorised to do so
10. The Goods are designed for domestic use only. A limited 90-day Warranty applies to any
industrial or commercial use of the Goods. The Goods must be connected to the electrical
voltage requirements as specied in the ratings label located on the Goods.
11. This warranty does not cover the cost of claiming under the warranty or transport
of the Goods to and from the Supplier or us.
12. This warranty is only valid and enforceable in Australia against Spectrum Brands Australia Pty
Ltd and in New Zealand against Spectrum Brands New Zealand Ltd.
Contact us or the Supplier for further details.
Register your product online
If you live in Australia please visit: www.spectrumbrands.com.au/warranty
If you live in New Zealand Please visit: www.spectrumbrands.co.nz/warranty
Registration of your warranty is not compulsory, it gives us a record of your purchase
AND entitles you to receive these benets: Product information; Hints and tips; Recipes and
news; Information on special price oers and promotions.
Any questions? Please contact Customer Service for advice.
Locked Bag 3004 Braeside
Victoria 3195 Australia
Customer Service in Australia
Toll Free: 1800 623 118
Email: info@spectrumbrands.com.au
Website: www.spectrumbrands.com.au
Spectrum Brands New Zealand Ltd
PO Box 9817 Newmarket
Auckland 1149 New Zealand
Customer Service in New Zealand
Toll Free: 0800 736 776
Email: service@spectrumbrands.co.nz
Website: www.spectrumbrands.co.nz
Spectrum Brands Australia Pty Ltd and Spectrum Brands New Zealand Ltd
W
0911
In this warranty:
Australian Consumer Law means the Australian consumer law set out in Schedule 2 to the Competition
and Consumer Act 2010;
CGA means the New Zealand Consumer Guarantees Act 1993;
Goods means the product or equipment which was accompanied by this warranty and purchased in
Australia or New Zealand, as the case may be;
Manufacturer, We or us means:
1. for Goods purchased in Australia, Spectrum Brands Australia Pty Ltd ABN, 78 007 070 573;
or
2. for Goods purchased in New Zealand, Spectrum Brands New Zealand Ltd, as the case may be,
contact details as set out at the end of this warranty;
Supplier means the authorised distributor or retailer of the Goods that sold you the Goods in Australia or
in New Zealand; and
You means you, the original end-user purchaser of the Goods.
1. Our goods come with guarantees that cannot be excluded under the Australian Consumer Law, or
the CGA. You are entitled to a replacement or refund for a major failure and compensation for any
other reasonably foreseeable loss or damage. You are also entitled
to have the goods repaired or replaced if the goods fail to be of acceptable quality and the failure
does not amount to a major failure.
2. The benets provided by this Warranty are in addition to all other rights and remedies in respect of
the Goods which the consumer has under either the Australian Consumer Law
or the CGA. The original purchaser of the Goods is provided with the following Warranty subject to
the Warranty Conditions:
3. We warrant the Goods for all parts defective in workmanship or materials from the date
of purchase (Warranty Period), for the period of:(a) Two (2) years for Russell Hobbs products (see product packaging for details)
(b) Two (2) years with ve (5) year motor warranty for Russell Hobbs products (see product
packaging for details)
(c) Limited Lifetime, Ten (10) years for Russell Hobbs cookware.
(d) One (1) year for George Foreman® appliances.
If the Goods prove defective within the Warranty Period by reason of improper workmanship
or material, we may, at our own discretion, repair or replace the Goods without charge.
Warranty Against Defects
2
Page 3

Warranty Conditions
4. The Goods must be used in accordance with the manufacturer’s instructions. This Warranty
does not apply should the defect in or failure of the Goods be attributable
to misuse, abuse, accident or non-observance of manufacturer’s instructions on the part of
the user. As far as the law permits, the manufacturer does not accept liability for any direct or
consequential loss, damage or other expense caused by or arising out of any failure to use
the Goods in accordance with the manufacturer’s instructions.
5. Exhaustible components (such as batteries, lters and brushes) of the Goods are included
under this Warranty only where there is a defect in workmanship or materials used.
6. The warranty granted under clause 3 is limited to repair or replacement only.
7. Any parts of the Goods replaced during repairs or any product replaced remain the property
of the manufacturer. In the event of the Goods being replaced during the Warranty Period,
the warranty on the replacement Goods will expire on the same
date as for the Warranty Period on the original Goods which are replaced.
8. In order to claim under the warranty granted under clause 3 you must:
(a) Retain this warranty with your receipt/proof of purchase; and
(b) Return the Goods to us at the relevant address or to the Supplier by prepaid freight
within the Warranty Period accompanied with (i) the legible and unmodied original
proof of purchase, which clearly indicates the name and address of the Supplier, the date
and place of purchase, the product name or other product serial number and (ii) this
warranty.
9. This warranty is immediately void if:
(a) Any serial number or appliance plate is removed or defaced;
(b) The Goods have been serviced or otherwise repaired by a person not authorised to do so
by us or where non approved replaced parts are used.
10. The Goods are designed for domestic use only. A limited 90-day Warranty applies to any
industrial or commercial use of the Goods. The Goods must be connected to the electrical
voltage requirements as specied in the ratings label located on the Goods.
11. This warranty does not cover the cost of claiming under the warranty or transport
of the Goods to and from the Supplier or us.
12. This warranty is only valid and enforceable in Australia against Spectrum Brands Australia Pty
Ltd and in New Zealand against Spectrum Brands New Zealand Ltd.
Contact us or the Supplier for further details.
Register your product online
If you live in Australia please visit: www.spectrumbrands.com.au/warranty
If you live in New Zealand Please visit: www.spectrumbrands.co.nz/warranty
Registration of your warranty is not compulsory, it gives us a record of your purchase
AND entitles you to receive these benets: Product information; Hints and tips; Recipes and
news; Information on special price oers and promotions.
Any questions? Please contact Customer Service for advice.
3
Page 4

Congratulations on the purchase of your George Foreman® Grill. Each unit is manufactured
to ensure safety and reliability. Before using the appliance for the rst time, please read
the instruction book carefully and keep it for future reference. Pass it on if you pass on the
appliance.
When using electrical appliances, basic safety precautions should always be followed.
grease
channel
upper grill plateupper grill plate
handle
handle
l
ower grill platelower grill plate
handle
temperature
control dial
BEFORE USING YOUR GRILL
• Remove any packaging and labels from the appliance.
• Wipe the exterior and cooking plates with a damp cloth to remove any dust.
• Ensure the cooking plates are correctly locked in place.
• Place the grill on a stable, level, heat-resistant surface, in a well ventilated area, with the
lid closed.
CAUTION: Do not use this appliance near or below any curtains or other combustible
materials.
• Plug the power cord into a power outlet and turn the temperature control to 230°. The red
light will illuminate as it heats up.
• When the grill reaches operating temperature, the green light on the temperature control
will illuminate.
It will then cycle on and off as the thermostat operates to maintain the temperature.
NOTE: When using your grill for the first time, the unit may emit a fine smoke vapour
and scent. This is normal and is caused by the first heating of the new elements and
new cooking plates.
• Switch the power off at the wall power outlet, allow the grill to cool then wipe
over the cooking plates once again using a damp cloth.
4
Page 5

FITTING THE REMOVABLE PLATES
This grill has three removable plates. One bottom grill plate and two upper grill plates.
The two upper plates consist of one ribbed grill plate and one flat plate. Fit one upper
grill plate at a time.
NOTE: This appliance must always be used with two grill plates securely attached.
• Before handling, ensure the grill plates are cool and safe to touch.
• Align the tabs of each grill plate with slots near the hinge side of the grill (see diagram).
• Press down on the other edge of the plate (handle side) to lock it into place.
• To remove the plates, press the release button on the side of the grill and lift away from
the element. Note that there is one button for the upper grill plate and one button for the
lower grill plate.
CAUTION: Always unplug from the wall power outlet and ensure the grill is completely
cool before attaching or removing plates.
NOTE: When the upper and lower plates make contact, the coating may show slight
signs of wear. This is purely cosmetic and will not affect the operation of the grill.
CONDITION THE COOKING PLATES
NOTE: Conditioning the cooking plates will help prolong the life of the non-stick
coating.
• Lift the lid and wipe the upper and lower cooking plates lightly with cooking oil.
• Switch the power on at the wall power outlet. The power light will illuminate.
Allow the thermostat light to cycle on and off at least 2 times.
• Switch the power off at the wall power outlet, remove the plug and allow the grill
to cool.
• Wipe off any excess oil with a dry paper towel and close the lid.
USING YOUR GRILL
CONTACT GRILLING
• Place the grill on a at, level, heat resistant sur face, leaving enough space around all
sides to allow heat to ow without damage to cabinets, walls and overhanging curtains.
• Ensure that the upper and lower grill plates have been securely tted onto the grill.
(Refer to section: FITTING THE REMOVABLE PLATES).
• Place the drip tray under the front of the grill.
• Using the handle, close the lid.
• Plug the power cord into a power outlet and turn the power on. The red light on the
temperature control will illuminate to indicate that it is warming up.
• The green light on the temperature control will illuminate when the grill reaches the
selected temperature.
NOTE: The temperature control light will cycle on and off during cooking as the grill
maintains temperature.
• Using the handle, lift the lid and carefully place items to be cooked onto the bottom
cooking plate.
5
Page 6

• Close the lid, allowing the grill to begin cooking from both sides at once.
The grill is designed with a oating hinge to cope with thick or oddly shaped foods
allowing even cooking.
• The grill plates should be parallel to avoid uneven cooking.
NOTE: Normal cooking times are significantly reduced as the grill cooks from both sides
at once. As a rule of thumb, cooking times are generally halved when compared to
traditional ‘one side at a time’ grilling.
CAUTION: Do not leave this appliance unattended during use.
• Monitor food whilst cooking to ensure food is fully cooked and does not burn.
• When nished cooking switch the power off at the power outlet and remove the plug.
• Using an oven mitt or tea towel, carefully open the lid.
• Remove food using a non-metallic utensil.
NOTE: Be sure to always use either silicone, plastic or wooden utensils so as not to
scratch the non-stick surface. Never use metal tongs, forks or knives as these can
damage the coating of the cooking plates.
OPEN GRILLING
• Place the grill on a at, level, heat resistant sur face, leaving enough space around all
sides to allow heat to ow without damage to cabinets, walls and overhanging curtains.
• Ensure that the upper and lower grill plates have been securely tted onto the grill. (Refer
to section: FITTING THE REMOVABLE PLATES).
• Open the lid until it is vertical then lift the lid upwards and continue to tilt back until it is
resting fully open on the benchtop.
• Place the large drip tray under the front of the grill and small drip tray under the drip
channel of the top grill plate.
• Plug the power cord into a power outlet and turn the power on. The red light on the
temperature control will illuminate to indicate that it is warming up.
• The green light on the temperature control will illuminate when the grill reaches the
selected temperature.
NOTE: The thermostat light will cycle on and off during cooking as the grill maintains
temperature.
CAUTION: Do not leave this appliance unattended during use.
• Monitor food whilst cooking to ensure food is fully cooked and does not burn.
• When nished cooking switch the power off at the power outlet and remove the plug.
• Remove food using a non-metallic utensil.
• Allow the grill to cool completely.
CAUTION: Be sure the drip tray contents have cooled before removing drip tray.
• Once cool, the drip tray may be removed and emptied and the grill can be cleaned.
NOTE: Where the upper and lower plates make contact, the non-stick surfaces may
show signs of wear. This is purely cosmetic and will not affect the operation of the grill.
6
Page 7

CLEANING
CAUTION: Always unplug from the wall power outlet and allow the grill to cool completely
before cleaning. Do not immerse the grill, power cord or plug in water or any other liquid.
• Before cleaning, switch off the power and remove the plug from the wall power outlet.
CAUTION: Do not use scouring pads, scrapers, or metal objects to clean the cooking plates.
They will damage the surface.
• When cleaning up after grilling, with the drip tray placed at the front of the grill, use a nonmetallic utensil to scrape off any excess fat and food particles left on the grill plates.
CAUTION: Take extra care when cleaning the cooking plates, making sure the grill lid
does not close accidently and cause injury. Hold the grill open using the handle when
cleaning the cooking plates.
• Wipe plates with a damp cloth and a little detergent to remove any grease or char marks.
• Empty the plastic drip tray. Hand wash in warm, soapy water or alternatively place in the
dishwasher on the top shelf.
• To remove the plates, press the release button on the side of the grill and lift away from the
element. Note that there is one button for the upper grill plate and one button for the lower
grill plate.
• Hand-wash the plates in warm, soapy water or alternatively place in the dishwasher.
NOTE: Dishwasher detergent may cause oxidation on the uncoated side of the grill plate.
This is not harmful and will not affect performance.
• Once clean and dry, securely re-attach the plates to the grill.
• To clean the grill exterior, wipe with a cloth dampened in warm soapy water. Wipe dry with
paper towel.
• Any servicing requiring disassembly other than the above cleaning must be performed by a
qualied technician.
STORAGE
• Ensure that the grill is switched off and the plug is removed from the power outlet.
• Ensure all parts have been cleaned and dried thoroughly before storing.
• Once the grill has cooled wrap the cord around the guides in the base of the grill and store
in a clean, dry place.
QUICK COOKING GUIDE
Use these times purely as a guide. Cooking times are based on fresh, fully defrosted food.
Check food is cooked through before serving. If in doubt, cook it a bit more. Cook meat,
poultry, and any derivatives (mince, burgers, etc.) until the juices run clear. Cook sh until the
esh is opaque throughout.
When cooking pre-packed foods, follow any guidelines on the package or label.
7
Page 8
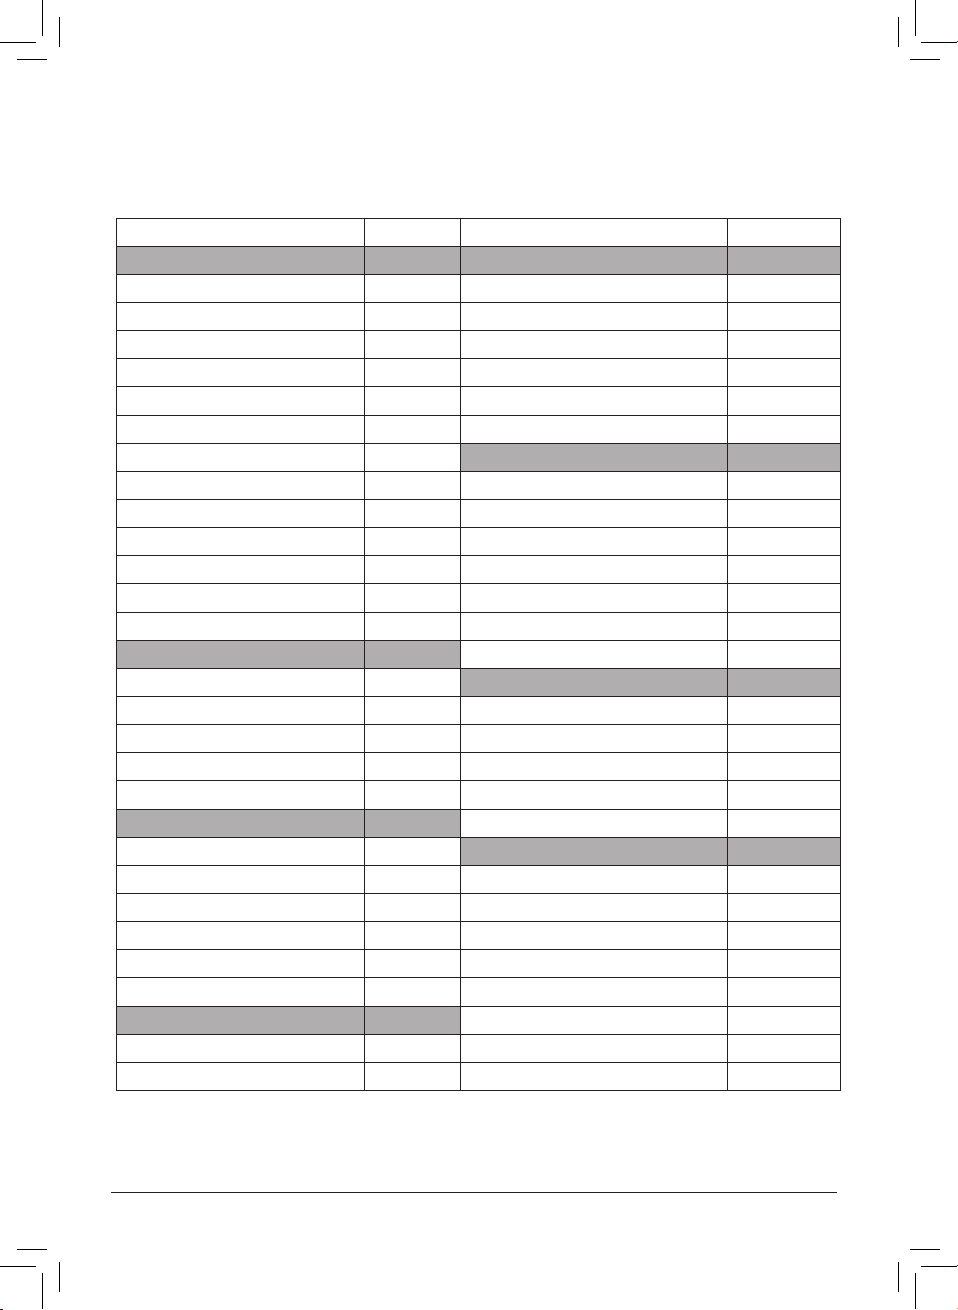
FOOD MINUTES FOOD MINUTES
BEEF SEAFOOD
Fillet rare 3 Kebab, 25mm
2
4-6
Fillet medium 4 Prawn (large) 2-3
Fillet well done 5 Snapper fillet 3-5
Loin steak 7-8 Salmon fillet 3-4
Burger, 50g 6-7 Scallop 1-2
Burger, 100g 7-8 Tuna steak 6-8
Burger, 200g 8-9 VEGETABLES
Kebab, 25mm
2
7-8 Asparagus 3-4
Round steak 5-7 Carrot, sliced 5-7
Sausage, thin 5-6 Eggplant, sliced/cubes 8-9
Sausage, thick 7-8 Onions, thin slices 5-6
Sirloin 7-9 Capsicum, thin slices 6-8
T-Bone 8-9 Potato, slices/cubes 7-9
PORK Squash, slices/cubes 6-8
Cutlets 5-6 FRUIT
Kebab, 25mm
2
7-8 Apple, halves/slices 6-8
Sausage, thin 5-6 Banana, lengthway slices 3-4
Sausage, thick 7-8 Nectarine, halves/slices 3-5
Fillet 4-6 Peach, halves/slices 3-5
CHICKEN/TURKEY Pineapple, slices 3-7
Chicken breast pieces 5-7 SNACKS
Burger, 100g 4 Sandwich, cheese 2-3
Burger, 200g 5 Sandwich, cooked meat 5-7
Kebab, 25mm
2
7-8 Calzone 8-9
Chicken thigh 5-7 Hot dog 2-3
Turkey breasts, thin slices 3-4 Quesadillas 2-3
LAMB
Kebab, 25mm
2
7-8
Cutlet 2-3
8
Page 9

TROUBLESHOOTING
IMPORTANT SAFEGUARDS
When using electrical appliances, basic safety precautions should always be followed.
1. To protect against electrical hazards do not immerse the power cord, plug or grill in water
or any other liquid.
2. Do not use in the bathroom or near any source of water.
3. Do not use outdoors.
4. Always use the appliances handles as some parts will be hot. The temperature of
accessible surfaces/parts may become very hot when the appliance is operating.
5. Do not touch the hot cooking surfaces.
6. Allow the appliance to cool before attaching or removing any plates or any parts.
7. This appliance is not intended for use by persons (including children) with reduced
physical, sensory or mental capabilities, or lack of experience and knowledge, unless they
have been given supervision or instruction concerning use of the appliance by a person
responsible for their safety.
8. Do not leave the appliance unattended when in use.
9. Always turn off and unplug from the wall power outlet when not in use.
10. Always turn off and unplug from the wall power outlet before cleaning the appliance.
11. To disconnect, turn off the wall power outlet, then grasp the plug and remove from the wall
power socket. Never pull by the cord.
12. Do not operate this appliance with a damaged cord or plug or after the appliance has
malfunctioned, or been dropped or damaged in any manner. Contact Customer service for
replacement, examination, repair or adjustment.
13. There are no user serviceable parts. If the power cord or appliance is damaged, it must be
replaced or repaired by the manufacturer or similarly qualied person in order to avoid a
hazard.
14. Do not use on an inclined plane or unstable surface.
15. Do not move the appliance or drip trays when in use or immediately after use, as it may
contain hot oils or other hot liquids.
16. Do not cover the appliance when in use.
17. Take care when opening the lid of the appliance, there may be some steam.
18. Always take care when removing food after cooking as it is hot.
19. Food may burn. Always monitor when using this appliance.
20. Do not use the appliance near or below any curtains or other combustible materials.
21. Do not place on or near any heat sources.
22. Keep the appliance and the power cord away from the edge of tables or countertops and
out of reach of children and persons with reduced physical, sensory and mental capacities.
23. Do not cook food wrapped in plastic lm or polythene bags. It will cause a re hazard.
24. Always clean the appliance after use.
25. Follow the instructions when cleaning this appliance.
9
Page 10

26. Do not attempt to t accessories/components that have not been supplied with or are not
specically designed for use with this appliance.
27. Do not attempt to cook food in the appliance without rst tting the cooking plates.
28. Do not use appliance for other than its intended purpose.
29. This appliance is not a toy. Children should be supervised to ensure they do not play with
the appliance.
30. Do not leave the appliance unattended when in use or where it may be touched by children
or persons with disabilities.
31. This appliance is not intended to be operated by means of an external timer or separate
remote control system.
32. For added safety, electrical appliances should be connected to a power outlet that is
protected by a residual current device (RCD), also often referred to as a ‘Safety Switch’.
Your switchboard may already incorporate an RCD. If unsure, call an electrician for
verication and tting if necessary.
SAVE THESE INSTRUCTIONS
THIS APPLIANCE IS FOR HOUSEHOLD USE ONLY
10
Page 11

14
NOTES
Page 12

13
RECIPES
NOTES12NOTES
Page 13

Page 14

11
RECIPES
from the cooking process.
NOTE: For all recipes, please remember to place the drip trays in position to catch drippings
Serves 4
slice of smoked salmon and a dollop of tomato relish. Finish with a big squeeze of lemon.
4. To serve, place a slice of toast on each plate and top with a handful of rocket, 2 fritters, a
toasted to your liking.
3. While the fritters are cooking, place bread on the grill side to toast, turning over when it is
a few minutes.
on the at grill. When browned on one side, turn and cook through – this should take only
selected temperature. When the grill reaches temperature, place spoonfuls of the mixture
illuminate red as it is heating and the green light will illuminate once it has reached the
2. Open the grill fully and pre-heat on 200°C. The red light on the temperature control will
pepper. Mix to combine.
1. Place grated zucchini and corn into a bowl with beaten eggs, oil, cheese, parsley, salt and
Method:
Tomato relish to serve
Salt and pepper to taste
1 lemon, quartered
4 slices sourdough or Turkish bread
1 cup rocket
200g smoked salmon
½ cup continental parsley, chopped
½ cup corn kernels, fresh or tinned
½ cup tasty cheese
1 tbs olive oil
2 eggs, beaten
3tbs plain our
4 small zucchini, grated
Ingredients:
Cooking Time: 5 minutes
Preparation Time: 10 minutes
ZUCCHINI & CORN FRITTERS WITH SMOKED SALMON BREAKFAST
Page 15

10
from the cooking process.
NOTE: For all recipes, please remember to place the drip trays in position to catch drippings
Serves 4-6
salad.
5. To serve, place the salad on a large serving platter. Slice the lamb and pile on top of the
extra virgin olive oil, red wine vinegar and lemon juice.
4. In a large bowl, toss the cooled peas, mint, parsley, feta, onion, shredded lettuce, 1tbs
rinse under cold water.
3. Meanwhile, blanch the peas in boiling water for 4 minutes or until just tender. Drain and
for 5 minutes while you assemble the salad.
grill. Close the lid and cook for 4-6 minutes or until cooked to your liking. Rest the meat
2. Coat the lamb with 1tbs extra virgin olive oil, season with salt & pepper and place on the
heating and the green light will illuminate once it has reached the selected temperature.
1. Pre-heat grill to 230 °C. The red light on the temperature control will illuminate red as it is
Method:
1tbs red wine vinegar
Juice of 1 lemon
200g feta, cubed
1 small Cos lettuce, shredded
1 small red onion, halved and sliced very thinly
½ cup continental parsley, chopped
½ cup mint leaves, torn
150g freshly shelled peas (or frozen)
Salt & black pepper
2 tbs olive oil
2 lamb backstraps, 200g each
Ingredients:
Cooking Time: 10-12 minutes
Preparation Time: 5 minutes
LAMB SALAD WITH FETA, PEAS & MINT
Page 16

9
RECIPES
from the cooking process.
NOTE: For all recipes, please remember to place the drip trays in position to catch drippings
Makes 12
4. Serve the pikelets with banana on top with a drizzle of honey or golden syrup.
golden brown.
3. Meanwhile, place the sliced bananas on the grill side and cook for 2 minutes or until
take only a few minutes. Repeat with remaining batter.
on the at grill. When golden brown on one side, turn to cook the other side – this should
selected temperature. When the grill reaches temperature, place spoonfuls of the mixture
illuminate red as it is heating and the green light will illuminate once it has reached the
2. Open the grill fully and pre-heat on 200°C. The red light on the temperature control will
milk and ricotta until mixed through.
1. Combine the our, baking powder, salt and caster sugar in a large bowl. Stir in the egg,
Method:
Honey or Golden Syrup to serve
3 ripe bananas, sliced down the middle lengthways
150g fresh ricotta
¼ cup low fat milk
1 egg, lightly whisked
1 tbs caster sugar
Pinch of sea salt
1 tsp baking powder
1 cup wholemeal plain our
Ingredients:
Cooking Time: 5-7 minutes
Preparation Time: 10 minutes
CARAMELISED BANANA & RICOTTA PIKELETS
Page 17

8
from the cooking process.
NOTE: For all recipes, please remember to place the drip trays in position to catch drippings
Serves 4
pepper and fresh chives.
5. Serve the salmon and charred vegetables with a generous squeeze of lemon, salt and
your liking.
4. Place the vegetables on the grill side and grill on each side for 2-3 minutes until cooked to
and cook for a further 2 minutes.
3. Place the salmon skin side down on the pre-heated at grill. Cook for 3 minutes then ip
salmon with olive oil cooking spray.
2. Place the vegetables in a large bowl and spray with olive oil cooking spray. Also spray the
selected temperature.
illuminate red as it is heating and the green light will illuminate once it has reached the
1. Open the grill fully and pre-heat on 230°C. The red light on the temperature control will
Method:
Olive oil cooking spray
Fresh chives, nely chopped
Sea salt & black pepper
1 lemon, halved
4 spring onions, trimmed to 10cm length
1 bunch asparagus
2 ripe tomatoes, halved
4 X 150g Atlantic Salmon llets
Ingredients:
Cooking Time: 6 minutes
Preparation Time: 10 minutes
ATLANTIC SALMON WITH CHARRED VEGETABLES
Page 18

7
RECIPES
from the cooking process.
NOTE: For all recipes, please remember to place the drip trays in position to catch drippings
Serves 4-6
Serve over jasmine rice with a dollop of yoghurt, squeeze of lime and fresh coriander.
every minute to ensure the kebabs cook evenly.
4. When it reaches temperature, place the kebabs on the grill. Cook for 6-8 minutes, turning
it is heating and the green light will illuminate once it has reached the selected temperature.
3. Pre-heat your grill on 230°C. The red light on the temperature control will illuminate red as
beef kebabs and turn to coat in the marinade.
2. Combine remainder of ingredients in a food processor and blitz for 30 seconds. Pour over
1. Skewer beef onto kebab sticks and place in a shallow dish.
Method:
6 kebab sticks
Salt & pepper to taste
2 tbs peanut oil
¼ tsp ground turmeric
½ tsp ground cumin
½ tsp ground coriander
1 clove garlic
Ginger, 2cm peeled & roughly chopped
600g beef sirloin, cut into 2cm cubes
Ingredients:
Cooking Time: 10 minutes
Preparation Time: 20 minutes
INDIAN SPICED BEEF KEBABS
Page 19

6
from the cooking process.
NOTE: For all recipes, please remember to place the drip trays in position to catch drippings
Makes 8 burger patties
leaves and mustard.
5. Serve on wholemeal hamburger buns with spinach, fresh tomato, Swiss cheese, basil
minutes, until juices run clear.
4. Arrange patties on the George Foreman® Convertible Easy To Clean Grill and cook for 4-6
it is heating and the green light will illuminate once it has reached the selected temperature.
3. Pre-heat your grill on 230°C. The red light on the temperature control will illuminate red as
2. Shape the mixture into eight patties, place on a plate and refrigerate for 10 minutes.
1. In a large bowl, combine all ingredients and mix well, using your hands.
Method:
Mustard
½ cup fresh basil leaves
Swiss cheese
Tomatoes
80g spinach
Wholemeal hamburger buns
For serving:
1 tsp ground black pepper
1 tbs Worcestershire sauce
750g lean minced beef (5-star)
2 sprigs of thyme, leaves only
2 tbs parsley
1 egg
¼ cup wholemeal breadcrumbs
¼ cup grated carrot
¼ cup nely chopped vegetables (eg. spring onions, zucchini, red or green capsicum)
Ingredients:
POWER BURGER
Page 20

5
RECIPES
drippings from the cooking process.
NOTE: For all recipes, please remember to place the drip tray in front of the grill to catch
Serves 4
shredded iceberg lettuce.
into bite-size pieces. Place chicken in each pita bread, top with tzatziki and serve with
chicken with the lid down for 4-5 minutes or until done. Rest on a plate, then shred
5. Remove chicken from bowl; discard marinade. Place drip tray under the grill and cook
is done.
4. Lightly toast the pita bread pockets for a minute each. Wrap them in foil until your chicken
it is heating and the green light will illuminate once it has reached the selected temperature.
3. Pre-heat your grill on 230°C. The red light on the temperature control will illuminate red as
a stick blender until smooth. Add cucumber and stir through.
2. Meanwhile, for tzatziki sauce, place all ingredients except cucumber in a jug and blitz with
shallow bowl. Cover with cling wrap and place in refrigerator for 10 minutes.
1. To marinate chicken, combine lemon juice, oregano, oil, salt, garlic and chicken in a
Method:
Sea salt & black pepper
1 Lebanese cucumber, seeded, coarsely grated and drained
1 garlic clove, minced
1 tbs lemon juice
100g Greek feta
½ cup plain Greek yoghurt
Tzatziki sauce:
¼ iceberg lettuce, shredded
4 pita bread pockets
400g boneless chicken thighs
2 garlic cloves, minced
½ tsp salt
2 tbs olive oil
1 ½ tbs chopped fresh oregano
2 tbsp fresh lemon juice
Ingredients:
Cooking Time: 10 minutes
Preparation Time: 10 minutes
CHICKEN SOUVLAKIS
Page 21

4
drippings from the cooking process.
NOTE: For all recipes, please remember to place the drip tray in front of the grill to catch
Serves 4
the sh and serve.
5. Meanwhile, assemble the baguettes with tomato, rocket and a dollop of yoghurt. Top with
4. Place the marinated sh on the grill and gently place the lid down. Cook for 4-5 minutes.
sh. Turn the sh over to coat in the spice mix.
3. Mix the herbs and spices together with the vegetable oil in a small bowl and pour over the
2. Lay the sh llets in a shallow baking dish.
it is heating and the green light will illuminate once it has reached the selected temperature.
1. Pre-heat your grill on 230°C. The red light on the temperature control will illuminate red as
Method:
4 tbs natural yoghurt
50g rocket
1 tomato, sliced
1 baguette cut into 4
3 tbs vegetable oil
1 tsp cayenne pepper
1 tsp paprika
1 tbs oregano
1 tsp salt
1 tsp black pepper
4 x 150g white sh llets (eg. Dory or Ling)
Ingredients:
Cooking Time: 5 minutes
Preparation Time: 10 minutes
CAJUN FISH BURGERS
Page 22

3
RECIPES
drippings from the cooking process.
NOTE: For all recipes, please remember to place the drip tray in front of the grill to catch
Makes 2
Quick and easy!
4. Toast for 2-3 minutes or until nice and golden in colour.
top of your sandwich.
and tomato. Spread tomato relish on the remaining 2 slices of bread and place them on
3. Spread mustard on 2 slices of the bread and top with the cooked bacon, lettuce, avocado
2. Cook bacon for 2 minutes with the lid down. Set aside.
it is heating and the green light will illuminate once it has reached the selected temperature.
1. Pre-heat your grill on 230°C. The red light on the temperature control will illuminate red as
Method:
1 tbs tomato relish
1 tbs mustard
1 avocado, peeled and sliced thinly
4 leaves cos lettuce
1 tomato, sliced thinly
4 slices sourdough bread
4 rashers shortcut rindless bacon
Ingredients:
Cooking Time: 5 minutes
Preparation Time: 10 minutes
BREAKFAST BLT
Page 23

2
drippings from the cooking process.
NOTE: For all recipes, please remember to place the drip tray in front of the grill to catch
Serves 4-6
over the salad and season with salt and pepper.
4. Transfer the salad to a serving platter and ake the salmon over the top. Drizzle lemon juice
vinegar, gently toss to combine.
3. Meanwhile, place all the salad ingredients in a large bowl and drizzle with olive oil and
minutes.
the lid. Cook salmon for 2-3 minutes, carefully take off the grill and rest on a plate for 2
2. Spray the salmon llets lightly with olive oil spray, place them on the grill and gently close
it is heating and the green light will illuminate once it has reached the selected temperature.
1. Pre-heat your grill on 230°C. The red light on the temperature control will illuminate red as
Method:
2 tbs extra virgin olive oil
1 tbs red wine vinegar
½ cup continental parsley, chopped
4 spring onions, sliced on the diagonal
4 anchovies, halved (optional)
4 baby potatoes, halved, boiled and cooled
2 ripe tomatoes, quartered
4 soft boiled eggs, peeled and quartered
50g black olives, pitted and halved
100g green beans, blanched and cut in half
Salad ingredients
Sea salt & black pepper
Juice of 1 lemon
Olive oil spray
4 x Atlantic Salmon llets (approx. 150g each)
Ingredients:
Cooking Time: 20 minutes
Preparation Time: 10 minutes
ATLANTIC SALMON NICOISE SALAD
Page 24

© 2015 SBI.
of its subsidiaries.
RECIPES
means, electronic, mechanical, photocopying, recording or otherwise, without prior permission of the copyright owner.
Recipes are to be used in conjunction with the (GRP10) George Foreman ® Convertible Easy to Clean Grill.
WWW.GEORGEFOREMAN.CO.NZ
WWW.GEORGEFOREMAN.COM.AU
All rights reserved. No part of this publication may be reproduced, stored in a retrieval system or transmitted in any form or by any
® Registered Trademark and TM Trademark of Spectrum Brands, Inc. (SBI), or one
TO CLEAN GRILL
CONVERTIBLE EASY
 Loading...