

Page 1

Griddle
Griddle
GREG10
INSTRUCTIONS
& WARRANTY
GREG10_IB_RB2_031111
Page 2

Spectrum Brands Australia Pty Ltd
Locked Bag 3004 Braeside
Victoria 3195 Australia
Customer Service in Australia
TollFree: 1800 623 118
Email: info@spectrumbrands.com.au
Website: www.spectrumbrands.com.au
Spectrum Brands New Zealand Ltd
PO Box 9817 Newmarket
Auckland 1149 New Zealand
Customer Service in New Zealand
TollFree: 0800 736 776
Email: service@spectrumbrands.co.nz
Website: www.spectrumbrands.co.nz
Spectrum Brands Australia Pty Ltd and Spectrum Brands New Zealand Ltd
W
0911
In this warranty:
Australian Consumer Law means the Australian consumer law set out in Schedule 2 to
the Compeon and Consumer Act 2010;
CGA means the New Zealand Consumer Guarantees Act 1993;
Goods means the product or equipment which was accompanied by this warranty and
purchased in Australia or New Zealand, as the case may be;
Manufacturer, We or us means:
1. for Goods purchased in Australia, Spectrum Brands Australia Pty Ltd ABN, 78 007 070 573;
or
2. for Goods purchased in New Zealand, Spectrum Brands New Zealand Ltd, as the case
may be, contact details as set out at the end of this warranty;
Supplier means the authorised distributor or retailer of the Goods that sold you the
Goods in Australia or in New Zealand; and
You means you, the original end-user purchaser of the Goods.
1. Our goods come with guarantees that cannot be excluded under the Australian
Consumer Law, or the CGA. You are entled to a replacement or refund for a major
failure and compensaon for any other reasonably foreseeable loss or damage. You
are also entled to have the goods repaired or replaced if the goods fail to be of
acceptable quality and the failure does not amount to a major failure.
2. The benefits provided by this Warranty are in addion to all other rights and
remedies in respect of the Goods which the consumer has under either the
Australian Consumer Law or the CGA. The original purchaser of the Goods is provided
with the following Warranty subject to the Warranty Condions:
3. We warrant the Goods for all parts defecve in workmanship or materials from the
date of purchase (Warranty Period), for the period of:-
(a) Two (2) years for Russell Hobbs products (see product packaging for details)
(b) Two (2) years with five (5) year motor warranty for Russell Hobbs products (see
product packaging for details)
(c) Limited Lifeme, Ten (10) years for Russell Hobbs cookware.
(d) One (1) year for George Foreman, iRobot, Wesnghouse, Black & Decker and
Spectrum Brands products.
If the Goods prove defecve within the Warranty Period by reason of improper workmanship
or material, we may, at our own discreon, repair or replace the Goods without charge.
Warranty Against Defects
Page 3

Warranty Condions
4. The Goods must be used in accordance with the manufacturer’s instrucons. This
Warranty does not apply should the defect in or failure of the Goods be aributable
to misuse, abuse, accident or non-observance of manufacturer’s instrucons on the
part of the user. As far as the law permits, the manufacturer does not accept liability
for any direct or consequenal loss, damage or other expense caused by or arising
out of any failure to use the Goods in accordance with the manufacturer’s
instrucons.
5. Exhausble components (such as baeries, filters and brushes) of the Goods are
included under this Warranty only where there is a defect in workmanship or
materials used.
6. The warranty granted under clause 3 is limited to repair or replacement only.
7. Any parts of the Goods replaced during repairs or any product replaced remain the
property of the manufacturer. In the event of the Goods being replaced during the
Warranty Period, the warranty on the replacement Goods will expire on the same
date as for the Warranty Period on the original Goods which are replaced.
8. In order to claim under the warranty granted under clause 3 you must:
(a) Retain this warranty with your receipt/proof of purchase; and
(b) Return the Goods to us at the relevant address or to the Supplier by prepaid
freight within the Warranty Period accompanied with (i) the legible and
unmodified original proof of purchase, which clearly indicates the name and
address of the Supplier, the date and place of purchase, the product name or
other product serial number and (ii) this warranty.
9. This warranty is immediately void if:
(a) Any serial number or appliance plate is removed or defaced;
(b) The Goods have been serviced or otherwise repaired by a person not authorised
to do so by us or where non approved replaced parts are used.
10. The Goods are designed for domesc use only. A limited 90-day Warranty applies to
any industrial or commercial use of the Goods. The Goods must be connected to the
electrical voltage requirements as specified in the rangs label located on the Goods.
11. This warranty does not cover the cost of claiming under the warranty or transport of
the Goods to and from the Supplier or us.
12. This warranty is only valid and enforceable in Australia against Spectrum Brands
Australia Pty Ltd and in New Zealand against Spectrum Brands New Zealand Ltd.
Contact us or the Supplier for further details.
Register your product online
If you live in Australia please visit: www.spectrumbrands.com.au/warranty
If you live in New Zealand Please visit: www.spectrumbrands.co.nz/warranty
Registraon of your warranty is not compulsory, it gives us a record of your purchase
AND entles you to receive these benefits: Product informaon; Hints and ps; Recipes
and news; Informaon on special price offers and promoons.
Any quesons? Please contact Customer Service for advice.
Page 4
Congratulations on the purchase of your George Foreman Grill. Each unit is manufactured
to ensure safety and reliability. Before using the appliance for the first time, please read
the instruction book carefully and keep it for future reference. Pass it on if you pass on the
appliance.
When using electrical appliances, basic safety precautions should always be followed.
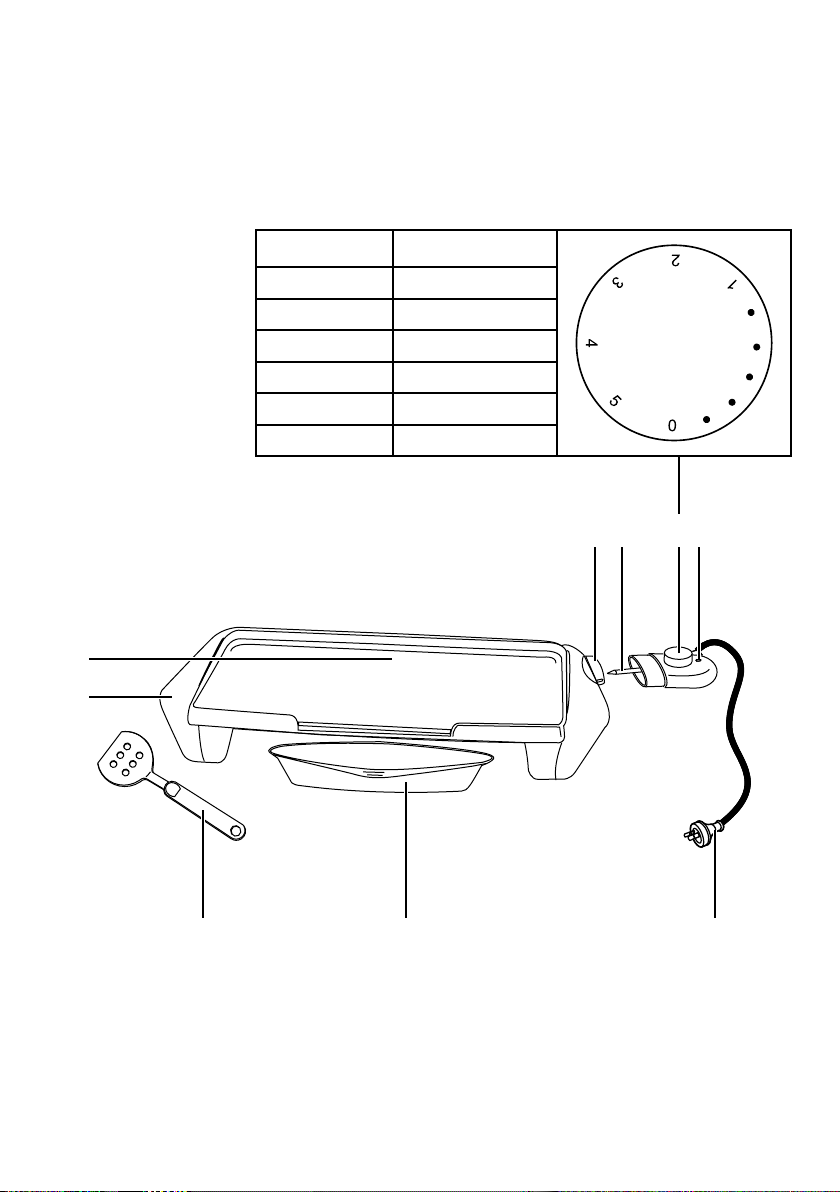
Temp. setting
0
1
2
3
4
5
Approx temp. °C
OFF
160°C
170°C
180°C
190°C
200°C
3 4 5 6
1
2
1. Griddle cooking plate.
2. Handle.
3. Probe receptacle.
4. Temperature control probe.
5. Temperature control knob.
789
6. Power-on light.
7. Power cord.
8. Drip tray.
9. Plastic spatula.
4
Page 5

Before Using your Griddle
• Remove all packing material and any stickers.
• Remove and save literature.
• Wash all removable parts as instructed in “Care and Cleaning” section of this manual.
• Wipe cooking surface with a damp cloth or sponge to remove any dust.
Wipe dry with a soft cloth or paper towel.
• Select location where unit is to be used, leaving enough space between back
of unit and wall to allow heat to flow without damage to cabinets and walls.
Using Your Griddle
• Before using this appliance for the first time, clean griddle as outlined
in “Care and Cleaning”.
• Slide drip tray beneath the front of the unit with hand grip facing out.
• To preheat: Turn the temperature control knob to ‘OFF’. Insert the temperature control
probe fully into the probe receptacle. Plug the cord into a power outlet and switch on.
The variable temperature control allows you to cook at a heat setting over the range of
95°C–200°C. Adjust the control up or down to achieve desired cooking temperature. As
the griddle is heating, the preheat indicator light turns on and it will remain ON until the
set temperature has been reached.
Note: Preheat indicator light will cycle on and off as needed to maintain the set temperature.
• Allow griddle to preheat except where noted on the Cooking Chart. The preheat time will
vary depending on the heat setting you have selected.
The higher the heat setting, the longer the preheat time.
• Carefully place items to be cooked on the griddle.
• Allow food to cook, turning halfway through cooking time, if needed.
Caution: Do not leave appliance unattended during use!
• When finished cooking, turn the temperature control knob to ‘OFF’.
Disconnect plug from power outlet.
• Remove food using the plastic spatula. Be sure to always use either silicone, plastic or
wooden utensils so as not to scratch the non-stick surface. Never use metal tongs, forks
or knives as these can damage the coating on the griddle plate.
• Let appliance cool completely. When cool, the drip tray may be removed and emptied.
Caution: Be sure liquid has cooled before removing drip tray.
Cooking Hints and Tips
• Use tender cuts of meat.
• Marinate tougher cuts of meat to tenderise them before cooking.
• To avoid drying out meat and fish, do not pierce with a utensil.
• Better cooking results will be achieved with boneless cuts of meat, chicken and fish.
• Cut edge of meat in several places to prevent curling.
• When cooking fish or chicken breast fillets, tuck extremely thin parts under to prevent
overcooking.
5
Page 6

• If cooking more than one item, try to select foods of even thickness to promote uniform
cooking.
• When cooking small portions, make sure meat is centred on griddle. When cooking
larger portions, distribute evenly and allow 25mm of space between foods to promote
uniform cooking.
• Some foods such as eggs and pancakes cook better if the non-stick surface is
conditioned with cooking oils before preheating. If necessary, remove excess oil with a
paper towel.
• Adjust heat setting gradually and only as necessary. Cooking foods at too high a
temperature can cause them to dry out.
• If food is undercooked when removed from griddle, simply return to griddle
for additional cooking time.
Care and Cleaning
Warning: To avoid electric shock, unplug from outlet when not in use and before
cleaning. DO NOT IMMERSE TEMPERATURE CONTROL PROBE, CORD OR PLUG IN
WATER OR OTHER LIQUID.
Caution: To avoid accidental burns, allow griddle to cool thoroughly before cleaning.
• Before cleaning, turn the temperature control knob to ‘OFF’ and unplug from the wall
outlet. Remove temperature control probe, wipe with a damp cloth and dry thoroughly.
• Place drip tray under front of griddle with the handle facing out. Using the spatula,
scrape off any excess fat and food particles.
• Empty the drip tray.
• Wash griddle, drip tray and spatula in warm soapy water; rinse and dry thoroughly.
Caution: temperature control probe and probe receptacle must always be completely
dry before use. The drip tray and plastic spatula may be washed in the dishwasher,
top-rack only. Do not wash griddle in the dishwasher.
• Stubborn Build-up: If necessary, use a non-metallic scrubbing pad to clean the griddle.
Do not use steel wool, scouring pads or abrasive cleaners on any part of the appliance.
Storage
Unplug unit, allow to cool and clean before storing. Store in a clean, dry place. Never store
griddle while it is hot or still plugged in. Never wrap cord tightly around the appliance as
this could cause the cord to fray and break.
Important Safeguards
When using electrical appliances, basic safety precautions should always be followed.
1. To protect against electrical hazards do not immerse the power cord, plug or
temperature control probe in water or any other liquid.
2. Do not use in the bathroom or near any source of water. Do not use outdoors.
3. Always use the appliances handles as some parts will be hot. The temperature of accessible
surfaces/parts may become very hot when the appliance is operating.
6
Page 7

4. Do not touch the hot cooking surfaces.
5. This appliance is not intended for use by persons (including children) with reduced physical,
sensory or mental capabilities, or lack of experience and knowledge, unless they have been
given supervision or instruction concerning use of the appliance by a person responsible for
their safety.
6. Always turn off and unplug from the power outlet before cleaning the appliance.
7. To disconnect, turn off the wall power outlet, then grasp the plug and remove from wall power
socket. Never pull by the cord.
8. Do not operate this appliance with a damaged cord/plug or after the appliance has
malfunctioned, or been dropped or damaged in any manner. Contact Customer service for
replacement, examination, repair or adjustment.
9. There are no user serviceable parts. If the power cord or appliance is damaged, it must be
replaced or repaired by the manufacturer or similarly qualified person in order to avoid a hazard.
10. Do not use on an inclined plane or unstable surface.
11. Do not move the appliance when in use.
12. Do not cover the appliance when in use.
13. Always take care when removing food after cooking as it is hot.
14. Food may burn. Always monitor when using this appliance.
15. Do not use the appliance near or below any curtains or other combustible materials.
16. Keep the appliance and the power cord away from the edge of tables or countertops and out of
reach of children and infirm persons.
17. Do not cook food wrapped in plastic film or polythene bags. It will cause a fire hazard.
18. Always clean the appliance after use.
19. Do not place on or near any heat sources.
20. Do not leave the appliance unattended when in use.
21. Follow the instructions when cleaning this appliance.
22. Do not use this appliance for other than its intended purpose.
23. This appliance is not a toy. Children should be supervised to ensure they do not play with the
appliance.
24. This appliance is not intended to be operated by means of an external timer or separate remote
control system.
25. For added safety, electrical appliances should be connected to a power outlet that is protected
by a residual current device (RCD), also often referred to as a ‘Safety Switch’. Your switchboard
may already incorporate an RCD. If unsure, call an electrician for verification and fitting if
necessary.
SAVE THESE INSTRUCTIONS
THIS APPLIANCE IS FOR HOUSEHOLD USE ONLY
Additional Important Safeguards
26. Caution: This appliance is hot during operation and retains heat for some time after turning off.
Always use oven mitts when handling hot materials and allow metal parts to cool before cleaning.
27. Caution: The Temperature Control Probe is a sensitive device. Use care not to drop, hit or impact
the temperature control probe against hard surfaces. Never pull on the cord of the temperature
control probe. Always grip the body of the temperature control probe when handling.
Page 8

9
3. Serve with fresh berries.
second side.
browns lightly, turn over with a spatula and cook the
evenly to create a thin crepe. As soon as crepe
mixture onto the surface, spreading quickly and
2. Preheat Griddle to ‘3’. Pour about ¼ cup of crepe
Transfer the mixture to a jug.
Whisk until mixture is light, then stir in the butter.
together eggs and milk, pour gradually into the flour.
1. Sift flour into a bowl, add the castor sugar. Beat
Makes 6
30g melted butter
1¼ cups milk
3 medium eggs
2 tbsp castor sugar
1 cup plain flour
INGREDIENTS
FRENCH CREPES
Page 9

8
4. Serve with jam and whipped cream.
rack or kitchen paper.
underside is browned, remove and cool on a wire
egg slide and cook the second side. As soon as
on the surface. Flip over with a spatula or plastic
reduce heat slightly and cook until bubbles appear
surface in small quantities (less than 1 tablespoon),
3. Preheat Griddle to ‘3’. Drop the mixture onto the
drop easily from a spoon, add a little more milk.
2. Beat until mixture is smooth. If it seems too thick to
and vanilla.
milk and vinegar, and add the softened butter or oil
Make a well in the centre, pour in the beaten egg,
1. Mix together sifted flour, soda, salt and castor sugar.
Makes about 30
½ tsp vanilla essence
extra light olive oil
2 tsp softened butter or
1 tsp white vinegar
¾ cup milk
1 egg, beaten
2 tbsp castor sugar
Pinch salt
⅓ tsp bi-carb of soda
sifted
1 cup self raising flour,
INGREDIENTS
PIKELETS
Remove the hard centre core.
* Very sweet, ripe fresh pineapple may be substituted.
of mint.
serve with a crisp biscuit. Garnish with a small sprig
of ice cream onto each, top with the berries and
3. Place onto small serving plates; place a small scoop
brown, turn and grill second side.
onto the surface, grill until underside is golden
2. Preheat Griddle to ‘3’. Place the pineapple slices
up to one hour.
little honey with a little brown sugar. Allow to sit for
with the blueberries and orange juice, drizzle on a
1. Slice or halve strawberries and place into a bowl
Serves 4
Crisp biscuit
Vanilla ice cream
Orange zest
Blueberries
Strawberries
sugar
Honey or dark brown
well drained
pineapple in syrup*,
4 slices canned
INGREDIENTS
GRILLED PINEAPPLE WITH BERRIES
Page 10

7
Pepper, to taste
sour cream.
4. Serve with a garden salad and baked potatoes with
serve the dressing on the side.
ingredients. Place the tuna onto heated plates and
3. Meanwhile, mix together the mayonnaise and other
turning once with tongs.
the Griddle and watch closely to cook as desired,
2. Preheat Griddle to either ‘4’ or ‘5’. Place the fish on
until well coated.
flat dish. Turn the fish in the mixture several times
1. Mix together olive oil and lemon or lime juice in a
chopped
1 gherkin, finely
capers
½ tsp drained, chopped
lime or lemon juice
Generous squeeze of
¼ cup mayonnaise
SIDE DRESSING
Lemon juice
Olive oil
2 tuna steaks
Serves 2
INGREDIENTS
TUNA WITH CAPERS
toast.
browned, arrange on plates. Serve with hot buttered
spatula and place onto plates. When bacon is lightly
griddle, brown underside lightly, then turn with the
with the spatula. Place the tomato slices on the
3. Meanwhile, turn the bacon once, pressing it down
warm.
heated plates, remove from metal rings and keep
over. Cook for another 30 seconds, then slip onto
or plastic egg slide under each ring and quickly turn
slightly. After just a minute, carefully slip the spatula
then prick the yolk with a knife to allow it to run
2. Cook eggs until they are just beginning to firm and
4 thick slices tomato
Arrange the bacon on the surface.
the surface carefully, and break an egg into each.
1. Preheat the Griddle to ‘3’. Place four egg rings onto
8 rashers lean bacon
4 eggs
Serves 2
INGREDIENTS
HEARTY EGG & BACON BREAKFAST
Page 11

6
Salt & pepper, to taste
3. Serve with a cheese sauce.
should take only a few minutes.
browned on underside, turn and cook through. This
lightly with a spatula or plastic egg slide. When
of the zucchini mixture onto the hotplate, and flatten
2. Preheat Griddle to ‘3’, place eight large spoonfuls
salt and pepper. Mix lightly but thoroughly.
beaten eggs, grated cheese, oil, parsley or mint and
1. Place the grated zucchini into a bowl, sift, stir in
Serves 4
1 tbsp extra light olive oil
or mint
1 tbsp chopped parsley
cheese
½ cup grated tasty
2 eggs, beaten
2 tbsp flour
grated
4 medium large zucchini,
INGREDIENTS
ZUCCHINI & CHEESE FRITTERS
Page 12

5
oregano
1 tsp chopped fresh
mushroom sauce and a green salad.
5. Serve the patties on a warm plate, topped with
mix well.
taste, stir in the light sour cream and oregano and
the mushrooms and onion until tender. Season to
4. To prepare the sauce, melt butter in a pan, sauté
through.
egg slide. Continue cooking until patties are cooked
before turning over patties with a spatula or plastic
then reduce heat to ‘3’. Cook for several minutes
3. Arrange on the Griddle, brown underside quickly
four portions, shape into patties.
2. Preheat Griddle to ‘5’. Divide the meat mixture into
seasoning for the patties. Mix very thoroughly.
spring onions, beaten egg, lemon zest and
1. In a bowl, mix together mince, chopped mushrooms,
⅓ cup light sour cream
Salt & pepper, to taste
sliced
1 medium onion, thinly
250g mushrooms, sliced
2 tbsp butter
MUSHROOM SAUCE
Salt & pepper, to taste
1 tsp grated lemon zest
1 egg, beaten
chopped
2 spring onions, finely
finely chopped
250g mushrooms, very
mince
500g lean pork and veal
Serves 4
INGREDIENTS
PORK & VEAL PATTIES WITH MUSHROOM SAUCE
Page 13

4
Light sour cream
¼ cup taco sauce
Squeeze of lemon juice
½ small red onion, diced
and diced
1 ripe tomato, seeded
spoonful of sour cream and additional taco sauce.
with the shredded chicken and roll up. Serve with a
tomato, onion, lemon juice and taco sauce. Top
down one side, top with mixed chickpeas, avocado,
3. Spread tortilla flat, place a strip of shredded lettuce
from Griddle and shred the chicken.
cook on both sides until cooked through. Remove
cooking surface. Pressing down with a spatula,
2. Preheat Griddle to ‘3’ and place fillets onto the
to one hour.
Brush over the chicken fillets and refrigerate for up
oil and smoked paprika.
1. Flatten chicken fillets. Mix together taco sauce, olive
diced
1 avocado, peeled and
well drained
½ cup canned chickpeas,
Finely shredded lettuce
4–6 Tortillas
FILLING
½ tsp smoked paprika
1 tbsp olive oil
2 tbsp taco sauce
trimmed of fat
2 skinless chicken fillets,
Serves 4
CHICKEN TORTILLAS
INGREDIENTS
Page 14

3
Designed in Australia.
electronic, mechanical, photocopying, recording or otherwise, without prior permission of the copyright owner.
All rights reserved. No part of this publication may be reproduced, stored in a retrieval system or transmitted in any form or by any means,
Recipes are to be used in conjunction with the Griddle by George Foreman.
©2011 Spectrum Brands, Inc
® Registered Trade Mark of Spectrum Brands, Inc., or one of its subsidiaries
the bun in place and press down lightly.
burgers. Spoon on tomato chutney. Set the top of
onion, tomato and beetroot and top with the cooked
shredded lettuce on the base, add the cooked
4. Split and lightly butter the bread rolls. Arrange
Tomato chutney
2 large wholemeal buns
Salt & pepper, to taste
Sliced beetroot
Shredded lettuce
underside, turn and cook until cooked through.
spatula. Continue cooking until well browned on the
onto the griddle, pressing down lightly with the
3. Wipe down Griddle, reheat to ‘3’. Place the burgers
Sliced tomato
thinly sliced
2 small white onions,
FILLING
and lightly golden. Set aside and keep warm.
Using a spatula, toss and turn onions until softened
2. Preheat Griddle to ‘2’ or ‘3’. Place onion on top.
Salt & pepper, to taste
mixed herbs
1 tbsp finely chopped
rounds, flatten.
oil, herbs and salt and pepper. Shape into two
1. Prepare vegetables. In a bowl, mix together steak,
Serves 2
2–3 tsp light olive oil
250g lean minced steak
INGREDIENTS
HAMBURGERS
Page 15

2
time
through cooking
Turn halfway
brown both sides
time
remaining cooking
halfway through
325°F (165°C). Turn
then reduce temp to
top side, turn
bubbles appear on
griddle. When
through cooking
through cooking
through cooking
through cooking
through cooking
Well: 15–22 min.
Med: 9–16 min.
3/4" (2 cm) thick
5 / approx 200°C Rare: 6–11min.
3 / approx 180°C 6–10 min. Brown both sides
5 / approx 200°C 10–16 min. Turn halfway
Steaks,
Sausage 2 / approx 170°C 15–20 min. Turn often.
Sandwiches 3 / approx 180°C 5–8 min. Butter outside and
1/2” (1.25 cm) thick
Pork chops,
Pancakes 4 / approx 190°C 3–6 min. Pour batter onto
Ham slices 3 / approx 180° 15–20 min. Turn halfway
Hamburger 3 / approx 180°C 6–18 min. Turn halfway
French toast 3 / approx 180°C 6–12 min. Turn halfway
1”(2.5 cm) thick
Fish steaks,
Eggs 3 / approx 180°C 2–4 min. Turn halfway
Bacon 2 / approx 170°C 8–16 min. Turn often.
Food Setting Time Directions
thermometer.
or thickness of the meat being cooked. To be sure that the food is truly done, use a cooking
The following times are meant to be used as guidelines only. Times will vary due to the cut
Quick Cooking Guide
Page 16

RECIPES
 Loading...