

Page 1

INDOOR-OUTDOOR
New logo April 2016
GRILL FOR 15 SERVINGS
USE AND CARE MANUAL
GIO3000
Register your product at
www.prodprotect.com/georgeforeman
www.georgeforemancooking.com
GIO3000_IB_18252-000.indd 1 9/28/17 4:22 PM
Page 2

PLEASE READ AND SAVE THIS USE AND CARE BOOK.
IMPORTANT SAFEGUARDS.
When using electrical appliances, always follow basic safety precautions to
reduce the risk of fire, electric shock, and/or injury, including the following:
• Read all instructions.
• Do not touch hot surfaces. Use handles or knobs.
• To protect against electrical shock do not
immerse cord, plug, or temperature control
probe in water or other liquid.
• Close supervision is necessary when any
appliance is used by or near children.
• Unplug from outlet when not in use and
before cleaning. Allow to cool before putting
on or taking off parts and before cleaning
the appliance.
• Do not operate any appliance with a damaged
cord or plug, or after the appliance malfunctions
or has been damaged in any manner. Contact
consumer support.
• The use of accessory attachments not
recommended by the appliance manufacturer
may cause injuries.
• Do not let cord hang over edge of table or
counter, or touch hot surfaces.
• Do not place on or near a hot gas or electric
burner, or in a heated oven.
• Extreme caution must be used when moving an
appliance containing hot oil or other hot liquids.
• Use only George Foreman (Part no. 21006A)
temperature-control probe.
• Always attach plug to appliance first, then plug
cord into the wall outlet. To disconnect, turn any
control to OFF, then remove plug from wall outlet.
• Do not use this appliance for other than intended use.
• Fuel, such as charcoal briquettes, is not to be
used with this appliance.
• Use only on properly grounded outlet.
• This appliance is not intended for use by persons
(including children) with reduced physical, sensory
or mental capabilities, or lack of experience
and knowledge, unless they have been given
supervision or instruction concerning use of the
appliance by a person responsible for their safety.
• Children should be supervised to ensure that
they do not play with the appliance.
• This product is not intended for outdoor storage
• Be sure the pedestal is assembled and fastened
securely.
• See instructions regarding assembly of pedestal
under “ASSEMBLY INSTRUCTIONS” on page 4.
• Do not clean this product with a water spray or
the like.
• Store product indoors when not in use – out of
reach of children.
WARNING—Tip-over Hazard
• Cup holder and tray should only be utilized when
grill is on a flat, level surface.
• Do not exceed the maximum allowable capacity.
See installation instructions on page 7 for details.
Failure to do so can result in burns and/or
injuries to children or adults.
SAVE THESE INSTRUCTIONS.
This product is for household use only.
GROUNDED PLUG
As a safety feature, this product is equipped with a
grounded plug, which will only t into a three-prong
outlet. Do not attempt to defeat this safety feature.
Improper connection of the grounding conductor may
result in the risk of electric shock. Consult a qualied
electrician if you are in doubt as to whether the outlet is
properly grounded.
TAMPER-RESISTANT SCREW
Warning: This appliance is equipped with a tamper-
resistant screw to prevent removal of the outer cover. To
reduce the risk of re or electric shock, do not attempt
to remove the outer cover. There are no user-serviceable
parts inside. Repair should be done only by authorized
service personnel.
ELECTRICAL CORD
CAUTION: To reduce risk of electric shock, connect to
properly grounded outlets only.
GIO3000_IB_18252-000.indd 2 9/28/17 4:22 PM
1) Extension cords are available and may be used if care
is exercised in their use.
2) If an extension cord is used:
a) The marked electrical rating of the extension cord
should be at least as great as the electrical rating of
the appliance.
b) If the appliance is of the grounded type, the extension
cord should be a grounding-type 3-wire cord.
c) The cord should be arranged so that it will not
drape over the counter top or tabletop where it can
be pulled on by children or tripped over.
d) Outdoor extension cords should be used with
outdoor use products and are surface marked
with the suffix letter “W” and with a tag stating,
“SUITABLE FOR USE WITH OUTDOOR APPLIANCES”.
CAUTION: Risk of Electric Shock. Keep extension cord
connection dry and off the ground.
Note: If the power cord is damaged, please call our
Customer Service line listed in these instructions.
2
Page 3

GETTING TO KNOW YOUR INDOOR-OUTDOOR GRILL
† 1. Lid handle (Part no. GIO3000-02)
† 2. Lid part no. depends on color
GIO3000RD-01(Red)
GIO3000BK-01 (Black)
GIO3000BL-01 (Blue)
GIO3000SV-01 (Silver)
GIO3000CU-01 (Copper)
GIO3000EP-01 (Eggplant)
3. Lid holder
† 4. Tray (Part no. GIO3000-03)
† 5. Upper pedestal tube
(Part no. GIO3000-04)
† 6. Pedestal base hub/lower tube
(Part no. GIO3000-05)
† 7. Pedestal feet (4)
(Part no. GIO3000-06)
† 8. Temperature control probe
(Part no. 21006A)
9. Probe receptacle
† 10. Nonstick coated grill plate
(Part no. GIO3000-07)
† 11. Cup holder
(Part no. GIO3000-08)
† 12. Removable drip tray
(Part no. GIO3000-09)
† 13. Grill base
Note: † indicates consumer
replaceable/removable parts.
3
GIO3000_IB_18252-000.indd 3 9/28/17 4:22 PM
Page 4

GETTING STARTED
• Remove all packing material, any
stickers, and the plastic band
around the power plug.
• Remove and save literature.
• Please visit www.prodprotect.com/
georgeforeman to register your
warranty.
• Wash grill plate, drip tray and lid
with warm, soapy water. Wipe dry.
Important: Do not immerse temperature
control probe in water or any other liquid.
To clean, wipe with a damp cloth and dry
thoroughly.
ASSEMBLY INSTRUCTIONS
Additional tool needed: Phillips screwdriver
Insert the four grill pedestal feet
into the pedestal base hub.
The feet will click into place when
fully seated.
WHAT'S IN THE BOX?
Lid handle: 1
Lid: 1
Tray: 1 (comes assembled in grill base)
Upper pedestal tube: 1
Pedestal base hub/lower tube: 1
Pedestal feet: 4
Temperature control probe: 1
Grill plate: 1
Cup holder: 1
Drip tray: 1
Grill base: 1
Screws: 4, located in the lid
handle and the bottom side of the base.
Remove screws from the bottom
of the grill base. Attach cup holder
(optional) to the bottom of the grill
base using screws and screwdriver.
Place the assembly with feet side
down on a at, level surface. Insert
the tapered end of the upper
tube into the lower tube and turn
clockwise to tighten.
4
GIO3000_IB_18252-000.indd 4 9/28/17 4:22 PM
Place grill base on top of the
outdoor stand, ensuring the stand
enters the hole in the bottom of the
grill base. Press down to ensure a
secure t.
Page 5

Place cleaned and completely dry
grill plate onto grill base. The plate
will only t in one orientation onto
the grill base.
Insert removable drip tray into front
opening.
Tighten screws with a screwdriver.
Place lid over grill. Your grill is
ready to use!
Remove screws from handle. Use
the two locating pegs on the handle
to place it in the correct position
on the outside of the lid. From the
inside of the lid, attach screws into
the empty holes next to the pegs.
TEMPERATURE SETTINGS
1=200°F
2=250°F
3=300°F
4=350°F
5=450°F
5
GIO3000_IB_18252-000.indd 5 9/28/17 4:22 PM
Page 6

GRILLING OUTDOORS
Place fully assembled grill on a
at, level surface within reach of a
grounded power outlet.
Turn temperature control probe to
OFF. Position and attach securely
into probe receptacle on grill.
Tip: The light on the temperature
control probe will cycle on and off as
the grill thermostat maintains proper
temperature. This is normal operation.
Remove lid when preheating is
complete. Place food onto surface
of the grill and replace the lid.
Important: For your protection this
appliance has an interlock system. The
grill probe will only insert into the probe
receptacle and function if the grill plate
is placed correctly on the grill base.
Plug into standard electrical outlet.
Caution: To ensure continued protection
from risk of electric shock, connect to
properly grounded outlets only.
Align desired temperature setting
with indicator light. Place lid
securely on grill. Allow grill to
preheat to desired temperature
(Approx. 10 min.) The rst time that
the light turns off is an indication
that the grill is preheated.
Caution: Grill surfaces are hot during
use. Allow grill, drip tray, lid and grill base
to cool completely before handling and
cleaning.
Caution: When removing the lid, steam
may escape and condensation may
collect on inside of lid while cooking.
Caution: Do not move or reposition grill
while hot.
Note: Temperature control probe may be
turned to setting 1 (200°F) to keep foods
warm for short periods of time.
Note: Use only plastic or wooden
utensils on grill surface.
When nished cooking, turn
temperature control to OFF
Position. Temperature probe
indicator light will go out.
Unplug and allow grill to cool
before disassembling and cleaning.
Once cooled remove probe.
Do not store outside. See CARE
AND CLEANING.
6
GIO3000_IB_18252-000.indd 6 9/28/17 4:23 PM
Page 7

GRILLING INDOORS
Remove the grill base from the grill
stand by lifting it off while placing
your foot on one of the stand feet.
Place grill base on a heat resistant
surface within reach of a grounded
power outlet.
TRAY AND CUP HOLDER
A pull-out tray and a cup holder
with accessory hooks are provided.
To use, pull outward on tray
until tray locks into an extended
position.
To store the tray after usage,
push inward until table locks into
retracted position
Important: Cup holder and tray should
only be utilized when grill is on a at,
level surface.
Important: Do not attempt to move or
relocate the grill while tray, hooks, or cup
holder are in use. Empty them and store
the tray prior to moving the grill.
Note: Maximum tray capacity: 4.4 lbs.
Maximum cup holder capacity: 2 lbs.
Important: Never use grill plate without
the grill base.
Caution: Some countertop nishes
are more affected by heat than others;
make sure the countertop surface can
withstand temperatures of 150°F to
prevent discoloration or other damage
to countertop surface.
Follow steps 2-6 on previous page
under Grilling Outdoors.
GIO3000_IB_18252-000.indd 7 9/28/17 4:23 PM
(Spatula and tongs not included.)
7
Page 8
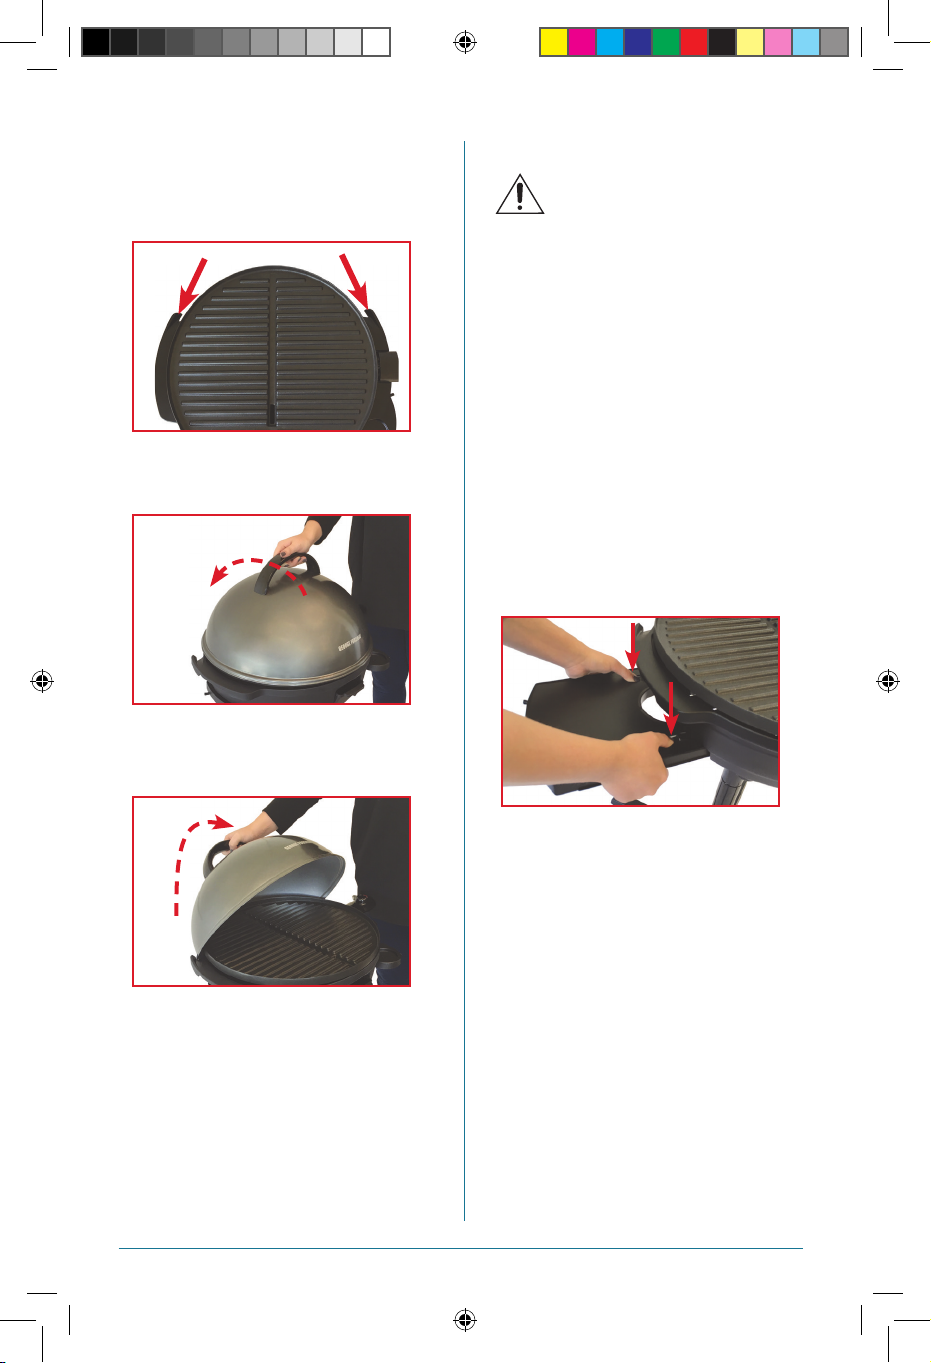
LID HOLDERS
There are two lid holders on the back
edge of the grill base.
To use them, slide the lid gently back in
an arc to rest within their grip.
CARE AND CLEANING
Caution: To avoid accidental
burns, allow your grill to cool
completely.
This product contains no user
serviceable parts. Refer service to
qualied service personnel.
Unplug and allow grill to cool
before disassembling and cleaning.
Thoroughly clean all parts after
each use.
Remove temperature control probe
(DO NOT IMMERSE). Wipe with a
damp cloth and dry thoroughly.
Remove grill plate and empty drip
tray.
To remove tray: extend full length,
then press tabs to release.
To release, rst lift up then move in an
arc forward.
Wash grill plate, drip tray, sliding
tray, and lid in warm water and dish
soap. Wipe dry.
Important: Do not use metallic
scrubbing pads, steel wool or any
abrasive cleaners to clean any part of
your grill; use only nylon or nonmetallic
scrubbing pads.
Caution: Temperature control probe
receptacle must always be completely
dry before use. Make sure receptacle is
dry before inserting control probe.
Note: This product is not intended for
outdoor storage.
8
GIO3000_IB_18252-000.indd 8 9/28/17 4:23 PM
Page 9

COOKING CHART
The following chart is meant to be used as a guideline only. Cooking time will
depend on the thickness of the food. To be sure your food is cooked, USDA
recommends using a meat thermometer to test for doneness. Insert the meat
thermometer into the thickest part of the meat until the temperature stabilizes.
FOOD
ME ATS
Hamburgers, fresh,
4 oz.
Beef Kabobs #5
Lean, boneless
steak (NY Strip,
Sirloin, Tenderloin)
Hot Dogs #5 2 minutes per side, until 145°F Turn for even grilling.
POULTRY
Boneless, skinless
chicken breast,
6 oz.
Ground Turkey
Burgers
PORK
Boneless pork
chops, 6 oz
FISH/SEAFOOD
Salmon fillets
(5 oz.), skinless
Shrimp (16/20 or
larger count)
Thin fish fillets (pan
fish, tilapia, sole)
VEGETABLES - Toss with oil, salt, and pepper to add flavor and to keep from sticking.
Asparagus #5
Bell peppers, seeded
and quartered
Onion slices #5 2-3 min per side Cut ½-inch thick.
Summer squash
(yellow, zucchini),
sliced
OTHER
Take and bake
pizza
Frozen pizza
(non rising crust
TEMP
SETTING
#5 4-6 min. per side, until 160°F
3-4 min. per side for medium rare
4-5 min. per side for medium
Medium rare (130-135F)2-3 min. per side
#5
#5
#5
#5
#5
#5
#5 2-3 min. per side or until 145°F
#5 2-3 min per side
#5 2-3 min per side
#5
#5 30-35 minutes
Medium (140-145F) 3-4 min. per side
Medium Well (150-155F) 4-5 min per side
4-6 min per side or until a minimum
internal temperature of 165°F at the
4-6 min per side or until a minimum
internal temperature of 165°F
3-4 min. per side or until a minimum
3-4 min. per side or until a minimum
2-3 min per side or until opaque and
4-6 min or until tender, turning halfway
For Thin Crusts: 20-25 minutes
For Thicker Crusts: 30-35 minutes
COOK TIME COMMENTS
Shape into patties no
more than ½- inch thick.
Cut meat and veggies
into 1-inch cubes.
Based on a 6 oz. steak
with even thickness
about 1 inch thick.
Pound or cut chicken
thickest part
of 14 5°F
of 14 5°F
not pink
through grilling
to an even thickness for
more even cooking.
Shape patties into
½-inch thickness.
Let rest 2-3 min. before
cutting.
Brush surface of salmon
with oil before grilling to
prevent sticking.
Toss with oil, salt,
pepper before grilling.
Brush with oil to prevent
sticking.
Grilling time will vary
depending on diameter.
9
GIO3000_IB_18252-000.indd 9 9/28/17 4:23 PM
Page 10

PARMESAN CORN ON THE COB
Corn on the cob is a summer staple. Dress yours up with this recipe on your George
Foreman grill.
Prep Time: 10 minutes
Cook Time: 30 minutes
Ingredients:
6 ears of corn
1 package (8 ounces) Parmesan cheese of your choice
2 tablespoons chili powder
4 tablespoons melted butter
Directions:
In a small mixing bowl combine all ingredients except for the corn. Stir until well
mixed. Take mix and spread evenly on to your ears of corn. Place on your preheated
George Foreman indoor outdoor grill. Cook for 30 minutes or until tender, turning the
cobs every 5-10 minutes.
Servings: 6
GRILLED PULL-APART BREAD
Prep Time: 10 minutes Cooking Time: 30 minutes Total Time: 40 minutes
Ingredients:
1 French boule or sourdough loaf
3 Tbsp. butter, softened
Directions:
1. Preheat the Indoor/Outdoor Grill on setting 5.
2. Cut the loaf on a diagonal into 2” diamonds, being careful not to cut all the way
through the bread.
3. Using your ngers, open each crack and spread the butter and pesto onto the
bread coating each piece completely.
4. Stuff the cheese into each crack.
5. Place a large piece of tinfoil under the bread and lightly wrap up the sides of the
bread, leaving the top open.
6. Place the foil wrapped bread onto the preheated grill. Place the lid on the grill.
7. Grill the bread for 25–30 minutes, until the cheese is melted.
8. Serve as one large loaf and pull out chunks of bread to enjoy!
Servings: 8
3 Tbsp. pesto
2 cups shredded mozzarella
10
GIO3000_IB_18252-000.indd 10 9/28/17 4:23 PM
Page 11

GOAT CHEESE PARTY POPPERS
Try these poppers at your next backyard get together or dinner party. They are sure to
please with their upscale flavor.
Prep Time: 30 minutes
Cook Time: 10 minutes
Ingredients:
12 mini sweet peppers
8 oz. goat cheese log (Try different kinds to nd what avor you like best!)
1 package low fat bacon
Directions:
Cut peppers in half and remove seeds. Cut the goat cheese (if you bought it in log
form) into slices and then in half again and place them inside the pepper halves. Take
each slice of bacon and wrap them around each pepper half. Preheat your George
Foreman grill. Place peppers on the grill, cheese side up, and cook for 8-10 minutes.
Servings: 24
MINI QUESADILLAS
Prep Time: 13 minutes
Cooking Time: 12 minutes
Total Time: 25 minutes
Ingredients:
8 fajita sized tortillas
4 Tbsp. nacho cheese sauce
¼ cup black beans, drained
½ cup shredded Mexican cheese
Directions:
1. Preheat the Indoor/Outdoor Grill on setting 4.
2. Butter the outside of 2 tortillas. Spread ½ Tbsp. nacho cheese sauce on the inside
of each tortilla.
3. Top one tortilla with 1 Tbsp. black beans, 2 Tbsp. shredded cheese, 1 Tbsp.
tomatoes, and 1 oz. chicken.
4. Place the remaining tortilla with the nacho cheese on top of the chicken and lightly
press down. The buttered sides should be facing out.
5. Repeat with the remaining 6 tortillas
6. Place the quesadillas on the preheated grill. Place the lid on the grill.
7. Grill the quesadillas for 6 minutes per side, until cheese is melted.
8. Serve warm with tortilla chips and salsa.
Servings: 4
GIO3000_IB_18252-000.indd 11 9/28/17 4:23 PM
¼ cup diced tomatoes
4 oz. diced chicken
Butter
11
Page 12

WARRANTY AND CUSTOMER
SERVICE INFORMATION
For support or any questions regarding your appliance, call the appropriate 800
number listed within this section. Please DO NOT return the product to the place of
purchase. Also, please DO NOT mail product back to manufacturer, nor bring it to a
service center. You may also want to consult our Product Protection Center at
www.prodprotect.com/georgeforeman.
Three-Year Limited Warranty
(Applies only in the United States and Canada)
What does my warranty cover?
• Your warranty covers any defect in material or workmanship provided; however, the liability of
Spectrum Brands Inc. will not exceed the purchase price of product.
How long is the warranty period?
• Your warranty extends three years from the date of original purchase with proof of
purchase.
What support does my warranty provide?
• Your warranty provides you with a reasonably similar replacement product that is either
new or factory refurbished.
How do you get support?
• Save your receipt as proof of date of sale.
• Visit the online service website at www.prodprotect.com/georgeforeman, or call toll-free
1-800-947-3745, for general warranty service.
• If you need parts or accessories, please call 1-800-738-0245.
What does my warranty not cover?
• Damage from commercial use
• Damage from misuse, abuse or neglect
• Products that have been modied in any way
• Products used or serviced outside the country of purchase
• Glass parts and other accessory items that are packed with the unit
• Shipping and handling costs associated with the replacement of the unit
• Consequential or incidental damages (Please note, however, that some states do not allow
the exclusion or limitation of consequential or incidental damages, so this limitation may
not apply to you.)
How does state law affect my warranty?
• This warranty gives you specic legal rights. You may also have other rights that vary from
state to state or province to province.
USA/Canada 1-800-947-3745
Accessories/Parts 1-800-738-0245
Register your product at www.prodprotect.com/georgeforeman
© 2017 Spectrum Brands, Inc., 3001 Deming Way, Middleton, WI 53562
®
Registered Trademark and
Made in China.
TM
Trademark of Spectrum Brands, Inc.
T22-5004065
18252-00
12
GIO3000_IB_18252-000.indd 12 9/28/17 4:23 PM
 Loading...