

Page 1
OWNER’S MANUAL
Model: GBQ440
GEORGE FOREMAN
®
LP Gas Grill
Page 2
IMPORTANT NOTICE
READ ALL INSTRUCTIONS PRIOR TO ASSEMBLY AND USE! The
instruction manual should be retained by the consumer for future
reference.
ARNING
W
FOR YOUR SAFETY
If you smell gas:
1. Shut off gas to the appliance.
2. Extinguish any open flame.
3. Open Lid.
4. If odor continues, immediately call your gas supplier or your fire
department.
WARNING
FOR YOUR SAFETY
1. Do not store or use gasoline or other flammable vapors and liquids
in the vicinity of this or any other appliance.
2. When cooking with oil/grease do not allow the oil/grease to
exceed 350˚ F (177˚ C).
3. Do not store or use extra cooking oil in the vicinity of this or any
other appliance.
4. An LP cylinder not connected for use shall not be stored in the
vicinity of this or any other appliance.
WARNING
FOR YOUR SAFETY
1. Do not store spare LP cylinder within 10 feet (3 m) of this appliance.
2. Do not store or use gasoline or other flammable liquids or vapors
within 25 feet (8 m) of this appliance.
3. Do not leave oil/grease unattended.
2 23
Page 3
WARNING
FOR YOUR SAFETY
1. Gas leaks may cause a fire or explosion, which can cause serious
bodily injury or death, or damage to property.
2. You must follow all leak-checking procedures before operating
this unit.
3. Never use an open flame to check for leaks.
WARNING
FOR YOUR SAFETY
1. Improper installation, adjustment, alteration, service or maintenance can cause injury or property damage.
2. Read the installation, operation, and maintenance instructions
thoroughly before installing or servicing this equipment.
3. Failure to follow these instructions could result in fire or explosion, which could cause property damage, personal injury or
death.
DANGER
DO NOT use gas grill for indoor cooking or heating. TOXIC fumes
can accumulate and cause asphyxiation. NOT to be used in or on
boats or recreational vehicles.
WARNING
Chemicals known to the state of California to cause cancer, birth
defects, or other reproductive harm are created by the combustion
of propane.
322
Page 4

IMPORTANT SAFEGUARDS
WARNING: A risk of fire or explosion exists in all propane grills. Read
this manual before use. Failure to follow all instructions may result in
serious personal injury, property damage, or death.
When using propane grills, basic safety precautions should always be
followed to reduce the risk of fire and injury to persons, including the
following:
1. Read all instructions before using the grill.
2. Do not touch hot surfaces. Use handles or knobs and oven mitts or
pot holders.
3. Keep children and pets away from the grill at all times.
4. This grill is not for use by children.
5. Do not leave this grill unattended while in use.
6. Do not move the grill when in use. Allow to cool before moving,
putting on or taking off parts, and before cleaning and storing the
grill.
7. To disconnect, turn OFF Burners and gas supply.
8. Do not operate any grill after the grill malfunctions, or has been
dropped or damaged in any manner. Contact Consumer Service for
return authorization, examination, repair or adjustment.
9. The use of accessory attachments not recommended by the grill
manufacturer may cause injuries.
10. This grill is for outdoor use only. NEVER operate grill in enclosed
areas, as this could lead to gas accumulating from a leak, causing
an explosion or a carbon monoxide buildup which could result in
injury or death. DO NOT USE in garages, sheds or any enclosed
areas.
11. Do not use grill for other than intended use.
12. Extreme caution must be used when moving a grill containing hot oil
or other hot liquids. Allow liquid to cool before removing and emptying Drip Tray.
13. Do not attempt to dislodge food or clean the grill when it is hot.
14. Fuel, such as charcoal briquettes, is not to be used with this grill.
SAVE THESE INSTRUCTIONS
THIS GRILL IS NOT FOR COMMERCIAL USE.
FOR OUTDOOR USE ONLY.
4
Page 5

Additional Important Safeguards
1. CAUTION: This grill generates heat and escaping steam during use.
Proper precautions must be taken to prevent the risk of burns, fires or
other damage to persons or property. Use of protective oven mitts or
gloves is recommended.
2. All users of this grill must read and understand this Owner's Manual before
operating or cleaning this grill.
3. When using this grill, provide adequate air space above and on all sides for
air circulation. Do not allow this grill to touch clothing, dish towels or other
flammable materials during use.
4. IMPORTANT: Minimum clearance of 18 inches around all sides of the grill
should always be maintained and the appliance shall not be located under
overhead unprotected combustible construction.
5. If this grill begins to malfunction during use, immediately turn the Burner
Control Knobs and the Cylinder Valve to OFF. Do not use or attempt to repair
the malfunctioning grill.
6. This outdoor cooking gas grill is not intended for use in or on recreational
vehicles and/or boats.
7. The use of alcohol, prescription or non-prescription drugs may impair the
consumer’s ability to properly assemble or safely operate the grill.
8. When cooking with oil/grease, fire extinguishing materials shall be readily
accessible. In the event of an oil/grease fire do not attempt to extinguish
with water. Use Type BC dry chemical fire extinguisher or smother fire with
dirt, sand or baking soda.
9. In the event of rain while cooking with oil/grease, turn the Burner Control
Knobs and gas supply to the OFF position.Immediately close the Lid. Do not
attempt to move the grill.
10. When cooking, the grill must be on a level and stable surface in an area
clear of combustible materials. An asphalt surface (blacktop) may not be
acceptable for this purpose.
11. The grill is not intended for and should never be used as a heater.
12. Keep grill area clear and free from combustible materials, gasoline and
other flammable vapors and liquids.
13. Do not obstruct the flow of combustion and ventilation air.
14. Always open lid before lighting your grill.
15. Do not attempt to disconnect the regulator or any gas fitting while the unit
is in operation.
16. Do not wear clothing with loose flowing sleeves while lighting or using the
grill.
17. Use barbecue tools with long, heat-resistant handles.
18. The Grill should never face directly into the wind.
19. Do not operate Grill in a high-traffic area.
20. After use, allow Grill to cool completely before cleaning.
21. We recommend storing Grill indoors or, if unable to store indoors, always
cover Grill with protective cover. Always keep out of the reach of children.
520
Page 6

Special Instructions for the Use of
Regulator and LP (Propane) Cylinders
• Grill installation must conform with local codes, or in the absence of local
codes, with the National Fuel Gas Code, ANSI Z223.1, Storage and Handling
of Liquefied Petroleum Gases, ANSI/NFPA 58 or CSA B149.1, Natural Gas and
Propane Installation Code.
• Use only 20-pound LP (propane) gas cylinders equipped with a cylinder connection device compatible with the connection for outdoor cooking appliances. Only use with the regulator/valve assembly supplied.
• Never use charcoal briquettes or lighter fluid in a gas grill.
• Discard used and empty fuel cylinder in a safe place.
• Store spare fuel cylinders in a well-ventilated area away from the grill.
• Do not puncture or burn fuel cylinders.
• Do not operate the grill if there is a gas leak present.
• Do not enlarge orifice or burner ports when cleaning the regulator and burner.
• If you smell gas, turn Burner Control Knobs to OFF to shut off gas to the grill.
Extinguish any open flame and open Lid. If odor continues, immediately call
your gas supplier or your fire department.
• Do not store or use gasoline or other flammable vapors and liquids in the
vicinity of this or any other grill.
• An LP cylinder not connected for use shall not be stored in the vicinity of this
or any other appliance.
• The LP-gas supply cylinder to be used must be constructed and marked in
accordance with the specifications for LP-gas cylinders of the U.S.
Department of Transportation (DOT) CFR 49 or the National Standard of
Canada, CAN/CSA-B339, Cylinders, Spheres and Tubes for the Transportation
of Dangerous Goods; and Commission.
• If the grill is not in use, the Burner Control Knobs must be turned to OFF.
Close cylinder valve to shut off the gas supply. Storage of a grill indoors is
permissible only if the cylinder is disconnected and removed from the grill.
Cylinders must be stored outdoors out of the reach of children and must not
be stored in a building, garage or any other enclosed area.
• The regulator may make a humming or whistling noise during operation. This
will not affect safety or use of grill.
•Save cylinder cap and reinstall when not in use
• Use only licensed and experienced LP dealers.
•You may choose to replace your empty LP tank through an exchange service.
Use only those reputable exchange companies that inspect, precision fill,
test and certify their cylinders.
6
Page 7
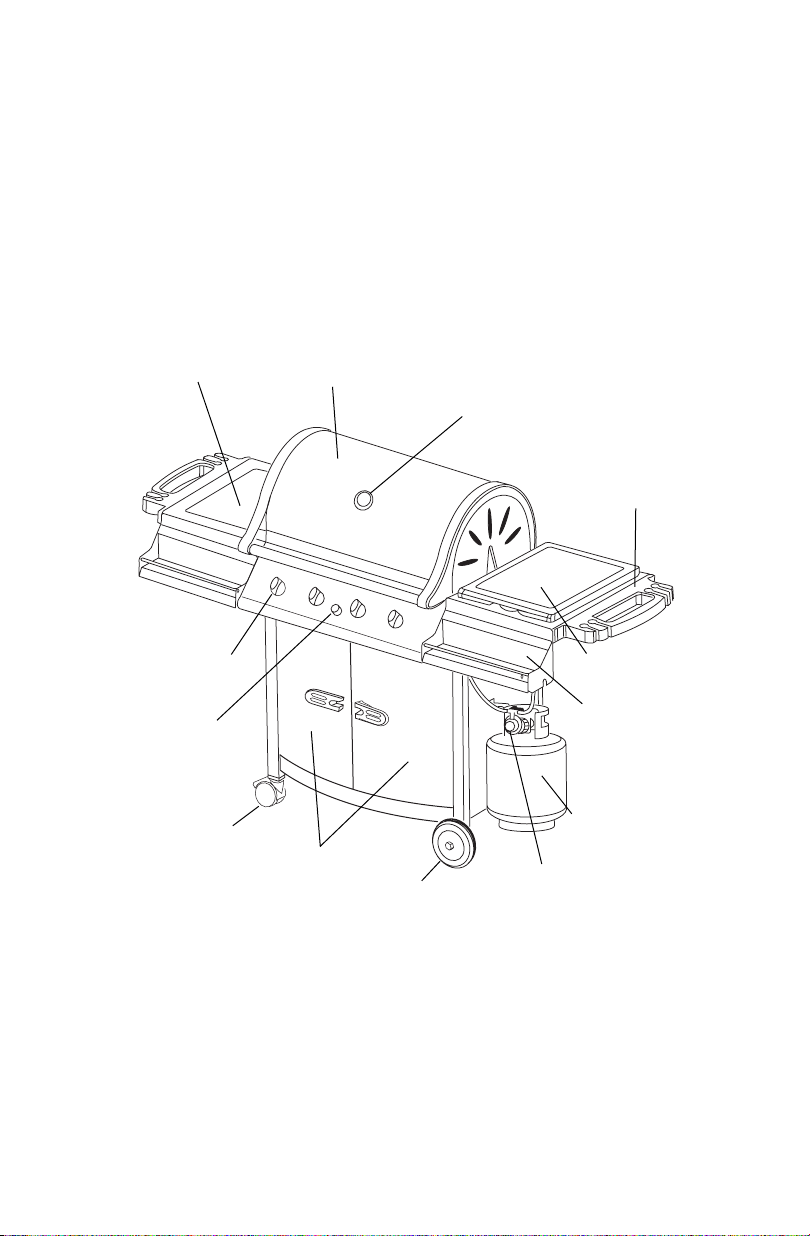
Getting To Know Your GBQ440 LP Grill
Congratulations on your purchase of the George Foreman GBQ440 LP Grill.
Remove the grill and any packaging materials from the shipping carton.
Carefully unpack the components. Compare each part against the Parts List to
make sure nothing is missing or has been damaged in transit. Make sure you
have all the hardware. Included in the hardware package are two special openend wrenches that are used to tighten the Casters and Wheels.
Side Shelf, Left
Burner Control
Knob
Ignitor
Button
Lockable
Casters
Doors
Lid
Thermometer
Side Shelf w/Burner
Burner Cover
Cruet Shelf
20 Lb.LP Tank
Regulator
Wheel
7
Page 8
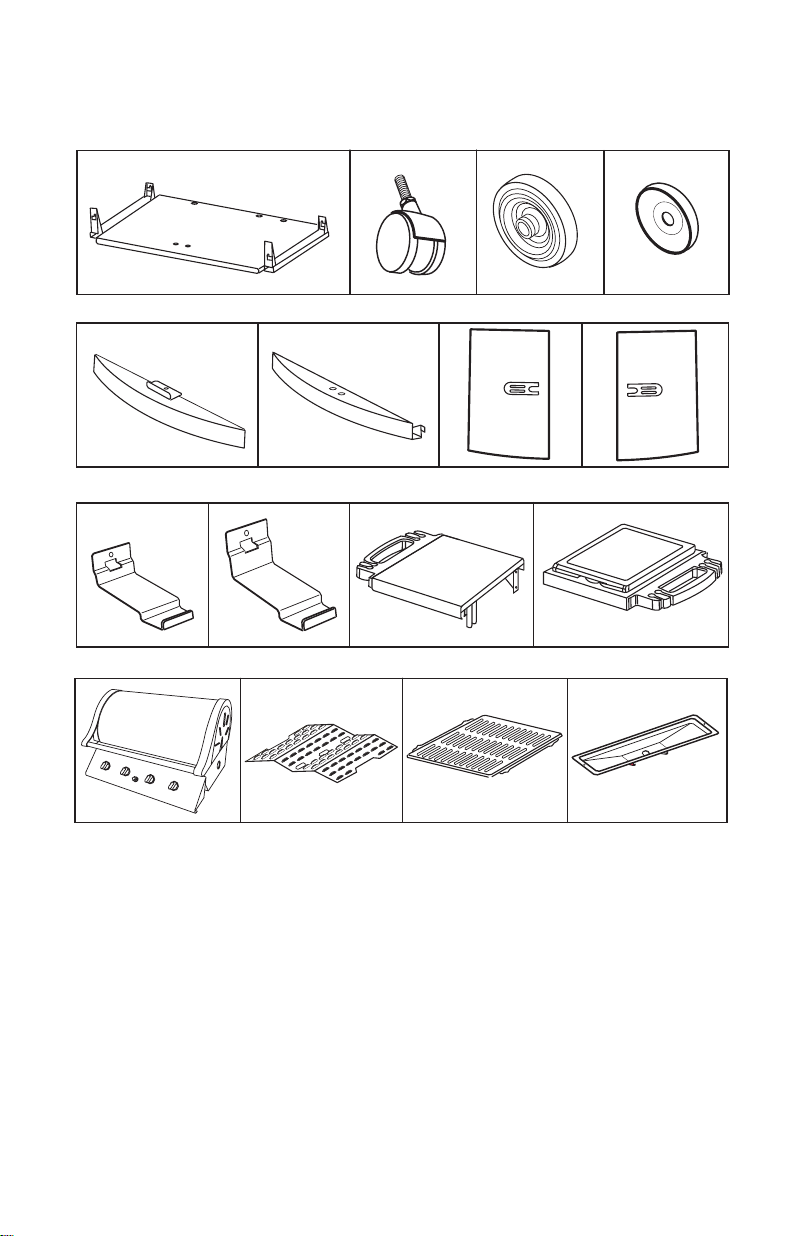
Parts List
1
56
9
13 14 15 16
10
2
11
3
7
12
4
8
1 Base Panel (P/N 22494)
2. Lockable Caster (2) (P/N 22495)
3. Wheel (2) (P/N 22496)
4. Wheel Spacer (2) (P/N 22497)
5. Lower Frame Support (P/N 22498)
6. Upper Frame Support (P/N 22499)
7. Door, Left (P/N 22500L)
8. Door, Right (P/N 22500R)
9. Tank Clamp Bracket (P/N 22501)
10. Tank Support Bracket (P/N 22502)
11. Side Shelf, Left (P/N 22503)
12. Side Shelf w/Burner, Right
(P/N 22504)
13. Lid and Grill Assembly
(P/N 22505)
14. Heat Plate (2) (P/N 22506)
15. Cooking Grid (2) (P/N 22507)
16. Drip Pan (P/N 22508)
8
Page 9

17
18
19
20
21
23
27
17. Drip Tray (P/N 22509)
18. Hanging Rack (P/N 22510)
19. Back Panel (P/N 225511)
20. Cruet Shelf (2) (P/N 22513)
21. Side Panel, Left (P/N 22512L)
22. Side Panel, Right (P/N 22512R)
23. Bolt, Long (19) (P/N 22515)
24. Bolt, Short (6) (P/N 22514)
25. Shoulder Bolt (2) (P/N 22520)
26. Nut, Self Locking (2) (P/N 22516)
24
28 29
22
25 26
30
27. Flat Washer (25) (P/N 22517)
28. Lock Washer (25) (P/N 22518)
29. "AA" Battery
30. Wrench (2) (P/N 22519)
916
Page 10

Assembly Instructions
Remove all contents from the carton and make sure all parts are present before
attempting to assemble. Tighten all bolt connections by hand first, then when
the grill is fully assembled, go back and tighten.
1. Attach the Lockable
Casters to the left Side
Panel by turning the
threaded end of each
caster into the holes as
shown. Securely tighten
using the open-end
wrench provided.
2. Attach each Wheel to the
right Side Panel by inserting a Shoulder Bolt
through the Wheel,
Wheel Spacer and
mounting hole, as shown.
Secure the Wheel
Assembly to the leg of the
Side Panel with a Self
Locking Nut. Use one of
the wrenches to hold the
bolt while tightening the
nut with the other.
3. Attach the Base Panel to
the left Side Panel, as
shown, using three of the
Long Bolts (two may be in
panel already). Thread a
Long Bolt into the upper
mounting hole on the
inside of the front of the
Side Panel, leaving about
1/4". Hook the Base Panel
brackets over the head of
each Bolt as shown in
Detail A. Slide the Base
Panel forward (Detail A),
then down, as shown in
Detail B. Partially tighten
each Bolt, keeping in
mind that they will be
securely tightened at the
completion of assembly.
Caster
Wheel
Shoulder
Bolt
Detail A Detail B
Side Frame, Left
Side Panel, Left
Side Panel, Right
Nut
Wheel Spacer
Bracket
Base Panel
Page 11

4. Attach the Base Panel to the right Side Panel, as shown, using three Long
Bolts (two may be in panel already), following the same procedure outlined
in step 3.
Side Frame, Right
Bracket
Base Panel
5. Slide the Back Panel into
position between both
Side Panels, engaging the
pins on the bottom of the
Back Panel with the entry
holes on the Base Panel.
Align the mounting holes
in the Back Panel and the
Side Panels. Secure in
place with two Short
Bolts, Lock Washers and
Flat Washers, as shown.
Back Panel
Base Panel
Page 12

Assembly Instructions (cont)
6. Attach the Upper Frame
Support to the front of the
cart, as shown (with
screw holes on top).
Secure both ends in place
with a Short Bolt, Lock
Washer and Flat Washer.
Attach the Lower Frame
Support to the cart by
inserting the extension
knobs into the mounting
holes. Slide the Lower
Frame Support down to
lock it in place. Pin on
Support must meet with
keyhole slot in side rails.
Secure the Door Stop in
place with a Long Bolt,
Lock Washer and Flat
Washer as shown.
7. On the bottom hinge-side
of each door is a pin that
extends about 1/2". The
top hinge-side contains a
mounting hole. The Upper
Frame Support contains a
spring-loaded pin, one at
each end of the Support.
The Base Panel contains
mounting holes designed
to accept the pins on the
lower end of the Doors.
Attach the right door by
Inserting the hinge pin at
the bottom of the Door
into the mounting hole in
the Base Panel. Raise the
spring-loaded pin in the
Upper Frame Support , align the mounting hole in the top of the Door and
release the spring-loaded pin to secure the Door in place. Repeat this procedure with the left Door.
8. At this point, securely tighten all the hardware. The cart is now fully assem-
bled and ready to accept the Lid and Grill Assembly.
Long Bolt,
Lock Washer
and Flat
Washer
Door Stop
Lower Frame Support
Mounting
Hole
Pin
Mounting
Hole
Upper Frame
Support
Spring
Loaded Pin
Page 13

9. Note: Lifting and positioning the Lid and Grill Assembly requires two peo-
ple.
Carefully lift the Lid and Grill assembly into place on top of the cart, taking
care not to pinch ignitor lead from right burner. Raise the Lid, align the
mounting holes inside the grill body with the mounting holes on the left and
right Side Panels of the cart assembly. Secure in place with a Long Bolt,
Lock Washer and Flat Washer at all four locations, however, do not tighten
until after step 13.
Grill Body
Mounting
Holes
Side Frame
Mounting Holes
1312
Page 14

Assembly Instructions (Cont.)
10. Place the Heat Plates over the burners; allowing them to securely rest on
the lower ledge, side by side, as shown.
11. Place the Cooking
Grids over the
Heat Plates; allowing them to
securely rest on
the upper ledge,
side by side, as
shown.
12. Insert the hooks on
the Hanging Rack
into the brackets
inside the Lid.
Hanging Rack
Heat Plates
Cooking Grids
14 11
Page 15

13. Each Side Shelf has a support leg at the front and a support brace at the
back. Position the left Side Shelf above the left Side Panel. Lower the Side
Shelf and insert the support leg into the opening on the top-front of the left
Side Panel. Align the mounting holes in the support leg and brace with the
mounting holes in the Side Panel and securely fastened with Long Bolts
Lock Washers, and Flat Washers. Repeat this procedure with the Right Side
Shelf w/Burner. Tighten all screws from Grill and Lid Assembly.
14. Attach one of the Cruet Shelves to the left Side Shelf. This is accomplished
by aligning the notch in the end of the shelf over the support rod located at
the left side of the control panel. Rotate the Cruet Shelf up, sliding its top
edge behind the front edge of the Side Shelf. Secure with Long Bolts, Lock
Washers and Flat Washers. Repeat this procedure to attach the other Cruet
Shelf to the Side Shelf w/Burner.
Side Shelf
Cruet Shelf
Side Shelf
w/Burner
Cover
Side Shelf
w/Burner
Support Leg
Support Leg
and Support
Brace
Mounting Holes
1510
Page 16

Assembly Instructions (Cont.)
15. Insert the Drip Pan into the back of the Grill then insert the Drip Tray into
slots beneath the Drip Pan. See view below.
16. Attach one end of the regulator gas line to the fitting that feeds the Side
Shelf Burner, see Detail A. Attach the other line to the fitting that feeds the
four burners in the Grill, see Detail B. Make sure the fittings are tight. Refer
to the Leak Test section in this manual and be sure to follow all the steps.
Connect the Ignitor wire to the Ignitor beneath the burner, as shown in
Detail C,. by simply pushing it on to the crimped end of the Ignitor.
Detail A
Regulator
Detail B
17. Install the AA Battery into the Ignitor. Unthread the Ignitor Button Assembly
on the front of the Control Panel, drop in the battery, negative end down,
then screw on the Ignitor Button Assembly
18. Fasten the Tank Clamp
Bracket (short) to the upper
position and the Tank
Support Bracket to the lower
position by inserting the top
end of each Bracket into the
access slots in the right Side
Panel and securing them in
place with Short Bolts, Lock
Washers and Flat Washers.
19. Hang the 20 pound LP cylin-
der on the Brackets and
connect the regulator to the
tank. Tighten securely by
hand.
Detail C
Drip Pan
Shelf
Tank Clamp
Bracket
Tank Clamp
Support
Page 17

Attaching LP Gas Cylinder
The LP-gas supply cylinder to be used must be constructed and marked in
accordance with the Specifications for LP-gas Cylinders of the US Department
of Transportation (DOT) or the National Standard of Canada, CAN/CSA-B339,
Cylinders, Spheres, and Tubes for the Transportation of dangerous Goods; and
Commission. Only Cylinders with a listed overfilling prevention device (OPD) will
have valve handles with three "lobes" (prongs). Only use 20-pound cylinders
equipped with a cylinder connection device compatible with the connection for
out door cooking appliances. The cylinder must include a collar to protect the
cylinder valve. Blue gas cylinder should not be dropped or handled roughly! If
the appliance is not in use, the gas cylinder must be disconnected. Storage of
an appliance indoors is permissible only if the cylinder is disconnected and
removed from the appliance. Cylinders must not be stored in a building, garage,
or and enclosed area. Your cylinder must never be stored where temperatures
can reach over 125˚F! Before connecting, be sure that there is no debris caught
in the head of the gas cylinder, head of the regulator valve, or in the head of the
burner and burner ports. Connect regulator valve and hand–tighten firmly.
Disconnect the propane cylinder from the regulator valve when the grill is not
in use. DO NOT obstruct the flow of combustion air and ventilation air to the
grill.
Leak Test
Safety Precautions:
•Test all gas connections for leaks before using your propane grill.
•Test for leaks every time you connect the gas supply.
• Do not smoke while checking for leaks.
• DANGER - Do not use an open flame to check for gas leaks. Be sure there
are no sparks or open flames in the area while you check for leaks. This
will result in a fire or explosion which can cause serious bodily injury or
death, and damage to property.
•Test for leaks outdoors in a well ventilated area.
1. Mix a couple tablespoons of liquid detergent with an equal amount of
water. Use mild soap and water. DO NOT USE HOUSEHOLD CLEANING
AGENTS.
2. Be sure that all the Burner Control Knobs are in the OFF position and the
gas cylinder is open.
3. Use a clean paint brush to brush soapy solution onto connection between
gas cylinder and Regulator orifice, and watch for bubbles.
4. If bubbles form or if a bubble grows, there is a leak. Retighten connection
and repeat steps (2) and (3).
NOTE: If you cannot stop a leak, remove gas cylinder and check for damaged
threads, dirt and debris at the connection and gas cylinder. Also check to see if
anything is obstructing flow of gas at the connection and gas cylinder openings. Remove any obstruction that may be found and repeat leak test.
17
Page 18

How To Use the George Foreman
®
GBQ440 Propane Grill
Lighting Burner with Ignitor:
1. Open the Lid or raise the Side Shelf Burner Cover before lighting. Attempting
to light the Grill burners with the Lid down or the Side Shelf Burner with the
Cover closed may cause an explosion! Make sure there are no obstructions
of airflow to the gas unit. Spiders and insects can nest within and clog the
burner/venturi tube at the orifice. A clogged burner tube can lead to a fire
beneath the appliance.
2. All Burner Control Knobs must be in the OFF position.
3. Turn on gas at the cylinder.
4. Push down and turn the left-center and right-center Burner Control Knobs
counterclockwise to HIGH.
5. Press and hold the Ignitor Button to light the burners.
6. If ignition does not occur in five seconds, turn all open Burner Control Knobs
clockwise to the OFF position. Wait five minutes and repeat lighting procedure. If Ignition still does not occur, use a match through hole located on
Right Side Panel of the Grill.
Important: Light both CENTER burners FIRST! Once burner is lit, the burner next
to it will light by turning its Burner Control Knob to HIGH. Never light the outside
burners unless the two center burners are lit. Since the Side Shelf Burner has
just one burner, no such sequential precautions exist.
After lighting, please observe the burner flames; make sure all burner ports are
lit. If burner flames go out during operation, immediately turn the gas off and
open Lid to let the gas clear for about 5 minutes before re-lighting.
Before cooking on this grill for the first time, light and set all four burners on
HIGH and operate for about 15 minutes with the Lid closed. This will "heat clean"
the internal parts and dissipate odor from the manufacturing processes and
painted finish. DO NOT, however, operate the Side Shelf Burner with the Cover
closed at any time!
Grilling Instructions:
1. Light burners and turn all Burner Control Knobs from HIGH to LOW. Make
sure all burners are lit.
2. To preheat the Grill: Close the Lid and preheat on HIGH for 8 minutes. After
the 8 minute preheat period, carefully open the Lid and place food onto the
Grill Plate. Cook until done, turning at least once halfway through cooking
time for most foods. Adjust flames with Burner Control Knob as needed.
CAUTION: Condensation may collect on the inside of the Lid when cooking. Use caution when opening Lid.
3. When finished cooking, or when the propane cylinder is empty, turn all Burner
Control Knobs to the OFF position and close the propane cylinder.
4. Allow the Grill to cool before disassembling and cleaning.
5. When cool, the Drip Tray may be removed and emptied. Be sure the liquid
has cooled before removing Drip Tray.
18
Page 19

Instructions For Cleaning
CAUTION: Grill surfaces become hot during use. Allow all parts to cool completely
before handling and cleaning.
1. Turn the Burner Control Knobs to the OFF position and allow the Grill to cool
before disassembling and cleaning.
2 Remove and empty the Drip Tray.
3. Wash the Cooking Grids, Heat Plates, Drip Pan and Drip Tray with warm, soapy
water and, if necessary, a plastic scouring pad. Rinse and dry thoroughly. Do not
use steel wool, coarse scouring pads or harsh or abrasive cleaners. If necessary, use a nylon bristle brush to loosen hardened food particles.
4. Wash exterior parts with a soft sponge and warm clear water. Non-abrasive
cleaners may also be used. Be sure to scrub with the grain direction of the
stainless steel.
5. Use a damp cloth to clean the inside of the Lid and Grill Body.
Cleaning the Side Shelf Burner Assembly
IMPORTANT: Clean the burner assembly prior to use after storing, at the beginning
of the grilling season or an inactive period of one month. Spiders and insects like to
build nests in burner tubes, especially during colder months. The nests can cause
fires in burner tubes or under grill.
In order to clean the inside of the burner tube, the Side Shelf Burner Assembly must
be removed from the Grill.
1. Make sure the gas cylinder has been turned OFF. Disconnect the gas line from
the Regulator to the Burner then disconnect the Ignitor Wire from the Ignitor. DO
NOT pull on the wire itself. Grasp the crimped end of the connector and gently
pull straight down to disconnect.
2. Raise the Side Shelf Burner cover. Remove the cast iron cooking grate and the
brass diffuser from the center of the burner. Inspect the diffuser and clean it as
needed.
3. Remove the three mounting Bolts, Lock Washers and Flat Washers that secure
the Side Shelf to the grill. Lift the Side Shelf up and away from the grill then set
the assembly upside down on a clear, stable working surface.
4. Two small screws, lock washers and flat washers are used to secure the burner
to the Side Shelf. Remove the screws and washers. Lift the burner from the Side
Shelf. Inspect both ends of the burner and clean it as needed.
5. Carefully reassemble the Burner Assembly, making sure the mounting screws
are tight, all parts have been properly reassembled and the Ignitor Wire has
been reconnected to the Ignitor.
6. Clean the outside of the Side Shelf Burner assembly with a paper towel or damp
sponge
Storing Your Propane Grill
1. Cover Grill if stored outdoors. Store Grill indoors only if the propane cylinder is
turned off and disconnected, removed from Grill and stored outdoors in a wellventilated space and out of the reach of children.
2. When removing Grill from storage, follow the Cleaning the Side Shelf Burner
Assembly instructions before starting the Grill.
Any service requiring disassembly other than the above cleaning must be performed
by an authorized appliance repair technician. Do NOT ship gas cylinder if product
needs service or repair.
19
Page 20

Page 21

21
Page 22

Page 23

Page 24

LIMITED ONE YEAR WARRANTY
Warranty: This product is warranted by Salton, Inc. to be free from defects in materials
or workmanship for a period of (1) year from the original purchase date. This product
warranty covers only the original consumer purchaser of the product.
Warranty Coverage: This warranty is void if the product has been damaged by accident
in shipment, unreasonable use, misuse, neglect, improper service, commercial use,
repairs by unauthorized personnel, normal wear and tear, improper assembly, installation
or maintenance abuse or other causes not arising out of defects in materials or workmanship. This warranty is effective only if the product is purchased and operated in the
USA, and does not extend to any units which have been used in violation of written
instructions furnished with the product or to units which have been altered or modified
or to damage to products or parts thereof which have had the serial number removed,
altered, defaced or rendered illegible.
Implied Warranties: ANY IMPLIED WARRANTIES WHICH THE PURCHASER MAY HAVE
ARE LIMITED IN DURATION TO ONE (1) YEAR FROM THE DATE OF PURCHASE. Some
states do not
may not apply to you.
Warranty Performance: During the above One (1) Year Warranty period, a product with a
defect will be either repaired or replaced with a reconditioned comparable model (at our
option) when the product is returned to the Repair Center. The repaired or replacement
product will be in warranty for the balance of the One (1) Year warranty period and an
additional one-month period.
Service and Repair: Should the appliance malfunction, you should first call toll-free 1
(800) 937-3883 between the hours of 9:00 am and 5:00 pm Central Standard Time and ask
for CONSUMER SERVICE stating that you are a consumer with a problem. Please refer
to model number GBQ440 when you call.
Out-of Warranty Service: A flat rate charge by model is made for out-of-warranty service. Call Consumer Service for instructions, toll-free 1-(800) 937-3883.
Limitation of Remedies: No representative or person is authorized to assume for Salton,
Inc. any other liability in connection with the sale of our products.
There shall be no claims for defects or failure of performance or product failure under
any theory of tort, contract or commercial law including, but not limited to negligence,
gross negligence, strict liability, breach of warranty and breach of contract. Repair,
replacement or refund shall be the sole remedy of the purchaser under this warranty,
and in no event shall Salton be liable for any incidental or consequential damages, losses or expenses. Some states do not allow the exclusion or limitation of incidental or
consequential damages, so the above limitation or exclusion may not apply to you.
Legal Rights: This warranty gives you specific legal rights, and you may also have other
rights which vary from state to state.
George Foreman
For more information on Salton products: Visit our website: www.eSalton.com
© 2004 Salton, Inc. All Rights Reserved P/N 61473
Made in China 3/04
allow limitations on how long an implied warranty lasts, so the above limitation
To contact us, please write to, call, or email:
Salton, Inc.
P.O. Box 1526
Columbia, MO 65205-1526
1 800 937-3883
Email: Salton@Saltonusa.com
®
is a registered trademark of Salton, Inc.
 Loading...