

Page 1
WS900 6/07/06 17:50 Page 1
Page 2
Page 3
26
EN
25
EN
Thank you for your confidence in purchasing the Geonaute WS900 weather station.
This high qualitydevice gives you an indication of the weather conditions for the
next 12 to 24 hours by measuring changes in atmospheric pressure. In addi-
tion, it offers a quick reading of indoor temperature, outdoor temperature, humi-
dity level, barometric pressure measured by the wireless sensor, the hour, and the
date. Thanks to the weather information supplied by this station, you can anticipate
untimely changes in the weather. You can thus outfit yourself properly for your outdoor
athletic activities. The station can also display information measured by an optional
UV sensor (sold separately according to in-store availability) that indicates the intensity of the harmful sunshine. Carefully read this pamphlet before using the device and
retain this information during the entire life of the product.
LIMITED WARRANTY
Geonaute guarantees the initial purchaser of this weather station that it is free from any defects of
materials or manufacture for a period of two years from the date of purchase.
Please keep your
receipt as proof of purchase.
•
This guarantee does not cover damage resulting from misuse, from a failure to observe the precautions for use, nor from accidents; neither does this guarantee cover damage resulting from improper
maintenance or from use of the item for commercial purposes.
•
This warranty does not cover damage resulting from repairs carried out by persons not authorized
by Geonaute.
•
The guarantees contained herein explicitly replace all other guarantees, including the implicit guarantee of merchantable goods and/or suitability for use. Geonaute cannot under any circumstances
be held responsible for any damage, whether direct or indirect, general or specific, caused by or
related to these directions for use or the products they describe.
•
During the warranty period, the item will either be repaired free of charge by an authorized repair
service or replaced free of charge (at the discretion of the distributor).
•
The guarantee does not cover batteries or cracked or broken casings where signs of impact are evident.
NORMAL CONDITIONS OF USE
The weather station is designed to measure temperatures and humidity levels indoors (at the level of
the sensor) and outdoors (at the level of the wireless sensor).
It gives a local weather forecast, calculated with the aid of barometric measurements, for the coming
12 to 24 hours.
It also graphically displays the barometric pressure and past readings.
It gives the time in 2 time zones and features a daily alarm.
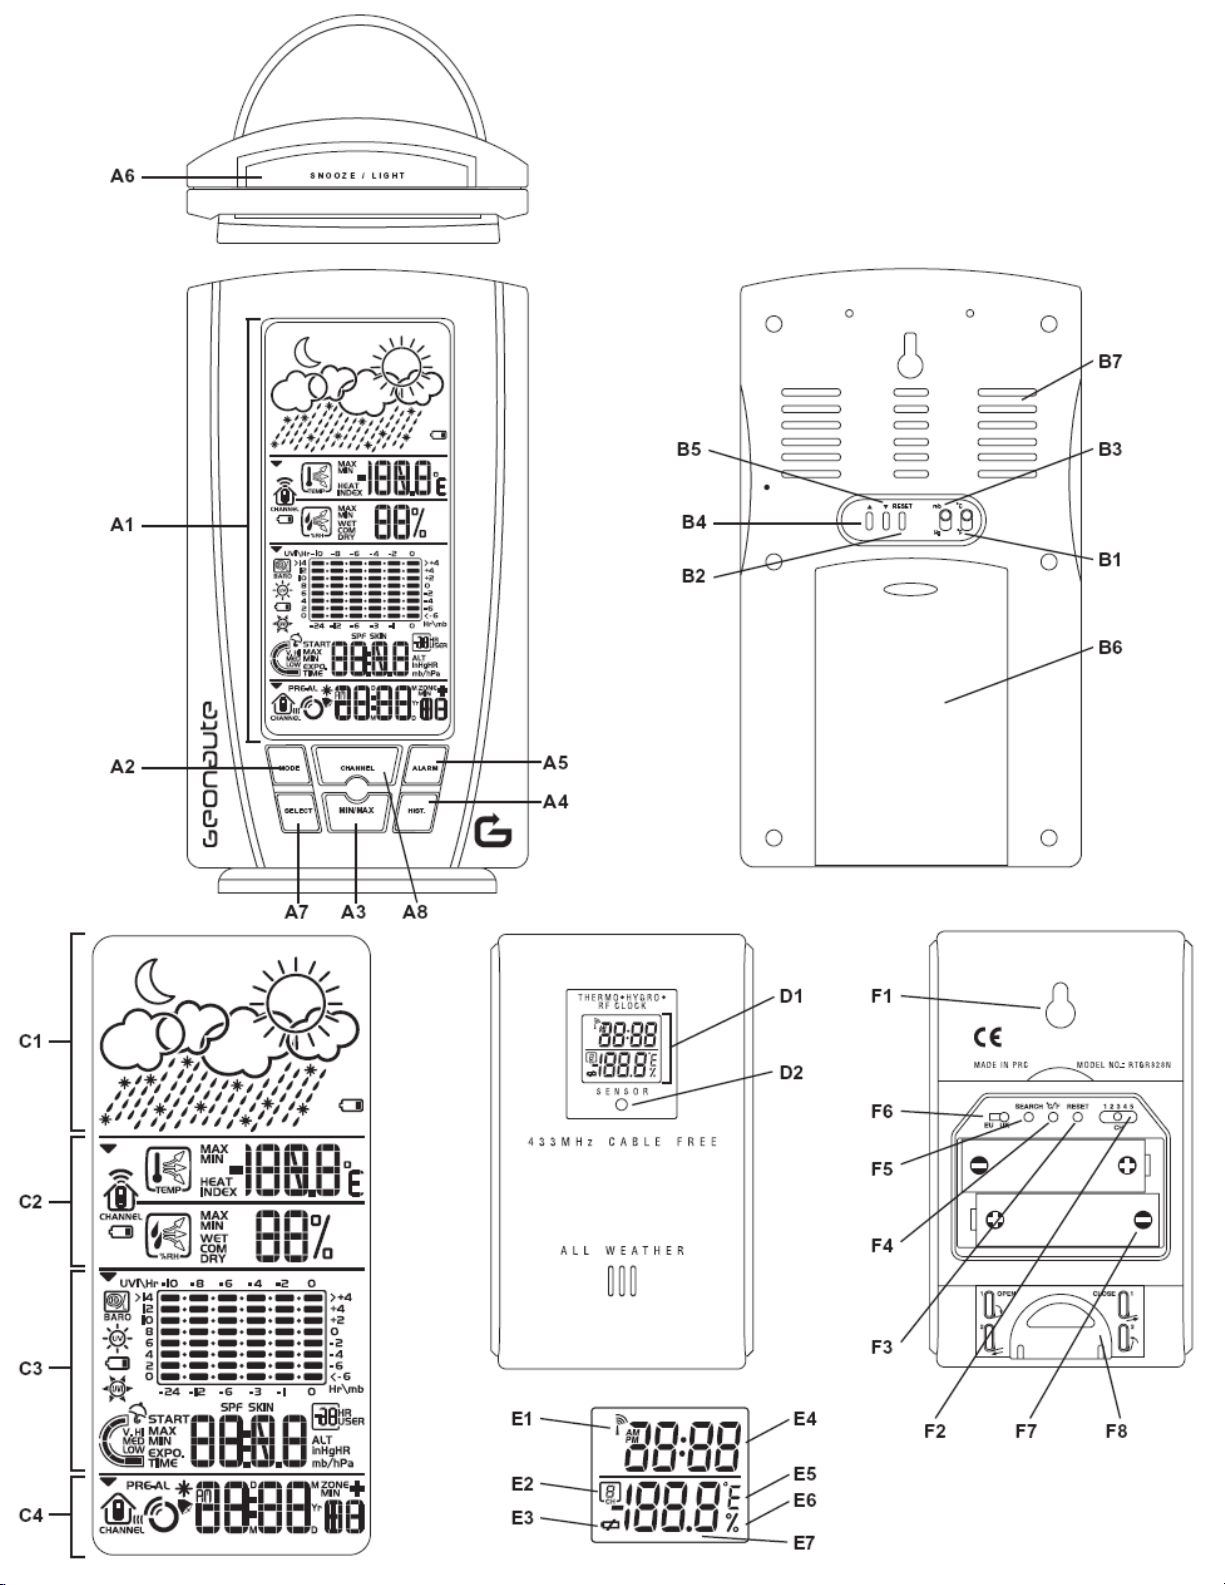
A1. LCD Display
A2. MODE: changes settings and displays
A3. MIN/MAX: displays the current, low, and high temperatures, humidity, and UV readings
A4. HISTORY: displays the pressure and UV readings from the last 24 hours
A5. ALARM: activates and sets the alarm
A6. SNOOZE / LIGHT: engages the snooze alarm 8 minutes later and the backlighting.
A7. SELECT: changes fields
A8. CHANNEL: changes the displayed measurement channel
B1. °C/°F Control: changes temperature units.
B2. RESET (battery compartment): re-initializes the station.
B3. MB/ In HG: changes pressure unit.
B4. UP: increases setting, activates radio control
B5. DOWN: reduces setting, deactivates the radio control
B6. Battery housing
B7. Ventilation holes
C1. Weather forecasts through icons
C2. Temperature and humidity display
C3. UV index/barometer, graphic display of pressure reading or UV index over the last 24 hours
C4. Clock, alarm, calendar
D1. LCD display
D2. LED status indicator
E1. Reception of signal from the station
E2. Channel number
E3. Low battery indicator
E4. Time
E5. Temperature unit (°C or °F)
E6. Temperature or humidity display
F1. Hole for attachment to wall
F2. Channel selector switch (CHANNEL)
F3. RESET button: re-initialization of sensor
F4. °C/°F switch for choosing temperature units
F5. SEARCH
F6. Radio signal format control US (DCF) for Europe and UK (MSF) for the English system
F7. Battery housing
F8. Table stand
EN
WS900 6/07/06 17:50 Page 25
Page 4
28
EN
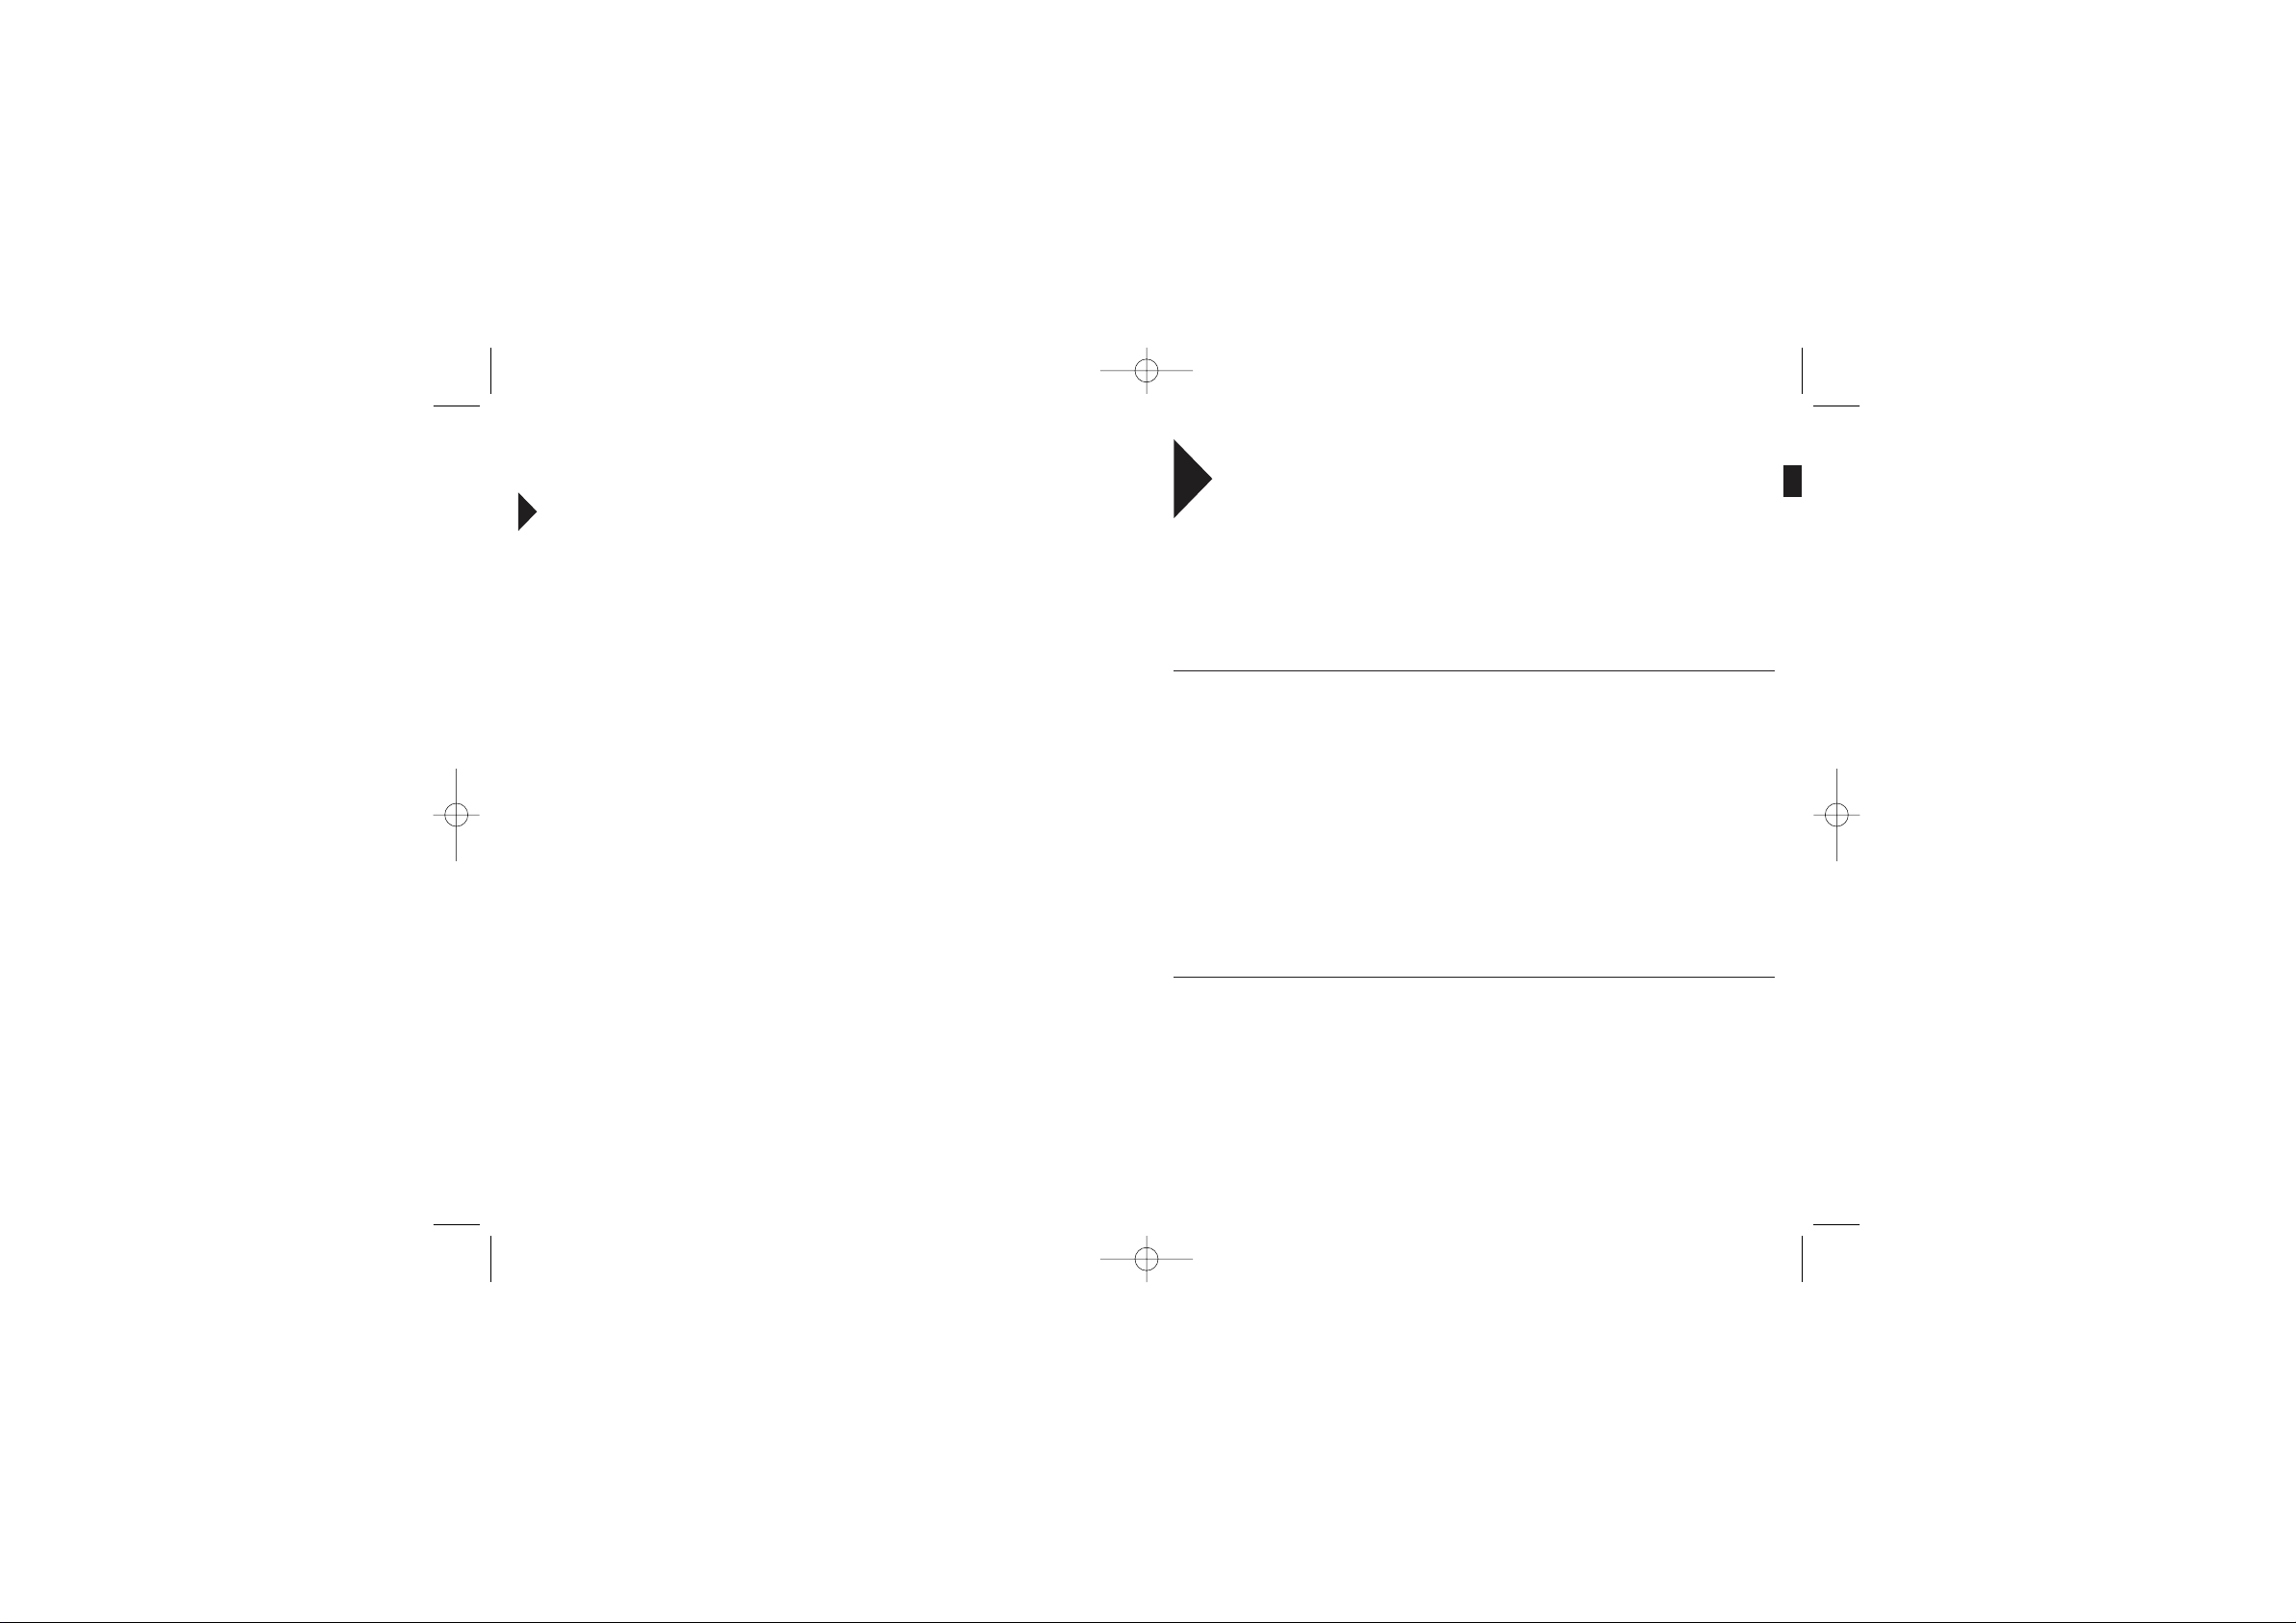
Once the batteries have been inserted in the sensor, data will be transmitted in 60 second intervals.
Transmission status:
The reception icon displayed in the temperature/humidity field indicates the transmission status.
Locating a remote sensor:
In searching for information sent by a sensor on a new channel, press SELECT to enter the temperature/humidity field (the symbol “ ” is displayed on the side of the field. Then simultaneously press
MIN/MAX and CHANNEL for 2 seconds to begin an active detection of remote sensors.
PRECAUTIONS FOR USE
•
Handle this device with care. Do not drop it or subject it to significant impact.
•
Do not dismantle the device or the sensor. Doing so would void the Geonaute warranty and may
damage the device. This does not apply to changing the batteries, as described under the heading
"Changing the Batteries".
•
Please read instructions carefully before use and use the device under normal operating conditions.
•
The receiver is not watertight. It is designed for indoor use. Place it on a flat, stable surface or fasten it to the wall in a well-ventilated, clean room, away from direct sunlight.
•
The wireless sensor is resistant to splashing, but it should never be immersed in water or exposed
to heavy rain. Avoid prolonged exposure to direct sunlight and wind.
•
Do not expose the receiver or the sensor to extreme temperatures. In wintertime, cold temperatures reduce the power and lifetime of the sensor's batteries. This means that at cold temperatures
(0°C), the sensor may stop transmitting a signal even though it was transmitting at summer temperatures (20°C). Move the sensor closer or use rechargeable Ni-MH batteries, which are less sensitive to the cold, and change the batteries more often.
•
Like any device utilizing radio transmission, the receiver and the wireless sensor are sensitive to
electromagnetic interference. Do not place them near electromagnetic sources (televisions, computers, cordless telephones, electrical equipment) that could impair their functioning.
BATTERIES
The batteries are supplied with this device :
•
Main device 4 x LR6 (AA) 1.5V
•
Wireless sensor 2 x LR6 (AA) 1.5V
Insert the batteries prior to first use, observing the orientations indicated in the battery compartment.
For best results, place the batteries into the sensor before the main device. Press
RESET after every
change of batteries.
Installing the batteries in the remote sensor and selecting the channel
The remote sensor runs on two AA (LR6) batteries. To install them and select the channel:
1. Unscrew the cover of the battery compartment.
2. Select the channel number using the
CHANNEL switch. If you are simply changing the batteries,
do not change the position of the
CHANNEL switch. Note that once a channel has been assigned
to a sensor, you can change it only by removing the batteries or re-initializing the unit.
3. Choose the format for the radio control for the time: EU (DCF) for Europe (24 hour mode) and UK
(MSF) for the English system.
4. Insert the batteries in strict observance of the polarities.
5. Press
RESET using a fine point.
6. Then set the temperature unit: °C (Centigrade degrees) or °F (Fahrenheit degrees) with the appropriate switch.
7. Put the battery compartment cover back on and retighten the screws.
27
Icon
Description
Search for sensors by station
At least 1 active channel was found
Channel 1 is active and is sending data
(the number indicates that the channel is
currently displayed)
-- -- is displayed in the
temperature/humidity
field
The sensor for the selected channel can-
not be found. Check the transmission or
the sensor batteries.
WS900 6/07/06 17:50 Page 27
Page 5

30
EN
FIRST USE
Important:
This paragraph is crucial to ensuring proper use of the device. It is very important to follow the instructions
step by step when using the station for the first time. Do not skip any steps or do them out
of order. The order of the steps is important.
In case of problems, you can always come back to this procedure to reset the whole system and get
a fresh start.
Procedure for initializing and installing a temperature/humidity
sensor
It is important to start the initializing or problem-solving procedure according to the precise configuration described below. The following checklist must be followed in the right order. Each item on the list
is important.
- You have 4 new LR6-AA batteries for the station. The batteries are not installed in the device.
- You have 2 new LR6-AA batteries for the sensor. The batteries are not installed in the device.
- 1 precision Phillips-head screwdriver for the screws on the sensor.
- The WS900 station, with battery cover open.
- ALL the temperature/humidity sensors (3 max), with battery covers open and table stands.
- A fine point for pressing the sensor reset button
All the elements are placed on the same table, away from any source of interference (television, portable phone, etc.)
1. Place the batteries into the first temperature/humidity sensor using the indicated orientation.
2. Choose a communication channel for the first sensor by flipping the “CH” switch on the rear of the
sensor, inside the battery cover. Write it down in the following table:
3. Choose the format for the radio control signal for the time: EU (DCF) for Europe (24 hour mode)
and UK (MSF) for the English system
4. Press the sensor
RESET button
5. Then set the temperature unit: °C (Centigrade degrees) or °F (Fahrenheit degrees) using the
appropriate switch.
6. Close the sensor battery cover using the 4 Phillips-head screws.
To search for information sent by a new UV sensor, press SELECT to enter the UV-barometer field
(the symbol “ ” is displayed on the side of the field.) Then simultaneously press
MIN/MAX and
CHANNEL for 2 seconds to begin an active detection of remote UV sensors.
Installing the batteries in the main unit.
Once you have installed the batteries in the remote sensor,
you can install the four AA (LR6) batteries in the main unit.
To do so:
1. Gently remove the cover of the battery compartment.
2. Insert the batteries in strict accordance with the polarities
indicated in the battery compartment.
3. Put the battery compartment cover back on.
4. Press
RESET every time after changing batteries.
Important :
Do not use rechargeable batteries.
Instead, for longer service use alkaline batteries with this device.
Note : For both the remote sensor and the main unit, change the batteries as soon as they are low.
The station’s low battery indicator ( ) is in the weather forecast window and is displayed as soon
as the batteries are low.
Low battery indicators:
This station informs the user when the batteries for different features become depleted:
•
The indicator located in the weather forecast field shows when the station batteries are depleted.
•
The indicator located in the temperature/humidity field shows when the batteries of the remote sensor are depleted.
•
The indicator located in the UV/barometer measurement field shows when the batteries for the
optional UV sensor are depleted.
RECYCLING
The "crossed-out trash can" symbol means that this product, as well as the batteries it
contains, is made of recyclable materials.
They should not be disposed of with
municipal waste.
When the batteries and electronic product are worn out, return them to a recycling or
collection facility.
This treatment of your electronic waste will protect the environment and your health.
29
Channel Sensor number Tº/H% Description of sensor position
E.g.: 1 1 attic
1
2
3
WS900 6/07/06 17:50 Page 29
Page 6

32
EN
17. Place the station and the sensors in their permanent locations. Make sure to position the sensors
upright, and not to exceed the distances recommended in the instructions, depending on whether
or not there are obstacles between the sensor and the station.
18. Scroll through the various outdoor temperature channels by pressing on the
CHANNEL button,
and verify that the temperature measured by each of the sensors is displayed on the screen. If it
is not, press simultaneously on
MIN/MAX and CHANNEL to initialize data transmission. If there
still is no temperature displayed, start over by first bringing the unrecognized sensor closer to the
station.
Physical installation
Mounting the main unit
This unit can be mounted on a flat surface using the table stand.
Mounting the remote sensor
The remote sensor is fitted with a wall mount. It can also be placed on a horizontal surface with the
folding table stand.
Important :
The sensor and the station must be placed in an upright position for the signal to be transmitted properly!
7. Position the sensor vertically on the work table using the built-in table stand.
Optional: Installing other sensors. This weather station is compatible with the WS70 sensor sold
separately.
8. Take a second sensor. Carefully repeat steps 1 through 5 in the same order and
choose a free channel
CHANNEL (Step 2). Fill in the information on the table in step 2 to identify
each sensor and its channel number. The UV sensor is installed in the same way.
NB: Some sensors have no radio control switch. In such cases, skip this step. The station then takes
into account the time from the sensor supplied in this pack.
9. Insert the batteries into the station according to the indicated polarities. Close the cover and reinstall the base. Verify that the station is displaying something. If it is not, check the position of the batteries.
10. Press the station
RESET button to reinitialize the measurements.
11. Select the temperature measurement field (C2) by pressing
SELECT several times, so that the
indicator “ ” appears in this field.
12. Display channel 1 in the outdoor temperature field by pressing repeatedly on the
CHANNEL but-
ton.
13. Press simultaneously on
MIN/MAX and CHANNEL to initiate transmission. The symbol above
number 1 starts flashing.
14. Display channel 2 by pressing
CHANNEL. Initialize transmission by pressing simultaneously on
MIN/MAX and CHANNEL. Repeat the operation for each channel utilized by the sensors, accor-
ding to the information entered into the table in step 2.
15. Setting the time: the station automatically sets the time when it establishes a connection with the
atomic clock in Frankfurt (Germany). The icon “ ” at the lower left of the screen flashes while
this connection is being established. When the connections is established, the icon is displayed
permanently with a symbol that indicates the reception quality of the time signal.
If the time has not set itself after a couple of minutes (2 to 10 minutes), or if the indicated time
does not correspond to your time zone, perform a manual setting in accordance with the procedure explained in the appropriate chapter in the manual. To enter the set mode, deactivate the
radio control for the time by pressing the
DOWN (B5) button for 2 seconds, until the icons disap-
pear. Then press the
MODE button for 3 seconds. Use the arrows located on the back of the
device to change the parameters.
16. Setting climate conditions: it is not necessary to set the climate conditions display. This starts with
“ ” and graduallycomes up to speed after 24 hours. After 24 hours if there is still a significant difference between real local weather and the display on the station, you can initialize the
station by using a fine point to press the station
RESET button. It is then necessary to repeat steps
9 through 12.
31
WS900 6/07/06 17:51 Page 31
Page 7

34
EN
NAVIGATION SYSTEM
This device has 4 display fields for easy reading.
Each line has a precise function:
•
Weather forecasts,
•
Temperature and humidity
•
Measuring barometric pressure and UV (after installation of optional sensor)
•
Time, alarm, calendar.
You can select active display by pressing the
SELECT key. A triangular symbol is then displayed to
the left of the active field.
Most fields have options for alternative displays (time/alarm or barometer/UV).
Press
MODE in the active field to change options or ALARM to change from clock to alarm.
Explanation of each display
Displaying weather forecasts
1. Icon for weak batteries in main device
2. Weather display
Transmission distances
Important:
The maximum transmission distances for the signal vary according to the surrounding materials and
electromagnetic interference.
The table below describes typical distances in different situations:
33
Outdoors, no obstacles 30 - 60 m
Small obstacles (window, plywood door, wooden
table, couch)
20 - 30 m
Electric devices (stereo system, TV, computer,
washing machine, microwave)
10 - 15 m
Radio devices, satellite antenna, cell phone
0 - 15 m with risk of random discon-
nections
Brick walls 5 -10 m
Reinforced concrete wall, several walls 5 m or no transmission
2
1
WS900 6/07/06 17:51 Page 33
Page 8

36
EN
Temperature/humidity displays
The weather station can receive and display information gathered by a maximum of 5 remote sensors.
•
Present, low, and high temperatures and relative humidity.
•
Comfort level indicator and trend curve (rising, falling, or stable).
Data are measured, transmitted, and displayed approximately every 60 seconds.
1. icon for the selected field
2. temperature trend
3. number of channel displayed
4. low battery indicator for remote sensor
5. humidity trend
6. temperature indicator MIN and MAX
7.
temperature unit ºC, ºF
8. heat index indicator
9. humidity indicator MIN and MAX
10.
hygrometer
11. comfort levels
•
Selecting unit of measurement: turn the°C/°F switch to the chosen position.
•
Selecting the remote sensor from which you wish to display information: press CHANNEL
to alternately display information from the different sensors recognized by the station. The “ ” icon
indicates the number of the selected sensor.
•
For alternate display of all connected sensors, hold down CHANNEL for 2 seconds. The data for
each sensor are displayed for 3 seconds.To terminate the automatic scanning, press
CHANNEL
once again, or press MIN/MAX.
LOW/HIGH RECORDINGS
•
Press MIN/MAXseveral times to display the current low/high recordings for the selected sensor.
•
To erase regordings, press MIN/MAX for 2 seconds. An audible signal wil sound to confirm that the
memory has been erased.
This device is capable of detecting changes in local atmospheric pressure.
Based on the gathered data, this device can forecast local weather for the next 12 to 24 hours. The
accuracy of the weather predictions is 70 to 75%.
Important:
The weather forecasts do not necessarily reflect the current situation. Rather, they indicate the situation for the next 12 to 24 hours. They are forecast
. At night, the " " icon means clear weather.
NB : The night icon is displayed during the night, arbitrarily between 6:00 PM and 6:00 AM.
NB : If the temperature measured on the remote sensor for channel 1 is lower than 2°C (35.6 °F), the
icon “ ” changes to icon “ ” .
35
Icon Description
Clear
Partly cloudy
Cloudy
Rainy
Snowy
1
2
3
4
5
6
7
8
9
10
11
WS900 6/07/06 17:51 Page 35
Page 9

38
EN
Backlighting
Press SNOOZE-LIGHT to activate the backlighting for 8 seconds.
Re-initializating system
Re-initializing the functions of the device is accomplished using the RESET button. The RESET button is located on the back of the device.
•
Press RESET when you change batteries, or any time the device does not function properly (for
example, it doesn’t establish a radio frequency connection with the sensor or the radio controlled
clock). When you press
RESET, all the settings return to their default value, and you lose all recor-
ded information.
Barometer
This device records fluctuations in atmospheric pressure in order to provide weather forecasts. The
measurements of atmospheric pressure for the present and for the preceding 24 hours are recorded
by the main device (indoors).
1. Display of barometric pressure
2. UV display
3. Low battery icon for the UV sensor
4. UV value display
5. Start of countdown for UV exposure time.
6. UV level index
7. User’s exposure time to UV
8. Atmospheric pressure/UV diagram
9. SPF applied to user for exposure to UV
10. User’s skin type for exposure to UV
11. User number (for UV Mode) or hourly record for UV and atmospheric pressure readings
12. Altitude/atmospheric pressure/ UVI reading
TEMPERATURE AND HUMIDITY TREND
The trend curves are indicated beside the readings for temperature and current humidity level.
Comfort level
The comfort level indicates if the environment is pleasant, based on readings for temperature and current humidity level.
This information is indicated in the humidity field when the current reading is displayed.
Heat index
The heat index communicates 4 warning levels at high temperatures.
To display the heat index:
1. Press SELECT to enter the temperature field. “ ” is displayed next to the field.
2. Press MODE to display the heat index.
3. Press CHANNEL to select the desired channel.
If the temperature is below 26°C / 80°F, or the desired channel is not activated, the heat index displays “
NA”
37
Trend Increase Constant Decrease
Temperature
Humidity
Level Temperature Humidity
Humid (WET) All >70%
Comfortable (COM) 20-25°C 40-70%
Dry (DRY) All <40%
Category Temperature
Danger °C °F
Extreme Danger >54.5 >130
Danger 40.5-54.4 105-130
Extreme caution 32.2-40.5 90-105
Caution 26.6-32.2 80-90
1
2
8
3
5
4
6
7
9
10
12
11
WS900 6/07/06 17:51 Page 37
Page 10

40
EN
UV indication (optional)
This weather station is compatible with a WS90.UV sensor (sold separately; not included in the pack).
This sensor provides the following information:
•
Record of the ultra-violet index for 10 hours.
•
Automatic calculation of acceptable exposure time to UV based on preset user profiles (maximum
of 4 users).
•
UVI Danger Alert when the UV index reaches dangerous levels. The UV data are indicated in the
same field as the barometer. Press
SELECT to enter the barometer field; the “ ” appears in the
barometer field. Then press
MODE to display the UV icon and the data.
Important:
The UV sensor must be recognized (see paragraph on installation of additional sensors) for the functions relative to UV measurements to be usable.
Countdown for exposure time to UV
To set the countdown for exposure time, you must input the Sun Protection Factor (SPF) and skin type
as follows:
1. Press SELECT to enter the barometer field, and then press MODE to select the UV display.
2. Press CHANNEL to select a user from 1 to 4.
3. Press MODE for 2 seconds to enter set mode and input skin type for the selected user.
4. Press UP or DOWN to choose among 4 settings for skin type. Then press MODE to confirm and
enter the set mode for SPF.
5. Press UP or DOWN to increase or decrease the SPF value. Then press MODE to confirm and
enter the set mode for countdown for UV exposure time.
6. Press UP or DOWN to start or stop the countdown. Press MODE to exit display mode for user’s
remaining time and begin the countdown for exposure time. The user’s remaining time for exposure to UV is displayed and the icon flashes.
7. When the countdown reaches "0", an alarm sounds for 2 minutes. Press any key to turn off the
alarm. The “ ” icon flashes for 2 minutes even if the alarm has been turned off.
Barometer display field
•
Press SELECT to enter the barometer field. The indicator triangle is displayed in the relevant field.
•
If necessary, press MODE to change from display of UV indices to barometric pressure display. The
« » icon is displayed.
The barometric data are indicated in 2 fields in the middle of the display.
•
The upper field displays a bar graph for 24 hours.
•
The lower field indicates past or present readings.
Selecting unit of measurement
•
Press the °C/°F button mb/inHg to change the display units.
Barometer record
In the barometer field, press HISTORY several times to scroll through the measurements. The number indicated in the
HR box specifies when the measurement was made (e.g., : 2 hours before, 3
hours before, etc.).
Bar graph display
The bar graph visually indicates the atmospheric changes between the present time (0) and the preceding 24 hours (-24).
Altitude setting
Set the altitude where you live relative to sea level. This allows for pecise atmospheric pressure
readings.
1. Enter the barometer field.
2. Press
HISTORY for 2 seconds.
3. Press
UP or DOWN to set the altitude in 10 meter increments (- 100 m to 2500m).
4. Press
HISTORY to confirm.
39
WS900 6/07/06 17:51 Page 39
Page 11

42
EN
To start a manual search for reception from the RF clock: press SEARCH on the sensor for
2 seconds. If the sensor still is not located, check the batteries.
Activating/deactivating the radio control
IF you wish to set the clock manually, you must first deactivate the radio control command.
•
To do so, enter the Clock/Alarm field
•
Then press DOWN on the main device for 2 seconds.
•
To activate it, enter the Clock/Alarm field, and then press UP for 2 seconds.
Radio control activated:
Radio control deactivated:
Setting the clock
Necessary if the radio control is deactivated or you are too far from the RF signal.
•
Press SELECT to enter the Clock field. “ ” is displayed next to the field.
•
Press MODE for 2 seconds.
•
Select a time zone (+ / - 23 heures), 12 / 24 hour format, hour, minute, year, date / monthly format,
month, date, day and display language.
•
Press UP or DOWN to change the setting.
•
Press MODE to confirm. The language choices are (E) English, (F) French, (D) German, (I) Italian,
and (S) Spanish. The language selected determines how the week is displayed.
Clock control display
•
Press SELECT to enter the Clock field. “ ” is displayed next to the field.
NOTE : The language choices are (E) English, (F) French, (D) German, (I) Italian, and (S) Spanish.
The language selected determines how the week is displayed.
•
Press the MODE button to alternate between:
•
Hour and seconds
•
Hour and day
•
Hour and time zone
•
Calendar
Alarms
This device has two alarms: the daily alarm and a pre-alarm for snowy weather.
•
The daily alarm can be set to go off every day at the same time.
•
The pre-alarm sounds only when the daily alarm is turned on and the recorded temperature from the
channel 1 sensor falls to 2°C (35.6 °F) or lower.
Maximum/minimum memory for UVI (UV Index)
To display maximum and minimum memory for UVI:
1. Press SELECT to enter the barometer field.
2. Press MODE to select UV display.
3. Press MIN/MAX to show current, maximum, and minimum UV readings.
4. Press MIN/MAX for 2 seconds to erase the UVI memory.
Clock and calendar
This device indicates the time and date according to radio control signals or manual settings that
you input.
The time and date are automatically updated by the radio-controlled clock by official organizations for
tracking time in Frankfurt (Germany) and Rugby (England), unless this function is deactivated. The
signals are received by the sensor (RTGR328N) within a radius of 1500 km (932 miles) of a signal.
Important:
If the station is not less than 1,000 km from from one of the two specified antennas (specifically in the
USA and all the countries of North and South America, in China and all the Asian countries) or if environmental conditions prevent proper reception of the signal, set the clock and the calendar manually
as explained in the following procedure.
Initial reception is established in 2 to 10 minutes, and is initiated when you turn on the device and
every time you press
RESET. Once reception is established, the reception icon stops flashing.
The icon displayed in the clock field indicates 2 factors:
• Connection between the main device and the sensor that gathers the RF signals ( )
• Reception of the RF signal ( )
Association of the 2 icons:
41
Icon Direction
The device is in contact with the sen-
sor and has synchronized the time.
The device is in contact with the sensor,
but the time has not been synchronized.
The device has lost contact with the
sensor, but the time is synchronized.
The device has lost contact with the sen-
sor and the time is not synchronized.
The device cannot reach the sensor.
.
WS900 6/07/06 17:51 Page 41
Page 12

44
EN
Power supply
Main device
4 x LR6 (AA) 1.5V batteries
Temperature’humidity device
2 x LR6 (AA) 1.5V batteries
For longer performance it is advisable to use alkaline batteries with this device.
Troubleshooting
This troubleshooting table will guide you in resolving minor incidents. Use it to analyze any problems
you may encounter. Carry out the problem-solving procedures in numerical order
Important !!! :
For any problems other than those described above, or for any problems you cannot resolve alone,
place the station and the sensors on a table and carry out the initializing procedure
STEP by STEP
as described in the initialization procedure.
The order in which the steps are carried out is
very important.
Setting the daily alarm
1. Press SELECT to enter the clock field. “ ” is displayed beside the field.
2. Press
ALARM to see the alarm. (AL is displayed above).
3. Press
ALARM for 2 seconds.
4. Select the hour and the minutes.Press
UP or DOWN to change the settings.
5. Press
ALARM to confirm.
6. The icon for the daily alarm is displayed when the alarm is set.
SPECIFICATIONS – TROUBLESHOOTING TABLE
Specifications
Temperature
Unit: °C or °F
Indoor measurement range: -5 °C to 50 °C (23 °F to 122 °F)
Outdoor measurement range: -20 °C to 60 °C (-4 °F to 140 °F)
Display resolution: 0.1 °C (0.2° F)
Comfort: 20 °C to 25 °C (68 °F to 77 °F)
Min / Max Memory
Relative Humidity
Measurement range: 25% to 95%
Display resolution: 1%
Comfort: 40% to 70%
MIN / MAX Memory
Barometer
Unit mb / hPa or inHg
Display resolution: 1 mb (0.03 inHg)
Altitude: -100 to 2500 meters (-328 to 7750 feet)
Display: Sunny (day/night), partially cloudy (day/night), cloudy, rainy, snowy
Temperature/humidity sensor
RF frequency: 433 MHz
Distance up to 70 meters (230 feet) with no obstruction
Transmission Approx. every minute
Channel No. 1, 2, 3, 4 or 5
Unit °C or °F
Radio controlled clock
Synchronization Auto or deactivated
HH/MM/SS time display
Time format 12 hour AM/PM (MSF format)
24 hour (DCF format)
Calendar DD / MM or MM / DD;
Day of the week in
5 languages (E, G, F, I, S)
Daily Alarm
Pre-alarm: Crescendo for 2 minutes
Snooze alarm for 8 minutes
43
Incident Resolution
1 You want to set a para-
meter and can’t do it.
1. Make sure the correct field is indicated by the “triangle” symbol. If not, press SELECT to navigate between information fields.
2. Then activate the desired display (for example between barometer and UV) by pressing the MODE key severay times until the correct icon appears.
2 You can’t read the tem-
perature measured by
the sensor on the station.
---.- is displayed in the
”outdoor temperature”
field"
1. Connection lost: the signal sent by the sensor is not being received by the station. - force the connection to reset by pressing simultaneously on
MIN/MAX and CHANNEL. The symbol above the channel number flashes while the connection is being made.
2. The channel displayed is not the right one: Check the parameters of the sensor (position of the CHANNEL switch inside the sensor battery cover);
verify that the number of the channel displayed on the station matches the number of the switch on the sensor. If this is not the case, press on the
CHANNEL button of the station to scroll through the channels until you find the right number.
3. The sensor has fallen or is lying down. The sensor's antenna will work properly only if the sensor is in an upright position. Use the stand provided to
ensure that the sensor is in the best position.
4. The sensor and the station are too far apart, or transmission is hindered by objects generating interference (concrete walls, antennas etc.) Bring the
sensor closer or eliminate the interference, then reset transmission (MIN/MAX + CHANNEL).
5. The sensor's batteries are low, so the sensor does not have enough power for data transmission.
Change the sensor's batteries, then reset transmission (MEM+CHANNEL).
3 The temperature is dis-
played, but is very different from the anticipated
value.
1. The MIN/MAX mode has been displayed by mistake. -> Press repeatedly on MIN/MAX to display the current temperature.
2 The sensor is exposed to a local microclimate: a source of heat (e.g. heating pipe, chimney etc.) or cold (draft) is affecting the temperature measure-
ment very locally. Move the sensor away from this source of temperature interference.
3. Set the display units according to the procedure indicated in the appropriate chapter (°C/°F).
4 The weather conditions
displayed don’t correspond to reality.
1.The calculation algorithm has not had enough time to calculate the forecasts. Wait at least 24 hours to obtain a reliable forecast.
2- You have changed the altitude of the station. Wait 24 hours. If the forecasts are still not reliable then, press RESET and wait another 24 hours.
3. For all other cases: Press RESET and wait 24 hours.
5 The time indicated is dif-
ferent from the actual
time
1. The time displayed is the time of the second time zone; verify that the "ZONE" icon is not displayed. As needed, press several times on MODE to
display local time.
2. The alarm is displayed;
3. Press the ALARM button several times to redisplay the hour.
4. You are not in the same time zone as Frankfurt - program the time difference with Frankfurt, then display the hour of the time zone as the local time;
see the relevant section for programming instructions.
5. You are not within range of the antenna in Frankfurt (around 1,000 km). The antenna icon, in the bottom left-hand corner of the screen, is not displayed.Set the time manually as indicated in the relevant section.
6 You cannot set the time. 1. Deactivate the radio control by selecting the time/date field by pressing SELECT several times and then pressing DOWN for 2 seconds (to reactivate
this function press UP for 2 seconds.)
WS900 6/07/06 17:51 Page 43
Page 13

46
EN
CONTACT
As we strive to continually improve the products we develop, we are interested in your feedback
regarding the quality, the functionality, and the usage of our products.
•
In France, please call the customer service center at:
0810 08 08 08 (local call)
•
For any other country, please leave a message under the relevant heading on our website:
www.decathlon.com
We promise to answer you promptly.
Re-initializing/RESET
The RESET button located on the back of the station (inside the battery compartment) is to be used in
case the device does not function satisfactorily or malfunctions. Use a stylus to hold the button down. All
the settings return to their initial default values. You must again perform the manual settings and customize the display.
Maintenance
Here are a few tips for maintaining the weather station:
1. Never immerse this device. If the unit comes into contact with water, dry it immediately with a soft,
lint-free cloth.
2. Never use an abrasive or corrosive cleaner on this device. Abrasive cleaners may scratch the plastic parts and corrode the electronic circuit.
3. Do not expose this unit to excessive pressure, shocks, dust, extreme temperatures or dampness.
Such treatment would cause malfunctioning, reduce the lifetime of the electronic circuit, damage
the batteries, and deform the product.
4. Do not dismantle the device and do not touch the internal components. Doing so would void the
warranty and could damage components that cannot be repaired by the user.
5. Only use brand new batteries. Do not mix brand new batteries with old batteries, since the old ones
could leak.
R&TTE
May be used in EU countries.
Complies with European directive 99/5/EC
FCC
This device complies with section 15 of the FCC regulation.
Operation of this device is subject to the following two conditions:
1 – There is no risk of this device producing harmful interference.
2 - This device must accept any interference received, including interference which may cause malfunctioning.
This equipment has been tested and judged to be in compliance with the limits of class B digital devices, pursuant to section 15 of the FCC regulation. These limits aim to ensure a reasonable level of
protection from harmful interference within the framework of a residential setting. This equipment
generates, utilizes, and emits radio frequency energy, and if it is not installed according to instructions,
it may cause harmful interference with radio communications.However, it is in no way guaranteed that
no interference will be produced in specific settings. Should this equipment cause interference harmful
to radio or television reception, which may be determined by turning the device on and off, the user is
advised to remedy such interference by implementing one or several of the following measures:
- Reorient or move the reception antenna.
- Increase the distance between the device and the receiver.
- Plug the equipment into a power outlet in a different circuit from the one in which the receiver is plug-
ged.
- Ask the vendor or an experienced radio/television technician for advice.
Important:: Any changes or modifications not explicitly approved by Décathlon may void the
authorization granted to the user to utilize the equipment.
45
WS900 6/07/06 17:51 Page 45
 Loading...