

Page 1
EN
ONstart 310
A
E
D
C
B
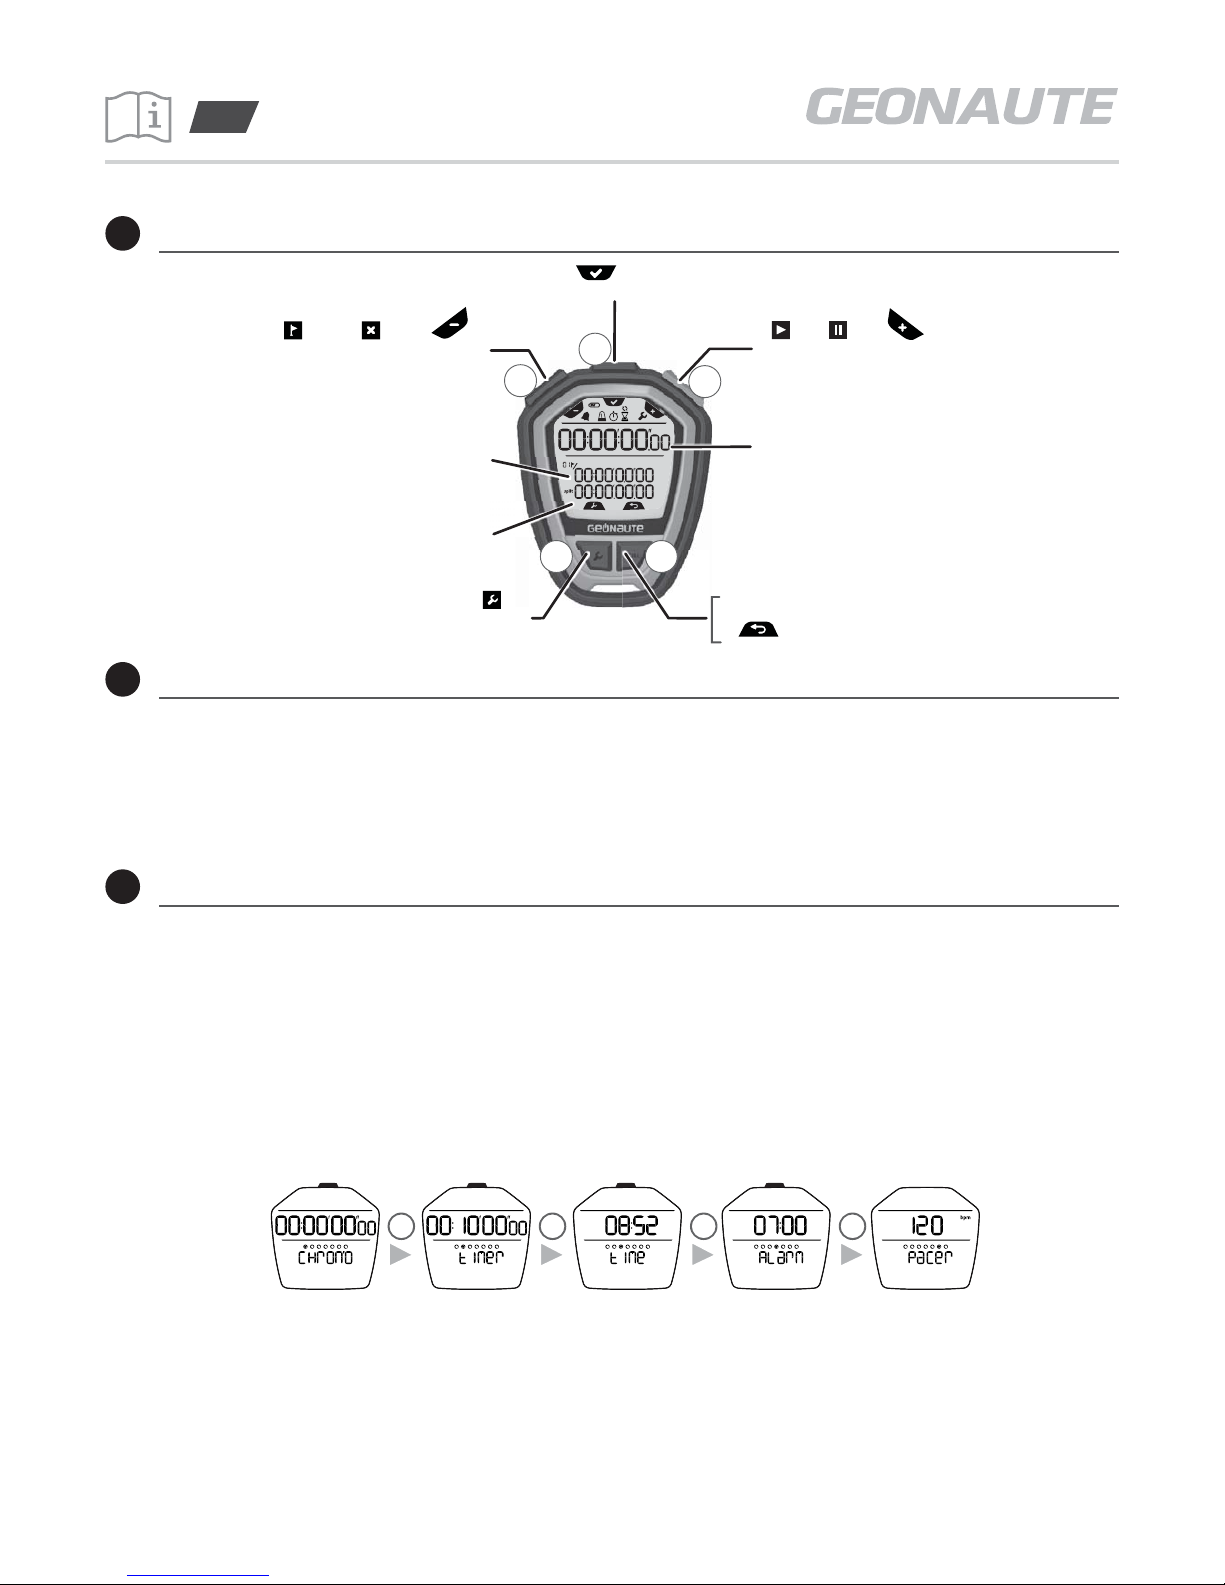
Intuitive guide
Start / Standby
This product can be switched to standby to increase battery life.
To start ► Press C for 2 seconds
To switch to standby ► Go to "TIME" or "ALARM" mode
► Press C for 5 seconds
NOTE: ONstart 310 can be switched to standby manually if the stopwatch and timer are at zero.
ONstart 310 switches to standby mode automatically after 24 hours.
Accessing the functions
Press the Mode button (B) in succession to access the various functions.
• STOPWATCH: Stopwatch (1/100s up to 99h59min59s) with 50 split times
• TIMER: 3 types of countdown:
MATCH: countdown with several programmable times (see page 3/8)
COACH: with several customisable workouts (see page 3/8)
UPDOWN: countdown followed by a stopwatch (see page 4/8)
• TIME: Time and date
• ALARM: Alarm
• PACER: Sets a cadence (from 1 to 240 beeps/min)
Note: For each function, when set for the first time, ONstart 310 will switch automatically to settings mode.
B B B B
B B B B
LAP-SPLIT / Reset / Decrease
Start / Pause / Increase
LAP
SPLIT
Mode / Validation / (Settings)
Main display
RECALL: Recall split time
Return
Settings
1/6
1
2
3
Page 2
Stopwatch Mode
4.1 - Using the stopwatch
AC
Start the stopwatch ► Press C
Pause ► Press C
Reset ► Press A when the stopwatch is paused.
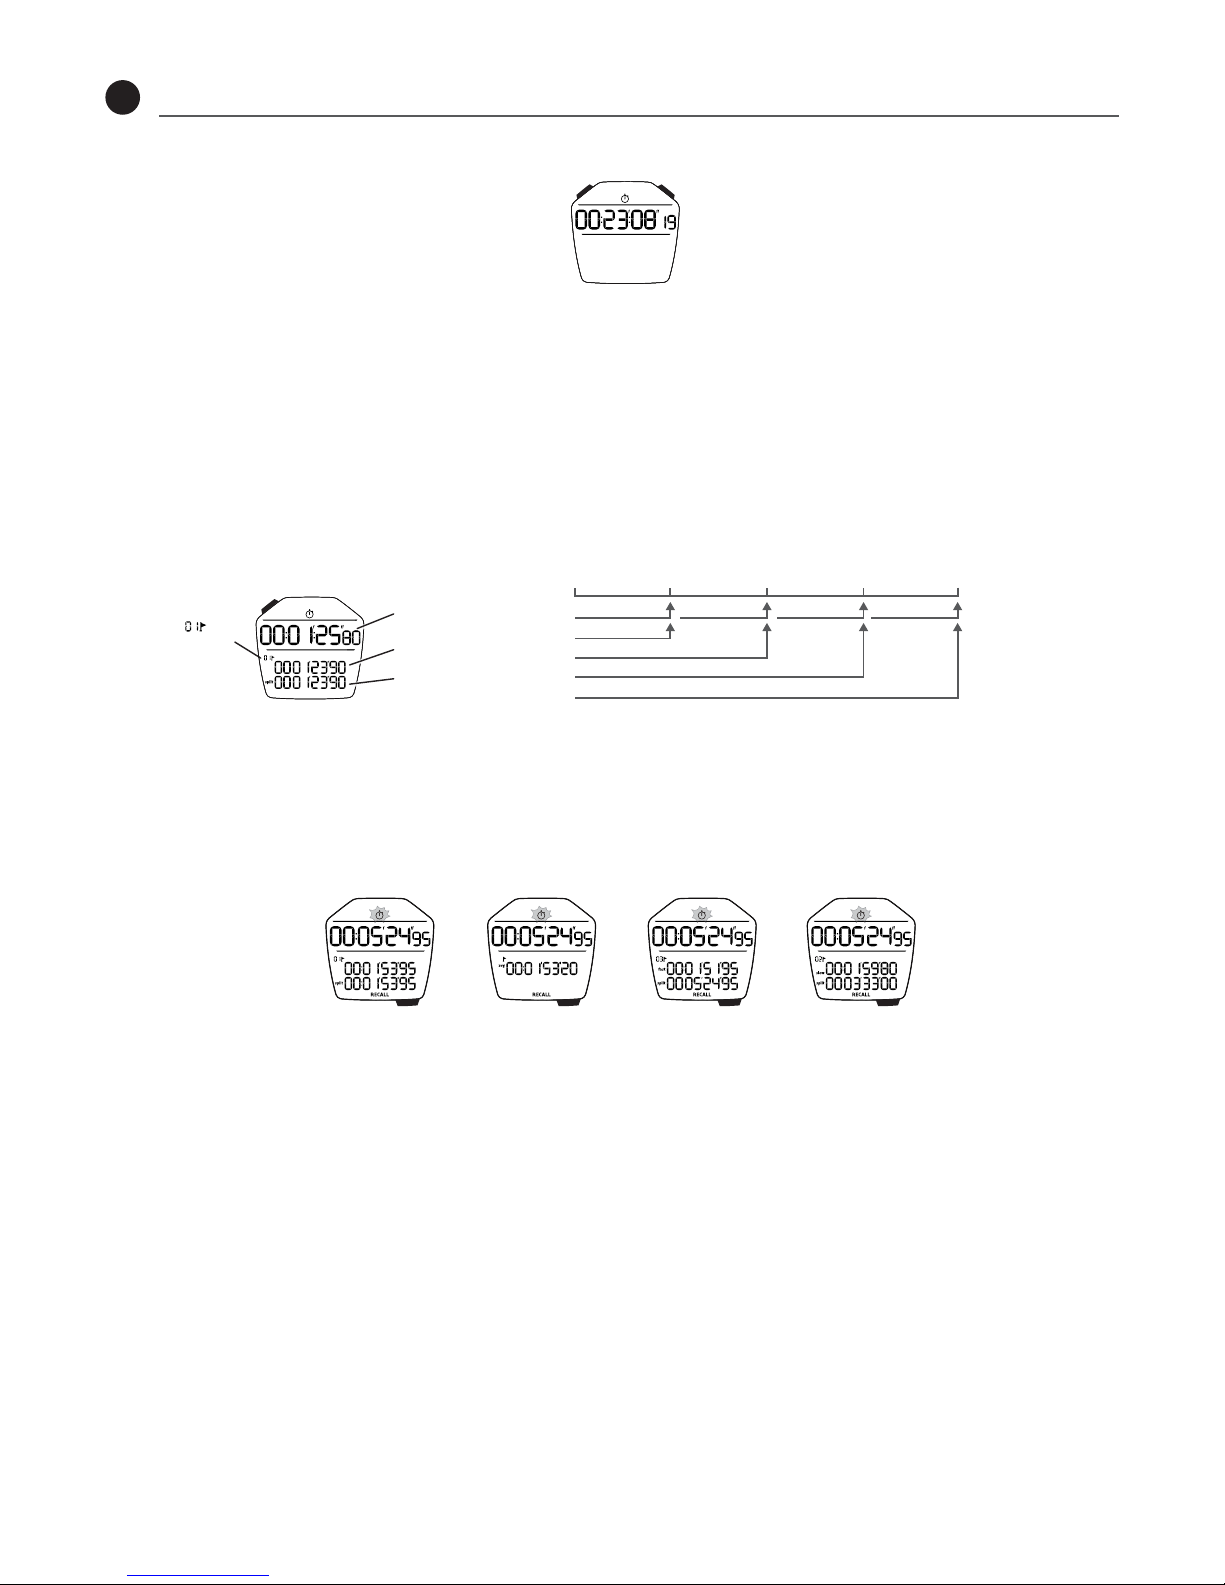
4.2 - Using split times
ONstart 310 measures split times (SPLIT: the time taken from the start up to a given point) and lap times (LAP: the
time taken since the previous partial measurement up to the given point).
Taking a split time when the stopwatch is on ► Press A
Each time A is pressed, the latest LAP and SPLIT times are shown below the total time.
A
Total time
Most recent LAP
SPLIT
LAP no.
START
LAP 1
SPLIT 1
SPLIT 2
SPLIT 3
END: SPLIT 4
LAP 2 LAP 3 END: LAP 4
400 m 800 m 1200 m 1500m
STOP
4.3 - Viewing split times
To view the split times for each LAP/SPLIT (when the stopwatch is on
or off)
► Press D
To scroll through the various split times as well as the average time,
the quickest time and the slowest time
► Press D
D D D D
Time for LAP 1
and Split 1
AVG
Average of the split
times
FAST
Fastest split time and
corresponding LAP
SLOW
Slowest split time and
corresponding LAP
Note: It is possible to view only the latest activity timed with the stopwatch.
... up to 50 LAP/SPLIT times
2/6
4
Page 3

Timer mode (countdown)
ONstart 310 has 3 different countdown modes.
• MATCH: Countdown with several programmable times (up to 9 blocks and 99 repetitions).
Perfect for refereeing a match with several half-times.
Block 1 Block 2 ...... Block no.
X repetitions (Repeat)
• COACH: Coach with several customisable workouts (up to 99 Action + Rest series and 99 repetitions for each
series).
Series 1 Series 2
Warm Up Action Rest Break Action Rest ...... Cool
X repetitions (Repeat) X repetitions (Repeat)
This type of countdown is designed for programming a workout session made up of blocks that vary in intensity and
length. Perfect for interval training.
WARM UP
Warm up phase
ACTION
Acceleration phase
REST
Deceleration phase
BREAK
Recovery time between 2 series
COOL
Cool down time
• UpDown: Countdown linked to a stopwatch. When the countdown is over, the stopwatch starts automatically.
Perfect for the start of a race using a countdown (sailing in a regatta, for example).
5.1 - Selecting the countdown
► Go to "TIMER" mode by pressing B.
► Use A and C to select the countdown and press B to confi rm.
C
A
C
A
ACACC
B B B
5.2 - Setting the "MATCH" countdown
► Go to countdown mode then select "MATCH" mode
► Press and hold the E button to access the settings
(when setting for the fi rst time, you will arrive there automatically).
► Set the countdown times and the repetitions
by pressing the A(-) and C(+) buttons and press the
B button to confi rm.
5.3 - Setting the "COACH" countdown
For "COACH" mode, 9 different schedules can be saved.
► Go to countdown mode then select "COACH" mode
► If you have already created several workouts,
select the one you want to set.
► Press and hold the E button to access the settings
(when setting for the fi rst time, you will arrive there automatically).
► Choose your settings by pressing the
A(-) and C(+) buttons and press the
B button to confi rm:
• Edit: modify a workout programme.
• Delete: delete a workout programme.
• Rename: rename an existing programme.
• Create: create a workout programme.
Time remaining
Number of
repetitions
completed
Number of
repetitions
programmed
Progress in blocks
completed
Time remaining
Number of
repetitions
completed
Number of
repetitions
programmed
3/6
5
Page 4

5.3.1 - "EDIT" programme
After selecting "EDIT" for the relevant programme, set the countdown time for each exercise, the number of series
(from 1 to 99) and repetitions (1 to 99) by pressing the A(-) and C(+) buttons and press the B button to confirm.
Series 1 Series 2
Warm Up Action Rest Break Action Rest ...... Cool
X repetitions (Repeat) X repetitions (Repeat)
5.3.2 - "DELETE" programme (only if at least one programme has been saved)
After selecting "DELETE" for the relevant programme, select YES to delete the programme by pressing the A(-)
and C(+) buttons and press the B button to confirm.
5.3.3 - "RENAME" programme (only if at least one programme has been saved)
After selecting "RENAME" for the relevant programme, select YES to rename the programme by pressing the A(-)
and C(+) buttons and press the B button to confirm each letter.
5.3.4 - "CREATE" programme
After selecting "CREATE", set the various countdown times, the number of series (from 1 to 99) and repetitions
(1 to 99) by pressing the A(-) and C(+) buttons and press the B button to confirm.
Series 1 Series 2
Warm Up Action Rest Break Action Rest ...... Cool
X repetitions (Repeat) X repetitions (Repeat)
By default, the name of the workout programme is "COACH 1", "COACH 2", etc.
If you want to change this, go to the "RENAME" STEP.
"MEMORY FULL" appears if the memory is full. One or more programmes will need to be deleted by going to the
"DELETE" STEP.
5.4 - Setting the "UPDOWN" COUNTDOWN
► Go to countdown mode then select "UPDOWN" mode
► Press and hold the E button to access the settings
(when setting for the fi rst time, you will arrive there
automatically).
► Set the countdown times by pressing the A(-) and C(+) buttons and press the B button to confi rm.
5.5 - Using the countdown
► Go to the desired countdown mode.
► For "COACH" mode, select the desired saved workout by pressing the A(-) and C(+) buttons and press the B
button to confi rm.
Starting the countdown ► Press Start/Pause (C)
Pause ► Press Start/Pause (C)
Reset ► Press Reset/LAP (A)
4/6
Page 5

PACER mode
The "PACER" can be used to set a per-minute pace with
beeps at a set frequency. The pacer is used in combination
with a stopwatch.
Setting the PACER
► Go to "PACER" mode
► Press and hold the E button to access the settings.
► Set the per-minute frequency (1, 2, 3, 4, 5, 10, 15, 20, 30, 40, 50, 60, 80, 100, 120, 140, 150, 140, 180, 200 or
240 bpm) by pressing the A (-) and C(+) buttons and press the B button to confi rm.
Using the PACER
Start the pacer and the stopwatch ► Press Start/Pause (C)
Pause ► Press Start/Pause (C)
Reset ► Press Reset/LAP (A)
Time Mode
Setting the time mode
► Go to the "TIME" mode
► Press and hold the E button to access the settings.
► In turn, set the hours, minutes, format for the time, year, month, day and the date format by pressing the A(-)
and C(+) buttons and press the B button to confi rm.
E
E
Alarm Mode
Setting the Alarm mode
► Go to the "ALARM" mode
► Press and hold the E button to access the settings.
► Enable (ON) or disable (OFF) the alarm then set the hour and minutes by pressing the A(-) and C(+) buttons
and pressing the B button to confi rm.
E
E
Using the alarm
► To stop an alarm ringing: press any button.
Pace value set
Stopwatch
5/6
7
6
8
Page 6

4 Boulevard de Mons – BP 299
59665 Villeneuve d’Ascq cedex – France
ɉɪɨɢɡɜɨɞɢɬɟɥɶɢɚɞɪɟɫɎɪɚɧɰɢɹ
Precautions for Use
This product is waterproof (1 ATM) in wet conditions, when exposed to water spills and to rain but
cannot be submerged in water.
CR2032
3V
To change the battery, visit the store where you purchased your product. If you change the battery
yourself, you may damage the seal, affect the watch’s watertightness, and void your warranty. Battery life
is affected by how long the product has been at the store and how you use the product.
The "crossed out bin" symbol means that this product and its batteries cannot be disposed of with
household waste. They must be disposed of via selective waste sorting. The product and batteries must
be recycled at a collection point at end of life. Recycling your electronic waste protects the environment
and your health. Discard your batteries in a recycling area.
Contact Us
Download the instruction manual and contact us at www.support.geonaute.com
6/6
9
10
Ref. 1850.754
cc : 89854
Made in China - Fabricado na/em China
Произведено в Китае - Imal edildigi yer Çin
中国制造 - 中國製造 - ผลตในจน
以下标示仅在中国大陆地区适用
中国 制造 - 中國 製造
上海莘威运动品有限公司, 上海市闵行区申北路2号 邮
编:201108
商标 : GEONAUTE
产品等级:合格品 - 质检证明:合格
执行标准:GB/T 227782008
540-0011 大阪市中央区農人橋1-1-22 大江ビル10
階 ナチュラムイーコマース株式会社
廢電池請回收
IMPORTADO PARA BRASIL POR IGUASPORT LtdaCNPJ :
02.314.041/0001-88
для занятий спортом
хронометр
Импортер: ООО "Октоблу", 141031, Россия, Московская область,
Мытищинский район, МКАД 84-й км., ТПЗ "Алтуфьево", владение 3,
строение 3, +7(495)6414446
Не подлежит обязательному подтверждению соответствия
台灣迪卡儂有限公司台灣台中市408南屯區大墩南路379號諮詢電話: (04) 2471-3612
TURKSPORT Spor Urünleri Sanayi ve Ticaret Ltd.ŞtiOsmaniye Mahallesi
Çobançeşme Koşuyolu Bulvarı No: 3 Marmara Forum Garden Offi ce 0B
Blok 01 Bakırköy 34146 Istanbul, TURKEY
 Loading...