

Page 1

D
SET / LIGHT
A
START / SPLIT
13
C
MODE
B
STOP / RESET
Page 2

Congratulations on your purchase of a Geonaute MW600 mountain
watch.
This watch will go everywhere with you - in leisure and sports
activities or simply in your day-to-day life.
It is shock-resistant, waterproof, accurate and practical, and it
en
will win you over with its versatility and quality.
Class leader for climbing and globetrotting and also ideal for
trekking, it will guide you over the ups and downs in the mountains
using its altimeter and electronic compass.
Its weather predictions will help you to better anticipate weather
conditions. Higher, stronger, safer!
LIMITeD WARRAnTY
DECATHLON guarantees the initial purchaser that this watch is free from
defects of materials or manufacture for a period of two years from the date of
purchase. Please keep your receipt as proof of purchase.
• This guarantee does not cover damage resulting from misuse, from a failure to
respect the precautions for use, from accidents, from improper maintenance or
from commercial use.
• This warranty does not cover damage resulting from repairs carried out by
persons not authorised by DECATHLON.
• The guarantees contained herein explicitly replace all other guarantees
including the implicit guarantee of merchantability and/or suitability for use.
DECATHLON cannot under any circumstances be held liable for any damage,
whether direct or indirect, general or specic, caused by or related to these
instructions for use or the products they describe.
• During the warranty period, the item will either be repaired free of charge
by an authorised repair service or replaced free of charge (depending on the
distributor).
• The warranty does not cover batteries or cracked or broken casings where
signs of a blow are evident.
USe
This watch is designed to be worn on your wrist for mountain sports (hiking,
mountain-biking, etc). It is for telling the time and measuring time periods, using
the stopwatch function. It features various measuring instruments (barometer,
altimeter, compass) which enable you to position yourself better and give you
indications on outside environmental conditions.
PReCAUTIOnS FOR USe
Altimeter/barometer: altimetry is not an exact science. It entails interpreting
variations in atmospheric pressure. An altimeter is above all a barometer. As
a consequence, a variation in altitude may change the barometric pressure
displayed and a change in the weather may change the altitude displayed.
Please follow the advice in barometer mode and altitude mode.
• Handle the watch with care - do not drop it or subject it to strong impacts.
• Do not dismantle the watch. This would void the warranty and could cause
damage and loss of waterproong.
• Please recalibrate the watch’s altitude or atmospheric pressure after swimming
or diving, following the indications in altimeter mode or barometer mode.
• Read the instructions carefully before use. Keep the instructions for the entire
life of the watch.
• Do not subject the watch to extreme temperatures. If the watch is exposed to
direct sunlight for long periods of time, the display may darken temporarily, but
will go back to normal once it has cooled down again.
• Only clean with a soft, damp cloth. Do not use detergents, which risk damaging
the watch equipment.
en
14
Page 3
bATTeRIeS AnD ReCYCLIng
This watch uses a CR2032 battery.
Please note: if you note that the display is ashing unusually or doesn’t appear
to be working correctly, this usually means that the watch battery is low and
needs to be replaced.
We recommend that you take the watch to a DECATHLON specialist to have
the battery replaced. If you change the battery yourself, you risk damaging the
seal, thus impairing the waterproof design as well as voiding your warranty.
batteries it contains cannot be disposed of with household waste. They are
subject to specic sorting. Take the batteries and your unusable electronic
product to an authorised collection area for recycling. Recycling your electronic
waste will protect the environment and your health.
Please check the availability of the battery with your dealer before
travelling.
Battery life is approximately one year, but can vary, depending
on how long it was stored in the shop and the way in which the
watch is used.
The “crossed-out bin” symbol indicates that this product and the
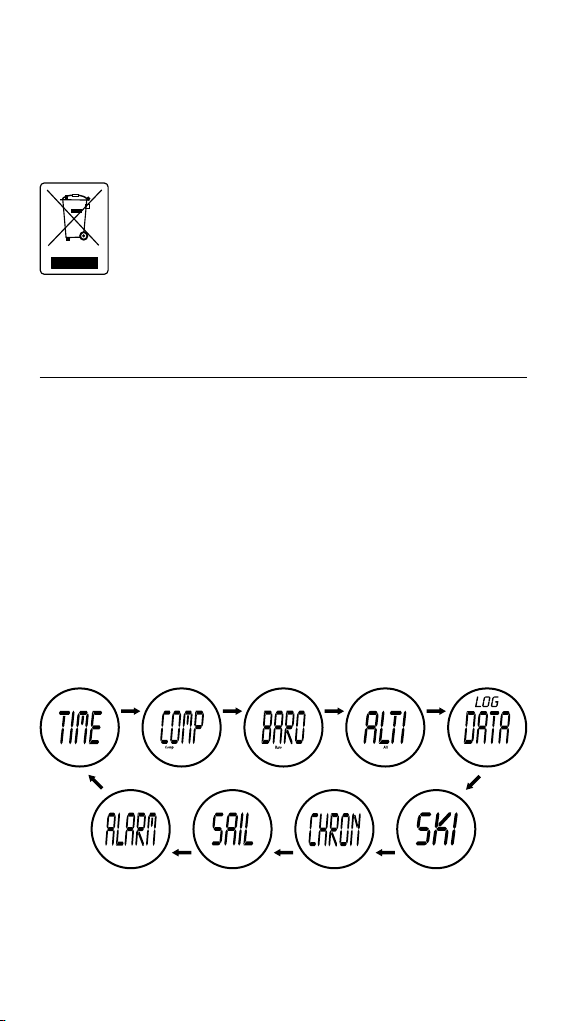
nAVIgATIOn SYSTeM
This watch has 9 operating modes:
• A time/date mode (TIME), with two time zones and optional display of date,
temperature, altitude and weather predictions.
• A compass mode (COMP).
• A barometer mode (BARO): weather predictions, barometric variations and
recording facility.
• An altimeter mode (ALTI): current altitude, climbing speeds and data record.
• An altimeter log book (LOG DATA): recall stored data.
• A ski mode (SKI): delayed, congurable stopwatch on the altimeter.
• A stopwatch mode (CHRON): stopwatch with recall of stored split times.
• A sailing mode (SAIL): a sailing events countdown timer.
• An alarm mode (ALRM): two daily alarms.
Press C to change modes.
15
C
C
C C C
C
CCC
Page 4
eXPLAInIng THe MODeS
1 - TIMe MODe (TIMe)
Using the time mode:
D
C
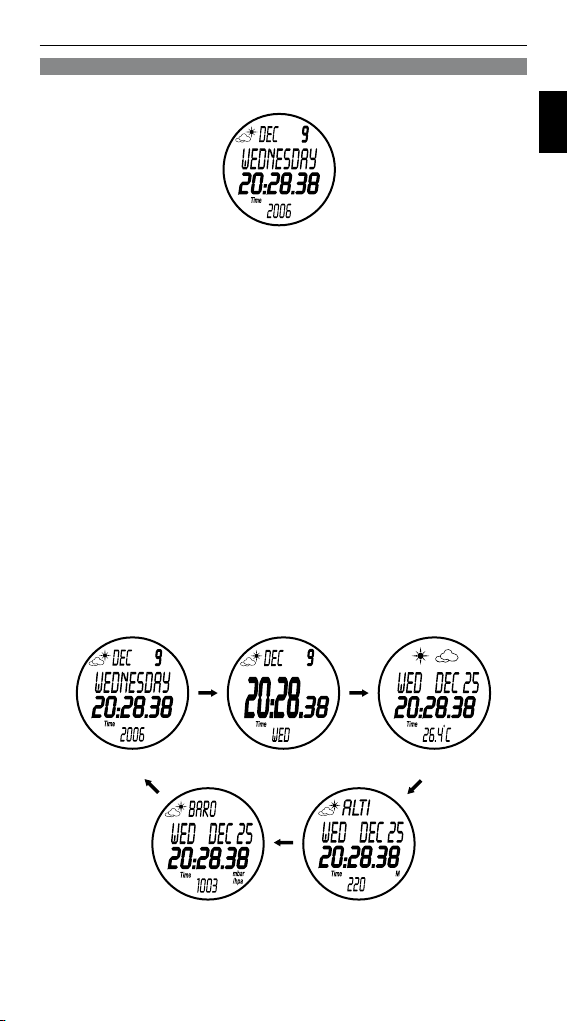
This mode displays information linked to the time and the date, and optionally
displays weather predictions, temperature, altitude and local pressure.
This mode displays information linked to the time and the date, and optionally
displays weather predictions, temperature, altitude and local pressure.
The watch can display two time zones (indicated by T1 and T2).
• You can quickly check the one which is not displayed by pressing A.
• You can select one or other of the time zones to be displayed permanently
by holding down A (T1 or T2 ashes while you press and is then displayed
continually).
NB: The two time zones, T1 and T2, are independent: hour, minutes, date..
Only the seconds are identical in the two zones. T1 and T2 must therefore be
set separately.
The calendar automatically calculates the day of the week for all dates until the
year 2055.
There are three time display modes:
• View 1: Time/date/day of the week/year (TIME).
• View 2: Time/date/day of the week (TIME).
• View 3: Time/date/temperature/day of the week/weather trends
(TEMPERATURE).
• View 4: Time/date/altimeter/day of the week (ALTIMETER).
• View 5: Barometer time/day of the week (BAROMETER).
Press B to change views.
B B
A
B
en
Vue 1 Vue 2 Vue 3
B
B
Vue 5 Vue 4
NB: The graphic display of sea level pressure and barometric trends are
described in the barometer chapter.
B
16
Page 5

Setting the time, date, altimeter, barometer and temperature:
In time mode,
• Select the time zone to be set as indicated above. Check that T1 or T2 is
displayed.
• Hold down D
HOLD) and the hour ashes (HOUR).
• Press A (+) or B (-) p to increase or decrease the hour.
• Press C p and the minutes ash (MIN).
•
Press A (+) or B (-)
• Press C p he seconds ash.
• Press A or B
Proceed in the same way to set the year, month, day of the month, the units for
the ALTI mode (ft or m), BARO mode (mbar or inHg) and TEMP mode (F or C),
and to choose 12 or 24h clock.
Press D at any time to exit adjustment mode. The day of the week will be
calculated automatically.
NB: holding down buttons A or B while setting allows you to scroll through the
values more quickly.
NB : when you reset the seconds to zero, if the value was between 00 and 29
the minutes remain unchanged. Between 30 and 59, the minutes increase by
1.
NB: if 12 hour mode is selected, the symbol A or P is displayed on the main
screen.
2- COMPASS MODe (COMP)
p Go into setting mode. A brief message is displayed (SET
p to increase or decrease the minutes.
p to reset the seconds to zero.
Reading direction equals 12
o’clock on the watch
Cardinal direction
Azimuth
Using the compass:
When you enter compass mode, the word COMP is displayed for several
seconds then a small COMP symbol will be present throughout the use of this
mode. The reading direction (e.g.: NNW for North north west) and the azimuth in
degrees are displayed. The reading equals 12 o’clock on the watch.
The measurement displayed incorporates the declination correction, which is
the correction between the geographic north pole and the magnetic north pole.
It is very important to calibrate it before starting.
WARNING: in order that measurements are reliable it is very important that
you ensure that the plane of the screen is perfectly horizontal. Otherwise the
measurements will not be correct.
Like all compasses, this watch is sensitive to magnetic elds. It is designed
to operate outdoors, away from all metal parts and magnetic sources (pay
particular attention to watches, keys, table legs, power lines, computers and
mobile telephones). Again, measurements will not be correct if you do not
observe this instruction.
Furthermore, before any meaningful use of the compass, you must calibrate it.
WARNING: the compass function uses a lot of energy. To save the battery, it
will only be activated for around ten seconds before the display turns off (- - -).
However, it is possible to reactivate measurement by pressing A.
You can also hold down A for as long as you like. In this case, the direction will
17
Page 6

be displayed for as long as you press the button.In this case, the direction will
be displayed for as long as you press the button.
Calibrating the compass:
Hold the compass perfectly horizontal.
• Hold down D
• Slowly turn the watch clockwise through 720 degrees horizontally (two
complete turns). The manoeuvre must last at least 15 seconds per turn.
• Press C
(see the table below).
p CAL HOLD is displayed then the word CAL.
p to conrm that rotation has ended and enter the declination value
The tens ash.
• Press A (+) or B (-) p to increase or decrease the tens.
• Press C p the units ash.
•
Press A (+) or B (-)
p to increase or decrease the units.
• Press C p E (East) or W (West) ashes.
• Press A or B
• Press D at any time to end calibration. The pre-calibration declination angle is
zero.
Declination values for a few major world cities. Enter an average value between
two nearby cities listed below. Or the value of the closest city.
NB: If you restart your watch, in COMP mode you can directly access digital
compass calibration.
p to change the value from E to W.
en
City Déclination
Anchorage 22°E
Atlanta 4°W
Mumbai 1°W
Boston 16°W
Calgary 18°W
Chicago 3°W
Denver 10°E
Jerusalem 3°E
London 4°W
Munich 1°E
3 – bAROMeTeR MODe (bARO)
Weather trends
Local pressure
Ville Déclination
New York 14°W
Oslo 2°W
Paris 2°W
Rio de Janeiro 21°W
San Fransisco 15°E
Seattle 19°E
Shanghai 5°W
Toronto 11°W
Vancouver 20°W
Washington DC 10°W
Sea level pressure
Graph of changes in sea level
pressure
Unit of pressure
18
Page 7

There are ve display modes available for the barometer. Press B to change
display modes.
B B
View 1 View 2 View 3
B
B
View 5 View 4
In barometer mode the watch displays weather forecast symbols and a
measurement of the current local and sea level atmospheric pressure. This
mode also features a graphic display of the barometric trend over the last 24
hours.
Weather conditions display:
The watch displays symbols giving an idea of the local climatic trends for the
coming hours. Calculation is based on barometric measurements and the
display is the same as in time mode.
There are four trend symbols :
B
Sunny Cloudy Sunny with
WARNING:
• Weather forecasting is not an exact science! No professional institute in the
world is capable of 100% certainty. The forecasts given by the watch should
be taken as an indication. If you have to make a major or dangerous trip
(sea, mountains), conrm the MW600’s predictions by contacting your local
meteorological institute.
Furthermore, at sea and in the mountains, climatic conditions can change
extremely rapidly, creating life-threatening conditions. Be prepared and
extremely careful.
• Meteorological predictions are given at 6am, and will only be reliable if the
barometer has been functioning correctly for at least the last 12 hours.
• View 1 : Barometric pressure display.
Est afché le graphique de la pression barométrique au niveau de la mer lors
The graph of sea level barometric pressure over the last 24 hours is displayed.
The last value is on the right with each point representing one hour.
It is not possible to read the exact value from the graph, merely the trend.
In order to read the sea level barometric pressure values for the last 24 hours,
go to view 5 and press A to scroll through the data for the last 24 hours.
NB: The barometer varies by intervals of 1mbar and displays pressures from
cloudy spells
Rainy
19
Page 8

300mbar to 1100mbar.
Press A to change the units of the barometric pressure value and hold it down
until the pressure unit (mbar or inHg) stops ashing to go from mbar to inHg
and vice versa. Press B to change between the barometric pressure values and
current values.
To convert pressure to inches of Mercury, use the following formula:
Pressure in inches of Mercury [inHg] = Pressure in millibars [mbar]/33.9
• View 2 : Temperature display.
In this view the watch displays sea level and local pressure values and
temperature. Change the units between (°C) and (°F) by holding down A.
WARNING: body temperature may inuence the value displayed. To get a
precise idea of the outside temperature, you need to take the watch off and
put it on an ambient temperature surface. Leave the watch to come to ambient
temperature (around 10 minutes) and the display will stabilise.
NB: The temperature varies in intervals of 0.1°C and the variations will be
recorded very precisely.
However, the accuracy of the absolute gure will be lower (1 to 2°C).
Comparing the display with another thermometer may lead to errors, as the
value depends on the calibration of the two devices.
• View 3 : Displaying local pressure.
The main display in this view shows the local pressure.
The watch measures altitude and atmospheric pressure using the same
sensor.
It cannot therefore determine whether the atmospheric pressure changes
because of a change in altitude or in climatic conditions.
You therefore need to calibrate the barometer to the altitude of the measurement
site.
Calibrating sea level atmospheric pressure.
• Calibration is only possible for views 1 to 3.
• Hold down D until the words SET CURRENT WEATHER scroll across the
screen. The weather symbol begins to ash.
• Press A(+) and B(-)
on the weather conditions observed at the time.
• Press C
• Press A(+) and B(-)
on information from an ofcial meteorological bulletin, for example.
Press D to exit setting mode. After 2-3 minutes without calibration, the screen
stops ashing and goes back into barometer mode.
p the sea level pressure value ashes.
p to increase or decrease the displayed value, depending
p to increase or decrease the displayed value, depending
en
A
B
• View 4 : Differential barometer.
In view 4, it is possible to activate a differential mode. This allows you to
measure pressure changes from the moment it is activated, without having to
reset the barometer. This gives you a new benchmark for monitoring barometric
variations.
• Press D “START” is displayed.
• Hold down D until S.level and C.baro appear with ashing gures.
• Press A or B to reset the values to zero. You have just calibrated the benchmark
to launch the differential calculation.
• Press D to conrm the calculation.
• Hold down D until STOP stops ashing to interrupt the calculation.
A
B
A
B
20
Page 9

• View 5 : Pressure records.
View 5 displays the values recorded over the past 24 hours.
Press A to scroll through the pressure values.
4- ALTIMeTeR MODe (ALTI)
In this mode the watch measures and displays local
altitude in relation to sea level.
This mode can also graphically display recent variations
in altitude.
Altitude is displayed in metres (m) or in feet (FT).
The sensor’s accuracy makes possible a resolution of
1m (or 1 foot) and measurements from -700m (-2296ft) to
+9000m (29520ft).
WARNING: Altitude is calculated on the basis of atmospheric pressure
measurements. If changes in the weather cause variations in pressure, altitude
will be measured incorrectly as a result, and it is therefore necessary to calibrate
it very frequently, particularly when the weather is changeable.
Similarly, the accuracy of altitude measurements is indicative. Even though
the pressure sensor is very accurate, climatic factors – even imperceptible
ones – affect value’s accuracy (1mbar of pressure difference equals around
8m altitude difference). You therefore need to put the measured value into
perspective yourself.
Press B to access 5 different screens.
B B
Vue 1 Vue 2 Vue 3
B
B
B
Vue 5 Vue 4
• View 1 : Display of altitude and accumulated altitude.
Cette vue afche l’altitude locale ainsi que la vitesse d’évolution de l’altitude
This view displays local altitude and altitude change speed in m/min.
Hold down A for a few seconds to simultaneously display positive and negative
accumulated altitude. These are recorded in a log book (LOG); Press A again
for a few seconds to stop recording and return to view 1.
• View 2 : Differential calculation.
This view allows you to measure and time your altitude in relation to your
departure altitude.
You can also record this change in the log book (LOG) by holding down A for a
few seconds to start and stop recording.
To launch this differential measurement, press D until the digital value ashes,
then press A or B to calibrate altitude to 0m, your reference altitude based on
which you want to record future changes.
Press D again to launch the differential display and to simultaneously launch
the stopwatch.
Hold down D for a few seconds to stop this display.
21
Page 10

• View 3 : Graphic display
This view displays graphic altitude variation over the last 24 hours, time and
temperature.
• View 4 : Digital display.
This view gives a “simple” display of local altitude.
• View 5 : 24h altitude recall.
This view allows you to recall pressure values over the last 24h.
To do this, keep pressing A to display altitude in 1h intervals.
WARNING: Accumulated altitude difference is calculated mathematically.
If the display oscillates between two values, the cumulative value will increase
every time it oscillates between the lowest and the highest value.
The accumulated difference will therefore be more accurate when you climb
steadily than if you proceed at a more or less constant altitude.
Calibrating measurements.
The watch measures altitude and atmospheric pressure using the same sensor.
It cannot therefore determine whether the atmospheric pressure changes
because of a change in altitude or in climatic conditions.
You therefore need to calibrate the altimeter every time weather conditions
change.
Calibrating altitude:
• Go to the display mode which corresponds to view 1.
• Hold down D until SET HOLD stops ashing and CURRENT ashes.
• Press C to conrm the local altitude setting. Press A to increase or B to
decrease its value.
• Once you have set the altitude, press C to return to main altimeter settings and
proceed in the same way for:
• The 3 pre-programmable altitudes: LOCAL 1, 2 and 3. These 3 values
allow you to enter known altitudes of landmarks which you come across during
your trip. In this way you can switch to a reference altitude and thus improve
the reliability of your watch’s measurements. Please note: if you exit setting
mode by pressing D at one of the local altitudes, this altitude will be taken as the
default altitude.
• Restarting accumulated altitude.
• The maximum altitude reached during your trip.
• Triggering an alarm set to an altitude.
If no button is pressed for 2-3 minutes, the display will automatically return to
normal display.
Storing climbing speed and waypoints in the memory:
• Hold down until the words LOG 1 stop ashing to store the altitude of the
waypoint and climbing speed in the memory.
• Hold down A to stop measurement. The words LOG 1 are then displayed,
conrming storage in the memory. Repeat for different recordings:
LOG 2, 3 and 4…
5 – DATA ReCALL MODe (LOg DATA)
In this mode, data stored in Altimeter mode (climbing speed) can be recalled.
Altitude data is displayed on two different screens:
• Positive and negative accumulated altitudes.
• Average climbing and descent speeds.
• The maximum altitude reached.
• The time when the recording was made.
To return to data recording, press A to scroll through the recording numbers
(e.g.: LOG DATA 2) until you nd the desired recording.
Press B to see the detail on the 4 different screens.To delete the stored data,
hold down D. The message CLEAR HOLD appears and indicates that the data
is about to be deleted.
Continue and hold down D to delete all data: CLEAR ALL HOLD. The screen
then displays 4 dotted lines.
en
22
Page 11

6- SkI MODe (SkI)
Measuring the time it takes to reach base camp (altitude
target):
• Hold down D to set the altitude of your base camp.
Press A or B to set the displayed value. Press D when the
base camp altitude is set.
• Press A to start the countdown timer at 10 seconds.
When the beep sounds start skiing.
The stopwatch stops when you arrive at the altitude
set for your base camp
STOPWATCH MODe (CHROn)
In this stopwatch mode the watch can store 100 split
times.
These split times can be stored for later use in 50 sessions
called “laps”.
The CHRON information is displayed for 3 seconds when
you enter this mode.
The stopwatch has an accuracy of /00s up to one hour
(display: minutes/seconds/100ths) then of seconds up to a
limit of 24 hours (display: hours/minutes/seconds).
stops for 6 seconds to allow you to read the split time and the lap time.
Using the stopwatch:
• Press A
• Press B
Press A to continue measuring time
Recording split times:
• Press A
• Press D
• Press B
• Press D to see all split times and the average session.
To delete data from the session in progress:
• While the stopwatch is in operation, press B
• Press D for 3 seconds
to zero.
p start the stopwatch.
p stop the stopwatch.
p start the stopwatch.
p Press D to record a split time.
p stop the stopwatch.
When the user measures a split time, the display
p stop the stopwatch.
p reset the stopwatch and split times
8- SAIL MODe (SAIL)
The maximum countdown is 120 minutes. These split
times can be stored for later use in 50 sessions called
“spl”. During the countdown there are beeps.
Every minute: double short beep
Every 10 seconds during the last minute:
double short beep.
Every second during the last 10 seconds:
short beep
At the end of the countdown there is a long beep.
To start:
• Press B to set the duration of the countdown between 1 minute and 120
minutes.
• Press A to start. The stopwatch starts automatically at the end of the
countdown.
To record split times:
• Press B. The word “spl” is displayed for 10 seconds when you arrive in this
mode.
23
Page 12

• Press B again to record more split times (spl).
• Stop the stopwatch by pressing A then B to display
the different “lap times».
• Press D to see all the data recorded [the date/time/
total duration/split times (50 max)].
9- ALARM/CHIMe MODe (ALARM)
en
Alarm indicator
Alarm chime
When you arrive in Alarm mode, the watch displays ALARM for several
seconds.
The watch has two daily alarms (AL1 or AL2) which can be set in local time (T1)
or the second time zone (T2).
When the alarm is activated, the watch beeps for around 20 seconds.
You can stop the alarm by pressing any button.
Using the alarm:
Press B p switch between Alarm 1 (AL1) and Alarm 2 (AL2) and the chime
(CHIME).
Setting the alarm:
• Press B to set alarm 1 and 2.
• Hold down D for 3 seconds
• Press A (+) or B (-)
• Press C
• Press A (+) or B (-)
• Press A (+) or B (-)
• Press D at any time to exit adjustment mode.
For each alarm press A to turn the alarm ON or OFF.
If the alarm is activated, the symbol is displayed.
Setting the chime:
• Press B to set the chime.
• Press B to turn the chime ON or OFF.
If the chime is activated, the buzzer symbol is displayed.
So that we continue to develop improved products which meet your needs, we
are pleased to receive your feedback with regard to the quality, functionality and
usage of our products.
• In France, you can contact the customer relations centre on:
N° Azur 0810 080808 (price of a local call).
• For other countries, you can leave a message on the appropriate section of
our website at www.decathlon.com
We shall reply as soon as possible.
p the minutes ash.
10- COnTACT
p the hour ashes.
p to increase or decrease the hour value
p to increase or decrease the minutes value.
p to activate or deactivate the chime.
Alarm
ON/OFF
24
 Loading...