

Page 1
26
qua
gui
com
con
Li
DE
fro
the
• T
fr
fr
• T
o
• T
g
a
c
in
in
• D
c
(d
• T
w
EN
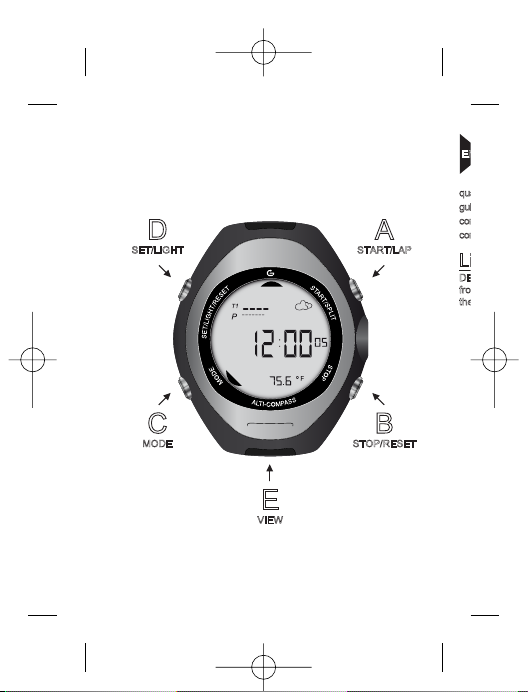
D
SET/LIGHT
C
MODE
A
START/LAP
B
STOP/RESET
E
VIEW
2MW500EN.qxd:NOTICE_MW500_2 11/12/07 12:14
Page 2
2727
EN
EN
Congratulations on purchasing a Géonaute MW500 watch. This
watch will go everywhere with you - in leisure and sports activities
or simply in your day-to-day life. Shock-resistant, waterproof,
accurate and practical, it will soon impress you with its versatility and
quality. Whether you are a keen climber or a globetrotting trekker, it will
guide you over mountainous terrain with its altimeter and electronic
compass. Its weather predictions will help you to better anticipate weather
conditions. Higher, stronger, safer!
Limited Warranty
DECATHLON guarantees the initial purchaser that this watch is free
from defects of materials or manufacture for a period of two years from
the date of purchase. Please keep your receipt as proof of purchase.
• This guarantee does not cover damage resulting from misuse,
from a failure to respect the precautions for use, from accidents,
from improper maintenance or from commercial use.
• This warranty does not cover damage resulting from repairs carried
out by persons not authorised by DECATHLON.
• The guarantees contained herein explicitly replace all other
guarantees including the implicit guarantee of merchantability
and/or suitability for use. DECATHLON cannot under any
circumstances be held liable for any damage, whether direct or
indirect, general or specific, caused by or related to these
instructions for use or the products they describe.
• During the warranty period, the item will either be repaired free of
charge by an authorised repair service or replaced free of charge
(depending on the distributor).
• The warranty does not cover batteries or cracked or broken casings
where signs of a blow are evident.
EN
2MW500EN.qxd:NOTICE_MW500_2 11/12/07 12:14
Page 3
28
Use • Precautions for use
Normal conditions of use:
This watch is designed to be worn on your wrist for mountain sports
(hiking, mountain-biking, etc) It is for telling the time and measuring
lap times, using the stopwatch function. It features several
measurement instruments (barometer, altimeter, compass) to orient
yourself and describe outdoor environmental conditions.
Usage restrictions/recommendations for use:
• Waterproof design: This watch is waterproof to 5 ATM. It can therefore be
used in damp conditions, in heavy rain, in the shower, and for swimming.
However, do not wear the watch while diving or at a depth greater than 5
metres. However, you should not swim while wearing it. Do not press the
buttons under water.
• Handle the device with care: do not drop it and do not subject it to
significant impacts.
• Do not dismantle the watch. This would void the warranty and could
cause damage and loss of waterproofing.
• Read the instructions carefully before using it. Keep the instructions for
the entire life of the watch.
• Do not subject the watch to extreme temperatures. If the watch is
exposed to direct sunlight for long periods of time, the display may
darken temporarily, but will go back to normal once it has cooled down
again.
• Only clean with a soft, damp cloth. Do not use detergents, which risk
damaging the watch equipment.
I WARNING: Altitude calculations are based on variations in
pressure. We also advise you to set the value of the “sea level
pressure” parameter every time there is a significant change in the
weather or altitude (aeroplane) and the first time you use the watch in
order to avoid calculation errors. Indeed, air pressure varies not only
according to altitude but also because of the weather. To set “sea
level pressure” contact a meteorological centre or get the information
from an official website and see the adjustment section of these
instructions. Important This watch has an accuracy tolerance of +/- 8m
in altimeter function.
F
Ba
tha
co
to
DE
the
wa
av
ap
ho
us
be
en
co
N
Th
1T
t
2C
3B
p
4A
5A
6S
7S
8A
Pr
2MW500EN.qxd:NOTICE_MW500_2 11/12/07 12:14
Page 4
2929
EN
EN
to
is
sk
in
in
First use
Batteries: This watch uses a CR2032 battery. Please note: if you note
that the display is flashing unusually or doesn’t appear to be working
correctly, this usually means that the watch battery is low and needs
to be replaced. We recommend that you take the watch to a
DECATHLON specialist to have the battery replaced. If you change
the battery yourself, you risk damaging the seal, thus impairing the
waterproof design as well as voiding your warranty. Please check the
availability of the battery with your dealer before travelling. The
approximate battery life is one year, but this can vary depending on
how long it was stored in the shop and the way in which the watch is
used. The raw materials and the battery contained in this device can
be recycled by a professional. In order to protect the environment, we
encourage you to dispose of this product and/or the batteries which it
contains after using them in a collection site designed for this purpose.
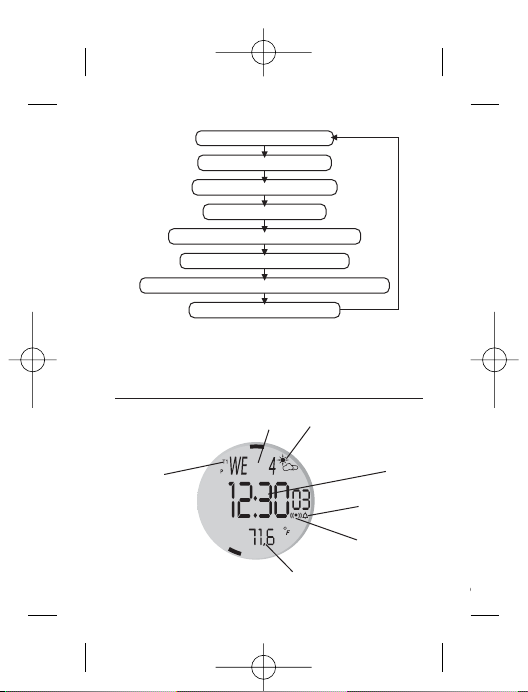
Navigation system
This watch has 8 operating modes:
1 Time/date mode, with two time zones and the optional display of
temperature and weather predictions,
2 Compass mode (COMP).
3 Barometer mode (BARO) : Weather predictions, and barometric and
past variations.
4 Altimeter mode (ALTI) : Current and historic altitude.
5 Altitude data mode (ALTI DATA) : recall stored data.
6 Stopwatch mode (CHRO) : stopwatch.
7 Split time data mode (CHRO DATA) : recall stored split times.
8 Alarm mode (ALRM) : Two daily alarms.
Press C to change between modes
2MW500EN.qxd:NOTICE_MW500_2 11/12/07 12:14
Page 5
30
Please note: Since the time mode (TIME) is the most regularly used
mode, we have provided a shortcut in order to select it more quickly:
Hold down C for three seconds at any time to return directly to time
mode.
Explanation of each mode
1 -Time/date mode
CB
E
D
A
Date
Weather conditions
Time
Alarm buzzer
indicator
Alarm indicator
Temperature
Time zone
8 Alarm Mode (ALRM)
7 Split Time Data Mode (CHRO DATA)
6 Stopwatch Mode (CHRO)
5 Altimeter Data Mode (ALTI DATA)
4 Altimeter Mode (ALTI)
3 Barometer Mode (BARO)
2 Compass Mode (COMP)
1
Local time/date mode
C
C
C
C
C
C
C
Us
Th
op
Th
• Y
p
• Y
d
d
NB
ho
T1
Th
fro
Th
• T
• B
• T
Yo
dia
NB
are
2MW500EN.qxd:NOTICE_MW500_2 11/12/07 12:14
Page 6
3131
EN
EN
r
r
A : change the time display mode
B : change the time zone
C : go to compass mode
D : electroluminescence
E : change the time display mode
Using the time mode
This mode provides information relating to the time and date, and
optionally displays weather conditions and the temperature.
The watch can display two time zones (indicated by T1 and T2)
• You can quickly see the time zone which is not displayed by
pressing B
• You can choose to display either time zone permanently by holding
down B (T1 or T2 flashes while you press the button and is then
displayed continually).
NB : The two time zones, T1 and T2, are independent:
hour, minutes, date. Only the seconds are identical in the two zones.
T1 and T2 must therefore be set separately.
The calendar automatically calculates the day of the week for all dates
from 2000 to 2049.
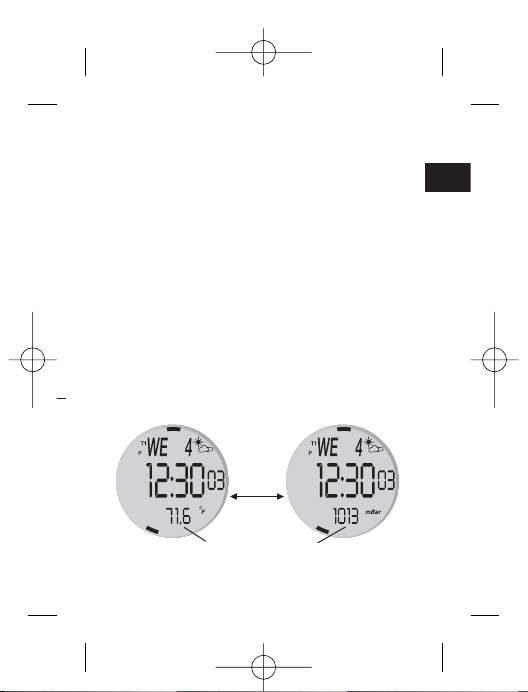
There are three time display modes:
• Time/date (TIME)
• Barometer time (BAROMETER)
• Time/weather forecast (WEATHER)
You change between modes by pressing A or E as in the following
diagram:
NB : The graphic display of sea level pressure and barometric trends
are described in the barometer chapter.
C
B
E
D
A
C
B
E
D
A
A or E
Temperature Barometer
2MW500EN.qxd:NOTICE_MW500_2 11/12/07 12:14
Page 7
32
Adjusting the time and date
In time mode
Select the time zone to be set as indicated above.
Check that T1 or T2 is displayed.
Hold down D: you enter adjustment mode. A brief message is
displayed (ADJUST HOLD) and the hour flashes (HOUR).
Press A (+) or B (-) to increase or decrease the hour value.
Press C and the minutes flash (MIN).
Press A (+) or B (-) to increase or decrease the minute value
Press C and the seconds flash.
Press A or B to reset the seconds to zero.
Proceed in the same way to set the year, month, day and 12/24 hour
format.
Press D at any time to exit adjustment mode. The day of the week will
be calculated automatically.
NB : holding down buttons A or B while setting allows you to scroll
through the values more quickly.
NB : when you reset the seconds to zero, if the value was between 00
and 29 the minutes remain unchanged. Between 30 and 59, the
minutes increase by 1.
NB : if 12 hour mode is selected, the symbol A or P is displayed on the
main screen.
2 -
Us
In
It
thr
2MW500EN.qxd:NOTICE_MW500_2 11/12/07 12:14
Page 8
3333
EN
EN
is
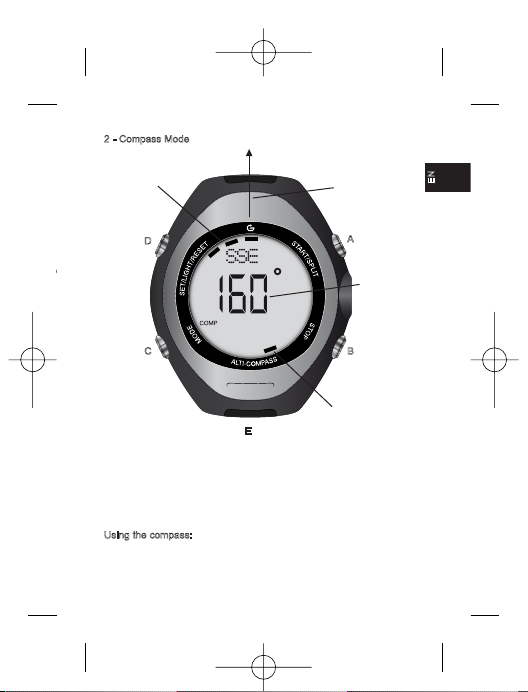
2 - Compass Mode
A : start measuring
B : inactive
C : go to barometer mode
D : calibrating the compass
E : inactive
Using the compass:
In compass mode, the word COMP is displayed for several seconds.
It is then replaced by a small COMP symbol, which is displayed
throughout the use of this mode.
SOUTH
indicator
NORTH
indicator
Azimuth with
the
indicated value
C B
E
D
A
Azimuth
value
2MW500EN.qxd:NOTICE_MW500_2 11/12/07 12:14
Page 9

The value displayed in the table includes the corrected declination. This is
the correction between the geographic North pole and the magnetic North
pole.
I WARNING: it is very important to hold the screen horizontally so that
the calculated measurements are reliable. Otherwise the measurements
will not be correct. Like all compasses, this watch is sensitive to magnetic
fields. It is designed to be used outdoors, away from any metal parts and
magnetic sources (pay particular attention to watches, keys, table legs,
electric cables, computers, mobile telephones) which would cause
incorrect measurements. Also, before any significant use of the compass,
do not forget to calibrate it.
I WARNING: the compass function uses a lot of energy.
To save the battery, it will only be activated for around ten seconds before
the display turns off (- - -).
However, you can reactivate measurement by pressing button A again.
You can also hold down A for as long as you like.
In this case, the direction will be displayed for as long as you press the
button.
Calculated
direction
C B
E
D
A
S
N
There are three types of indication:
• Graphic North and South
directions (in the form of LCD
segments on the outside of the
display). One segment: indicates
North. Three segments: indicate
South.
• The azimuth in degrees
corresponding to the axis of the
bracelet.
On some models, a colour or
engraved marker points to the
calculated direction for greater
precision:
• The cardinal points of the
azimuth measured
(16 possibilities): for example:
NNW for North/North-West
34
Ca
Ho
Ho
Tu
Ea
Pr
va
Pr
Pr
Pr
Pr
Pr
Ap
Pr
the
Lis
2MW500EN.qxd:NOTICE_MW500_2 11/12/07 12:14
Page 10

3535
EN
is
tic
EN
Calibrating the compass:
Hold the compass horizontally.
Hold down D: CAL HOLD is displayed, then the word CAL.
Turn the watch horizontally through 720 degrees (two full rotations).
Each rotation should last fifteen seconds.
Press D to confirm that the rotation is over and to enter the declination
value (see the table below). The tens flash.
Press A(+) or B(-) to increase or decrease the tens.
Press C and the units flash.
Press A(+) or B(-) to increase or decrease the units.
Press C and E (East) or W (West) flashes.
Press A or B to change between E and W.
Appuyez sur D à n’importe quel moment pour terminer l’étalonnage.
Press D at any time to end calibration. Choose the closest city or, if
the cities are remote, enter a value halfway between two close cities.
Listed below.
City Declination
Anchorage 22°E
Atlanta 4°W
Mumbai 1°W
Boston 16°W
Calgary 18°W
Chicago 3°W
Denver 10°E
Jerusalem 3°E
London 4°W
Munich 1°E
City Declination
New york 14°W
Oslo 2°W
Paris 2°W
Rio de Janeiro 21°W
San Francisco 15°E
Seattle 19°E
Shanghai 5°W
Toronto 11°W
Vancouver 20°W
Washington DC 10°W
2MW500EN.qxd:NOTICE_MW500_2 11/12/07 12:14
Page 11

W
Th
me
on
mo
Th
I
W
No
Th
If
mo
me
Fu
ch
Be
I
Th
ha
ex
ae
Ba
On
Se
rig
ex
36
3 - Barometer Mode/BARO
A : change display (bottom line)
B : change the units of pressure
C : go to Altimeter mode
D : adjustment mode
E : change display (bottom line)
In barometer mode the watch displays weather forecast symbols and
a measurement of the current local and sea level atmospheric
pressure.
This mode also features a graphic display of the barometric trend over
the last 24 hours.
NB: atmospheric pressure is displayed in mbar (millibars).
To convert this figure into "inches of mercury", use the following
formula:
Inches of mercury = pression en millibar / 33,9
CB
E
D
A
Weather conditions
Local pressure
Graphic
barometric
changes
Sea level
pressure
2MW500EN.qxd:NOTICE_MW500_2 11/12/07 12:14
Page 12

3737
EN
Weather conditions display:
The watch displays symbols to give an idea of the local
meteorological trends over the coming hours. The calculation is based
on barometric measurements, and the display is the same as in time
mode.
There are four trend symbols:
I WARNING!
Weather forecasting is not an exact science!
No professional institute in the world is capable of 100% certainty.
The forecasts given by the watch should be taken as an indication.
If you have to make an important or dangerous excursion (sea,
mountains), confirm the MW500 predictions by contacting your local
meteorological institute.
Furthermore, at sea and in the mountains, climatic conditions can
change extremely rapidly, creating life-threatening conditions.
Be prepared and extremely careful.
I WARNING:
The meteorological predictions will only be reliable if the barometer
has been functioning correctly for at least the last 12 hours. (for
example, if there have been no significant changes of altitude or
aeroplane journeys).
Barometric pressure display:
On the top line:
Sea level pressure over the last 24 hours. The latest value is on the
right. Each point represents one hour. It is impossible to read the
exact values on the graph. Only the trend can be read from the graph.
Sunny with
cloudy spells
CloudySunny Rainy
37
EN
2MW500EN.qxd:NOTICE_MW500_2 11/12/07 12:14
Page 13

38
On the middle line:
The pressure displayed in the large digits on the middle line is the sea
level pressure in current conditions. This system ensures a continuity of
trends, even if your altitude has varied.
On the bottom line:
Three displays are possible.
Press A or E to go from one to the next according to the following
model:
NB : The barometer varies by intervals of 1mbar and displays
pressures from 300mbar to 1100mbar.
To change the barometric pressure units, hold down B until the unit of pressure (mbar or mmHg) stops flashing to change from mbar to mmHg and
vice versa.
Temperature display:
I WARNING: Body temperature may influence the value
displayed. For an accurate idea of the outside temperature, take the
watch off your wrist and place it on a surface at ambient temperature.
Allow the watch to adjust to the ambient temperature (three to five
minutes) and the display will stabilise.
NB : The temperature varies by intervals of 0.1°C and variations are
recorded very precisely. However, the accuracy of the absolute figure is
lower (1 to 2°C). Comparing the display with another thermometer may
lead to errors, as the value depends on the calibration of the two devices.
To change the units of temperature measurement (°C <> °F).
You must be in “BAROMETER” mode.
Keep pressing A or E to
display the temperature on the bottom line.
Hold down B until the unit of temperature (°C or °F) stops flashing to
go from °C to °F or vice versa.
Temperature in °C or °F -> Pressure -> Time
A/E
A/E
A/E
Ca
Th
se
ch
Yo
su
Ca
Ho
ac
SE
Se
or
off
mo
Ca
Ho
ac
an
we
Pr
2MW500EN.qxd:NOTICE_MW500_2 11/12/07 12:14
Page 14

3939
EN
EN
of
is
to
Calibrating measurements.
The watch measures altitude and atmospheric pressure using the same
sensor. It cannot therefore determine whether the atmospheric pressure
changes because of a change in altitude or changed climatic conditions.
You therefore need to calibrate the barometer to the altitude of the measurement site.
Calibrating sea level atmospheric pressure.
Hold down D until the words “SET CURRENT WEATHER” scroll
across the screen. The weather symbol starts to flash. Press C: “SET
SEA LEVEL PRESSURE” scrolls across the screen.
Sea level pressure begins to flash. Press A (+) and B (-) to increase
or decrease the displayed value, according to the information in an
official meteorological report for example. Press D to exit adjustment
mode.
Calibrating local meteorological conditions.
Hold down F until the words “SET CURRENT WEATHER” scroll
across the screen. The weather symbol begins to flash. Press A (+)
and B (-) to increase or decrease the displayed value according to the
weather conditions observed at a given moment.
Press D to exit adjustment mode.
A
-
>
<
-
B
A
-
>
<
-
B
A
-
>
<
-
B
2MW500EN.qxd:NOTICE_MW500_2 11/12/07 12:14
Page 15

40
4 - Altimeter Mode
A : display cumulative altitude difference and max
altitude/waypoint storage
B : adjust the unit
C : go to Alti data mode
D : electroluminescence
E : inactive
In this mode the watch measures and displays local altitude in relation to
sea level. This mode can also graphically display recent variations in
altitude.
NB : altitude is displayed in metres (m) or feet.
The accuracy of the sensor allows for measurements at intervals of 1m (or
1 foot) and in a range from -700m (-2296 feet) to +9000m (29520 feet).
I WARNING: altitude is calculated on the basis of atmospheric
pressure measurements. If changes in the weather cause variations in
pressure, altitude will be measured incorrectly as a result, and it is
therefore necessary to calibrate it very frequently when the weather is
changeable. Similarly, the accuracy of altitude measurements is indicative.
Even though the pressure sensor is very accurate, climatic factors, even if
imperceptible, affect the accuracy of the value (1mbar pressure difference
C
B
E
D
A
Time
Cumulative altitude
difference or altitude
graph
Local
altitude
at
pe
Al
On
Gr
co
ca
the
On
In
un
fig
On
Lo
To
do
the
Di
Th
dif
I
mo
I
•
all
me
me
dif
I
ma
cu
low
mo
alt
2MW500EN.qxd:NOTICE_MW500_2 11/12/07 12:14
Page 16

4141
EN
to
in
in
is
is
at around + or - 8m). You therefore need to put the measured value into
perspective yourself.
Altitude display
On the top line:
Graph of variations in altitude over the last six hours. One dash
corresponds to a time period of 15 minutes. The range of the graph is
calculated according to the variations in maximum altitude. You cannot
therefore read the altitude value from the graph.
On the middle line:
In the middle, the altitude at the measurement site is displayed. The
unit of measurement (m or ft) is indicated at the bottom right of the
figure.
On the bottom line:
Local time display.
To change the units of altitude measurement (m/ft) Hold
down B until the unit symbol (m or ft) stops flashing to set the display to
the corresponding unit.
Display maximum altitude and positive altitude difference
The watch stores the maximum altitude and the positive altitude
difference measured throughout the time spent in Altimeter mode.
I WARNING: these values are not updated when the watch is in a
mode other than “altimeter” mode.
IWARNING: the watch does not calculate negative altitude difference.
•
Calculating positive altitude difference: the watch takes the sum of
all positive vertical movements (climbs) made during the
measurement period. E.g. if a hiker climbs 10 metres, descends 5
metres and then climbs a further 10 metres, the positive altitude
difference is 20m.
IWARNING: The calculation of cumulative altitude difference is a
mathematical one. If the display oscillates between two values, the
cumulative value will increase every time it oscillates between the
lowest and the highest value. The cumulative value will therefore be
more accurate when climbing regularly than when travelling at an
altitude which is more or less constant.
EN
2MW500EN.qxd:NOTICE_MW500_2 11/12/07 12:14
Page 17

42
•
Measuring maximum altitude: the watch displays the maximum
altitude reached by the user since the device was last started. The
positive altitude difference and maximum altitude are displayed when
entering altitude mode. The values scroll across the top line: ACC xxx
MAX xxx. To display the values while using altimeter mode: Press A
to display the positive altitude difference and maximum altitude.
Calibrating measurements.
The watch measures altitude and atmospheric pressure using the same
sensor. It cannot therefore determine whether the atmospheric pressure
changes because of a change in altitude or changed climatic conditions.
You therefore need to calibrate the altimeter every time weather
conditions change.
Calibrating local altitude.
Carry out this operation based on a point at a known altitude
(refuge, boundary marker, mountain summit or pass). Hold down D
until the altitude in the middle of the screen begins to flash.
Press A (+) or B (-) to
increase or decrease the displayed value to reach the known
altitude. Hold down A or B to scroll through the values more quickly.
Press C to start the positive altitude difference count.
Press A or B to reset the altitude difference counter to zero.
Press C to start the maximum altitude count.
Press A or B to reset maximum altitude to zero.
Press D to exit adjustment mode.
If no button is pressed for 2-3 minutes, the display automatically
returns to normal.
Memorising altitude and waypoints.
The watch can store the altitudes of landmark waypoints: cottages, passes,
summits, valleys and villages. The date and time of arrival will also be stored.
RECALL mode, described in the following chapter, will recall these points.
To store a waypoint:
Hold down A until the word “DATA” stops flashing to store the altitude
of the waypoint in the memory. The word “STORED” is then displayed
as confirmation.
5
In
Ea
the
Alt
Th
of
po
Pr
If
ev
Pr
sto
2MW500EN.qxd:NOTICE_MW500_2 11/12/07 12:14
Page 18

4343
EN
EN
A
D
lly
5 - “WAYPOINT RECALL/ALTI DATA” mode
A : bottom-up navigation
B : top-down navigation
C : go to stopwatch mode
D : electroluminescence/delete data
E : display values
In this mode the waypoints stored in altimeter mode can be recalled.
Each waypoint is given an sequence number (DATA xx) and features
the following information: The watch can store up to 20 waypoints.
Altitude data is displayed on two different screens:
The first screen features the recording number, and the time and date
of recording. The second screen features the altitude measured at this
point.
Press E to change screens.
If no button is pressed the two screens will be displayed alternately
every three seconds. To return to a waypoint recording.
Press A (+) or B (-) to scroll through the recording numbers of the
stored waypoints until you find the recording.
E
Recording date
Recording time
Recording number
Recorded altitude
CB
E
D
A
C
B
E
D
A
2MW500EN.qxd:NOTICE_MW500_2 11/12/07 12:14
Page 19

Press E to display the stored altitude or wait for the automatic alternate
display.
To delete the stored data, hold down D. The message “CLEAR ALL
HOLD” appears and indicates that the data is about to be deleted.
Continue to hold down D to delete the data. The screen then displays
DATA 01 followed by three dotted lines.
6 - Stopwatch Mode
A : start/split times
B : stop, go to next run
C : go to memory recall mode
D : electroluminescence
E : inactive
Time
Lap time (LAP)
CB
E
D
A
44
In
tim
ca
Th
en
(m
ho
the
Us
Pr
Pr
Pr
Ho
the
Re
Pr
Pr
Pr
Pr
cu
to
To
W
Pr
Ho
ze
To
W
nu
Th
2MW500EN.qxd:NOTICE_MW500_2 11/12/07 12:14
Page 20

4545
EN
EN
In this mode the watch has a stopwatch which can store up to 100 split
times. These split times can be stored for later use in 30 sessions
called “runs”.
The “CHRO” information is displayed for three seconds when you
enter this mode. The stopwatch is accurate to 1/100s for one hour
(minutes/seconds/hundredths) then to 1 second up to a limit of 24
hours (hours/minutes/seconds). When a user measures a lap time,
the display stops for six seconds to show the split times and lap times.
Using the stopwatch:
Press A to start the stopwatch.
Press B to stop the stopwatch.
Press A to continue timing.
Hold down B for three seconds to store the current session and go to
the next session by resetting the counters to zero.
Recording split times:
Press A to start the stopwatch.
Press A to record a split time.
Press B to stop the stopwatch.
Press A to continue timing. Hold down B for three seconds to store the
current session and go to the next session by resetting the counters
to zero.
To delete the session data without changing session.
When the stopwatch is in use:
Press B to stop the stopwatch.
Hold down D for three seconds to reset the stopwatch and split times to
zero.
To display the number of memory slots and split times available:
When the stopwatch is at zero, press E: the screen displays FREE and the
number of free slots.
The display automatically returns to the stopwatch after three seconds.
2MW500EN.qxd:NOTICE_MW500_2 11/12/07 12:14
Page 21

To
Ho
---
8
W
se
se
ac
ala
the
ind
pre
Us
Pr
sw
Th
ala
46
7 - Stopwatch memory recall mode/CHRONO DATA
A : Scroll through split times
B : Scroll through sessions
C : Go to alarm mode
D : electroluminescence/delete
E : inactive
The first screen features the session number and the session date. The
second screen features the split time sequence number, the split time and
the lap time (time since the last split time).
NB : if the stopwatch is running, the data cannot be deleted.
To search the values:
press B to scroll through the sessions (RUNS)
press A to scroll through the different split times in each session.
The times scroll in the order LAP 01 – LAP N then BEST (best lap
time) then AVG (average lap time).
To delete a session:
Press B to select the RUN to be deleted.
Hold down D until CLEAR HOLD ALL is displayed then release D and
the chosen RUN will be deleted.
E
Date
Session number (RUN)
Lap time
(LAP)
Split time (SPLIT)
CB
E
D
A
CB
E
D
A
2MW500EN.qxd:NOTICE_MW500_2 11/12/07 12:14
Page 22

4747
EN
To delete all sessions:
Hold down D until CLEAR HOLD ALL is displayed. Hold down D until
--- is displayed
8 - Alarm/buzzer Mode
A : activate/deactivate the alarm
B : switch between AL1/AL2
C : go to time mode
D : Electroluminescence
E : inactive
When you enter Alarm mode, the watch displays “ALRM” for a few
seconds. The watch has two daily alarms (AL1 or AL2) which can be
set in local time (T1) or the second time zone (T2). When the alarm is
activated, the alarm sounds for around 20 seconds. You can stop the
alarm by pressing any button. The alarm indicator is only displayed in
the time mode concerned by the alarm in question. The buzzer
indicator is linked to the beep which sounds when each button is
pressed.
Using the alarm:
Press B to
switch between Alarm 1 (ALM1) and Alarm 2 (ALM2).
CB
E
D
A
ON/OFF
activate/deactivate the alarm
The time in which the
alarm is set
Alarm time
Alarm indicator
Alarm number
EN
2MW500EN.qxd:NOTICE_MW500_2 11/12/07 12:14
Page 23

48
Setting the alarm and the buzzer:
Hold down D for three seconds: the hours begin to flash.
Press A (+) or B (-) to increase or decrease the hours.
Press C and the minutes flash.
Press A (+) or B (-) to increase or decrease the minutes.
Press C and TIME1 or TIME2 flashes
Press A (+) or B (-) to match the alarm to time T! or time zone T2.
Press C and Chime ON or OFF flashes.
Press A (+) or B (-) to activate or deactivate the buzzer.
To activate or deactivate the alarm:
Press A to activate (ON) or deactivate (OFF) the alarm.
If the alarm is activated, the indicator ON is displayed.
C
So
ne
qu
•
I
0
•
F
s
W
2MW500EN.qxd:NOTICE_MW500_2 11/12/07 12:14
Page 24

4949
EN
EN
Contact
So that we continue to develop improved products which meet your
needs, we shall be pleased to receive your feedback with regard to the
quality, functionality and usage of our products.
•
In France, you can contact the customer relations centre on:
0810 080808 (price of a local call)
•
For other countries, you can leave a message on the appropriate
section of our website at www.decathlon.com
We shall reply as soon as possible.
2MW500EN.qxd:NOTICE_MW500_2 11/12/07 12:14
 Loading...