

Page 1
1
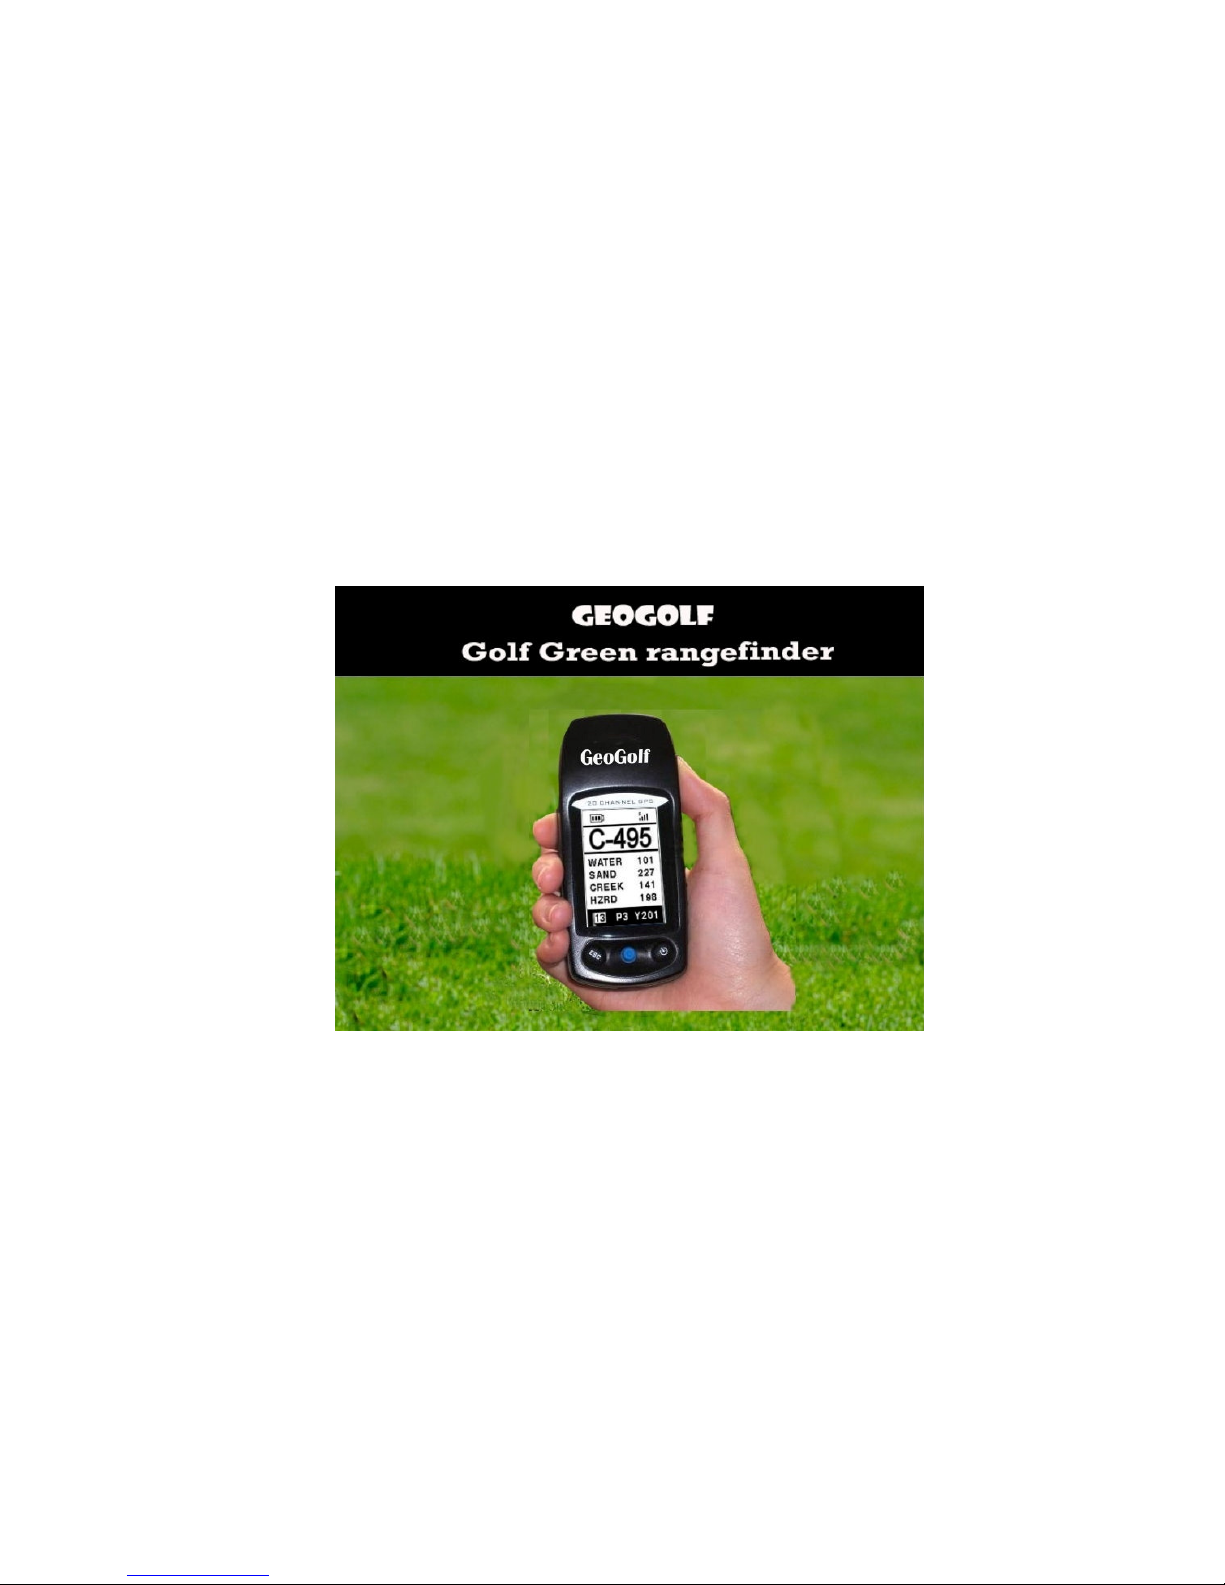
GeoGolf Golf Green Rangefinder
GF-2000 User manual
Page 2

2
Thank you for purchasing our Golf GPS product, and wish you have the
best experience in using. Knowing the exact distance for each shot will
help you lower your score and enhance your overall golfing experience.
Package Contents
1. G-Golf main device
2. Belt clip
3. CD (including User Manual)
4. USB Sync-Cable
Please contact us if your package is incomplete.
Additional Requirements
1. Two 1.5V AA batteries (alkaline or rechargeable)
2. PC with Windows 98/2000/XP
3. PC with CD-ROM to load software
4. PC with USB port to sync files
Page 3

3
Contents
Device Introduction ------------------------------------------------- 4
Battery Installation ------------------------------------------------- 5
Keypad Function ------------------------------------------------- 6
Start-up -------------------------------------------------7
Main Menu -------------------------------------------------8
Map Course ------------------------------------------------- 11
About Setting --------------------------------------------------16
How to use Google earth to create new Golf course file ---------- 21
Edit the information of Golf course --------------------------------- 31
How to install the course-data file from PC to Device ------------ 32
How to transfer the data from device to PC as backup ------------ 35
Page 4
4
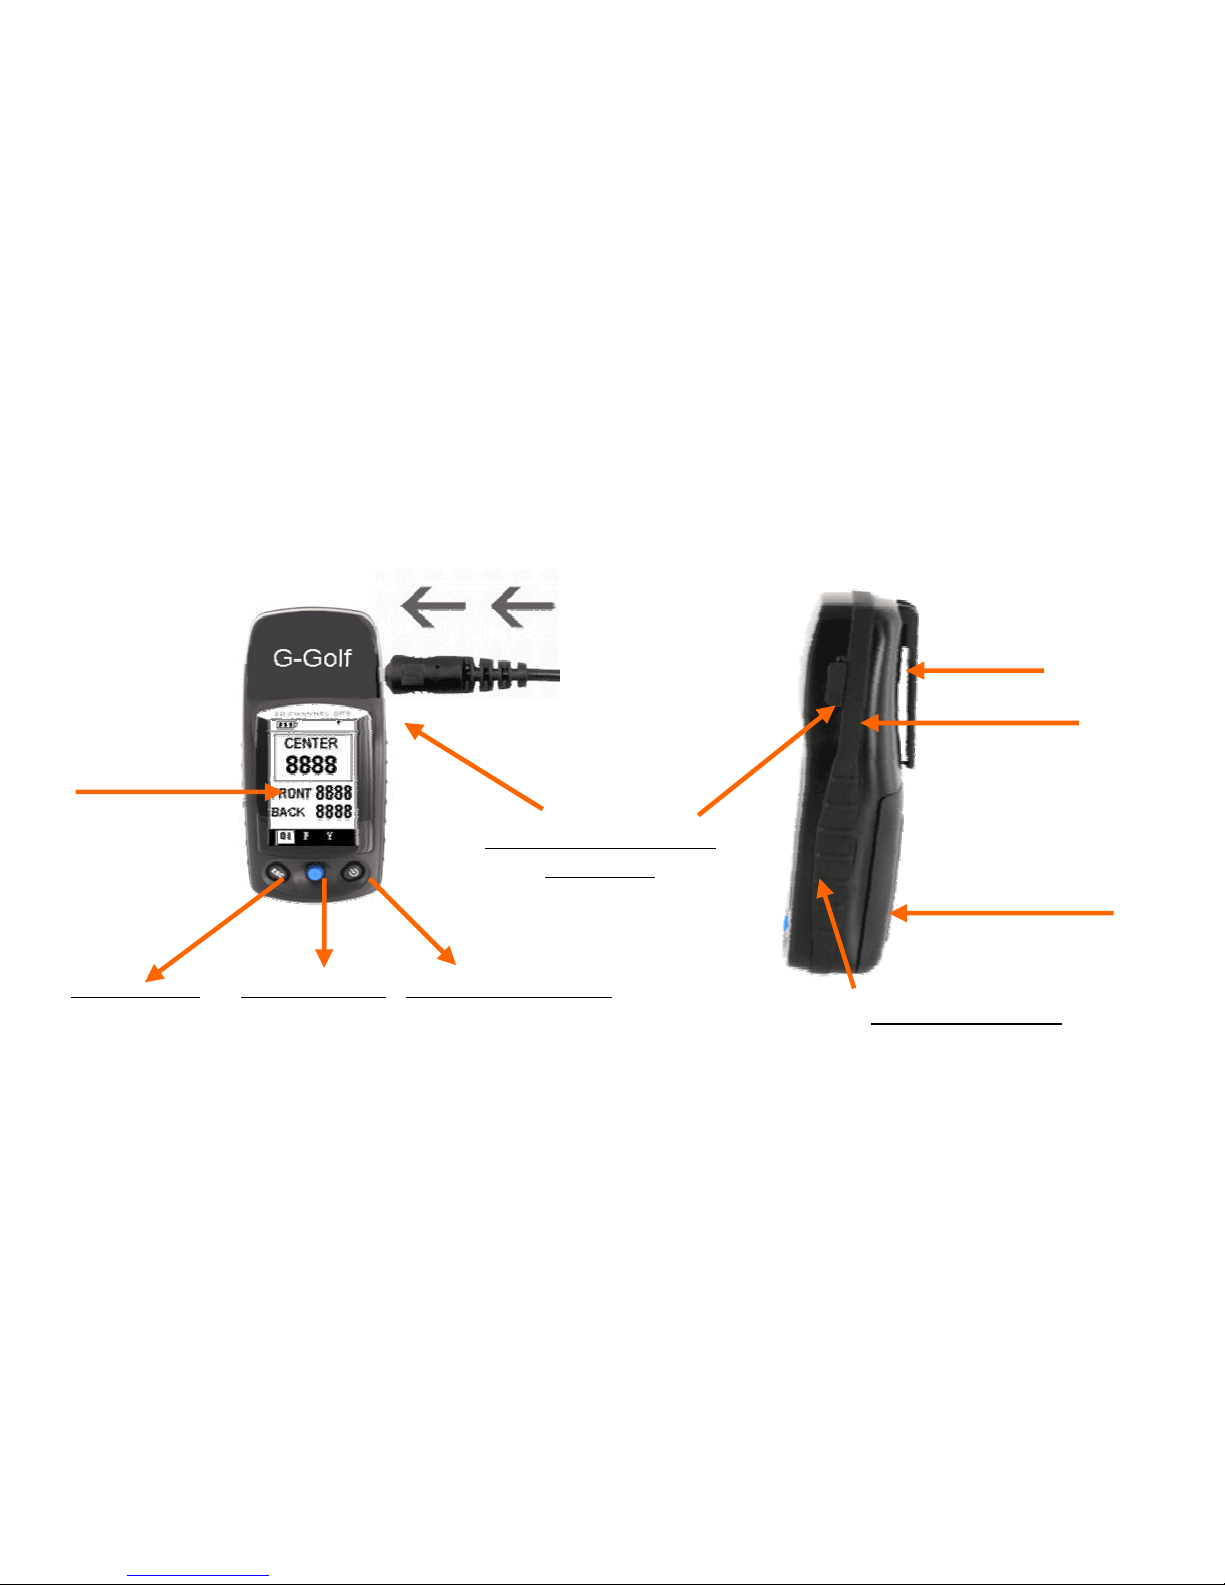
• Device Introduction
Water-resistant
construction
Large Display
USB Synchronization
Connector
ESC/EXIT 4 way toggle Power / backlight
Water-resistant
construction
Belt Clip
easy-grip sides
Page 5
5
+
++
+
-
--
-
-
--
-
+
++
+
Battery Installation
Battery life varies due to a variety of factors, including
temperature and
back-light usage. While changing batteries, an internal
lithium battery will retain saved data.
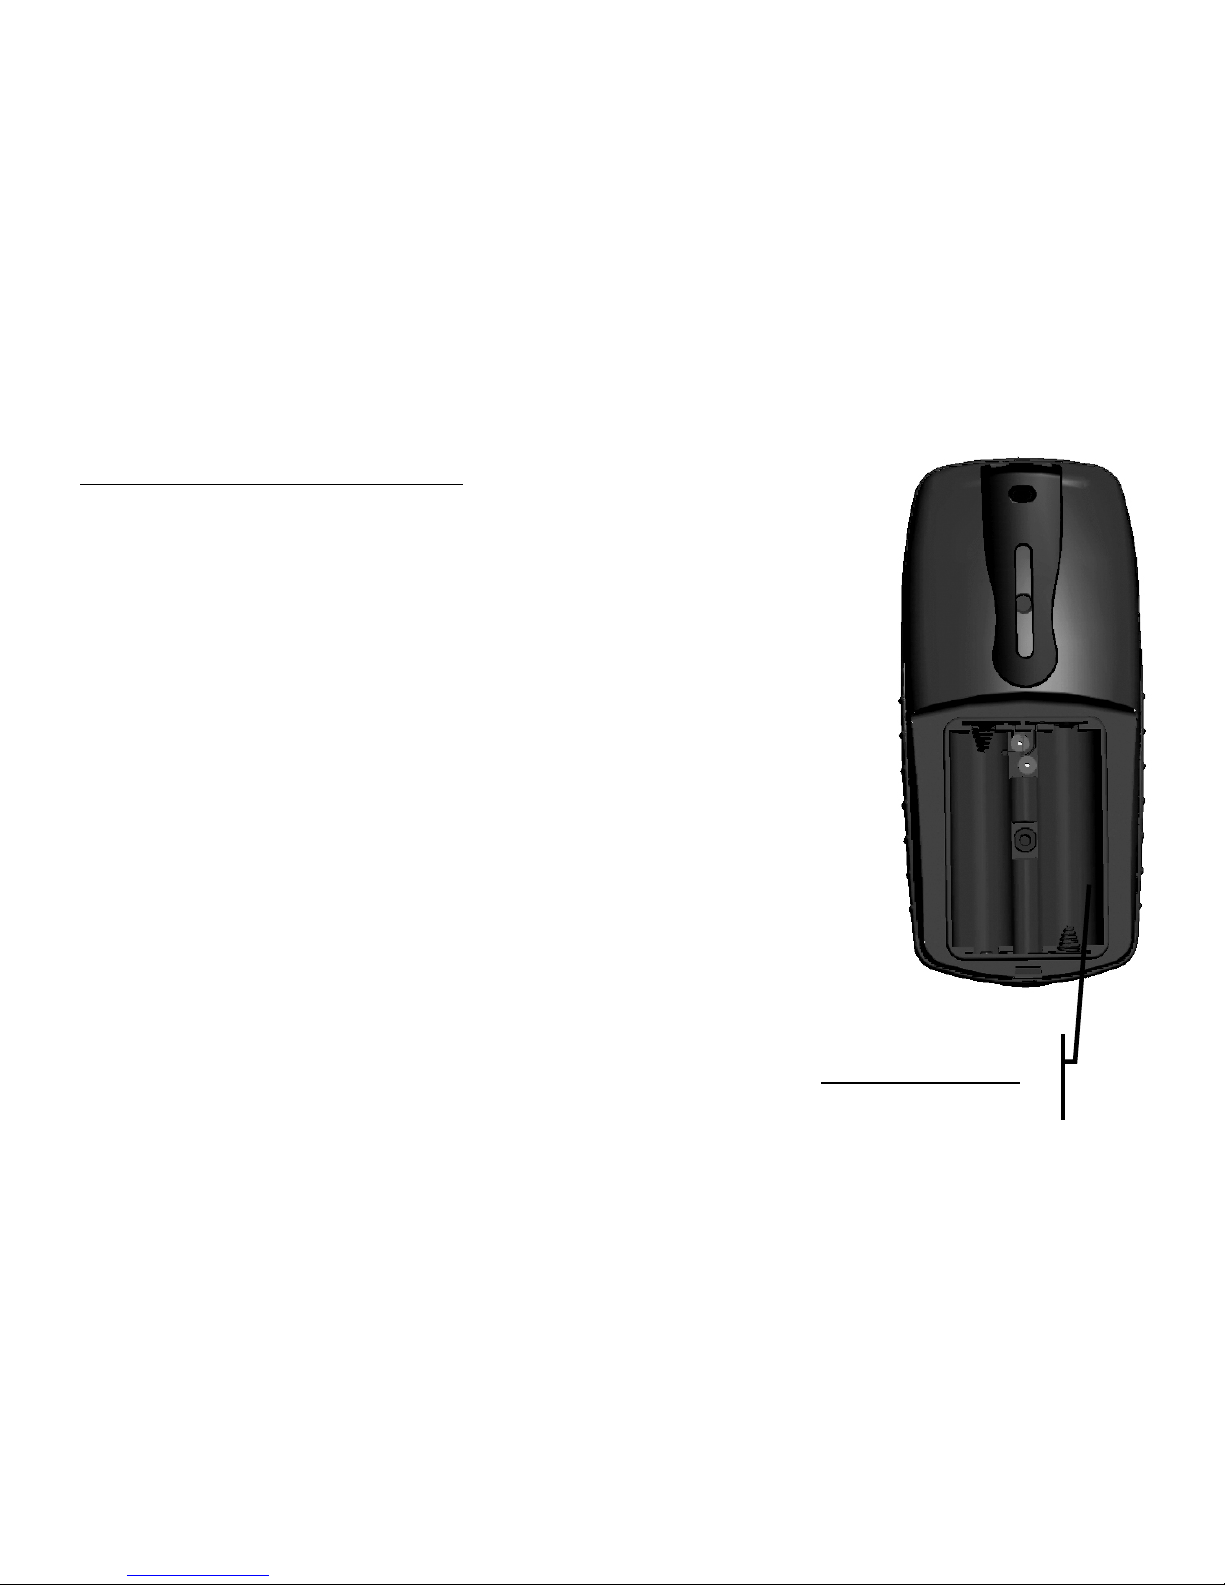
1.Access battery compartment by turning the battery
cover screw counterclockwise.
2.Lift up on the cover by using fingernail to break
airtight seal.
3.Insert two (2) 1.5V AA batteries (as shown in the
graphic below).
4.Replace cover.
5.Turn battery-cover screw clockwise until tight (do not
over-tighten)
Battery Cover
Page 6
6
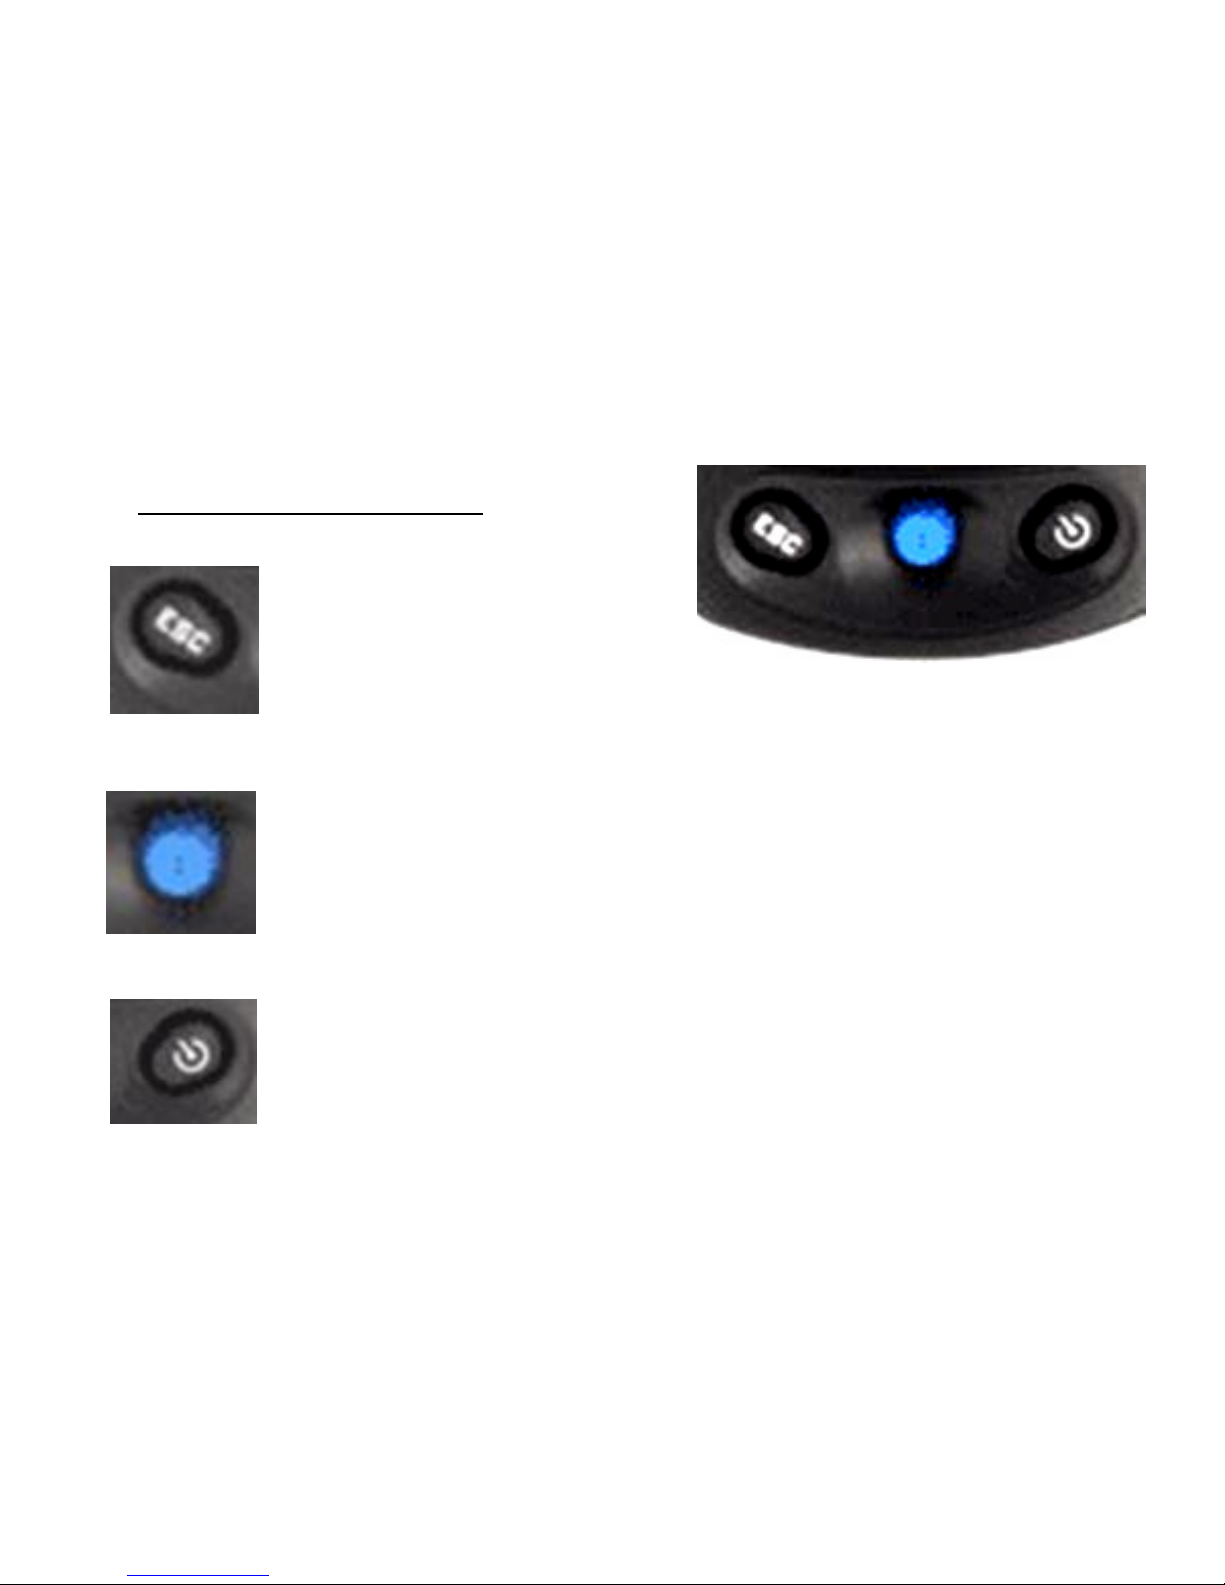
Escape
• Switches between screens.
• Cancels current operation.
• Backs up to previous step or screen.
Toggle/Enter
• Scroll up, down, left and right.
• Highlights menu options and enters data.
• Press down to enter
•Switches between screens
Power
• Turns the GPS Caddie on and off.
• Turns the back-light on and off
Keypad Function
Page 7
7
Start-up
Power On
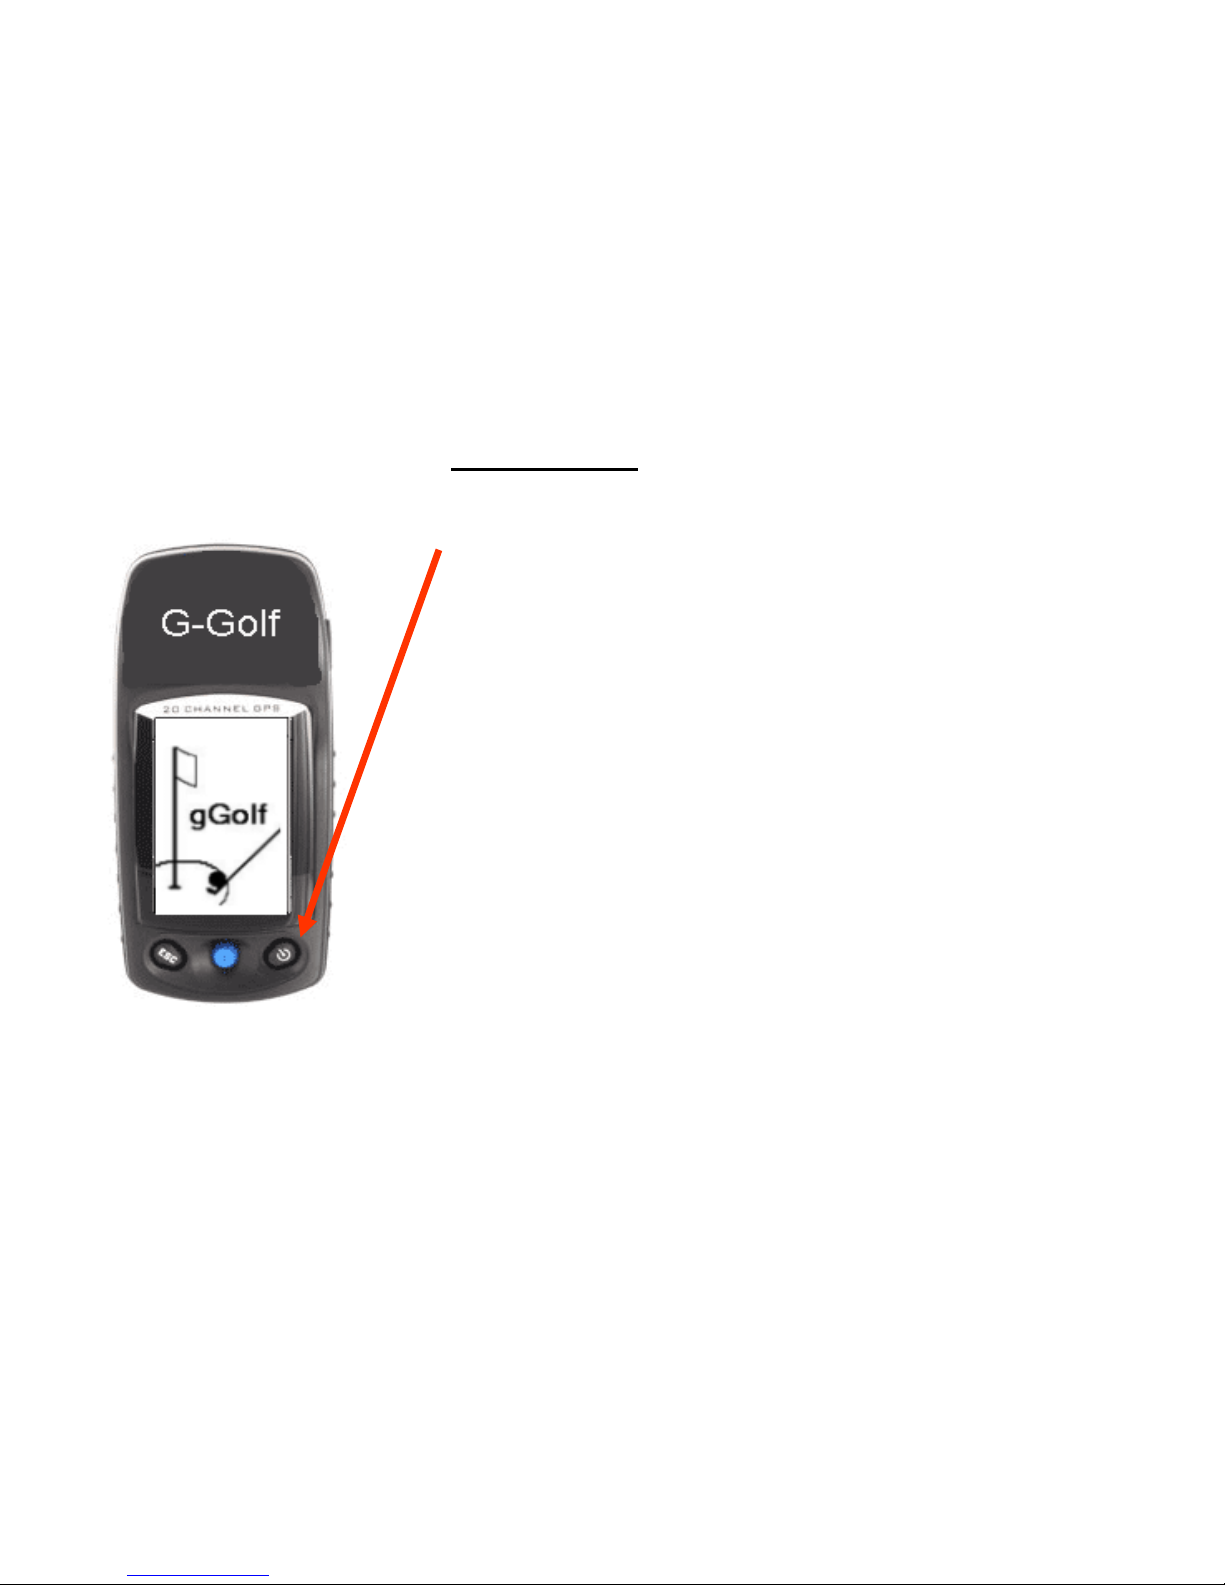
• Press and hold Power button until
the welcome screen appears.
Power Off
• Press and hold Power button until
the screen goes blank (about 3
seconds).
Back-light On/Off
• From any screen, press Power
button to turn back-light on.
• Press Power button again to turn
back-light off.
Page 8
8
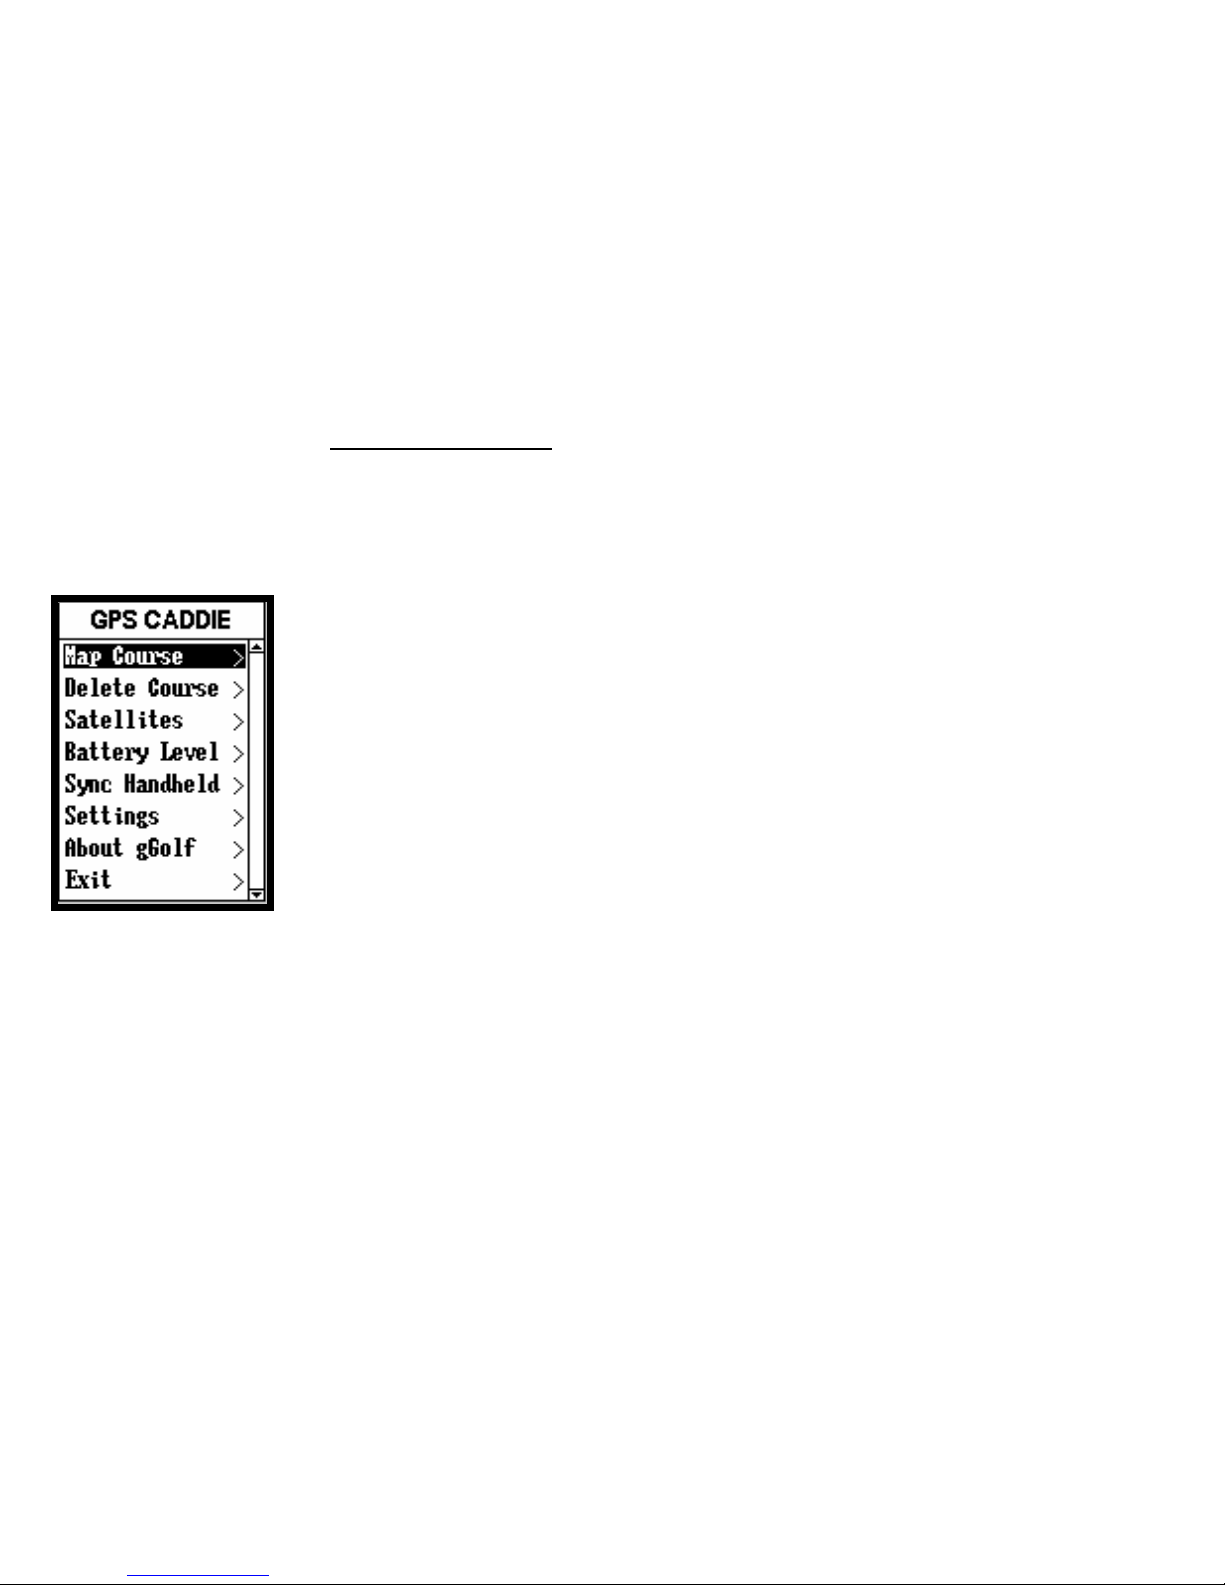
Map Course: Select to create and customize course files.
Delete Course: Select to delete files from the device
Satellite: View GPS data and signal strength.
Battery:Select to verify remaining battery power level.
Sync Handheld:Select to sync or save files to computer.
Settings:Select to customize additional features.
About gGolf :Display version and company information.
Exit::::Back to main menu
Main menu:
The Main Menu displays all the features available to the user,
which are explained in detail in subsequent sections of this
User Manual. To begin using the device, scroll to highlight
any feature and press Enter.
Page 9
9
Play Golf
1. This feature is the main interface to display scorecard and distance information.
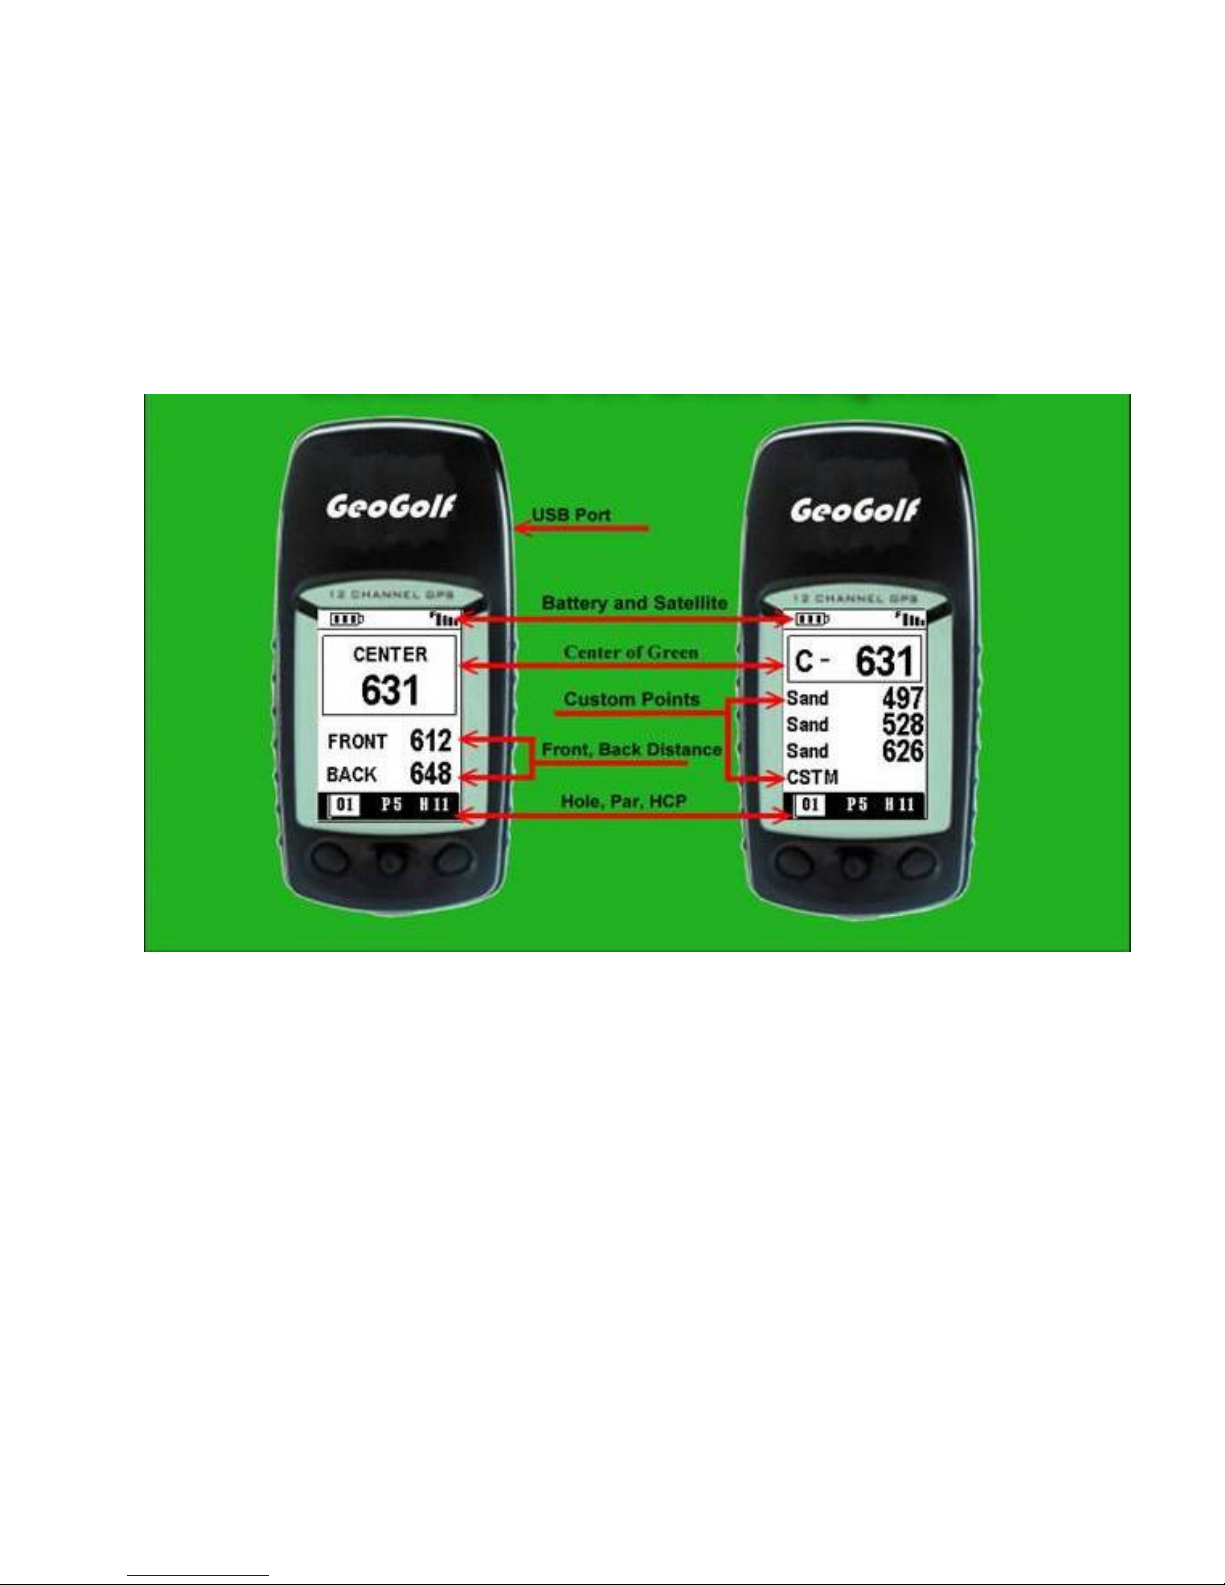
2. Golf Course feature. If GPS data is available, distances to the front, center and back of the
green and up to eight custom points per hole will be displayed upon satellite acquisition.
Power ON:
Press and hold Power button until the welcome screen appears.
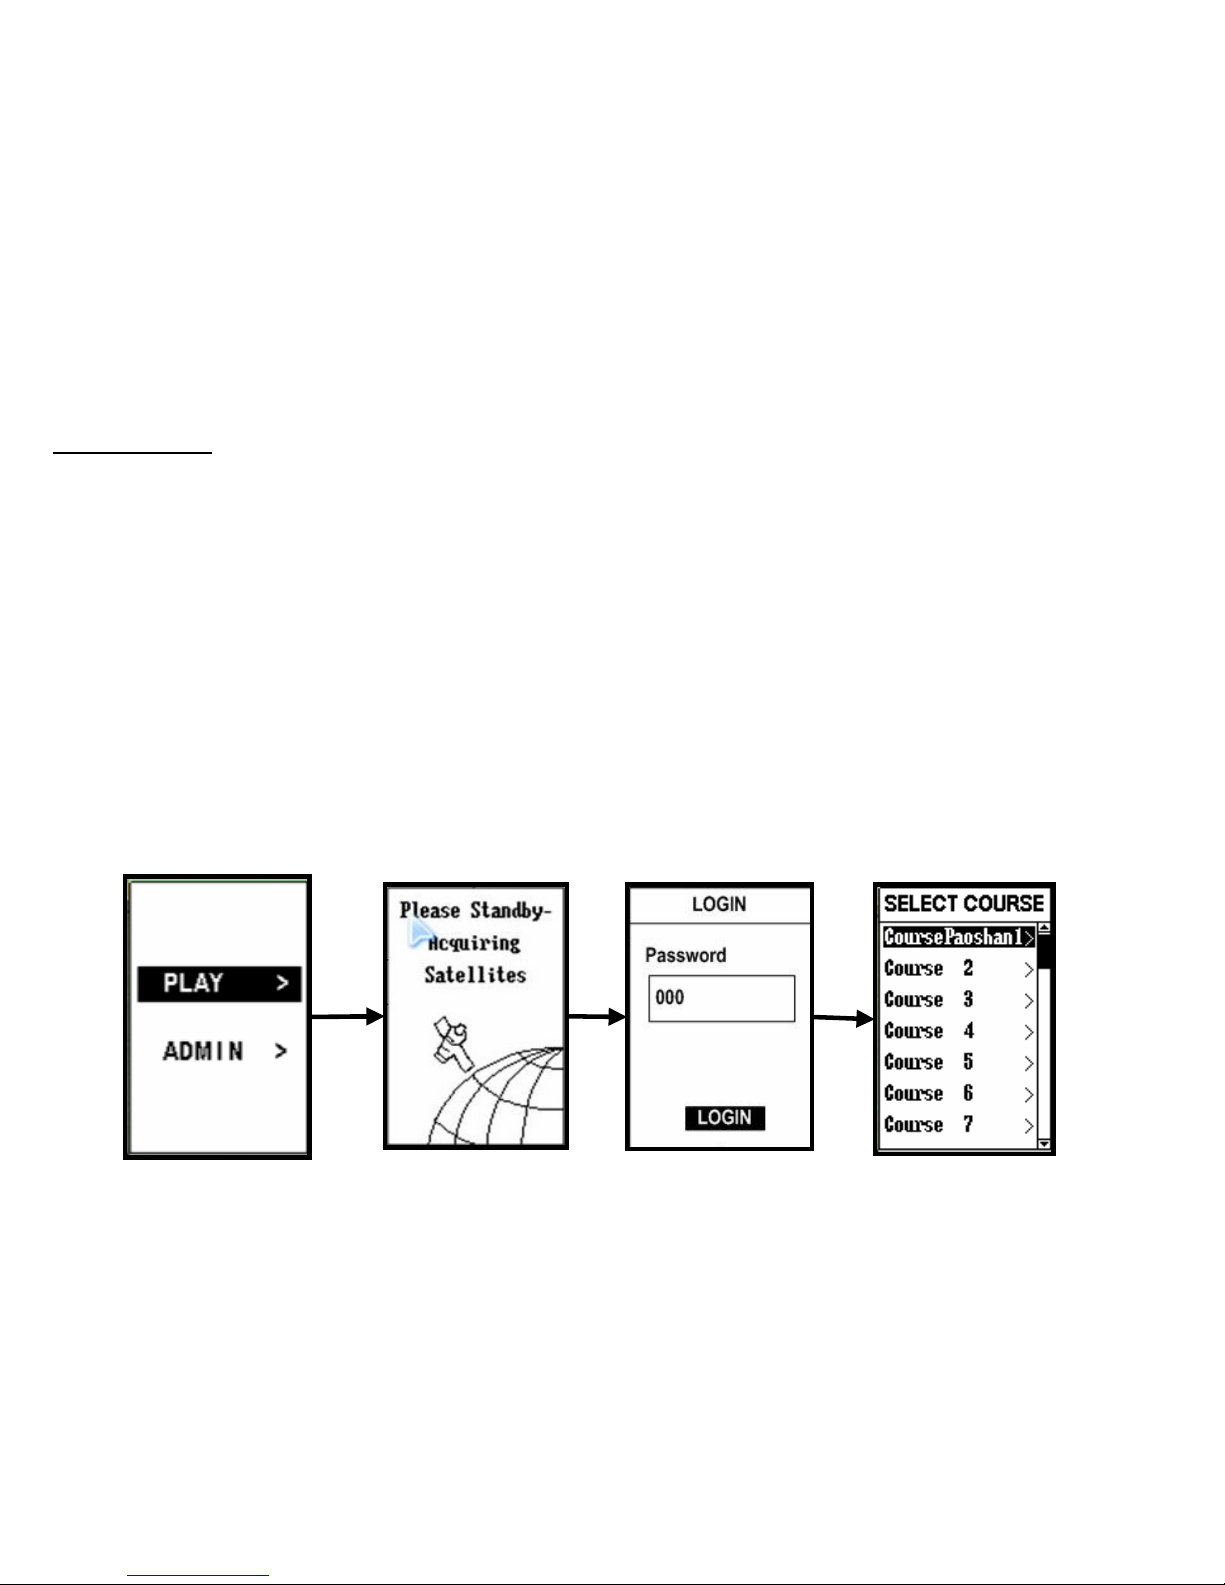
Play →→→→ Waiting Satellites →→→→ Key in Password (Default is 000) →→→→ Select Course
• Highlight “Play Golf” on the Main Menu and press “Enter”. If the satellite fix is available,
the golf course closest to current location (within 1,000 yards) will automatically be
highlighted.
• If the satellite fix is not available, scroll to highlight the correct golf course.
• Once the desired course is highlighted, press Enter.
Page 10
10
Screen Operation
• Right/Left toggle Move between holes
• Up/Down toggle Move between screens
• Enter Activate Shot Distance
• ESC Go to Play Menu
Page 11
11
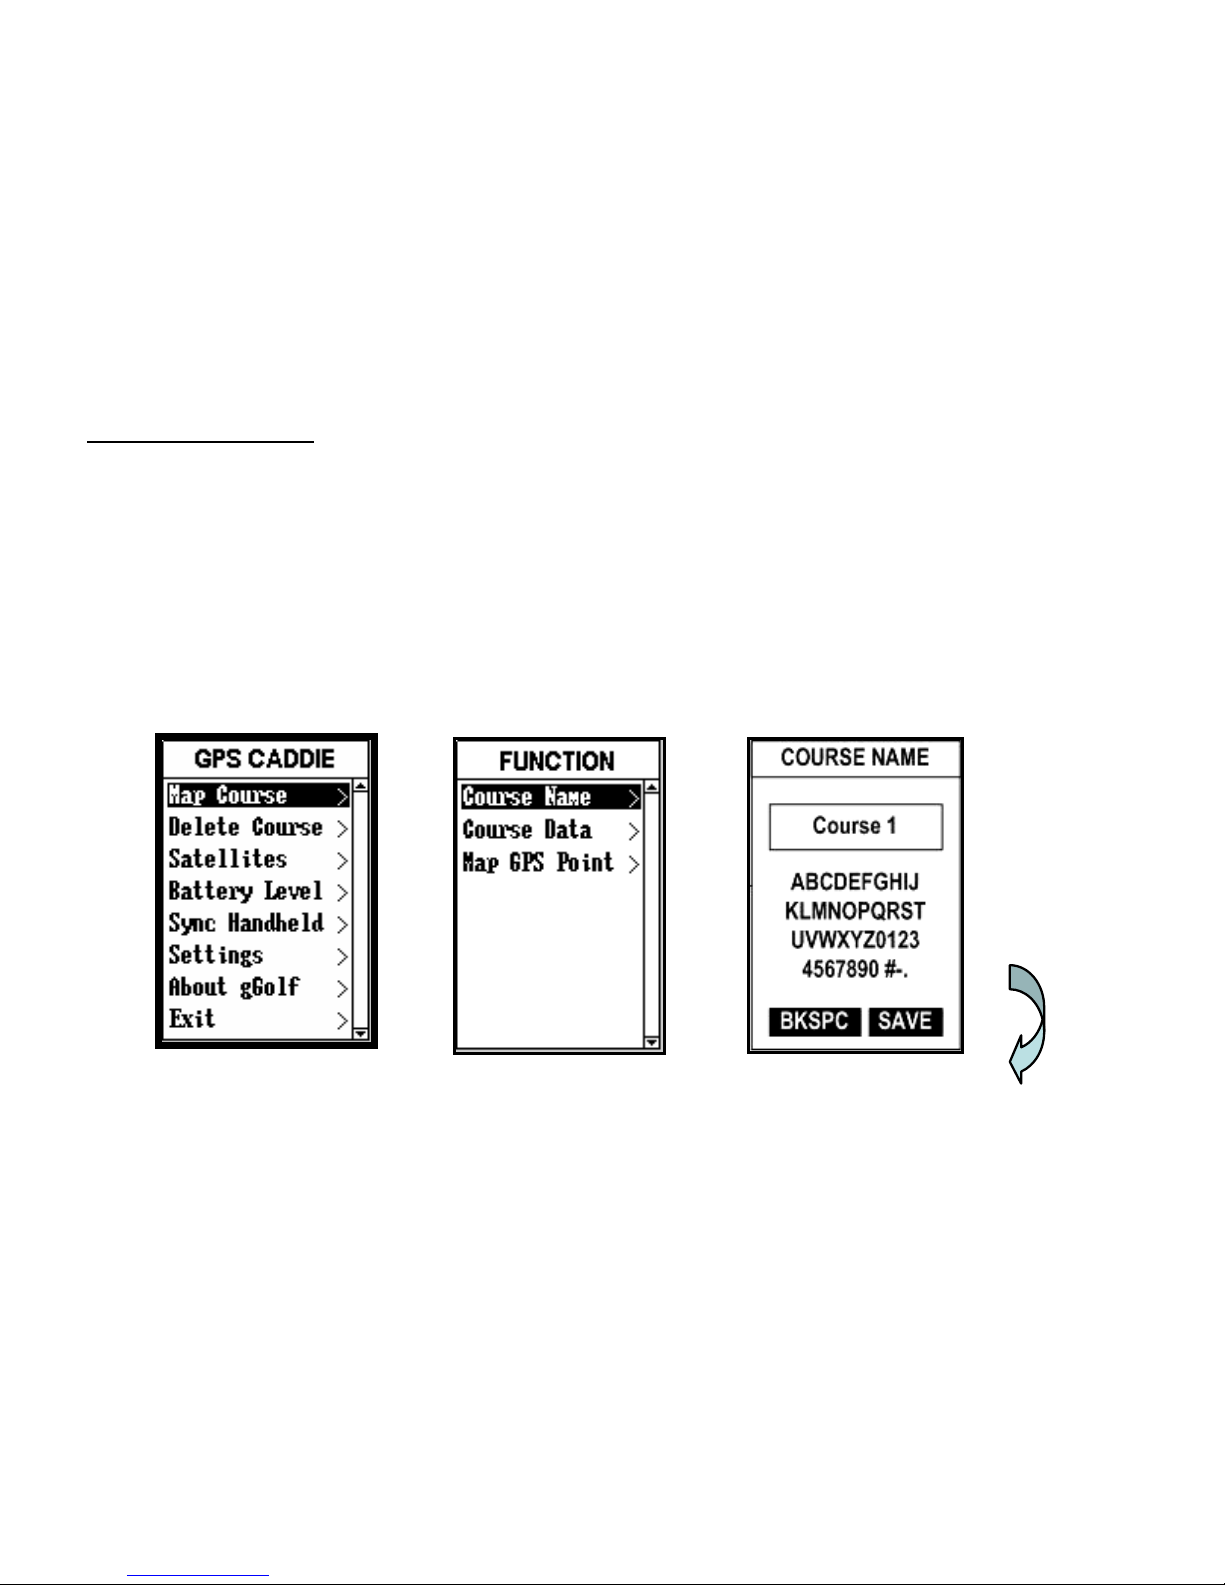
Map Course
This feature is used to manually input course information and map GPS
data points.
Existing course files may be customized or new files created using the
device.
Revisions to course name, course data and GPS points all are made using
this feature.
See next page
Page 12
12
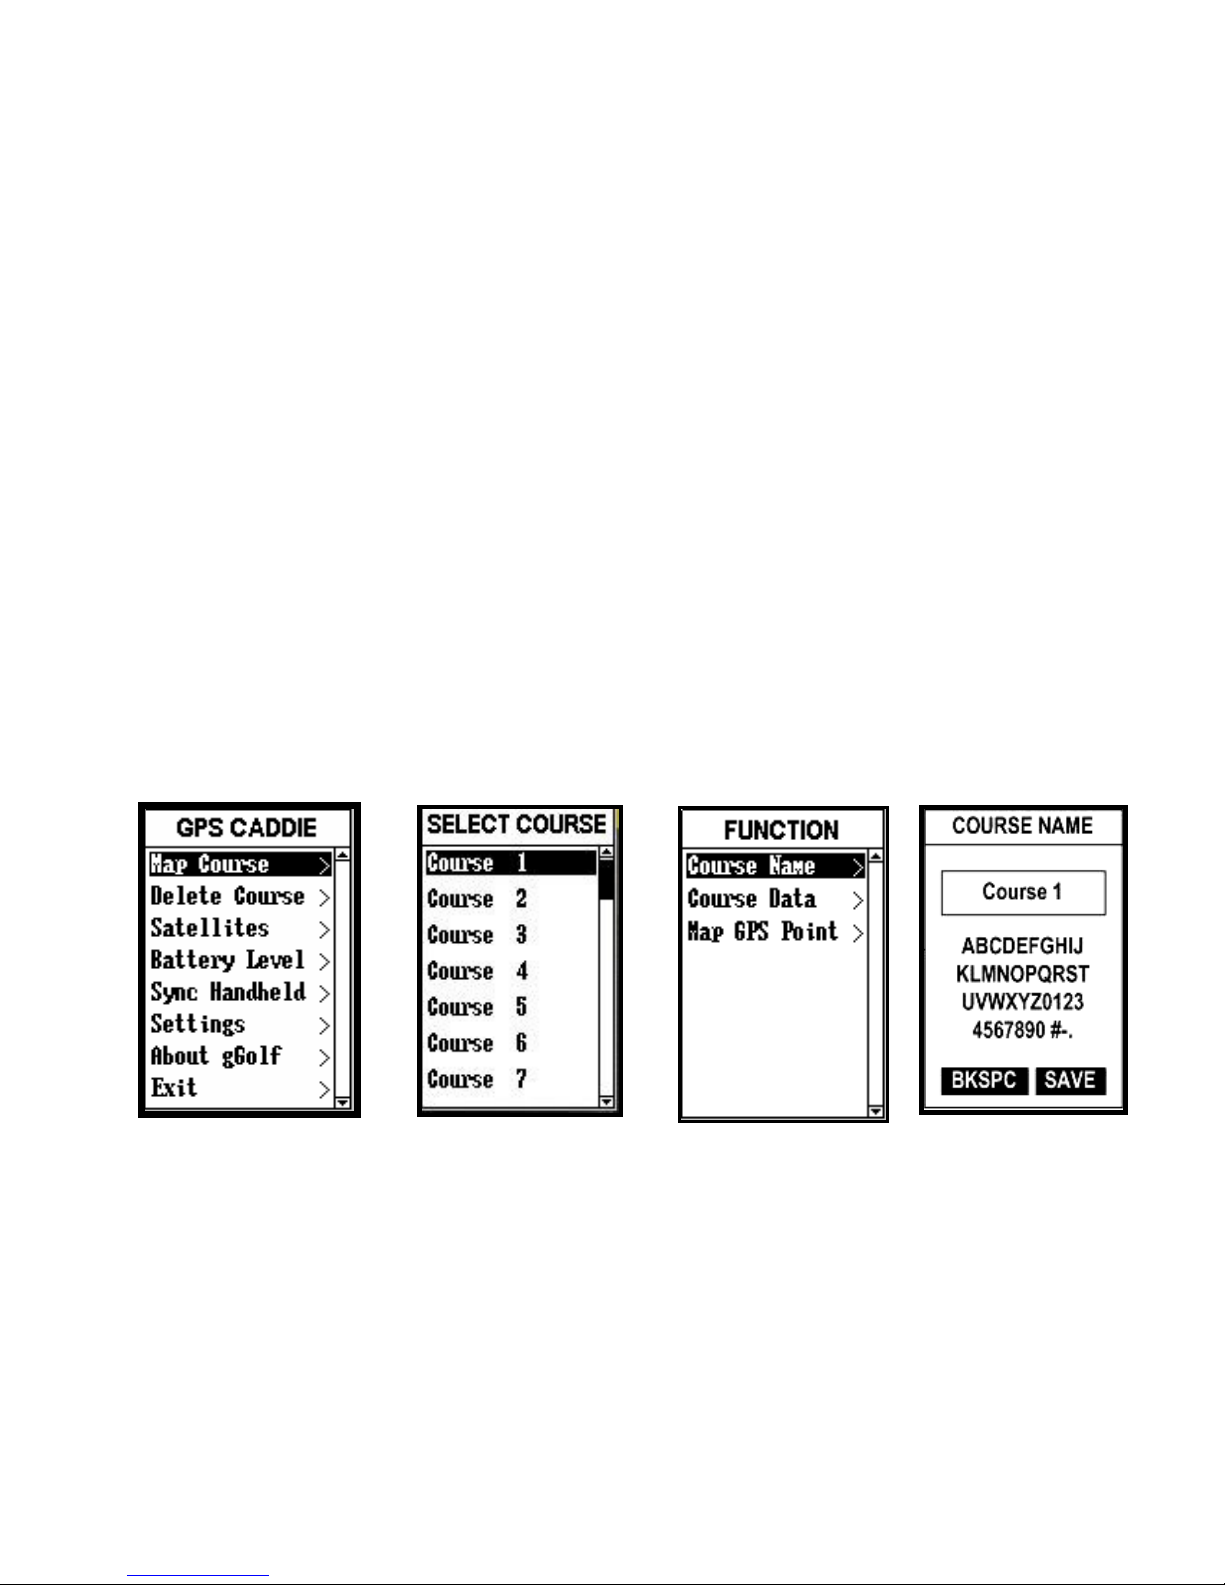
1. Select Course
Highlight “Map Golf Course” on the Main Menu and press Enter. Scroll to
highlight the desired new or existing golf course and press Enter.
2. Course Name
Highlight “Course Name” and press Enter. Names are limited to 12
characters and should be distinguishable from other golf courses entered.
Scroll to highlight the character and press Enter.
To delete characters, scroll to “BKSPC” and press Enter. When finished,
scroll to highlight “SAVE” and press Enter.
Page 13
13
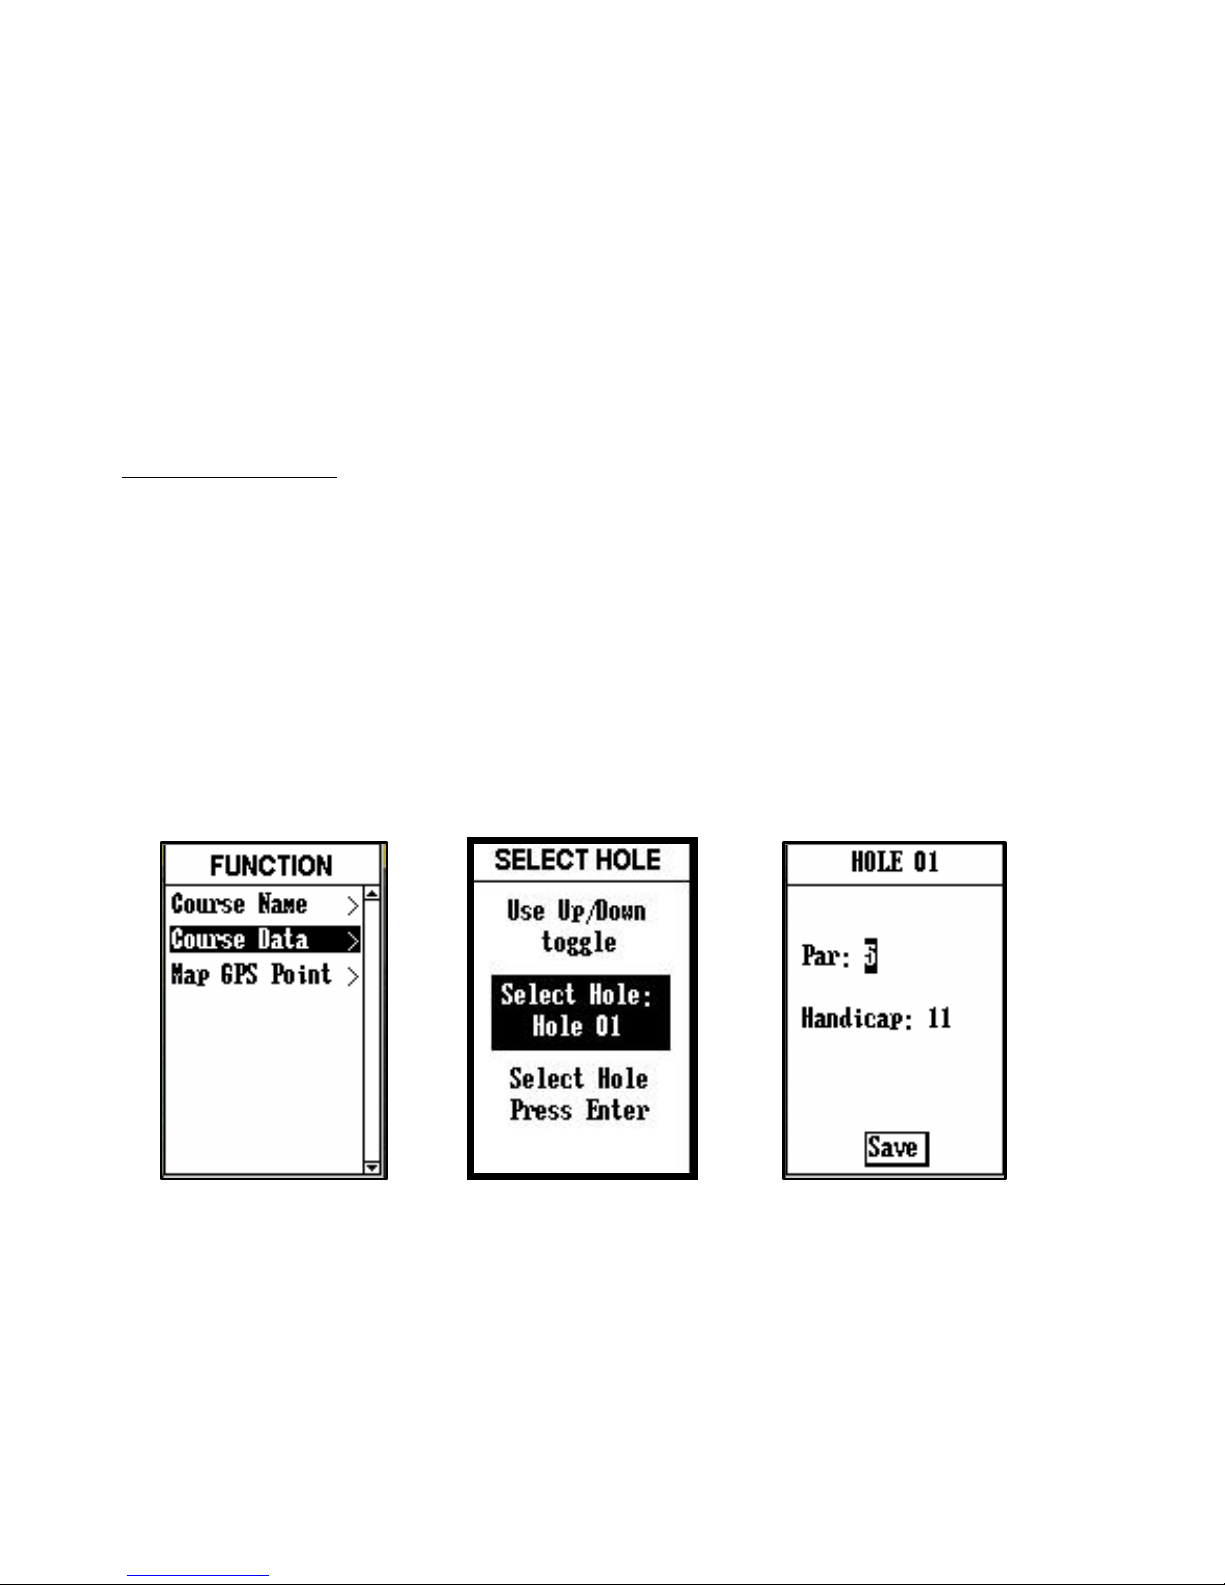
Course Data:
• Highlight “Course Data” and press Enter. Highlight desired tee box and
• press Enter. Select the desired hole and press Enter. Input par and
distance
• information using the toggle button to select values and move between
options.
• When finished, scroll to “Save” and press Enter. Repeat these
instructions for
• all desired holes and tee boxes for the course and press ESC to exit.
Page 14
14
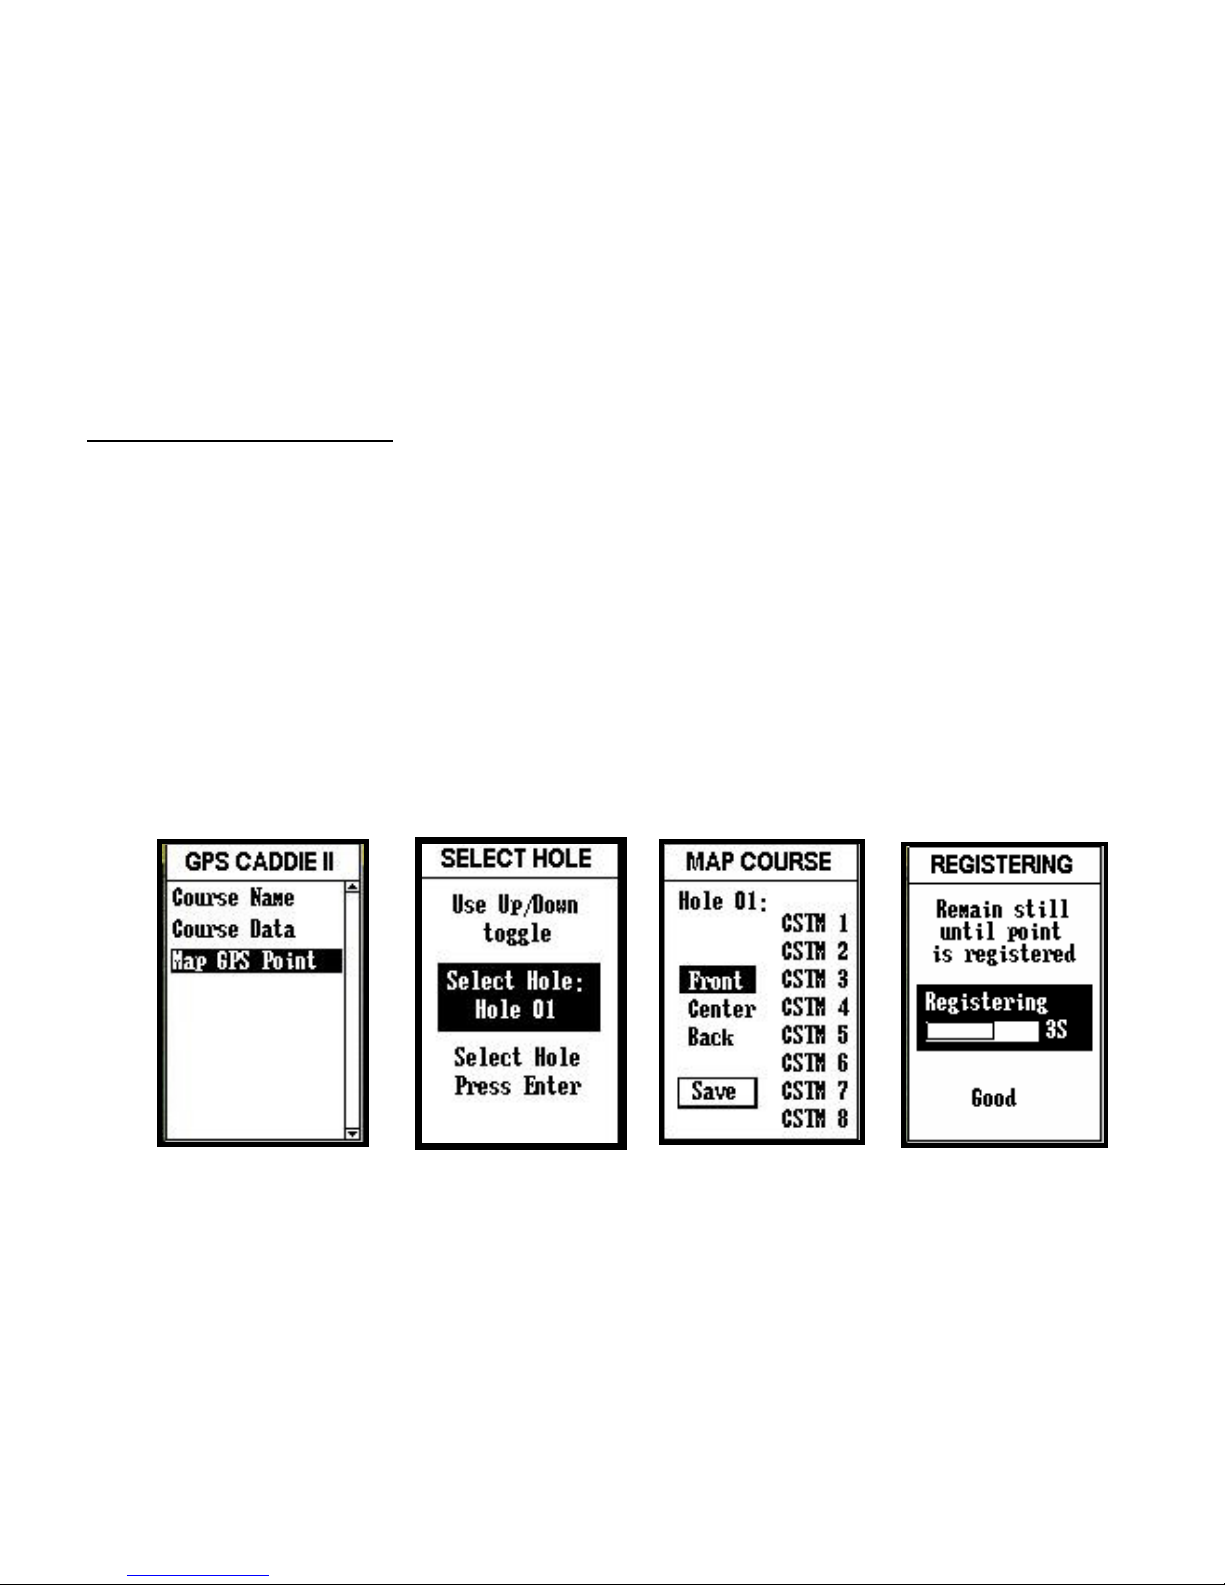
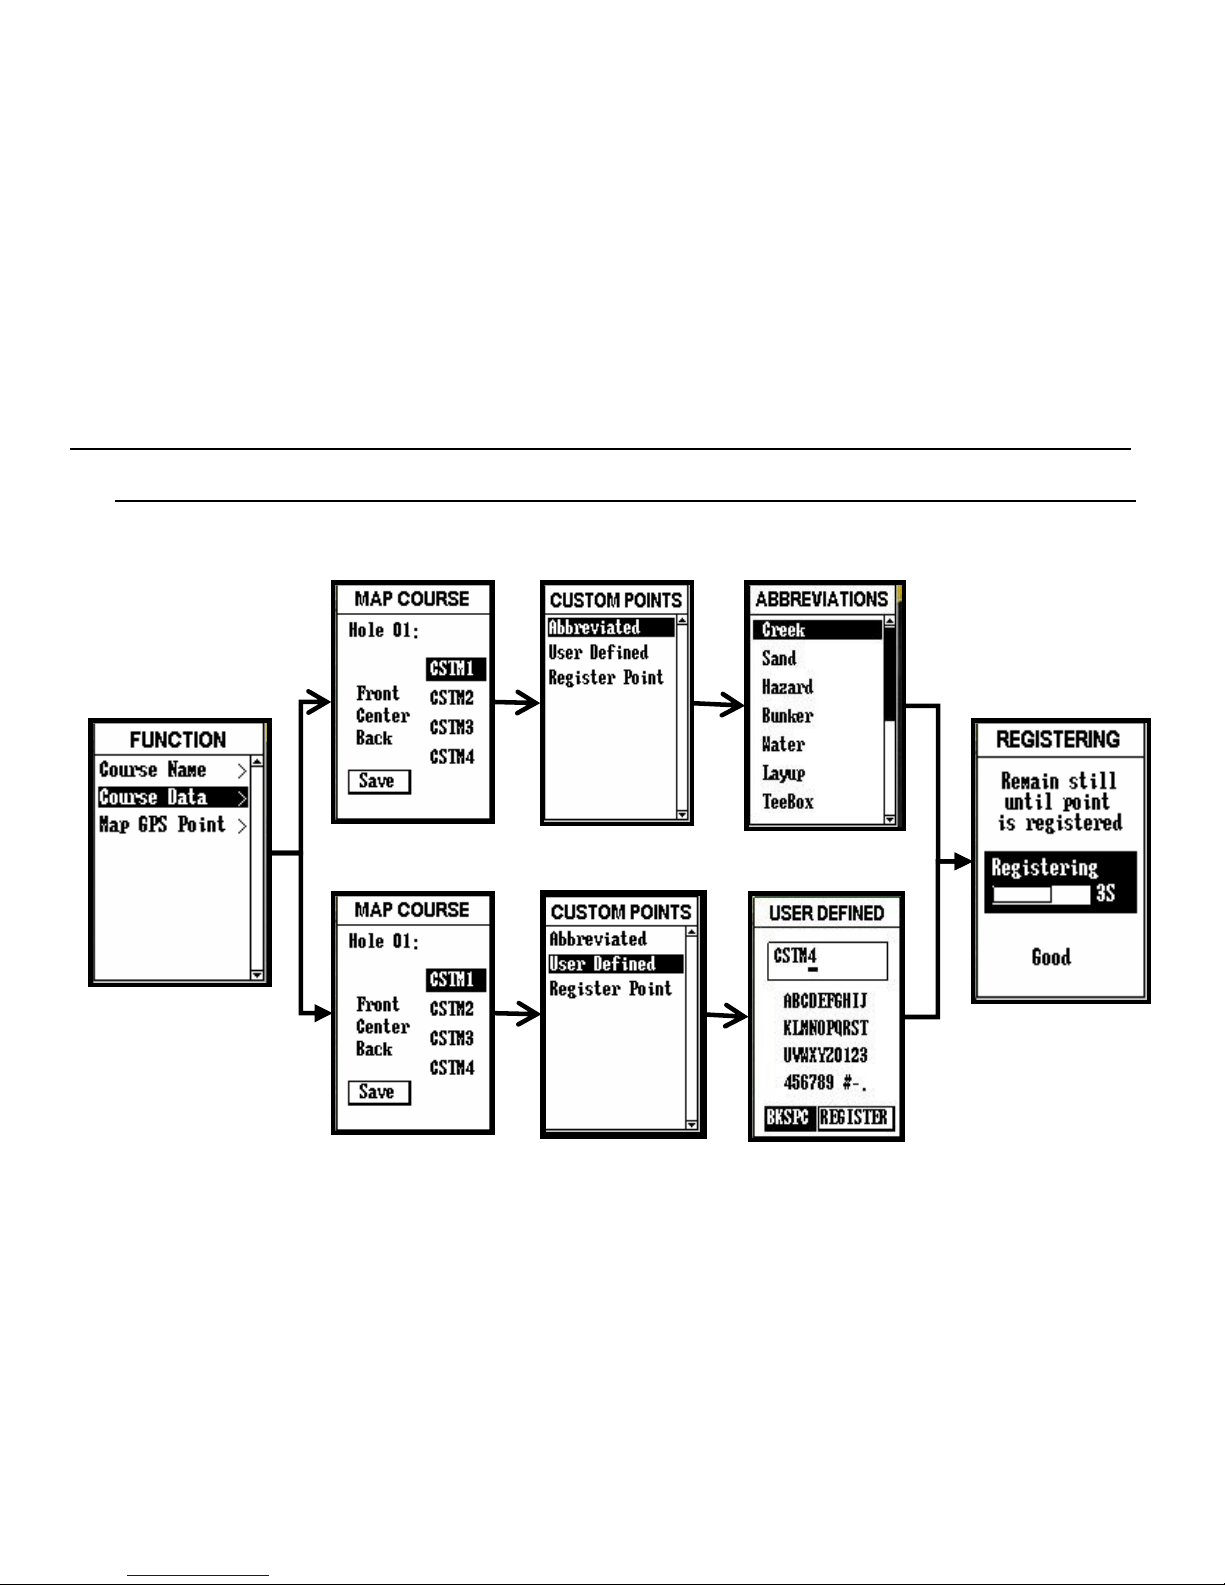
Map GPS Point:
• Highlight “Map GPS Point” and press Enter. Select the desired hole
and press Enter.
• Stand at desired location, confirm satellite strength and select
“Front ,Center or Back”, then press Enter to register point.
• Do not move until process is completed. Repeat these instructions for
all desired points. As all desired points are completed , you MUST
scroll to “Save” and press Enter to avoid losing mapped data.
Page 15
15
As following process, please register the 3 locations
(Front , Center and Back ) of one course in Device.
Page 16
16
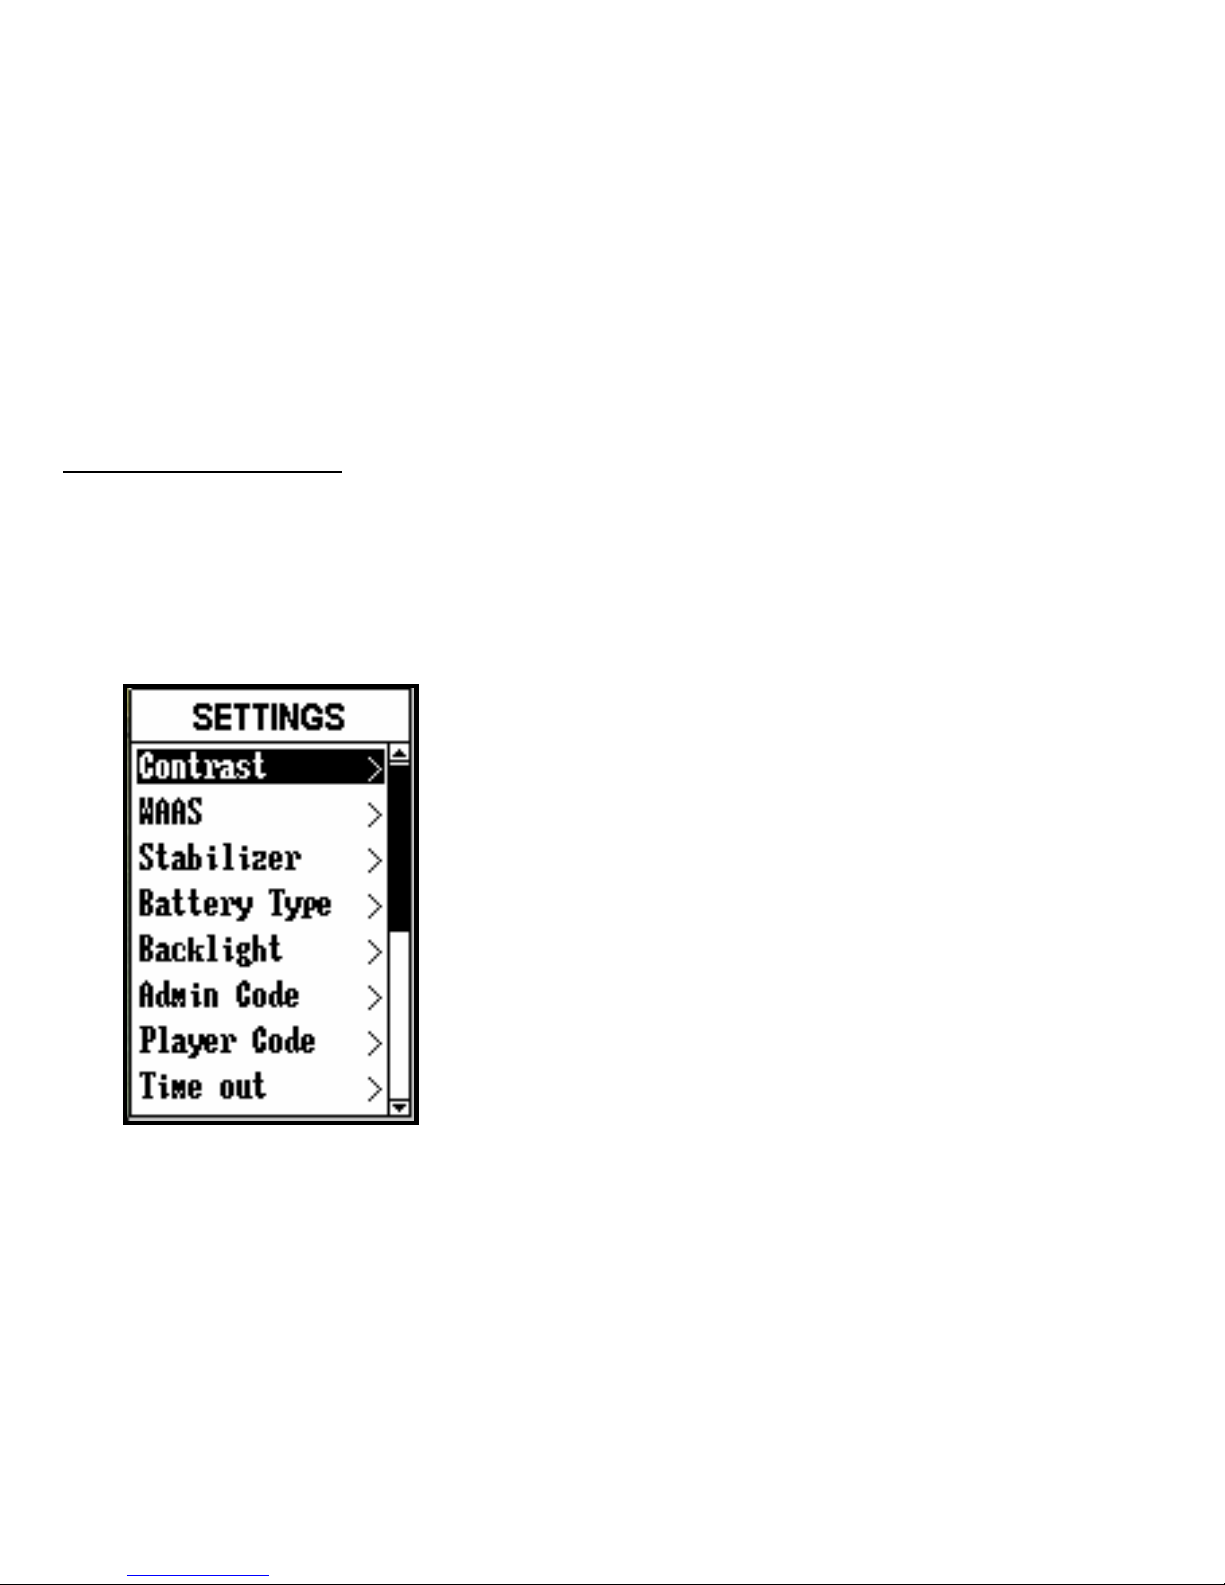
About Setting:
This feature provides various configuration settings to personalize the
device, such as screen contrast, distance measurement, GPS
performance and power management. Highlight “Settings” on the
Main Menu and press Enter.
Contrast:
Allows the user to adjust the contrast of the
screen to aid viewing in various light conditions.
WAAS:
Allows the user to select if location correction is
used to improve GPS accuracy within the
United States. The user may need to adjust the
WAAS setting according to geographic location.
The default setting on the device is “WAAS On”.
Page 17
17
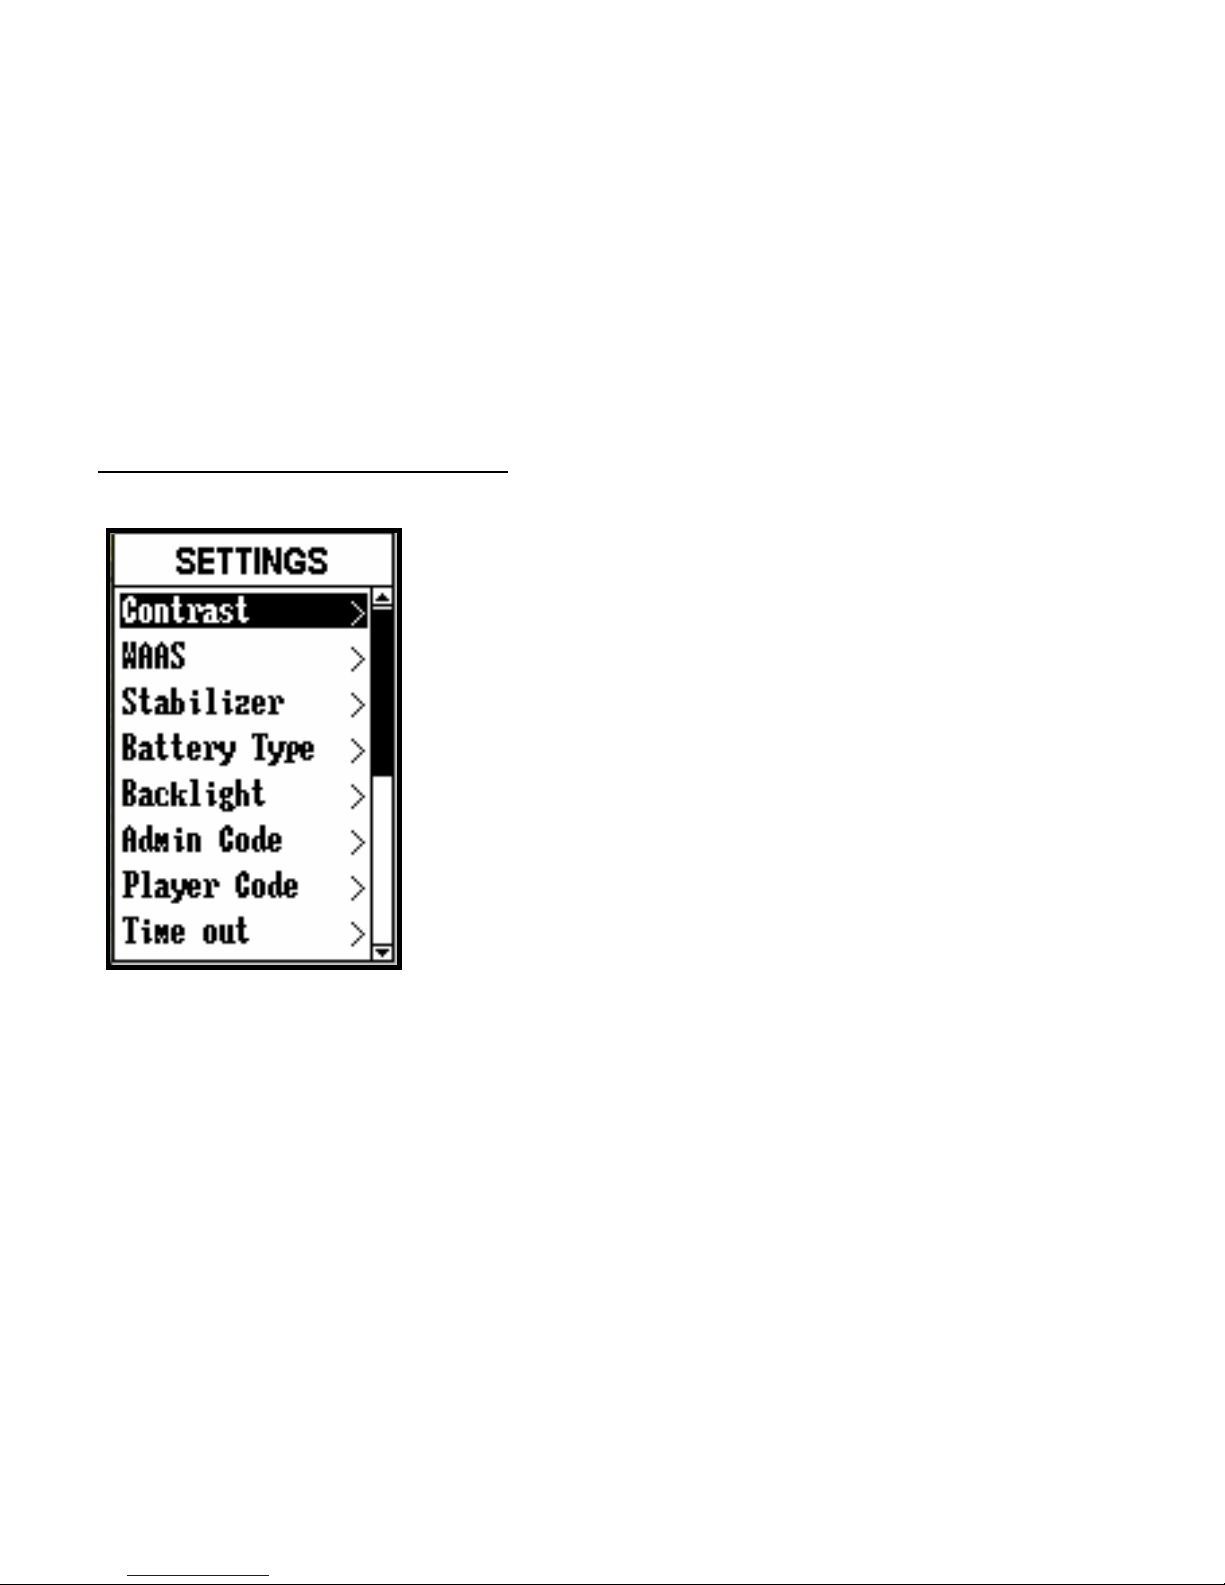
Stabilizer
Allows the user to select the rate at which the device
refreshes GPS position. With “Stabilizer” ,the device
will not refresh GPS position once movement has
ceased. This is useful to users who experience
fluctuating distance readings, even though they are
stationary. The default setting on the device is
“Stabilizer On”.
Battery Type
Allows the user to select the type of battery being
used. If correct setting is not selected, the battery
level meter may not be accurated. The default setting
on the device is “Alkaline”.
Settings (continued)
Page 18
18
Settings (continued)
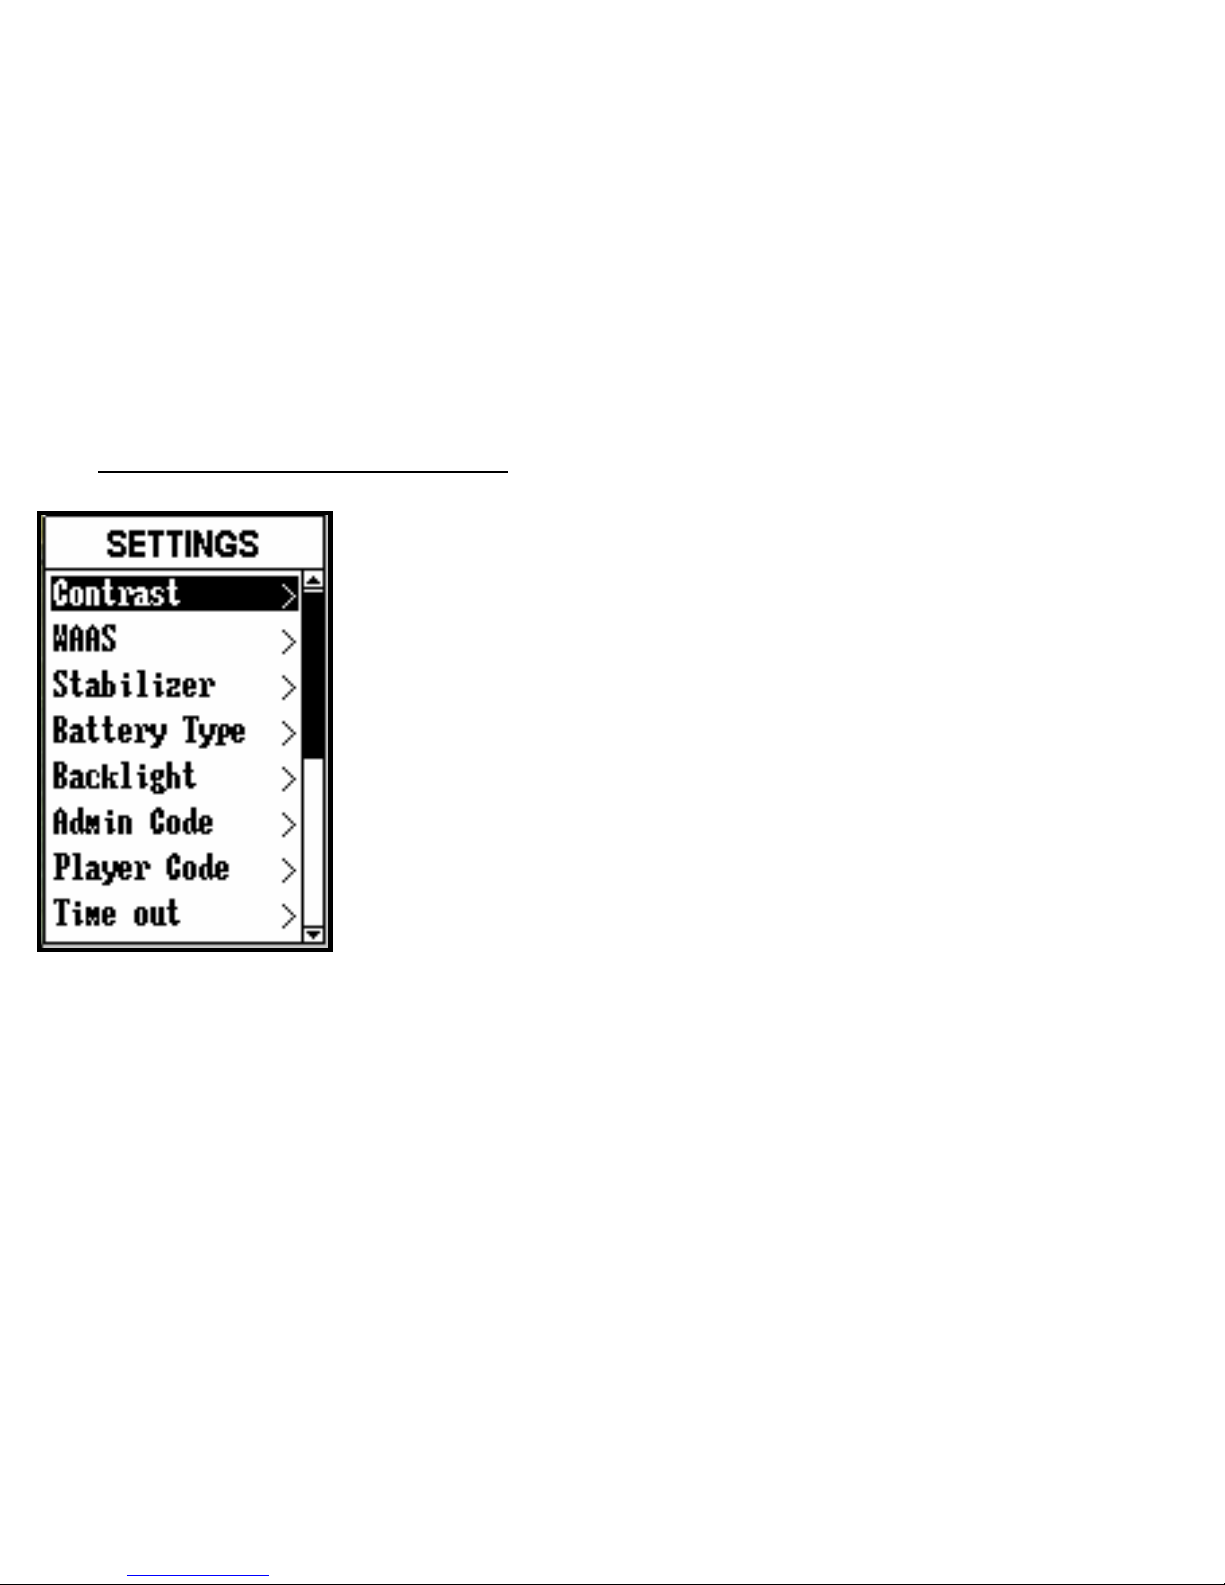
Backlight
Allows the user to select the length of time for the backlight
remaining illuminated. If “Auto Shut-Off” selected, backlight
will remain on for 10 seconds. The default setting is “Normal”
and the backlight will remain on until the Power button is
pressed again.
Admin code and Player code
The main function is that the setting parameters do not be
altered as in use, only manager (G-GOLF owner ) can
change the setting parameters.
Time out:
The “Time Out” function is the power saving mode. If you do
not touch the device for some predefined period of time, the
device will turn off automatically. The setting modes are
60/120/180 minutes.
Page 19
19
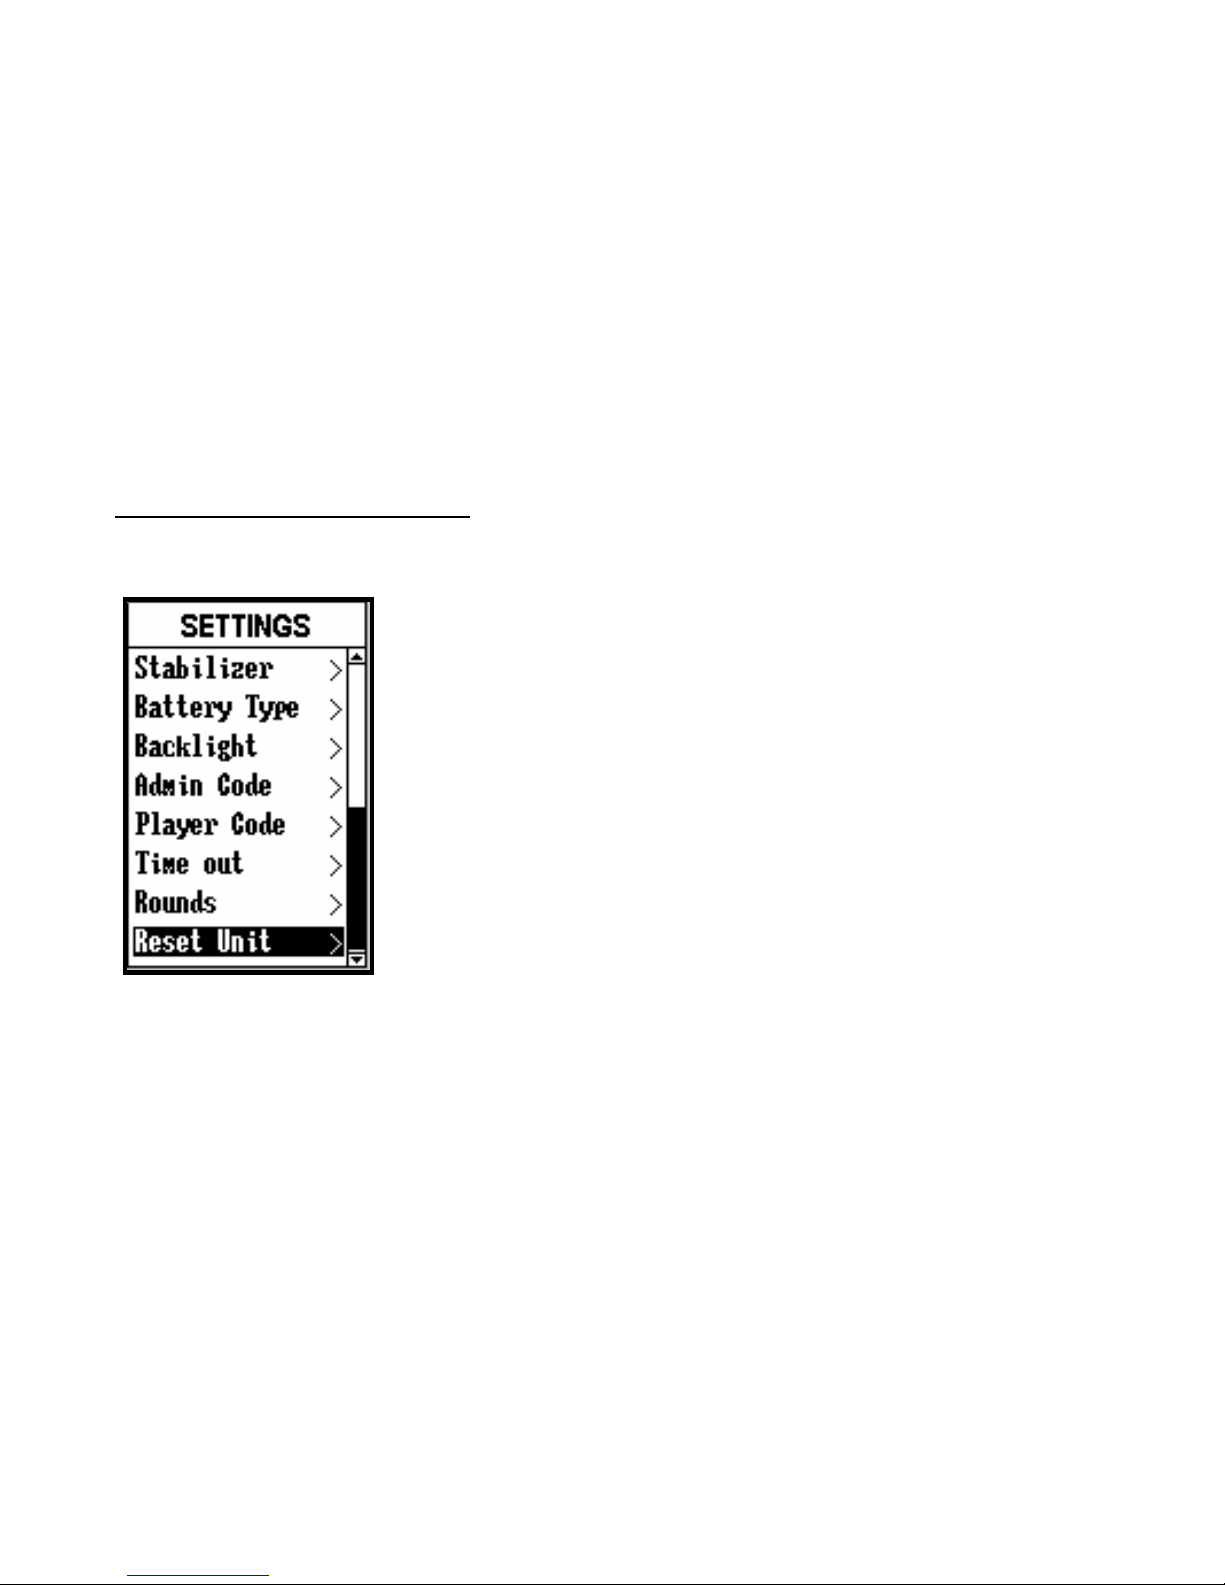
Reset Unit
Allows user to return device to factory default
settings. All data, including course files, will be
permanently deleted. It is recommended all files
are saved to computer prior to accessing this
setting.
Settings (continued)
Page 20
20
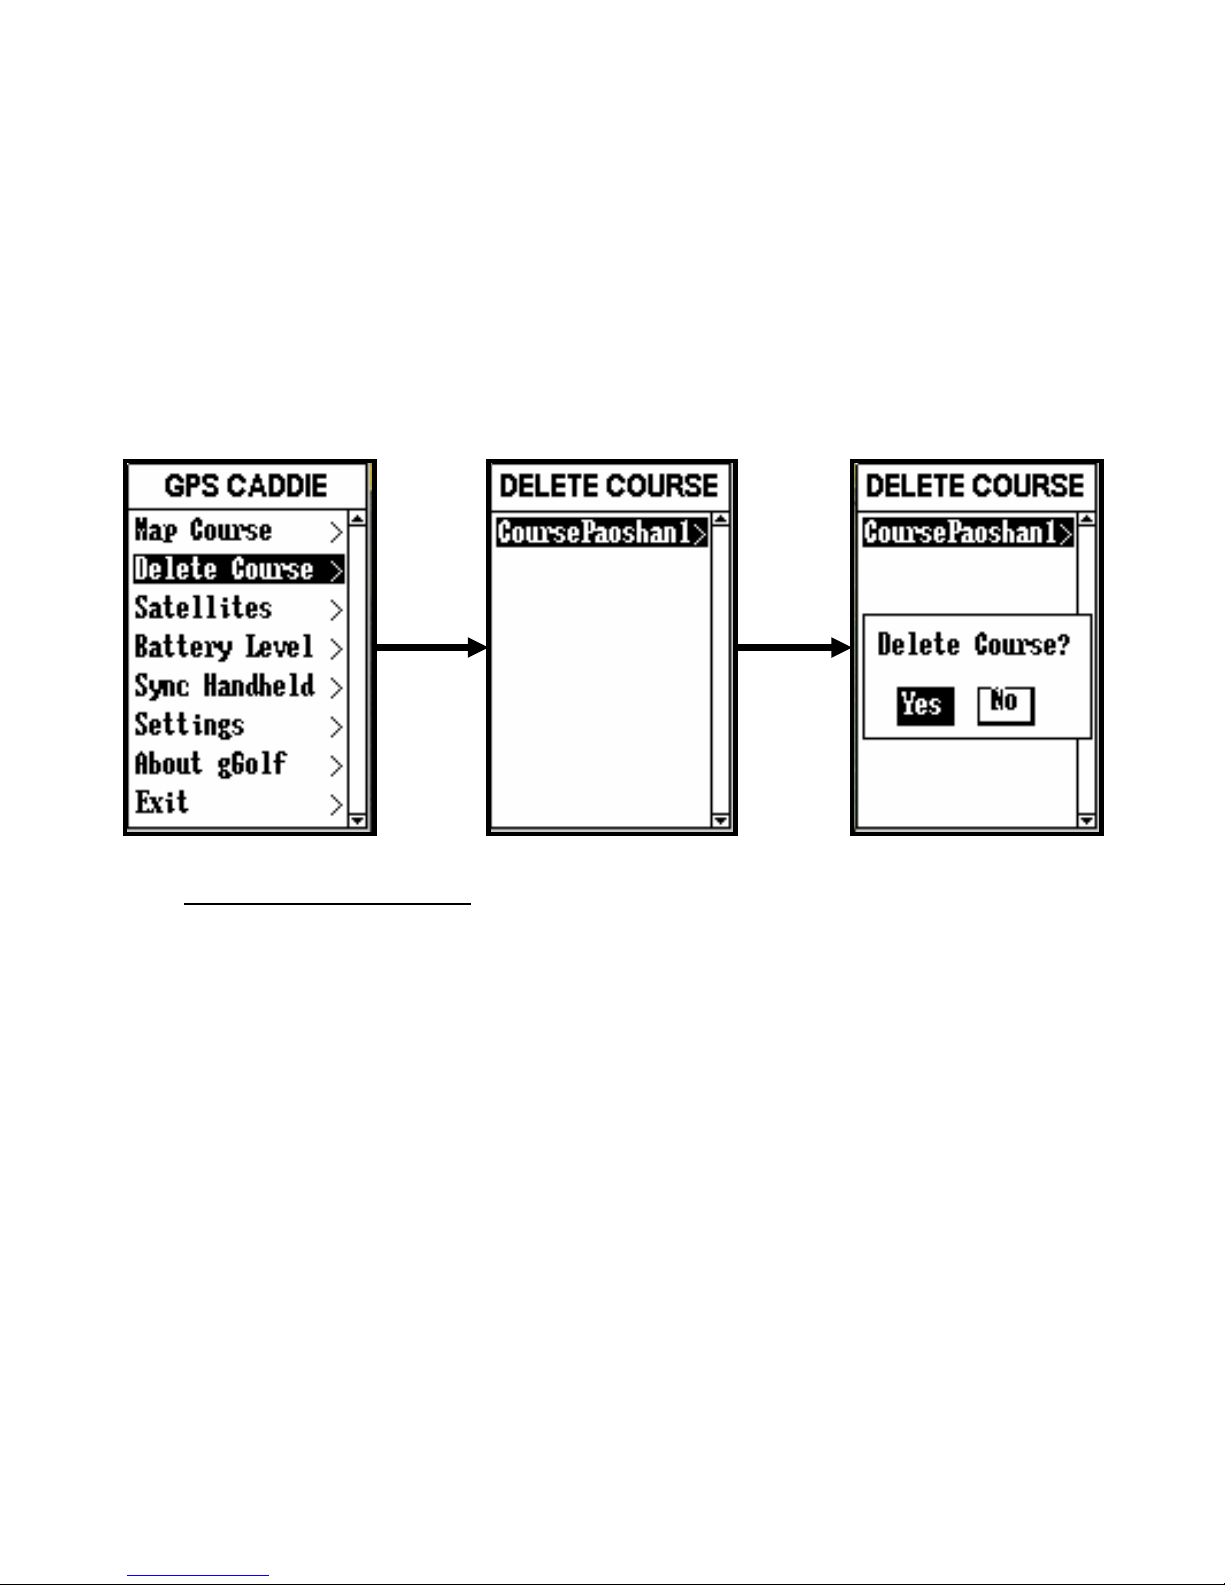
Delete Course
1. Select course.
2. Press Yes.
Page 21
21
How to create new Golf
course
with Google earth
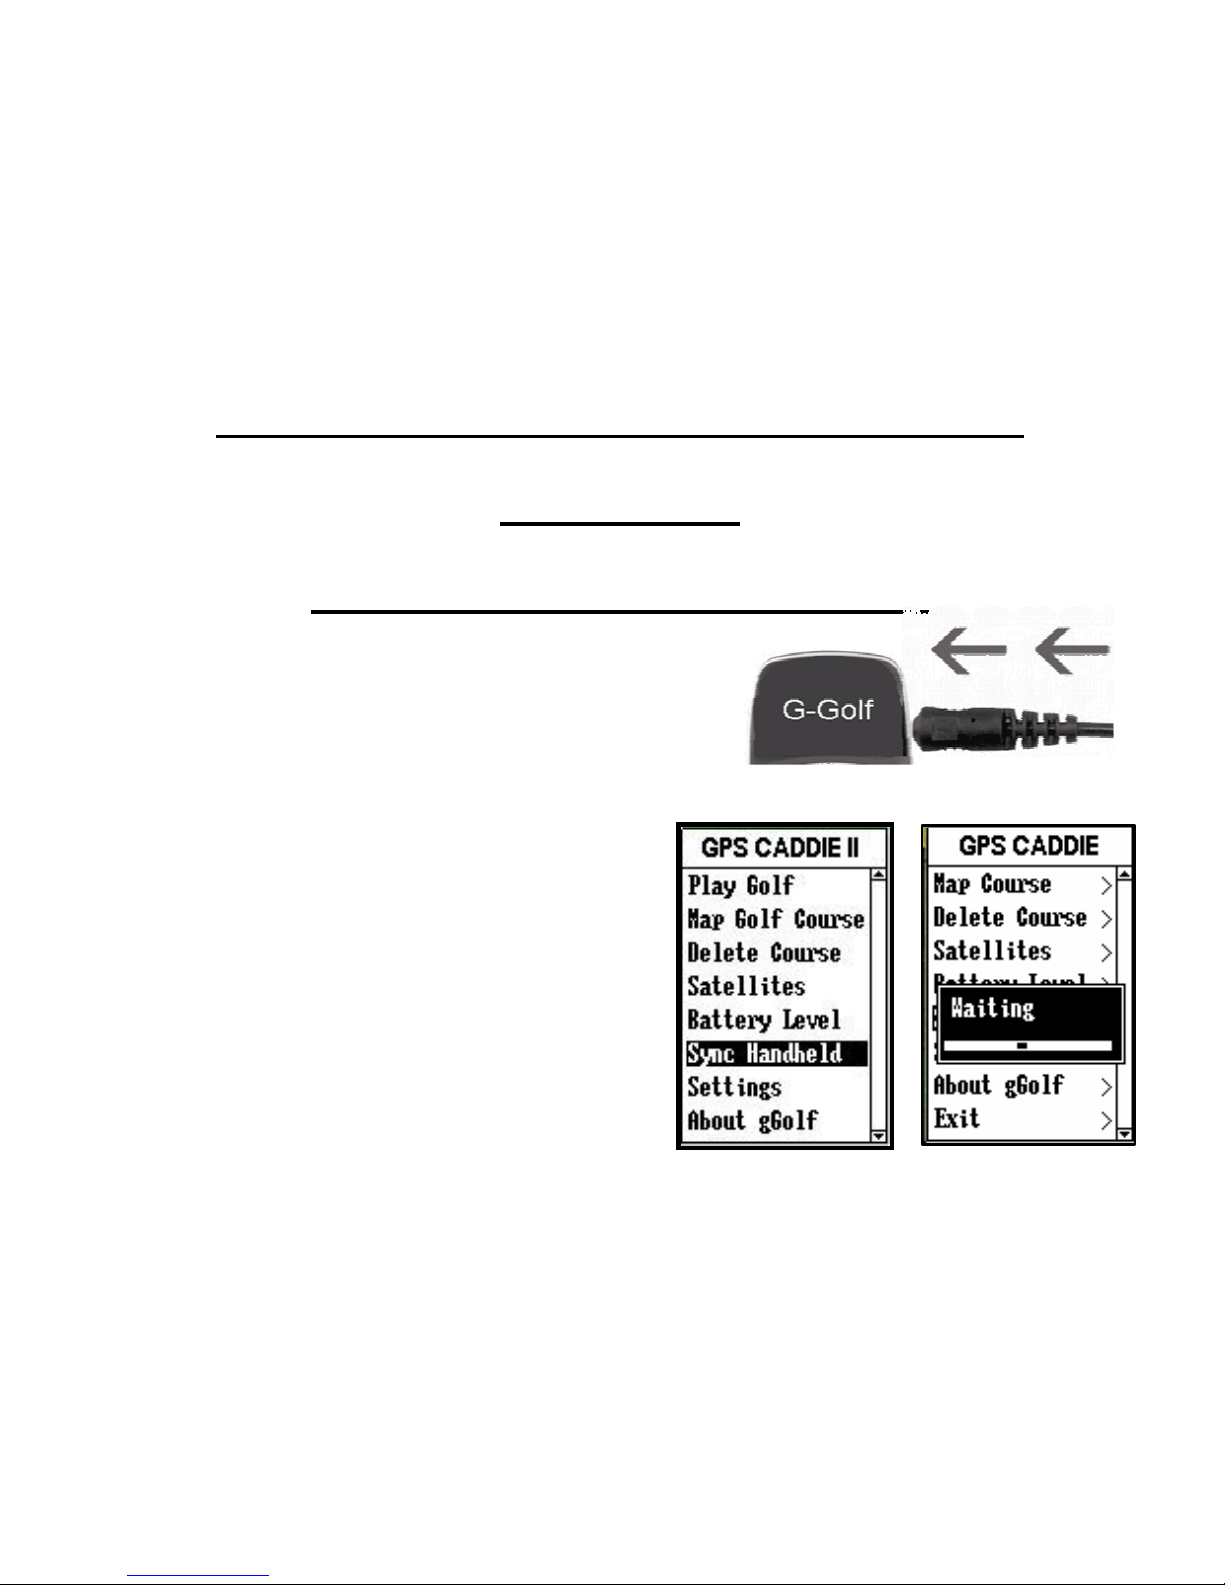
1. Install USB Driver:Please run
“UDriver_98_2000_xp “ in CD。
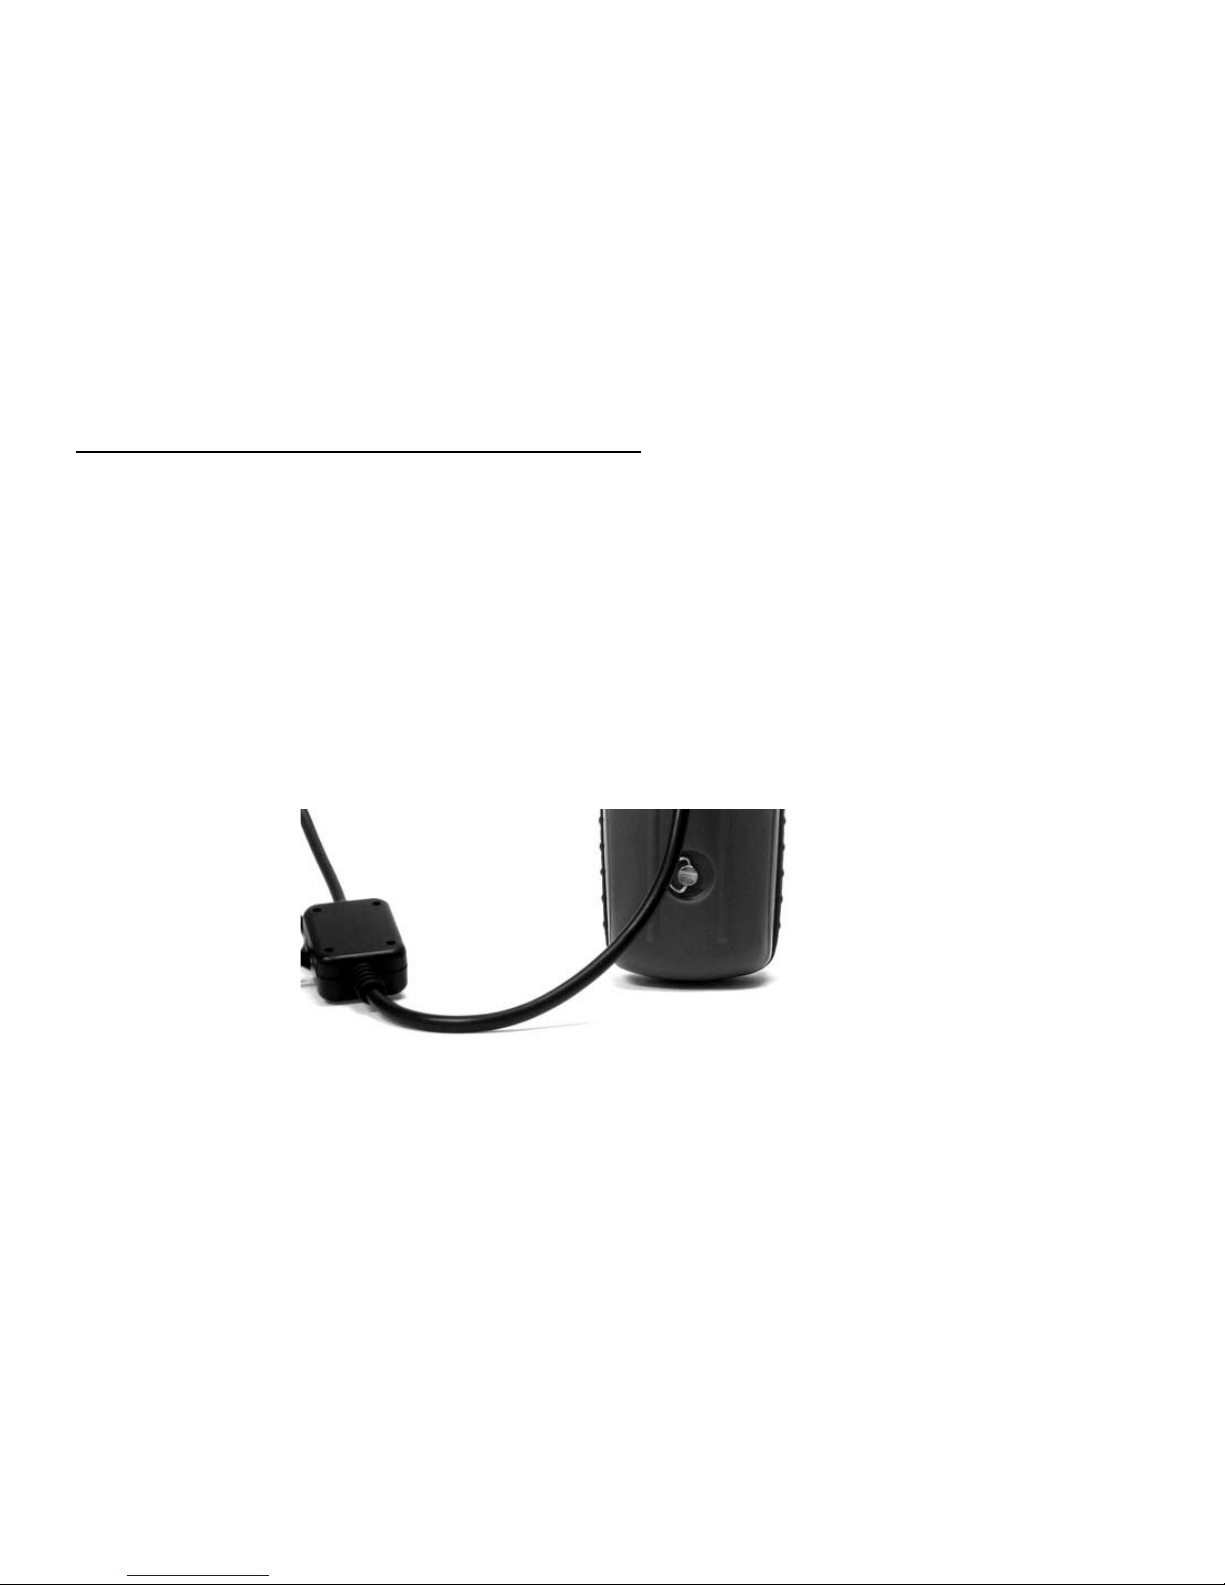
2. Connect the device with min USB cable.
(the battery must be taken out before
connecting)
3.Select “Sync Handheld” in Device
to connect with PC.
Page 22
22
Installation Golf Sync software
To install Golf Sync on a Windows 98/2000/XP computer:
1.Insert Golf Sync software CD into your computer’s CD-ROM.
2.Open drive folder on computer to view CD contents.
3.Open Setup file to launch Windows Installer Wizard.
4.Follow on-screen instructions to install USB driver and Golf Sync.
Page 23
23
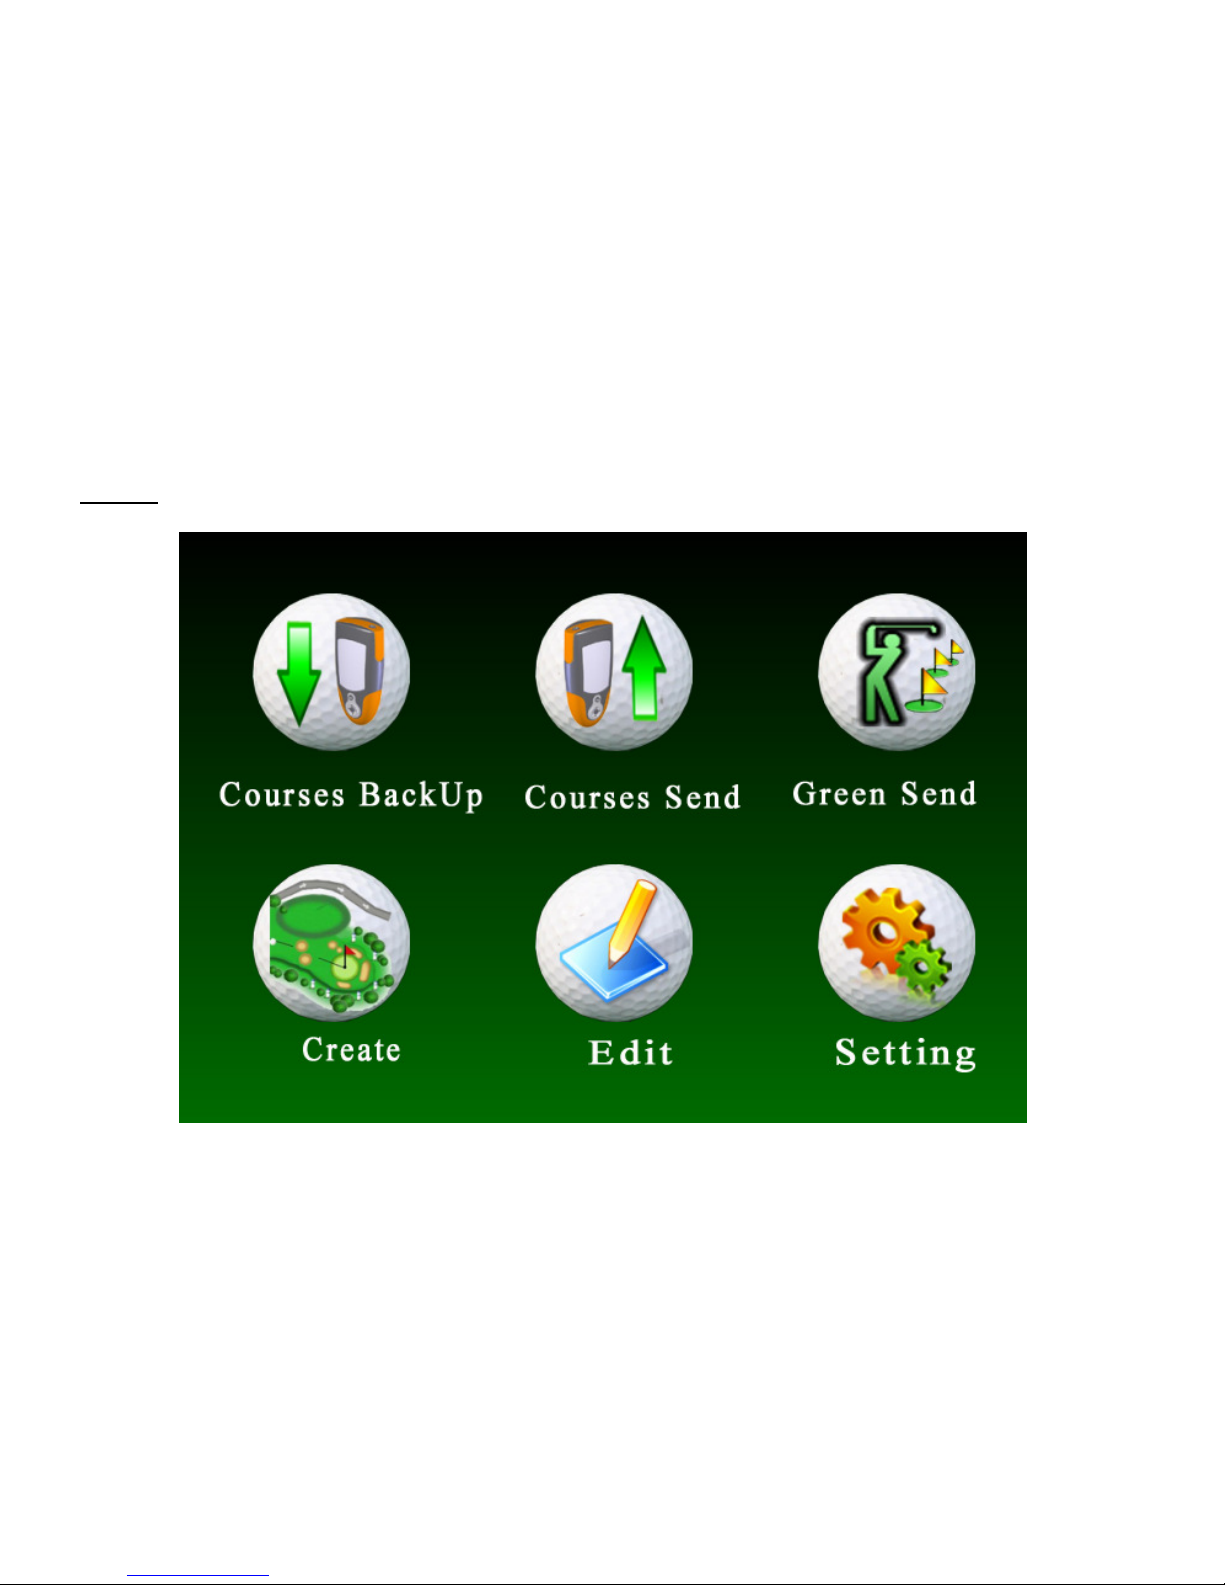
Run ” Gps Sync” Software , you will see main menu as below.
Page 24
24
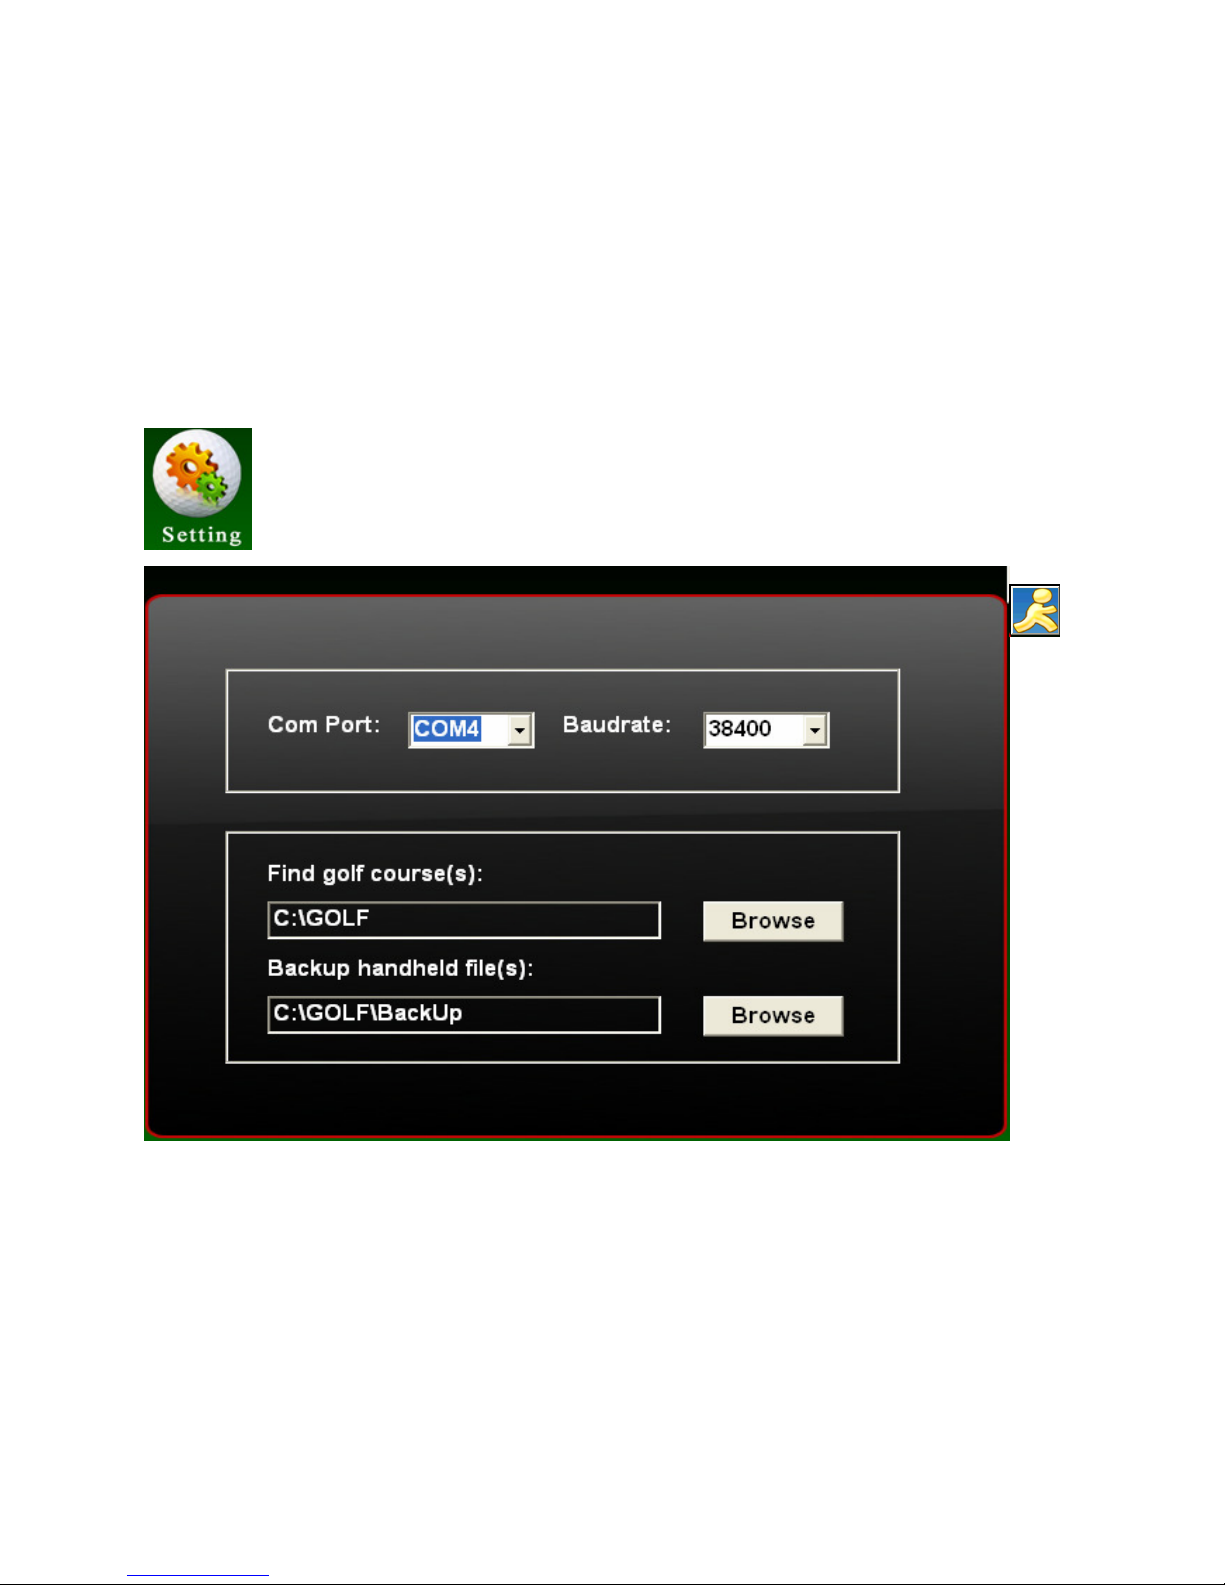
Please set up the right COM Port , Baudrate.
Page 25
25
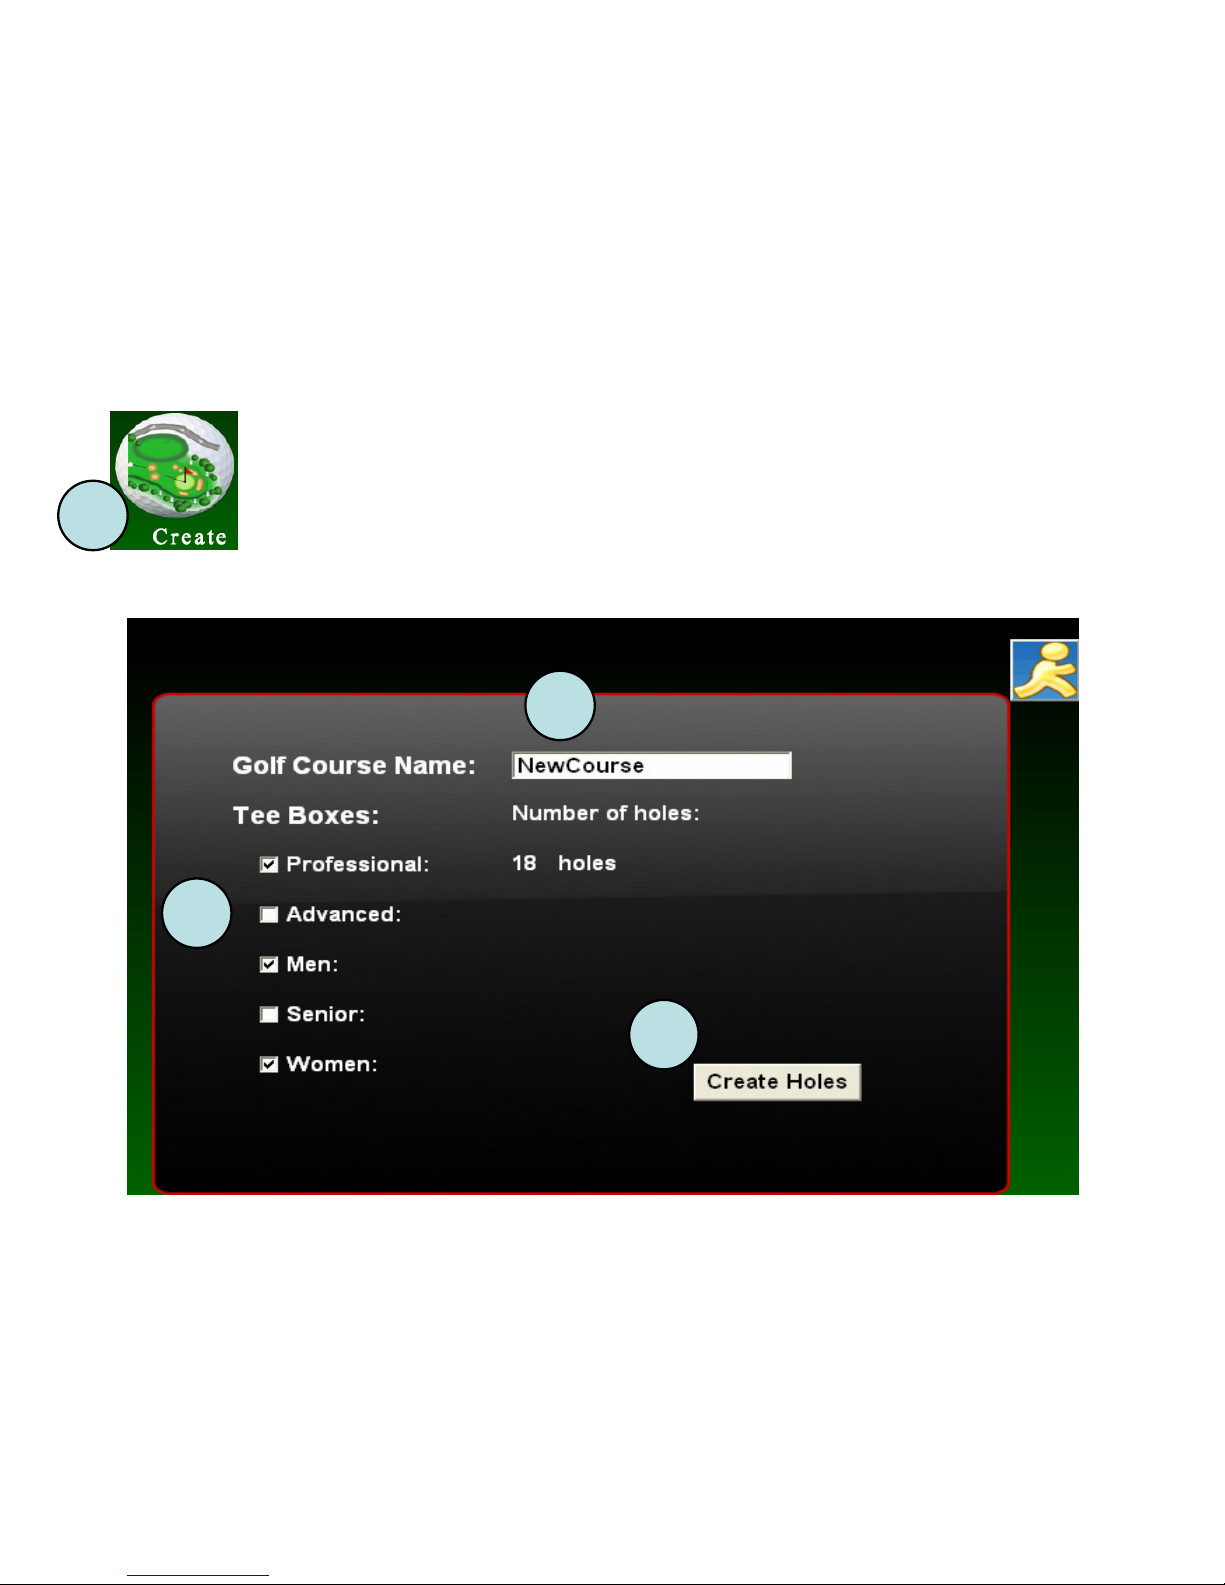
Create a new Golf course database
1.Please push “Create “ and go into following menu.
2.Input the Golf Course Name.
3.Select the scorecard scales.
4.Highlight “Create Holes” and go to next step.
1
2
3
4
Page 26
26
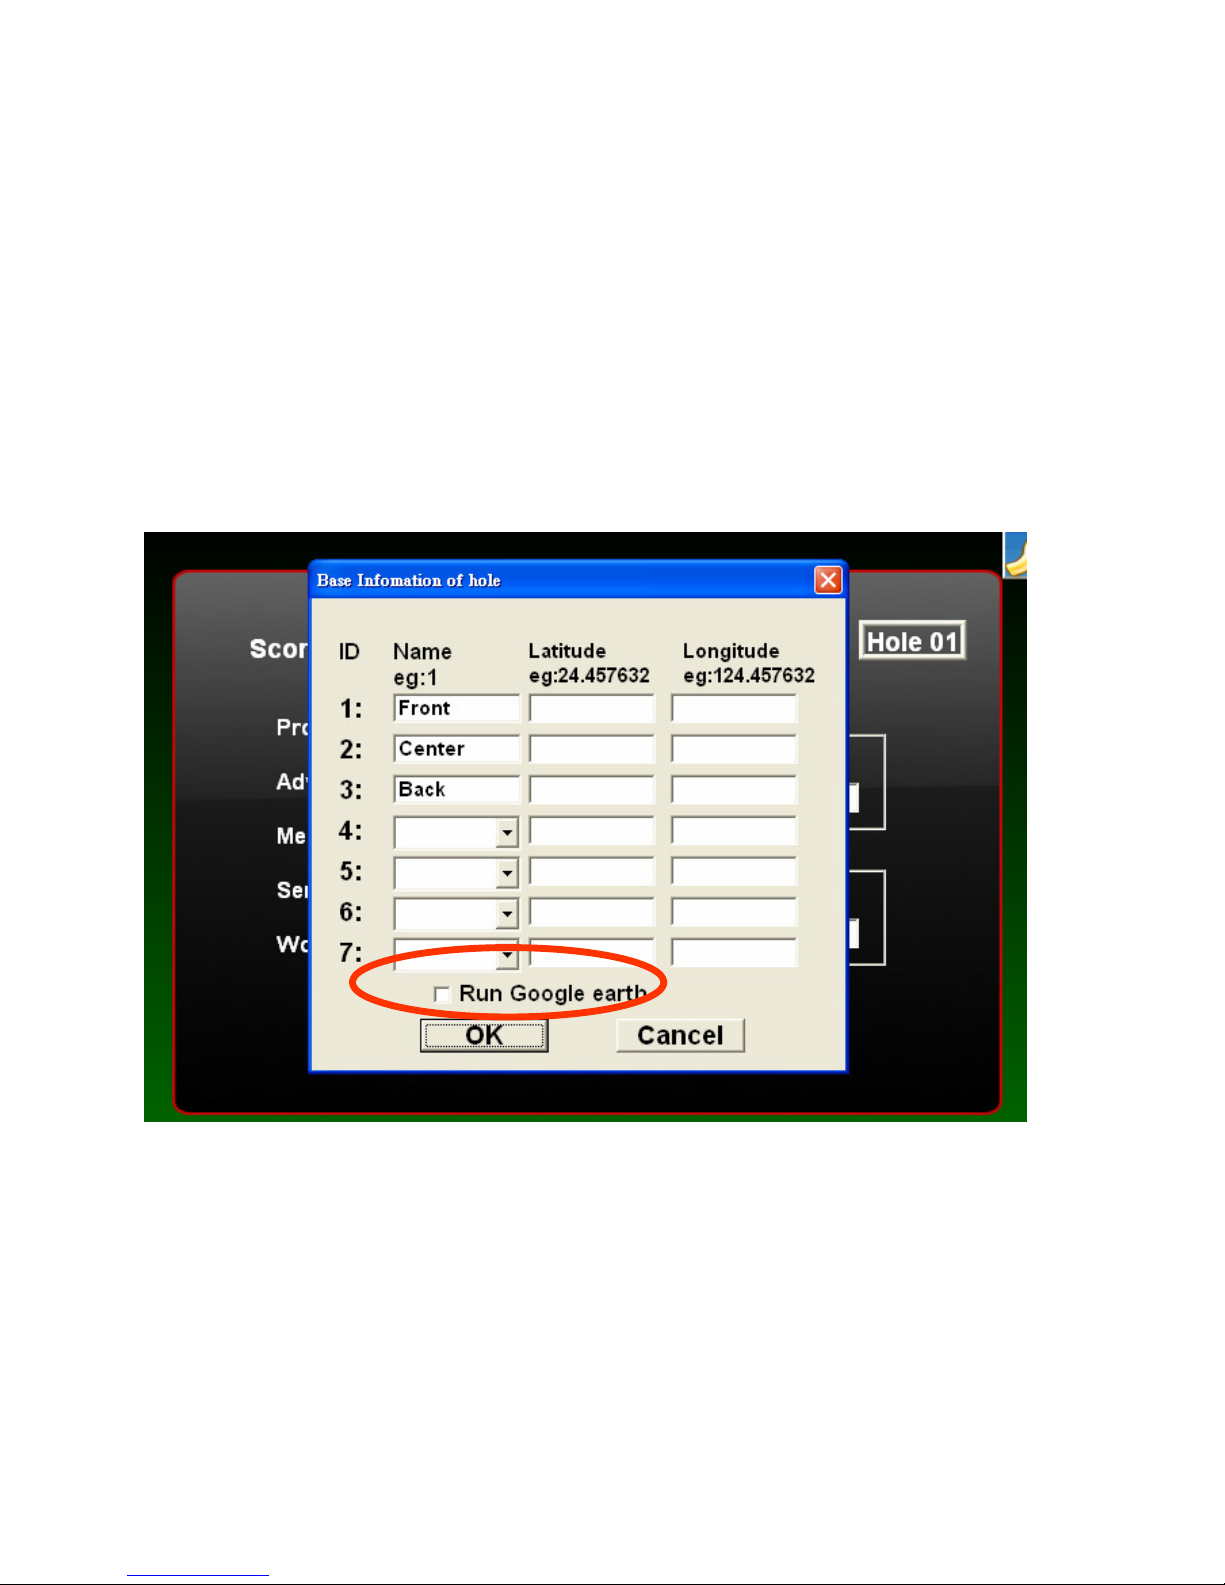
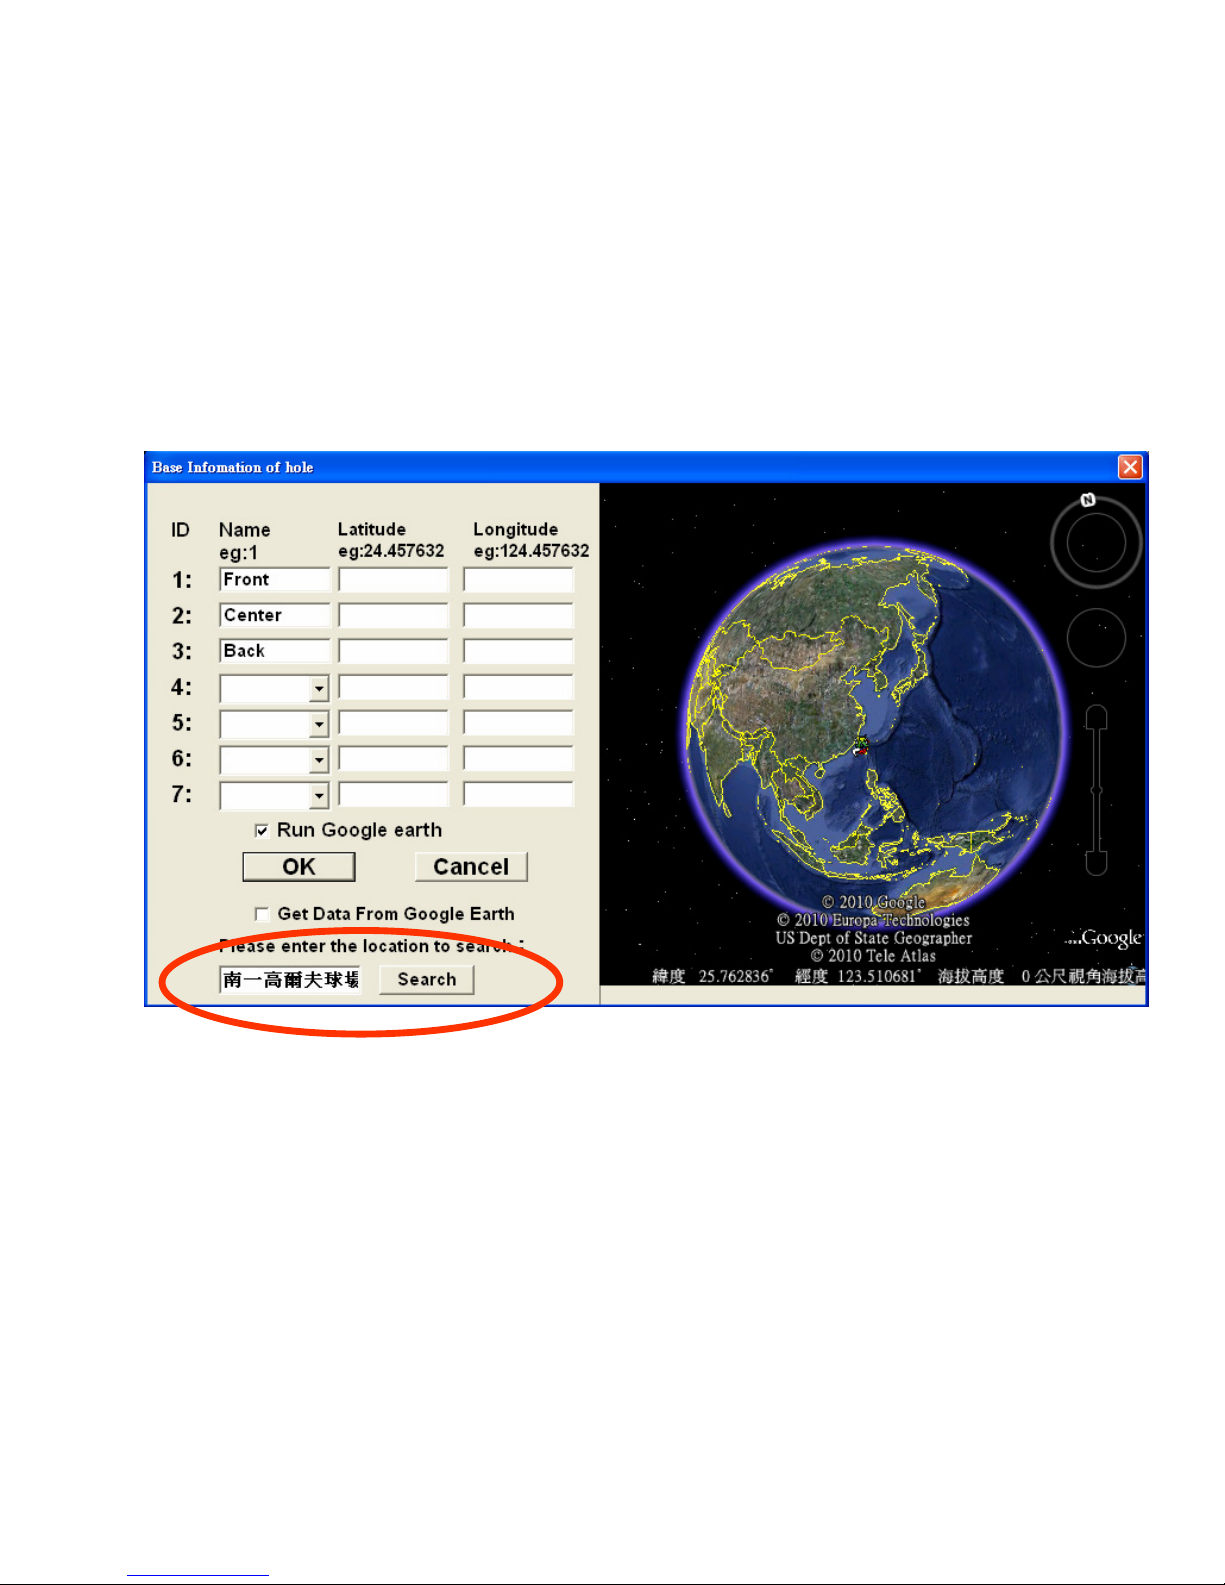
Select ”Run Google earth” and press “ ok”
Page 27
27
In this column, input the name of Golf course and press “Search”.
And the Golf course will be found out automatic.
Page 28
28
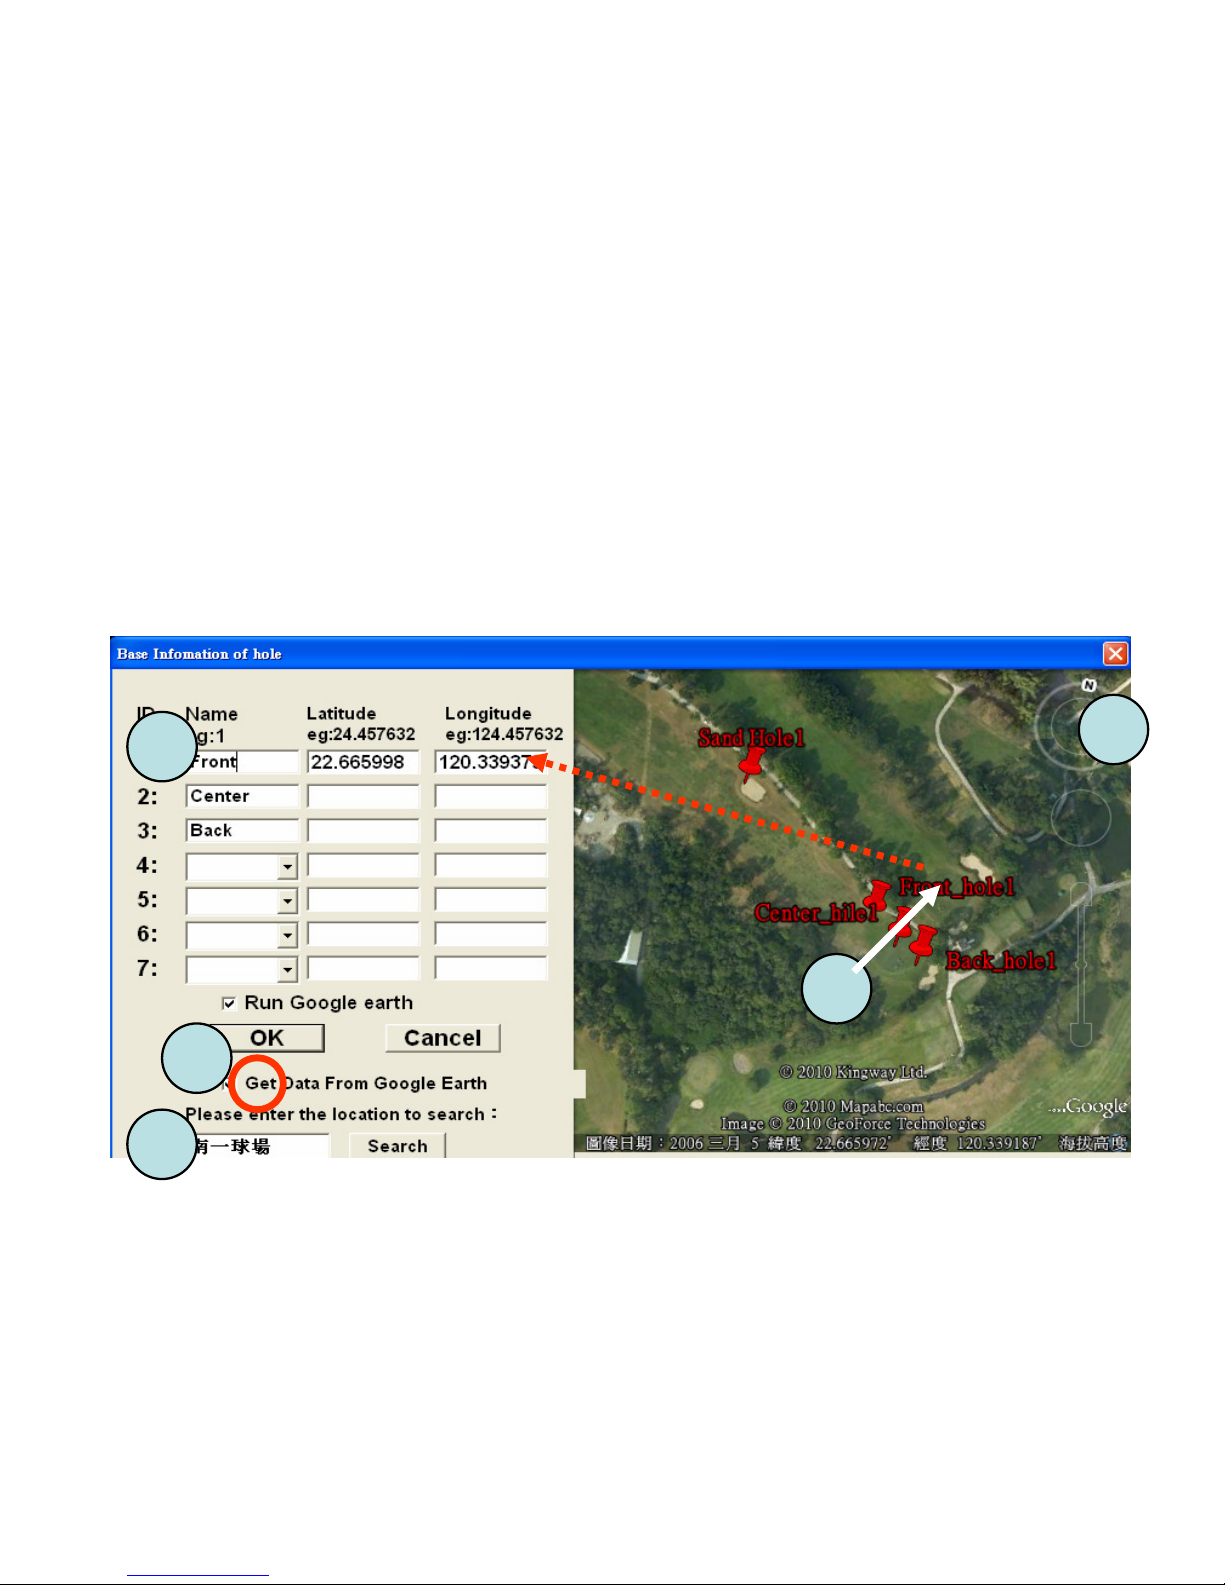
1.Find the desired Golf course.
2.Use scorecard to find out each Hole.
3.Highlight “Front” column.
4.Highlight ”Get data from Google earth” and move the cursor to
desired point , press enter and get the GPS data in the column.
5.Repeat these instructions for all desired holes.
1
2
3
4
4
Page 29
29
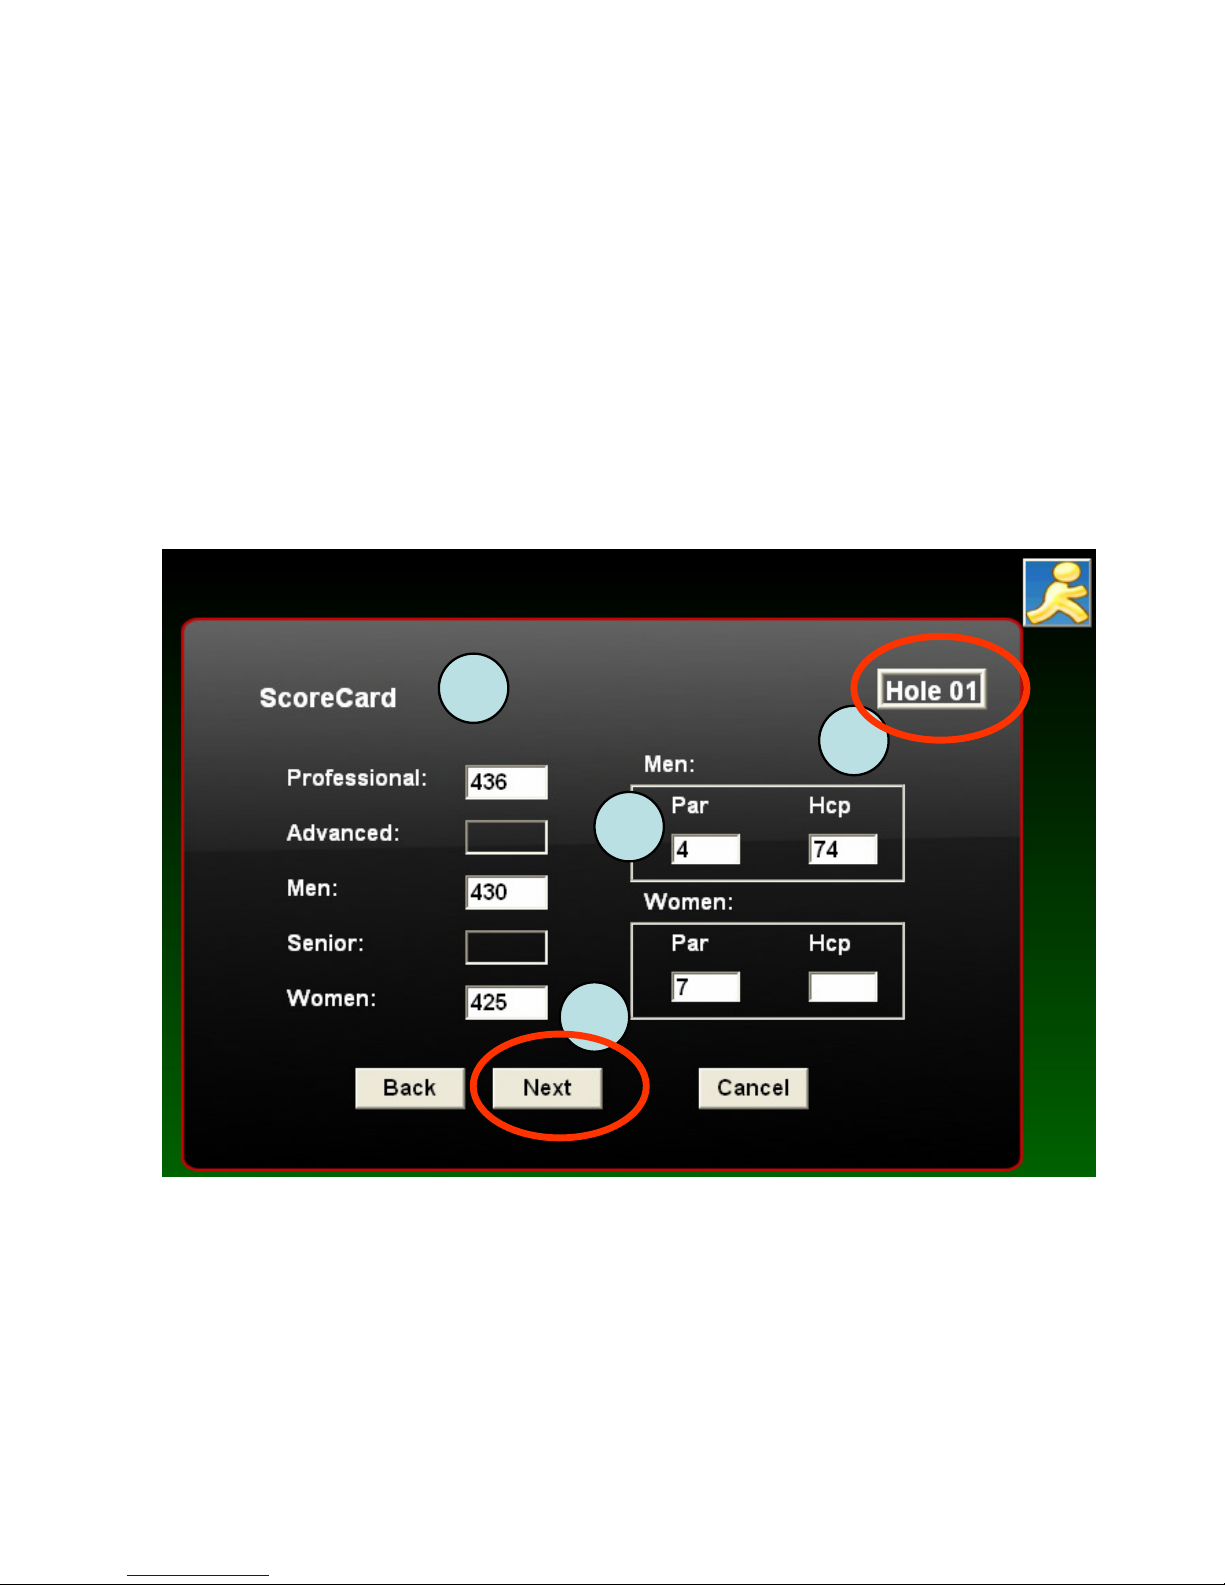
•According the ScoreCard provided by Golf Course, input the
information of each hole.
•To change the column, please push “ Tab” key.
1
2
3
4
Page 30
30
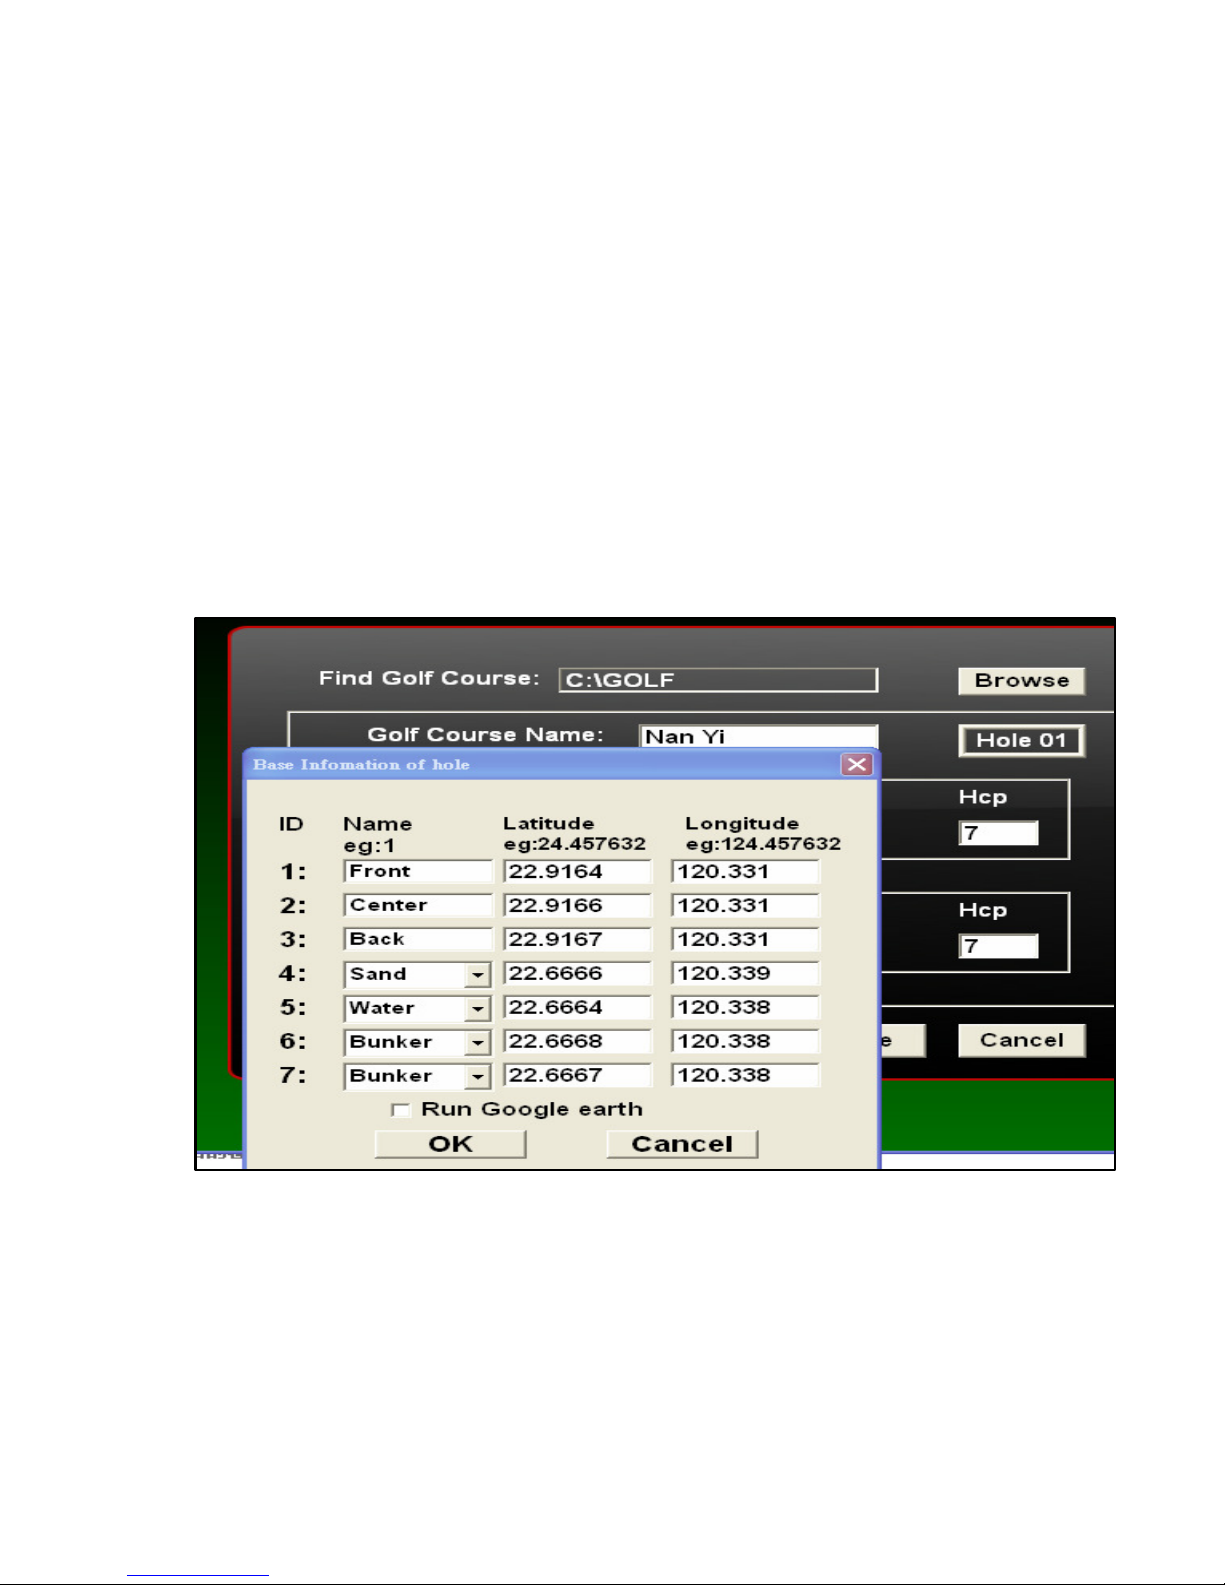
• Repeat these instructions to complete all data for 18 holes.
• If the user will loge out the system by creating data , please follow
the system instructions to store the data.
• If Google earth can not show the course , maybe the computer
memory is not enough. Please restart “GPS Sync” software.
Page 31
31
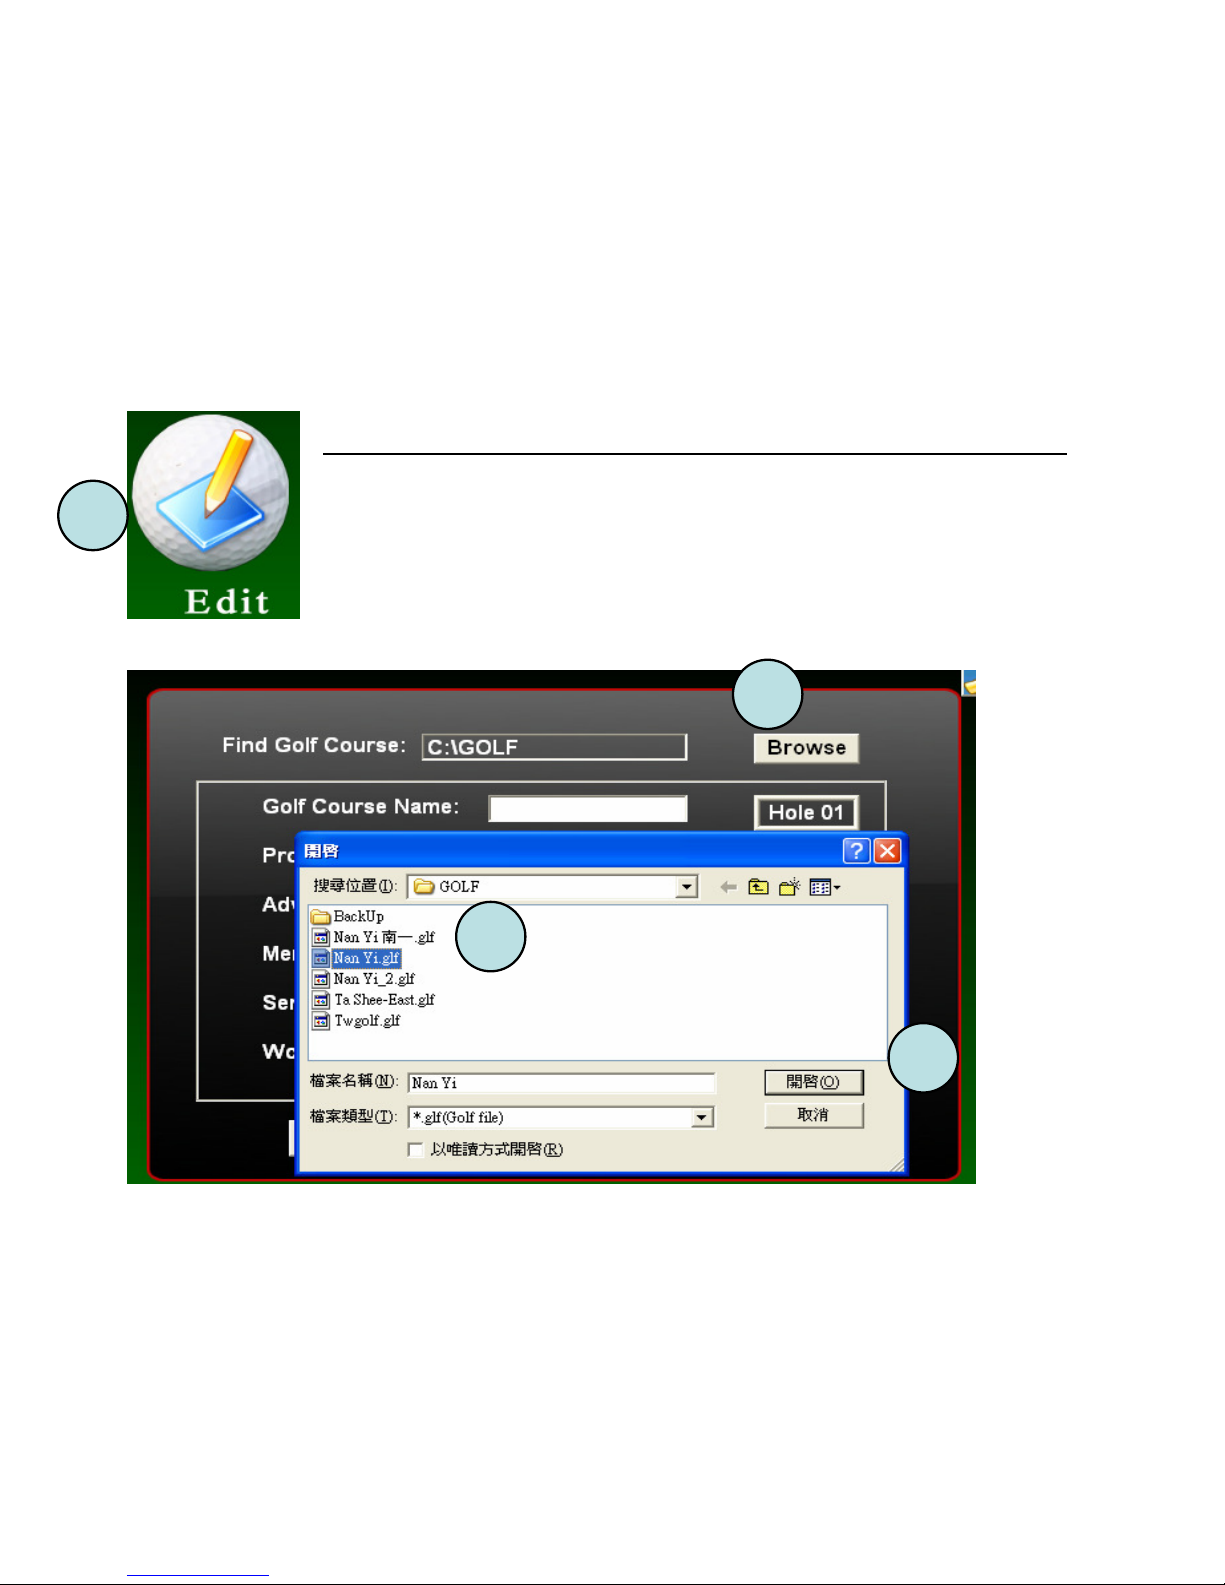
Edit the information of Golf course:
::
:
1. Highlight “Edit” to get into “edit” function.
2. Press “BOWSE” to find out the file of golf course, and then
select the hole to edit the data.
1
2
3
4
Page 32
32
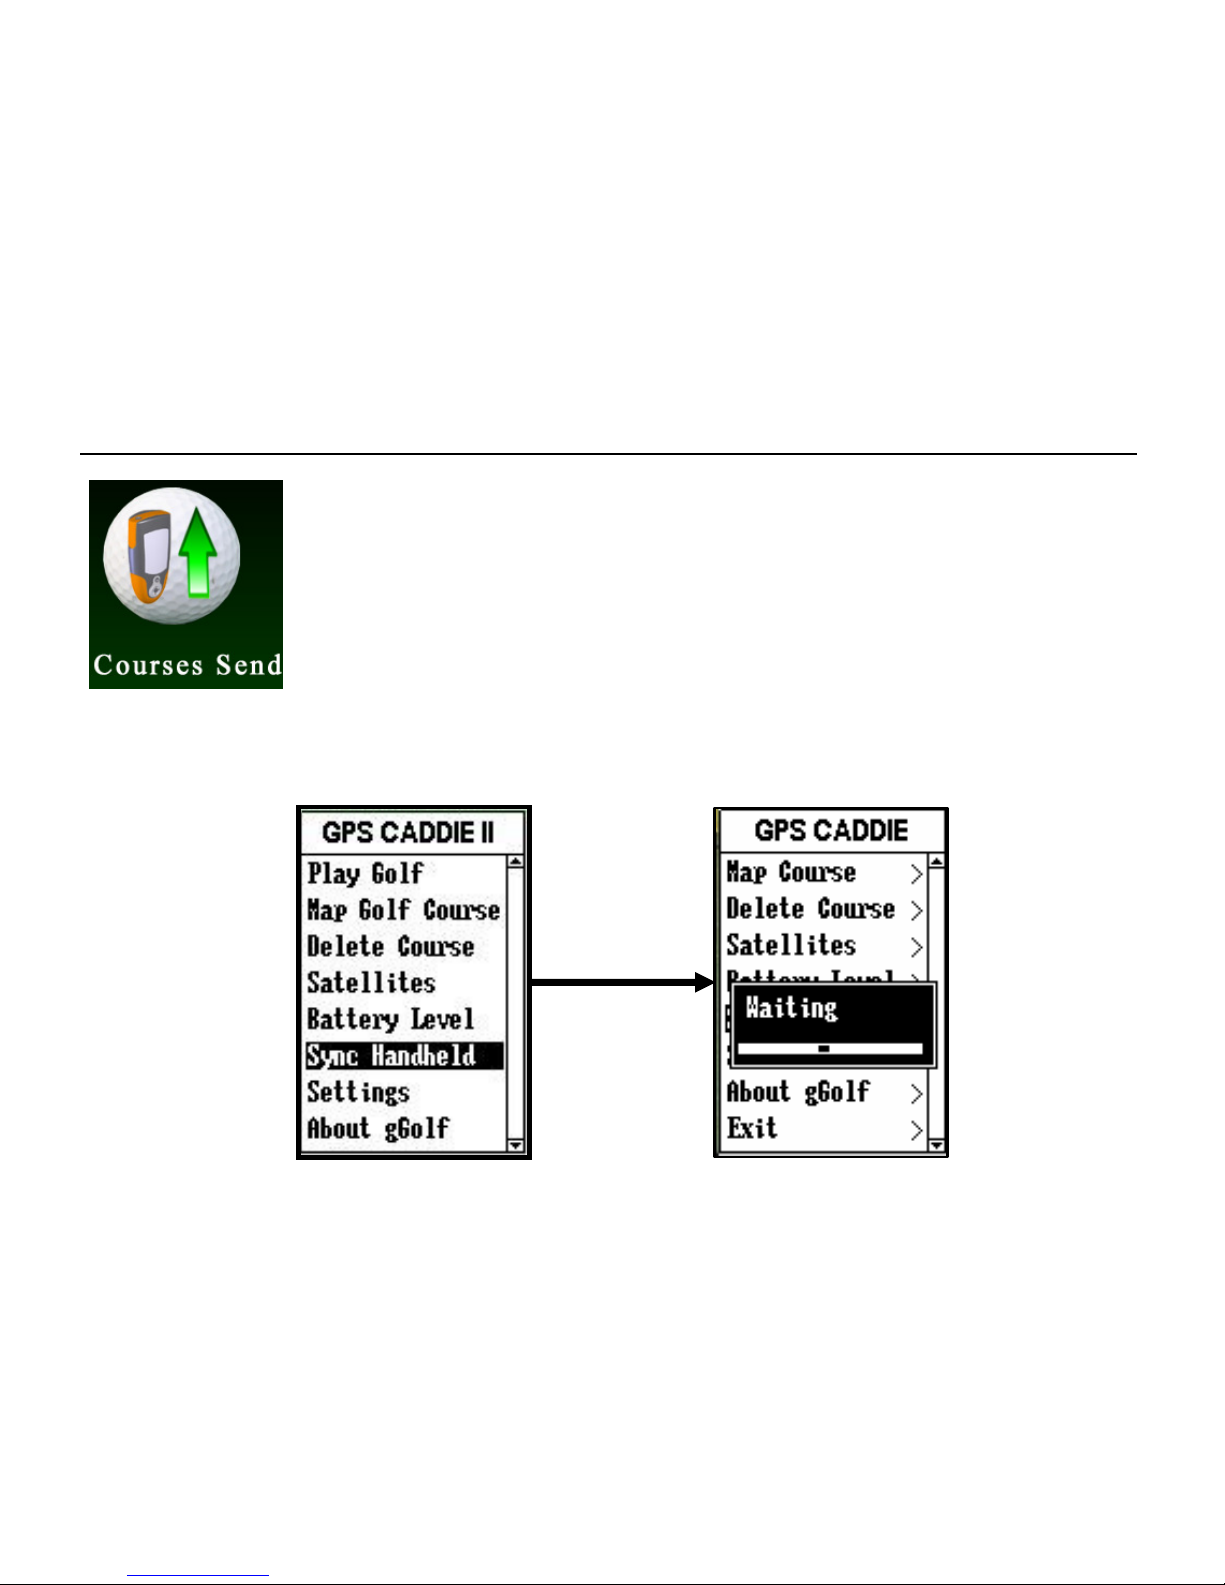
How to install the course-data file from PC to Device
Step1:
1.Select “Sync Handheld” in Device to connect with PC.
2.Highlight “Courses Send” icon by Sync software.
3.Make sure that the device is connected with PC.
GO TO NEXT PAGE.
Page 33
33
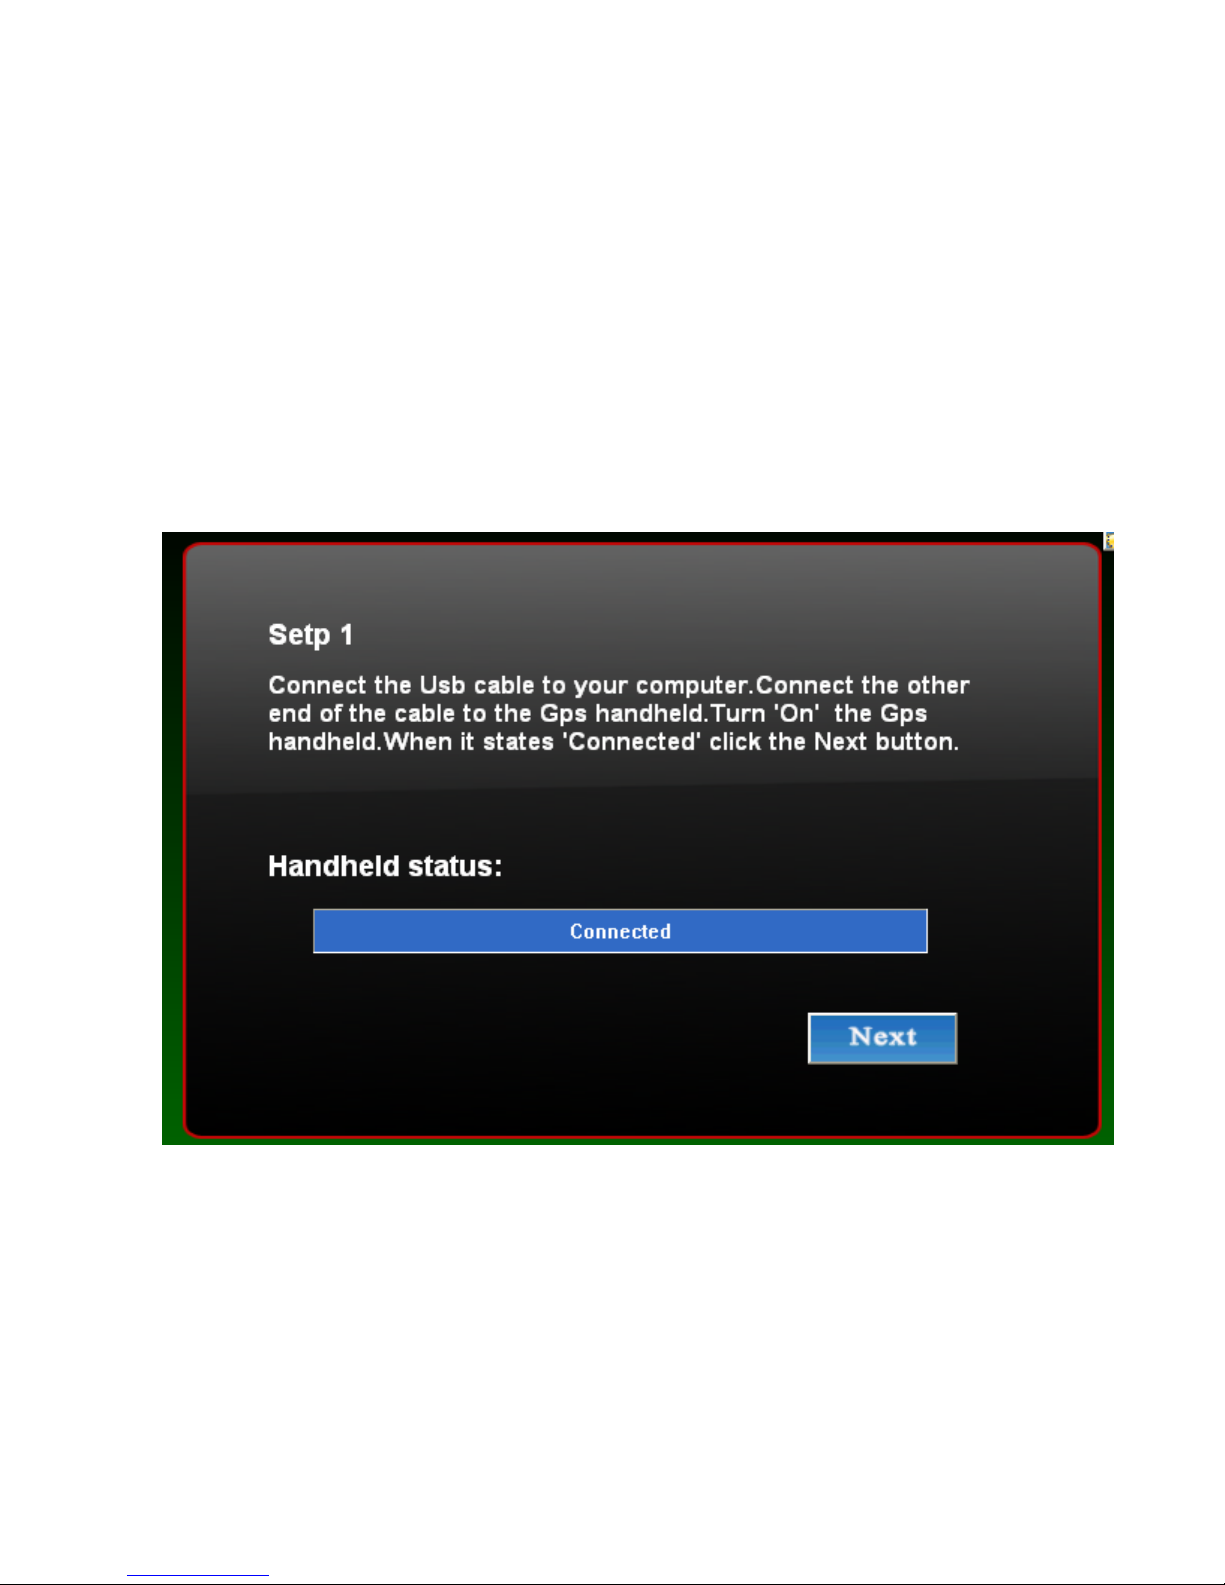
Step2:Keep the device on and connect with PC,press “Next “
Page 34
34
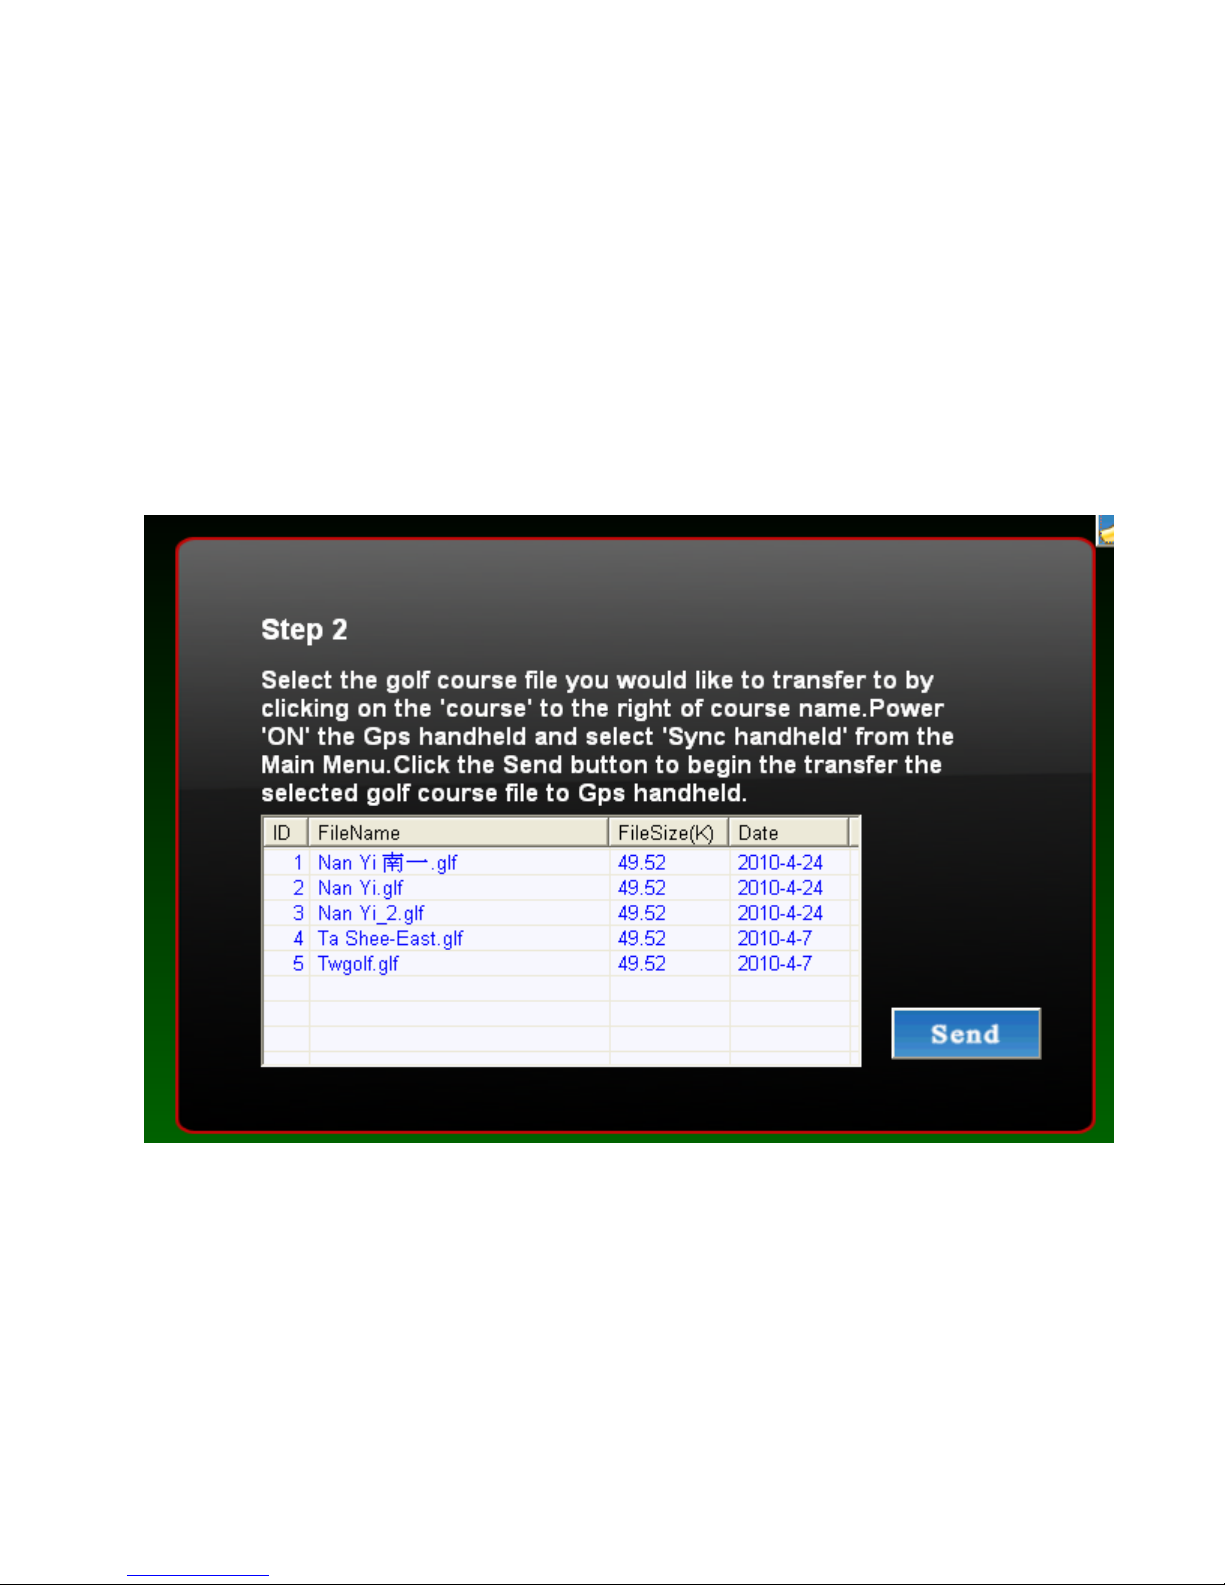
Step 3 : Select the file which you need and press “Send “.
Page 35
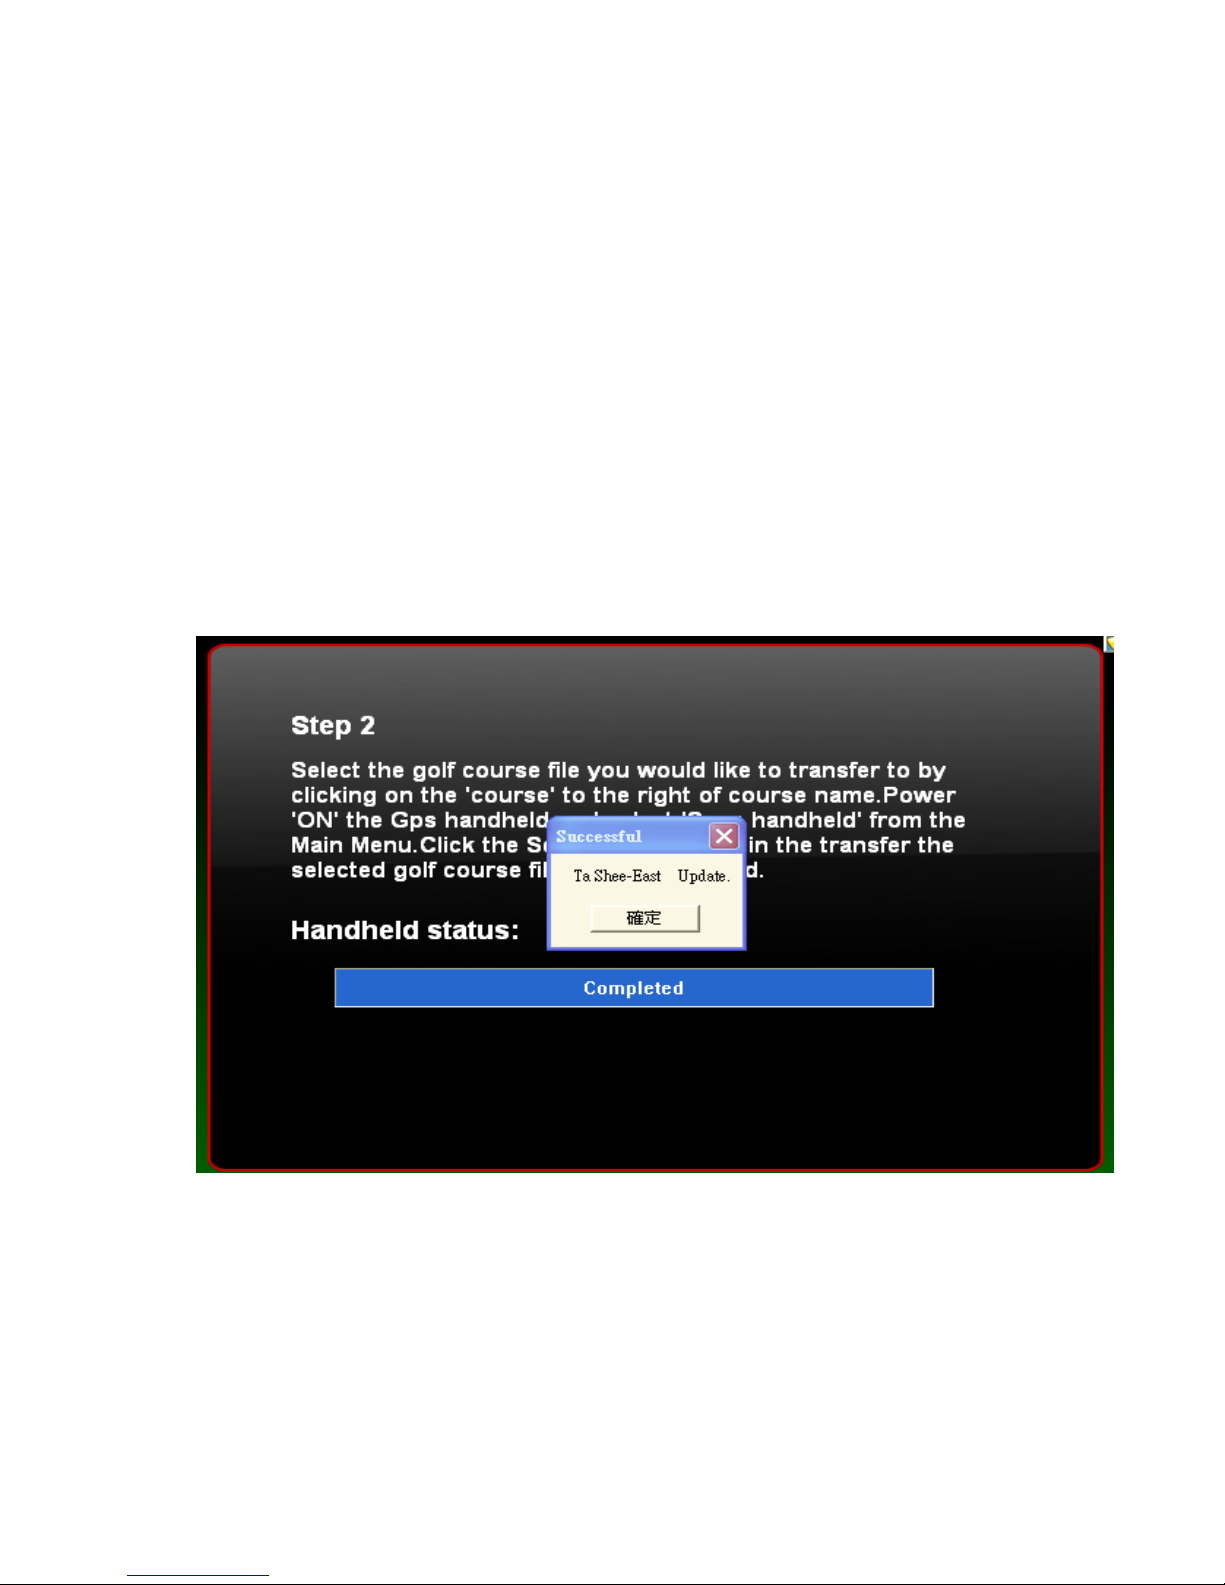
35
Step 4: Then you have completed to set up a golf course in
device via “Google earth “. You can log out the system and
restart the device. You can see the course information in the
device.
Page 36
36
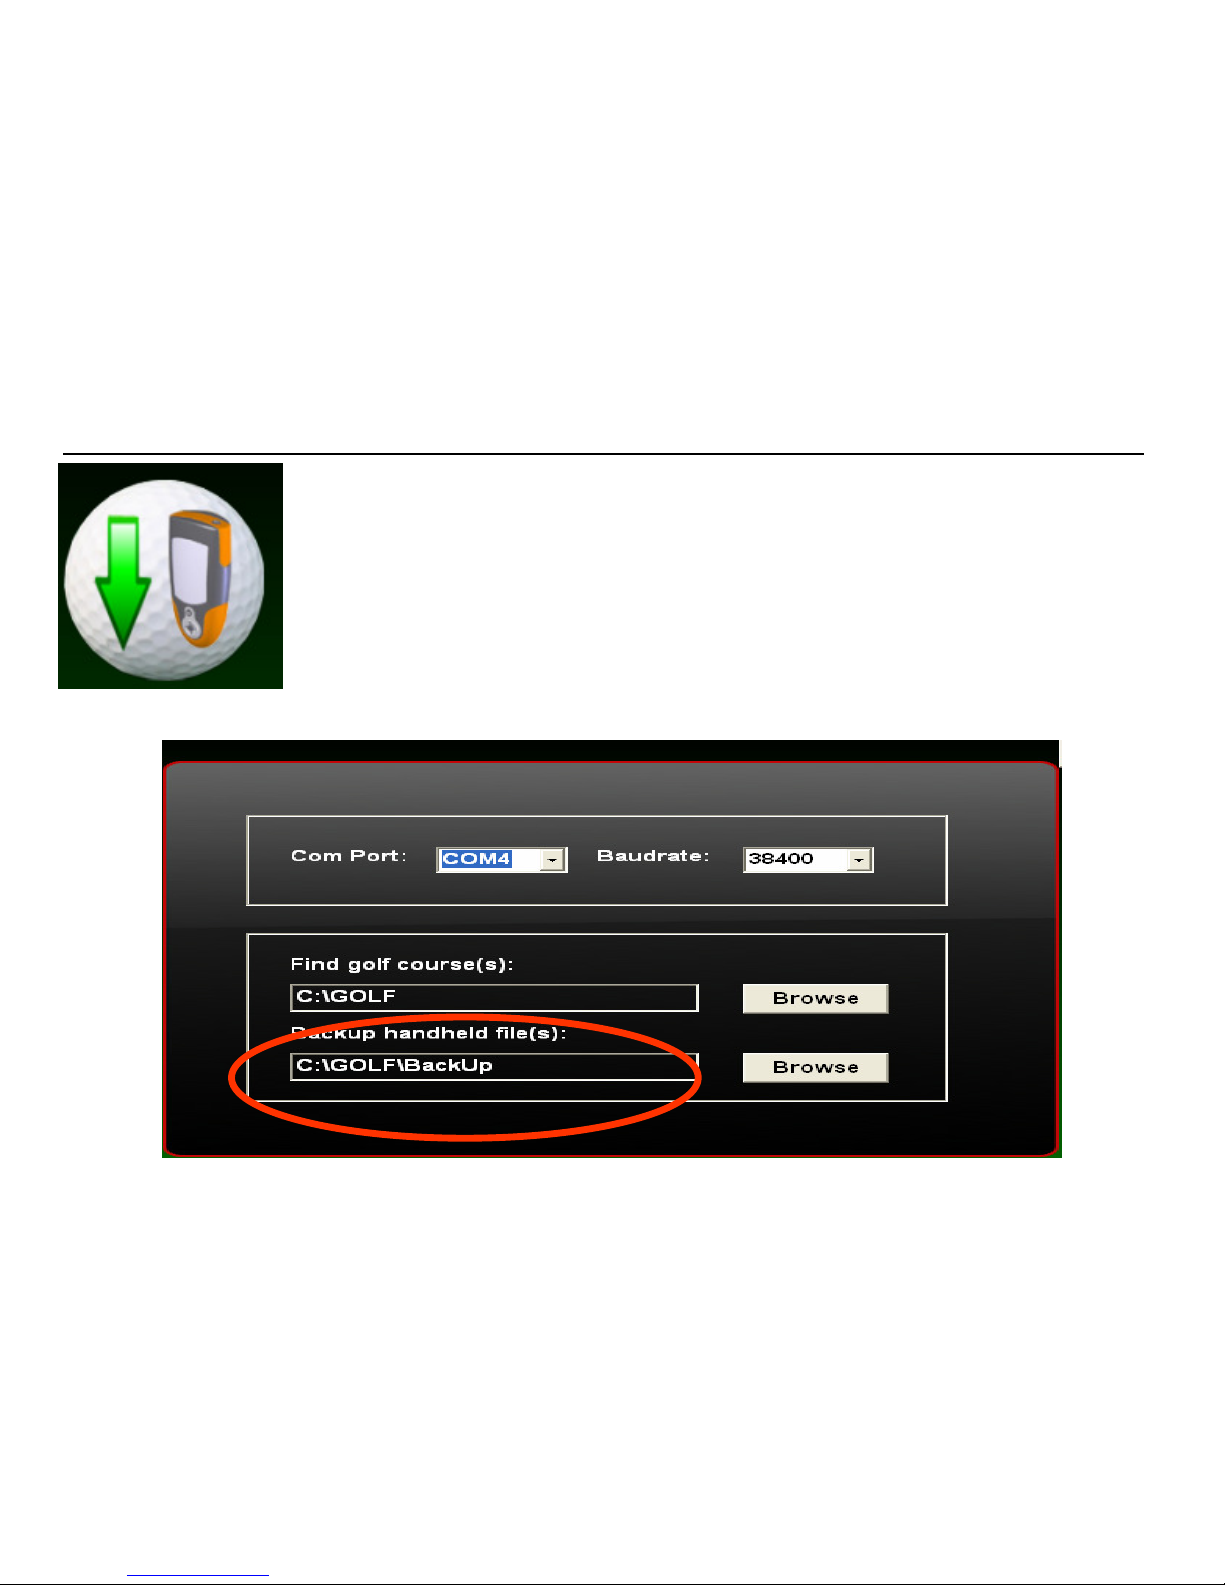
How to transfer the data from device to PC as backup
1. Select “Sync Handheld”.
2. Press “Courses Backup” icon.
3. Make sure that the device is connected with PC.
4. Create a new file to make the backup of the
course data in the computer.
5. To set up the save path in PC.
Page 37
37
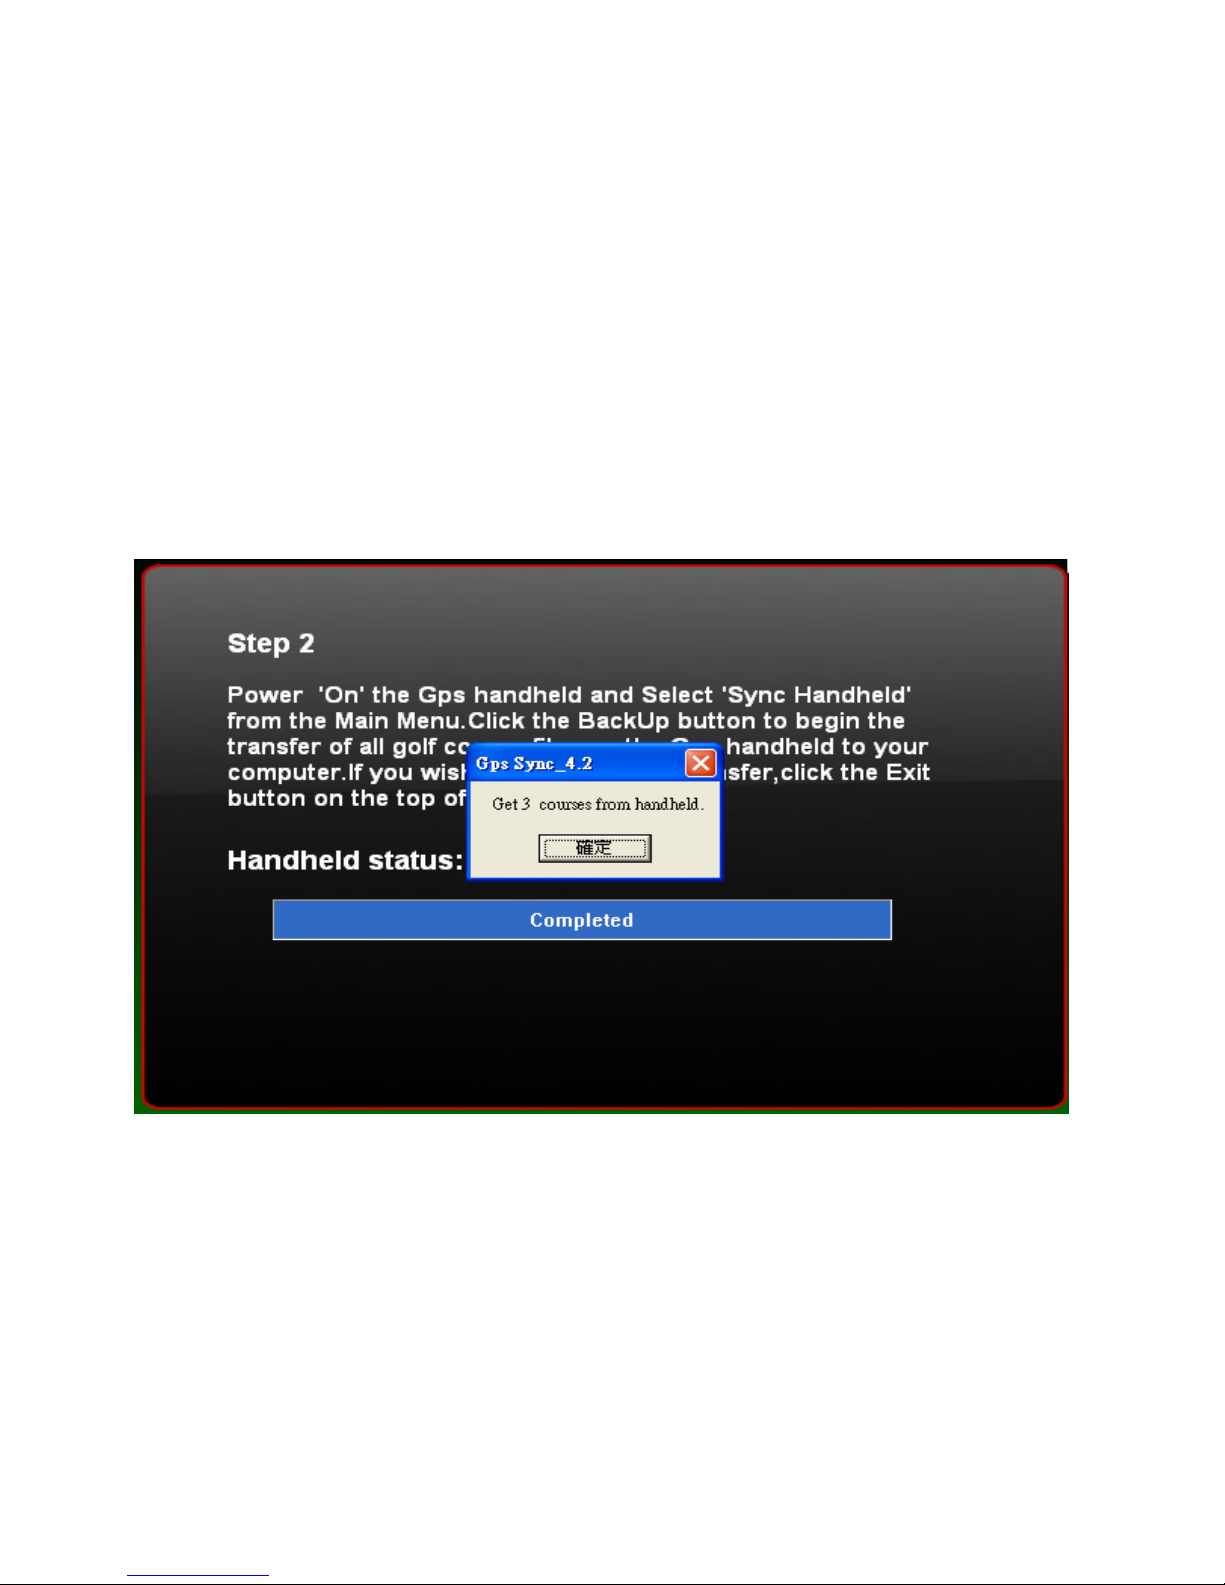
You can recheck if there is the backup in the computer. If
not , please repeat the procedure.
 Loading...