

Page 1
DE | EN | FR
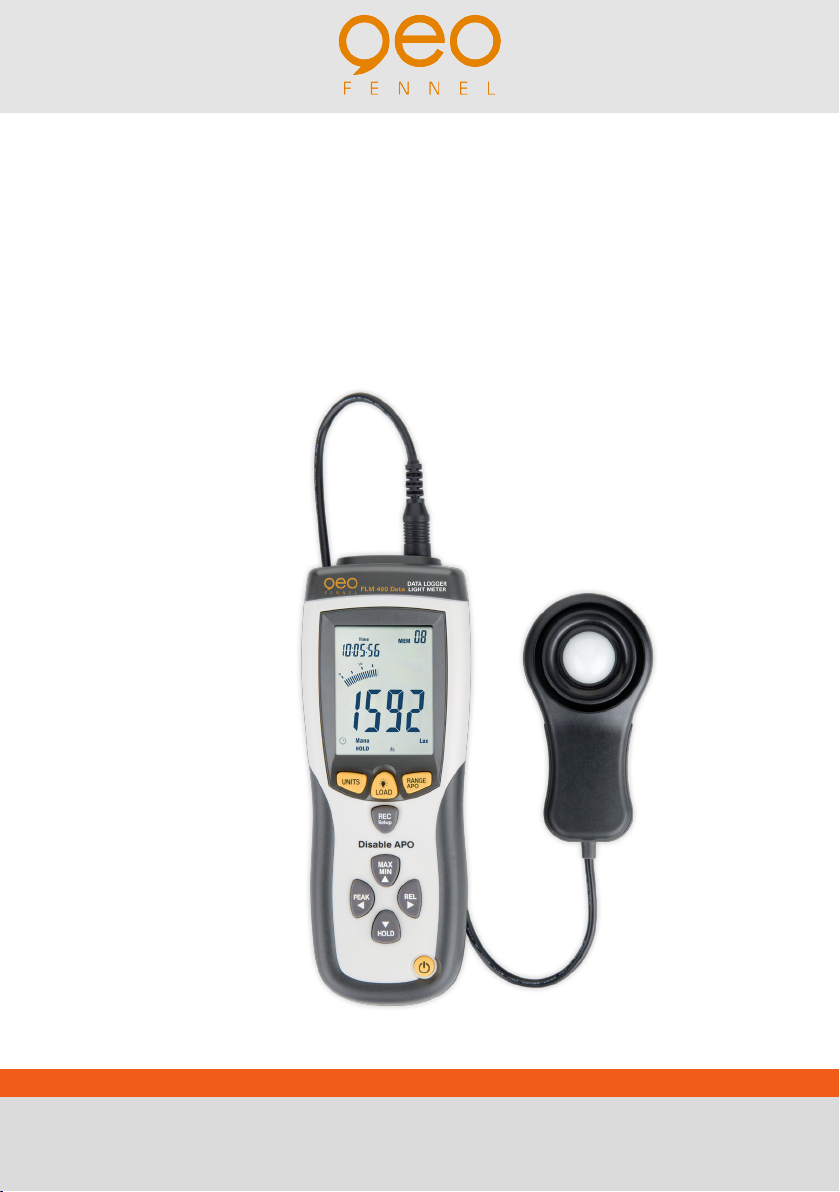
FLM 400 Data
BEDIENUNGSANLEITUNG
USER MANUAL
MODE D‘EMPLOI
www.geo-fennel.de
www.geo-fennel.com
www.geo-fennel.fr
Page 2
DE
Sehr geehrter Kunde,
vielen Dank für das Vertrauen, welches Sie uns beim Erwerb Ihres neuen geo-FENNEL-Gerätes entgegengebracht haben. Dieses hochwertige Qualitätsprodukt wurde mit größter Sorgfalt produziert und
qualitätsgeprüft.
Die beigefügte Anleitung wird Ihnen helfen, das Gerät sachgemäß zu bedienen. Bitte lesen Sie insbesondere auch die Sicherheitshinweise vor der Inbetriebnahme aufmerksam durch. Nur ein sachgerechter Gebrauch gewährleistet einen langen und zuverlässigen Betrieb.
geo-FENNEL
Precision by tradition.
Inhaltsverzeichnis
1. Lieferumfang
2. Stromversorgung
3. Bedienelemente und Display
4. Bedienung
5. Sicherheitshinweise
A
B
C
D
E
LIEFERUMFANG
A
· Luxmessgerät FLM 400 Data
· 9V-Batterie
· Sonde
· USB-Kabel
· Software
· Tasche
· Bedienungsanleitung
ANWENDUNG
· Für progressionelles Messen und Überprüfen von Lichteinstrahlungen in geschlossenen Räumen
EINSATZBEREICHE
· Hoch-/ Tiefbau, Innenausbau
2
Page 3
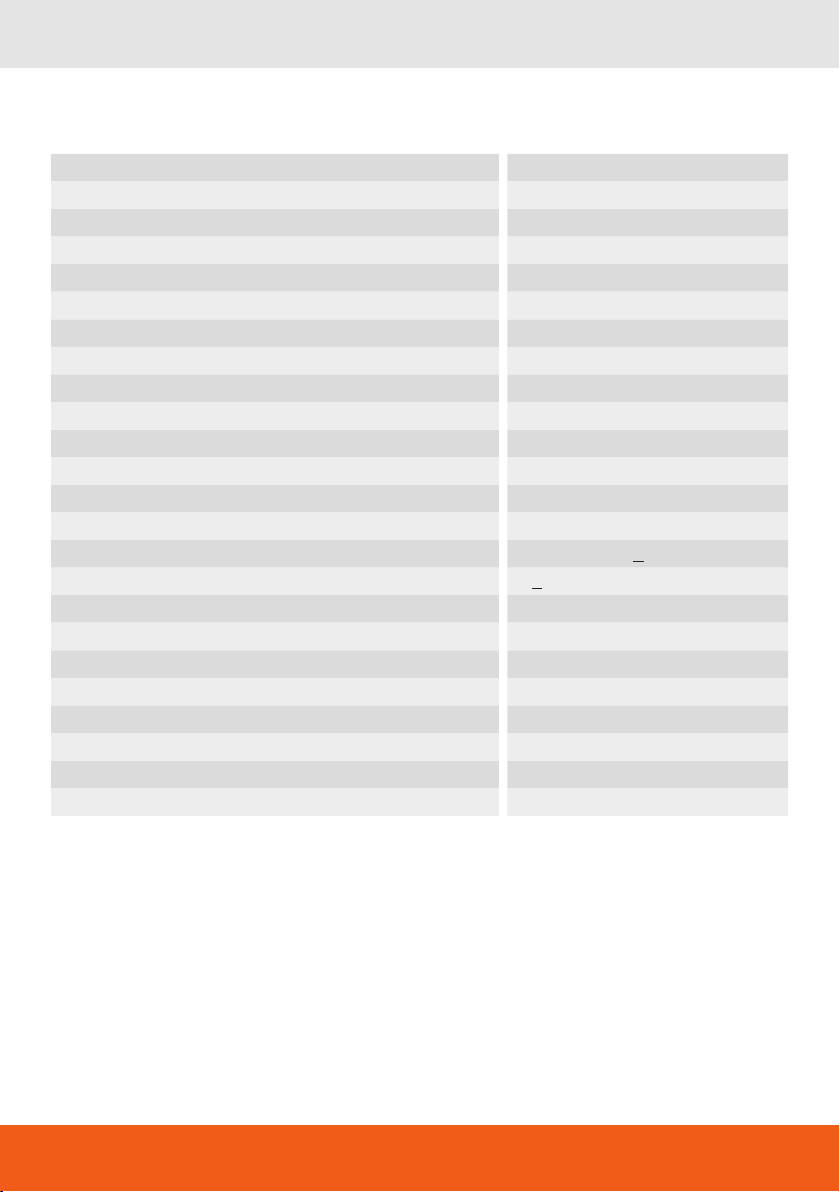
Technische Daten
Maximaler Messbereich 400.000 Lux
Genauigkeit ± 5 % ± 10d (< 10.000 Lux)
± 10 % ± 10d (> 10.000 Lux)
Displayauflösung 0,1 Lux
Data-HOLD-Funktion ja
Automatische Abschaltung ja
Anzeige 3 ¾-stelliges LCD mit Balkenanzeige
Messbereich 400 / 4000 Lux, 40 / 400 KLux
40 / 400 / 4000 Fc, 40 KFc
Anzeige bei Überschreitung des Messbereiches „OL“
Wiederholbarkeit ±3%
Abtastrate 1,5 x / Sekunde
Messsonde Silikon-Fotodiode mit Spektralfilter
Spektralempfindlichkeit CIE photopisch
Spektralgenauigkeit V -Funktion (f1 < 6 %)
Cosinusempfindlichkeit f2 < 2 % (Korrektur bei schräg
Temperaturbereich 0 bis +40°C (32 bis 104°F)
Luftfeuchtigkeit 0 bis 80% RH
Ausgang USB
Stromversorgung 9V-Batterie
Abmessungen Sonde 115 x 60 x 27 mm
Abmessungen Gerät 203 x 75 x 50 mm
Gewicht 390 g
y
einfallendem Licht)
DE
BEACHTE
1 Fc
1 KLux
1 KFc
= 10,76 Lux
= 1000 Lux
= 1000 Fc
3
Page 4

DE
EIGENSCHAFTEN
· Messbereich von 0 bis 400.000 Lux
· 1,5 Messungen pro Sekunde
· Großes LC-Display
· Messbereich 4.000 Zeichen
· 41 analoge Bargraphen
· 99 Speicherplätze für direkten Abruf am Instrument
· 16.000 verfügbare Speicherpätze
· MAX- / MIN-Anzeige
· Hohe Genauigkeit bei kurzer Ansprechzeit
· USB-Schnittstelle
· Messung in den Einheiten in Lux oder Foot-candle (Fc)
· Entspricht dem CIE-Standard
· Volle Cosinuskorrektur bei schrägem Lichteinfall
· Data-Hold-Funktion
· Peak-Hold-Funktion (zur Verfolgung schneller Änderungen der Beleuchtungsstärke bereits ab 10μs)
· Automatische Nullsetzung
· Automatische Korrektur für nicht standardmäßige Lichtquellen
· Automatische Abschaltung
· Relativablesung
STROMVERSORGUNG
B
Vor erstmaliger Inbetriebnahme oder wenn die Batteriezustandsanzeige einen niedrigen Ladezustand
anzeigt, neue Batterie einlegen. Dazu Gerät ausschalten, Batteriefachdeckel öffnen und neue Batterie
einlegen. Dabei auf korrekte Polarität achten. Batteriefach wieder schließen.
Beachte
Wenn sich das Gerät nicht ein- oder ausschalten läßt, muss die Batterie ersetzt werden.
4
Page 5
DE
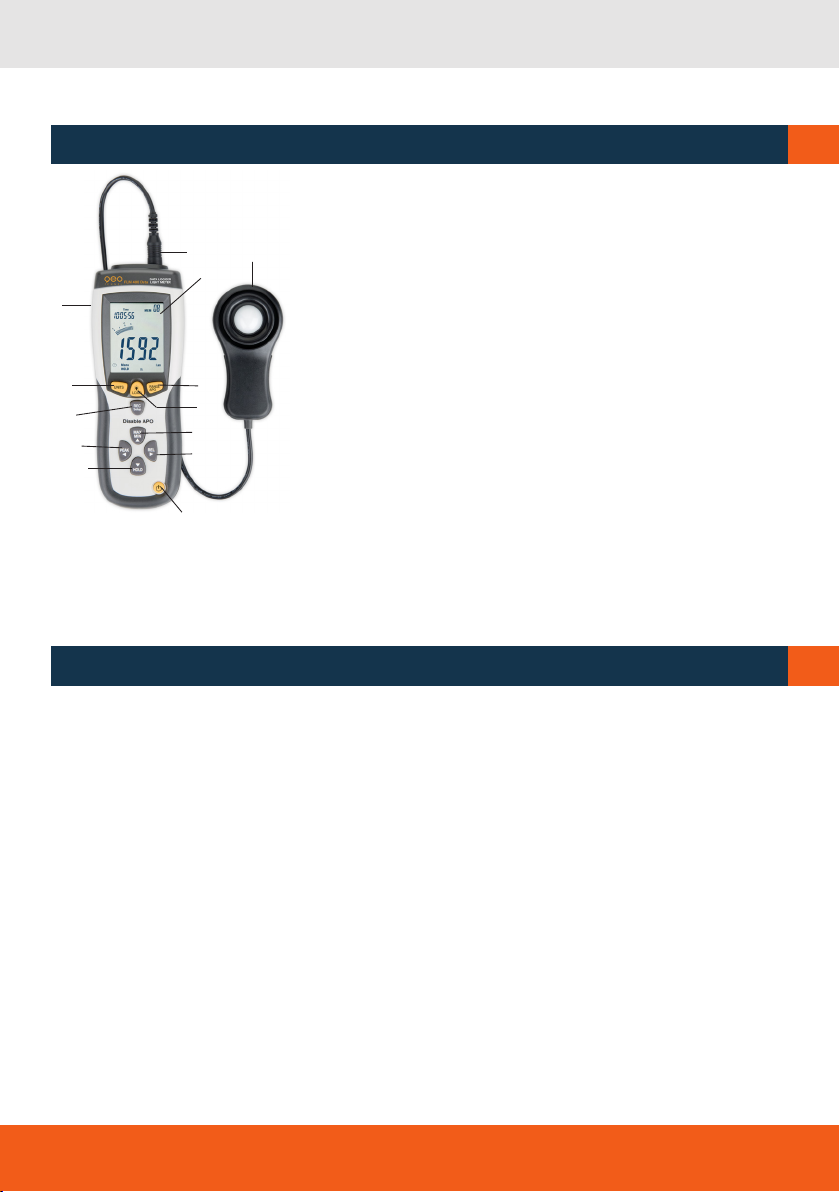
BEDIENELEMENTE UND DISPLAY
1. AN-/ AUS-Schalter
2. Messsonde
3. Anschluss Messsonde
4. LC-Display
2
3
4
5
6
9
12
13
7
8
10
11
1
5. USB-Anschluss
6. UNITS: Auswahl der Einheit (Lux oder Fc)
7. RANGE / APO: Auswahl Messbereich
8. BACKLIGHT / LOAD: Hintergrundbeleuchtung / Laden der Daten
9. REC / SETUP: Speichern / Einstellungen
10. MAX / MIN: ∆ Maximum-Minimum / AUF
11. REL / : Relative Ablesung / Rechts
12. PEAK / : Höchstwert / Links
13. HOLD / : Messwerte einfrieren / AB
∆
∆
∆
BEDIENUNG
MESSSONDE ANSCHLIESSEN
Vor Inbetriebnahme die mitgelieferte Messsonde mit der dafür vorgesehenen Buchse an der Gehäuseoberseite fest verbinden. Nach dem Abnehmen der Schutzkappe kann mit der Messung begonnen
werden.
C
D
AN/AUS
Mit der Taste AN/AUS das Gerät einschalten und auch nach Gebrauch wieder ausschalten.
Die Schutzkappe des Sensors entfernen und horizontal auf die Lichtquelle richten.
EINHEITEN
Mit der Taste UNITS die gewünschte Einheit Lux oder Foot-candle (Fc) auswählen. Mit der Taste
RANGE/APO den Messbereich festlegen.
5
Page 6

DE
AUTOMATISCHE ABSCHALTUNG
Das Gerät ist mit einer automatischen Abschaltung ausgestattet. Diese ist nach dem Einschalten automatisch aktiv; Displayanzeige:
Wenn keine Tastenbetätigung erfolgt, schaltet sich das Gerät nach 20 Min. automatisch aus. Tasten
RANGE/APO und REC/Setup gleichzeitig gedrückt halten, um die automatische Abschaltung auszuschalten; die entsprechende Displayanzeige verschwindet. Tasten RANGE/APO und REC/Setup gleichzeitig
gedrückt halten, um die automatische Abschaltung wieder einzuschalten.
MESSBEREICH
Wenn das Gerät „OL“ anzeigt, übersteigt die Helligkeit den gewählten Messbereich; in diesem Fall den
nächst höheren Messbereich wählen. Der Messbereich wird unten im Display angezeigt:
Lux 400 / 4K / 40K / 400K
Fc 40 / 400 / 4K / 40K
Zur Auswahl des Messbereichs RANGE drücken.
HOLD-FUNKTION
HOLD drücken, um den aktuellen Messwert festzuhalten (die Messung stoppt); Displayanzeige: MANU
HOLD. HOLD erneut drücken, um in den Messmodus zurückzukehren.
PEAK-FUNKTION
Mit der PEAK-HOLD-Funktion können kurzzeitige Spitzen (nach oben und unten) aufgezeichnet werden.
Dazu PEAK drücken, um die Funktion zu aktivieren.
Displayanzeige: „MANU Pmax“ -> Aufzeichnung positiver Spitzen
PEAK erneut drücken.
Displayanzeige: „MANU Pmin“ -> Aufzeichnung negativer Spitzen
PEAK erneut drücken, um die Funktion zu verlassen.
MAX-/MIN-FUNKTION
In der MAX-/MIN-Funktion können die höchsten (MAX) und niedrigsten (MIN) Werte abgelesen werden.
Dazu Taste MAX/MIN drücken, um die Funktion zu aktivieren.
Displayanzeige: „MANU MAX“. Nun werden die höchsten gemessenen Werte angezeigt.
Taste MAX/MIN erneut drücken.
Displayanzeige: MANU MIN“. Nun werden die niedrigsten gemessenen Werte angezeigt.
Taste MAX/MIN erneut drücken, um die Funktion wieder zu verlassen.
RELATIV-FUNKTION
Mit der Relativ-Funktion kann das Gerät auf „0“ gesetzt werden; alle nachfolgenden Messungen in dieser Funktion werden dann mit dem Nullwert in Beziehung gesetzt. Dazu Taste REL drücken. Displayanzeige „MANU REL“. . Taste REL erneut drücken, um die Funktion wieder zu verlassen.
USB-ANSCHLUSS
Gerät über den USB-Anschluss und das Datenkabel mit dem PC verbinden. Displayanzeige .
HINTERGRUNDBELEUCHTUNG
Zum Einschalten der Hintergrundbeleuchtung Taste drücken; zum Ausschalten Taste erneut drücken.
Um Batterieleistung zu sparen schaltet sich die Hintergrundbeleuchtung automatisch nach einiger Zeit
aus.
6
Page 7

EINSTELLUNG VON ZEIT UND ABTASTRATE
Die Tasten REC/SETUP und UNITS zusammen gedrückt halten. Oben links im Display beginnt die Uhrzeit zu blinken. Mit den Tasten MAX/MIN oder HOLD die Werte nach oben oder unten verändern. Mit
den Tasten PEAK und REL > Stunde > Minute > Sekunde > Abtastrate > Tag > Monat > Wochentag >
Jahr ansteuern. Die Tasten REC/SETUP und UNITS erneut zusammen gedrückt halten, um die Funktion
zu verlassen.
SPEICHERN
Die Taste REC/SETUP drücken, um den aktuellen Messwert zu speichern. Displayanzeige oben rechts:
MEM + Nr. des vergebenen Speicherplatzes. Taste LOAD 5 Sek. gedrückt halten, um die gespeicherten
Daten zu laden. Displayanzeige oben rechts: MEM + Nr. des vergebenen Speicherplatzes. Nun kann mit
den Tasten MAX/MIN oder HOLD nach oben oder unten geblättert werden. Taste LOAD erneut ca.
5 Sek. gedrückt halten, um diese Funktion zu verlassen. (Das Gerät hat 99 interne Speicherplätze).
DATALOGGER
Zunächst Zeit und Abtastrate einstellen (siehe oben); die Standard-Abtastrate ist 1 Sek. Taste REC/
SETUP ca. 5 Sek. gedrückt halten, um die Datalogger-Funktion zu starten. Displayanzeige oben rechts:
MEM - blinkend. Um Werte zu speichern, REC/SETUP drücken. Displayanzeige oben rechts: MEM +
Nr. des vergebenen Speicherplatzes. Taste REC/SET-UP erneut ca. 5 Sek. gedrückt halten, um diese
Funktion zu beenden.
Wenn der Speicher voll ist, zeigt das Display „OL“ an. Die Tasten REC/SETUP und LOAD gleichzeitig gedrückt halten, um die 99 gespeicherten Messwerte zu löschen. Displayanzeige oben rechts: MEM CL.
Wenn die Messung abgeschlossen ist, den Sensor mit der Schutzkappe abdecken und das Gerät ausschalten.
DE
DATENÜBERTAGUNG AUF PC
Die im Gerät gespeicherten Daten können über die mitgelieferte Software zur Ansicht, zum Speichern
oder zum Ausdruck auf PC übertragen werden.
Systemvoraussetzungen: Windows 98®, Windows 2000® oder höher; 90MHz Pentium® oder schneller, 32MB Ram; 5MB freier Speicherplatz
INSTALLATION DER SOFTWARE
· Windows® starten
· Vor der Installation alle laufenden Anwendungen schließen; CD in CD-Laufwerk einlegen
· Eingabe: „x:\setup“ + OK
· Pfad: c:\program files\ Lightmeter
· Nun den Installationsanweisungen folgen
· Wenn die Software installiert ist, Gerät einschalten und Software starten
GERÄT AN PC ANSCHLIESSEN
· Gerät einschalten
· Gerät über mitgeliefertes USB-Kabel mit PC verbinden
· Software starten
7
Page 8

DE
SICHERHEITSHINWEISE
E
BESTIMMUNGSGEMÄSSE VERWENDUNG
Für progressionelles Messen und Überprüfen von Lichteinstrahlungen in geschlossenen Räumen.
UMGANG UND PFLEGE
Messinstrumente generell sorgsam behandeln. Nach Benutzung mit weichem Tuch reinigen (ggfs. Tuch
in etwas Wasser tränken). Wenn das Gerät feucht war, sorgsam trocknen.
ELEKTROMAGNETISCHE VERTRÄGLICHKEIT
Es kann nicht generell ausgeschlossen werden, dass das Gerät andere Geräte stört (z.B. Navigationseinrichtungen); durch andere Geräte gestört wird (z.B. elektromagnetische Strahlung bei erhöhter Feldstärke z.B. in der unmittelbaren Nähe von Industrieanlagen oder Rundfunksendern).
CE-KONFORMITÄT
Das Gerät hat das CE-Zeichen gemäß den Normen EN 61326-1:2006, EN 61326-2-1:2006.
SICHERHEITSHINWEISE
· Richten Sie sich nach den Anweisungen der Bedienungsanleitung.
· Anleitung vor Benutzung des Gerätes sorgfältig lesen.
· Reparaturen nur vom autorisierten Fachhändler durchführen lassen
· Gerät nur zum Messen und Überprüfen von Lichteinstrahlungen in geschlossenen Räumen
verwenden.
· Keine Warn- und Sicherheitshinweise entfernen.
· Gerät nicht in Kinderhände gelangen lassen.
· Gerät nicht in explosionsgefährdeter Umgebung betreiben.
· Benutzen Sie das Gerät nicht, wenn es defekt aussieht oder Sie glauben, es könnte nicht einwandfrei funktionieren.
· Es kann nicht ausgeschlossen werden, dass das Gerät andere Geräte stört oder von anderen Geräten gestört wird.
8
Page 9

GARANTIE
· Die Garantie beträgt zwei (2) Jahre, beginnend mit dem Verkaufsdatum.
· Die Garantie erstreckt sich nur auf Mängel wie Material- oder Herstellungsfehler sowie auf die Nichterfüllung zugesicherter Eigenschaften.
· Ein Garantieanspruch besteht nur bei bestimmungsgemäßer Verwendung. Mechanischer Verschleiß
und äußerliche Zer-störung durch Gewaltanwendung und Sturz unterliegen nicht der Garantie. Der
Garantieanspruch erlischt, wenn das Gehäuse geöffnet wurde. Der Hersteller behält sich vor, im
Garantiefall die schadhaften Teile instand zusetzen bzw. das Gerät gegen ein gleiches oder ähnliches
(mit gleichen technischen Daten) auszutauschen. Ebenso gilt das Auslaufen der Batterie nicht als
Garantiefall.
HAFTUNGSAUSSCHLUSS
· Der Benutzer dieses Produktes ist angehalten, sich exakt an die Anweisungen der Bedienungsanleitung zu halten. Alle Geräte sind vor der Auslieferung genauestens überprüft worden. Der Anwender
sollte sich trotzdem vor jeder Anwendung von der Genauigkeit des Gerätes überzeugen.
· Der Hersteller und sein Vertreter haften nicht für fehlerhafte oder absichtlich falsche Verwendung
sowie daraus eventuell resul-tierende Folgeschäden und entgangenen Gewinn.
· Der Hersteller und sein Vertreter haften nicht für Folgeschäden und entgangenen Gewinn durch
Naturkatastrophen wie z.B. Erdbeben, Sturm, Flut, usw. sowie Feuer, Unfall, Eingriffe durch
· Dritte oder einer Verwendung außerhalb der üblichen Einsatz-bereiche.
· Der Hersteller und sein Vertreter haften nicht für Schäden und entgangenen Gewinn durch geänderte
oder verlorene Daten, Unterbrechung des Geschäftsbetriebes usw., die durch das Produkt oder die
nicht mögliche Verwendung des Produktes verursacht wurden.
· Der Hersteller und sein Vertreter haften nicht für Schäden und entgangenen Gewinn resultierend aus
einer nicht anleitungs-gemäßen Bedienung.
· Der Hersteller und sein Vertreter haften nicht für Schäden, die durch unsachgemäße Verwendung
DE
9
Page 10
EN
Dear customer,
Thank you for your confidence in us having purchased a geo-FENNEL instrument.
This manual will help you to operate the instrument appropriately.
Please read the manual carefully - particularly the safety instructions. A proper use only guarantees a
longtime and reliable operation.
geo-FENNEL
Precision by tradition.
Contents
1. Supplied with
2. Power supply
3. Keypad and display
4. Operation
5. Safety notes
A
B
C
D
E
SUPPLIED WITH
A
· Luxmeter FLM 400 Data
· 9 V battery
· Photo detector
· USB cable
· Software
· Carrying case
· User manual
APPLICATION
· For professional indoor measuring and monitoring of light insolation
TASKS AND TRADES
· Building construction, indoor construction
10
Page 11
Technical data
Maximum measuring range 400.000 Lux
Accuracy ± 5 % ± 10d (< 10.000 Lux)
± 10 % ± 10d (> 10.000 Lux)
Display resolution 0,1 Lux
Data HOLD function yes
Automatic shut-off yes
Display indication 3 ¾ digit LCD w. segment bargraph
Measuring range 400 / 4000 Lux, 40 / 400 KLux
40 / 400 / 4000 Fc, 40 KFc
Overrange indication „OL“
Repeatability ±3%
Sampling rage 1,5 x / second
Photo detector Silicon photo-diode with spectral
Spectral response CIE photopic
Spectral accuracy V function (f1 < 6 %)
Cosine response f2 < 2 % (correction for angular
Temperature range 0 up to +40°C (32 up to 104°F)
Air humidity range 0 up to 80% RH
Output USB
Power supply 9 V battery
Dimensions photo detector 115 x 60 x 27 mm
Dimensions instrument 203 x 75 x 50 mm
Weight 390 g
response filter
y
incidence of light)
EN
NOTE
1 Fc
1 KLux
1 KFc
= 10,76 Lux
= 1000 Lux
= 1000 Fc
11
Page 12

EN
FEATURES
· Measuring range from 0 to 400,000 Lux
· Sampling rate 1.5 times per second
· Large LC display
· Measuring range 4,000 digits
· 41 analogue bargraph indication
· 99 values in memory for direct reading on the meter
· 16,000 values can be stored in the data logger
· MAX / MIN function
· High accuracy and short reponse time
· USB interface
· Measuring units Lux or Foot-candle (Fc)
· Meets the CIE standards
· Full cosine correction for angular incidence of light
· Data HOLD function
· Peak HOLD function (for tracing the peak signal of light pulse if least duration is 10μs)
· Automatic zeroing
· Automatic correction for non-standard light sources
· Automatic shutt-off
· Relative reading
POWER SUPPLY
B
Before first use or if the battery status indicator shows a low battery power insert a new battery. Open
the battery cover and insert a new battery (ensure correct polarity). Close the battery cover.
Note
If the instrument cannot be powered on or off the battery has to be replaced.
12
Page 13
EN
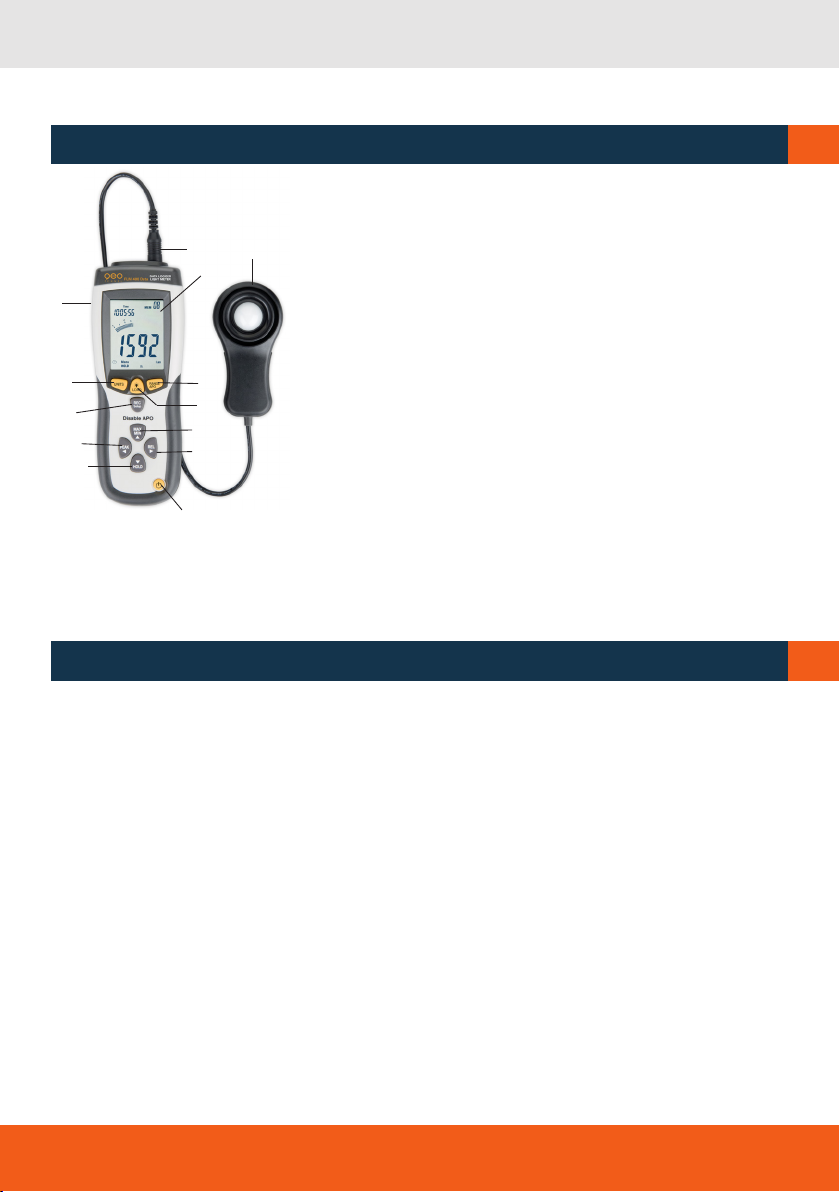
KEYPAD AND DISPLAY
1. ON / OFF button
2. Photo detector
3. Connection of the photo detector
2
3
4
5
6
9
12
13
7
8
10
11
1
4. LC display
5. USB port
6. UNITS: Selection of the unit (Lux or Fc)
7. RANGE / APO: Selection of the measuring range
8. BACKLIGHT / LOAD: Backlight / loading of data
9. REC / SETUP: Save / settings
10. MAX / MIN: ∆ Maximum-Minimum / UP
11. REL / : Relative reading / FORWARD
12. PEAK / : HOLD peak value / BACKWARD
13. HOLD / : HOLD values / DOWN
∆
∆
∆
OPERATION
CONNECT THE PHOTO DETECOR
Before starting the operation connect the photo detecor supplied in the kit with the socket on top of the
instrument housing. Remove the protective cover before starting any operation.
C
D
ON/OFF
Power on and off the instrument with the ON/OFF button.
Remove the lens protection and face the instrument to the light source in a horizontal position.
UNITS
Select the unit required Lux or Foot-candle (Fc) with the button UNITS. Set the measuring range with
the button APO.
13
Page 14

EN
AUTOMATIC SHUT-OFF
The instrument is equipped with an automatic shut-off function which is automatically active when the
instrument is powered on. Display indication:
If no key is used for about 20 minutes the instrument will automatically power off. Press the buttons
RANGE/APO and REC/Setup simultaneously to deactivate this function; the relevant display indication
will disappear. Press the buttons RANGE/APO and REC/Setup again simultaneously to re-activate this
function.
MEASURING RANGE
If the display shows „OL“ the illumination measured exceeds the measuring range selected; in this case
select the next higher measuring range. The measuring range selected is shown on the bottom of the
display:
Lux 400 / 4K / 40K / 400K
Fc 40 / 400 / 4K / 40K
For selecting the measuring range press the button RANGE.
HOLD FUNCTION
Press the button HOLD to freeze the current reading (the measuring procedure will stop); display indication: MANU HOLD. Press the button HOLD again to return to the measuring mode.
PEAK FUNCTION
With the PEAK function short light flashes (high and low) can be recorded.
Press the button PEAK to activate this function.
Display indication: „MANU Pmax“ -> recording of the positive peak
Press the button PEAK again.
Display indication: „MANU Pmin“ -> recording of the negative peak
Press the button PEAK again to quit this function.
MAX/MIN FUNCTION
With the MAX/MIN function the maximum (MAX) and minimum (MIN) values will be displayed.
Press the button MAX/MIN to activate this function.
Display indication: „MANU MAX“. Now the maximum values measured will be displayed.
Press the button MAX/MIN again.
Display indication: „MANU MIN“. Now the minimum values measured will be displayed.
Press the button MAX/MIN again to quit this function.
RELATIVE FUNCTION
With the relative function the instrument can be set to „0“; all measurements made will now be relative to this zero-value. Press the button REL to activate this function. Display indication: „MANU REL“..
Press the button REL again to quit this function.
USB CONNECTION
Connect the instrument to a PC via USB cable. Display indication: .
BACKLIGHT
Press the button to power on the backlight. Press this button again to power off the backlight. In
order to save battery power the backlight will power off automatically after some time.
14
Page 15

SETTING OF THE TIME AND THE SAMPLING RATE
Press the buttons REC/SETUP and UNITS simultaneously. The time will start flashing in the display. Set
the time with the buttons MAX/MIN (up) and HOLD (down).
Select > hour > minute > second > sampling rate > day > month > year with the buttons PEAK and
REL. Press the buttons REC/SETUP and UNITS again simultaneously to quit this function.
MEMORY
Press the button REC/SETUP to save the current reading. Display indication in the upper right corner:
MEM + no. of the memory location assigned. Press the button LOAD for approx. 5 sec. to load the
readings saved. Display indication in the upper right corner: MEM + memory location. Now you can
browse in the data saved with the buttons MAX/MIN (up) and HOLD (down). Press the button LOAD
again for approx. 5 sec. to quit this function. (The instrument has an internal memory for 99 measurements).
DATALOGGING
First set the sampling rate (see above); the standard sampling rate is 1 sec. Press the button REC/
SETUP for approx. 5 sec. to activate the datalogging function. Display indication in the upper right corner: MEM flashing. Press the button REC/SETUP to save the current reading. Display indication in the
upper right corner: MEM + no. of the memory location assigned. Press the button REC/SETUP again
for approx. 5 sec. to quit this function.
If the memory is full the display will show „OL“.. Press the buttons REC/SETUP and LOAD simultaneously to cancel all 99 measurements saved. Display indication in the upper right corner: MEM CL:
If the measurement is completed cover the photo detector with the lens cover and power off the
instrument.
EN
DATA TRANSFER TO THE PC
The data stored in the instrument can be transferred to a PC by means of the software supplied with
the kit. This allows to read, save, print and analyze the data.
System requirements: Windows 98®, Windows 2000® or better; 90MHz Pentium® or better, 32MB
Ram; 5MB free memory space
INSTALLATION OF THE SOFTWARE
· Start Windows®
· Close all open applications before installing the software
· Insert the CD in the CD drive; enter „x:\setup“ + OK
· Path: c:\program files\ Lightmeter; now follow the installation instructions
· Once the installation of the software is completed power on the instrument
· Start the software
CONNECT THE INSTRUMENT TO A PC
· Power on the instrument
· Connect the instrument to a PC by means of the USB cable supplied with the kit
· Start the software
15
Page 16

EN
SAFETY NOTES
D
INTENDED USE OF THE INSTRUMENT
For professional indoor measuring and monitoring of light insolation.
CARE AND CLEANING
Handle measuring instruments with care. Clean with soft cloth only after any use. If necessary damp
the cloth with some water. If the instrument is wet clean and dry it carefully.
ELECTROMAGNETIC ACCEPTABILITY (EMC)
It cannot be completely excluded that this instrument will disturb other instruments (e.g. navigation systems); will be disturbed by other instruments (e.g. intensive electromagnetic radiation nearby industrial
facilities or radio transmitters).
CE-CONFORMITY
The instrument has the CE mark according to
SAFETY INSTRUCTIONS
· Please follow up the instructions given in the user manual.
· Carefully read the user manual before the operation.
· Do not open the instrument housing. Repairs should be carried out by authorized workshops only.
Please contact your local dealer.
· Use the instrument for measuring and monitoring light insolation only.
· Do not remove warning labels or safety instructions.
· Keep the instrument away from children.
· Do not use instrument in explosive environment.
· It cannot be completely excluded that this instrument will disturb other instruments or will be disturbed by other instruments.
EN 61326-1:2006, EN 61326-2-1:2006.
16
Page 17

WARRANTY
· This product is warranted by the manufacturer to the original purchaser to be free from defects in
material and workmanship under normal use for a period of two (2) years from the date of purchase.
· During the warranty period, and upon proof of purchase, the product will be repaired or replaced
(with the same or similar model at manufacturers option), without charge for either parts or labour.
· In case of a defect please contact the dealer where you originally purchased this product.
· The warranty will not apply to this product if it has been misused, abused or altered.
· Without limiting the foregoing, leakage of the battery, bending or dropping the unit are presumed to
be defects resulting from misuse or abuse.
EXCEPTIONS FROM RESPONSIBILITY
· The user of this product is expected to follow the instructions given in the user manual. Although all
instruments left our warehouse in perfect condition and adjustment the user is expected to carry out
periodic checks of the product’s accuracy and general performance.
· The manufacturer, or its representatives, assumes no responsibility of results of a faulty or intentional usage or misuse including any direct, indirect, consequential damage, and loss of profits.
· The manufacturer, or its representatives, assumes no responsibility for consequential damage, and
loss of profits by any disaster (earthquake, storm, flood etc.), fire, accident, or an act of a third party
and/or a usage in other than usual conditions.
· The manufacturer, or its representatives, assumes no responsibility for any damage, and loss of
profits due to a change of data, loss of data and interruption of business etc., caused by using the
product or an unusable product.
· The manufacturer, or its representatives, assumes no responsibility for any damage, and loss of
profits caused by usage other than explained in the user manual.
· The manufacturer, or its representatives, assumes no responsibility for damage caused by wrong
movement or action due to connecting with other products.
EN
17
Page 18
FR
Cher client,
Nous tenons à vous remercier pour la confiance que vous avez témoignée, par l‘acquisition de votre
nouvel instrument geo-FENNEL.
Les instructions de service vous aideront à vous servir de votre instrument de manière adéquate. Nous
vous recommandons de lire avec soin tout particulièrement les consignes de sécurité de ladite notice
avant la mise en service de votre appareil. Un emploi approprié est l‘unique moyen de garantir un fonctionnement efficace et de longue durée.
geo-FENNEL
Precision by tradition.
Contenu
1. Fourni avec
2. Alimentation en courant
3. Description
4. Opération
5. Consignes de sécurité
A
B
C
D
E
FOURNI AVEC
A
· Luxmètre FLM 400 Data
· Pile 9 V
· Capteur
· Câble USB
· Logiciel
· Sacoche
· Mode d‘emploi
APPLICATION
· Pour la mesure et la surveillance professionelle de l‘intensité de lumière in intérieur
DOMAINES
· Génie civil, aménagement intérieur
18
Page 19
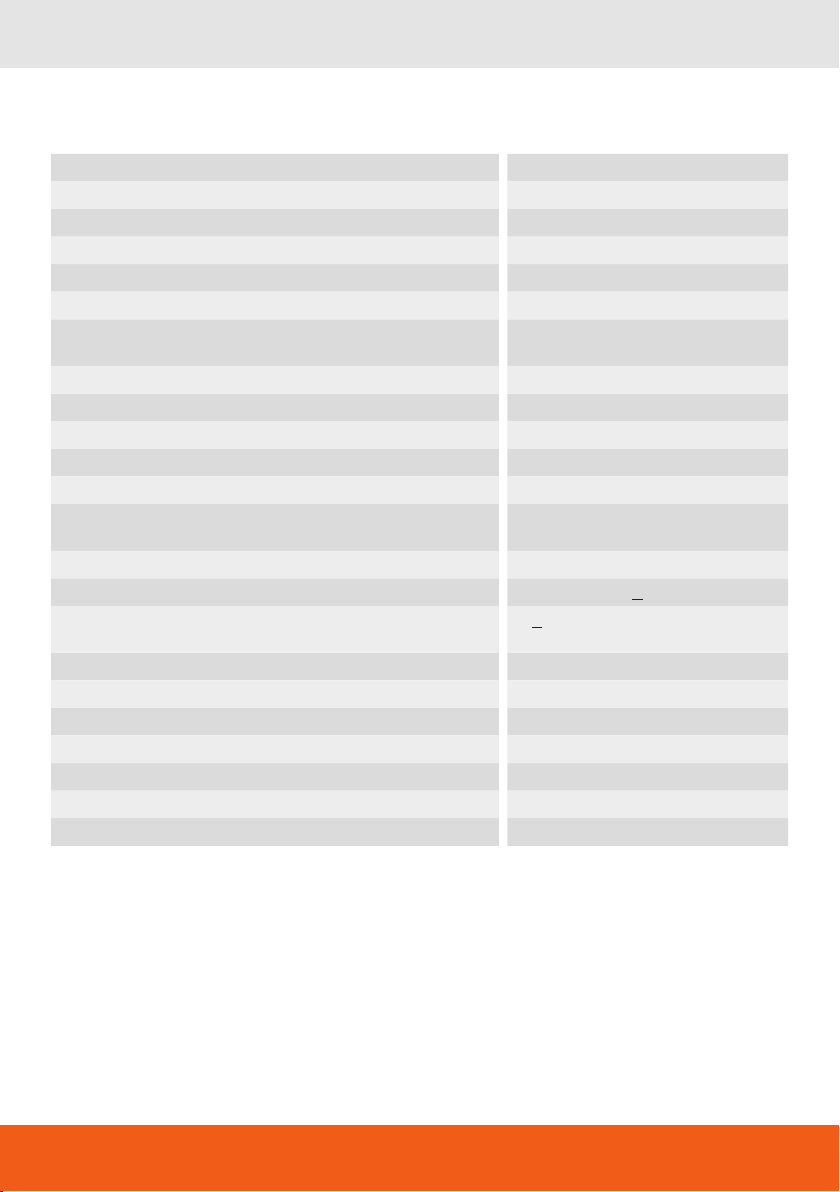
Données techniques
Plage de mesure maximale 400.000 Lux
Précision ± 5 % ± 10d (< 10.000 Lux)
± 10 % ± 10d (> 10.000 Lux)
Résolution de l‘écran 0,1 Lux
Fonction data HOLD oui
Déconnexion automatique oui
Affichage 3 ¾ chriffres avec affichage par
Plages de mesure 400 / 4000 Lux, 40 / 400 KLux
Indication dépassement de seuil „OL“
Répétabilité de mesure ±3%
Taux d‘échantillonnage 1,5 x / seconde
Capteur Photo-diode à silicone avec filtre de
Spectre Selon norme CIE photopique
Précision spectrale Fonction V (f1 < 6 %)
Réponse cosinus f2 < 2 % (cosinus corrigé pour inci-
Plage de température 0 à +40°C (32 à 104°F)
Humiditié de l‘air 0 à 80% RH
Sortie USB
Alimentation en courant Pile 9 V
Dimensions du capteur 115 x 60 x 27 mm
Dimensions de l‘instrument 203 x 75 x 50 mm
Poids 390 g
barres
40 / 400 / 4000 Fc, 40 KFc
réponse spectrale
y
dence angulaire de la lumière
FR
ATTENTION
1 Fc
1 KLux
1 KFc
= 10,76 Lux
= 1000 Lux
= 1000 Fc
19
Page 20

FR
CARACTÉRISTIQUES
· Plage de mesure de 0 à 400.000 Lux
· 1,5 mesure par seconde
· Grand écran LCD
· Plage de mesure 4.000 nombres
· 41 bargraphes analogiques
· 99 espaces d‘enregistrement pour la consultation directe sur l‘instrument
· 16.000 espaces d‘enregistrement disponibles
· Affichage MAX/MIN
· Précision élevée avec un temps de réaction rapide
· Interface USB
· Mesure l‘éclairement lumineux en Lux et Foot-candle (Fc)
· Respecte les normes de réponse spectrale CIE
· Correction de cosinus intégrale pour incidence angulaire de la lumière
· Fonction Data-Hold
· Fonction Peak-Hold (mémorisation rapide pour enregistrer les changements rapides de 10μs)
· Fonction mise à zero automatique
· Facteurs de correction automatique pour les types de lumières non standard
· Mise hors tension automatique
· Fonction de mesure relative
ALIMENTATION EN COURANT
B
Avant d‘utiliser l‘instrument pour la première fois ou si le symbole de pile faible apparaît il faut installer
une nouvelle pile. Mettre l‘instrument en arrêt, ouvrir le couvercle du compartiment et remplacer /
installer la pile. Attention à la polarité. Fermer le couvercle du compartiment à piles.
Attention
Il faut remplacer la pile quand l‘instrument ne peut plus être mis en marche ou en arrêt.
20
Page 21
FR
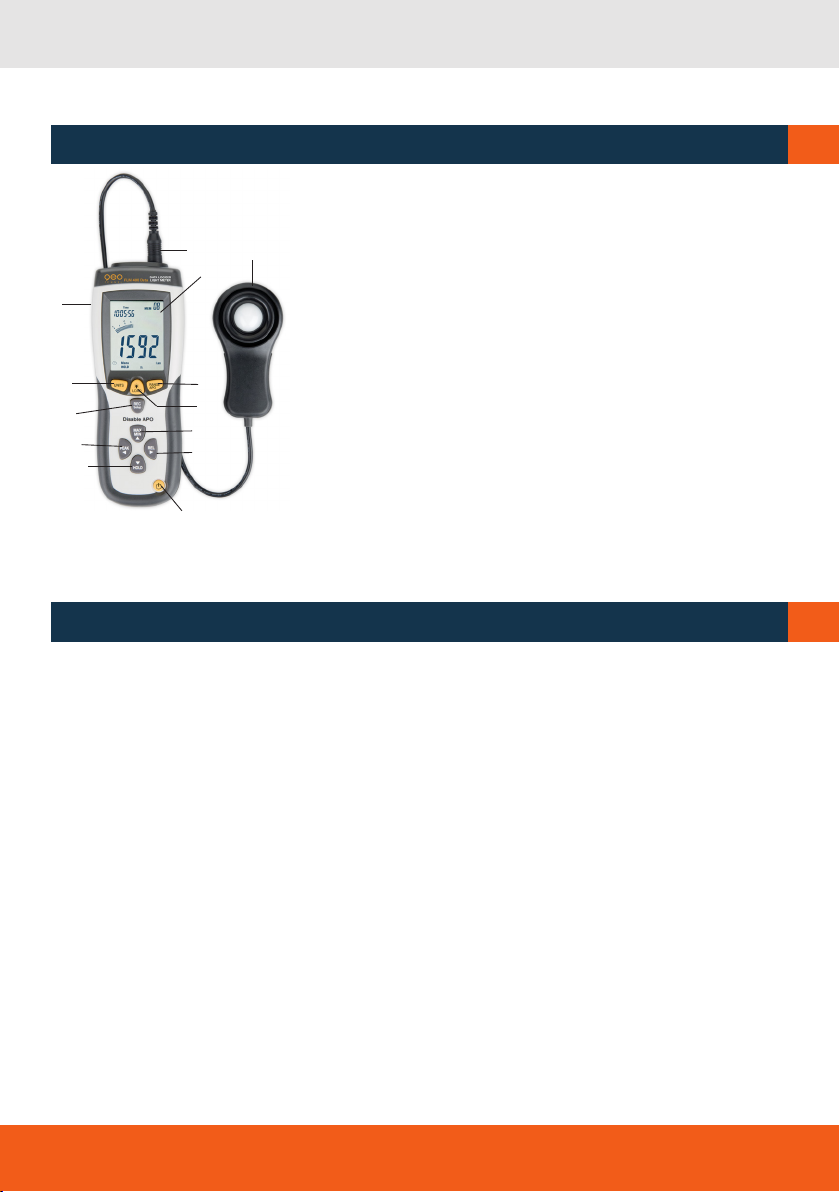
DESCRIPTION
1. Touche MARCHE/ARRÊT
2. Capteur
3. Connexion du capteur
4. Écran LCD
2
3
4
5
6
9
12
13
7
8
10
11
1
5. Connexion USB
6. UNITS: Sélection des unités (Lux ou Fc)
7. RANGE / APO: Sélection de la plage de mesure
8. BACKLIGHT / LOAD: Rétro-éclairage / charger les données
9. REC / SETUP: Enregistrer / paramètres
10. MAX / MIN: ∆ Maximum-Minimum / en haut
11. REL / : Mesure relative / à droite
12. PEAK / : Mode Peak / à gauche
13. HOLD / : Mode Hold / en bas
∆
∆
∆
OPÉRATION
RACCORDER LE CAPTEUR
Avant d‘utiliser l‘instrument raccorder le capteur et enlever le capot de protection. Maintenant le luxmètre est prêt à être utililisé.
C
D
MARCHE/ ARRÊT
Mettre en marche l‘instrument avec la touche MARCHE/ ARRÊT. Enlever le capot de protection et tenir
le capteur horizontalement vers la source lumineuse. Presser la touche MARCHE/ ARRÊT pour mettre
en arrêt l‘instrument.
UNITÉS
Presser la touche UNITS pour sélectionner l‘unité désirée: Lux ou Foot-candle (Fc). Déterminer la plage
de mesure avec la touche RANGE/APO.
21
Page 22

FR
FONCTION AUTO-OFF
La fonction auto-off est activée automatiquement avec la mise en marche de l‘instrument.
Indication de l‘écran:
Si pendant 20 minutes aucune touche n‘est pressée l‘instrument s‘éteint automatiquement. Presser les
touches RANGE/APO et REC/Setup simultanément pour mettre hors service cette fonction; l‘affichage
de l‘écran disparraît. Presser les touches RANGE/APO et REC/Setup simultanément pour mettre en
service la fonction auto-off.
PLAGE DE MESURE
Si l‘instrument affiche „OL“ la clarté dépasse la plage de mesure sélectionnée; sélectionner alors une
plage de mesure plus haute. Affichage de la plage de mesure sur l‘écran:
Lux 400 / 4K / 40K / 400K
Fc 40 / 400 / 4K / 40K
Pour sélectionner la plage de mesure presser la touche RANGE.
FONCTION HOLD
Presser la touche HOLD pour figer la valeur mesurée actuellement (la mesure s‘arrête); affichage de
l‘écran: MANU HOLD. Presser cette touche de nouveau pour retourner dans le mode de mesure.
FONCTION PEAK
La fonction PEAK-HOLD enregistre de brèves crêtes (en haut et en bas).
Presser la touche PEAK pour activer cette fonction.
Affichage de l‘écran: „MANU Pmax“ -> enregistrement des crêtes positives
Presser la touche PEAK encore une fois.
Affichage de l‘écran: „MANU Pmin“ -> enregistrement des crêtes négatives
Presser la touche PEAK de nouveau pour arrêter cette fonction.
FONCTION MAX/MIN
Sélectionner la fonction MAX-/MIN pour afficher les valeurs les plus hautes (MAX) et les plus basses
sur l‘écran.
Presser la touche MAX/MIN pour activer cette fonction.
Affichage: „MANU MAX“. Maintenant les valeurs mesurées les plus hautes sont affichées.
Presser la touche MAX/MIN encore une fois.
Affichage: „MANU MIN“. Maintenant les valeurs mesurées les plus basses sont affichées.
Presser la touche MAX/MIN encore une fois pour quitter la fonction.
FONCTION RELATIVE
Sélectionner cette fonction pour mettre l‘instrument à „0“; tous les mesures consécutives dans cette
fonction sont relatives à cette valeur „0“. Pour activer cette fonction presser la touche REL.
Affichage: MANU REL“. . Presser la touche encore une fois pour quitter cette fonction.
CONNEXION USB
Relier l‘instrument avec le PC via le port USB. Affichage: .
RÉTRO-ÉCLAIRAGE
Mettre en marche le rétro-éclairage avec la touche ; pour arrêter cette fonction presser la touche
encore une fois. Le rétro-éclairage se met hors circuit automatiquement après quelque temps pour
economiser de la batterie.
22
Page 23

RÉGLAGE DU TEMPS ET DU TAUX D‘ÉCHANTILLONNAGE
Tenir pressées les touches REC/SETUP et UNITS simultanément. A gauche en haut sur l‘écran le symbole du temps commence à clignoter. Presser les touches MAX/MIN et HOLD pour régler le temps.
Presser les touches PEAK et REL pour naviguer > heure > minute > seconde > taux d‘échantillonnage
> jour > mois > jour de semaine > an. Presser les touches REC/SETUP et UNITS encore une fois simultanément pour quitter cette fonction.
SAUVEGARDER
Presser la touche REC/SETUP pour sauvegarder la mesure actuelle. Affichage à droit en haut: MEM +
le numéro de l‘espace de mémoire attribué. Tenir pressée la touche LOAD pour 5 sec. pour charger les
données sauvegardées. Affichage à droit en haut: MEM + le numéro de l‘espace de mémoire attribué.
Maintenant il est possible de naviguer vers le haut ou vers le bas avec les touches MAX/MIN ou HOLD.
Tenir pressée la touche LOAD encore une fois pour 5 sec. pour quitter cette fonction. (L‘instrument a
99 espaces de mémoire internes).
ENREGISTRER (FONCTION DATALOG)
D‘abord régler le temps et le taux d‘échantillonnage (voir en haut); le taux standard est 1 sec. Tenir
pressée la touche REC/SETUP pour 5 sec. pour mettre en marche la fonction d‘enregistrement (datalog). Affichage à droit en haut: MEM - clignotant. Presser la touche REC/SETUP pour sauvegarder des
valeurs. Affichage à droit en haut: MEM + le numéro de l‘espace de mémoire attribué. Presser encore
une fois la touche REC/SET-UP pour 5 sec. pour arrêter cette fonction.
L‘ affichage „OL“ montre que la mémoire est pleine. Tenir pressées les touches REC/SETUP et LOAD
simultanément pour effacer les 99 valeurs mesurées sauvegardées. Affichage à droit en haut: MEM CL.
FR
Pour finir les mesures mettre l‘instrument en arrêt et couvrir le capteur avec le capot de protection.
Gerät ausschalten.
TÉLECHARGEMENT SUR PC
Toutes les lectures peuvent être téléchargées sur PC via le Port USB pour l‘analyse des données.
Système et matériel requis: Windows 98®, Windows 2000® ou supérieur; 90MHz Pentium® ou supérieur, 32MB de Ram; 5 Mo de mémoire.
INSTALLATION DU LOGICIEL
· Démarrer Windows®.
· Arrêter toutes les applications avant l‘installation; insérer le CD dans le lecteur CD.
· Entrée: „x:\setup“ + OK.
· Chemin d‘accès: c:\program files\ Lightmeter.
· Consulter le guide des logiciels.
· Quand l‘installation est complète mettre en marche l‘instrument et demarrer le logiciel.
CONNEXION DE L‘INSTRUMENT POUR PC
· Mettre l‘instrument en marche
· Relier l‘instrument au PC via le port USB
· Démarrer le logiciel
23
Page 24

FR
CONSIGNES DE SÉCURITÉ
E
UTILISATION CONFORME AUX PRESCRIPTIONS
Le FLM 400 Data est un luxmètre professionel pour la mesure et la surveillance de l‘intensité de lumière en intérieur.
NETTOYAGE ET REMISAGE
Essuyer l‘instrument mouillé, humide ou sali en le frottant uniquement avec un tissu de nettoyage.
Laisser sécher un instrument humide au moins pendant un jour dans un local chauffé!
COMPATIBILITÉ ÉLECTROMAGNÉTIQUE
De manière générale, il n‘est pas exclu que le niveau ne dérange d‘autres instruments (p. ex. les
dispositifs de navigation) ou qu‘il puisse lui-même être dérangé par d‘autres appareils (p. ex. soit par
un rayonnement électromagnétique dû à une élévation de l‘intensité du champ, soit par la proximité
d‘installations industrielles ou d‘émetteurs de radiodiffusion).
CONFORMITÉ CE
L‘instrument porte le label CE conformément aux normes NE 61326-1:2006, NE 61326-1-2:2006.
INDICATIONS D‘AVERTISSEMENT ET DE SÉCURITÉ
· Prière de respecter les instructions fournies dans le mode d’emploi du luxmètre.
· Lire ces instructions avant d’utiliser l’instrument.
· Faire exécuter les réparations éventuelles uniquement par un spécialiste autorisé
· Utiliser cet instrument uniquement pour la mesure et la surveillance de l‘intensité de lumière.
· Ne pas enlever les indications d’avertissement et de sécurité portées sur l‘instrument.
· Éviter que l’instrument ne soit touché ou manipulé par des enfants.
· Ne pas utiliser l‘instrument dans un milieu à risque d’explosions.
· Ne jamais utiliser l’instrument s’il semble présenter une anomalie ou ne pas devoir fonctionner
normalement.
· Il n’est pas exclu que cet instrument soit perturbé par d’autres appareils ou qu’il ne les perturbe lui-même.
24
Page 25

GARANTIE
· La durée de garantie est de deux (2) ans à partir de la date d’achat.
· Cette garantie ne couvre que les défauts tels que le matériel défectueux ou les anomalies de fabrication, ainsi que le manque des propriétés prévues.
· Le droit à la garantie n’est valable que si l’utilisation du niveau a été conforme aux prescriptions. En sont
exclus l’usure mécanique et un endommagement externe par suite d’usage de la force et/ou d’une
chute. Le droit à la garantie prend fin lorsque le boîtier a été ouvert. Dans un cas couvert par la garantie,
le fabricant se réserve le droit de remettre en état les éléments défectueux ou d’échanger l’instrument
par un autre identique ou similaire (possédant les mêmes caractéristiques techniques). De même, un
endommagement résultant d’un écoulement de l’accumulateur n’est pas couvert par la garantie.
EXCLUSION DE LA RESPONSABILITÉ
· L’utilisateur de ce produit est tenu de respecter ponctuellement les instructions du mode d’emploi. Tous
les instruments ont été très soigneusement vérifiés avant leur livraison. Toutefois, l’utilisateur devra
s’assurer de la précision de ce niveau avant chaque emploi.
· Le fabricant et son représentant déclinent toute responsabilité dans le cas d’une utilisation incorrecte
ou volontairement anormale ainsi que pour les dommages consécutifs en découlant, tout comme pour
les bénéfices non réalisés.
· Le fabricant et son représentant déclinent toute responsabilité pour les dommages consécutifs et
les bénéfices non réalisés par suite de catastrophes naturelles, comme p.ex. tremblement de terre,
tempête, raz de marée etc. ainsi que d’incendie, accident, intervention malintentionnée d’une tierce
personne, ou encore dus à une utilisation hors du domaine d’application normal de l’instrument.
· Le fabricant et son représentant déclinent toute responsabilité pour les dommages et les bénéfices
non réalisés par suite de modification ou perte de données, interruption du travail de l’entreprise etc., à
savoir les dommages qui découlent du produit lui-même ou de la non-utilisation du produit.
· Le fabricant et son représentant déclinent toute responsabilité pour les dommages et les bénéfi ces
non réalisés par suite d’une manoeuvre non-conforme aux instructions.
· Le fabricant et son représentant déclinent toute responsabilité pour les dommages et les bénéfices non
réalisés qui découlent d’une utilisation inadéquate ou en liaison avec des produits d’autres fabricants.
FR
25
Page 26

FR
26
Page 27

FR
27
Page 28

geo-FENNEL GmbH
Kupferstraße 6
D-34225 Baunatal
Tel. +49 561 / 49 21 45
Fax +49 561 / 49 72 34
[email protected]
www.geo-fennel.de
Technische Änderungen vorbehalten.
All instruments subject to technical changes.
Sous réserve de modifications techniques.
12/2015
Precision by tradition.
 Loading...