

Page 1

VB3-II – Virtual tonewheel organ
USER'S MANUAL
Version 1.1.1
www.GenuineSoundware.com
GSi VB3-II USER'S MANUAL - Page 1/21
Page 2

INTRODUCTION
VB3-II Virtual Tonewheel Organ
As of its date of release in 2018, GSi VB3-II is the result of almost 15
years of study, research, experimentation and development of the
simulation of a vintage Hammond B3 organ. It is the evolution of the
GSi VB3 1.x with a new sound, a new parameter set, endless
possibilities of sound customization. It's not a simple update to an
old software, it's a whole new product. It's based on the same sound
engine that was written first for the Hamichord Organ, then for the
Crumar Mojo, and is also found in the Crumar Mojo61 and in the GSi Gemini. The DSP
part of VB3-II was rewritten from the ground up around 2010 and has been
constantly updated during all these years by adding features and improvements
suggested by many users of our hardware products. Many people requested this
sound engine to be released as a software for regular computers, and here it is. Now
you can have the sound of a full-featured clonewheel organ right into your
computer.
Main features:
Full polyphony (61 upper + 61 lower + 25 pedals = 147 notes)
91 modeled tonewheels with accurate phase synchronization
Adjustable leakage noise and cross modulation between tonewheels
A total of 22 different tonewheel generators to choose from
Generator shaping for a total of 154 generator combinations
Adjustable global tuning from 430 to 450 Hz
Foldback on 16" deactivatable
Complex wheels
Resistor wiring with multiple options
Realistic “run” motor wow & flutter
Busbars and 9 key contact simulation
Two separate sets of drawbars per manual
Full "inverted octave" presets
String Bass with adjustable release time
Loudness "robbing" effect
Single triggered percussion with natural capacitor discharge/recharge
Adjustable Percussion Level & Decay
Vibrato/Chorus virtual scanner
Adjustable Vibrato Scanner depth & mix
Separated Upper and Lower V/C tablets with smooth switching
Dynamic tube overdrive simulation
Spring Reverb (pre) and Digital stereo reverb (post)
Rotary speaker simulation with virtual microphone positioning, tube overdrive, tube feedback
Rotors "Front Stop" brake position with adjustable preferred position
Very low CPU consumption
Advanced MIDI Learn function with import/export of custom mappings
Upper and Lower manuals SPLIT with adjustable split point
Adjustable output level
Supports pedal sustain
Custom programmer with import/export of Programs and Banks
...and many more.
GSi VB3-II USER'S MANUAL - Page 2/21
Page 3

INSTALLATION
SYSTEM REQUIREMENTS
VB3-II is available in the following formats:
– for Windows: VST2 x64, VST3 x64, Standalone x64
– for OSX: VST2 x64, VST3 x64, Audio Unit x64, Standalone x64
Windows:
– any Windows computer manufactured after 2010 running Windows 7 x64 or
greater
– ASIO compatible sound card for low latency performance
OSX:
– OSX version 10.9 or greater
Of course you need a MIDI controller keyboard to play VB3-II, and if you want to
enjoy the experience of a real dual manual console organ, we advice you to check
out GSi DMC-122:
Please visit www.GenuineSoundware.com for more informations.
INSTALLATION ON WINDOWS
An automatic installer is provided. Double click its icon, accept the EULA and follow
the on-screen instructions.
INSTALLATION ON OSX
An automatic installer is provided. Double click its icon, accept the EULA and follow
the on-screen instructions. At some point you might be asked to insert your user's
log-on password, this is required by OSX to authorize the copy of the files into your
Library.
GSi VB3-II USER'S MANUAL - Page 3/21
Page 4

AUTHORIZING YOUR LICENSE
When the product is installed, it runs in DEMO mode so that you can test its sound
and functionality, but with some minor limitations: the sound will go silent for a
second every 15 seconds, and importing / exporting Programs and Banks won't be
allowed.
If you have purchased a license, you can authorize your copy by doing copy & paste
of the 24 characters license code into the registration screen.
If the computer is connected to the Internet, just insert the license code and click
REGISTER, the rest of the process is fully automatic. In case you wish to install VB3-II
on a computer that isn't connected to the Internet, click the “Offline registration”
option after inserting the license code, you'll be presented a numerical code in a
read-only text box, copy that code somewhere (on paper or in a text file that you'll
later save onto a USB stick), then go at a computer connected to the Internet, point
your browser to http://www.genuinesoundware.com/activate and follow the
instructions. The basic personal license allows three installations; extra installations
can be purchased separately. Please contact GSi for this.
GSi VB3-II USER'S MANUAL - Page 4/21
Page 5

THE MAIN WINDOW
Since you're using VB3-II can we assume that you already know what the fabulous B3
organ was, how it was done and how it is used? You should be well aware of what
drawbars are, what the percussion circuit does to the sound and how the “scanner
vibrato” impacts on the overall sound, not counting the Leslie rotating amp.
Well, what you see on the main screen of VB3-II is pretty much what you see when
you sit at a real B3, with every little bit exactly where it belongs. In the center of the
screen you have six knobs for the basic adjustments such as Volume, Bass & Treble
EQ, amount of KeyClick, amount of Overdrive and amount of Reverb.
On the left you have the controls to select and activate the scanner vibrato effect, on
the right you have the four percussion tabs; on the bottom there are all the drawbars
(how many!) and the classic “half-moon” switch to select the rotary speaker speeds.
Now let's just examine the rest.
DRAWBAR PRESETS
Right above the drawbars there are two rows of 12 buttons each with some symbols
below them. These represent what on a real B3 is the octave with inverted colors that
is used to recall the “presets”.
Since VB3-II is a software, the concept of “preset” can assume a different meaning.
VB3-II is capable of storing up to 128 “Programs” in a “Bank”, each Program stores all
parameters, including the drawbar positions, so there would have been no need to
implement the old-style drawbar presets, but this is an added feature that VB3 has
always had since its first release. Drawbar presets just store the drawbar registrations
and nothing else. The first button is the “Cancel”, i.e. a zeroed preset (no sound on
that manual) and the buttons labeled A or B switch between the drawbar sets A or B.
Remember that, for what concerns the upper manual, the percussion is only
available on the SET B and the 9th drawbar (1') will be muted if the percussion is on.
Storing an organ preset is as easy as
right-clicking on the desired preset and
doing what the menu asks for. Once the
preset is stored, its content is
graphically represented below it by
gray vertical lines.
GSi VB3-II USER'S MANUAL - Page 5/21
Page 6

SPLIT
If you don't have two keyboards but still
want to play left hand walking bass on
the lower manual and comping or
melody on the upper manual, the SPLIT
function comes handy. Click on the
button to enable / disable this function,
right click to select the split point. Both
these parameters (split toggle and
point) are stored with Programs. The
split is only done between the upper
manual (on the right) and the lower
manual (on the left), but if you also wish
to play the pedal tones on the left part
of the keyboard, open the Edit Organ
window (explained later) and activate
the “Pedals to lower” parameter. Now
the Pedal tones will play along with the
lower manual tones on the left of the
keyboard. The lower manual will still
respond to its associated MIDI channel.
ON SCREEN KEYBOARDS
On the bottom right corner of the interface you see a small button, click on it to
show or hide the virtual keyboards that will allow you to play VB3-II from your screen
by clicking with the mouse on the keys, or by using your computer keyboard; the
most useful function of virtual keyboards, though, is to visualize what's being played
from the MIDI keyboard. This comes very handy if you're planning to use VB3-II to
teach the Hammond technique to your students or if you just want to show what
you're playing on a big screen at a fair or in a video.
Virtual keyboards are always hidden by default.
GSi VB3-II USER'S MANUAL - Page 6/21
Page 7

THE PROGRAMMER
One of the most interesting features of VB3-II is the programmer. This section allows
to Write / Recall user Programs, import /
export single Programs or entire Banks,
also copy & paste Programs from one
location to another, or initialize the
current Program for a fresh start.
Each Bank consists of 128 Programs numbered from 0 to 127, like the good old MIDI
protocol required. To recall a Program, either use the UP / DOWN arrows on the left of
the main display, or click on the Program name label for a full pop-up list of the 128
available Programs, or recall them from MIDI Program Change events (needs to be
activated from the Settings Window).
To store a Program: once you're done with all your tweakings and you decide it's time
to store the Program, just click the WRITE button if you wish to overwrite the current
Program; if you want to give it a new
name, right-click the name label and
type the new name, press <ENTER> to
confirm. In case you wish to store it to a
new location, right-click the WRITE
button, a dialog window pops up
asking you to select a location from a
drop-down menu.
Other operations with Programs and Banks can
be performed from the FILES menu that you can
access by clicking on the FILES button. Here you
can export or import single Programs or entire
Banks. Programs and Banks use a proprietary
format and are saved in binary files with the
extensions .VB3Program and ..VB3Bank, and the
built-in bank is automatically saved every time a
Program is written or the application / plugin is
closed. The functions “Copy to clipboard” and
“Paste from clipboard” can be used for
reorganizing Programs in a Bank, and “Reset
Program” recalls an initialized program with
default parameter settings. Operations such as
import, reset or paste, that apparently overwrite
the current program, actually use a temporary
volatile memory that is lost unless the WRITE
function is used. Lastly, it's also possible to reset
the whole Bank or restore the factory Bank.
GSi VB3-II USER'S MANUAL - Page 7/21
Page 8

OPTIONS FOR THE STANDALONE APPLICATION
The standalone application offers an extra menu for setting the AUDIO and MIDI
devices. Under Windows it is possible
to select between the available audio
driver types. For better performance,
use a low-latency ASIO driver, possibly
the most recent driver released from
your sound-card's manufacturer. Select
the stereo output port, the sampling
rate, the buffer size, and the MIDI input
device.
VB3-II supports sample-rates from
44100 up to 384000 with no internal resampling. However, the best
performance is achieved at 44100.
If you have two or more keyboards
connected to your computer, you can
enable them all at the same time, their
MIDI streams are internally merged.
This way you could use two 61-note
controllers and play upper and lower manuals like on a real B3!
The settings are immediately applied as soon as they're changed. Close this window
when done.
Please note: the standalone application always stores the last status, regardless of the
Program that was selected the last time it was used.
SOUND EDITING AND GLOBAL SETTINGS
The buttons on the top right corner of the main screen are used to open the editing
panels and the global settings in separate windows. The choice of using separate
windows, rather than embedding everything in the main window, makes it easier to
organize the work-space and facilitates the work-flow by offering a wide view of all
editing possibilities at a glance.
GSi VB3-II USER'S MANUAL - Page 8/21
Page 9
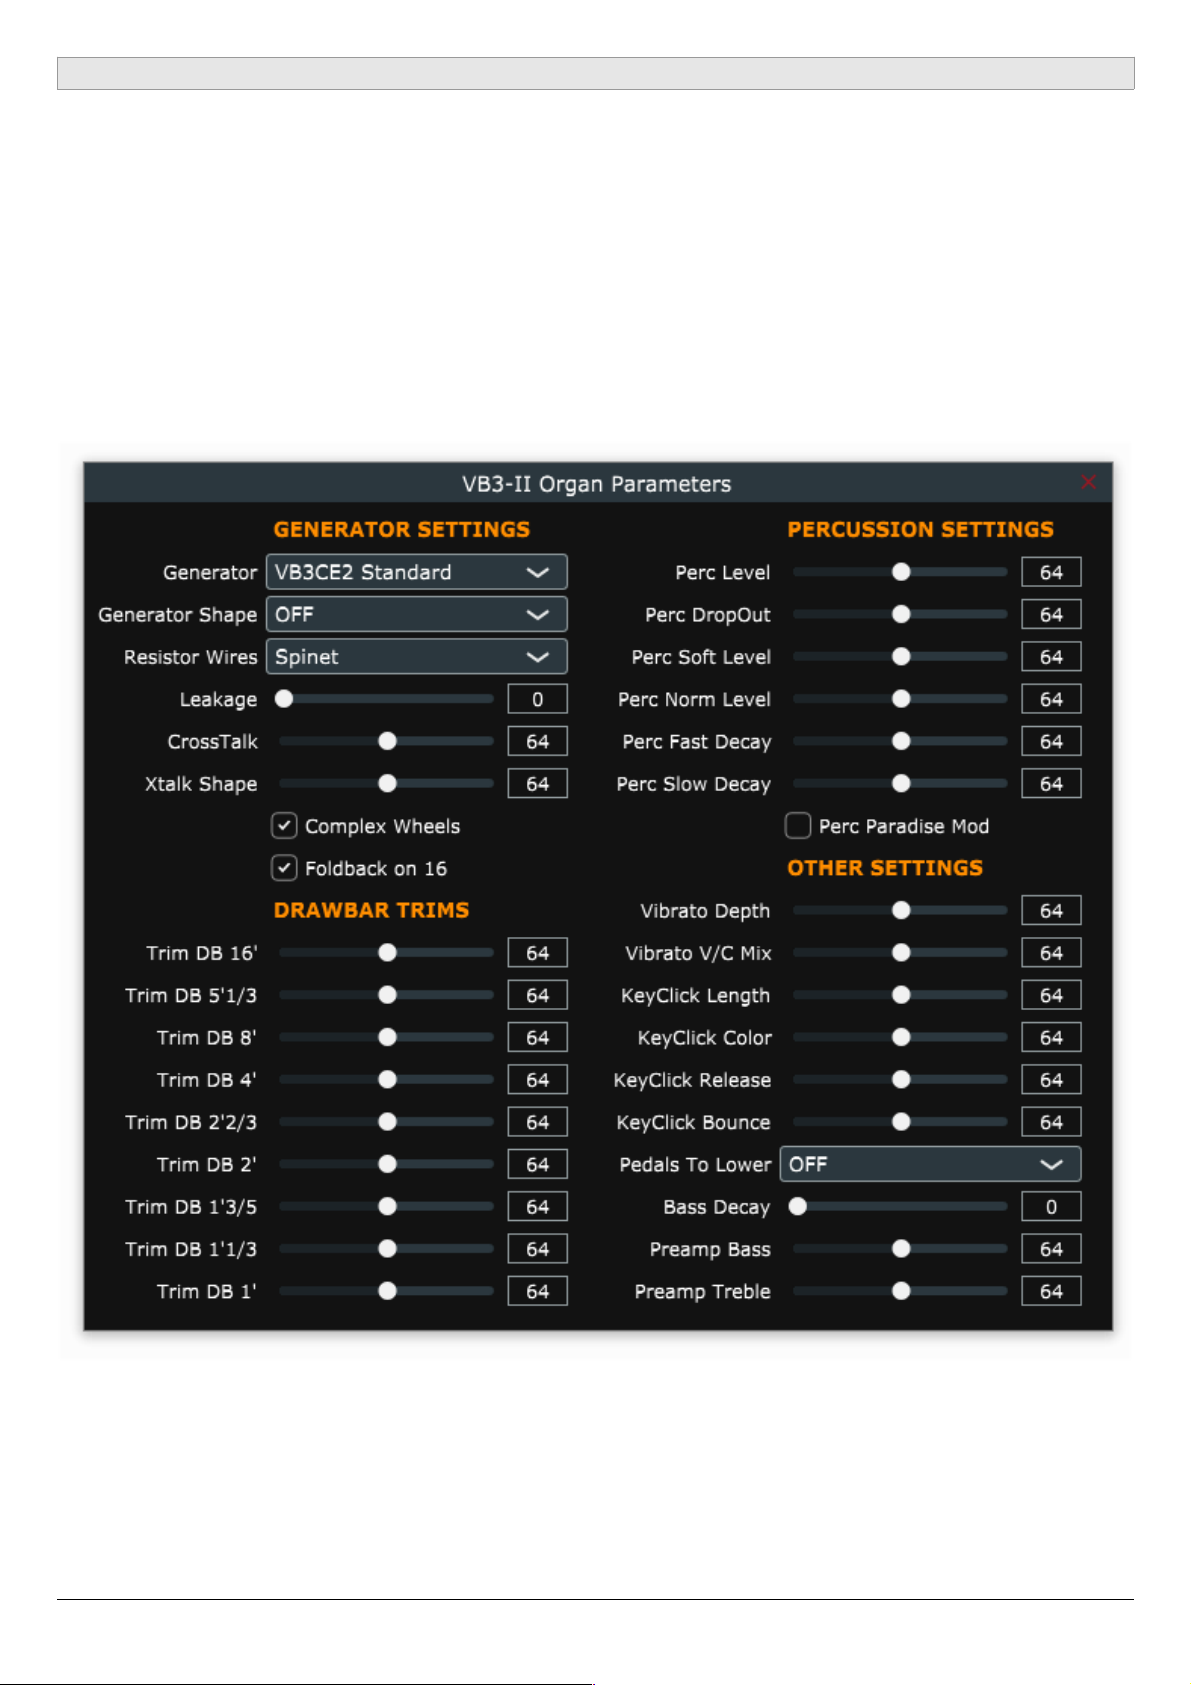
THE EDIT ORGAN WINDOW
The organ-related parameters are organized in sections and represented as dropdown menus if they consist in lists of elements to choose from, check boxes if they
consist in options to toggle, or horizontal sliders if they respond to a range of values
spanning from 0 to 127.
Stopping the mouse pointer on a control invokes a “tool tip window” with useful
informations related to the parameter the mouse is on; a double-click on a slider
knob recalls the previous value that was set the moment the window was open.
Values can also be typed directly into the readout boxes. If your computer has
multiple screens, this window can be moved to a secondary screen.
GSi VB3-II USER'S MANUAL - Page 9/21
Page 10

Brief explanation of all parameters:
– Generator: select a tonewheel generator from this list. Each generator is based
on actual values as measured from real console organs of the B/C/A series.
– Generator Shape: select between OFF (no shaping) or 3 levels of CUT and 3
levels of BOOST. These will modify the amplitude chart of the generator values
according to different positions along the generator. This parameter does not
apply any equalization to the sound. Levels 1 can boost or cut starting from
wheel n. 25; levels 2 start from wheel n. 52; levels 3 start from wheel n. 72.
– Resistor wires: these are the small wires that in the vintage organ connect the
keyboards to the generator. We have three different choices: Console: NEW”
uses the original values as per manufacturer's specifications; “Console: OLD”
uses modified values for a better volume scaling; “Spinet” uses the same values
as “New” but disables the so-called “fold-back” on the top frequencies.
– Leakage: adjusts the background hum & hiss.
– Crosstalk: adjusts the amount of crosstalk caused by the analog circuitry. This
is a very important element of the tonewheel organ sound.
– Xtalk Shape: since the crosstalk consists of both bass and treble tones, this
parameter mixes between the presence of one or the other, left towards a
“rumble” noise, right towards a “brilliant” noise.
– Complex wheels: are special tonewheels only used for the first 12 tones wired
with the pedalboard. Unselecting this parameter will use standard sinus
tonewheels.
– Foldback on 16': the first 16 wheels wired to the keyboards are usually folded
back, thus starting from wheel n.13 rather than from wheel n.1. If you wish to
use the first 12 wheels on the manuals, uncheck this option but you should also
uncheck the Complex wheels.
– Drawbar trims: the 9 slider below this section can be used to adjust the
presence of each drawbar. This will apply above the actual drawbar
registrations for both the upper and the lower manual.
– Percussion settings: set the parameters of the percussion circuit such as the
level when it's on normal or soft, the decay time when it's on slow or fast, the
overall level, and the loudness loss when the volume tab is set to normal.
– Perc Paradise Mod: this is a “hack” that causes the percussion to never decay.
What's special in this is that if you activate the scanner vibrato effect, you'll
notice that the vibrato is applied to the rest of the drawbars but not to the
percussion tone.
– Other settings: here you can adjust the depth of the vibrato circuit and the mix
amount that affects the chorus settings, plus some parameters related to the
generation of the KeyClick noise. Read the tool-tips for more details.
– Pedals to lower: bring pedal tones to the lower manual in either overlay or split
– Bass Decay: the pedalboard is polyphonic, but if you adjust the decay time, the
last note played will decay slowly.
– Preamp Bass / Treble: adjust the frequency response of the organ's built-in
preamp circuitry.
GSi VB3-II USER'S MANUAL - Page 10/21
Page 11

THE EDIT EFFECTS WINDOW
Here is where you find all parameters related to the effects, comprising the “Leslie”
rotary speaker emulation and the reverbs.
Parameters for the Spring Reverb are:
– Level: adjust the volume of the spring reverb which is always positioned before
the Rotary effect, and does not exclude the Digital Reverb, which is positioned
after the Rotary effect.
– Timbre: adjust the frequency response of the reverberated sound according to
your taste. In real life, different types of spring reverb tanks give different
timbres.
– Decay: adjust the length of the reverberation.
– Damp: when springs are made of a larger gauge they tend to dampen the
sound faster. Adjust the damping effect with this slider.
GSi VB3-II USER'S MANUAL - Page 11/21
Page 12

Parameters for the Rotary speaker are:
– Horn slow / fast: adjust the speed offset of the horn for when the speed is on
slow or on fast.
– Bass slow / fast: same as above but for the bass rotor.
– Horn up / down: adjust the acceleration and deceleration times of the horn for
the transitions between the slow and fast speeds. When the brake is engaged,
the power is taken off from the motor so the horn slows down until stopping
only driven by the centrifugal force, so the time between fast and stop may be
longer than from fast to slow.
– Bass up / down: same as above but for the bass rotor.
– Balance: adjusts the balance between the horn and the bass rotor.
– Ambience: a real amplifier stays in a real environment causing the
microphones to capture the sound reflections as well as the direct sound
coming from the speakers. This parameter adjusts the amount of
environmental reflections.
– Cabinet: adjusts the amount of resonances caused by the wooden cabinet.
– Mic Angle: adjusts the angle between the two microphones at the horn,
ranging from 0 (both microphones in the same spot) to 180 degrees
(microphones at the opposite sides of the cabinets). This simulation considers
only three microphones, two for the horn and one for the bass rotor.
– Mic Distance: adjusts the distance between the microphones and the cabinet.
A longer distance results in more sound dispersion, a shorter distance results in
a deeper proximity effect.
– Horn EQ: not all vintage rotary speakers have the same quality for what
concerns the sound coming from the horn, some are brighter, some are duller
or maybe just well balanced. This parameter lets you adjust the treble response
of the horn sound.
– Mid reflections: adjusts the amount of sound reflections happening in the
middle of the stereo field.
– Doppler intensity: the so called “Doppler” effect is the fundamental of the
“Leslie” effect that causes the sound to be cyclically untuned while the sound
source (the speaker) gets farther or nearer to the listened; this parameter lets
you adjust the amount of this effect that is mostly caused by the sound
reflections over the walls around the amplifier.
GSi VB3-II USER'S MANUAL - Page 12/21
Page 13

– Dry Leak: some of the dry sound coming from the speakers does not reach the
rotating elements and is mixed with the rotating sound. Use this parameter to
adjust the amount of dry signal you want to be mixed in.
– Bass Port: a real Leslie cabinet has a hole in the back that serves for two
reasons: 1) lets the heat from the motors ventilate out from the cabinet and 2)
acts as a bass tuning port, like those found on modern speakers. If you put a
microphone in front of this hole you get nothing but sub-bass frequencies. Use
this parameter to adjust the amount of sub-bass you want to get into the mix.
– Tube feedback. This is a very important parameter that works on an aspect of
the whole amplification system that can drastically vary both the dynamic
response and the frequency response, as well as have an impact on the
overdrive. When a Leslie cabinet is set very close to the Hammond organ and is
played at a high volume, there's some sort of feedback between the tubes, the
transformers and the pickups of the Hammond and the speakers of the Leslie,
resulting in a sound that tends to get “fatter”, the attack is “punchier” and the
distortion is aggressive, giving you the feeling that some sort of energy is
looping between the organ and its amplifier. Now, a genuine Leslie 122 or 147
is only 40W of power, but if you try to connect your Hammond organ to a 100W
guitar amp such as a Marshall JCM900 or a Fender Twin you'll notice that the
amp starts going in feedback even if you don't play any note on the organ. This
is... pure analog power! Try this parameter at small steps, it can drastically
change the sound in both a pleasant or unpleasant way, according to your
tastes.
– Stop Position: you can use this parameter to find a position where the horn
and rotor should “preferably” stop when you set the speed lever in the brake
position and the “Front Stop” option is enabled. Please consider that not always
the position you've set is reached with precision, it depends mostly on the
Ramp Down times you've set... after all it's virtual reality, baby! It takes into
account the kinetic energy, the gravity, the belt friction...
– Noises: well, a real rotary effect is far from being a silent amplifier. Your
microphones will pick up not only the sound but also the wind generated by
the rotating elements, and the relays that switch between the fast and slow
motors. Use this parameter to adjust the amount of noises you want to get into
the mix.
– Memphis Style: check this parameter to unplug the motors that drive the bass
rotor. This way, the bass stays motionless while the horns keep spinning.
– Front Stop: this very sought after function causes the horn and the bass rotor
to stop always in a “sweet” spot every time the brake is engaged. VB3-II uses a
simple algorithm that produces this effect in a very pleasant and seamless way
that you won't even notice when you're braking the rotors.
GSi VB3-II USER'S MANUAL - Page 13/21
Page 14

VB3-II features a built in high quality stereo digital reverb that can be adjusted in a
variety of ways in order to reproduce virtually any kind of artificial environment.
Reverb settings are:
– Decay: adjusts the average reverb tail length.
– Damp: simulates various types of reflecting walls, from tiles to absorber panels.
– Diffusion: adjusts the diffusion of traveling waves across the reflecting
surfaces.
– Pre-delay: adjusts the time between the direct sound and the early reflections.
– Room size: adjusts the size of the virtual room, from a small cabinet to a large
tunnel.
– High / Low shelf: adjust the amount of treble or bass frequencies to be to cut
off the sound before starting to reverberate.
Notes on the rotation speeds.
All sliders in the Organ and Effect edit pages, whenever moved, show a pop-up that
displays the readout in both MIDI and actual value, when available. As for the Rotary
speaker's rotation speeds and times, values are shown in Hz and Seconds. To convert
Hz to RPM (revolutions per minute), just multiply the Hz value by 60. For example, the
horn, when the Horn Slow parameter is set at 64, rotates at 0,77 Hz which translates
in 46,2 RPM. All the speed values can be varied between 50% and 150% of the center
value. The ramp up and ramp down times are in seconds, and can be varied between
50% and 500% of the center value.
Center values are:
– Horn slow: 0,77 Hz 46,2 RPM→
– Horn fast: 6,9 Hz 414 RPM→
– Bass slow: 0,72 Hz 43,2 RPM→
– Bass fast: 6,4 Hz 384 RPM→
– Horn ramp up: 1 second
– Horn ramp down: 0,8 seconds
– Bass ramp up: 6 seconds
– Bass ramp down: 3,5 seconds
These times are average values as measured by a wide sample of well working and
serviced vintage Leslie 122, 142, 147 and 145 models.
Due to kinetics energy, when the Rotors ramp down from fast to brake and the Front
Stop option is disabled, they take a bit longer to get to full stop position.
GSi VB3-II USER'S MANUAL - Page 14/21
Page 15
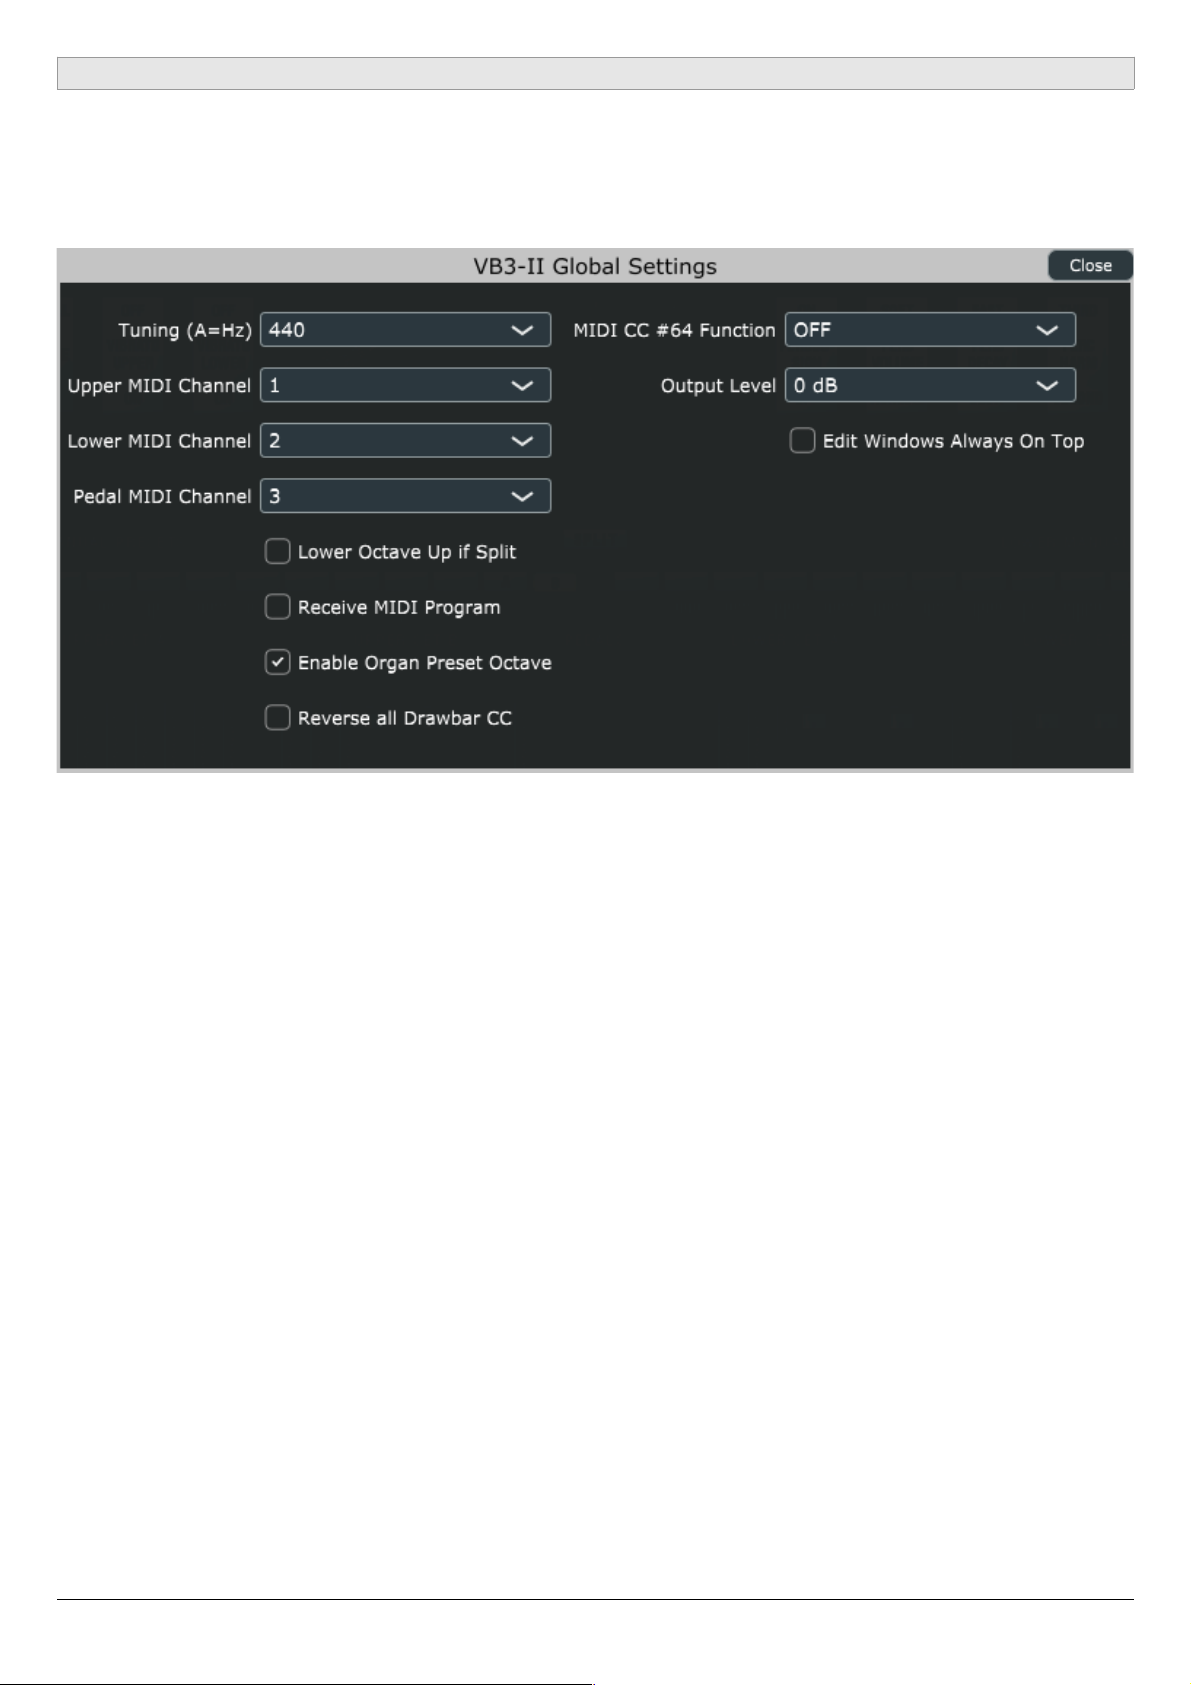
THE GLOBAL SETTINGS WINDOW
This panel shows the global settings that are stored in a separate file and affect the
overall operation of VB3-II.
Settings are:
– Tuning: set the base tuning from A=430 Hz to A=450 Hz. Consider that original
tonewheel organs DID NOT have any tuning option because the tonewheel
generator was driven by a “synchronous” motor that was locked to the power
line frequency, 60 Hz for the North American market and 50 Hz for Europe.
There was no way to tune the organ to a frequency other than A=440 Hz,
unless making some costly modification. Are you that guy who really believes
that the 440 Hz frequency has something to do with the nazis? Do you really
want to tune your tonewheel organ at 432 Hz? Please... Ok, you can... but don't
tell anybody that you did :-)
– Upper, Lower and Pedal MIDI Channel: each manual responds to a specific
channel. Beware not to set two or three manuals on the same channel!
– Lower Octave Up if Split: check this if you with to have the lower manual
shifted by one octave up when using the split function. This can be useful in
case you with to play chord with the left hand rather than bass notes.
– Receive MIDI Program: check if you wish to switch between Programs by
sending MIDI Program Change events.
GSi VB3-II USER'S MANUAL - Page 15/21
Page 16

– Enable Organ Preset Octave: the tonewheel organ responds to MIDI notes
from 36 to 96 (C to C), you can check this option to use the octave between 24
and 35 for switching the drawbar preset, just like on a real B3.
– Reverse all drawbar CC: if you don't have a drawbar controller yet, please visit
www.GenuineSoundware.com or www.Crumar.it, but if you still want to use
your generic controller with regular faders, you might find this option useful as
it reverses the MIDI response of all drawbars.
– MIDI CC#64 function: the CC #64 is usually the sustain pedal, that in VB3-II can
be used in a variety of ways. Choose whether it has to switch the speeds of the
rotary speaker emulation, in a latched way (push – push), or in a momentary
way (push for fast, release for slow). Note that the switch is done between FAST
and SLOW or STOP according to the position of the speed lever on the GUI.
If you really want to apply the sustain to the upper, to the lower manual or to
both manuals. Hey, do you really want to use the sustain function? There was
only a way to sustain notes on a real tonewheel organ, google for Keith
Emerson...
– Output Level: adjust the overall output level from -3 dB to +3 dB. Default is
zero.
– Edit Windows Always On Top: this option causes the Edit windows always stay
on top of other windows. Enable it if they appear behind the main window
(required for some Mac host programs).
Remarks on the output level:
The tonewheel organ is a very dynamic sound that can go to almost silent to very
loud, it's not easy to have it fully dynamic in a digital system without incurring in
digital clipping. VB3-II has a built-in de-clipping function that tries to prevent digital
clipping. If you feel that it plays too soft, you should try playing a “full” organ with a
bit of overdrive and the chorus on to verify that it's already using all the available
headroom. On the other hand, if you think that it plays too loud, you're probably
forgetting that the dynamic on a tonewheel organ, that unlike a piano does not have
velocity sensitive keyboards, is given by using the “swell pedal”.
Just try to adjust the volume and the output level in a way that fits your
requirements the best you can. The rest depends on the cascaded devices (other
effects in the DAW, or mixing desk, amplifiers, etc.)
GSi VB3-II USER'S MANUAL - Page 16/21
Page 17
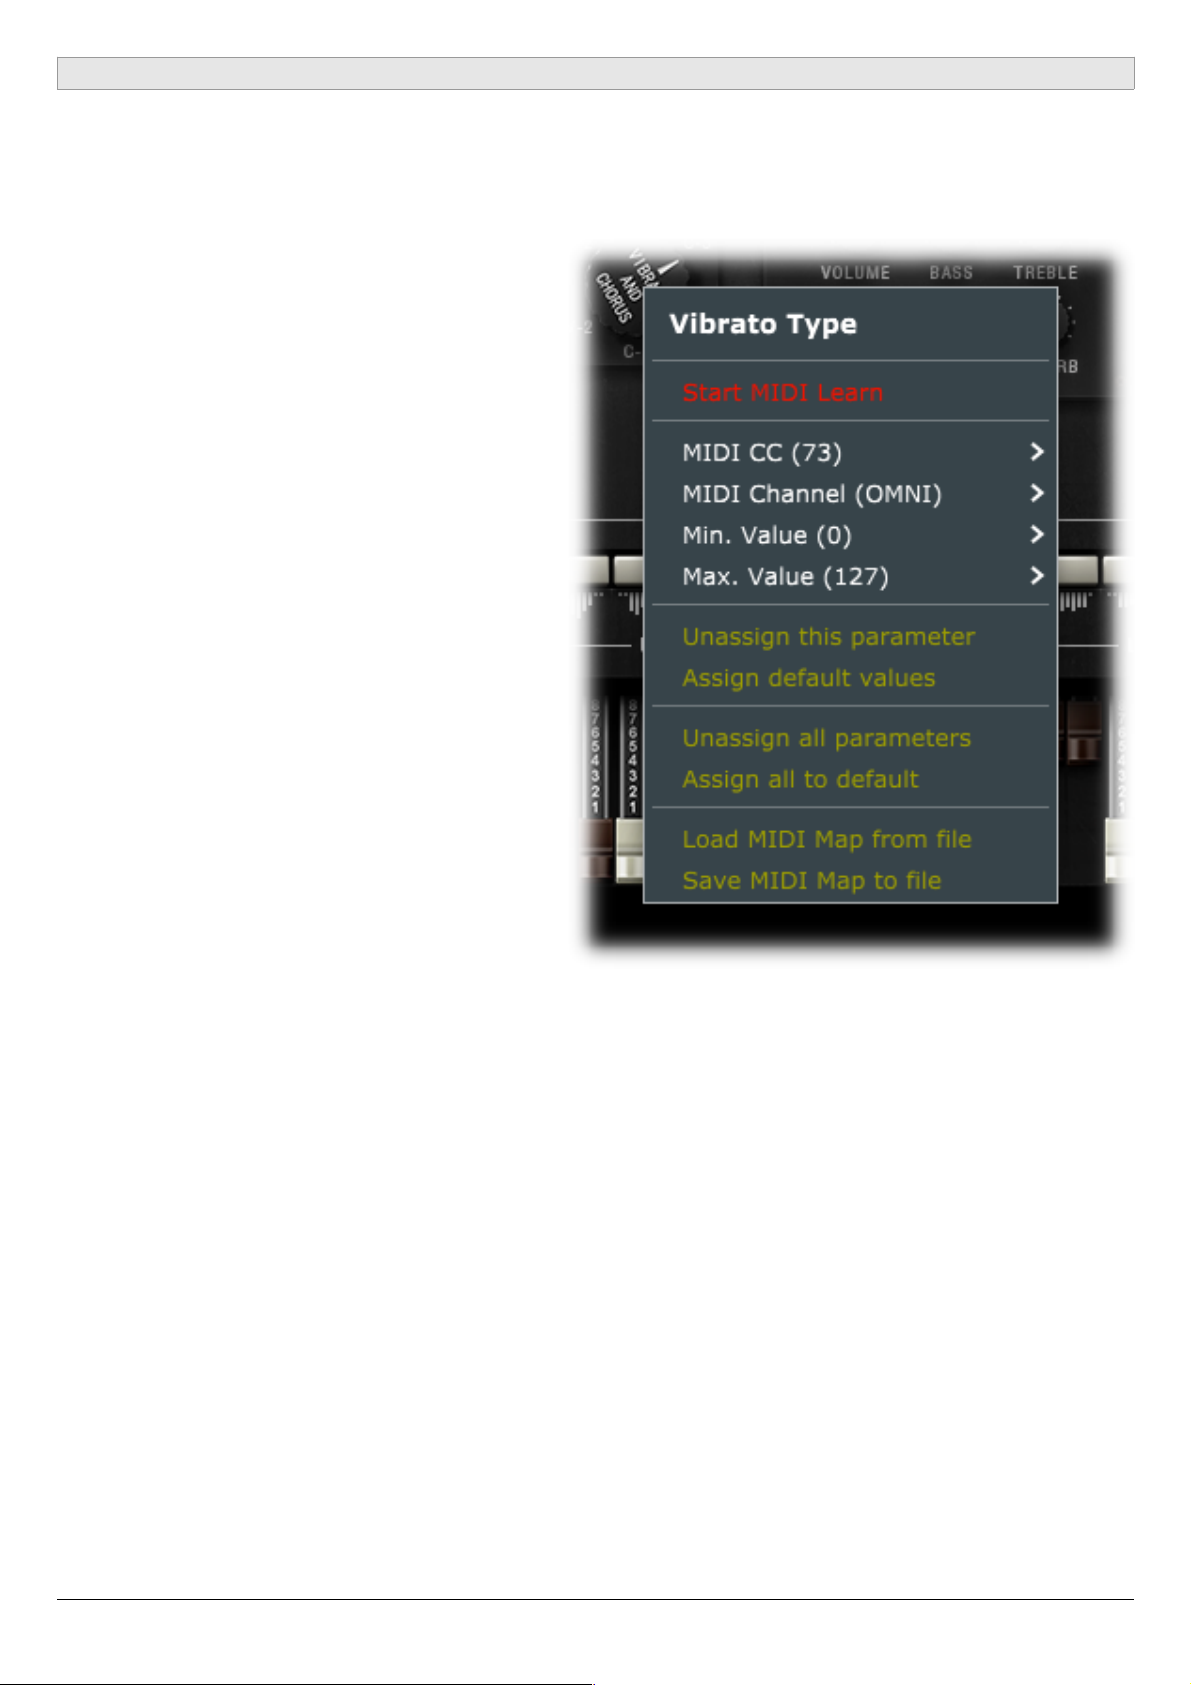
MIDI LEARN
VB3-II features an advanced MIDI “Learn” system for helping with mapping MIDI CC
messages to the parameters. By default, all “performance” parameters are already
mapped to specific CC numbers (table below), but it's very easy to change the
assignments to fulfill different
requirements.
Right click on any parameter on the
interface (also in the separate editing
windows) to access the MIDI Learn
menu.
Click on “Start MIDI Learn” to start
learning the MIDI parameters coming
from your controller. A dialog window
appears which you should give
confirmation to if your assignment is
done as expected, of you can click on
“Abort” and abandon the operation.
If you're creating your map but you
don't need to catch the CC numbers
from your controller, you can still use
the other menu options to set the
values manually. Set the CC number, the
MIDI Channel (1 to 16 or OMNI), the min
and max values. If min and max are
swapped (i.e. min is major than max) the
parameter will respond reversed.
You can “unassign” a parameter if you don't want it to be controlled by any MIDI
message, or you can assign default values if you're unsure what assignment to give
to it.
Last but absolutely not least important, you can save your entire MIDI map to a file or
load it from a previously saved file, so you can have more mappings ready for
different controllers that you might have.
GSi VB3-II USER'S MANUAL - Page 17/21
Page 18

DEFAULT MIDI MAP
The table below shows the MIDI CC numbers assigned by default. All parameters
receive a range of values between 0 and 127 and are set to Channel “OMNI” (can
receive on any channel).
PARAMETER NAME C.C. NUMBER REMARKS
Volume 7
Drive 76
Reverb 91
Key-click 75
Bass 8
Treble 10
Drawbars Upper SET A 40 ~ 48
Drawbars Upper SET B 12 ~ 20
Drawbars Lower SET A 50 ~ 58
Drawbars Lower SET B 21 ~ 29
Drawbar Pedals 16' 33
Drawbar Pedals 8' 35
Vibrato Type 73 Values: 0, 27, 52, 78, 102, 127
Vibrato Upper Switch 31
Vibrato Lower Switch 30
Percussion On 66
Percussion Soft 70
Percussion Fast 71
Percussion Third 72
Swell Pedal 11
Rotary Effect Switch 85
Rotary Effect Slow/Fast 1 Values: <32 = slow, >95 = fast,
middle = stop
Rotary Effect Run/Stop 68 Values: 0 = stop, 127 = run
VB3-II recognizes the GM “All Notes Off” command, CC #123 value 0.
GSi VB3-II USER'S MANUAL - Page 18/21
Page 19

ROTARY SPEAKER EFFECT: GSiRotary
Starting from version 1.1.0 released in September 2018, GSi VB3-II comes with a
separate Rotary effect plugin/standalone that can be used with any audio source and
is based on the same rotary effect built into VB3-II. It's called GSiRotary and is free for
all VB3-II registered users.
GSiRotary shares the same Program Bank, the same MIDI Map and the same Settings
as the main program VB3-II and starts activated if VB3-II is activated, otherwise starts
in “Demo mode”.
In the middle of the screen there are the three main knobs, Volume Drive and Reverb
to adjust the related parameters, on the bottom there's the 3-position lever switch
for the rotary speeds, and on the top there's the display for the current Program,
along with the up and down buttons for scrolling programs. Click the Program name
to open the pop-up menu showing all Programs in the Bank.
Click EDIT to open the editor window with all parameters. Here you'll find the same
parameters as the “Edit Effects” window from VB3-II except the Spring Reverb.
The BYPASS button puts the whole effect in bypass, i.e. the output is an exact copy of
the input. The HELP button opens a menu with useful links.
GSiRotary comes in 64 bit VST2, VST3 and Standalone for Windows and 64 bit AU,
VST2, VST3 and Standalone for OSX.
GSiRotary isn't sold separately from VB3-II and doesn't require extra payments.
GSi VB3-II USER'S MANUAL - Page 19/21
Page 20

END USER LICENSE AGREEMENT
This License Agreement is a legal agreement between the User, hereafter called
"you", and GenuineSoundware regarding VB3-II software, including the GSiRotary
software. VB3-II in the following of the contract includes the computer software
named VB3-II and associated media, CD and product documentation. VB3-II also
includes any updates and supplements to the original VB3-II provided to you by
GenuineSoundware. By installing, accessing or otherwise using VB3-II, you agree to
be bound by the terms of this License Agreement.
1 VB3-II License
Subject to the limitations described below, GenuineSoundware, as licensor, hereby
grants you, the licensee, a non-exclusive, perpetual License to use VB3-II in
accordance with the documentation provided by GenuineSoundware.
1.1 GRANT OF LICENSE
This License Agreement grants you the following rights:
(a) Software. You may install and use VB3-II for an unlimited period on at most three
Computers provided that these Computers belong to you and that VB3-II is used only
on one Computer at a time.
(b) Reservation of Rights. All rights not expressly granted are reserved by
GenuineSoundware.
1.2 LIMITATIONS
(a) Strict personal use. Your use of VB3-II is limited to strict personal use. You may not
rent, lease or share VB3-II with another user. Transfer of License to another user is
allowed once for each licensed product. A License transfer fee must be paid by the
current License holder before the transfer takes place. For this purpose, please
contact sales@genuinesoundware.com.
(b) Sound produced by VB3-II can only be distributed within a musical context, and
not in forms that allow the sounds to be used as sample based instruments or
sample libraries.
(c) Limitations on Reverse Engineering, Decompilation, Disassembly and
Modification. You may not reverse engineer, decompile, disassemble or modify VB3-II.
(d) Limitations on usage. You may not merge VB3-II into another software nor create
derivative works based on VB3-II.
(e) Separation of Components. VB3-II is licensed as a single product. Its component
parts may not be separated.
(f) Termination. Without prejudice to any other rights, GenuineSoundware may
terminate this Agreement if you fail to comply with the terms and conditions of this
Agreement. In such event, you must destroy all copies of VB3-II and all of its
component parts.
GSi VB3-II USER'S MANUAL - Page 20/21
Page 21

1.3 COPYRIGHT
VB3-II is protected by copyright laws and international copyright treaties, as well as
other intellectual property laws and treaties. All title and intellectual property rights
related to VB3-II are owned by its authors. Unauthorized copying of VB3-II, in whole
or in part, is expressly forbidden. All title and intellectual property rights in and to the
content which may be accessed through use of VB3-II is the property of the
respective content owner. This Agreement grants you no rights to use such content.
You may print one copy of the documentation provided in VB3-II.
1.4 BACKUP COPY
After installation of VB3-II, you may keep one copy of the file provided by
GenuineSoundware solely for backup or archival purposes, provided that its
component parts are not separated. You may not distribute copies of VB3-II or
accompanying documentation.
1.5 OWNERSHIP
VB3-II is licensed to you, not sold nor given. This License Agreement does not
constitute a transfer or sale of ownership rights for VB3-II. Except for the License
rights granted above, GenuineSoundware retains all right title and interest for VB3-II
including all intellectual property rights therein.
2 WARRANTIES
VB3-II is licensed without any warranty. It is provided on an “as is” basis.
3 LIMITATION OF LIABILITY
You agree that in no event will GenuineSoundware be liable for any kind of damages,
material, immaterial or corporal, that arise as a result of the malfunctioning or misuse
of VB3-II. You assume full responsibility for all possible consequences of your use of
VB3-II.
4 DISPUTE
This License Agreement is governed by the laws in force in Italy, and, in respect of
any dispute which may arise hereunder, you consent to the jurisdiction of the courts
sitting in Treviso, Italy.
All software by Guido Scognamiglio. All rights reserved.
Graphic design by Pierre Collard. Special thanks to Michele Picaro & Andrea Agnoletto.
All trademarks used herein are the property of their respective owners.
VST technology by Steinberg. AU technology by Apple.
GSi software is distributed as shareware by: GSi di Guido Scognamiglio - P.IVA: 04790400263 – Treviso, Italy.
Last update: October 2018
www.GenuineSoundware.com
GSi VB3-II USER'S MANUAL - Page 21/21
 Loading...