


Owner’s Manual


ЭСТМЫТМН
СКЫОКЧЫЙ ЯТЬ СРЫОЯМЧСТ
К·»© ±º ª»¸·½´» тттттттттттттттттттттттттттттттттттттттттттттттттттттттттттттттттттттттм у л
Э±½µ°·¬ф ¸¿²¼´»¾¿® ·²-¬®«³»²¬ ттттттттттттттттттттттттттттттттттттттттттттттттттттк
Ч¹²·¬·±² ´±½µ ¿²¼ º±®µу½±´«³² ´±½µ тттттттттттттттттттттттттттттттттттттттттттттттй
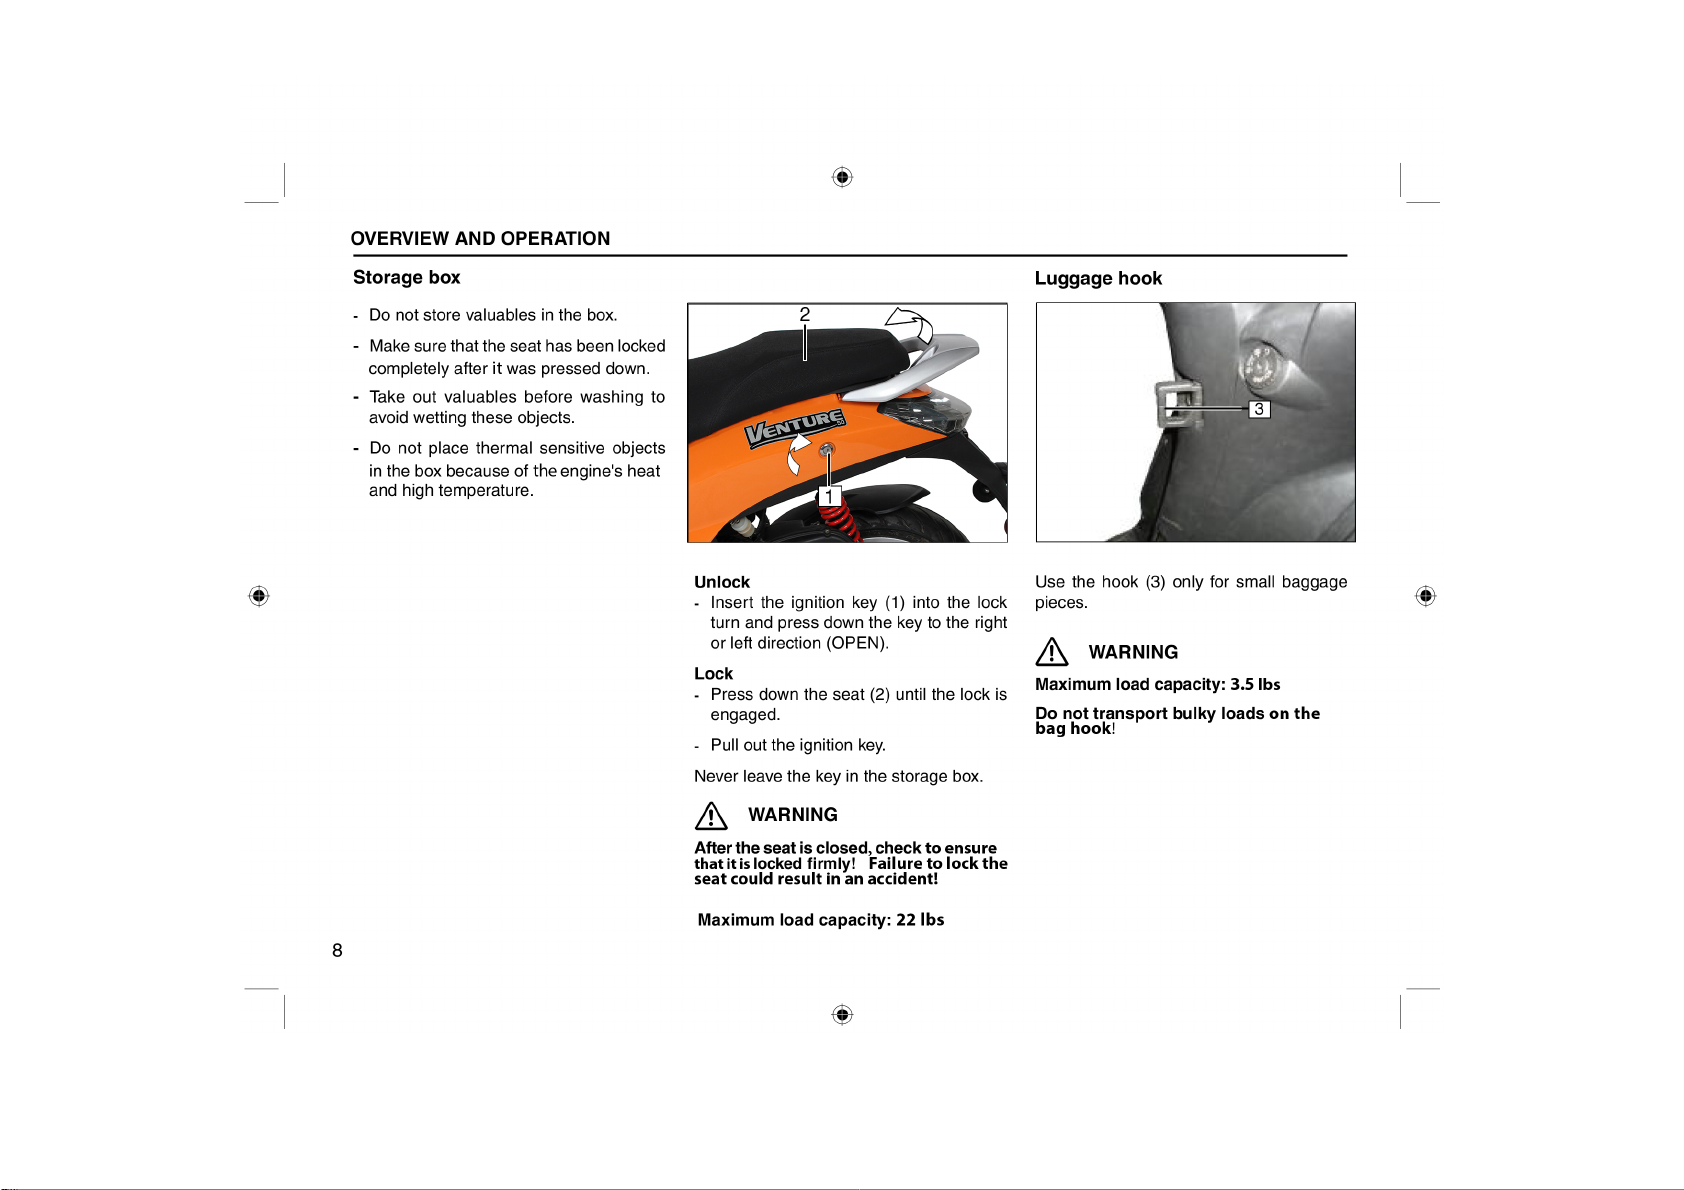
Н¬±®¿¹» ¾±¨ф ´«¹¹¿¹» ¸±±µ ттттттттттттттттттттттттттттттттттттттттттттттттттттттттти
Ъ«»´ф º«»´ -¬±½µ ф½±±´¿²¬ ¬»³°»®¿¬«®» ©¿®²·²¹ ´·¹¸¬тттттттттттттттттттттз
М¿²µ ½¿° тттттттттттттттттттттттттттттттттттттттттттттттттттттттттттттттттттттттттттттттттттпр
Э±±´¿²¬ ´»ª»´ ттттттттттттттттттттттттттттттттттттттттттттттттттттттттттттттттттттттттттттпп
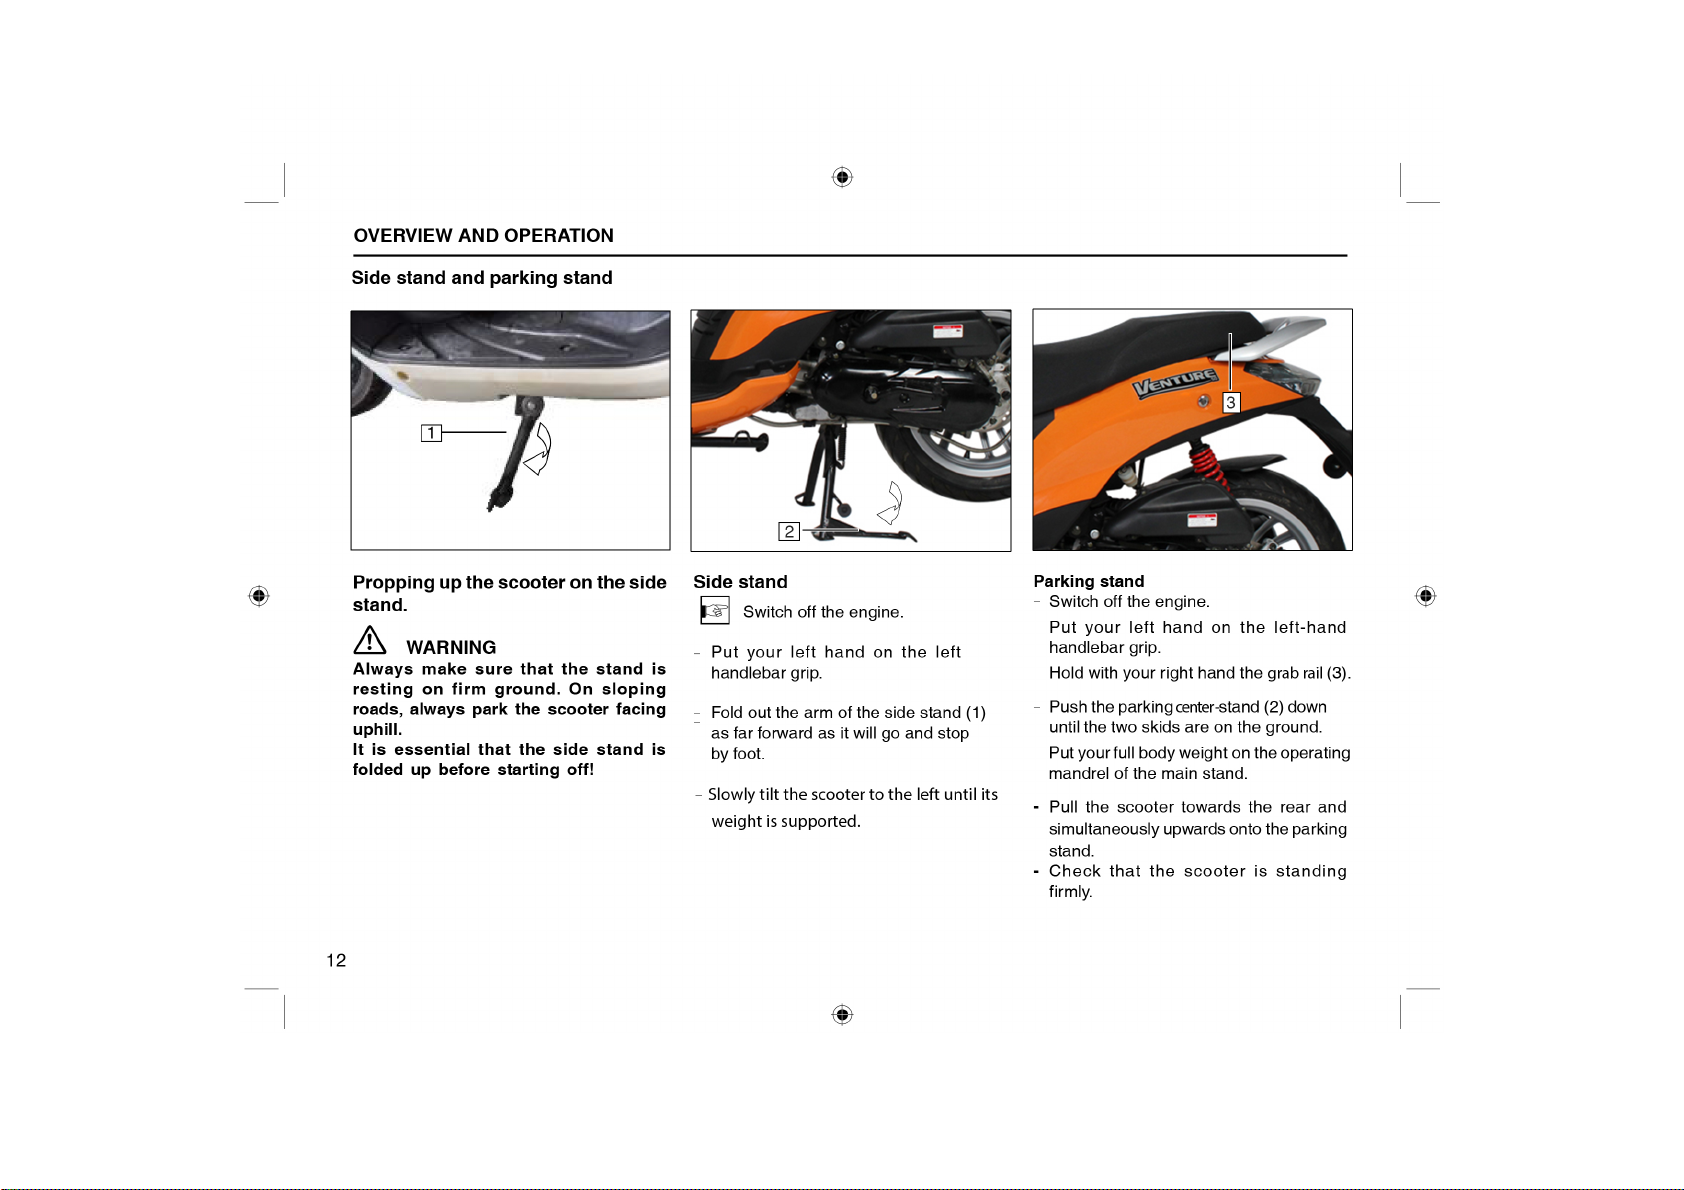
Н·¼» -¬¿²¼ф °¿®µ·²¹ -¬¿²¼ тттттттттттттттттттттттттттттттттттттттттттттттттттттттттпо
НЯЪЫМЗ МЫНМ
Э¸»½µ´·-¬ тттттттттттттттттттттттттттттттттттттттттттттттттттттттттттттттттттттттттттттттттттпн
Ф±¿¼ ¿²¼ ´·¹¸¬- тттттттттттттттттттттттттттттттттттттттттттттттттттттттттттттттттттттттттпм
ОЧЬЧТЩ ЧТНМОЛЭМЧСТН
О·¼» -¿º»´§ тттттттттттттттттттттттттттттттттттттттттттттттттттттттттттттттттттттттттттттттпм
О·¼» »½±²±³·½¿´´§ ¿²¼ »²ª·®±²³»²¬¿´´§ ттттттттттттттттттттттттттттттттттпл
О«²²·²¹у·² ·²-¬®«½¬·±²- ттттттттттттттттттттттттттттттттттттттттттттттттттттттттттттпк
Н¬¿®¬·²¹ тттттттттттттттттттттттттттттттттттттттттттттттттттттттттттттттттттттттттттттпй у пи
Ю®¿µ»- ттттттттттттттттттттттттттттттттттттттттттттттттттттттттттттттттттттттттттттттпз у ор
Н¬±°°·²¹ ¬¸» »²¹·²» тттттттттттттттттттттттттттттттттттттттттттттттттттттттттттттттттор
НЫОКЧЭЫ ЧТНМОЛЭМЧСТН
Н»®ª·½·²¹ ¬¸» -½±±¬»® с ½´»¿²·²¹ ¿¹»²¬- ттттттттттттттттттттттттттттоп у оо
Й·²¬»® ±°»®¿¬·±² ¿²¼ ½±®®±-·±² °®±¬»½¬·±² тттттттттттттттттттттттттттттттоо
О»°¿·®·²¹ °¿·²¬ ¼¿³¿¹» с -»®ª·½·²¹ ¬¸» ¬i®»- ттттттттттттттттттттттттттон
Ф¿§у«° ½±³³·--·±² ттттттттттттттттттттттттттттттттттттттттттттттттттттттттттттттттттон
ï

ЭСТМЫТМН
ТСМЫН СТ УЯЧТМЫТЯТЭЫ
Ы²¹·²» ±·´ ´»ª»´ф ½´»¿² ±·´ º·´¬»® »´»³»²¬тттттттттттттттттттттттттттттттттттттол
Ъ·´´ »²¹·²» ±·´ф ¬®¿²-³·--·±² ±·´ ттт.ттттттттттттттттттттттттттттттттттттттттттттттток
Э¸»½µ·²¹ -¬»»®·²¹ ¾»¿®·²¹ф ¬»´»-½±°·½ º±®µ тттттттттттттттттттттттттттттттой
Мi®»- тттттттттттттттттттттттттттттттттттттттттттттттттттттттттттттттттттттттттттттттттттттттттои
Ъ®±²¬ ©¸»»´ ¾®¿µ» тт.ттттттттттттттттттттттттттттттттттттттттттттттттттттттттттттоз у нр
О»¿® ©¸»»´ ¾®¿µ» ттттттттттттттттттттттттттттттттттттттттттттттттттттттттттттттнп у но
Я¼¶«-¬·²¹ ¬¸» °´¿§ ±º ¬¸» ¬©·-¬ ¹®·° ¬¸®±¬¬´» ½±²¬®±´ тт.ттттттттттттттттттнн
тттттттттттттттттттттттттттттттттттттттттттттттттт.ттттттттнм у нк
Э¸»½µ·²¹ ¬¸» -°¿®µ °´«¹ ттттттттттттттттттттттттттттттттттттттттттт.ттттттттттттттттнй
Ъ«-» ттттттттттттттттттттттттттттттттттттттттттттттттттттттттттттттттттттттттттттттттттттттттттни
Ю¿¬¬»®§ ттттттттттттттттттттттттттттттттттттттттттттттттттттттттттттттттттттттттттттттттнз умр
Э¸¿²¹·²¹ ¬¸» ´·¹¸¬ ¾«´¾- тттттттттттттттттттттттттттттттттттттттттттттттттттттмпу мк
Я¼¶«-¬·²¹ ¬¸» ¸»¿¼´·¹¸¬ ттттттттттттттттттттттттттттттттттттттттттттт.ттттттттттттттттмй
МЫЭШТЧЭЯФ ЬЯМЯ
Ы²¹·²» ттттттттттттттттттттттттттттттттттттттттттттттттттттттттттттттттттттттттттттттттттттттми
Р±©»® ¬®¿²-³·--·±² ттттттттттттттттттттттттттттттттттттттттттттттттттттттттттттттттттмз
Э¸¿--·- тттттттттттттттттттттттттттттттттттттттттттттттттттттттттттттттттттттттттттттттттттттмз
Ы´»½¬®·½¿´ »¯«·°³»²¬ тттттттттттттттттттттттттттттттттттттттттттттттттттттттттттттттттлр
Ь·³»²-·±²- ¿²¼ ©»·¹¸¬- тттттттттттттттттттттттттттттттттттттттттттттттттттттттттттлп
ЙЯООЯТМЗ ЯТЬ НЫОКЧЭЫ ЬЯМЯ
Й¿®®¿²¬§ ½±²¼·¬·±²- ттттттттттттттттттттттттттттттттттттттттттттттттттттттттттттттттттло
Ф·-¬ ±º ©»¿® ·¬»³- тттттттттттттттттттттттттттттттттттттттттттттттттттттттттттттттлн у лм
Ч²-°»½¬·±² °´¿² ттттттттттттттттттттттттттттттттттттттттттттттттттттттттттттттттттлл у лй
Р®±±º ±º ³¿·²¬»²¿²½» ттттттттттттттттттттттттттттттттттттттттттттттттттттттттли у лз
î


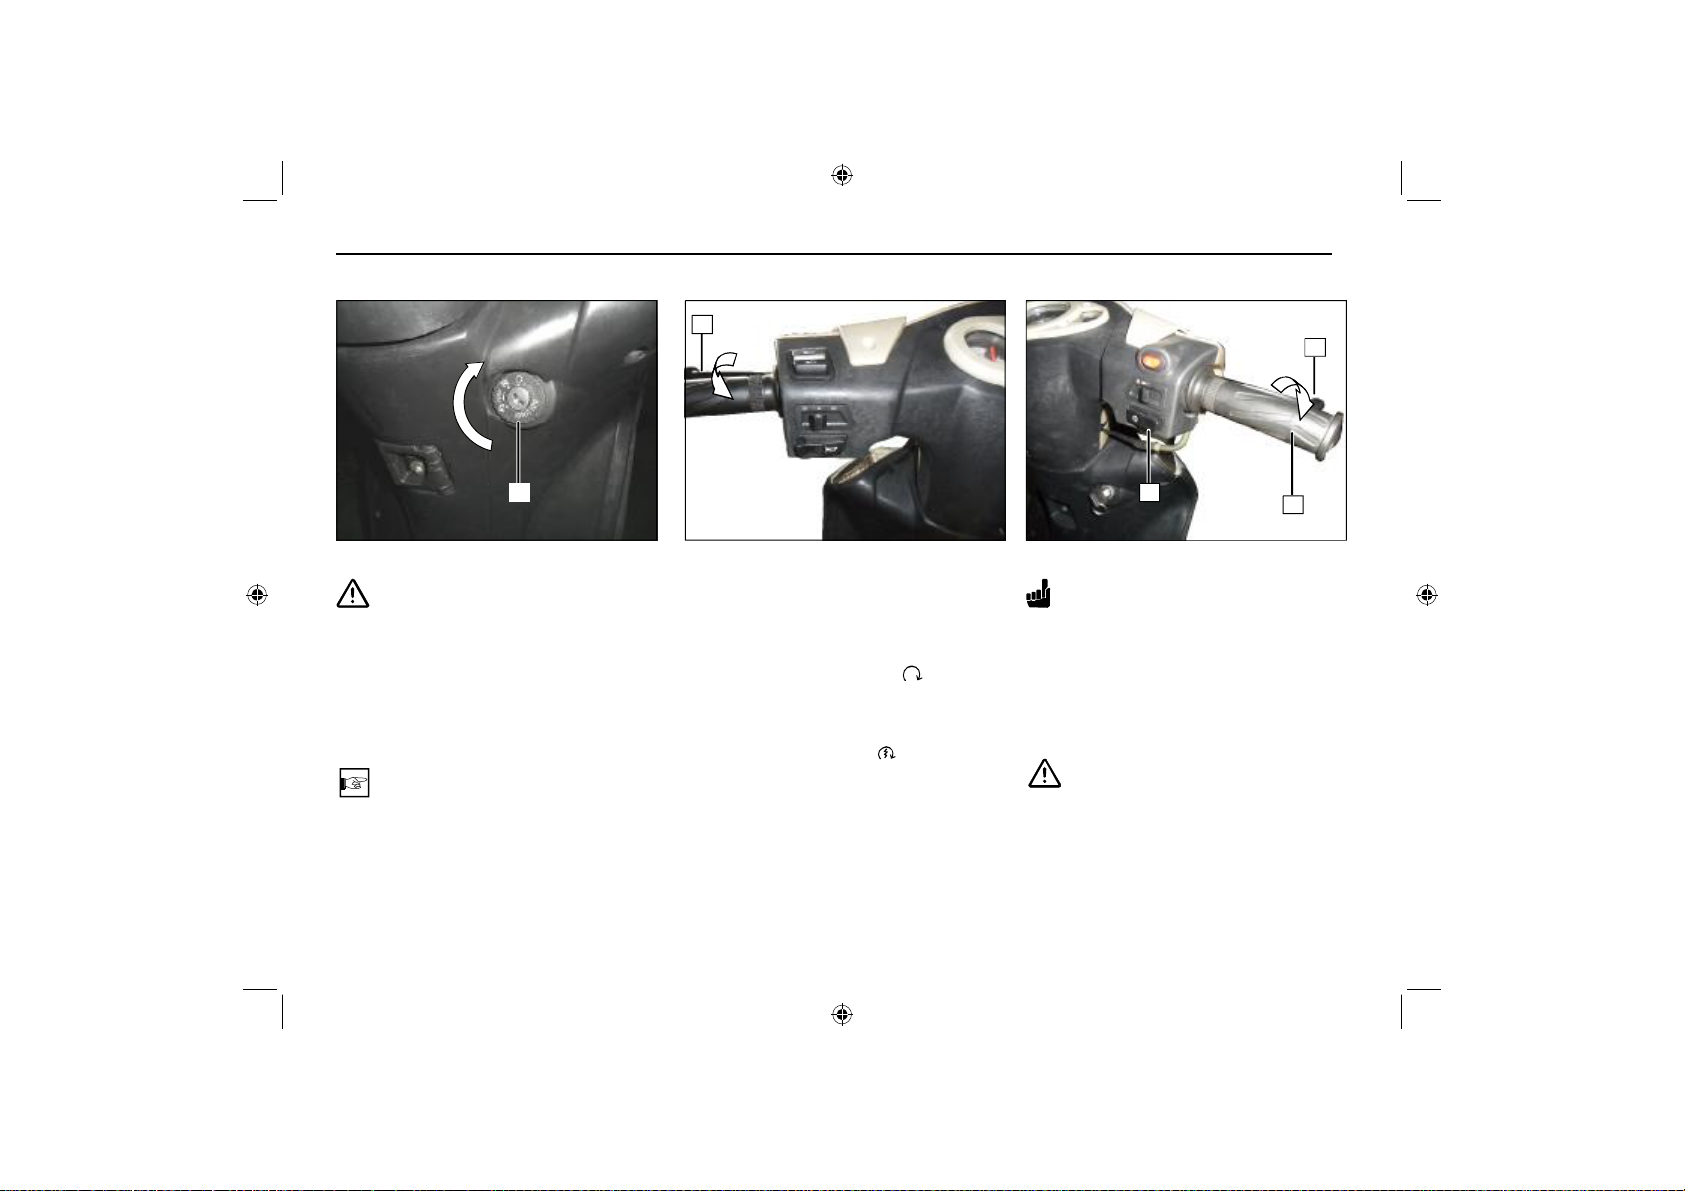
×¹²·¬·±²ó ¿²¼ º±®µó½±´«³² ´±½µ
î
ï
í
Õ»§ °±-·¬·±²-
ÒÑÌÛ
ß½¬·ª¿¬» ¬¸» °¿®µ·²¹ ´·¹¸¬ ±²´§ º±® ¿ ´·³ ·¬ »¼
°»®·±¼ of timeò Ì¿µ» ·²¬± ¿½½±«²¬ ¬¸»
½¸¿®¹» ±º ¬¸» ¾¿¬¬»®§ò
̸» µ»§ ½¿² ¾» ®»³±ª»¼ ·² °±-·¬·±²- ¿²¼
øï÷ Ñ°»®¿¬·²¹ °±-·¬·±²
×¹²·¬·±² ¿²¼ ¿´´ ½·®½«·¬- ¿½¬·ª¿¬»¼ò
СКЫОКЧЫЙ ЯТЬ СРЫОЯМЧСТ
ЙЯОТЧТЩ
ɸ·´» ®·¼·²¹ô ¼± ²±¬ -©·¬½¸ ¬¸» ·¹²·¬·±²
±ºº ÿ
ÒÑÌÛ
Õ»§-:
Two keys are supplied with your vehicle.
Keep the spare key in a safe place.
øî÷ ×¹²·¬·±² ±ºº
Ú±®µ ½±´«³² ²±¬ ´±½µ»¼ ø¸¿² ¼´» ¾¿®½¿² ¾» º®»»´§ ¬«®²»¼ ¬± ¬¸» ´»º¬ ±®
®·¹¸¬÷ò
øí÷ Ú±®µ ½±´«³² ´±½µ»¼ ¿²¼ ×¹²·ó
¬·±² ±ºº
Ì«®² ¬¸» ¸¿²¼´»¾¿® ¬± ¬¸» ´»º¬ ¿- º¿®
¿- ¬± ¬¸» -¬±°ò
Ы-¸ ¿²¼ ¬«®² ¬¸» µ»§ ¬± ¬¸» ´»º¬ «²ó
¬·´ ·¬ ·- ·² ¬¸» ÔÑÝÕ °±-·¬·±²ò
̸» º±®µ ½±´«³² ·- ²±© ´±½µ»¼ò
é

СКЫОКЧЫЙ ЯТЬ СРЫОЯМЧСТ
Ú«»´ô º«»´ ¬¿²µ
ЙЯОТЧТЩ
Ú«»´ ·- ¸·¹¸´§ A ¿³³¿¾´» ¿²¼ ½¿² »¨°´±¼»ò ܱ ²±¬ -³±µ» ±® ¾®·²¹ an open
A ¿³» ²»¿® ¬¸» º«»´ ¬¿²µò
Ú«»´ »¨°¿²¼- «²¼»® ¬¸» ·²A «»²½» ±º ¸»¿¬
¿²¼ ¬¸» -«²ò ̸»®»º±®»ô ²»ª»® B ´´ ¬¸» ¬¿²µ
¬± ¬¸» ¾®·³ò Ò»ª»® B ´´ ¬¸» ¬¿²µ ©¸·´» ¬¸»
»²¹·²» ·- ®«²²·²¹ò
Ò»ª»® ¾®·²¹ ¿ ¹´±©·²¹ ½·¹¿®»¬¬» ±® open
A ¿³» ²»¿® ¿² ±°»² ¬¿²µô ¾» ½¿«-» º«»´
ª¿°±«® ½±«´¼ -«¼¼»²´§ ·¹²·¬»ò
Fuel Indicator
ï
ÒÑÌÛ
̸» º«»´ ·²¼·½¿¬±® øï÷ ·- ¿½¬·ª» ©¸»² ¬¸»
·¹²·¬·±² ·- ¬«®²»¼ ±²ò
̸» -½¿´» ©·¬¸ ¬¸» ¬¿²µ -§³¾±´
Û ã Û³°¬§
Ú ã Ú«´´
ܱ²¬ ®«² ¼±©² ¬¸» º«»´ ¬¿²µ level to
»³°¬§ò
Úuel Grade
ó Ë-» ±²´§ °®»³·«³ ´»¿¼óº®»» º«»´
(minimum 93 octane) in this vehicle.
ݱ±´¿²¬ ¬»³°»®¿¬«®» ©¿®²·²¹ ´·¹¸¬
î
ÒÑÌÛ
If the coolant temperature indic
has reached the red area, the coolant
temperature is too high indicating a
problem.
߬ ¬¸·- ¬·³»ô -¬±° ¬¸» -½±±¬»® ·³³»¼·¿¬»´§
¿²¼ ¬¸»² ¬«®² ±ºº ¬¸» »²¹·²»ô ´»¬¬·²¹ ·¬ ½±±´
¼±©²ò
ator (2)
ЭЯЛМЧСТ
ܱ not ®«² ¬¸» »²¹·²» if it has ±ª»®¸»¿¬ed,
¬¸»®©·-» ¬¸» »²¹·²» ©·´´ become ¼¿³¿¹»¼!
o
ç


ݱ±´¿²¬ ´»ª»´
СКЫОКЧЫЙ ЯТЬ СРЫОЯМЧСТ
í
ï
Ú«´´
ﱩ
ЭЯЛМЧСТ
ݸ»½µ ¬¸» ½±±´¿²¬ ´»ª»´ ¼«®·²¹ »ª»®§
refueling ¿²¼ ®»°´»²·-¸ ·º ²»½»--¿®§ò
д»¿-» µ»»° ¬¸» ½±±´¿²¬ ´»ª»´
between the Low and Full indicators as
shown above.
Ü¿³¿¹» ½¿«-»¼ ¾§ ²±¬ ±¾-»®ª·²¹ ¬¸·-
·²-¬®«½¬·±² ©·´´ ²±¬ ¾» ½±ª»®»¼ «²¼»®
©¿®®¿²¬§ò
î
ï
Ú·´´·²¹ «° ©·¬¸ ½±±´¿²¬
Ú·´´ ¬¸» ®»½±³³»²¼»¼ ½±±´¿²¬ ¬± ¬¸»
ó
°®±°»® ´»ª»´ò
λ½±³³»²¼»¼ ½±±´¿²¬æ Ø·¹¸ó¯«¿´·¬§
¿²¬·º®»»¦» ½±²¬¿·²·²¹ ½±®®±-·±² ·²¸·ó
¾·¬±®- º±® ¿´«³·²«³ »²¹·²»-ò
Ó·¨·²¹ ®¿¬·±æ ìæê ø¿²¬·º®»»¦»æ ©¿¬»®÷
ݱ±´¿²¬ ®»-»®ª±·® ½¿°¿½·¬§æ ðòë Ô
øÓ¿¨ò󳿮µ·²¹÷
ЭЯЛМЧСТ
Ë-» ±²´§ ¼·-¬·´´»¼ ©¿¬»® when mixing
with coolantò
ó λ³±ª» ¬¸» -½®»© øï÷ò
Ñ°»² ¬¸» ·²-°»½¬·±² ½±ª»® øî÷ò
ó
ó Ñ°»² ¬¸» º·´´»® ½¿° øí÷ ¿²¼ ®»°´»²·-¸ ¬¸»
coolant to the °®±°»® ´»ª»´.
ó
Ì·¹¸¬»² ¬¸» º·´´»® ½¿° ¾§ ¸¿²¼
ó Close ¬¸» ·²-°»½¬·±² ½±ª»® øî÷
ïï

ݸ»½µ´·-¬
НЯЪЫМЗ МЫНМ
Þ»º±®» »¿½¸ ®·¼»ô ½¿®®§ ±«¬ ¿ -¿º»¬§
½¸»½µ «-·²¹ ¬¸» ½¸»½µ´·-¬ò
Take this safety check seriously. Carry
out maintenance activities before you
start your ride or ask a specialized
dealer to do so. This will provide you
with the certainty that your scooter
corresponds to traffic regulations. A
technically sound scooter is a basic
requirement for the safety of both
yourself and other road users.
Þ»º±®» -¬¿®¬·²¹ §±«® ®·¼»ô ½¸»½µ ¬¸» º±´ó
´±© ·²¹æ
Š ͬ»»®·²¹ ø-³±±¬¸ ¿²¼ º®»» ±º °´¿§÷
Š Ý´«¬½¸ ´»ª»® °´¿§
Š Û²¹·²» ±·´ ¯«¿²¬·¬§
Š C±±´¿²¬ ¯«¿²¬·¬§
Š Ú«»´ ¯«¿²¬·¬§
Š Ú®±²¬ ¾®¿µ»
Š λ¿® ¾®¿µ»
- Tires (profile and pressure)
Š Ì»´»-½±°·½ º±®µ
Š Ô±¿¼ ñ ´·¹¸¬-
Š ̱¬¿´ ©»·¹¸¬
Š Ô·¹¸¬-
Š Þ®¿µ»- ø±°»®¿¬·±²÷
½«´¬·»-ô ½±² ¬¿½¬ ¿
¼»¿´»®ô ©¸± ©·´´ ¼± »ª»®§¬¸·²¹ °±-ó
-·¾´» ¬± ¿--·-¬ §±«ò
ЙЯОТЧТЩ
ɸ·´» ¬¸» »²¹·²» ·- ®«²²·²¹ ±® ¬¸» ·¹ó
²· ¬·±² ·- ±²ô ¼± ²±¬ ¬±«½¸ ¬¸» ·¹²·¬·±²
-§-¬»³ò
ЪЧОЫ ШЯЖЯОЬ
Ì
¸» »¨¸¿«-¬ -§-¬»³ ¾»½±³»É¸·´» ®·¼·²¹ô ·¼´·²¹ ±® °¿®µ·²¹ô ³¿µ» -«®»
¬¸¿¬ ²± ·²A ¿³³¿¾´» ³¿ ¬» ®· ¿´- ø»ò¹ò ¸¿§ô
´»¿ª»-ô ¹®¿--ô ½±ª »® ·²¹- ±® ´«¹¹¿¹»ô »¬½ò÷
½¿² ½±³» ·²¬± ½±²¬¿½¬ ©·¬¸ ·¬ÿ
ª»®§ ¸±¬ò
ïí

НЯЪЫМЗ МЫНМ
Ô±¿¼ ñ ´·¹¸¬-
ЙЯОТЧТЩ
For the sake of your safety, use
only original Genuine Scooter
Company parts and acessories or
products approved by us.
We cannot judge whether each third-
party product can be safely used in
combination with your scooter. Nor can
an official approval give such a
guarantee in all cases, since the test
scope is not always sufficient.
ÒÑÌÛ
Our ¿½½»--±®·»- ¿²¼ ¿° °®±ª»¼
¿ª¿·´¿¾´» º®±³ ¿´´ -°» ½·¿´ ·¦»¼ ¼»¿´ó
»®-ò
ݱ®®»½¬´§ ´±¿¼»¼
ó Ó¿µ» -«®» ¬¸¿¬ ¬¸» ´»º¬ó®·¹¸¬ ©»·¹¸¬ ¼·-ó
¬®·¾«¬·±² ·- ¾¿´¿²½»¼ò
ó ݸ»½µ ¬¸¿¬ º¿-¬»²·²¹- ¿®» ½±®®»½¬ ¿²¼
¬·¹¸¬ò
ó ܱ ²±¬ ¬®¿²-°±®¬ ¾«´µ§ ´±¿¼-ò
ó ܱ ²±¬ ½±ª»® ¬¸» ´·¹¸¬-ò
ЙЯОТЧТЩ
The total allowable weight may not
be exceeded.
Check the tire pressure.
ݸ»½µ ¬¸» ´·¹¸¬-.
ЙЯОТЧТЩ
Þ»º±®» ¿²§ ®·¼»ô ½¸»½µ ¬¸» ±°»®¿¬·±² ±º
¿´´ ´·¹¸¬·²¹ ½±³°±²»²¬-ò
ó ݸ»½µ ¬¸¿¬ ¬¸» ¸»¿¼´¿³°- ¿²¼ ´»²- »- ¿®»
½´»¿²ò
η¼» -¿º»´§
ЭЯЛМЧСТ
η¼·²¹ -¿º»¬§ ·- ´¿®¹»´§ ¼» ¬»® ³·²»¼ ¾§
¬¸» ³¿²²
̸»®»º±®»æ
Š Ы¬ ±² ¿ DOT a°°®±ª»¼ -¿º»¬§ ¸»´ ³»¬
Š É»¿® -«·¬¿¾´» °®±¬»½¬·ª» ½´±¬¸»-ò
Š λ-¬ §±«® º»»¬ ±² ¬¸» º±±¬®»-¬-ò
Š ܱ ²±¬ ®·¼» ·º §±«® ®·¼·²¹ ¿¾·´·¬§ ¸¿- ¾»»²
DZ«® ®»¿½¬·±²- ½¿² ¾» ¿¼ª»®-»´§ ¿º º»½¬ »¼
²±¬ ±²´§ ¾§ ¿´½±¸±´ô ¾«¬ ¿´-± ¾§ ¼®«¹- ¿²¼
³»¼·½·²»-ò Do not operate the scooter
under the influence of drugs or alcohol.
- Strictly observe all traffic regulations.
- Always adapt your riding speed to the
»® ±º ®·¼·²¹ò
¿²¼ ½±®®»½¬ly ½´±-» ¬¸» ¾«½µ´»ò
½±³°®±³·-»¼ò
traffic and road conditions.
On smooth, slippery roads take into account
that your riding stability and braking power
are limited by the grip of the tires on the
road surface.
ïì

η¼» »½±²±³·½¿´´§ ¿²¼ ¾» ¿©¿®» ±º ¬¸» »²ª·®±²³»²¬
ОЧЬЧТЩ ЧТНМОЛЭМЧСТН
Fuel consumption, environmental
pollution and wear of the engine, brakes
and tires depend on various factors.
Your personal riding style is highly
determinate for economical fuel
consumption, exhaust gas and noise
generation.
While idling, the engine takes a long time
to warm up to operational temperature.
In the warm-up phase, however, the
wear level and pollutant emissions are
very high. It is therefore best to start
riding immediately after start-up.
Avoid rapid acceleration
Open the throttle not further than
needed, in order to reduce fuel
consumption as well as pollution and
wear levels.
Do not use excessive revs; change up as
soon as possible and do not change
down until it is necessary to do so.
Ride as evenly as possible and look
ahead as far as possible.
Unnecessary acceleration and hard
braking cause high fuel consumption and
increased pollution levels.
Turn the engine off when waiting in
traffic.
Different riding conditions affect fuel
consumption. The following conditions
are unfavorable for fuel consumption:
- High traffic density, especially in big
cities with many stops for traffic lights.
- Frequent short rides with repeated
starts and warm-ups of the engine.
- Riding in a column of scooters at low
speed, meaning riding with relatively
high revs.
Plan rides ahead of time in order to avoid
heavy traffic.
Fuel consumption is also affected by
conditions that are out of your control,
for instance, poor road conditions,
hills, riding in winter.
Observe the following aspects for
economical fuel consumption:
- The planned inspection intervals
must be closely observed.
- Regular service by a specialized
dealer will guarantee not only
continued operability, but also
economical fuel consumption, low
environmental pollution and a long
lifespan.
- Check the tire pressure every two
weeks
Low tire pressure increases rolling
resistance. This increases fuel
c
onsumption and tire wear and
adversely affects riding behavior.
- Continually check fuel consumption.
- Frequently check the oil.
ïë

ОЧЬЧТЩ ЧТНМОЛЭМЧСТН
Ϋ²²·²¹ó·²
Ϋ²²·²¹ó·² ·²-¬®«½¬·±²- º±® »²¹·²»
¿²¼ ¬®¿²-³·--·±²
ЭЯЛМЧСТ
Û¨½»--·ª» ®»ª- ©¸·´» ®«²²·²¹ó·² ¬¸» »²ó
¹·²» ·²½®»¿-»- ¬¸» ©»¿® ±º ¬¸» »² ¹·²»ò
Û²¹·²» º¿«´¬- ¼«®·²¹ ¬¸» ®«² ²·²¹ó·² °»ó
®·±¼ ³«-¬ ¾» ·³ ³» ¼· ¿¬» ´§ ®» °±®¬ »¼ ¬± ¿
-°»½·¿´·¦»¼ ¼»¿´»®ò
ÒÑÌÛ
Ü«®·²¹ ¬¸» ®«²²·²¹ó·² °»®·±¼ô ®·¼» ·² º®»ó
¯«»²¬´§ ½¸¿²¹·²¹ ´±¿¼ ¿²¼ ®°³ ®¿²¹»-ò Í»ó
´»½¬ ©·²¼·²¹ ¿²¼ -´·¹¸¬´§ ¸·´´§ ®±«¬»-ò ߪ±·¼
½±²-¬¿²¬´§ ´±© ®°³ ½±«²¬- ¿²¼ º«´´ ¬¸®±¬ ¬´»
«²¼»® ´±¿¼ò
ó Ü«®·²¹ ¬¸» B ®-¬ 250 milesæ
Ô»-- ¬¸¿² ïñî ¬¸®±¬¬´»ò
ó Ë° ¬± 500 milesæ
̸» B ®-¬ ·²-°»½¬·±² ³«-¬ ¾» ½¿®®·»¼
±«¬ ·³³»¼·¿¬»´§ ¿º¬»® ¬¸» B ®-¬ 500
miles.
DZ« ½¿² -¿ª» §±«®-»´º ¼»´¿§- ¾§ ³¿µ ·²¹
¿² ¿°°±·²¬³»²¬ ©·¬¸ ¿ -°» ½·¿´ ·¦»¼
¼»¿´»® ·² ¿¼ª¿²½»ò
¿² íñì ¬¸®±¬¬´»ò
Ô»-- ¬¸
ЭЯЛМЧСТ
Running-in new tires
ЭЯЛМЧСТ
New tires have a smooth surface
and are often covered in release
agent. The tires must therefore be
roughened by carefully running
them in at various slanted
positions.
Only then will the tire surface
obtain its full grip!
Ϋ²²
·²¹ó·² ²»© ¾®¿µ» ´·²·²¹-
ЙЯОТЧТЩ
Ò»© ¾®¿µ» ´·²·²¹- ³«-¬ ¾» ®«²ó·² ¿²¼
©·´´ ²±¬ ¸¿ª
after 250 miles.
effect can be compensated for by an
increase in pressure on the brake
lever.
unnecessary hard braking actions!
» ¬¸»·® º«´´ º®·½¬·±² °±©»® «²¬·´
The slightly reduced braking
During this period, avoid
ïê
ͬ¿®¬·²¹ ©·¬¸ ¬¸» »´»½¬®·½ -¬¿®¬»®
ОЧЬЧТЩ ЧТНМОЛЭМЧСТН
î
ë
ï
ЙЯОТЧТЩ
Prop up the scooter with the parking
stand. Operate the rear handbrake
lever to avoid movement of the
scooter.
Avoid high engine rpm's while the
vehicle is standing still, otherwise the
clutch will engage.
ÒÑÌÛ
The tank cap is located behind the rear part
of the seat (1).
Þ»º±®» -¬¿®¬·²¹
ó Ю±° «° ¬¸» -½±±¬»® ©·¬¸ ¬¸» center
-¬¿²¼ò
Ì«®² ¬¸» ·¹²·¬·±² ´±½µ øï÷ ©·¬¸ ¬¸» ·¹²·¬·±²
ó
µ»§ ¬± ·¬- ±°»®¿¬·²¹ °±-·¬·±² ò
ó ܱ ²±¬ ±°»² ¬¸» ¬¸®±¬¬´» øì÷ò
Ы´´ ¿²¼ ¸±´¼ either ¾®¿µ» ´»ª»® øî÷ ±® øë÷ò
ó
ó Ñ°»®¿¬» ¬¸» -¬¿®¬ ¾«¬¬±² øí÷ò
ó ׺ ¬¸» »²¹·²» ½¿² ²±¬ ¾» -¬¿®¬»¼ ¿º¬»® ¬¸»
-¬¿®¬»® ³±¬±® ·- ®«²²·²¹ º±® íóë -»½±²¼-ô
±°»² ¬¸» ¬¸®±¬¬´» øì÷ ïñè ó ïñì ¬«®² ¿²¼
-¬¿®¬ ¿¹¿·²ò
Ы-¸ ¬¸» -½±±¬»® ±ºº ·¬- °¿
ó
ó Ó±«²¬ ¬¸» -½±±¬»®ò
ó λ´»¿-» ¬¸» ¾®¿µ» ¾»º±®» ®·¼·²¹ò
®µ·²¹ -¬¿²¼ò
í
ì
ЭЯЛМЧСТ
׺ ¬¸» »²¹·²» ©
®»´»¿-» ¬¸» -¬¿®¬ ¾«¬¬±²ô ©¿·¬ ¿ º»© -»½ó
±²¼- ¿²¼ °«-¸ ·¬ ¿¹¿·²ò Û¿½¸ ¬·³»ô °«-¸
¬¸» -¬¿®¬ ¾«¬¬±² º±® ¶«-¬ ¿ º»© -»½o²¼- ·²
±®¼»® ¬± -¿ª» ¬¸» ¾¿¬¬»®§ò Ò»ª»® °«-¸ ¬¸»
-¬¿®¬ ¾«¬¬±² º±® ³±®» ¬¸¿² ïð -»½±²¼-ò
±²K¬ -¬¿®¬ ·³³»¼·¿¬»´§ô
ЙЯОТЧТЩ
Ò»ª»® ¿´´±© ¬¸» »²¹·²» ¬± ®«² ·² ¿² »²ó
½´±-»¼ -°¿½»ò Û¨¸¿«-¬ ¹¿-»- ¿®» ¸·¹¸´§
¬±¨·½ ¿²¼ ½¿² µ·´´ò
ïé

RIDING INSTRUCTIONS
Starting with kick starter
1
2
3
CAUTION
Afterstartingtheengine,checkthatthe
kickstarterlever(3)isreturnedtoits
normal position.
18
- Propping up thescooterwhenoperating
the kick starter.
- Turntheignitionlock(1)withthekeyto
its operating position .
- Do not open the throttle (2).
- Depressthekickstarterlever(3)quickly
and the engine will start.
- Aftertheengineisrunningreturnthekick
starter lever to its normal position.
NOTE
Usethekickstarterfromtimetotimeto
maintain its function.

Þ®¿µ·²¹
ОЧЬЧТЩ ЧТНМОЛЭМЧСТН
É»¬ ¾®¿µ»-
Washing the scooter or riding through
water or rain can delay the braking effect
due to wet or (in winter) ice-covered brake
discs and linings.
ЙЯОТЧТЩ
̸» ¾®¿µ»- ³«-¬ B ®-¬ ¾» ±°»®¿¬»¼ «²¬·´
¬¸»§ ¿®» ¼®§.
Í¿´¬ B ´³ ±² ¬¸» ¾®¿µ»-
ɸ»² ®·¼·²¹ ±² -¿´¬»¼ -¬®»»¬- ©·¬¸±«¬ ¾®¿µó
·²¹ º±® ¿ ©¸·´»ô ¬¸» º«´´ ¾®¿µ·²¹ »º º»½¬ ³¿§
¾» ¼»´¿§»¼ò
Ñ·´ ¿²¼ ¹®»¿-»
ЙЯОТЧТЩ
̸» ¾®¿µ» ¼·-½- ¿²¼ ´·²·²¹- ³«-¬ ¾» º®»»
±º ±·´ ¿²¼ ¹®»¿-»ÿ
If the scooter is not used for a while, a
rust film may form on the brakes and
thus increase the braking effect. A thick
rust film can cause the brakes to lock
up. When setting out on a ride after a
long lay-up period, carefully operate the
brakes several times until they work
normally.
ÒÑÌÛ
Ó¿µ» -«®» §±« °®¿½¬·½» ¾®¿µ·²¹ º±® »³»®ó
¹»² ½§ -·¬«¿¬·±²-ô ¾«¬ ¼± -± ©¸»®» §±« ©·´´
²±¬ °±-» ¿ ®·-µ ¬± §±«®-»´º ±® ±¬¸»®- ø»ò¹ò ¿
¼»-»®¬»¼ °¿®µ·²¹ ¿®»¿÷ò
ЙЯОТЧТЩ
Ñ°»®¿¬» ¬¸» ¾®¿µ»- ¬± ¹®·²¼ ±ºº ¬¸» -¿´¬
¼»°±-·¬»¼ ±² ¬¸» ¾®¿µ» ¼·-½-ò
Ü·®¬§ ¾®¿µ»-
ɸ»² ®·¼·²¹ ±² ¼·®¬§ -¬®»»¬-ô ¬¸» ¾®¿µ ·²¹
»ºº»½¬ ½¿² ¾» ¼»´¿§»¼ ¼«» ¬± ¼·®¬§ ¾®¿µ»
¼·-½- ¿²¼ ´·²·²¹-ò
ЙЯОТЧТЩ
Ñ°»®¿¬» ¬¸» ¾®¿µ»- «²¬·´ ¬¸»§ ¿®»
½´»¿²ò Ô·²·²¹ ©»¿® ·- ·²½®»¿-»¼ ¾§ ¼·®¬§
¾®¿µ»-ÿ
ïç

ОЧЬЧТЩ ЧТНМОЛЭМЧСТН
Þ®¿µ·²¹
ï
Þ®¿µ·²¹
̸» º®±²¬ ¾®¿µ» ¿²¼ ®»¿® ¾®¿µ» ¿®» ±° »® ¿¬ »¼
·²¼»°»²¼»²¬´§ º®±³ »¿½¸ ±¬¸»®ò
̸» º®±²¬ ¾®¿µ» ·- ±°»®¿¬»¼ ª·¿ ¬¸» ®·¹¸¬ó
¸¿²¼ ¾®¿µ» ´»ª»® øï÷ ±² ¬¸» ¸¿² ¼´» ¾¿®-ô ¿²¼
¬¸» ®»¿® ¾®¿µ» ·- ±°»®¿¬»¼ ª·¿ ¬¸» ´»º¬ó¸¿²¼
¾®¿µ» ´»ª»® øî÷ò
ɸ»² -¬±°°·²¹ ±® -´±©·²¹ ¼±©²ô ®» ´»¿-»
¬¸» ¬¸®±¬¬´» ¹¿- ¿²¼ ±°»®¿¬» ¾±¬¸ ¾®¿µ»¿¬ ¬¸» -¿³» ¬·³»ò
î
Ѳ ¬·¹¸¬ ½«®ª»-ô -¿²¼§ ñ ¼·®¬§ -¬®»»¬-ô ©»¬
¿-°¸¿´¬ ¿²¼ ·½§ ®±¿¼-ô «-» ¬¸» º®±²¬ ¾®¿µ»
½¿®»º«´´§æ ·º ¬¸» º®±²¬ ©¸»»´ ´±½µ-ô ¬¸» ¾·µ»
©·´´ -´·¼» -·¼»©¿§-ò
Þ®¿µ» ©·¬¸ ½¿®»ò Ô±½µ»¼ ©¸»»´- ¼± ²±¬ ¸¿ª»
³«½¸ ¾®¿µ·²¹ »ºº»½¬ ¿²¼ ½¿² ´»¿¼ ¬± -µ·¼ó
¼·²¹ ñ ½®¿-¸·²¹ò ײ °®·² ½· °´»ô ¼± ²±¬ ¾®¿µ»
±² ¿ ½«®ª»ô ¾«¬ ¾»º±®» ¬¸» ½«®ª»ò
Þ®¿µ·²¹ ±² ¿ ½«®ª» ·²½®»¿-»- ¬¸» ¼¿² ¹»®
±º -´·¼·²¹ò
ͬ±°°·²¹ ¬¸» »²¹·²»
í
ó Ì«®² ¬¸» ·¹²·¬·±² ´±½µ øí÷ ©·¬¸ ¬¸» ·¹²·¬·±² µ»§
¬± ¬¸» °± -· ¬·±² ò
ó Ы´´ ±«¬ ¬¸» ·¹²·¬·±² µ»§ò
îð

Servicing the scooter / cleaning agents
ÒÑÌÛ
λ¹«´¿®ô »¨°»®¬ -»®ª·½» ©·´´ ¸»´° ³¿·² ¬¿·²
¬
¸» ª¿´«» ±º §±«® ³±¬±®½§½´» ¿²¼ ·- ¿ ½±²¼·ó
¬·±² º±® ¹«¿®¿²¬»» ½´¿·³- º±® ½±® ®± -·±² ¿²¼
±¬¸»® -«½¸ ¼¿³¿¹»ò
ЭЯЛМЧСТ
Ϋ¾¾»® ¿²¼ °´¿-¬·½ °¿®¬- ©·´´ ¾» ¼¿³ó
¿¹»¼ ¾§ ½¿«-¬·½ ±® °»²»¬®¿¬·²¹ ½´»¿² ·²¹
¿¹»²¬- ±® -±´ª»²¬-ò
ЙЯОТЧТЩ
ß´©¿§- ½¿®®§ ±«¬ ¿ ¾®¿µ» ¬»-¬ ¿º¬»® ½´»¿²ó
·²¹ ¿²¼ ¾»º±®» -¬¿®¬·²¹ ¿ ®·¼»ÿ
ЭЯЛМЧСТ
ܱ ²±¬ «-» -¬»¿³ ±® ¸·¹¸ó°®»--«®» ¶»¬
¼»ª·½»-ÿ
Í«½¸ ¼»ª·½»- ½¿² ¼¿³¿¹» -»¿´-ô ¬¸» ¸§ó
¼®¿«´·½ ¾®¿µ·²¹ -§-¬»³ ¿²¼ ¬¸» »´»½ ¬®· ½¿´
-§-¬»³ò
НЫОКЧЭЫ ЧТНМОЛЭМЧСТН
ЭФЫЯТЧТЩ
ó ̱ ©¿-¸ ¬¸» ³±¬±®½§½´»ô «-» ¿ -±º¬ -°±²¹»
¿²¼ ½´»¿² ©¿¬»®ò
ó ߺ¬»®©¿®¼-ô ¼®§ ±ºº ©·¬¸ ¿ °±´·-¸·²¹ ½´±¬¸
±® ½¸¿³±·-ò
ó ܱ ²±¬ ©·°» ±ºº ¼«-¬ ±® ¼·®¬ ©·¬¸ ¿ ¼®§
½´±¬¸ô ¬± ¿ª±·¼ -½®¿¬½¸·²¹ ¬¸» °¿·²¬ ±® ½±ªó
»®·²¹ò
îï

НЫОКЧЭЫ ЧТНМОЛЭМЧСТН
Servicing the scooter / cleaning agents
РОЫНЫОКЯМЧСТ ЯЩЫТМН
ɸ»² ²»½»--¿®§ô ¬¸» ³±¬±®½§½´» ³«-¬ ¾»
°®»-»®ª»¼ ©·¬¸ ½±³³»®½·¿´´§ ¿ª¿·´ ¿¾´» °®»ó
-»®ª·²¹ ¿²¼ ½´»¿²·²¹ ¿¹»²¬-ò
ó Þ§ ©¿§ ±º °®»½¿«¬·±² ø»-°»½·¿´´§ ·² ©·²ó
¬»®÷ô ®»¹«´¿®´§ ¬®»¿¬ °¿®¬- ´·¿¾´» ¬± ½±®®±ó
-·±² ©·¬¸ °®»-»®ª¿¬·±² ¿¹»²¬-ò
ЭЯЛМЧСТ
Ò»
°´¿-¬·½ °¿®¬-ò
ó ߺ¬»® ¿ ´±²¹ ®·¼»ô ¬¸±®±«¹¸´§ ½´»¿² ¬¸»
» °¿·²¬ó°±´·-¸·²¹ ¿¹»²¬- ±²
ª»® «-
½¸¿--·- ¿²¼ ¬¸» ¿´«³·²·«³ °¿®¬- ¿²¼ °®»ó
-»®ª» ¬¸»³ ©·¬¸ ¿ ½±³ ³»® ½·¿´ ´§ ¿ª¿·´¿¾´»
¿²¬·ó½±® ®± -·±² ¿¹»²¬ò
Ñ°»®¿¬·±² ·² ©·²¬»® ¿²¼
¿²¬·ó½±®®±-·±² °®±¬»½¬·±²
ÒÑÌÛ
Ю±¬»½¬ ¬¸» »²ª·®±²³»²¬ ¾§ «-·²¹ ±²´§ »²ó
ª·®±²³»²¬¿´´§ º®·»²¼´§ °®»-»®ª¿¬·±² ¿¹»²¬-ô
¿²¼ «-» ¬¸»³ º®«¹¿´´§ò
Use of the vehicle in the winter can
cause considerable damage due to the
presence of salt on the roads.
ЭЯЛМЧСТ
ܱ ²±¬ «-» ¸±¬ ©¿¬»®ô ©¸·½¸ ©±«´¼ ·²ó
½®»¿-» ¬¸» corrosion »ºº»½¬ ±º ¬¸» -¿´¬ò
ó At the end of each ride, wash the
scooter with cold water.
- Thoroughly dry the scooter.
- Treat parts liable to corrosion with wax borne anti-corrosion agents.
îî

НЫОКЧЭЫ ЧТНМОЛЭМЧСТН
λ°¿·®·²¹ °¿·²¬ ¼¿³¿¹»
Ó·²±® °¿·²¬ ¼¿³¿¹» -¸±«´¼ ¾» ·³ ³» ¼· ¿¬» ´§
®»°¿·®»¼ò
Servicing tires
If the scooter is not used for a long
period, it is recommended to support the
scooter so that its weight is not on the
tires.
You can prevent the tires from becoming
dry and brittle by spraying them with a
silicone-rubber treatment. First,
thoroughly clean the tires.
Do not store the scooter or the tires in
hot spaces (such as a boiler room) for
long periods.
ЙЯОТЧТЩ
A minimum tire-profile depth of 2.0
mm must be maintained at all times.
Long-term Storage
Storage
- Clean the scooter
- Remove the battery
- Observe the maintenance instructions.
- Spray suitable lubricants onto the brake lever and clutch lever joints and the side standard and main-standard bearings.
- Rub bright / chromium-plated parts with
acid-free grease (Vaseline).
- Store the scooter in a dry room and jack
it up so that its weight is not on the
wheels
ÒÑÌÛ
Combine storage activities with an
inspection by a dealer.
Recommision after storage
- Remove the preservation agents from
the outside.
- Clean the scooter.
- Install the charged battery
- Preserve the battery terminals with
terminal grease.
- Check / adjust the tire pressure.
- Check the brakes.
- Carry out activities according to the
inspection plan.
- Carry out the safety checks.
îí

НЫОКЧЭЫ ЧТНМОЛЭМЧСТН
Ì»½¸²·½¿´ ½¸¿²¹»-ô ¿½½»--±®·»- ¿²¼ -°¿®» °¿®¬-
ЙЯОТЧТЩ
Technical changes to the scooter can
lead to cancellation of the warranty.
Should you want to make technical
changes, observe Genuine Scooter
Company guidelines. This will help to
prevent the scooter from being damaged
and ensure the operational safety of the
scooter is retained. A specialized dealer
can carry out these activities with
meticulous care.
Always consult a dealer before buying
accessories or making any technical
changes.
ЭЯЛМЧСТ
We recommend using only approved
accessories and original spare parts
for our scooters.
This is in your own best interest: the
safety, suitability and reliability of these
accesories and parts will have been
tested specifically for our scooters.
Although we keep track of the market,
we cannot evaluate nor be held liable
for the quality of non-approved
accessories and parts, even if they
have a certificate of acceptance from
an originally recognized technical
testing / supervision agency, or a
license issued by the authorities.
For approved accessories and original
spare parts, see a Genuine Scooter
Company dealer. He/She will also
ensure that they are professionally
installed.
îì

ТСМЫН СТ УЯЧТМЫТЯТЭЫ
Û²¹·²» ±·´ ´»ª»´
ï
î
í
ݸ»½µ·²¹ ¬¸» »²¹·²» ±·´ ´»ª»´
ó ͬ±° ¬¸» ©¿®³»¼ó«° »²¹·²»ô ©¿·¬ º±®
-»ª»®¿´ ³·²«¬»-ò
ó Ю±° «° ¬¸» -½±±¬»® ±² ¬¸» °¿®µ·²¹
-¬¿²¼ò
ó λ³±ª» ¬¸» ±·´ ´»ª»´ °´«¹øï÷ ¿²¼
½¸»½µ ¬¸» »²¹·²» ±·´ ´»ª»´ ¬¸¿¬ -¸±«´¼ ¾»
¾»¬©»»² ¬¸» ³·²·³«³ ´»ª»´ ³¿®µøí÷ ¿²¼
³¿¨·³«³ ´»ª»´ ³¿®µøî÷ò
ó ׺ ¾»´±© ¬¸» ³·²·³«³ ´»ª»´ ³¿®µøí÷ô
®»°´»²·-¸ ®»½±³³»²¼»¼ »²¹·²» ±·´ ¬± ¬¸»
°®±°»® ´»ª»´ò
ó
ͬ±° ©¿®³»¼ó«° »²¹·²» ¿²¼ ½¸»½µ ¿¹¿·²
ݸ¿²¹·²¹ ¬¸» »²¹·²» ±·´
ï
ݸ¿²¹·²¹ ¬¸» »²¹·²» ±·´ ´»ª»´
- Stop the warmed-up engine, wait
for several minutes.
- Prop up the scooter on the parking
s
tand.
- Remove the oil drain bolt (1) and drain
the engine oil.
ЭЯЛМЧСТ
ܱ ²±¬ ¿´´±© º±®»·¹² ³¿¬»®·¿´- ¬±
¬»® ¬¸» ½®¿²µ½¿-»
»²
Ý´»¿² ±·´ º·´¬»® »´»³»²¬
î
í
ì
ï
Ý´»¿² ±·´ º·´¬»® »´»³»²¬
If the oil filter element also needs to be
replaced or cleaned, perform the following
procedure.
- Remove the oil strainer cover (1), spring
(3) and Oil filter element (2).
- Replace the O-ring (4).
- Install the new or clean oil filter element
and the oil strainer cover.
ó Ì·¹¸¬»² ¬¸» ±·´ ´»ª»´ °´«¹
îë

ТСМЫН СТ УЯЧТМЫТЯТЭЫ
Ú·´´ »²¹·²» ±·´
ï
ÒÑÌÛ
λ½±³³»²¼»¼æ
Û²¹·²» ±·´ ¹®¿¼»æ ßÐ× -»®ª·½» ÍÙ ¬§°»
±® ¸·¹¸»®
Ы²¹·²» ±·´ ¬§°»ж НЯЫ прЙсмр
Ï«¿²¬·¬§æ ðòé Ôè
Ì®¿²-³·--·±² ±·´
ï
î
ݸ»½µ·²¹ ¬¸» ¬®¿²-³·--·±² ±·´ ´»ª»´
- Stop the warmed-up engine, wait for
approx. 5 minutes
- Prop the scooter on the parking stand.
- Remove the oil filler plug (1) and check
if the oil level is below the oil-filler
opening.
- If required, replenish transmission oil.
ݸ¿²¹·²¹ ¬¸» ¬®¿²-³·--·±² ±·´
ó Stop the warmed-up engine, wait for
several minutes
- Prop the scooter on the parking
stand.
- Remove the oil drain bolt (2).
- Drain the transmission oil
(completely).
- Install the oil drain bolt (2).
Ú·´´·²¹ ¬¸» ¬®¿²-³·--·±² ±·´
ó λ³±ª» ¬¸» ±·´ º·´´»® °´«¹ øï÷
ó Ú·´´ ¬¸» ¬®¿²-³·--·±² ±·´
ó ײ-¬¿´´ ¬¸» ±·´ º·´´»® °´«¹ øï÷
λ½±³³»²¼»¼æ
Ì®¿²-³·--·±² ±·´ ¹®¿¼»æ ßÐ× ÙÔóì
±® ¸·¹¸»®
Ì®¿²-³·-
П«¿²¬·¬§ж ртплФ
-·±² ±·´ ¬§°»æ ÍßÛ è ðÉñ ç ð
¸§°±·¼ ¹»¿® ±·´
îê


ТСМЫН СТ УЯЧТМЫТЯТЭЫ
Ìi®» °®±B ´»
While the tires are cold:
- Twist off the valve caps:
- Check/adjust the tire pressure.
- Twist on the valve caps.
ï
î
Checking the tire profiles
ЙЯОТЧТЩ
Observe the minimum profile depth
prescribed by law.
Never ride without valve caps (1).
Firmly tightened valve caps prevent
the tire from suddenly losing
pressure.
- Measure the profile depth at the
center (2) of the tire's tread.
îè
í
Recommended minimum profile depth:
2.0 mm
Observe the wear marks (3).
Checking the tire pressure
ЙЯОТЧТЩ
Adjust the tire pressure according to
the total weight load. Never exceed the
rated total weight or the bearing
capacity of the tires.
Incorrect tire pressure will have a
considerable effect on the riding
properties of the scooter and the
lifespan of the tires.
Tire pressure
Front 2.0 bar
Rear 2.25 bar
Tire size
The standard scooter is provided with
the following tire sizes:
Front 100/80-16
Rear 120/70-14
All tires are tubeless.

ТСМЫН СТ УЯЧТМЫТЯТЭЫ
Ú®±²¬ ¾®¿µ»
ï
ЙЯОТЧТЩ
Sudden changes in play or a spongy
feel of the brake lever (1) can be
caused by faults in the hydraulic
system.
Ú®±²¬ ¾®¿µ»óA «·¼ reservoir
Checking the brake fluid
WARNING
Every two years, the brake fluid must
be changed by a dealer. The level
must not drop below the MIN mark.
Use only brake fluid of the DOT 4
classification.
CAUTION
Do not spill any brake fluid on
painted or plastic surfaces as it will
damage the scooter severely.
2
MIN
3
- Turn the handlebars until the brake-
fluid tank (2) is level.
- The brake fluid level (3) should be
between the minimum (MIN) and the
maximum marking (MAX).
- If air bubbles can be seen, check the
brake linings for wear; if necessary
replenish the brake fluid by a dealer.
îç

ТСМЫН СТ УЯЧТМЫТЯТЭЫ
Ú®±²¬ ¾®¿µ» system
í
Þ
ݸ»½µ·²¹ ¬¸» ¾®¿µ» ´·²·²¹-
ЭЯЛМЧСТ
̸» ³·²·³«³ ´·²·²¹ ¬¸·½µ²»-- ³«-¬ ¾»
³¿·²¬¿·²»¼ò
ÒÑÌÛ
Ú±® §±«® ±©² -¿º»¬§ô ©» ®»½±³³»²¼ ¸¿ª·²¹
½¬·ª·¬·»- ¬± ¬¸» ¾®¿µ» -§-¬»³ ½¿®®·»¼ ±«¬ ¾§
¿
¿ ¼»¿´ »®ò
íð
ó λ³±ª» ¬¸» °®±¬»½¬·ª» ½¿° øï÷ ¿¬ ¬¸»
¾®¿µ» ½¿´´·°»®ò
ó Ê·-«¿´´§ ·²-°»½¬ ¬¸» -·¹¸¬ ¹´¿-- øî÷ ¿¬ ¬¸»
¾®¿µ» ½¿´´·°»®ò
ó ݸ»½µ ¬¸» ¬¸·½µ²»-- ±º ¬¸» ¾®¿µ» ´·²·²¹ò
Ó·²·³«³ ¬¸·½µ²»--æ ß ã îòð ³³
ó ׺ ¬¸» ´·²·²¹ ¬¸·½µ²»-- ·- ¾»´±© ¬¸» ³·²·ó
³«³ô ¸¿ª» ¬¸» ¾®¿µ» ´·²·²¹ øî÷ ®»°´¿½»¼
¾§ ¿¼»¿´»®ò
ݸ»½µ·²¹ ¬¸» ¼·-½ ¾®¿µ»
ó Ê·-«¿´´§ ·²-°»½¬ ¬¸» ¼·-½ ¾®¿µ» øí÷ò
ó ݸ»½µ ¬¸» ¬¸·½µ²»-- ±º ¬¸» ¼·-½ ¾®¿µ»ò
Ó·²·³«³ ¬¸·½µ²»--æ Þ ã íòð ³³
ó ׺ ¬¸» ¼·-½ ¬¸·½µ²»-- ·- ¾»´±© ¬¸» ³·²·ó
³«³ô ¸¿ª» ¬¸» ¼·-½ ¾®¿µ» øí÷ ®»°´¿½»¼
¾§ ¿ ¼»¿´»®ò
Rear brake system
ï
ТСМЫН СТ УЯЧТМЫТЯТЭЫ
2
MIN
3
ЙЯОТЧТЩ
Sudden changes in play or a spongy
feel of the brake lever (1) can be
caused by faults in the hydraulic
system. If you notice low brake
lever pressure, stop immediately
using the front brake to inspect the
brake system thoroughly.
Checking the brake fluid
WARNING
Every two years, the brake fluid
must be changed by a dealer. The
level must not drop below the MIN
mark. Use only brake fluid of the
DOT 4 classification.
CAUTION
Do not spill any brake fluid on
painted or plastic surfaces as it will
damage the scooter severely.
- Turn the handlebars until the brake-
fluid tank (2) is level.
- The brake fluid level (3) should be
between the minimum (MIN) and the
maximum marking (MAX).
- If air bubbles can be seen, check the
brake linings for wear; if necess
replenish the brake fluid by a dealer.
ary
íï

NOTES ON MAINTENANCE
Rear brake system (continued)
3
B
ݸ»½µ·²¹ ¬¸» ¾®¿µ» ´·²·²¹-
ЭЯЛМЧСТ
̸» ³·²·³«³ ´·²·²¹ ¬¸·½µ²»-- ³«-¬ ¾»
³¿·²¬¿·²»¼ò
ÒÑÌÛ
Ú±® §±«® ±©² -¿º»¬§ô ©» ®»½±³³»²¼ ¸¿ª·²¹
¿½¬·ª·¬·»- ¬± ¬¸» ¾®¿µ» -§-¬»³ ½¿®®·»¼ ±«¬ ¾§
¿ ¼»¿´ »®ò
32
ó λ³±ª» ¬¸» °®±¬»½¬·ª» ½¿° øï÷ ¿¬ ¬¸»
¾®¿µ» ½¿´´·°»®ò
ó Ê·-«¿´´§ ·²-°»½¬ ¬¸» -·¹¸¬ ¹´¿-- øî÷ ¿¬ ¬¸»
¾®¿µ» ½¿´´·°»®ò
ó ݸ»½µ ¬¸» ¬¸·½µ²»-- ±º ¬¸» ¾®¿µ» ´·²·²¹ò
Ó·²·³«³ ¬¸·½µ²»--æ ß ã îòð ³³
ó ׺ ¬¸» ´·²·²¹ ¬¸·½µ²»-- ·- ¾»´±© ¬¸» ³·²·ó
³«³ô ¸¿ª» ¬¸» ¾®¿µ» ´·²·²¹ øî÷ ®»°´¿½»¼
¾§ ¿¼»¿´»®ò
ݸ»½µ·²¹ ¬¸» ¾®¿µ» disc
ó Ê·-«¿´´§ ·²-°»½¬ ¬¸» ¼·-½ øí÷ò
ó ݸ»½µ ¬¸» ¬¸·½µ²»-- ±º ¬¸» ¼·-½ò
Ó·²·³«³ ¬¸·½µ²»--æ Þ ã íòð ³³
ó ׺ ¬¸» ¼·-½ ¬¸·½µ²»-- ·- ¾»´±© ¬¸» ³·²·ó
³«³ô ¸¿ª» ¬¸» ¼·-½ ¾®¿µ» øí÷ ®»°´¿½»¼
¾§ ¿ ¼»¿´»®ò

ß¼¶«-¬·²¹ ¬¸» °´¿§ ±º ¬¸» ¬©·-¬ ¹®·° ¬¸®±¬¬´» ½±²¬®±´
ß
ï
NOTES ON MAINTENANCE
î
í
ݸ»½µæ
ó Check the throttle cable for light
movement by turning the twist grip
(1) from closed to open position
- Move the handlebar to check whether
the throttle cable moves freely.
- Check whether the throttle cable is
obstructed by other parts.
- Open the twist grip throttle control
until resistance can be felt.
- Measure the play.
Nominal value: A = 1-2 mm
ß¼¶«-¬³»²¬æ
- Slacken the lock nut (3) on the
handlebar.
- Turn the setscrew (2) accordingly.
- Tighten the lock nut (3).
- Check the play.
ÒÑÌÛ
If the play cannot be corrected this
, have the scooter checked by your
way
dealer.
33


λ°´¿½·²¹ ¬¸» ¿·® B ´¬»®
NOTES ON MAINTENANCE
è
é
- Remove the screws (7) and take
off the air filter housing (8)
ç
ç
Disassembly and replace
- Remove the screws (9) and take off
the air filter cover (10).
- Remove the foam (11).
- Check air filter element (12)
If damaged or dirty, replace.
ïð
ç
ç
NOTE
Replace the air filter element every
7500 miles.
The air filter needs more frequent
service if you are riding in unusually
wet or dusty areas.
ç
ïðïï
ç
ïî
35

ТСМЫН СТ УЯЧТМЫТЯТЭЫ
ײ-¬¿´´ ¬¸» ¿·® B ´¬»®
ЭЯЛМЧСТ
Never run the engine without an air
filter.
- Dust deposit is one of the major
causes of reducing output
horsepower and increasing fuel
consumption.
- Change the air cleaner element more
frequently to prolong the engine's
service life if the scooter is often
ridden on dusty roads.
- Check for proper installation of the
foam housing in the filter case.
- Otherwise the engine will run
poorly or engine damage can occur.
- Be careful not to soak the air cleaner
when washing the scooter. Otherwise
the engine will be hard to start.
ïðïï
ײ-¬¿´´¿¬·±²
ÒÑÌÛ
Check the gasket for damage and
proper placement before installation.
Installation takes place in reverse order
from disassembly.
íê


ТСМЫН СТ УЯЧТМЫТЯТЭЫ
ݸ»½µ·²¹ ¬¸» º«-»
ï
î
í
ЭЯЛМЧСТ
Ò»ª»® ·²-¬¿´´ ¿ º«-» ©·¬¸ ¿ ´¿®¹»® ®¿¬ ·²¹ô
-·²½» ¬¸·- ½±«´¼ ¼»-¬®±§ ¬¸» »² ¬·®» »´»½ó
¬®·½¿´ -§-¬»³ò
̸» º«-» ·- ´±½¿¬»¼ ¾»¸·²¼ ¬¸» ·²-°»½¬·±²
½±ª»® øî÷ò
íè
ó Ì«®² ±ºº ¬¸» ·¹²·¬·±²ò
ó λ³±ª» ¬¸» ¬©± -½®»©- øï÷ ¿²¼ ±°»² ¬¸»
·²-°»½¬·±² ½±ª»® øî÷ò
ó Ñ°»² ¬¸» º«-» ½¿-» øí÷ ¿²¼ ®»³±ª» ¬¸»
º«-»ò
ó ß º¿«´¬§ ±® ¾´±©² º«-» ³«-¬ ¾» ®»°´¿½»¼
¾§ ¿ ²»© ±²» ©·¬¸ ïë ßò
ó ݸ»½µ ¬¸» º«-» º±® ½±®®»½¬ ½±²¬¿½¬ò Ô±±-»
º«-» ©·´´ ¾´±©ò
ײ-¬¿´´¿¬·±² ¬¿µ»- °´¿½» ·² ®»ª»®-» ±®¼»® ¬±
¼·-¿--»³¾´§ò


ТСМЫН СТ УЯЧТМЫТЯТЭЫ
λ³±ª·²¹ ¿²¼ ·²-¬¿´´·²¹ ¬¸» ¾¿¬¬»®§
ï
î
ЭЯЛМЧСТ
̸» ¾¿¬¬»®§ ³¿§ ±²´§ ¾» ½±²²»½¬»¼ ±®
¼·-½±²²»½¬»¼ ©¸·´» ¬¸» ·¹²·¬·±² ·- ·²¿½ó
¬·ª»ò
Ú·®-¬ ¼·-½±²²»½¬ ¬¸» negative (-)
¬»®³·²¿´ øíô ¾´¿½µ ½¿¾´»÷ò
ɸ»² ·² -¬¿´´ ·²¹ ¬¸» ¾¿¬ ¬»®§ô B ®-¬
co²²»½¬ ¬¸» °ositive (+) ¬»®³·²¿´ øìô
®»¼ ½¿¾´»÷ò
̸» ¾¿¬¬»®§ ·- ³¿·² ¬» ²¿²½»óº®»»ò ܱ ²±¬
attempt ¬± ±°»² ·¬ò
ìð
í
ì
ó Ì«®² ±ºº ¬¸» ·¹²·¬·±²ò
ó λ³±ª» ¬¸» ¬©± -½®»©- øï÷ò
ó Ñ°»² ¬¸» ·²-°»½¬·±² ½±ª»® øî÷ò
ó Ü·-½±²²»½¬ ¬¸» ¾¿¬¬»®§ò
ó λ³±ª» ¬¸» ¾¿¬¬»®§ò
ײ-¬¿´´¿¬·±² ¬¿µ»- °´¿½» ·² ®»ª»®-» ±®¼»® ¬±
¼·-¿--»³¾´§ò


ТСМЫН СТ УЯЧТМЫТЯТЭЫ
Ø»¿¼´·¹¸¬ ¿²¼ °±-·¬·±² ´·¹¸¬
ë
ï
Ô±© ¾»¿³
- Remove the rubber cover (1).
- Remove the bulb socket (2) by
turning to the left.
- Remove the head light bulb (3).
Installation takes place in reverse order
to disassembly
ìî
ë
б-·¬·±² ´·¹¸¬
- Remove the headlight.
- Pull the position light (5) with the bulb
holder carefully out of the position
light housing.
î
í


λ¿® ¼·®»½¬·±² ·²¼·½¿¬±®ñ¬¿·´ñ¾®¿µ» ´¿³°
í
ТСМЫН СТ УЯЧТМЫТЯТЭЫ
ë
ì
ó λ³±ª» ¬¸» -½®»©- øí÷ò
ó λ³±ª» ¬¸» -½®»©- øì÷ò
Ý¿®»º«´´§ ®»³±ª» ¬¸» ½±ª»® øë÷ò
ó
ìë

ТСМЫН СТ УЯЧТМЫТЯТЭЫ
λ¿® ¼·®»½¬·±² ·²¼·½¿¬±® ñ ¬¿·´ ñ ¾®¿µ» ´¿³°
è
ê
- Remove the bolts (6).
ìê
é
ó Remove the screws (7).
- Pull the lamp connector (8).
- Carefully remove the tail / brake
lamp.
ó The rear direction indicator / tail / brake light
is LED.
Please change the whole lamp.
Installation takes place in reverse order to
disassembly.

ТСМЫН СТ УЯЧТМЫТЯТЭЫ
ݸ»½µ ¬¸» ¸»¿¼´¿³°-
ïî½³
Ø
ë³
Ø
ЙЯОТЧТЩ
ܱ ²±¬ ®«² ¬¸» »²¹·²» ·² ¿² »²½´±-»¼
-°¿½» ø®·-µ ±º ¿-°¸§¨·¿¬·±²÷ò
Position the scooter on a level floor 5m
(measured from the headlamp) from a
light colored wall with a rider seated on
the scooter and the tires filled at the
correct pressure.
- Measure the distance from the floor
to the center of the headlamp and
mark the height on the wall with a
cross. Draw a second cross 12 cm
beneath the first cross.
ß¼¶«-¬·²¹ ¬¸» ¸»¿¼´¿³°-
ï
ó Start the scooter and run the engine.
- Activate the dipped beam.
- Use a screwdriver to adjust the
screws (1) for the vertical and
horizontal angle of the illuminated
surface area of the road top for the
left and right headlamp.
ÒÑÌÛ
If you have problems adjusting the
headlamps, see a specialized dealer.
An incorrect adjustment is punishable by
law. Remember, you are responsible for
the correct adjustment of the scooter's
headlamp.
ìé

ТСМЫН СТ УЯЧТМЫТЯТЭЫ
Engine type
Construction:
Pis
tion displacement:
Bore:
Stroke:
Compression ratio:
Cooling:
Maximum net power output:
Maximum net torque:
Ignition system:
Spark plug:
Electrode gap:
Carburetor:
Idle speed:
Air Filter:
Starter:
L J1P38MB
One cylinder 4-strok
49.3 cm
3
e gas engine
38 mm
43.5 mm
12:1
Water cooling
2.0 hp at 7000 rpm (restricted)
1.5 ft-lb at 6500 rpm
Transistorized ignition system with electronic ignition control (CDI))
NGK CR7E
0.7 - 0.8 mm
Deni PD18J
nim/1 001 -/+ 0081
Element air-cleaner
retrats kcik dna retrats cirtcelE
ìè

Power transmission
Chassis
Scooter version:
:noisnepsus tnorF
:tnorf seriT
:raer seriT
:erusserp eriT
:tnorf ,sekarB
:raer ,sekarB
TECHNICAL DATA
epyt lagufirtneC:hctulC
TVC:noissimsnarT
Ó·¨·²¹ ®¿¬·±æ ìæê ø¿²¬·º®»»¦»æ ©¿¬»®÷ݱ±´¿²¬ ݱ±´¿²¬ ®»-»®ª±·® ½¿°¿½·¬§æ ðòë Ô
Venture ëð
Telescopic fork
Unit swing, hydraulic shock absorption, adjustable preload:noisnepsus raeR
TM )ulA( latem thgiL:tnorf sleehW
TM )ulA( latem thgiL:raer sleehW
61 x 51.2
41 x 57.2
100/80-16 tubeless
120/70-14 tubeless
Front = 29 psi Rear = 33psi
Disc brake ø 240 mm, hydraulic
Disc brake
ø 193 mm, hydraulic
49

TECHNICAL DATA
uids
:lio gnitacirbuL
Gear oil:
Filling quantity:
Electrical Equipment
Generator:
Battery:
Fuse:
Head light:
Position light:
Instrument lights
Speedometer:
Control lights indicator and high beam:
Brake/rear light:
Front turn signal light:
6.8 Liters / 1.8 Gallons:yticapac knat leuF
Premium lead-free fuel (min. 93 octane):leuF
API service SG type or higher SAE 10W/40
quantity: 0.78 L
Hypoid-oil SAE 85W - 140 or SAE 80W-90 GL4
oil change: 0.13 litres / oil change + overhaul: 0.15 litres
W021 V21
FM hA7 V21
A 51
/ High beam
W5 V21
12V 3W
12V 3W
LED V21
W01 V21 x 2
W / 35W53 V21 maeb woL
50

Dimensions and weights
:htgnel llarevO
78.3 in
Width across handlebars: 27.6 inches without rear view mirror
44.5 inches without rear view mirror:thgieh mumixaM
:esab leehW
:thgieh taeS
:ytpme thgieW
Weight in running order:
Max. permitted total weight:
:deeps poT
56.6 in
31.5 in
210 lbs
218 lbs
553 lbs
30 mph (restricted)
TECHNICAL DATA
51

!“Õ–¤›Ã!—“ –‘fl“
1MFBTFPCTFSWFUIFGPMMPXJOH
%VSJOHBOEBGUFSUIFXBSSBOUZQFSJPE
BMMJOTQFDUJPOTTIPVMETPMFMZCF
QFSGPSNFECZBGenuineEFBMFS
0CTFSWFUIFJOTQFDUJPOJOUFSWBMT.
6TFPOMZPSJHJOBMTQBSFQBSUT
CAUTION
!- .ø0ª ±3 -±-Û.±56¥8ø-.ª ¨:ª ©øÆÆø-¨ß
©8¥¥ æª.±5ª -´¥¥ ø-º ™±8ºÚ
Ã"ª ™øÆ(±´+ ø,¨(™(¨(ª+ ,øÆÆ(ªº ±´¨ øƪ ¥(+¨ ªº
±0 ¨"ª (0+1ª,¨(±0 1¥ø0Ú
‹´Æ(04 ¨"ª ©øÆÆø0¨ß 1ªÆ(±º ¨"ª 7±¥¥±©(04 (0Û
+1ª,¨(±0 (0¨ªÆ™ø¥+ 9´+¨ æª ,±91¥(ªº ©(¨"Ê
߬
¤™ªÆß
¤™ªÆß
iles ¯Ô
iles ±Æ ø.¨ªÆ Í 0±1¨2$
iles ±Æ ø.¨ªÆ ÔÓ 0±1¨2$
$¨
$ªÆ™)*ª˜
…ARNING
For safety reasons, do not alter or
adjust the scooter components or
chassis in a manner that exceeds
design restrictions. Tinkering with
safety-relevant parts could threaten
the safety of yourself and others.
Ã:80 ø66¥8ª0 ª06ª.8ø¥¥ß ¨± ¨:ª ª® :ø´0¨
0ß0¨ª5Ù .øÆæ´Æª¨±ÆÙ 8K-8¨8±- 0ß0¨ª5Ù
3±Æµ .±¥´5-Ù æÆøµª 0ß0¨ª5 ø-º ¥8K:¨0Ú
fiª3±Æª 0¨øƨ8-g work on the electical
system, º80.±--ª.¨ ¨:ª negative
¨ªÆ58-ø¥ ±3 ¨:ª æø¨¨ªÆßÚ
52

ЧТНРЫЭМЧСТ РФЯТ
× ã ײ-°»½¬·±²ô ½´»¿²·²¹ô ¿²¼ ¿¼¶«-¬³»²¬
Î ã λ°´¿½»³»²¬
Ý ã Ý´»¿²·²¹ ø®»°´¿½»¼ ·º ²»½»--¿®§÷
Ô ã Ô«¾®·½¿¬·±²
ݱ³°±²»²¬
ß--»³¾´§
Í°¿®µ °´«¹
×¹²·¬·±² ¬·³»
Ý¿®¾«®»¬±® ø×¼´» -°»»¼÷ ×××
¸®±¬¬´» ½¿¾´» ¿¼¶«-¬³»²¬ ×××
Ì®¿²-³·--·±² ±·´
Ì®¿²-³·--·±² ½¸»½µ º±® ´»¿µ¿¹» ×××
Ý®¿²µ»½¿-» ½¸»½µ º±® ´»¿µ¿¹» ×××
Ý®¿²µ»½¿-» ª»¬·´¿¬·±² ××
Ü®·ª» ¾»´¬ô ®±´´»® ×× ñ Î
Ý´«¬½¸ ¼·-½- ×× ñ Î
Û²¹·²» ±·´
Û²¹·²» ±·´ -¬®¿·²»®
ݱ±´¿²¬ ´»ª»´ ××× Î
Þ»º±®»
»¿½¸
¬®·°
×××
×××Î
×××Î
×Î ×Î
×ÎÎ
ï-¬ -»®ª·½»
¿º¬»®
500 miles
××
Ý
Ûª»®§
1500 miles ñ
ê ³±²¬¸-
Ûª»®§
300 milesñ
ïî ³±²¬¸-
Ý
Ûª»®§
7500 miles ñ
îì ³±²¬¸-
Î
ëê

ЧТНРЫЭМЧСТ РФЯТ
× ã ײ-°»½¬·±²ô ½´»¿²·²¹ô ¿²¼ ¿¼¶«-¬³»²¬
Î ã λ°´¿½»³»²¬
Ý ã Ý´»¿²·²¹ ø®»°´¿½»¼ ·º ²»½»--¿®§÷
Ô ã Ô«¾®·½¿¬·±²
ݱ³°±²»²¬
ß--»³¾´§
Þ±´¬- ¿²¼ ²«¬- ø»²¹·²»÷ ×××
Û¨¸¿«-¬ -§-¬»³ ××
Ú«»´ ¬¿²µô º«»´ ¸±-»- ×××
Þ¿¬¬»®§
ͬ»¿®·²¹ ¿²¼ ¾»¿®·²¹- ×××
Ú®±²¬ ¿²¼ ®»¿® -«-°»²-·±² ×××
-¸±½µ ¿¾-±®°¬·±² ×××
Ì·®» °®»--«®» ×××
Þ®¿µ» º«²½¬·±²ô ¾®¿µ» °¿¼- ×××
Ó¿·²ó ¿²¼ -·¼» -¬¿²¼ ××× ñ Ô
Þ±´¬- ¿²¼ ²«¬- ø½¸¿--·-÷ ×××
Þ»º±®»
»¿½¸
¬®·°
×××
×××Î ñ »ª»®§
ï-¬ -»®ª·½»
¿º¬»®
500 miles
Ûª»®§
1500 milesñ
ê ³±²¬¸-
Ûª»®§
300 milesñ
ïî ³±²¬¸-
7500 miles
îì ³±²¬¸-
Ûª»®§
î §»¿®-
ëé

УЯЧТМЫТЯТЭЫ ЭСТЪЧОУЯМЧСТ
500 Miles ñ ï ³±²¬¸-
ï-¬ -»®ª·½»
¼»¿´»® -¬¿³°æ
³iтттттттттттттттттттттттттттттттт
¼¿¬» тттттттттттттттттттттттттттттт
ߺ¬»® 7500 Miles ñ îì ³±²¬¸-
¼»¿´»® -¬¿³°æ
³i тттттттттттттттттттттттттттттттт
¼¿¬» тттттттттттттттттттттттттттттт
ߺ¬»® 1500 Miles ñ ê ³±²¬¸-
¼»¿´»® -¬¿³°æ
³i тттттттттттттттттттттттттттттттт
¼¿¬» тттттттттттттттттттттттттттттт
ߺ¬»® 10,000 Miles ñ íð ³±²¬¸-
¼»¿´»® -¬¿³°æ
³i тттттттттттттттттттттттттттттттт
¼¿¬» тттттттттттттттттттттттттттттт
ߺ¬»® 3000 Miles ñ ïî ³±²¬¸-
¼»¿´»® -¬¿³°æ
³i тттттттттттттттттттттттттттттттт
¼¿¬» тттттттттттттттттттттттттттттт
ߺ¬»® 12,500 Miles ñ íê ³±²¬¸-
¼»¿´»® -¬¿³
°æ
³i тттттттттттттттттттттттттттттттт
¼¿¬» тттттттттттттттттттттттттттттт
ߺ¬»® 5000 Miles ñ ïè ³±²¬¸-
¼»¿´»® -¬¿³°æ
³i тттттттттттттттттттттттттттттттт
¼¿¬» тттттттттттттттттттттттттттттт
ߺ¬»® 15,00 Miles ñ ìî ³±²¬¸-
¼»¿´»® -¬¿³°æ
³i тттттттттттттттттттттттттттттттт
¼¿¬» тттттттттттттттттттттттттттттт
ëè

УЯЧТМЫТЯТЭЫ ЭСТЪЧОУЯМЧСТ
Ç»- ²±
³ iттттттттттттттттттттттттттттттттттттт
Ь¿¬» тттттттттттттттттттттттттттттттттт
ͬ¿³°ô -·¹²¿¬«®»
Ç»- ²±
³ iттттттттттттттттттттттттттттттттттттт
Ь¿¬» тттттттттттттттттттттттттттттттттт
ͬ¿³°ô -·¹²¿¬«®»
Ç»- ²±
³ iттттттттттттттттттттттттттттттттттттт
Ь¿¬» тттттттттттттттттттттттттттттттттт
ͬ¿³°ô -·¹²¿¬«®»
Ç»- ²±
³i ттттттттттттттттттттттттттттттттттттт
Ь¿¬» тттттттттттттттттттттттттттттттттт
ͬ¿³°ô -·¹²¿¬«®»
ëç
 Loading...