

Page 1
E
T10
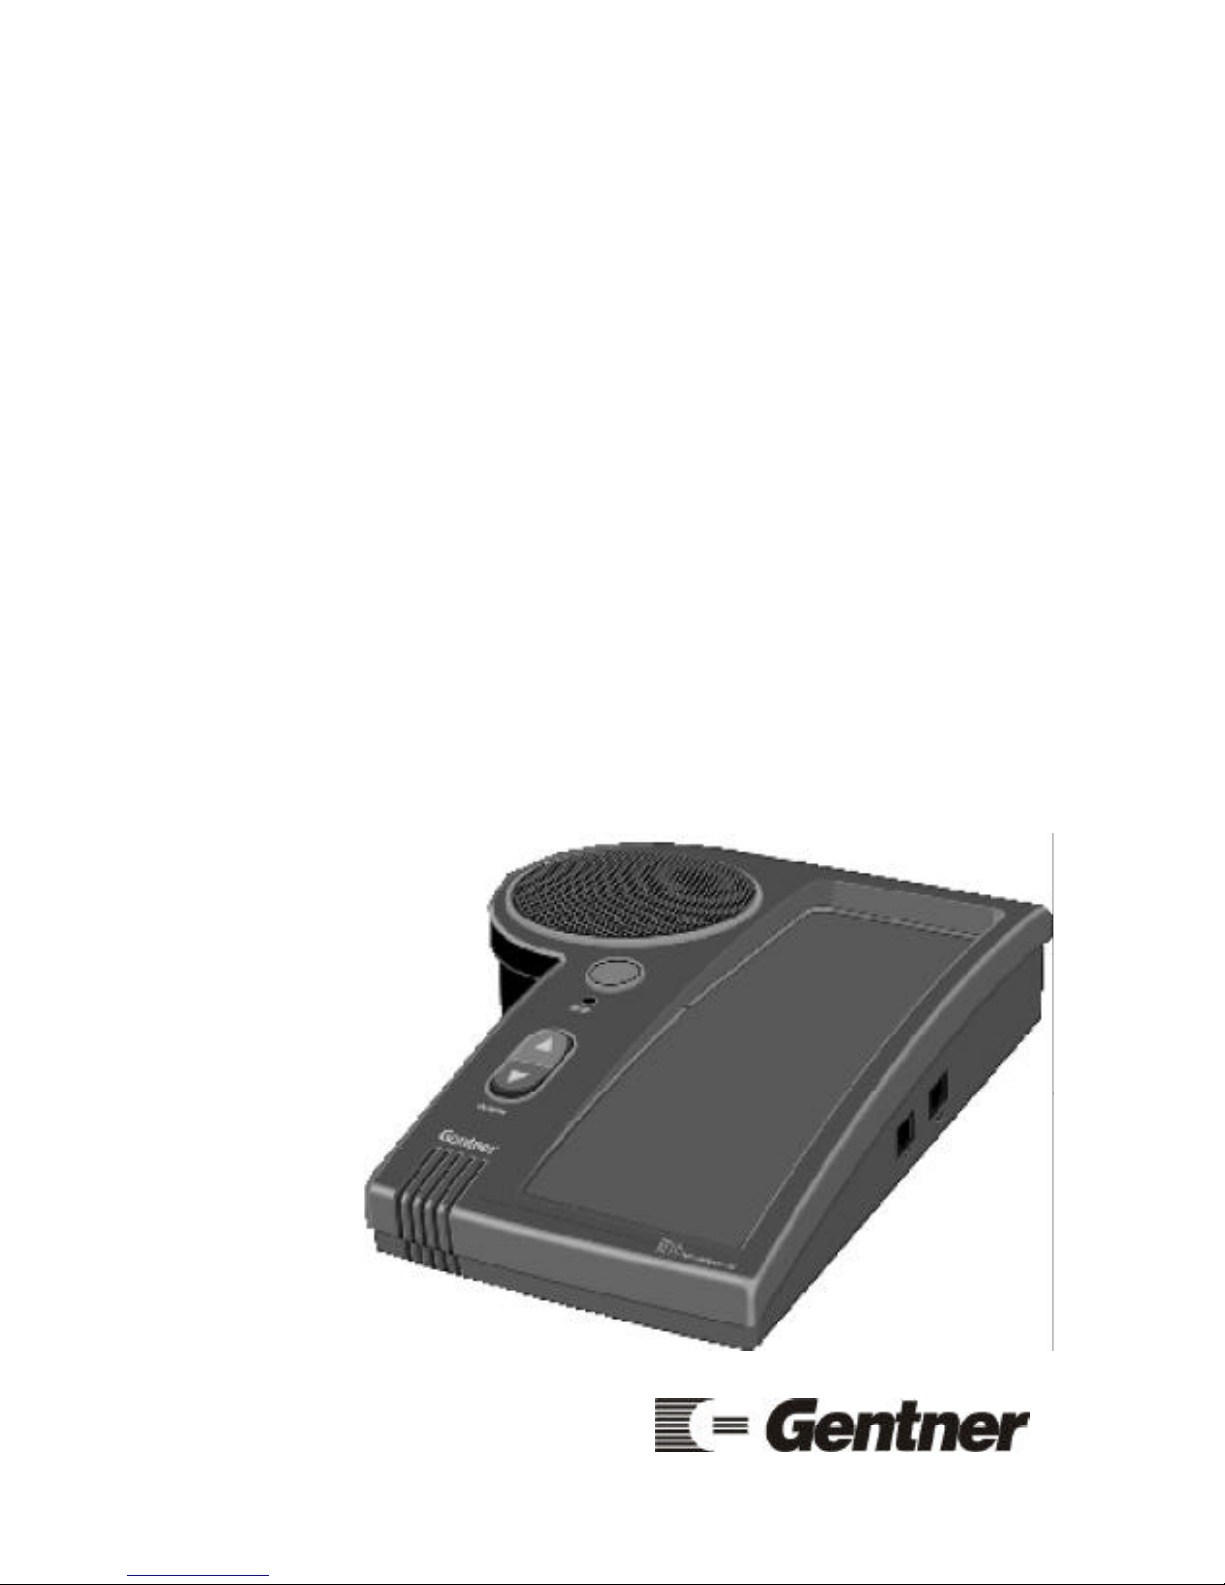
Teleconferencer
User’s Manual
Page 2

Copyright 1996 by Gentner Communications Corporation. All rights reserved. No part of
this manual may be reproduced in any form or by any means without written permission from
Gentner Communications Corporation. Printed in the United States of America. Original
version, 1/96. Gentner Communications Corporation reserves specification privileges.
Information in this manual is subject to change without notice.
Copyright
Information
The ET10 is designed for workstations and small conference
rooms. For medium and large conference rooms, contact
Gentner Communications Corporation for assistance.
Page 3

For Setup Assistance Dial: 800-945-7730 or 801-975-7200
ET10 User’s Manual Page 1
Congratulations on purchasing the teleconferencing
industry’s first full-duplex audioconferencer
designed for analog or digital telephones. The ET10
teleconferencer allows you to hold a completely
interactive teleconferencing meeting at your work
station, as long as the keypad is not in the handset
itself. With the ET10, you can directly connect to
your existing telephone to maintain all of your
telephone functions.
This manual explains how to install, set up and
operate the ET10 and the optional ET10ex extension
microphone step by step. It also provides instructions on how to improve room acoustics and resolve
minor technical problems, should any arise.
If you need additional information on how to install,
set up or operate your system, please contact us at
Gentner Communications Corporation at the
location noted below. We welcome and encourage
your comments so we can continue to improve our
products and serve your teleconferencing needs.
Gentner Communications Corporation
1825 Research Way
Salt Lake City, UT 84119
TEL: Worldwide (801) 975-7200 In U.S.A. (800) 945-7730
FAX: Worldwide (801) 977-0087 In U.S.A. (800) 933-5107
Introduction
Page 4
For Setup Assistance Dial: 800-945-7730 or 801-975-7200
Page 2 ET10 User’s Manual
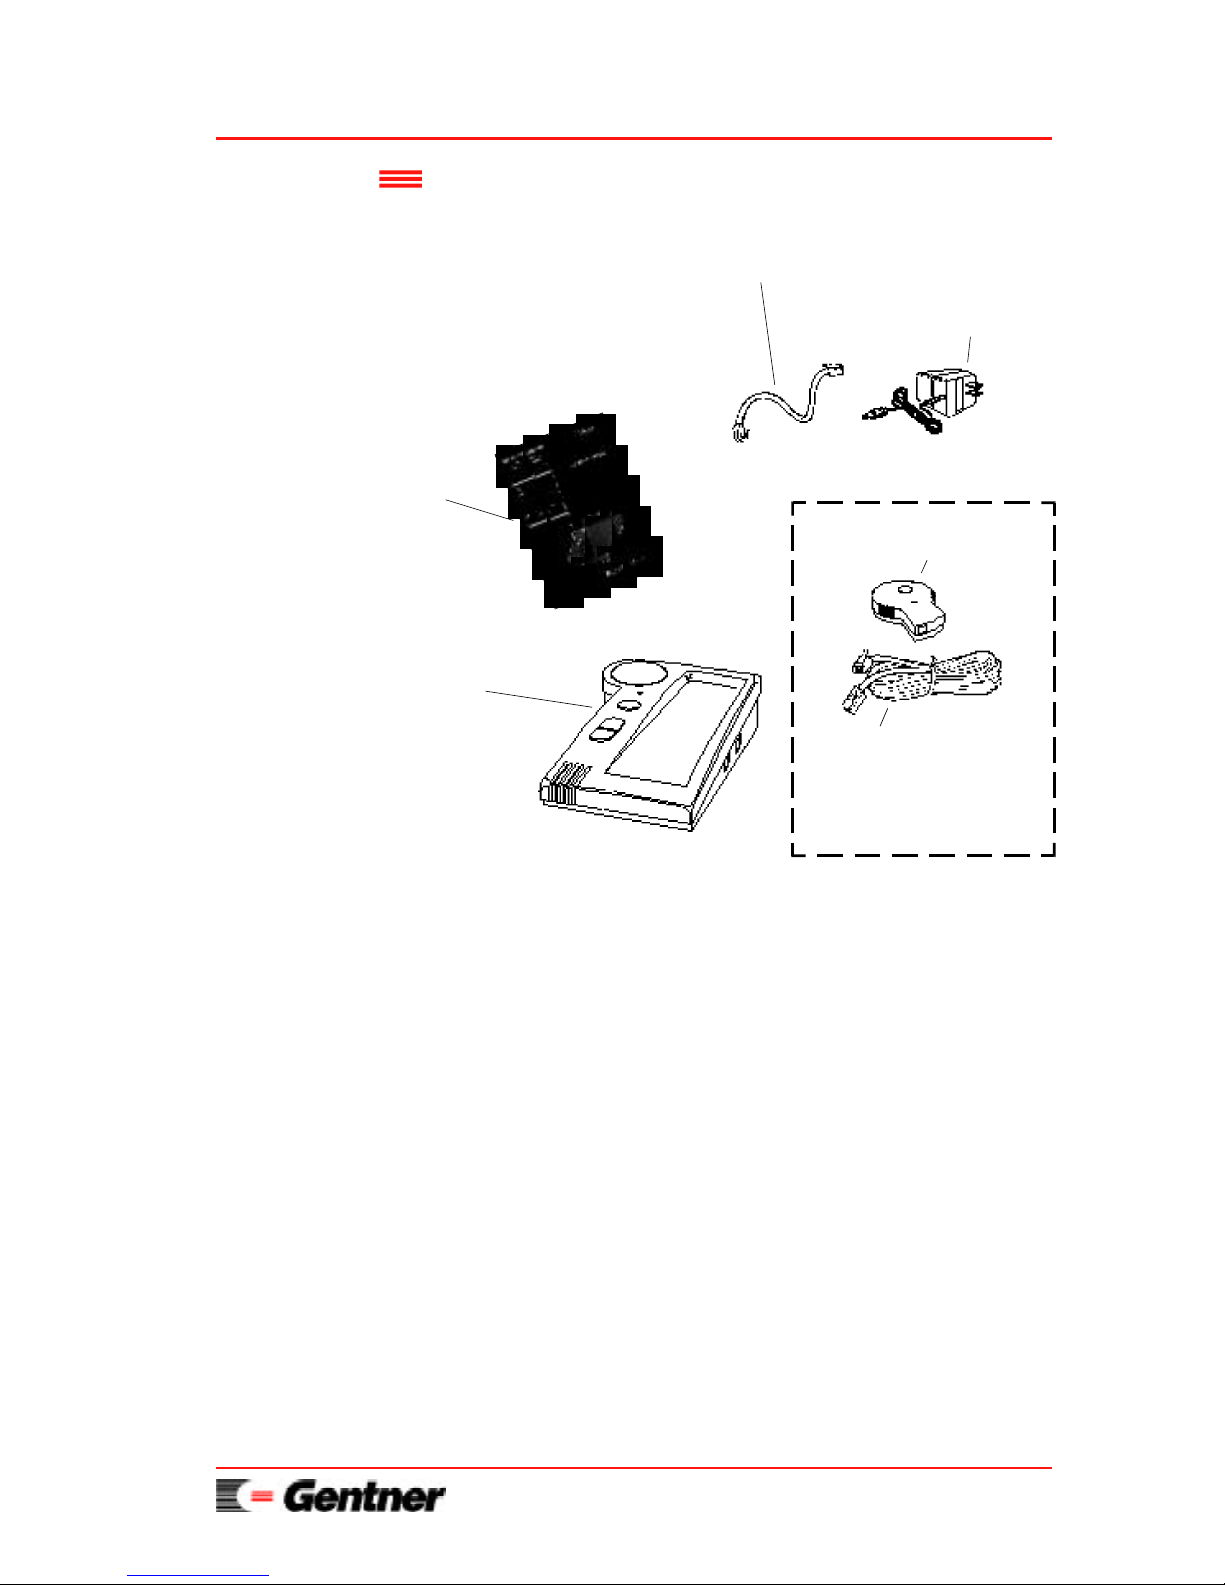
Ensure that the following equipment was received
with your shipment:
SHIPPING NOTE:
Gentner Communications is not responsible for
product damage incurred during shipment. You
must make claims directly with the carrier. Inspect
your shipment carefully for obvious signs of
damage. If the shipment appears to be damaged,
retain the original boxes and packing material for
inspection by the carrier. Contact your carrier
immediately.
Unpacking
15’ Ex Cable Assembly *
Direct Plug-In Power
Module
ET10ex Microphone*
Optional accessories
* Additional accessories available
(back cover). Contact Gentner
Communications Corporation for
more information.
ET10 Manual
13" Flat Handset Cable
ET10
Page 5

For Setup Assistance Dial: 800-945-7730 or 801-975-7200
ET10 User’s Manual Page 3
Turns your existing telephone into a full-duplex
audioconferencer
Provides telephone compatibility to use your current
telephone capabilities (i.e. hold, transfer, conference, speed-dial, last-number redial, etc.)
Operates with digital and analog telephones
Functions without installation of a dedicated
telephone line
Allows full-duplex operation for participants to talk
and listen without speakerphone cutoffs
Maximizes isolation between speaker and
microphones for enhanced audio quality
Utilizes unsurpassed digital technology for audio
quality
Provides 120
o
pick-up pattern with built-in profes-
sional microphone
Uses simple mute and volume controls
Records audioconference through tape recorder jack
Installs and operates easily
Provides access to professional technical support for
reliable assistance with setup and operation
Expands capabilities with the optional ET10ex
extension microphone
Allows optional headset port for private, hands-free
communication
Indicates when unit is properly adjusted with
assisted setup
Features and
Benefits
Page 6

For Setup Assistance Dial: 800-945-7730 or 801-975-7200
Page 4 ET10 User’s Manual
The ET10 is designed to work in almost any
acoustic environment with digital and analog
telephones. This unique design is a first in the
audioconferencing industry. To maximize your
teleconference audio quality, we recommend that
you prepare your teleconferencing site by taking the
following factors into consideration:
Acoustic Room Treatment
Rooms that have large areas of windows, white
boards, hard floors, etc., are acoustically “live.”
These areas increase the amount of audio
reverberation in the room which, in turn,
reduces the audio quality of your
teleconference. You should minimize the
amount of audio reverberation where possible.
You can improve room acoustics by installing
acoustic panels, drapes and other wall fabrics.
Another way to improve overall room acoustics
is to keep room noise, such as computers and
fans, to a minimum.
Power Requirements
The ET10 will accommodate voltage
requirements in accordance with the supplied
direct plug-in power module.
Telephone Line Requirements
Unlike other portable full-duplex
audioconferencing units, the ET10 connects
directly to digital and analog telephones. A
dedicated analog telephone line is NOT needed
to operate your ET10.
Before You
Install
Page 7

For Setup Assistance Dial: 800-945-7730 or 801-975-7200
ET10 User’s Manual Page 5
Telephone Set Requirements
The ET10 will operate with telephone sets that
have a detachable handset cord at the telephone
base. The ET10 will not work with “Princess”
or “Trimline” style telephones that have the dial
pad built into the handset. The dial pad must be
located on the telephone base, not on the
telephone handset.
Equipment Placement
Place the ET10 next to the telephone set.
Page 8
For Setup Assistance Dial: 800-945-7730 or 801-975-7200
Page 6 ET10 User’s Manual
The ET10 connects directly to your existing
telephone set so that you can maintain all your
standard telephone functions. Follow these step-bystep instructions to install your ET10:
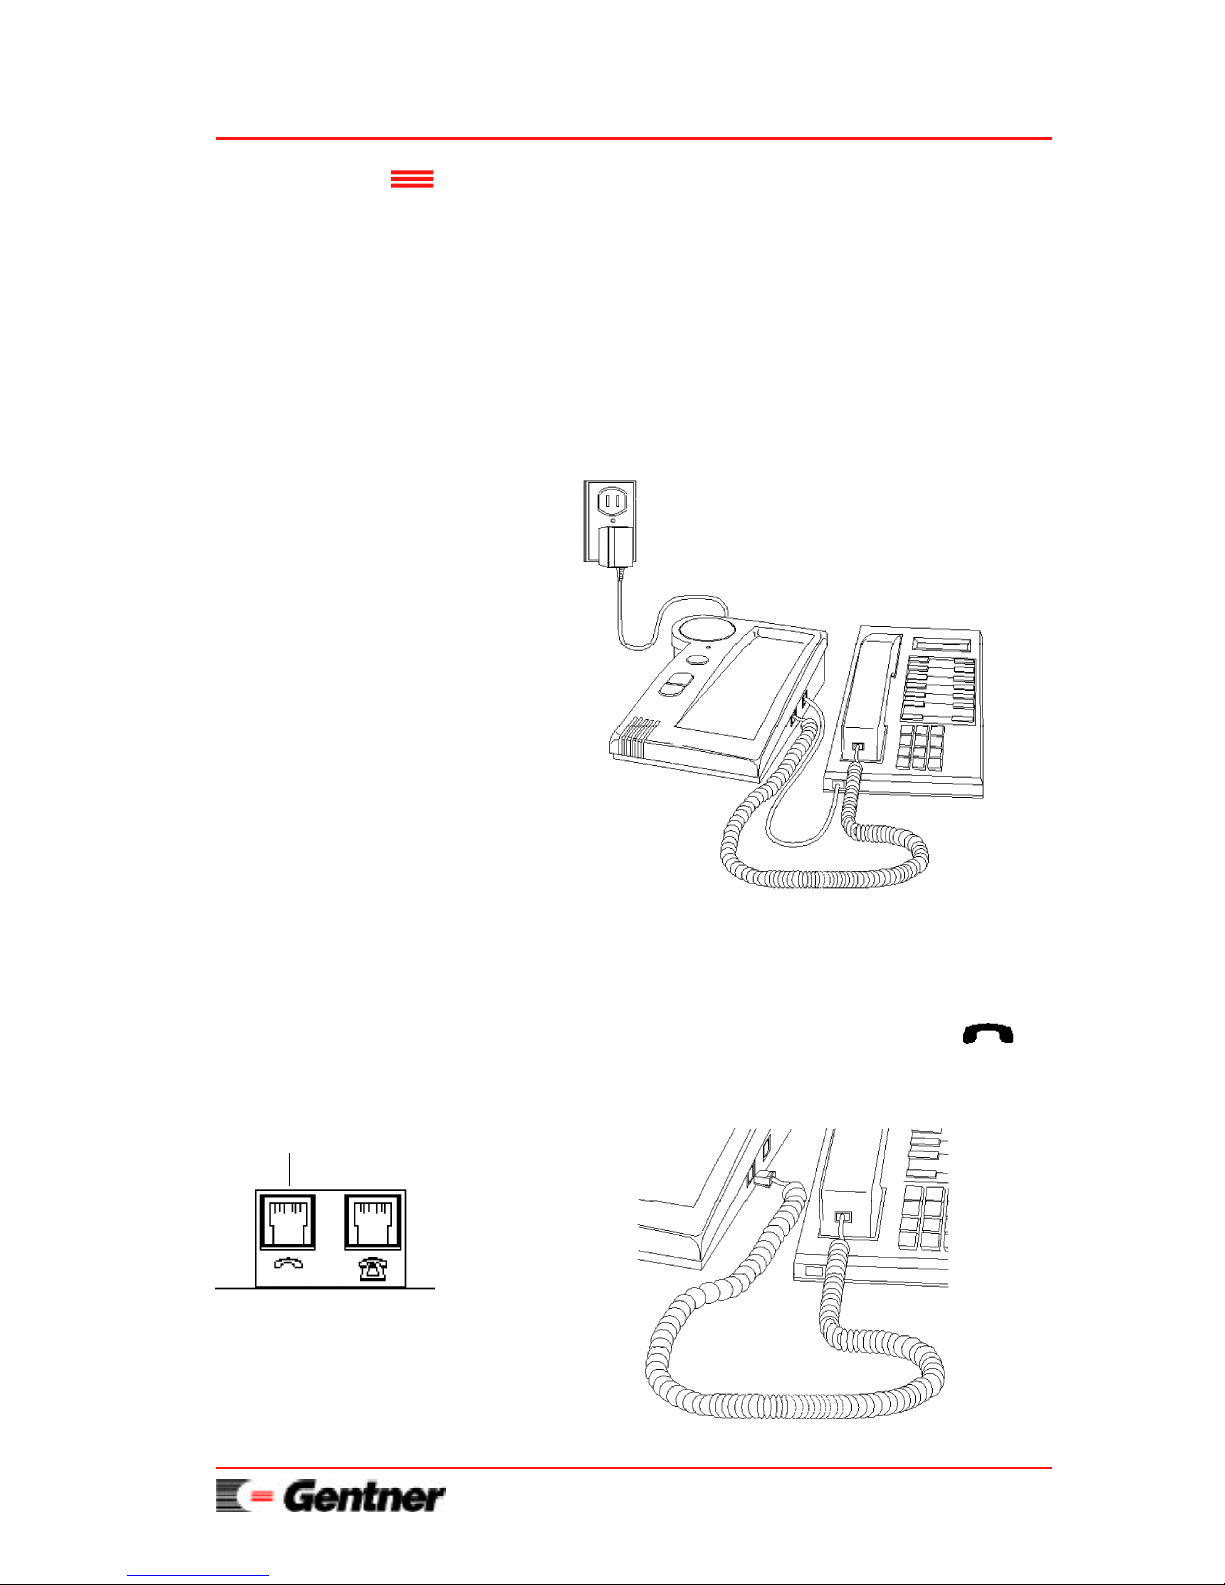
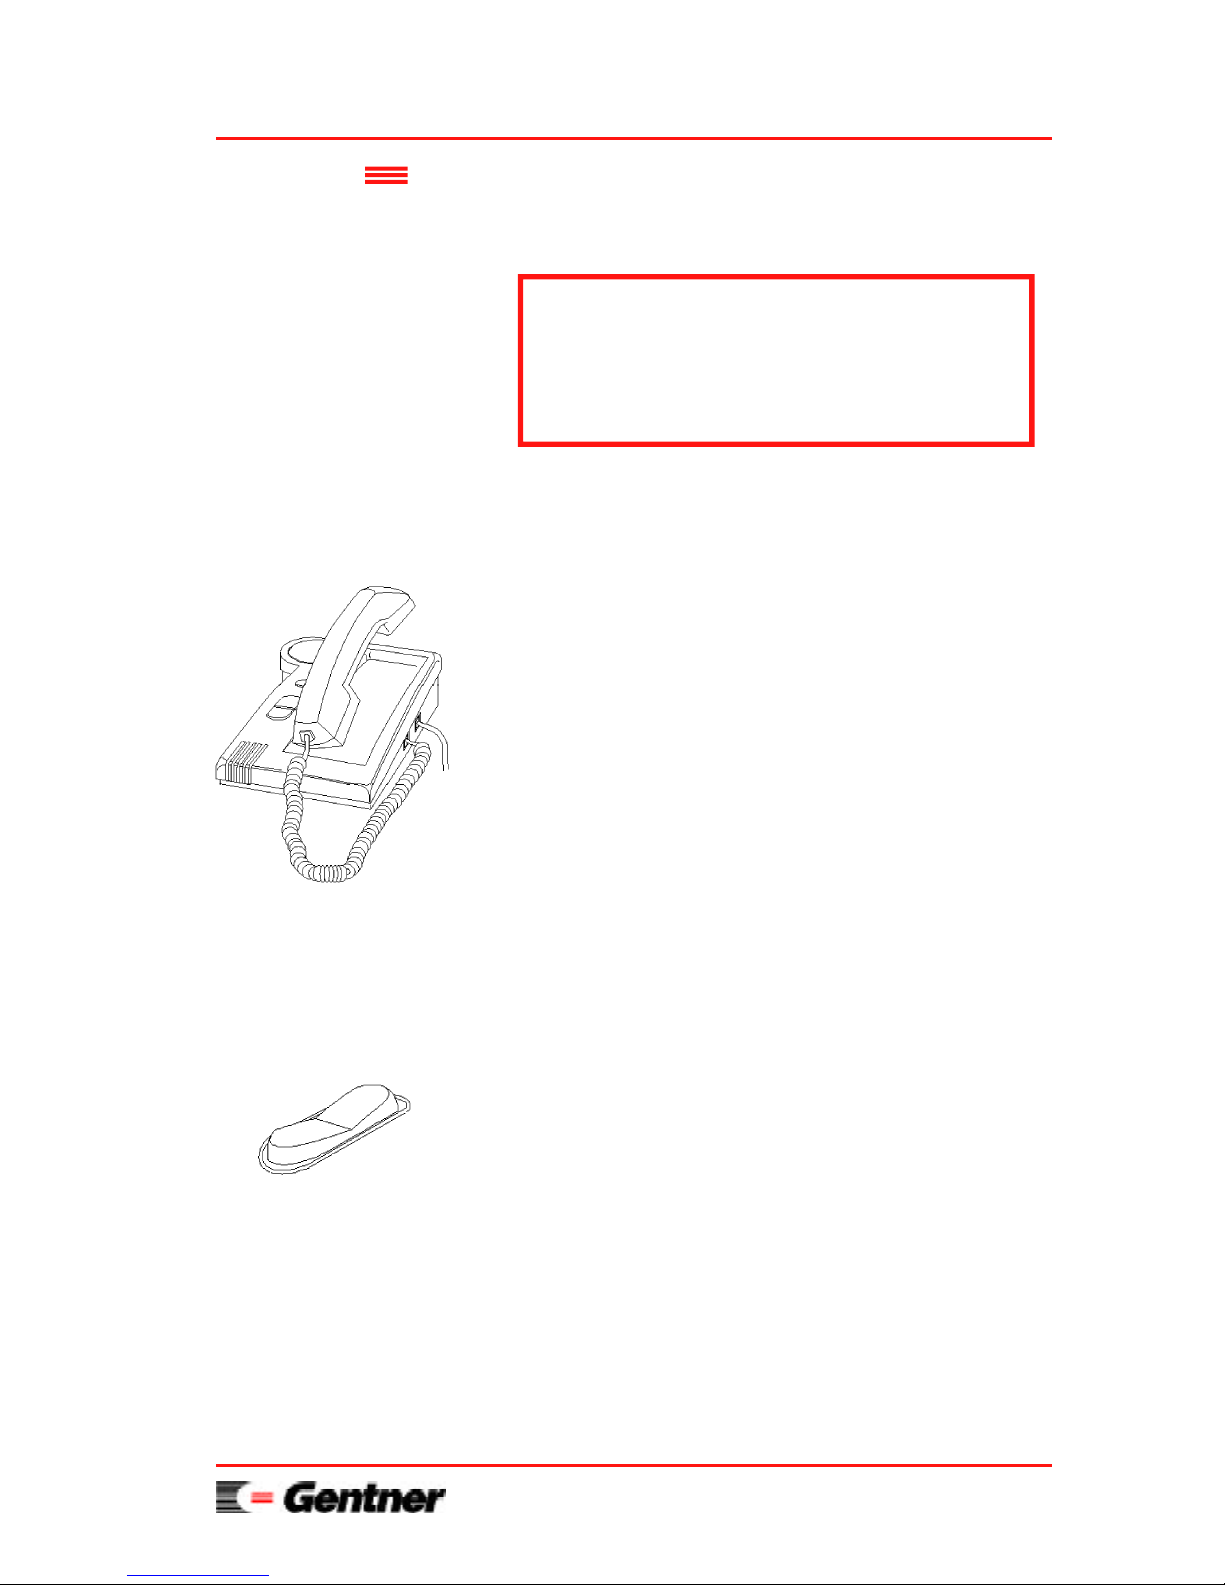
Completed Installation
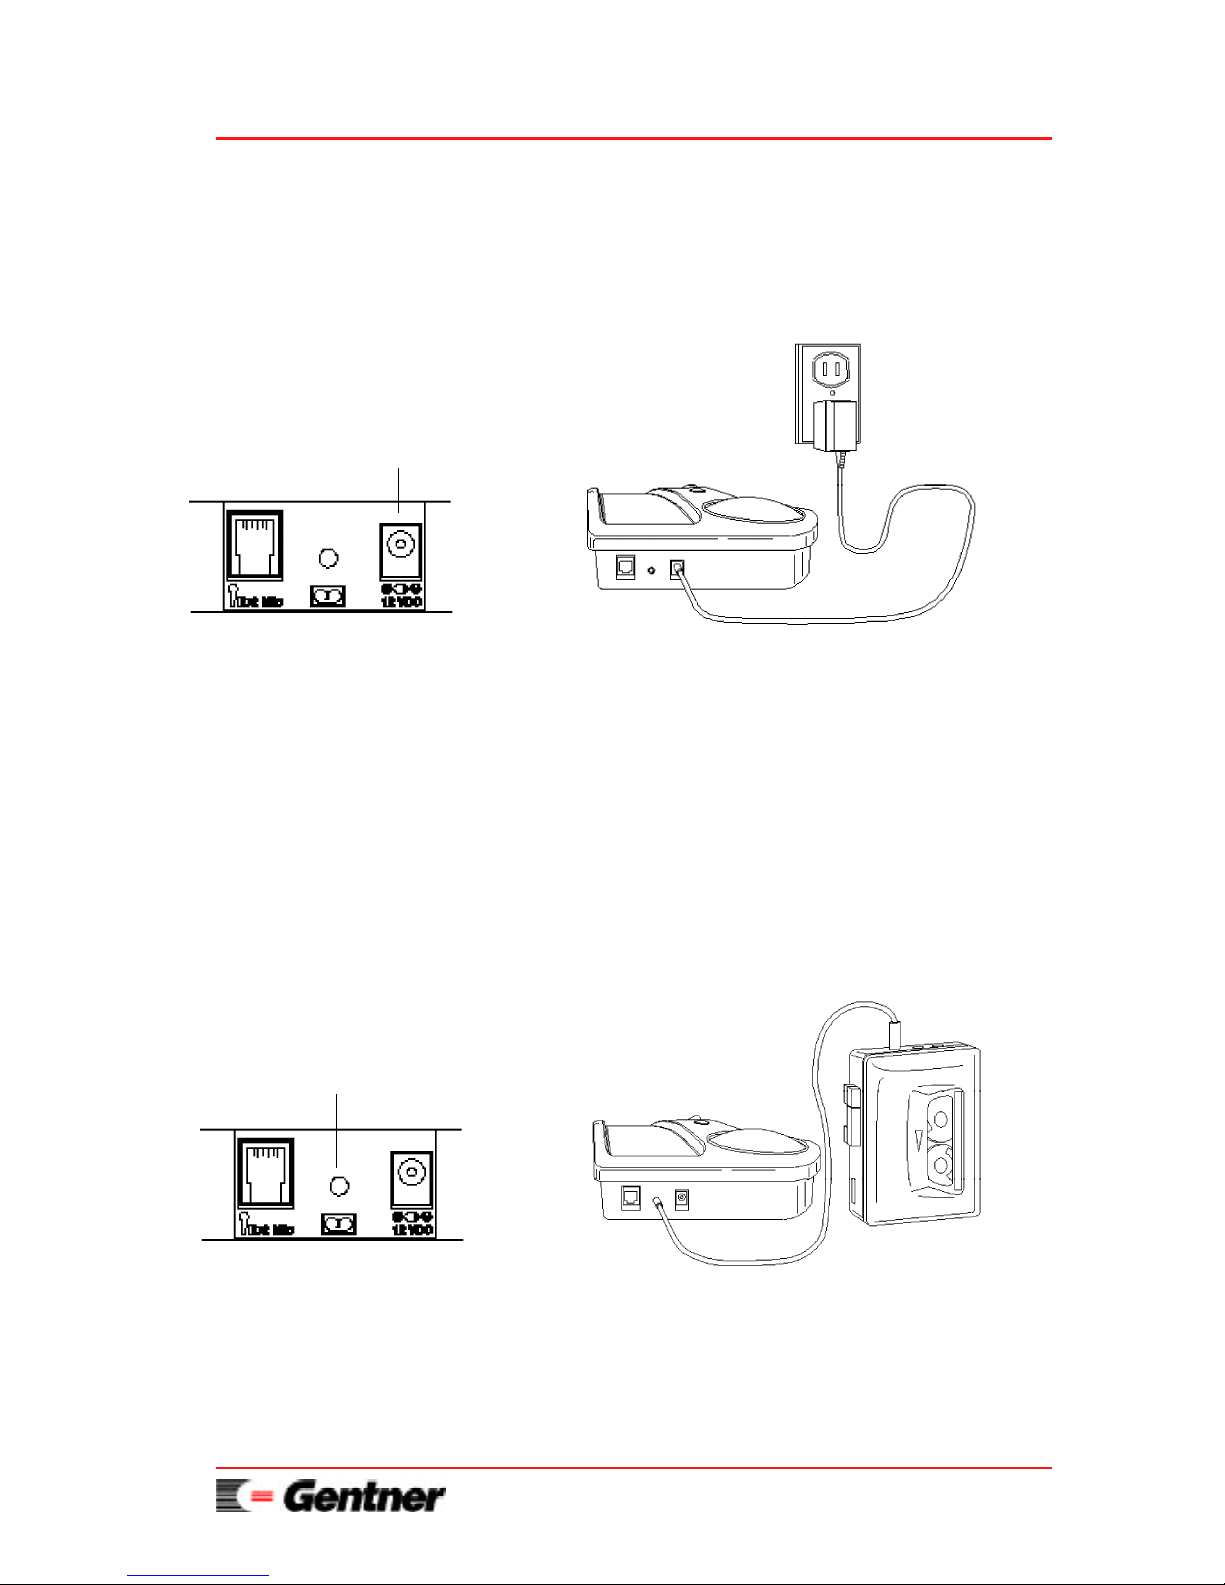
The following drawing diagrams the ET10
system when installation is complete.
Step 1
Unplug the handset cord from the base of
your telephone set. Plug the handset cord
into the ET10 module jack labeled .
Installation
Handset Module Jack
Page 9
For Setup Assistance Dial: 800-945-7730 or 801-975-7200
ET10 User’s Manual Page 7
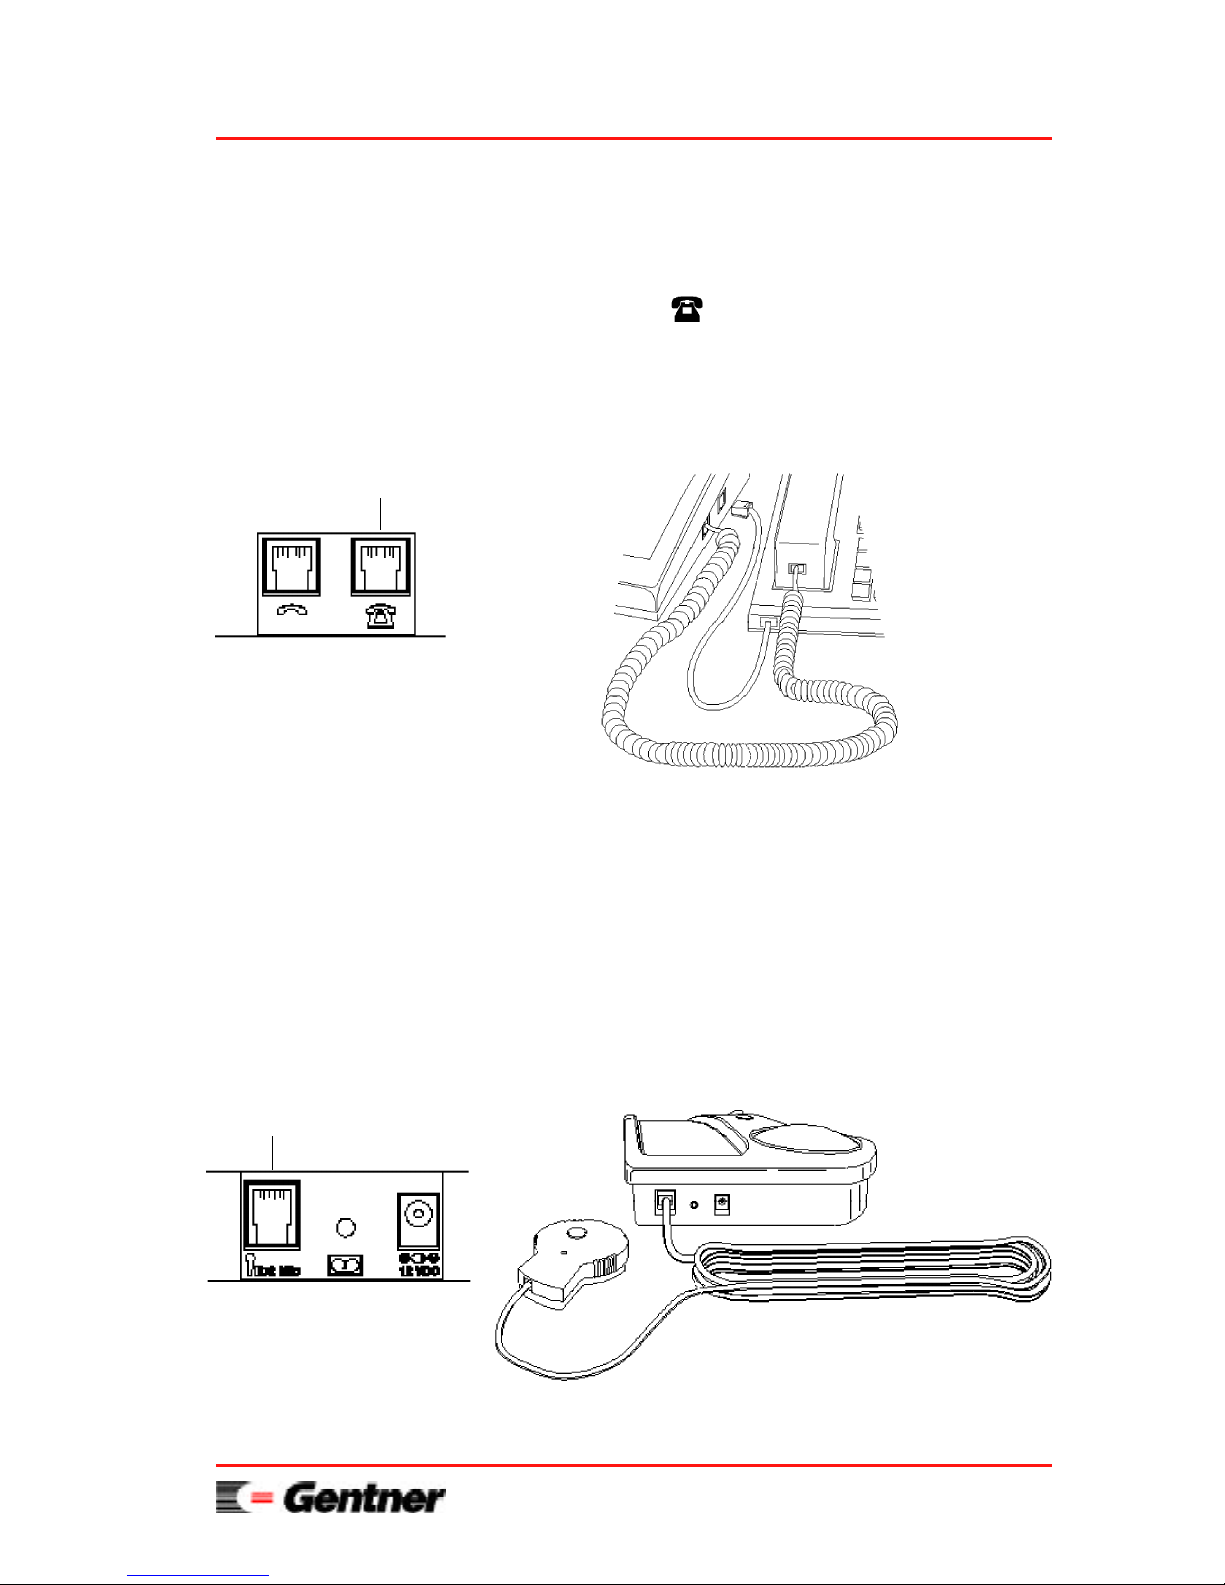
Step 2
Plug one end of the supplied 13-inch handset
cable into the telephone handset jack. Plug the
other end of the flat handset cable into the ET10
jack labeled . Note: If you need a longer
handset cable, please contact Gentner
Communications at the number listed below.
Step 3 (ET10ex Option)
If using the ET10ex, plug the external
microphone into the port labeled EXT MIC.
Both internal and external mics will operate at
the same time. Note: If the external
microphone is not in use, unplug it to prevent
possible reverb distortion
Telephone Module Jack
External Microphone Port
Page 10
For Setup Assistance Dial: 800-945-7730 or 801-975-7200
Page 8 ET10 User’s Manual
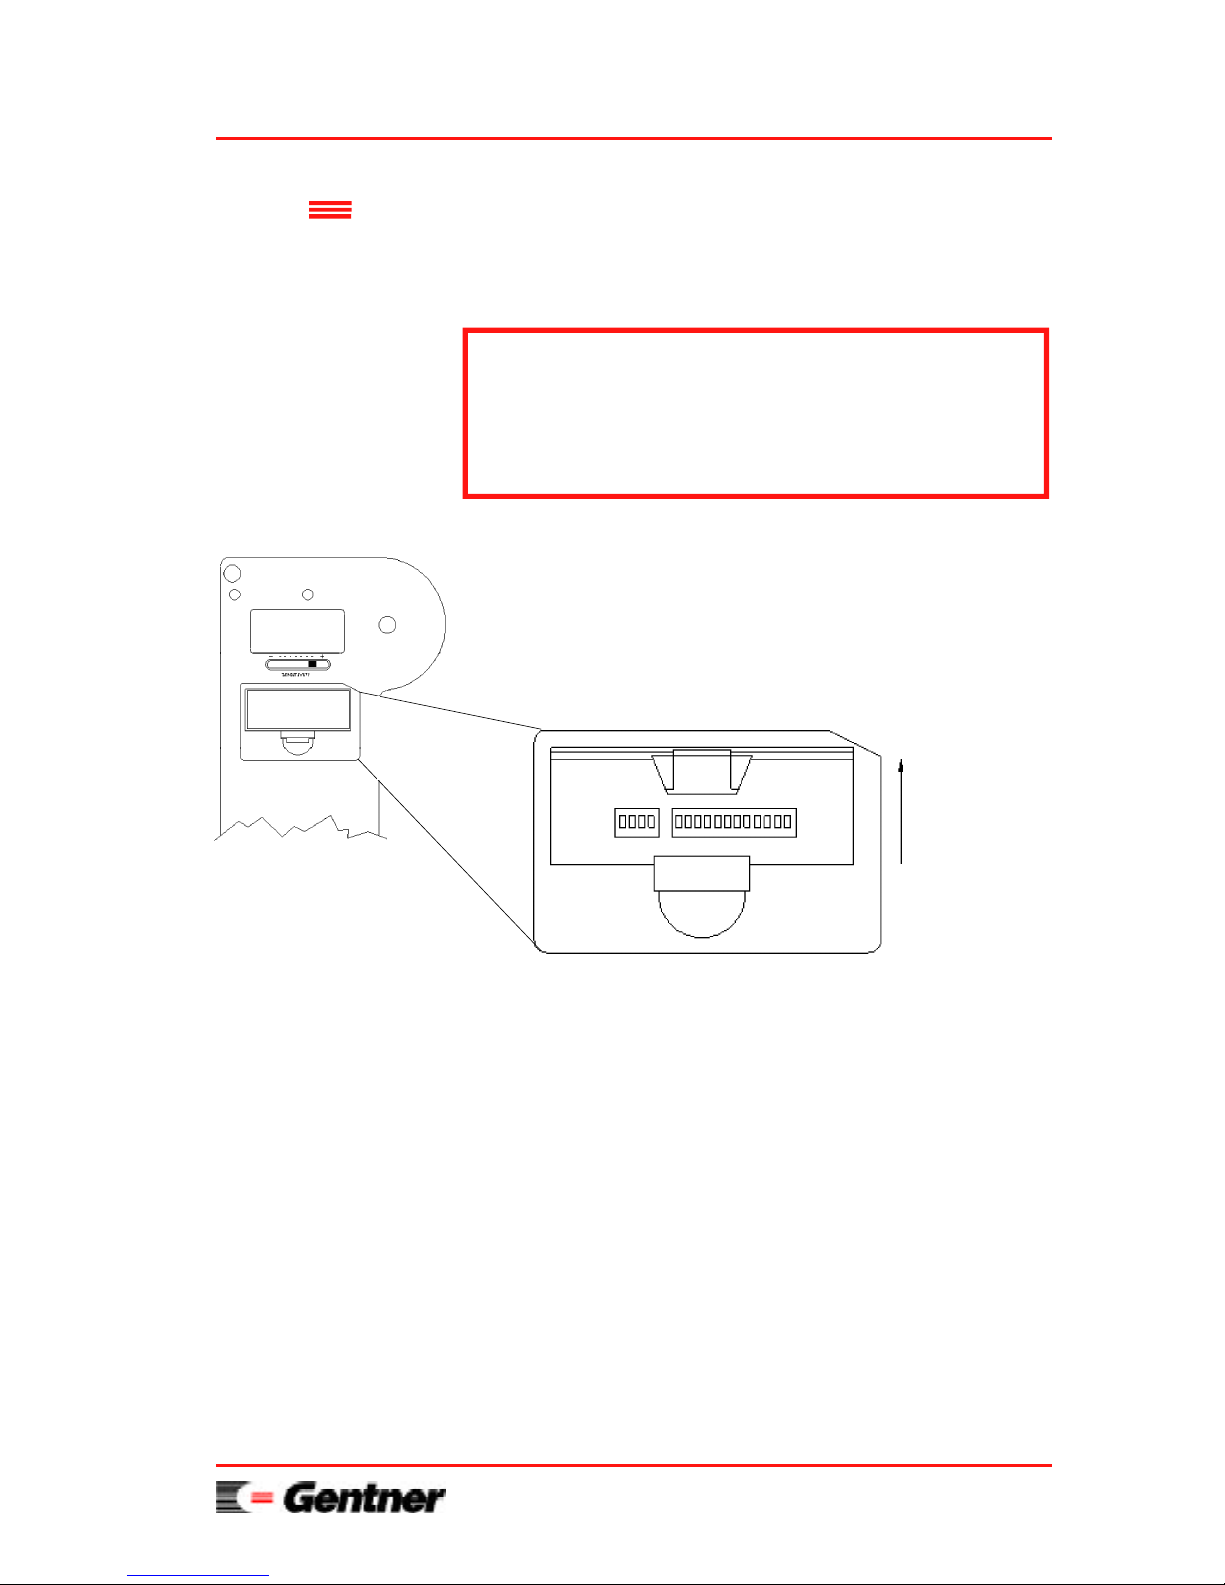
Step 4
Plug in the direct plug-in power adaptor barrel
connector into the ET10 power connector
labeled 12 VDC.
Step 5 (Record Option)
To record your audioconference, connect a tape
recorder (not provided) to the ET10 jack labeled
REC. A standard phono cable is typically
supplied with most tape recorders, or may be
purchased at most electronic supply stores.
Power Connector
Tape Recorder Jack
Page 11
For Setup Assistance Dial: 800-945-7730 or 801-975-7200
ET10 User’s Manual Page 9
Because telephones are different, you will need to
make a one-time setup to accommodate your
particular type of telephone. Follow these step-bystep procedures:
TELEPHONE VOLUME NOTE:
For telephones that have handset volume control,
set the telephone handset volume at a normal
listening level prior to adjusting the ET10.
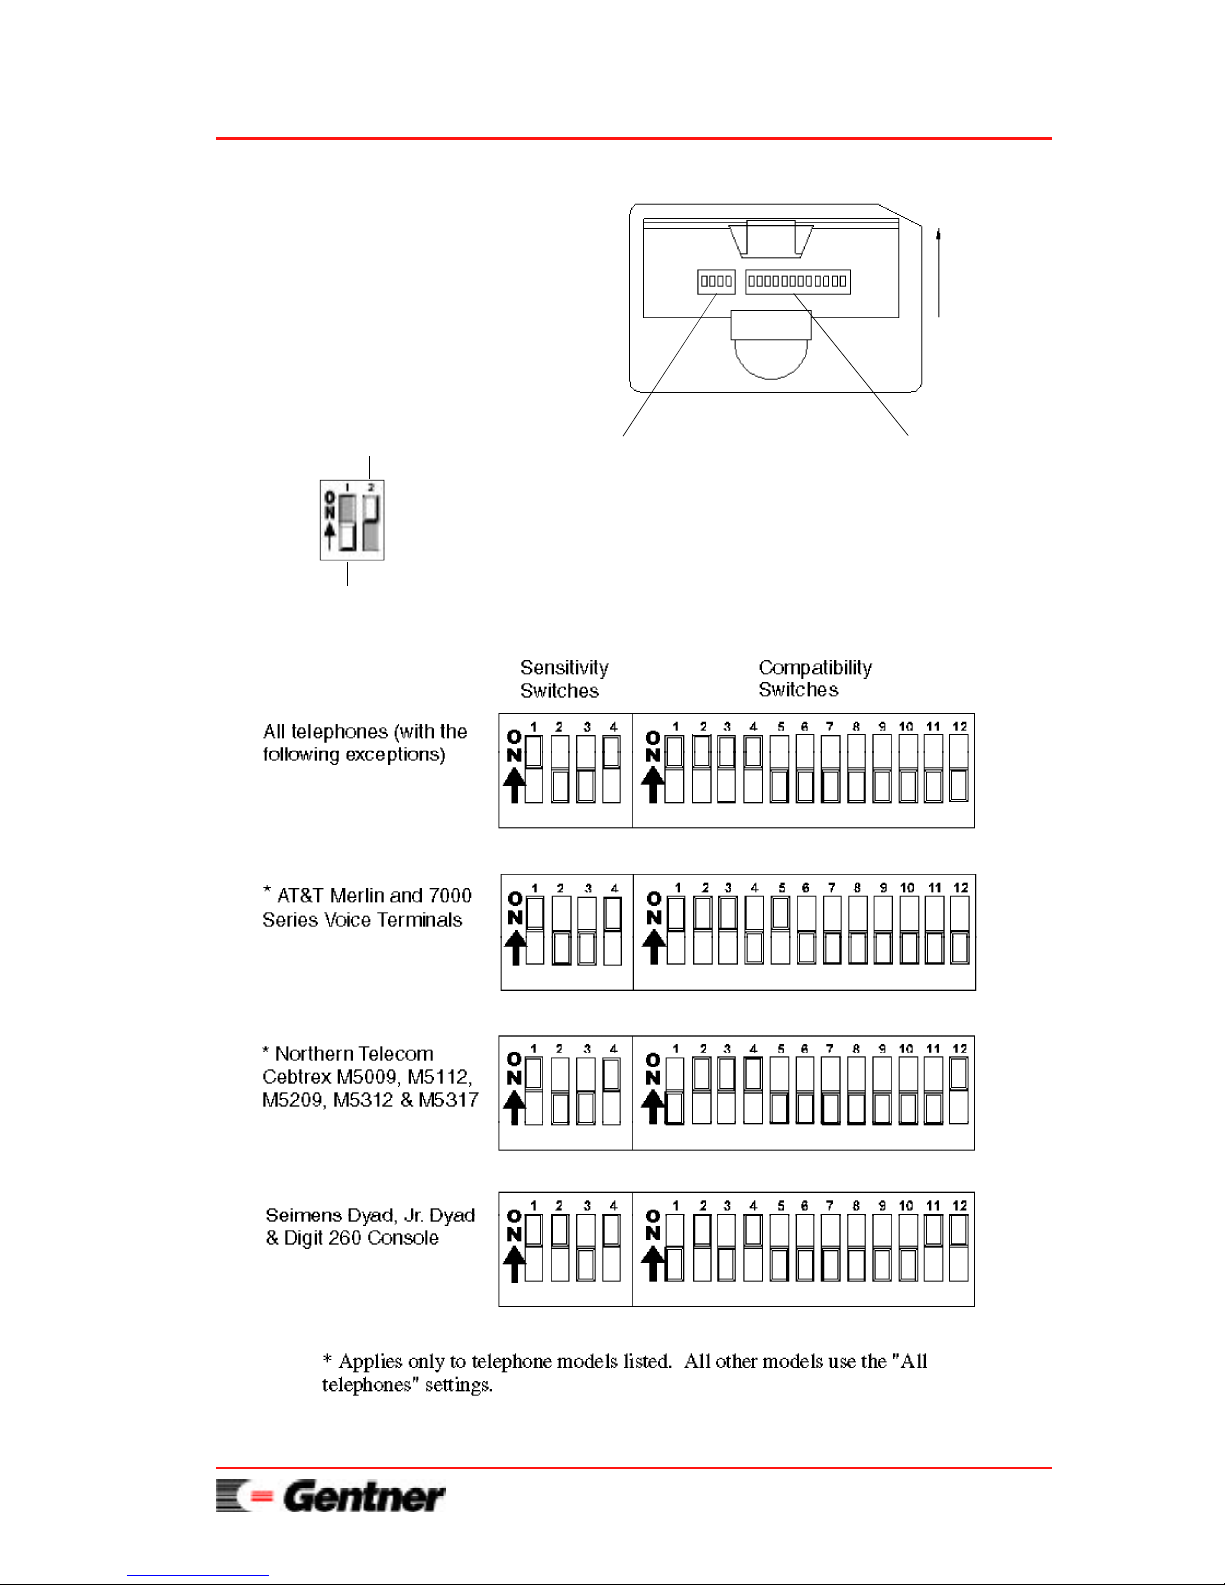
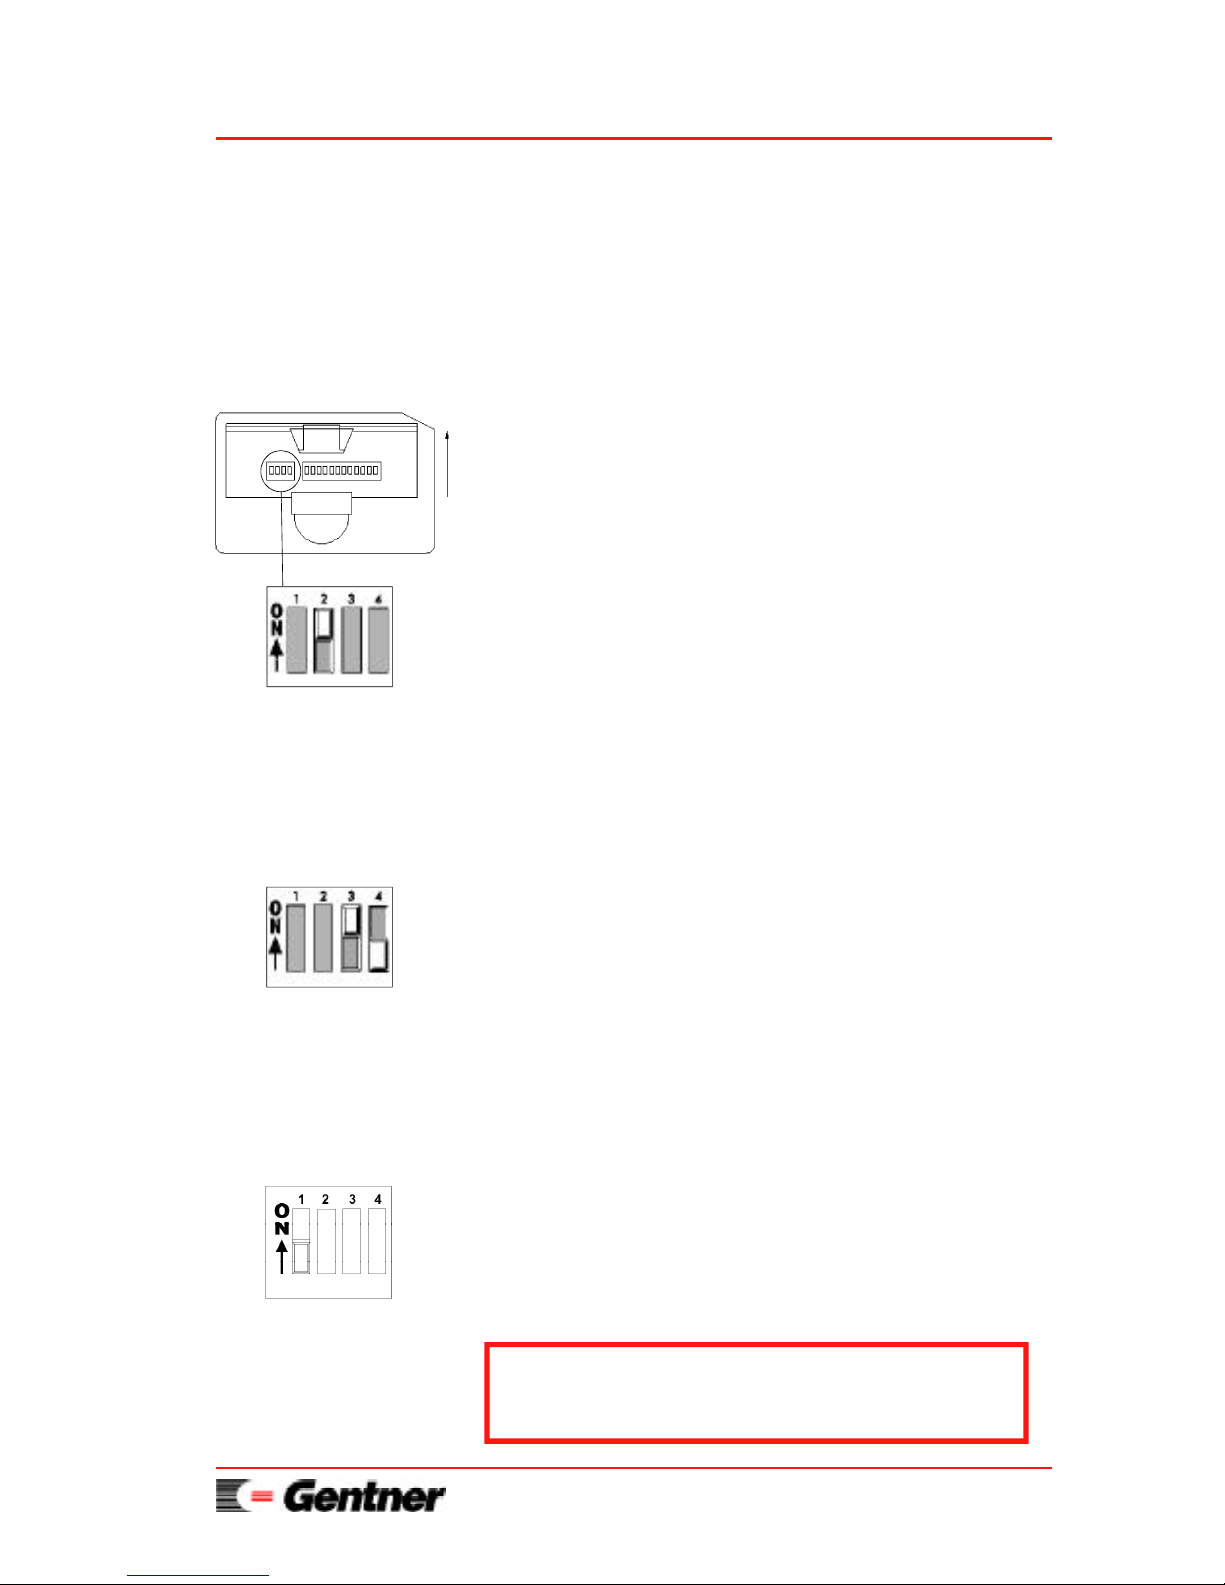
Step 1 - Switch Location
Locate the slide cover on the bottom of the
ET10. Open the cover to reveal the telephone
sensitivity and compatibility switches.
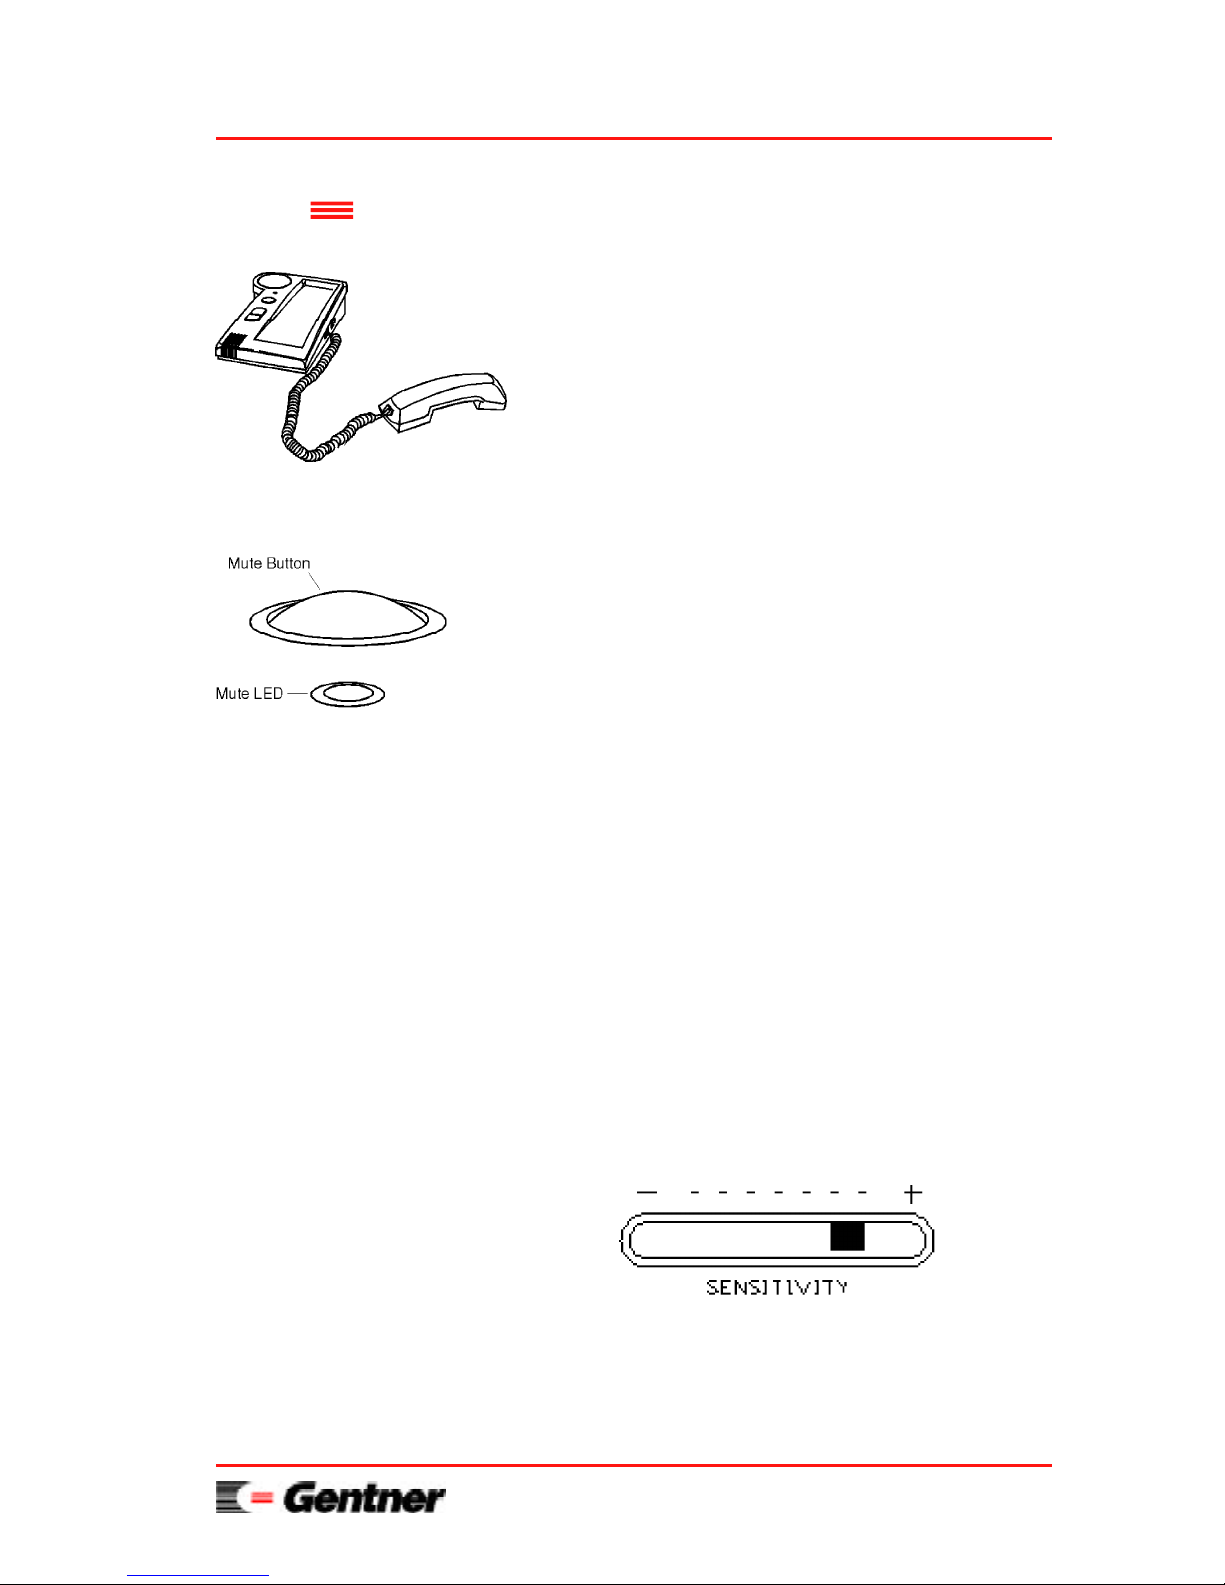
Step 2 - Sensitivity and Compatibility Setup
Determine the appropriate settings for your
particular telephone using the following
diagram (next page). Set the sensitivity and
compatibility switches according to your
telephone type.
One-Time
Setup
Bottom view of
ET10
Lift Cover
Page 12
For Setup Assistance Dial: 800-945-7730 or 801-975-7200
Page 10 ET10 User’s Manual
Switch Setting Key
Switch ON (Up)
Switch OFF (Down)
Sensitivity
Switches
Compatibility
Switches
Page 13
For Setup Assistance Dial: 800-945-7730 or 801-975-7200
ET10 User’s Manual Page 11
Step 1
Pick up your telephone handset and call
1-800-283-5330 (a quiet line used for ET10
setup). When you hear silence on the other end,
set the handset down next to your phone (NOT
on the ET10).
Step 2
Press and hold the MUTE button on the ET10
for a few seconds, until you see the MUTE light
flash rapidly.
Step 3
Set the slide control on the bottom of the ET10
to the far right (+). If you are not using a
Seimens Dyad, Jr. Dyad or Digit 260 Console,
make sure the sensitivity switch #2 (found on
the bottom of the ET10) is down (off). If the
MUTE light on the ET10 is flashing green, no
adjustment is needed; go to step 4. If not,
continue with Step 3.
Assisted
Setup
Page 14
For Setup Assistance Dial: 800-945-7730 or 801-975-7200
Page 12 ET10 User’s Manual
Move the slide control slowly down toward the
left (-). Stop immediately when the MUTE light
turns from a flashing red to a flashing green.
If the MUTE light never flashes green,
reposition the slide control to the far right (+).
Move the sensitivity switch #2 up (on).
Slowly move the slide control toward the left (-)
again. Stop immediately when the MUTE light
changes from a flashing red to flashing green.
If the MUTE light NEVER turns green, call for
assistance at the number below.
Step 4
Press the MUTE button to turn the assisted
setup off. You can now hang up your phone.
Please Note: Some telephones are more
sensitive than others. If the listener complains
that the audio is too loud, move the slide control
down one notch (a single tick mark) for a more
comfortable sound level; if the complaint is that
the audio too soft, move the slide control up one
notch.
Helpful Hint
When placing a call and the distant location
hears static, a hum, or scratchy noises, try
moving sensitivity switch 3 up (ON) and 4
down (OFF), and see if this solves the problem.
Repeat steps 1 through 4.
THIS IS A ONE-TIME SETUP.
Additional Hint
When placing a call and the distant location
complains of distortion, try moving
sensitivity switch 1 down (OFF).
Do not settle for bad audio. Please call the
number below if you are unable to get clean,
good-sounding audio.
Page 15
For Setup Assistance Dial: 800-945-7730 or 801-975-7200
ET10 User’s Manual Page 13
Operating the ET10 is practically identical to
operating your telephone because it uses your
existing telephone functions.
When first beginning your conference, there
is a 20–30 second period where the ET10
adjusts to your room environment. Sound
quality will improve after this automatic
adjustment is made.
Making calls and beginning a conference
Take your handset from the telephone cradle
and dial out normally; set the handset on the
ET10 pad to begin the conference or place the
handset on the ET10 pad first and dial out
normally. The conference begins automatically.
Answering calls and beginning a conference
Pick up your handset from the telephone cradle
and answer the call as normal. After the
telephone call has been established, place the
telephone handset on the ET10 pad or
immediately place the handset directly on the
ET10 pad after answering the call. The
conference will automatically begin.
Adjusting the speaker volume
Press the VOL button on the ET10 either up or
down to a desired listening level. The green
light will flash for every volume-level increase
or decrease. Holding down the VOL button will
adjust the volume more rapidly.
Please Note: When using a headset, adjusting
the speaker volume will affect the volume heard
through the headset, not the transmit volume.
Operation
Page 16
For Setup Assistance Dial: 800-945-7730 or 801-975-7200
Page 14 ET10 User’s Manual
Muting and unmuting the microphones
Press the MUTE button once to mute the
microphone. The MUTE light will flash red
when the microphone is muted. Press the
MUTE button once again to unmute the
microphone. The MUTE light will glow green
when the microphone is unmuted.
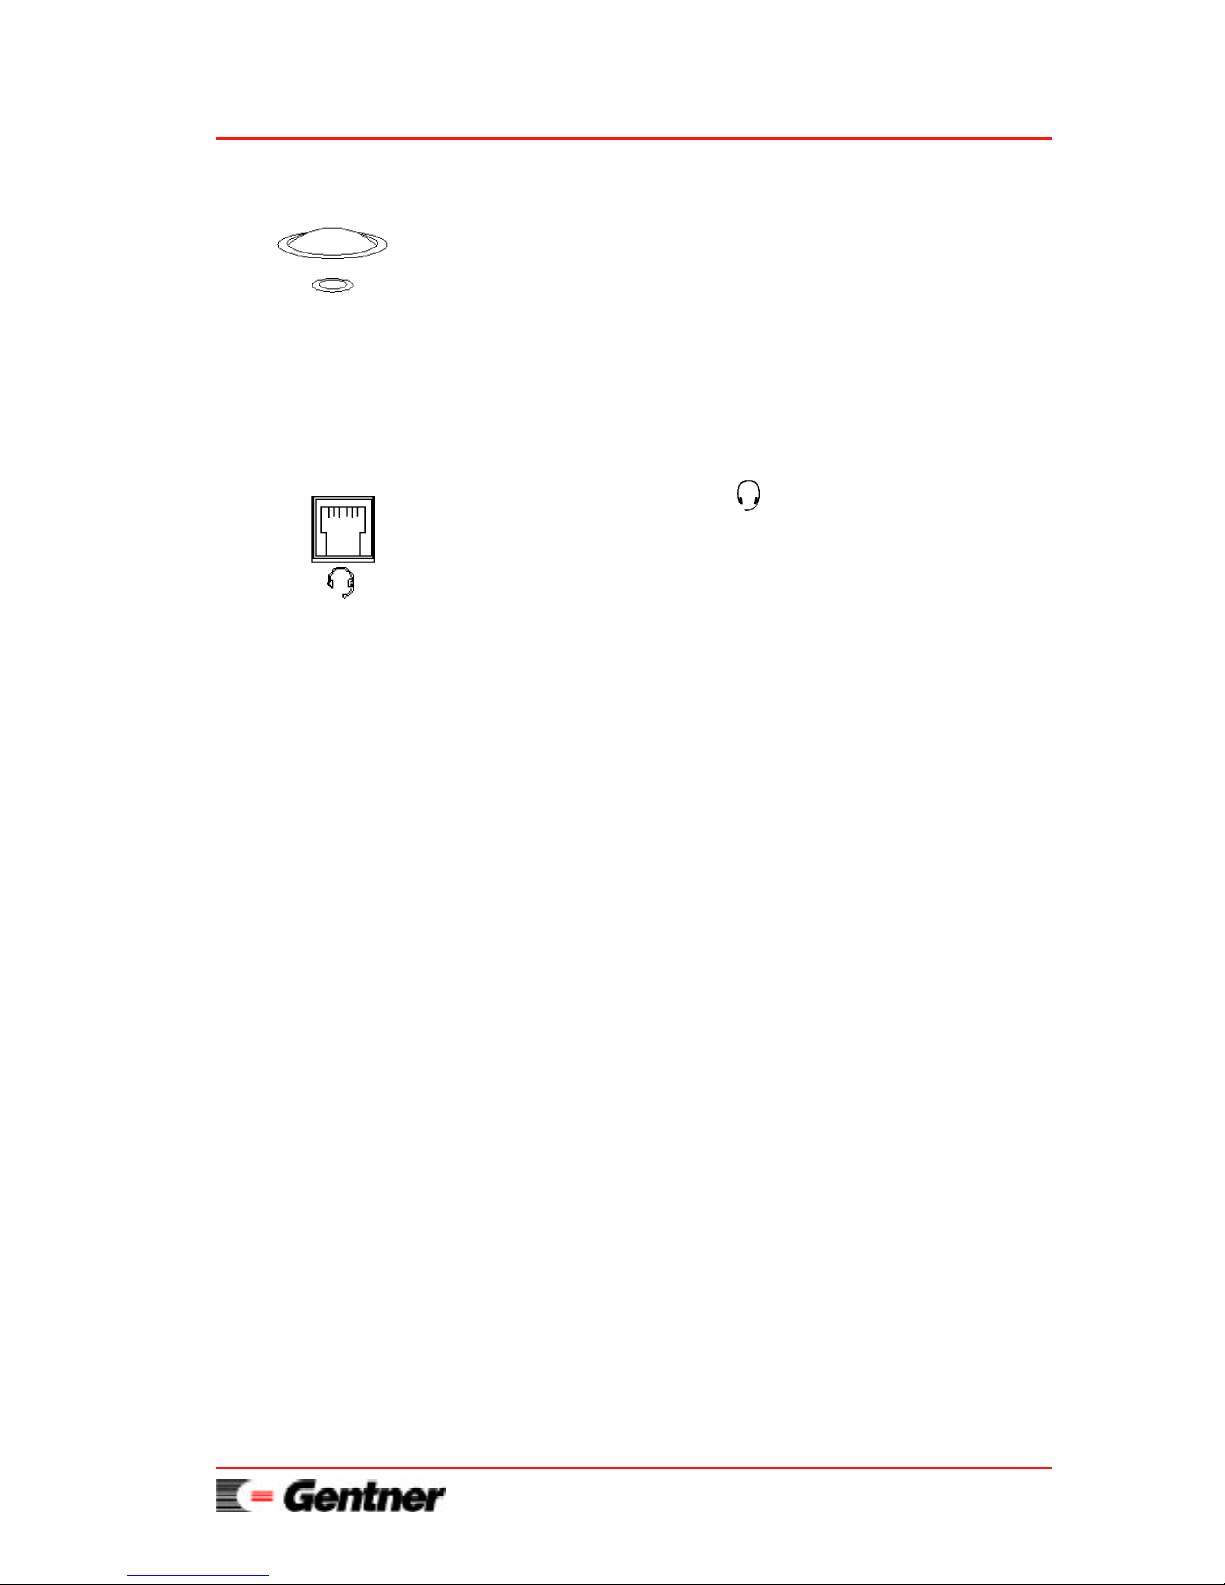
Hooking up optional headset
A headset port is provided on the left side of the
ET10 unit labeled . Plug your headset into
the headset port to automatically switch audio
from the ET10 to your headset. Unplug the
headset to switch audio back to the ET10.
To increase the volume to the headset, use the
VOLUME button on the ET10 accordingly.
Using the volume control on the ET10 will not
affect the headset’s transmit level.
HEADSET NOTE:
We recommend a dual-pro headset with a modular
RJ9 connector. See the back cover for a complete
list of Gentner accessories to fully customize your
ET10.
Using existing telephone features
To use your normal telephone functions (i.e. put
a call on hold, transfer a call, access additional
lines, conference additional lines, hold a private
conversation) the handset can be either placed
on the ET10 or picked up and used as normal.
Hanging up a call
Place the handset on the telephone handset
cradle.
Headset Port
Page 17

For Setup Assistance Dial: 800-945-7730 or 801-975-7200
ET10 User’s Manual Page 15
Troubleshooting
Symptom
Probable RemedyProbable Cause
The unit is not receiving
power
The telephone handset
cables are not properly
connected
The handset cables are
plugged in backwards
The telephone is not
connected to a call
The mute function is turned
on; the mute indicator will
flash red when the
microphone is muted
The One-Time Setup
configuration is improperly
set
The send audio volume is set
too low or too high
If the telephone has a
handset volume control, it
has been set too low or too
high
Ensure all cables are
properly connected; ensure
the power outlet is active
Ensure all telephone handset
cables are properly connected; see Installation
section (Steps 1-2, Pages 6-
7) in this manual
Ensure the LINE or
ACCESS button on the
telephone has been pushed
Press the mute button once;
the mute indicator will glow
green when the microphone
is active
See the One-Time Setup
section (Pages 9-10) in this
manual
See the Assited Setup (Pages
11-12) section in this
manual; adjust sensitivity to
fine tune
Adjust the telephone handset
volume to nominal listening
level, and repeat the
Assisted Setup (Pages 11-
12)
The power indicator
does not light
The mute indicator
lights green when the
handset is placed on the
ET10, but there is no
audio present
You can hear the people
at the distant location,
but they cannot hear
you
The audio level
received at the distant
location is too low or
too high
The speaker volume is
too low or too high at
the maximum or
minimum setting
If you cannot resolve your difficulty by following the suggested remedies in
this troubleshooting section, please call Gentner Communications Corporation
for assistance at 800-945-7730 or 801-975-7200.
Page 18

For Setup Assistance Dial: 800-945-7730 or 801-975-7200
Page 16 ET10 User’s Manual
ET10
Dimensions
8.75"/22.5cmL x 7"/17.5cmW x 2"/5cmH
Weight
1.7 lbs./.77 kg dry 2.6 lbs./1.18 kg shipping
Connectors
PHONE: 4 conductor, RJ9
HANDSET: 4 conductor, RJ9
REC: 2.5 mm phone jack
12 VDC IN: 2.5 mm Barrel Connector
MIC: RJ11-6
Microphone
1 directional element configured in 120
o
polar pattern
Speaker
2.25" round, adjustable to 80 dB SPL peak volume
Power Requirements
120 VAC, 60 Hz, 9W (or optional power supply)
Echo Cancellation
Digital echo cancellation used to eliminate acoustic
(room) and telephone-line echo
Audio Performance
Frequency Response
300 Hz - 3300 Hz, ± 2.0 dB
Signal to Noise Ratio
50 dB
Total Harmonic Distortion
≤.3%
Record Output
-10 dBu, 600 ohms, balanced
Controls
Volume up/down
Microphone mute
Utilizes all telephone system functions
Operating Temperature
32
o
to 100o F
Storage Temperature
0
o
to 150o F
Specifications
Page 19

For Setup Assistance Dial: 800-945-7730 or 801-975-7200
ET10 User’s Manual Page 17
ET10ex extension microphone (optional)
Dimensions
4"/9.5cmL x 2.75"/7cmW x 1.25"/3cmH
Weight
5.1 oz./.14 kg dry 8.6 oz./.23 kg shipping
Connector
Mic to ET10: RJ11-6
ET10ex Microphone
1 Omni-directional element, 360° coverage
Direct Plug-In Power Adaptor
Dimensions
2.25"/6cmL x 2"/5cmW x 2.25"/6cmH
Cable Length
6-foot fixed cable
Weight
8.4 oz./.23 kg dry
Electrical
12Vdc unregulated, 9W
Supplied Cables
ET10
13-inch flat handset cable
ET10ex (optional)
15-foot cable
Page 20

For Setup Assistance Dial: 800-945-7730 or 801-975-7200
Page 18 ET10 User’s Manual
Gentner Communications Corporation (Manufacturer) warrants that this product is free of
defects in both materials and workmanship. Should any part of this equipment be defective,
Manufacturer agrees, at its option, to:
A. Repair or replace any defective part free of charge (except transportation charges) for a
period of one year from the date of the original purchase, provided the owner returns the
equipment to the Manufacturer at the address set forth below. No charge will be made for
parts or labor during this period;
B. Furnish replacement for any defective parts in the equipment for a period of one year from
the date of original purchase. Replacement parts shall be furnished without charge, except
labor and transportation.
This Warranty excludes assembled products not manufactured by Manufacturer whether or
not they are incorporated in a Manufacturer product or sold under a Manufacturer part or
model number.
THIS WARRANTY IS VOID IF:
A. The equipment has been damaged by negligence, accident, act of God or mishandling, or
has not been operated in accordance with the procedures described in the operating and
technical instructions; or,
B. The equipment has been altered or repaired by other than Manufacturer or an authorized
service representative of Manufacturer; or,
C. Adaptations or accessories other than those manufactured or provided by Manufacturer
have been made or attached to the equipment which, in the determination of Manufacturer,
shall have affected the performance, safety or reliability of the equipment; or,
D. The equipment’s original serial number has been modified or removed.
NO OTHER WARRANTY, EXPRESS OR IMPLIED, INCLUDING WARRANTY OF
MERCHANTABILITY OR FITNESS FOR ANY PARTICULAR USE, APPLIES TO THE
EQUIPMENT, nor is any person or company authorized to assume any warranty for
Manufacturer or any other liability in connection with the sale of Manufacturer’s products.
Manufacturer does not assume any responsibility for consequential damages, expenses or loss
of revenue or property, inconvenience or interruption in operation experienced by the
customer due to a malfunction in the purchased equipment. No warranty service performed
on any product shall extend the applicable warranty period.
In case of unsatisfactory operation, the purchaser shall promptly notify Manufacturer at the
address set forth below in writing, giving full particulars as to the defects or unsatisfactory
operation. Upon receipt of such notice, Manufacturer will give instructions respecting the
shipment of the equipment, or such other matters as it elects to honor this warranty as above
provided. This warranty does not cover damage to the equipment during shipment and
Manufacturer assumes no responsibility for such damage. All shipping costs shall be paid by
customer.
This warranty extends only to the original purchaser and is not assignable or transferable.
Gentner Communications Corporation, 1825 Research Way, Salt Lake City, UT, 84119
Warranty
Page 21

For Setup Assistance Dial: 800-945-7730 or 801-975-7200
ET10 User’s Manual Page 19
This equipment has been tested and found to comply with the limits for a Class A digital device, pursuant to Part 15 of the FCC rules. These limits are designed to provide reasonable
protection against harmful interference when the equipment is operated in a commercial environment. This equipment generates, uses, and can radiate radio frequency energy and, if not
installed and used in accordance with the instruction manual, may cause harmful interference
to radio communications. Operation of this equipment in a residential area is likely to cause
harmful interference, in which case the user will be required to correct the interference at his/
her own expense.
Changes or modifications not expressly approved by Gentner Communications Corporation
could void the user's authority to operate the equipment.
This equipment complies with Part 68 of the FCC rules. On the bottom of the ET10 is a label
that contains, among other information, the FCC registration number. If requested, this information must be provided to the telephone company.
If this equipment causes harm to the telephone network, the telephone company will notify
you in advance that temporary discontinuance of service may be required. If advance notice
isn’t practical, the telephone company will notify the customer as soon as possible. Also, you
will be advised of your right to file a complaint with the FCC if you believe it is necessary.
The telephone company may make changes in its facilities, equipment, operations or
procedures that could affect the operation of this equipment. If this happens, the telephone
company will provide advance notice in order for you to make the necessary modifications in
order to maintain uninterrupted service.
If trouble is experienced with this equipment, please contact Gentner Communications
Corporation at 800-945-7730 or 801-975-7200 for repair and/or warranty information. If the
trouble is causing harm to the telephone network, the telephone company may request that
you remove the equipment from the network until the problem is resolved.
This equipment cannot be used on telephone company-provided coin service. Connection to
Party Line Service is subject to state tariffs.
When the ET10 is used with a leased telephone system, permission to connect to the
telephone system should be obtained from the owner of the system. Customer instructions for
KX-type telephones with message waiting lights and/or line status indicators must contain
statements that they can only be connected to host equipment and never to the network. This
device must be connected through the telephone handset.
FCC Registration Number: FBITAI-23293-KX-N
FCC Part 15
Compliance
FCC Part 68
Compliance
Page 22

For Setup Assistance Dial: 800-945-7730 or 801-975-7200
Page 20 ET10 User’s Manual
NOTICE: The Industry of Canada label identifies certified equipment. This certification
means that this equipment meets certain telecommunications network protective operational
and safety requirements. The Industry of Canada does not guarantee this equipment will
operate to the user’s satisfaction.
Before installing this equipment, users should ensure that it is permissible to be connected to
the facilities of the local telecommunications company. The equipment must also be installed
using an acceptable method of connection. In some cases, the company’s inside wiring
associated with a single-line individual service may be extended by means of a certified
connector assembly (telephone extension cord). The customer should be aware that
compliance with the above conditions may not prevent degradation of service in some
situations.
Repairs to certified equipment should be made by an authorized Canadian maintenance
facility designated by Gentner Communications Corporation. Any repairs or alterations made
by the user to this equipment, or equipment malfunctions, may give the telecommunications
company cause to request the user to disconnect the equipment.
Users should ensure, for their own protection, that the electrical ground connections of the
power utility, telephone lines and internal metallic water pipe system, if present, are
connected together. This precaution may be particularly important in rural areas.
CAUTION: Users should not attempt to make such connections themselves, but should
contact the appropriate electric inspection authority or electrician, as appropriate.
IC Certification Number: 1970 7050 X
CAUTION: For use only with certified telecommunication equipment.
ATTENTION: Pour utilisation seulement avec du materiel de telecommunications certifie
de marque.
IC Compliance
Safety
Information
Page 23

“Our vision is to provide our customers with
the total audio solution for conferencing.”
Accessories for full ET10 customization:
Accessory Case (part no. 910-140-006)
Companion Phone (part no. 910-140-007)
Dual Headset (part no. 910-140-004)
ET10 Case (part no. 910-140-005)
ET10ex Extension Mic (part no. 910-140-003)
Mic Extension Cable (part no. 830-140-003)
Page 24

GENTNER COMMUNICATIONS CORPORATION
Sales and Technical Assistance
1825 Research Way
Salt Lake City, Utah 84119
Toll Free 800-945-7730
Telephone 801-975-7200
FAX 801-977-0087
 Loading...