

Page 1

EXHIBIT D: O
Recommended Owners Manual for Automatic-Dimming NVS Mirror with Homelink® series
Universal Garage Door Opener, Electronic Compass and Outside Temperature Display.
WNER’S MANUAL
[2.1033(A3)]
Automatic-Dimming NVS Mirror with Homelink®, Electronic Compass and
Outside Temperature Display
Suggested Owner’s Manual Text
December 2001
Automatic-Dimm ing N ig ht Vision Safety
The NVS Mirror in your vehicle is the most advanced way to eliminate dangerous and
annoying glare in the rearview mirror during any driving situation. For more information
regarding NVS mirrors and other applications, please refer to the Gentex website –
www.gentex.com.
(NVS
) Mirror
Precautions
The NVS Mirror automatically reduces glare during driving conditions based upon light levels
monitored in front of the vehicle and from the rear of the vehicle. These light sensors are visible
through openings in the front and rear of the mirror case. Any object that would obstruct either
light sensor will degrade the automatic dimming control feature.
Operation
The NVS Mirror operates automatically whenever the vehicle ignition is ON. The status of the
automatic dimming feature is indicated by a green light on the face of the mirror.
To turn the automatic dimming feature off, press the button with the
light will turn off to indicate that the automatic dimming feature is off.
button. The indicator
To turn the automatic dimming feature on, press the button with the
indicator light will also turn on.
If the automatic dimming feature is off when the vehicle ignition is turned off, the automatic
dimming feature will become active when the vehicle ignition is turned back on.
button again. The
Page 2
Electronic Compass and Outside Temperature Display
The NVS Mirror in your vehicle is also equipped with a display the shows the vehicle heading
using the 8 basic cardinal headings (N, NE, E, SE, etc.). The NVS Mirror may also include a
display of the outside temperature. For more information regarding these features in the NVS
mirrors, please refer to the Gentex website – www.gentex.com.
Electronic Com pass Mirror Operation
The Compass display operates automatically whenever the vehicle ignition is ON. To turn the
display feature off, press the button with the
the button with the
If the compass display feature is off when the vehicle ignition is turned off, the display feature
will turn on again when the vehicle ignition is turned back on.
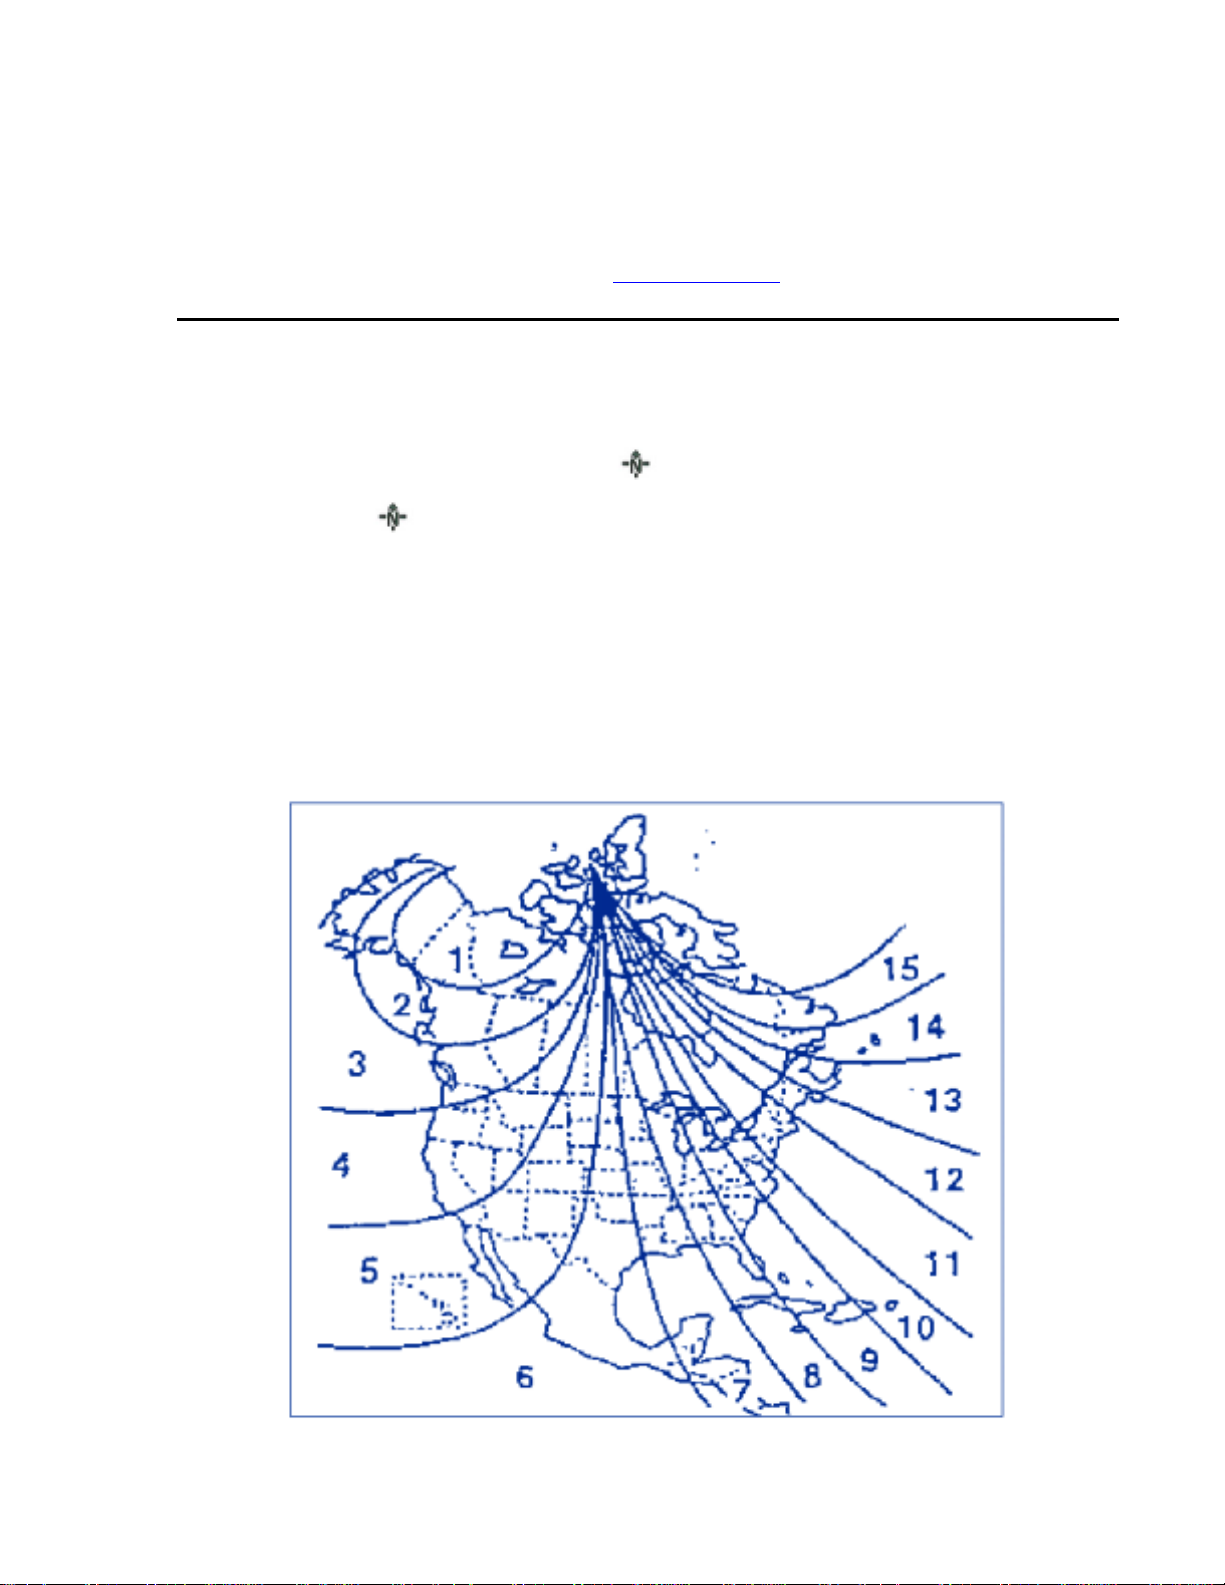
There is a difference between magnetic north and true north. The compass in the mirror can
compensate for this difference when it knows what region in which it is operating. This is set
either by the dealer or by the user. These operating regions or zones for the continental United
States are shown in the figure below.
symbol again.
symbol. To turn the display feature on, press
Page 3

To adjust the zone setting press and hold the button with the symbol for more than 3
seconds. Determine the appropriate zone number based upon your current location and the map
provided above. Press and hold the button until the new zone setting appears on the
display (note: the numbers will repeat, …13, 14, 15, 1, 2, …). Release the button and within
about 5 seconds the compass will start displaying a compass direction again.
There are some conditions that can cause changes to the vehicle magnets. Items such as
installing a ski rack or a CB antenna or even some body repair work on the vehicle can cause
changes to the vehicle's magnetic field. In these situations, the compass will need to be recalibrated to quickly correct for these changes. To re-calibrate the compass, press and hold the
button for more than 6 seconds. When the compass memory is cleared a “C” will appear in
the display. To calibrate the compass, drive the vehicle is 3 complete circles at less than five
mph.
Electronic Compass with Outside Temperature Mirror Operation
The Compass and Outside Temperature display operates automatically whenever the vehicle
ignition is ON. To turn the display feature off, press the button with the
the display feature on, press the button with the
If the compass and outside temperature display feature is off when the vehicle ignition is turned
off, the display feature will turn on again when the vehicle ignition is turned back on.
To adjust the outside temperature units (°F or °C) setting press and hold the button for more
than 3 seconds. The °F (or °C) will start flashing. Press the
are displayed. Wait a few seconds and the mirror will display the current and compass heading
and the outside temperature using the selected units.
There is a difference between magnetic north and true north. The compass in the mirror can
compensate for this difference when it knows what region in which it is operating. This is set
either by the dealer or by the user. These operating regions or zones for the continental United
States are shown in the figure above.
symbol again.
button until the correct units
symbol. To turn
Page 4

To adjust the zone setting press and hold the button with the symbol for more than 6
seconds. Determine the appropriate zone number based upon your current location and the map
provided above. Press and hold the button until the new zone setting appears on the
display (note: the numbers will repeat, …13, 14, 15, 1, 2, …). Release the button and within
about 5 seconds the compass will start displaying a compass direction again.
There are some conditions that can cause changes to the vehicle magnets. Items such as
installing a ski rack or a CB antenna or even some body repair work on the vehicle can cause
changes to the vehicle's magnetic field. In these situations, the compass will need to be recalibrated to quickly correct for these changes. To re-calibrate the compass, press and hold the
button for more than 9 seconds. When the compass memory is cleared a “C” will appear in
the display. To calibrate the compass, drive the vehicle is 3 complete circles at less than five
mph.
HomeLink® Universal Transceiver
The HomeLink® Universal Transceiver included in your
convenient way to replace up to three hand-held transmitters with a single built-in component. This innovative
feature will learn the radio freq uency cod es of most current transmitters use d to ac tiva te de vice s s u ch as
garage doors, entry door locks, estate gates, se curity s ys tems, and home or office lighting. For additional
information on HomeLink and/or HomeLink
HomeLink web s ite at
www.homelink.jci.com
compatible products, call
.
NVS Mirror with Homelink®
1-800-355-3515
provides a
or refer to the
Precautions
When programming the HomeLink Universal Transceiver to a garage door opener or entry
gate, make sure that people and objects are out of the way to prevent potential harm or
damage.
Do not use the HomeLink Universal Transceiver with any garage door opener that
lacks the safety stop and reverse feature as required by federal sa fety standards. (This
includes any garage door opener model manufactured before April 1, 1982.) A garage
door opener which cannot detect an object, signaling the door to stop and reverse, does
not meet current federal sa fety standards. Using a garage door opener without these
features increases risk of serious injury or death. For more information, call
1-800-355-3515
Retain the original transmitter for future programming procedures (i.e . , new vehicle
purchase). It is als o suggested that upon the sale of the vehicle, the programmed
HomeLink Universal Transceiver buttons be erased for security purposes (follow step
1 in the “Programming” portion of this text).
or on the internet at
www.homelink.jci.com.
Page 5

Programming
For best results, replace the battery in the hand-held transmitter with a
Note:
If your garage door opener receiver (located in the garage) is equipped with an antenna, make sure the
antenna is completely uncoiled and hangs straight down.
1.
Press and hold the two outside buttons - releasing
flash
to be followed to program additional hand-held transmitters.)
2.
one to three inches away from the HomeLink surface -
www.homelink.jci.com.
3.
HomeLink button.
Note: Some entry gates and garage door openers may require you to
4. The HomeLink indicator light will flash, first slowly and then rapidly. When
If, after 20 seconds, the indicator light does not flash rapidly, release both the HomeLink and the hand-held transmitter
buttons and repeat steps two through four.
and/or angle
rapidly.
after 20 seconds
Hold the end of the hand-held transmitter of the device you wish to train approximately
(For placement questions, please contact HomeLink at
Using both hands, simultaneously push the hand-held transmitter button
with the procedures noted in the “Canadian Programming / Gate Programming” section.
the indicator light flashes rapidly, release both buttons. (The rapid flashing light
indicates successful programming of the new frequency signal.)
until the indicator light begins to flash rapidly. Release both buttons after the indicator light flashes
. (This procedure erases the factory set default codes and does not have
)
Do not release the buttons until step 4 has been completed.
However, position the hand-held transmitter at a different length
when the indicator light begins to
only
keeping the indicator light in view.
1-800-355-3515
battery before programming.
new
or on the internet at
the desired
and
replace
this programming step (#3)
Refer to “Rolling Code Programming” and/or “Canadian Programming/Gate Programming” for additional procedures
if necessary.
To activate the garage door or other programmed device upon successfully completing the steps above, press and hold
the HomeLink button - releasing when the device
To program the remaining two buttons, follow steps 2 through 4.
If you do not successfully program the HomeLink Universal Transceiver to learn the signal of the hand-held
transmitter, refer to “Rolling Code Programming” within this text
355-3515
or on the internet at
www.homelink.jci.com.
begins
to activate.
or call toll-free for customer assistance at
1-800-
Page 6

Canadian Programming / Gate Programm ing
Canadian frequency laws, and the technology of some entry gates, require you to “cycle” (press and re-press the handheld transmitter button every two seconds) during programming.
Continue to press and hold the desired HomeLink button (note steps 3 through 5 in the “Programming” portion of this
text) while you “cycle” your hand-held transmitter until the frequency signal has been learned. The indicator light will
flash slowly and then rapidly upon successful training.
Note:
during the “cycling” process to prevent possible motor burn-up
When programming a garage door opener or gate, it is advised to unplug the device
Ope rating the Ho meLink® Universal Transceiver
To operate, simply press the programmed HomeLink button. Activation will now occur for the trained product
(garage door, security system, entry door lock, estate gate, or home or office lighting). For convenience, the hand-held
transmitter of the device may also be used at any time.
Rolling Code P ro gr amm ing
Rolling code garage door openers (or other rolling code devices) which are “code protected” and manufactured after
1996, may be determined by the following:
A. Reference the garage door opener owner’s manual for verification.
B. The hand-held transmitter appears to program the HomeLink Universal
Transceiver but HomeLink does not activate the garage door.
C. Press and hold the trained HomeLink button. The garage door opener has
the rolling code feature if the HomeLink
then turns solid after 2 seconds.
indicator light
flashes rapidly and
To train a garage door opener with the rolling code feature, follow these instructions after completing the
“Programming” portion of this text (the aid of a second person may make the following training procedures quicker
and easier.)
1. Locate the training button on the
location and color of the button may vary by garage door opener brand. If there is
difficulty locating the training button, reference the garage door opener owner’s
manual or contact HomeLink at
www.homelink.jci.com.
2. Press the “training” button on the garage door opener receiver (
activate the
Note:
“training” light
Following step 2, there are
garage door opener receiver (in the garage).
1-800-355-3515
).
30 seconds
or on the internet at
which will
in which to initiate step 3.
Exact
Page 7

3.
Firmly press and release the programmed HomeLink button. Press and release the HomeLink button
to complete the training process. (Some garage door openers may require you to do this procedure a
time
to complete the training.)
time
a second
The garage door opener should now recognize the HomeLink signal and activate when the HomeLink button is
pressed. The remaining two buttons may now be programmed if this has not previously been done. Refer to the
“Programming” portion of this text.
Erasing Programmed Hom e Link® Buttons
Individual buttons cannot be erased, however, to erase the three programmed buttons:
1. Press and hold the two outside buttons until the indicator light beings to flash
after 20 seconds.
2. Release both buttons.
The HomeLink Universal Transceiver is now in the train (or learning) mode and can be programmed at any time
following steps 2 through 4 in the “Programming” portion of this text.
third
Reprogramm ing a Single HomeLink® Button
To program a device to HomeLink using a button previously trained, follow these steps:
1. Press and hold the desired HomeLink button
Do NOT
.
has been completed.
2. When the indicator light begins to flash slowly (after 20 seconds), position
the hand-held transmitter 1 to 3 inches away from the HomeLink surface.
3. Press and hold the hand-held transmitter button.
4. The HomeLink indicator light will flash, first slowly and then rapidly. When
the indicator light begins to flash rapidly, release both buttons.
The previous device has now been erased and the new device can be activated by pushing the HomeLink button that
has just been programmed. This procedure will not affect any other programmed HomeLink buttons.
This device complies with FCC rules part 15. Operation is subject to the follow ing two c onditions: (1) This device may not cause harmful interference, and (2) This
device must acc ept any interference that may be rec eived including interference that may cause undesired operation. WARNING: The transmitter h as b een t es t ed
and complies with FCC and DOC/MDC rules. Changes or modifications not expressly approved by the party respons ible for compliance could void the user’s
authority to operate the device.
DOC: XXXX XXXX XXX XXX Gentex MODEL #: NZLCTHL3 FCC ID: NZLCTHL3
®
HomeLink
is a registered trademark owned by Johnson Contr ols, I nc .
release until
step 4
 Loading...