

Page 1

7109CS/CSX & 7109LS
7139CS/CSX & 7139LS
PHOTOELECTRIC TYPE RESIDENTIAL SMOKE
ALARMS FOR THE HEARING IMPAIRED
AC POWERED WITH 9V BATTERY BACKUP
Installation Instructions - Owner's/User's Information Manual
READ CAREFULLY AND SAVE
INTRODUCTION
The 7139CS/CSX & 7139LS Smoke Alarms are
Photoelectric Type Alarms for use as an evacuation device in
residential applications, while the 7109CS/CSX &7109LS are
for use as an alert and relocate device. Each alarm has a solid
state piezo signal to warn and alert the household to the
presence of threatening smoke.
Your Photoelectric alarm is designed to detect the smoke
that results from an actual fire. Consequently, it is uncommon
for household smoke such as cigarette smoke or normal
cooking smoke to cause an alarm.
MODEL NO. DESCRIPTION
7109CS/CSX-W or C*.....120 VAC, 60 Hz with 1 Form C
7109LS*..........................120 VAC, 60 Hz Wall Mounted,
7139CS/CSX-W or C......Same as the 7109CS but with a
7139LS...........................Same as 7109LS but with a
* These units produce a non-temporal audible alarm and are therefore not
intended for locations where the desired action of the occupant(s) is
evacuation.
Aux. Relay Contact and Visual
Signaling Strobe Light with Tandem
Wire Connection. CSX model is
provided with an additional wire (grey)
for the remote activation of the strobe.
Provided With a 9 ft. Line Cord,
Pulsating Horn.
Temporal Horn. CSX model is
provided with an additional wire (grey)
for the remote activation of the strobe.
Temporal Horn.
HOW YOUR SMOKE
ALARM WORKS
These Smoke Alarms operate on the photoelectric light
scatter principle. The unit's sensing chamber houses a light
source and a light sensor.
The darkened sensing chamber is exposed to the
atmosphere and designed to permit optimum smoke entry from
any direction while rejecting light from outside the alarm.
The light source is an infrared (invisible) LED which pulses
every 4-8 seconds. The light sensor is a photodiode matched
to the light frequency of the LED light source.
Under normal conditions, the light generated by the pulsing
infrared LED is not seen by the light sensor, as it is positioned
out of the direct path of the light beam. When smoke enters
the sensing chamber, light from the pulsing LED light source is
reflected by the smoke particles onto the photodiode light sensor. At the first sighting of smoke, the alarm is put into a prealarm mode.
This is indicated by a rapidly flashing LED on the face of the
alarm. Once the light sensor confirms smoke for 2 consecutive
pulses inside the chamber, the light sensor produces the signal
necessary to trigger the alarm.
This technique of verifying the smoke condition, combined
with a 5-to-1 signal-to-noise ratio, substantially reduces the
possibility of nuisance alarms.
HOW TO TELL IF YOUR SMOKE
ALARM IS WORKING PROPERLY
§ Your alarm is provided with an alarm horn and pulsating
Light Emitting (indicator) Diode, which pulses every 15-30
seconds, and a green AC power on LED.
§ When turning the test knob on the alarm to TEST 1, the red
light will flash rapidly, the horn will sound and the strobe will
flash. Strobe will not operate without AC power.
§ If the battery is low, a chirp will be sounded when the red
LED flashes. If the alarm is malfunctioning, or if the battery
is missing, the chirp is sounded without the red LED flashing.
If AC power fails, the green LED will turn off.
§ The test knob of your alarm simulates actual smoke
conditions.
NOTE: Tandem Interconnect Models.
§ When testing one alarm, the alarm that is activated will
flash the red indicator light emitting diode and sound its
alarm horn. All other units will sound the alarm horn with
their red indicator lights remaining off.
FIRE PROTECTION PLAN
This Smoke Alarm can quickly alert you to the presence of
smoke-it cannot prevent fire. Please note that there are
hazards against which smoke detection may not be effective,
such as smoking in bed, explosions, when a closed door
separates the alarm from the source of the smoke, etc. The
ultimate responsibility for fire protection rests solely on you.
1. To minimize fire hazards-avoid improper storage of
flammable liquids and don't leave small children home
alone.
2. Bedroom doors should be closed while sleeping if a
smoke alarm is installed in the bedroom. They act as a
barrier against heat and smoke.
3. Establish an escape plan:
(a) Post a detailed floor plan depicting the chosen escape
routes.
(b) Each bedroom should have at least two escape routes.
(c) Make sure your children know what to do in case of
fire and teach them to follow the escape plan you
have posted.
(d) Agree on an outside meeting place.
(e) Conduct fire drills at least twice a year.
(f) Be sure each member of the family is familiar with
the smoke alarm so they can react properly.
If the alarm should sound:
1. Never waste time dressing or gathering valuables. Follow
the escape route and leave the house immediately.
2. Check bedroom doors before opening. If the door is hot
or smoke is leaking in around the edges-DO NOT OPENuse the alternate escape route.
Pg. 7-1
Page 2

3. If there is smoke in the escape route-keep close to the
floor and take short breaths. If possible, cover your nose
and mouth with a wet cloth.
4. Do not use your own telephone-call the Fire Department
from your neighbor's house.
5. Once out, do not re-enter your house, but proceed to
your prearranged meeting place.
WHAT ELSE YOU CAN DO TO MAKE
YOUR FAMILY SAFE FROM FIRES
Putting up smoke alarms is just the first step in protecting
your family from fires. You also must reduce the chances that
fires will start in your home and increase your chances of safely
escaping if one does start. To have an effective fire safety
program:
a. Install smoke alarms properly following the instructions
in this manual. Keep your smoke alarms clean. Test
your alarm weekly and repair or replace it when it no
longer functions. As with any electronic product, alarms
have a limited life, and alarms that don't work cannot protect
you.
b. Follow safety rules and prevent hazardous situations:
§ Use smoking materials properly; never smoke in bed.
§ Keep matches and cigarette lighters away from children.
§ Store flammable materials in proper containers and
never use them near open flames or sparks.
§ Keep electrical appliances and cords in good working
order and do not overload electrical circuits.
§ Keep stoves, fireplaces, chimneys, and barbecue grills
grease-free and make sure they are properly installed
away from combustible materials.
§ Keep portable heaters and open flames such as candles
away from combustible materials.
§ Do not allow rubbish to accumulate.
c. Develop a family escape plan and practice it with your
entire family, especially small children.
§ Draw a floor plan of your home and find two ways to exit
from each room. There should be one way to get out of
each bedroom without opening the door.
§ Teach children what the smoke alarm signal means,
and that they must be prepared to leave the residence
by themselves if necessary. Show them how to check
to see if doors are hot before opening them, how to
stay close to the floor and crawl if necessary, and how
to use the alternate exit if the door is hot and should
not be opened.
§ Decide on a meeting place a safe distance from your
house and make sure that all your children understand
that they should go and wait for you if there is a fire.
§ Hold fire drills at least every 6 months to make sure that
everyone, even small children, know what to do to
escape safely.
§ Know where to go to call the fire department from outside
your residence.
§ Provide emergency equipment such as fire extinguishers
and teach your family to use this equipment properly.
WHAT TO DO IF THERE IS A FIRE
IN YOUR HOME
If you have prepared family escape plans and practiced
them with your family, you have increased their chances of
escaping safely. Review the following rules with your children
when you have fire drills so everyone will remember them in a
real fire emergency:
a. Don't panic; stay calm. Your safe escape may depend on
thinking clearly and remembering what you have practiced.
b. Get out of the house following a planned escape route as
quickly as possible. Do not stop to collect anything or to
get dressed.
c. Open doors carefully only after feeling to see if they are
hot. Do not open a door if it is hot; use an alternate
escape route.
d. Stay close to the floor; smoke and hot gases rise.
e. Cover your nose and mouth with a cloth, wet if possible,
and take short, shallow breaths.
f. Keep doors and windows closed unless you open them to
escape.
g. Meet at your prearranged meeting place after leaving the
house.
h. Call the Fire Department as soon as possible from out
side your house. Give the address and your name.
i. Never re-enter a burning building.
Contact your local Fire Department for more information
on making your home safer from fires and about preparing your
family's escape plans.
WHAT THIS SMOKE ALARM CAN DO
This alarm is designed to sense smoke entering its sensing
chamber. It does not sense gas, heat, or flames.
When properly located, installed, and maintained, this
smoke alarm is designed to provide early warning of
developing fires at a reasonable cost. This alarm monitors the
air and, when it senses smoke, activates its built-in alarm horn.
It can provide precious time for you and your family to escape
from your residence before a fire spreads. Such an early
warning, however, is possible only if the alarm is located,
installed, and maintained as specified in this User's Manual.
NOTE: This smoke alarm is designed for use within
single residential living units only; that is, it should be used
inside a single-family home or one apartment of a
multi-family building. In a multi-family building, the alarm may
not provide early warning for residents if it is placed outside of
the residential units, such as on outside porches, in corridors,
lobbies, basements, or in other apartments. In multi-family
buildings, each residential unit should have alarms to alert the
residents of that unit. Alarms designed to be interconnected
should be interconnected within one family residence only;
otherwise, nuisance alarms will occur when an alarm in another
living unit is tested.
IMPORTANT NOTE: WHAT SMOKE
ALARMS CANNOT DO
Smoke alarms will not work without power. A battery
must be connected to the alarm to maintain proper alarm
operation if AC power supply is cut off by an electrical fire, an
open fuse or circuit breaker, or for any other reason. In the
event of AC power failure, the battery will supply standby
power for a minimum of 24 hours.
Smoke alarms may not sense fire that starts where
smoke cannot reach the alarms such as in chimneys, in
walls, on roofs, or on the other side of closed doors. If
bedroom doors are usually closed at night, alarms should be
placed in each bedroom as well as in the common hallway
between them.
Smoke alarms also may not sense a fire on another
level of a residence or building. For example, a second-floor
alarm may not sense a first-floor or basement fire. Therefore,
alarms should be placed on every level of a residence or
building.
The horn in your alarm meets or exceeds current audibility
requirements of Underwriters Laboratories. However, if the
alarm is located outside a bedroom, it may not wake up a
sound sleeper, especially if the bedroom door is closed or only
partly open. If the alarm is located on a different level of the
residence than the bedroom, it is even less likely to wake up
people sleeping in the bedroom. In such cases, the National
Fire Protection Association recommends that the alarms be
interconnected so that an alarm on any level of the residence
will sound an alarm loud enough to awaken sleepers in closed
bedrooms. This can be done by installing a fire-detection
system, by connecting alarms together, or by using radio
frequency transmitters and receivers.
All types of smoke alarm sensors have limitations. No
type of smoke alarm can sense every kind of fire every
time. In general, alarms may not always warn you about
fires caused by violent explosions, escaping gas, improper
storage of flammable materials, or arson.
NOTE: This alarm is not designed to replace specialpurpose fire detection and alarm systems necessary to
protect persons and property in non-residential buildings such
as warehouses, or other large industrial or commercial build ings. It alone is not a suitable substitute for complete firedetection systems designed to protect individuals in hotels and
motels, dormitories, hospitals, or other health and supervisory
care and retirement homes. Please refer to NFPA 101,The Life
Safety Code, and NFPA 72 for smoke alarm requirements for
fire protection in buildings not defined as "households."
Installing smoke alarms may make you eligible for lower insurance rates, but smoke alarms are not a substitute for insur -
ance. Home owners and renters should continue to insure
their lives and property.
Pg. 7-2
Page 3
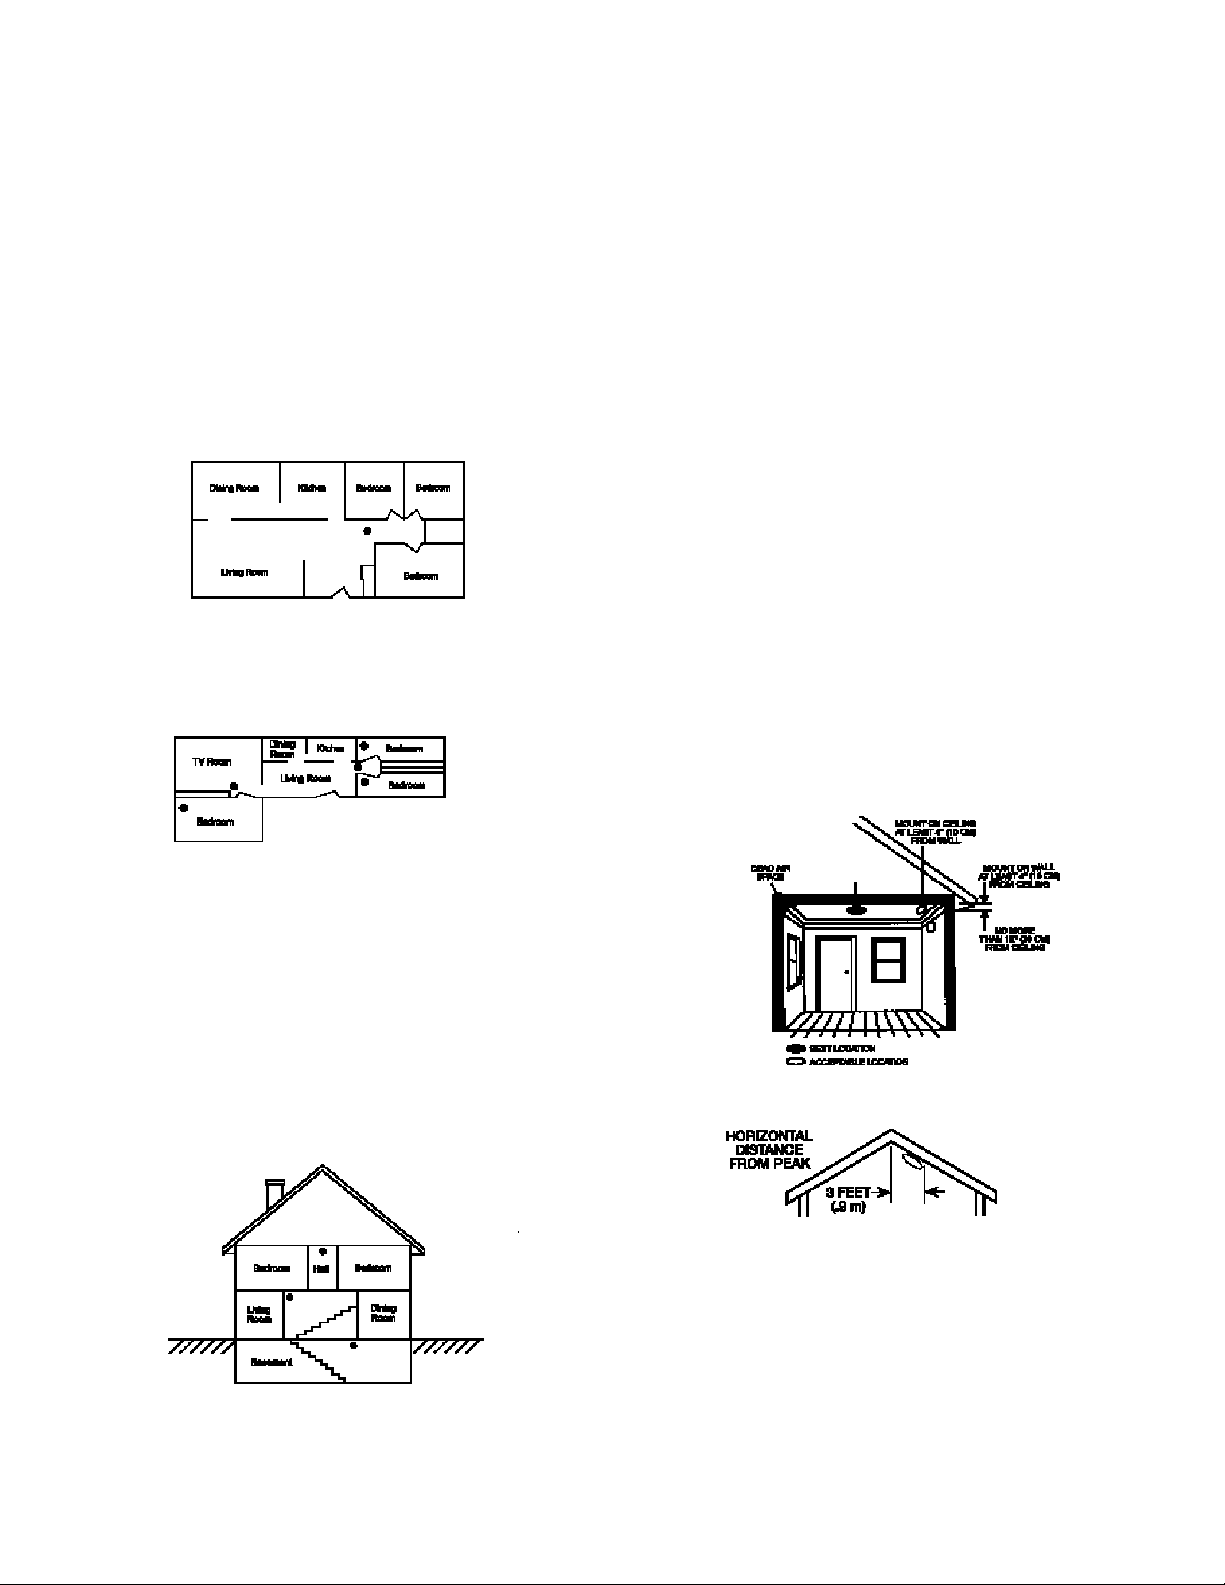
PLACEMENT OF SMOKE ALARMS
THIS EQUIPMENT SHOULD BE INSTALLED IN
ACCORDANCE WITH THE NATIONAL FIRE PROTECTION
ASSOCIATION'S STANDARD 72 (National Fire Protection
Association, Batterymarch Park, Quincy, MA 02269).
For your information, the National Fire Protection
Association's Standard 72, reads as follows:
Smoke detectors shall be installed outside of each separate
sleeping area in the immediate vicinity of the bedrooms and on
each additional story of the family living unit including
basements and excluding crawl spaces and unfinished attics.
In new construction, a smoke detector shall be installed in each
sleeping room.
Where to Locate the Required Smoke Detectors in Existing
Construction. The major threat from fire in a family living unit is
at night when everyone is asleep. The principal threat to
persons in sleeping areas comes from fires in the remainder of
the unit; therefore, a smoke alarm(s) is best located between
the bedroom areas and the rest of the unit. In units with only
one bedroom area on one floor, the smoke alarms should be
located as shown in Figure 1.
Figure 1: A SMOKE ALARM SHOULD BE LOCATED
BETWEEN THE SLEEPING AREA AND THE REST OF THE
FAMILY LIVING UNIT.
In family living units with more than one bedroom area or
with bedrooms on more than one floor, more than one smoke
alarm will be needed, as shown in Figure 2.
Are More Smoke Alarms Desirable? The required
number of smoke alarms may not provide reliable early
warning protection for those areas separated by a door from
the areas protected by the required smoke alarms. For this
reason, it is recommended that the householder consider the
use of additional smoke alarms for those areas for increased
protection. The additional areas include: basement,
bedrooms, dining room, furnace room, utility room and
hallways not protected by the required smoke alarms. The
installation of smoke alarms in kitchens, attics (finished or
unfinished), or garages is not normally recommended, as
these locations occasionally experience conditions that can
result in improper operation.
IMPORTANT CONSIDERATION
We recommend replacing your alarm(s) every ten (10)
years; why:
§ Dust, dirt, and other environmental contaminants can affect
your alarm over a prolonged period.
§ Fast changing industry consensus standards and codes on
all alarms make it advisable to periodically upgrade your
alarm to maximize life safety.
§ Assurance that your smoke alarm needs are kept abreast
with the constantly improving electronic technology.
§ Smoke alarms are recognized as one of the lowest cost
ways to protect dwelling inhabitants against the danger of
fire(s). It makes good common sense to periodically
replace and update your smoke alarm that contributes so
much to life safety.
MOUNTING LOCATION
§ Ceiling location (CS & CSX only) - detector should be
mounted as close as possible to the center of a hallway or
room. If this is not possible, the edge of the detector should
be at least 4 inches from any wall.
§ Wall location-locate the top of the alarm at least 4 inches
and not more than 12 inches from the ceiling. Observe
alarm for proper top/bottom orientation (test knob is near
bottom of unit).
Figure 2: IN FAMILY LIVING UNITS WITH MORE THAN ONE
SLEEPING AREA, A SMOKE ALARM SHOULD BE
PROVIDED TO PROTECT EACH SLEEPING AREA IN
ADDITION TO ALARMS REQUIRED IN BEDROOMS.
In addition to smoke alarms outside of the sleeping areas,
NFPA 72 requires the installation of a smoke alarm on each
additional story of the family living unit, including the
basement. These installations are shown in Figure 3. The
living area smoke alarms should be installed in the living
room or near the stairway to the upper level, or in both
locations. The basement smoke alarm should be installed in
close proximity to the stairway leading to the floor above.
When installed on an open joisted ceiling, the alarm should
be placed on the bottom of the joists. The alarm should be
positioned relative to the stairway so as to intercept smoke
coming from a fire in the basement before the smoke enters
the stairway.
Figure 3: A SMOKE ALARM SHOULD BE LOCATED ON
EACH STORY.
Where to Locate the Required Smoke Alarms in New
Construction. All of the smoke alarms specified for existing
construction are required, and, in addition, a smoke alarm is
required in each bedroom.
Figure 4: RECOMMENDED SMOKE ALARM MOUNTING
LOCATIONS.
Figure 5: RECOMMENDED SMOKE ALARM LOCATION IN
ROOMS WITH SLOPED, GABLED, OR PEAKED CEILINGS.
The placement of the alarm is critical if maximum speed
of fire detection is desired. Thus, a logical location for an
alarm is the center of the ceiling. At this location, the alarm
is closest to all areas of the room.
WHERE SMOKE ALARMS SHOULD
BE PUT IN MOBILE HOMES
In mobile homes built after about 1978 that were
designed and insulated to be energy-efficient, smoke alarms
should be installed as described in the section above. In
older mobile homes that have little or no insulation
compared to today's standards, uninsulated metal outside
Pg. 7-3
Page 4
walls and roofs can transfer heat and cold from outdoors,
making the air right next to them hotter or colder than the rest
of the inside air. These layers of hotter or colder air can prevent smoke from reaching a smoke alarm. Therefore, put
smoke alarms in such units only on inside walls, between 4 and
12 inches (10 and 30 cm) from the ceiling. If you are not sure
about the insulation level in your mobile home, or if you notice
that the walls or ceiling are unusually hot or cold, put the alarm
on an inside wall.
Minimum protection requires one alarm as close to the
sleeping area as possible. For better protection, put one alarm
in each room, but first read the "Locations to Avoid."
LOCATIONS TO AVOID
Nuisance alarms are caused by placing alarms where they
will not operate properly. To avoid nuisance alarms, do not
place alarms:
§ In or near areas where combustion particles are normally
present such as kitchens; in garages where there are
particles of combustion in vehicle exhausts; near furnaces,
hot water heaters, or gas space heaters. Install alarms at
least 20 feet (6 meters) away from kitchens and other
areas where combustion particles are normally present.
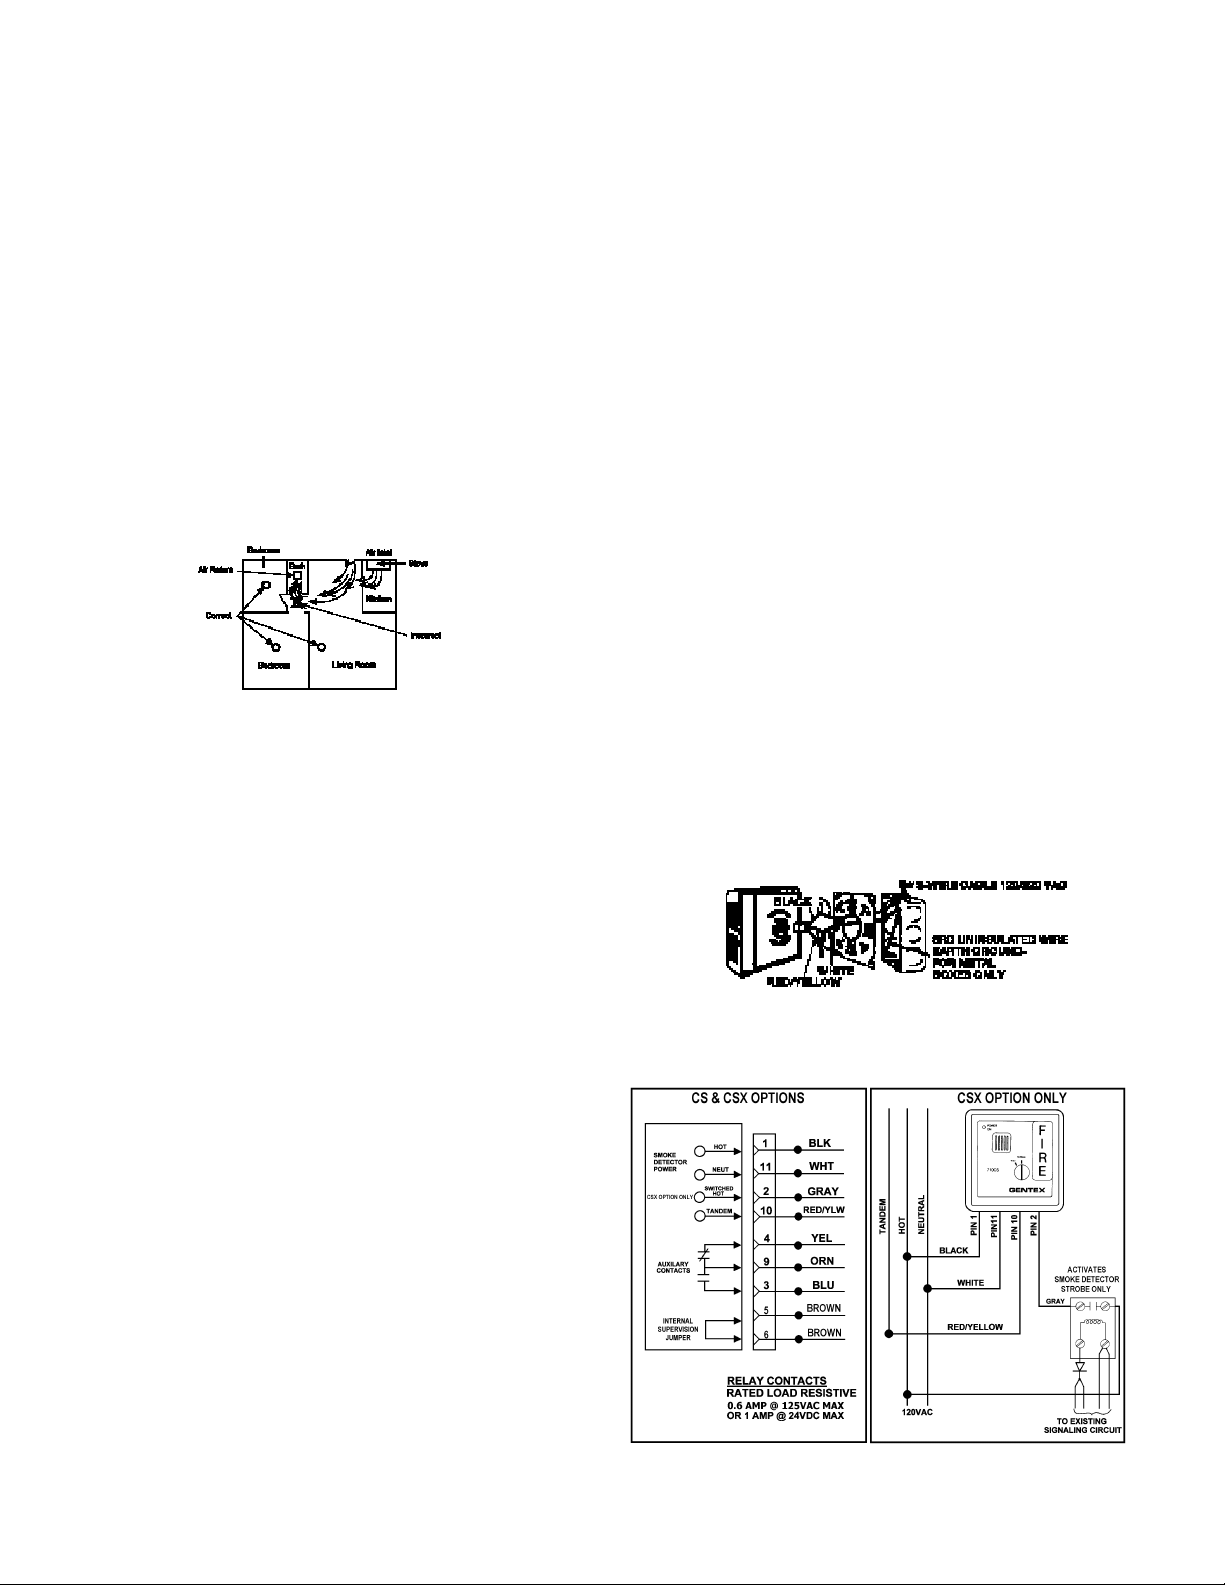
§ In air streams passing by kitchens . Figure 6 shows how
an alarm can be exposed to combustion particles in normal
air movement paths, and how to correct this situation.
Figure 6.
§ In damp or very humid areas, or next to bathrooms with
showers. The moisture in humid air can enter the sensing
chamber as water vapor, then cool and condense into
droplets that cause a nuisance alarm. Install alarms at
least 10 feet (3 meters) away from bathrooms.
§ In very cold or very hot environments, or in unheated
buildings or outdoor rooms, where the temperature can
go below or above the operating range of the alarm.
Temperature limits for proper operation are 40° to 100°F
(4.4° to 37.8°C).
§ In very dusty or dirty areas. Dust and dirt can build up
on the alarm's sensing chamber and can make it overly
sensitive, or block openings to the sensing chamber and
keep the alarm from sensing smoke.
§ Near fresh air inlets or returns or excessively drafty
areas. Air conditioners, heaters, fans, and fresh air intakes
and returns can drive smoke away from smoke alarms,
making the alarms less effective.
§ In dead air spaces at the top of a peaked roof or in the
corners between ceilings and walls. Dead air may
prevent smoke from reaching an alarm.
§ In insect-infested areas. If insects enter an alarm's sensing
chamber, they may cause a nuisance alarm. Get rid of the
bugs before installing alarms where bugs are a problem.
§ Near fluorescent light fixtures. Electrical "noise" from
nearby fluorescent light fixtures may cause a nuisance alarm.
Install alarms and fluorescent lights on separate
electrical circuits.
WARNING: Never remove power from the alarm to silence a
nuisance alarm. Open a window or fan the air around the
alarm to remove the smoke. The alarm will automatically turn
off when the smoke in the air is completely gone. Do not stand
close to the alarm. The sound produced by the alarm is loud
because it is designed to awaken you in an emergency.
Prolonged exposure to the horn at a close distance may be
harmful to your hearing.
BATTERY INSTALLATION
1. Remove alarm from mounting plate by turning
counter-clockwise.
2. Remove AC power connector and unsnap power leads from
the top of the old battery. Snap new battery onto snaps and
reinsert battery through hole in the back of the alarm.
WARNING: Units with battery back-up will not provide power or
transmit an alarm to AC only units in the event of
an AC power failure.
All battery back-up units in tandem, with good batteries,
will operate normally during an AC power failure.*
*Strobe will not operate during AC power failure.
WIRING/GENERAL
(7109CS/CSX & 7139CS/CSX only)
1. Use U.L. listed cable with Class 1 insulation.
2. Observe local code requirements. Use box connector to
anchor cable to outlet box.
3. Metal outlet boxes must be grounded to earth ground.
4. Use only Duracell MN 1604 battery with
the 7109/7139 Series smoke alarms.
CAUTION: Turn off electricity to prevent SHOCK and damage
to alarm. Be sure the power line to the alarm is not controlled
by any on/off switch, or other type of switch, other than a fuse
or circuit breaker.
IMPORTANT: Insure that all fluorescent lighting fixtures are
properly grounded.
WARNING: Alarm installation must conform to the electrical
codes in your area and to Article 760 of the U.S. National
Electrical Code. Wire installation should be performed only by
a licensed electrician.
MOUNTING OUTLET BOX
(7109CS/CSX & 7139CS/CSX only)
Use a 2" x 3" switch box or a 4" square or octagon junction
box. Mount a box for each alarm. If wall mounting is desired,
be sure the box screws are oriented to upper right and lower
left corners. Be sure to use supplied Mounting Plate.
NOTE: For trouble areas where there can be a large
volume of air blowing out through the electrical junction box.
You must first attach an adhesive backed foam gasket, which
has been packed with your alarm, to the back side of the
mounting bracket before it's secured to the junction box.
WIRING ONE ALARM
(7109CS/CSX & 7139CS/CSX only)
1. Run a minimum of 16 gauge, 2-conductor cable, plus
ground (3 wires) to the alarm junction box from a power
supply. Smoke alarms should be run on their own
dedicated circuit. Use U.L. listed Class 1 wire.
2. Make wire connections to the supplied plug-in connector as
follows: black to black, white to white, and connect the
ground wire to the metal outlet box.
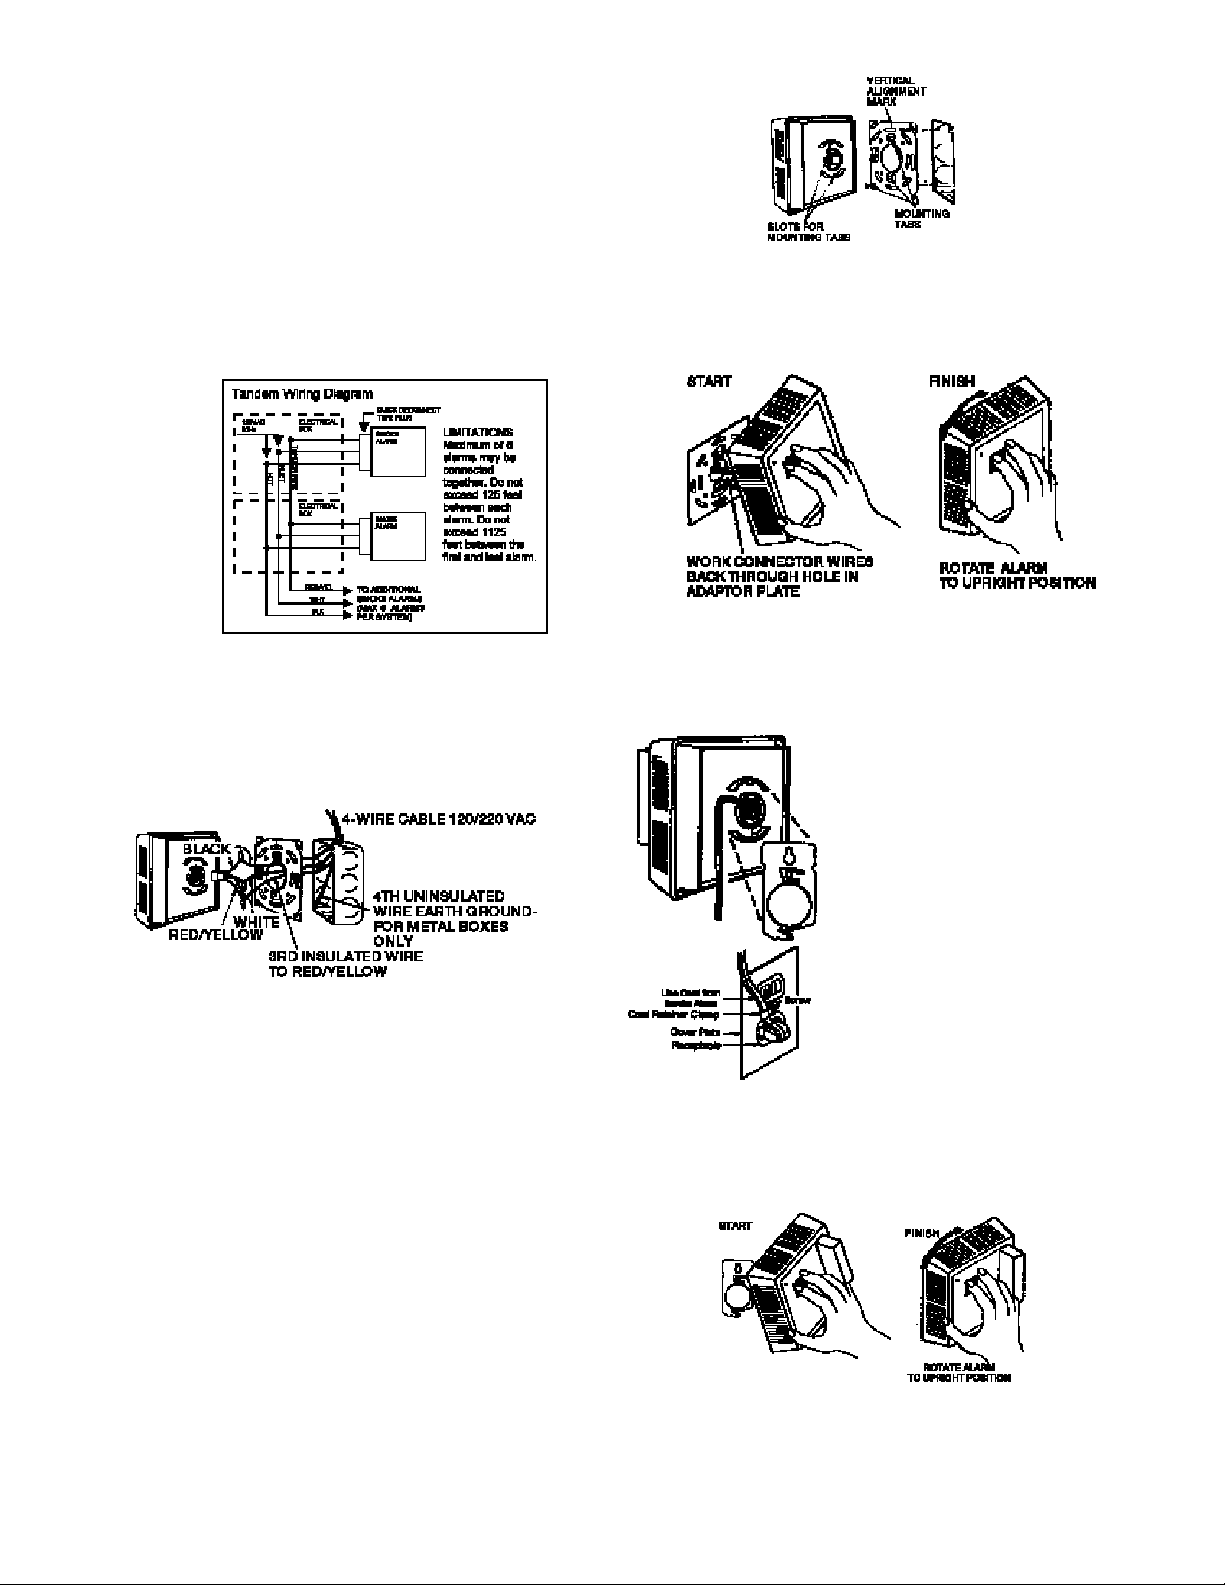
Figure 7.
NOTE/RED-YELLOW WIRE: The red-yellow wire from the
alarm is for tandem connection only. DO NOT USE, AND DO
NOT REMOVE INSULATION CAP UNLESS CONNECTING
ANOTHER ALARM.
Figure 8
Pg. 7-4
Page 5
WIRING TWO OR MORE ALARMS
(7109CS/CSX & 7139CS/CSX only)
Tandem Installation
CAUTION: All alarms in tandem installation must be
controlled by the same fuse or circuit breaker. Otherwise
tandem units will not operate. Tandem will operate in the event
of AC power failure if battery is connected to the alarm.
LIMITATIONS: A maximum of six (6) alarms of model
7109CS/CSX & 7139CS/CSX or models with the relay option
(F, HF, TF) may be tandem interconnected. Do not exceed
1125 feet between first and last alarm.
Wire used for interconnecting shall be in accordance with
the latest edition of article 760 of the National Electrical Code
(NEC), and NFPA 70, and must not exceed a resistance of 10
ohms.
Figure 9
Figure 10
2. Plug the wire connector into the alarm base.
3. Place the alarm up to the mounting plate, rotating it to
about 10:00 o'clock then rotate it clockwise to 12:00. It
should "snap-lock" firmly into place. Keep the alarm
parallel to the mounting plate so upper and lower tabs on
the plate seat into the alarm.
Figure 11
1. Run a minimum of 16 gauge, 3-conductor cable, plus ground
(4 wires) to the first alarm junction box from a power supply
and between all alarms that are to be connected together.
Use U.L. listed Class 1 wire.
2. Make wire connections to the supplied plug-in connector as
follows: black to black, white to white, 3rd conductor to the
red-yellow wire. The red-yellow wire should be stripped to
make this connection. Connect ground wire between metal
outlet boxes.
NOTES ON TANDEM INTERCONNECTING MODELS
§ DO NOT connect Gentex Smoke Alarms to other
manufacturers' smoke alarms.
§ No more than 12 Gentex models 9120/9123, 9120T/9123T,
and 9120H/9123H may be connected in tandem.
§ No more than 6 Gentex models 7109CS/CSX &
7139CS/CSX, 9120F/9123F, 9120HF/9123HF, and
9120F/9123TF may be connected in tandem.
§ All units connected in tandem MUST get their power from the
same circuit, that is, all smoke alarms in tandem must be
controlled by the same fuse or circuit breaker.
§ After installation to verify proper working conditions all horns
must sound in this system.
IMPORTANT WARNING: Failure to observe any of the
conditions set forth may cause system malfunction and damage
to the alarm.
MOUNTING: PLATE & ALARM
(7109LS/7139LS only)
LINE CORD MODEL
The 7109LS/7139LS is supplied
with a 9 foot line cord for installation
to a normal outlet box.
For this type of installation:
1. Connect line cord to unit as
demonstrated in Figure 12.
2. Determine proper location for
alarm above a receptacle that is
NOT CONTROLLED BY AN
"ON-OFF" SWITCH.
3. If screw anchors are used, drill a
3/16" hole and mount bracket to
wall.
4. Mount the alarm to the bracket as
illustrated in Figure 13.
5. Use the enclosed cord retainer
clamp as illustrated in Figure 12
to insure the unit is not
accidentally disconnected.
Figure 12
Place the alarm up to the mounting plate, rotating it to about
10:00 o'clock then rotate it clockwise to 12:00. It should
"snap-lock" firmly into place. Keep the alarm parallel to the
mounting plate so upper and lower tabs on the plate seat into
the alarm.
MOUNTING: PLATE & ALARM
(7109CS/CSX & 7139CS/CSX only)
1. Lace the connector through the provided mounting plate and
secure the plate to the junction box so that the smoke alarm
snap-in tabs are in the vertical position if wall mounted.
NOTE: Mounting plate is marked "THIS SIDE OUT" and
slotted for proper positioning.
Figure 13
IMPORTANT WARNING:
Failure to observe any of the conditions set forth may cause
system malfunction and damage to the alarm.
Pg. 7-5
Page 6
CHECKOUT & TROUBLESHOOTING
1. Turn test knob to the NORMAL position and supply house power to
the alarm. The red indicator should flash every 15-30 seconds,
showing that the alarm is operating properly.
2. If red light is not flashing or the green LED is not on:
a. Check that the battery is installed.
b. Check to see if the plug is in the outlet.
c. If the power and wiring check out, but the red light does not
flash or the green LED is still off, return the alarm to the
manufacturer. See TO RETURN AN ALARM.
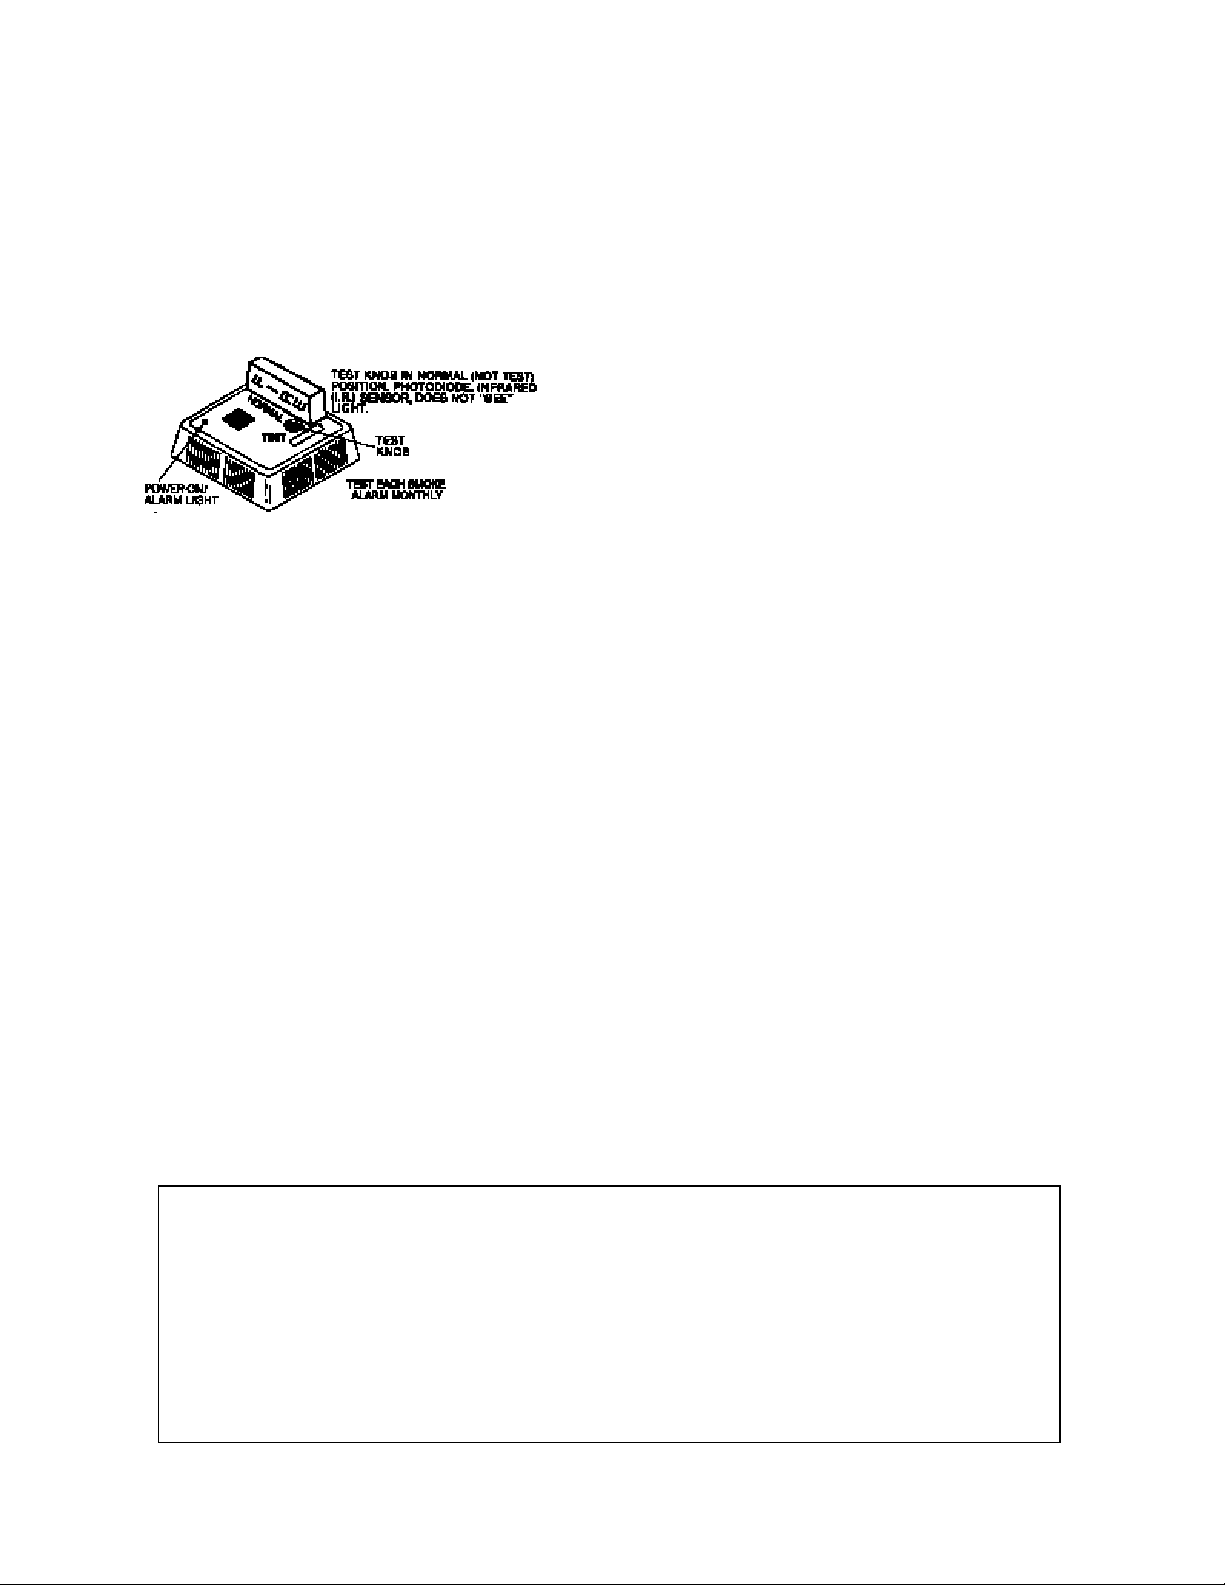
3. Testing with the Test Knob:
a. Rotate the test knob counter-clockwise to the TEST 1 position
and wait up to 20 seconds for the alarm to sound. If the alarm
does not sound after 20 seconds, return the alarm for service.
b. After successfully testing alarm, return test knob to NORMAL
(non-test) position and wait 20 seconds for the alarm to stop
sounding.
Figure 14.
c. To test alarm for high sensitivity, turn test knob clockwise to
TEST 2 position. Alarm should remain silent. Return knob back
to the normal position.
If your alarm sounds during this test it means the alarm's
sensitivity has become too high and may cause false alarms.
This could mean your alarm is dirty and should be cleaned as
described in the maintenance procedure below.
If the alarm continues to alarm for TEST 2 position following
cleaning return it to Gentex for service.
To check for proper smoke entry into your alarm's sensing
chamber. Gentex recommends using the Home Safeguard
Smoke Alarm spray.
This test should be performed once a year and should be
sprayed from a distance no closer than 12 inches from smoke
alarm.
MAINTENANCE
After your alarm has been in operation for a period of time or if it
was installed prior to the completion of all building construction, your
alarm may have become more sensitive due to dirt build-up in the
alarm's optic sensing chamber which could cause nuisance alarms or
could cause activation from small amounts of smoke build-up.
If this should occur, following this simple washing procedure will
restore your smoke alarm back to its original condition.
For further information, regarding frequency of cleaning and testing,
refer to NFPA 72, NFPA, Batterymarch Park, Quincy, MA 02269.
IMPORTANT: Failure to follow full cleaning instructions
could result in damage to this smoke alarm.
DO NOT remove all alarms at the same time for cleaning.
1. Twist the alarm counter-clockwise to remove it from its mounting
plate.
2. Unplug the electrical power cord to the alarm and remove the
battery.
3. Select three (3) standard size wash buckets and fill them each with
one gallon of normal tap water (distilled or de-ionized treated water
is recommended as a final rinse if water is extremely hard in your
area).
4. Add 1/8 cup of Ivory dishwashing liquid to the first bucket of water
and allow it to mix thoroughly, then place one dirty alarm into the
soap water mixture until it becomes completely covered or
submerged.
NOTE: If the alarms are exceptionally dirty, you may wish to first wipe
off any excess dirt before washing alarm so as not to dirty the wash
water too quickly.
DO NOT open alarm for cleaning.
WARNING: ONLY IVORY DISHWASHING LIQUID IS TO BE USED.
5. Allow alarm to soak for approximately 10 minutes (longer if
extremely dirty). Then agitate for 5 or 10 seconds to flush out any
remaining dirt left inside alarm's housing.
6. Remove alarm from wash water and transfer directly to one of the
first rinse buckets containing clear water. Again, allow alarm to
become completely submerged, agitate once more for 5 or 10
seconds to remove soap residue.
7. Finally, transfer alarm to your second and final rinse bucket,
repeating method found in Step 6, then remove alarm to a clean
dry area for a period of 48 hours to allow it to thoroughly dry.
WARNING: SMOKE ALARMS ARE TO BE AIR DRIED ONLY. DO
NOT PLACE ALARM IN OVEN, MICROWAVE OR USE A HOT AIR
BLOWER TO ACCELERATE DRYING TIME. THIS COULD RESULT
IN DAMAGE TO YOUR SMOKE ALARM.
IMPORTANT: IT IS RECOMMENDED TO CHANGE WASH AND
RINSE WATER AFTER FIVE (5) ALARMS. IF YOUR ALARMS ARE
EXTREMELY DIRTY, WATER SHOULD BE CHANGED MORE FREQUENTLY.
OTHER BRANDS ARE NOT RECOMMENDED AND
MAY CAUSE YOUR ALARM TO MALFUNCTION.
In the event you experience difficulty in the cleaning of your smoke
alarm or if you have any questions, please contact Gentex Corporation
or your local Gentex distributor.
WARNING:
If the smoke alarm does not work properly, do not try and fix it yourself. This will void your warranty. See "To Return an Alarm" for instructions to return smoke alarms that do not operate properly. DO NOT
TRY TO FIX IT YOURSELF.
IMPORTANT: Gentex recommends alarm be tested a minimum of
once a week.
WARNING: Never use an open flame of any kind to test your
alarm. You may ignite and damage the alarm as well as your home.
The test feature of your alarm accurately simulates smoke conditions
and tests the alarm's functions as required by Underwriters
Laboratories.
WARNING: Do not cover, tape, or otherwise block the openings of
your smoke alarm. These openings are designed to allow air to pass
through your smoke alarm, thus sampling the air around the alarm.
FAILURE TO REGULARLY CLEAN THIS SMOKE ALARM WILL
RESULT IN FALSE ALARMS. A BUILD UP OF DUST CREATES AN
OBSCURATION THAT SIMULATES SMOKE. THIS MEANS THE UNIT
WILL GO INTO ALARM WITHOUT A FIRE CONDITION.
TO RETURN AN ALARM
Should you experience problems with your smoke alarm, proceed
as follows:
1. Twist the alarm counter-clockwise to remove it from its mounting
plate.
2. Unplug the electrical power cord to the alarm and remove the
battery.
3. Carefully pack (the manufacturer cannot be responsible for
consequential damage) and return to the manufacturer. Include
complete details as to exact nature of difficulties being experienced
and date of installation.
4. Return to: Gentex Corporation,
LIMITED WARRANTY
For a period of 12 months from the date of purchase, or a maximum of 18
months from the date of manufacture, Gentex warrants to you, the original
consumer purchaser, that your Smoke Alarm will be free from defects in
workmanship, materials, and construction under normal use and service. If a
defect in workmanship, materials, or construction should cause your Smoke Alarm
to become inoperable within the warranty period, Gentex will repair your Smoke
Alarm or furnish you with a new or rebuilt replacement Smoke Alarm without
charge to you except for postage required to return the Smoke Alarm to us. Your
repaired or replacement Smoke Alarm will be returned to you free of charge and it
will be covered under this warranty for the balance of the warranty period.
This warranty is void if our inspection of your Smoke Alarm shows that the
damage or failure was caused by abuse, misuse, abnormal usage, faulty
installation, improper maintenance, or repairs other than those performed by us.
ANY WARRANTIES IMPLIED UNDER ANY STATE LAW, INCLUDING
IMPLIED WARRANTIES OF MERCHANTABILITY OR FITNESS FOR A
PARTICULAR PURPOSE, APPLY ONLY FOR THE WARRANTY PERIOD
SPECIFIED ABOVE. PLEASE NOTE THAT SOME STATES DO NOT ALLOW
LIMITATIONS ON HOW LONG AN IMPLIED WARRANTY LASTS, SO THE
ABOVE EXCLUSION MAY NOT APPLY TO YOU.
550-0094-12 9-1-93
Distributed by HITEC - 8160 S Madison St - Burr Ridge, IL 60527
GENTEX CORPORATION
PHONE: 1-800-288-8303
GENTEX WILL NOT BE LIABLE FOR ANY LOSS, DAMAGE,
INCIDENTAL OR CONSEQUENTIAL DAMAGES OF ANY KIND ARISING IN
CONNECTION WITH THE SALE, USE, OR REPAIR OF THIS SMOKE
ALARM. PLEASE NOTE THAT SOME STATES DO NOT ALLOW THE
EXCLUSION OR LIMITATION OF INCIDENTAL OR CONSEQUENTIAL
DAMAGES. SO THE ABOVE EXCLUSION MAY NOT APPLY TO YOU.
If a defect in workmanship, materials, or construction should cause your
Smoke Alarm to become inoperable within the warranty period, you must
return the Smoke Alarm to Gentex postage prepaid. You must also pack the
Smoke Alarm to minimize the risk of it being damaged in transit. You must
also enclose a return address. Smoke Alarms returned for warranty service
should be sent to: Gentex Corporation
If we receive a Smoke Alarm in a damaged condition as the result of
shipping, we will notify you and you must file a claim with the Shipper.
THIS LIMITED WARRANTY GIVES YOU SPECIFIC LEGAL RIGHTS.
YOU MAY ALSO HAVE OTHER RIGHTS WHICH VARY FROM STATE TO
STATE.
Pg. 7-6
 Loading...