

Page 1

Version 2.0
June 4, 2010
Prot e in Staining System
User Manual
For electric staining of proteins in mini polyacrylamide gels
The Biology CRO
Page 2

Table of Contents
Product Contents
Product Specifications
eStain
TM
Protein Staining Device
Accessory Products
Introduction
Quick Reference Guide
Protocols
Troubleshooting
Examples of Results
Technical Support
Warranty
1
3
5
7
8
11
12
21
22
23
24
eStainTM Protein Staining System www.genscript.com
Page 3

Product Contents Product Contents,
Type of products
eStain
TM
Protein Staining
Device Contents
Upon Receiving
the Instrument
eStain
TM
Protein Staining
Pads
Product
eStainTM Protein Staining Device
Cat. No.
L02010
Component
eStainTM Protein Staining Device
Specific Power Cord based on the type
of unit ordered (for U.S./Canada/China/
Taiwan/Japan, Europe, or UK)
Forceps
Shovel
eStainTM Graphite Electrode (11mm)
(installed inside the device)
Ice Pack
Quantity
1 each
1 each
1 each
1 each
1 each
1 each
Product
eStainTM Protein Staining Pads (R-250, 20-pak)
eStainTM Protein Staining Pads (G-250, 20-pak)
Cat. No.
L02011
L02012
This manual is supplied with the following products:
The contents of the eStainTM Protein Staining Device are listed below
Examine the unit carefully for any damage incurred during transit. File any
damage claims with the carrier. The warranty does not cover in-transit
damage.
The following eStain
TM
Protein Staining Pads are available from GenScript:
If you ordered the eStainTM Protein Staining Pads, you will receive the
components listed in the table below. Store the eStainTM Protein Staining
Pads at room temperature. For best results, use the eStainTM Staining Pads
before the expiration date printed on the package.
eStainTM Protein Staining System www.genscript.com eStain
Page 4

continued
eStain
TM
Protein Staining
Pads, continued
eStainTM Graphite
Electrode
Product
eStainTM Graphite Electrode (11mm, 1-pak)
Cat. No.
L02014
The following eStainTM Graphite Electrode is available from GenScript:
For best results, when a Graphite Electrode was used for 200 times of electric
staining, replace it with a new one.
Component
The eStain
TM
Protein Staining Pads
(R-250, 20-pak) contains:
eStainTM Protein Staining Pad (R-250)
Gel Window (66mm×56mm)
Gel Window (76mm×64mm)
The eStainTM Protein Staining Pads
(G-250, 20-pak) contains:
eStainTM Protein Staining Pad (G-250)
Gel Window (66mm×56mm)
Gel Window (76mm×64mm)
each pack eStain
TM
Protein Staining Pad
(R-250) contains:
1×eStainTM Cathode Pad (R-250)
1×eStainTM Anode Pad
each pack eStainTM Protein Staining Pad
(G-250) contains:
1×eStainTM Cathode Pad (G-250)
1×eStainTM Anode Pad
TM
Protein Staining System www.genscript.com
Quantity
20
1
1
20
1
1
1
1
1
1
- 2 --1 -
Page 5

Product Specifications Product Specifications,
eStainTM Protein Staining
Device Specifications
- 3 -
Weight:
Dimensions:
Electrical Parameters:
Built-in Features:
Compatibility:
Materials:
Operating Temperature:
Forceps:
Shovel:
2.3 kg
200 mm (l) ×180 mm (w) ×90 mm (h)
100-120 V, 220-240 V, 50/60 Hz, 3.2 A
Digital display, alarm, light LED
Suitable for electric staining of proteins in mini
polyacrylamide gels
Acrylonitrile Butadiene Styrene, Polycarbonate,
Aluminum, Titanium, Plasticized silicone.
15 - 40°C
Stainless steel
Polycarbonate
eStainTM Protein Staining
Pads Specifications
size:
Materials:
8cm (l) x 7cm (w) x2.5mm (thick)
Blotting filter paper presoaked with proprietary
cathode buffer containing CBB R-250 or G-250
size:
Materials:
8cm (l) x 7cm (w) x2.5mm (thick)
Blotting filter paper presoaked with proprietary
anode buffer
The eStainTM Protein Staining Pads are used with the eStainTM Protein Staining
Device.
The specifications of the eStainTM Protein Staining Pads are listed below:
eStainTM Cathode Pad (R-250 or G-250)
Avoid acetone, dimethyl sulfoxide, and acetic acid. These reagents can erode or
damage the device.
eStainTM Anode Pad
Inter frame size:
Materials:
66mm×56mm
76mm×64mm
Polycarbonate
Gel Window
eStainTM Protein Staining System www.genscript.com eStain
Page 6

- 4 -
continued
eStainTM Graphite
Electrode Specifications
Dimensions:
Weight:
Materials:
100 mm (l) ×90 mm (w) ×11mm (h)
180g
Powdered carbon, clay
eStain
TM
Graphite Electrode (11mm)
The eStain
TM
Graphite Electrode is used as the replaceable anode of eStain
TM
Protein Staining Device and available separately from GenScript.
The specifications for eStainTM Graphite Electrode are listed below:
TM
Protein Staining System www.genscript.com
Page 7

eStainTM Protein Staining Device eStain
Front View of
eStain
TM
Device
Rear View of
eStain
TM
Device
- 5 -
The rear view showing various parts of the eStain
TM
Protein Staining Device
is shown below.
The front top view showing various parts of the eStain
TM
Protein Staining Device
is shown below.
Control Panel
Handle Bar
eStainTM Protein Staining System www.genscript.com eStain
Power Switch AC Inlet
Page 8

- 6 -
TM
Protein Staining Device,
continued
Control Panel of
eStain
TM
Device
Inside View of
eStain
TM
Device
The control panel of the eStainTM Protein Staining Device is described below.
When upper status light is on, which indicates staining mode, the Digital
Display shows running time; otherwise when both upper and lower status lights
are on, which indicates numbering mode, the Digital Display shows how many
times of electric staining the eStainTM Graphite Electrode has been used for.
The Reset button is used to clear parameters.
The Time button is used to set running time and toggle between staining mode
and numbering mode.
The Start/Stop button is used to activate/stop the staining program.
The inside view showing various parts of the eStain
TM
Protein Staining
Device is shown below:
TM
Protein Staining System www.genscript.com
Titanium Cathode
Graphite Anode
Page 9

Accessory Products Introduction
eStainTM Protein Staining System www.genscript.com
eStainTM Protein Staining
Pads
eStain
TM
Graphite
Electrode
Additional Products
- 7 -
eStain
TM
Graphite Electrode is available separately from GenScript. Ordering
information is provided below.
The precast Express
TM
PAGE Gels as well as premade buffers or buffer powders
are available from GenScript. For details, contact Technical Support or visit
www.genscript.com.
eStain
TM
Protein Staining Pads are available separately from GenScript. Ordering
information is provided below.
Product
eStainTM Protein Staining Pads
(R-250, 20-pak)
eStainTM Protein Staining Pads
(G-250, 20-pak)
Cat. No.
L02011
L02012
Quantity
1 box
1 box
Product
eStainTM Graphite Electrode (11mm, 1-pak)
Cat. No.
L02014
Quantity
1 unit
Page 10

- 8 -
eStainTM Protein Staining System www.genscript.com
System Overview
System Components
The eStainTM Protein Staining System is a unique electric staining system that
allows you to quickly, reliably and efficiently stain proteins in various types of
mini polyacrylamide gels with Coomassie blue dye reagents. It consists of the
eStainTM Protein Staining Device and eStainTM Protein Staining Pads.
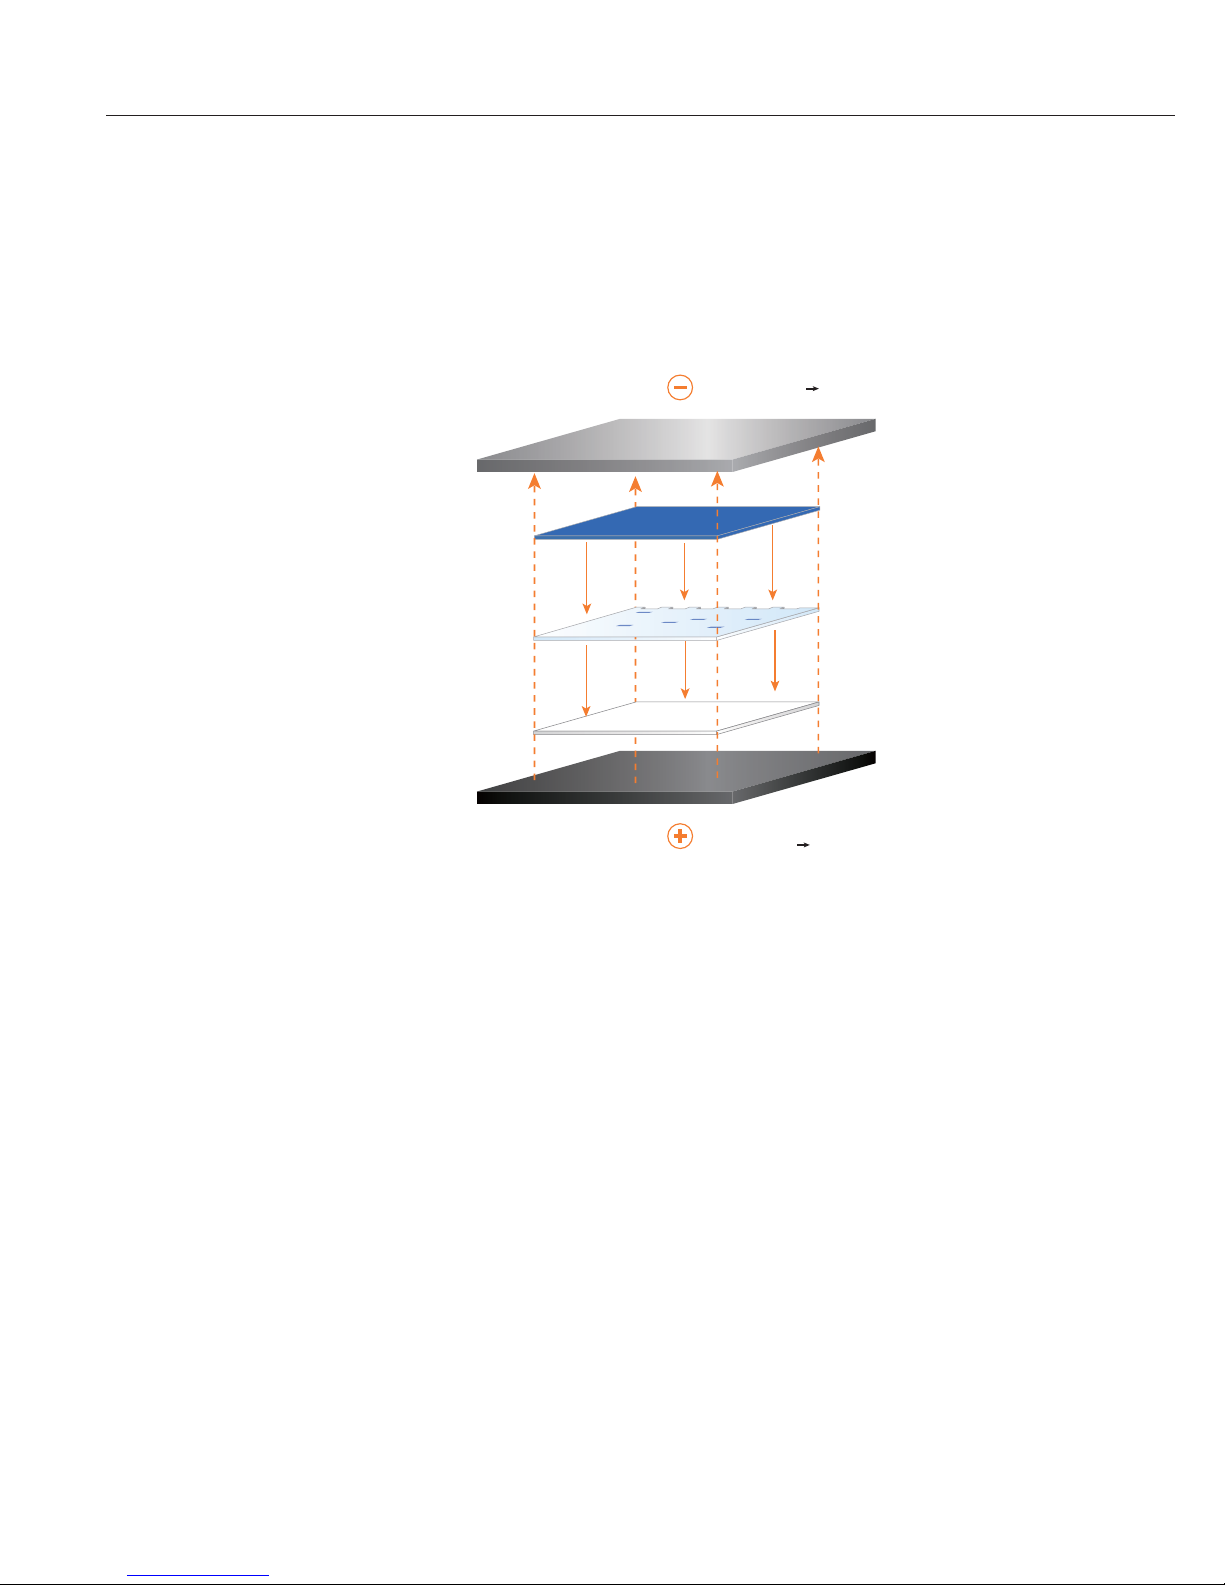
The proprietary electric staining technology of the eStainTM Protein Staining
Device combined with the eStainTM Protein Staining Pads applies a high
electric force generated between graphite anode and titanium cathode to
allow for quick and directional movement of negatively charged Coomassie
blue dye reagents into the gel matrix to stain the proteins and also the quick
and directional movement of the free staining reagents out of the gel matrix to
destain the gel matrix within only 7 minutes or less. The eStainTM Protein
Staining System integrates three steps of conventional Coomassie blue
staining method into a single step and greatly cuts down the time required for
protein staining analysis. The proteins stained using the eStainTM Protein
Staining System exhibit as high detection sensitivity as proteins stained using
conventional Coomassie blue staining method.
The eStain
TM
Protein Staining System consists of:
eStainTM Protein Staining Device
The eStainTM Protein Staining Device is a user-friendly electric staining unit
that allows for fast, convenient and efficient in-gel protein staining with
Coomassie blue dye reagents.
eStainTM Protein Staining Pads
The eStainTM Protein Staining Pads are disposable pads to perform electric
staining of proteins in gels with Coomassie blue dye. Two types of eStainTM
Protein Staining Pad, R-250 and G-250, are available separately from
GenScript and for different requirements. Each pack eStainTM Protein Staining
Pad contains an eStainTM Cathode Pad presoaked with proprietary cathode
buffer containing CBB dye R-250 or G-250, and an eStainTM Anode Pad
presoaked with proprietary anode buffer, allowing for rapid, convenient and
reliable in-gel protein staining without the need to prepare any solutions and
buffers.
Page 11

Introduction,
continued
eStainTM Protein Staining System www.genscript.com
System Components,
continued
System Mechanism
- 9 -
The eStain
TM
Protein Staining System is based on the electric staining concept
which utilizes the unique and patent-pending technology developed by GenScript.
To use the eStainTM Protein Staining System for in-gel protein staining,
assemble the eStainTM Protein Staining Pad with your pre-run gel on the eStainTM
Protein Staining Device. Similar to semi-dry blotting, the eStainTM Cathode Pad
and eStainTM Anode Pad act as ion reservoirs that contain the appropriate anode
and cathode buffers incorporated into the gel matrix. Simultaneously the eStainTM
Cathode Pad presoaked with proprietary cathode buffer containing CBB dye
R-250 or G250, also supplies negatively charged staining reagents. The high
electric force generated between graphite anode and titanium cathode allows
for rapid and directional movement of negatively charged Coomassie blue dye
reagents into the gel matrix to stain the proteins and also the homogenous
movement of the free staining reagents out of the gel matrix to destain the gel
matrix within only 7 minutes or less. Therefore the eStainTM Protein Staining
System provides fast, convenient and reliable in-gel protein staining without the
need to prepare any solutions and buffers.
eStain
TM
Graphite Electrode
The eStainTM Graphite Electrode serves as the replaceable anode of the eStainTM
Protein Staining Device. For the common use, one eStainTM Graphite Electrode
(11mm) is pre-installed inside the eStainTM Protein Staining Device to constitute a
complete electric staining unit. Each eStainTM Graphite Electrode is produced with
special process and can be steadily used for 200 times of electric staining.
Page 12
- 10 -
Introduction,
continued
System Mechanism,
continued
eStainTM Protein Staining System www.genscript.com
Features
Important features of the eStainTM Protein Staining System are listed below:
· Unique electric staining technology created for fast, reliable and efficient
protein gel staining in as few as 7 minutes.
· User-friendly electric staining unit allowing for easy and convenient
procedures.
· Consumable staining pads offering convenience without the need for
additional solutions and buffers.
· High staining efficiency as conventional Coomassie blue staining method.
· Compatible for use with various types of mini polyacrylamide gels.
Schematic mechanism of eStain
TM
Protein Staining System showing the
movement of Coomassie blue dye:
eStainTM Cathode Pad
eStain
TM
Anode Pad
Pre-run gel
E
E
E
E
CBB
dye
CBB
dye
CBB
dye
CBB
dye
CBB
dye
CBB
dye
Titanium Cathode
2e
-
+ 2H2O H2 + 2OH
-
Graphite Anode
4OH- - 4e- O2 + 2H2O
Page 13

eStainTM Protein Staining System www.genscript.com
- 11 -
Quick Reference Guide
Mode
eStainTM plugged in
eStainTM device and
staining pad assembled
Time selection
Run
End of run
Checking using
frequency
of graphite anode
Replacement of worn
graphite anode
Action
Connect eStain
TM
Device to an electrical
outlet and power
switch is on
Place staining pads
on the device and close
lid
Press Time button to
select desired running
time
Press Start/Stop
button
Automatic
Press and hold Time
button for 2 seconds
Switch off the device
and replace the worn
graphite anode with a
new one
Sound
–
–
–
–
Continuous beeping
for 2 minutes
–
–
Light
Steady upper
light
Steady upper
light
Steady upper
light
flashing upper
light
Steady upper
light
Steady upper
and lower light
–
Display
Default
running
time (000)
Default
running
time (000)
Running
time
defined
Count down
time
Default running
time (000)
Staining times
the graphite
anode has
been used for
–
A quick reference guide for operating the eStain
TM
Protein Staining Device
is provided below.
Introduction
Page 14
- 12 -
Protocols
eStainTM Protein Staining System www.genscript.com
Recommendations
1. Check the Power Cord supplied with the unit to ensure that the cord is
compatible with the local socket format.
2. Place the eStainTM Protein Staining Device on a level laboratory bench.
Keep the area around the device clear to ensure proper ventilation of the
unit.
3. For your safety: Position the device properly such that the power switch
and the AC inlet located on the rear of the unit are easily accessible.
4. Ensure the AC power switch is in the Off position.
5. Attach the power cord to the AC inlet and then to the electrical outlet.
Use only properly grounded AC outlets and power cords.
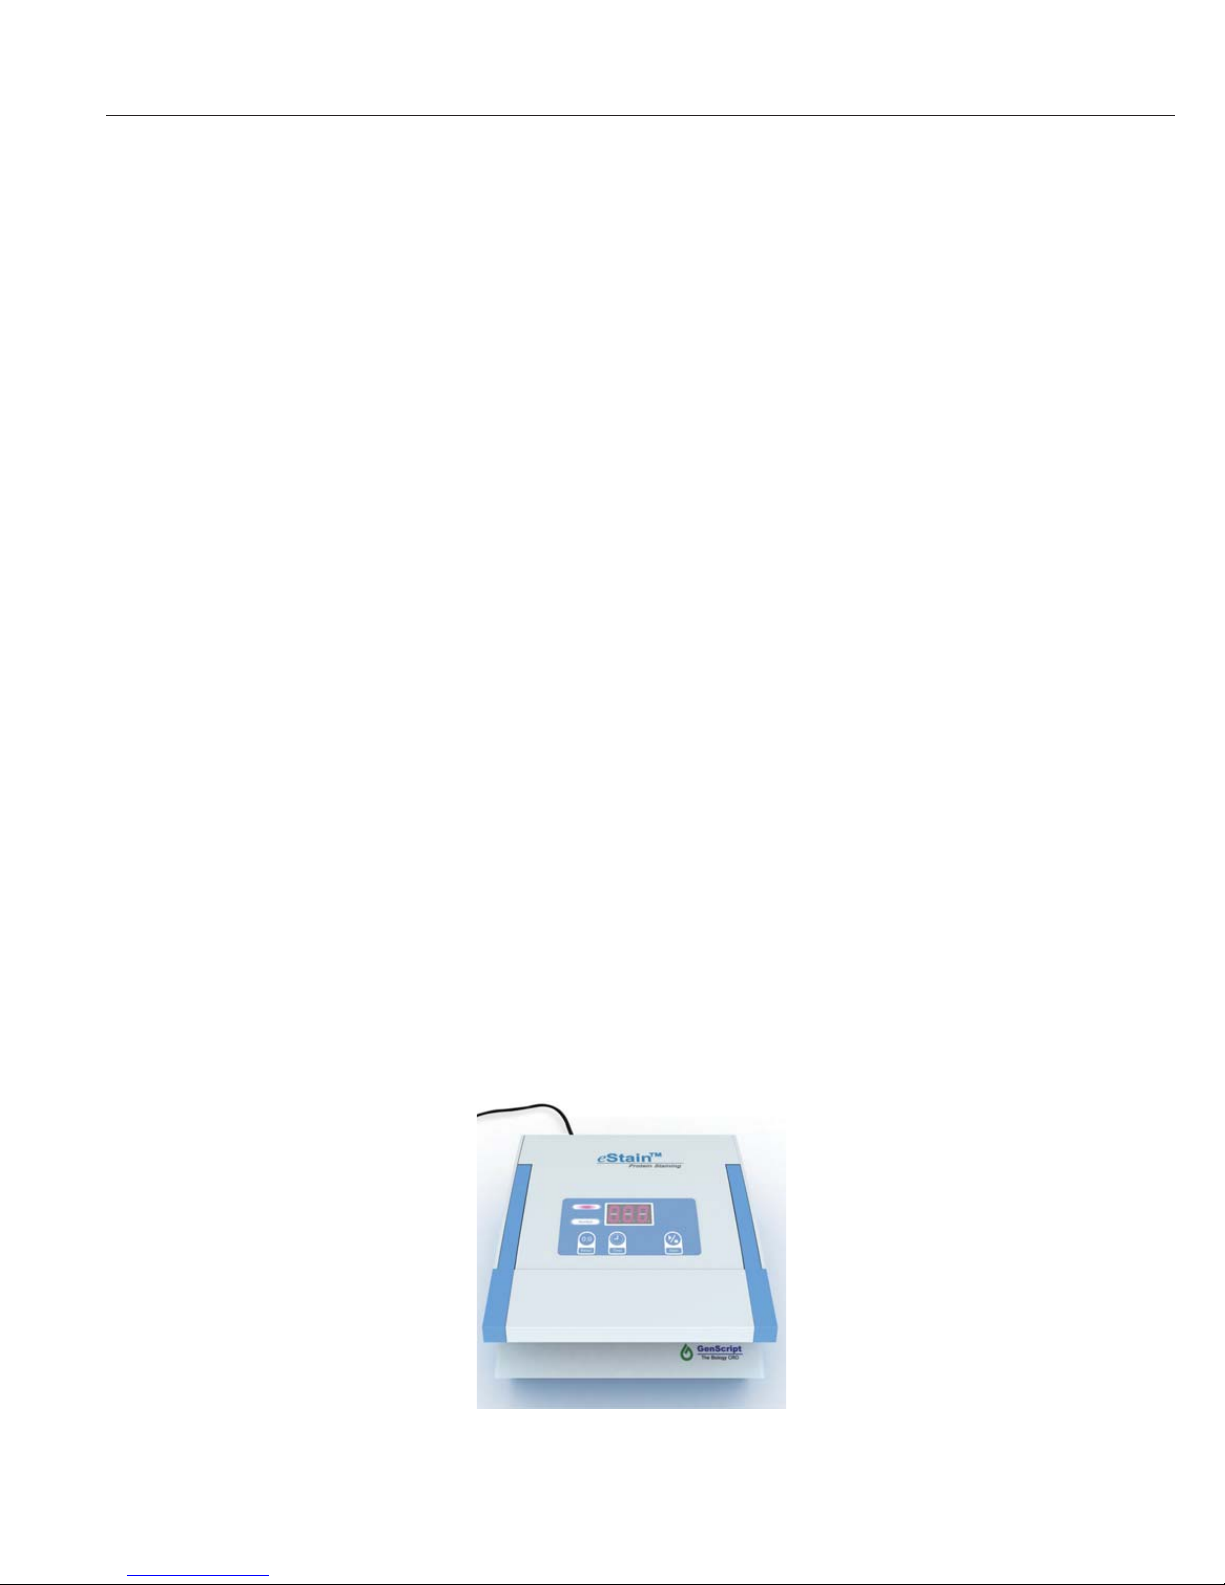
6. When the electrophoresis of your samples is almost complete, press the
power switch (located on the rear of the device) to turn ON the eStainTM
Protein Staining Device. The upper status light is on indicating you are
using staining mode. Digital Display shows the default parameters (000).
To obtain the best results follow these recommendations:
· Wear gloves at all times during the entire staining procedures to prevent
contamination of pads and gels.
· Avoid using expired eStain
TM
Protein Staining Pads. Always use the pads
before the specified expiration date printed on the package.
· Always keep the Ice Pack supplied with eStain
TM
Device stored at -20℃ or
below to facilitate cooling electrodes procedure.
Installing the
eStain
TM
Device
You are ready to use the eStainTM Protein Staining Device for staining
applications.
Page 15
eStainTM Protein Staining System www.genscript.com
Assembling Staining
Stack with eStain
TM
Pads and Pre-run Gel
- 13 -
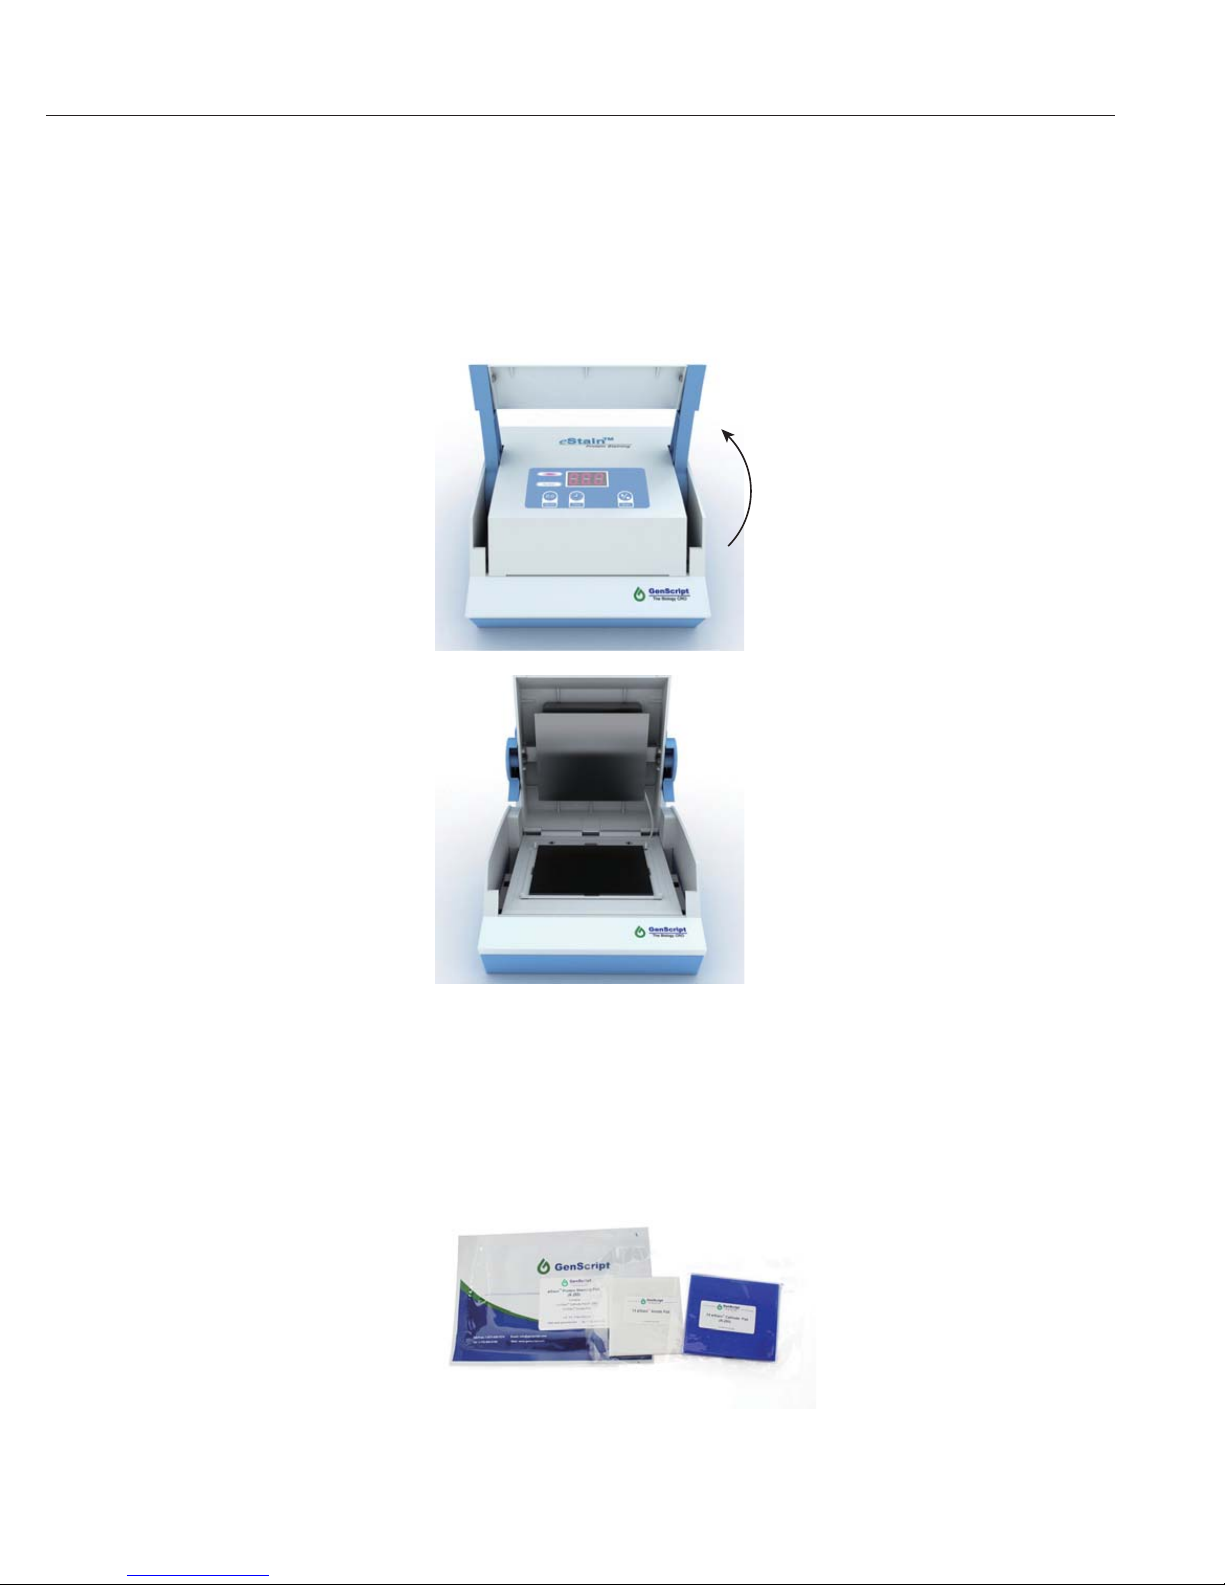
1. Lift up the handle bar to vertical position, then push it forward to open the
lid of eStain
TM
Device.
2. Remove one package labeled as eStain
TM
Protein Staining Pad from the
eStainTM Protein Staining Pads box and tear the laminated sealing of the
package. Remove the two small packages respectively labeled as 1 x
eStainTM Cathode Pad R-250 (or G-250), and 1 x eStainTM Anode Pad.
Protocols,
continued
Page 16
- 14 -
Assembling Staining
Stack with eStain
TM
Pads and Pre-run Gel,
continued
eStainTM Protein Staining System www.genscript.com
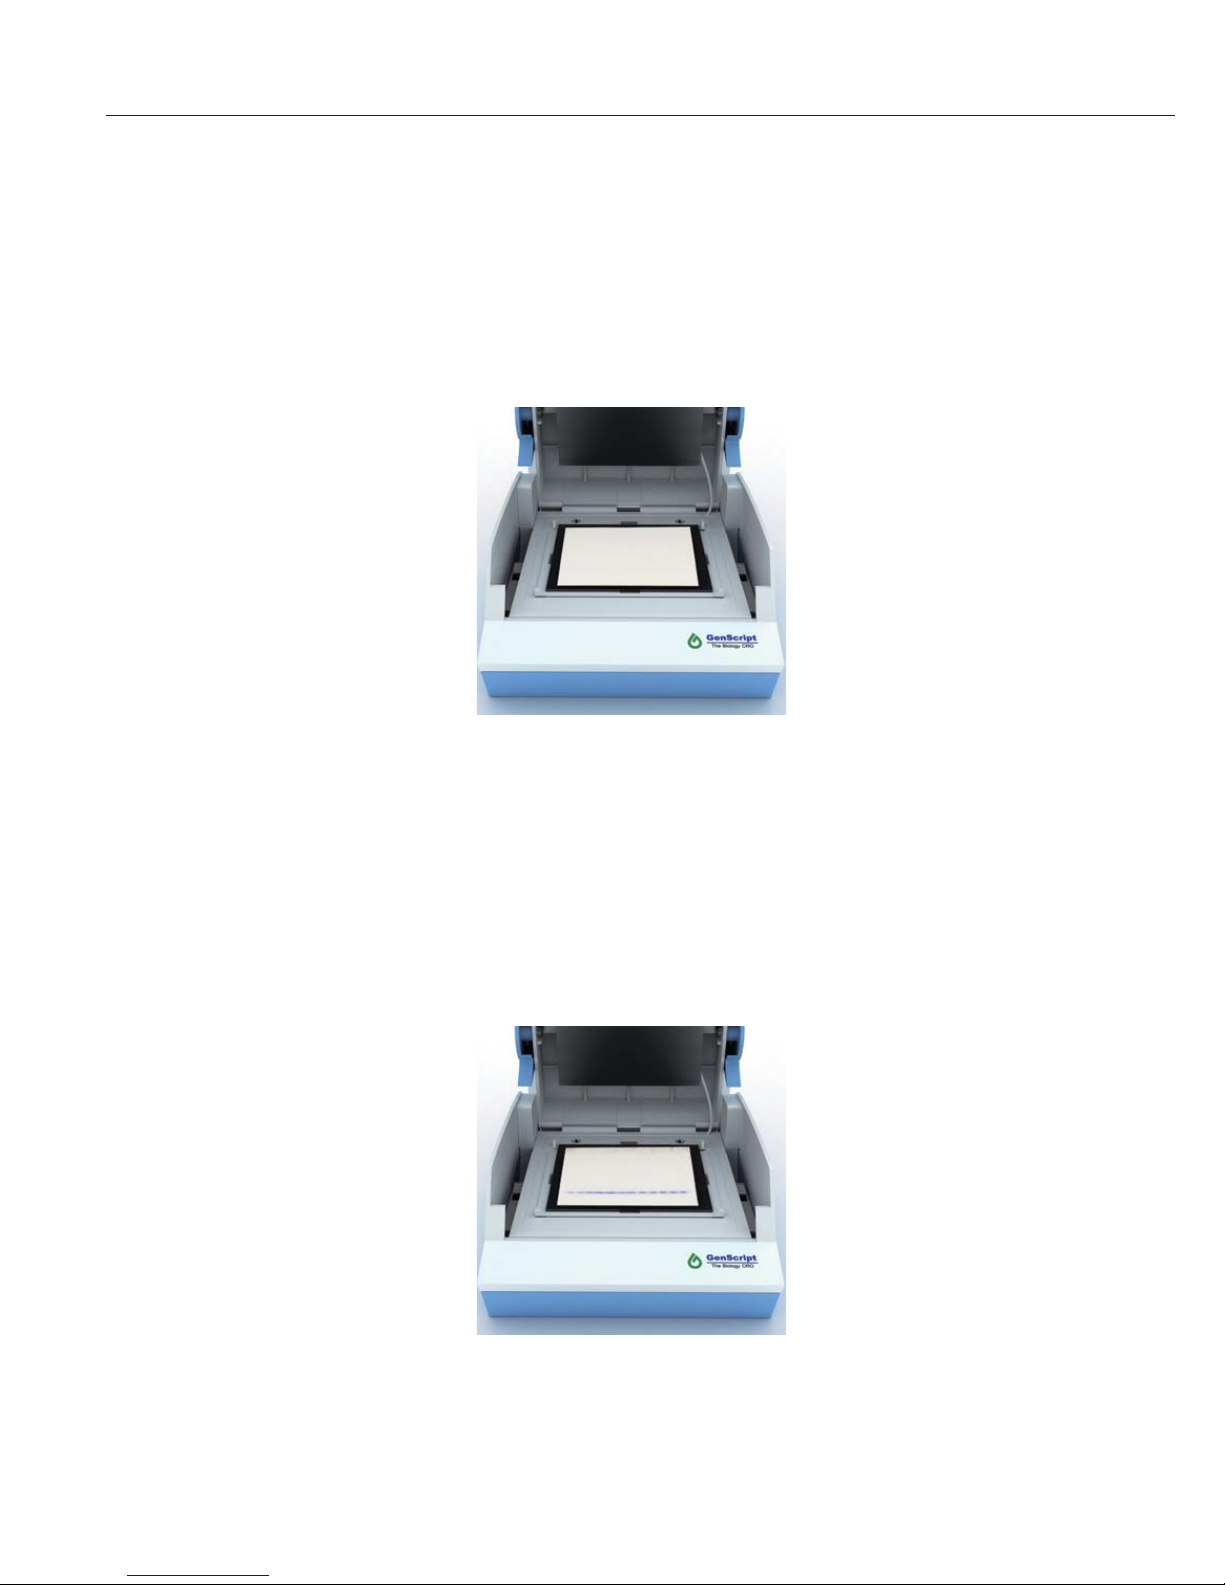
4. Carefully remove the pre-run gel containing your protein samples from the
gel cassette and rinse the gel with 50 to 100 ml distilled water for about 1
minute.
5. Place the gel on the eStainTM Anode Pad. Gently remove air bubbles
between gel and anode pad using the small shovel supplied with the
device.
3. Tear the sealing of the 1 x eStain
TM
Anode Pad package. Remove the
eStainTM Anode Pad from the package and place it on the anode plate of
the eStain
TM
Protein Staining Device.
Protocols,
continued
Page 17
Protocols,
continued
eStainTM Protein Staining System www.genscript.com
Assembling Staining
Stack with eStain
TM
Pads
and Pre-run Gel,
continued
- 15 -
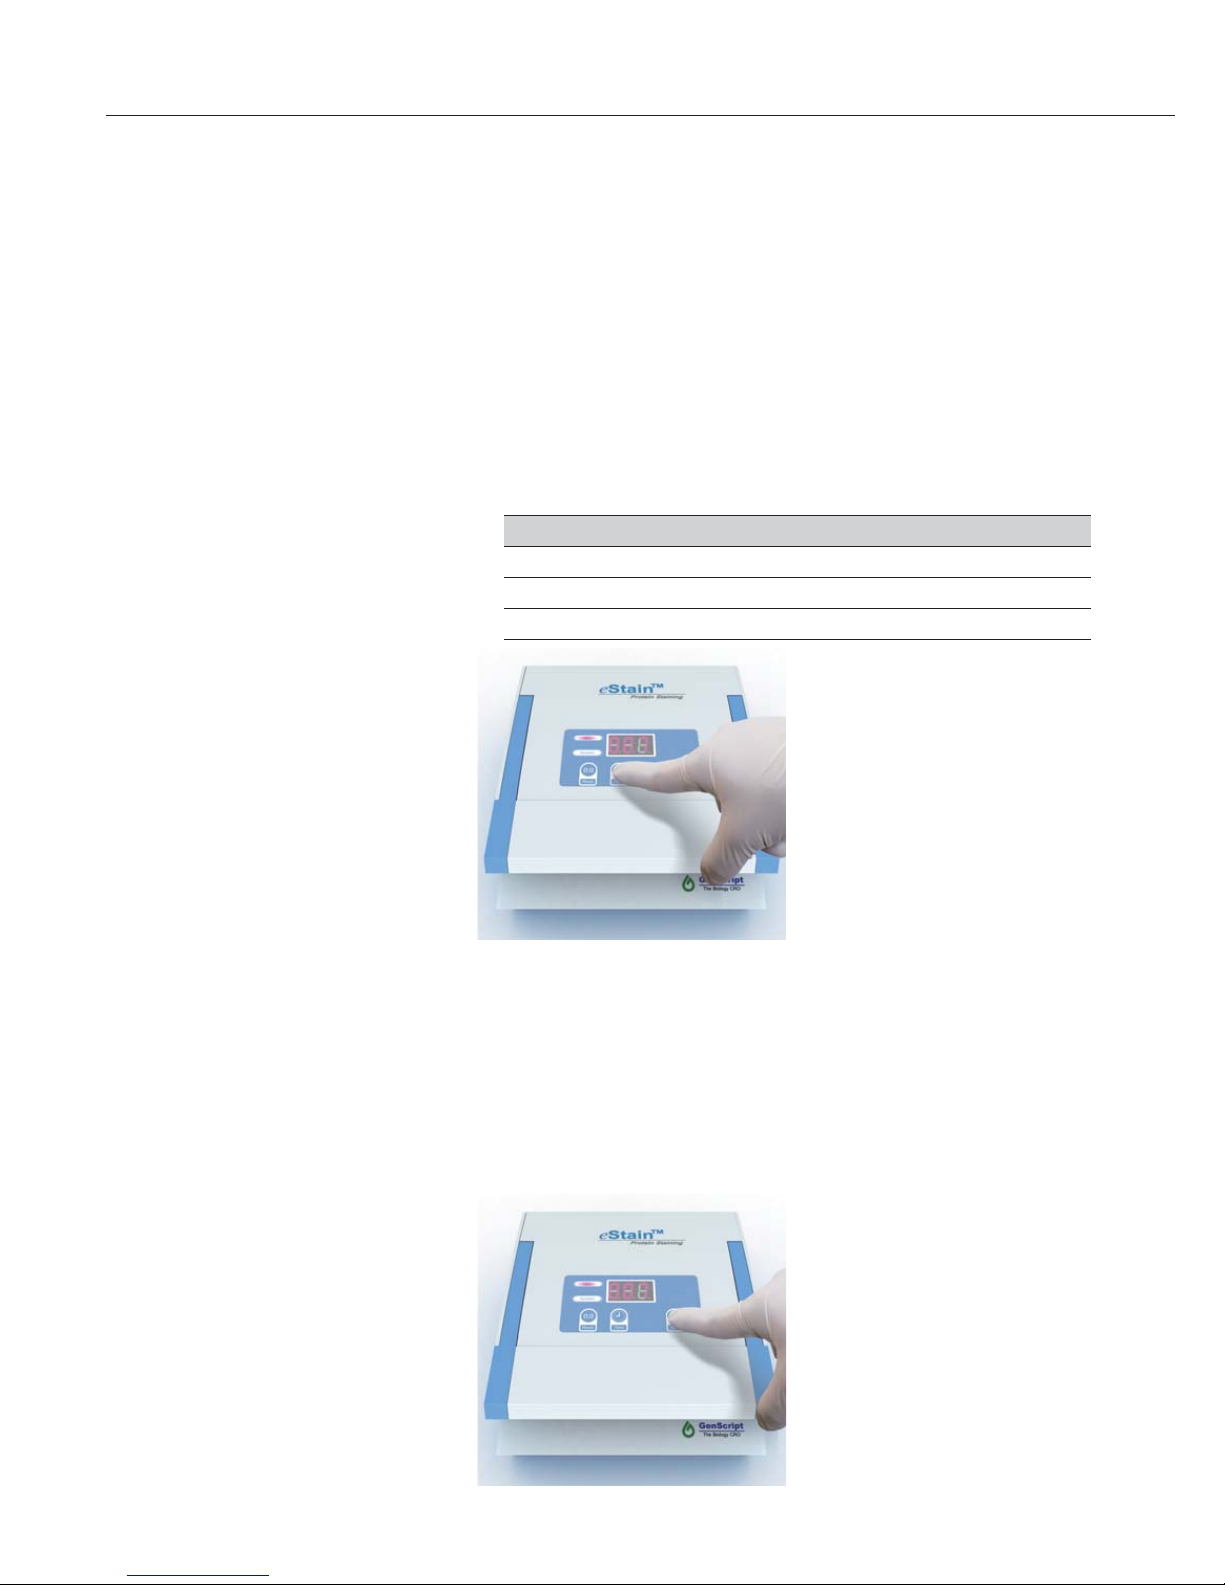
8. Pull back the handle bar to close the lid of eStain
TM
Device while keeping
the bar vertical to the lid, and then return the bar to horizontal position.
Note: Gel Window is used as the spacer between anode pad and cathode pad to prevent
short circuit. The edges of the pre-run gel may also be covered by Gel Window and
will probably be stained to deep blue after running an electric staining program.
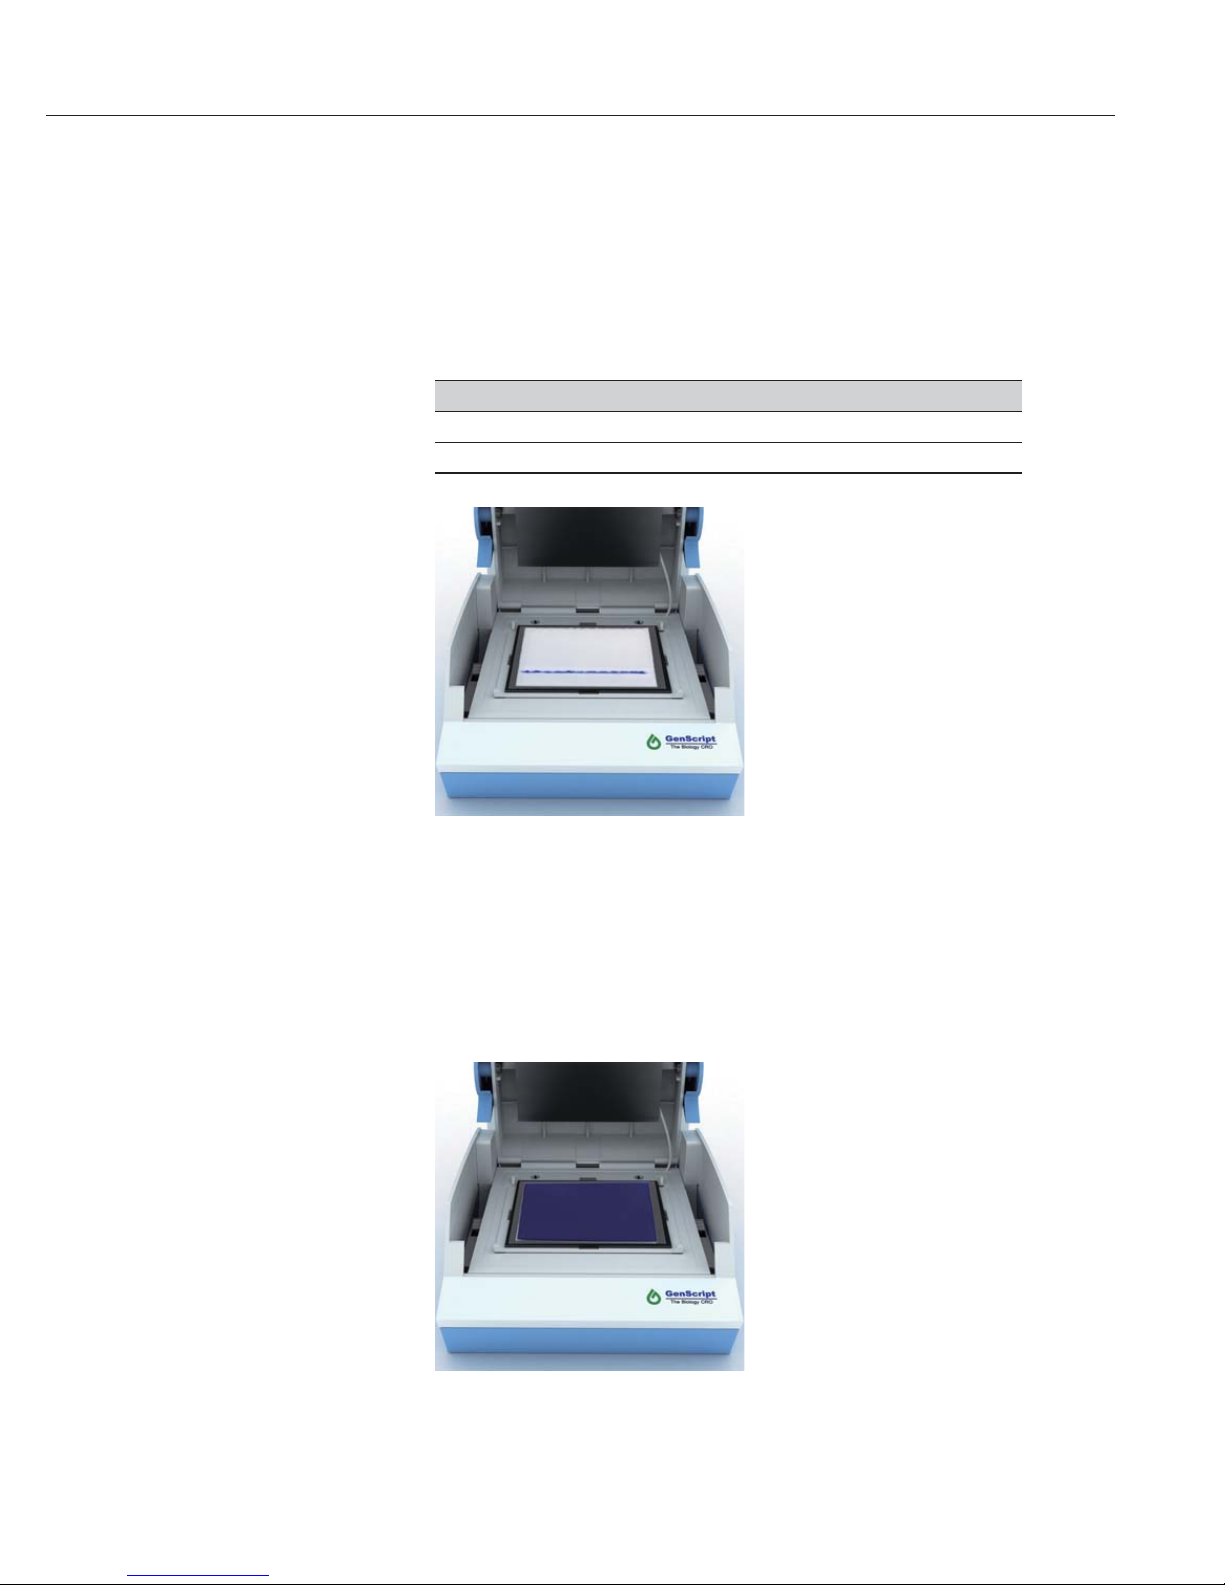
6. Select appropriate Gel Window according to actual size of the gel (see the
table below). Place Gel Window on the gel. Ensure that the Gel Window fully
cover the margin of the anode pad.
Pre-run gel
Gel with size 66 x 56mm to 80 x 60 mm
Gel with size <66 x 56 mm
Gel Window
Gel Windows 76 x 64mm
Gel Windows 66 x 56mm
7. Tear the sealing of the 1 x eStainTM Cathode Pad package. Remove the
eStainTM Cathode Pad from the package and place it on the gel.
Page 18
- 16 -
Protocols,
continued
eStainTM Protein Staining System www.genscript.com
Gel Thickness
0.75 mm
1.0 mm
1.5 mm
Running Time
6 minutes
7 minutes
9 minutes
Performing electric
staining
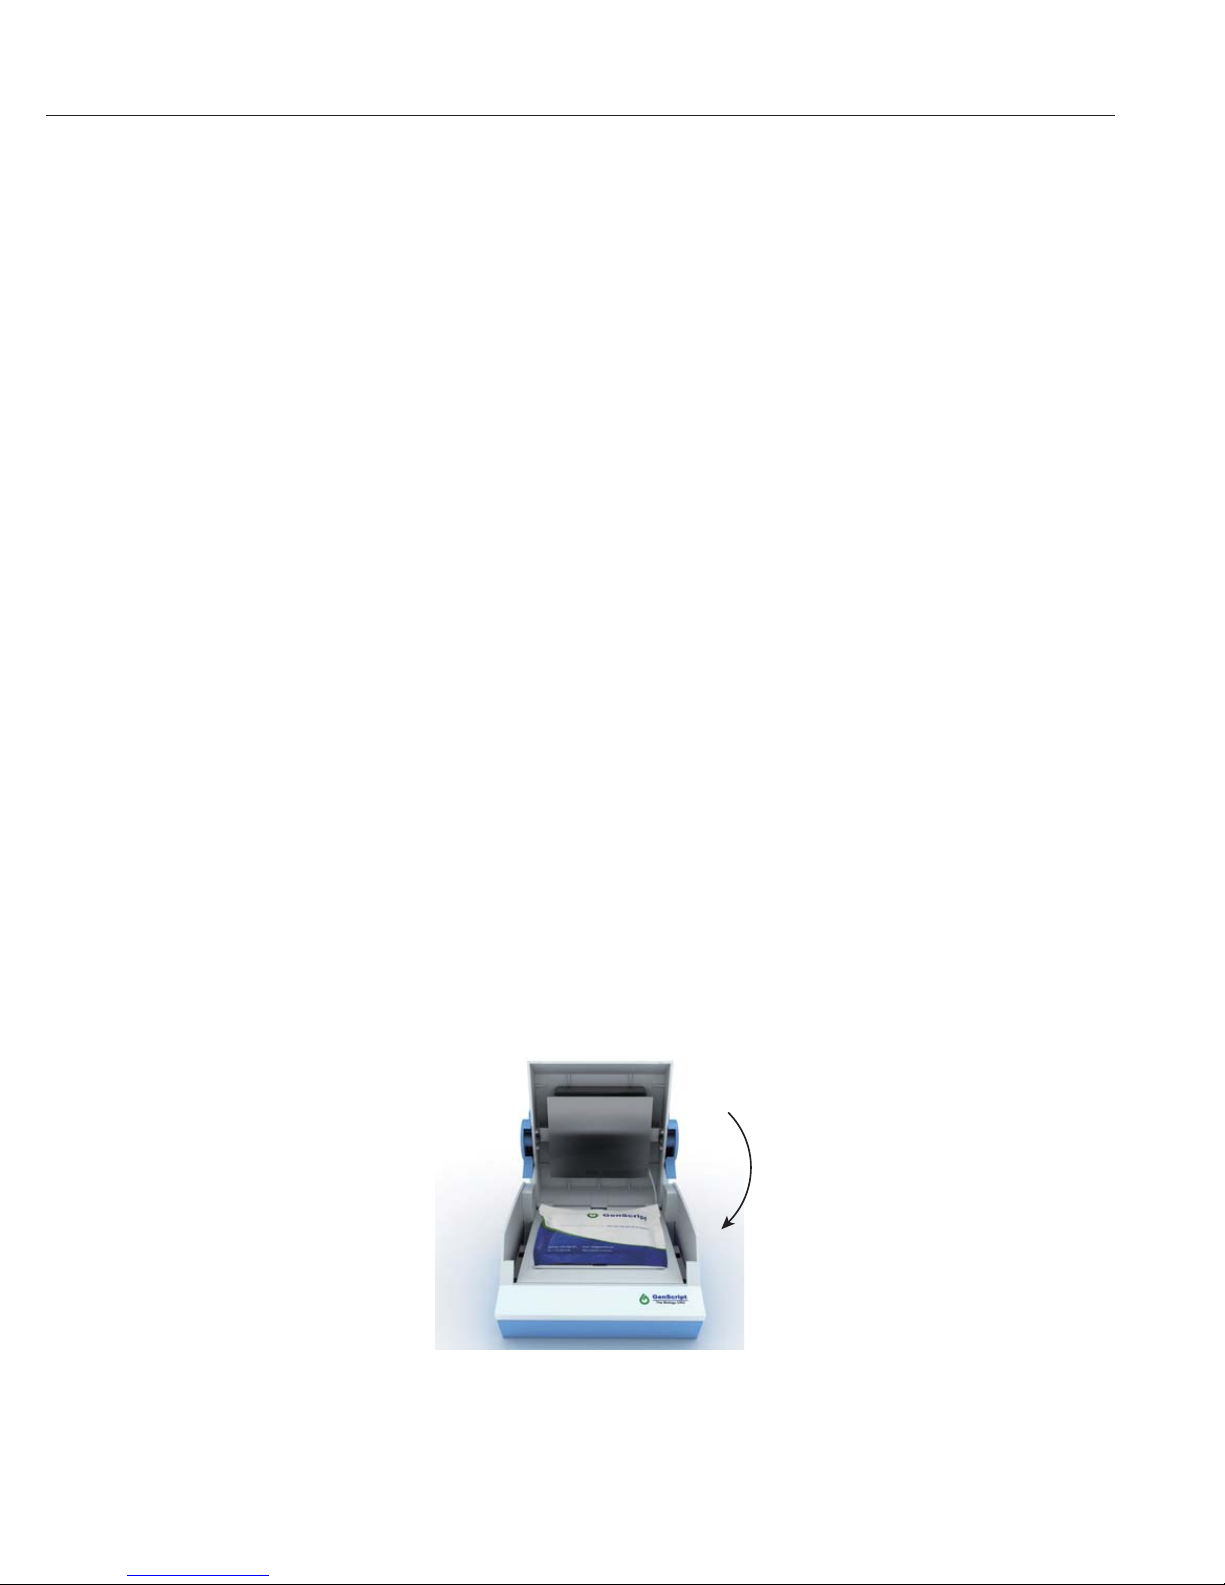
2. Press the Start/Stop button to activate the electric staining program. The
running time begins to count down and upper status light keeps flashing
during the whole staining program.
After assembling the staining stack, perform electric staining as described
below.
1. Press the Time button to set appropriate running time based on the gel
thickness (see table below). If an undesired running time is set by mistake,
press Reset button to clear the wrong time, and then press again the Time
button to choose the desired running time.
Note: During electric staining process, the graphite electrode may be heated to 60-70℃.
For continuous use and best results, it is necessary to cool down both graphite
anode and titanium cathode to room temperature before the next run
.
(see next page for cooling procedures)
Page 19
eStainTM Protein Staining System www.genscript.com
- 17 -
3. At the end of the staining, current automatically shuts off and the eStain
TM
Protein Staining Device signals the end of staining with repeated beeping
sounds. Upper status light stops flashing and the Digital Display shows
text (000).
4. Press any button on the control panel to stop the beeping.
5. Proceed to disassemble the stack and clean the device.
To obtain good staining results, disassemble the staining stack right away after
ending the staining procedure.
1. Open the lid of eStain
TM
Protein Staining Device.
2. Carefully separate the stained gel from the staining stack and proceed to be
photographed.
3. Discard the used eStainTM Protein Staining Pad.
Note: Do not re-use the eStainTM Protein Staining Pad after staining. Discard after each
use.
4. Clean the titanium cathode plate, graphite anode plate and its surrounding
area with a dry cloth or paper towel.
For continuous use and best results, it is necessary to cool down both graphite
anode and titanium cathode to room temperature before the next run. Place the
pre-frozen ice pack on the graphite anode, close the lid gently to let the titanium
cathode also touches the ice pack. Do not force to close the lid otherwise the ice
pack will damage the device.
At this point, the eStain
TM
Protein Staining Device is ready for another run. If
you are not using the device, turn Off the power switch located on the back of
the device.
Disassembling and
cleaning the
eStain
TM
Device
Cooling Graphite
Anode and Titanium
Cathode
Protocols,
continued
Performing electric
staining, continued
Page 20

- 18 -
eStainTM Protein Staining System www.genscript.com
2. Switch Off the eStainTM Protein Staining Device and then open the lid of
the device.
3. Use small shovel to pry out the worn Graphite Electrode along the gap at
either side of the anode tank.
1. If the eStainTM Protein Staining Device works at staining mode, press and
hold Time button for 2 seconds to toggle to numbering mode. If the Digital
Display shows “200” or a number greater than 200, perform the replacing
protocol as describe below.
Protocols,
continued
During electric staining process, the eStainTM Graphite Electrode will absorb ions
from anode pad and as well as lose carbon composition, thereby changing the
characteristics of the Graphite Electrode and composition of the anode buffer.
For the best staining results, after having been used for 200 times of electric
staining, the worn Graphite Electrode should be replaced by a new one.
Replacing the eStainTM
Graphite Electrode
Page 21
eStainTM Protein Staining System www.genscript.com
- 19 -
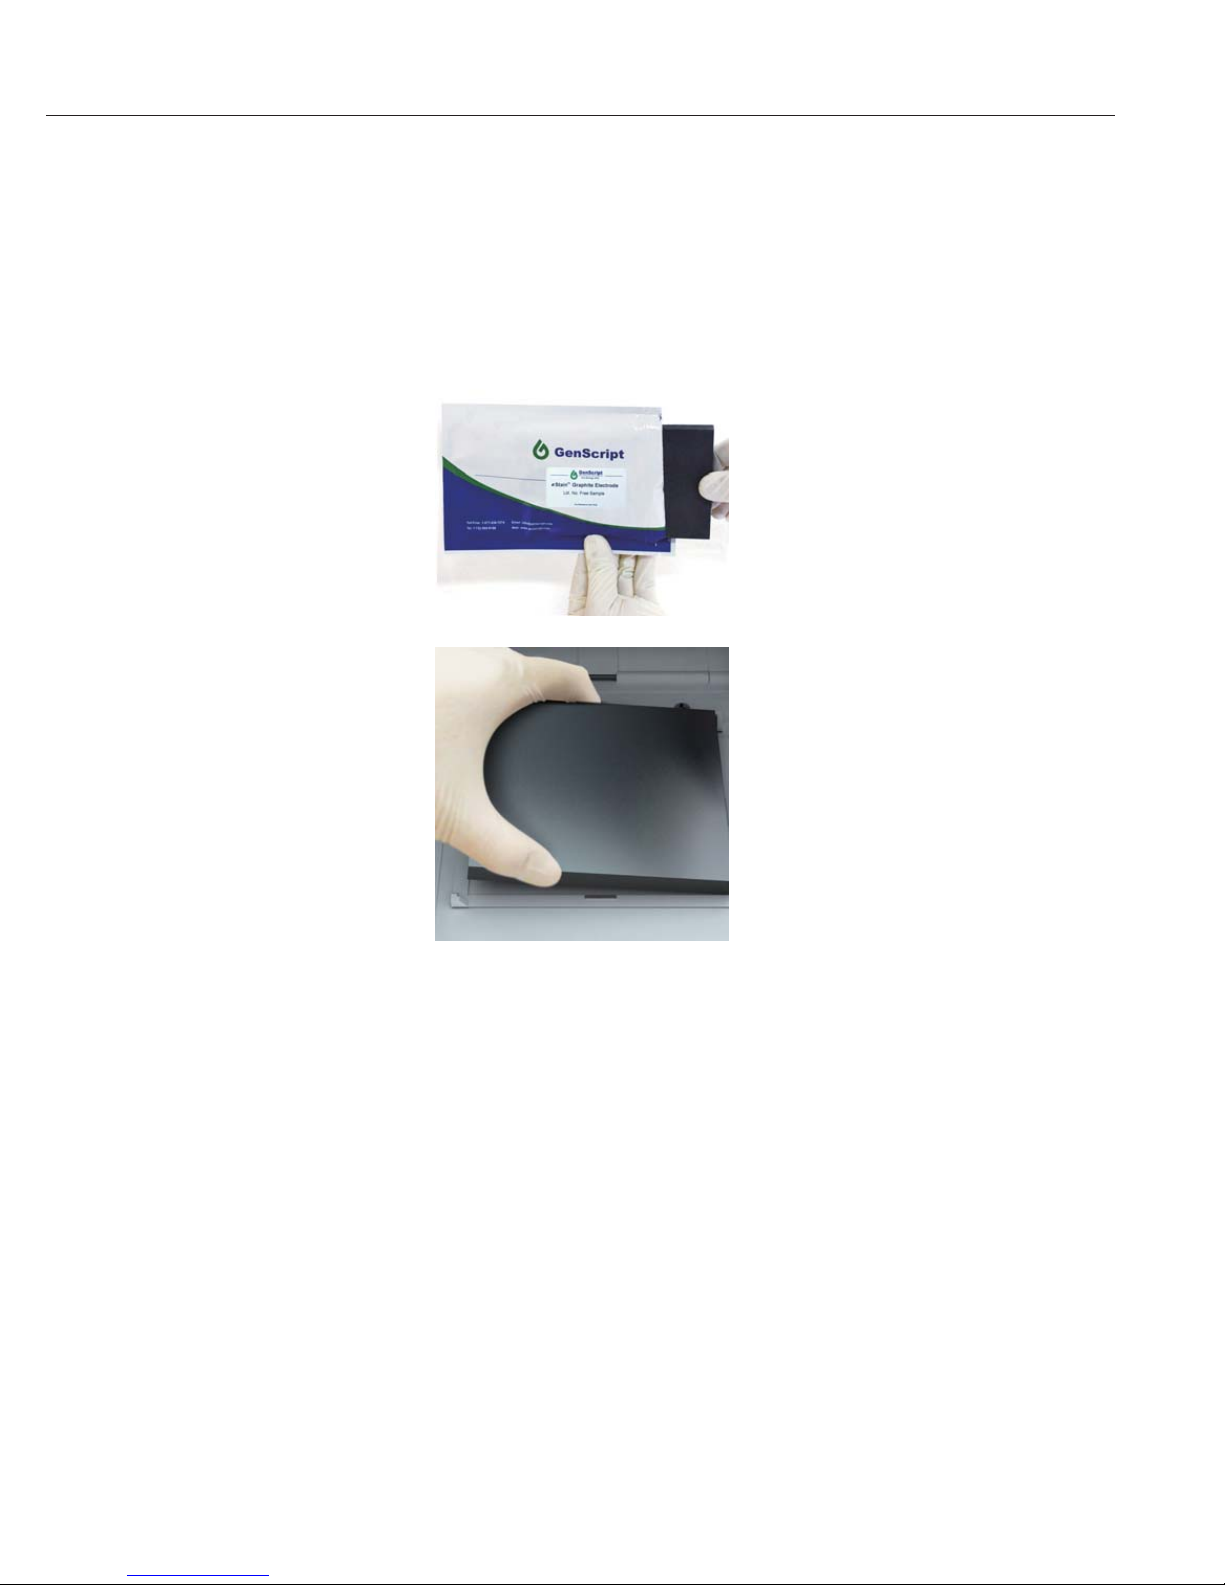
4. Tear the sealing of a new eStain
TM
Graphite Electrode package and take the
new Graphite Electrode out of the package. Place the new Graphite Electrode
into the anode tank and close the lid of the device.
5. Switch On the eStainTM Device. Press and hold Time button for 2 seconds
to toggle to numbering mode.
Protocols,
continued
Replacing the eStainTM
Graphite Electrode,
continued
Page 22

- 20 -
eStainTM Protein Staining System www.genscript.com
Protocols,
continued
Replacing the eStain
TM
Graphite Electrode,
continued
After successfully installing Graphite Electrode into the eStainTM Device, you
are ready to use the eStainTM Device for staining applications again.
6. Press Reset button to zero the staining times.
Note: For the best results, after using Graphite Electrode per 40 times of electric
staining, you may also need to perform a washing step by soaking the Graphite
Electrode in distilled water for half an hour and then drying it with a dry cloth or
paper towel.
Page 23

eStain
TM
Protein Staining System www.genscript.com
- 21 -
Troubleshooting
Problem
The upper status light doesn’t
flash during electric staining
process
The upper and lower status
lights flash simultaneously
The stained gel has very tinged
or nearly invisible protein bands
with high blue background.
The stained gel has very tinged
or nearly invisible protein bands
with clear background.
The stained gel has hazy blue
spots.
Cause
Incomplete electric circuit due
to improper assembly of the
staining pads.
Excessive current is flowing
through the Device.
1. The staining time is not
long enough.
2. Cooling the electrodes
for too long a time.
3. The graphite electrode has
been used for 200 times or
above.
1. The staining time is too long
2. The electrodes have not
been cooled or the cooling time
is not long enough
1. The gel has not been destained
sufficiently.
2. Cooling the electrodes for too
long a time
3. Air bubbles present in staining
stack interfering gel staining.
Solution
Ensure the staining stack is
assembled correctly: use the
eStain
TM
Anode Pad first
followed by the gel, Gel
Window and eStain
TM
Cathode
Pad.
Check the staining stack and
ensure Gel Window covered
correctly on the gel.
1. Cover Gel Window and the
eStain
TM
Cathode Pad again
and perform electric
staining for 2 more minutes.
2. Follow the instruction to
perform cooling procedure.
3. Replace the worn graphite
electrode using a new one.
1. Re-assemble the staining
stack using a new set of
eStain
TM
Protein Staining
Pad and then perform
another 7-min electric
staining.
2. Follow the instruction to
perform cooling procedure.
1. Cover Gel Window and the
eStain
TM
Cathode Pad again
and perform electric
staining for 1 more minute.
2. Follow the instruction to
perform cooling procedure.
3. Be sure to remove all air
bubbles present in the
staining stack by using the
small shovel supplied with
eStain
TM
Device
Review the information below to troubleshoot your experiments using the eStain
TM
Protein Staining Device and eStain
TM
Protein Staining Pad.
Introduction
Page 24
- 22 -
eStain
TM
Protein Staining System www.genscript.com
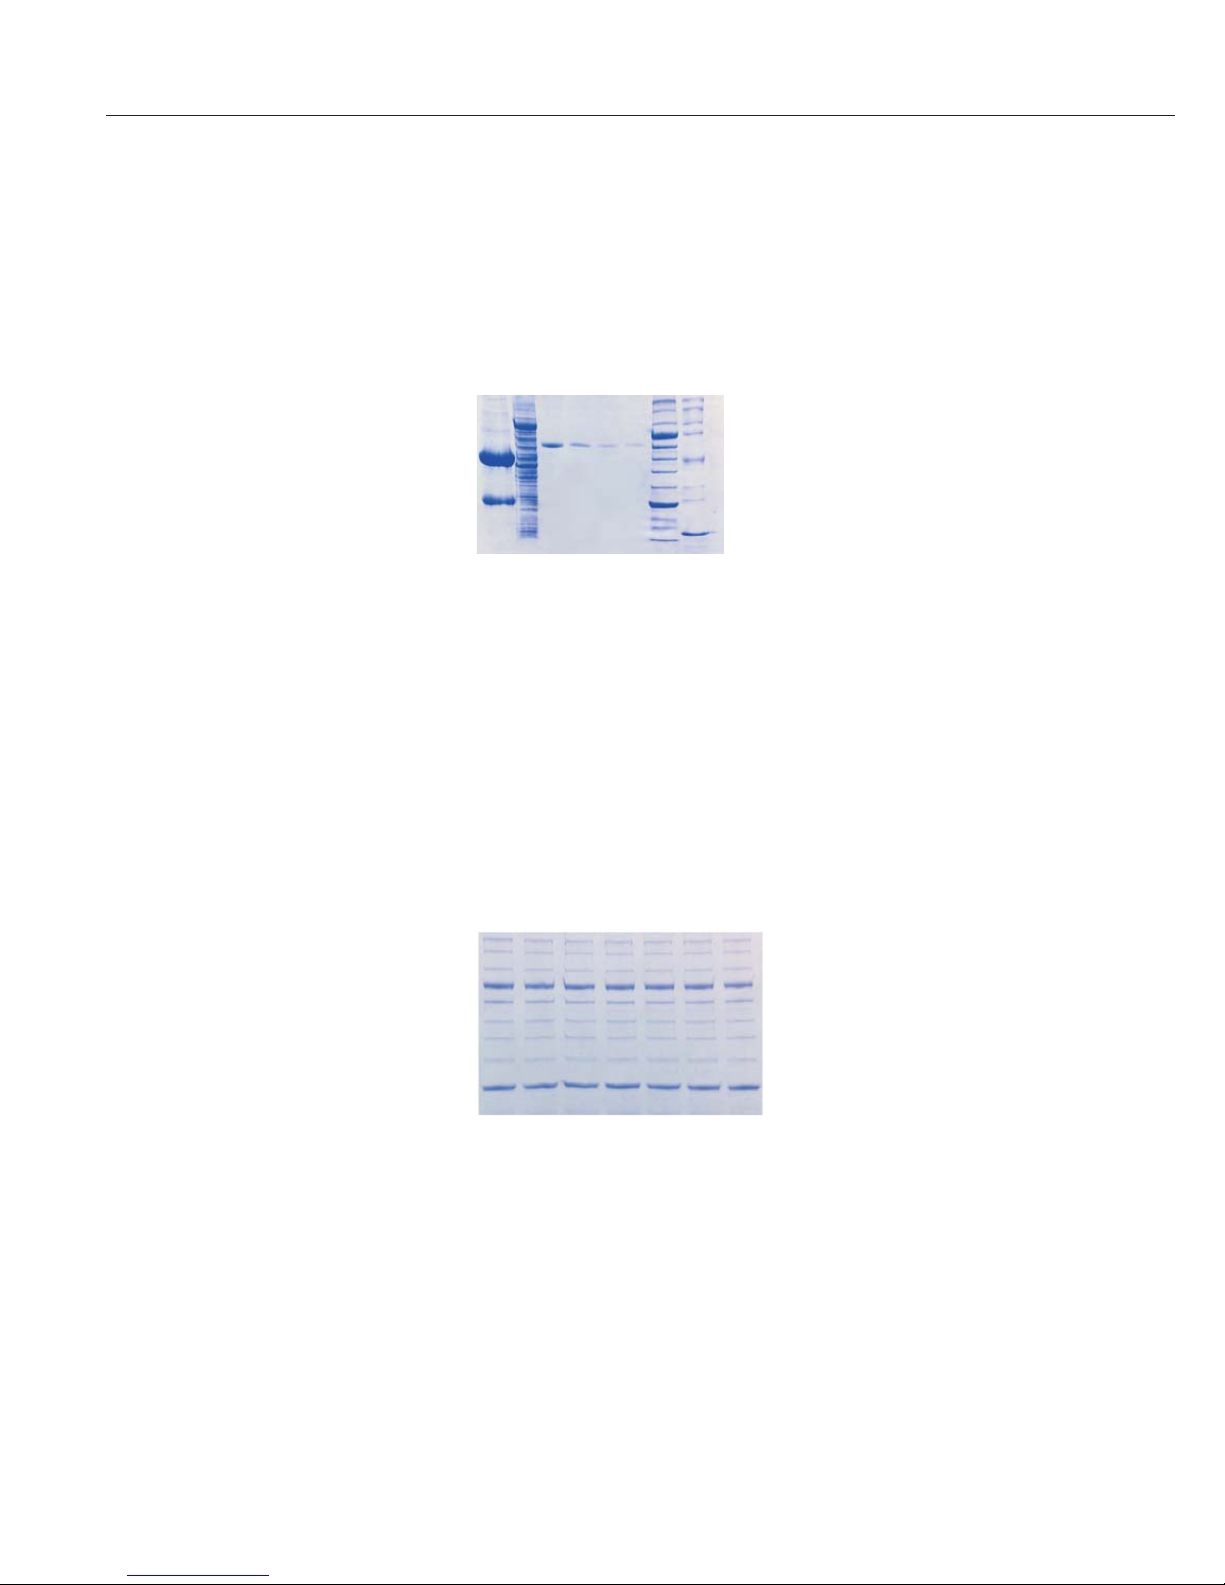
Examples of Results
Samples of 5μl New England Biolabs® Protein Ladder (P7703S) in each lane
were separated on a 4-20% Bis-Tris gel and stained using eStain
TM
Protein
Staining System (R-250).
Samples were separated on a 12% Tris-Glycine gel and stained using eStain
TM
Protein Staining System (R-250).
Tris-Glycine gel
results
Bis-Tris gel
results
1 2 3 4 5 6 7 8 Lane 1 500ng rabbit IgG
Lane 2 10μl
E.coli
lysate
Lane 3 200ng reduced BSA
Lane 4 125ng reduced BSA
Lane 5 50ng reduced BSA
Lane 6 15ng reduced BSA
Lane 7 10μl New England Biolabs
®
Protein Ladder
(Cat. No. P7703S)
Lane 8 10μl GenScript Smart Middle
Range Protein Standard
(Cat. No. MM0900)
Page 25

eStainTM Protein Staining System www.genscript.com
- 23 -
Technical Support
Visit the GenScript Web site at www.genscript.com for:
1. Technical resources, including manuals, vector maps and sequences,
application notes, MSDSs, FAQs, formulations, citations, handbooks, etc.
2. Complete technical support contact information
3. Access to the GenScript Online Catalog
4. Additional product information and special offers
For more information or technical assistance, call, write, fax, or email.
GenScript USA Inc.
120 Centennial Ave.
Piscataway, NJ 08854
Tel: 732-885-9188, 732-885-9688
Fax: 732-210-0262, 732-885-5878
Email: [email protected]
Web Resources
Contact Us
Page 26

- 24 -
eStainTM Protein Staining System www.genscript.com
eStain
TM
Protein Staining
Device
GenScript warrants that eStainTM Protein Staining Device will be free from
defects in material and workmanship for a period of one year from date of
purchase. If any defects occur in the product during this warranty period,
GenScript will, at its option, repair, replace, or refund the purchase price of
this product at no charge to you. The following defects, however, are
specifically excluded:
1. Defects caused by improper operation.
2. Repair or modification done by anyone other than GenScript or an
authorized agent.
3. Use of fittings or other spare parts supplied by anyone other than
GenScript.
4. Damage caused by accident or misuse.
5. Damage caused by disaster.
6. Corrosion due to use of improper solvent or sample.
For any inquiry or request for repair service, contact GenScript after
confirming the model and serial number of your instrument. For your
protection, items being returned must be insured against possible damage or
loss. This warranty shall be limited to the replacement of defective products.
It is expressly agreed that this warranty will be in lieu of all warranties of
fitness and in lieu of the warranty of merchantability.
Warranty
Page 27

GenScript USA Inc.
120 Centennial Ave.
Piscataway, NJ 08854
Tel: 732-885-9188, 732-885-9688
Fax: 732-210-0262, 732-885-5878
Email: [email protected]
 Loading...