

Page 1

MULTI-FUNCTION
DIGITAL
WIRELESS
HEADSET
USER'S
MANUAL
Models
Z-280, Z-350, Z-470
Page 2

Contents
Introduction................ 4
Contents of this Package
.......... 5
Cautionary Notes .............8
Positioning of the Headset ......... 10
Changing the Ear Tip ............12
Charging the Headset 12
........
Turning On/Off the Headset ........13
Digital Volume Control ...........14
Pairing the Headset ............15
Multiple Pairings
..............16
Features for Bluetooth Headset Profile ...18
Features for Bluetooth HandsFree Profile . . 19
Call State ................24
Low Battery State
Error State
.............24
................24
© 2005 Gennum Corporation All rights reservedPage 2
Page 3

TM
L-E-A-P Feature (Model Z-470) ......25
Hi-Fi Music Audio Input
(Models Z-350 and Z-470)
Graphic Equalizer
.............27
........26
Minimizing Power Consumption ......36
Troubleshooting ..............37
Limited Warranty .............38
Safety Warnings ..............41
Trademarks and Registered Trademarks . 41
TM ®
FCC Notice ...............42
EU Notice ................43
Specifications ...............43
Gennum Contact Information .......44
© 2005 Gennum Corporation All rights reserved Page 3
Page 4

Introduction
The Z-E-N Models Z-280, Z-350 and Z-470 headsets use Bluetooth
wireless technology to connect to phones or other devices, which support
the headset or handsfree profiles. While connected to your phone (Phone
Mode),you can make and receive calls using the headset,including using voice
control features if your phone supports this function. All models allow the
user to customize the receive phone audio using a 5-band Graphic Equalizer.
In addition, the user is also able to increase the volume level of their
transmitted voice. The Models Z-350 and Z-470 allow the user to plug-in a
PC, CD or MP3 player into theheadset to listen to music in between calls and
to use an 8-Band Graphic Equalizer to customize the audio (Hi-Fi Music
Mode). The Model Z-470 adds two L-E-A-P ( ocal nvironment udio
P
rocessing) Modes (L-E-A-P 1 and L-E-A-P 2) which allow the user to
carry on face-to-faceconversationsmore easily in noisyenvironments.
Page 4 © 2005 Gennum Corporation All rights reserved
TM ®
TM
TM TM
LE A
Page 5

Contents of thisPackage
1 Z-E-N DigitalWirelessHeadset
1 Mini Bag of ReplacementTips
1 Installation CD
1 User's Manual
1 Fitting Guide
1 Audio Interface Cable
1 ACWall Charger
© 2005 Gennum Corporation All rights reserved Page 5
TM
Page 6
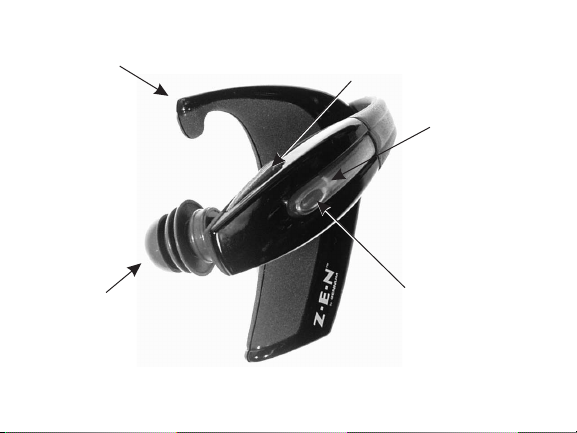
EAR TIP
PINCH BUTTON
BLUE
INDICATOR
LIGHT
SIDE BUTTON
EAR HOOK
© 2005 Gennum Corporation All rights reservedPage 6
Page 7
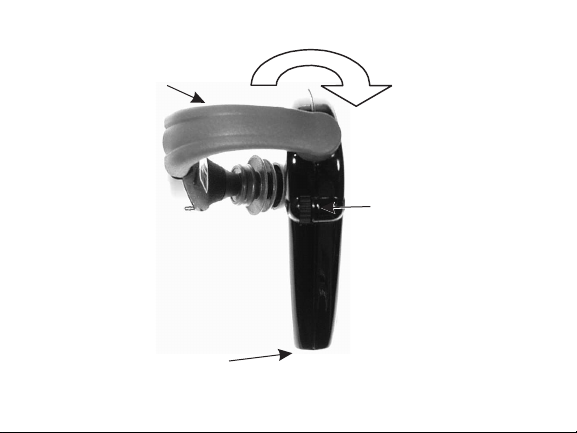
FLEXIBLE
ARM
CHARGING PORT /
AUDIO INPUT PORT
DIGITAL
VOLUME CONTROL
ROTATE ARM
FOR RIGHT
EAR FIT
© 2005 Gennum Corporation All rights reserved Page 7
Page 8
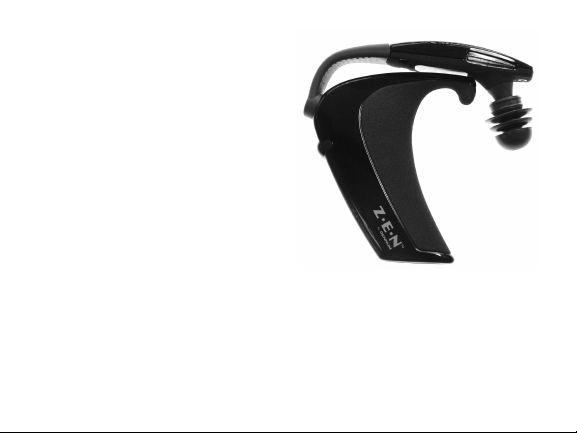
Storage Position
Rotate the flexible arm upwards into
the upright position as shown in the
photograph for storage.
Cautionary Notes
Significant flexibility has been designed into the flexible arm to allow the
headset to comfortably fit a variety of ear shapes and sizes; however some
care must be taken inmanipulating the flexible arm
Failure to observe the following cautionary notes could irreparably damage
your headset and voidyourwarranty
© 2005 Gennum Corporation All rights reservedPage 8
Page 9
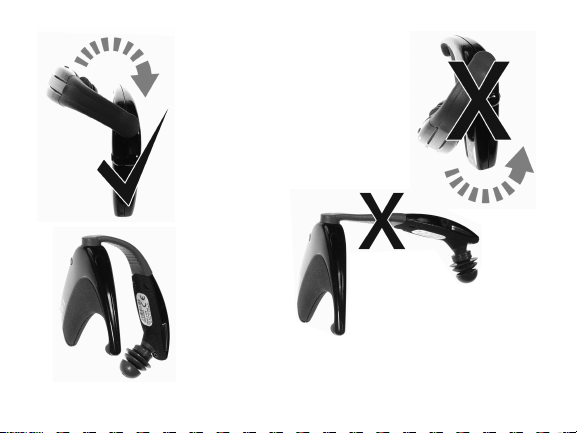
NOTE: Only
rotate the
flexible arm
above the
body of the
headset
NOTE:
Do not attempt to
forcibly rotate the
flexible arm below
the body of the
headset or
irreparable
damage will occur
© 2005 Gennum Corporation All rights reserved Page 9
NOTE:
Only stretch
the flexible
arm out
sufficient to
position on
the ear
NOTE:
Do not stretch the flexible
arm out to the position
shown or continuously manipulate the
arm outwards and inwards or
irreparable damage will occur
Page 10
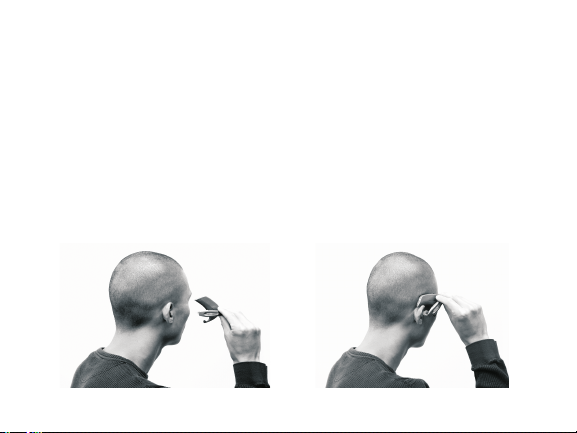
Positioning theHeadset
It is recommended you stand in front of a mirror when trying to fit the headset for
the first time. You can fit the headset on either the left ear or right ear by first
rotating the flexible arm over the top of the headset onto the left sideor right side
respectively. Grasp the headset betweenyour thumb andindex and middlefingers
as shown. Position the body of the headset over the top of the ear and insert the
ear tip into the ear. Rotate the headset until it hooks into position over the top of
your ear. If the ear tip isnot snugly positioned in your ear, remove the headset and
adjust the flexible arm by pressing it in the direction that will allow a more snug fit
on the ear. This is just one suggestion for putting it on and you may find a more
convenient way of doing it. We encourage you to try this afewtimes,in frontof the
mirror,until you find the mostcomfortableposition for yourself.
© 2005 Gennum Corporation All rights reservedPage 10
Page 11
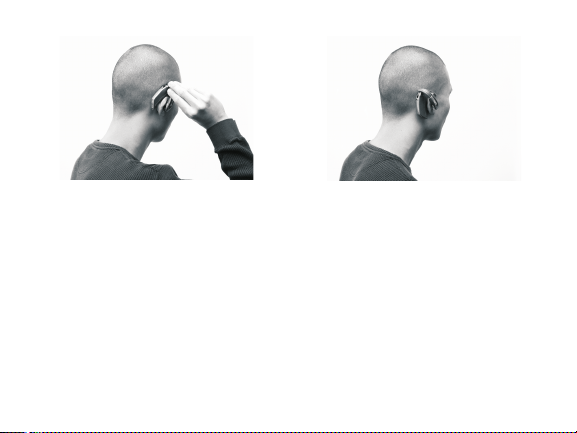
NOTE: the arm is made from a flexible rubber material throughout its entire
length and is meant to be adjustable. Please position the arm in the shape desired,
to get themost comfortable fit for you.
PositioningTip
To obtain thebest possible results withyour headset,it is important toensure
that the ear tip is inserted snugly into the ear. A snug fit will provide the best
possible sound quality as well as good isolation from external background
noise allowing you to hear the incoming call more clearly. A proper fit can be
obtained by applying pressure to the end of the flexible arm until the ear tip
has provided a goodseal in the earcanal,similar toearplugs.
© 2005 Gennum Corporation
All rights reserved Page 11
Page 12
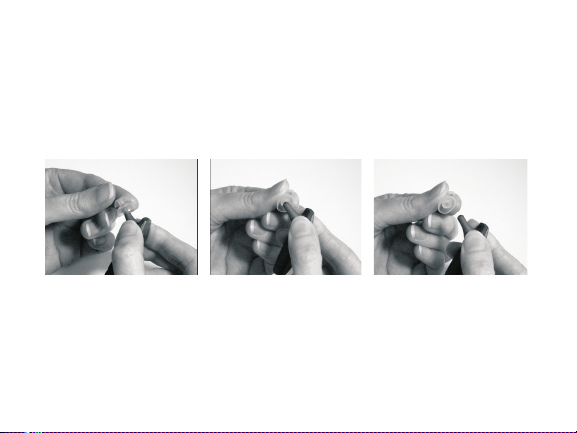
Changing the EarTip
Charging the Headset
The headset contains a rechargeable battery and must be charged before
use
Turn the headset off
Insert the headset charging plug into the charging port of the
© 2005 Gennum Corporation
All rights reservedPage 12
With one hand, firmly grasp the end of the ear tip between your thumb and
index finger. Similarly, with the other hand,grasp the end of the flexible arm.
Remove the ear tipwith a gentle tug.
To replace the ear tip,reversethis procedure by aligningthe hole in the ear tip
and pushing iton the end ofthe flexible arm untilit is firmly seatedin position.
Page 13

headset
Plug the AC power adapter into an electrical wall outlet
If charging is required, the Blue Indicator Light will turn on indicating
charging is in progress
(if the Blue Indicator Light does not turn on, the headset is already
fully charged)
The Blue Indicator Light will flash when charging is complete
If left plugged-in, the Blue Indicator Light will eventually stop flashing
(Charging is automatically stopped in order to protect your
headset)
Turning On/Off theHeadset
To turn ON the headset, the SIDE button and you will see 2
flashes of the Blue Indicator Light, followed by a longer 3 second flash.
Release the button at any time. If you are wearing theheadset,you will hear a
quick series of going from . The Blue Indicator Light
tones low to high pitch
will turn off to indicate you have successfully powered on the Z-E-N
headset.
© 2005 Gennum Corporation All rights reserved Page 13
press and hold
TM
Page 14

To turn OFF the headset, the SIDE button until you hear 4
. Release the SIDE button and you will heara quick series of going
beeps tones
from . If you are not wearing the headset, the
high to low pitch press and hold
press and hold
SIDE button for4 flashes of theBlue Indicator Light.
DigitalVolume Control
With the headsetoriented upright,
Rotate the volume controlknob upwards to increase thevolume
Rotate the volume controlknob downwards to reduce thevolume
You will hear a beep when you have reached the top end orbottom end ofthe
volume range.
When on a call, the volume control on your headset is synchronized
NOTE:
to the volume on your phone. As you change the volume you will see the
volume bars on your phone change accordingly. However, if you change the
volume control on your phone, it will have no effect on the headset volume
level
NOTE:
The volume control in each mode (Hi-Fi Music, L-E-A-P 1
© 2005 Gennum Corporation All rights reservedPage 14
TM
,
Page 15

TM
L-E-A-P 2 or Phone) is entirely independent so changing the volume in one
mode,will not affect the othermodes.
NOTE: Do not initially turn the volume control to maximum until
you become familiar with the volume levels and determine what is
most comfortable for you
Pairing the Headset
You must successfully complete the following pairing procedure to allow the
headset and your phone to communicate. The phone and headset will
remain paired until the pairing is deleted from the phone through the phone
menu options.
?
Turn on the Bluetooth function on your phone (refer to your phone's
user manual)
?
Turn the headseton
??Press and hold 4 beeps
you are not wearing theheadset),then releasethe button
Verify that the Blue Indicator Light is solid on, indicating the headset is
now in phonepairing mode
© 2005 Gennum Corporation All rights reserved Page 15
the PINCH button until you hear (or 4 flashes if
Page 16

?
Follow your phone's pairingprocedure topair it withthe headset
? When found,the headsetwill display as“Z-E-N” on your phone.
?
When asked for the passkey, password or pin code, enter on
the phone's keypad:0000
?
If pairing is successful, your phone will display a “pairing successful”
message and the Blue IndicatorLight will turn off. If you are wearing the
headset,you willhear a 'pairing success'melody
? Depending on your phone model, you may have to initiate a
Bluetooth Connection. This can be achieved by selecting 'connect to
Bluetooth device' from your phone or by the
PINCH button for , then release the button.
1 beep
pressing and holding
Repeat the pairing procedure if the pairing process fails. If you are
unsuccessful in pairing the headset after several pairing attempts, please
contact Customer Service for assistance.
Multiple Pairings
You can pair the headset with up to 3 phones or devices supporting the
headset or hands-free profile by repeating the pairing procedure described
above. The headset cannot be used with all three devices simultaneously. To
© 2005 Gennum Corporation All rights reservedPage 16
Page 17

move the headset from onedevice to the next,use the following procedure:
??Turn off theheadset
Turn off the phone or device to which it is currently connected or,turn
?
off the Bluetooth function,or select “Disconnect Z-E-N” manually from
your phone's menu options
Turn on the new phone or device you want to now connect with the
headset. You must have previously paired the headset with this phone
or device as describedin the pairing procedure
Turn on theheadset
?
Depending on your phone model, you may have to initiate a Bluetooth
?
Connection using the phone. This can be achieved by selecting 'connect
to Bluetooth device' from your phone's menu options (refer to your
phone's user manual), or for some phone models, by
the PINCH buttonfor ,then releasingthe button.
holding 1 beep
© 2005 Gennum Corporation All rights reserved Page 17
pressing and
Page 18

FEATURES FOR PHONES SUPPORTINGTHE
BLUETOOTH HEADSET PROFILE ONLY
If your phone only supports the Bluetooth , then thefollowing
features are available.
®
Headset Profile
Answering a Call
If your headset is to your phone then with an incoming call, you will
hear a seriesof ring tones inthe earpiece of theheadset
?
To answer the call, the SIDE button.
linked ,
briefly press and release
Ending a Call
?
To end thecall, the SIDEbutton.
briefly press and release
Making a Call
?
Dial the number you are calling on your phone's keypad and the call will
be automatically transferred to the headset
Transferring a Call
?
If you are on an active call using your phone,and then want to transfer
© 2005 Gennum Corporation All rights reservedPage 18
Page 19

the call from your phone to the headset, the PINCH
button until you hear ,then immediatelyreleasethe button
1 beep
press and hold
Mute/ Unmute
While on anactivecall,
To MUTE the call, the PINCH button. You will
?
hear followed by periodic beeps,indicating the headset has been
1 beep
muted
?
To UNMUTE the call, the PINCH button. The
periodic beeps willstop,indicating that thecall has been un-muted
briefly press and release
briefly press and release
FEATURES FOR PHONES SUPPORTINGTHE
BLUETOOTH HANDSFREE PROFILE
If your phone also supports the Bluetooth , then additional
®
Handsfree Profile
features are available.
Answering a Call
If your headset is to your phone, then with an incoming call, you will
hear a seriesof ring tones inthe earpiece of theheadset
© 2005 Gennum Corporation All rights reserved Page 19
linked
Page 20

? To answer thecall, the SIDEbutton.briefly press and release
If your headset is to your phone,you will not hear the ring tones in
your headset, however you can still transfer the incoming call to your headset
at any time by by the PINCH button for . It may
take a few seconds longerto transfer.
not linked
pressing and holding 1 beep
Ending a Call
?
To end thecall, the SIDEbutton.
briefly press and release
Making a Call
If your headset is to your phone,
Dial the number you are calling on your phone's keypad and the call will
?
be automatically transferred to the headset
If your headset is to your phone, you can still transfer the call to
your headset at anytime,
?
Press and hold 1 beep
immediately release the button. It may take a few secondsto transfer.
linked
not linked
the PINCH button until you hear , then
© 2005 Gennum Corporation All rights reservedPage 20
Page 21

Voice Dial
If your phone supports voice-activated dialing and you have set up voice tags
on your phone,
??Press and hold 1 beep
immediately release the button
NOTE:
results
You should create the voice tags from your headset for better
the PINCH button until you hear , then
Last Number Redial
?
Press and hold 2 beeps
immediately release the button
the PINCH button until you hear , then
Last Number ReDialwhile on aCall
?
Press and hold 2 beeps
immediately release the button
?
Refer to theCallWaitingsection below for callcontrol
the PINCH button until you hear , then
Rejecting a Call
If you want toreject an incoming call,
Press and hold 3 beeps
© 2005 Gennum Corporation All rights reserved Page 21
the PINCH button until you hear then
Page 22

immediately release the button.
Transferring a Callfrom the Headset tothe Phone
If you are on an active call using your headset and then want to transfer
?
the callto the phone, the PINCH button until you hear
beep
,then immediatelyrelease the button
press and hold 1
Transferring a Callfrom the Phone to the Headset
?
If you are on an active call using your phone and then want to transfer
the call to the headset, the PINCH button until you hear
, then immediately release the button. There may be a few
1 beep
seconds delay before the callis transferred
NOTE:
your phone's menu optionto transfer the sound.
This feature may not be supported on all phones and you must use
press and hold
CallWaiting
While on anactivecall and your phonenotifies you of another incomingcall,
?
Press and hold 1 beep
immediately release the button,to the waiting call and place the
the PINCH button until you hear , then
accept
© 2005 Gennum Corporation All rights reservedPage 22
Page 23

first call on-hold
?
Press and hold 1 beep
immediately release the button to between an active and a held
the PINCH button until you hear , then
swap
call
?
Press and hold 2 beeps
immediately release the button,to the waiting call and
the PINCH button until you hear , then
accept hang-up
the original call
?
Press and hold 3 beeps
immediately release the button,to the waiting call
?
Press and hold 4 beeps
the PINCH button until you hear , then
reject
the PINCH button until you hear , then
immediately release the button,to release all heldcalls
Mute/ Unmute
While on anactivecall,
To MUTE the call, the PINCH button. You will
?
hear , indicating theheadset has been
1 beep followed by periodic beeps
muted
To UNMUTE the call, the PINCH button.The
?
periodic beeps willstop,indicating that thecall has been un-muted.
© 2005 Gennum Corporation All rights reserved Page 23
briefly press and release
briefly press and release
Page 24

Call State
?
When you are on a call, the Blue Indicator Light will flash periodically. It
will stop flashingwhen the call ends
Low Battery State
?
When the headset requires re-charging, you will hear a warning tone
from your headset. You will receive warnings every minute when 15
minutes of battery time are left. Warnings will increase to every 10
seconds when battery time is 5 minutes or less. When the battery
expires,the unitwill power itself off.
To re-charge the headset,
?
Turn off theheadset
?
Refer to thesection on Charging theHeadset
Error State
?
When an invalid button sequence is pressed you will hear a quick low
error beep. This is an indication of an invalid action. No action is taken
and you may continue asusual with your actions.
© 2005 Gennum Corporation
All rights reservedPage 24
Page 25

L-E-A-P Feature
This feature is available while you are not on a call. When you use the L-E-AP ( ocal nvironment udio rocessing) feature, you will more clearly hear
TM
TM
LE A P
(Model Z-470 only)
the person you are in face-to-face conversation with, because the headset
uses its advanced noise reduction algorithm to minimize the amount of
background noise you hear. Two L-E-A-P modes are available, namely L-E-A-
TM TM TM
P 1 and L-E-A-P 2. L-E-A-P 1, set for normal listening, is factory
programmed to provide a transparent effect which allows the user to
continuously wear the headset without plugging their ear. L-E-A-P 2 is set
up to provide additional amplification and noise reduction. L-E-A-P 2 has
TM
TM
TM
been designed forchallenging noisy environments.
?
On initial power-up,you will hear a single beep as the headset defaultsto
the L-E-A-P 1 mode. Use the volume control to adjust the volume
level into your ear
?
To turn on the L-E-A-P 2 mode, quickly press and release the SIDE
TM
TM
button. You will hear 2 beeps indicating you are in the LEAP 2 mode.
Use the volume controlto adjust the volume level intoyour ear.
?
You may toggle between these two modes by quickly pressing and
releasing the SIDE button
© 2005 Gennum Corporation All rights reserved Page 25
Page 26

NOTE:
P 2 or Phone) is entirely independent so changing the volume in one mode,
The volume control in each mode (Hi-Fi Music, L-E-A-P 1, L-E-A-
TM
TM
will not affectthe other modes.
When in either of these modes,the user may also customize the audio. Refer
the section onthe Graphic Equalizer.
to
Hi-Fi Music Audio Input (ModelZ-350 and Z-470only)
These headset modelsallow the user toplug in a CDor MP3 music player into
the headset's Charging Port/Audio Input Port using the Audio InterfaceCable
provided and listen to hi-fi audio when not on a call. On an incoming call, the
music will be muted to allow the user to hear the ring tones and answer the
call. At the end of the call, the music will be un-muted. To select this mode,
press and hold 2 beeps
level. To exit this mode, the SIDE button for , then
release.
NOTE:
TM
P 2 or Phone) is entirely independent so changing the volume in one mode,
will not affectthe other modes.
the SIDE button for , then release. Adjust the volume
press and hold 2 beeps
The volume control in each mode (Hi-Fi Music, L-E-A-P 1, L-E-A-
© 2005 Gennum Corporation All rights reservedPage 26
TM
Page 27

Refer to the section on the Graphic Equalizer which allows the user to
customize the audio.
Model Z-470 Only
If the user is listening to Hi-Fi Music between calls and needs to conduct a
face-to-face conversation using the L-E-A-P feature, a quick press and
release of the SIDEbutton will put the headset into thelast selected L-E-A-P
memory. A subsequent quick SIDE button press will continue playing Hi-Fi
music through your headset.
TM
Graphic Equalizer
The graphic equalizer allows you to customize the sound you hear in each
mode ofoperation: L-E-A-P (Model Z-470 only), Hi-Fi Music (Model Z-350
and Model Z-470)or Phone (all models).
NOTE:
Your PC must have Bluetooth wireless capability to be able to
use this feature.
TM
®
Software Installation
Important:
? Insert the installation CD in the disk drive
© 2005 Gennum Corporation All rights reserved Page 27
Please read the README.txt file on the installation CD:
TM
Page 28

?
Open and read the README.txt file on the CD to ensure your
computer is properly set up for the installation, prior to installing the
Graphic Equalizer software
?
After installing the Graphic Equalizer software, a shortcut is created
under the Z-E-N folder which is located in the Start Menu:
Start Menu>Programs>Z-E-N>GraphicEQ>GraphicEQ
?
Double click 'GraphicEQ' to start the application
Connecting the Headset for the Graphic Equalizer
Application
?
Press the PINCH button and SIDE button simultaneously for 4 beeps
(or 4 flashes of the Blue Indicator Light if you are not wearing the
headset) to place the headset in Graphical Equalizer “Connect
Mode”
?
Go to Start->Programs->My Bluetooth Places
?
Double-click 'Find Bluetooth Devices'
?
Right-click on the Z-E-N Bluetooth device in the Explorer window
?
Select “Pair Device”
?
During the pairing procedure, when asked for a Password,PIN code
© 2005 Gennum Corporation
All rights reservedPage 28
Page 29

or Passkey, enter: 00000000
© 2005 Gennum Corporation All rights reserved Page 29
Select 'Connect SPP Slave'?
? After the pairing procedure is completed, make note of the COM port
value as shown
The windows shown above are for the Windows 2000 operating system
NOTE:
and may appear different for other operating systems such as Windows XP,
howeverthe basic procedure remains the same.
When the headset has been paired to the PC, you do not have to repeat
NOTE:
the pairing procedure unless you want to pair to another PC However, you are
required to place the headsetin“Connect Mode” (press PINCH
simultaneously for 4 beeps)whenever youwant to use the GraphicEqualizer
Click“Connect”
?
.
and SIDEbuttons
Page 30

?
© 2005 Gennum Corporation All rights reservedPage 30
Enter PIN code“
00000000” when prompted
Application Setup
?
Select the next to the 'Connect' button
drop down menu
COM Port Selection
Click on ‘Set COM Port' and enter the COM port value noted above
?
Click 'Update' to save the COM port value
?
Page 31

?
Click 'Connect' to establish a connection to the headset and the
current equalization settings will be displayed
?
Click on the appropriate tab (Hi-Fi Music, L-E-A-P 1, L-E-A-P 2 or
TM TM
Phone) to select the mode you want to program
Programming the Headset
There are three ways to customize the equalization settings in the
headset:
?
Dragging the sliders which programs the setting into the device as
each slider is moved
?
Using one of the pre-defined presets which contain default
equalizations settings for different listening environments
?
Loading a set of equalization settings that have been previously saved
to a file
NOTE:
For each tab, click the 'Defaults' button to return to the factory
programmed settings
Hi-Fi Music Presets (Model Z-350 and Model Z-470)
?
Refer to the section on 'Hi-Fi Music Audio Input' on setup for music
listening
?
Click the 'Presets' button and a drop down menu will appear
© 2005 Gennum Corporation
All rights reserved Page 31
Page 32

? Click on your selection and the equalization settings will be
© 2005 Gennum Corporation All rights reservedPage 32
programmed into the headset. Individual sliders can be changed to
further tune the settings to your liking
Hi-Fi Music Presets
L-E-A-P™ Mode Presets (Model Z-470 only)
? Click the 'Presets' button and a drop down menu will appear
Page 33

? Click on your selection and the equalization settings will be programmed
© 2005 Gennum Corporation All rights reserved Page 33
into the headset
? Individual sliders can be changed to further tune the settings to your liking
L-E-A-P Mode Presets
TM
Phone Mode Programming and Presets
Phone Mode Programming
To listen to changes that you have programmed in Phone mode:
Page 34

?
© 2005 Gennum Corporation All rights reservedPage 34
Connect the Audio Interface Cable to the Z-E-N headset and to
TM
the PC audio port
?
Ensure the volume level on the PC is not muted
?
Click the 'PlayTest Call' button and you will hear the test call audio.
?
If necessary, increase the volume level on your PC
You can dynamically change the settings while the Test Call is playing
?
Phone Mode
Page 35

NOTE: A Microphone Gain slider is also available which controls the
loudness level of your voice heard by the person you are talking with on
the phone. Adjust this setting only if your called party complains that your
voice is not loud enough. Adjusting this level too high will make your voice
sound distorted and/or the person you are talking with may hear an echo
of their voice
Phone Mode Presets
Click the 'Presets' button and a drop down menu will appear similar
?
to the L-E-A-P mode presets
?
Click on your selection and the equalization settings will be
TM
programmed into the headset
?
Individual sliders can be changed to further tune the settings to your
liking
Customizing, Saving and Loading Equalization Settings
For each tab selection, you may customize and save the equalization
settings as follows:
?
Select the tab for adjustment: Hi-Fi Music, L-E-A-P 1, L-E-A-P 2 or
Phone
© 2005 Gennum Corporation All rights reserved Page 35
TM TM
Page 36

?
Drag the sliders into the positions you prefer
?
Click the 'Save' button and save the file with a .zen extension. You
may save as many files as you like.
?
To load a previously saved file, click the 'Load' button and browse for
the file you want to load
Disconnecting the Z-E-N
TM
There are two ways to disconnect from the headset:
?
Clicking 'Disconnect' will disable the connection to the headset.
?
Clicking 'Close' will disconnect the connection to the headset and
close the Graphic Equalizer application.
Minimizing Power Consumption
Switch off the headset if youanticipate you will notbe using theheadset for an
extended period of time and if convenient, connect it to the charger so the
headset is always fully chargedand ready for use.
© 2005 Gennum Corporation
All rights reservedPage 36
Page 37

TROUBLESHOOTING
The phone or headset does not respond at all when I press
the SIDE orPINCH buttons?
You may need toreset your phone by turningoff the power and thenturning it
back on again. You may also need to turn the Z-E-N headset off and then
back on. All button presses on the headset are accompanied by a flash of the
Blue Indicator Light. If you don't see a flash, this is a definite indication of a
dead battery.
TM
Does your caller complain theyhear an echo?
Generally this is an indication that the ear tip is not positioned snugly in the
ear and the phone volume is high. Try re-positioning the ear tip until a better
seal is obtainedand/or reducing the call volume.
Is the incomingsound tinny and quiet?
Try re-positioning the ear tip into the ear for a better seal which will restore
proper volume and tonalbalance to the incomingaudio.
© 2005 Gennum Corporation
All rights reserved Page 37
Page 38

Limited Warranty
Gennum Corporation warrants that your headset will be free fromdefects in
material or workmanship for a period of one (1) year from the date of
shipment, under normal use and conditions.
related matters, please see the Gennum Contact Information on
the last page ofthis manual.
During this period, if the headset is found to be defective in materials or
workmanship,Gennum will repair or replace it,at the sole option of Gennum,
at no charge to you. If Gennum determines that it is not possible to repair or
replace the headset,it may, at its sole option, refund the purchase price paid
for the headset. THESE ARETHE SOLE AND EXCLUSIVE REMEDIES FOR
BREACH OF WARRANTY BY GENNUM. IN NO EVENT SHALL
GENNUM BE LIABLE FOR DAMAGES EXCEEDING THE SALE PRICE FOR
YOURHEADSET.
You are responsible for packing the defective headset properly in the original
packaging,and for the cost of shipping. A copy of the original receipt must be
included. Shipping instructions will be given bytechnical support at Gennum.
For all warranty and service
© 2005 Gennum Corporation
All rights reservedPage 38
Page 39

Warranty repairs are completed at no charge for parts or labour, and
Gennum will pay the cost of shipping the repaired or replaced product back
to you.Warranty repairsmayuse new or equalreplacement parts. Goods will
not be accepted for return for non-warranty reasons without the express
prior written approval ofGennum.
Gennum reserves the right to make the final decision on any warranty claim
that may be questionable. This limited warranty does not cover and Gennum
will not be responsible for failures or defects due to misuse, neglect, abuse,
accidents, alterations, improper or unauthorized installation or service,
unauthorized removal or repairs, failure to follow instructions, fire, floods,
acts of God,or spills offoodor liquids.
EXCEPT FOR THE EXPRESS LIMITED WARRANTY PROVIDED ABOVE,
THE HEADSET, FIRMWARE, SOFTWARE, WALL CHARGER WITH
ADAPTERS, REPLACEMENT EAR TIPS AND WRITTEN MATERIALS ARE
PROVIDED “AS IS” WITHOUT REPRESENTATION, CONDITION OR
WARRANTY OF ANY KIND, WHETHER EXPRESS, IMPLIED OR
STATUTORY,ANDGENNUM SPECIFICALLY EXCLUDESALL OTHER
CONDITIONS ANDWARRANTIES, INCLUDING BUT NOT LIMITEDTO
© 2005 Gennum Corporation
All rights reserved Page 39
Page 40

IMPLIED CONDITIONS AND WARRANTIES OF MERCHANTABILITY
AND FITNESS FOR A PARTICULAR PURPOSE. IN NO EVENT SHALL
GENNUM BE LIABLE FOR ANY INDIRECT, INCIDENTAL, SPECIAL OR
CONSEQUENTIAL DAMAGES ARISING DIRECTLY OR INDIRECTLY IN
CONNECTION WITH THE HEADSET, THE USE OF THE HEADSET OR
OTHERWISE,WHETHER FOR LOSS OF PROFITS, BUSINESS REVENUES
OR OTHERWISE.
This warranty sets forth the entire responsibility of Gennum with respect to
the headset,firmware, and software,wall charger with adapters,replacement
tips and written materials. Your exclusive remedy is repair, replacement or
refund as stated herein.In no event shall Gennum's liabilities exceed the cost
of correcting defects as provided herein and any such liabilities will terminate
upon expiration ofthe warranty period.
This warranty is valid only when the headset is purchased from a Gennum
Authorized Dealer,and applies only to the original purchaser. Headsets with
the serial numberor model designation removed,altered,replaced or defaced
are not covered by thiswarranty.
© 2005 Gennum Corporation
All rights reservedPage 40
Page 41

SafetyWarnings
This package contains small parts which may be hazardous to children under
3.
Headsets encourage hands-free operation of phones while driving or
conducting other activities. You should nonetheless ensure you obey the laws
regarding cell-phone use while driving, and give your full attention to the
operation of your vehicle.
Do not attempt to use this device if it is submerged in liquid. Immediately
unplug all electricalconnections.
Users with pacemakers or other electrical medical devices should consult
with their physicians before usingcell-phones or a headset.
The use of wireless devices and their accessories may be prohibited or
restricted in certain areas.Always obey the laws and regulations onthe use of
these products.
Trademarks™ and RegisteredTrademarks ®
The Bluetooth® word mark and logos are owned by the Bluetooth SIG,Inc.
© 2005 Gennum Corporation
All rights reserved Page 41
Page 42

and any use ofsuch marks by GennumCorporation is under license.
The Z-E-N and L-E-A-P™ trademarksareowned by Gennum Corporation.
TM
FCC Notice
This device contains FCC ID SD7GR2316 which complies with part 15 of the
FCC Rules. Operation is subject to thefollowingtwo conditions:
(1) This device may notcause harmful interference, and
(2) This device must accept any interference received, including
interference that may cause undesired operation.
Changes or modifications not expressly approved by the party responsible
for compliance couldvoidthe user's authority tooperate the equipment.
Please refer to thezen.gennum.com website for more information.
© 2005 Gennum Corporation All rights reservedPage 42
Page 43

EU Notice
DECLARATION OF CONFORMITY
In accordance with Annex IV of the EU directive 1999/5/EC,
Corporation
complies with the appropriate essential requirements of the Article 3 of the
R&TTE and theother relevantprovisions,when used for its intended purpose.
Please refer to thezen.gennum.com websitefor more information.
Specifications
TypicalWeight 22grams
TypicalTalkTime 8 hours
Typical StandbyTime 100 hours (from a full charge)
Typical RechargeTime 2 hours (from afull discharge)
Design and specificationsare subjectto change without notice.
© 2005 Gennum Corporation All rights reserved Page 43
declares under our responsibility that the product:
Type:
Intended Purpose:
Equipment Class:
Z-280,Z-350, Z-470
Bluetooth Headset
1
Gennum
Page 44

Gennum Contact Information
For latest revisions to this manual, customer assistance or inquiries about the
Z-E-N headset,please visit our websiteat
zTMen.gennum.com
For general inquiries,please e-mail us at
zen@gennum.com
CorporateAddress:
Gennum Corporation
970 Fraser Drive, Burlington, Ontario L7L 5P5
www.gennum.com
ZEN 2350series .0
 Loading...