

Page 1

DIGITAL
WIRELESS
HEADSET
with
HearPhone
Technology
USER'S
MANUAL
™
Page 2

Contents
Introduction ........................................................................................6
Contents of this Package ........................................................6
Safety Information ....................................................................8
Getting Started...................................................................................9
Connecting the Ear Tip............................................................9
Connecting a custom earmold ..............................................9
Positioning the Headset........................................................10
Positioning Hints.....................................................................12
Turning the headset on or off..............................................12
Volume Control ......................................................................13
Storage Position......................................................................13
Operating Modes: Universal, Directional, Bluetooth...............14
Universal Mode.......................................................................15
Directional Mode ...................................................................16
Bluetooth Mode......................................................................17
© 2005 Gennum Corporation All rights reservedPage 2
Page 3

Setting up to receive phone calls........................................18
After you've ended a call ......................................................18
Sound Customization features .....................................................19
Connecting to Cell Phones - Pairing to your cell phone .......20
How to Pair your Headset to your Cell Phone..............20
Features for phones supporting the BLUETOOTH
®
Headset Profile only ..............................................................22
To answer a call .............................................................22
To end a call....................................................................22
To make a call.................................................................22
To transfer a call ............................................................22
To Mute/ “Unmute” ......................................................23
Features for phones supporting the BLUETOOTH
®
Handsfree Profile....................................................................23
Answering a call.............................................................24
To create a link ..............................................................24
© Gennum Corporation All rights reserved2005 Page 3
Page 4

To end a call....................................................................24
To make a call.................................................................25
Voice Dial ........................................................................25
Last Number Redial......................................................26
Last Number Redial while on a Call .........................26
To reject a call................................................................26
To transfer a call from the headset to the phone..26
To transfer a call from the phone to the headset..26
Call Waiting.....................................................................27
Mute / Unmute ..............................................................28
Care and Maintenance of your headset .....................................29
Eartips .......................................................................................29
Cleaning the eartips......................................................29
Cleaning your custom earmold..................................30
Headset Maintenance ............................................................30
Battery and Charging Information...............................................31
© Gennum Corporation All rights reserved2005Page 4
Page 5

Minimizing Power Consumption.........................................31
Battery Life ..............................................................................31
Low Battery Indicator (Red Light) .....................................31
How to charge the headset .................................................32
Replacing the battery.............................................................32
Frequently Asked Questions (FAQs) ..........................................33
Limited Warranty.............................................................................36
Trademarks™ and Registered Trademarks ® ..................38
FCC Notice ......................................................................................39
EU Notice .........................................................................................40
Contact Information .......................................................................42
HANDSFREE FUNCTION QUICK SUMMARY ......................44
© Gennum Corporation All rights reserved2005 Page 5
Page 6

Introduction
The Digital Wireless Headset with HearPhone™ Technology and Bluetooth
connectivity provides a high quality digital wireless connection between
Bluetooth-enabled devices and the digital headset.The DigitalWireless Headset
with HearPhone™ Technology incorporates wide dynamic range compression,
FRONTWAVE directional microphones, noise reduction, and active feedback
cancellation. This headset can be custom programmed to satisfy the user's
hearing needs and listeningpreferences.
Any device that supports the headset or HandsFree Bluetooth profile may be
paired to this headset.
Contents of this Package
•1
•1Wall Charger with 4 Adapters (North America,UK, Europe,Australia)
•3
•1
•1
•1
®
Digital Wireless Headset with HearPhone™ Technology
Replacement Ear Tips
Handsfree Function Quick Summary sheet
piece of (size 12 standard) tubing for use with custom earmolds (9”
length).
User's Manual
© Gennum Corporation All rights reserved2005Page 6
®
Page 7

© Gennum Corporation All rights reserved2005 Page 7
Page 8

Safety Information
! This package contains small parts which may be hazardous to children under
3.
Headsets encourage hands-free operation of phones while driving or
!
conducting other activities. Please obey the laws regarding cell-phone use
while driving,and give yourfull attention to the operation ofyour vehicle.
Do not attempt to use this device if it is submerged in liquid. Immediately
!
unplug all electrical connections.Users with pacemakers or other electrical
medical devices should consult with their physicians before using cellular
phones or a headset.
The use of wireless devices and their accessories may be prohibited or
!
restricted in certain areas.Always obey the local laws and regulations on the
use of these products.
Although this headset is warranted,reflecting its design quality and reliability,
!
fail-safe reliability is not implied.This headset-hearing instrument should not
be relied on as a primary safety system in any application where injury or loss
of life may result from failure of the hearing device to operate properly. No
redundancy or back-up is available in either the power source or the
individual and collective circuit functions of theproduct.
© Gennum Corporation All rights reserved2005Page 8
Page 9
Getting Started
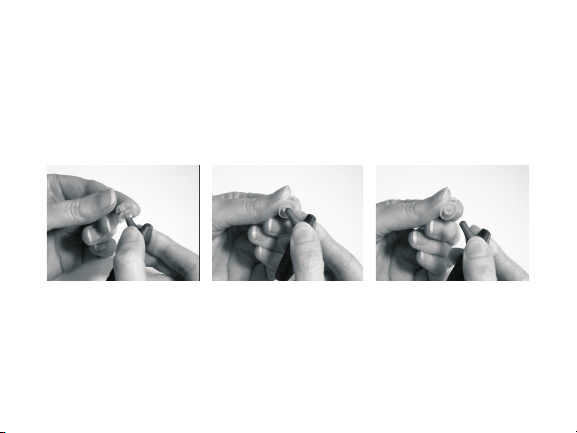
Connecting the EarTip
With one hand,firmly grasp the end of the ear tip.With the other hand,grasp
the end ofthe flexible arm.Remove the eartip with a gentletug.Toreplacethe
ear tip, reverse this procedure by aligning the hole in the ear tip and pushing it
on the end ofthe flexible arm until it isfirmlyseated in position.
Connecting a custom earmold
For improved comfort and sound quality, you may wish to obtain a custom
earmold to attach to your headset. Custom earmolds are made by hearing
healthcare providers (typically, audiologists and hearing instrument
dispensers).A silicone impression of your ear is made and then shipped to
© Gennum Corporation All rights reserved2005 Page 9
Page 10
an earmold lab for final construction. In order for the custom earmold to
fit onto your headset, you will need to provide the clear plastic tubing
(included in your headset kit) to the hearing healthcare provider at the
time the earmold impression is made.The tubing will be incorporated into
your custom earmold and will be compatible with your headset.
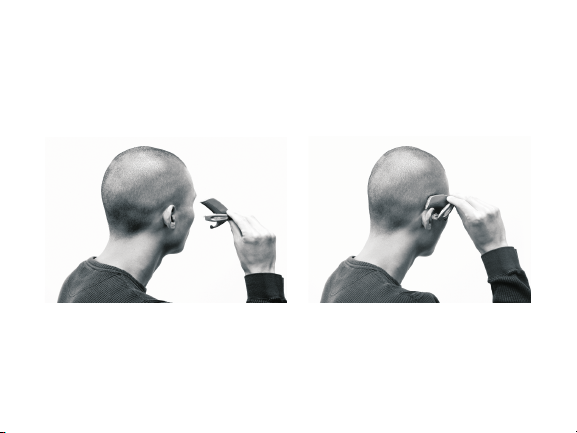
Positioning the Headset
The headset's flexible arm (see photos above) can be rotated to fit either
ear. To position the headset, grasp it between your thumb and index and
middle fingers as shown. Position the body of the headset over the top of
© Gennum Corporation All rights reserved2005Page 10
Page 11
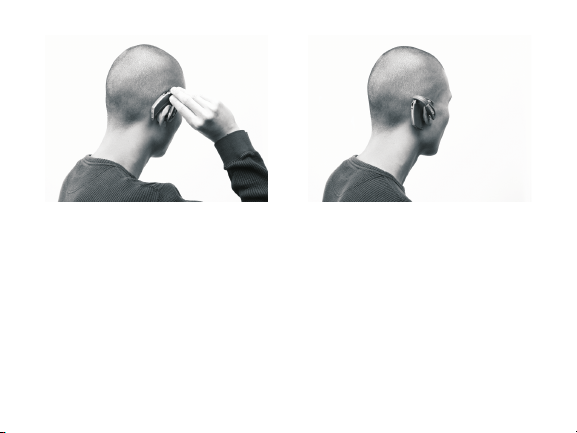
the ear and the ear tip into the ear. Rotate the headset until it hooks into
position over the top of your ear.Adjust the flexible arm until the ear tip is
comfortably positioned in your ear.This is just one suggestion for putting it
on and you may find a more convenient way of doing it.We encourage you
to try this a few times until you find the most comfortable position for
yourself.
To avoid damaging your headset, only manipulate the flexible arm of
Note:
the headset.
© Gennum Corporation All rights reserved2005 Page 11
Page 12

Positioning Hints
For best results, ensure that the ear tip is inserted snugly into the ear. A snug
fit will provide the best possible sound quality as well as good isolation from
environmental noise allowing you to hear incoming calls more clearly.
To obtain a snug fit, apply light pressure to the end of the
flexible arm until the ear tip feels snug but comfortable in
FLEXIBLE AREA
the ear canal.
To avoid damaging your headset, only manipulate the
Note:
area of the headset arm as shown here.
flexible
Turning the headseton or off
To turnonthe headset:
Press and hold the MODE button and you will see 2 flashes of the
!
Blue IndicatorLight,followed bya longer 3 second flash.Release the
button at any time. If you are wearing the headset, you will hear a
quick series oftones going from low to high pitch.Theblue indicator
light will turn offtoindicate youhave successfully powered on the headset.
To turnoffthe headset:
Press and hold the MODE button until you hear 4 beeps.Release the MODE
!
button and you will heara quick series of tones going
© Gennum Corporation All rights reserved2005Page 12
Page 13
Volume Control
With the headset oriented upright, push upward or downward on the
volume dial to decrease or increase the volume,respectively.
Do not initially turn the volume control to maximum until you
Note:
become familiar with the volume levels and determine what is most
comfortable for you.
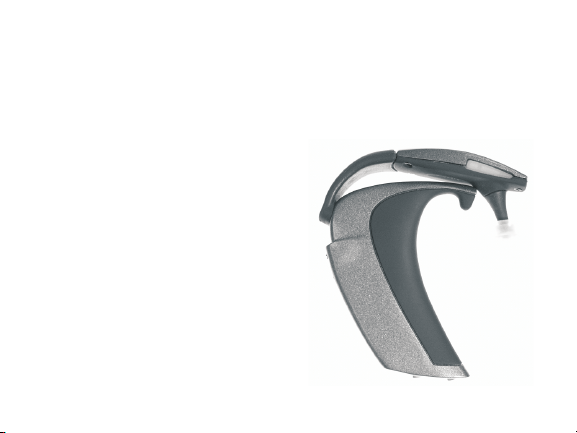
Storage Position
1. Rotate the flexible arm upwards
into the upright position as
shown in the photograph for
storage.
2. Turn it off by pushing the volume
dial upwards until you feel the
détente (click).
3. Place your headset in a clean,
dry place away from extreme
heat or cold.
© Gennum Corporation All rights reserved2005 Page 13
Page 14

Operating Modes: Universal, Directional,
Bluetooth
Introduction
As soon as you turn on your headset, it functions in Universal Mode.This
mode allows you to hear locally-generated sound that has been
customized to suit your hearing preferences before it is sent through the
headset and into your ear canal.This mode keeps you in touch with what's
happening around you, allowing you to hear sound from all around you - in
front, to the side, and behind you. However, if you find yourself in a
challenging listening environment in which you prefer to focus on sound
coming from directly in front of you - to hear a friend sitting across from
you in a restaurant, for example - then you can switch the headset to
Directional Mode.The third operating mode is Bluetooth Mode. In this
mode, you are engaged in a phone call and have one or more phone calls
actively in progress.
© Gennum Corporation All rights reserved2005Page 14
Page 15

Universal Mode
As soon as you turn on your headset, it is in Universal Mode. Use this
Mode in quiet listening environments and/or whenever you want to hear
sound coming from all directions.Your customized hearing preferences are
in effect, modifying the tones and loudness of the incoming sounds to suit
your listening preferences.Sound that is generated in your immediate
vicinity will arrive at your ear customized to suit your hearing preferences.
Please read Sound Customization features below for more information
about customizing sound to suit your hearing preferences.Your hearing
healthcare provider can customize your headset to suit your preferences.
In addition to the sound customization that can be programmed into your
headset, you can always adjust the volume control on the top back of the
headset to increase or decrease the volume as you wish.
In both Universal and Directional modes you will hear a ringing sound if a
cell phone call arrives, and will hear the beeping tones that assist you in
managing cellular phone calls. Please read Features for phones supporting
the BLUETOOTH and Features for phones supporting the
BLUETOOTH Handsfree Profile in this manual regarding how to handle
© Gennum Corporation All rights reserved2005 Page 15
®
®
Page 16

calls, use voice dial, manage multiple calls (call waiting), etc.
Remember:
If you decide to initiate or accept a cellular phone call, or connect
wirelessly to your computer, then you will only hear the phone or
computer audio. Once you break the connection to those devices, you will
once again hear the sounds being generated in your immediate vicinity.
To switch to Directional Mode from Universal Mode:
Press the Mode Button.When you press the Mode Button, you will
hear 2 beeps, which indicates that you are in Directional Mode.
To switch to Universal Mode from Directional Mode:
Press the Mode Button.When you press the Mode Button, you will
hear 1 beep, which indicates that you are in Universal Mode.
Directional Mode
Use Directional Mode whenever you want to focus your attention to
sound coming from in front of you.In this mode, you will not hear sounds
coming from behind you very well.This mode is the mode to use when
© Gennum Corporation All rights reserved2005Page 16
Page 17

you want to hear one source of sound, such as your dining partner's voice
from across the table, and don't want to be disturbed by sound occurring
behind you. It is a good idea to use Directional Mode whenever you find
yourself in especially challenging (noisy) listening environments.
To switch to Universal Mode from Directional Mode:
Press the Mode Button.When you press the Mode Button, you will
hear 1 beep, which indicates that you are in Universal Mode.
Remember:
If you decide to initiate or accept a cellular phone call, or connect
wirelessly to your computer, then you will only hear the phone or
computer audio. Once you break the connection to those devices, you will
once again hear the sounds being generated in your immediate vicinity.
Bluetooth Mode
Your headset can be paired with any Bluetooth-enabled audio device.
When a phone call arrives from a Bluetooth enable phone, you may hear a
ringing sound (depending on phone model).You may accept or reject the
call. Please read Features for phones supporting the BLUETOOTH and
© Gennum Corporation All rights reserved2005 Page 17
®
Page 18

Features for phones supporting the BLUETOOTH Handsfree Profile in
®
this manual regarding how to handle calls, use voice dial, manage multiple
calls (call waiting), etc. Please read the manual that came with your cellular
phone for instructions regarding headset operation.
Setting up to receive phone calls
In order to receive cell phone calls through your Digital Wireless Headset:
1. Your headset and cell phone must have been paired (see How
to Pair your Headset to your Cell Phone, below).
2. They must both be turned on, and
3. They must be within 10m of each other.
When a phone call arrives, you may hear a ringing sound depending on
your phone model.
Note:
Noise reduction technology is in effect at all times to improve the
quality of both the incoming transmission and the outgoing transmission.
After you've ended a call
Your headset will return you automatically to whichever mode you were in
© Gennum Corporation All rights reserved2005Page 18
Page 19

just prior to the arrival of the last phone call.Therefore, if you were in
Universal mode, you will be returned to that mode after ending your
phone call. If you were in Directional mode, you will be returned to
Directional mode after ending your phone call.
Sound Customization features
The Digital Wireless Headset with HearPhone™ Technology can be
programmed using HearPhone™ software, the Hi-Pro programming box,
and the CS44 cable.Your headset can be programmed to provide you with
the balance of bass, mid-frequency,and treble tones that you find most
pleasant to listen to.The loudness of these tones is also programmable,
and you can also limit the maximum sound that the headset delivers to
your ear.This ensures that you won't hear sounds that are intolerably loud.
Ask your hearing healthcare provider to program your headset to suit
your particular hearing needs and preferences.
© Gennum Corporation All rights reserved2005 Page 19
Page 20

Connecting to Cell Phones - Pairing to your
cell phone
It is necessary to “pair” the headset with your Bluetooth-enabled cell
phone in order for them to communicate wirelessly. Once pairing is
complete, as long as the devices are within range (10 meters/33 feet) of
each other and both devices are switched on, the two devices will be able
to communicate with each other. Pairing is done once and normally there
is no need to repeat this.
How to Pair your Headset to your Cell Phone
1. Turn on the Bluetooth function on your phone (refer to your
phone's user manual)
2. Turn the headset on
3. Press and hold the PINCH button until you hear 4 beeps (or 4
flashes if you are not wearing the headset),then release the button
4. Verify that the blue indicator light is solid on, indicating the headset
is now in phone pairing mode.
© Gennum Corporation All rights reserved2005Page 20
Page 21

5. Follow your phone's pairing procedure to pair it with the headset
6. When found, the headset will display as “HearPhone” on your
phone.
7. When asked for the passkey,password or pin code, enter on the
phone's keypad: 0000
8. If pairing is successful, your phone will display a “pairing successful”
message and the blue indicator light will turn off. If you are wearing
the headset, you will hear a 'pairing success' melody
9. Depending on your phone model, you may have to initiate a
Bluetooth Connection.This can be achieved by selecting 'connect to
Bluetooth device' from your phone or by pressing and holding the
PINCH button for 1 beep, then release the button.
Repeat the pairing procedure if the pairing process fails.If you are
unsuccessful in pairing the headset after multiple pairing attempts, please
contact your cell phone manufacturer or the company from which you
bought the headset for assistance.
© Gennum Corporation All rights reserved2005 Page 21
Page 22

Features for phones supporting the BLUETOOTH®
Headset Profile only
If your phone only supports the Bluetooth , then the
features described below are available. NOTE:During a call, the blue
indicator light will flash rapidly.
When a call is incoming, you will hear a series of ring tones in the earpiece
of the headset.
To answer a call
1. the MODE button.
Briefly press and release
To end a call
1. the MODE button.
Briefly press and release
To make a call
1. Dial the number you are calling on your phone's keypad and the
call will be transferred automatically to the headset.
To transfer a call
If you are on an active call using your phone,and then want to transfer the
call from your phone to the headset:
1. the PINCH button until you hear , then
Press and hold 1 beep
Headset Profile
© Gennum Corporation All rights reserved2005Page 22
Page 23

immediately release the button
To Mute/ “Unmute”
If you wish to prevent your voice from being heard by the person with
whom you are having the phone conversation, use the mute function
described below.When the headset is in this mode, you will still be able to
hear the caller's voice, and you will also hear beeps that remind you that
your voice cannot be heard by the caller.
To mute the call:
1. the PINCH button.You will hear periodic
Briefly press and release
beeps, indicating the headset has been muted
To “unmute” the call:
1. the PINCH button. The periodic beeps
Briefly press and release
will stop, indicating that the call has been un-muted
Features for phones supporting the BLUETOOTH
®
Handsfree Profile
If your phone also supports the Bluetooth , then
additional features are available. NOTE:During a call, the blue indicator
© Gennum Corporation All rights reserved2005 Page 23
Handsfree Profile
Page 24

light will flash rapidly.
Answering a call
If your headset is to your phone (headset icon displayed on your
linked
phone), and a call is incoming, you will hear a series of ring tones in the
earpiece of the headset.
To answer a call:
1. the MODE button.
Briefly press and release
If your headset is to your phone, you will not hear the ring
not linked
tones in your headset; however you can still transfer the incoming call to
your headset at any time by by the PINCH button for
. It may take a few seconds longer to transfer.
1 beep
pressing and holding
To create a link
You can create a link to your phone at any time if one does not exist
(provided it has been already paired).
Press and hold
1. the PINCH button until you hear 1 beep.
2. Release the button immediately.
To end a call
Briefly press and release
1. the MODE button.
© Gennum Corporation All rights reserved2005Page 24
Page 25

To make a call
If your headset is to your phone (headset icon displayed on your
linked
phone), dial the number you are calling on your phone's keypad and the
call will be transferred automatically to the headset.
If your headset is to your phone (no headset icon), you can still
not linked
transfer the call to your headset at any time.
1. the PINCH button until you hear 1 beep.
Press and hold
2. Release the button immediately. It may take a few seconds to
transfer.
Voice Dial
If your phone supports voice-activated dialing and you have set up voice
tags on your phone,
1. the PINCH button until you hear , then
Press and hold 1 beep
immediately release the button
NOTE: You should create the voice tags from your headset for
better results
© Gennum Corporation All rights reserved2005 Page 25
Page 26

Last Number Redial
1. the PINCH button until you hear , then
Press and hold 2 beeps
immediately release the button.
Last Number Redial while on a Call
1. the PINCH button until you hear 2 beeps, then
Press and hold
immediately release the button.
2. Refer to the Call Waiting section below for call control.
To reject a call
1. the PINCH button until you hear 3 beeps, then
Press and hold
immediately release the button.
To transfer a call from the headset to the phone
If you are on an active call using your headset and then want to transfer
the call to the phone:
1. the PINCH button until you hear 1 beep.
Press and hold
2. Release the button immediately.
To transfer a call from the phone to the headset
If you are on an active call using your phone and then want to transfer the
call to the headset:
© Gennum Corporation All rights reserved2005Page 26
Page 27

1. the PINCH button until you hear 1 beep.
Press and hold
2. Release the button immediately. There may be a few seconds delay
before the call is transferred.
This feature may not be supported on all phones and you may
NOTE:
have to use your phone's menu option to transfer the sound.
Call Waiting
If your phone notifies you of an incoming call while you already engaged in
a call:
To accept the waiting call:
1. the PINCH button until you hear 1 beep.
Press and hold
2. Release the button immediately. This will place the first call
.
hold
on-
To swap between calls:
1. the PINCH button until you hear 1 beep.
Press and hold
2. Release the button immediately.
To accept the waiting call and end the call you were engaged in:
1. the PINCH button until you hear 2 beeps.
Press and hold
2. Release the button immediately.
© Gennum Corporation All rights reserved2005 Page 27
Page 28

To reject the waiting call:
1. the PINCH button until you hear 3 beeps.
Press and hold
2. Release the button immediately.
To release all waiting calls:
1. the PINCH button until you hear 4 beeps.
Press and hold
2. Release the button immediately.
Mute / Unmute
To mute the call:
1. the PINCH button.You will hear
Briefly press and release periodic
, indicating the headset has been muted.
beeps
To unmute the call:
1. the PINCH button. The periodic beeps
Briefly press and release
will stop, indicating that the call has been un-muted.
© Gennum Corporation All rights reserved2005Page 28
Page 29

Care and Maintenance of your headset
Eartips
Although the risk of disease transmission is extremely low, earwax,
perspiration, and skin do come into contact with the eartips. Do not share
eartips with other people. Do not insert dirty eartips into your ears.
Cleaning the eartips
To clean the eartip, detach it from the headset. Put the headset aside in a
clean, dry area. Use a small brush to brush wax,dirt and dust out of the
eartip. If you wish, you may also clean the eartip using mild soap and water.
Be sure to remove the eartip from the headset before any cleaning begins.
You may also use an alcohol wipe on the eartip (only) to disinfect it.
If visual inspection of the eartip reveals tears, cuts, or other damage,
replace it with a new eartip.A damaged eartip could detach itself from the
headset and remain in your ear canal.Although it will not damage your ear,
you may have to ask your physician or hearing healthcare provider to
extract the eartip.
© Gennum Corporation All rights reserved2005 Page 29
Page 30

Cleaning your custom earmold
If you have obtained a custom earmold from your hearing healthcare
provider, ask him or her for directions regarding cleaning the earmold. In
general, custom earmolds can be cleaned with mild soap and water.If you
are using water to clean an earmold, you should detach the earmold from
the headset and place the headset in a clean, dry location. Debris can be
brushed or blown out of the tubing and around the canal portion of the
earmold. Be careful not to allow a water drop to clog the tubing blow it
out of the tubing before reattaching the earmold to the headset.
Headset Maintenance
Your headset is virtually maintenance-free. However, it is NOT waterproof.
To remove dust or debris, use a clean cloth or tissue to wipe
dirt/perspiration off the headset.
WARNING:
extreme temperatures can damage it and can void the warranty.
Dropping, immersing in liquid, or exposing your headset to
© Gennum Corporation All rights reserved2005Page 30
Page 31

Battery and Charging Information
Minimizing Power Consumption
To minimize power consumption, either disconnect the link (if one already
exists) between the headset and the phone (icon displayed on the phone),
or turn off the headset and turn it back on.
To save power by disconnecting the link:
1. Press and hold the PINCH button until you hear a single beep.
2. Release the PINCH button immediately.
Battery Life
A fully recharged headset will provide 8+ hours of cell phone talk time, or
approximately 150 hours of use inAlways-On Universal or Directional
Mode before it is necessary to recharge it.
Low Battery Indicator
When the headset requires re-charging,you will hear a warning tone from
your headset.You will receive warnings every minute when 15 minutes of
battery time are left.Warnings will increase to every 10 seconds when
battery time is 5 minutes or less.The unit will power itself off when the
battery expires.
© Gennum Corporation All rights reserved2005 Page 31
Page 32

How to charge the headset
The headset contains a rechargeable battery and must be charged before
use. It takes about 3 hours to recharge the battery.
To charge the headset:
1. Turn the headset off.
2. Insert the headset charging plug into the charging port of the
headset.
3. Plug theAC power adapter into an electrical wall outlet.
4. The blue indicator light will turn on indicating charging is in
progress
5. The blue indicator light will flash when charging is complete
(approximately 2 hours)
The headset cannot be overcharged so keep your headset fully
Note:
charged when not in use.
Replacing the battery
The battery is warranted for one year. It is not replaceable and is expected
to work for 5 years.
© Gennum Corporation All rights reserved2005Page 32
Page 33

Frequently Asked Questions (FAQs)
How do I identify the model number and serial number of my
headset?
These numbers are noted on the inside of the flexible arm.
What is the pass code or PIN for my DigitalWireless Headset,
and can I change it?
The pass code or PIN used for pairing your Bluetooth headset to your
mobile phone is "0000".This pass code cannot be changed, but it is only
needed for the first connection with a phone.
Can other Bluetooth phone users hear my conversation?
No. Pairing your headset to your Bluetooth phone creates a private
encrypted link between your headset and phone.
Will my DigitalWireless Headset work with laptops,PCs, and
PDAs?
Yes, as long as the device is Bluetooth version 1.1 (or higher) and includes
the audio gateway profile to support the headset or HandsFree profile in
the headset.
© Gennum Corporation All rights reserved2005 Page 33
Page 34

Can my DigitalWireless Headset talk to several other devices at
the same time?
No. It will only “pair” and work with one phone or device at a time. If you
want to pair it with another device, you must perform the pairing process
again. Future models will allow multiple concurrent pairings.
What is that beeping sound?
Beeping sounds alert you that you are requesting a change in how the
headset is working (by pressing the PINCH button), or that a phone call is
waiting or that you've placed a call on “mute”.
The phone or headset does not respond at all when I press the
PINCH button.What's going on?
You may need to reset your phone by turning off the power and then
turning it back on again.You may also need to turn the Digital Wireless
Headset off and then back on.
What is voice activation?
For those mobile phones that support voice activation, it is possible for
the mobile phone user to dial phone numbers and access other calling
© Gennum Corporation All rights reserved2005Page 34
Page 35

services using simple voice commands. Press the PINCH button for 1 beep,
then speak a stored name, number or function into the headset and the
phone will call it up for you.
Does your caller complain they hear an echo?
Generally this is an indication that the ear tip is not positioned properly in
the ear. Try re-positioning the ear tip until a better seal is obtained.
Is the incoming sound tinny and quiet?
Try re-positioning the ear tip into the ear.The eartip should fit snugly but
be comfortable too.A snug fit will restore proper volume and tonal
balance to the incoming sound.
How can I increase the range of my Digital Wireless Headset?
The range is generally determined by the location of both the transmitting
and receiving antennas on the phone and headset, in addition to the
surrounding environment.Some things to try are:
• Do not completely cover the phone with your hand.
Do not position your phone and headset such that your body
•
or any walls are in between them.
© Gennum Corporation All rights reserved2005 Page 35
Page 36

Limited Warranty
Gennum Corporation warrants that your headset will be free from defects
in material or workmanship for a period of one (1) year from the date of
shipment, under normal use and conditions.
service related matters, please read the contact information
below.
During this period, if the headset is found to be defective in materials or
workmanship, Gennum will repair or replace it,at the sole option of
Gennum, at no charge to you. If Gennum determines that it is not possible
to repair or replace the headset, it may, at its sole option, refund the
purchase price paid for the headset.THESE ARE THE SOLEAND
EXCLUSIVE REMEDIES FOR BREACH OFWARRANTY BY GENNUM.
IN NO EVENT SHALL GENNUM BE LIABLE FOR DAMAGES
EXCEEDING THE SALE PRICE FOR YOUR HEADSET.
You are responsible for packing the defective headset properly in the
original packaging, and for the cost of shipping.A copy of the original
receipt must be included. Shipping instructions will be given by technical
support at Gennum.Warranty repairs are completed at no charge for
parts or labour,and Gennum will pay the cost of shipping the repaired or
For all warranty and
© Gennum Corporation All rights reserved2005Page 36
Page 37

replaced product back to you.Warranty repairs may use new or equal
replacement parts. Goods will not be accepted for return for nonwarranty reasons without the express prior written approval of Gennum.
Gennum reserves the right to make the final decision on any warranty
claim that may be questionable.This limited warranty does not cover and
Gennum will not be responsible for failures or defects due to misuse,
neglect, abuse, accidents, alterations, improper or unauthorized installation
or service, unauthorized removal or repairs, failure to follow instructions,
fire, floods, acts of God,or spills of food or liquids.
EXCEPT FOR THE EXPRESS LIMITED WARRANTY PROVIDED ABOVE,
THE HEADSET, FIRMWARE, SOFTWARE,WALL CHARGER WITH
ADAPTERS, REPLACEMENT EARTIPS AND WRITTEN MATERIALS ARE
PROVIDED “AS IS” WITHOUT REPRESENTATION, CONDITION OR
WARRANTY OFANY KIND,WHETHER EXPRESS, IMPLIED OR
STATUTORY,AND GENNUM SPECIFICALLY EXCLUDESALL OTHER
CONDITIONS AND WARRANTIES, INCLUDING BUT NOT LIMITED
TO IMPLIED CONDITIONSAND WARRANTIES OF
MERCHANTABILITY AND FITNESS FOR A PARTICULAR PURPOSE. IN
NO EVENT SHALL GENNUM BE LIABLE FOR ANY INDIRECT,
INCIDENTAL, SPECIAL OR CONSEQUENTIAL DAMAGES ARISING
© Gennum Corporation All rights reserved2005 Page 37
Page 38

DIRECTLY OR INDIRECTLY IN CONNECTIONWITHTHE HEADSET,
THE USE OF THE HEADSET OR OTHERWISE,WHETHER FOR LOSS
OF PROFITS,BUSINESS REVENUES OR OTHERWISE.
This warranty sets forth the entire responsibility of Gennum with respect
to the headset, firmware, and software, wall charger with adapters,
replacement tips and written materials.Your exclusive remedy is repair,
replacement or refund as stated herein.In no event shall Gennum's
liabilities exceed the cost of correcting defects as provided herein and any
such liabilities will terminate upon expiration of the warranty period.
This warranty is valid only when the headset is purchased from a Gennum
Authorized Dealer, and applies only to the original purchaser. Headsets
with the serial number or model designation removed,altered, replaced or
defaced are not covered by this warranty.
Trademarks™ and Registered Trademarks ®
The Bluetooth® trademark is owned by the Bluetooth SIG, Inc., and used
by Gennum Corporation under license.
HearPhone™ Technology is a trademark that is owned by Gennum
Corporation.
© Gennum Corporation All rights reserved2005Page 38
Page 39

FCC Notice
This device complies with part 15 of the FCC Rules. Operation is subject
to the following two conditions:
(1) This device may not cause harmful interference, and
(2) This device must accept any interference received, including
interference that may cause undesired operation.
Changes or modifications not expressly approved by the party responsible
for compliance could void the user's authority to operate the equipment.
This equipment has been tested and found to comply with the
Note:
limits for a Class B digital device, pursuant to part 15 of the FCC Rules.
These limits are designed to provide reasonable protection against harmful
interference in a residential installation.This equipment generates uses and
can radiate radio frequency energy and, if not installed and used in
accordance with the instructions, may cause harmful interference to radio
communications. However, there is no guarantee that interference will not
occur in a particular installation. If this equipment does cause harmful
interference to radio or television reception,which can be determined by
© Gennum Corporation All rights reserved2005 Page 39
Page 40

turning the equipment off and on, the user is encouraged to try to correct
the interference by one or more of the following measures:
Reorient or relocate the receiving antenna
•
Increase the separation between the equipment and receiver.
•
Consult the dealer or an experienced radio/TV technician for help.
•
EU Notice
DECLARATION OF CONFORMITY
In accordance with Annex IV of the EU directive 1999/5/EC, Gennum
Corporation declares under our responsibility that the product:
Type:
Intended Purpose:
Equipment Class:
Complies with the appropriate essential requirements of theArticle 3 of
the R&TTE and the other relevant provisions,when used for its intended
purpose.
H-100
Bluetooth Headset
1
© Gennum Corporation All rights reserved2005Page 40
Page 41

Health and Safety requirements contained in Article 3 (1) a)
EN 60 950-1:2001:
EN 50371:2002,
Information technology equipment - Safety
Generic standard to demonstrate the compliance of low
power electronic and electrical apparatus with the basic restrictions
related to human exposure to electromagnetic fields (10 MHz - 300 GHz)
- General public
Protection requirements with respect to electromagnetic compatibility
Art.3 (1) b)
EN 301 489-17:V1.2.1,
Electromagnetic compatibility and Radio
spectrum Matters (ERM); ElectroMagnetic Compatibility (EMC) standard
for radio equipment and services; Part 17:Specific conditions for 2.4 GHz
wideband transmission systems and 5 GHz high performance RLAN
equipment
Means of the efficient use of the radio frequency spectrum Art.3 (2)
EN 300 328-2 V1.2.1,
Electromagnetic compatibility and Radio Spectrum
Matters (ERM);Wideband Transmission systems; Data transmission
equipment operating in the 2.4 GHz ISM band and using spread spectrum
© Gennum Corporation All rights reserved2005 Page 41
Page 42

modulation techniques; Part 2: Harmonized EN covering essential
requirements under article 3.2 of the R&TTE Directive
Specifications
Specifications are subject to change without notice.
Weight 22 grams
Typical Talk Time 8 hours
Typical Standby Time 150 hours (from a full charge)
Typical Recharge Time 3 hours (from a full discharge)
Contact Information
For general information about the Digital Wireless Headset, please contact:
If you are having difficulty operating your headset or desire more
information, please contact the company from which you purchased the
headset.
© Gennum Corporation All rights reserved2005Page 42
Page 43

© Gennum Corporation All rights reserved2005 Page 43
Page 44

HANDSFREE FUNCTION QUICK SUMMARY
Status Function Press and hold
Not on a Call
Single active call
Two active calls
One or two
active calls
Answer Call 1 beep
End/ Reject Call 3 beeps
Voice Dial 1 beep
Last Number Redial 2 beeps
Transfer Call
Phone to Headset
from Headset to Phone
Last Number Redial 2 beeps
Answer Call Waiting; 1 beep
Hold First Call
Swap Between Calls 1 beep
Accept Waiting Call; 2 beeps
Hang-up First Call
Reject Call Waiting 3 beeps
Release All Held Calls 4 beeps
Mute/Unmute Brief Press Only
from 1 beep
OR
PINCH
BUTTON for
WIRELESSHDSTmanual 1.0
 Loading...