

G2200 G4000 G5500 G6000E
MANUALE GENERATORI - GENERATOR MANUAL
GENERATOR MANUAL - GENERATOR MANUAL
GENERATOR MANUAL - GENERATOR MANUAL


GENERATORI G2200 G4000 G5500 G6000E
DEESRU
CHENIT
3
PREFACE
Thank you for choosing a generator set of our
company.
This manual contains the information on how to
do that. Please read it carefully before operating.
Operating safely and correctly can help you get the
best results.
All information in this publication is based on the
latest product information available at the time of
printing. The contents in this manual may be different
from the actual parts due to revision and other
changes.
Our company reserves the right to make changes
at any time without notice and without incurring
any obligation. No part of this publication may
be reproduced without our company’s written
permission.
This manual should be considered a permanent part
of the generator and should accompany the generator
if it is resold.
INDEX page
1. SAFETY
2. COMPONENT IDENTIFICATION
3. CONTROL
4. GENERATOR OPERATION
5. PRE-OPERATION CHECK
6. STARTING THE ENGINE
7. STOPPING THE ENGINE
8. MAINTENANCE
9. STORAGE
10. TROUBLESHOOTING
11. ELECTRIC STARTING
12. WHEEL (OPTIONAL)
13. SPECIFICATIONS
14. WIRING DIAGRAM
10
11
12
12
14
14
15
4
5
5
6
8
9
9
GENMAC group:
head quarter
42044 GUALTIERI (Reggio Emilia) Italy
via Don Minzoni, 13
Tel. 0039 - 0522.222311
Fax 0039 - 0522.829218 - 0522.222330
www.genmac.it
Genmac USA, Inc.
7060 NW 52nd St.
Miami , FL 33166 - U.S.A.
Ph: 305 599 8099
Fx: 305 599 8098
E-mail: genmacusa@genmac-group.com
www.genmac-group.com
GENERATORI G2200 G4000 G5500 G6000E
SAFETY MESSAGES
Your safety and the safety of others are very important. We
have provided important safety messages in this manual
and on the generator. Please read these messages carefully.
A safety message alerts you to potential hazards that could
hurt you or others.
CHENIT DEESRU
4
WARNING
Each safety message is preceded by a safety alert symbol
and one of three words: DANGER, WARNING, or CAUTION.
meaning as
follows:
You WILL be KILLED or SERIOUSLY HURT if you don’t follow
instructions.
You CAN be KILLED or SERIOUSLY HURT if you don’t follow
instructions.
You CAN be HURT if you don’t follow instructions.
Your generator or other property could be damaged if you
don’t follow instruction.
1.SAFETY
SAFETY STANDARD
Read and understand this owner’s manual before operating
your generator. You can help prevent accidents by being
familiar with your generator’s controls, and by observing
safe operating procedures.
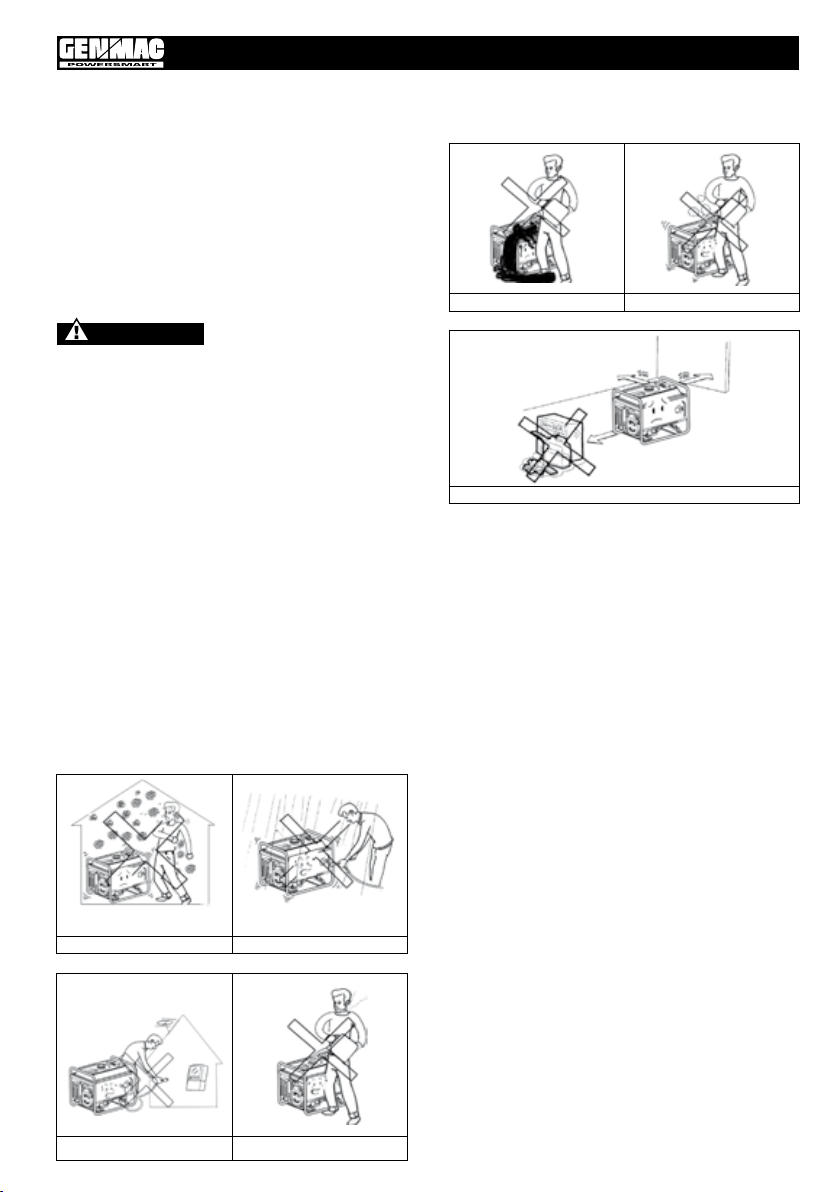
Don’t overow the fuel when refueling
Please keep it 1m at least far away from the inammable materials.
SPECIAl REquIREMENTS
• Electrical equipment, including lines and plug connections
should be free from being bare.
• The circuit breakers should match with the generator
equipment. If the circuit breakers require replacement, they
must be replaced with a circuit breaker of the same ratings
and performance characteristics.
• Don’t operate the generator before grounding.
If using extension lines, the requirement should be met as
following:
for 1.5mm2, the line should not be exceeded 60m; for
2.5mm2, the line not exceeded 100m.
OvERCuRRENT PROTECTOR
Stop the engine before refueling.
Don’t operate indoors.
Don’t directly connect to the household
power supply.
Don’t operate in the wet condition.
Don’t smoke when refueling.
Environmental temperature will trigger the action of
overcurrent protector. Please change the overcurrent
protector with one that ts the local environment
temperature if necessary.

ON
OFF
GENERATORI G2200 G4000 G5500 G6000E
CHENIT DEESRU
5
2.COMPONENT
IDENTIFICATION
G2200 64000 G5500
GENERATOR
FUEL
VALVE
CHOKE
LEVER
AIR CLEANER
RECOIL
STARTER GRIP
FUEL METER
DC OVERCURRENT
PROTECTOR
DC TERMINAL
SWITCH
FUEL TANK CAP
POSTS
OIL CAP
VOLTAGE
METER
AC
RECEPTACLES
GROUND TERMINAL
CIRCUIT
BREAKER
SPARK PLUG
CAP
3.CONTROL
GENERATOR SwITCh
ON
AC
STARTER GRIP
Per avviare il motore, tirare leggermente la maniglia di
avviamento nché non si avverte resistenza, quindi
tirare energicamente.
WARNING
Do not allow the starter grip to snap back against
the engine. Return it gently to prevent damage to the
starter.
STARTER
GRIP
OFF
GENERATOR
SWITCH
MUFFLER
ENGINE TYPE & SERIAl NuMbER
MODEL NO
SER NO
FINISHED
PRODUCT NO
FuEl vAlvE
The fuel valve controls fuel owing from the fuel tank
to carburetor. Be sure to return the lever to “OFF” after
stopping the engine.
FUEL
VALVE
OFF
ON
ON
OFF
ON
OFF
GENERATORI G2200 G4000 G5500 G6000E
CHENIT DEESRU
6
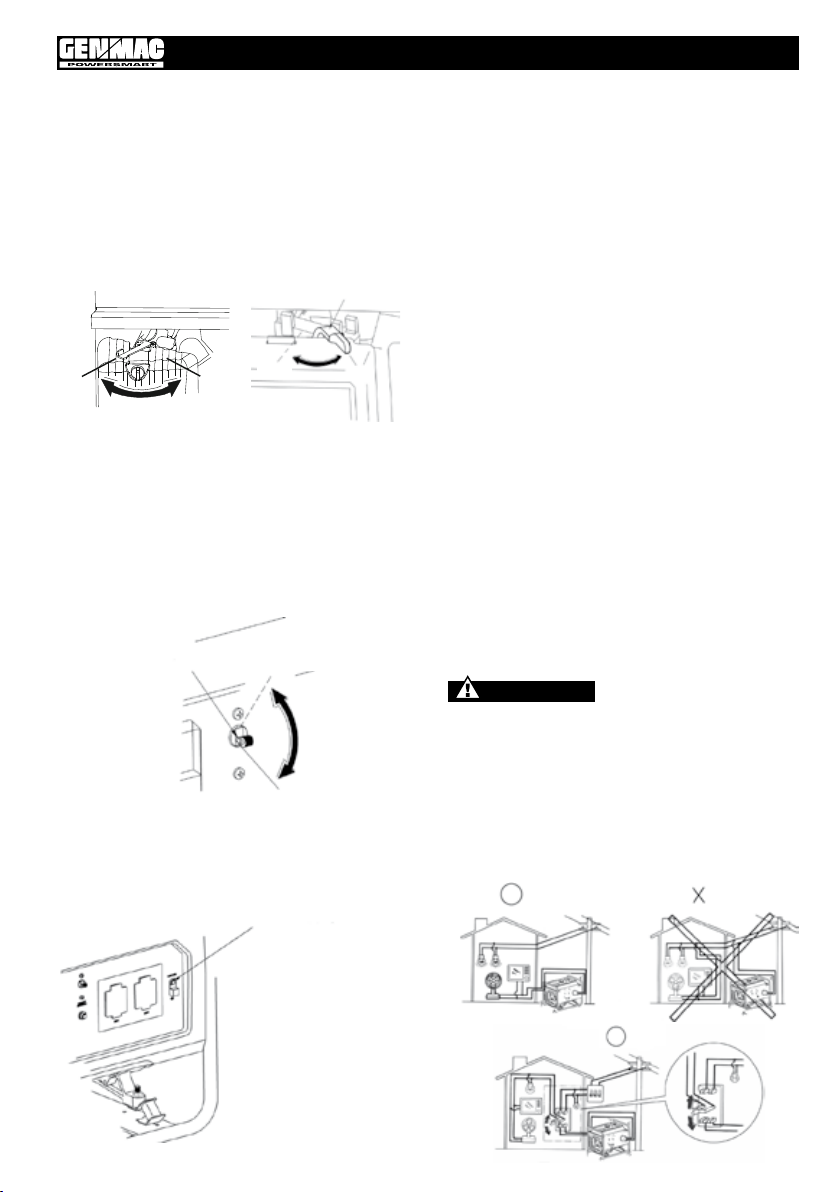
ChOkE lEvER
The choke lever is used to provide an enriched fuel mixture
when starting a cold engine.
Slowly put the choke lever to “OPEN” position after the
engine is started.
CHOCKE LEVER
CLOSE
OPEN
1kW 2.3kW/2.8kW/5.5kW/6.5kW
CLOSE
OPEN
AC CIRCuIT bREAkER
The overload current will automatically switch OFF circuit
breaker to avoid short circuiting of the load or overload. If
the circuit breaker is switched OFF automatically, check load
before switching the circuit breaker ON again.
AC CIRCUIT
BREAKER
ON
OFF
GROuND TERMINAl
OIl AlERT SYSTEM
The oil alert system is especially designed to prevent engine
damage caused by an insufcient amount of oil in the
crankcase. When the oil level in the crankcase fall down
below the safe limit, the oil alert system will automatically
shut down the engine(though the generator switch still
remains in the ON position), so that the engine can’t be
damaged due to the insufcient amount of the oil.
4. GENERATOR OPERATION
Ambiente di funzionamento del generatore:
• Temperatura: -15 °C ~ 40 °C.
• Umidità: inferiore al 95%.
• Altezza sul livello del mare: al di sotto di 1.000 m
(Se l’area è superiore a 1.000 m di altitudine, bisogna
considerare che vi sarà una riduzione della potenza erogata
dal generatore).
CONNECTION TO ThE hOuSEhOlD
POwER SuPPlY
WARNING
When connecting the generator to a household power
supply, connection must be made by a qualied
electrician. After connecting, carefully check electric
connection for their safety and reliability, if not, damage
to the generator, burning and ring may be caused.
This ground terminal is dedicated to reliably grounding the
whole generator.
GROUND TERMINAL
OK
NO
OK

GENERATORI G2200 G4000 G5500 G6000E
CHENIT DEESRU
7
GENERATOR GROuNDING
To prevent electrical shock or misuse from faulty appliances,
the generator should be grounded with an insulated lead.
MESSA A TERRA
AC CuRRENT
Before starting the generator, make sure that total power of
loads (total of resistive, capacitive and inductive loads) does
not exceed rated power of the generator.
WARNING
Overload operation will greatly shorten generator
service life.
If the generator set is connected to multiple loads or electric
appliances, please rst connect to one with the highest
starting power, then, the one with the second highest
TYPE
WATTAGE EXAMPLES
TYPICAL
DEVICE
starting power, and connect others one by one,
each with a lower starting power than the preceding one,
nally, connect the one with the lowest starting power.
In general, capacitive and inductive loads, especially motordriven devices have a big starting current when starting. The
following table is a reference for when connecting to the
electric appliances
DEVICE STARTSTART RATEDRATED
INCANDESCENT
LAMP
HEATING DEVICE
FLUORESCENT
LAMP
MOTOR DRIVE
DEVICE
×1×
×2×
3-5×2
×
INCANDESCANT LAMP
1
1.5
TV
FLUORESCENT LAMP
REFRIGERATOR
ELECTRIC FAN
INCANDESCENT
LAMP
100 W
FLUORESCENT LAMP
40 W
REFRIGERATOR
150 W
100VA
80VA
750VA
(W)
(W)
450-
(W)
100VA
(W)
60VA
(W)
300VA
(W)

GENERATORI G2200 G4000 G5500 G6000E
CHENIT DEESRU
8
DC CuRRENT
• DC Terminals
The DC terminals are used to provide power supply for
lower-power DC loads and charging other batteries.
The terminals are colored as such: red to identify the
positive (+) terminal and black to identify the negative
(-) terminal. Load connection method: The load must be
connected to DC terminals with the proper polarity (load’s
positive to positive DC terminal and load’s negative to
negative DC terminal).
• DC OVERCURRENT PROTECTOR
The DC overcurrent protector will automatically shut off
when the DC circuit is overloaded or poor connection
occurs. If the indicator inside the DC overcurrent protector
button pops out, it shows that the DC overcurrent protector
has switched off. Wait a few minutes and then push the
button in to return to “ON” position.
OVERCURRENT
PROTECTOR
MINUS
PLUS
hIGh AlTITuDE OPERATION
At a high altitude, the standard carburetor air-fuel mixture
will be excessively rich. Output power will decrease, and fuel
consumption will increase.
Engine performance can be improved by installing a smaller
diameter main fuel jet in the carburetor and readjusting the
pilot screw. If you always operate the engine at altitudes
1,000 meters above the sea level,
have our company authorized dealer perform this carburetor
modication. If not, you should lower load power in
operating generator.
Even equipped with suitable carburetor, engine horsepower
will decrease approximately 3.5% for each 300 meter
increase in altitude. The effect of altitude on horsepower will
be lowered greater than this if no carburetor
modication is made.
WARNING
If a carburetor for high altitude operation is installed
onto an engine suitable to a lower altitude, the lean air
fuel mixture will cause lower engine output power, over
heating and serious damage.
5.PRE-OPERATION CHECK
ENGINE OIl
WARNING
Engine oil is a major factor affecting engine
performance and service life. Non-detergent and
2-stroke engine oils will damage the engine and are
not recommended. Check the oil level before each use
with the generator on a level surface with the engine
stopped.
AMBIENT TEMPERATURE
Recommended engine oil 4-stroke gasoline engine oil SF
under API service classication or SAE10W-30 (equivalent
to SG class).
Method of checking engine oil level:
Remove the oil ller cap and wipe the dipstick to clean it.
Check the oil level by inserting the dipstick into the ller
neck without screwing it in.
If the level is low, add the recommended engine oil until oil
level can reach the upper mark on the dipstick.
After adding, don’t forget to ret and screw the oil dipstick
tight.
OIL DIPSTICK
OIL UPPER
MARK
OIL LOWER MARK
GENERATORI G2200 G4000 G5500 G6000E
CHENIT DEESRU
9
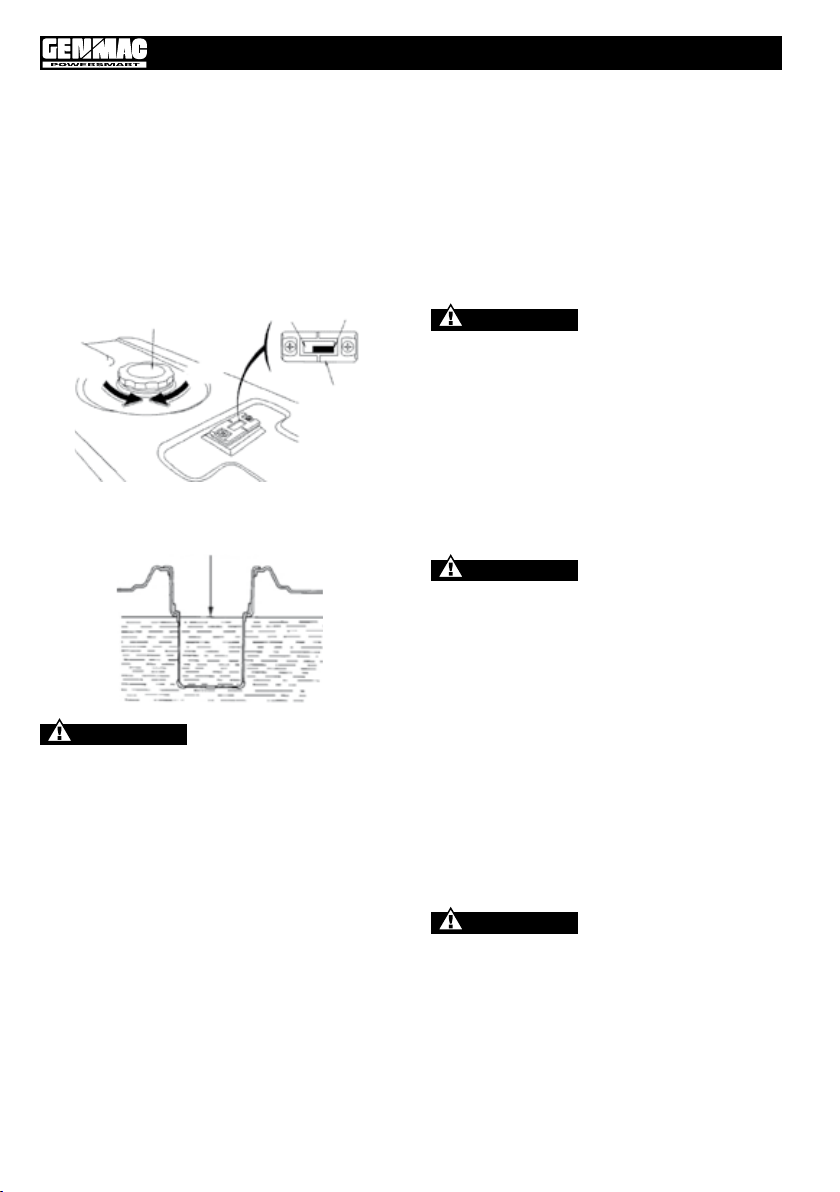
FuEl
1) Check the fuel level gauge.
2) Replenish the tank if the fuel level is low. Do not let oil
level rise above the shoulder of the fuel strainer.
3) Ret and screw the fuel tank cap tight after refueling.
FUEL TANK CAP
OPEN CLOSE
FUEL MAXIMUM UPPER LEVEL
WARNING
• Refuel in a well-ventilated area with the engine
stopped. Never smoke or allow ames or sparks in the
area where the engine is refueled or where gasoline is
stored.
• Do not overll the fuel tank.
• Avoid repeated or prolonged contact with skin or
breathing in of fuel vapor.
• Keep children from contacting fuel.
• Never use the oil/gasoline mixture or gasoline
containing impurity.
Use gasoline with octane rating ≥90 .
We recommend unleaded gasoline because it produces
fewer engine carbon deposits and spark plug deposits and
extends exhaust system’s life.
Never use stale or contaminated gasoline or oil/gasoline
mixture. Avoid getting dirt or water into the fuel tank.
FULL
FUEL LEVEL
GAUGE
EMPTY
6. STARTING THE ENGINE
RECOIl STARTER
(1) Remove all the loads from the output side.
(2) Turn the fuel valve to the “ON” position.
(3) Turn the AC circuit breaker to the“OFF” position.
(4) Turn the choke lever to the“CLOSE” position.
WARNING
Don’t close the choke when starting the engine in a
warm state.
(5) Turn the generator switch to the “ON” position.
(6) Pull the starter grip until a resistance is felt, then pull it
out briskly.
(7) Turn the choke lever to the“OPEN” position after the
engine is warm.
(8) Don’t use electric apparatus before setting circuit
breaker to the “ON” position.
WARNING
Turn the generator switch to electric starting position
and hold for not longer than 5 seconds, or damage will
be caused to the starting motor. If starting fails, release
the switch and wait for 10 seconds
before operating it again.
If the speed of the starting motor drops fast after
running for a period of time, it means the battery
should be recharged.
7.STOPPING THE ENGINE
(1) Turn the AC circuit breaker to the OFF position.
(2) Turn the generator switch to the OFF position.
(3) Turn the fuel valve to the OFF position.
WARNING
To stop the engine in an emergency, turn the generator
switch to the OFF position.

GENERATORI G2200 G4000 G5500 G6000E
CHENIT DEESRU
10
8. MAINTENANCE
Good maintenance is essential for safe, economical, and
trouble-free operation. It will also help reduce air pollution.
WARNING
Exhaust gas contains poisonous carbon monoxide. Shut
off the engine before performing any maintenance. If
the engine must be run, make sure the area is well
ventilated.
Periodic maintenance and adjustment are necessary for
keeping the generator in good operating condition. Perform
the service and inspection at the intervals shown in the
Maintenance schedule below:
First
Every 3
Every 6
Month
REGULAR SERVICE PERIOD EACH USE
Check Level •
Engine Oil
Air cleaner
Drain plug Clean •
Spark plug Clean • change
clearance
Cylinder
Fuel tank
and stainer
Fuel Line Change ogni 2 anni (2)
Cylinder head
and the head
of piston
Change • •
Check •
Clean • (1)
Valve
cover
Adjust • (2)
Clean ogni 300 ore (2)
Clean ogni 2 anni (2)
Clean
carbon
or 20
Hrs.(3)
ogni 125 ore (2)
Months
or 50
Hrs.(3)
(1) Service more frequently when operation is done in dusty
areas.
(2) These items should be serviced by an authorized
generator dealer.
(3) When use is more frequent, only servicing according
to above correct intervals can insure the generator set’s
long-term use.
WARNING
Improper maintenance, or failure to correct a problem
before operation, can cause a malfunction by which
you can be seriously hurt or killed.
Months
or 100
Hrs.(3)
Every Year or
300 Hrs.
(3)
Always follow the inspection and maintenance
recommendations and schedules in this owner’s
manual.
ENGINE OIl ChANGE
Drain the oil while the engine is warm to ensure complete
and rapid draining.
1. Remove the oil dipstick and drain plug to drain the oil.
2.Reinstall the drain plug, then tighten the plug securely.
3. Rell oil and check the oil level.
Oil capacity:
G2200 0,6 L
G4000/G5500/G6000E 1 L
OIL
DIPSTICK
UPPER
LEVEL
DRAIN
PLUG
WARNING
Used engine oil may cause skin cancer if repeatedly
left in contact with the skin for prolonged periods.
Although this is unlikely unless you handle used oil on
a daily basis, it is still advisable to thoroughly
wash your hands with soap and water as soon as
possible after handling used oil.
Please dispose of used engine oil in a manner that is
compatible with the environment. We suggest you take use
a sealed container to take it to your local service station or
recycling center for reclamation. Do not throw it in the trash
or pour it on the ground.
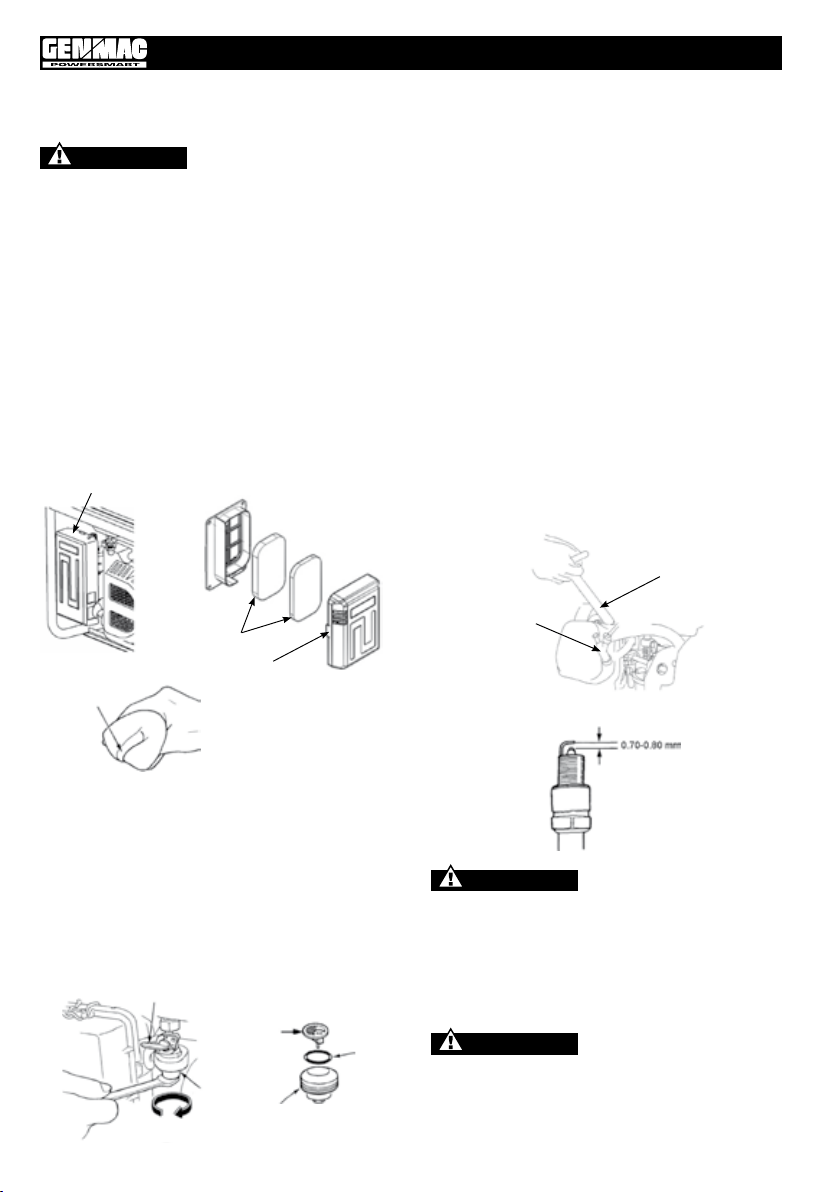
AIR ClEANER SERvICE
A dirty air cleaner will restrict air ow into the carburetor.
To prevent carburetor malfunction, service the air cleaner
regularly. Service more frequently when operating the
generator in extremely dusty areas.
WARNING
Using gasoline or ammable solvent to clean the lter
element can cause a re or explosion. Use only soapy
water or a non-ammable solvent.
GENERATORI G2200 G4000 G5500 G6000E
CHENIT DEESRU
11
WARNING
Never run the generator without the air cleaner. If not,
rapid engine wear will result.
(1) Open the air cleaner clip and open the air cover. Check
the air cleaner element to see if it’s complete and clean.
(2) If the air cleaner element is dirt, please clean it:
Wash the air cleaner element in a solution of household
detergent and warm water, then rinse thoroughly or wash in
non-ammable or high ash point solvent: Drop a few points
engine oil in, then, squeeze out.
AIR CLEANER COVER
AIR CLEANER
ELEMENT
CLIP
ELEMENT
(3) Reinstall the O-ring, and strainer and screw back the
sediment cup.
(4) Turn the fuel valve ON and check for leaks.
SPARk PluG SERvICE
Recommended spark plugs: F6TC E7RTC(1kW) or other
equivalents.
(1) Remove the spark plug cap.
(2) Use the plug wrench to remove the spark plug.
(3) Visually inspect the spark plug to see if the insulator is
cracked, if so, replace it with a new the spark plug.
(4) Measure the plug gap with a feeler gauge. Correct as
necessary by carefully bending the side electrode. The gap
should be: 0.70-0.80 mm.
(5) Check the spark plug washer to see if it’s good.
(6) Reinstall the spark plug, tighten it with the plug wrench
and impact the washer. Reinstall the spark plug cap
accurately.
PLUG WRENCH
SPARK PLUG
CAP
(3) Reinstall the air cleaner element and the cover.
FuEl SEDIMENT CuP ClEANING
(1) Turn the fuel valve to the OFF position. Remove the
sediment cup, o-ring and strainer according to the
arrow direction.
(2) Clean the sediment cup, and o-ring, and strainer in
nonammable or high ash point solvent.
FUEL
VALVE
STRAINER
SEDIMENT
O-RING
WARNING
In order to avoid burning or re due to contact with
any hot part of the generator, don’t pack and store the
generator before it is cooled.
8. CONSERVAZIONE
WARNING
In order to avoid burning or re due to contact with
any hot part of the generator, don’t pack and store the
generator before it is cooled.

GENERATORI G2200 G4000 G5500 G6000E
CHENIT DEESRU
12
If it need be stored for a long time, be sure the storage area
is clean and dry.
(1) Drain the fuel in the fuel tank out, clean strainer, o-ring
and sediment, then ret them well. Drain fuel out of the
carburetor by loosening the drain bolt, then ret it and screw
the carburetor bolt tight.
CARBURETOR
BOLT
G2200/G4000/G5500/G6000E
WARNING
Gasoline is extremely ammable and is explosive under
certain conditions. Drain fuel in a well ventilated area
with the engine stopped. Never smoke or allow ames
or sparks in the area during this procedure.
(2) Screw the oil dipstick off and screw the drain bolt off the
crankcase to completely drain the oil out. Then screw back
the drain bolt and add fresh oil to upper mark, nally ret
the oil dipstick well.
10. TROUBLESHOOTING
ENGINE uNAblE TO START:
YES
YES
NO
Rell the fuel tank.
NO
Add the recommended
NO
Replace the
spark plug.
NO
Check and clean the
NO
Turn the AC circuit
NO
Take the generator to an
authorized generator dealer.
Rep lace the electr ical
appliance or equipment.
fuel sediment cup.
breaker ON.
Is there fuel in the
tank?
YES
Is there enough oil in
the engine?
YES
Is there a spark from
the spark plug?
YES
Is the fuel reaching the
carburetor?
YES
If the engine still does not start, take the
generator to an authorized generator dealer
NO POwER SuPPlY
Is the AC circuit
breaker ON?
Check the electrical
appliance or equipment for
any defects.
oil.
STILL
NO
Take the generator
to an authorized
generator dealer.
(3) Remove the spark plug, and pour about a tablespoon of
clean engine oil into the cylinder. Crank the engine several
revolutions to distribute the oil, then reinstall the spark plug.
(4) Slowly pull the starter grip until resistance is felt. Let the
intake and exhaust valves in “close” position.
(5) Place the generator in a clean area.
11. ELECTRIC STARTING
COMPONENT IDENTIFICATION
G6000E INTERNAl bATTERY
CHOKE
LEVER
AIR
CLEANER
GENERATOR
SWITCH
FUEL
VALVE
DC TERMINAL
POSTS
VOLTAGE
METER
AC
RECEPTACLES
BATTERY
GROUND
TERMINAL

GENERATORI G2200 G4000 G5500 G6000E
FUEL
FUEL METER
G6000E EXTERNAl bATTERY
TANK CAP
MUFFLER
FUEL
TANK
CHENIT DEESRU
13
bATTERY
WARNING
Don’t connect the battery positive and negative
poles reversely (pay attention to leads mark). When
connecting, rst connect the positive poles, then
negative poles. When disconnecting, rst disconnect
the negative pole, then positive poles, if not, serious
damage may be caused to the generator set and
battery.
Check the electrolyte of the battery’s each cell if the uid
level is kept between upper mark and lower mark. If the
uid level is under the lower mark, screw off the cap and
add the distilled water up to upper mark. All cells’ electrolyte
uid level should be approximately maintained at the same
level.
CHOKE
LEVER
AIR
CLEANER
FUEL VALVE
RECOIL STARTER
FUEL METER
BATTERY
WHEEL
GENERATOR
SWITCH
GRIP
DC TERMINAL
POSTS
FUEL TANK CAP
GROUND
TERMINAL
VOLTAGE
METER
AC
RECEPTACLES
HANDLE
MUFFLER
UPPER MARK
LOWER MARK
WARNING
• If improper operation is performed, the battery may
be explosive and may potentially hurt persons nearby.
Keep the re and inammable materials far away from
the battery.
• The battery will release the explosive gas, please keep
the re far away from it. Keep a good air ventilation
condition when battery is being charged or used.
• Be careful not to spill or overow when relling
electrolyte.
ElECTRIC STARTING
(1) Remove all the loads form the output side.
(2) Turn the fuel valve to the “ON” position.
(3) Turn the AC circuit breaker to the “OFF” position.
(4) Turn the choke lever to the “CLOSE” position.
WARNING
Don’t close the choke when starting the engine in
warm state.

GENERATORI G2200 G4000 G5500 G6000E
CHENIT DEESRU
14
(5) Turn the GENERATOR switch to electric starting position.
(6) After starting engine, immediately release generator
switch and generator switch can automatically return to
open position.
(7) Turn the choke lever to the “OPEN” position after the
engine is warm.
WARNING
Turn the GENERATOR switch to electric position and
hold for more than 5 seconds or damage may be
caused to the starting motor.
If starting fails,, release the switch and wait for 10
seconds before starting it again.
If the speed of the starting motor drops fast after
a period of time, it suggests the battery should be
recharged
12. WHEEL (OPTION)
(1) Install the two wheels on the wheel axle with gaskets
and pins.
(2) Install the wheel on the bottom plate of the generator
frame with bolts and nuts.
(3) Fix the handle on the frame.
13. SPECIFICATIONS
Item
Engine Style R210 R270 R390 R4200
Engine Type
Displacement (cc) 210 270 389 420
Igniting mode Transistorized Magneto
Engine
Generator
Fuel Volume (L) 15 25 25 25
Fuel consumption
(g / (kW • h))
Full load continuum running time 8 8 9 9
1/2 load continuum running time 12 12 13 13
Oil Capacity (L) 0.6 1.1 1.1 1.1
Rated Frequency (Hz) 50
Rated Voltage (V) 230
Rated Output Power (kW) 2 3.2 5 5.5
Maximum Output Power (kW) 2.2 3.5 5.5 6
Large Air Cleaner • • • •
G2200 G4000 G5500 G6000E
Single cylinder, 4-Stroke, Forced
≤395 ≤374 ≤374 ≤374
Air Cooling, OHV
(1) Install the two wheels on the wheel axle with gaskets
and pins.
(2) Install the wheel on the bottom plate of the generator
frame with bolts and nuts.
Large Mufer • • • •
Large Fuel tank • • • •
Fuel Gauge • • • •
General
purpose
Accessory
Voltmeter • • • •
Automatic Voltage Regulator • • • •
Oil Alert system • • • •
Overcurrent Protector • • • •
Electric starting accessory - - - -
WARNING
“•” means available, “-” means unavailable

GENERATORI G2200 G4000 G5500 G6000E
CHENIT DEESRU
15
14. WIRING DIAGRAM
G2200
G4000-G5500

GENERATORI G2200 G4000 G5500 G6000E
CHENIT DEESRU
16
G6000E

GENERATORI G2200 G4000 G5500 G6000E
CHENIT DEESRU
17
 Loading...