

Page 1

HD-527 HD-530
Digital Camcorder
Page 2

Getting started
Before using the Camcorder
(Fig.1) (Fig.2) (Fig.3)
(Fig.4) (Fig.5) (Fig.6)
Thank you for selecting d igi tal camcorder of high quality and resolution as manufacture d by ou r
company.
Press the power switch to t urn o n or off the camcorder. Some basic settings mus t be pe rfo rmed
prior to use of this camcor der.
Setting the format of dat e and t ime
1) Rotate the Mode kno b to sw itc h to the Setup mode.
2) Move the Up and Down bu tto n to se lect the options of time format or date format and enter the
submenu;
3) Move the Up and Down bu tto n to se lect the type of the time format or date format.
Setting the date and time
1) Rotate the Mode kno b to sw itc h to the Setup mode
2) Move the Up and Down bu tto n to th e option of date and time setting and enter the submenu;
3) Move the Up and Down bu tto n to se lect whether setting the time and date; if selecting “Yes”,
enter the submenu;
4) Move the Up and Down bu tto n to se lect changing the option; Move the Left and Right button
to adjust the value of the op tio n.
Setting the buzzer
1) Rotate the Mode kno b to sw itc h to the Setup mode
2) Move the Up and Down bu tto n to th e option of prompt tone and enter the submenu;
3) Move the Up and Down bu tto n to ma ke the corresponding setting;
4) Return to the menu of the Se tup m ode after completing the setting.
Setting the language
1) Rotate the Mode kno b to sw itc h to the Setup mode
2) Move the “Up-Down ” but ton t o the option of language (ABC) and enter the submenu.
Insert SD card
Install SD memory ca rd in to th e camcorder to provide more images stored, messages or storage
for other files.
1) Open the SD card cover. (Fi g.1 )
2) Insert SD memory card( gol den finger up). (Fig.2)
3) Properly close th e SD ca rd co ver. (Fig.3)
Engl ish
1
Install the batteries
As this camcorder uses re cha rgeable batteries, please make sure to use attached batteries or
similar batterie s as re com mended by the manufacturer or distributor.
Note: Please set in ba tte rie s properly as per instructions described herein. Improper set- in of
batteries may incu r dam age s to the camcorder or even fire.
1) Insert batteries int o the b attery slot (Fig.4)
2) Push batteries up war d to th e battery pack (Fig.5).
Page 3
Shooting video
Take out batteries
Operate according to the procedures shown in Figure 6 to remove batteries properly as per
procedures as shown in Figure 6; push to open the battery pack, and remove batteries from the
battery slot.
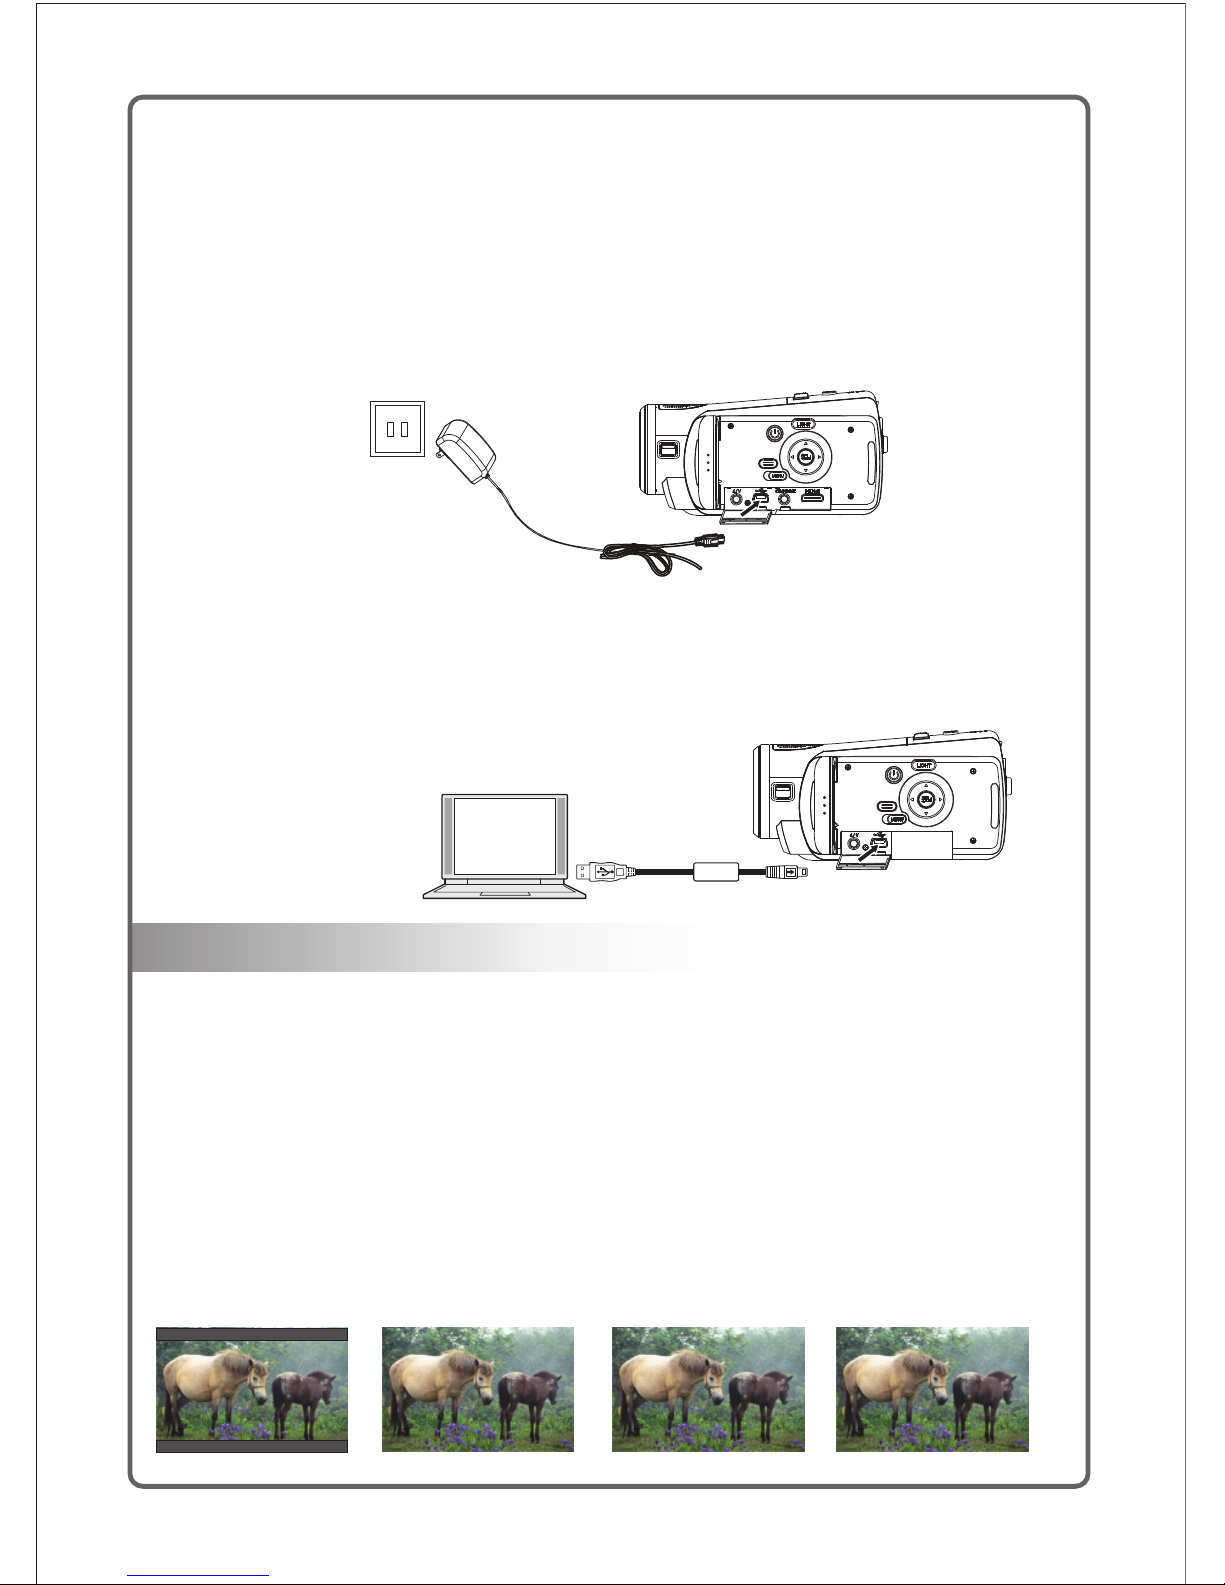
Charging batteries
You can use the attached charger to charge batteries as per the following procedures.
1) Connect the switch power to the camcorder in the mode as shown in the diagram.
2) Insert the switch power plug into the socket to start charging.
3) Red indicator light flashes to show the charging is under way.
4) LED indicator light will extinguish once charging is completed.
5) Batteries will be fully charged within approximately 180 minutes. Specific charging time may
vary as per battery capacity and local charging conditions
You can also use USB cable to charge batteries in th e sta ndby mode. Charge batteries by
following proced ure s stated as follows. Connect the USB with the camcorder.
1) Connect the USB cab le to t he US B interface of the computer.
2) Switch off the power to the camcorder to start charging.
3) LED indicator lig ht wi ll extinguish once the charging is completed.
4) Batteries will be full y cha rged within approximately 180 minutes.
Note:
1) The maximum size of each video file is 3.75GB.
2) The high resolution and high quality will produce the larger fi le, s o the l ength will be shorter.
3) LCD preview and the p rop ortion for image shooting will vary with the diff erent resolution.
Please refer to:
720P 16:9 screen QVGA 4:3 screen VGA 4:3 screen photograph 4:3 screen
1) Switch on the power s upp ly of t he camcorder, and turn the Mode knob to switch to the
Shooting mode;
2) Make use of LCD screen to ca ptu re photo images
3) Press the Shooting Sta rt/ Sto p button to start the recording;
4) Press the Shooting Sta rt/ Sto p button again to stop the recording;
5) The video clip is automatically saved with a unique file name.
2
Page 4

1
2
3
4
5
6
7
8
9
10
11
12
Description to ico ns un der the shooting mode:
Indicator for shoo tin g sta tus:
Indicator for resolut ion ;
Indicator for close/f ar sh ooting;
Indicator for remaini ng ti me of recording;
Scene;
EV value;
White balance;
Anti-shake indic ato r;
Indicator for battery :
Shooting time;
Shooting date;
Indicator for zoom.
Playing video clip
1) Turn the Mode knob to sw itc h to th e Photography Playback mode, and the latest files will be
displayed on the LCD s cre en.
2) Press the Up button to ent er th e Nine-picture mode, and press the Up/Down button and Left/
Right button to select th e vid eo file recorded.
3) Press the Enter button t o con firm and press the Shooting Start/Stop button to play.
4) Press the Left button fo r fas t rew ind and press the Right button for fast forward.
5) Press the Shootin g Sta rt / St op button to pause / resume playing the video.
6) When reviewing th e vid eo clip, press the Zoom button to adjust the volume.
7) Press the Enter button t o sto p the playing.
Engl ish
3
1 2
3
4
5
6
7
8
9
10
11
12
Shooting mode
In the mo de of Shooting (image c apture), Press
Down button t o adjust resolution (QVGA, VGA,
HD);
Note:
Page 5

Sound recording mode
00:00:00
00:00:43
1
2
3
1
2
3
4
5
6
7
00:00:43
00:00:00
1 2
3
Indicator for play bac k mod e;
Indicator for type of vid eo fi le playback;
Total number of file;
Total time period of fil e;
File playback prog res s bar;
Indicator for fast forw ard a nd fast rewind of file
Indicator for file p aus e or pl ayback;
Indicator for recordi ng st atus
Total time period for re cor din g
Time period for recording
1) Switch on the power s upp ly of t he camcorder,
and turn the Mode knob t o swi tch t o the Recording Mode;
2) Press the Shootin g Sta rt / St op button to start sound
recording;
3) Press the Shootin g Sta rt / St op button again to stop
the sound recordin g;
4) The audio clip is automatically saved with a unique
file name.
4
Shoot video playba ck mo de
Page 6

Recording playback
1
2
3
4
5
6
7
8
9
10
11
12
13
14
17
16
15
Taking photos
Indicator for shootin g sta tus;
Indicator for photo qua lity;
Indicator for fill l igh t;
Self-timer;
Indicator for close / far s hoo ting;
Indicator for SD card;
Total number of photos f or sh ooting;
Resolution;
Indicator for scene;
E V value;
White balance;
Anti-shake indic ato r;
Indicator for flash;
Indicator for battery ;
Time of shooting;
Date of shooting;
Indicator for zoom
1) Turn t he Mode knob to s witch to th e Re cording p layback M od e, and the la test files wi ll be displ ay ed on the LCD
scre en;
2) Pre ss the Up butto n to enter th e Ni ne-pict ure mode, a nd p ress the Up /Down butto n and Left/ Ri ght butto n to
sele ct required f iles.
3) Pre ss the Enter bu tton to con fi rm and pres s the Shoot in g Start/S to p button to p lay.
4) Pre ss the Shooti ng Start / St op b utton to pa use / resume pl aying the s ound record .
5) Whe n reviewing t he audio cl ip , press the Z oom butto n to a djust the v olume.
6) Pre ss the Enter bu tton to sto p pl aying.
1) Swi tch on the powe r supply of t he
camc order, and tur n the Mode kn ob t o switch
to the P hotograph m ode;
2) Mak e use of LCD scre en to captu re p hoto
imag es;
3) Pre ss the Shutte r button to t ak e a photo;
4) The file is a utomati ca lly saved w ith a
uniq ue file name;
Engl ish
5
15 16
17
09:3 9:35
2010 /01/21
12
13
14
10
9
11
10/1000
4
3
5
6 71 2
8
Note:
In the Ph ot og raph mode (image ca pt ure),
press Down bu tton to adjust re so lu tion
(VGA, 1.3M, 3M, 5M, 8M, 12M);
Page 7

Photo playback
Playing MP3 (optional)
Music player
Stereo
6.36MB
ABC
01:07 04:37
Shoot:Pause
Characteristics of digital camera
Please refer to the follo win g illustrations and tables to get familiar with control function s of ea ch
button on this camco rde r.
1
2
3
4
5
6
7
8 9
1) Turn the Mode knob to sw itc h to th e Photo playback mode, and the latest files will be
displayed on the LCD s cre en;
2) Press the Up button to ent er th e Nine-picture mode, and press the Up/Down button and Left/
Right button to select re qui red files.
3) Press the Enter button t o vie w the photo in the full screen;
4) Press the Zoom push butt on to e nlarge or reduce the photo;
5) Press the Up/Down b utt on an d Left/Right button to view the local photo enlarged;
6) Press the Enter button t o ret urn to the full Screen status.
Note: The files of MP3 shall be put into the folder of MP3 in the SD card.
1. Flash;
2. LED fill light;
3. Self-timer;
4. Lens;
5. Remote-contro l rec eiv er;
6. Microphone;
7. Zooming push button (z oom ing button);
8. Shooting button ( shu tte r button);
9. Speaker;
1) Turn the Mode knob to sw itc h to th e MP3 Play mode.
2) Press the Up/Down b uto n to se lect playing songs, and press the Enter button to confirm .
3) Press the Left/Right b utt on to select playing the previous song or the next song;
4) Press the Start/Stop b utt on to p ause the playing, and press the button again to resume the
playing;
5) Press the Zoom button to i ncr ease or reduce the volume;
6) Press the Menu button to r etu rn to songs list.
6
Page 8

10 11
12
13
14
15
16
18
17
19
20
21
22232425
26 27 28
29
30
31
32
33
34
Mode b utton
Powe r button
Mode s witchover k nob is avai la ble in 6 mode s: Camcor de r mode, Cam era
mode , Recording m ode,MP3 P la y mode, Fil e Playbac k mo de and Setu p
mode .
Pres s this button t o switch on t he c amera in ca se of the pow er -off state,
and pr ess this butt on for 3 seco nd s to switch o ff t he Camera in c ase of the
powe r-on state.
10. Battery pack;
11. Tripod hole;
12. Switch of lens cov er;
13. Power button;
14. Disp button;
15. Menu button;
16. LED fill light but ton ;
17. Left button;
18. Up button;
19. Right button;
20. Enter button;
21. Down button;
22. HDMI output inte rfa ce;
23. Headset output i nte rfa ce (optional);
24. USB output interfac e;
25. AV output interface;
26. Mode knob;
27. Wristband;
28. Focusing ring;
29. LCD display scre en;
30. Battery;
31. Start/Stop button ;
32. Power indicato r lig ht;
33. Charging indic ato r light;
34. SD card cover;
Please refer to the follo win g table for the functions of the buttons.(if the camcorder has the
MP3 function)
Button Designation
Function
Engl ish
7
Page 9

Ligh t button
DISP butto n
Left butt on
Righ t button
Up but ton
It is se t as off b y the syste m. P ress the bu tton to swi tc h on the fill l ight, and
pres s the button ag ain to swit ch o ff t he fill lig ht .
In the mode of Shooting , Recording,Taking ph oto, it is set as common OSD on
by the system, and pr ess the button to switch of the common OSD, and press
the bu tton again to switch off the ba cklight and power of the LCD sc reen, and
then finally press the button to switch on the common OSD;
In the mode of MP3 pl ayback, press the button to switch off the backlight and
power of the LCD screen, and press the button again to switch on the common
OSD;In the mode of file playback, press th e button to switch off the OSD, and
press the button again to switch off the backlight and power of LCD screen, an d
then press the button ag ain to switch on the co mmon OSD.
In the mode of Shooting,Recording,Taking photo, this button is invalid;In the
mode of MP3 Playback (browsing MP3), the is invalid; In the mode of MP3
Playback (during playback), press the to switch to the previous MP3
song;In the mode of File Pla yback (browsing video/voice), press the to
switch to the previous file;In the mode of File Playback (during video pl ayback),
press the for fast rewind;In the mode of File Playback (browsing photo),
press the to switch to the previous file;In the mode of File Playback (
browsing the enlar ged photo), press the to move the visual area of the
photo to left; In the Setup mode, press the to select the options from left;
button
button
button
button
button
button
button
In th e Shooting mode (during shootin g), the is invalid;
In th e Photograp h mode ( ), it is the switch of se lf-timer.
Press the to switc h the sel f-timer for 5 s and self-timer for 10 s, and then
press the button again to return to the initial state (t imer off);
In th e mode of MP3 Playback (browsin g MP3), the is invalid;
In th e mode of MP3 Playback (during playback), press the to sw itch to
the next MP3 son g; In the mode of File Playba ck (browsin g video/voice), pres s
the to sw itch to the next fil e;In the mo de of Fil e Playback (during video
playback), press the for fast-forward; In the mode of file playback (
browsing photo), press the to switch to the next file;In the mode of file
playback (browsi ng enlarged photo), press the to move the visual area
to ri ght;
In th e Setup mod e, press the to select the opti ons from ri ght.
In th e mode of Shooting,Recording, this button is invalid;
button
image capture
button
button
button
button
button
button
button
button
In the mode of Shooting, Recording,Taking Photo , the is invalid;
In the mode of MP3 Playb ack (browsing MP3), press the to switch to the
previous MP3 song ;
In the mode of MP3 Playb ack (during playback), the is invalid;
In the mode of File Play back (browsing video/voice ), pres s the to swi tch
to the 9 picture browse (in which the current picture is), press the again
to select browsin g the previous line of files in the 9 pictures;
In the mode of File Play back (during video/voice playback ), press the to
switch to the 9-picture browse (in which the current pict ure is), press the
again to browse the prev ious line of files in the current 9 pictures;
In the mode of File Play back (browsing photos), press the to switch to
the 9-picture bro wse (in which the current picture is), press the aga in to
browse the previo us line of files in the current 9 pictures;
In the mode of File Play back (browsing enlarged photo), press the to
move the visual area of the pho to upward;
In the Setup mode, press the to sele ct the options from top.
Special note: In the mod e of playback, the viewed files are of the same type
(photo, video, so und record) so as to facilitate the user ’s operat ion. Wh en
browsing in the mode of 9-picture, the files are combined together.
button
button
button
button
button
button
button
button
button
button
button
In the mo de of Shooting ( ), it is used for resolut io n adjustment
(QVGA, VGA, HD);In the Photograp h mode ( ), it is use d for
resolution ad ju stment (VGA, 1.3M, 3M , 5M, 8M, 12M); In the mode of MP3
Playback (b ro ws ing MP3), press the button to switch to the next MP3 song ;
In the mo de of MP3 Playback (d ur ing playback), the bu tton is invalid;In th e
mode of Fil e Playback, the but to n is invalid; In th e mode of File Pl ay ba ck (
browsing th e enlarged photo), pres s the button to mov e the visual area of the
photo downw ar d;
In the Se tu p mode, press the but ton to select the o ptions from bottom.
image captu re
image captu re
Down b utton
Button Designation
Function
8
Page 10

Ente r button
Menu b utton
Shoo ting button
(shu tter button )
Zoom push button
(zooming button)
In the m ode of Shooti ng, the is inva lid;
In the (ima ge capture) , the is invali d;
In the m ode of MP3 Play back (bro ws ing MP3), p ress the to pla y MP3 ;
In the m ode of MP3 Play back (dur in g playbac k), the is inva lid;
In the m ode of File Pla yback (br ow sing vide o/voice ), t he is in valid;
In the m ode of File Pla yback (du ri ng video pl ayback) , pr ess the to stop ;
In the m ode of File Pla yback (br ow sing phot os), the is inv alid;
In the m ode of File Pla yback (br ow sing enla rged phot o) , press the to
stop e nlarging th e photo;
In the S etup mode, pr ess the to sele ct functi on o f the curre nt option;
butt on
Phot ograph mode butto n
butt on
butt on
butt on
butt on
butt on
butt on
butt on
In the modes of Video /Voice Playback, Photo Playback and File Playback,
press the to open th e me nu f un ct io n, a nd pre ss the ag ai n to
close the menu; When playing the MP3 songs, pre ss the M en u to return
the interface of Mp3 list;
button button
button
In the P hotograph m ode, pres s th e button ha lf to focus , an d then pres s the
butt on fully to tak e a photo;
In Sho oting /Taking p hotos, it i s us ed for the fu nction of W - - - T;
In Video/Vo ice Playb ack / MP3 Playb ack, W refe rs t o the reduc tion of the
AUDI O AMP vol ume, and T refers to th e in crease of t he AUDIO AMP volume ;
In Pho to playback , when view in g a single ph oto, W refe rs t o zoom in, an d T
refe rs to zoom out;
this b utton is cont rol the Cam co rder/Re cording f un ction to St art/Stop.
In the m ode of MP3 play ( During pl ay ing), pre ss the butt on t o pause
In the m ode of File Pla yback (du ri ng video/ voice pla yb ack),Pr ess the butto n
to Pau se .
Star t /
Paus e button
If it is r equired to ta ke the clos e- up microp hotogra ph y, tu rn the red spot o f the
focu sing ring to th e positio n ( ), a nd the icon ( ) w ill display ed on the
left o f th e LCD scree n at the same t im e.
Focu sing ring
If the camcorder withou t MP3 f unction,please refer to the following table for the functions of the
buttons.
Mode b utton
Powe r button
Mode s witchover b utton is av ai lable in 5 mo des: Camc or der mode,
Came ra m ode,Rec or ding mode , File Playba ck mode and Set up mode.
Pres s this button t o switch on t he c amera in ca se of the pow er -off state, and
pres s this button f or 3 second s to s witch off the c am era in case o f the poweron sta te
Button Designation
Function
Ligh t button
DISP butto n
It is se t as off b y the syste m. P ress the bu tton to swi tc h on the ligh t, and
pres s the button ag ain to swit ch o ff t he light.
In the mode of Shooting,Recording,Taking photo, it is set as common OSD on
by the system, and press the button to switch off the common OSD, and press
the button again to switch off the backlight and power of the LCD screen, and
then finally press the button the switch on the common OSD;
In the mode of File Playback, press the button to switch off the backlight and
power of the LCD screen, and press the button again to switch on the common
OSD
Button Designation
Function
Engl ish
9
Page 11

Left butt on
Righ t button
Up but ton
In the mode of Shooting,Recording, Taking photo, this button is invalid;
In the mode of File Playback (browsing video), press the button to switch to the
previous file;
In the mode of File Playback (during video playback), press the button for fast
rewind;
In the mode of File Playback (browsing photo), press the button to switch to the
previous file;
In the mode of File Playback (browsing the enlarged photo), press the button to
move the visual area of the photo to left;
In the Setup mode, press the button to select the options from left;
In th e Shooting/ Recording mode, the button is invalid;
In th e Shooting mode (during shootin g), the but ton is in valid;
In th e Photograp h mode(imag e capture), it is th e switch of self-tim er. Pres s the
button to switch the self-timer for 5 seconds and self-t imer for 10 seconds, and
then press the button again to retur n to the initial sta te (timer off);
In th e mode of File Playback (browsi ng video/vo ice), press the butt on to switch
to th e next file ;
In th e mode of File Playback (during video playback), pr ess the but ton for fastforward;
In th e mode of File Playback (browsi ng photo), press the button to switch to the
next file;
In th e mode of File Playback (browsi ng enlarged photo), press the button to
move the visual area to right;
In th e Setup mod e, press the button to select the option s from right.
In the mode of Shooting ,Recording,Photograph mode , the button is invalid;
In the mode of File Play back (browsing video/voice ), pres s the button to switch
to the 9-picture browse (in which the current picture is) , press the button again
to select browsin g the previous line of files in the 9 pictures;
In the mode of file play back (during video/voice playback ), press the button to
switch to the 9-picture browse (in which the current pict ure is), press the button
again to browse the prev ious line of files in the current 9 pictures;
In the mode of File Play back (browsing photos), press the button to switch to the
9-picture browse (in whi ch the current picture is), press the button again to
browse the previo us line of files in the current 9 pictures;
In the mode of File Play back (browsing enlarged photo), press the button to
move the visual area of the pho to upward;
In the Setup mode, press the button to select the options from top.
Special note: In the mod e of playback, the viewed files are of the same type
(photo, video, so und record) so as to facilitate the user ’s operat ion. Wh en
browsing in the mode of 9-picture, the files are combined together.
In the mo de of shooting (image c apture), it is us ed for resolution adjus tm en t
(QVGA, VGA, HD);
In the Ph ot og raph mode(image captu re ), it is used for resolution adjustment
(VGA, 1.3M, 3M, 5M, 8M, 12M);
In the mo de of File Playback, th e button is inval id ;
In the mo de of File Playback (br owsing the enlarged photo), press the bu tt on to
move the vi su al area of the ph ot o downward;
In the Se tu p mode, press the but ton to select the o ptions from bottom.
Down b utton
Button Designation
Function
Ente r button
In the m ode of Shooti ng/Reco rd ing, the bu tton is inv al id;
In the m ode of Photog raph mode (i mage capt ure), the b ut ton is inva lid;
In the m ode of File Pla yback (br ow sing vide o/Voice) , th e button is i nvalid;
In the m ode of File Pla yback (du ri ng video pl ayback) , pr ess the but ton to stop;
In the m ode of File Pla yback (br ow sing phot os), the bu tt on is inval id;
In the m ode of File Pla yback (br ow sing enla rged phot o) , press the b utton to
stop e nlarging th e photo;
In the S etup mode, pr ess the but to n to select f unction of th e current o pt ion;
10
Page 12

Menu b utton
Shoo ting button
(shu tter button )
Zoom push button
(zooming button)
In the m odes of Video Pla yb ack,Voic e Playbac k Pl ayback, P hoto Play ba ck
and Fi le Playback , press the b ut ton to open t he menu fun ct ion, and pr ess the
butt on again to clo se the menu ;
In the P hotograph m ode, pres s th e button ha lf to focus , an d then pres s the
butt on fully to tak e a photo;
In Sho oting / Taking phot os mode, it is us ed for the fu nc tion of W - - - T;
In Video Pla yback, W re fe rs to the red uction of t he AU DIO AMP volume , an d
T refers to th e increas e of t he AUDIO AMP volu me ;
In Pho to Playback , when view in g a single ph oto, W refe rs t o zoom in, an d T
refe rs to zoom out;
In the m ode of Shooti ng/Reco rd ing, pres s the butto n to s tart shoo ti ng/
Reco rding, and pr ess the but to n again to st op shooti ng /Record ing;
In the m ode of Video/Voi ce Playback ( During pl ay ing), pre ss the butt on t o
paus e playing
Star t /
Paus e button
If it is r equired to ta ke the clos e- up microp hotogra ph y, tu rn the red spot o f the
focu sing ring to th e positio n ( ), a nd the icon ( ) w ill display ed on the
left o f th e LCD scree n at the same t im e.
Focu sing ring
Button Designation
Function
Testin g switch func tions
LCD ro llover test ing switc h
LCD st and by testin g switch
LCD sc reen will be co nverted t o th e upright i mage mode w he n it is rotat ed to the
fron t side.
LCD sc reen switch w ill be disp la yed when LC D screen is c lo sed.
1) Wa it for 5 seco nd s before st opping re co rding or pl aying vid eo s in the vide o/
soun d playback mo de; wait fo r 10 m inutes be fore auto s hu tdown.
2) Wa it for 10 min ut es before a uto shutd ow n in other mo des (Photog raphy,
Phot o Playback an d Setup mod es ).
Note : This c amcorde r wi ll not be ava ilable fo r au to shutdo wn when the L CD
turn ed to the front s ide is clos ed .
LCD ro llover test ing switc h
LCD St and by testin g switch
Engl ish
11
Page 13

Note : One end of the HD MI cable mu st b e A-type int erface, a nd t he other en d must be C-typ e interfa ce .
HDMI Output
Connecting to a computer
Use attached USB cab le to c onn ect the camcorder to the computer as shown in the figure.
Use attached AV cable to connect the camcorder to th e sta ndard TV set as shown in the figure.
Connecting to a CVBS TV port
Driver
Accessories
1.Digital camcor der 2 .CD 3 . Pouch 4.User manual 5.Battery
6.Adapter 7.AV cable 8.USB cable 9.SD card(optional) 10.Remote control ler (optional)
11.HDMI cable(optional) 12.Headset(optional)
Connect the camcorder t o a HD TV as shown with the HDMI cable
Large-capacity s tor age
This camcorder can p rov ide l arge-capacity storage via the built-in card reader. You can u se th is
camcorder as a USB dev ice .
Windows Vista/XP is a plug-and-play op era tin g system, which requires no manual installation
of drive program.
EMS memory of the camcord er an d SD card will be displayed as a large-capacity storage device
in the Windows explo rer o nce the camcorder is connected.
You can drag and drop files.
Webcam
You can use the camcorder as the webcam in all the Win dow s operating systems (Windows XP/
2000/Vista) only if you have installed the driver.
Note: The webcam driver shall be installed for all the operating syst ems .
12
Page 14

Specification
Image sensor
Pixel
Storage media
Sens itivity of se nsor
Lens
Focusing range
Video clips
Static image
Zoom
LT P S screen
Flash
White balance Auto, Sunn y, Cloudy, Tungsten light, Fluo res cent lamp
Auto power on/off
Scene
Picture quality
Size
Weight
Anti -shake / moti on
comp ensation
light
1/2.5 inch CMOS 5 mega pixe ls se nsor
12 mega pixels
SD memory card; support ing u p to 16GB
Auto
Prime lens
Normal: 30CM~inf .; Cl ose -up: 15CM~30CM
H.264
Image resolution
QVGA;VGA;720P
JPG format;VGA/1.3M /3M /5M /8M/12M
8X digital zooming
HD-527 is 2.7”;HD- 530 i s3”
Effe ctive range:1M~1.5M
Auto matic; land scape; ni gh t; portra it; night p or trait; be ach; moveme nt; banqu et
+2.0EV/+1.5EV/+1. 0EV /0EV/-1.0EV/-1.5EV/-2.0EV
optimal; fine; common
Off/ on
Off/ 5S/10S
USB2.0
NTSC/PAL;AV/HDMI
1~ 1 / 20 0 0 SEC.
Off/ 60S/120S
66X66.5X125mm
Approx. 400g (with out S D car d and batteries)
Off/ on
Self-timer
PC interface
TV output format
Shut ter
Powe r Supply
Li-ion battery
EV
Engl ish
13
 Loading...