

Page 1

WEEE Warning Message
Symbol for Separate Collection in European Countries
This symbol indicates that this product is to be collected
separately.
The following apply only to users in European countries:
This product is designated for separate collection at an
appropriate collection point. Do not dispose of as
household waste.
English
For more information, contact the retailer or the local
authorities in charge of waste management.
FCC STATEMENT
This device complies with Part 15 of the FCC Rules. Operation is subject to the
following two conditions:
(1). This device may not cause harmful interferenc e, and
(2). This device must accept any interference received, including interference that
may cause undesired operation.
Note:
This equipment has been tested and found to comply with the limits for Class B digital
devices, pursuant to Part 15 of the FCC rules. These limits are designed to provide
reasonable protection against harmful interference in a residential installation. This
equipment generates uses and can radiate radio frequency energy and, if not installed
and used in accordance with the instructions, ma y cause harmful interference to ra dio
communications.
However, there is no guarantee that interference will not occur in a particular
installation. If this equipment does cause harmful interference to radio or television
reception, which c an be determined by turning the equipment off and on, the user is
encouraged to try to correct the interference by one or more of the following
measures:
Reorient or relocate the receiving antenna
Increase the separation between the equipment and receiver
Connect the equipment into an out let on a circuit differ ent from that to which t he
receiver is connected
-1-
Page 2

English
Use of shielded cable is required to comply with Class B limits in Subpart B of Part 15
of the FCC rules.
Do not make any changes or modifications to the equipment unless otherwise
specified in the m anual. If suc h changes or modifi cations shoul d be made, y ou could
be required to stop operation of the equipment.
Product Information
1. Product design and specifications are subject to change without notice. This
includes primary product specifications, software, software drivers, and user’s
manual. This User Manual is a general reference guide for the product.
2. The product and accessories that come with your camera may be different from
those described in this manual. This is due to the fact that different retailers often
specify slightly different product inclusions and accessori es to suit their market
requirements, customer demographics, and geographical preferences. Products
very often vary between retailers especially with accessories such as batteries,
memory cards, cables, carrying cases/pouches, and language support.
Occasionally a retailer will specify a unique product color, appearance, and internal
memory capacity. Contact your dealer for precise product definition and included
accessories.
3. The illustrati ons in this ma nual are for the pu rpose of explan ation and may di ffer
from the actual design of your camera.
4. The manufacturer assumes no liability for any errors or discrepancies in this user
manual.
5. For driver updat e s, you can check the “Downl oad” section of our websi te,
www.geniusnet.com
SAFETY INSTRUCTIONS
Read and understand all Warnings and Cautions before using this product.
Warnings
If foreign objects or water have enter ed the camera, tur n the power
OFF and remove the batteries.
Continued use in this st ate might cause fire or electric shock. Consult the
store of purchase.
If the camera has fallen or its case has been damag e d, tur n the
power OFF and remove the batteries.
Continued use in this st ate might cause fire or electric shock. Consult the
store of purchase
-2-
Page 3

English
Do not disassemble, change or repair the camer a.
This might cause fire or electric shock. For repair or internal inspection,
ask the store of purchase.
Do not use the camera in areas near water.
This might cause fire or electric shock. Take special care during rain,
snow, on the beach, or near the shore.
Do not place the camera on inclined or unstable surfa ce s .
This might cause the camera to fall or tilt ov er, causing injury.
Keep the batterie s out of the reach of children.
Swallowing batt eries might cause poi soning. If the bat tery is accidentally
swallowed, immediately consult a phys ician.
Do not use the camera while you are walking, driving or riding a
motorcycle.
This might cause y o u to fall over or result in traffic accident.
Cautions
Insert the batter ies paying careful attention to t he pol ar i t y (+ or –) of
the terminals.
Inserting the batteries with its polarities inverted might cause fire and injury,
or damage to the surrounding areas due to the battery rupturing or leaking.
Do not fire the flash close to anyone’s eyes.
This might cause damage to the person’s eyesight.
Do not subject the LCD monitor to impact.
This might damage the glass on the screen or cause the internal fluid to
leak. If the inte rnal fluid enters your eyes o r comes into contact with your
body or clothes, rinse with fresh water.
If the internal fluid has entered your eyes, consult a physician to receive
treatment.
A camera is a precision instrument. Do not drop it, strike it or use
excessive force when handling the camera.
This might caus e damage to t he camera.
Do not use the camera in humid, steamy, smoky, or dusty places.
This might cause fire or electric shock.
Do not remove the battery immediately after long period of continuous
use.
The battery becomes hot during use. Touching a hot battery might c ause
burns.
Do not wrap the camera or place it in cloth or blankets.
This might cause heat to build up and deform the case, resulting in fire. Use
the camera in a well-ventilated place.
Do not leave the camera in places where the temperature may rise
significantly, such as insi de a car.
This might adversely affect the case or the parts inside, resulting in fire.
-3-
Page 4

English
Before you move the camera, disconnect cords and cables.
Failure to do this might damage cords and cables, resulting in fire and
electric shock.
Notes on Battery Usage
When you use the battery, carefully read and strictly observe the Safety Instructions
and the notes described below:
Different battery types and surrounding temperatures may affect the battery
performance.
Avoid using batteries in extremely cold environments as low temperatures can
shorten the battery life and reduce camera performance.
The battery may feel warm when using the camera for an extended period of time
or using the flash continuously. This is normal and not a malfunction.
The digital video c amera may feel warm when being used co ntinuously or f or an
extended period of time . This is normal and not a malfunction.
If you will not be using the batteries for an extended period of time, remove them
from the camer a to prevent leakage or corrosion.
Always keep th e terminals i n a clean stat e.
Never use manganese batt eries.
Risk of explosion if battery i s replaced by an incorrect type.
Dispose of used bat teries accordin g t o the instructions.
-4-
Page 5

English
CONTENTS
INTRODUCTION ____________________________________________________ 7
P
ACKAGE CONTENT __________________________________________________ 7
GETTING TO KNOW YOUR CAMERA___________________________________ 8
RONT VIEW _______________________________________________________ 8
F
R
EAR VIEW ________________________________________________________ 8
MONITOR INFORMATION ___________________________________________ 9
LCD
Camera Mode ____________________________________________________ 9
Video Mode_____________________________________________________ 10
Playback mode – still image playback ________________________________ 10
Playback mode – Video pl ayback____________________________________ 10
GETTING STARTED ________________________________________________ 11
REPARATION _____________________________________________________ 11
P
URNING THE POWER ON/OFF _________________________________________ 12
T
INDICATORS AND SELF-TIMER INDICATORS _____________________________ 12
LED
HOOSING THE LANGUAGE____________________________________________ 13
C
ORMATT ING TH E MEMORY CARD OR INTERNAL MEMORY _____________________ 13
F
CAPTURE MODE___________________________________________________ 14
APTURING IMAGES _________________________________________________ 14
C
SING THE ZOOM FUNCTION___________________________________________ 14
U
ETTING THE FOCUS ________________________________________________ 14
S
SING THE SCENE MODE _____________________________________________ 15
U
DJUSTING THE EXPOSURE (EV COMPENSATION) ___________________________ 16
A
SING THE FLASH __________________________________________________ 17
U
S
ETTING THE SELF-TIMER_____________________________________________ 17
P
OSSIBLE NUMBER OF SHOTS (STILL IMAGE) _______________________________ 18
VIDEO MODE______________________________________________________ 19
ECORDING VIDEO CLIPS_____________________________________________ 19
R
P
LAYING BACK VIDEO CLIPS___________________________________________ 19
P
OSSIBLE RECORDING TIME / SEC (VIDEO CLIP) _____________________________ 20
PLAYBACK MODE _________________________________________________ 21
LA YING BACK – STILL IMAGES _________________________________________ 21
P
HUMBNAIL DISPLAY_________________________________________________ 21
T
LIDESHOW DISPLAY ________________________________________________ 22
S
ROTECTING IMAGES ________________________________________________ 22
P
ANCELING THE PROTECTION__________________________________________ 23
C
DPOF
E
MENU OPTIONS ___________________________________________________ 26
C
SETTINGS ___________________________________________________ 24
RASING IMAGES ___________________________________________________ 25
Erasing single image / Erasing all images _____________________________ 25
AMERA MENU ____________________________________________________ 26
-5-
Page 6

English
Size___________________________________________________________ 26
Quality_________________________________________________________ 26
Scene Mode ____________________________________________________ 26
EV ____________________________________________________________ 27
Metering _______________________________________________________ 27
W. Balance _____________________________________________________ 27
ISO ___________________________________________________________ 27
Color __________________________________________________________ 27
Saturation ______________________________________________________ 27
Sharpness______________________________________________________ 28
Preview ________________________________________________________ 28
IDEO MENU ______________________________________________________ 28
V
Size___________________________________________________________ 28
EV ____________________________________________________________ 28
W. Balance _____________________________________________________ 29
LAYBACK MENU ___________________________________________________ 29
P
Delete _________________________________________________________ 29
Copy to Card____________________________________________________ 29
Slide Show _____________________________________________________ 29
DPOF _________________________________________________________ 29
Protect_________________________________________________________ 29
Thumbnail ______________________________________________________ 30
ETUP MENU______________________________________________________ 30
S
Format_________________________________________________________ 30
Beep __________________________________________________________ 30
Language ______________________________________________________ 30
Auto Off________________________________________________________ 30
Sys. Reset______________________________________________________ 31
Light Freq.______________________________________________________ 31
Message _______________________________________________________ 31
CONNECTING TO A PICTBRIDGE COMP LIANT PRINTE R _________________ 31
TRANSFERRING FILES TO YOUR COMPUTER__________________________ 33
OWNLOADING YOUR FILES ___________________________________________ 33
D
EDITING SOFTWARE INSTALLATION__________________________________ 34
USING THE DIGITAL STILL CAMERA AS A WEB CAMERA ________________ 35
NSTALL THE WEB CAMERA DRIVER ______________________________________ 35
I
CAMERA SPECIFICATIONS__________________________________________ 36
TROUBLESHOOTING _______________________________________________ 37
-6-
Page 7

English
Introduction
Thank you for purchasing this new digital still camera!
Capturing high-quality digital images is fast and easy with this state-of-the-art smart
camera. Equipped with a 5.0-megapixel sensor, this camera is capable of capturing
images with a resolution of up to 2560 x 1920 pixels.
Other features provided by the camera include the following:
True 5.0 Mega Pixel CMOS
Maximum 10.0 mega pixels
2.5 LTPS LCD monitor
4X Digital zoom
Supports SD/SDHC card (SDHC card up t o 4GB)
PictBridge support
Package content
Carefully unpack your kit box and ensure that you have the follo wing items.
Digital Camera
CD driver includes:
• MediaOne Gallery SE
• Web Cam Driver for Windows 2000/XP/Vista
• Multi-Language User’s Manual
USB cable
2 x AAA alkaline batteries
Quick Guide
Pouch
Strap
Warranty Card
-7-
Page 8
English
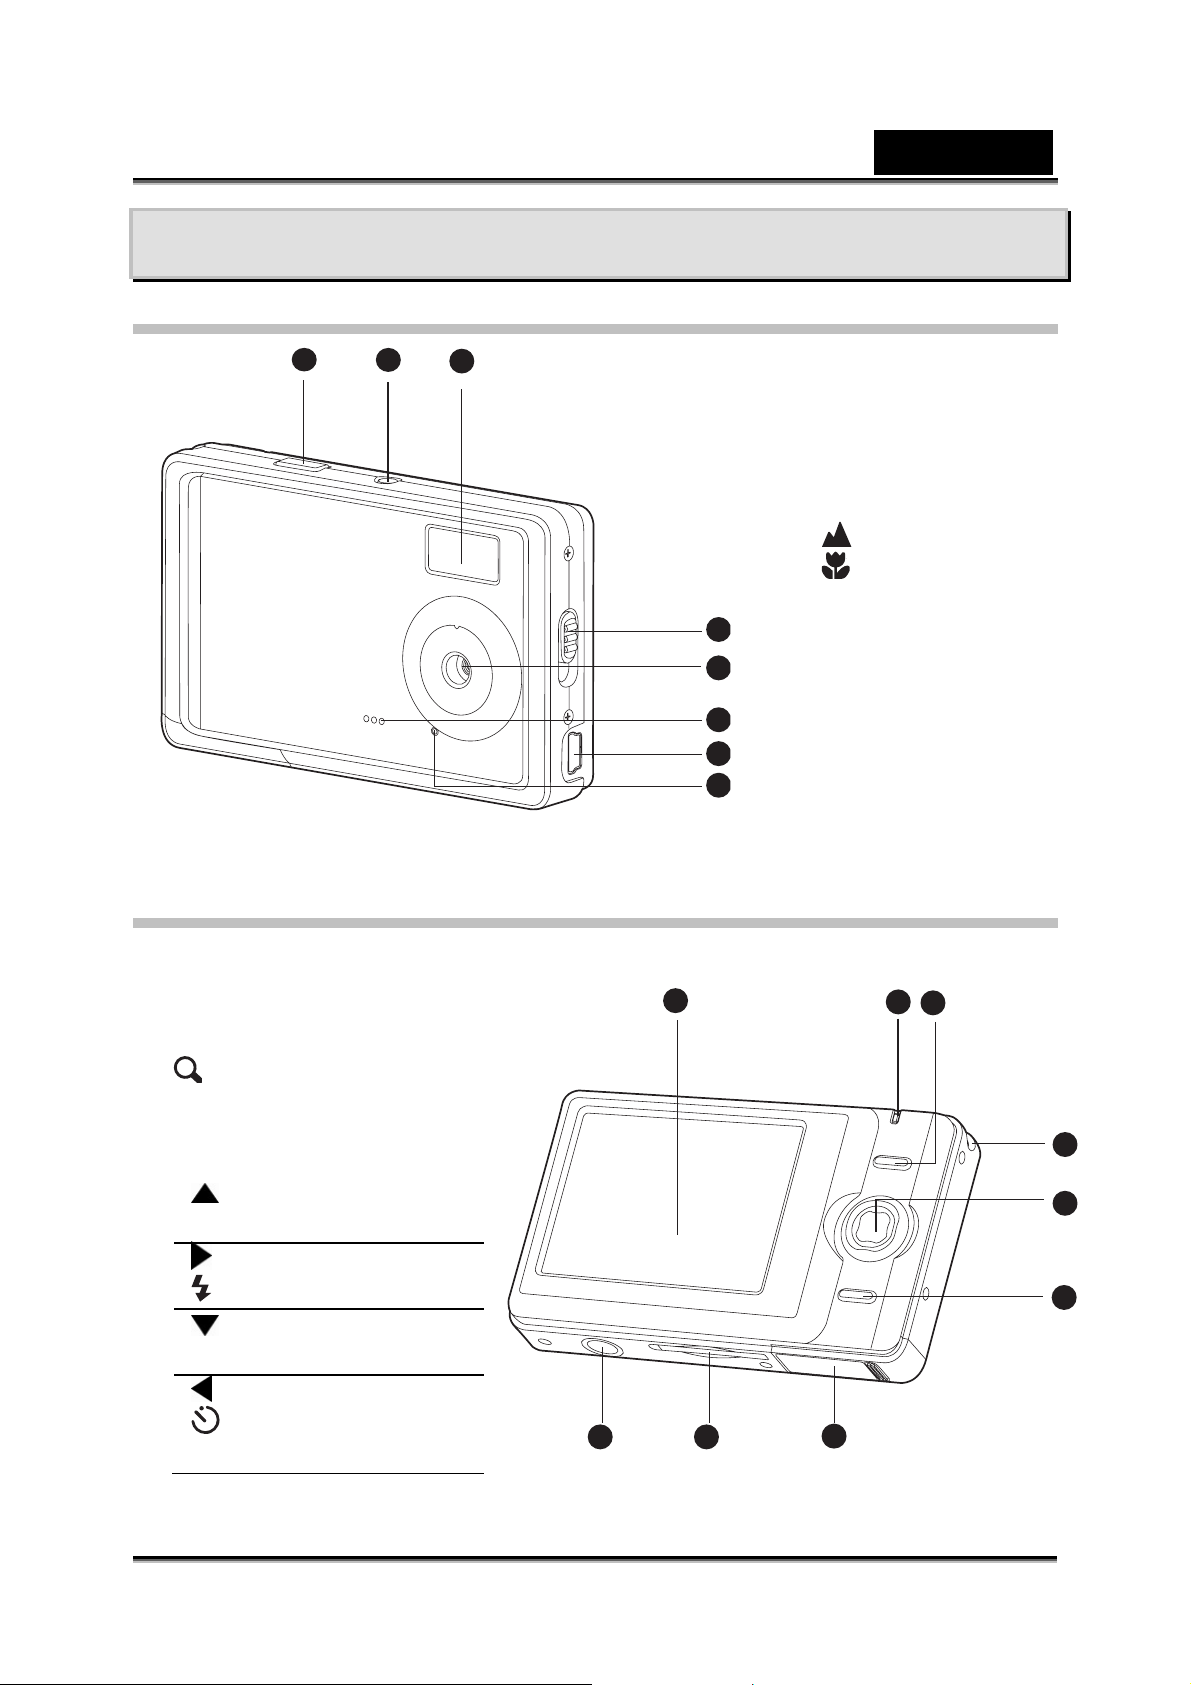
GETTING TO KNOW YOUR CAMERA
Front View
1
Rear View
2
3
4
5
6
7
8
1. Shutter button
2. Power button
3. Flash
4. Focus switch
Normal mode
5. Lens
6. Beep
7. USB connector
8. Self-timer LED
Macro mode
1. LCD monitor
2. Status LED
3. OK button
Digital Zoom button
4. Strap holder
5. 4-way control button
Up button
MENU Menu button
Right button
Flash button
Left button
MODE Mode button
Left button
Self-timer
button
1
9
8
7
2
3
4
5
6
-8-
Page 9
6. Playback button
7. Battery cover
8. SD/SDHC memory card sl ot
9. Tripod socket
LCD Monitor Information
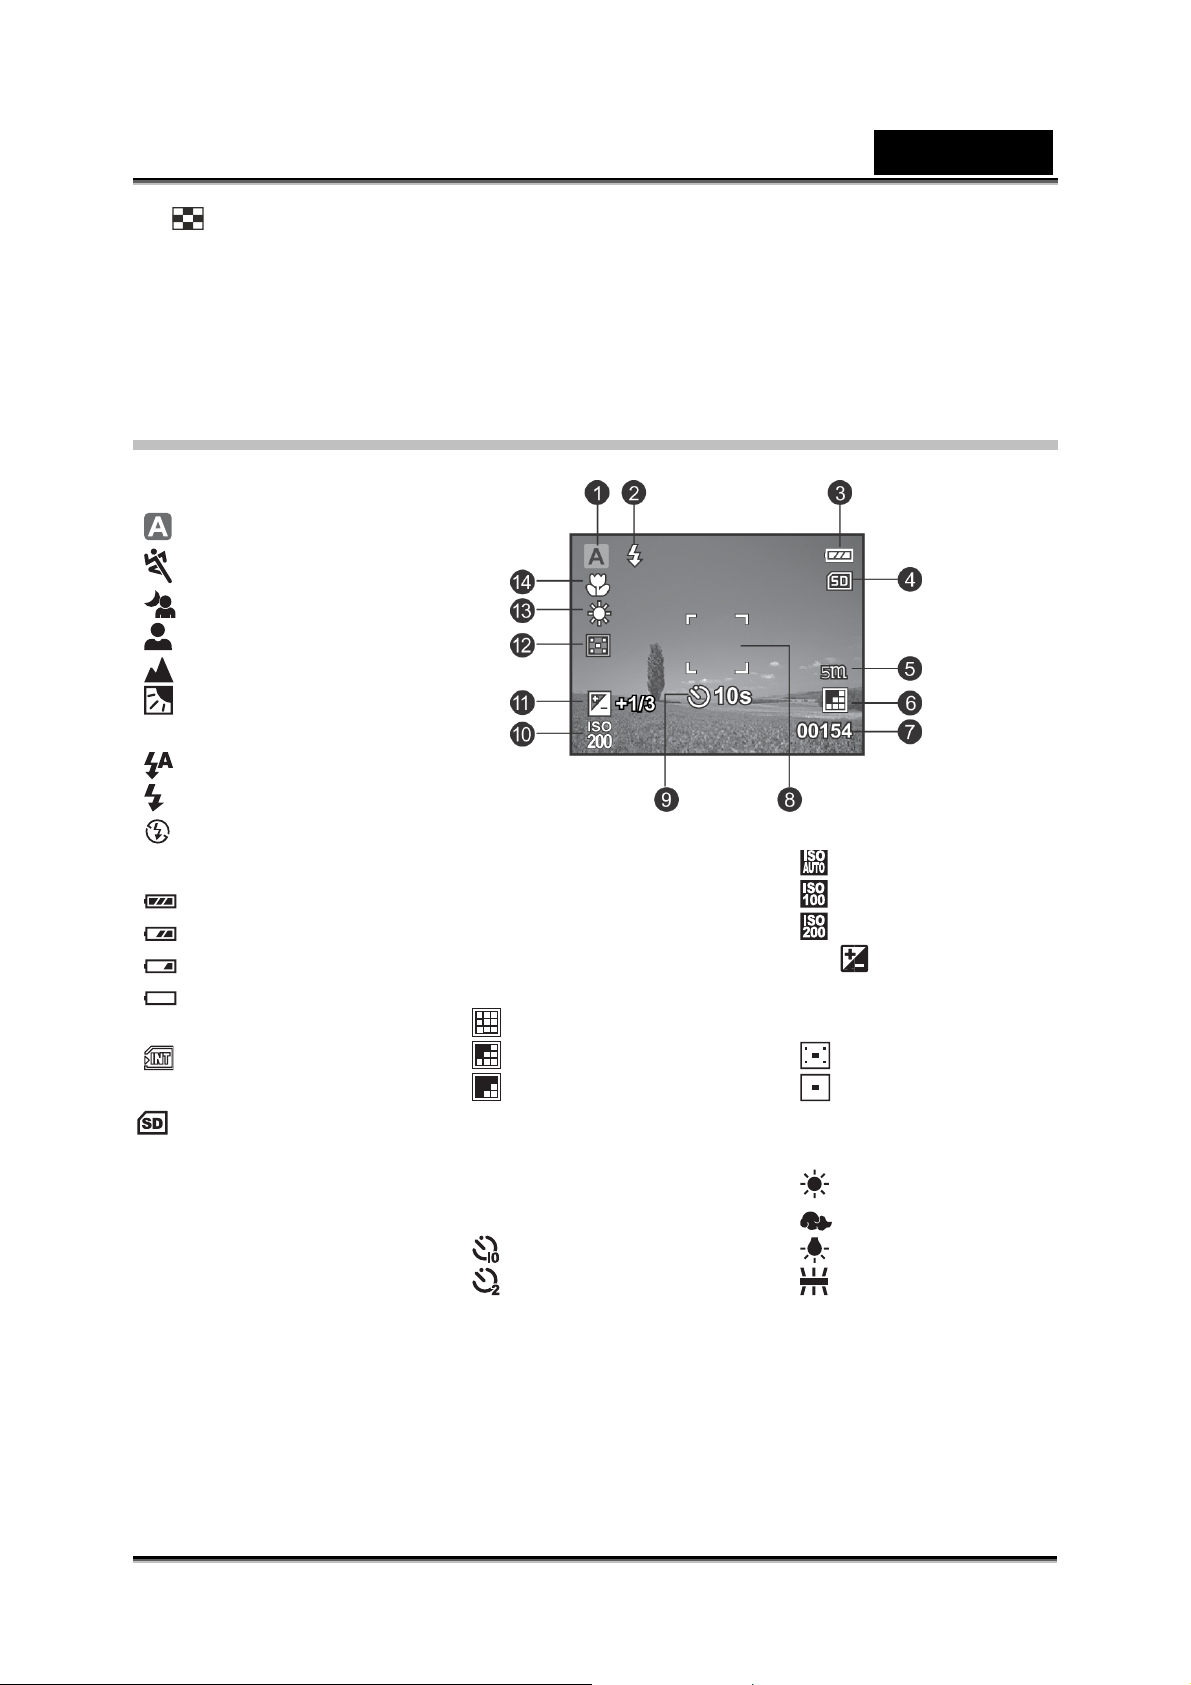
Camera Mode
1. Mode indication
] Auto Mode
[
[
] Sport Mode
] Night Mode
[
[
] Portrait Mode
] Landscape Mode
[
] Backlight
[
2. Flash mode
] Auto
[
] Forced Flash
[
[
] Flash off
m] 2560 x 1920
3. Battery
] Full battery power
[
] Medium battery
[
] Low battery power
[
] No battery power
[
4. Storage media
] Internal memory
[
(no card)
: SD/SDHC memory
card
5. Image size resolution
m] 3648 x 2736
[10
(FW Interpolation)
m] 3264 x 2448
[8
(FW interpolation)
[5
m] 2048 x 1536
[3
m] 1280 x 960
[1.3
[VGA] 640 x 480
6. Image quality
[
] Fine
] Normal
[
] Economy
[
7. Available number of
shots
8. Main focus area
9. Self-timer icon
] 10 sec. Self-timer
[
] 2 sec. Self-timer
[
10. ISO
English
] Auto
[
] 100
[
] 200
[
11. [
compensation
12. Metering
[
[
13. White balance
[Blank] Auto
[
[
[
[
] EV
] Average
] Spot
] Daylight
] Cloudy
] Tungsten
] Fluoresce nt
-9-
Page 10
Video Mode
1. Movie mode
2. Available recording time
3. Main focus area
4. Battery condition
5. Storage media
6. Video resolution
7. Exposure compensation
8. White Balance
9. Focus setting
Playback mode – still image
playback
1. Playback mode
2. Battery condition
3. Storage media
4. File number
5. Folder number
6. Protect icon
7. DPOF icon
Playback mode – Video pl ay ba ck
1. Playback mode
2. Mode icon
3. Total recorded time
4. Battery condition
5. Storage media
6. Video resolution
7. File number
8. Folder number
9. Video Play/Stop indicator
English
1 2
3
100-0001100-0001
4567
-10-
Page 11
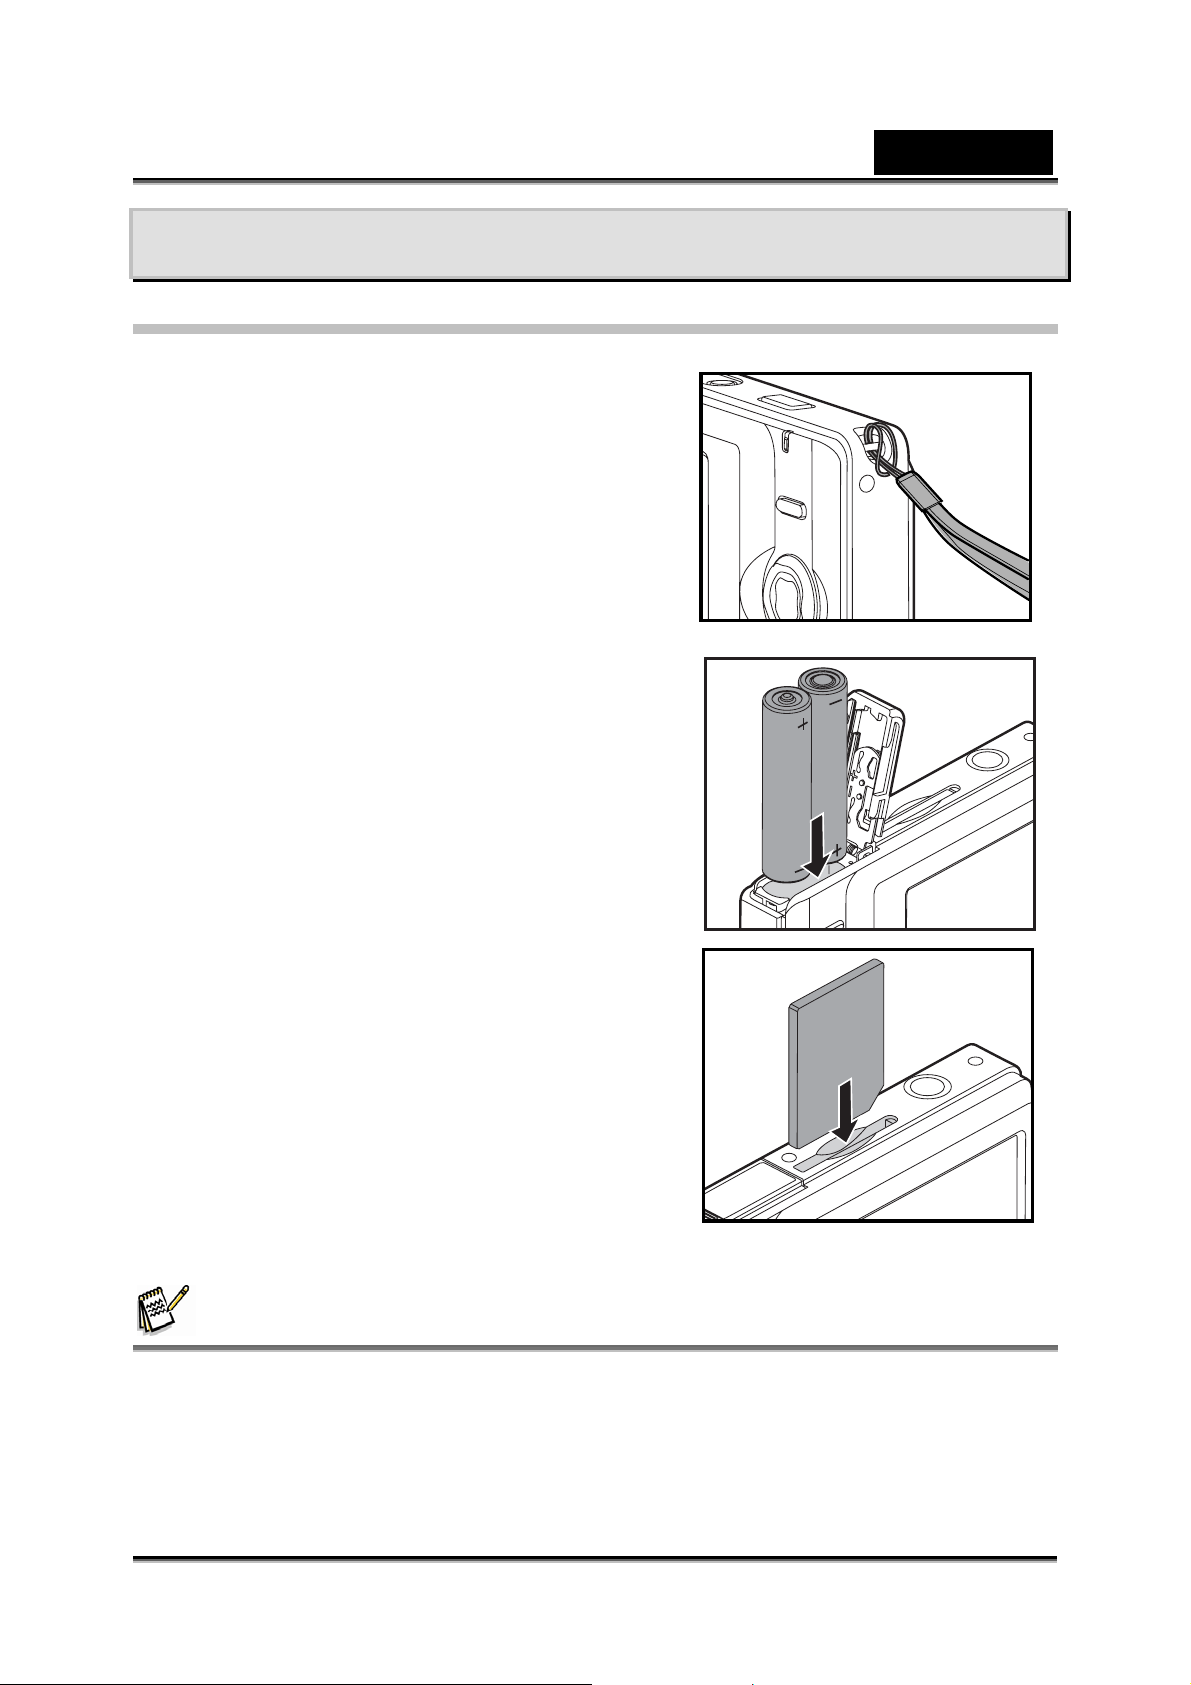
GETTING STARTED
Preparation
1. Attach the camera strap.
2. Open the battery cover.
3. Load the batteries in the correct orientati on
as shown.
4. Close the battery cover and make sure it is
locked securely.
5. Insert an SD/SDHC memory card.
The camera has 16MB int ernal mem o ry
(13.5MB available for image s torage),
but you can load a n SD/SDHC memory
card (SDHC memory card up to 4GB) to
expand the camera’s memory capacity.
Be sure to format the memory card with
this camera before its initial usage.
English
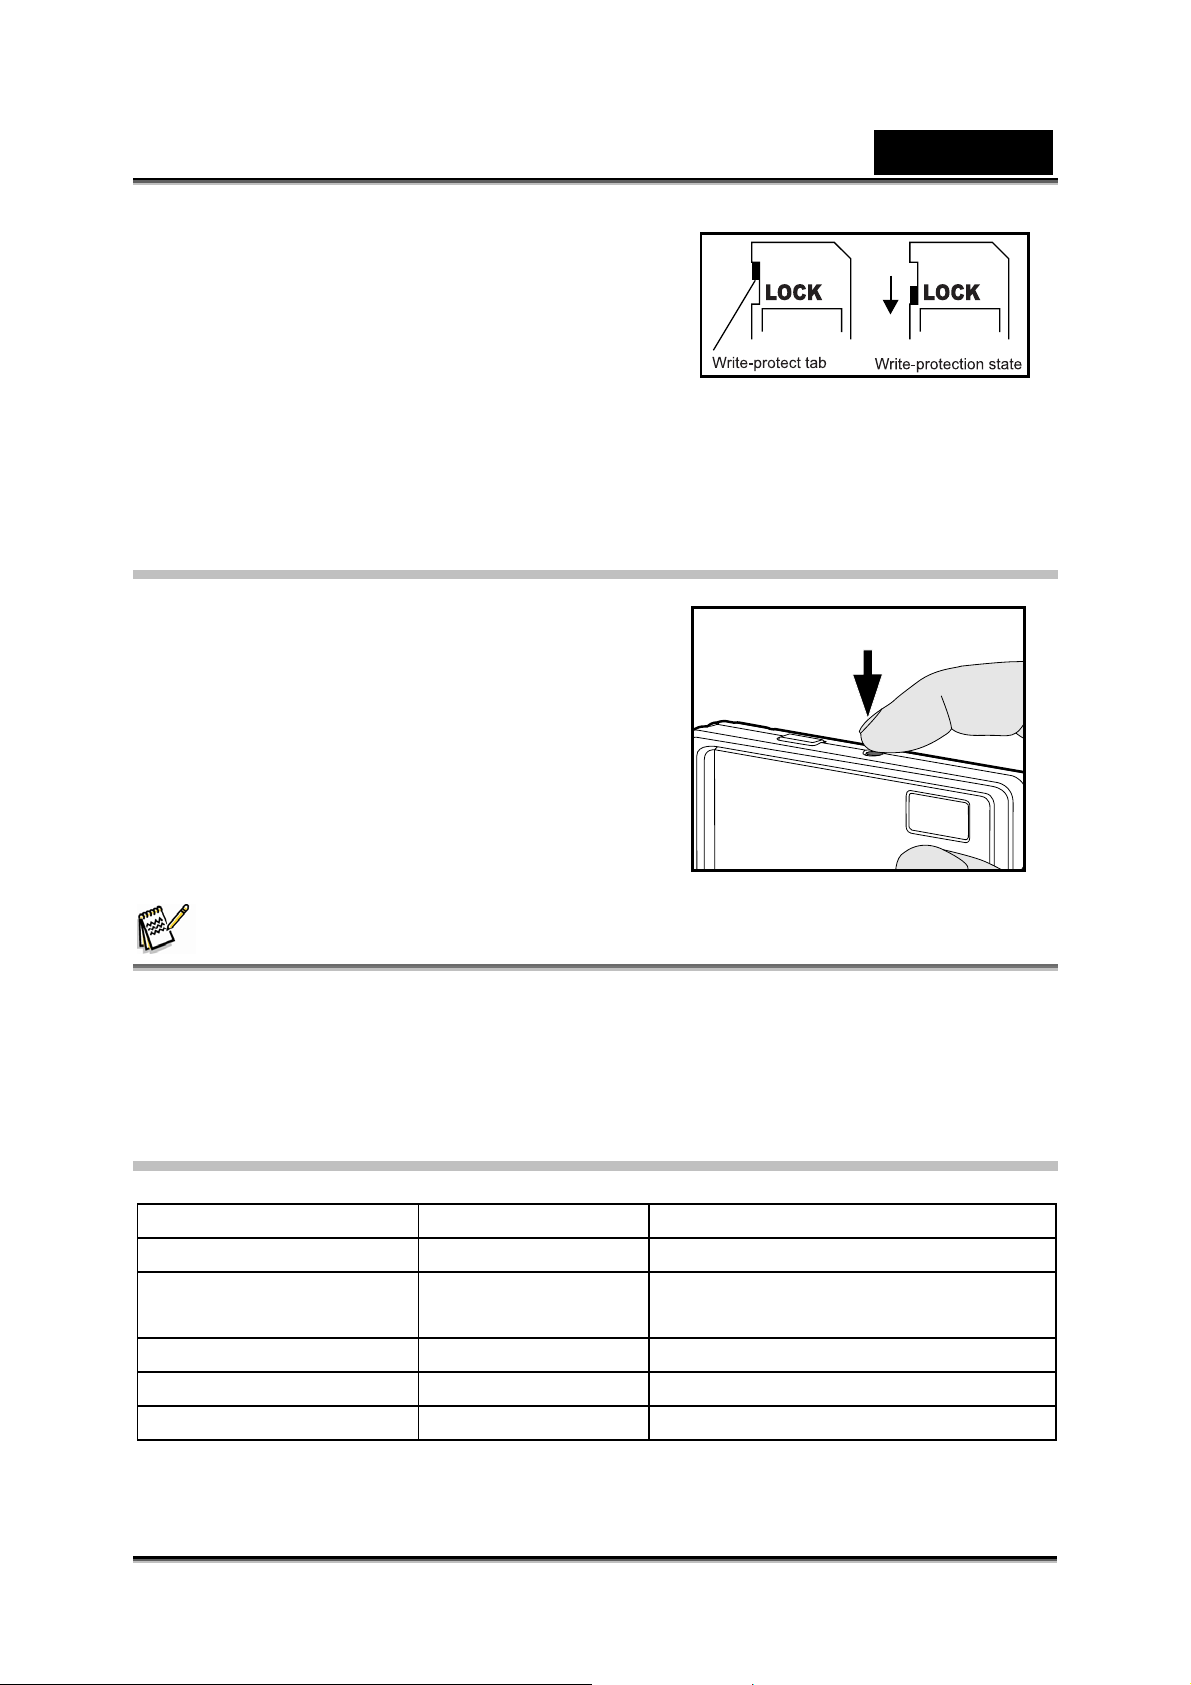
NOTE
To prevent valuable data from being accidentally erased from an SD/SDHC memory card
you can slide the write-protected tab (on the side of the SD /SDHC memory card) to
“LOCK”.
To save, edit or erase data on an SD/SDHC memory card, you must unlock the card.
-11-
Page 12
To prevent damaging of an SD/SDHC memory
card, be sure to turn off the power when
inserting or removing the SD/SDHC memory
card. If inserting or removing the SD/SDHC
memory card with the power on, the camera will
automatically turn off.
Be careful not to drop the batteries when
opening or closing the battery cover.
Turning the Power On/Off
Load the batteri es and insert an SD/SDHC
memory card before starting.
Press the POWER button until the
digital still camera turns on.
To turn the power off, press the
POWER button again.
English
NOTE
The power is turned off automatically when the camera has not been operated for a fixed
period of time. To resume the operation condition, turn the power on again. Refer to
section “Auto Off” in the Setup Menu for further det ails.
LED Indicators and Self-timer Indicators
Indicators State Description/Activity
LED indicator Solid green The digital camera is powering up.
LED indicator Solid green The digital camera is ready to
record images (or movies).
LED indicator Blinking green Reading/Writin g files.
LED indicator Blinking green Charging the flash.
Self-timer indicator Blinking red The self-timer function is activated.
-12-
Page 13

Choosing the Language
Specify in which language menus and
messages are to be displayed on the LCD
monitor.
1. Press the MENU button.
2. Select [Setup] menu with the
3. Select [Language] with the
and press the OK button.
The Language setting screen wi ll be
displayed.
4. Select the displayed language with the
buttons, and press the OK button.
The setting will be stored.
button.
buttons,
English
Formatting the Memory Card or Internal Memory
This utility formats the internal memory (or
memory card) and erases all stored ima ge s and
data.
1. Press the MENU button
2. Select [Setup] menu with the
3. Select [Format] with the
press the OK button.
4. Select [Execute] with the
press the OK button.
To cancel formatting, sele ct [Cancel] and
press the OK button.
button.
buttons, and
buttons, and
-13-
Page 14

English
CAPTURE MODE
Capturing Images
Your camera is equipped with a 2.5 full color LTPS-TFT LCD monitor to help you
compose images, playback recorded images/video clips or adjust menu settings.
1. Press the Power button to turn the power on.
2. Compose the ima g e on the monitor screen so that the main subject is withi n the
focus frame.
3. Press the shutter button to capture the image.
Using the Zoom Function
This camera is equi pped with 4x digital zoom. You can enl arge the subject s by
pressing the OK /
magnified, the grainer the image may become.
To capture a zoomed image:
1. Press the Power button to turn the power on.
2. To activate the digital zoom, press the OK /
button.
The status of digital magni fication is
displayed on the LCD monitor.
3. Compose your scen e and press the shutter
button to capture the image.
button. It’s a useful feature, h owever, the mo re the image is
NOTE
The digital magnification ranges from 1.0x to 4.0x.
As you record video clips, the zoom function cannot be activated.
Setting the Focus
Images can be captured by sliding the focus
switch to set the fo cus mo d es: [
normal mode.
1. Press the Power button to turn the power on.
2. Slide the focus switch to your desired focus
mode.
3. Compose you r scene and press the shutter
button.
] macro or [ ]
-14-
Page 15

English
The table below will help you choose the appropriate focus mode:
Focus mode Description
[ ] Infinity This mode is suitable for scenery and portrai t shooting .
[ ] Marco Select macro to capture close-up imag es. When the lens
is zoomed to its w idest position you may focus objects as
close as 60 cm.
Using the Scene Mode
You can select the scene mode according to the shooting scene. There are six
available scene modes.
Mode Description
Auto Select this mode to adjust point-and-shoot action.
Sports Select this mode to photograph fast-moving subjec ts.
Night Select this mode to capture dark scen es such as night views.
Portrait Select this mode to capture an image that makes the person
Landscape Select this mode to capture an image with infinity focus, hard
Backlight Select this mo de to capture images as the light comes f rom
1. Press the MENU button.
The [Capture] menu is displayed.
2. Select [Scene Mode] with the buttons, then press the OK button.
3. Select the desired scene mode with the buttons, then press the OK button.
4. To exit fr om the menu, pres s the button.
stand out against a defocused (b l urred) backg round.
sharpness and high saturation.
behind the object.
-15-
Page 16

English
Adjusting the Exposure (EV Compensation)
You can manually adjust the exposure determined by the digital camera. Use this
mode when the proper exposure cannot be obtai ned, for example, when the cont rast
(different between light and dark) between the subject and the b ackground is
extremely large. The EV compensation value can be set in the range from -2.0EV to
+2.0EV.
1. Press the MENU button.
The [Capture] or [Video] menu is
displayed.
2. Select [EV] with the buttons, then
press the OK button.
3. Use or to set the range of EV
compensation value from -2.0EV to +2.0EV,
then press the OK button.
4. To exit fr om the menu, pres s the button.
Effective Subjects and Set Values
+(positive)
compensation
• Printed matter with
black text on whitish
paper.
• Backlighting.
• Bright scenes or
strong reflected light
such as ski slope s.
• When the sky
accounts for a la rge
area on the screen.
-(negative)
compensation
• People illuminated
by a spotlight, in
particular, agai nst
dark background.
• Printed matter with
white text on
blackish pape r.
• Weak reflecting
bodies such as
evergreen trees or
darkish leaves.
Ex.: In Camera Mode
Backlight correction
(+1/3 EV, fixed)
• When the
background is bright
and the subject is
dark.
• When subjects
(people) have a light
source such as the
sun to their backs.
-16-
Page 17

English
Using the Flash
The flash is designed to function automatically when lighting conditions warrant the
use of flash. You can take an image using a desired flash mode depending on the
circumstances.
1. Press the four-way control ( / ). The flash mode changes each time the button
is pressed.
2. Compose your scene and press th e shutter release button.
The camera has three flash modes: Auto, Forced Flash and Flash off.
The table below will help you to ch oose the appropriate flash mode:
Flash mode Description
[ ] Auto Flash The flash fires automat ically to suit the photogra phic
[ ] Forced Flash
[ ] Flash Off
conditions.
In this mode, the flash always fires. Use this mode for
photographing under artificial light such as backlighting.
Use this mode when capturing images using indoor
lighting, for st ages and indoor competitions, and w hen the
subject is too far away for the fl ash to be effect ive.
Setting the Self-timer
The self-timer can be used in situations such as group shots. When using this option,
you should either mount the camera on a tripod (recommended) or rest it on a flat,
level surface.
1. Press the four-way co nt ro ller (
self-timer changes each time the button is pressed.
2. Compose your scen e and press the shutt er release button.
The self-timer function is activated.
The photograph is then tak en after the preset time.
The table below will help you choose the appropriate self-t imer mode:
Self-timer mode Description
[ 10s] 10 sec. The image is captured about 10 seconds after the shutter
button is pressed.
[ 2s ] 2 sec. The image is captured about 2 seconds after the shutter
button is pressed.
/ ) to select you r d esire d self - timer mode .. T he
-17-
Page 18

English
Possible number of shots (still image)
The table shows the approximate shots that you can capture at each setting based on
the capacity of the internal memory and the SD/SDHC memory card.
SD memory Card capacity
256
MB
512
MB
1
GB
Size Quality
Fine 3 21 43 88 178 333 667 1336
10M
8M
Standard 5 35 72 145 293 547 1097 2196
Economy
Fine 3 23 48 98 198 370 741 1485
Standard 6 39 80 162 326 608 1219 2440
Economy
Fine 4 28 57 117 235 440 883 1767
Internal
Memory
64
MB
128
MB
9 55 112 227 456 852 1707 3416
10 61 125 252 507 947 1897 3796
2
GB
4GB
SDHC
5M
3M
1.3M
VGA
Standard 8 46 95 193 388 724 1451 2904
Economy
Fine 7 44 91 183 369 689 1380 2762
Standard 13 73 150 302 607 1133 2268 4539
Economy
Fine 21 115 234 472 946 1766 3535 7073
Standard 35 190 386 776 1556 2902 5808 11621
Economy
Fine 88 466 941 1891 3790 7068 14144 28297
Standard 145 766 1547 3107 6228 11612 23238 46489
Economy
13 73 149 301 604 1128 2258 4518
21 115 234 471 945 1763 3529 7061
55 297 601 1207 2421 4515 9036 18078
226 1193 2407 4834 9689 18064 36148 72317
-18-
Page 19

English
VIDEO MODE
Recording Video Clips
This mode allows you to record video clips at a resolution of VGA (640 x 480) / QVGA
(320 x 240) pixels.
1. Press the MODE button to set the camera
mode to [
2. Compose th e i mage.
3. Press the shutter button.
The recordi n g of the video clip will start .
Pres the s hut ter button one more time to
end the recording of t h e video clip.
The recordin g t ime depends on the s t orage
size and the subject of the image to be
recorded.
].
NOTE
When recording a video clip, the flash cannot be used.
I f the write speed of your SD/SDHC memory card is not fast enough for recording video
clips in the currently selected size, the video recording will stop. In this case, select a
video size lower than the current one.
Playing Back Video Clips
You can play back recorded video clips on the
camera.
1. Press the [
The last image a ppears on the screen.
2. Select the desired video clip wi th the
buttons.
3. Press the OK button.
A press of the buttons during
playback allows fast forward play / fast
reverse play.
To stop video playback, press the button. This stops playback and returns
to the start of the video clip.
To pause video playback, press the OK button. This pauses video playback. To
cancel pause, press the OK but ton again.
] button.
-19-
Page 20

English
NOTE
Video clips cannot be displayed rotated or enlarged.
This camera does not have a microphone so the video is without sound.
This camera does not have a built-in speaker so you can not play back sound with the
camera. To play the video clip back on your computer, you may use either Windows
Media Player or Apple “Quick Time Player”.
Quick Time basic player is available free of charge, compatible with Mac and
Windows-computers and can be downl oaded from the App le web site a t www.apple.com.
For help using Quick Time Player usage, refer to the Quick Time on-line help for more
information.
Possible recording time / sec (video clip)
The table below indicates the approximate durati on of recording time depending on
the capacity of the internal memory and the SD/SDHC memory card.
The table shows the approximate length of time you can take video clips.
Size
VGA
640 x 480
QVGA
320 x 240
Internal
Memory
00:14
00:26
64
MB
01:04 02:12 04:27 08:58 18:00 36:05
02:08 04:21 08:46 17:41 35:27 01:11
128
MB
The values for the recording time may vary depending on the shooting condi ti ons and
settings.
The frame rate for VGA is 24fps and for QVGA is 30fps (frames per second).
SD memory Card capacity
256
MB
512
MB
1
GB
2
GB
4GB
SDHC
01:01
02:22
-20-
Page 21

PLAYBACK MODE
Playing back – Still Images
You can play back the still images on the LCD
monitor.
1. Press the [
The last image appears on the screen.
2. The images can be displayed in reve rse or
forward sequence with the
To view the previous image, press the
button.
To view the next image, press the
button.
3. Press the OK /
ratio. The magnification f ac tor is displayed on
the LCD monitor.
4. To view different portion of th e i m ages, press
the
area.
button to adjust the display
] button.
buttons.
button to adjust the zoom
English
NOTE
An [ ] icon is displayed with the video data.
The magnification factors range from 1x to 4x (within 4 stages: 1.0x, 2.0x, 3.0x, and
4.0x).
Thumbnail Display
This function allows you to view nine thumbnail images on the LCD moni tor
simultaneously so you can search for a particular
image.
1. Press the [
The last rec orded image appears o n the
LCD monitor.
2. Press the MENU button.
The playback menu is display ed.
3. Select [Thumbnail] with the
then press the OK button.
] button.
buttons,
-21-
Page 22

English
Nine thumbnail images are displayed simultaneously .
For recorded video clips, the [ ] video mode icon will be displayed.
4. Use the
displayed at regular size.
5. Press the OK button to display the selected i m age on full screen.
button to move the cursor to select the image to be
Slideshow Display
The slideshow fun ction enables you to playback yo ur still images automatically in
order one image at a time.
1. Press the [
2. Press the MENU button.
The playback menu is display ed.
3. Select [Slide Show] with the
then press the OK button.
4. Select the desired interval time with the
buttons, and press the OK button.
The slideshow starts.
5. To stop the slide show during playback , press the OK button.
The image is displayed on screen when you press the OK button.
] button.
buttons,
NOTE
The Auto Off function does not operate during slide show.
All still images in the folder are automatically played back.
Video files are displayed first frame image, and they are not played back.
Protecting Images
Set the data to read-only to prevent images from
being erased by mistake.
1. Press the [ ] button.
2. Select the image that you want to protect with
the
3. Press the MENU button.
4. Select [Protect] with the buttons, and
press the OK button.
5. Select [Single], [All], or [Select] with the
buttons, and press the OK button.
[Single]: Protects the selected image or the last image.
[All]: Protects all of the images.
buttons.
-22-
Page 23

[Select]: Select the image you want to
protect in thum bnail mode.
6. Select [Lock] with the buttons, and
press the OK button.
Protection is applied to the image and the
camera return s to the previous me nu mode.
The protect icon [ ] is displayed with
protected images .
When [All] has been selected, [ ] is
displayed with all the images.
English
Canceling the Protection
To cancel protection for only one image, display the image where you want to remove
the image protec tion.
1. Press the [ ] button.
2. Select the protected image that you want to unloc k with the buttons.
3. Press the MENU button.
4. Select [Protect] with the buttons from the playback menu, and press the
OK button.
5. Select [Single], [All], or [Select] with the buttons, and press the OK button.
6. Select [Unlock] with the buttons, and press the OK button.
The removal of image protection is executed and the camera returns to the
previous menu mode.
NOTE
Formatting an SD/SDHC memory card or internal memory overrides protection, and
erases all images regardless of their protected status.
-23-
Page 24

English
DPOF Settings
DPOF is the abbreviation for Digital Print Order Format, which allows you to embed
printing information on your memory ca rd. You can select the images t o be printed
and how many prints to make with the DPOF
menu in the camera and insert the memo ry
card to the card compatible printer. When the
printer starts printing, it will read the embedded
information on the memory card and print the
specified images.
1. Press the [ ] button.
2. Select the image that you want to set DPOF
with the
3. Press the MENU button.
4. Select [DPOF] with the buttons, and
press the OK button.
The DPOF setting screen is displayed.
7. Select [Single] or [All] with the
buttons, and pres s the OK button.
[Single]: Sets DPOF for each individual
image.
[All]: Sets DPOF for all images at once.
8. Select [Print Num] with the buttons,
and press the OK button.
This displays the number of pri n ts
setting screen.
6. Set the num b er of prints with the
buttons, and press the OK button.
You can set up to 99 prints for each
image.
This creates a file containing the DPOF
information, and when the operation is
finished, the screen returns to the
playback mode.
The DPOF icon [ ] is displayed on each
image that has s et up DPOF settings.
buttons.
-24-
Page 25

Erasing Images
Erasing single image / Erasing all images
1. Press the [ ] button.
The last imag e will be displayed on the
screen.
1. Select the image you want to erase with the
buttons.
2. Press the MENU button.
3. Select [Delete] with the
press the OK button.
4. Select [Single], [All], or [Select] with the
buttons, and press the OK button.
[Single] : Erases the selected i m age or
the last image.
[All]: Erases all of the images except for
the protected images.
[Select]: Select the image you want to
erase in thumbnail mode.
5. Select [Execute] with the
and press the OK button.
To not erase, select [Cancel], and press
the OK button.
buttons and
buttons,
English
NOTE
Deleting an image will not affect sequential image numbering. For example, if you delete
image number 240, the next captured image will be numbered 241 even though 240 no
longer exists. In other words, an image-number is retired when an image is deleted and
will not be reused or reassigned to another subsequently captured image.
-25-
Page 26

English
MENU OPTIONS
Camera Menu
This menu is for the basic settings to be used when capturing still images.
1. Press the MODE button to set the camera mode to Camera.
2. Press the MENU button.
3. Select the desired option item with the
enter its respective menu.
4. Select the desired setting with the
5. To exit from the me nu, press the
button.
Size
This sets the size of the image that will be captured.
[10m] 10MP (3648 x 2736 pixels) (FW interpolation)
[8m] 8MP (3264 x 2448 pixels ) ( F W interp olation)
[5m] 5MP (2560 x 1920 pixels)
[3m] 3MP (204 8 x 15 36 pi xels)
[1.3m] 1.3M P (1280 x 960 pixels )
[VGA] VGA (640 x 480 pixels)
Quality
This sets the qualit y (compression) at which the image is captured.
[ ] Fine
[ ] Standard
[ ] Economy
Scene Mode
Refer to “Setting the Scene Mode” for further details.
buttons, and press the OK button to
buttons, and press the OK button.
-26-
Page 27

English
EV
Refer to “Adjusting the Exposure (EV Compensation)” for further details.
Metering
This sets the metering method for calculating the exposure.
[ ] Average: The entire area of the screen is measured, and the exposure is
calculated.
[ ] Spot: A very small portion of the center of the screen is measured, and th e
exposure is calculated.
W. Balance
This sets the white balance for a variety of lighting conditions and pe rmits images to
be captured that approach the conditions that are seen by the human eye.
[ Blank ] Auto
[ ] Daylight
[ ] Cloudy
[ ] Tungsten
[ ] Fluorescent
ISO
This sets the sensitivity for capturing images. When the sensitivity is raised (and the
ISO figure is increased), photography will become possible even in dark locations, but
the more pixilated (grainier) t he image will appear.
Auto
100
200
Color
This sets the color of the image that will be captured.
Standard
Vivid
Sepia
B&W
Saturation
This sets the saturation of the image that will be captured.
High
Normal
Low
-27-
Page 28

English
Sharpness
This sets the sharpn ess of the image that will be captur ed.
Hard
Normal
Soft
Preview
This sets the preview interval when di splaying the captured image on t he screen
immediately after the image i s captured.
On
Off
Video Menu
This menu is for the basic settings to be used when recording video clips.
1. Press the MODE button to set the camera mode to [ ].
2. Press the MENU button.
3. Select the desired option item with the buttons, and press the OK butt on to
enter its respective menu.
4. Select the desired setting with the buttons, and press the OK button.
5. To exit fr om the menu, pres s the button.
Size
This sets the size of the video clip that will be captured.
[VGA] VGA (640 x 480 pixels)
[QVGA] QVGA (320 x 240 pixels)
EV
Refer to “Adjusting the Exposure (EV Compensation)” for further details.
-28-
Page 29

English
W. Balance
Refer to “W. Bal ance” in Capture Menu for further det ails.
Playback Menu
In the [ ] mode, choose wh ich settings are to be used for playback.
1. Press the [ ] button.
2. Press the MENU button.
3. Select the desired option item with the
enter its respective menu.
4. Select the desired setting with the
5. To exit from the menu, press the
button.
Delete
Refer to “Erasing Images” for further details.
Copy to Card
Allows you to c opy your file s from the camera’s internal memory to an SD/SDHC
memory card. Of course, you can only do this if yo u h ave a me mory card in stalled an d
some files in internal memory.
Cancel
Execute
Slide Show
Refer to “Slideshow Display” for further details.
DPOF
Refer to “DPOF Settings” for further details.
Protect
Refer to “Protecting Images” fo r further details.
buttons, and press the OK button to
buttons, and press the OK button.
-29-
Page 30

English
Thumbnail
Refer to “Thumbnail Display” for further details.
Setup Menu
Set your camera’s operating environment.
1. Press the MENU button.
2. Select the [Setup] menu with the
3. Select the desired option item with the
enter its respective menu.
4. Select the desired setting with the
5. To exit from the me nu, press the
Format
Refer to “Formatting the Memory Card or Internal Memory” for further details.
Beep
This sets whether or not to mute the camera sound each time you press the camera' s
buttons.
On
Off
Language
Refer to “Choosing the Language” for further details.
Auto Off
If no operation is performed for a s pecific period of time, the power to the camera is
automatically turned off. This feature is useful for reducing battery usage.
1 Min.
3 Min.
5 Min.
Off
button.
buttons, and press the OK button to
buttons, and press the OK button.
button.
-30-
Page 31

English
Sys. Reset
This returns all basic settings to the camera’s de fault settings.
Cancel
Execute
Light Freq.
The function allows you to change t he light frequ ency of environment to 60Hz or
50Hz.
[60Hz]: the l ight frequency of environment is 60Hz
[50Hz]: the light frequency of environment is 50Hz
Message
It will show the version of this camera.
CONNECTING TO A PICTBRIDGE
COMPLIANT PRINTER
If a printer that supports PictBridge is available, images can be printed by connecting
the digital still camera directly to the PictBridge-c ompatible printer withou t using a
computer.
Connecting the camera to the printer
1. Connect one end of the USB cable to your
camera.
2. Connect the othe r end of the USB cable to
the USB port on t he printer.
3. Select [Printer] with the
press the OK button.
Printing images
When the camera is properly connec ted to a
Pict-Bridge compliant printer and set to [Printer],
the PictBridge menu is displayed on the
monitor.
1. Select the item you want to configure with
the
[Images]: S elec t whether you want to
buttons, and
buttons, and press the OK button.
print a specific image or all images. You
may also select printing number for
specific image.
-31-
Page 32

[Size]: Select the desired paper size according to the printer type.
[Layout]: Select the desired printing
layout according to the printer type.
[Print]: After all settings are configured,
select this item to start printing.
2. If you select [Images] in the previous step,
the figure shown on the right hand side will
appear. Select [Select], [All] with the
buttons, and pres s the OK button.
[Select]: Select to print one specific
image.
[All]: Select to print all images.
3. If you select [Select] in the pr evious step,
the figure shown on the right hand side will
appear.
Select the image that you want to print
with the
Select the [Print Num] (up to 99) w ith the
buttons.
After selecting the desired image and
printing number, press the OK button to
confirm.
4. Select [Print] with the buttons, and
press the OK button to start printing.
5. The printing starts and the figure shown on
the right hand side appears.
[COMPLETE] will be displayed
temporarily, reminding you that the
printing procedure is finished.
If a print error is detected, [PRINT
ERROR] will be displayed.
buttons.
English
NOTE
The image printing may fail if the power to the camera is cut off.
-32-
Page 33

TRANSFERRING FILES TO YOUR
COMPUTER
System Requirements (Windows)
Pentium 166 MHz or higher
Windows 2000/XP/Vista
128MB RAM
128MB hard disk space
CD-ROM drive
Avail abl e USB port
System Requirements (Macintosh)
PowerPC G3/G4/G5
OS 9.0 or later
128MB RAM
128MB hard disk space
CD-ROM drive
Avail abl e USB port
English
Downloading your files
1. Connect one end of the USB cable to an
available USB port on your computer.
2. Connect the othe r end of the USB cable to the
USB terminal on the camera.
3. Select [PC] using the
the OK button.
4. From the Windows desktop, double cli ck on
“My Computer”.
5. Look for a new “remov abl e disk” icon.
This “removable disk” is actually the
memory (or memory card) in your camera.
Typically, the c a mera will be assign ed drive letter “e” or higher.
6. Double click on the removable disk and locate the DCIM folder.
7. Double click on the DCIM folder to open it to find more folders.
Your recorded images and video clips will be inside these folders.
8. Copy and paste or drag and drop the image and video files to a folder on your
computer.
Mac users: Double-click the “untitled” or “unlabeled” disk drive icon on your desktop.
iPhoto may automatically launch.
buttons, and press
-33-
Page 34

English
NOTE
Formatting the internal memory or SD/SDHC memory card by computer (via USB
connection) as NTFS file system, the stored data will be automatically deleted by the
camera.
Do not format the internal memory or SD/SDHC memory card as NTFS file system.
EDITING SOFTWARE INSTALLATIO N
MediaOne Gallery SE - makes i t the easiest way to ma nage and share your digital
life with family and friends. The intuitive thumbnail library automatically organizes
updates and sorts files for the most natural way to browse your multimedia collection.
To install software:
1. Insert the CD-ROM that came with the camera into your CD-ROM drive.
The welcome screen appears.
2. Click the respective software name.
Follow the on-screen instructions to complete the installation.
NOTE
For more information about the operation of the software, refer to its respective help
documentation.
For Windows 2000/XP/Vista users, make sure to install and use the software in
“Administrator” mode.
The software is not supported on the Mac.
-34-
Page 35

English
USING THE DIGITAL STILL CAMERA AS A
WEB CAMERA
Your camera can act as a Web camera, which allows you to videoconference with
business associates, or have a real-time conversation with friends or family. To use
the camera for videoconferencing, your computer system m ust include the i tems as
below:
Microphone
Sound card
Speakers or headphones
Network or Internet connection
NOTE
Video conferencing (or video editing) software is not included with the digital still camera.
This mode does not work with Mac.
Install the Web camera driver
The Web camera driv er included in the CD -ROM is exclus ively for Windows. The PC
camera function is not supported for Mac platforms.
1. Insert the enclosed CD-ROM into your CD-ROM drive.
2. Follow the on-screen instructions to complete the installation.
3. After the driv er installation is compl eted, restart your comput er.
-35-
Page 36

V
Z
A
A
W
A
2
2
2
W
CAMERA SPECIFICATIONS
Item Description
Image Sensor 1/2.5” 5.0 Mega Pixels CMOS Sensor
Lens Fixed Focus Lens
F/3, f=6.47mm (Ty p e: 39mm equivalent to 35m m film)
Range of Focus: Macro: 0.6~1.45m, Normal: 1.45m~Inf.
Image Resolution <Still Image>
10MP (3648 x 2736 pixels) (FW interpolation)
8MP (3264 x 2448 pi xels) (FW interpolation)
5MP (2560 x 1920 pixels), 3MP (2048 x 1536 pixels),
1.3MP (1280 x 960 pixels), VGA (640 x 480 pixels)
English
<Video clip>
GA: 640 x 480/24fps, QVGA: 320 x 240/30fps
oom 1~4X Digital Zoom (Preview & Playback)
Shutter Speed 1- 1/1000 sec.
Exposure
ISO
hite Balance
LCD monitor
Flash
Memory
Flash
Self-Timer
File Format Photo: JPEG ; Video: Motion JPEG
Connector USB port (USB 2.0 f u ll speed)
uto, Manual (-2.0 ~ +2.0 EV in 1/3 EV steps)
uto, 100, 200
uto, Manual (Daylight, Cloudy , Tungsten, Fluorescent)
.5” LTPS LCD (154K pi xels)
uto/ Forced Flash /Flash Off
6MB internal mem o ry (13.5MB avai lable for image storage)
upports SD/SDHC mem ory card (SDHC card up to 4GB)
uto/ Forced Flash /Flash Off
sec. / 10 sec. delay
Battery type
Dimensions
eight
X AAA Alkalin e Batteries
pprox. 90 x 55 x 18 mm (wi thout protruding parts)
pprox. 82g (without batteries and memory card)
Design and specifications are subject to change without notice.
-36-
Page 37

English
TROUBLESHOOTING
Refer to the symptoms and solutions listed below before sending the camera for
repairs. I f the problem pers ists, contac t your local res eller or service center.
Symptom Cause Solutions / Correct ive
Actions
The batteries are not
come on.
The batteries or
camera feels warm.
The start-up screen
blinks after powering
up.
Even if I press the
shutter button, the
camera does not
shoot.
The camera cannot
focus.
The distance to the
Files cannot be
deleted.
Cannot download
images.
loaded.
The batteries are
exhausted.
Long period of continuous
use of the camera or the
flash.
The rechargeable
batteries have reached
their effective life.
The shutter button is not
pressed all the way own.
The internal memory or
memory card does not
have any free capacity.
The flash is charging. Wait until the status LED turns
The memory card is
write-protected.
The lens is dirt y. Wipe clean with a soft, dry
subject is smaller than the
effective range.
The file is protected.
The memory card is
write-protected.
The free space on the
hard disk in your
computer may be
insufficient.
Load the batteries correctly. The power does not
Replace with a ne w set of
batteries.
Turn off the camera and wait for
5~10 minutes.
Replace with a ne w set of
rechargeable batteries.
Press the shutt er button all the
way down.
Insert a new memory card, or
delete unwanted files.
green.
Remove the write-protection.
cloth or lens paper.
Get your subject within the
effective f ocus range.
Cancel protec t ion.
Remove the write-protection.
Check whether the ha r d di sk has
a space for running Windows,
and if the drive for loading image
files has a capacity at least that
of the memory card inserted in
the camera.
-37-
 Loading...