

Page 1
Rev 2.00 Nov.2007
Page 2

Important Safety and Installation Instructions
INFORMATION RELATING TO POSSIBLE PERSONAL INJURY, ELECTRICSHOCK
AND FIRE HAZARD POSSIBILITIES HAVE BEEN INCLUDED IN THIS LIST.
WARNING - When using electrical products, basic precautions should always be
followed, including the following :
1. Read all instructions before using the product.
2. The product should be connected to a power supply only of the type described in the operating
instructions or as marked on the product.
3. Do not open the cover under any circumstances.
4. Power is supplied through a polarized line plug (one wide blade). Connect only to an outlet designed
for a polarized plug.
5. Keep the power cord away from other objects. Make sure that the cord is not twisted, placed in any
lane of traffic, or a trapped under the piano.
6. The product should be located so that its location or position does not interfere with its proper
ventilation.
7. The product should be located away from direct sunlight, water or moisture, or hot or cold air currents.
8. If the product is to remain unused for an extended period of time, its power supply should be
disconnected.
9. If repair service is necessary, refer only to authorized service personnel.
10. This product, either alone or in combination with an amplifier and headphones or speakers, may be
capable of producing sound levels that could cause permanent hearing loss. Do not operate for a long
period of time at a high volume level or at a level that is uncomfortable. If you experience any hearing
loss of ringing in the ears, you should consult an audiologist.
11. Care should be taken so that objects do not fall liquids are not spilled into the enclosure through
openings.
12. The product should be serviced by qualified service personnel when:
A. The power supply cord or the plug has been damaged; or
B. Object have fallen, or liquid has been spilled onto the product; or
C. The product has been exposed to remain; or
D. The product does not appeared to operate normally or exhibits marked change in performance; or
E. The product has been dropped, or the enclosure damaged.
Page 3

Congratulations
We greatly appreciate your purchase of the MPS2000 Silencer System Piano. The MPS2000 allows
you to enjoy your new piano any time you want without disturbing others. With the center pedal in the
Normal position, your MPS2000 functions as a quality upright acoustic piano with the added benefit of
audio and MIDI output signals. With the mute lever in the Mute position, the piano’s acoustic sound is
silenced and headphones can be used to hear the audio signal privately.
Before playing your new MPS2000 piano, we suggest reading this user’s guide thoroughly to become
acquainted with its capabilities and functions.
Important safety and installation instructions 2
I. Connection Diagram of the MPS2000 4
II. Control Panel
Front Panel 5
Rear Panel 6
III. MPS2000 Operations
How to play your MPS2000 piano silently 7~8
How to select Pre-set 9
How to select User-set 10
How to select the 128 GM sounds 11
How to select effects or variable sounds 11
How to edit User-set 12
How to change the User-set name 13
Functions of Parameter settings in EDIT mode 14~15
Metronome (Tempo, Beat, Rhythm, Volume) 16~18
Record/Play 19
Demonstration song 19
How to change the keyboard touch 20
MIDI Implementation chart 21
Drum map 22
General MIDI program map 23
IV. Initializing
How to initialize 24
How to adjust the keyboard sensitivity individually 25~26
V. Application
Connect your MPS2000 to external audio equipment 27
Connect your MPS2000 to external MIDI equipment 28
Trouble shooting 29
Table of Contents
Page 4
ⅠⅠ
.
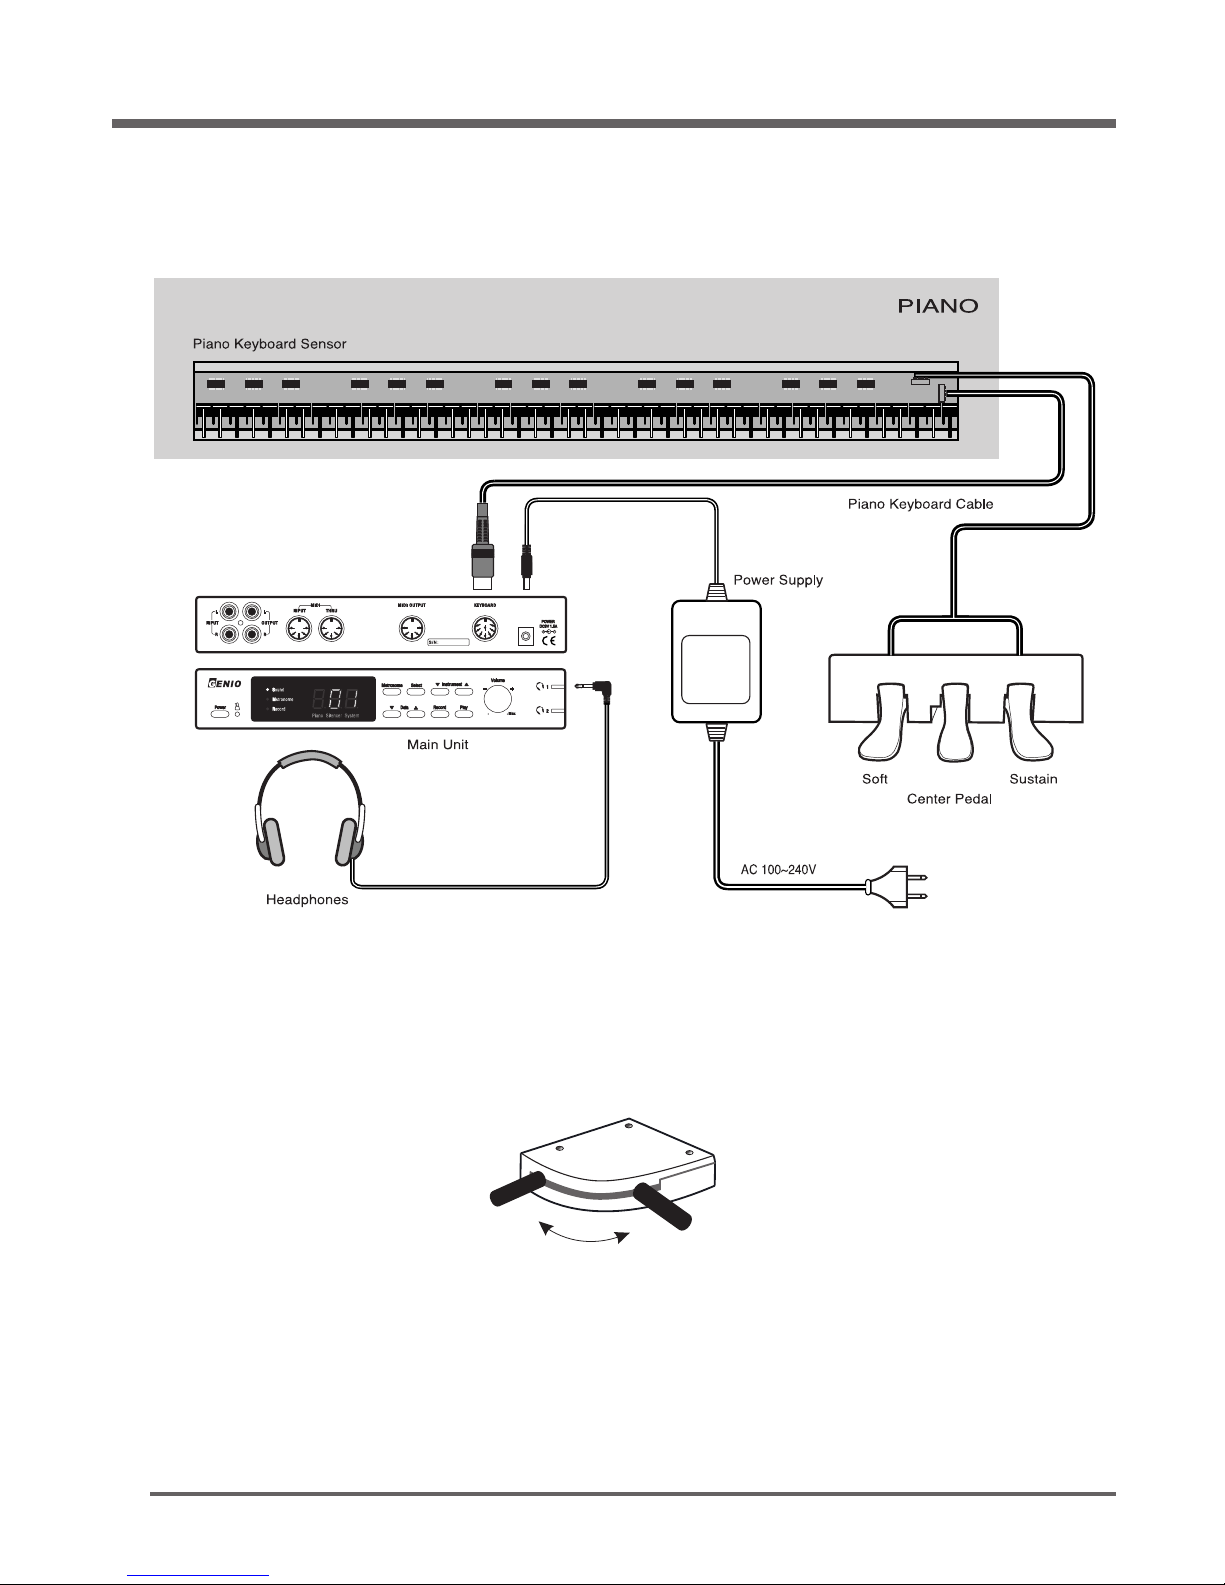
Connection Diagram of the MPS2000
MPS2000
4
Connection Diagram
Mute Lever
DC 12V 1~3A
Mute Position
Mute Lever
Real Acoustic Piano Position
Page 5
ⅡⅡ
.
Control Panel
MPS2000
5
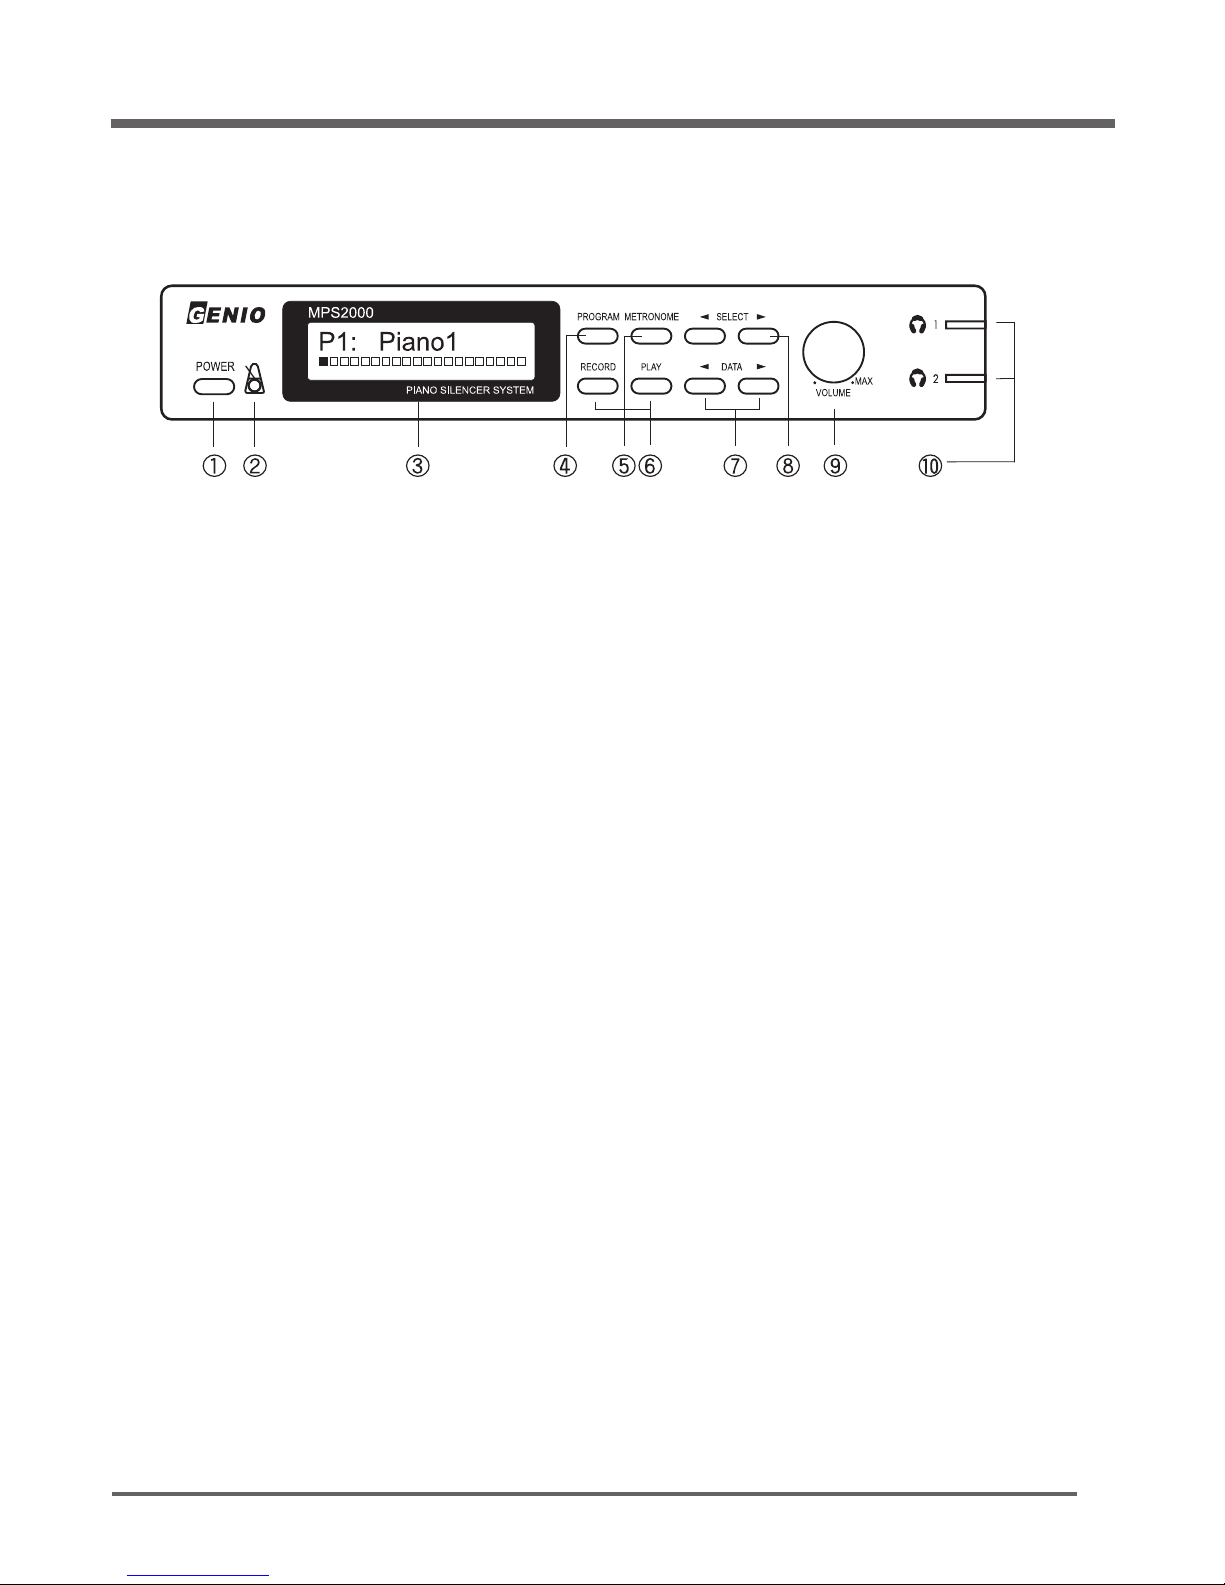
1) POWER switch
Press to turn the MPS2000 on; press again to turn it off.
2) LED Indicator
Flashes according to the metronome beat with red when down beat, green when up beat.
3) LCD Display
Shows the currently selected parameters with its dynamic or value
4) PROGRAM
Shows either an abbreviated name or a numeric value for a parameter.
5) METRONOME
Press to turn the metronome on; press again to turn it off.
6) RECORD/PLAY
Control Record and Play functions of the Recorder.
7) DATA
Modifies the currently selected parameter.
8) SELECT
Selects a parameter for display and modification.
9) VOLUME
Adjust the volume of the output of the headphone jack.
10) Headphone Jacks
Up to two headphones may be plugged into the jacks. The Indicator changes from green to red
to show that headphones are plugged in properly.
Front Panel
Page 6
MPS2000
6
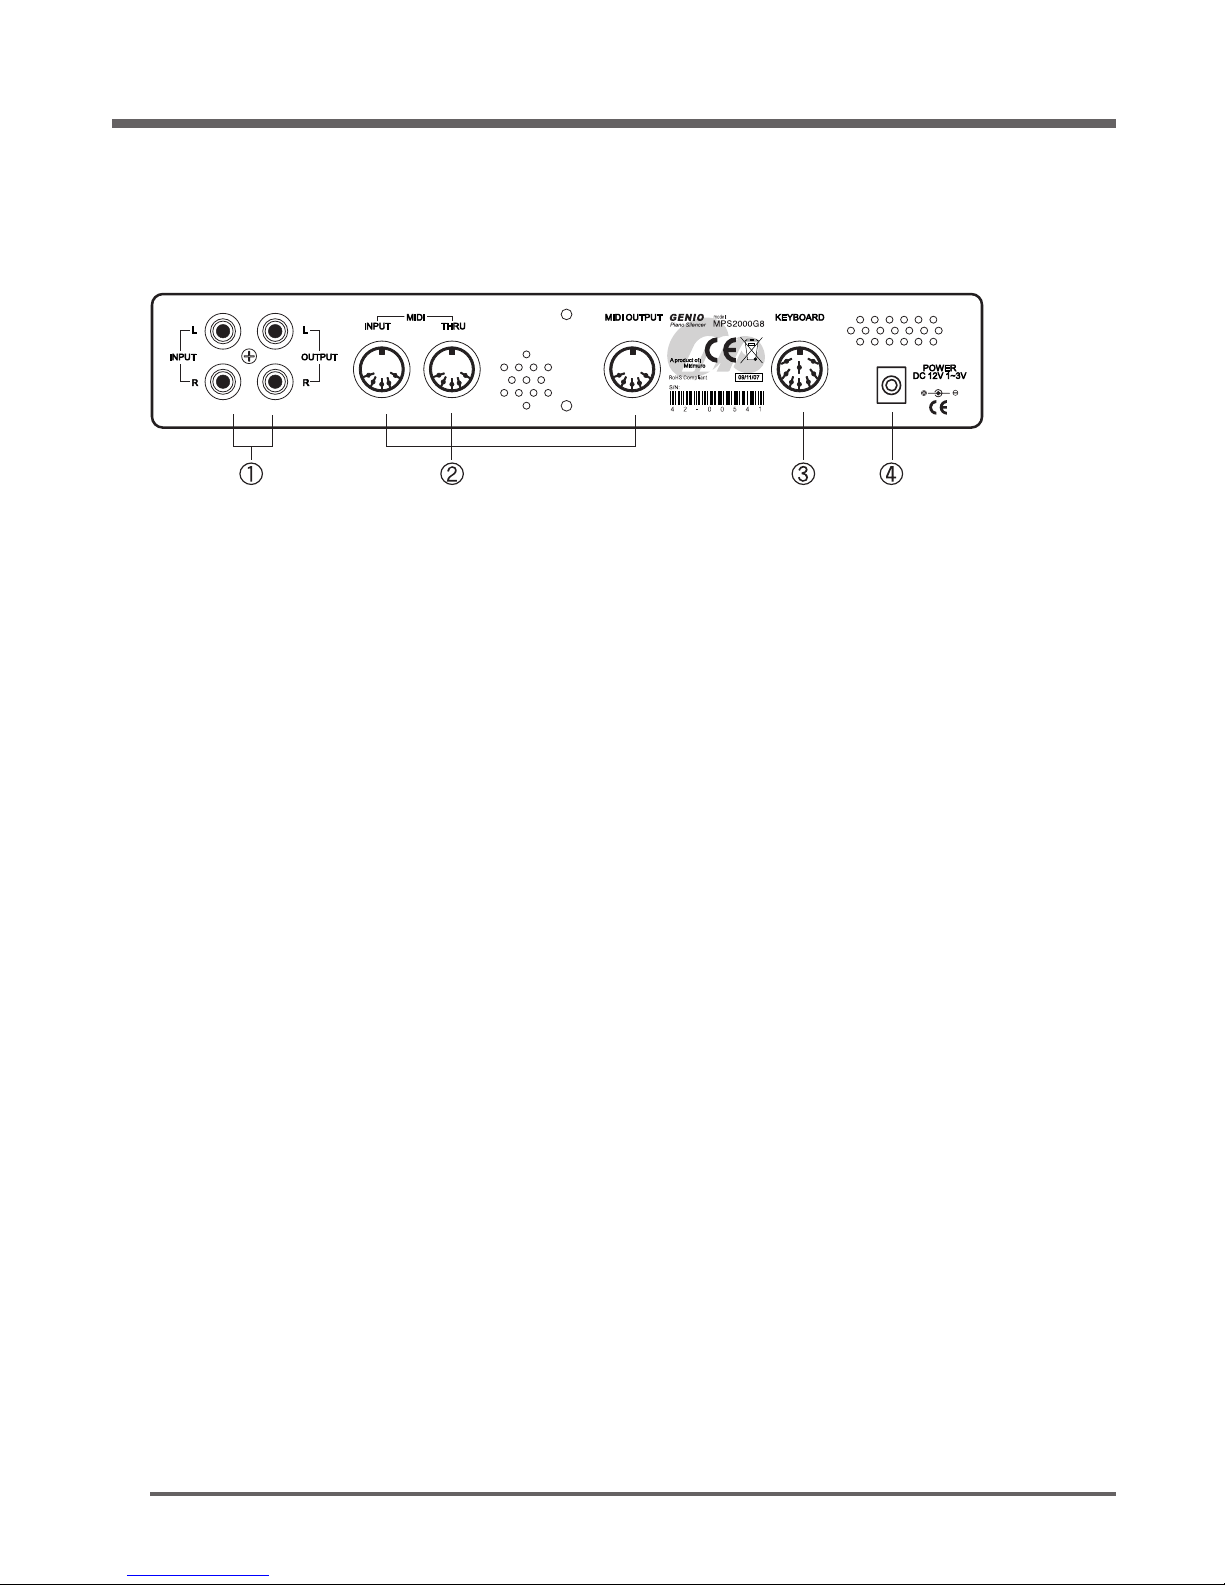
1) AUDIO In & Out
Stereo audio connections to external audio equipment.
2) MIDI In/Thru/Out
MIDI connections to external MIDI equipment or computer.
3) Keyboard
Connects to the signal cable from keyboard.
4) DC Jack
AC power adapter plugs in here.
Rear Panel
Page 7
ⅢⅢ
.
MPS2000 Operations
MPS2000
7
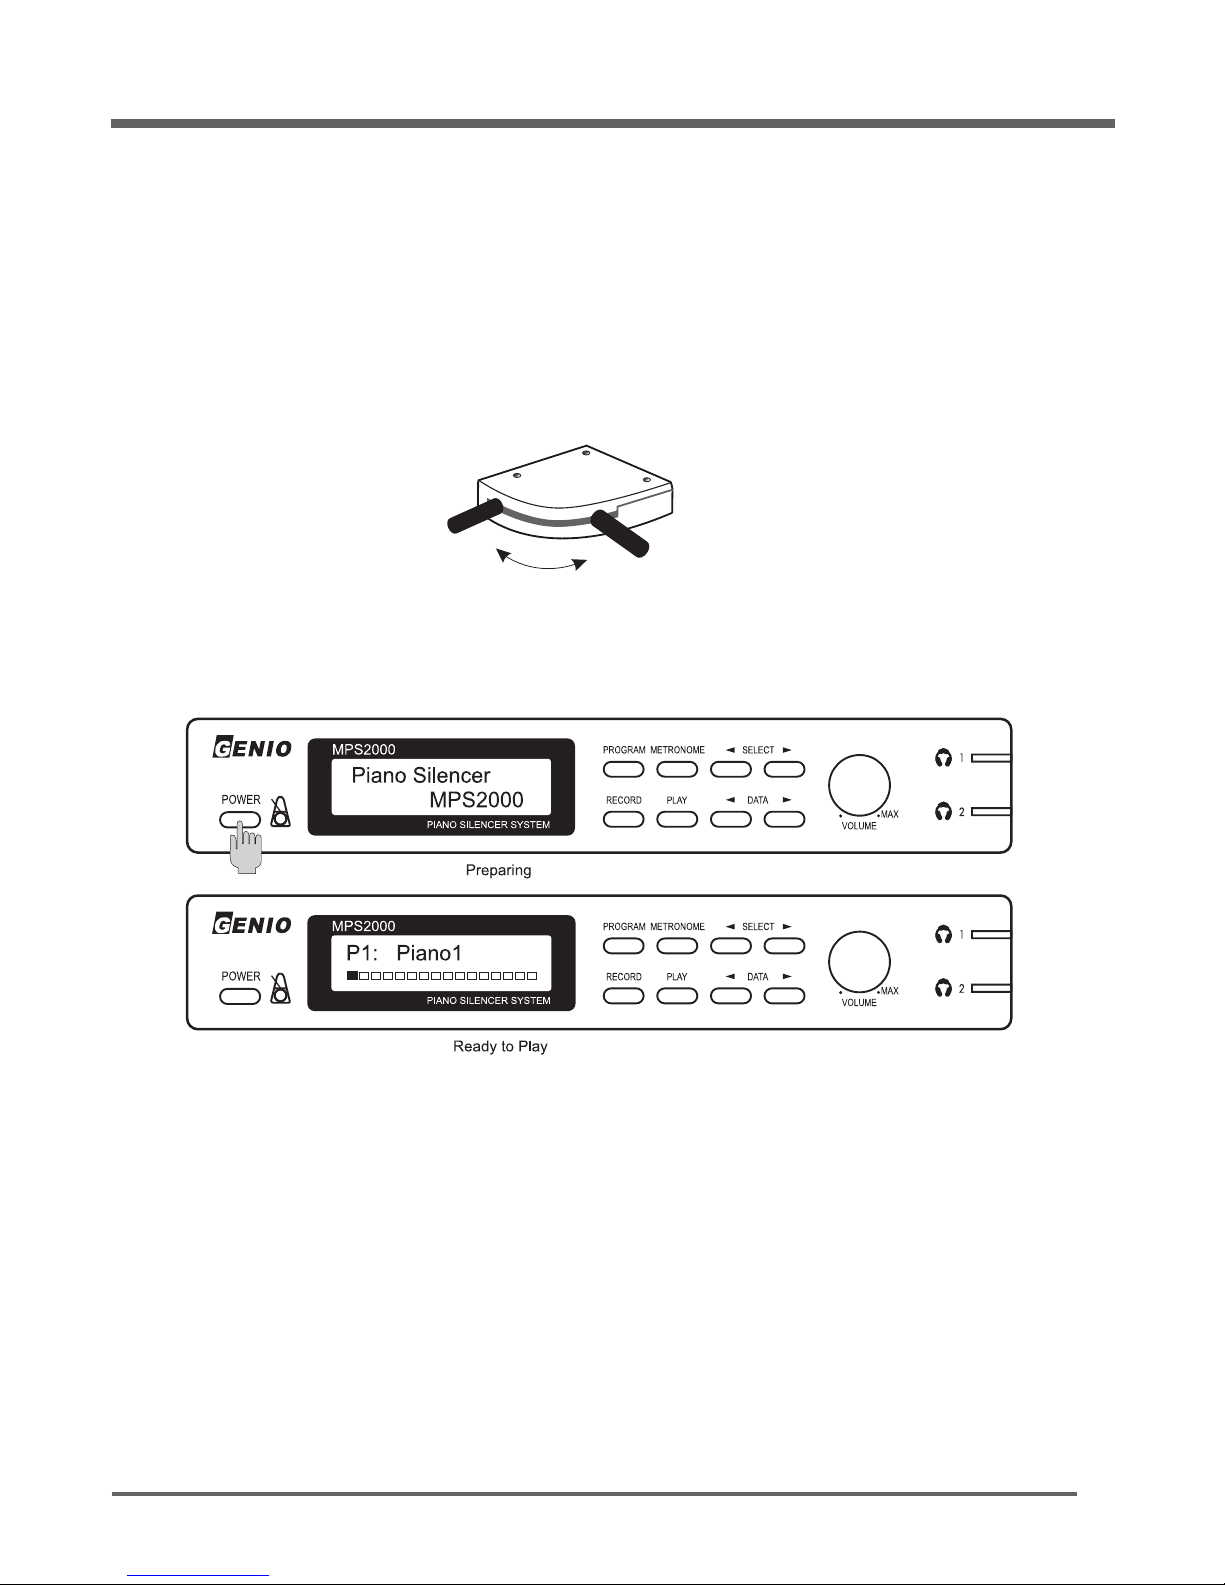
Sophisticated technology in your MPS2000 Piano allows you to play it like a standard acoustic piano or,
when desired, silently. During silent playing, only you can hear your performance, through headphones.
Make sure the AC power adapter is connected to the piano and plugged into an outlet.
Pull the Mute Lever to play the piano in silent.
Turn the MPS2000 on by pressing the POWER button on the left.
Plug headphones into either jack then put them on your head.
How to play your MPS2000 Piano silently
Mute Position
Mute Lever
Real Acoustic Piano Position
Page 8
MPS2000
8
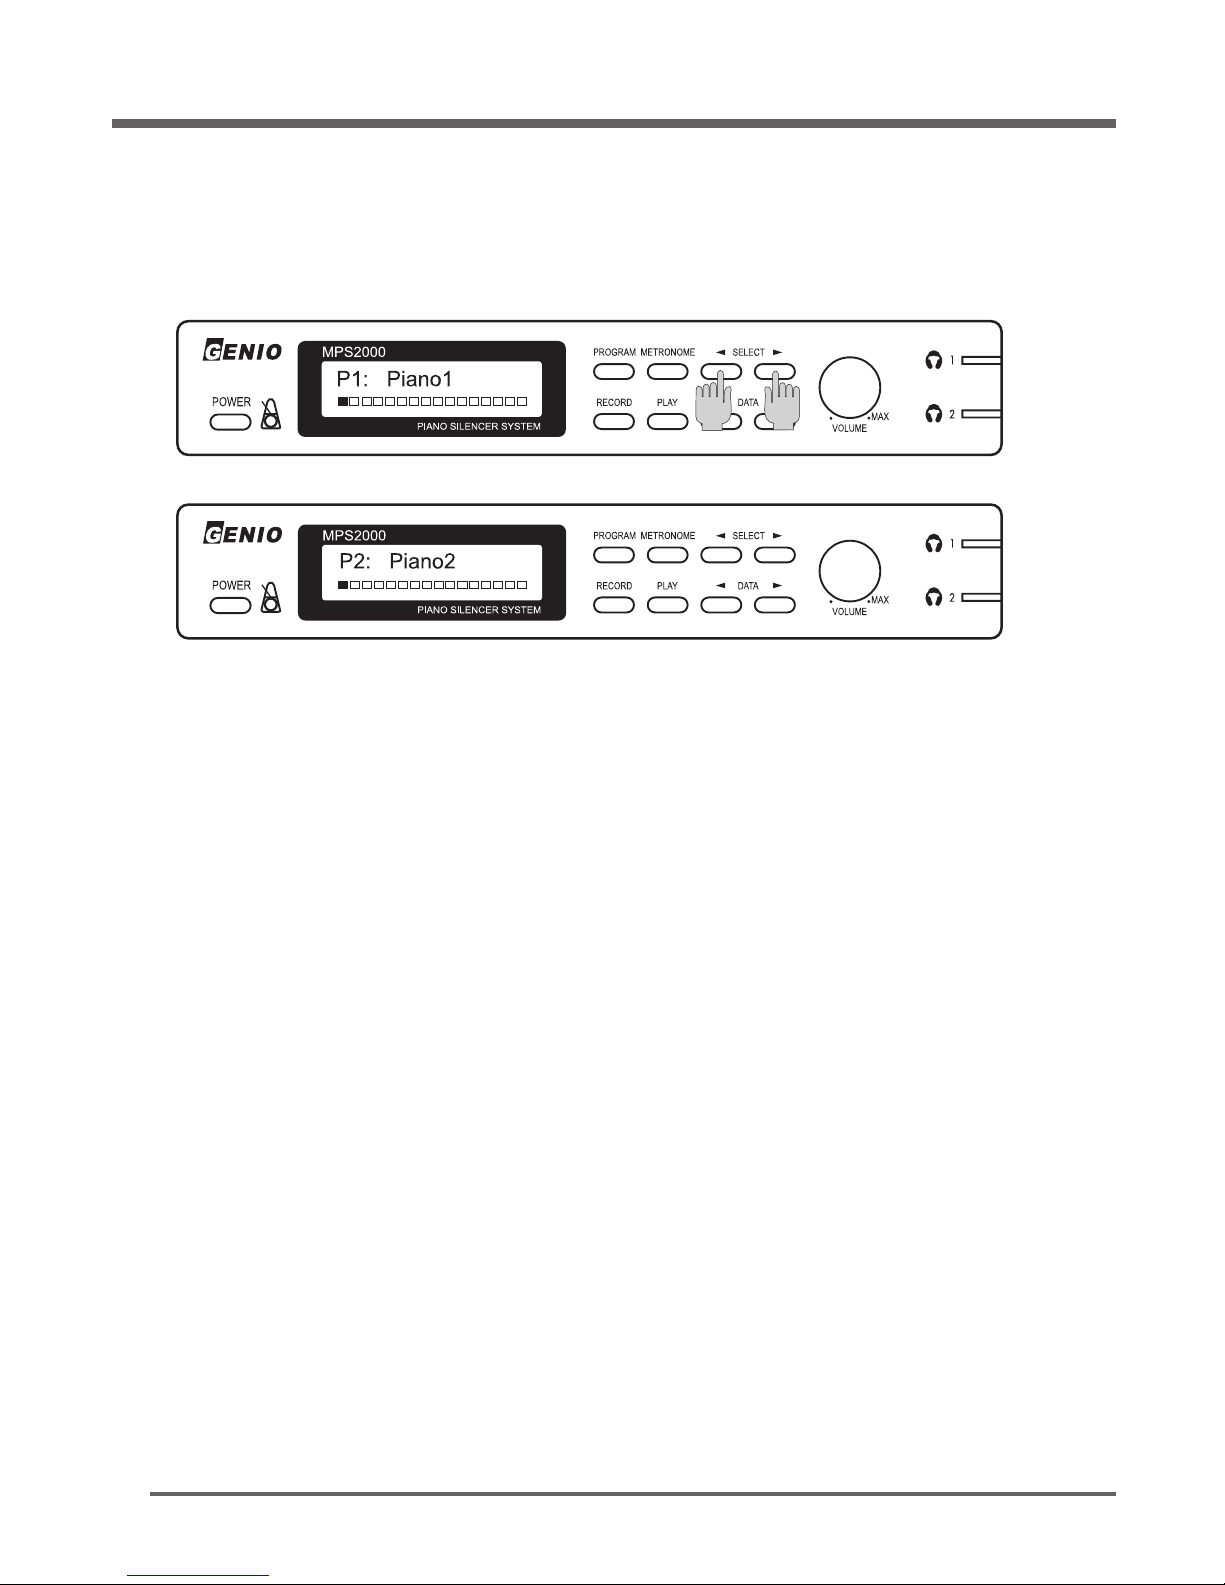
P1 : Piano1 is the default sound.
If desired,press either [◀]
SELECT
or
SELECT
[▶] button to select other program sounds.
Adjust the volume control as desired.
Enjoy your performance without disturbing other people.
NOTE:
1. When turning on the MPS2000, a few seconds of preparation are required before the unit is ready
to play.
Page 9
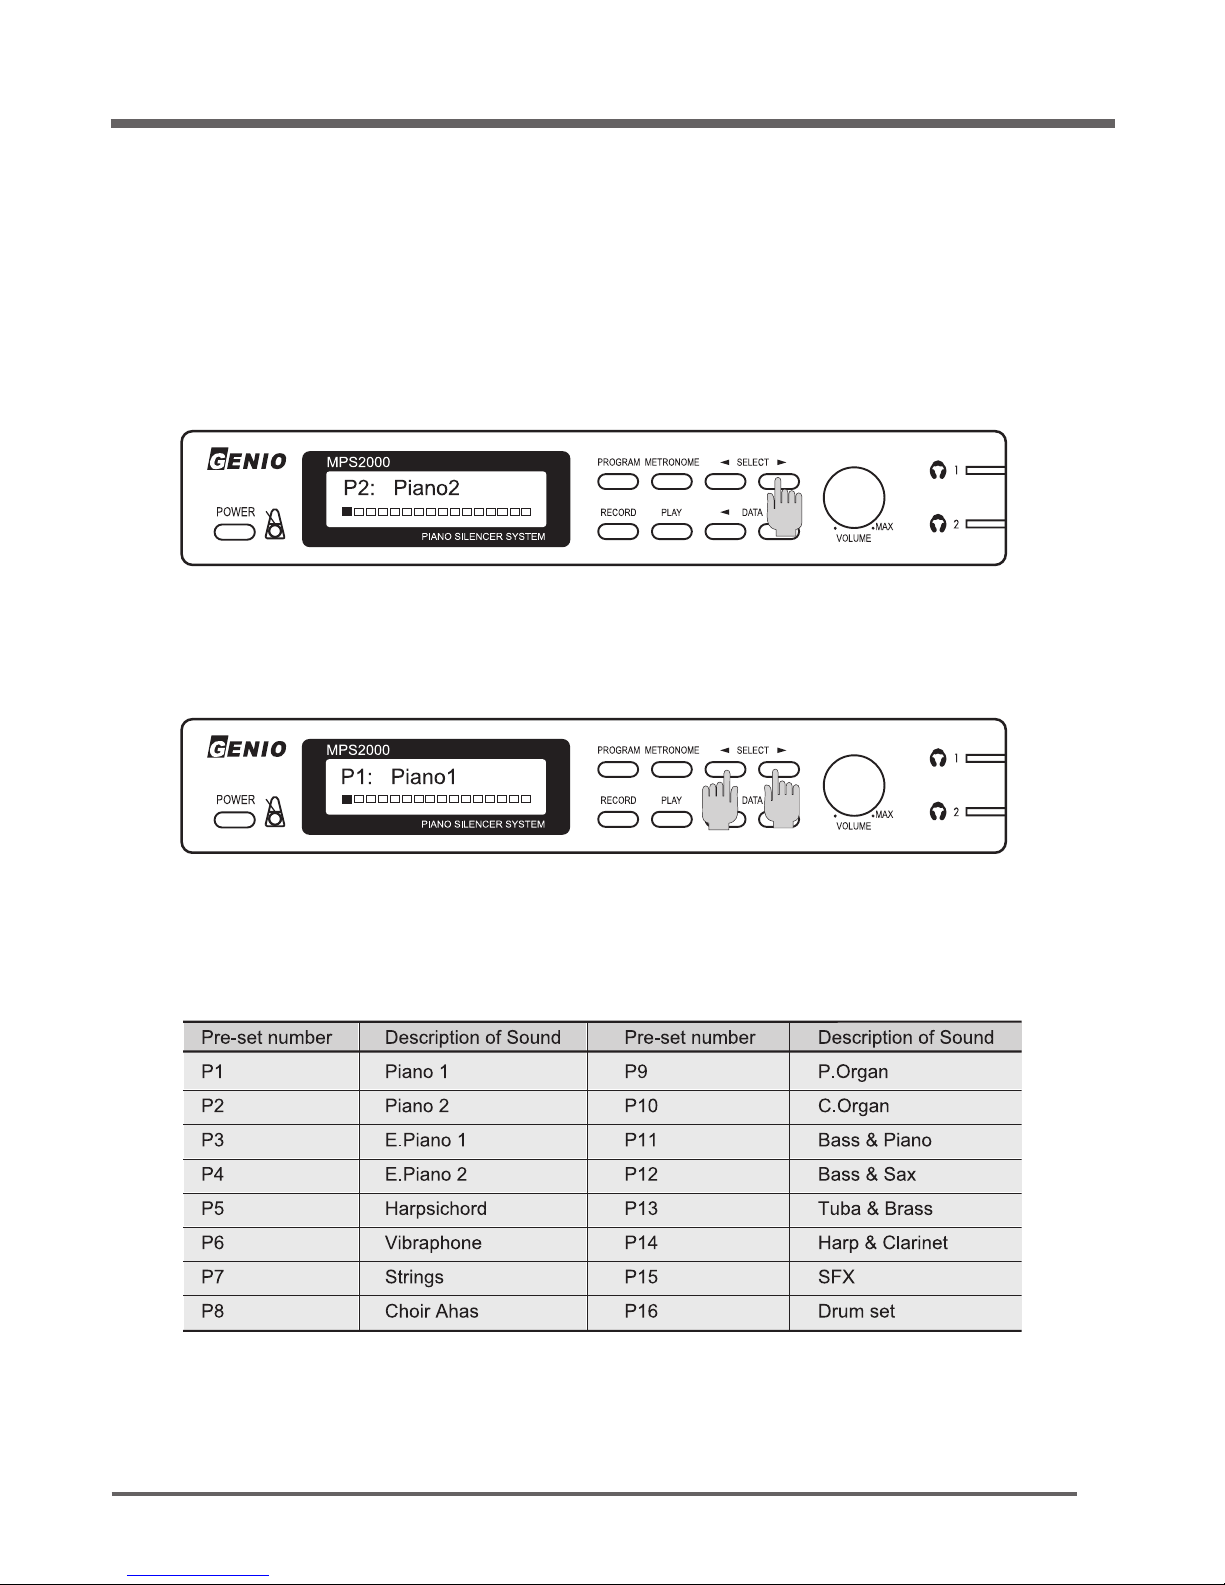
MPS2000 contents 16 Pre-set sounds, 16 User-sets sounds that can be edited by user and one of the 128
GM sounds
MPS2000
9
Press either [◀]
SELECT
or
SELECT
[▶] button to select one of the 16 Pre-set sounds.
Pre-set sounds can not be edited by user.
Press the [◀]
SELECT
and the
SELECT
[▶] button together,
then Preset should be P1: Piano 1 from any sounds.
How to Select Pre-set
Pre-set Chart
Page 10
MPS2000
10
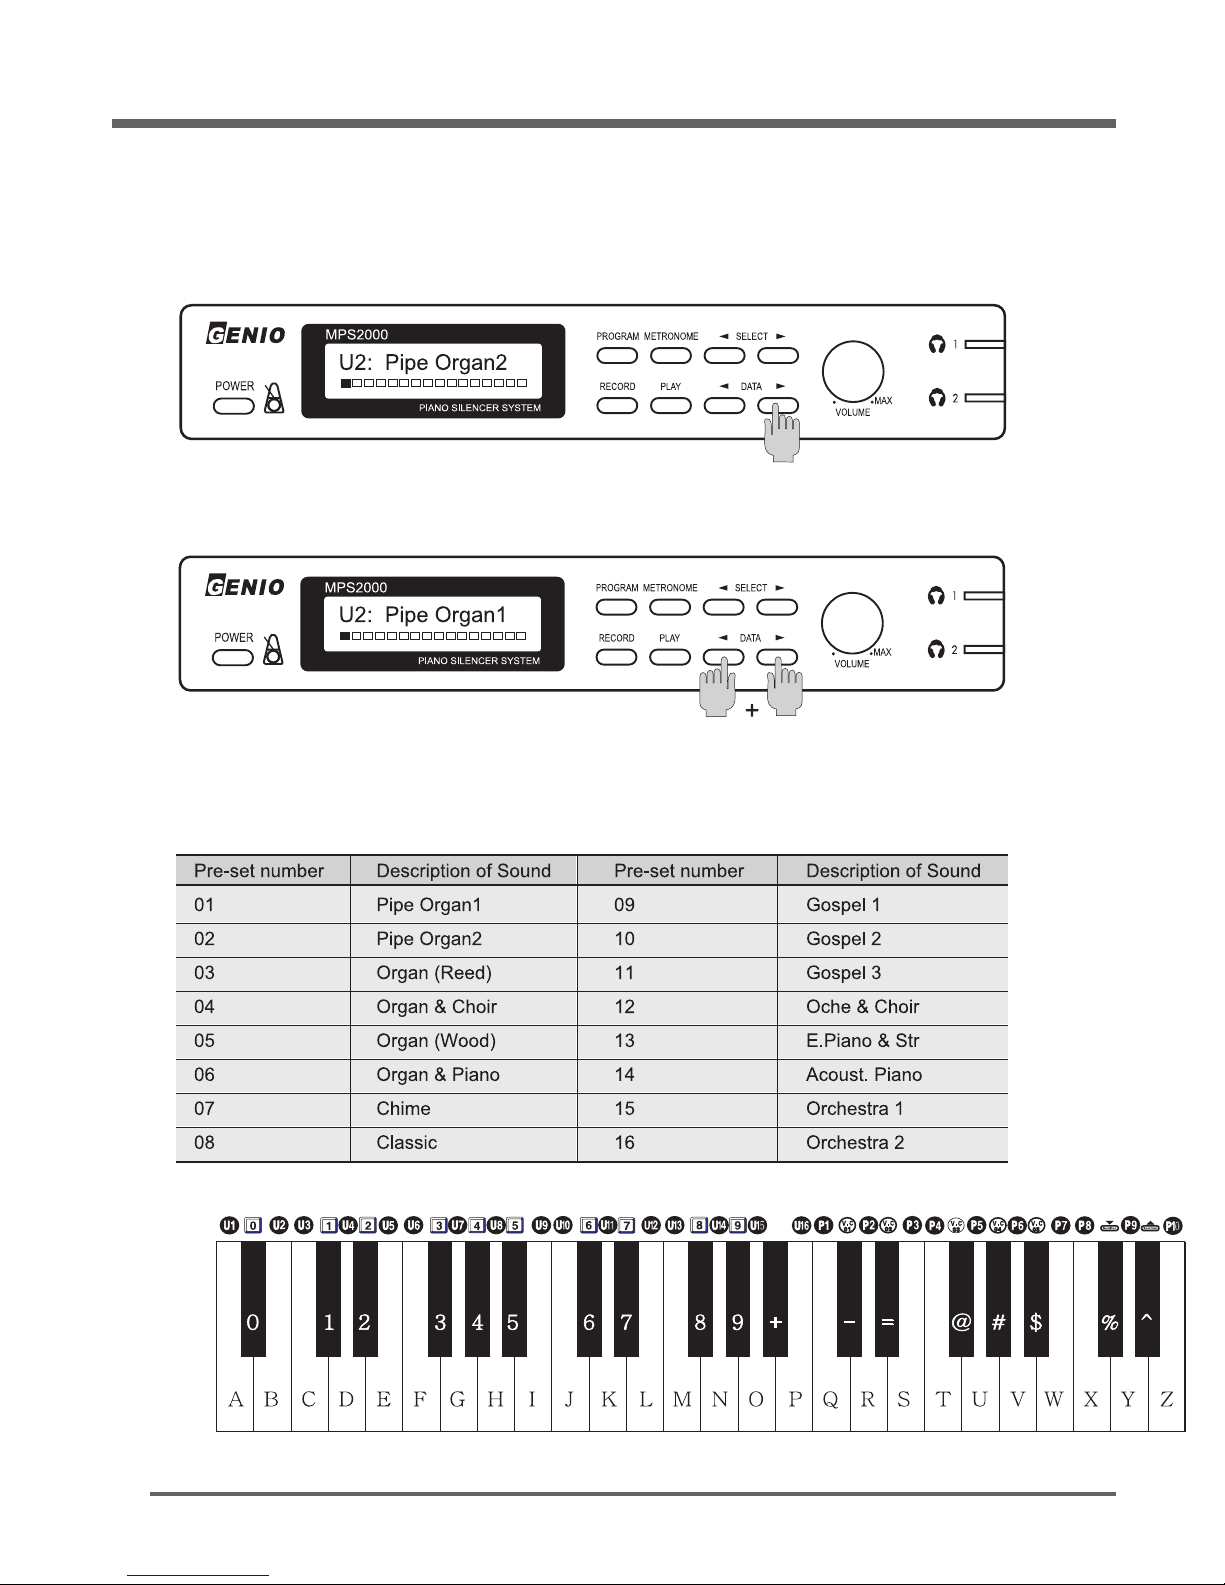
Press either [◀]
DATA
or
DATA
[▶] button to choose one of the 16 User-set sounds that were set in
factory when out of factory.
How to Select User-set
Press both the [◀]
DATA
and the
DATA
[▶] buttons together, then Preset should be U1: Pipe Organ
1 from any sounds.
U1: Pipe Organ 1 is default sounds when turn the MPS2000 on.
User-set Chart
Page 11
MPS2000
11
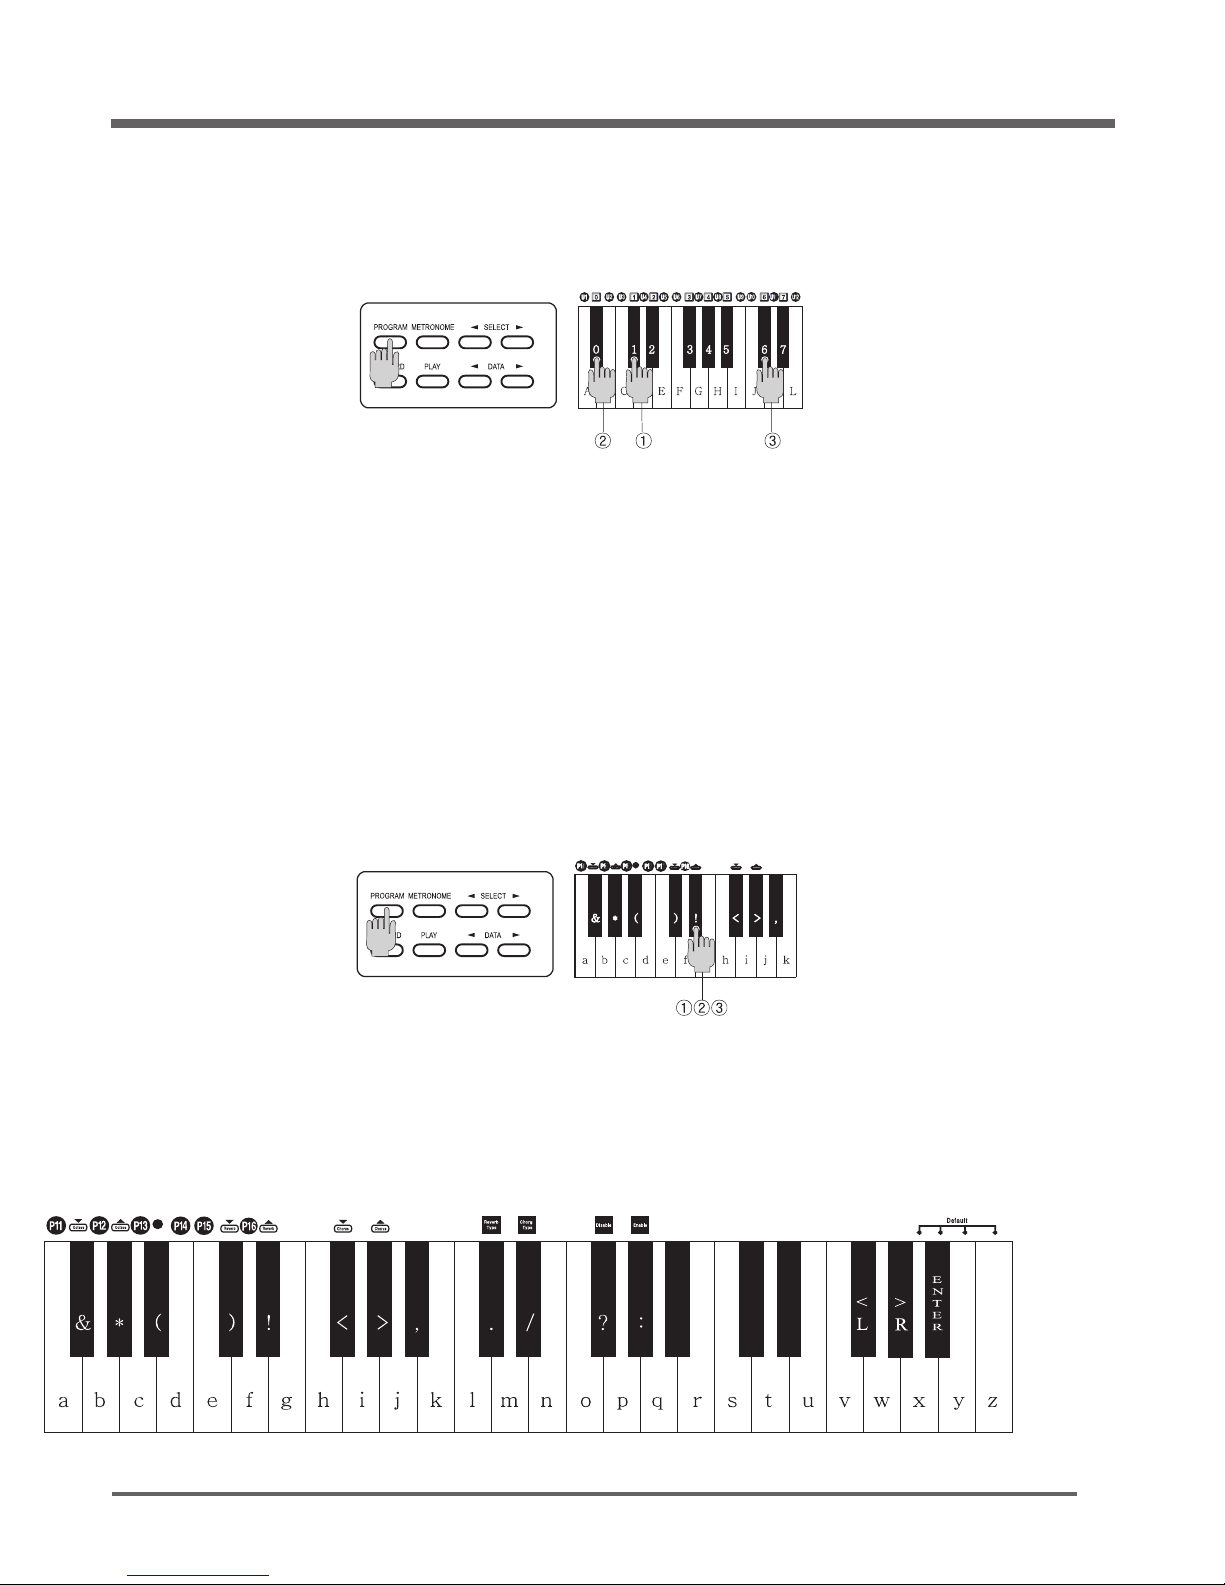
While holding down the [
PROGRAM
] button, press the applicable keys to choose one of the 128 GM
sound number as the chart indicates.
How to Select the 128 GM sounds
While holding down the [
PROGRAM
] button, press the applicable keys to choose or change the
value of effects as the chart below.
Some functions do not work in the Pre-set of User-set mode.
How to Select effects or variable sounds
Release the [
PROGRAM
] button to finish.
Repeat the same procedure as above to select another sound.
In order to select Instrument No.106 sound
While holding down the [
PROGRAM
] button, press the [1], [0], [6] keys in order, then release the
[
PROGRAM
] button.
For Example
In order to add the Reverb amount 30 to selected instrument.
While holding down the [
PROGRAM
] button, press D4#(55) key three times and release the
[
PROGRAM
] button.
For Example
Page 12
MPS2000
12
Press either [◀]
DATA
or
DATA
[▶] button to select the User-set number to be modified.
Press the [
PROGRAM
] and the [
RECORD
] buttons together to move onto the edit mode.
Press either [
PROGRAM
] (◀Channel) or [METRONOME] (Channel▶) button to select the channel
for editing. 16 channels are available to edit in the system.
Press either [◀]
SELECT
or
SELECT
[▶] button to check and select the parameter to be modified.
Please refer to Parameter information of User-set.
Press either [◀]
DATA
or
DATA
[▶] button to adjust the value of the parameter.
Press the [◀]
DATA
and the
DATA
[▶] buttons together to take off the instrument sound from the
selected channel.
Repeat the same procedure as above to modify another channel.
Press the [
PROGRAM
] and the [PLAY] buttons together to finish and return to normal mode and
memorize the edited data.
Press the [◀]
SELECT
and the
SELECT
[▶] buttons together to finish and return to the normal mode
without memorizing edited data.
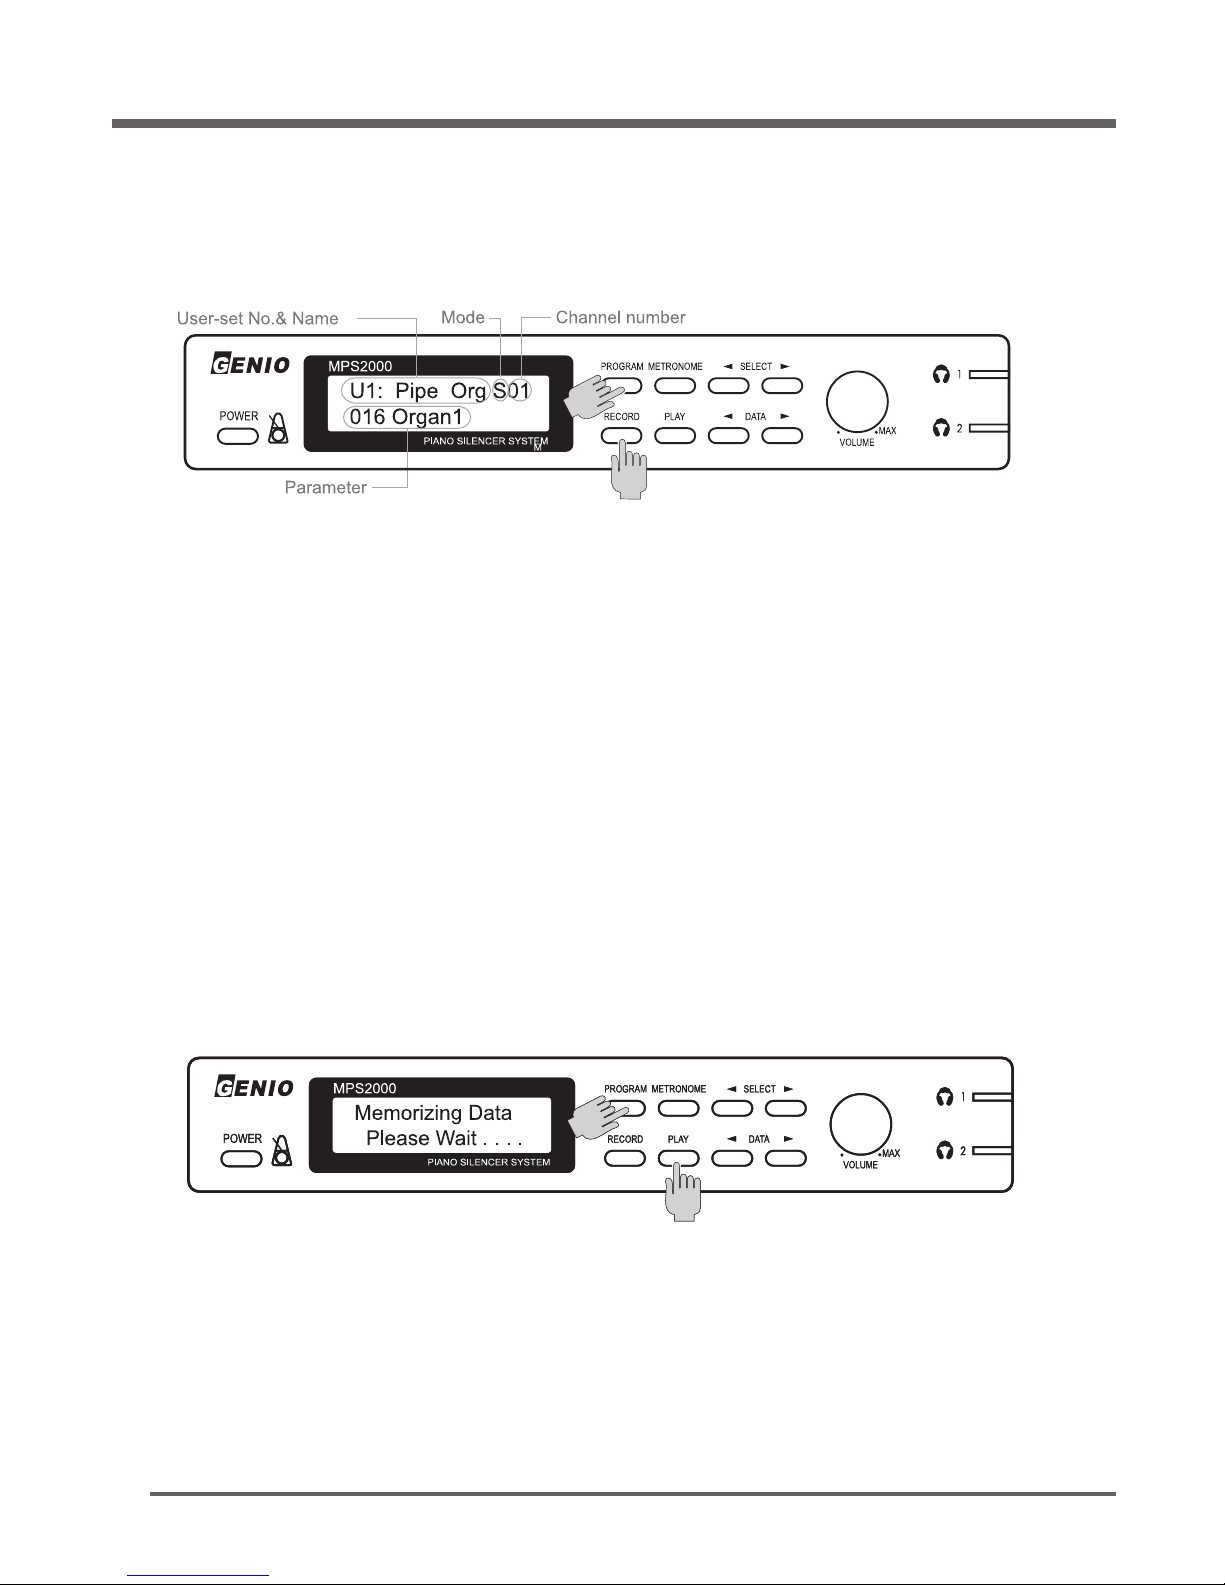
S01: The single mode means that sound effects only selected channel.To check by listening
edited, press the [PLAY] button.
How to edit User-set
Page 13

MPS2000
13
Press either [◀]
SELECT
or
SELECT
[▶] button to find out name parameter.
Press either [◀]
DATA
or
DATA
[▶] button to find out the letter.
If a letter appears in the cursor position, press the [
RECORD
] button to fix it and move to the next letter.
Another way to add input is by pressing the appropriate key as the chart below.
Press the key that matches the letter. Refer to the chart, press the [
RECORD
] button to fix it and move
to the next letter.
Repeat the procedure as above.
If the new name is completed, then press the [◀]
SELECT
and the
SELECT
[▶] buttons together to
finish.
How to change the User-set name
Page 14
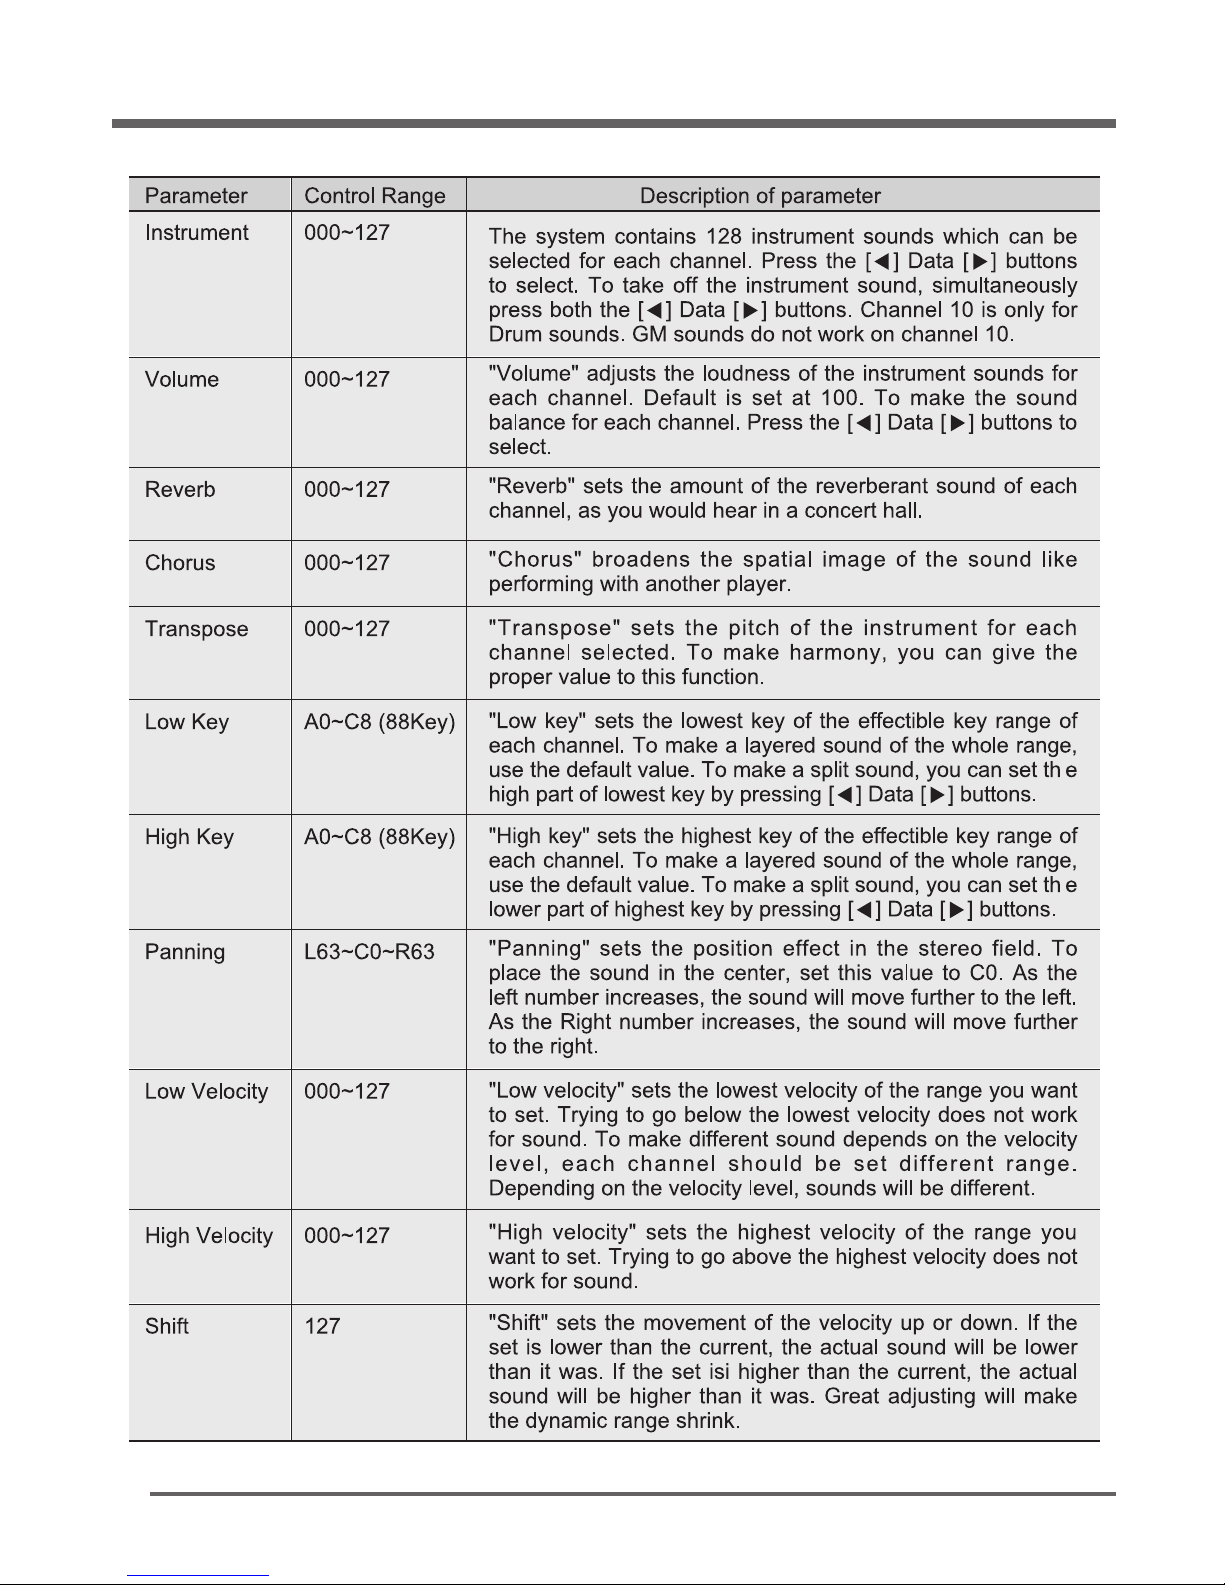
Functions of Parameter settings in EDIT mode
MPS2000
14
Page 15
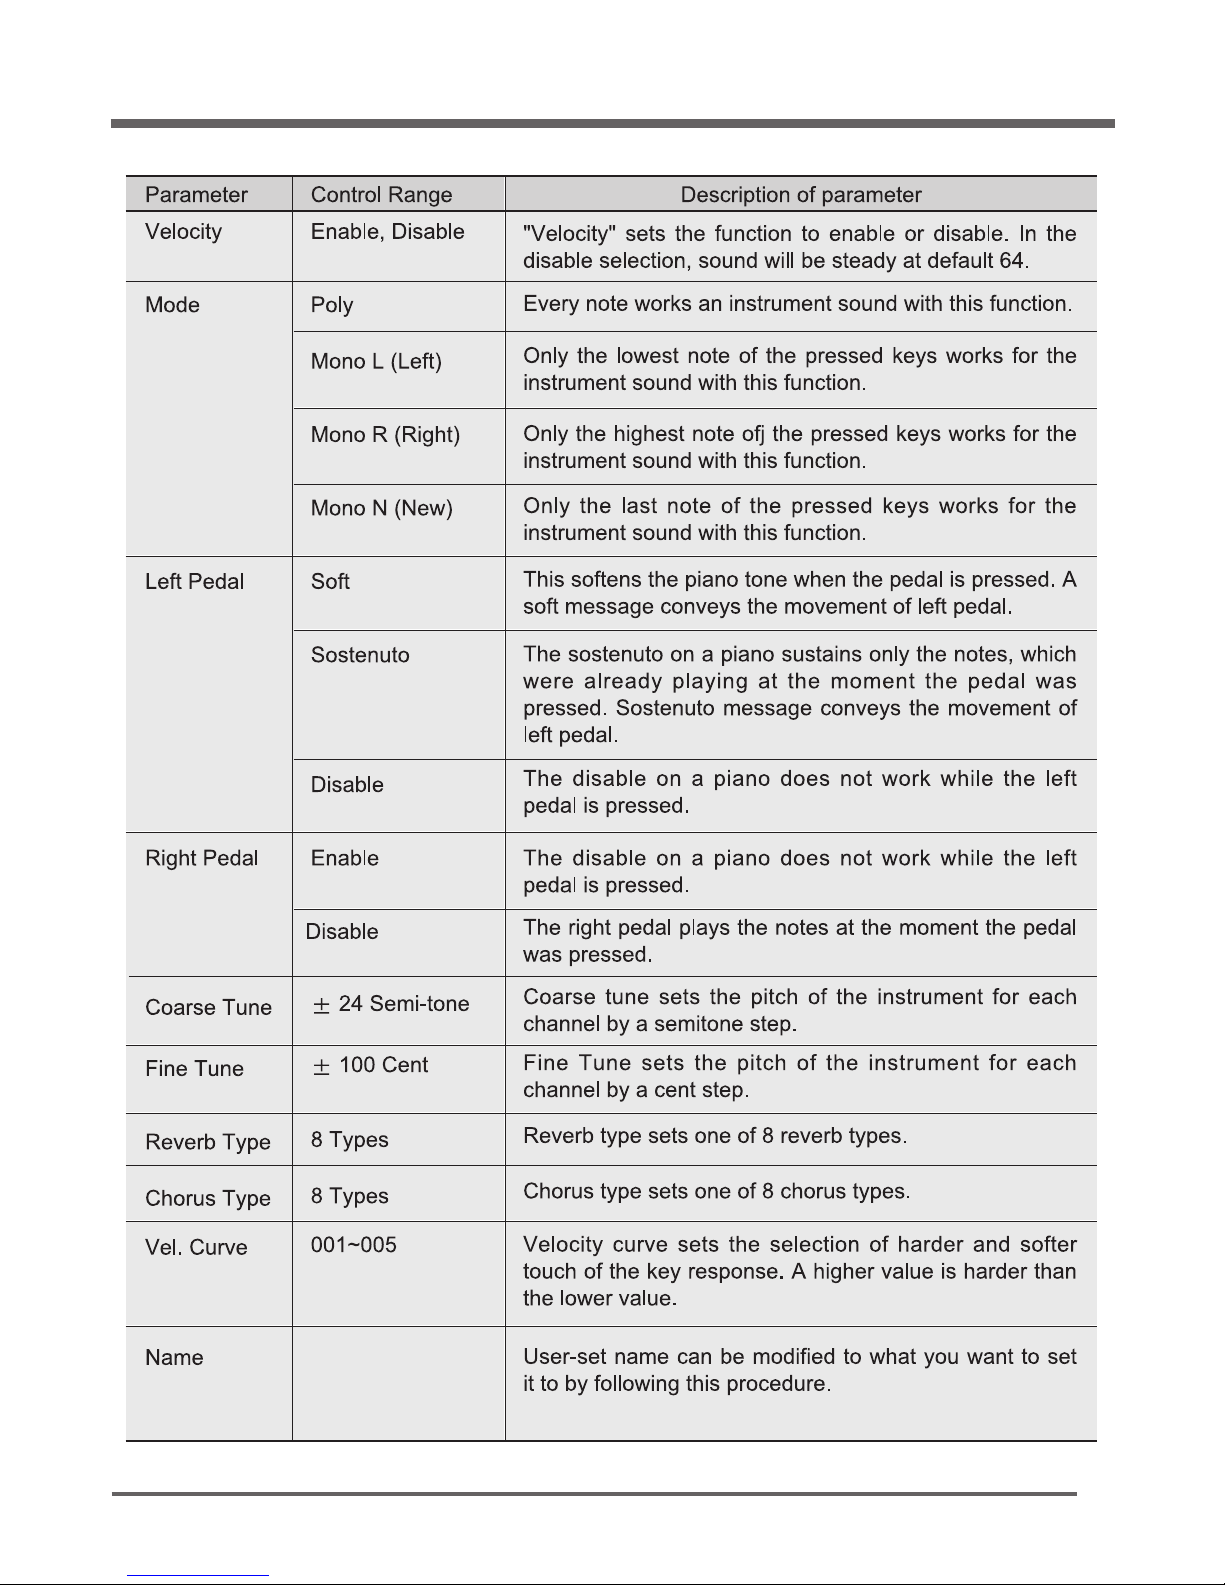
MPS2000
15
Page 16
MPS2000
16
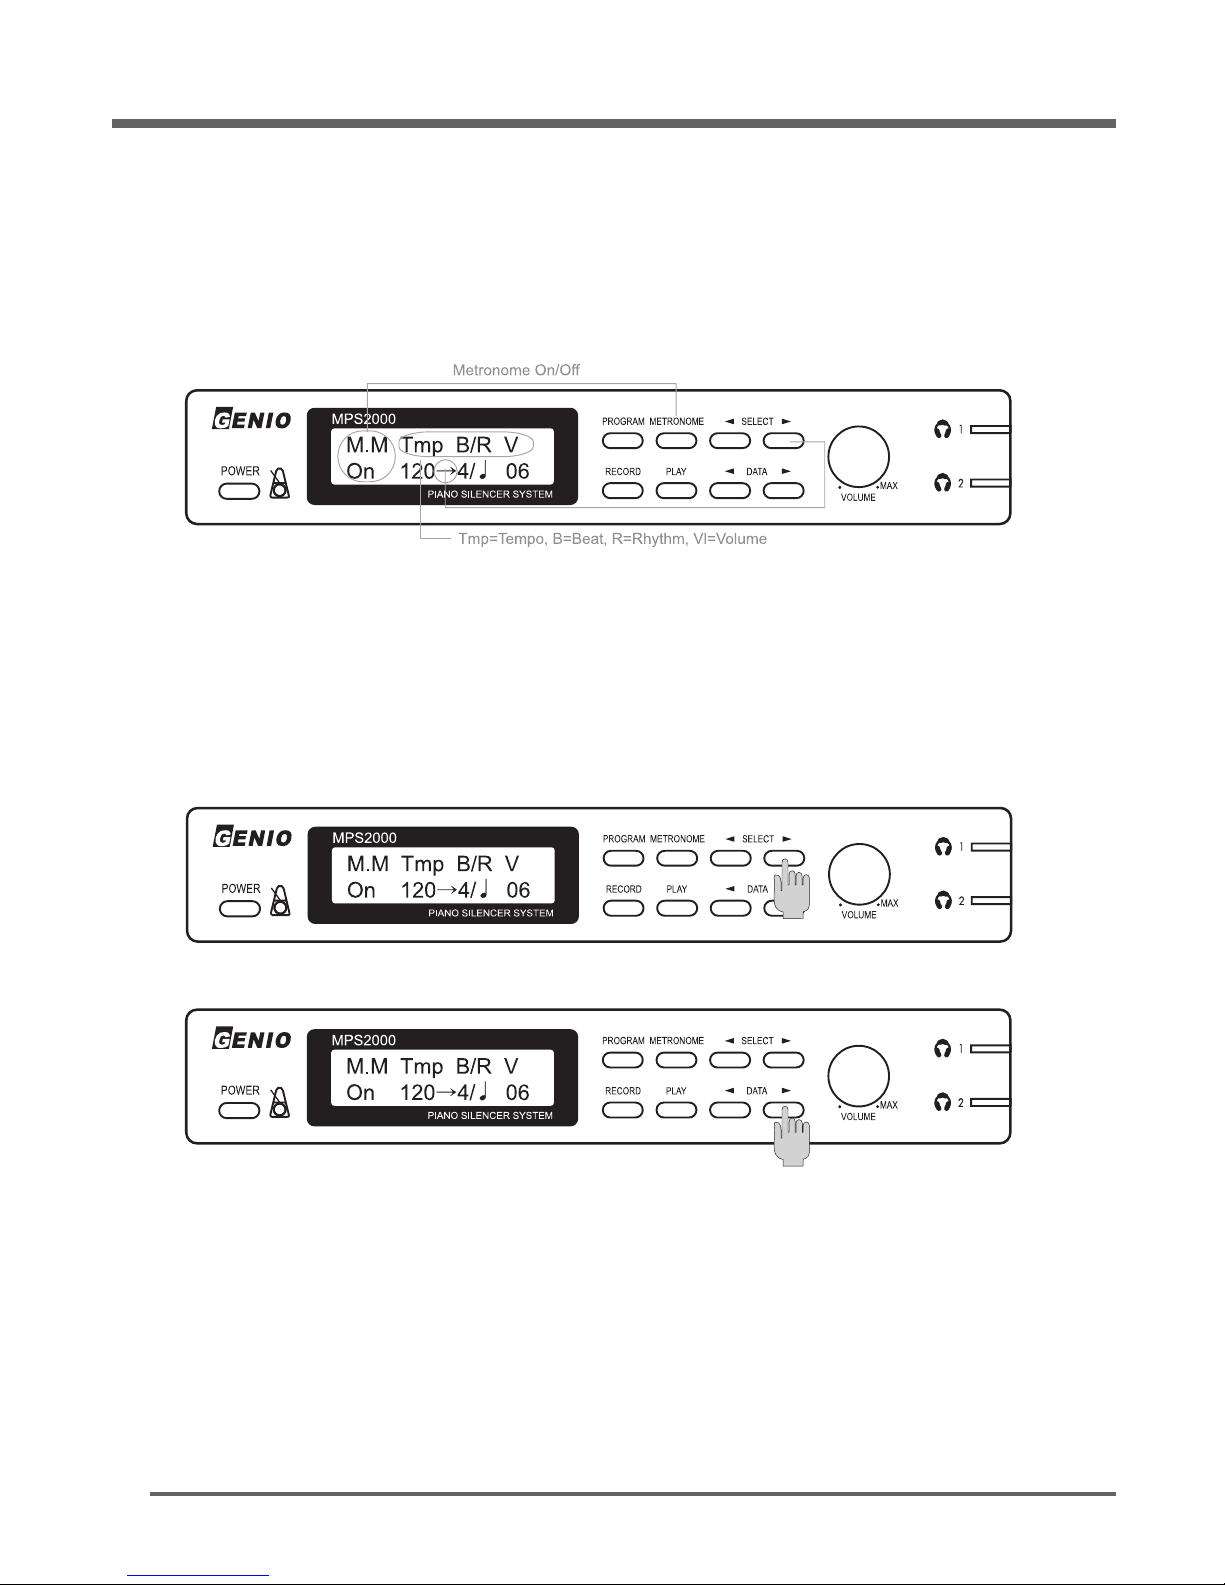
The built-in metronome has adjustable parameters for Tempo, Beat, Rhythm, and Volume.
Here is how to adjust each of these.
Press the [METRONOME] button, then display shows 5 abbreviated words.
Press either [◀]
SELECT
or
SELECT
[▶] button to select the parameter you wish to set.
Press either [◀]
DATA
or
DATA
[▶] button to set the value.
When you finish the settings, press the [METRONOME] button to start operating.
Press the [METRONOME] button to stop operating.
Note:
1. To change the instrument while operating the metronome, press the [
PROGRAM
] button to change
the instrument while the Metronome is operating.
If the display shows the instrument number and name, press the applicable buttons to select the new
instrument sound you want to play with.
(LED is flickering and tic tack sound is working while the metronome is operating)
M.M shows with under the letter either On and Off status of the metronome activating currently.
The cursor (Left arrow icon) indicates the current parameter can be changed the value user wants.
Tmp is the abbreviated name of the Tempo its value shows just below the letter from 30 to 255
Value shows the current tempo, which defaults to 120 beats per minute (Press either [◀]
DATA
or
DATA
[▶] button to adjust the tempo up or down).
Metronome
I
I
I
Page 17
MPS2000
17
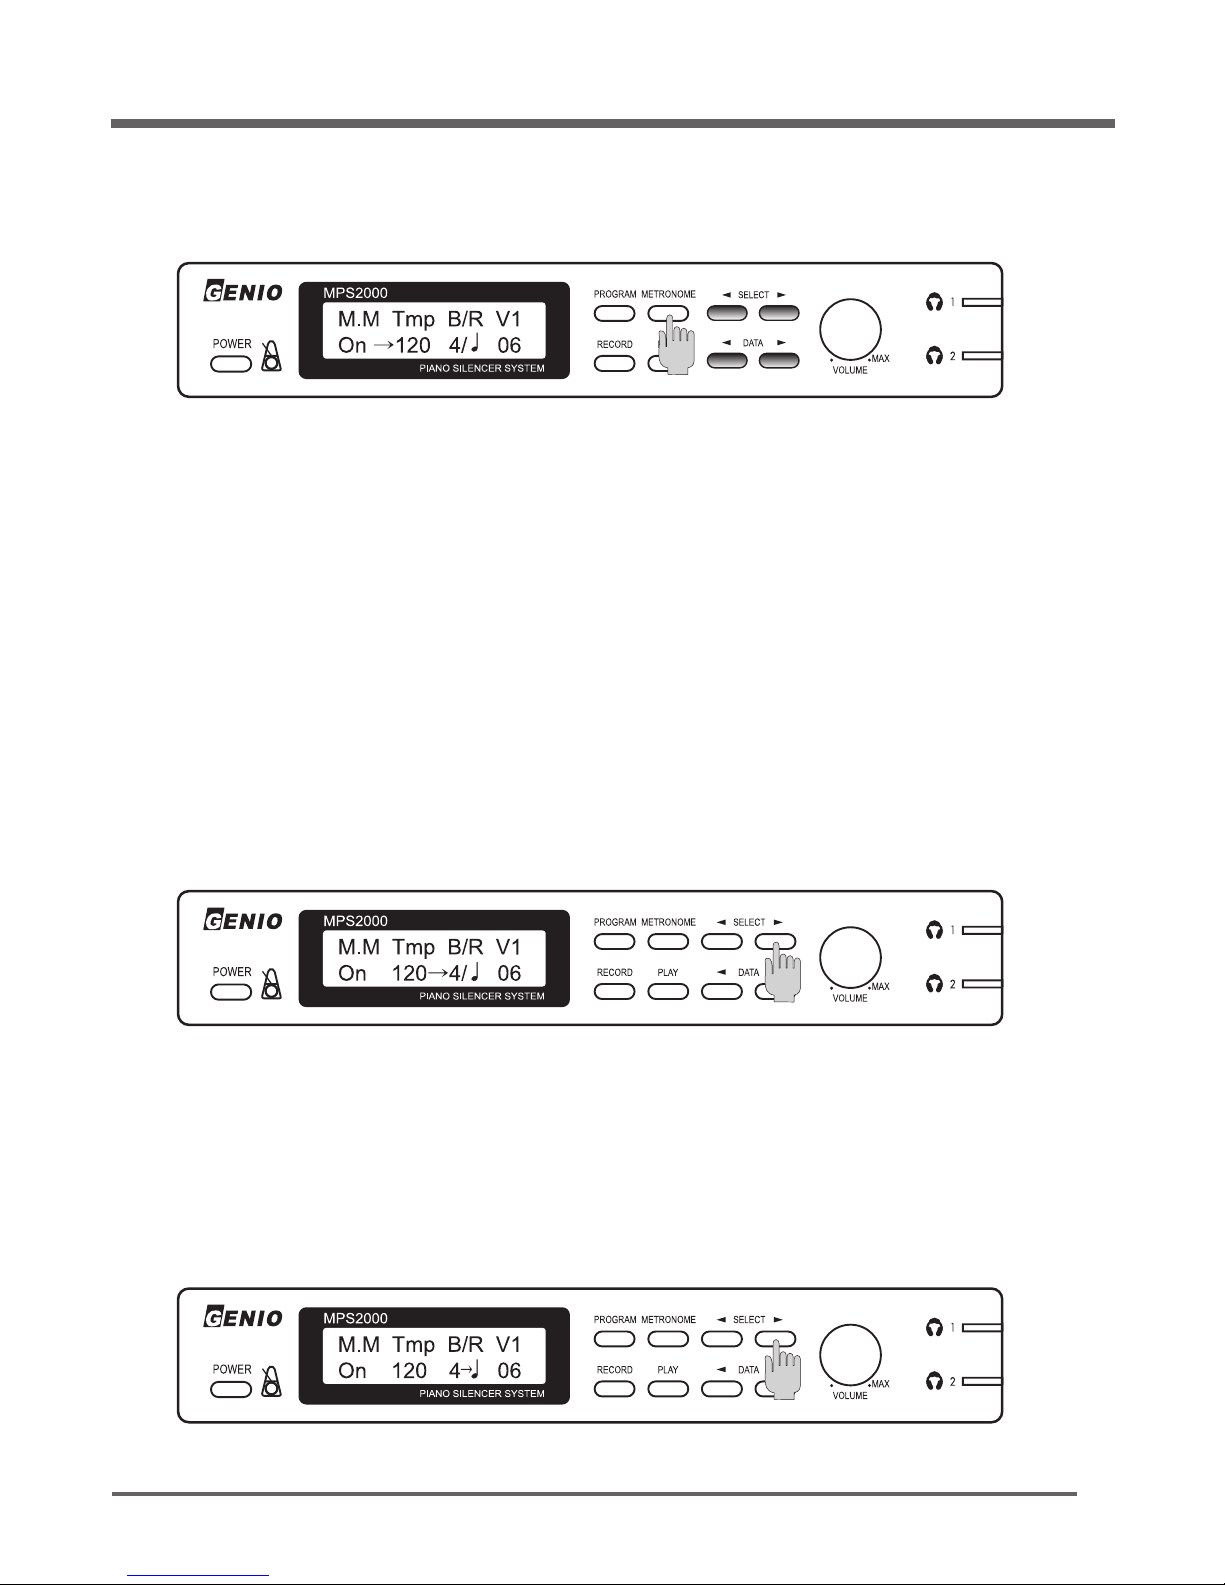
Press the [METRONOME] button.
Press either [◀]
DATA
or
DATA
[▶] button to adjust the tempo up or down.
Press the [METRONOME] button again to start the metronome sound.
Begin playing.
To stop the metronome, press the [METRONOME] button a third time.
Note:
1. Press and hold either [◀]
DATA
or
DATA
[▶] button to quickly increase or decrease the tempo.
With the metronome on and Tempo showing, press the
SELECT
[▶] button once.
Press either [◀]
DATA
or
DATA
[▶] button to adjust the beats/measure value up or down.
The cursor shows the current tempo, which defaults to 120 beats per minute.
The cursor will move to “B” which is the Beat Parameter value.
The cursor will move to “R” which is the Rhythm Parameter value.
Tempo
Beat
Press the
SELECT
[▶] button again.
Rhythm
Page 18
MPS2000
18
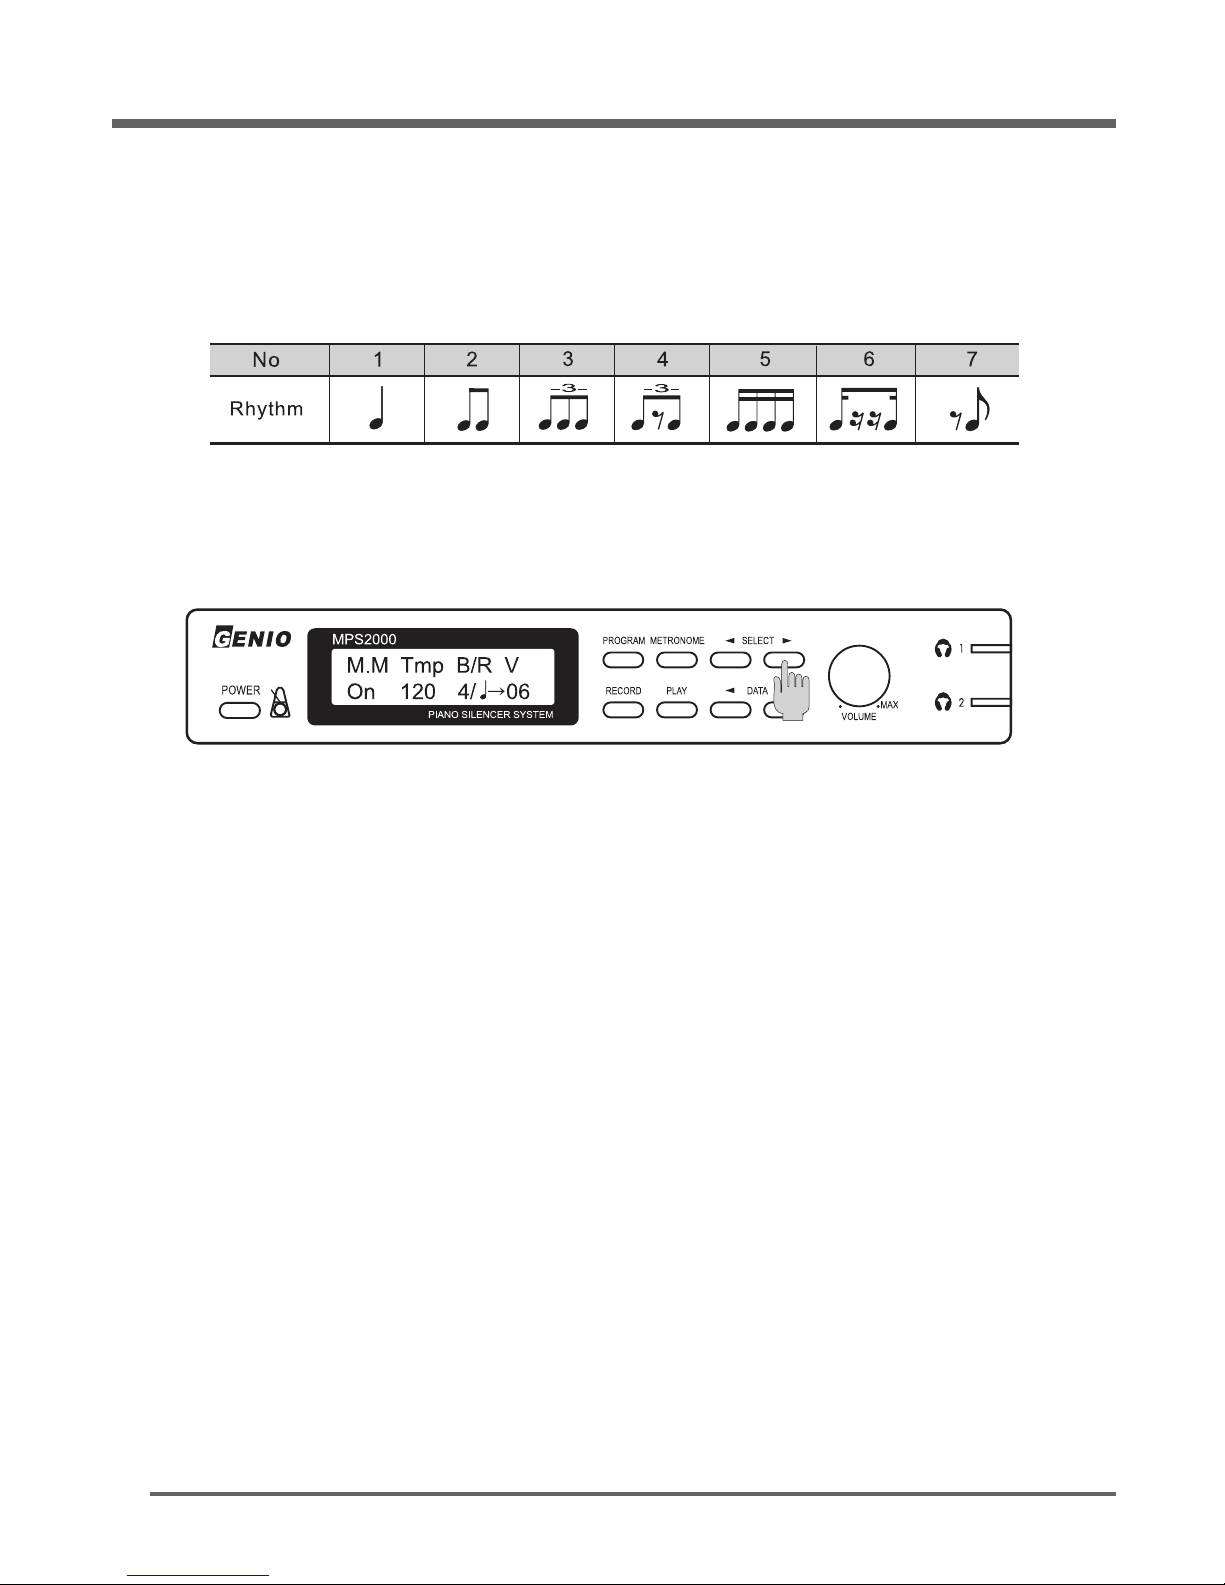
Press either [◀]
DATA
or
DATA
[▶] button to select a different rhythm. See the chart below.
Rhythm Chart
I
Press the
SELECT
[▶] button again.
Press either [◀]
DATA
or
DATA
[▶] button to adjust the volume up or down.
Note:
1. If the metronome is on during recording, its sound will be heard but it is not recorded.
The cursor will move to =V1= which is the Volume Parameter value.
Volume
Page 19
MPS2000
19
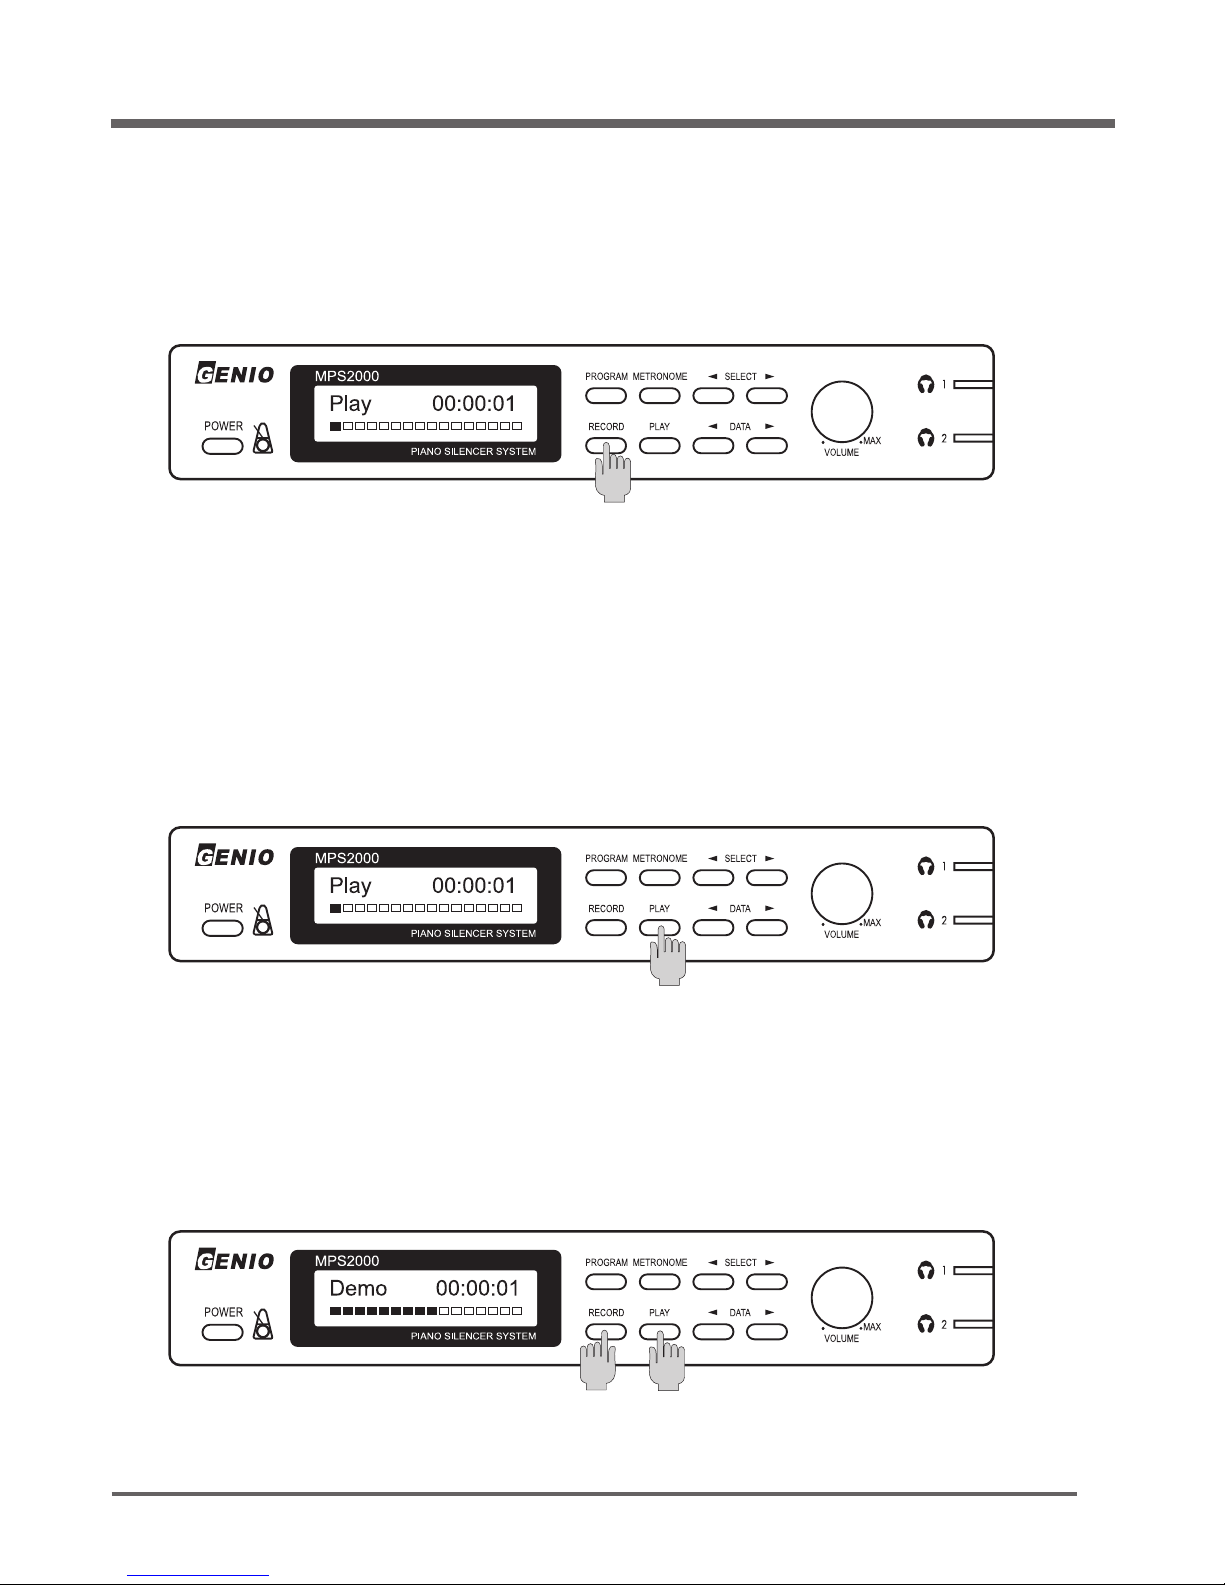
Your MPS2000 has a built-in one-track recorder. With it you can record your performance then later play it
back through the audio and MIDI outputs.
Press the [
RECORD
] button to start recording your performance.
Press the [
RECORD
] button to start recording your performance.
Turning the power off will erase the recording.
The previous recording, if any, will be erased.
The display shows how long you have been recording in units of seconds.
Record
Press the [PLAY] button to start playing your last recorded performance.
Press the [PLAY] button again to stop playing.
PLAY
Press the [
RECORD
] and the [PLAY] buttons together to play the prerecorded demonstration song.
Press either the [
RECORD
] button or the [PLAY] button to stop the demonstration song.
Demonstration Song
The display shows how long you have been playing.
Page 20
MPS2000
20
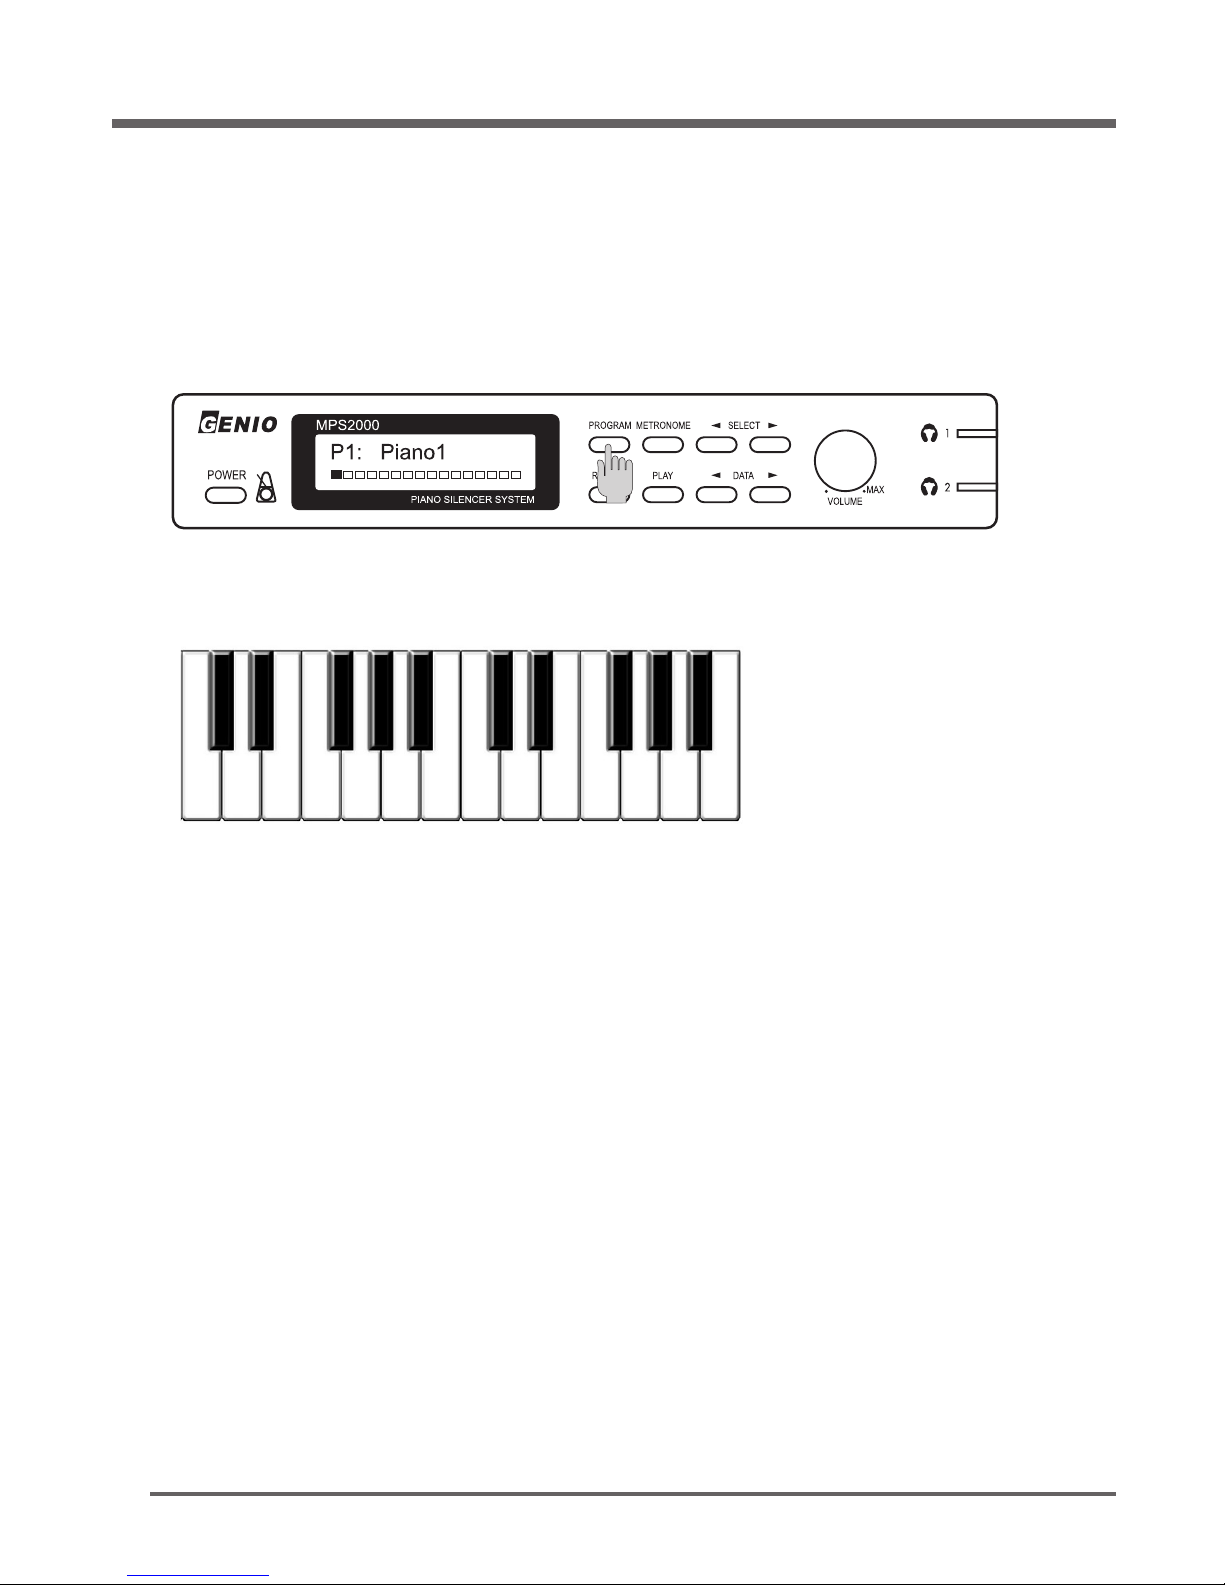
The touch of your MPS2000 can be made changed to accommodate players with a lighter or heavier
than average touch. To change from the default “Medium” setting, do this:
Press and hold the [
PROGRAM
] button.
Press one of the 5 black keys just below middle C to select the new touch:
Release the [
PROGRAM
] button.
How to change the Keyboard Touch
C#3: Heavy
D#3: Medium Heavy
F#3: Medium
G#3: Medium Light
A#3: Light
C#3 D#3 F#3 G#3 A#3 middle “C”
↓
Page 21
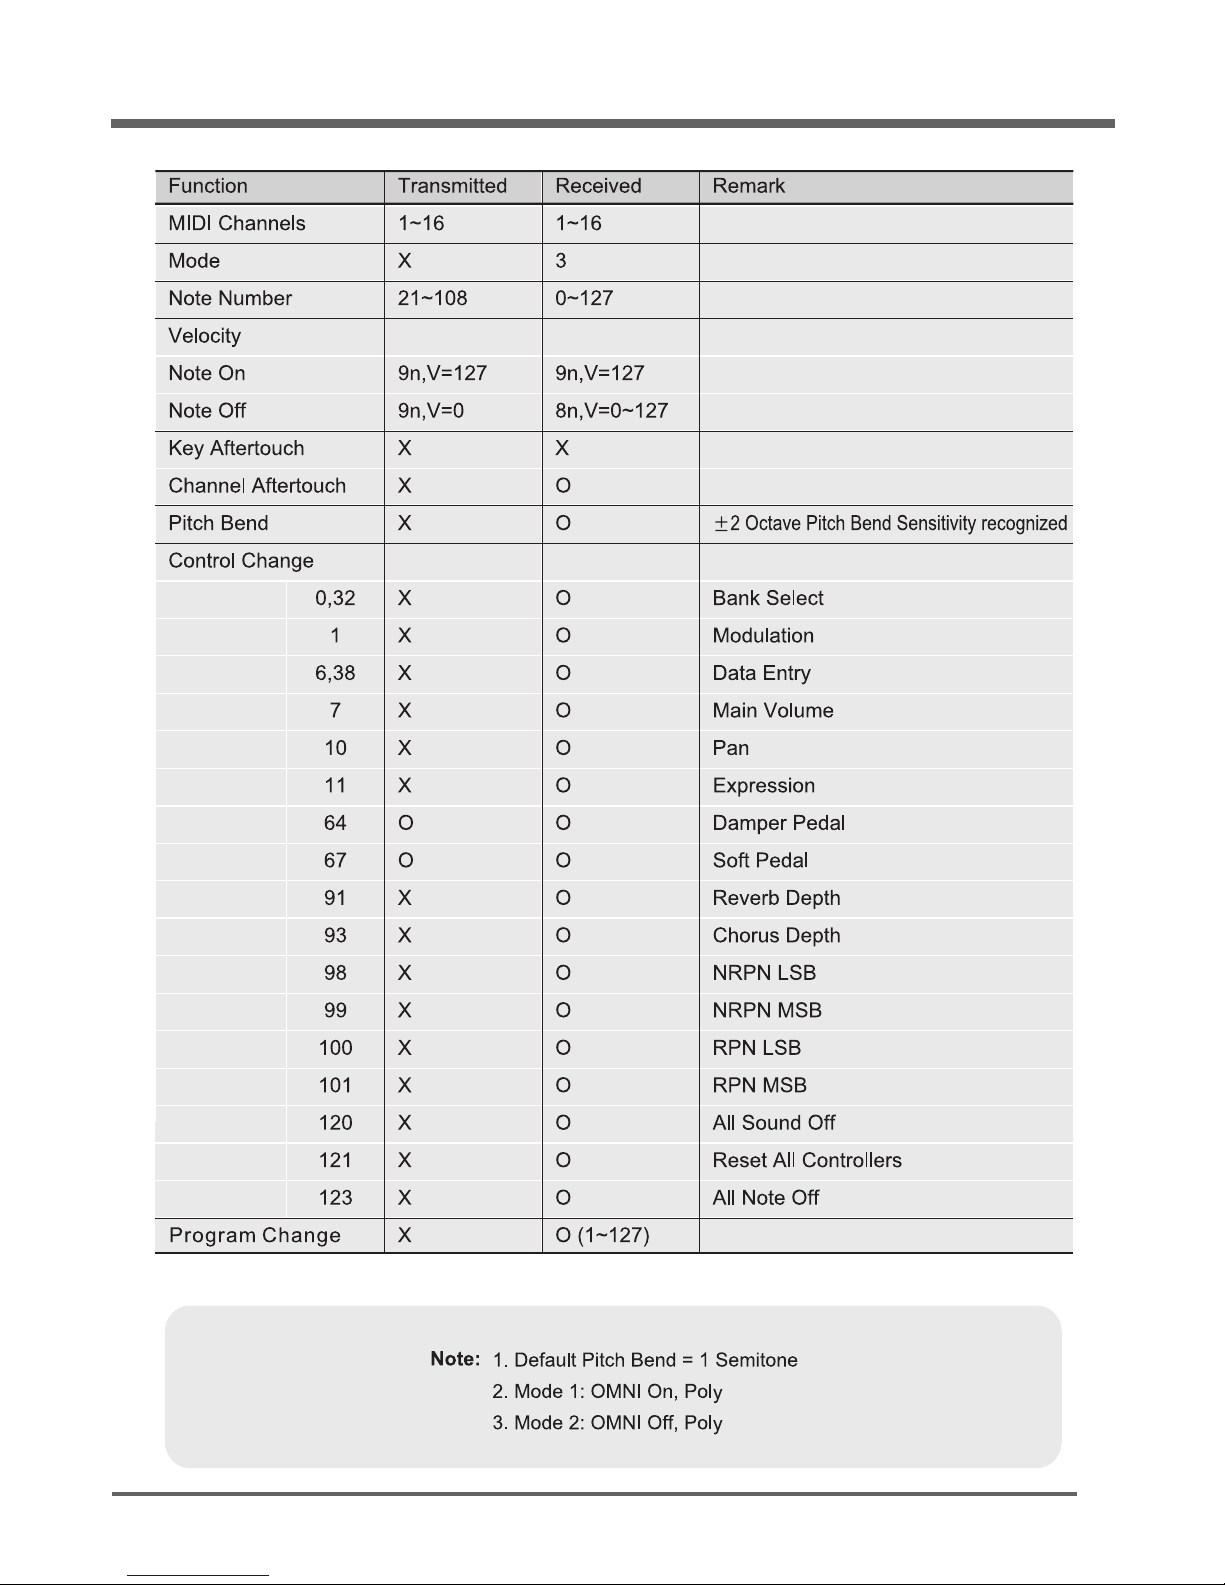
MIDI Implementation Chart
MPS2000
21
Page 22
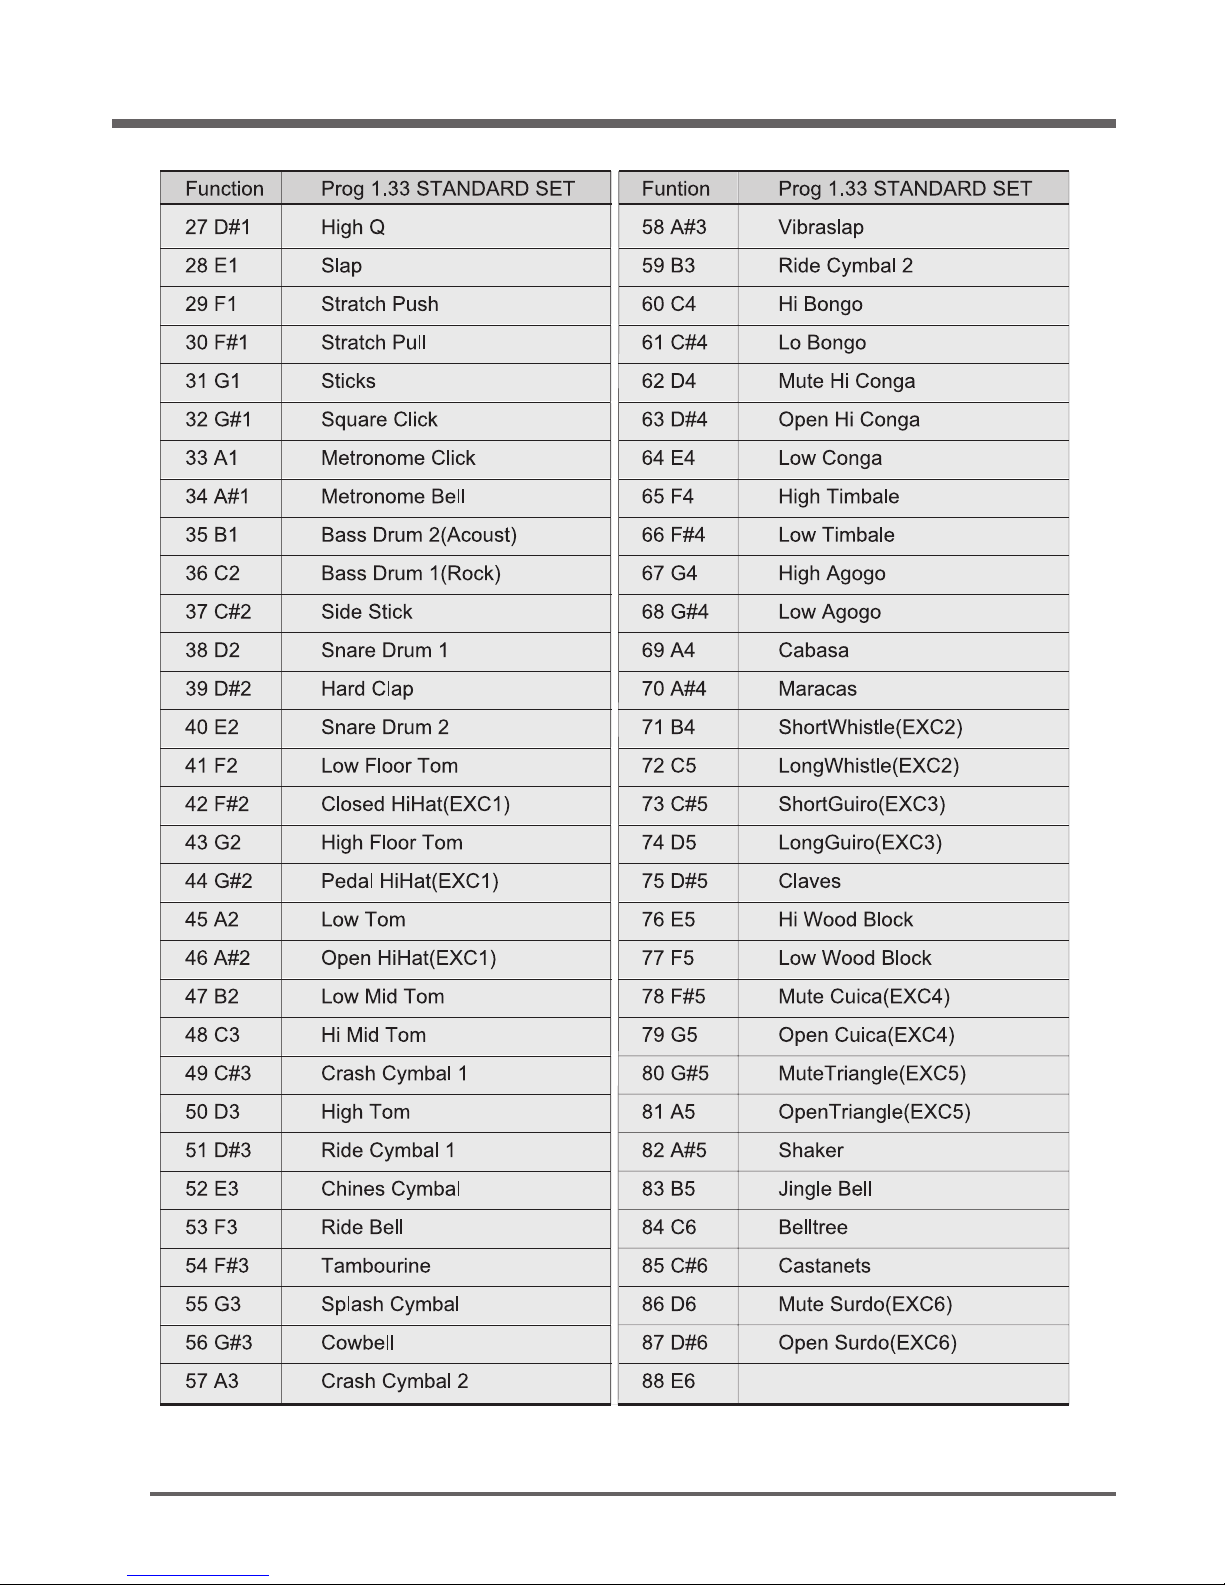
Drum Map
MPS2000
22
Page 23
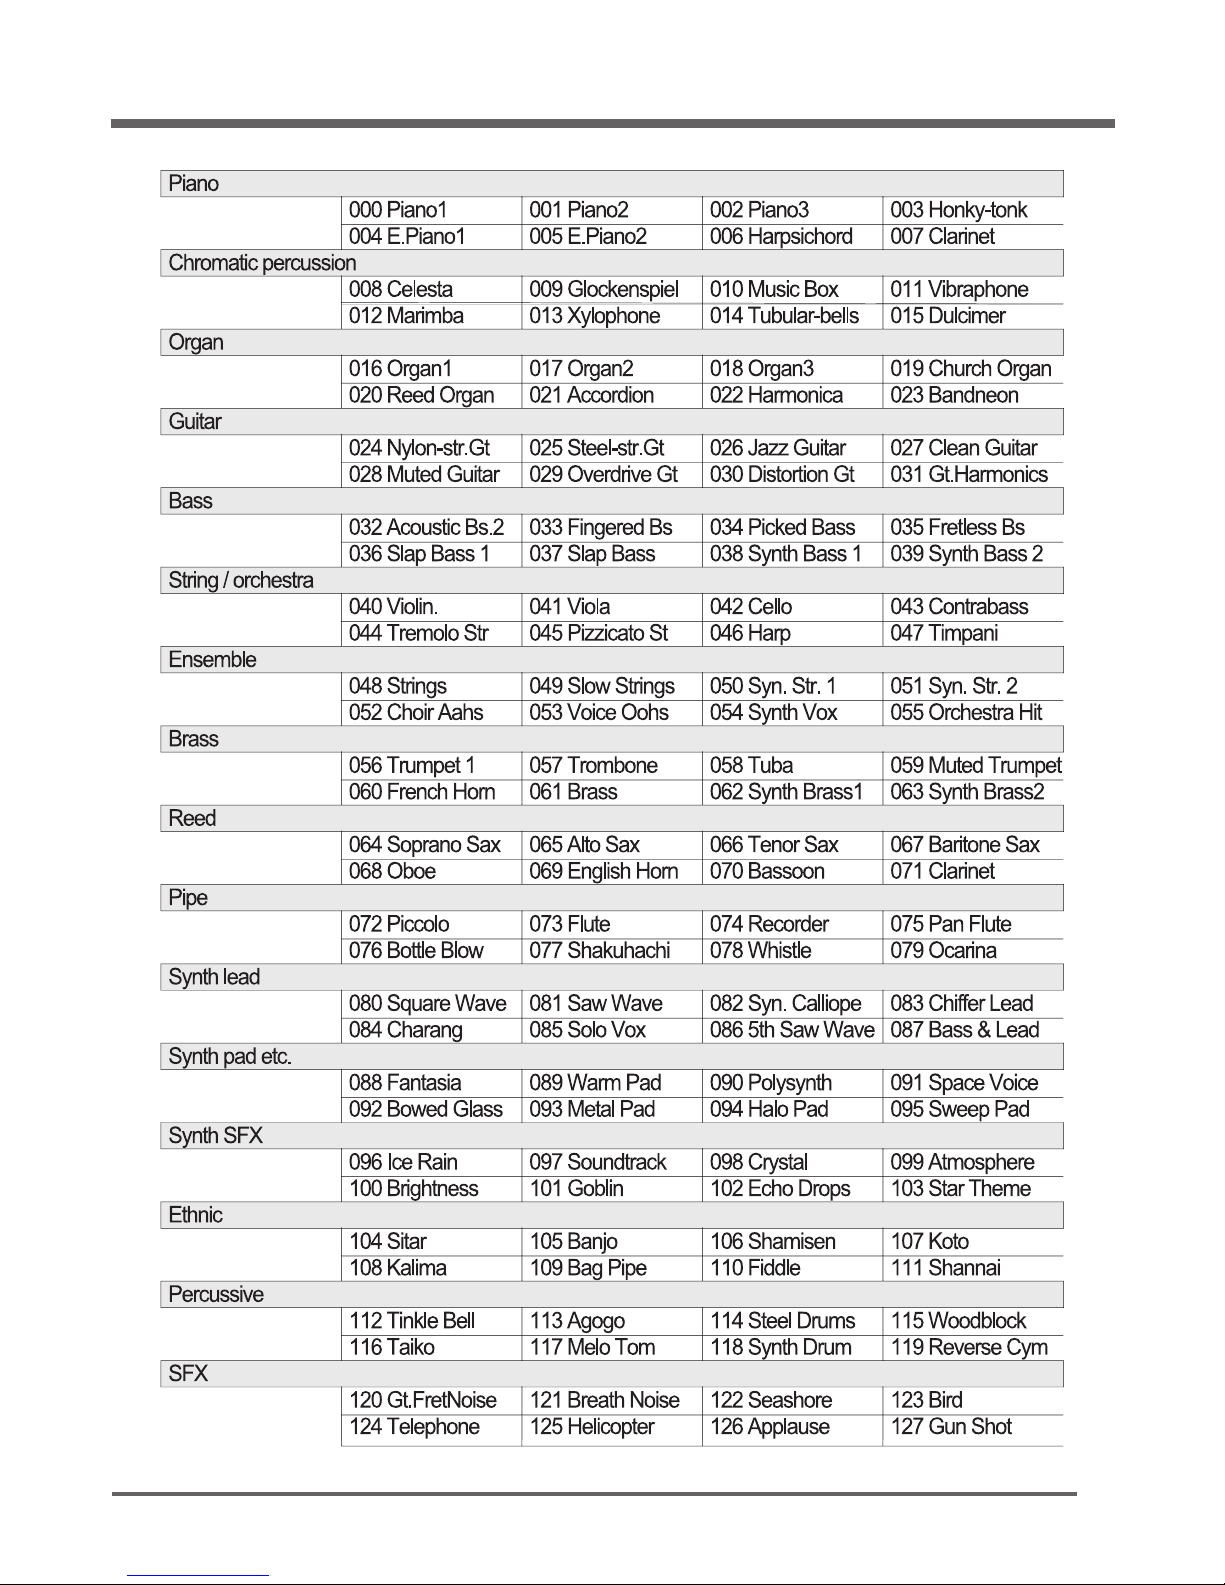
General MIDI Program map
MPS2000
23
Page 24
ⅣⅣ
.
Initializing
MPS2000
24
Occasionally you may want to calibrate the key sensors in your MPS2000 Silencer System Piano for
accurate response when in silent mode. A good time to do this when it is new and after the acoustic
parts (hammers and strings) have been tuned. Use the following procedure to calibrate the sensors.
How to Initialize
The keyboard cable and AC power adapter should be plugged into the MPS2000 control unit and
the power should be OFF.
The mute lever should be in the Mute position.
Make sure that nothing is sitting on the keyboard that might press a key down.
Preparing for Calibration
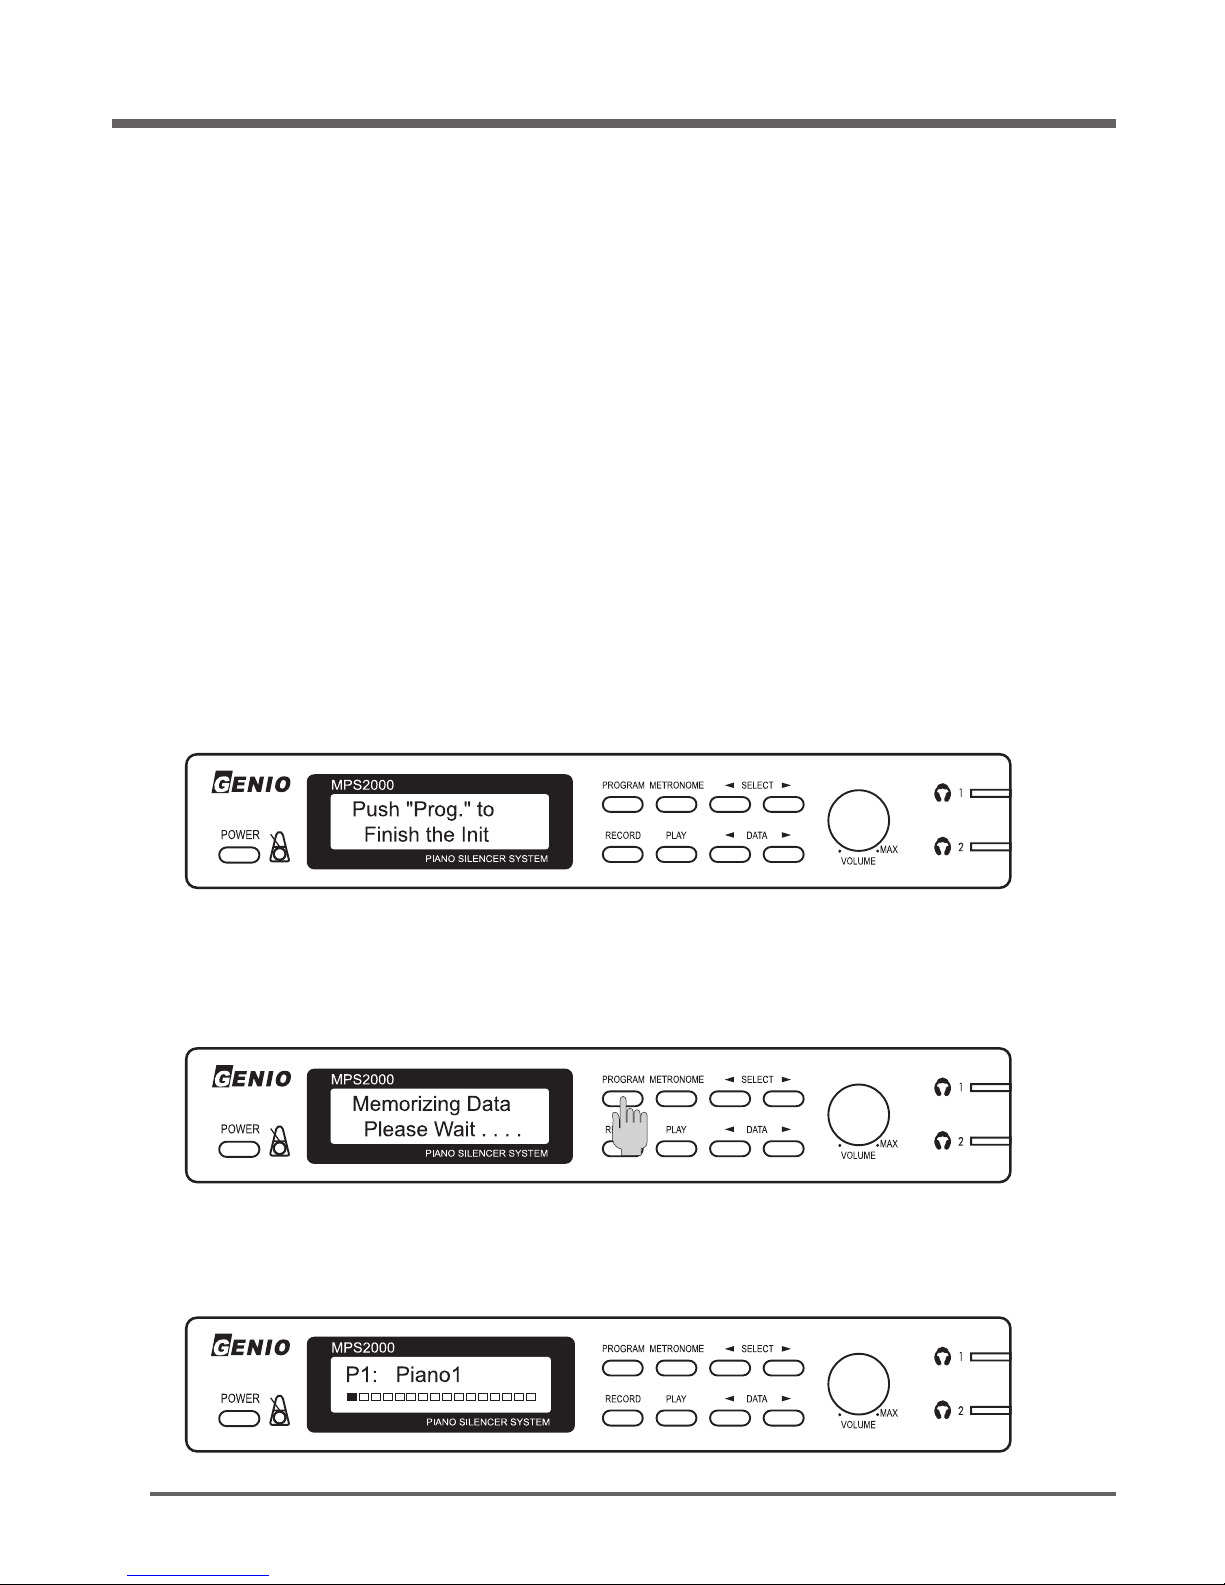
While holding the [
PROGRAM
] button down, turn the MPS2000 on.
After 3 seconds, release the [
PROGRAM
] button.
In few seconds, the display should be as below.
Press each of the 88 keys, one at a time, all the way down with medium force and speed. (not too
fast)
After you have finished pressing all of the keys, press the [
PROGRAM
] button again to finish the
calibration.
When the data is successfully stored, the display will change as shown and the piano is ready to play
again.
It will take a few seconds for the data to be stored in permanent memory.
Initializing
Page 25
MPS2000
25
The calibration procedure on the previous page should make all of the keys equally sensitive. If you find
that some keys still play too loudly or softly, use the following procedure to adjust the sensitivity of
individual keys
How to adjust the keyboard sensitivity individually
Make sure the MPS2000 is off.
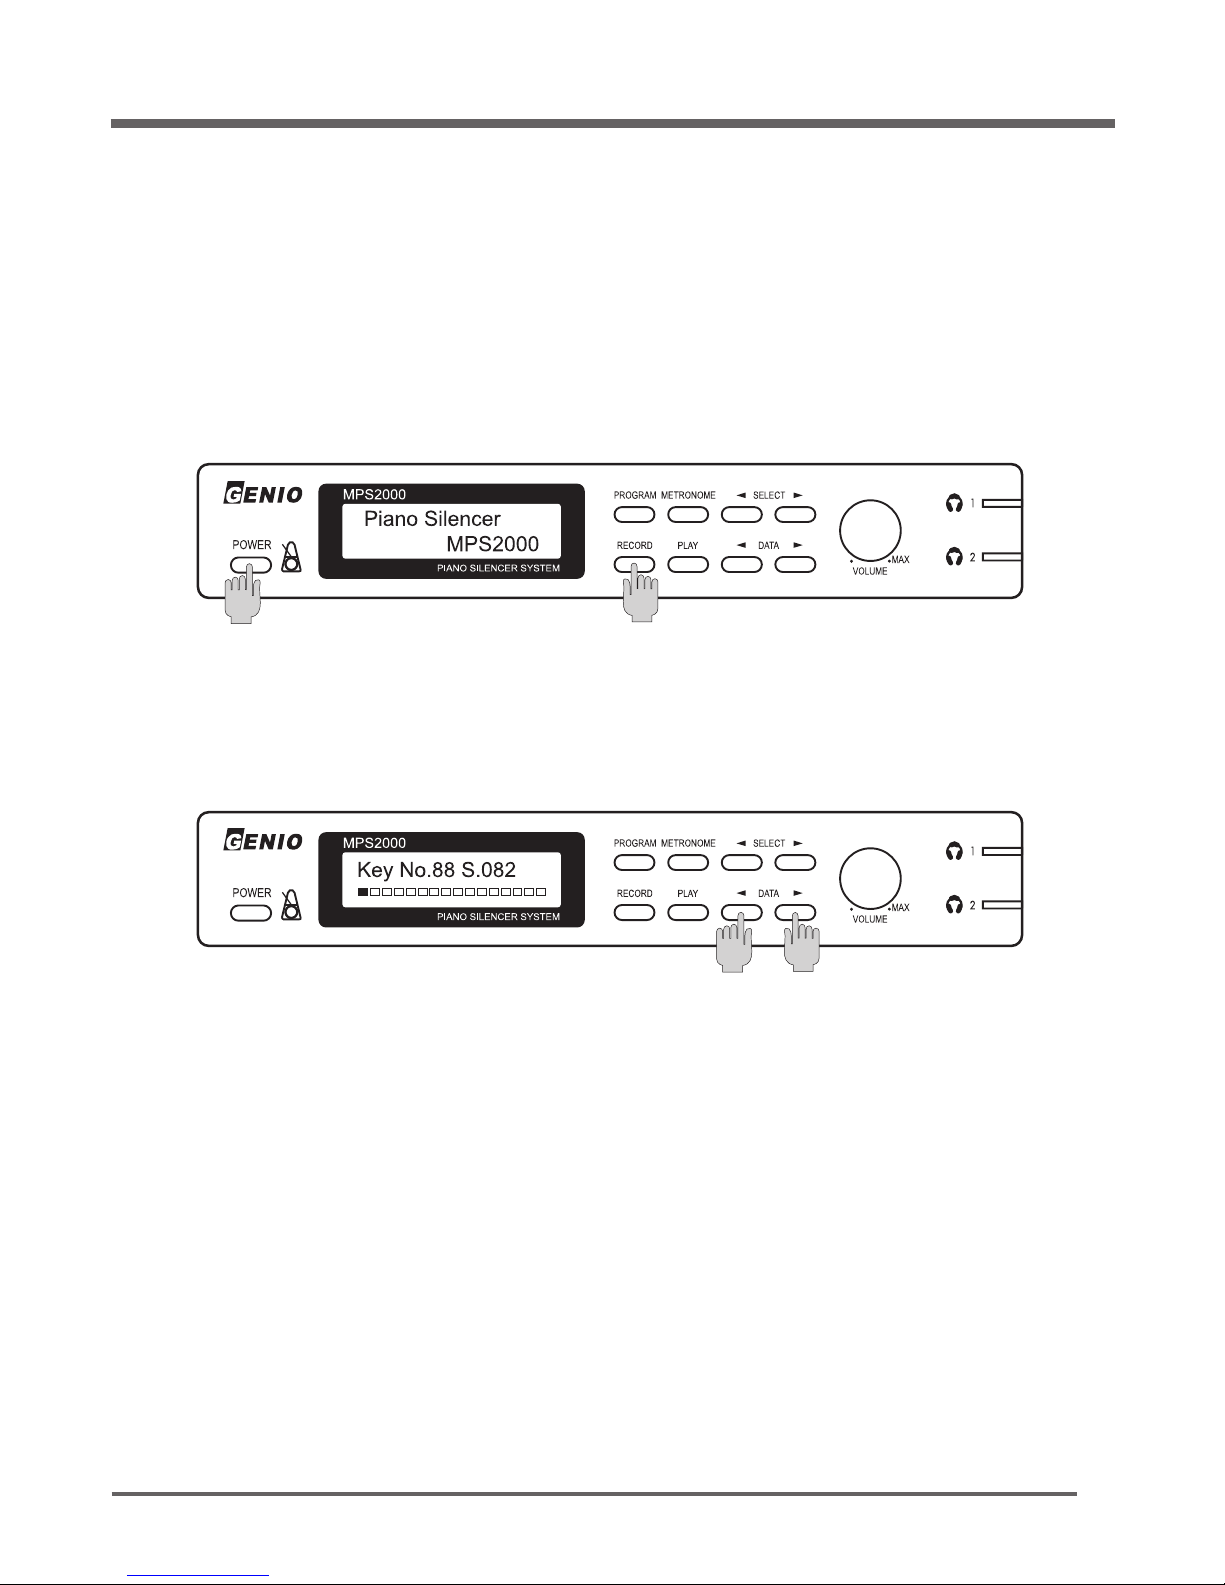
While holding the [
RECORD
] button down, turn MPS2000 the on.
After 3 seconds, release the [
RECORD
] button. The display should be as below.
While wearing headphones to monitor the sound, play each key and listen to the volume of the
sound, If the sensitivity needs to be adjusted, use either [◀]
DATA
or
DATA
[▶] button to adjust the
sound volume for the key last played down or up so that it matches the other keys.
The display shows the current key's sensitivity value from 000 to 255.
When moving to a different key, the last displayed value for the previous key is remembered.
Page 26
MPS2000
26
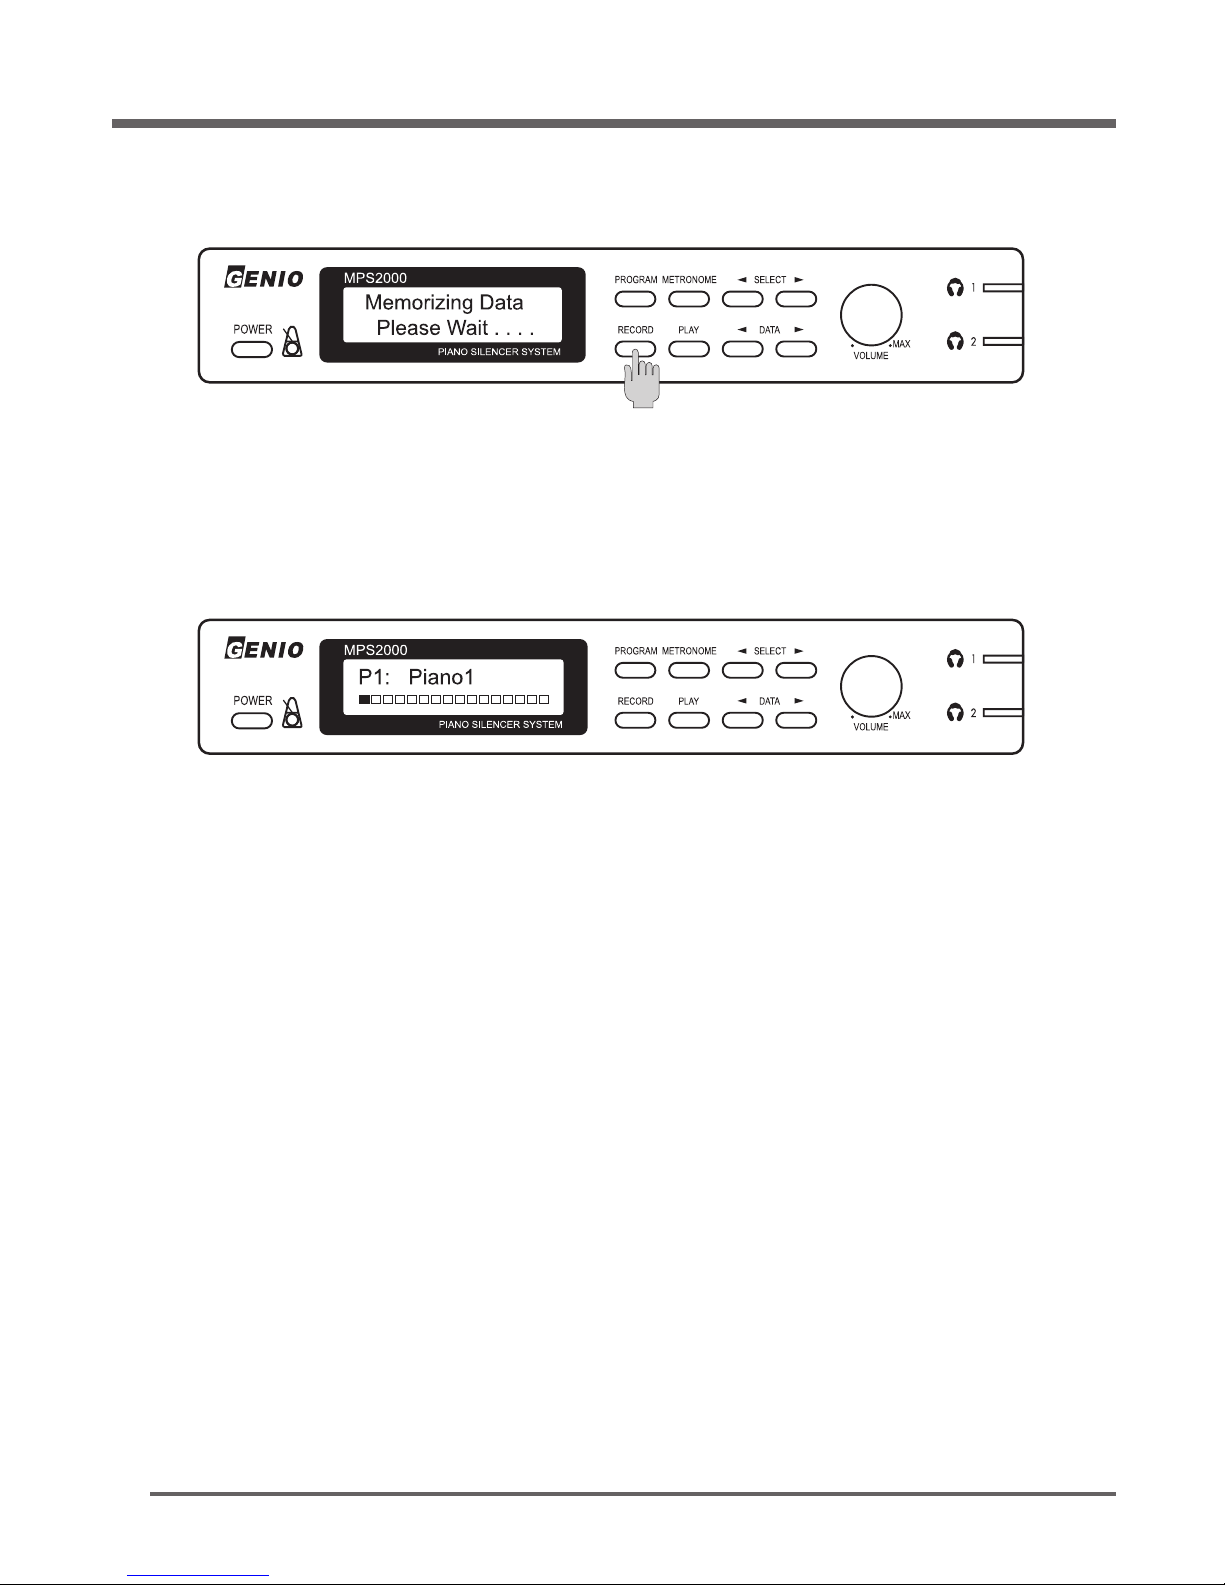
When all keys requiring adjustment have been done, press the [RECORD] button again to end key
adjustment.
When the adjustment data is successfully stored, the display will change as shown and the piano is
ready to play again.
It will take a few seconds for the adjustment data to be stored in permanent memory.
Page 27
ⅤⅤ
.
Application
MPS2000
27
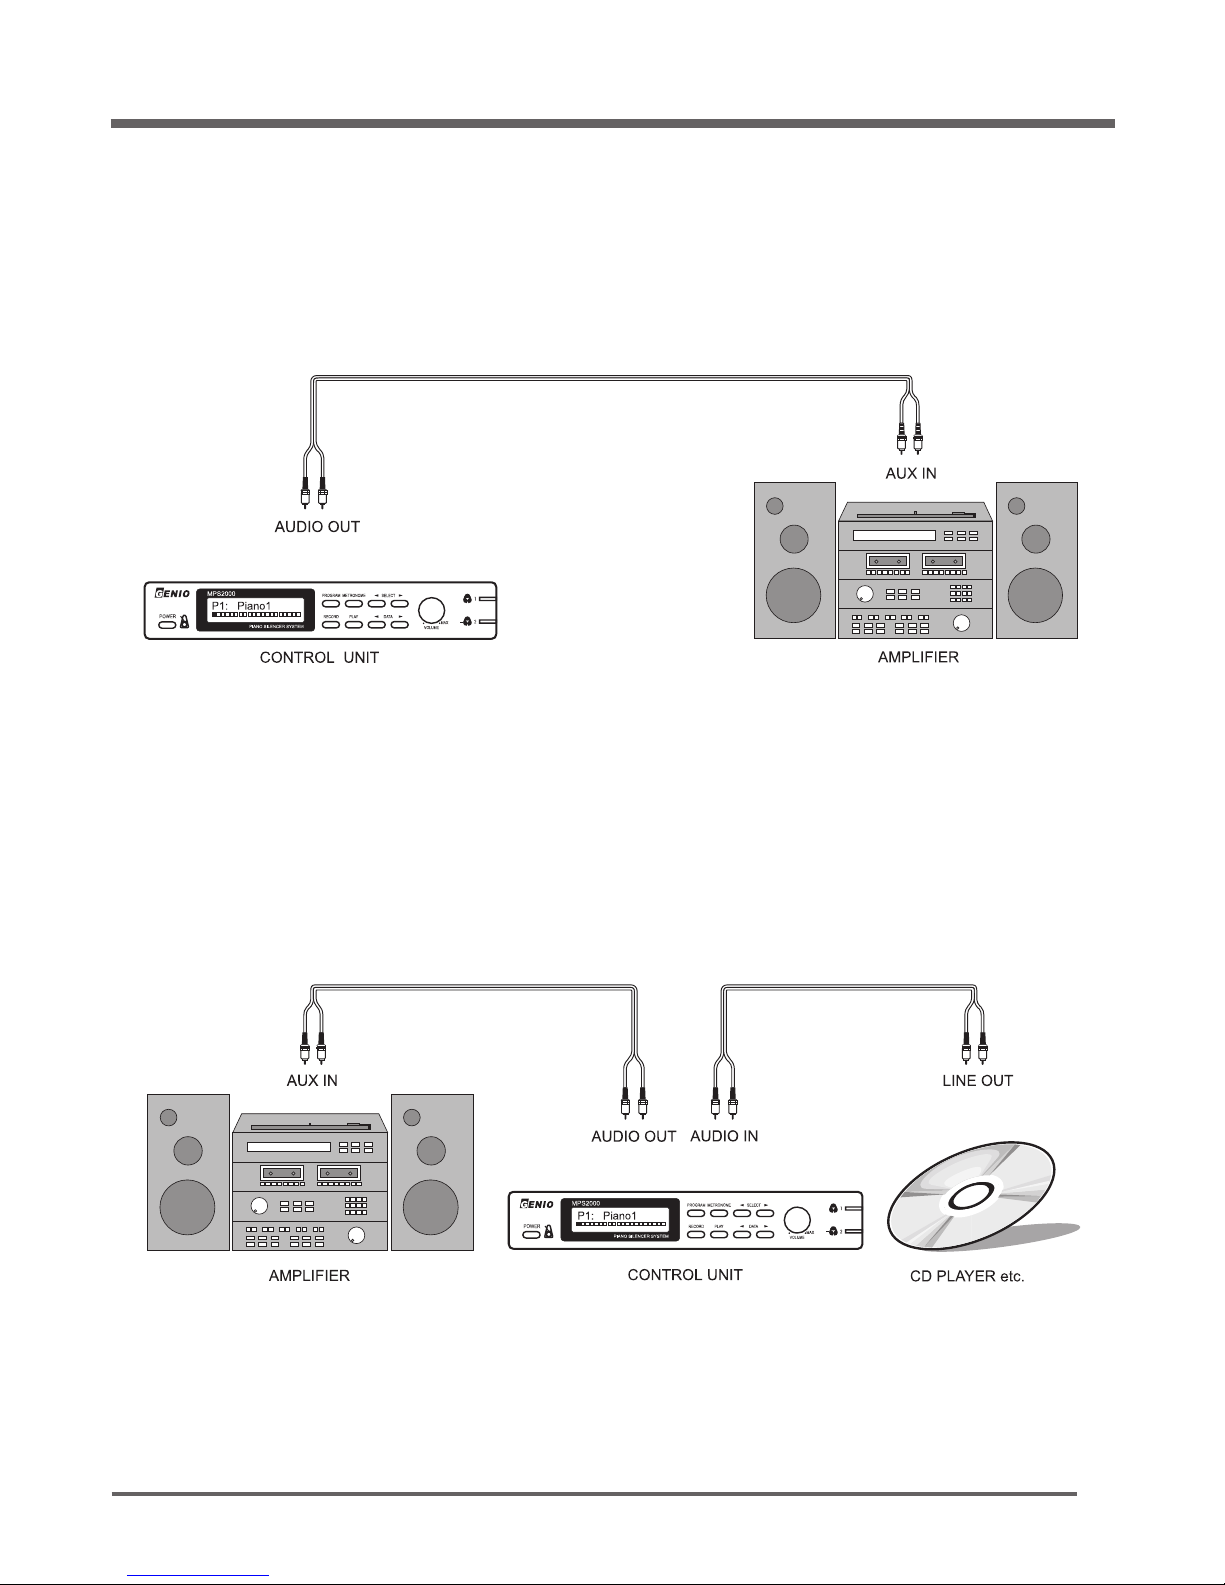
You may also connect an external audio source, such as a CD player, to the audio inputs of the
MPS2000. Using two audio cables, connect the Aux or Line output of your source to the Left and Right
Audio inputs of the MPS2000. The sound in the MPS2000 headphones will now be a mixture of the
piano sound and the external source sound. Use the volume control on the external source to adjust
the external sound volume.
Use two audio cables to connect the Left and Right Audio outputs of the MPS2000 to inputs of your
audio system. The signal is "unbalanced, line level". See the diagram below which is representative of
a club or performance hall audio system.
Connect your MPS2000 to external Audio Equipment
Page 28
MPS2000
28
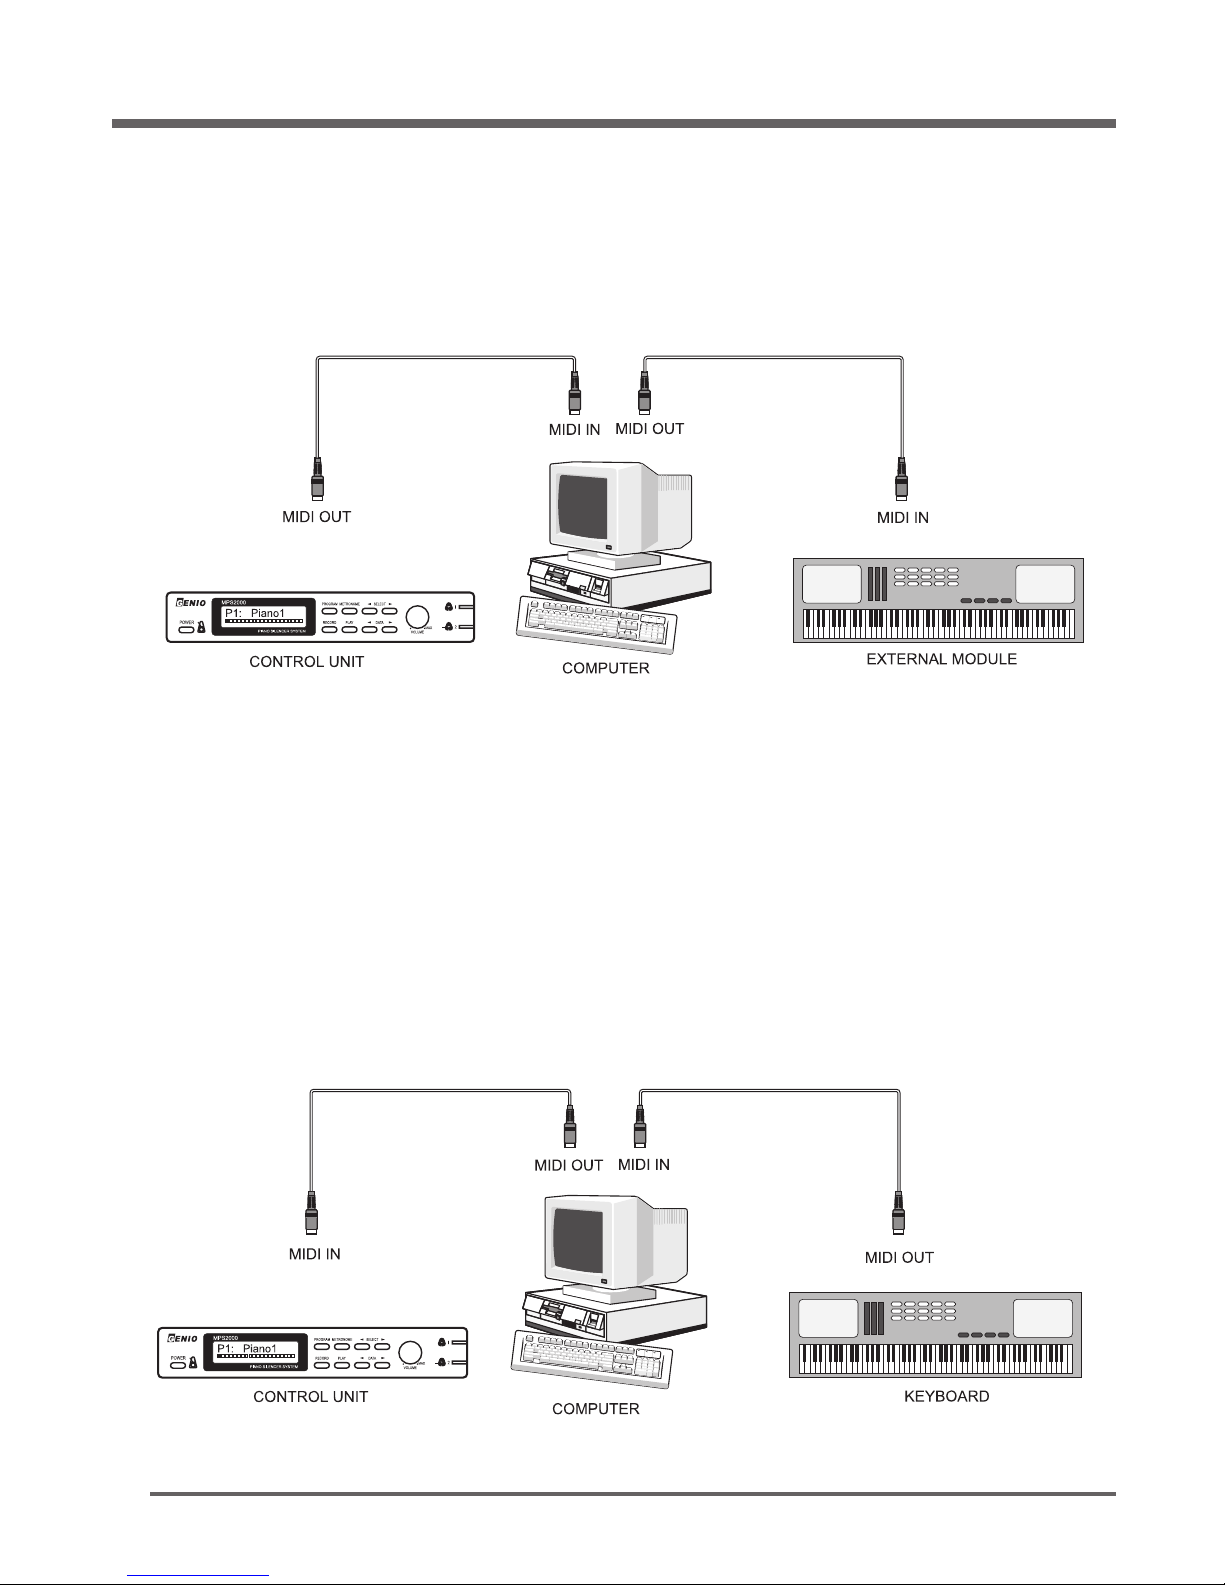
In order to send MIDI data to a General MIDI synthesizer or computer, connect a MIDI cable between
the MIDI Out port of the MPS2000 and the MIDI In port of your synthesizer or computer. See the
diagram below.
Note:
1. Most computers do not have a MIDI interface built-in. You may need to add a MIDI interface to your
computer before you can connect it to your MPS2000 .
In order to receive MIDI data from a General MIDI keyboard synthesizer or computer, connect a
MIDI cable between the MIDI Out port of the external device and the MIDI In port of the MPS2000 .
See the diagram below.
You can connect MIDI In and Out cables at the same time. If connecting to a computer, be sure to
turn "Patch Through" off in your software to avoid "double notes".
Although only Piano and Church Organ sounds are available from the MPS2000 keyboard, several
additional sounds are available when connected to an external MIDI source.
Connect your MPS2000 to external MIDI Equipment
Page 29
Trouble shooting
MPS2000
29
Page 30

Memo
MPS2000
30
Page 31

Memo
MPS2000
31
Page 32

121-2 Sannam-Ri Gyoha-Eup Paju-City Gyeonggi-Do,Korea 413-834
 Loading...