

Page 1

IPB2CP
IP Conical Pinhole Lens Board Camera
User Manual
Page 2

Contents
IP Camera Search ----------------------------------------- 4
Default IP Address ---------------------------------------- 5
ActiveX Installation ---------------------------------------------------- 6
LOGIN ----------------------------------------------------- 9
LIVE / Image ------------------------------------------------------- 10
LIVE / Image selection --------------------------------------------------- 11
LIVE / Digital Zoom ----------------------------------- 12
LIVE / Video Compression -------------------------------------------- 13
LIVE / OSD ----------------------------------------------- 15
LIVE / Image Lightening -------------------------------------- 17
LIVE / CAMERA -------------------------------------18
LIVE / ADVANCED ----------------------------------------19
SETUP / EVENT SCHEDULE --------------------------------------- 20
SETUP / NETWORK -------------------------------------22
SETUP / DATE/TIME ------------------------------------23
SETUP / INFORMATION & ACCOUNT ---------------------------- 24
SETUP / UPDATE --------------------------------------- 25
SETUP / LOG(S) & MOTION AREA--------------------- 26
SETUP / PRIVACY AREA -------------------------------- 27
PLAYBACK / FILE SEARCH ------------------------------ 28
PLAYBACK / DOWNLOAD & PLAYBACK -------------- 29
PLAYBACK / REWIND & FILE SAVE -------------------------- 30
Q&A ---------------------------------------------------------- 31
2
Page 3
Notice
About this Manual
It is assumed that the users are familiar with Microsoft Windows and Web Browsers such as
Internet Explorer. We recommend you to review this manual before install and use the product
although users have enough experience. Keep our recommended warning messages and
caution notices for your safety, to prevent damage of property.
Then keep this manual where you can find easily when you need this manual.
ü Damages caused by misuse (i.e. use of parts not suggested) will not be covered
under warranty.
ü If user is a beginner to install the product, and feel difficult to use the pr
oduct,
please contact to its supplier and ask his technical support.
ü Do not disassemble the product for alternation or r
epair. If you need, please
contact its supplier and ask his technical support.
For user’s safety
Please remind below safety rules for user’s safety and to prevent improper use of the product.
Correct using, it will save user’s life and prevent damage of user’s property.
ü Do not give shock during moving and installation.
ü Escape any electric shock, vibration, and risk of fire hazards.
ü Do not move & transfer the product during running the product.
ü Please remove power input when user clean the product.
(Do not spray water, wax or other cleaning liquid directly onto the product.)
ü Do not get wet when user remove power input..
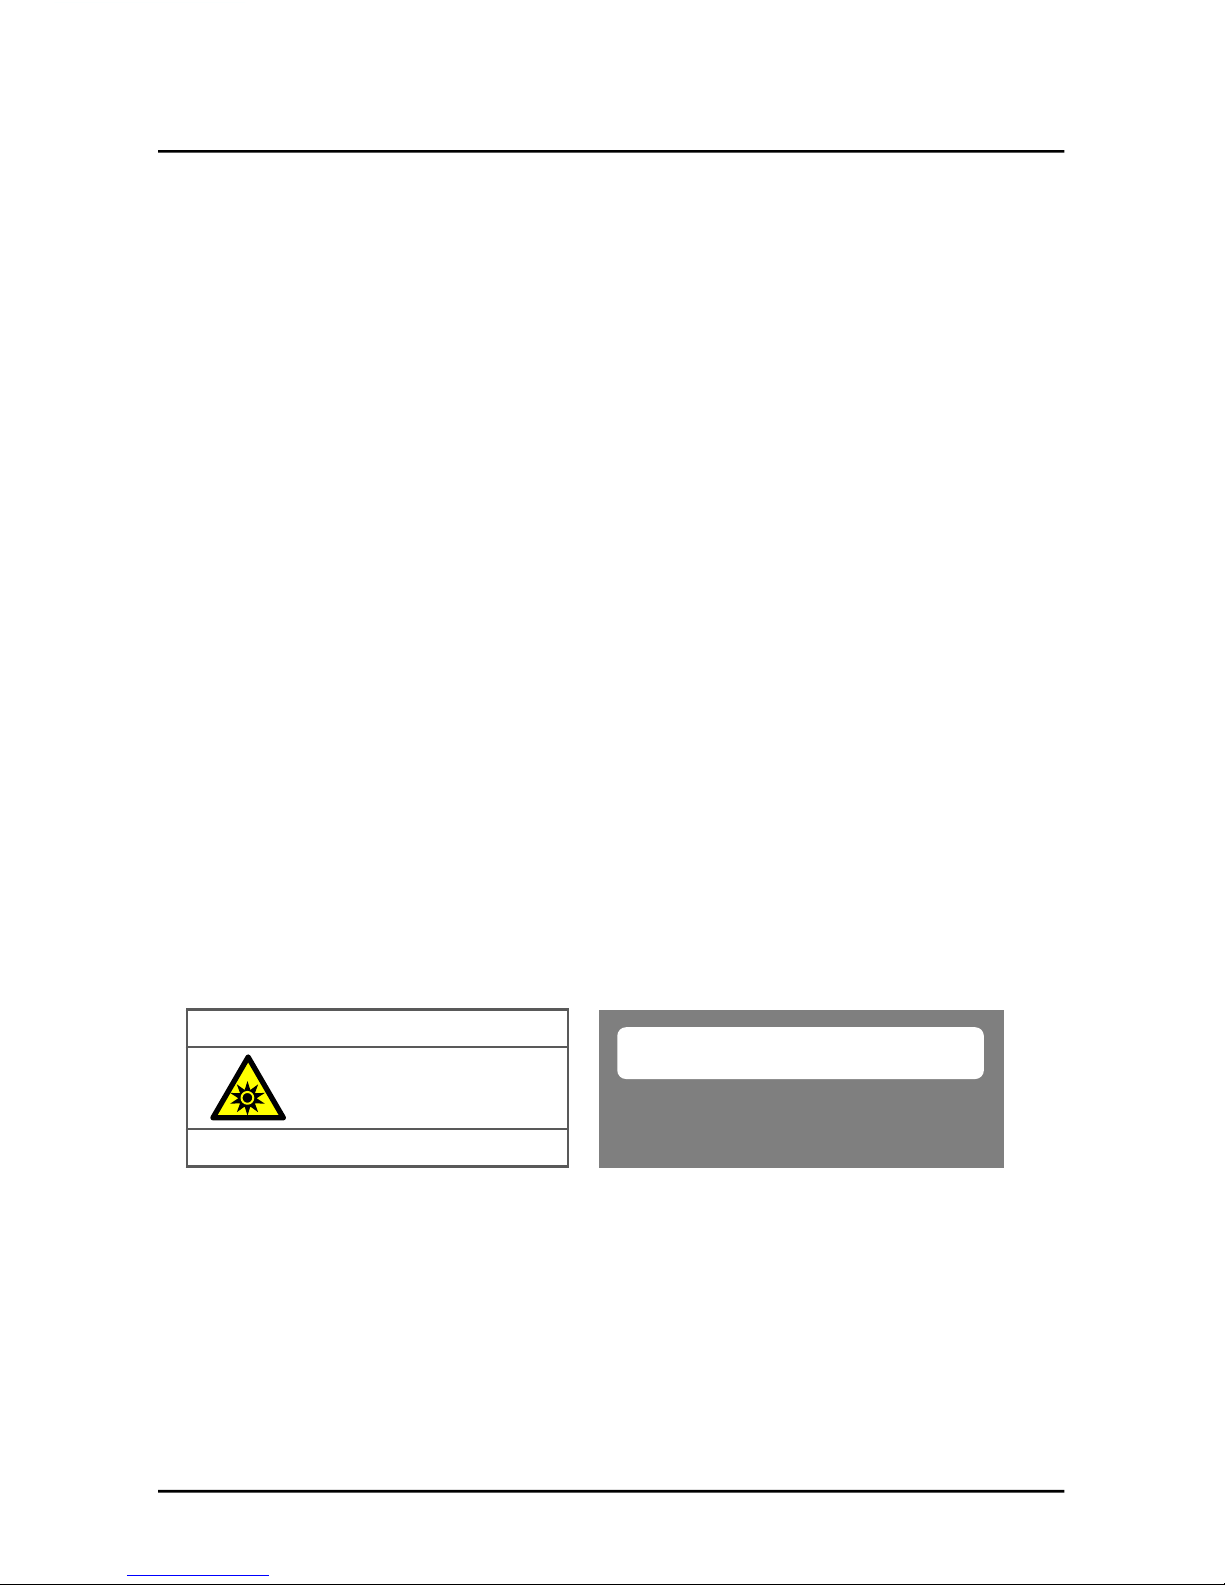
Risk Group 1
Product tested against IEC62471
WARNING IR emitted from this pr
oduct. Do not stare at operating la
mp
Do not watch IR LED Light on the
Product directly.
CAUTION
3
Page 4
IP Camera Search
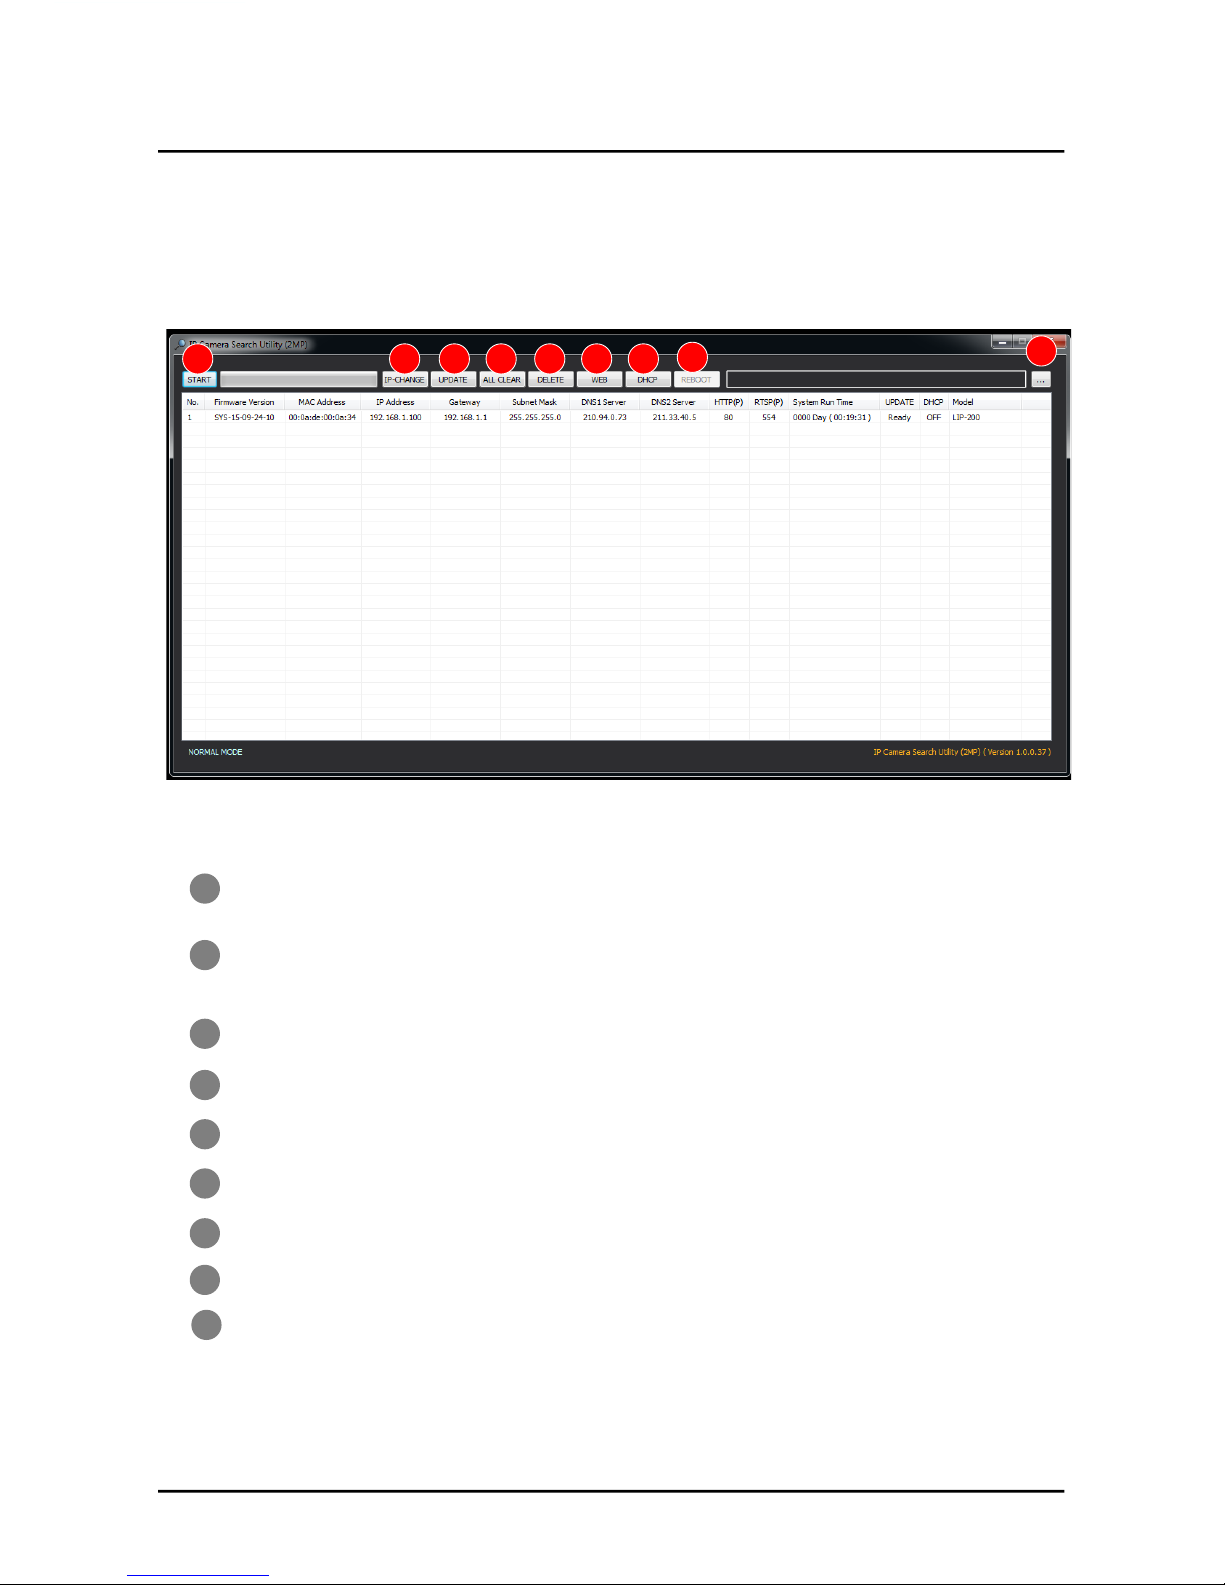
In order to have the camera viewable on the network, IP address has to be
assigned first. When a user double clicks IPCamSearch.exe file which a
software provided in the CD will help to search IP camera and change the IP
address easily.
1
START : Enable to search IP cameras in the network and display the list of searched
cameras.
2
IP-CHANGE : After Search, select the displayed camera and click “IP-Change” to
change IP address, Gateway and Net Mask.
3
UPDATE : Firmware can be updated. Before updating, please load firmware from PC.
4
ALL CLEAR : Displayed cameras are all cleared.
5
Delete : Delete the displayed cameras in the list.
6
WEB : Go to web view for the selected camera.
7
DHCP : Change to DHCP mode for the selected camera.
8
REBOOT : Reboot the selected IP cameras
9
Load firmware from your PC to update the latest firmware
1! 2! 3! 4! 5! 6!8!7!
9!
4
Page 5

Default IP Address
Factory default value of IP camera is like below.
When you connect IP camera and PC directly, please assign the IP address of
PC by choosing any numbers from 2 to 254 except “201” as shown below.
After connection, allow to install ActiveX (Web Live Player software) on PC.
For the installation of ActiveX, please refer to the following page.
※Available OS : XP, VISTA, WIN 7/8/10(32/64bit)
• IP : 192.168.10.201
• SM : 255.255.255.0
• GW : 192.168.10.1
• IP : 192.168.10.150
• SM : 255.255.255.0
• GW : 192.168.10.1
5
Page 6
ActiveX(Web Live Player) Installation
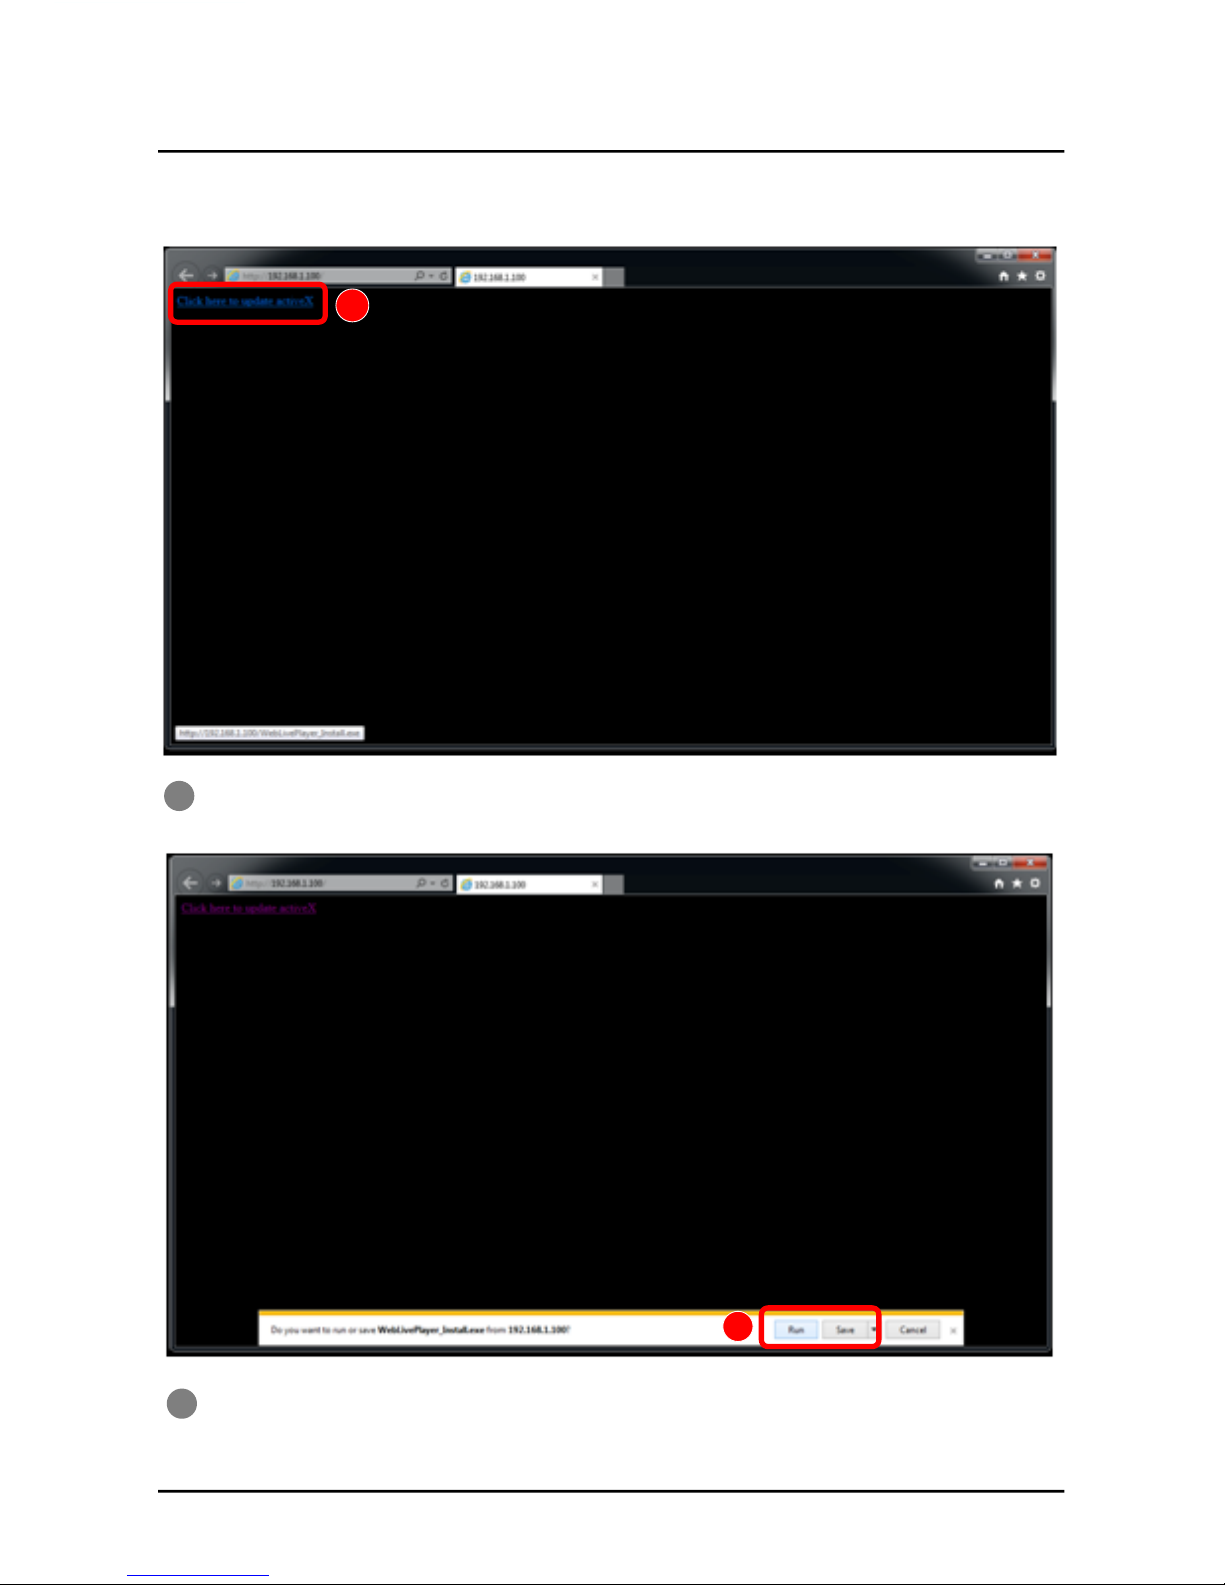
Click “Click here to install Web Live Player”.
1
2
ActiveX Installation
Click ‘Run’ to download or click ‘Save’ to download and save Web Live Player to your PC.
1
2
6
Page 7
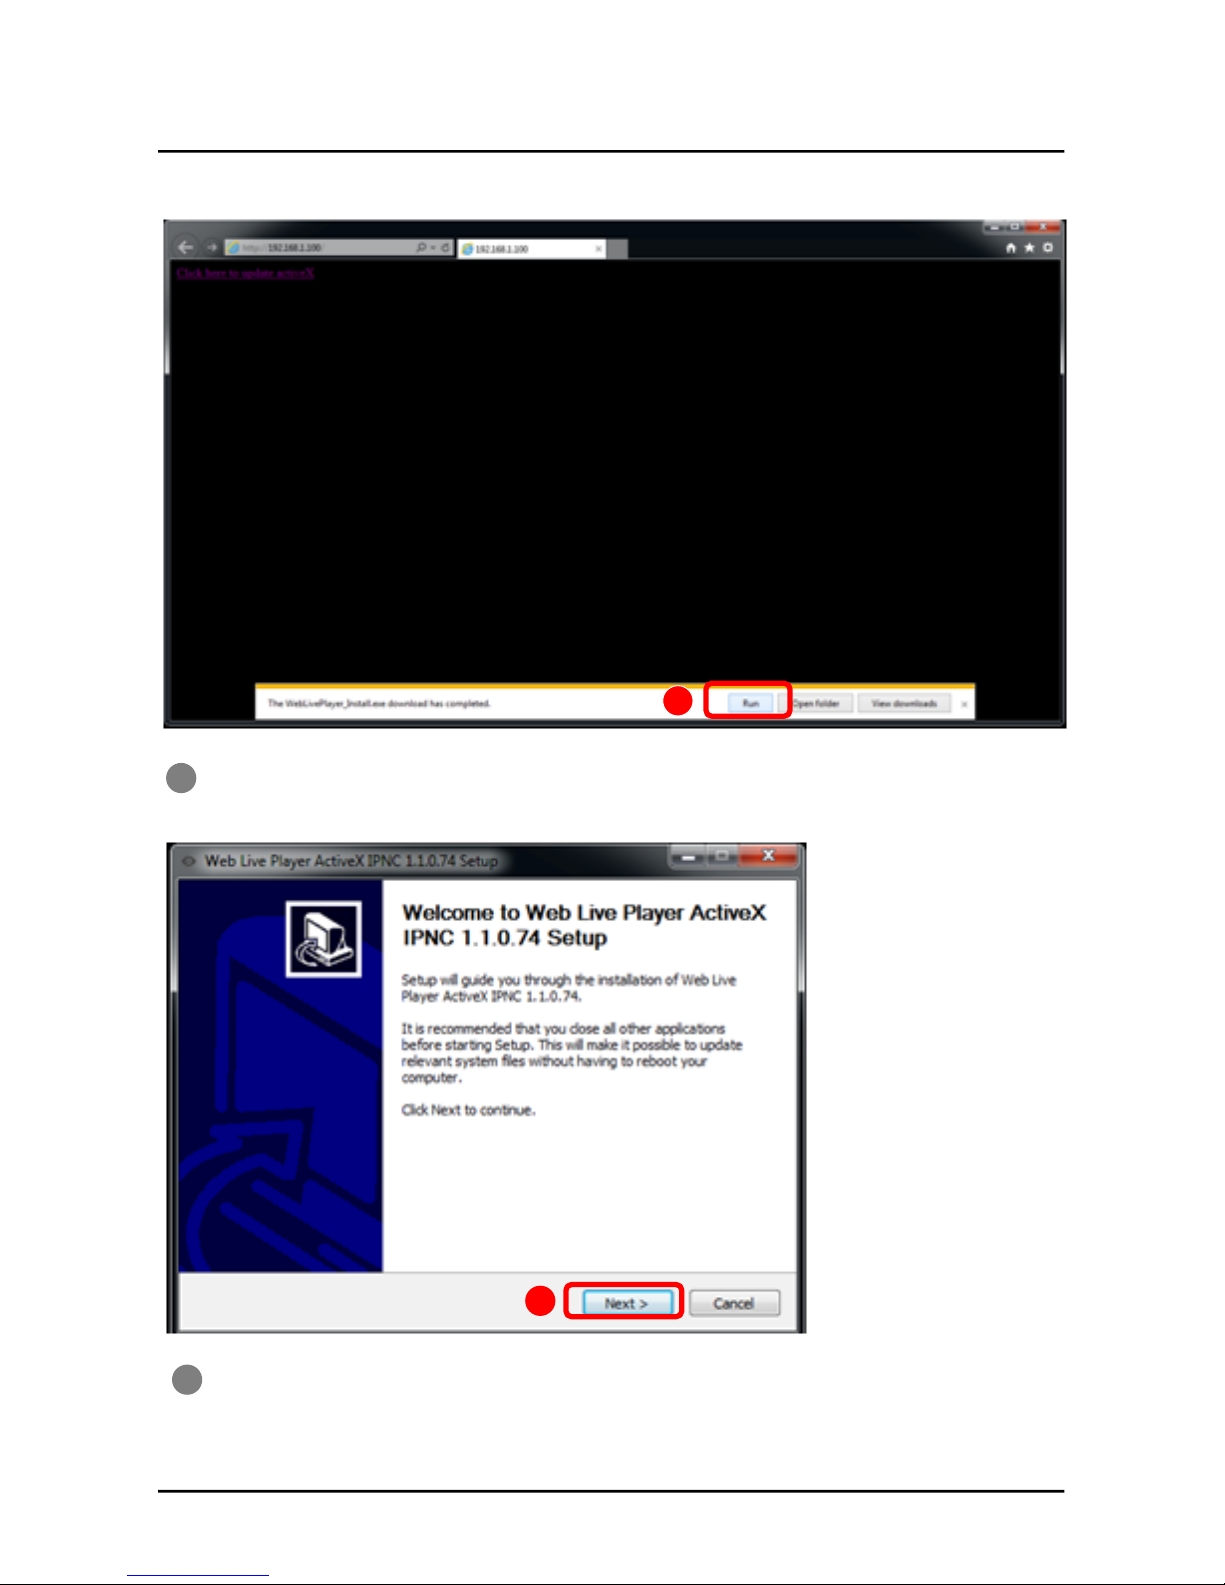
Click “Run” to directly install Web Live Player.
3
3
ActiveX Installation
Click the ‘Next’ button.
4
4
7
Page 8
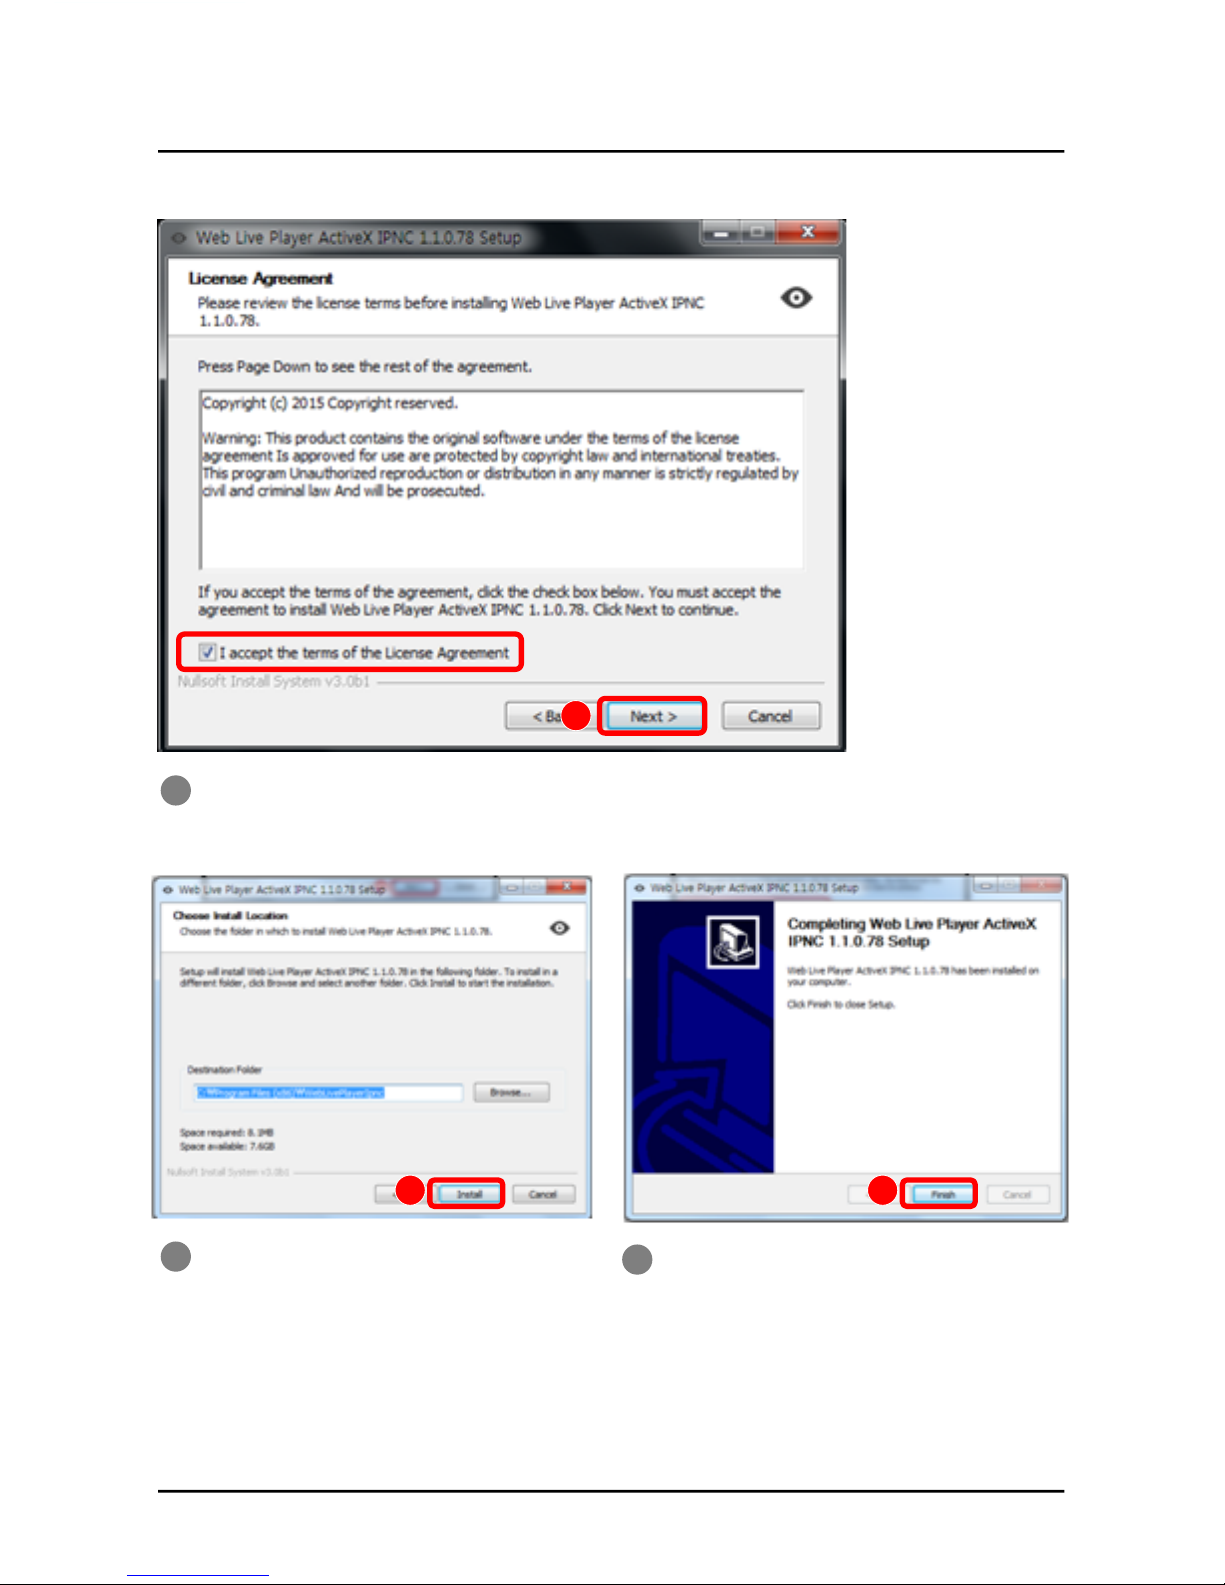
Check on Agreement message and click ‘Next’ button.
5!
5
Click ‘Finish’ to complete the installation.
7
Click the ‘Install’ button.
6
6 7
ActiveX Installation
8
Page 9
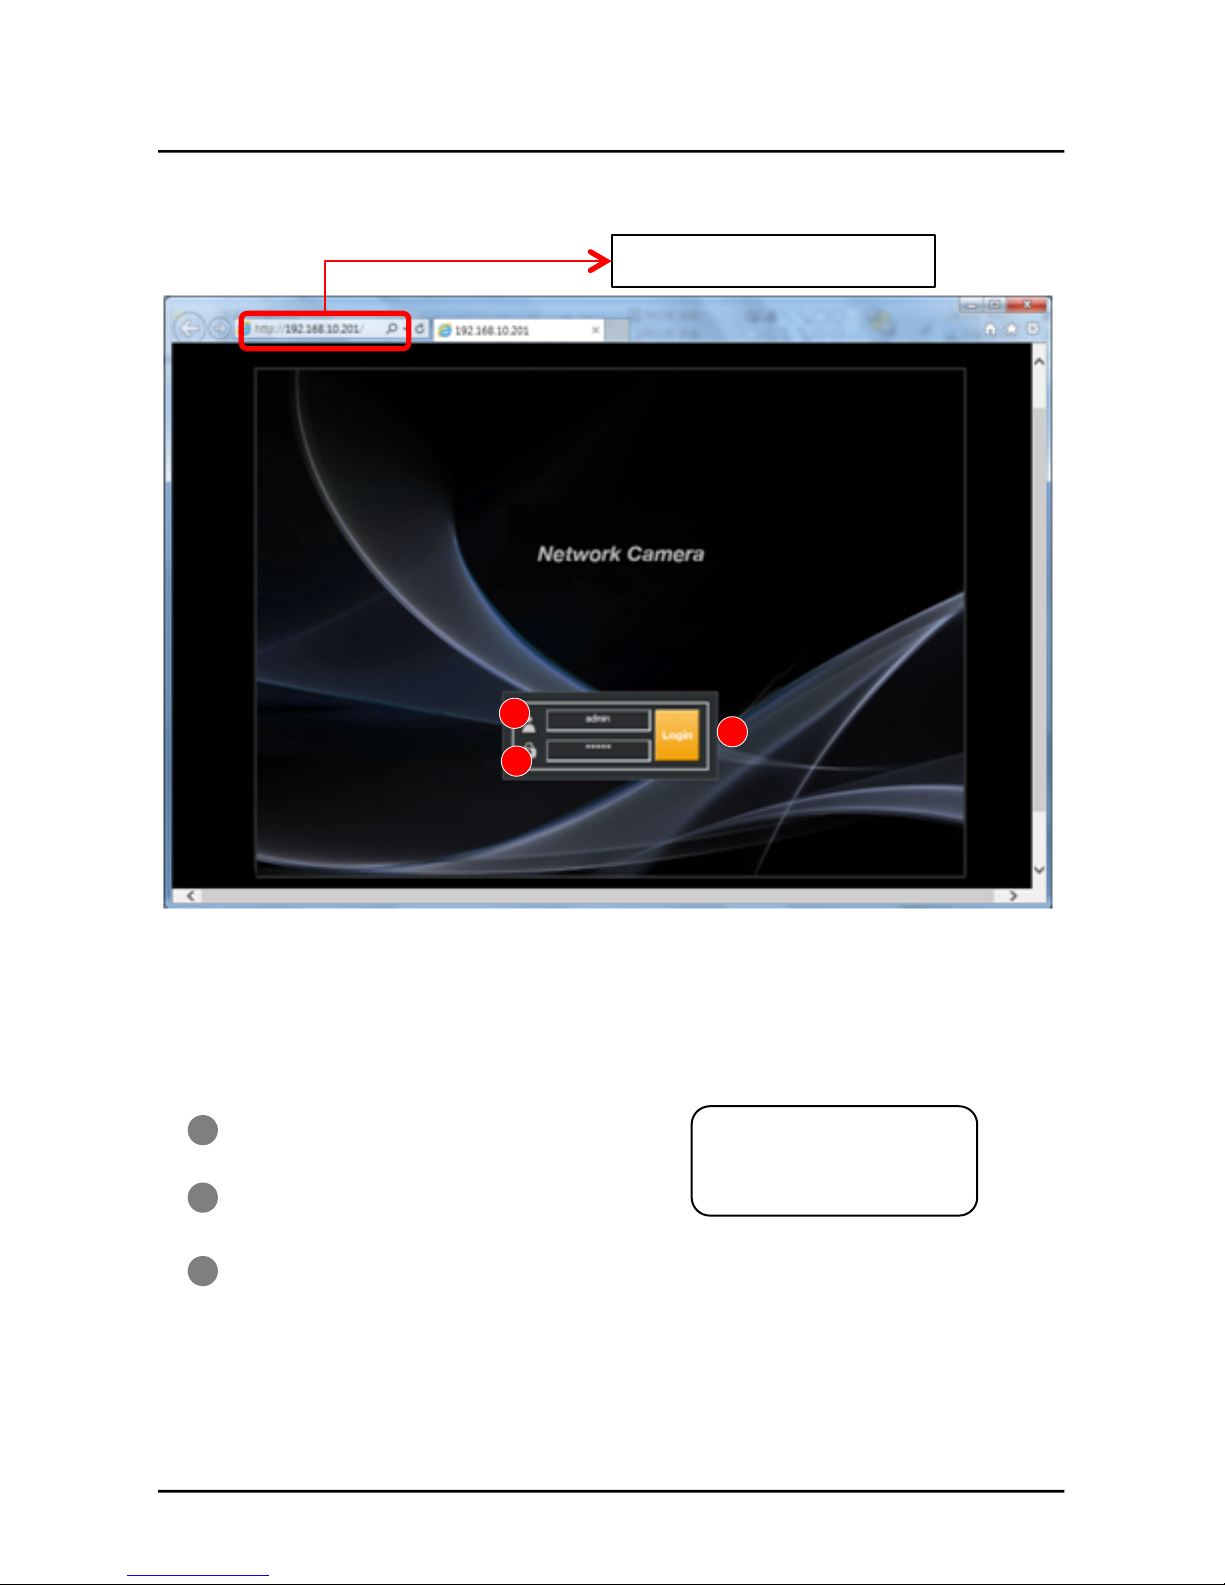
1
3
User ID : User’s Account Name
1
2
3
Input User ID, Password and click “Login” button.
Password : User’s Secret Number
Login : After input User ID & Password, click ‘Login’.
Default ID & PW
- User ID : admin
- Password: 123456
Input IP address of IP camera on web(Internet Explorer)!
LOGIN
http://192.168.10.201
2
9
Page 10
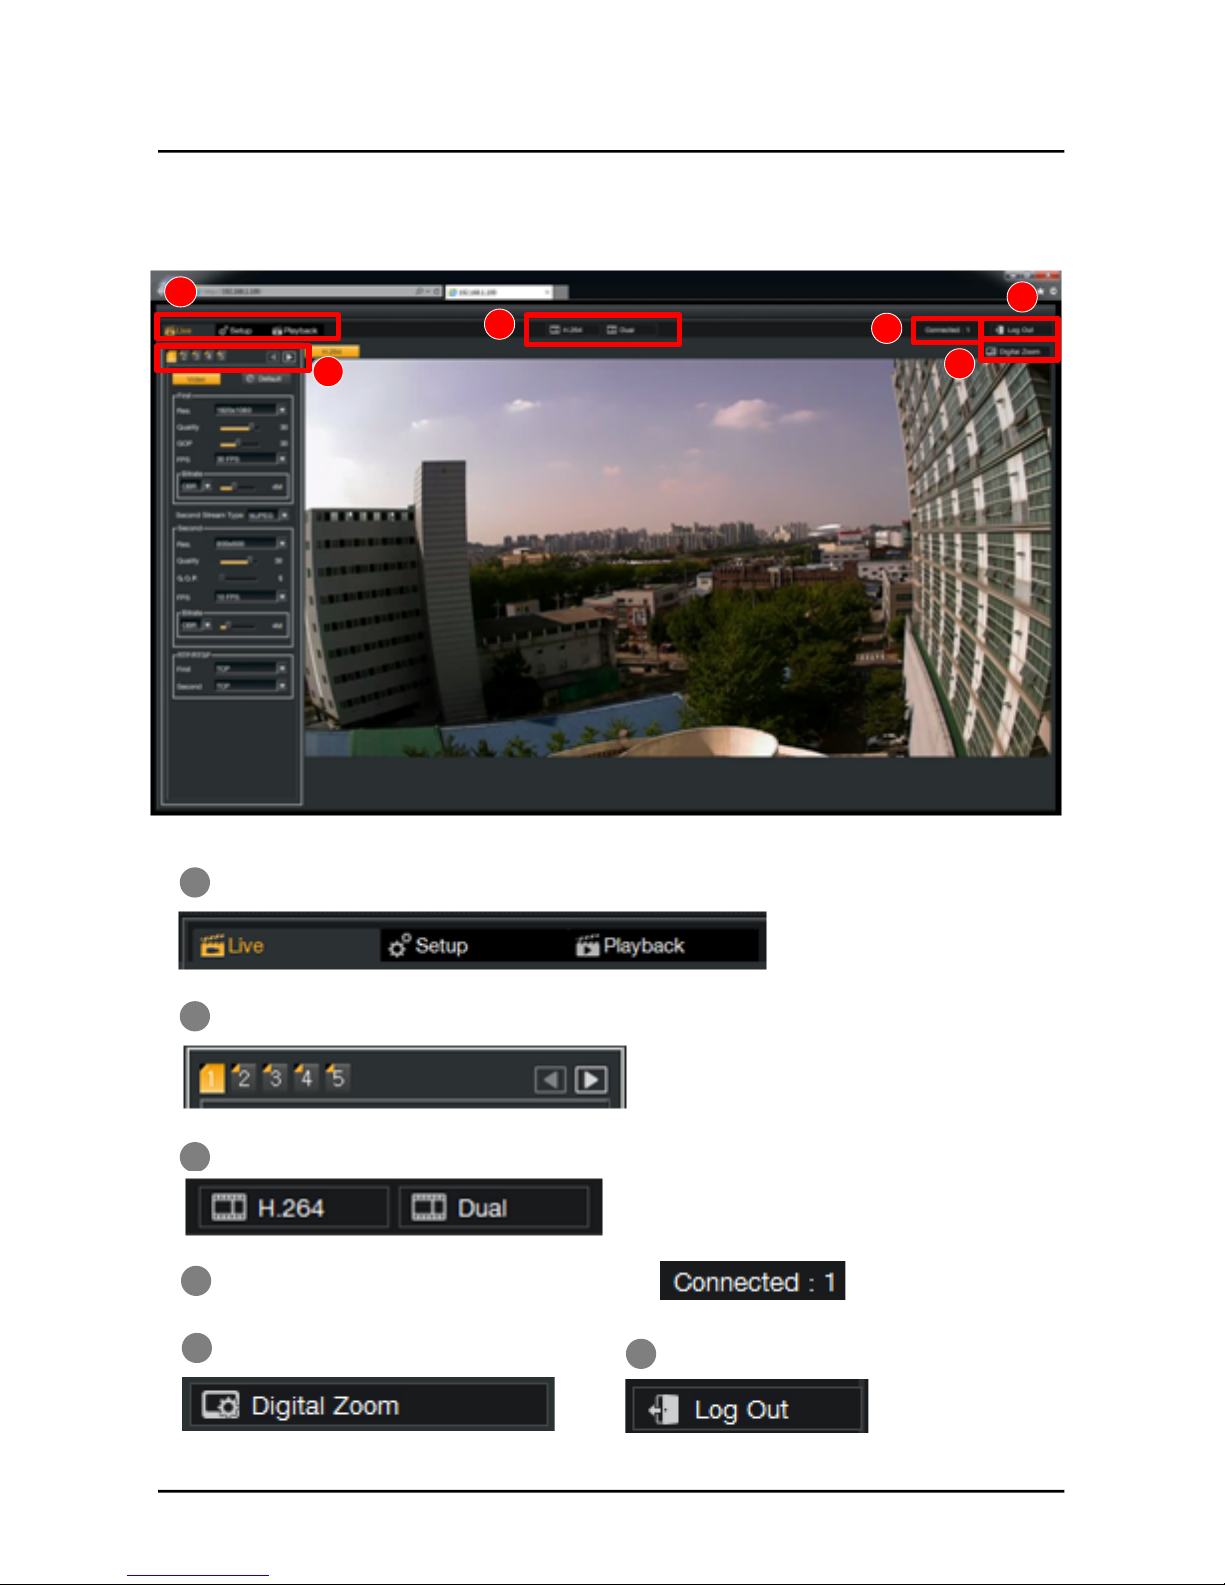
Live View & Camera Setting on Web
4
1
2
3
6
5
1
2
Selectable modes of Live / Setup / Playback Tab.
3
4
Live Image Control : 1(Video), 2(OSD), 3(Lightening), 4(Camera), 5(Advanced)
The number of connected users of camera
5
Digital Zoom
6
‘Log Out’ Button
LIVE
Live Image view mode : First Stream only or Dual Stream (First and Second )Stream)
10
Page 11
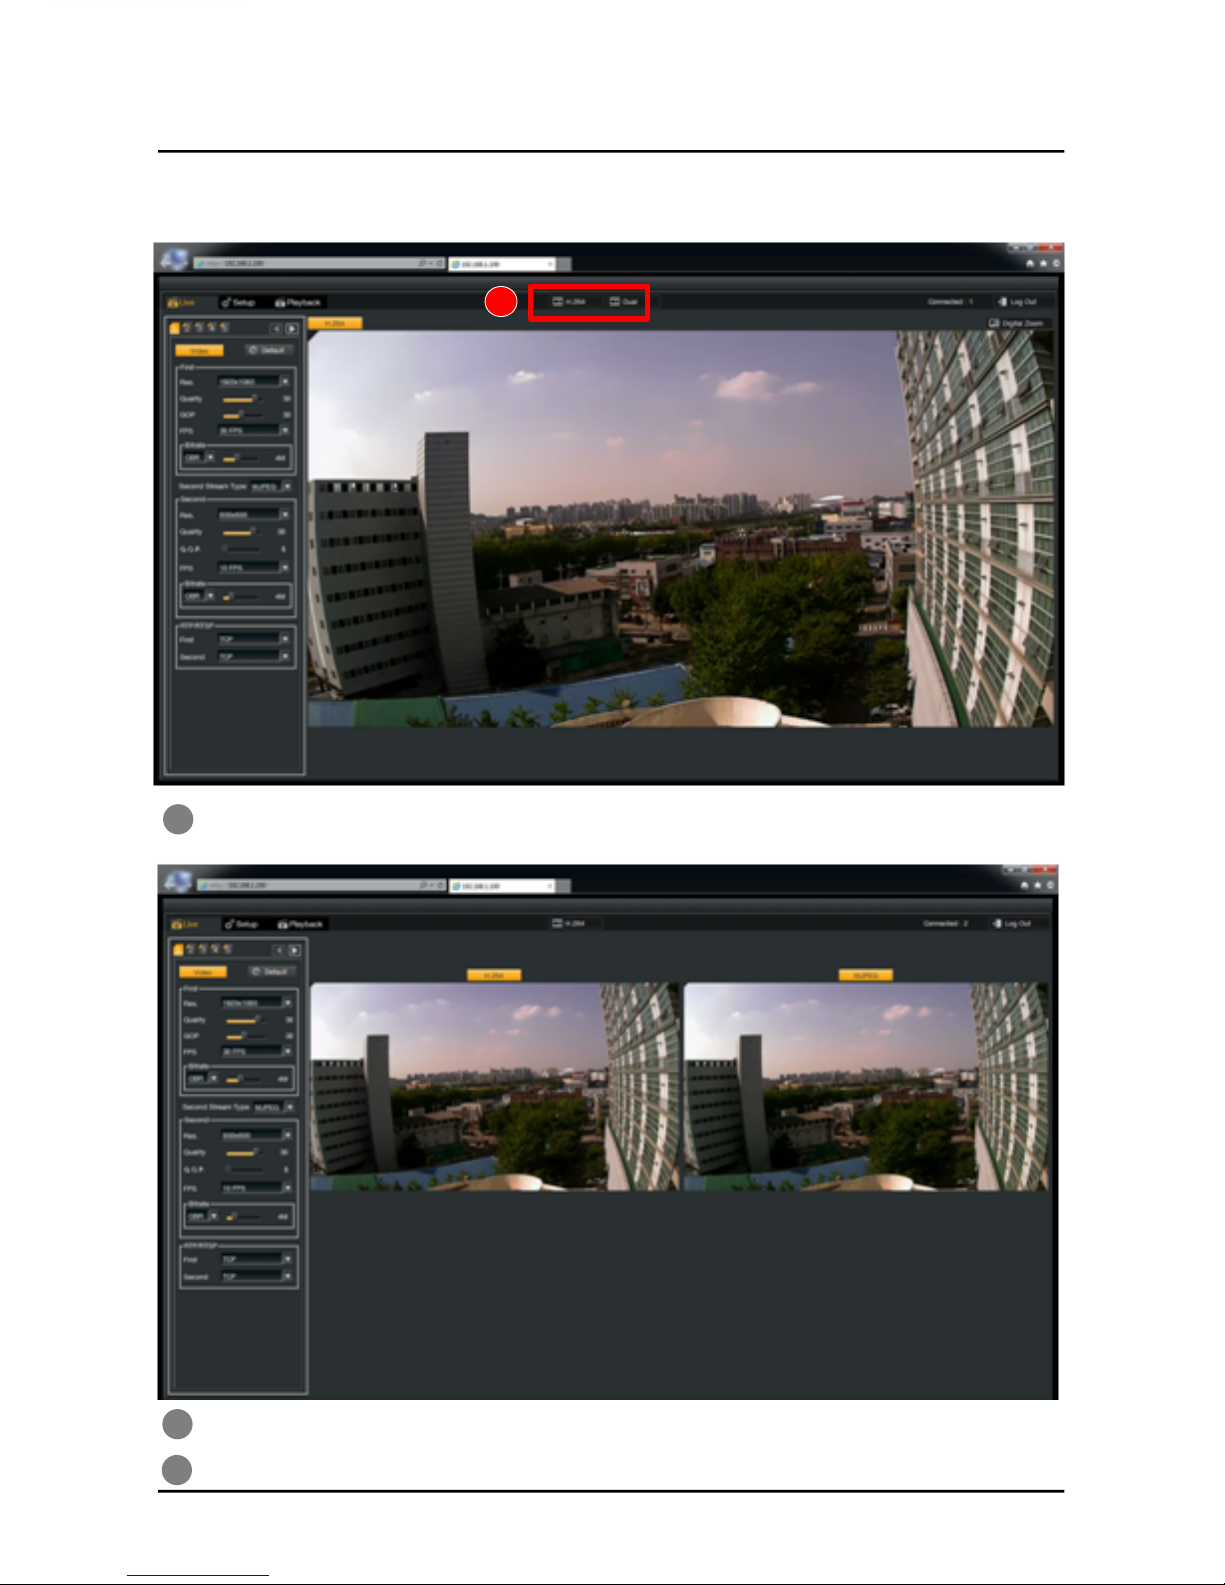
Image Selection – H.264 / H.264 or H.264/MJPEG
1
1
Single(First Stream : H.264) only or Dual(H.264/H.264 or H.264.MJPEG) images can be sel
ected.
2
If you click ‘Dual’, you will see dual images(First and Second Video Images).
3
Whenever you click, Mode is changed.
LIVE
11
Page 12
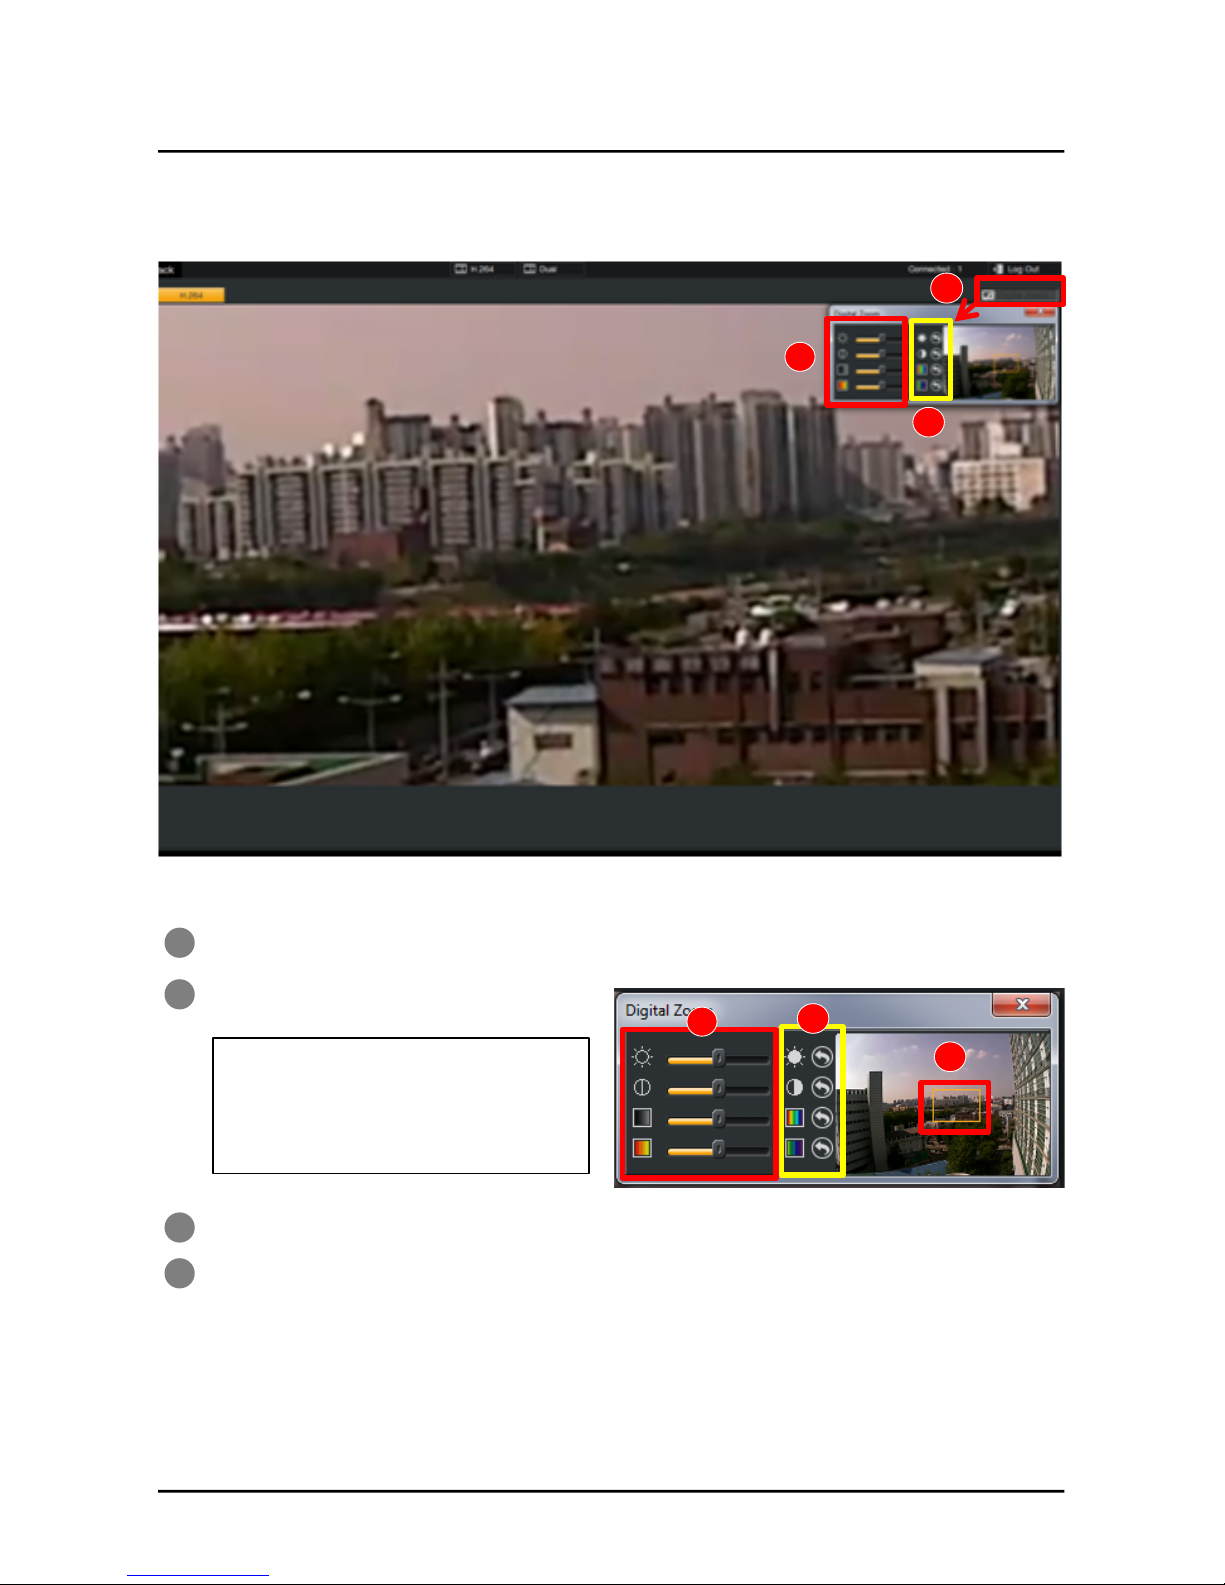
DIGITAL ZOOM
2
3
1
1
2
3
4
When you click Digital Zoom, you can see pop-up window for zoom setting.
From the up to down,
1. Brightness
2. Contrast
3. Hue
4. Saturation
You can get ‘Factory Default Value’ by clicking return arrow.
1. Once you do Mouse Click & Drag in the view window, the orange-colored square box w
ould be created. And you can see that the selected area is enlarged.
2. You can move the square box and change its size in the view window by ‘Click
and Drag’ the square box.
3. If you click the rest space of square box, the zoom image is back to the normal
image.
LIVE
4
2
3
12
Page 13
1
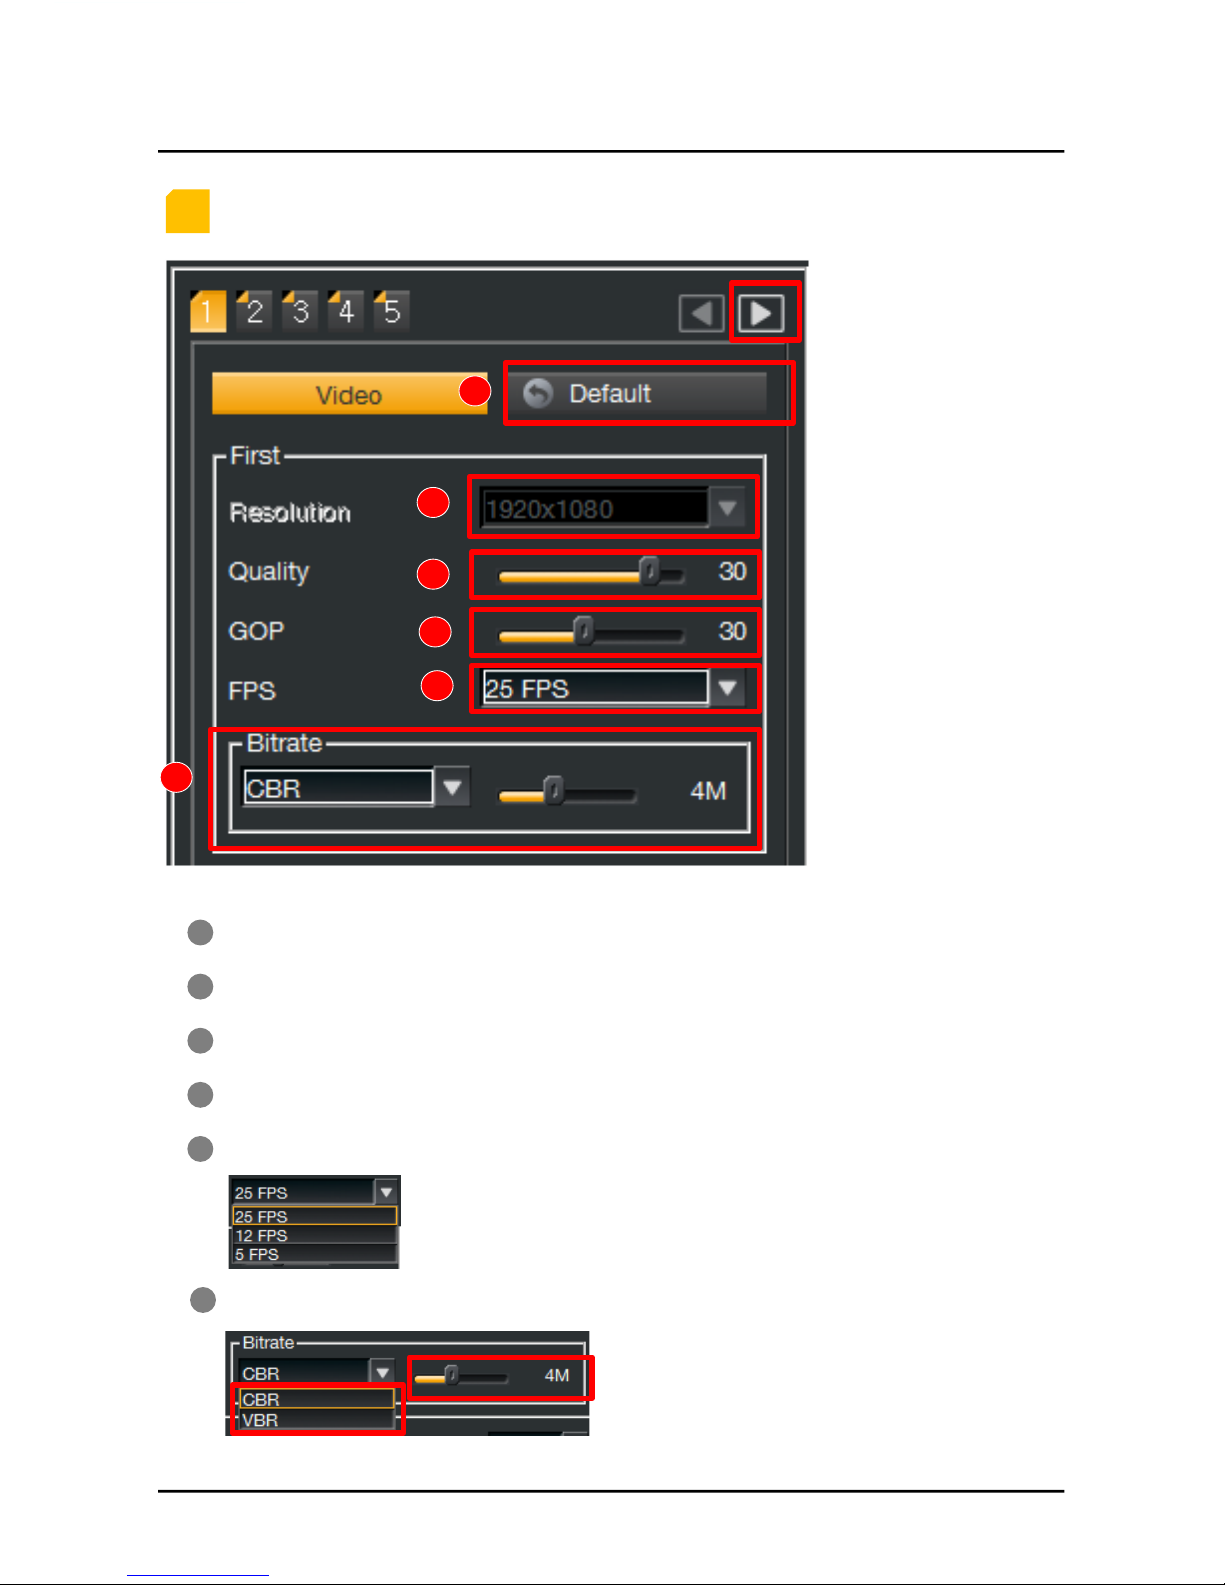
VIDEO – First Stream (H.264)
FPS(Frame Per Second) : 5FPS, 12FPS, 25FPS
1
Go to next page
for setting
Resolution : 1920x1080 fixed(no change)
Default : Change all video settings to default value.
Quality : Video Quality Control(2~35)
GOP(Group Of Picture) : 5~60
Bitrate
LIVE
§ CBR(Constant Bit Rate)/VBR(Variable Bit Rate)
§ Bit Rate Control : 512Kbps ~ 10Mbps
1
2
3
4
5
6
2
3
4
5
6
13
Page 14
1
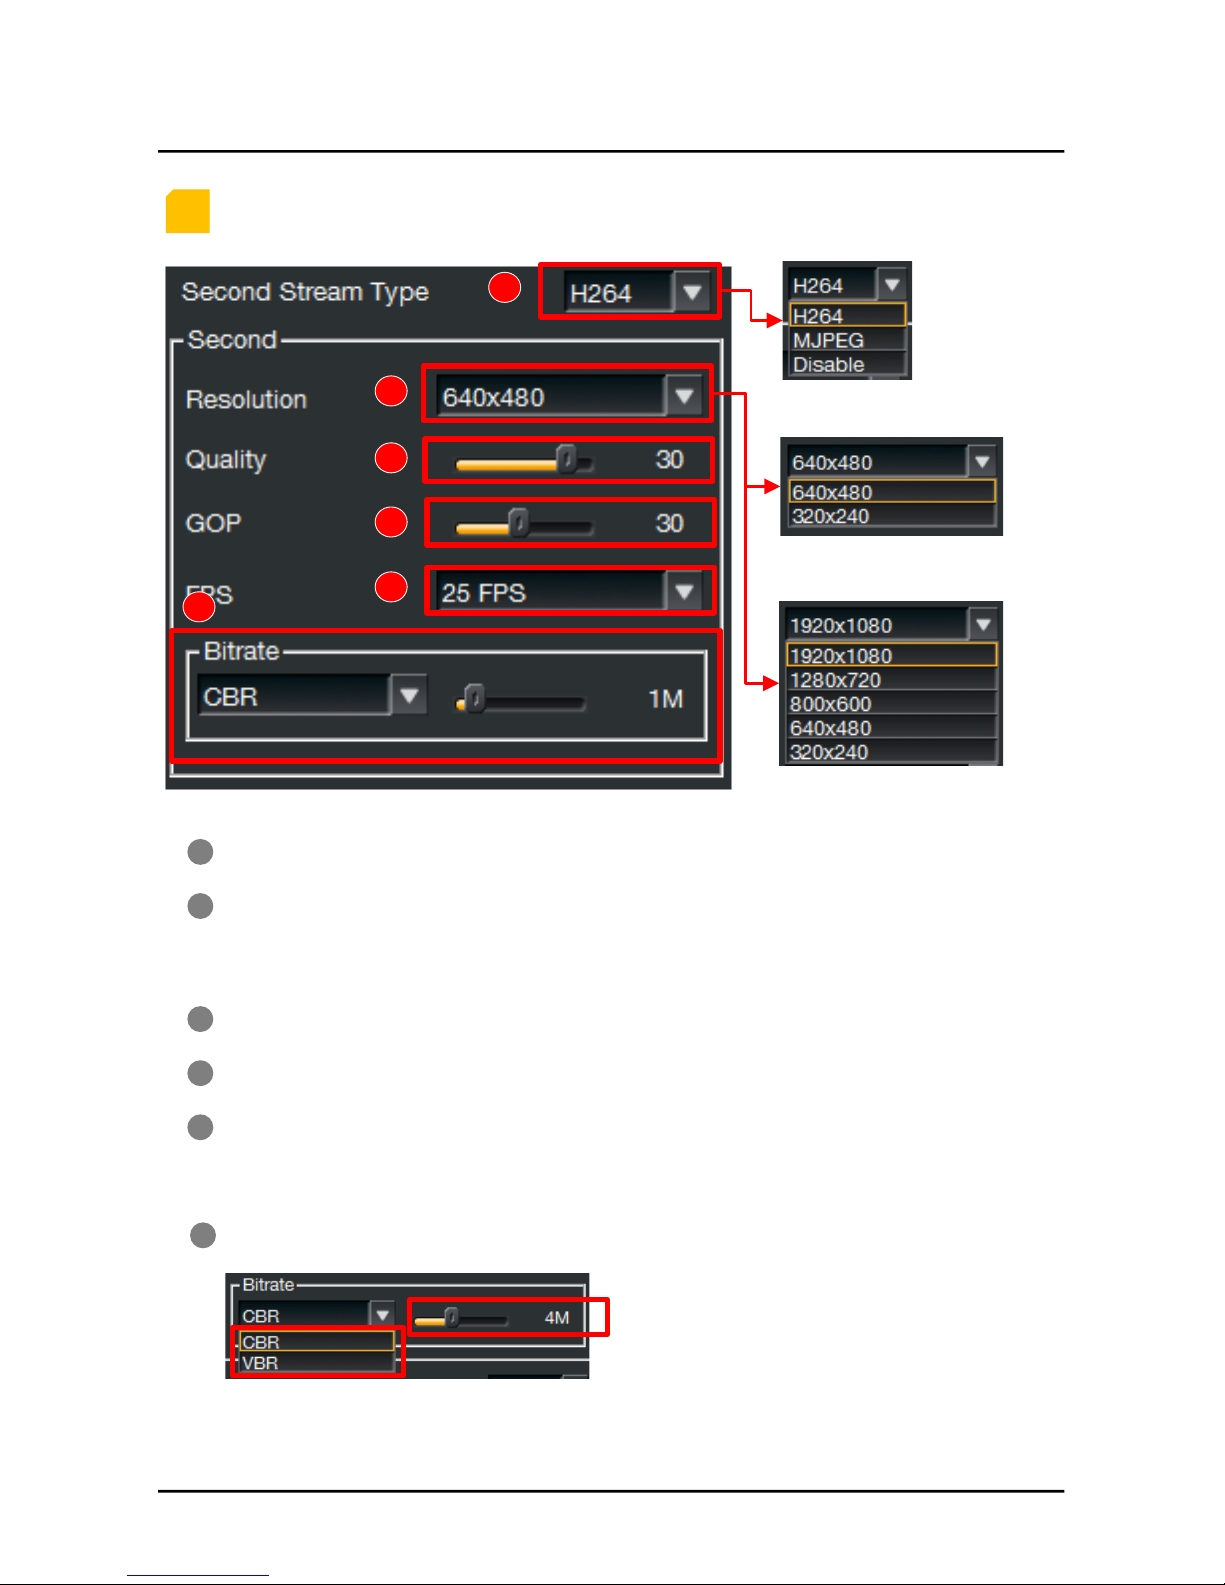
VIDEO – Second Stream (H.264/MJPEG)
FPS(Frame Per Second)
-H.264 : 5FPS, 12FPS, 25FPS
-MJPEG : 5FPS only
1
Resolution
-H.264 : 640x480, 320x240
-MJPEG : 1920x1080, 1280x720, 800x600, 640x480, 320x240
Second Stream Type : H.264, MJPEG, Disable
Quality : Video Quality Control(2~35)
GOP(Group Of Picture) : 5~60
Bitrate
LIVE
1
2
3
4
5
6
2
3
4
5
6
§ H.264
§ MJPEG
§ CBR(Constant Bit Rate) / VBR(Variable Bit Rate)
§ Bit Rate Control : 512Kbps ~ 10Mbps
14
Page 15
1
1
2
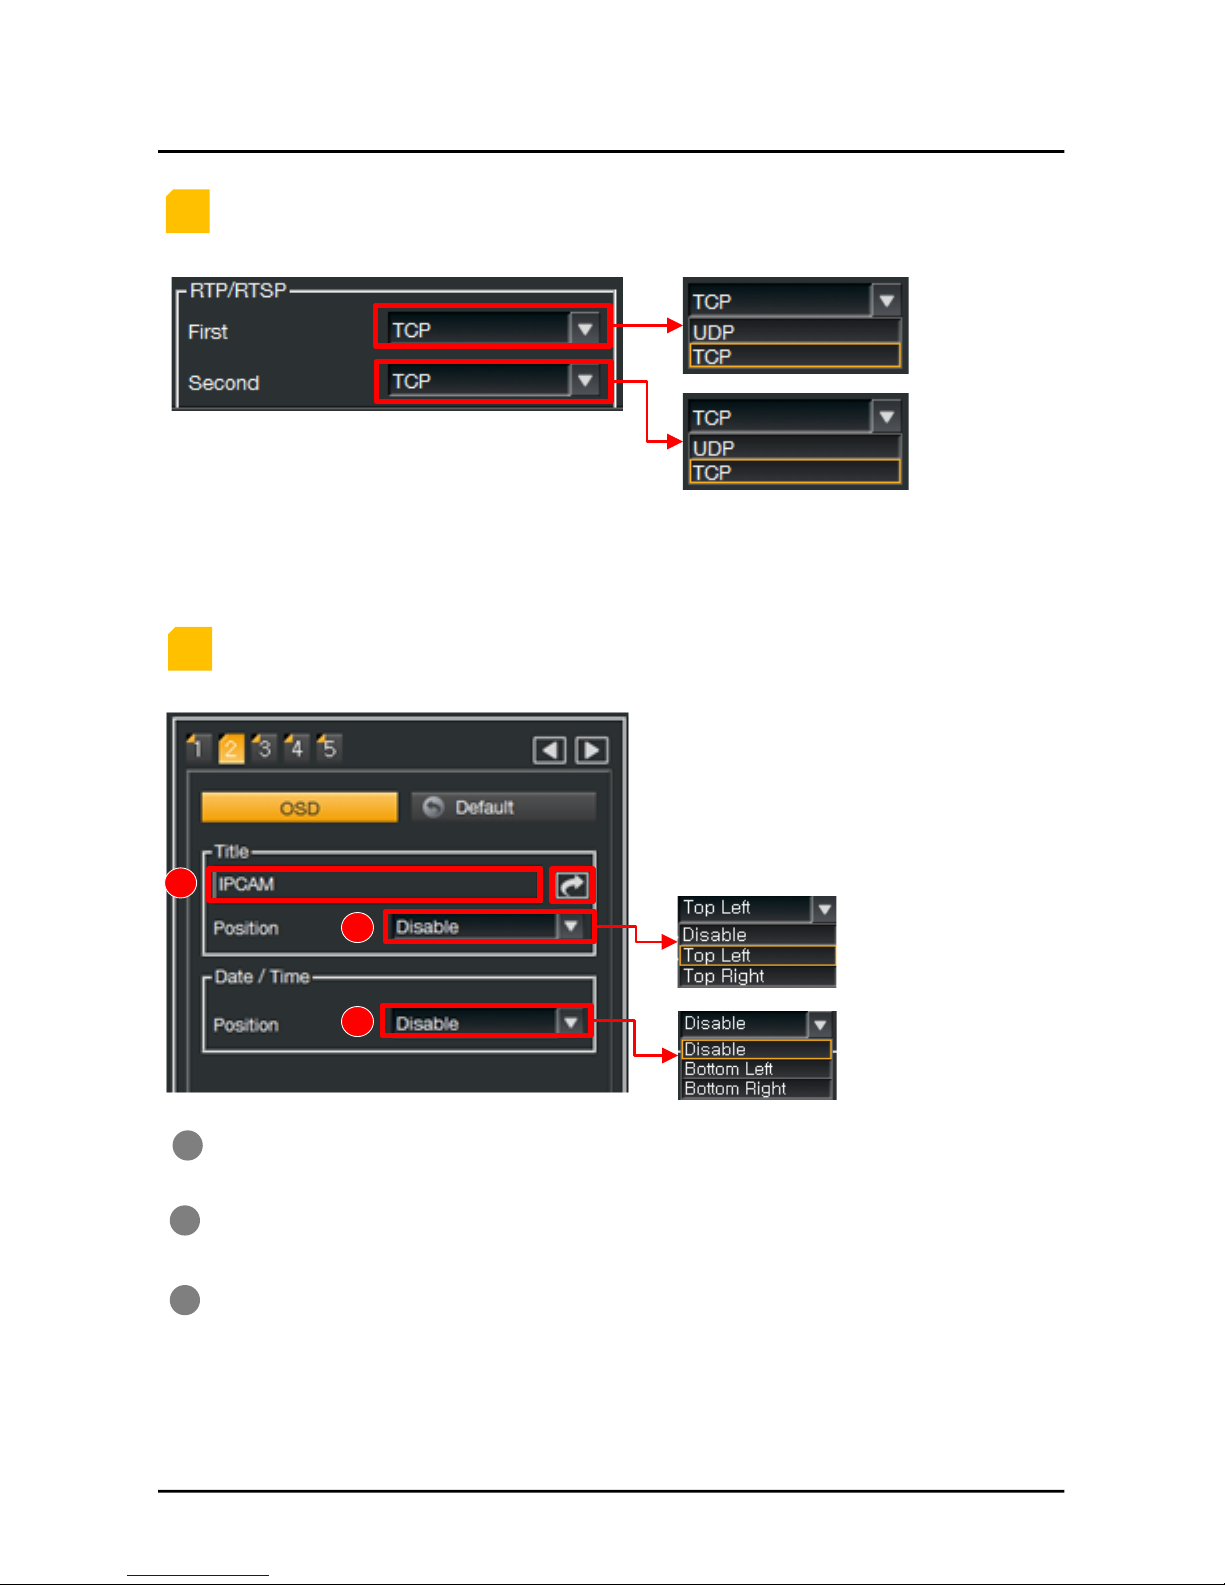
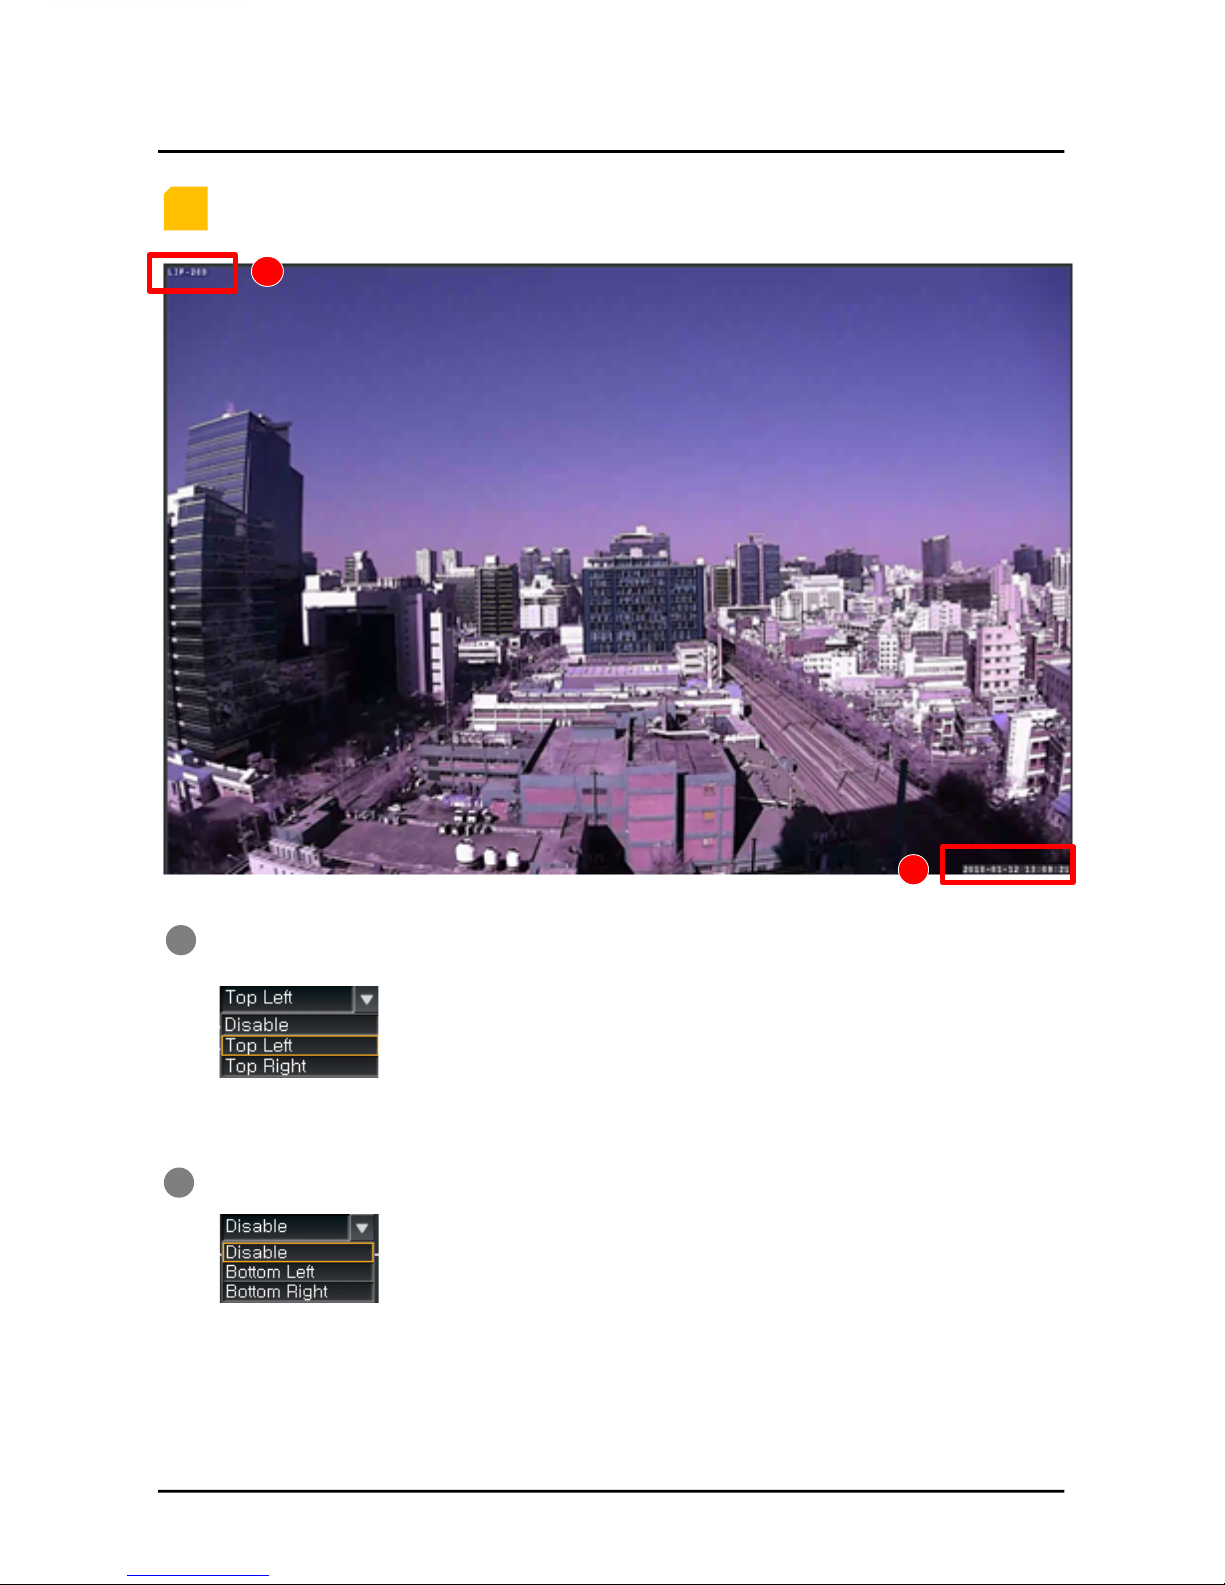
OSD – Title Setting, Date/Time Display on Screen
Title setting on the screen is available.
Click the right side of the arrow button after inputting the name of title.
The position of title on screen is available.
( Top Left / Top Right / Disable (Off ) )
The position of date & time on screen is available.
( Bottom Left / Bottom Right / Disable (Off) )
LIVE
VIDEO – RTP/RTSP
1
2
2
3
3
15
Page 16
1
2
1
2
OSD – Title, Date & Time on Screen
Title position setting is available. ( Disable/Left / Right)
Date / Time setting is available. ( Disable/Left / Right)
LIVE
2
16
Page 17
1
2
3
3
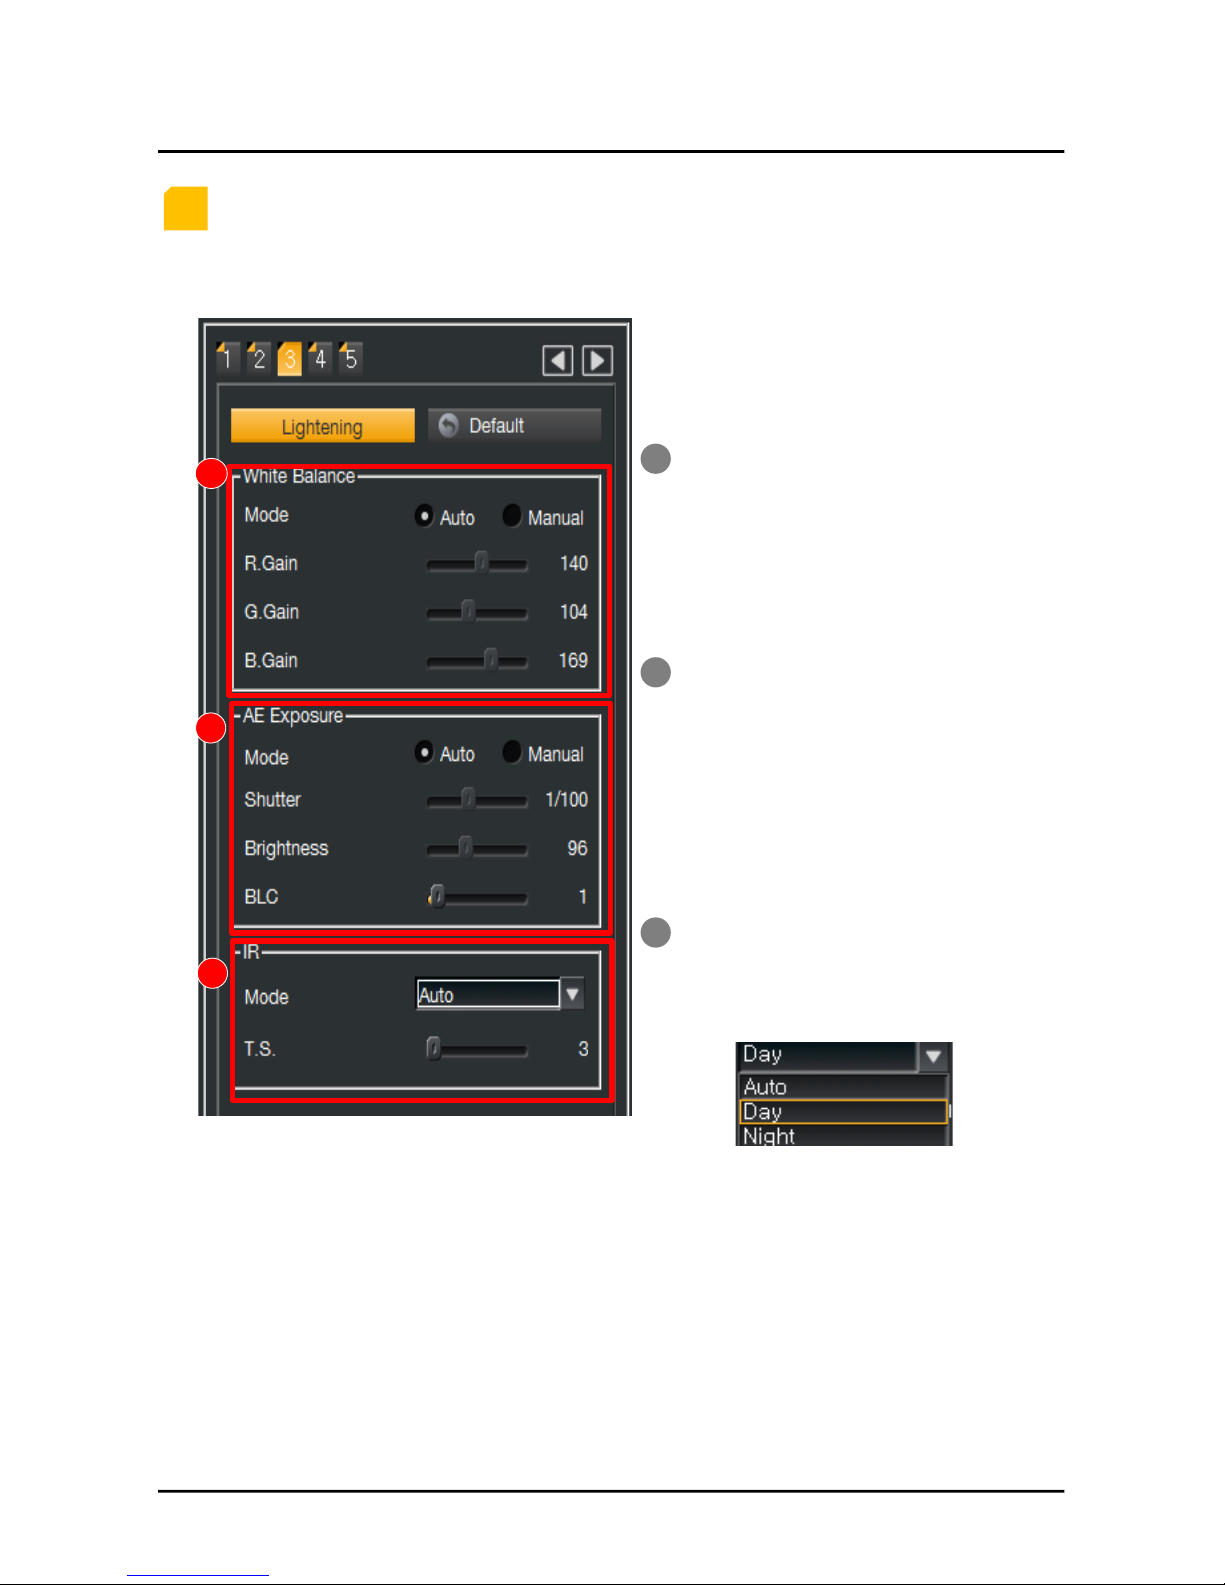
LIGHTENING – White Balance / AE Exposure / IR
1. White Balance Setting is available.
2. Auto / Manual Mode
3. Auto Mode – Need not set R, G, B Gain.
4. Manual Mode - Set R, G, B Gain.
1. AE Exposure Setting is available.
2. Auto / Manual Mode
3. Auto Mode
4. Manual Mode
- Set Shutter, Brightness & BLC(Back Light
Control)
1. IR Working Mode is changeable.
2. Selectable among Auto/Day/Night.
3. Threshold V
alue is changeable
regardless Mode(0~255)
LIVE
1
2
3
17
Page 18
1!
1!
2!
3!
2!
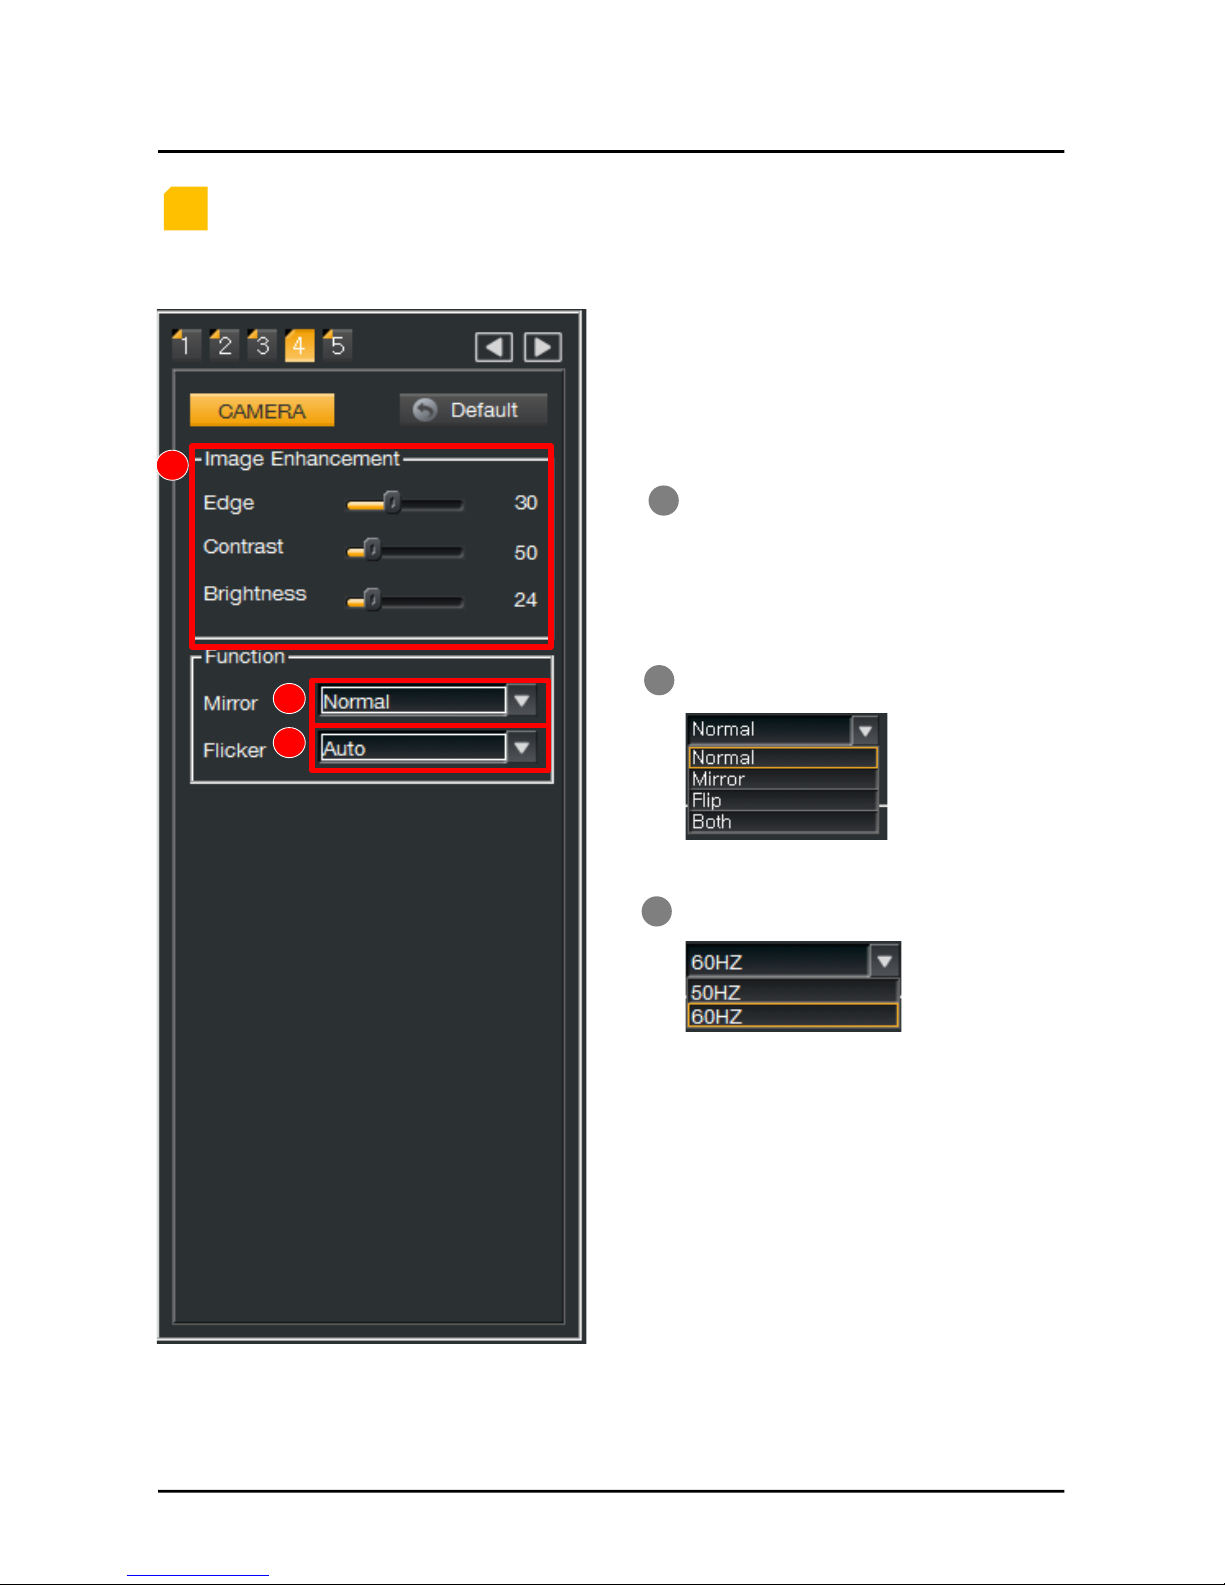
Change the Video Output Screen mode.!
3!
Set the ‘Flicker’.!
CAMERA – Image Enhancement, Mirror/Flip, Flicker
1. Image Enhancement Setting is available.
2. Edge Value Setting is available.
3. Contrast Value Setting is available.
4. Brightness Value Setting is available.
LIVE
4
18
Page 19
1!
2!
1!
2!
3!
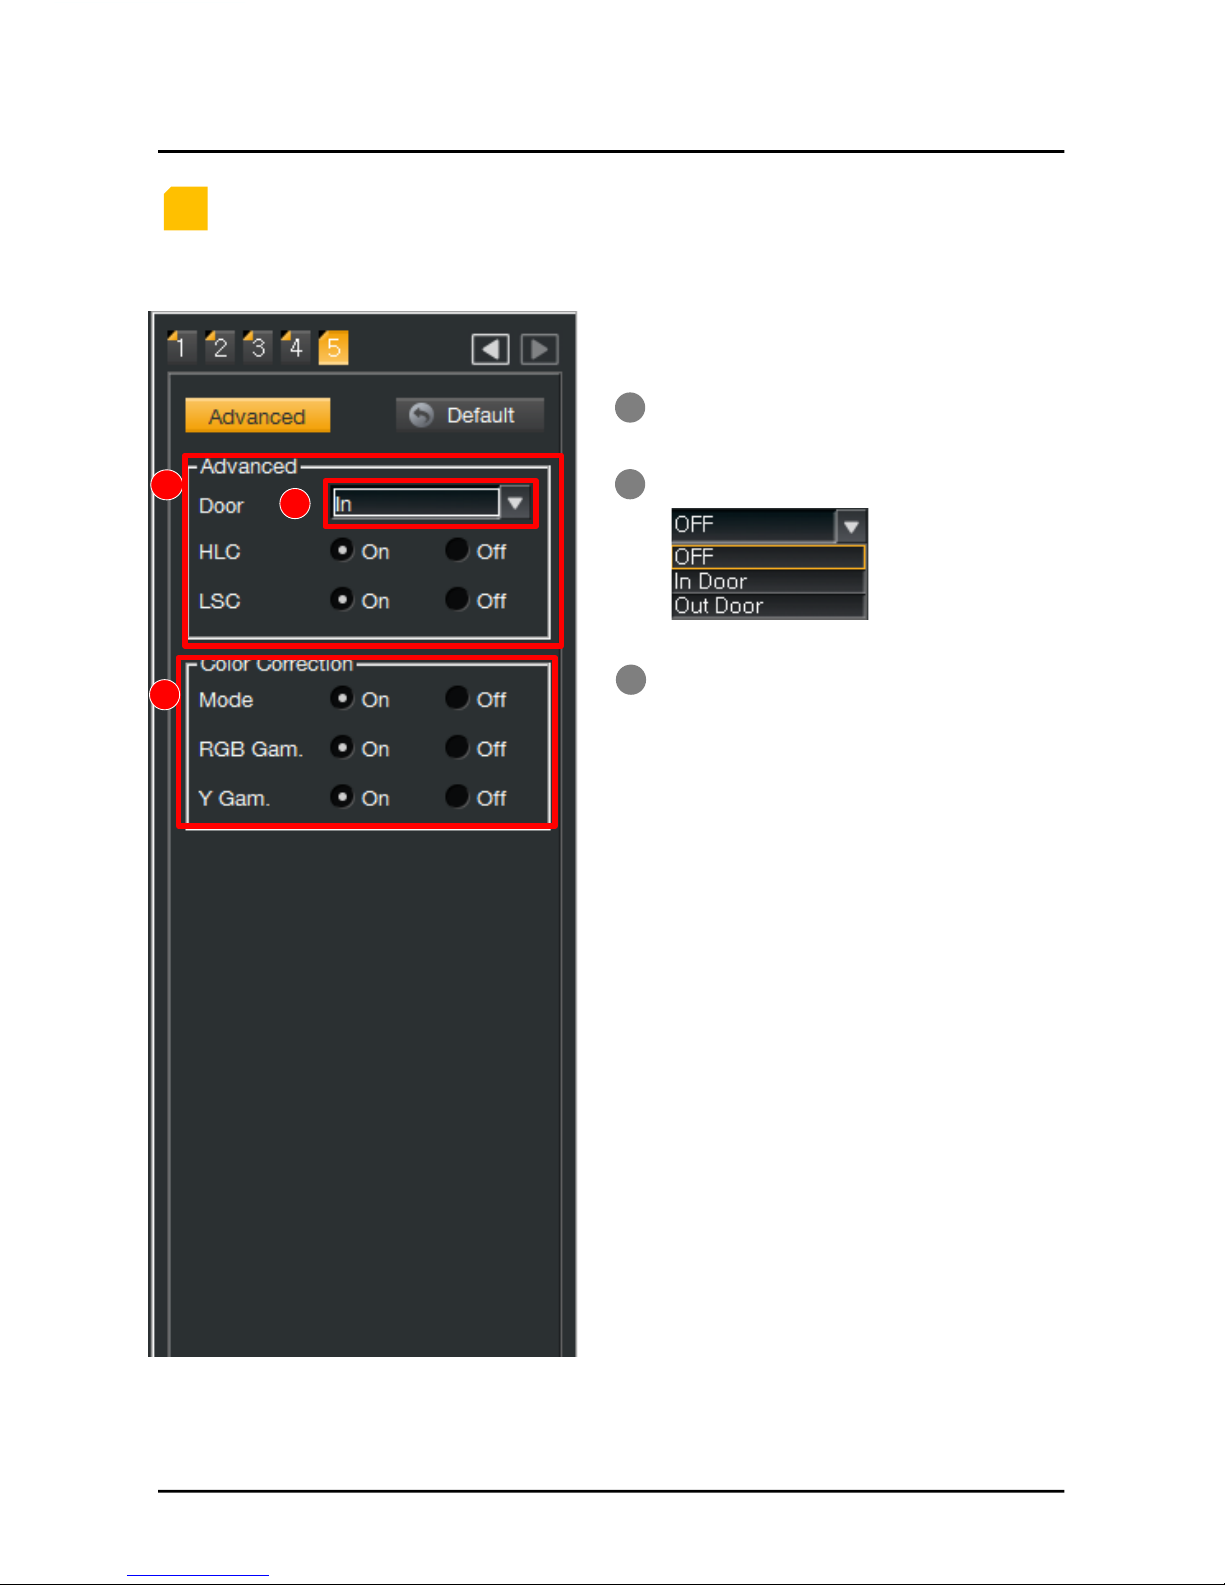
ADVANCED!
Door / HLC / LSC function setting
In / Out Door Setting!
Color Correction
1. Color Correction Mode ON / OFF
2. RGB Gamma ON / OFF
3. Y range Gamma ON / OFF
LIVE
3!
5
19
Page 20
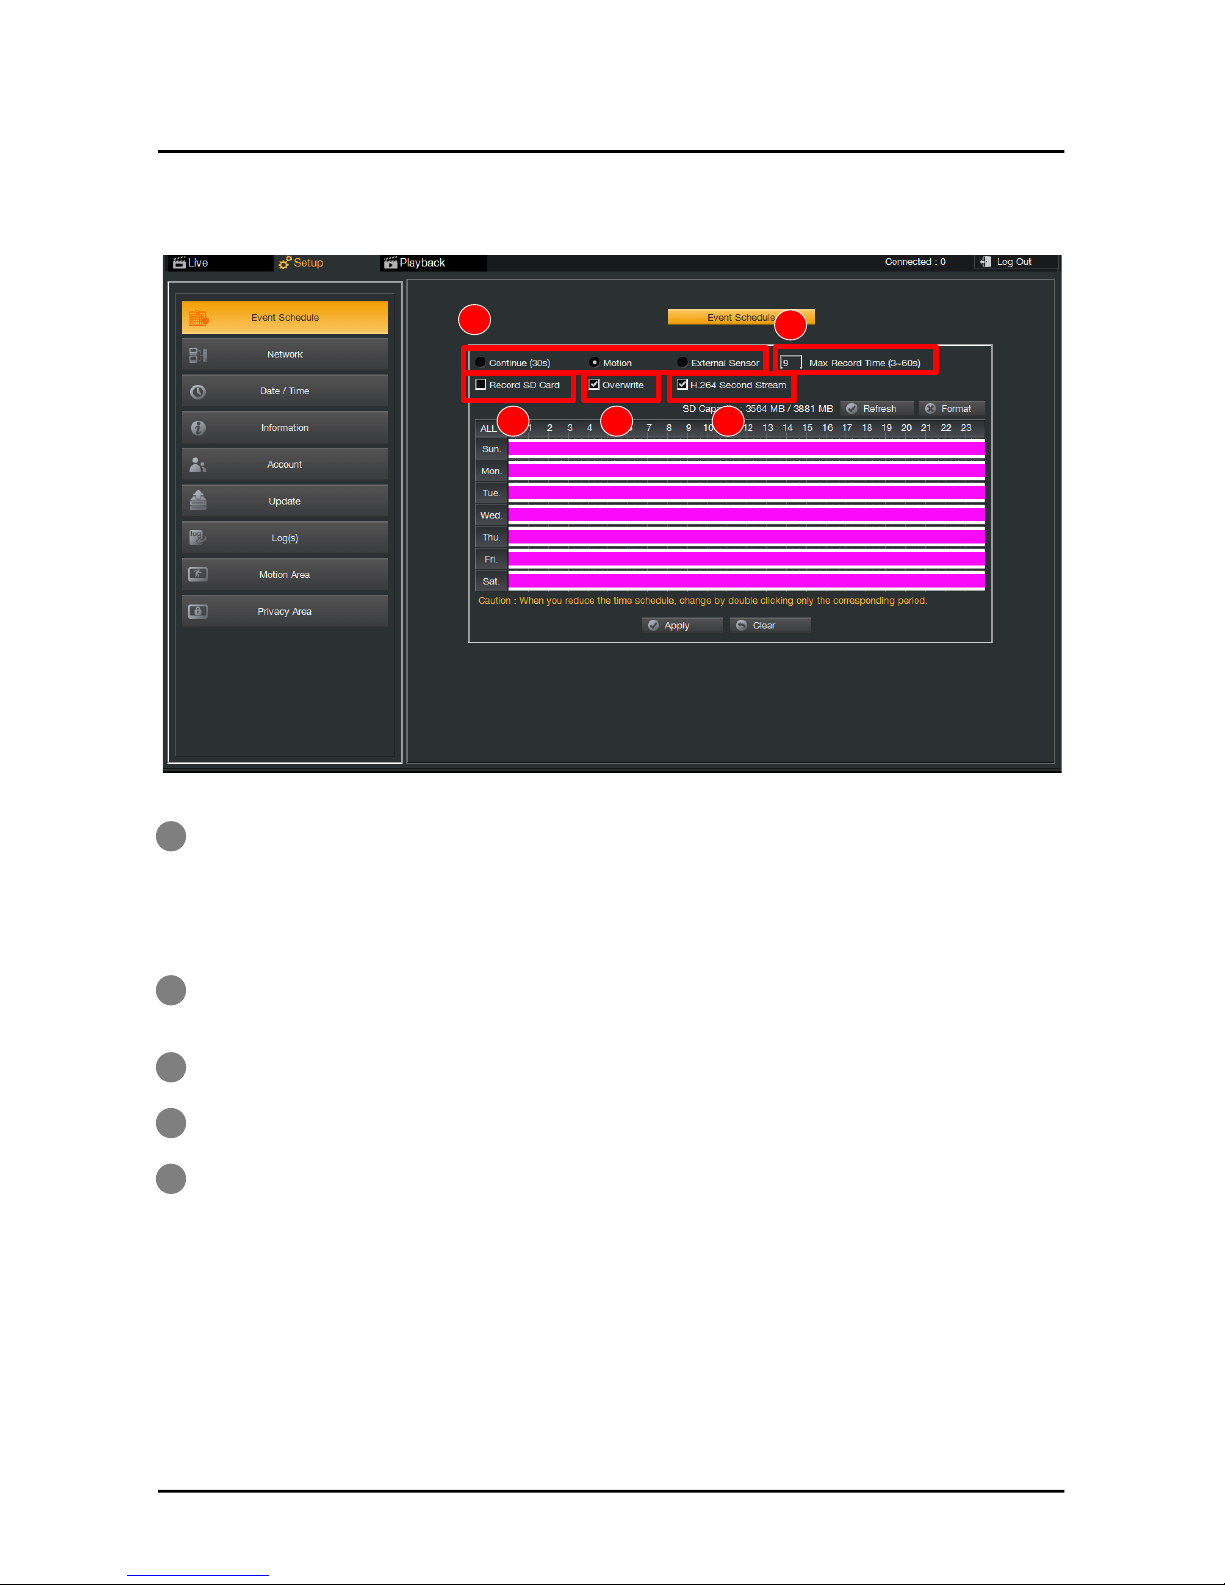
EVENT SCHEDULE – Check options!
2!
Recording time : 3 ~ 60 seconds, only available for ‘Motion’ or ‘External Sensor’!
* IP camera will reboot when you change the recording time.
1!
SETUP
1!
Event Source!
-Continue(30s) : Continuous recording for 30 seconds of period
-Motion : Recording when motion is triggered by camera
* ‘Motion Area’ setting is required on camera.
-External Sensor : Recording when motion is triggered by external sensor.(future use)
2!
3!
3!
Check on to start recording or Uncheck to stop recording!
4! 5!
4!
Check on to overwrite recording when SD memory is full.!
5!
Check on to record second stream(default : 640x480@25fps, 1Mbps)!
*If you uncheck, first stream(default : 1920x1080@25fps, 4Mbps) will be recorded.
20
Page 21
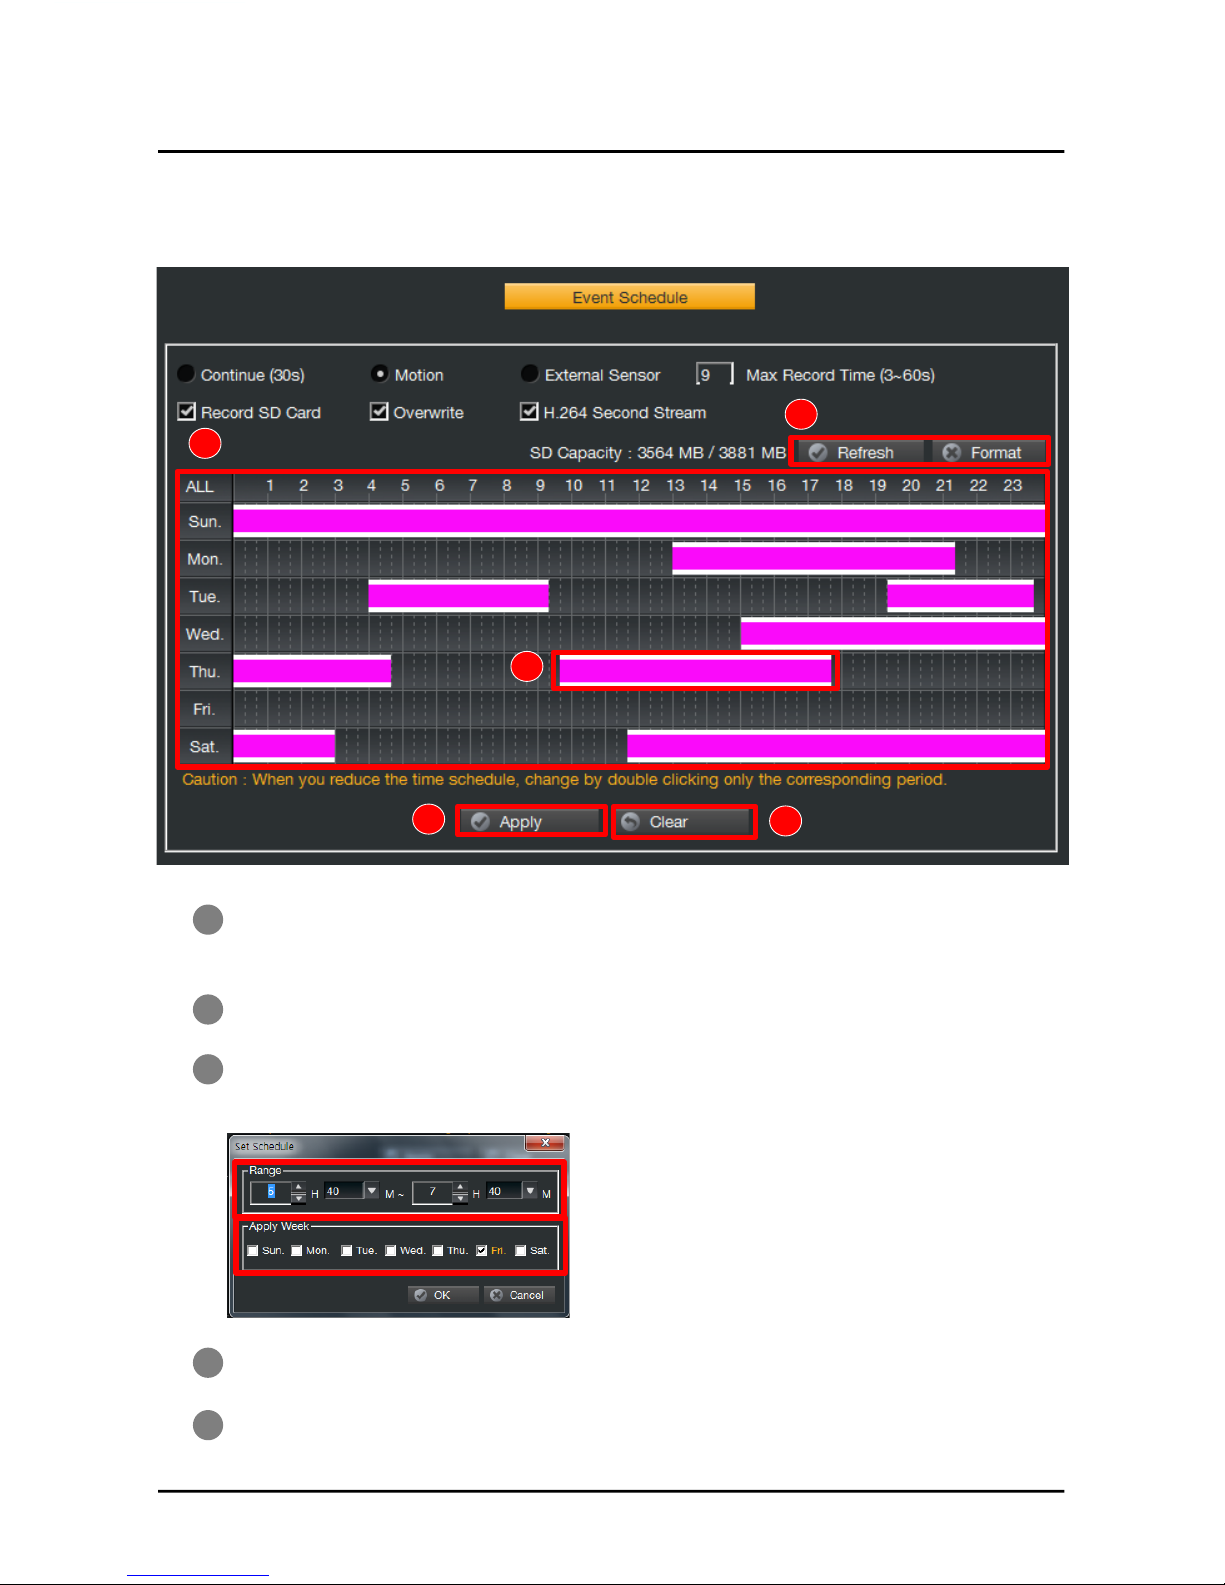
4!
Area is selectable by ‘Click & Drag’ on time table for each day.!
After dragging, sub menu will appear as shown below image.!
1!
2!
1!
2!
3!
Insert micro SD memory into memory slot of camera and click ‘Format’ to format the
memory. If you click ‘Refresh’ button, the current status of memory will be shown in a r
eal time.!
To make recording schedule, click ‘Clear’ button.(Default : all days )!
Double click existing schedule to modify the schedule. Sub menu will apear.
EVENT SCHEDULE – Recording schedule!
SETUP
3!
5!
§ Input time of range to record
4!
5!
Click ‘Apply’ to apply all settings or Click ‘Clear’ to erase all settings.!
§ Check on each day to copy schedule
21
Page 22
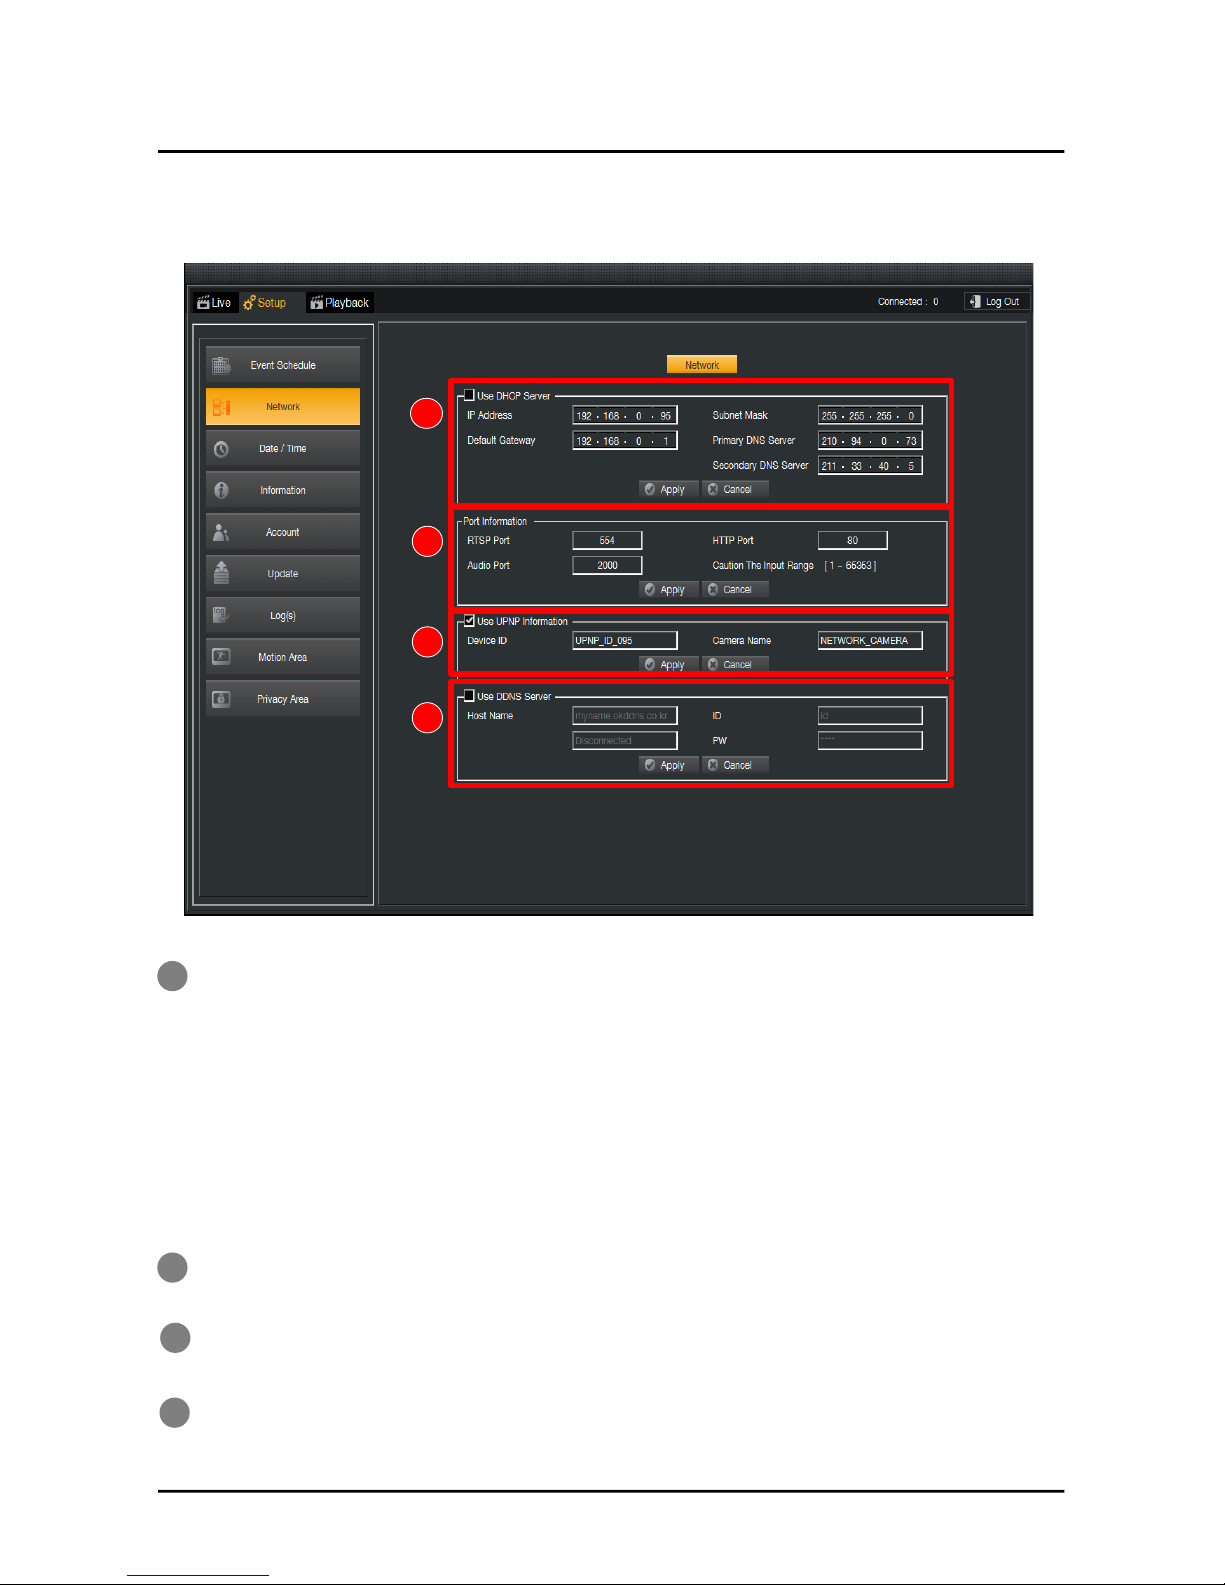
3!
4!
1!
2!
NETWORK SETTING!
1!
2!
3!
4!
1. Network Information setting
2. IP Address setting
3. Subnet Mask setting
4. Gateway setting
5. DNS setting ( Primary / Secondary )
6. DHCP setting
7. Apply – Setting default is saved.
8. Cancel - Setting default is cancelled.
9. After ‘Apply’, IP is changed. So you need to re-login
RTP / R
TSP Port setting is available.!
UPNP setting(future use)!
DDNS setting is available.!
SETUP
22
Page 23
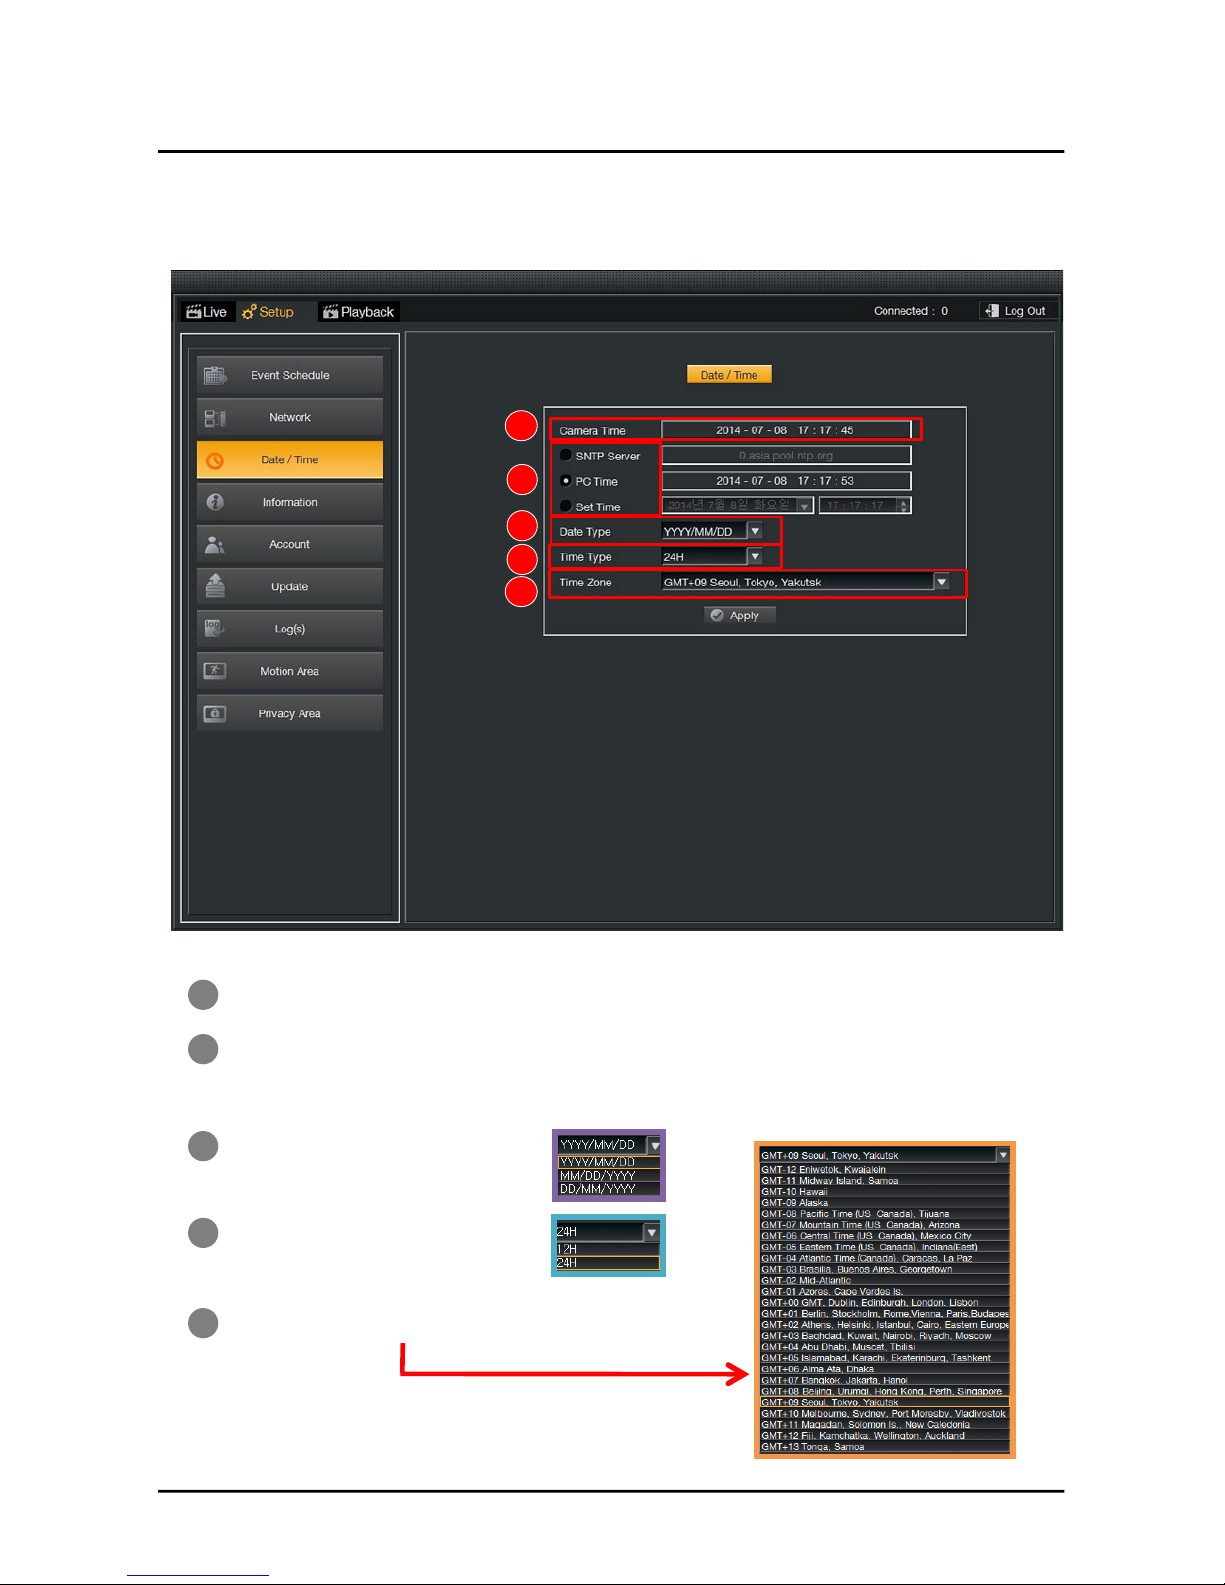
1!
2!
3!
5!
3!
4!
1!
2!
4!
5!
DATE & TIME!
Current Equipment Time!
1. SNTP / PC Time / Manual Time setting is available.
2. Setting of time for user or menu for time is available.
Date Type setting is available.!
Time Type setting is available.!
Time Zone setting is available.!
SETUP
23
Page 24
2!
3!
3!
1!
2!
1!
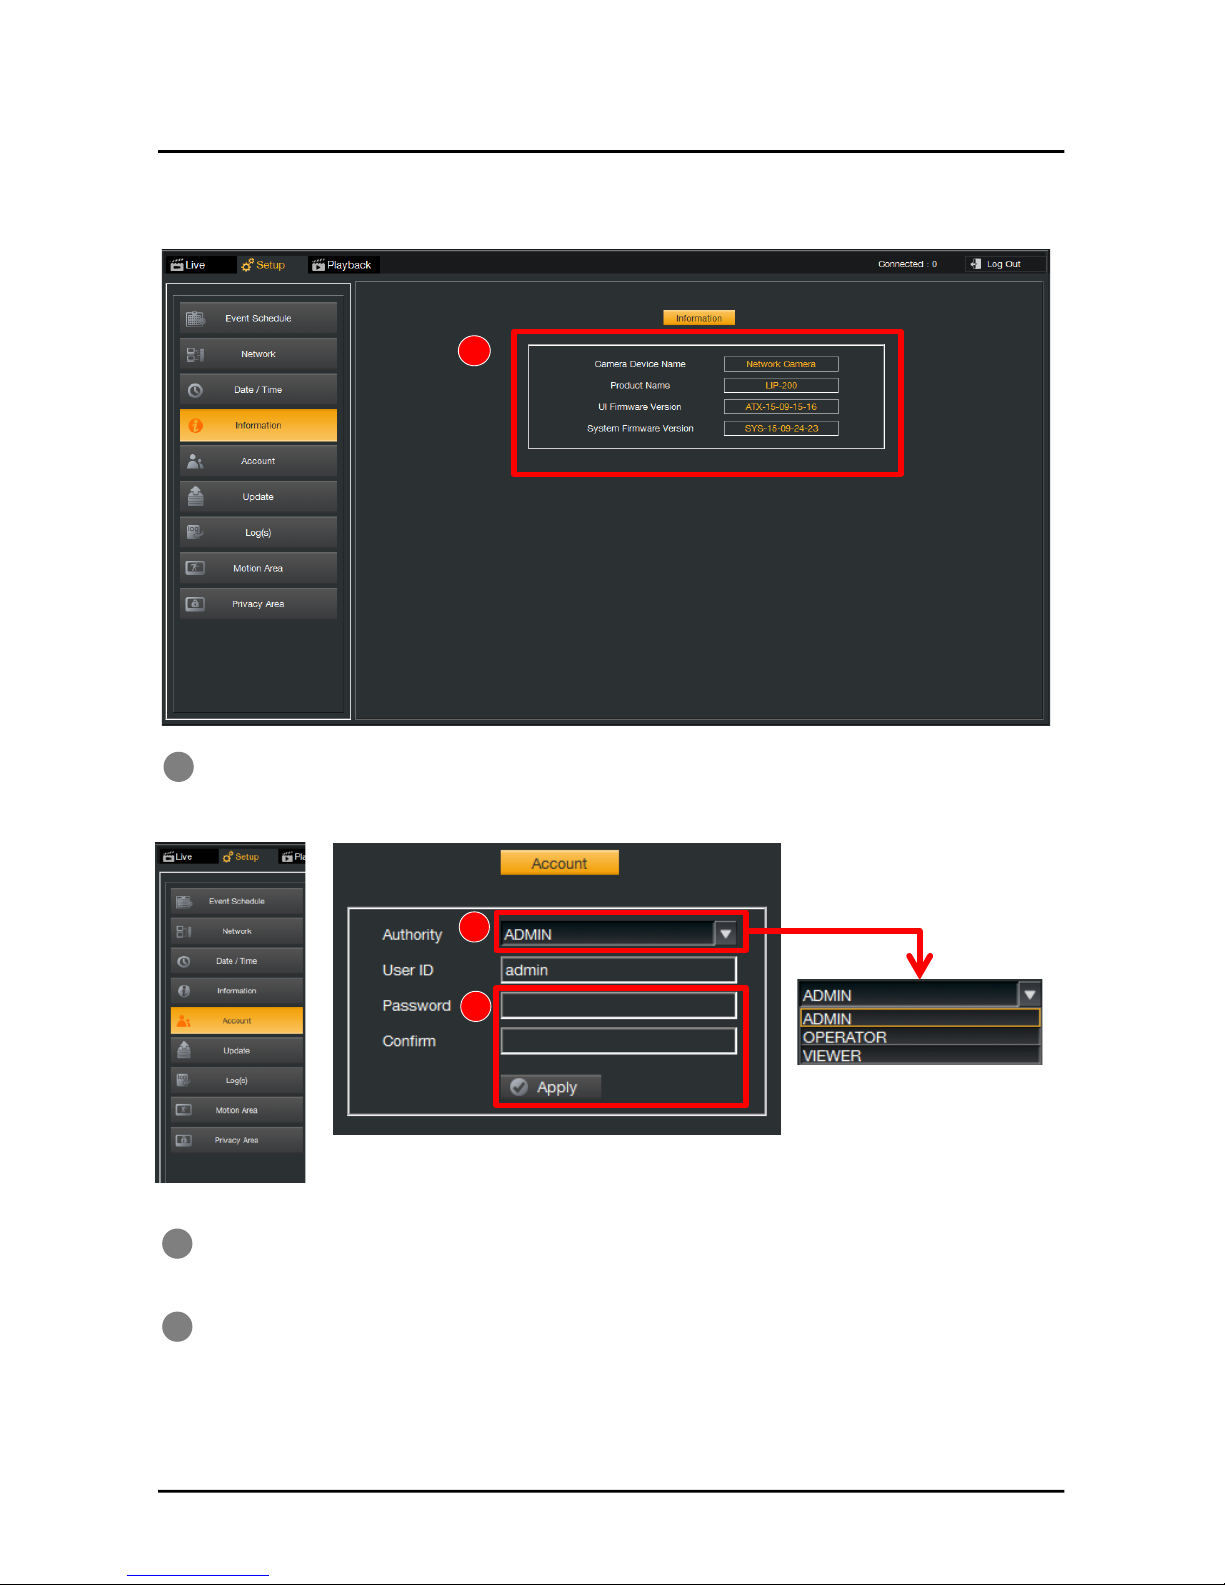
INFORMATION & ACCOUNT!
1. The various information can be seen.
2. Device Name / Product Name / UI Firmware Version / System Firmware Version
Admin / Operator / Viewer is selectable.!
1.
Input password for your account.
2. Click ‘Apply’ button, and you need re-login to check the adjustment.
SETUP
24
Page 25
1!
1!
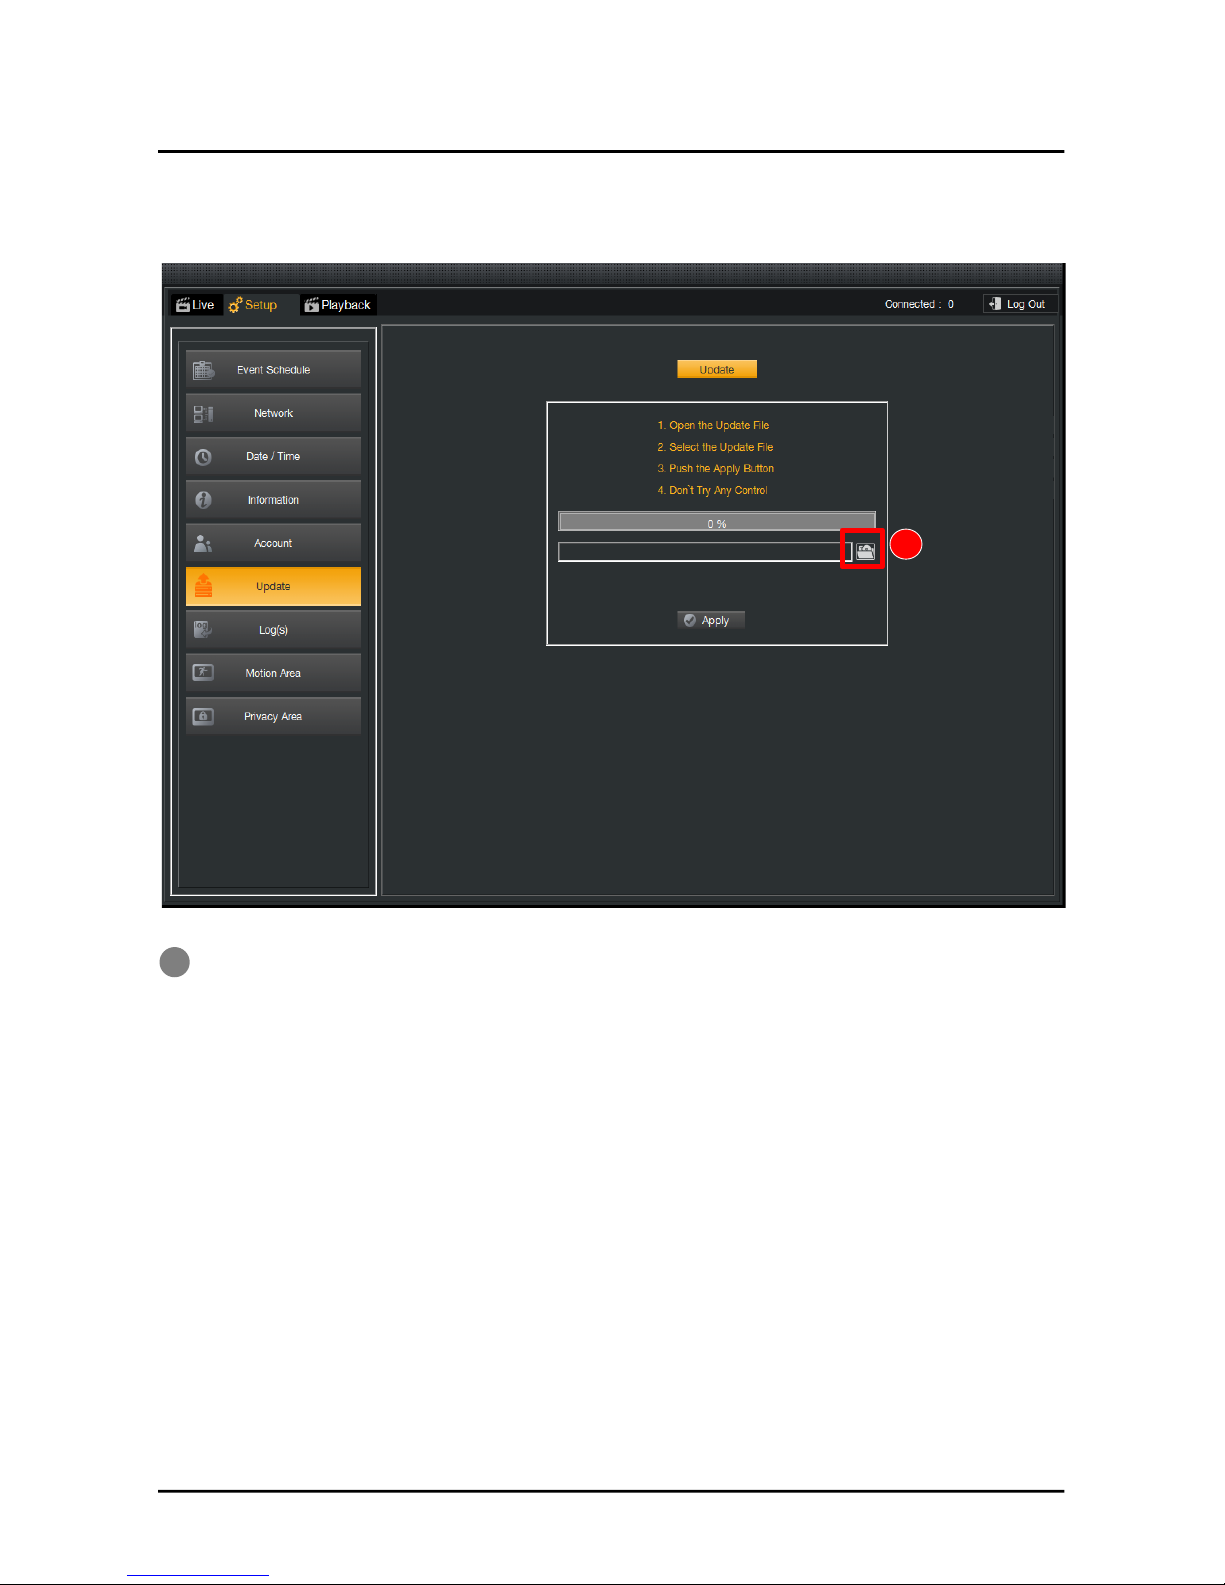
UPDATE(Firmware)!
1. Select the system firmware on your PC.
2. Click ‘Apply’, and update will be proceeded for 3 minutes.
SETUP
25
Page 26
1!
3!
3!
1!
1!
1!
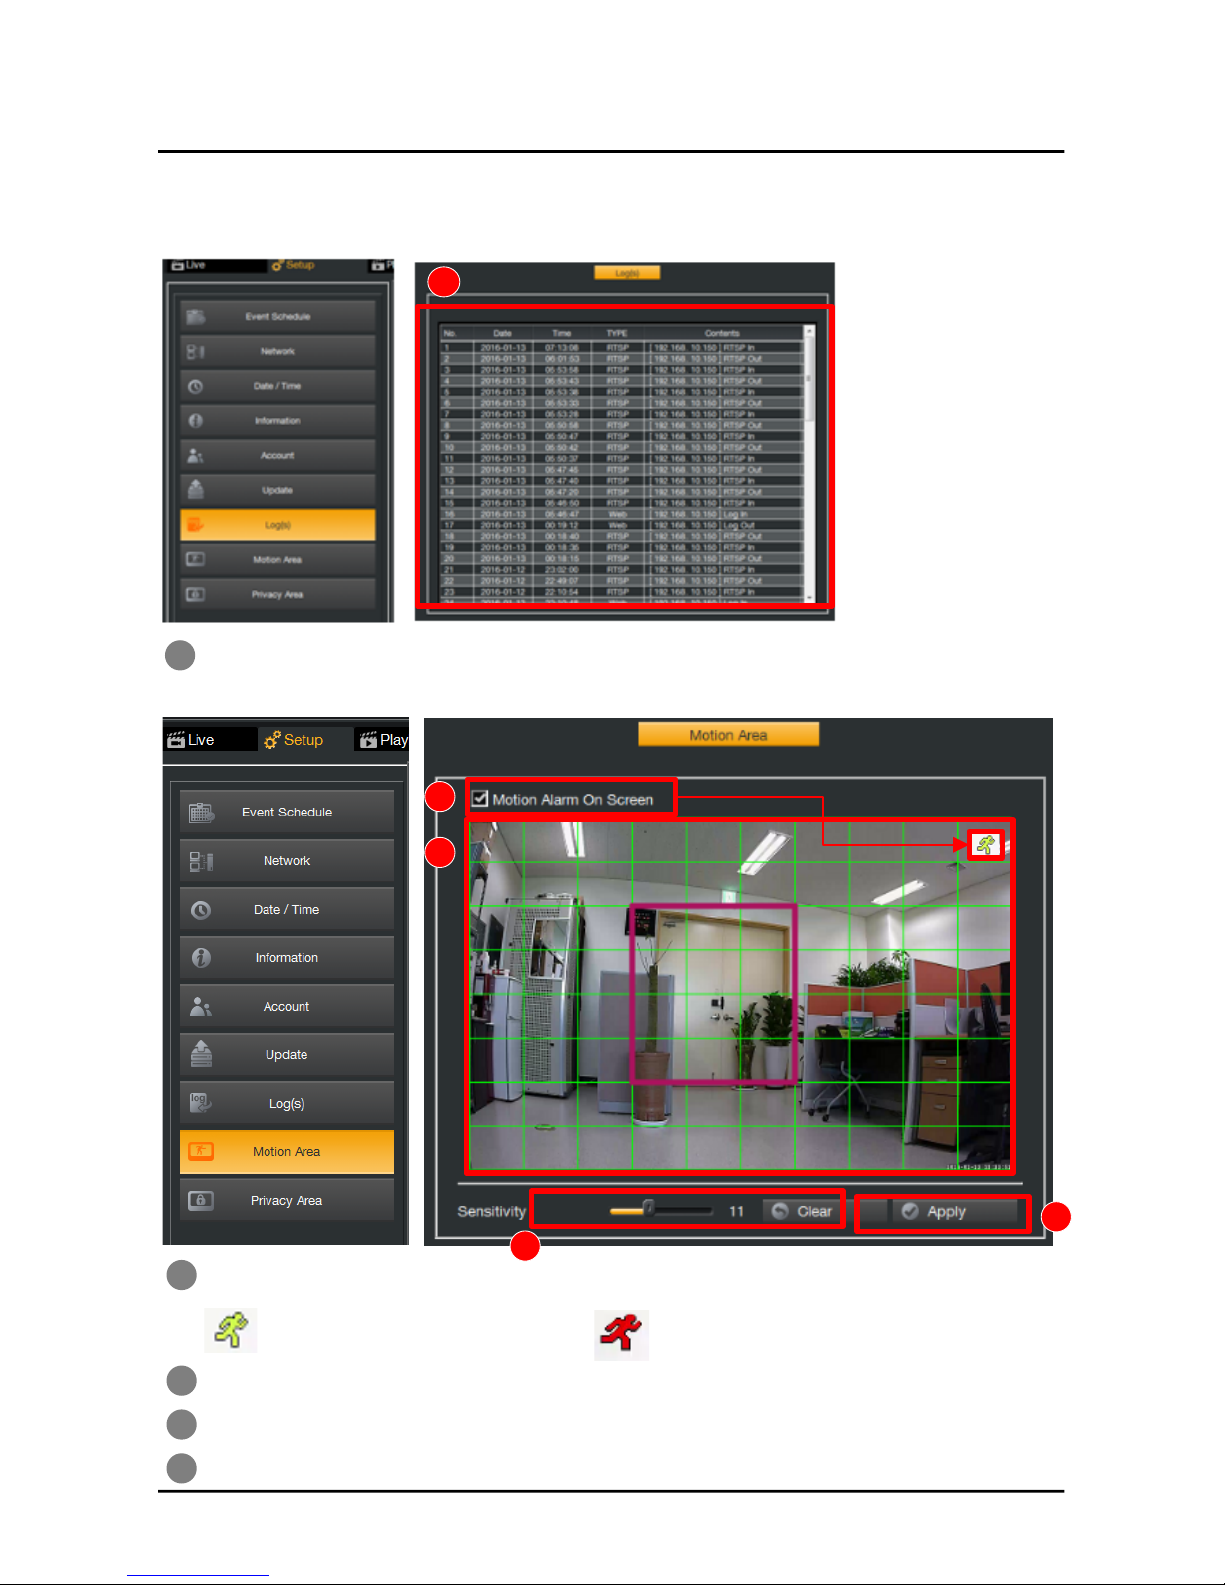
LOG(S) & MOTION AREA!
1. Shows event list on this log table.
Check on if you want to show motion status on screen when motion is detected.
SETUP
2!
Select the area by Mouse Click and Drag.(support 1 zone only)!
Adjust motion sensitivity from’1’ to ‘28’(‘1’ is most sensitive)!
Click ‘Apply’ button to save or ‘Clear’ to erase all.!
2!
4!
4!
No recording on SD memory!
Recording on SD memory!
26
Page 27
1!
2!
1!
2!
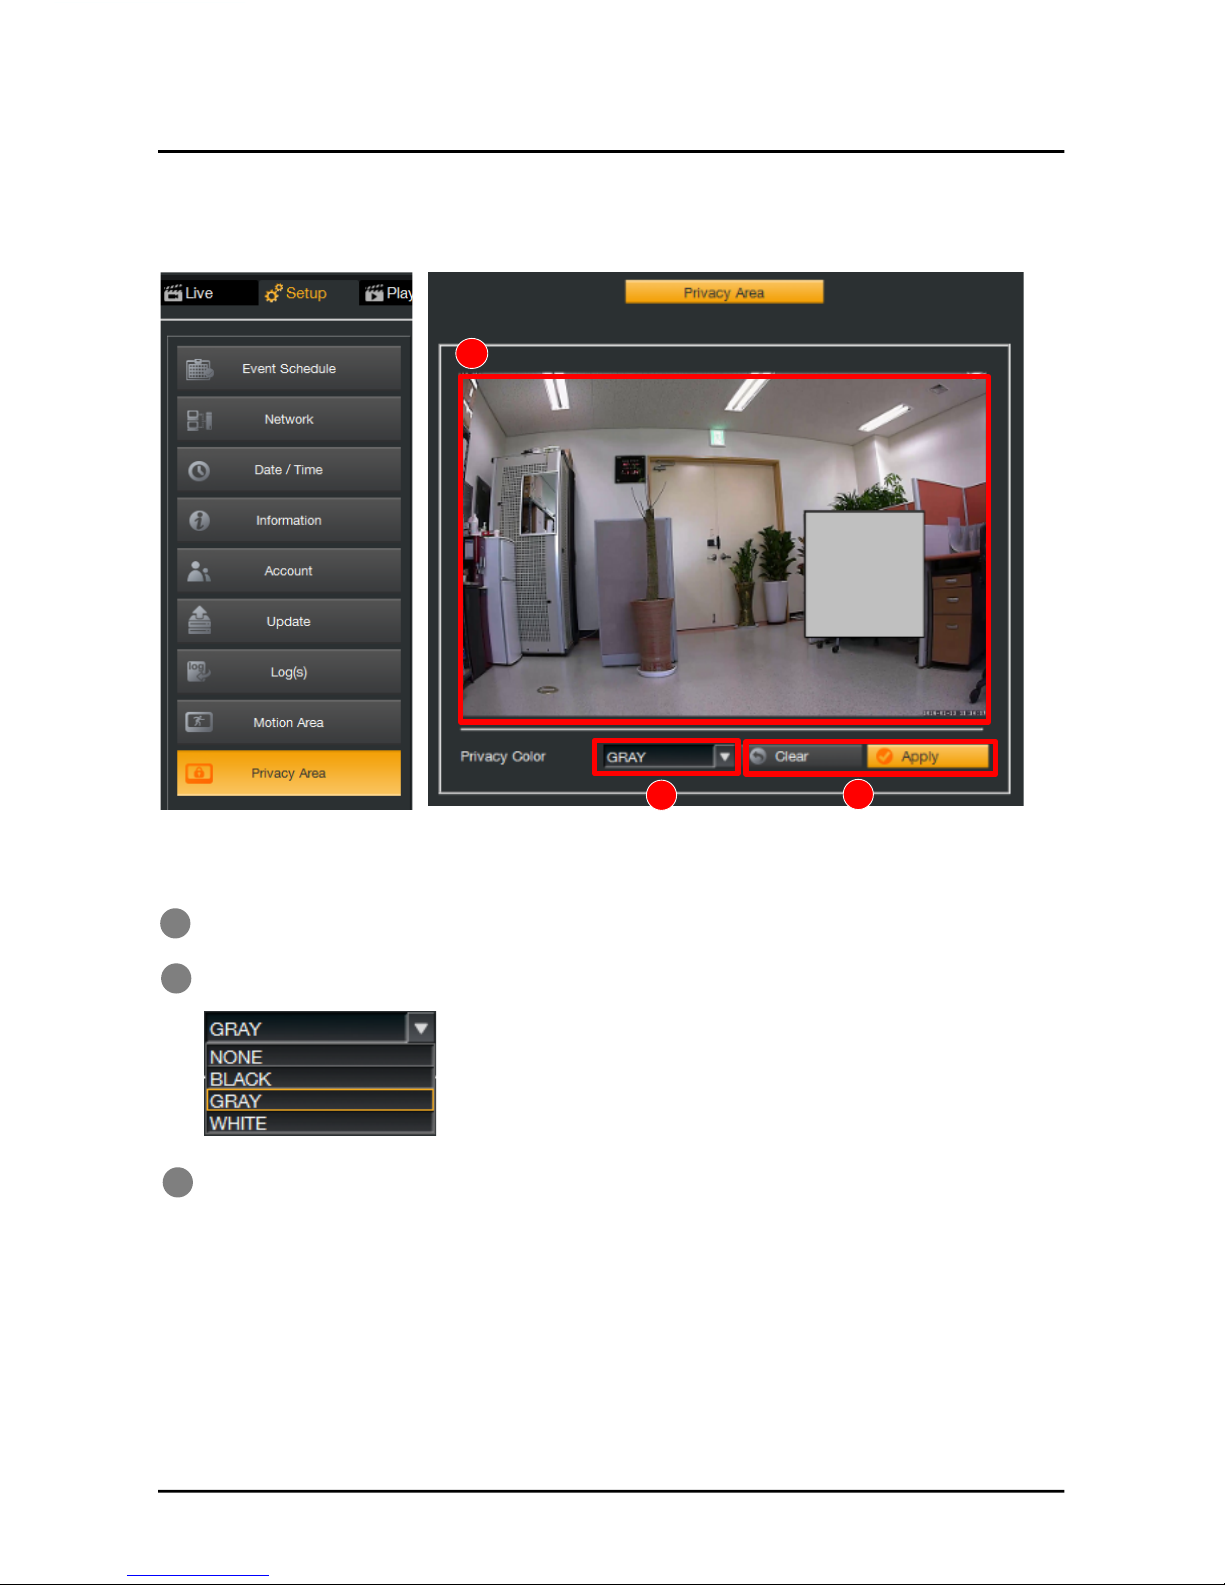
PRIVACY AREA!
Select the area by Mouse Click and Drag.(only 1 zone)!
!
Select color for privacy zone you selected.!
SETUP
3!
Click ‘Apply’ button to save or ‘Clear’ to erase all.!
3!
27
Page 28
1!
1!
4!
2!
4!
3!
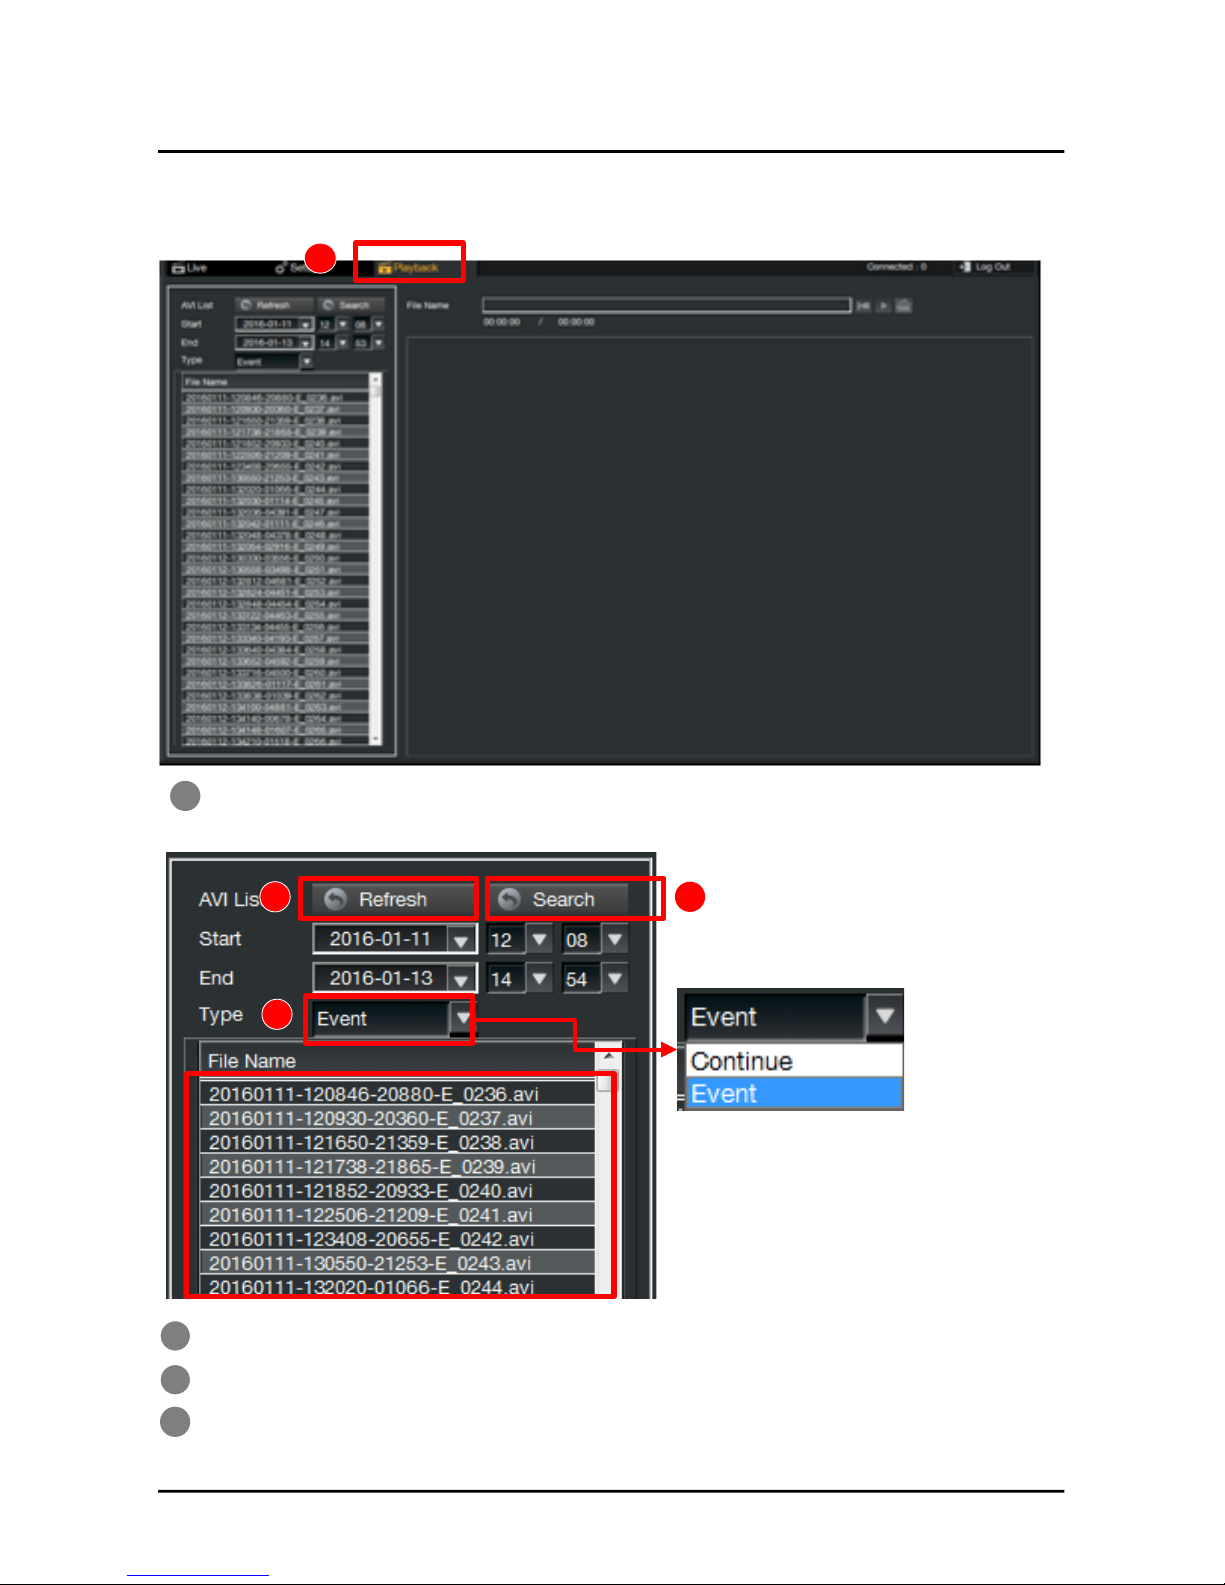
FILE SEARCH
Click ‘Playback’ to playback the recorded video in SD memory .!
Input ‘Start/End date’ to search and click ‘search’ to show the recorded video list.!
Click ‘Refresh’ to get latest video files!
PLAYBACK
2!
Select either ‘Continue’ or ‘Event’.!
3!
28
Page 29
1!
1!
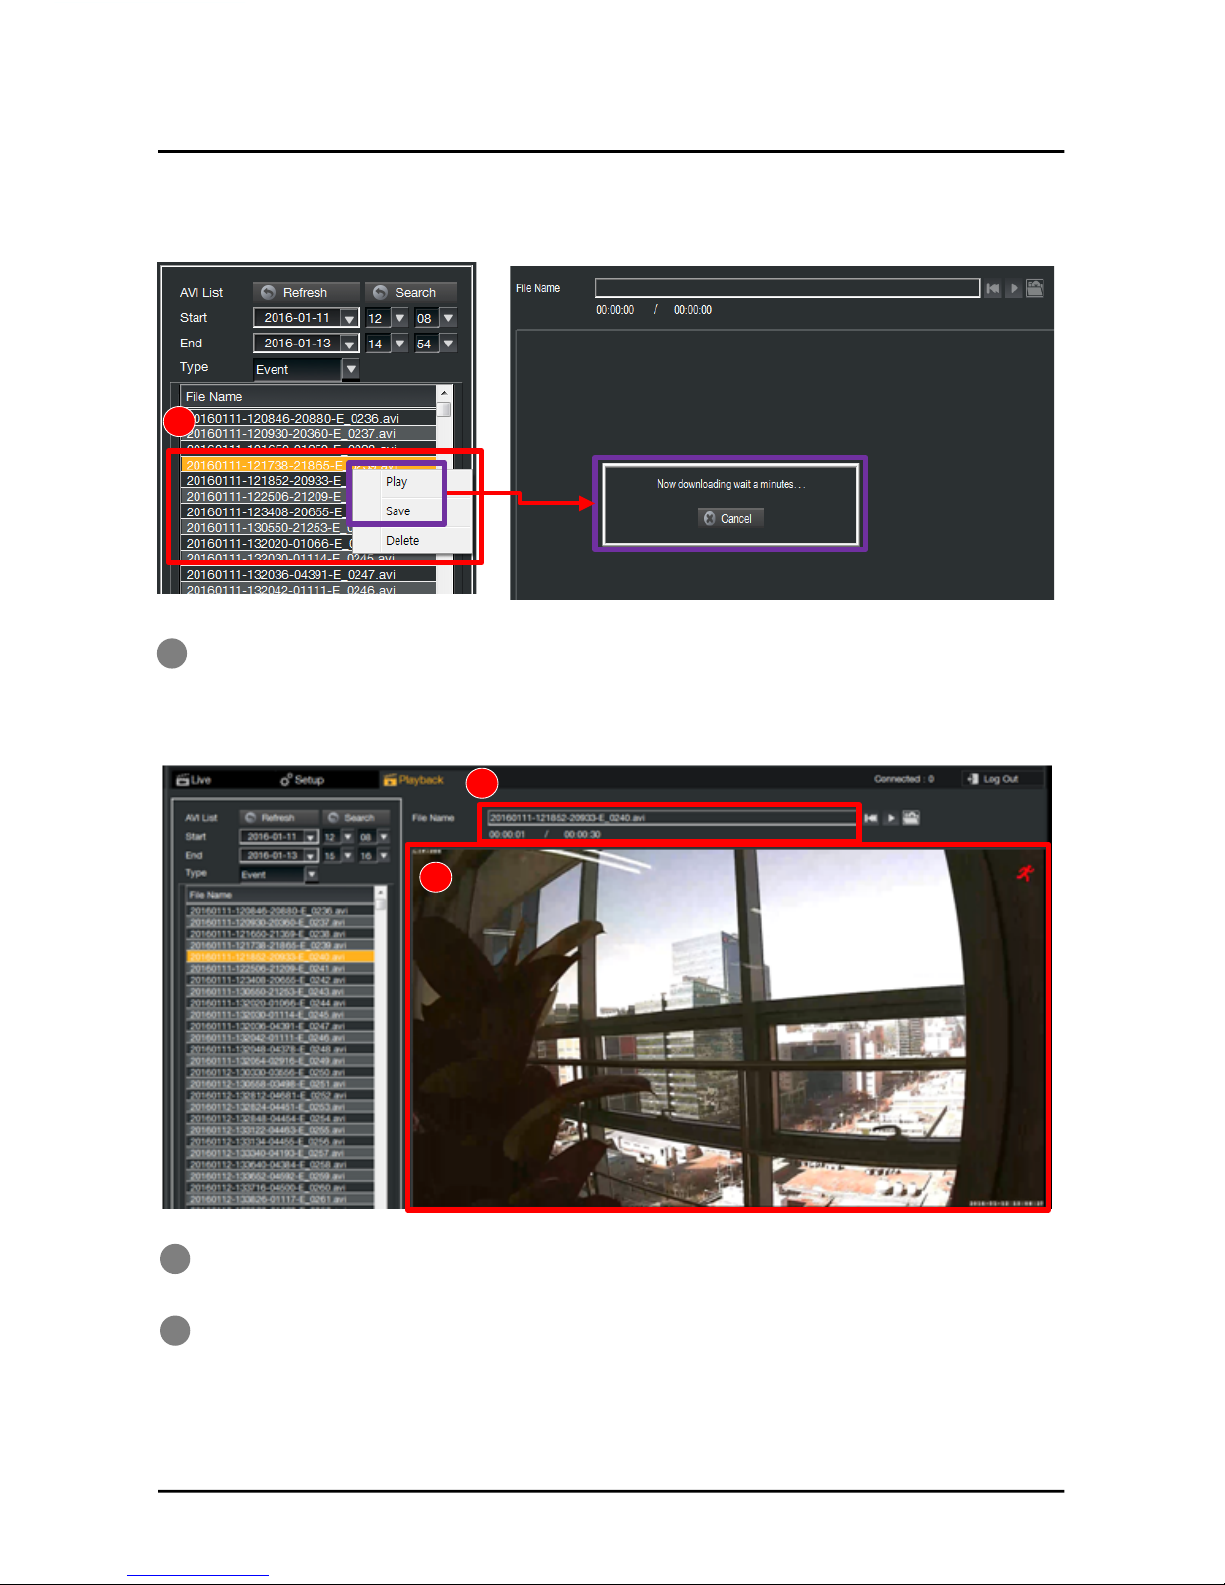
DOWNLOAD & PALYBACK!
Select video file and click mouse right-button to select ‘Play’, ‘Save’ or ‘Delete’.!
Or make mouse double-click to directly download and playback the selected video.!
File download will take some time(seconds ~ a minute) depending the file size.!
PLAY BACK
2!
3!
2!
After download, the video will be play backed. You can playback video without stoppi
ng recording.
3!
File name and running time will be shown during playback.
29
Page 30
1!
1
2!
2
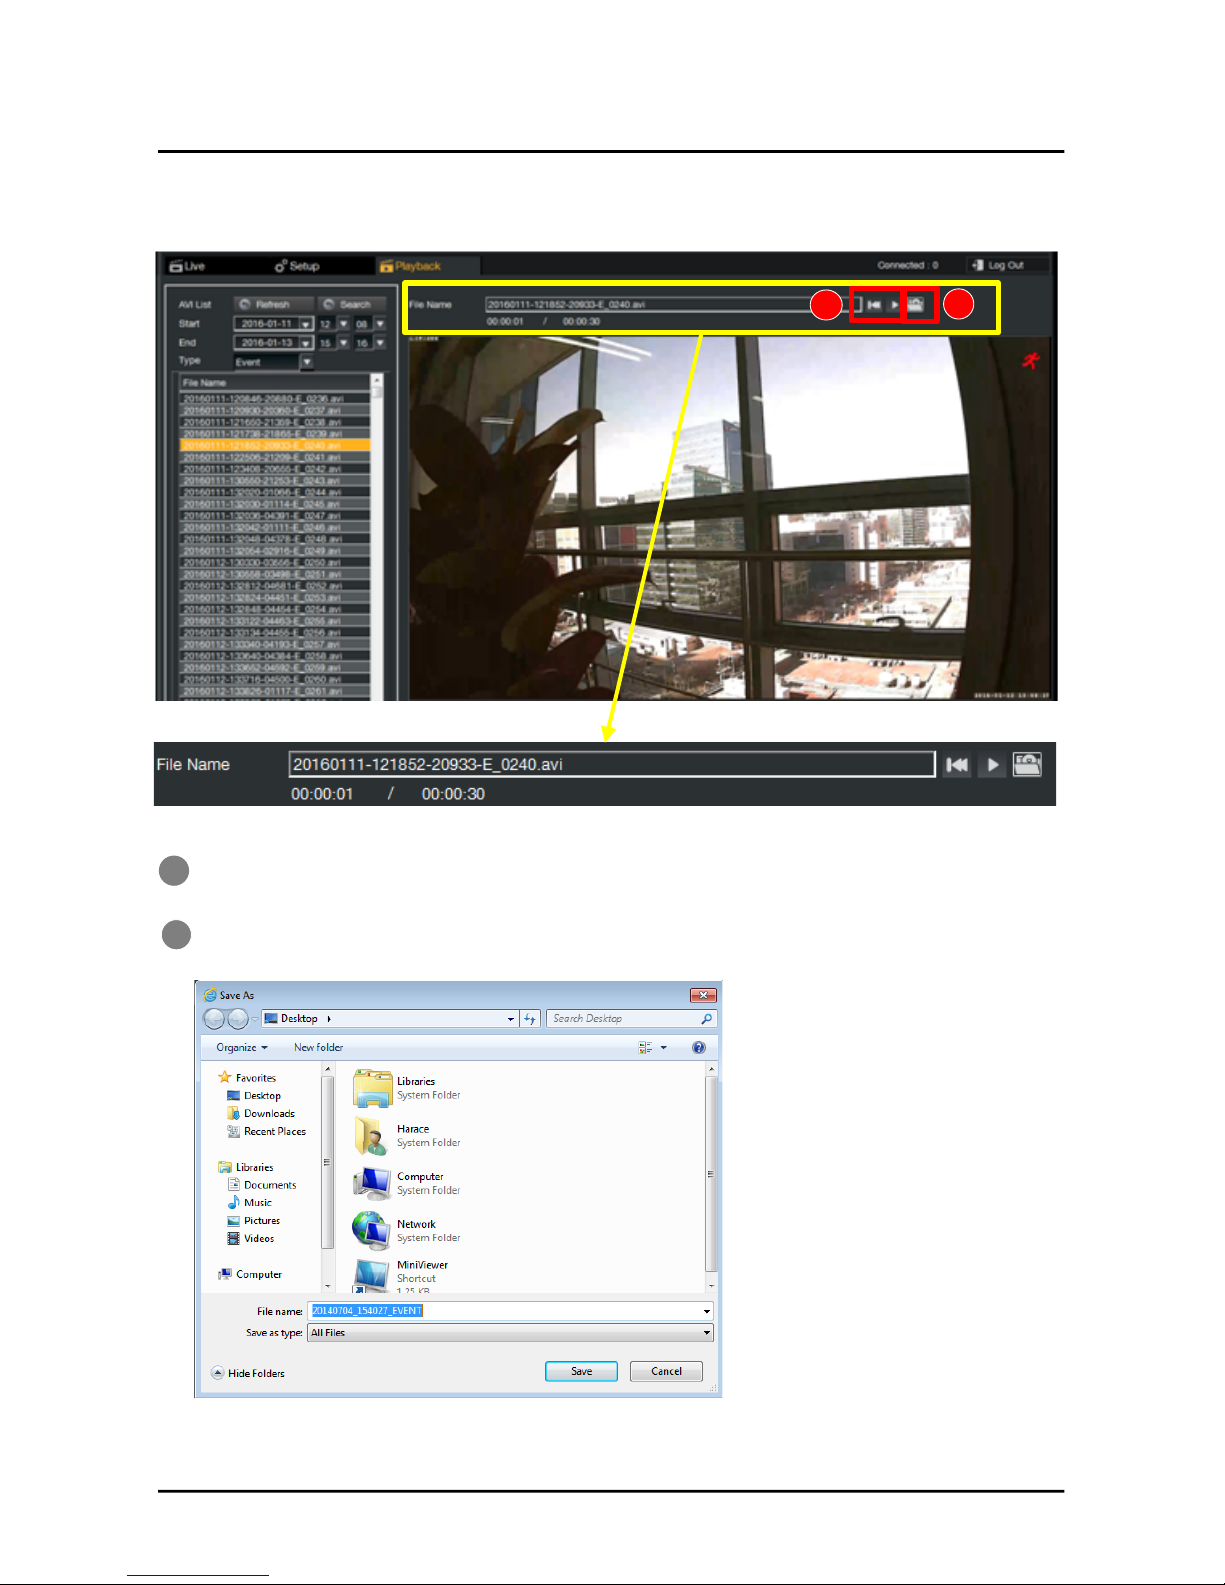
REWIND & FILE SAVE
‘Rewind’ and ‘Playback’ for the downloaded video
Click to save the file as other name’. Then you can see the below image box.
PLAY BACK
30
Page 31
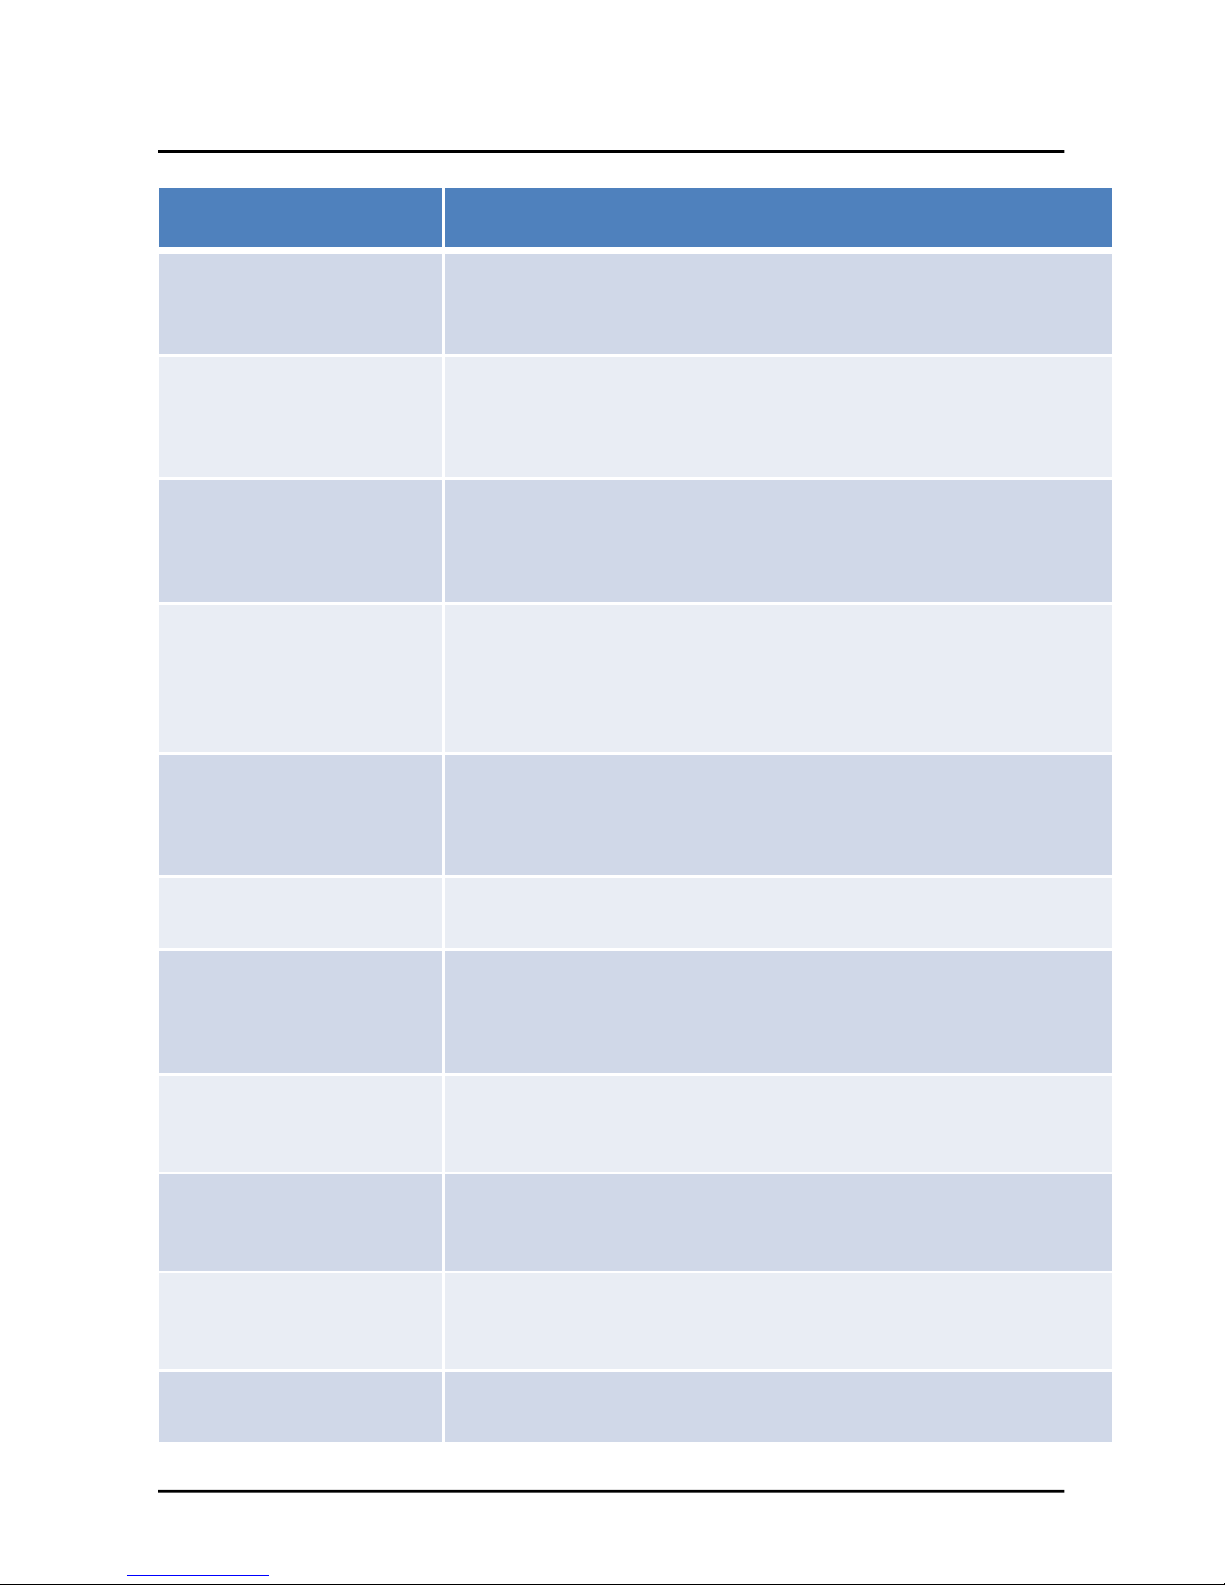
Symptom Check Point
It doesn’t turn on.
• Check Power Supply connection.
• Check Power socket status.
• Check PoE Module Power LED status.
It’s not available to ping by
IP setting address.
If the Camera and PC’s Subnet Mask & Gateway address are
different, it’s not available to connect each other. Please set-up
same Subnet Mask & Gateway address of Camera and PC.
Then try it again.
It’s not available to find
Web-page.
Basically, built-in Web server Port number is 80. If the Camera is
installed in Firewall and can’t use Port number 80, Web service is not
available. Please find available Port number and use that.
No movement on picture
screen.
It is something wrong on network or Web server. Please check
network service what is problem and solve it. After solve the network
problem, the Camera will connect with Web server automatically. If
not, please re-start Web Browser, and access to Web server.
PoE Switch doesn’t aware
on system.
• Check the LAN cable whether is Cross type or not.
• Check the Camera Input / Output status, and PoE Switch
connection in advance. If they don’t connected correctly, please
connect them correctly.
It’s not available to see any
picture image.
• Check Power Supply connection.
• Check network status from PC to Camera.
The picture quality is poor a
nd gloomy.
• Check whether Lens is dusty or not in advance. If yes, clean
the Lens with fresh brush or fabric.
• Don’t exposed to intense light source such as direct sun-light.
Please change camera’s location & angle of incidence.
Picture colour reproduction
is wrong.
Check the Camera’s White Balance set-up menu in advance.
If it’s Auto White Balance, it will takes some little time to control
White Balance function.
The picture image flickered.
• Don’t expose to intense light source such as direct sun-light.
Please change camera’s location & angle of incidence.
• Check Settings ▶ Camera ▶ Flicker menu.
It’s not available to install
“ActiveX” on PC.
• It’s available to crash old installed ActiveX with new one.
• Please ask this problem to PC Service Center.
Where is the installed
ActiveX at PC ?
If user delete “giffx.dll” / “GoDBATL.dll files in C:/window folder, it is
available to re-install ActiveX.
Question and Answer (Q&A)
31
Page 32

GENIE CCTV LTD.
CCTV House, City Park, Watchmead, Welwyn Garden City, Hertfordshire, AL7 ILT
Tel: +44 (0) 1707 330541 Fax: +44 (0) 1707 330543
www.geniecctv.com
Edition. GN-April 2016
32
 Loading...