

Page 1

User Guide
Tech Pro
™
Link
First Edition
Third
Printing
Part No. 1276689GT
Page 2
User Guide First Edition • Third Printing
Introduction
Tech Pro™ Link Part No. 1276689GT
Article I. Introducti o n
Important
Basic mechanical, hydraulic and
electrical skills are required to
perform most procedures. However,
several procedures require
specialized skills, tools, lifting
equipment and a suitable workshop.
In these instances, we strongly
recommend that maintenance be
performed at an authorized Genie
dealer service center.
Compliance
Contains:
FCC ID: 2AISP-1274140
IC:22906-1274140
FCC compliance:
This device complies with Part 15 of
the FCC Rules. Operation is
subject to the following two
conditions: (1) this device may
not cause harmful interference, and
(2) this device must accept any
interference received, including
interference that may cause
undesired operation.”
Changes or modifications not
expressly approved by Terex USA
LLC could void the user's authority
to operate the equipment.
ISED compliance:
This device complies with Industry
Canada license-exempt RSS
standard(s). Operation is subject to
the following two conditions: (1) this
device may not cause interference,
and (2) this device must accept any
interference, including interference
that may cause undesired operation
of the device.
RF exposure information:
Reported SAR value :0.11W/kg,
next to body. 0 mm
Technical Publications
Readers are encouraged to notify
Genie of errors and send in
suggestions for improvement. All
communications will be carefully
considered for future printings of
this and all other manuals.
Contact Us:
Internet: www.genielift.com
E-mail: awp.techpub@terex.com
Copyright © 2017 by Terex Corporation
First Edition: Third Printing, August 2018
Genie is a registered trademark of Terex
South Dakota, Inc. in the U.S.A. and many
other countries.
“Genie® Tech Pro” and "SmartLink" are
trademarks of Terex South Dakota, Inc.
Page 3

First Edition • Third Printing User Guide
Safety Rules
Part No. 1276689GT Tech Pro™ Link 1
Article II. Safety Rules
Danger
Failure to obey the instructions in
the appropriate Operator's Manual
on your machine will result in death
or serious injury.
Many of the hazards identified in the
operator's manual are also safety
hazards when maintenance and
repair procedures are performed.
Warning
Do not submerge or subject the
Tech Pro Link to pressurized fluids.
To clean the Tech Pro Link, wipe
with a damp cloth, using water or
mild detergent. Completely dry
before storing.
The Genie Tech Pro Link comes
with factory installed software. For
updates, please refer to Software
Installation.
Do Not Perform
Maintenance or Repairs
Unless:
You are trained and qualified to
perform maintenance and
repairs.
You read, understand and
obey:
manufacturer's instructions
and safety rules
employer's safety rules and
worksite regulations
applicable governmental
regulations
You have the appropriate tools,
lifting equipment and a suitable
workshop.
Page 4

User Guide First Edition • Third Printing
Safety Rules
2 Tech Pro™ Link Part No. 1276689GT
Kit Components
The full boxed kit is P/N 1276686GT
and includes:
• Tech Pro Link
• User manual
1276689GT
• USB cable
1276688GT
• Wrist lanyard
1276687GT
• Databus Harness Cable
1275739GT
• USB Thumb Drive
1284465GT
Available Accessories
• SmartLink retrofit harness
1275740GT
Page 5
First Edition • Third Printing User Guide
Key Features
Part No. 1276689GT Tech Pro™ Link 3
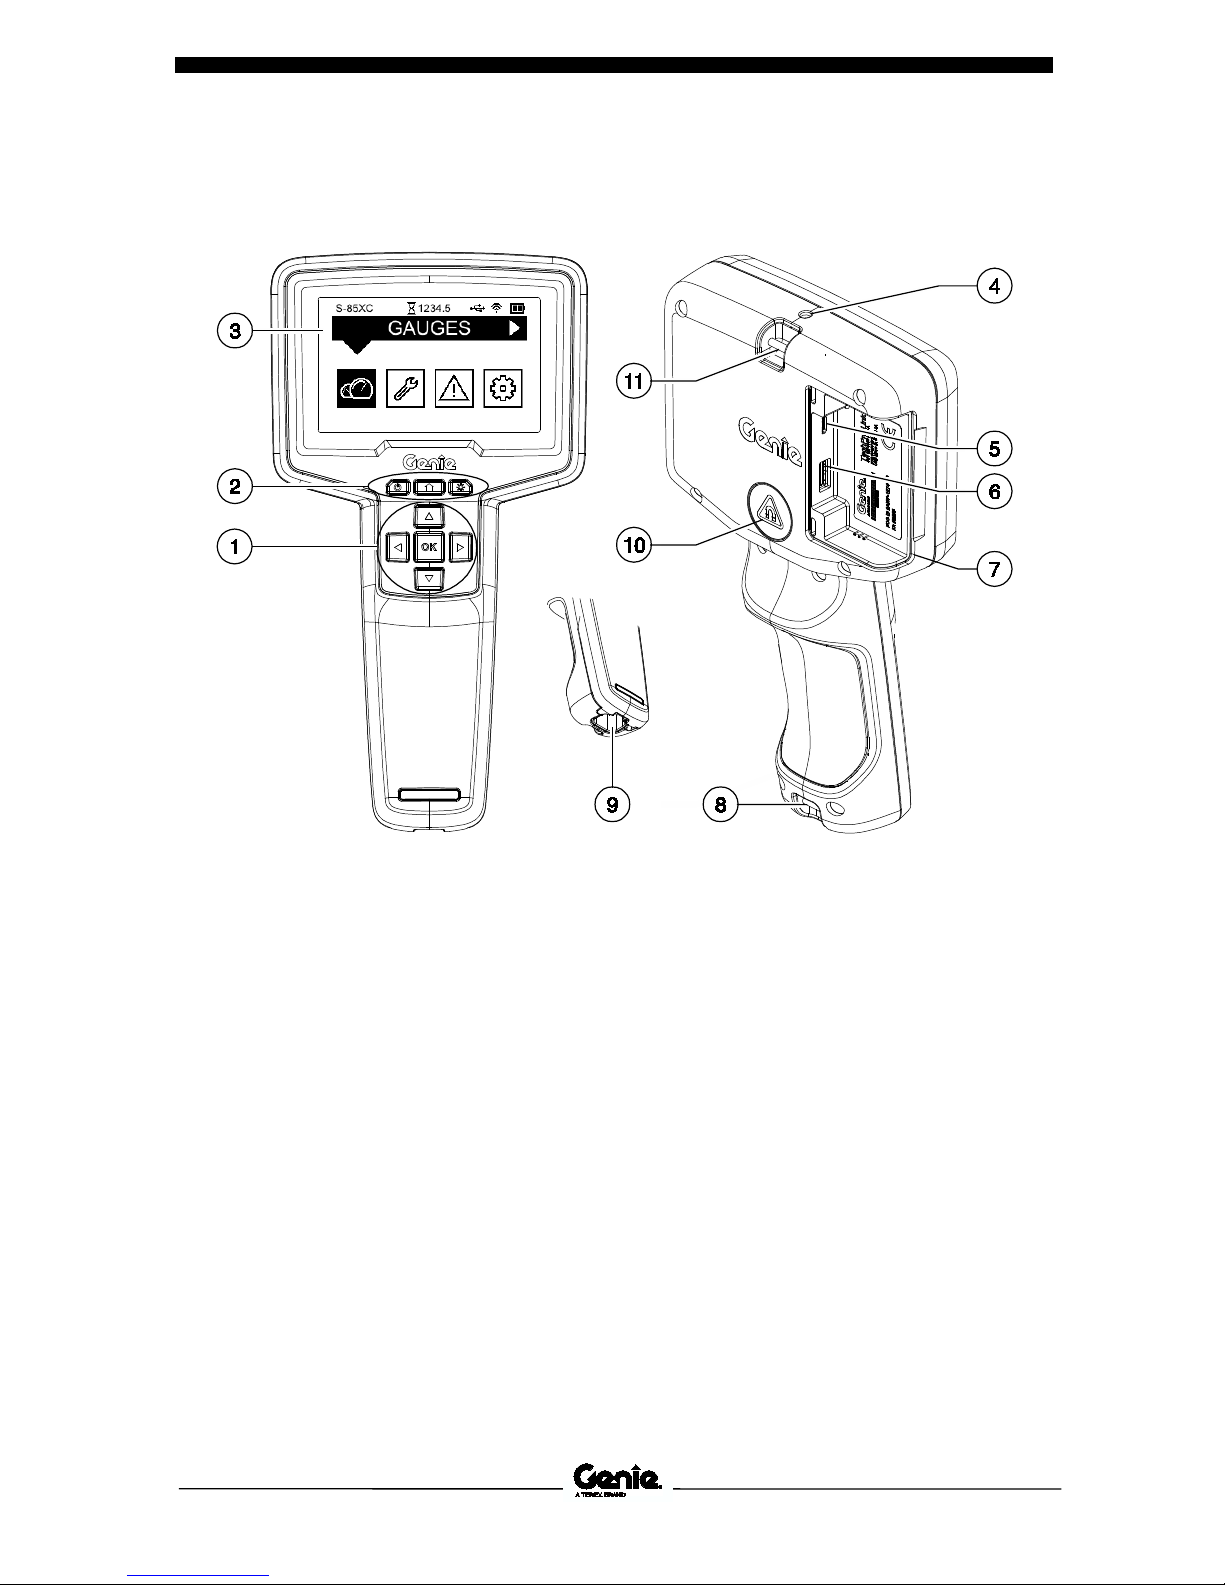
Article III. Key Features
1 Directional arrow key pad,
up/down, left/right, OK button
2 Power, Home, Flashlight
buttons
3 Display
4 Flashlight
5 USB connection - Micro B
6 USB connection - Type A
7 USB access door
8 Lanyard attachment point
9 Databus harness connection
point
10 Magnet mounting surface
11 Lanyard attachment point
Page 6

User Guide First Edition • Third Printing
Keypad Legend
4 Tech Pro™ Link Part No. 1276689GT
Article IV. Keypad Legend
Keypad Function Legend
1 Power Button
Press and hold for 1 second to
power on. Press and hold for 3
seconds to power down.
2 Home Button
Returns display to Home
screen.
3 Flashlight Button
Press and hold for 2 seconds to
power on the flashlight. Press
and hold for 1 second to power
off. When powered by the
internal battery, the flashlight
will automatically power down
after 2 minutes to save battery
life.
4 Up Button
The Up key will move menu
selection upward or increased
values.
5 Right Button
The Right key will scroll through
home screen icons to the right.
6 Down Button
The Down key will move menu
selection downward or
decreased values.
7 Left Button
The Left key will scroll through
home screen icons to the left
and back out the menu to the
previous screen.
8 OK Button
The OK button will select
highlighted menu items and
confirm value changes.
Page 7

First Edition • Third Printing User Guide
Home Screen Legend
Part No. 1276689GT Tech Pro™ Link 5
Article V. Hom e Scr een Leg end
1 Model
The model of the machine that
the Tech Pro Link is connected
to.
2 Title bar displays the name of
the selected menu.
3 Machine Hours
The current machine hours
displayed in the format 12345.6
4 USB Symbol
Indicates a USB thumb drive is
detected.
5 Wi-Fi Symbol
Indicates Wi-Fi is enabled.
6 Battery Level/Charge Status
7 Settings Menu
8 Faults Menu
9 Maintenance Menu
10 Gauges Menu
Battery Level/Charge
Status
1 The empty battery image is
displayed when battery charge
is less than 30%
2 The half battery image is
displayed when battery charge
is between 30% and 70%
3 The full battery image is
displayed when battery charge
is above 70%
4 The battery charge symbol is
displayed when connected to a
power source via either the
databus harness or the USB
Micro B charging port.
Page 8

User Guide First Edition • Third Printing
Home Screen Legend
6 Tech Pro™ Link Part No. 1276689GT
Settings Menu
• Calibration
• Speed / Threshold
• Model and Option Selection
• Battery Type
• Feature Selection
• Display Settings
• Units / Languages
• Software Update
Faults Menu
• Active Faults
• Fault History
• Clear Faults
Maintenance Menu
• System Information
• Real Time Machine Data
Gauges Menu
• Engine Gauges
Page 9

First Edition • Third Printing User Guide
Tech Pro Connections
Part No. 1276689GT Tech Pro™ Link 7
Article VI. Tech Pro Con nect ions
Equipment Databus
Connection
The Genie Tech Pro Link includes a
4-pin connector in its handle for
Power, Ground and CAN databus
connection with Genie control
systems.
The harness power connection also
charges the internal battery.
USB Connections
USB Connection - Type A
A standard USB thumb drive may
be connected to download machine
data or upload new machine
software.
USB Connection - Micro B
Use the USB cable included, to
charge the internal battery.
Equipment Connector
Locations
Compatible Genie equipment will be
identified by the Tech Pro Link logo
located next to one or more round 5
pin connection points.
Databus Harness Pin-out
Equipment Circuit 4 Pin Connector
5 Pin Connector
Battery Voltage 12V / 24V 1
A
Ground 2
B
CAN High 3
D
CAN Low 4
E
Page 10

User Guide First Edition • Third Printing
Software Installation
8 Tech Pro™ Link Part No. 1276689GT
Article VII. Software Instal lati on
USB Compatibility
Tech Pro Link only supports certain
types of USB thumb drive file
systems. If the incorrect file system
is detected, an error message will
occur, Try drive with FAT system.
To correct this, install the USB flash
drive into a PC or laptop. Under
Computer, select the drive the USB
thumb drive is installed on. Right
click on the drive and select Format.
Select the File system drop down
menu, select FAT32.
Verify that the box is checked for
Quick Format.
Select Start.
Page 11

First Edition • Third Printing User Guide
Software Installation
Part No. 1276689GT Tech Pro™ Link 9
Updating the Tech Pro Link
Software
1 Install a USB thumb drive into a
PC or laptop.
2 Launch a web browser on your
PC or laptop. Type in the
following IP address:
http://firmware.genielift.com/
3 Select the Controller Type
drop down menu, select Tech
Pro Link, then select Search.
4 Under Application Firmware,
select the .zip file. Select I
Accept, select Open.
Note: A window will open displaying
a .gff file.
5 Save the .gff file to a USB
thumb drive.
6 Remove the USB thumb drive
from the PC or laptop and insert
it into the Tech Pro Link
USB-Type A connection port.
Note: The Tech Pro Link must be
turned off to enter Bootloader Mode.
Press and hold the Power button for
3 seconds.
7 Press and hold the Left and OK
buttons. Press the Power
button until you see Preparing
System Bootloader Mode.
8 Press the up/down arrows to
navigate to the .gff file to be
installed. Press OK to install the
file.
9 After the software has been
updated, remove the USB
thumb drive.
Page 12

User Guide First Edition • Third Printing
Software Installation
10 Tech Pro™ Link Part No. 1276689GT
Updating the Machine
Software Using the Tech Pro
Link
1 Install a USB thumb drive into a
PC or laptop.
2 Launch a web browser on your
PC or laptop. Type in the
following IP address:
http://firmware.genielift.com/
3 Select the Machine Model drop
down menu, select the model of
the machine to be updated,
then select Search.
4 Under Application Firmware
and / or Bootloader Firmware,
select the .zip file. Select I
Accept, select Open.
Note: A window will open displaying
a .gff file.
5 Save the .gff file to a USB
thumb drive.
6 Remove the USB thumb drive
from the PC or laptop and insert
it into the Tech Pro Link
USB-Type A connection port.
Note: The Tech Pro Link must be
turned off to enter Bootloader Mode.
Press and hold the Power button for
3 seconds.
7 Connect the Tech Pro Link to
the machine.
1 Turn the key switch to ground
control and pull out the red
Emergency Stop button to the
on position at both ground and
platform controls.
8 Press and hold the Left and OK
buttons. Press the Power
button until you see Preparing
System Bootloader Mode.
9 Press the up/down arrows to
navigate to the .gff file to be
installed. Press OK to install the
file.
10 Follow the prompts to complete
the software update.
11 After the software has been
updated, remove the USB
thumb drive.
Page 13

First Edition • Third Printing User Guide
Specifications
Part No. 1276689GT Tech Pro™ Link 11
Article VIII. Specifications
Technical Specifications
Storage Temperature
-40 to +70 deg. C / -40 to +158 deg. F
Operating Temperature
-20 to +70 deg. C / -4 to +158 deg. F
Input Voltage 4 Pin Connector
5V-30V @1A
Input Voltage USB Micro B
5V@1A
Wi-Fi Range
50 feet / 15 m
Equipment Ratings
• Indoor and outdoor use
• Altitude up to 6500 ft / 2000 m
• Pollution degree 2
• Enclosure rated IPx4 (with USB access door closed)
Page 14

User Guide First Edition • Third Printing
12 Tech Pro™ Link Part No. 1276689GT
Notes
Page 15

First Edition • Third Printing User Guide
Part No. 1276689GT Tech Pro™ Link 13
This page intentionally left blank.
Tech Pro™ Link
Part No. 1276689GT
User Gui de
First Edition • Thir d Printin g
Page 16

 Loading...