

Page 1

1 2 3
4 5 6
7 8 9
* 0 #
1
2
3
4
5
6
7
8
9
*
0
#
1
2
3
4
5
6
7
8
9
*
0
#
1 2 3
4 5 6
7 8 9
* 0 #
1 2 3
4 5 6
7 8 9
* 0 #
UNIVERSAL GARAGE DOOR
KEYLESS ENTRY SYSTEM
2242923617
MODELS KEP-1 AND KEP-1A
INSTALLATION AND
OPERATING INSTRUCTIONS
SAFETY CAUTION
The Genie® Keyless Entry System includes everything required for most
residential garage installations. The contents include the code pad with
signal tail, control box, wall transformer, two (2) 25' rolls of wire and a
parts bag containing insulated staples and fasteners.
1. Select a convenient location for the code pad on the outside door jamb or
wall. BE CERTAIN THE LOCATION IS OUT OF THE AREA OR PATH OF THE
MOVING GARAGE DOOR AND SUPPORTING HARDWARE.
Figure 1 illustrates the code pad installed on the door jam. A wall installation is
illustrated in Figure 2. IMPORTANT: Do not allow children to play games with
the door.
2. For door jam mounting, momentarily pry the door stop away from the jam and
slide the signal tail between and into the garage, Figure 3. Secure the code pad
to the jam with the four brass screws supplied. CAUTION: JAM MOUNTING
SHOULD NOT BE USED FOR ONE-PIECE GARAGE DOORS. For wall mounting,
drill a 1/2" hole through the garage wall at the selected location. Carefully
insert the signal tail through the hole and into the garage., Figure 4. Be sure you
route all connecting wire away from the garage door to ensure it cannot be
snagged by the door or door hardware. Secure the code pad to the wall with
the four brass screws supplied.
3. Remove the cover of the control box by pressing inward on the sides and
pulling up. The signal tail plugs into the control box, therefor, position the box
on the interior wall of the garage within reach of the signal tail. Proper
positioning is illustrated in Figure 5. Secure the control box with the two
1" screws supplied.
Prior to installing the Keyless Entry System, be certain to disconnect
the electrical power to the garage door opener. Most garage door
openers feature a manual release device. Since automatic operation
of the door will not be possible after power is disconnected, we
suggest you disengage the opener per the manufacturer's
instructions. This will allow manual operation of the garage door
during installation of the Keyless Entry System.
Code Pad
Transformer
2-Conductor Wire (2)
Control Box
Parts Bag
The Genie® Company
1 Door Drive
Mt. Hope, OH 44660
For help call 1-800-654-3643
INSTALLATION
Door
Jam
Door Jam
Code
Pad
Outside
Garage
Wall
Code
Pad
Door
Stop
Door
Door
Figure 1 Figure 2
Figure 3 Figure 4
Door
Stop
Outside
Garage
Wall
Garage
Door
Signal
Tail
Signal
Tail
1/2" hole
Garage
Interior
Page 2
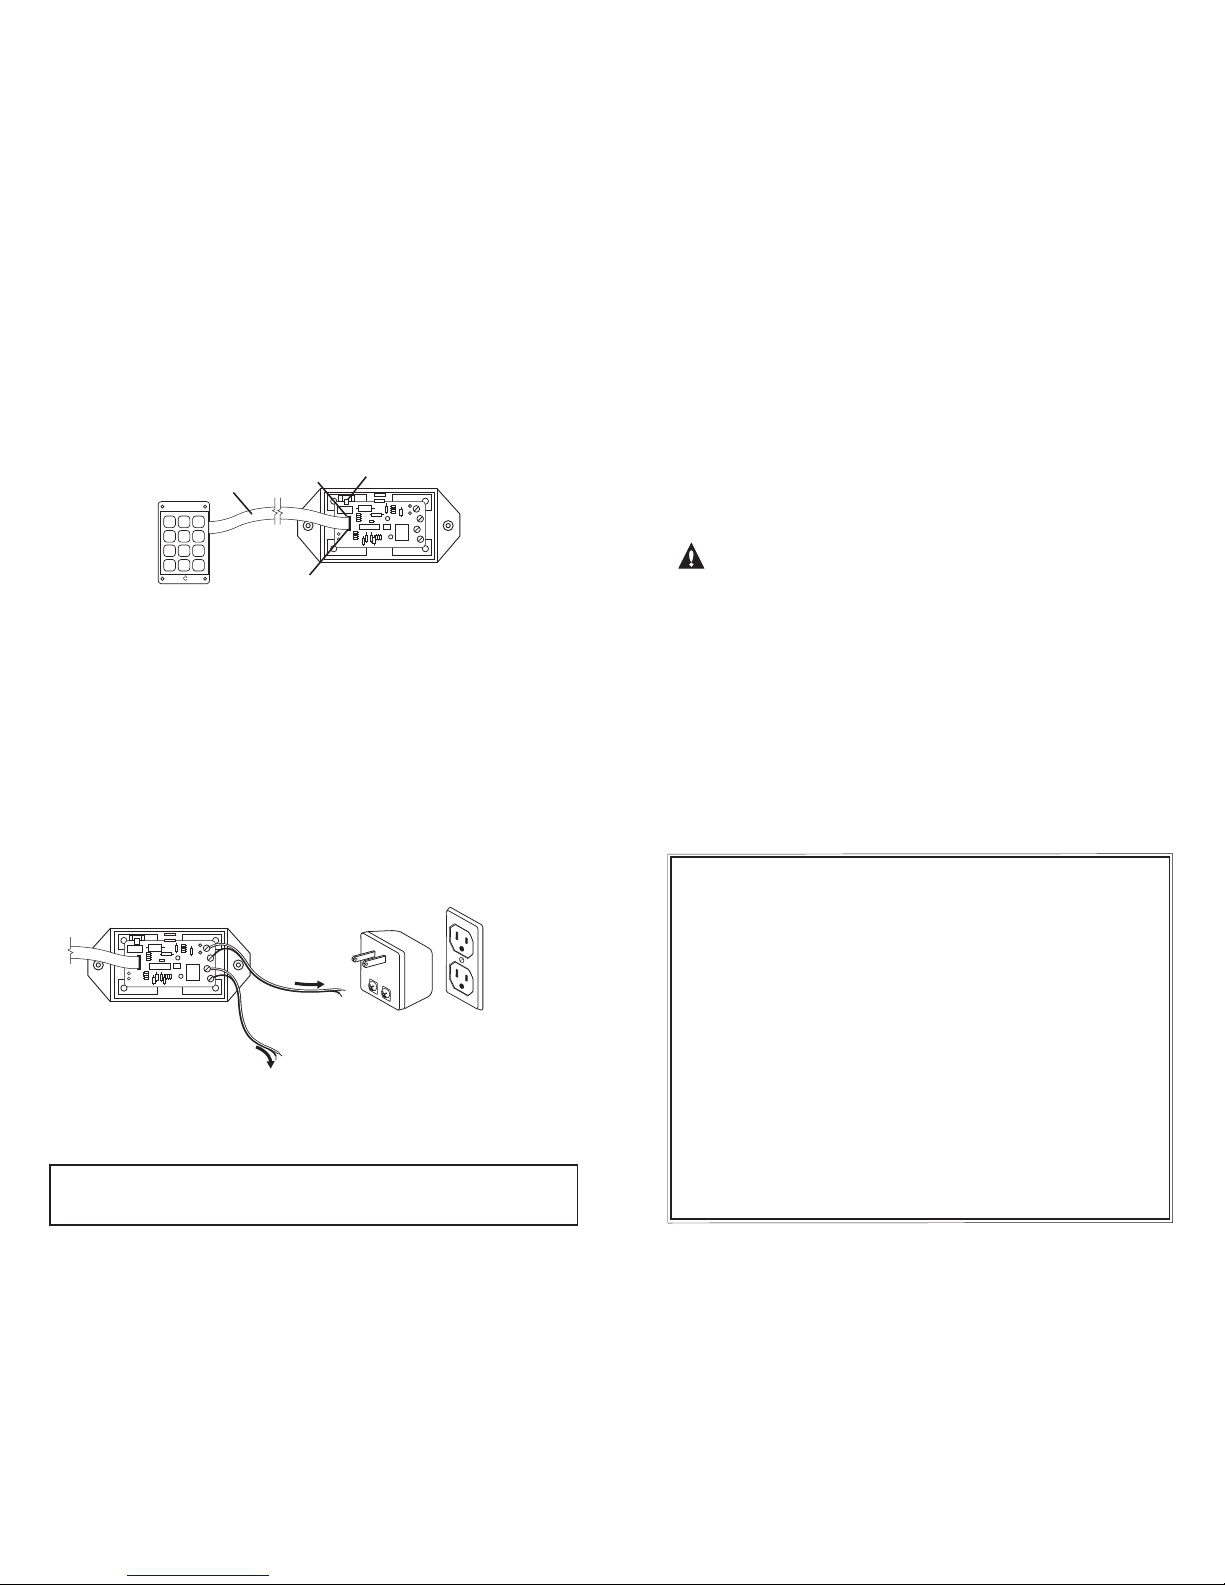
4. Plug the signal tail into the control box as shown in Figure 5. IMPORTANT: The
signal tail has a notch near the connector end. THE NOTCH MUST BE NEXT TO
THE PROGRAM SWITCH WHEN PLUGGED IN. If the notch faces away from the
program switch when plugged in, the unit will appear to operate properly, but
your security code will not be stored correctly and other codes may also open
your door.
1. Move the program switch to the "SET" position.
2. Press the series of buttons you have chosen for your code.
(From 1 to 8 numbers.) Do not use "
*
" as part of your code.
3. Press the "*" button ONCE to record your code. If the "*" button is pressed
more than once, it will erase your code, leaving,only the "*." You will have no
security code and the door will operate every time the "*" button is pushed.
4. Move the program switch to "RUN."
5. CAUTION: TEST YOUR CODE AS FOLLOWS.
Push only the "*".
The unit should not operate.
Enter any code (NOT YOUR OWN) and press the "*".
The unit should not operate.
Enter your code followed by the "*". The unit SHOULD operate.
If any part of the test fails, move the program switch back to "SET" and begin
again at Step 1.
6. Snap the cover back onto the control box. Make sure the wires go through the
slots provided for them.
5. Remove approximately 1/2" of insulation from both wires on one end of a roll
of two-conductor wire. Fasten one wire to each of the two screws located near
the relay, Figure 6. Route this pair of wires to the push button terminals on the
garage door opener powerhead using the staples provided. Cut the pair of
wires to length, strip back the insulation as needed and attach them to the
push button terminals, Figure 6. Remove approximately 1/2: of insulation from
both wires on one end of the remaining roll of 2-conductor wire and fasten
one wire to each of the remaining screws on the end of the control box,
Figure 6. Route this pair of wires to the nearest grounded 120V electrical outlet.
Cut the pair of wires to the required length, strip back insulation as needed
from each wire, and attach one wire to each of the screws on the transformer
(Do not connect them directly to the electrical outlet.) IMPORTANT: When
making all of the above connections, make sure wire ends do not touch
adjacent terminals or each other. Wires must be connected as shown in
Figure 6. Mark both ends of one pair of wires with tape to prevent connecting
them to the wrong terminals.
Re-engage the garage door opener per the manufacturer's instructions —
reconnect electrical power to the opener — plug the power transformer into the
120V outlet.
Note: Most garage door openers use terminals 1 and 2 for the push button
connection. To be certain, trace the wires from the push button back to the
opener powerhead.
PICK A CODE THAT CANNOT BE EASILY GUESSED. DO NOT USE ADDRESS, PHONE
NUMBER, FAMILY NAMES, ETC.
1. Enter your security code followed by the
"*". When you have entered the
correct code the "*" button operates the same as the wall mounted push
button. For 17 seconds the unit will continue to operate using only the "*"
button. For operation after 17 seconds, you must enter your whole security
code followed by the "*" again.
The Genie Company warrants the Genie Keyless Entry System for a period of one (1) year from the
date of purchase.
Who gets the Warranty? The warranty is limited to the consumer who originally purchases the product.
What is covered? This warranty covers all defects in workmanship and materials.
What is not covered? This limited warranty does not cover installation or damage resulting from an
accident, misuse or abuse, lack of proper maintenance, axing of any attachments not provided with
the product or loss of parts. IN NO EVENT SHALL THE GENIE COMPANY BE LIABLE FOR ANY SPECIAL,
INCIDENTAL OR CONSEQUENTIAL DAMAGES NOR FOR ANY DAMAGES RESULTING FROM MISUSE OR
MODIFICATION OF THIS PRODUCT.
How to Obtain Service
1) You may obtain service from a Genie dealer or dealers listed under the door section of your yellow
pages. The Genie Company will in-warranty parts at no charge, however, those dealers are
independent businesses and may render a bench or service call charge for their services. The Genie
Company will not be responsible for these charges. For questions pertaining to service, call
1-800-OK-GENIE.
2) You may also obtain warranty service by returning this product, postage pre-paid, to: Service
Department, The Genie Company, 1 Door Drive, Mt. Hope, Ohio 44660, U.S.A. In-warranty products
returned to the Service Department, will be repaired or replaced with no charge for either parts or
labor and will be returned to you, postage pre-paid. Please include a brief statement indicating
date and place of purchase and the nature of the problem.
Legal Remedies—This warranty gives you special legal rights and you may also have other legal rights
which vary from province to province. Some provinces do not allow the exclusion or limitation of
incidental or consequential damages or limitations on how long any implied warranty may last.
The above exclusions and limitations may not apply to you.
SETTING YOUR SECURITY CODE
OPERATING INSTRUCTIONS
Figure 5
Figure 6
Signal
Tail
1 2 3
4 5 6
7 8 9
* 0 #
Notch
Receptacle
to
Transformer
to
Push button terminals
on powerhead
Program Switch
Code Pad
Control Box
Transformer
Grounded
120V Outlet
Control Box
LIMITED WARRANTY
 Loading...