

Page 1

Exclusive Distribution:
WWW.BEGLEC.COM
Page 2
Page 3

Features
Great effect variety
Delicate and streamline appearance to allow movement and
installation be easier
Smooth 570 rotation angle about the x-axis and 270 rotation angle
about the Y-axis, electronic sensor to automatically reset
CMY mixer to allow the color to be various and richer and make color
adjustment more accurate by adding offset color micro-adjusting
function
One color disk with six dichroic color and open, which contains 3200°
K CTC, be able to rotate in both directions smoothly to create hearttouching rainbow effect, in order to make color adjustment more
convenient, a color macro function is added and in order to make
color adjustment more accurate, an offset color micro-adjusting
function is added
10-30 degree ZOOM effect
Frost lens with soft-edge frost
1-12fps fast flash with random and 0-100% mechanical exposure
adjustment
Sophisticated appearance and structure design
Stylish, high impact resistant polymer shell, which is lighter than
anyone else of the same class in the market.
Solid square base is convenient set on the TRUSS, or directly stand
on the ground or stage for uses.
Systematic modular construction design has all inner function wheels
and PCBs modularized, which allows version update or customization
more convenient.
Sophisticated optical system makes light output more bright and
sharp.
Simple and easy operation
Standard USITT DMX512 protocol, 15 or 13 DMX Channel.
High-torque stepper motors, smooth and precise micro-stepping
control.
LED screen controls DMX coding and built-in functions' election, as
well as also display lamp's time usage.
1
Page 4
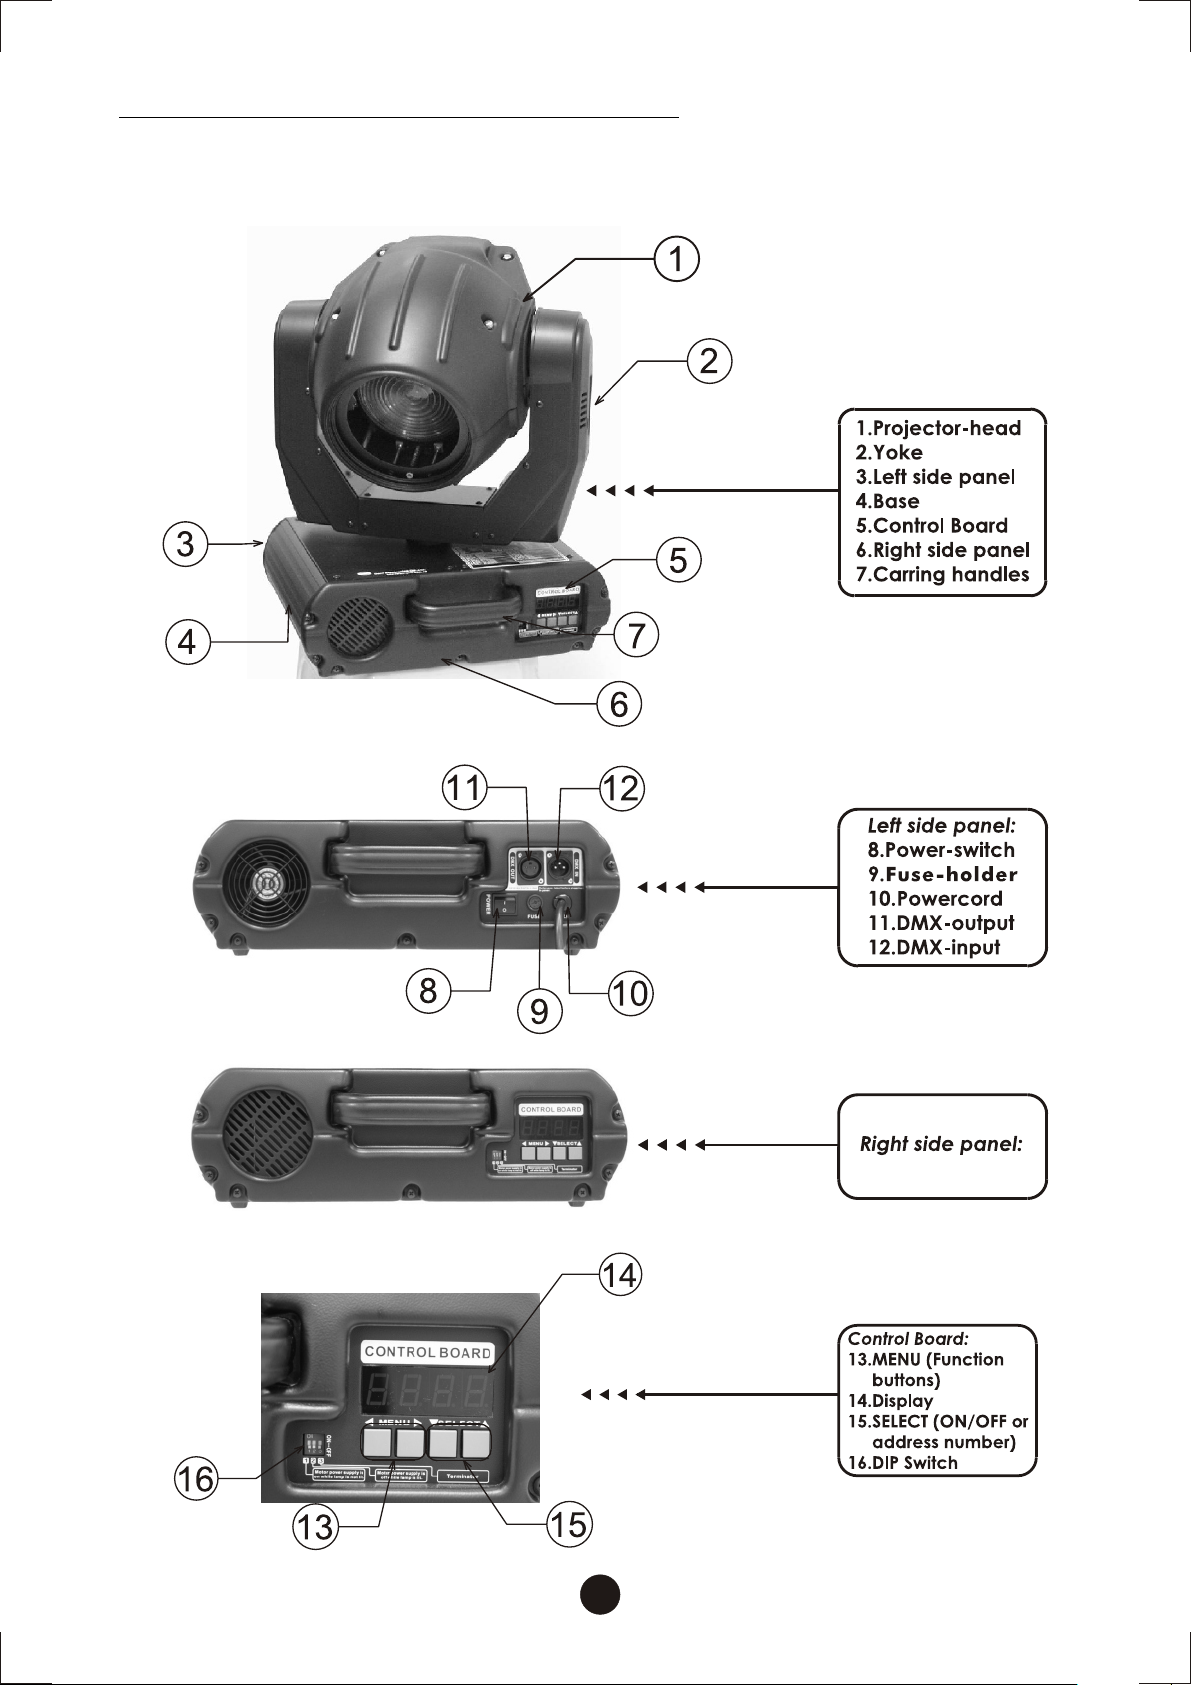
Description of the appearance
Fil ter
2
Page 5

Inspection
Carefully unpack the carton, and make sure if any damage or loss
caused by transportation.
Contact your Geni dealer to assure your right by telephone or
facsimile immediately if damage has occurred or if something is
missing.
Packing List:
A. OBY-600 Wash
B.Operating Manual
C.
Bracket
D.Lamps (Optional)
Safety instructions
This appliance must be earthed (grounded).
Disconnect power before removing covers or servicing.
Keep case closed while operating.
OBY-600 contains no user serviceable parts. Refer servicing to
qualified technicians only.
Lamp and components become hot during operation. Allow time to
cool before handling.
Keep flammable material at least one meter away from unit.
Do not operate in wet conditions or near liquids.
Keep air vents clear to avoid overheating.
Lamp produces hazardous UV light. Do not look directly at lamp
when lit.
Replace any blown or damaged fuses only with those of identical
values.
3
Page 6
Lamp Installation
!Warning!
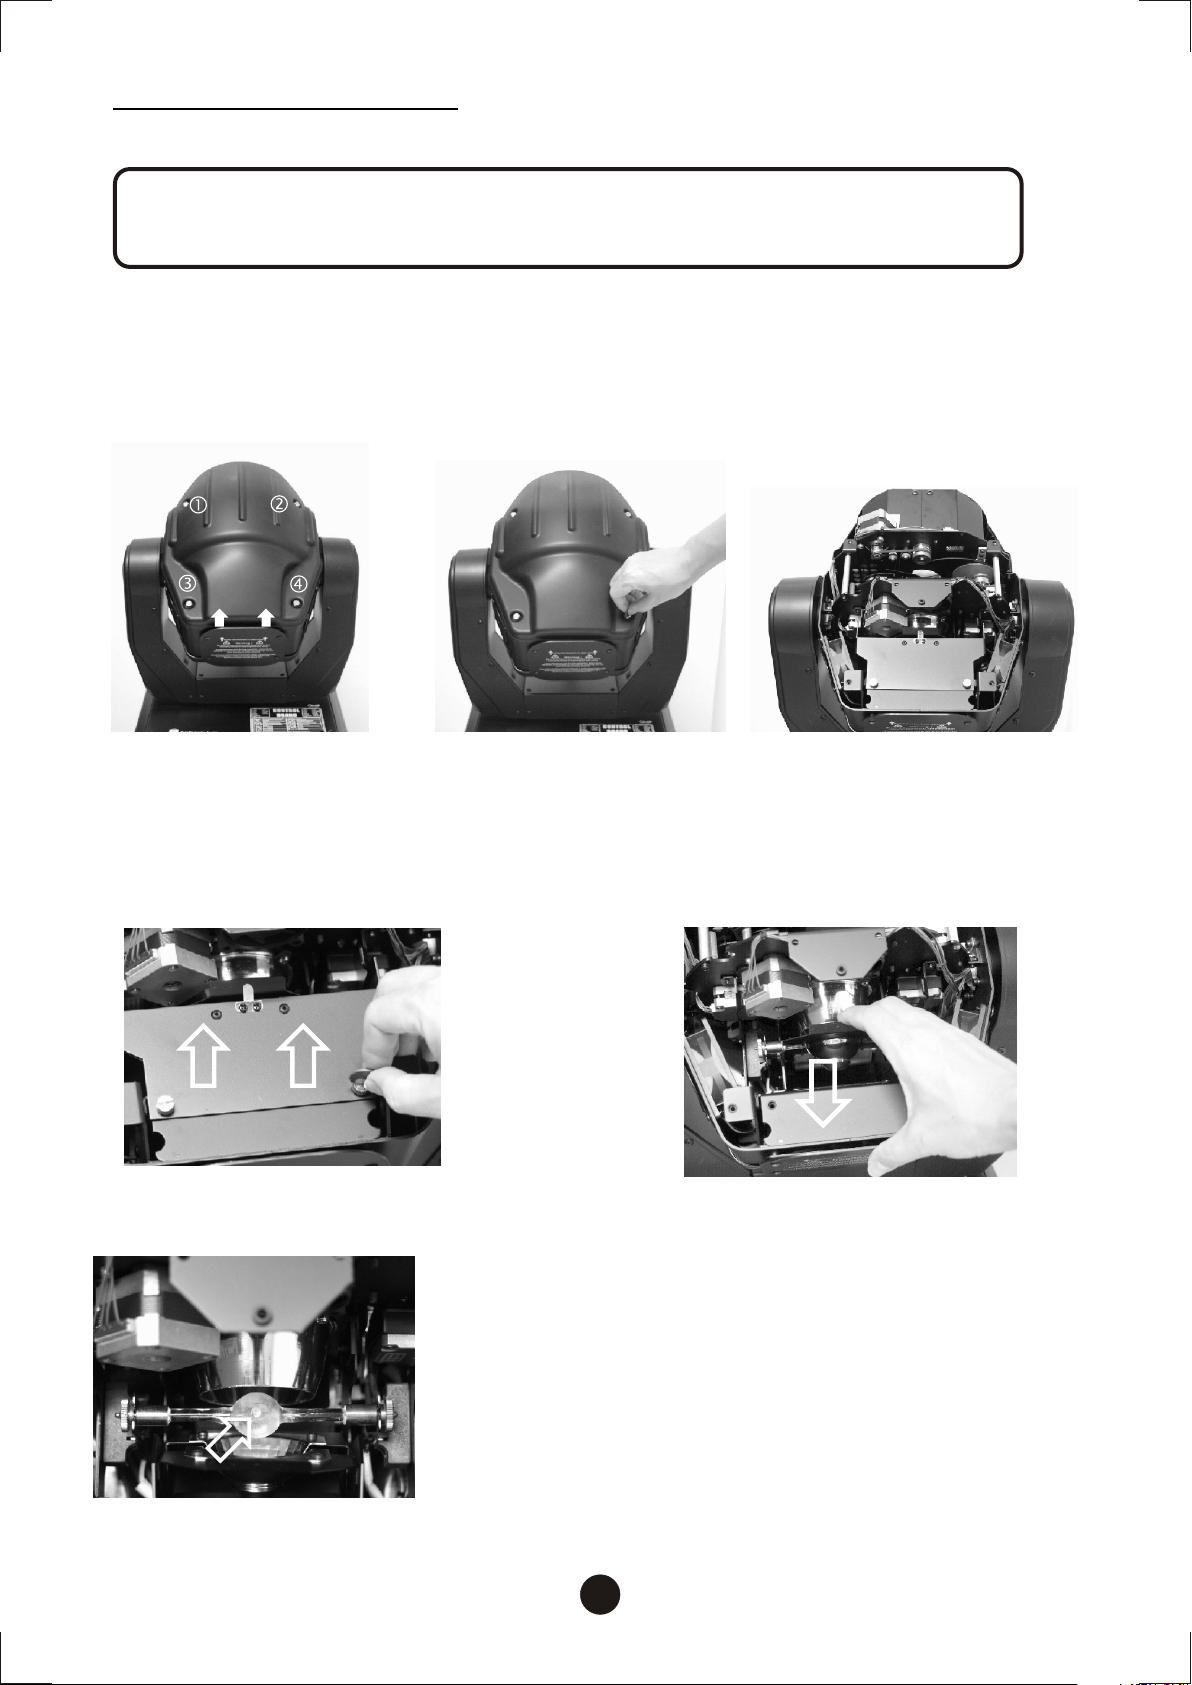
Remove the power cord before installing the lamp.
Keep projector-head upward (See Figure below.) and loosen four
screws on the cover with appropriate tool then open the top cover
and put it aside.
Loosen and grab the screws
on the shutter cover with
appropriate tool.
Wear the gloves and extract the lamp from
the package, loosen the screws on both sides of
the lamp, then slide the lamp paralleled into the
lamp socket. Adjust the round point of the
lamp upward (See Figure.) and fasten the
screws snugly.
Reverse the above-mentioned processes for
the complete installation.
Pull the reflector backward
4
Page 7
Rigging:
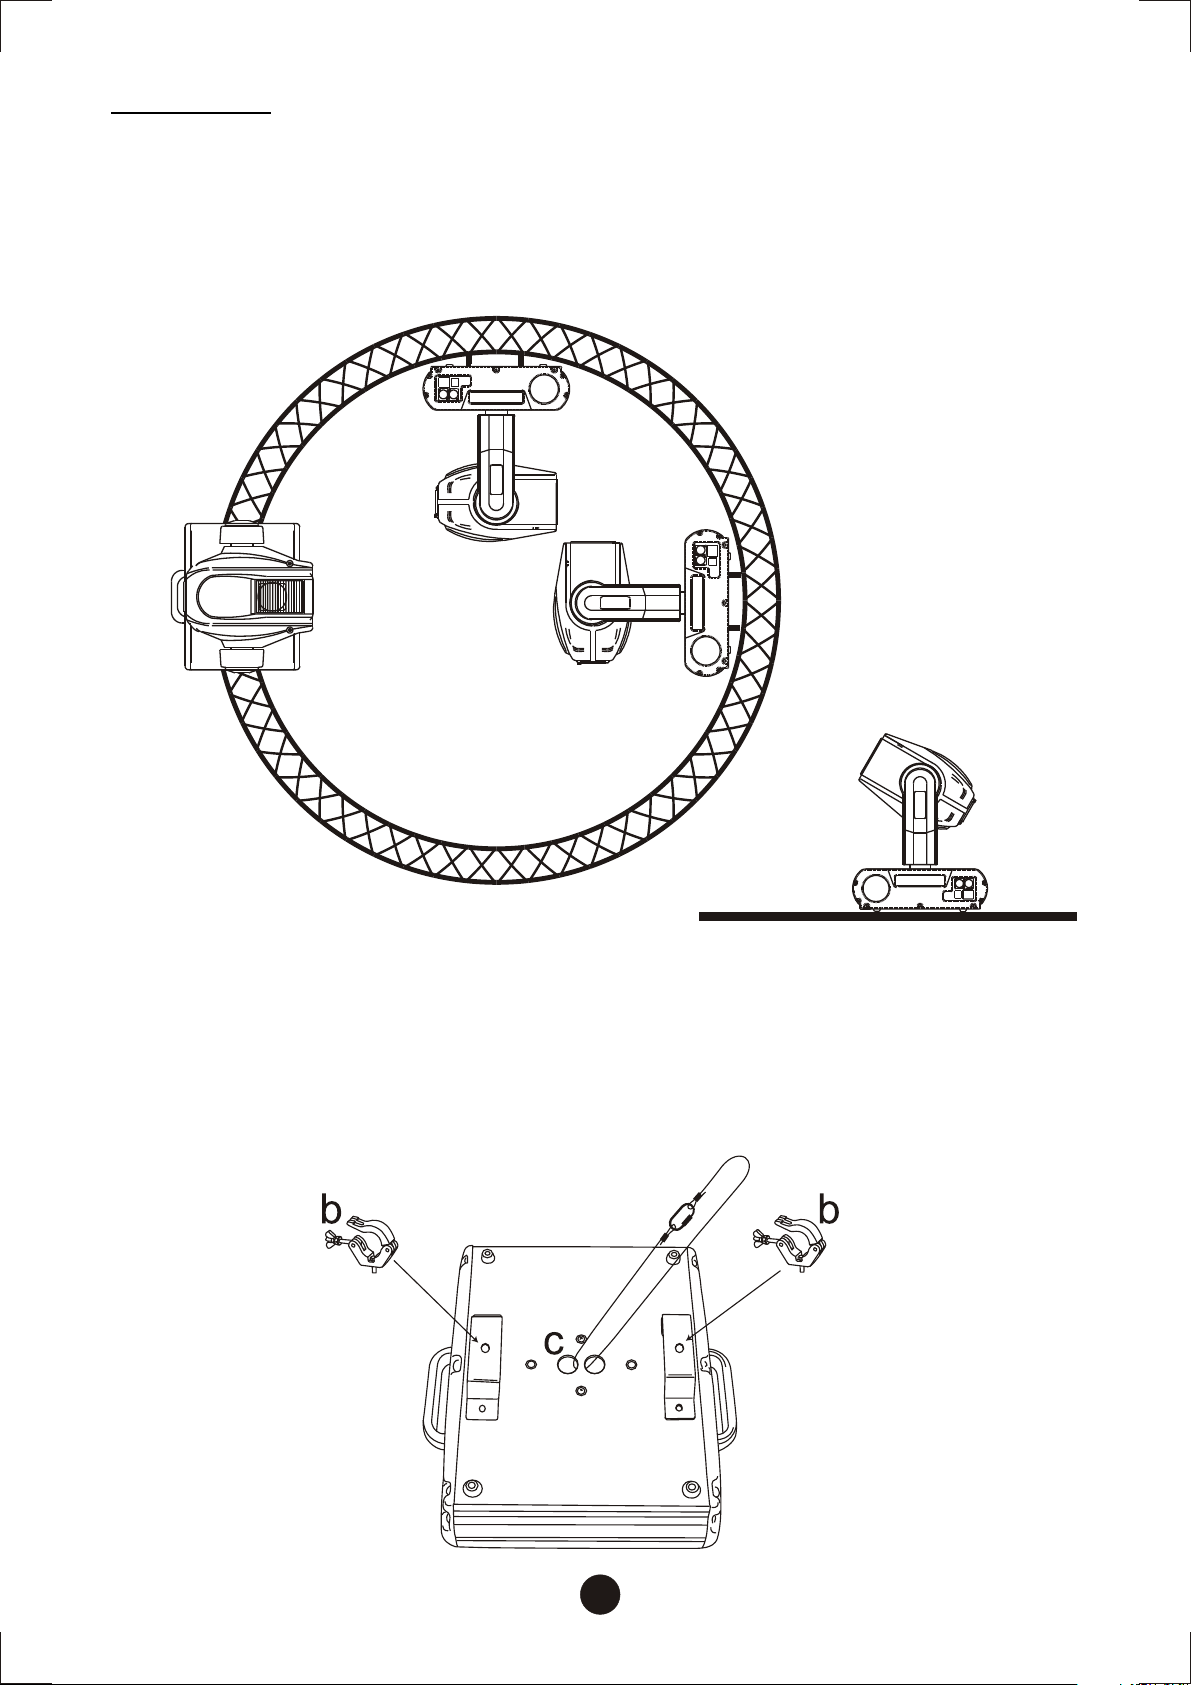
Oby-600 can be set on the flat stage floor directly or use clamp to mount on
any kinds of trusses for fitting the mobility of various venues.
Mount two attached brackets(a) on the bottom (See Figure ), and
collocate the appropriate clamps(b) to rig with trusses. Must use the
safety ropes that can hold the ten times as heavy as the fixture through
the eye bolts(c) on the bottom of the base and trusses; then join the
safety ropes with screw-on carabines(d).
d
a a
5
Page 8
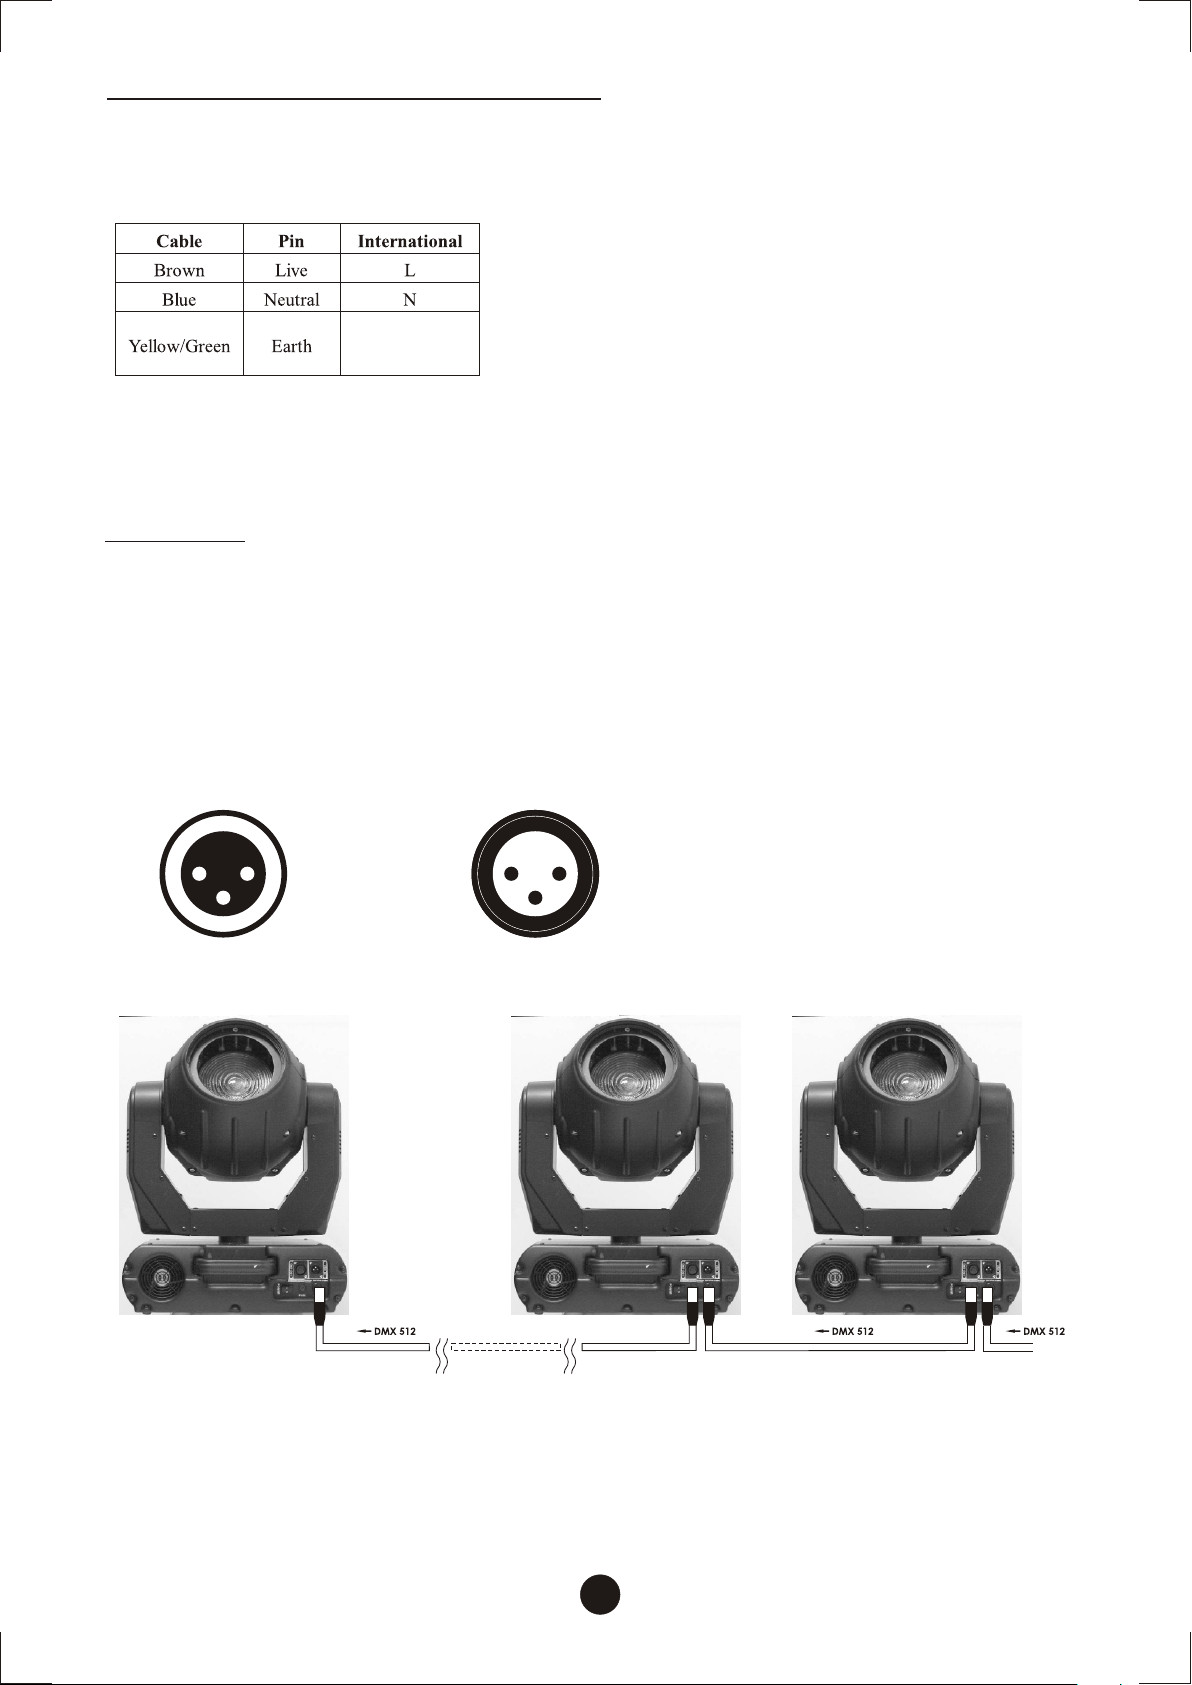
Connection with the mains
Connect the device to the mains with the power-plug.
The occupation of the connection-cables is as follows:
The earth has to be connected! In general, lighting effects should not
be connected to dimming-packs.
Linking
Use 3-pin XLR data cables to link the controller to DMX lighting
equipment.
3-pin XLR connectors are follows:
DMX-output
XLR mounting-socket:
12
3
1:Ground
2:Signal(-)
3.Signal(+)
DMX-input
XLR mounting-plug:
1 2
3
Building a serial DMX-chain:
1:Ground
2:Signal(-)
3.Signal(+)
Connect the DMX output of the first fixture with the DMX input of the
next fixture. And execute all the setups following the abovementioned instruction.
Flip the DIP SWITCH #3 of last fixture to ON position for terminal
confirmation.
6
Page 9
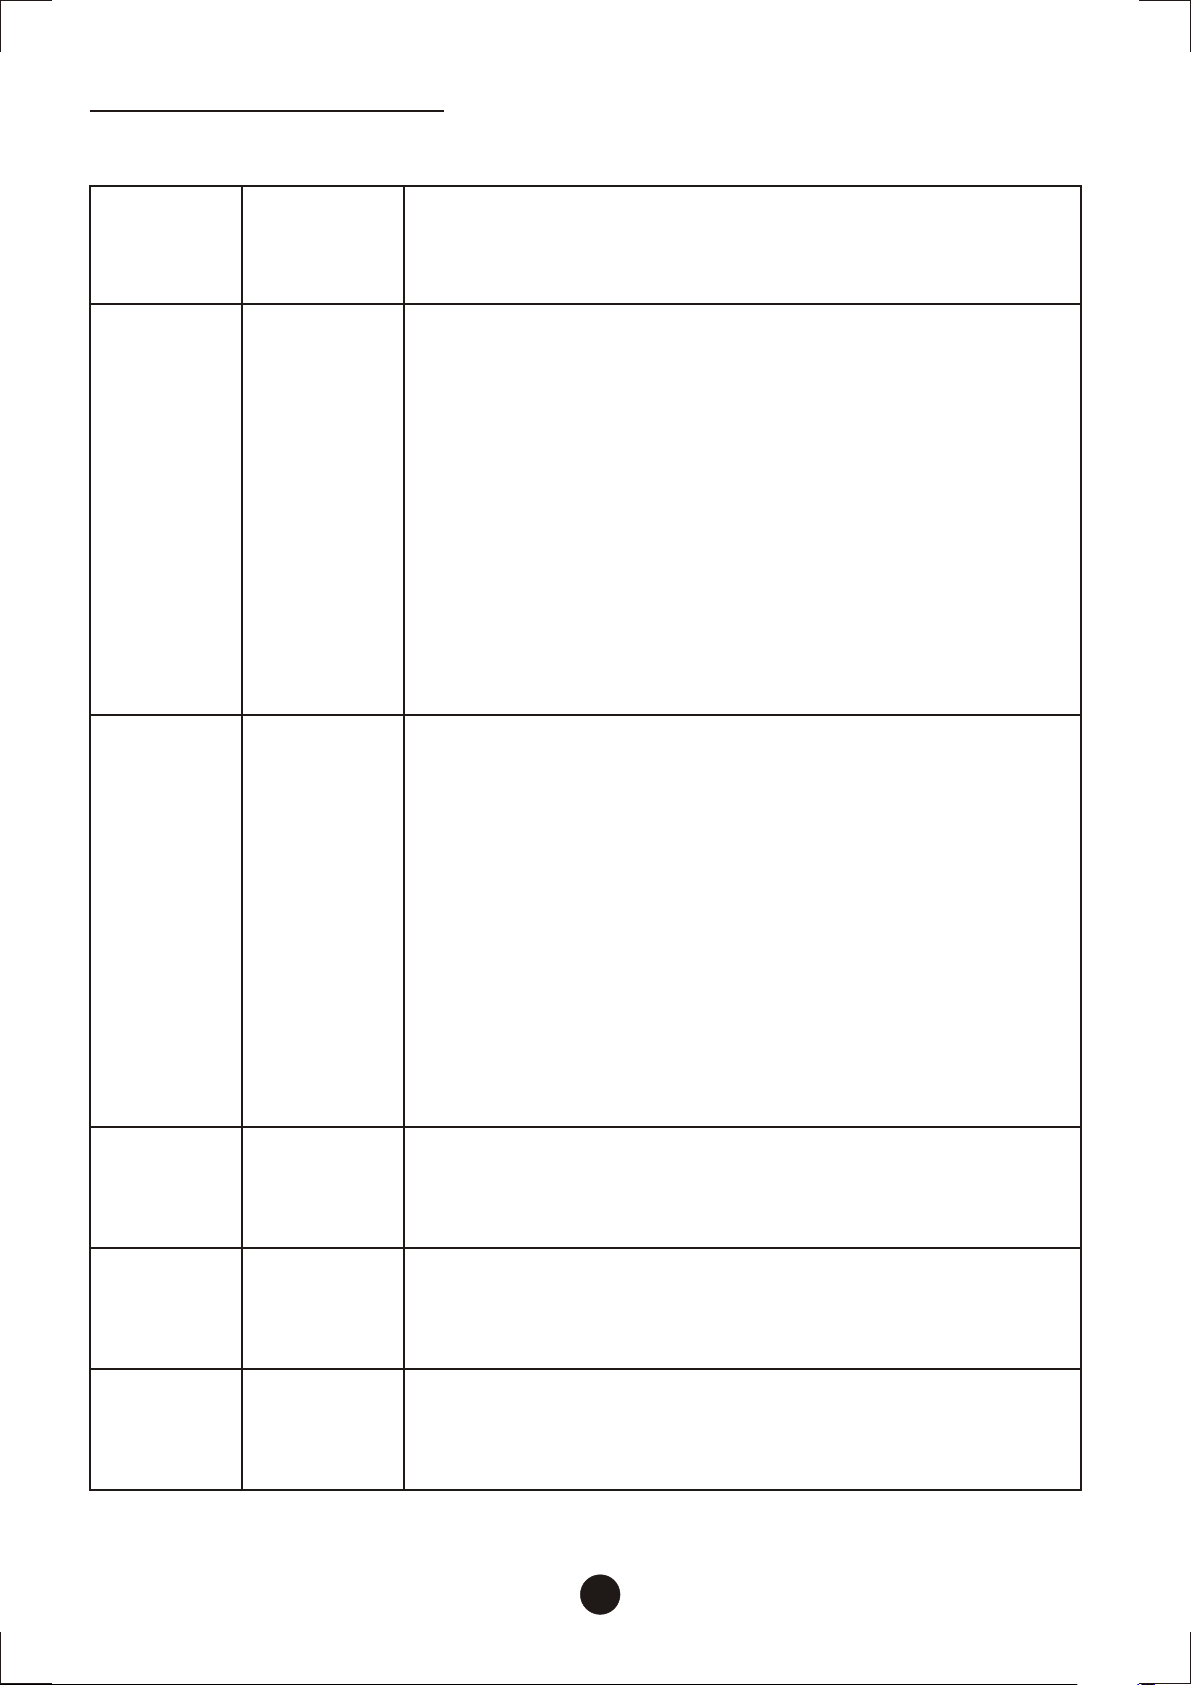
DMX Channel chart
CH 1
Dimmer
CH 2
Shut
CH 3
Color
wheel
0-255
0
1-7
8-63
64-71
72-127
128-135
136-191
192-199
200-253
254-255
0
18-35
36-51
52-71
72-89
90-107
108-127
Dimmer from dark to lightest.
Close
Open
Shutter from slow to fast.
Open
Fade out fast to slow.
Open
Fade in slow to fast.
Open
Random shutter slow to fast
Open
White
Red
Blue
Green
Purple
5000K
3200K
CH 4
Cyan
CH 5
Magenta
CH 6
Yellow
128-187
188-195
196-255
0-255
0-255
0-255
Forward rotate from fast to slow.
Stop
Reverse rotate from slow to fast.
From white to full cyan.
From white to full magenta.
From white to full yellow.
7
Page 10
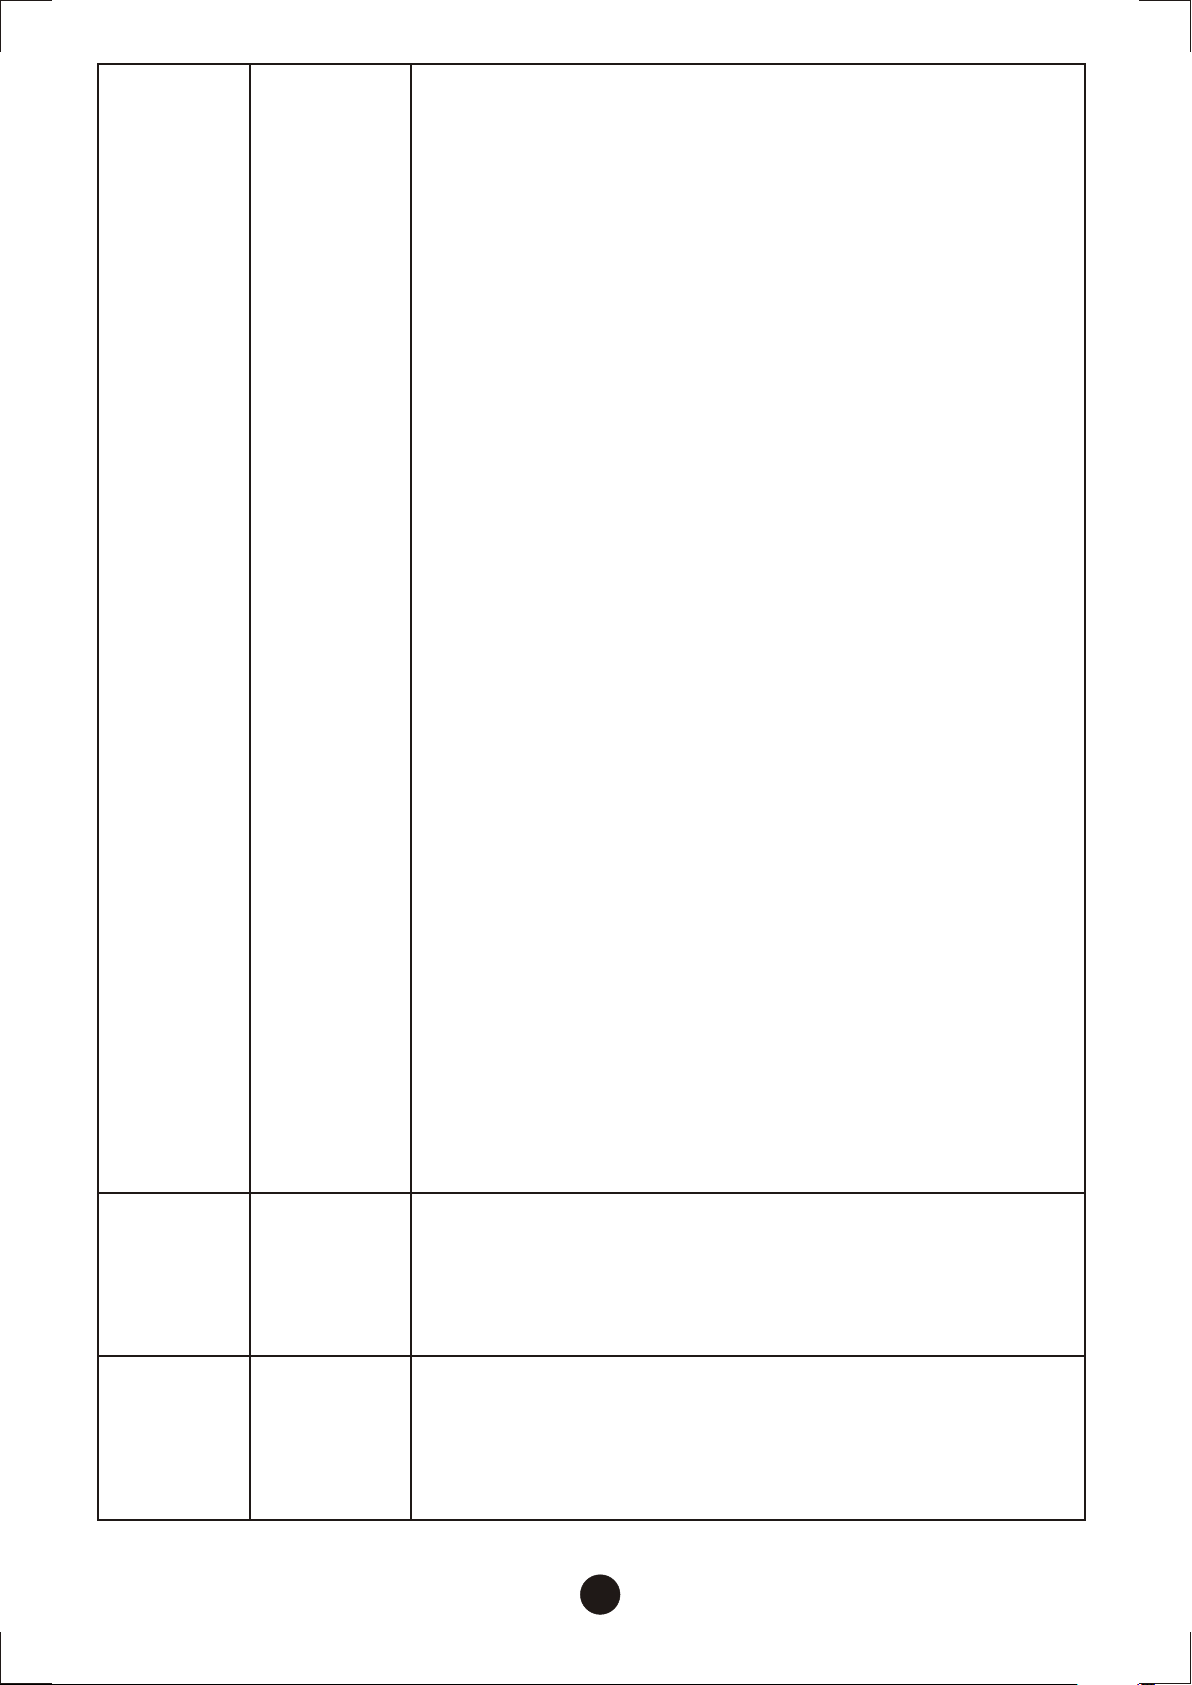
CH 7
Color
macro
0-7
8-15
16-23
24-31
32-39
40-47
48-55
56-63
64-71
72-79
80-87
88-95
96-103
104-111
112-119
120-127
128-135
136-143
144-151
152-159
160-167
168-175
176-183
184-191
192-199
200-207
208-215
216-223
224-231
232-239
240-247
248-255
Macro off
Macro 1
Macro 2
Macro 3
Macro 4
Macro 5
Macro 6
Macro 7
Macro 8
Macro 9
Macro 10
Macro 11
Macro 12
Macro 13
Macro 14
Macro 15
Macro 16
Macro 17
Macro 18
Macro 19
Macro 20
Macro 21
Macro 22
Macro 23
Macro 24
Macro 25
Macro 26
Macro 27
Macro 28
Macro 29
Macro 30
Macro 31
CH 8
Beam
CH 9
Zoom
0-63
64-127
128-143
144-255
0-255
Full beam.
Frost filter.
Flat and wide beam effect at 0°.
Flat and wide beam effect can 90° adjustment.
Zoom from 10 ~ 30
o o
8
Page 11
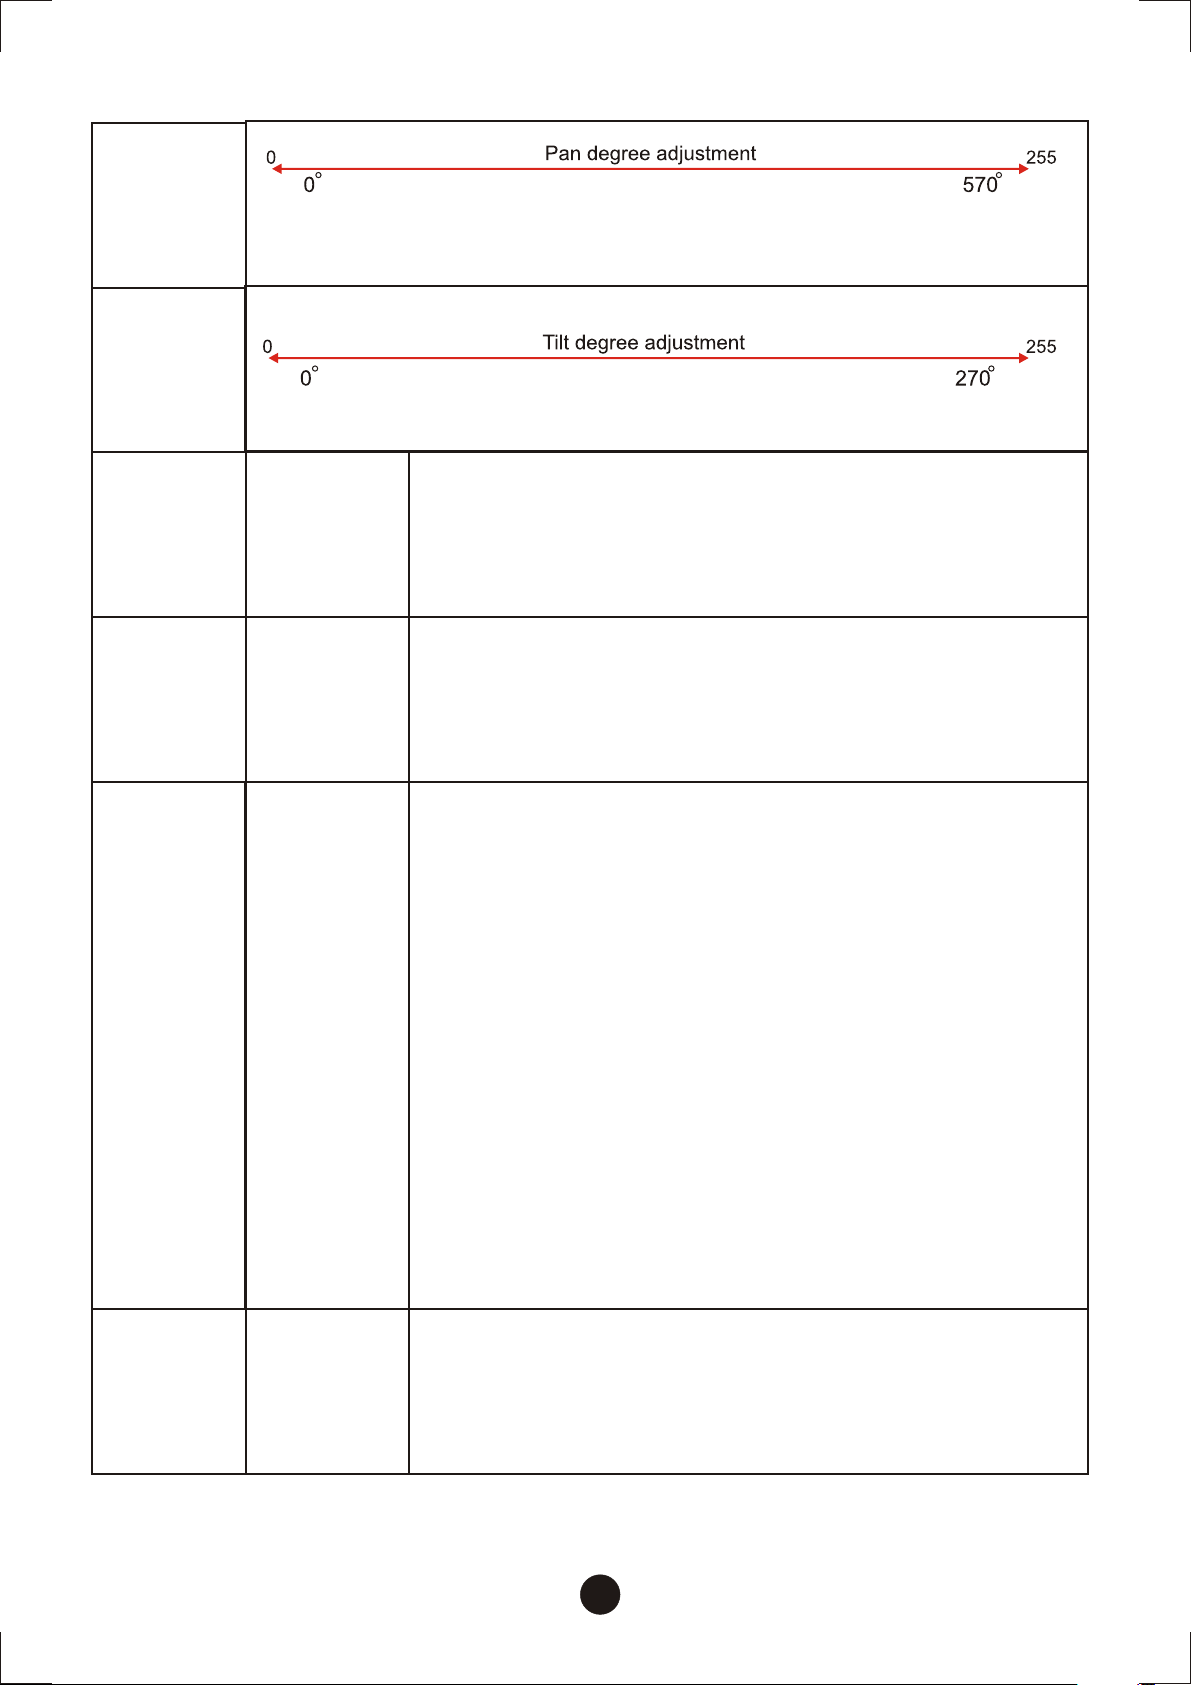
CH 10
Pan cors.
CH 11
Tilt cors.
CH 12
Pan fine.
X-axis fine tuning of 2.2 degree.
CH 13
Tilt fine.
CH 14
Control
0-7
8-6 3
64- 127
128 -191
192 -255
Y-axis fine tuning of 1 degree.
Pan/Tilt adjustment in the auto movement
mode (adjust nearness is moving slowly).
Pan/Tilt adjustment in the manual mode
(adjust nearness is moving rapidly).
Make color wheel, cyan, magenta, yellow into
offset calibration status after 3 seconds.
(Pan coarse -> Offset color wheel * Tilt coarse ->
Offset cyan * Pan fine -> Offset magenta *
Tilt fine -> Offset yellow)
Save offset value after counter 3 seconds.
Reset whole motors after counter 3 seconds
CH 15
Lamp swi tch
0-47
48-95
96-159
160-207
208-255
No function.
Switch On the lamp after counter 3 seconds.
No function.
Switch Off the lamp after counter 3 seconds.
No function.
9
Page 12
Channels arrangement
Selected
function
CH 1
CH 2
CH 3
CH 4
CH 5
CH 6
CHn1 OFF
16bit OFF
Dimmer
Shut
Color wheel
Cyan
Magenta
Yellow
CHn1 OFF
16bit ON
Dimmer
Shut
Color wheel
Cyan
Magenta
Yellow
CHn1 ON
16bit OFF
Pan coarse
Tilt coarse
Dimmer
Shut
Color wheel
Cyan
CHn1 ON
16bit ON
Pan coarse
Tilt coarse
Pan fine
Tilt fine
Dimmer
Shut
CH 7
CH 8
CH 9
CH 10
CH 11
CH 12
CH 13
CH 14
Color macro
Beam
Zoom
Pan coarse
Tilt coarse
Control
Lamp switch
Color macro
Beam
Zoom
Pan coarse
Tilt coarse
Pan fine
Tilt fine
Control
Magenta
Yellow
Color macro
Beam
Zoom
Control
Lamp switch
Color wheel
Cyan
Magenta
Yellow
Color macro
Beam
Zoom
Control
CH 15
CH 16
Lamp switch
10
Lamp switch
Page 13
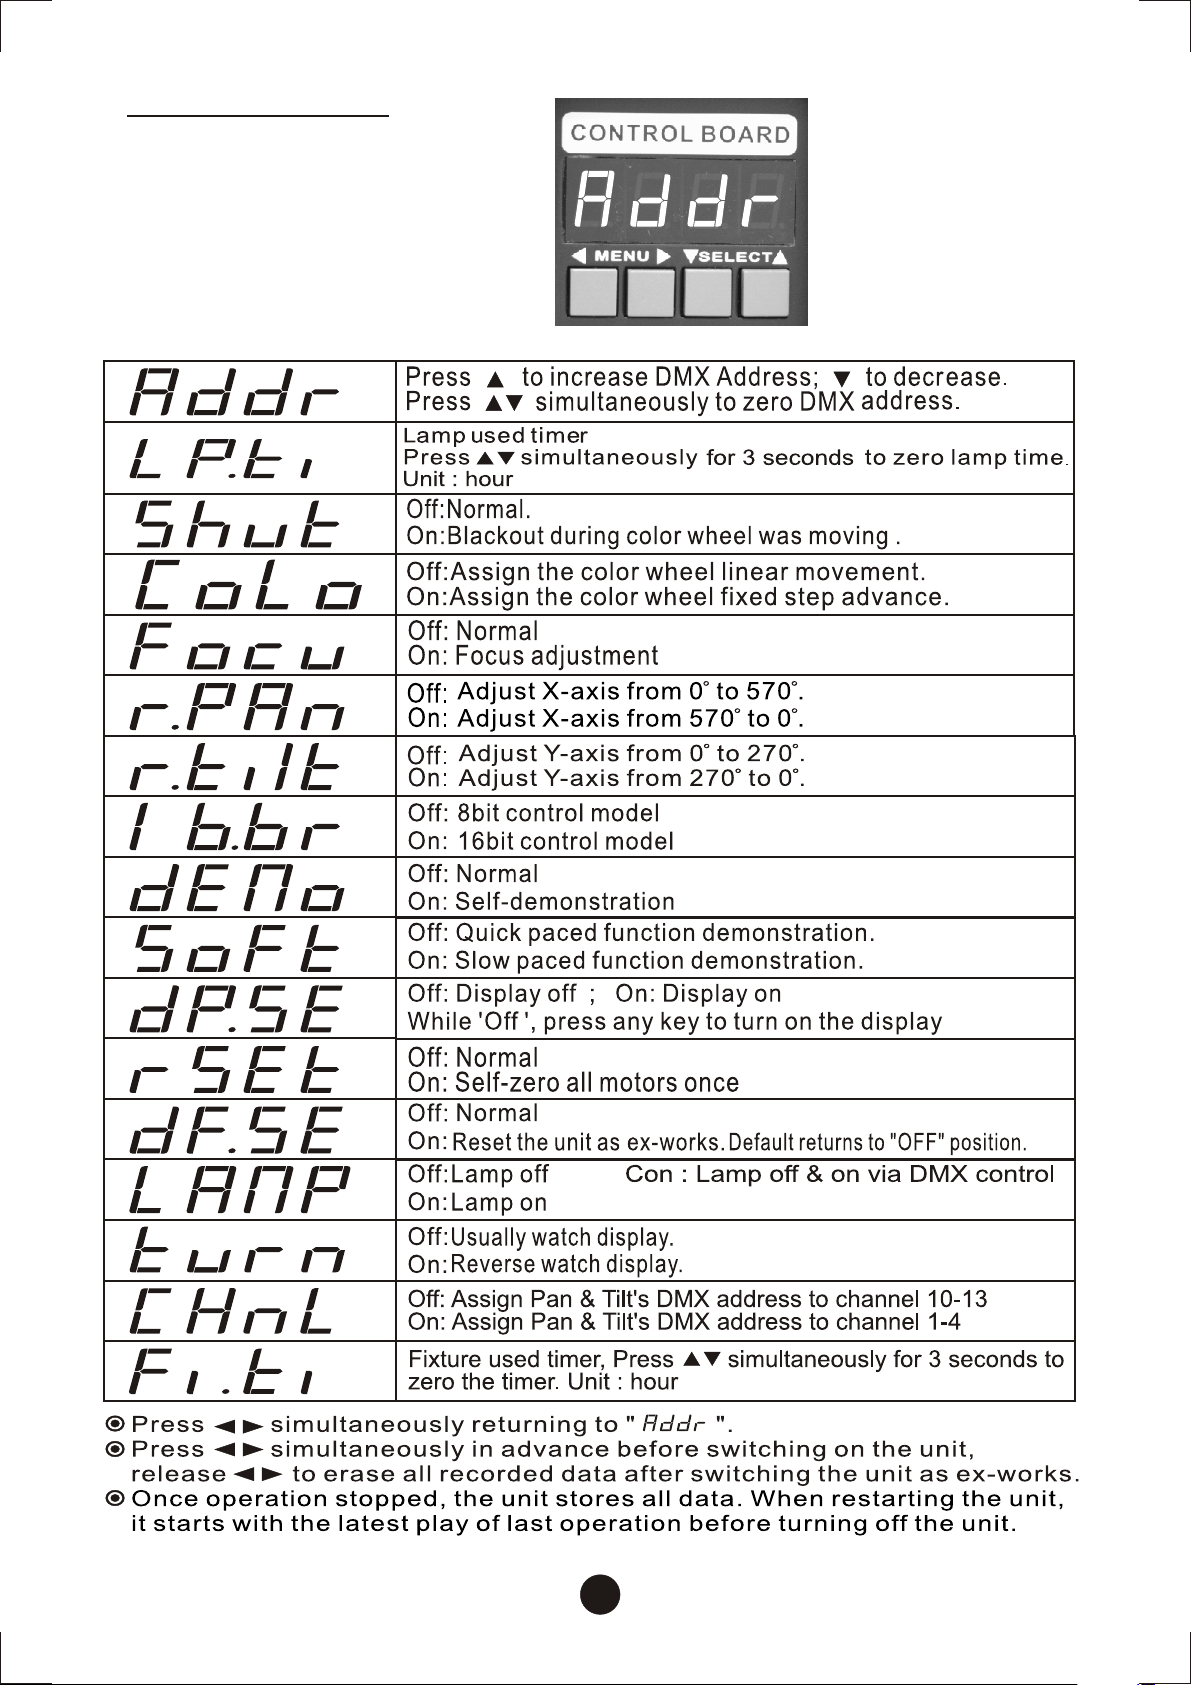
Control Board
11
Page 14

Replacing the Fuse
If the fixture does not function, that may be the fuse was burned out. It
may be time to replace the fuse of same type and specification for
eliminating this fault.
Remove the electric power and flip the switch to " off " position before
replacing the fuse.
Replace the fuse as follows:
Step 1: Unscrew the screw of the fuse holder on the housing
counterclockwise with appropriate tools.
Step 2: Remove the broken fuse and then replace the new fuse.
Step 3: Reinsert and tighten the screw on the fuse-holder.
Step 4: Turn the power on for test.
Please contact with the dealer if the fixture still cannot work or the fuse
burns out again.
12
Page 15

Product Specifications
Physical
Dimension (L x W x H):
AC supply
AC input: Certified power cord with
Voltage: Magnetic - 210/230/245V /
Electronic ballast - 100/120
Fuse: 230V 7A, 110V 15A
Power Consumption: 800W
Control and programming
Signal pinout: pin 1 shield, pin 2 (-), pin 3 (+)
Setting and addressing: LED control panel
Protocol: USITT DMX-512
Pan/tilt resolution: 8 or 16 bit
DMX channels: 13-15
Signal input: 3-pin XLR male
Signal output: 3-pin XLR female
Source
Lamp: 575W discharge
Approved models: Philips MSI-575/HR
Philips MSI-575/2
Osram HMI-575/GS
Control: Automatic and DMX
Ballast: Electronic & magnetic
416 x 400 x 564 mm
Weight: 230V /27.5 kg, 110V /30.5 kg
plug or without plug
50Hz, 208/230V / 60Hz
/210/230/250V, 50/60Hz
(1000 hr; 6000K)
(1000 hr; 6500K)
(750 hr; 6000K)
remote on/off
Electromechanical effects
Cyan: 0-100% + offset adjustment
Magenta: 0-100% + offset adjustment
Yellow: 0-100% + offset adjustment
Color wheel: 6 colors, 3200 ° K CTC
included + open + offset
adjustment
Zoom: 10 ° -30 °
Frost effect: Full beam, soft-edge frost
Flat & Wide: Beam shape adjustment 0 °
-90 °
Dimmer/Shutter: Infinite dimming and
strobe 1~12 fps with
random
Pan: 0 ° -570 °
Tilt: 0 ° -270 °
13
 Loading...