

Page 1
MK-1996 Basic Operation 03-02-10
1. General Specification
- Power On/Off Key : Top
- PTT Key : Side [ Tact SW ]
- Monitor Key : Side [ Tact SW ]
- UP Key : Top
- Down Key : Top
- SCAN Key : Top
- CALL Key : Top
- Menu Key : Top
- EXT Mic/Speaker Jack[ 3.5ö ]
2. Function Flow Chart
F CTCSS PWR Hi/Low DW VOX BEEP Tone Ringer Tone(CALL) F
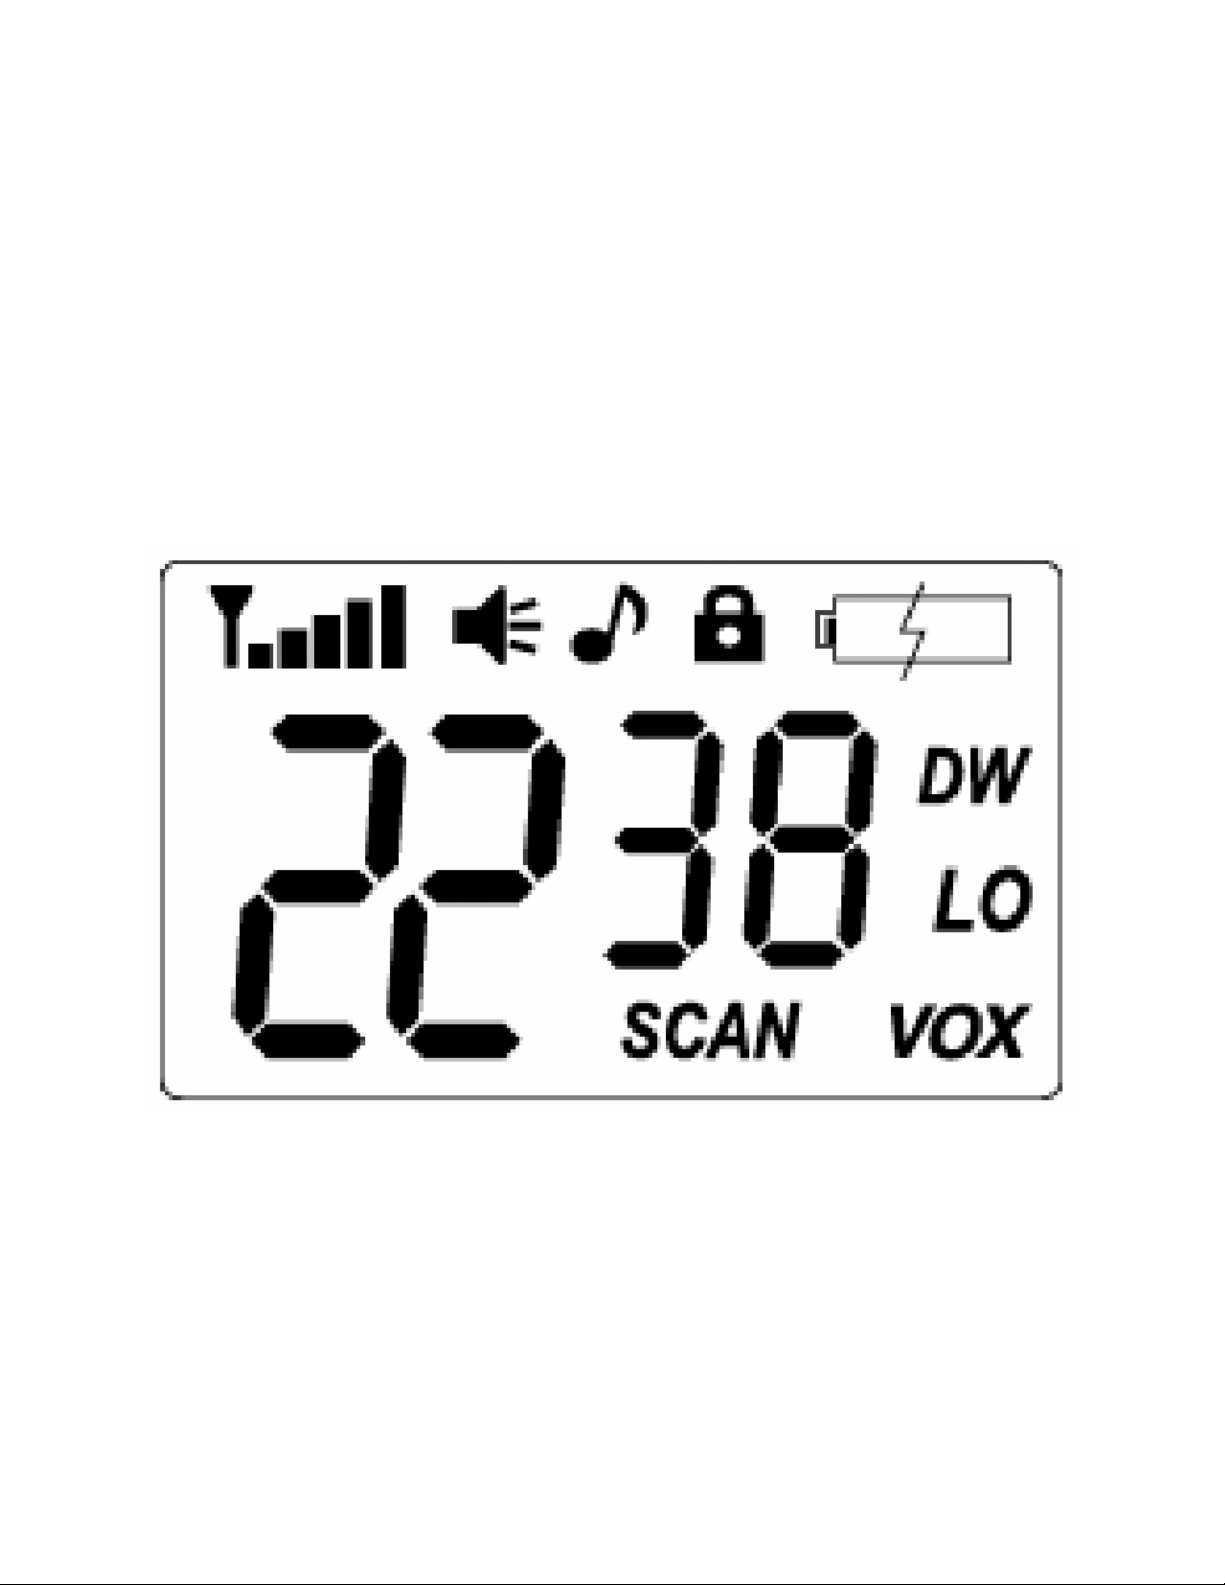
3. LCD Display
1 of 7
Page 2
MK-1996 Basic Operation 03-02-10
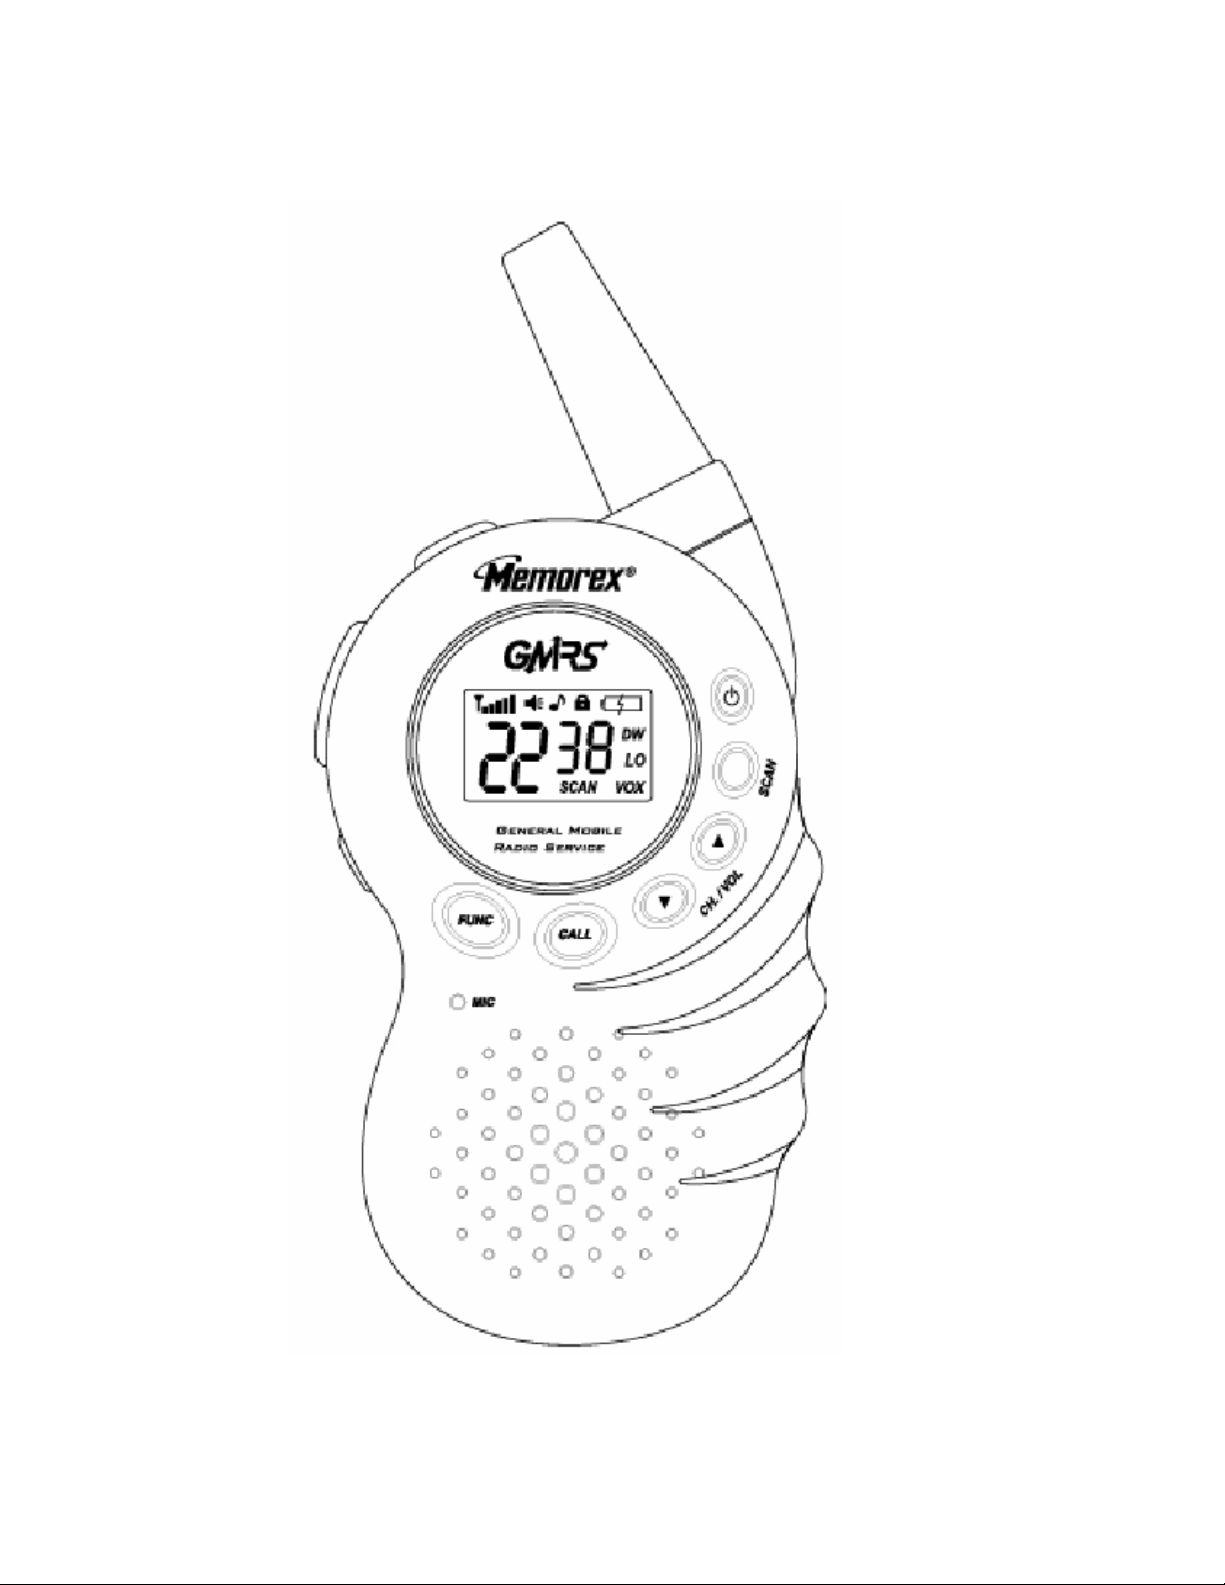
4. Front, Side, Top Overview
2 of 7
Page 3

MK-1996 Basic Operation 03-02-10
5. Operating Instruction
1) On/Off & Volume control Switch
- Radio ON : Press and hold down the Power[P] button for over 1seconds.
All indicators will appear momentarily on the LCD and you will hear short beep sound.
- Radio Off : Press and hold down the Power[P] button for over 2seconds until all indicators
Disappear on the LCD.
- Volume setting : Press up[•£] or down[•¥] button to choose the adjust level that is most
Comfortable for you.
2) Setting the Channel
MK-1996 has 22 main channels.
To select the channel
- Turn the radio on
- Press up[•£] or down[•¥] button to choose the channel.
3) Setting the Tone Code(CTCSS)
MK-1996 has 38 CTCSS Codes
To set the Tone Codes(CTCSS)
- Press Function[F] button once more,[XX oF up to 38] will appear and tone code digit will blink
on the LCD. " oF " means no CTCSS code.
- Press up[•£] or down[•¥] button to choose the desired sub-channel to use.
- Press the PTT button or Function[F] button to confirm.
4) Setting the Transmit Power HI/LO
- HI : 1.6W TX power (ERP)
- LO : 500mW TX power
To set the TX output power
- Press the Function[menu] button until the [ Po LO or HI ] appears.
- Press the up[•£] button or down [•¥] button to set the TX power
- Press the PTT button or Function[menu] button to confirm.
- HI or LO will appear on the LCD.
- If the battery is in low condition, the TX Power will be switched to LO automatically.
- Even though the TX power is set to HI.
5) Setting the DW(dual watch) and CTCSS in DW mode.
To active the DW mode
- Press the Function[menu ] button until the [ oF or 1 up to 22] and DW icon blink on the LCD.
- Press the up[•£] button or down [•¥] button to choose the channel.
- " oF " means no DW mode.
3 of 7
Page 4

MK-1996 Basic Operation 03-02-10
- Press the PTT button or Function[menu ] button to confirm.
- DW icon will appear on the LCD.
To stop the dual watch(DW)
- Press the "S" Scan button, the unit will stop the dual watch and will return to normal operation
and DW icon will disappear from the LCD.
- DW icon will disappear from the LCD.
6) VOX (Voice Operated Transmission)
This option enables you to have hands-free conversation. You do not have to operate the PTT
button each time when you want to transmit.
You can also choose the VOX sensitivity to suit your environment of operation.
(Ex ; noisy road, motor bike, factory etc.)
To set the VOX mode.
- Press the Function[menu ] button until the [ Uo oF or x ] appears. x is a vox level
- VOX icon will be appeared on the LCD.
To set the VOX level
- Press the up[•£] button or down [•¥] button to set the VOX level from 1 to 5.
"oF" is disable the VOX function.
" 3 " is most sensitive.
" 1 " is least sensitive.
- Press the PTT button or Function[F] button to confirm.
8) Beep tone
This feature will give the tone signal to other parties when transmitting finished (when PTT
button is released.)
To activate or disable the Roger tone
- Press the Function[menu ] button until [rb on or oF] and the Roger [ ] icon blink on the LCD.
- Press the up[•£] button or down [•¥] button.
- Press the PTT button or Function[menu ] button to confirm.
9) Setting the Ringer(CALL)
This feature provides 3 user selectable call ringer signal and vibration.
To set your favorite call ringer signal.
- Press the Function[menu ] button until the [ CA 1 or up to 3 ] appears on the LCD.
- Press the up[•£] button or down [•¥] button to select the call melody type.
- Press the PTT button to confirm.
- To activate the call , click the "PTT" button twice quickly.
4 of 7
Page 5

MK-1996 Basic Operation 03-02-10
10) Transmitting
- Press and hold the PTT button (The "TX" icon bar appears on the LCD)
- Speak slowly and clearly
- To stop the transmission, release the PTT button
- If there are no more receiving signal for 5 seconds, the unit will go into power save
11) Receiving
The coding feature reduces the possibility of interference and provides enhanced communication.
You can only listen to a call that has correct matching code.
Important ;
Before transmitting or receiving to the other parties ;
- Correct channel is selected ( 1 to 22 ) and
- Correct code is set ( 00 to 38 )
12) Channel Scanning
This feature allows you to monitor all activated channels while scanning.
To activate the Scan
- Press the Scan[S] button
- Radio will begin scanning.
- When in scan mode, the display will show each scanning channel.
- After an activated channel is scanned and received signal and then if there is no more signal, the
scan will resume automatically.
To disable the Scan
- Press the Scan[S] button, the unit will stop the scanning.
- SCAN icon indicator will disappear from the LCD
- The unit will return to home channel.
13) Call
- Press the Call[C] button.( The "TX" icon bar appears on the LCD.)
14) Monitoring the channel
It is used for listening the week signal or to hear all activities on the channel by manually
overriding channel sub tone code setting.
To activate the Monitor feature
- Press and hold the Monitor[M] button for over two seconds.
- When you hear the sound, release the Monitor[M] button.
(The monitor[ ] icon will appear on the LCD.)
5 of 7
Page 6

MK-1996 Basic Operation 03-02-10
To disable the Monitor feature
- Press and hold the Monitor[M] button for over two seconds.
(The monitor[ ] icon will disappear on the LCD.)
15) Backlight
Backlight is used to improve the display visibility in dark condition.
To activate the Backlight
- Press and hold the Monitor[M] button in a moment.
To disable the Backlight
- Press and hold the Monitor[M] button in a moment once again.
16) Keypad Lock
The lock function is to avoid the accidental changes to channel with other radio settings. All
buttons will be locked except the Power, PTT and monitor button.
To lock the keypad
- Press and hold down the Scan[SC] button for over 2 seconds.
- Keypad will lock.( LOCK[ ] icon will appear on the LCD)
To unlock the keypad
- Press and hold down the Scan[SC] button for over 2 seconds.
- Keypad will unlock. ( LOCK[ ] icon will disappear on the LCD)
17) Battery status indicator
The Battery[ ] icon will blink when the radio is in low battery power.
Charge the rechargeable battery or replace the batteries.
- Full battery - Battery[ ] icon is not displayed.
- Low battery - Battery[ ] icon is displayed.
- Low battery warning – Battery[ ] icon will blinking.
18) External charger /Speaker – Mic
MIC socket can be used for the charging purpose.
It should use the recommended rechargeable battery and wall charger
Use the approved accessories only to have the optimum performance.
- Ear/Mic unit
6 of 7
Page 7
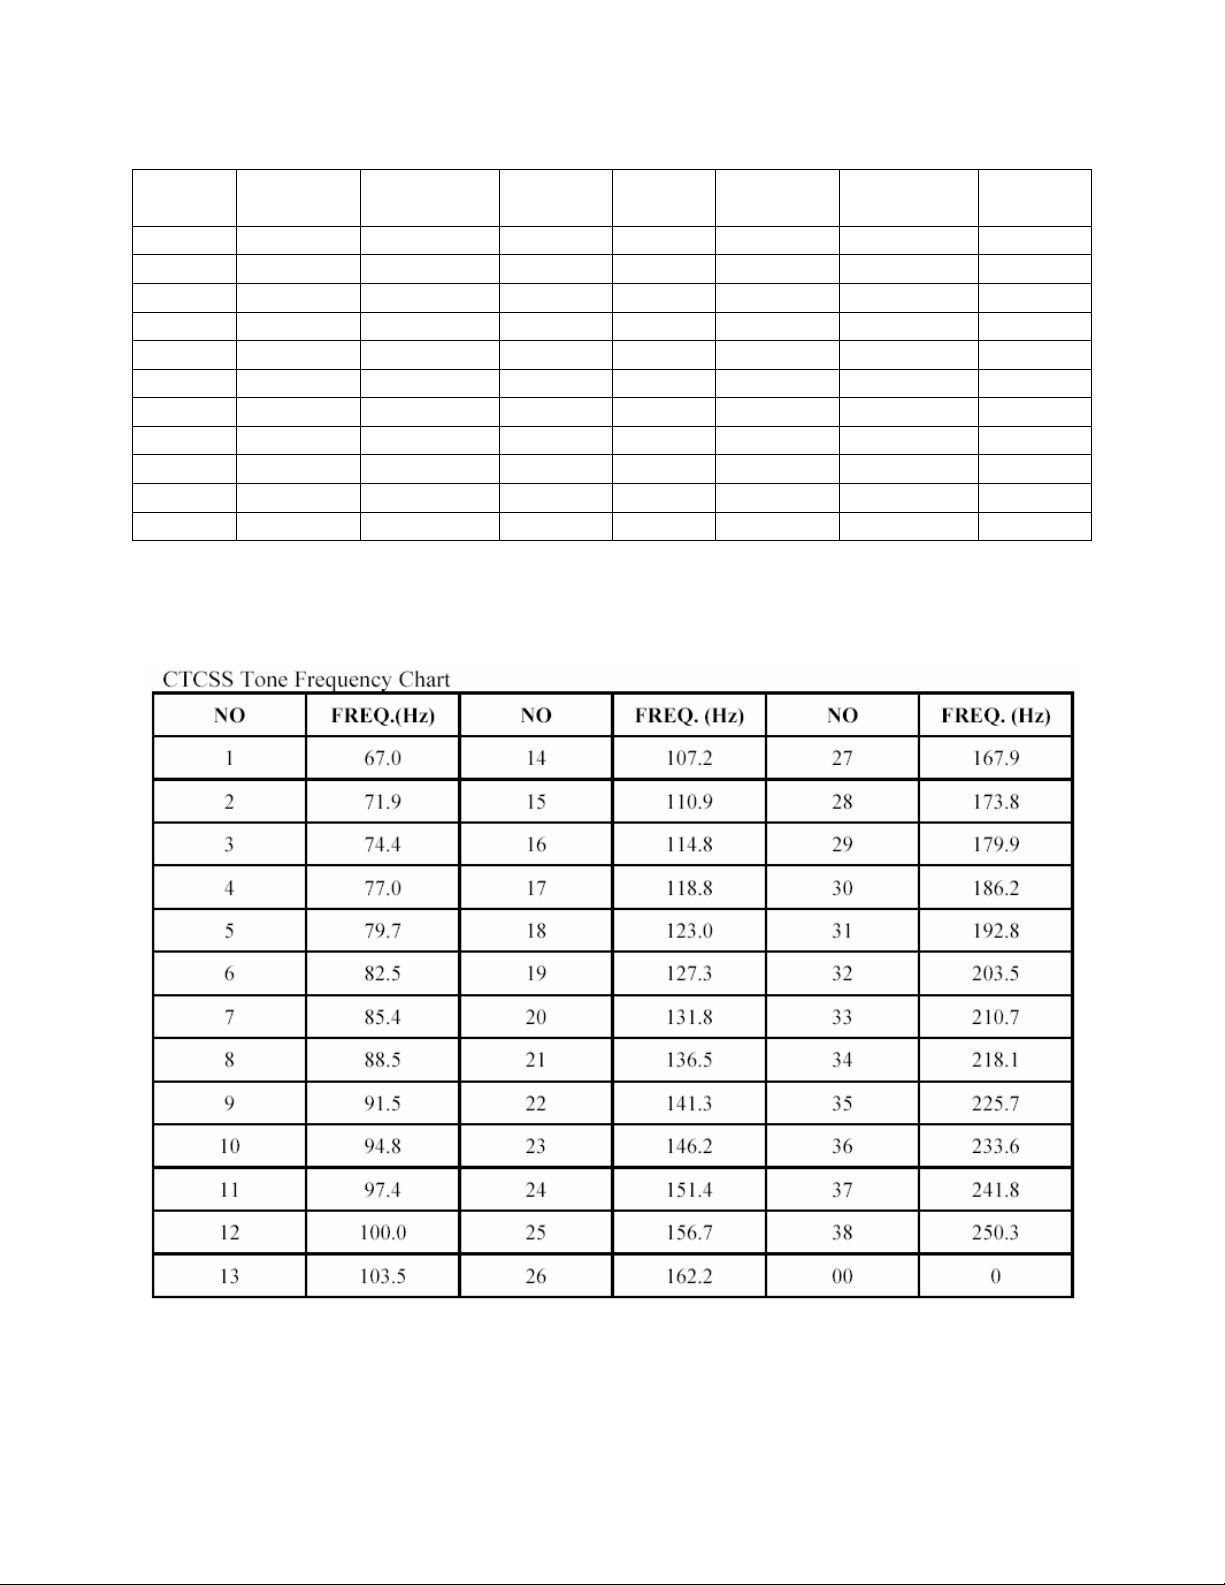
GMRS / FRS Frequency Chart
Channel Frequency
(MHz)
1 462.5625 FRS/GMRS High/low
2 462.5875 FRS/GMRS High/low
3 462.6125 FRS/GMRS High/low
4 462.6375 FRS/GMRS High/low
5 462.6625 FRS/GMRS High/low
6 462.6875 FRS/GMRS High/low
7 462.7125 FRS/GMRS High/low
8 467.5625 FRS/GMRS
9 467.5875 FRS/GMRS
10 467.6125 FRS/GMRS
11 467.6375 FRS/GMRS
Note: Channels 1 through 14 are shared with FRS radios. Operation in the FRS band without a
FCC license is restricted to low power transmit (0.5 watts). The GMRS radios require the user to
place the unit in low power mode for FRS operation. The GMRS unit will automatically select low
transmit power when FRS channels 8-14 are selected.
Use Power Channel Frequency
(MHz)
12 467.6625 FRS/GMRS
13 467.6875 FRS/GMRS
14 467.7125 FRS/GMRS
15 462.5500 GMRS High/low
16 462.5750 GMRS High/low
17 462.6000 GMRS High/low
18 462.6250 GMRS High/low
Low 19 462.6500 GMRS High/low
Low 20 462.6750 GMRS High/low
Low 21 462.7000 GMRS High/low
Low 22 462.7250 GMRS High/low
Use Power
Low
Low
Low
7 of 7
 Loading...