

Page 1
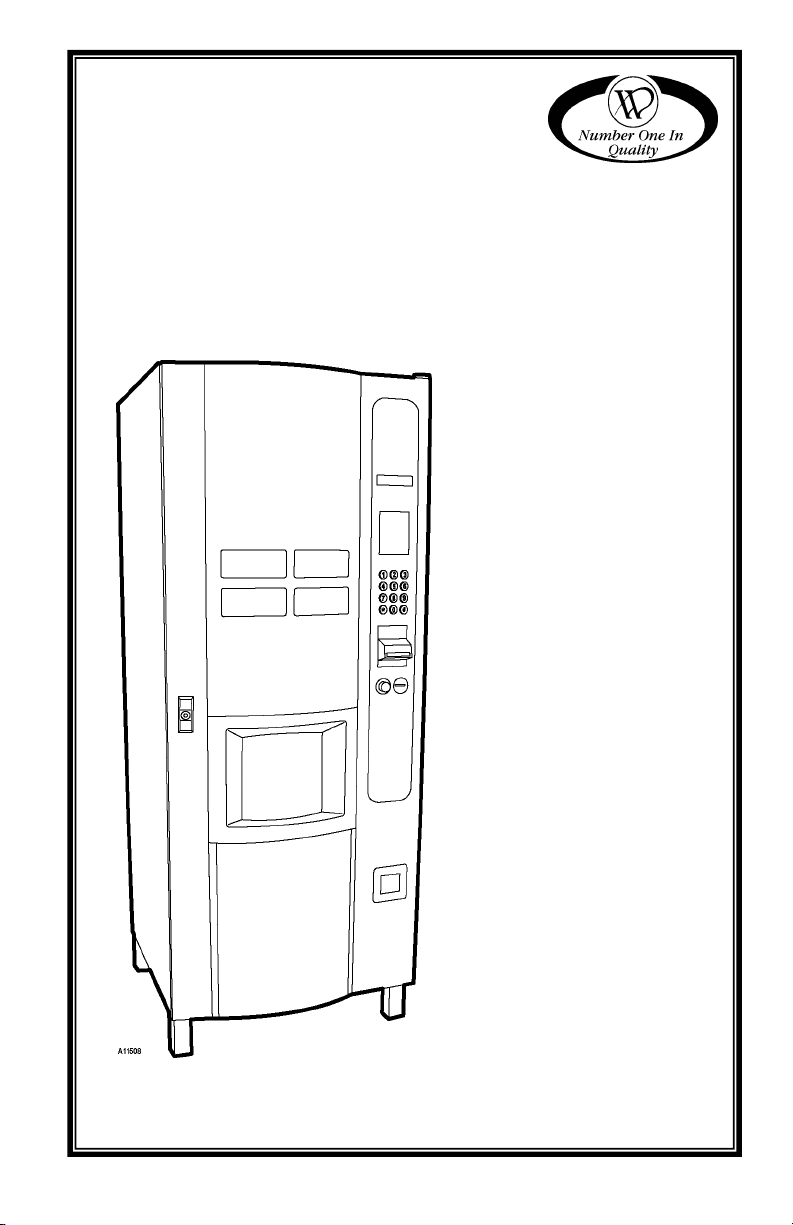
GENEVA
HOT BEVERAGE
MERCHANDISER
OPERATOR
MANUAL
MODEL
3205 FRESH BREW
3206 FREEZE DRIED
JUN 2008 4214803 • C
Page 2

TABLE OF CONTENTS
INTRODUCTION..................................................... 1
SPECIFICATIONS.................................................. 1
SAFETY WARNINGS............................................. 2
GENERAL DESCRIPTION..................................... 2
Cabinet Front ...................................................... 2
Cabinet Rear ....................................................... 2
MACHINE PARTS .................................................. 3
INSTALLATION...................................................... 4
SET-UP Requirements ....................................... 4
Electrical Supply .......................................................4
Water Supply............................................................ 4
Location............................................................... 4
Leveling ............................................................... 4
Connect Water .................................................... 5
Connect Electrical ............................................... 5
Checklist.............................................................. 5
FILL PRODUCT CANISTERS................................ 6
CHANGE MENU SELECTION LABELS................ 7
ADJUSTING CUP RING SETTING ........................ 8
SET PRICE FOR SINGLE CUP VOLUME
(LARGE) ................................................................. 9
SET PRICE FOR DUAL CUP VOLUMES
(LARGE AND REGULAR) ................................... 10
CUP SIZE ADJUSTMENT .................................... 11
FILL CUP COMPARTMENT ................................ 12
The Model and Serial numbers are needed for you to obtain quick service and parts information for your machine.
The numbers are listed on the identification plate located on the back side of the cabinet of the machine.
INGREDIENT VOLUME ADJUSTMENT ..............13
FLUSH HEATER TANK, BOWL & BREWER......14
Install Waste Containers.................................... 14
Flushing the machine ........................................ 14
Flush Mixing Bowls................................................. 14
Flush Coffee Brewer............................................... 15
DRIP CATCHER ................................................... 15
MERCHANDISER RECORD ................................15
CLEANING PROCEDURES .................................16
Hygiene.............................................................. 16
Safety................................................................. 16
Recommended items required ..........................16
Some Do’s & Don’ts: .........................................16
Daily/Weekly Routine ........................................ 17
Monthly Routine.................................................17
DISMANTLING COFFEE BREWER UNIT ...........18
FILTER BELT REMOVAL & REPLACEMENT ....20
REFITTING THE COFFEEE BREWER ................21
INTERNAL KEYPAD FUNCTIONS ......................22
USER KEYPAD..................................................... 24
TAKING A TEST VEND ........................................25
VIEWING COUNTER & EVENT RECORDS ........25
Heading Menu’s List:.........................................25
Available Sub-menu’s:....................................... 25
DIAGNOSTIC LOG ...............................................26
MODEL NUMBER: ___________________________________
SERIAL NUMBER: ___________________________________
ii
GENEVA - HOT BEVERAGE MERCHANDISER • 3205 • 3206 • 4214803
Page 3

INTRODUCTION
1. The information contained in this service manual is applicable to the Hot Beverage Merchandiser. The Hot
Beverage Merchandiser line consists of two types of coin-operated, microprocessor controlled, Hot
Beverage Merchandisers that dispense a range of hot beverages in response to keypad selections.
2. Two versions of each model are available:
Freeze-dried (INST) - Freeze-dried Coffee and Tea
Fresh Brew (SFB) - Fresh Brew Coffee
3. This manual uses the SFB version as the basis for examples. Where significant differences between
versions exist this will be highlighted in the main body of the document. Due to customer requirements,
however, some features may vary from those described, e.g. extras fitted, variations in programming etc.
4. Cups from a cup drop mechanism are dispensed to contain the beverages.
5. Selections are made on a 12 button keypad and an LCD display panel indicates status and beverage
selection information.
6. The status of the machine may be monitored and the configuration altered by accessing a menu of program
options using both internal and external keypads. A number of sub-options are included under each option,
the settings of which can be altered.
7. A feature of the Hot Beverage Merchandiser is the mobile dispense head which moves to a parked position
away from the cup port after each beverage is vended, preventing the possibility of any residue from the
previous delivery cycle dripping into the next one.
8. Hot Beverage Merchandiser machines require a single-phase 120V electrical supply from a 12A outlet, and
a cold water supply. These services connect to the machine through the rear of the cabinet.
9. Maintenance of the coffee machine must be undertaken only by personnel who are authorized and
suitably qualified.
10. The contents of this publication are presented for informational purposes only, and while every effort has
been made to ensure their accuracy, they are not to be construed as warranties or guarantees, express or
implied, regarding the products or services described herein or their use or applicability. The manufacturer
reserves the right to modify the designs or specifications of such products at any time without notice.
SPECIFICATIONS
DIMENSIONS
HEIGHT: 72 inches (1830 mm)
DEPTH: 26.8 inches (680 mm)
WIDTH: 27.6 inches (700 mm)
SHIPPING WEIGHT
360 lbs (163 kg) – Fresh Brew version
ELECTRICAL
120 Volts, 60 Hz, 9.2 Amps nominal
240 Volts, 50 Hz, 13 Amps
CUP CAPACITY
QUANTITY: Up to 400 (12 oz) cups
SIZES: 7 oz, 8 ¼ oz, 9 oz, 10 oz & 12 oz
OPERATING ENVIRONMENT
LOCATION:
SOUND LEVEL: Produces less than 70dBA
TEMPERATURE: 46°F (8°C) - 90°F (32°C)
For indoor use only
during normal operation
.
GENEVA - HOT BEVERAGE MERCHANDISER • 3205 • 3206 • 4214803
1
Page 4
SAFETY WARNINGS
• DISCONNECT / UNPLUG POWER TO THE MACHINE BEFORE SERVICING. Lethal voltages are
exposed when any panel inside the cabinet is removed if power is supplied to the on/off switch.
• Installation and maintenance of the Hot Beverage Merchandiser is to be undertaken only by trained
personnel who are fully aware of the dangers involved and who have taken adequate precautions.
• The Hot Beverage Merchandiser must be grounded (earthed). Do not tamper, modify or remove
the ground pin from the power plug. Should the power cord or plug become damaged, a
trained person from an approved service agent must perform the replacement using only
factory approved parts. Do not ground (earth) the machine to the water supply pipe.
• Keep clear of the Brewer Unit when it is operating.
• The Hot Beverage Merchandiser is a heavy item. Ensure that sufficient personnel are available for
lifting and transporting the machine. Use proper lifting procedures and equipment.
• The water in the heater tank and the tank itself are hot enough to scald or burn even some time after
the machine has been switched off. The water tank must be drained, filled with cold water and drained
again before any attempt is made to handle it or any of its associated parts.
• The Controller Board is fitted with a lithium battery. Abuse of this type of battery can lead to
overheating, venting, explosion, release of potentially hazardous materials and spontaneous ignition.
The lithium battery must not be charged by, or connected to, any other source of power. The battery
must not be short-circuited or forced to discharge its stored energy. The battery must not be
subjected to physical damage or overheating. ONLY the Trained Technician should attempt
controller board replacement!
• Care must be taken to protect the Hot Beverage Merchandiser from frost. Do not attempt to operate
the machine if it becomes frozen.
machine to operation until it has been checked and approved for use by the service agent.
• Due to the risk of being scalded by hot beverages, young children, the aged and the infirm
should not be allowed to operate the Hot Beverage Merchandiser unsupervised.
IMPORTANT: Please refer to the safety manual (p/n 4206816) for additional safety
information.
Contact the nearest service agent immediately. Do not restore the
GENERAL DESCRIPTION
Opening the merchandiser door via the key operated lock allows access to its internal components. Equipment
inside the Hot Beverage Merchandiser is arranged in two sections: front and rear. When the merchandiser door is
open the Operator has immediate access to those items which he or she will be controlling or adjusting (Ingredient
Canisters, Cup Compartment, Coin Mechanism, Waste Buckets, etc.). The remaining equipment (Water Heater,
Valves, Electrical and electronics components, etc), access to which is limited to the Trained Technician, are
located behind the panel at the rear of the cabinet.
CABINET FRONT
The Cup Drop Assembly, Coin Mechanism, Controller Board and Cup Station are fitted to the rear of the door. The
Customer’s keypad is on the door front panel.
Ingredient canisters are located on a shelf within the cabinet above the mixing area. An extractor fan removes
excessive moisture from the mixing systems, helping assure that the systems function properly. The moving
dispense head keeps residue from previous dispensing cycles from dripping into the current dispensing cycle.
Level sensor probes assure that the waste buckets will not overflow. When a level-sensor probe is activated the
water supply is shut off and the machine is rendered inoperable until the waste container is emptied.
CABINET REAR
Access to the components and equipment in the rear section of the cabinet (behind the rear panel) is limited to the
Trained Technician.
2
GENEVA - HOT BEVERAGE MERCHANDISER • 3205 • 3206 • 4214803
Page 5
r
Water for beverages travels through the inlet valve and into the water heater tank located at the top and back of
the cabinet. Solenoid dispensing valves direct the heated water to the appropriate mixing bowl. Excessively hot
water flowing from the tank activates a high temperature cut-out switch. When activated the cut-out switch cuts off
the electrical supply to the heater in the tank. The cut-out must then be reset to reactivate the heater
Level probes located in the cabinet door and waste container allows the unit’s control system to monitor the liquid
level in the waste containers and prevent overflow.
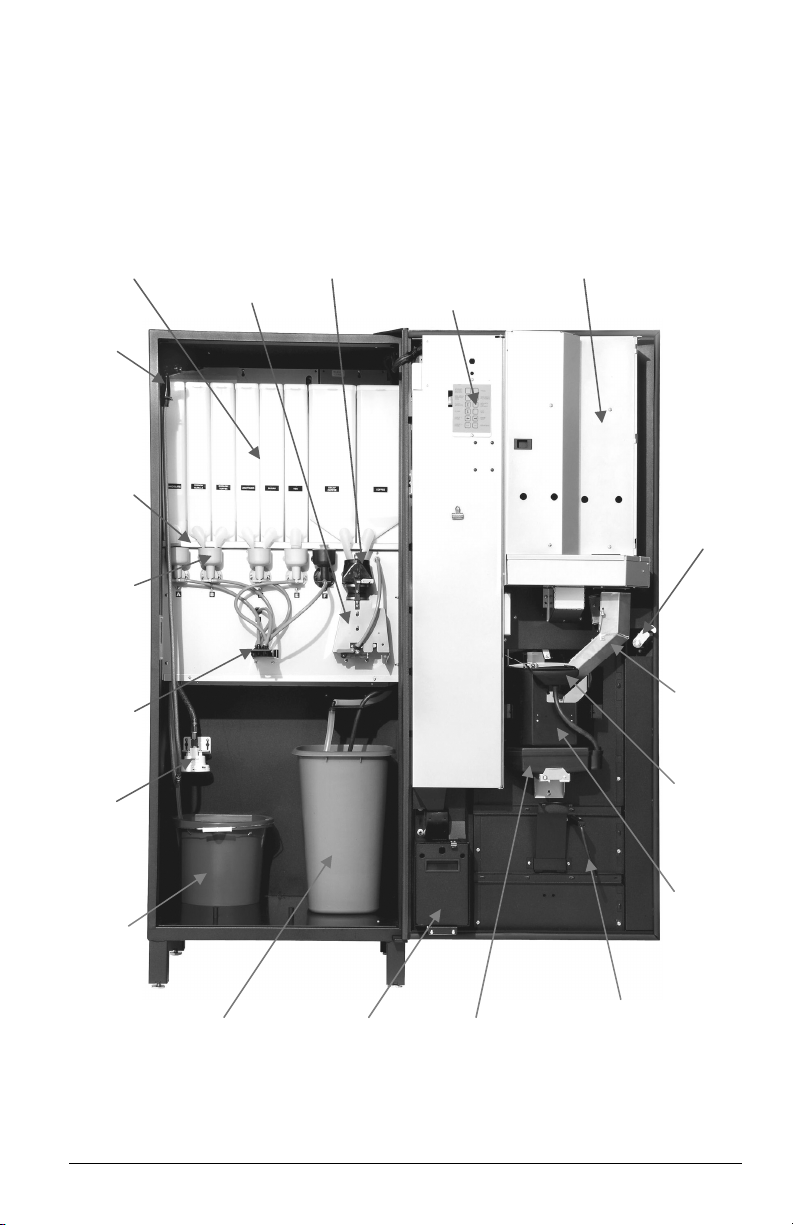
MACHINE PARTS
Ingredient Canisters
Rinse
Hose
Stainless
Steel
Canister
Shelf
Whipper
Chamber &
Station
Splash Guard
Coffee Brewer Unit Cup Storage Compartment
Internal Keypad
Door
Lock
Dispense
Arm
Wate
Filter
Liquid
Waste
Bucket
Coffee
Grounds
Waste Bucket
GENEVA - HOT BEVERAGE MERCHANDISER • 3205 • 3206 • 4214803
Cash Box Drain Tray
Safety Probe
Cup Station
Liquid Waste
Bucket
3
Cup
Delivery
Chute
Upper
Rinse
Funnel
Cup
Station
`
Page 6
INSTALLATION
WARNING: Disconnect or unplug power to the machine before servicing.
1. Servicing personnel must be familiar with the SAFETY WARNINGS listed in this manual and the Safety
Manual (P/N 4206816) before undertaking any installation or maintenance procedure on the Hot Beverage
Merchandiser. Any procedure which is found to be impractical, inadequate or inaccurate should be reported
to the Management for further investigation.
2. The information given in this section covers installation and maintenance procedures for the Hot Beverage
Merchandiser. Only authorized personnel who have knowledge or experience with the equipment, and using
only the manufacturer’s approved parts should carry out these procedures.
3. The requirements of proper hygiene in respect of food products must be ensured at every level of contact
with the Hot Beverage Merchandiser and the ingredients associated with it.
IMPORTANT: You are required to be aware of and adhere to all Federal, State, and Local laws
regarding food handling and storage. NOTE: DO NOT use non-food safe lubricants or cleaners.
SET-UP REQUIREMENTS
ELECTRICAL SUPPLY
• 110V, 60Hz, 12A fused
• 240V, 50Hz, 13A fused
The electrical outlet and supply circuit must be dedicated and isolated before connecting power to the machine.
The electrical outlet must be within 6 ft (2 m) of the machine. Preferably, the switched outlet should be located
behind the machine to prevent accidental damage or misuse.
WATER SUPPLY
The main water supply must have 15-116 psi pressure. The water outlet must have a shutoff valve so that the
water supply to the merchandiser may be turned off during servicing. The water outlet should be located behind
the machine to prevent misuse.
LOCATION
WARNING: The Hot Beverage Merchandiser
The Hot Beverage Merchandiser must be located close
to the appropriate electrical and water outlets.
There must be a minimum of 4 inches (100mm)
clearance between the rear of the cabinet and the wall
to allow adequate ventilation. See Figure 4a.
If placing in a corner location, there must be at least 16
inches (406mm) of space to the right hand wall to allow
the door to open properly.
is a heavy item. Ensure that
sufficient personnel are available
for lifting and transporting the
machine. Use proper lifting
procedures and equipment.
Figure 4a. Distance From Wall
LEVELING
The Hot Beverage Merchandiser must be level for proper operation. Using a level as a guide turn the machine’s
leg levelers as needed until all levelers are touching the floor. If it is properly leveled, the merchandiser should not
“rock” or “teeter” on any of the levelers.
4
GENEVA - HOT BEVERAGE MERCHANDISER • 3205 • 3206 • 4214803
Page 7
When the machine is level, the door can be opened to any
position and not swing either way. Try the door at various open
positions before deciding that the machine is leveled.
CONNECT WATER
Before connecting the hose to the machine, flush the water
supply system via the shutoff valve to remove any impurities
which may have accumulated in the supply pipe or water hose.
The merchandiser’s water inlet - a standard ¼” NPT female
water hose connector - is located on the back of the machine.
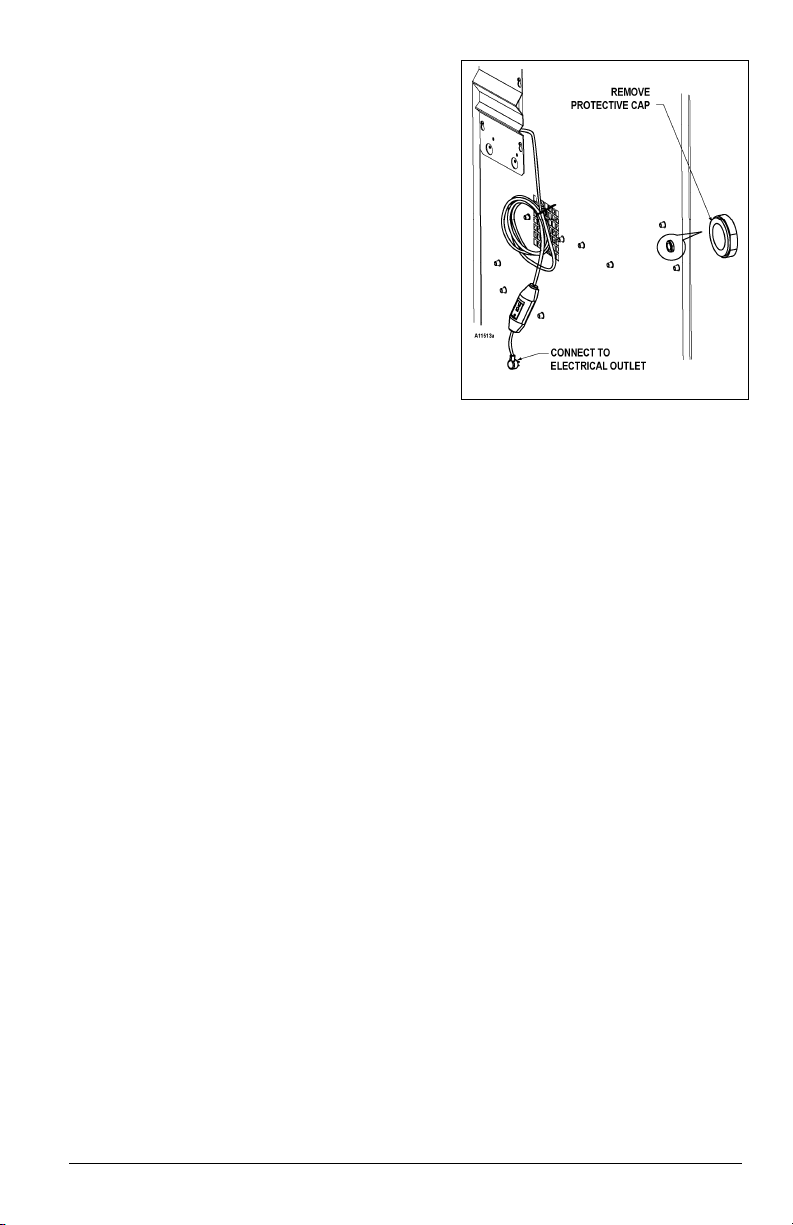
Remove the plastic protective cap. See Figure 4b. There is
also a 3/8” Flare Fitting supplied inside the waste bucket if this
is preferred.
Connect the water supply hose to machine water inlet and
ensure that all fittings are tight. Turn on the water supply at the
shutoff valve and check for leaks both outside and inside of the
machine.
Figure 4b. Power Cord & Water Inlet
CONNECT ELECTRICAL
Plug the Hot Beverage Merchandiser power cord into a 110V, 60Hz, 12A (240V, 50Hz, 13A) switch supply
socket. With the plug fitted to the socket, ensure that the cable is not stretched, distorted or hampered by any
object.
CHECKLIST
It is essential that the technician responsible for installing and commissioning the machine ensures the following:
1. All electrical and water supplies are correctly and safely connected and that the water heater overflow pipe
is not trapped or pinched (remove canisters to access and remove rear panel to check status of overflow
pipe.)
2. All covers, panels and access doors are in place and secured, and the machine is in a SAFE condition.
3. The Operator is familiar with the SAFETY PRECAUTIONS for the machine.
4. The Operator appreciates the importance of hygiene and regular cleaning of the merchandiser.
With water and electricity sources connected to the machine, check the water heater operation as follows:
1. Press merchandiser on/off switch (upper left side of interior back wall) to the ON position. Water will
flow into the water tank. Wait approx. 1 minute and the water will shut off (safety feature). Then turn
the power switch OFF, wait a few seconds and turn the power switch back ON. Water will continue to
fill the tank. When water reaches the probe level, the heater will turn on as indicated by the heater
indicator light (to the right of the on/off switch). There should be no water overflow into the waste
basket.
2. Ensure that the waste level probe is positioned in the waste basket.
3. Press the merchandiser on/off switch to the OFF position.
NOTE: Water tank MUST be allowed to preheat for 15 to 20 minutes before filling coin mechanism or
performing test vends because these will be automatically disabled if water temperature does not meet
standard.
GENEVA - HOT BEVERAGE MERCHANDISER • 3205 • 3206 • 4214803
5
Page 8
FILL PRODUCT CANISTERS
WARNING: FILL PRODUCT CANISTERS WITH POWDERED INGREDIENTS ONLY.
DO NOT USE LIQUID INGREDIENTS.
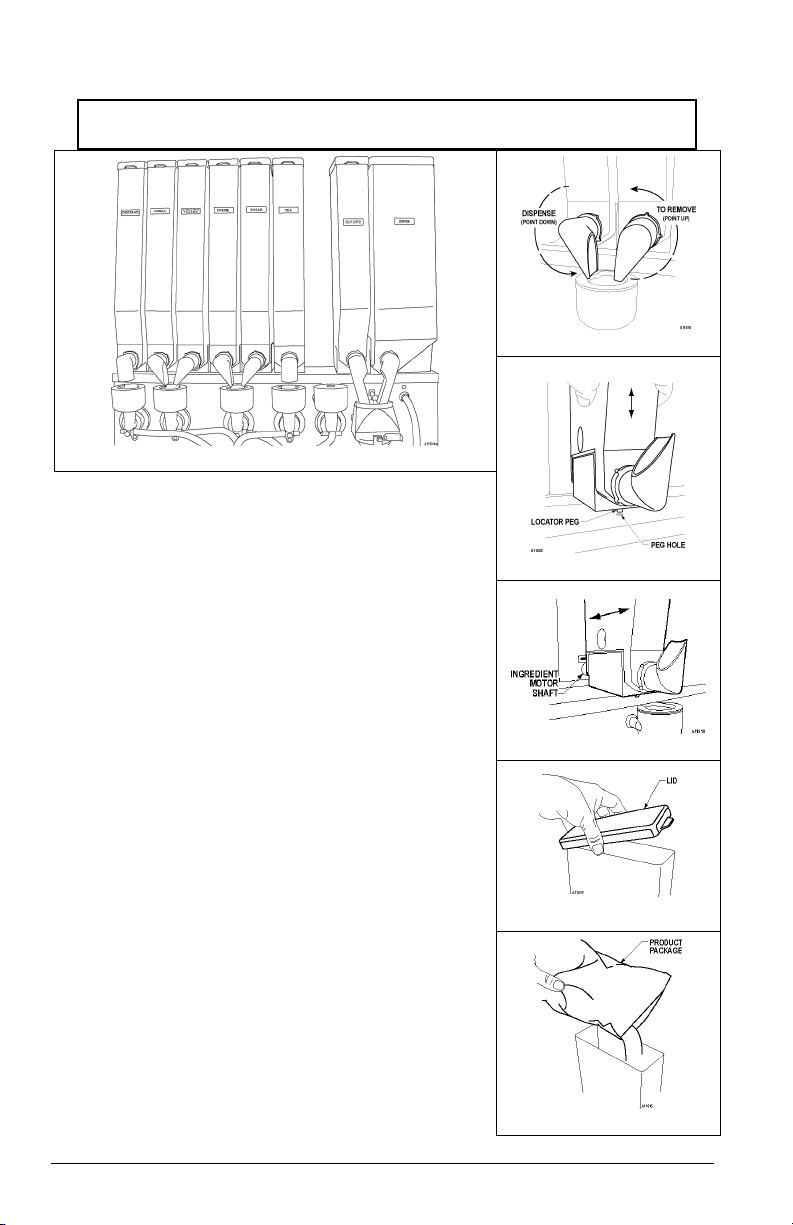
Figure 5a. Canister Lineup
1. Always remove the ingredient canisters in order to fill them. This
prevents spillage of foodstuffs which will encourage the ingress of
insects etc.
2. Prior to removing an ingredient canister, rotate the delivery chute in
an upward direction to prevent spillage of product onto internal
surfaces. See Figure 5b.
3. When removing each ingredient canisters, always give it a shake to
loosen-up any compacted product to keep it free-flowing.
4. When filling the canisters, hold the top and bottom of the canister
and slowly lift it up so that the locator peg clears the peg hole.
Figure 5c. Slide the canister forward until it is out of the ingredient
motor shaft. Figure 5d.
5. Place canister on a sheet of paper or on an easily cleaned surface.
6. Remove lid from the canister. Figure 5e.
7. Open product bag that matches the name on the Canister Label
(where applicable) according to the instructions on the bag.
8. Slowly pour the product into the canister. Figure 5f.
• Product must be loose for proper dispensing.
• DO NOT tap the sides of the canister.
• DO NOT compress or compact product into the canister.
• Leave a gap from the top of the product to the lip of the
canister. Figure 5g.
9. Replace canister lid. Figure 5e.
10. Review the canister arrangement as shown in Figure 5a. Hold the
canister carefully at the bottom and top to prevent spilling. Gently
place the filled canister back on the product shelf. Figure 5d.
11. Line up the hollow shaft in the back of the canister with the
ingredient motor shaft. See Figure 5d.
12. Slowly slide the canister toward and over motor shaft until locator
peg falls inside the hole on the product shelf. See Figure 5c.
Figure 5b. Product Chute
Figure 5c. Locator Peg
Figure 5d. Motor Shaft
Figure 5e. Canister Lid
Figure 5f. Fill Canister
6
GENEVA - HOT BEVERAGE MERCHANDISER • 3205 • 3206 • 4214803
Page 9
13. Rotate the product chute so that it points down (dispense position)
to the whipper bowl. See Figure 5b.
14. Repeat above steps for other canisters.
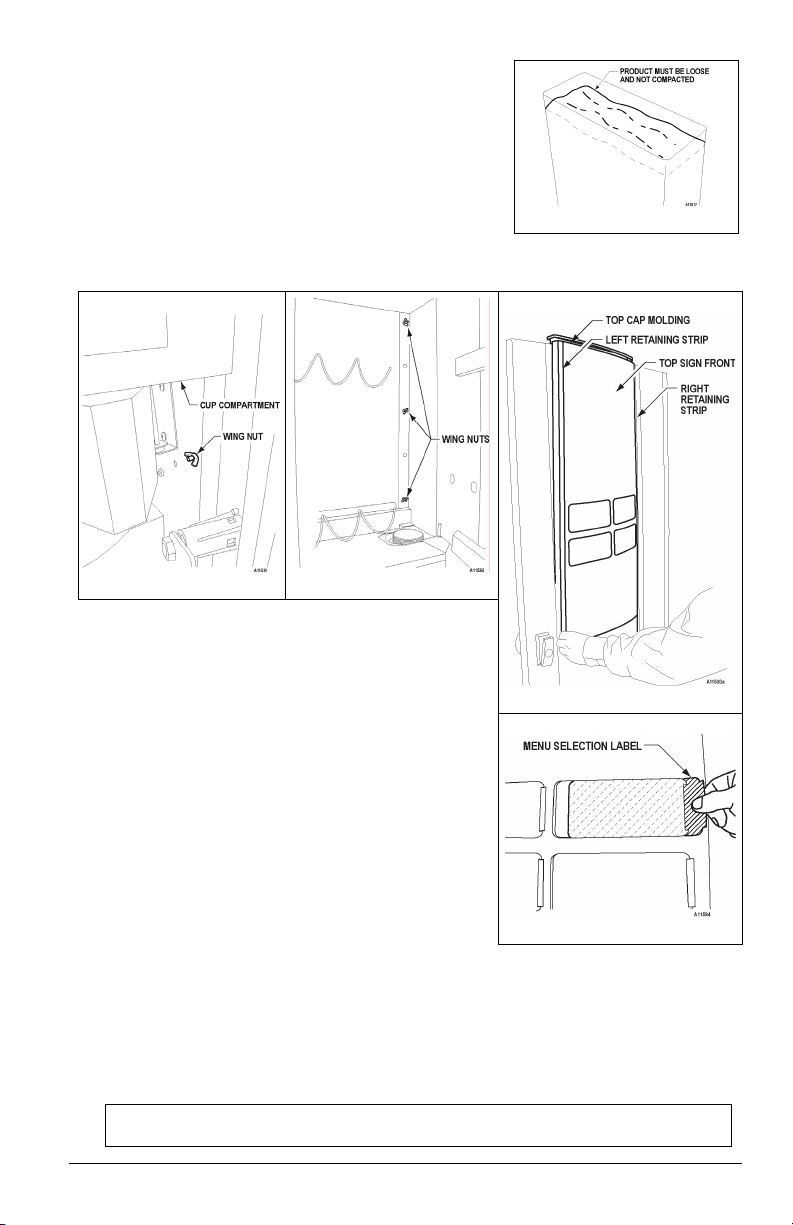
Figure 5g. Do Not Pack
CHANGE MENU SELECTION LABELS
Figure 6a. Bottom Wing Nut Figure 6b. Inside Wing Nuts
1. Remove and save the wing nut located on the right side
below the cup compartment (as viewed from behind the
door). See Figure 6a.
2. Open the cup compartment door. Remove and save the 3
wing nuts located on the right side of the cup compartment.
Loosen 2 wing nuts holding the Top Cap Molding. See
Figure 6b.
3. Lift Top Cap Molding and loosen Retaining Strip on the left
side of the Top Sign Front (on the front of cabinet door).
Remove the Retaining Strip and Top Sign Front assembly.
See Figure 6c. (This is most easily done by applying
outward pressure on the wing nut screws on the inside of the
door.)
4. Place the Top Sign Front on a clean, non-abrasive surface.
5. Locate the menu selection label behind the Top Sign Front.
See Figure 6d. Carefully slide the menu selection label out
of its pocket.
6. Insert the new menu selection label through the slots. Check the
front of the Top Sign Front to make sure that the menu selection labels are correctly aligned.
7. Insert the right edge of the Top Sign Front into the slot of the right side Retaining Strip. See Figure 6c.
8. Slip the left side Retaining Strip over the left edge of the Top Sign Front. Push the Retaining Strip back into
place. See Figure 6c. (To accommodate the rounded front design, carefully bow the left edge of the
assembly to the right until you are able to press the three retaining screws back into position.)
9. Reinstall and tighten the wing nuts saved from steps 1 and 2. See Figure 6a and Figure 6b.
NOTE: These steps change only the beverage label. Only the Trained Technician may change
beverage type or content.
Figure 6c. Remove Top Sign Front
Figure 6d. Menu Selection Label
GENEVA - HOT BEVERAGE MERCHANDISER • 3205 • 3206 • 4214803
7
Page 10
ADJUSTING CUP RING SETTING
The cup mechanism has been factory adjusted for an 8.25 oz. paper hot beverage cup.
Follow the instructions below to adjust the cup (diameter) size if necessary.
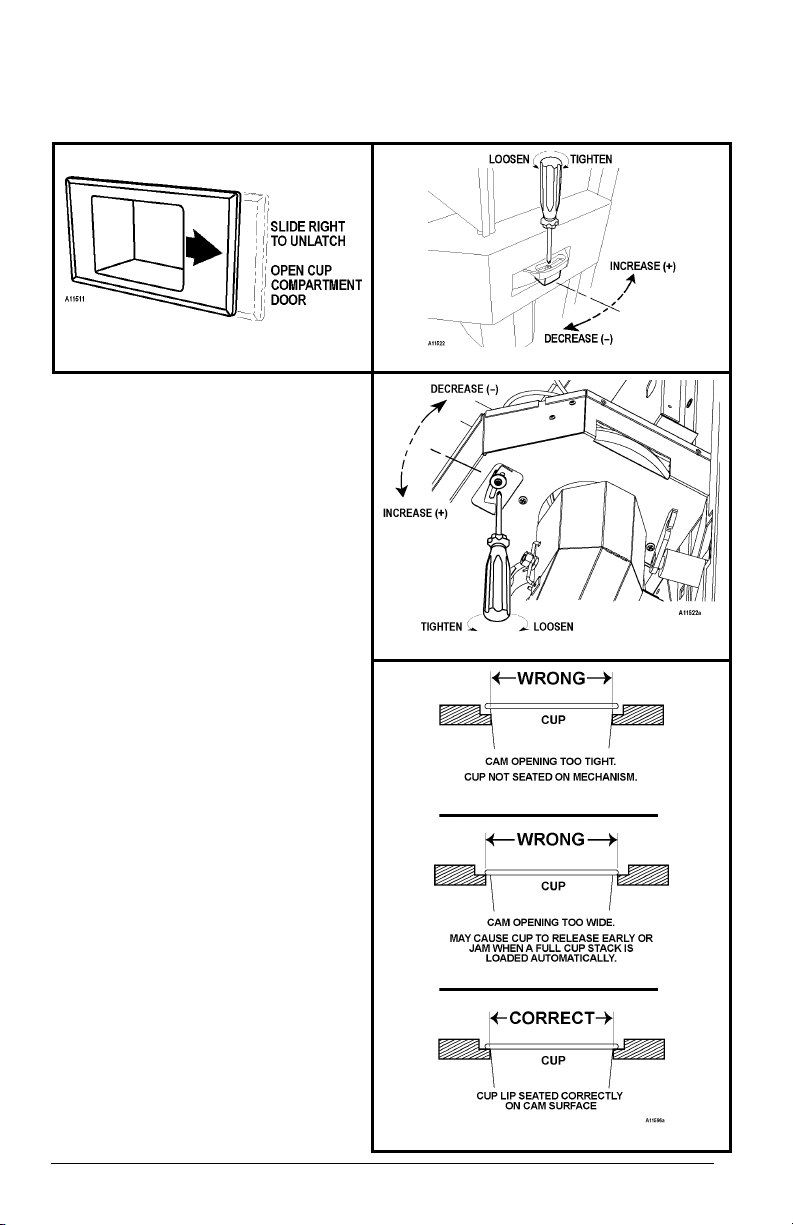
Figure 8a. Cup Compartment Latch
1. Open the cup compartment door by sliding
its plastic latch to the right. See Figure 8a.
2. Take a cup from the stack of cups that will
be used in the machine and place the cup in
the cup dispenser ring.
3. While facing the back of the door, find the
cup dispenser adjustment screw located on
the right side of the cup dispenser. Use a
Phillips screwdriver to loosen the screw. DO
NOT remove the screw. See Figure 8a &
Figure 8b
3a. Adjust the cup mechanism back and
forth so that the cup lip rests on top of
the circular cams of the cup dispenser
mechanism. See Figure 8d.
3b. Push or tap the cup from the bottom
end so that it moves up and down
freely. If it does not move freely or if it
falls through the mechanism when
tapped go back to step 3a.
3c. When steps 3a and 3b are satisfied
then tighten the screw. See Figure 8c.
4. Place a stack of cups to the left of the cup
ring. On the internal keypad press the Cup
Test button. The entire cup stack should
advance and fall into the cup ring. If a cup
drops completely through the mechanism,
the mechanism still needs adjustment—
return to step 3a.
Figure 8b. Cup Diameter Adjustment (PRE- NOV2007)
Figure 8c. Cup Diameter Adjustment (POST-NOV2007)
Figure 8d. Cup Position In Mechanism
8
GENEVA - HOT BEVERAGE MERCHANDISER • 3205 • 3206 • 4214803
Page 11
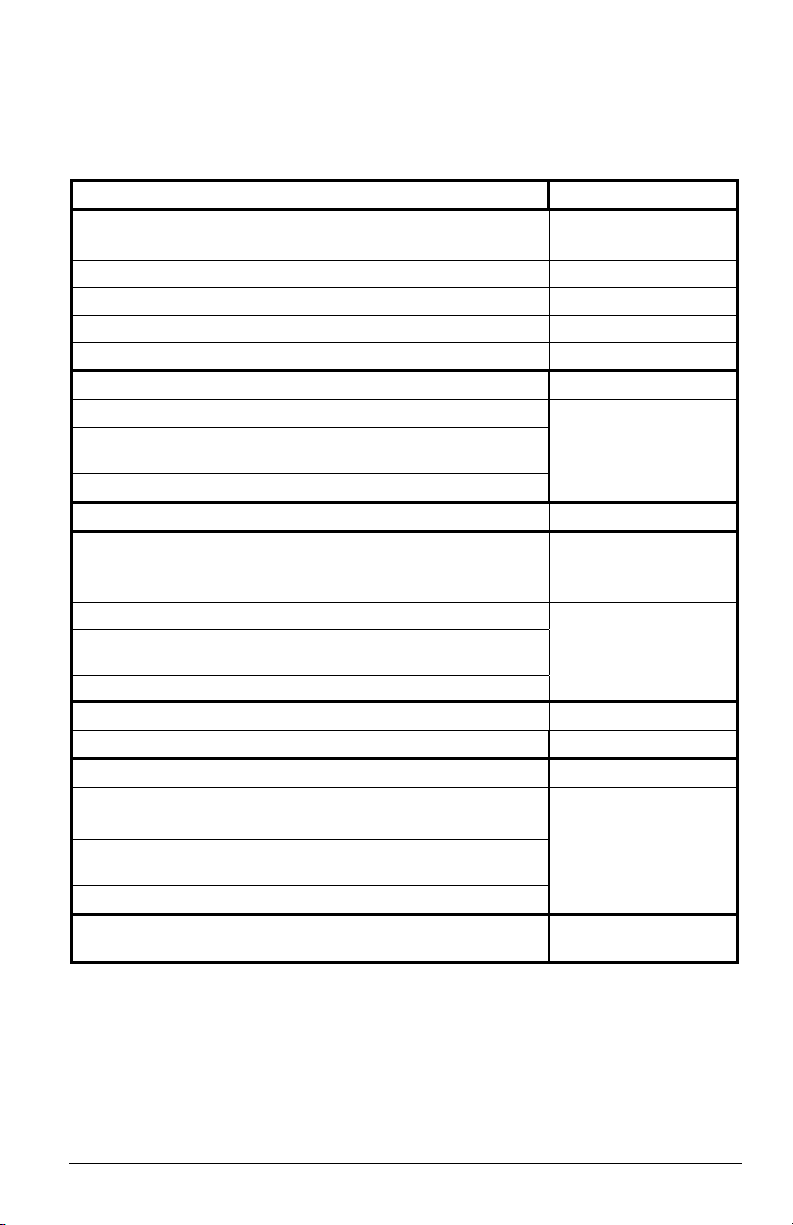
SET PRICE FOR SINGLE CUP VOLUME (LARGE)
The following procedure sets the price for the three (3) item types: filled Regular Cup, Cup Only and a filled Large
Cup. For additional information regarding Set Pricing Modes and Change Prices, please refer to the
programming section of this manual.
STEP DISPLAY
1. On internal keypad, press PROG
2. On external keypad, enter code 1111
3. Press 2 or 8. CHANGE PRICES
4. Press 0. LARGE PRICES
5. Press 2 or 8 to scroll to SET ALL PRICES SET ALL PRICES
6. Press0 LARGE PRICES
7. Press 0 to enter a new price
8. Press 4 (move curser left) or 6 (move cursor right), press 2 (increase
value) or press 8 (decrease value).
9. Press 0 to accept the price for ALL LARGE PRICES
10. Press # (ESCAPE) LARGE PRICES
11. Press 2 or 8 to scroll to other price settings for LARGE PRICE
NOTE: This is to set the prices for individual drinks different from the
value set in STEP 9
12. Press 0 to select the drink selection price to change
13. Press 4 (move curser left) or 6 (move cursor right), press 2 (increase
value) or press 8 (decrease value).
14. Press 0 to accept the price
15. Repeat steps 11 to 14 to set prices for any other drinks
16. Press # (ESCAPE) LARGE PRICES
17. Press 2 or 8 to scroll to other selection price settings CUP PRICE
18. Press 0 to accept CUP PRICE
Note: This is DISCOUNTED VALUE for using your own cup
19. Press 4 (move curser left) or 6 (move cursor right), press 2 (increase
value) or press 8 (decrease value).
21. Press 0 to accept the DISCOUNTED VALUE
22. Press # three times to exit the programming mode.
PLEASE ENTER
ACCESS CODE
SET PRICING MODE
Price=$0.00
LARGE PRICE
COFFEE
Price= 000.00
CUP
Price=$0.00
SELECT DRINK TO
SHOW PRICE
GENEVA - HOT BEVERAGE MERCHANDISER • 3205 • 3206 • 4214803
9
Page 12
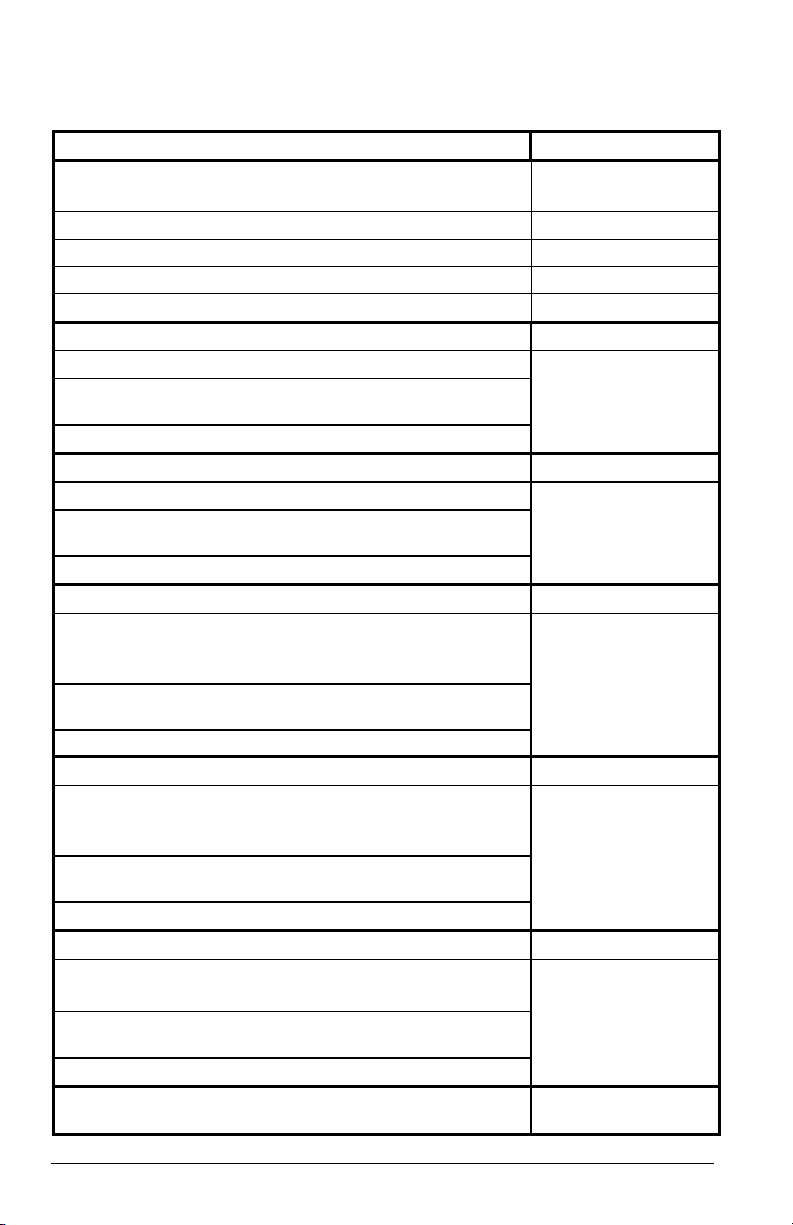
SET PRICE FOR DUAL CUP VOLUMES (LARGE AND REGULAR
Dual Menu Label set is required to set this option. Order P/N 4214600 Dual Drink/Cup Menu Label set.
STEP DISPLAY
1. On internal keypad, press PROG
2. On external keypad, enter code 1111
3. Press 2 or 8. CHANGE PRICES
4. Press 0. LARGE PRICES
5. Press 2 or 8 to scroll to SET ALL PRICES SET ALL PRICES
6. Press 0 LARGE PRICES
7. Press 0 to enter a new price
8. Press 4 (move curser left) or 6 (move cursor right), press 2 (increase
value) or press 8 (decrease value).
9. Press 0 to accept the price for ALL LARGE PRICES
10. Press 2 or 8 to scroll to REGULAR PRICES REGULAR PRICES
11. Press 0 to enter a new price
12. Press 4 (move curser left) or 6 (move cursor right), press 2 (increase
value) or press 8 (decrease value).
13. Press 0 to accept the price for ALL REGULAR PRICES
14. Press # (ESCAPE) LARGE PRICES
15. Press 0 to select the drink selection price to change
NOTE: This is to set the prices for individual drinks different from the
value set in STEP 9 for LARGE DRINKS
16. Press 4 (move curser left) or 6 (move cursor right), press 2 (increase
value) or press 8 (decrease value).
17. Press 0 to accept the price
18. Press 2 or 8 to scroll to REGULAR PRICES REGULAR PRICES
19. Press 0 to select the drink selection price to change
NOTE: This is to set the prices for individual drinks different from the
value set in STEP 13 for REGULAR DRINKS
20. Press 4 (move curser left) or 6 (move cursor right), press 2 (increase
value) or press 8 (decrease value).
21. Press 0 to accept the price
22. Press 2 or 8 to scroll to other selection price settings CUP PRICE
23. Press 0 to accept CUP PRICE
Note: This is DISCOUNTED VALUE for using your own cup
24. Press 4 (move curser left) or 6 (move cursor right), press 2 (increase
value) or press 8 (decrease value).
21. Press 0 to accept the DISCOUNTED VALUE
22. Press # three times to exit the programming mode.
PLEASE ENTER
ACCESS CODE
SET PRICING MODE
Price= $000.00
Price= $000.00
COFFEE
Price= $000.00
COFFEE
Price= $000.00
CUP
Price= $000.00
SELECT DRINK TO
SHOW PRICE
)
10
GENEVA - HOT BEVERAGE MERCHANDISER • 3205 • 3206 • 4214803
Page 13
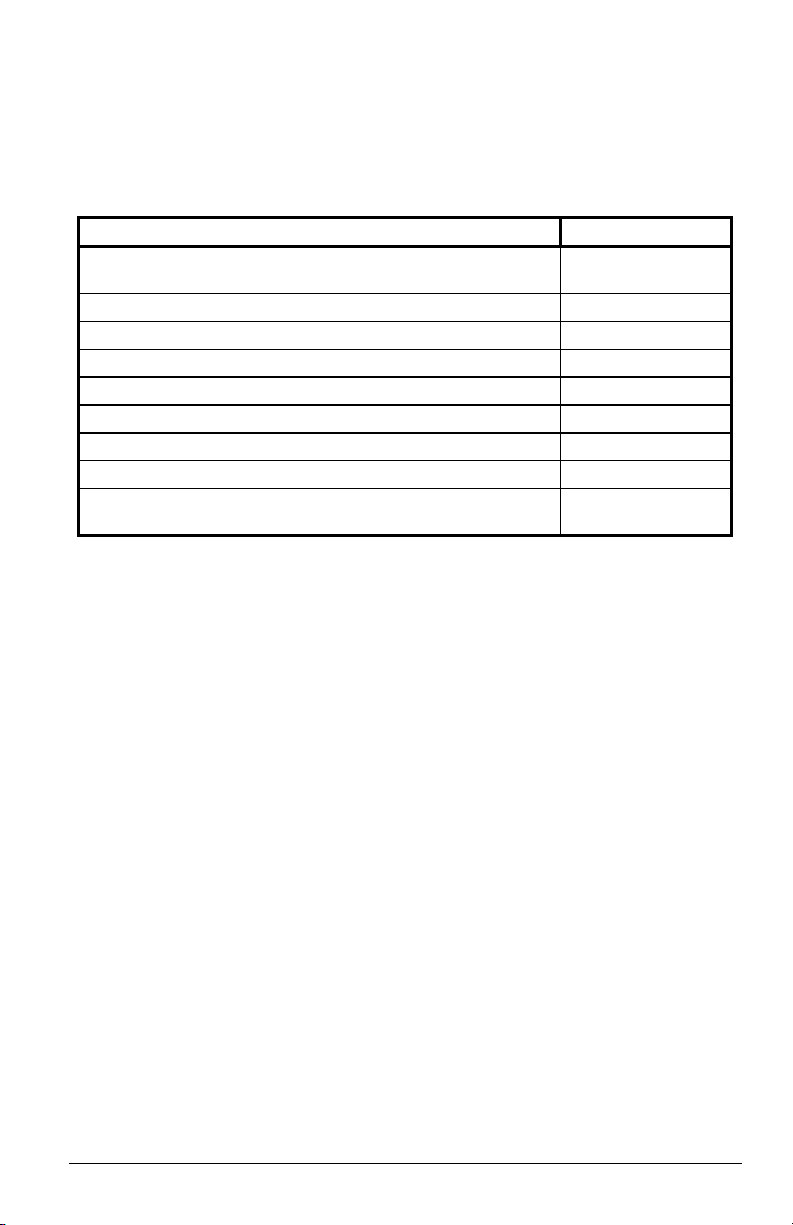
CUP SIZE ADJUSTMENT
IMPORTANT: Your Hot Beverage machine has been factory-set for use of 8.25 oz. PAPER
hot beverage cups. The machine can also be set up to use 7, 9, 10, or 12 oz. cups. If you are
not using 8.25 oz. cups, you must readjust the machine before use. This is a 2-part
procedure. Both Cup Size Adjustment and Adjusting Cup Dispenser Opening must be
accomplished.
STEP DISPLAY
1. On internal keypad, press PROG
2. On external keypad, enter code 1111 SET PRICING MODE
3. Using 2 or 8 Scroll to CONFIGURE MC CONFIG MC
4. Press 0 GENERAL SETTINGS
5. Using 2 or 8 Scroll to SETCUP SIZE CUP SIZE
6. Press 0 XX oz
7. Using 2 or 8 scroll to desired size 8.25 oz
8. Press 0 to confirm selection 8.25 oz
9. Press # to exit programming mode
PLEASE ENTER
ACCESS CODE
SELECT DRINK TO
SHOW PRICE
GENEVA - HOT BEVERAGE MERCHANDISER • 3205 • 3206 • 4214803
11
Page 14
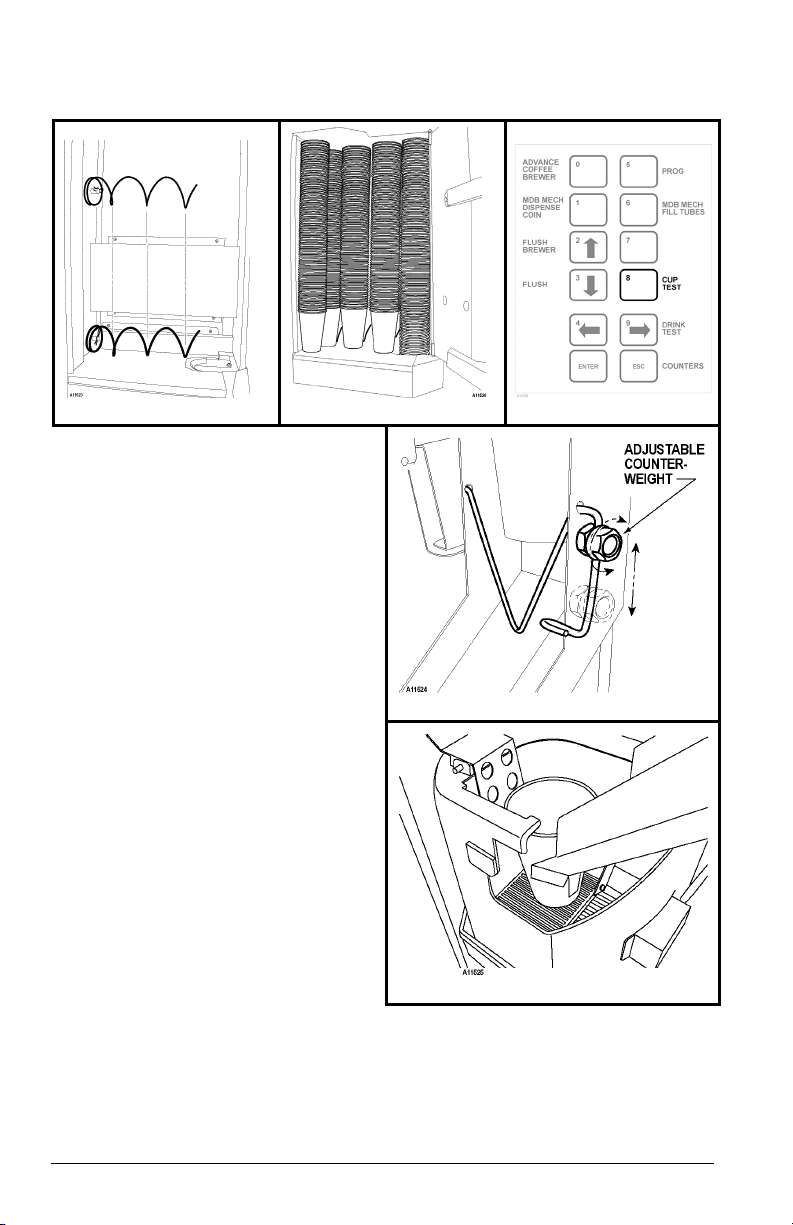
FILL CUP COMPARTMENT
Figure 9a. Cup Spirals
1. Check that the top and bottom spirals are
aligned the same and have room for three (3)
stacks of cups. See Figure 9a.
2. The cup compartment can have a total of five
(5) cup stacks. Load the compartment with
cups starting with the first stack in the cup
dispenser mechanism followed by three (3)
additional cup stacks. See Figure 9b. The cup-
stacks must be aligned with the top and bottom
spirals. Add the fifth cup stack directly in front
of the fourth cup stack and place it tight against
the left side wall of the compartment.
3. Close and latch the cup compartment door.
4. Find the internal keypad on the left side of the
door (as viewed from the rear of the door).
Press the square marked “CUP TEST”. See
Figure 9c.
4a. The cup should be dispensed via the
stainless steel cup chute and land
squarely on the platform of the delivery
compartment. See Figure 9e.
4b. If the cup gets stuck at the counter-
balance wire, loosen the counterweight
and slide it up to lessen the weight
against the cup. See Figure 9d. Repeat
step 4.
Figure 9b. Cup Stacks
Figure 9c. Keypad Cup Test
Figure 9d. Counterweight
Figure 9e. Delivery Compartment
12
GENEVA - HOT BEVERAGE MERCHANDISER • 3205 • 3206 • 4214803
Page 15
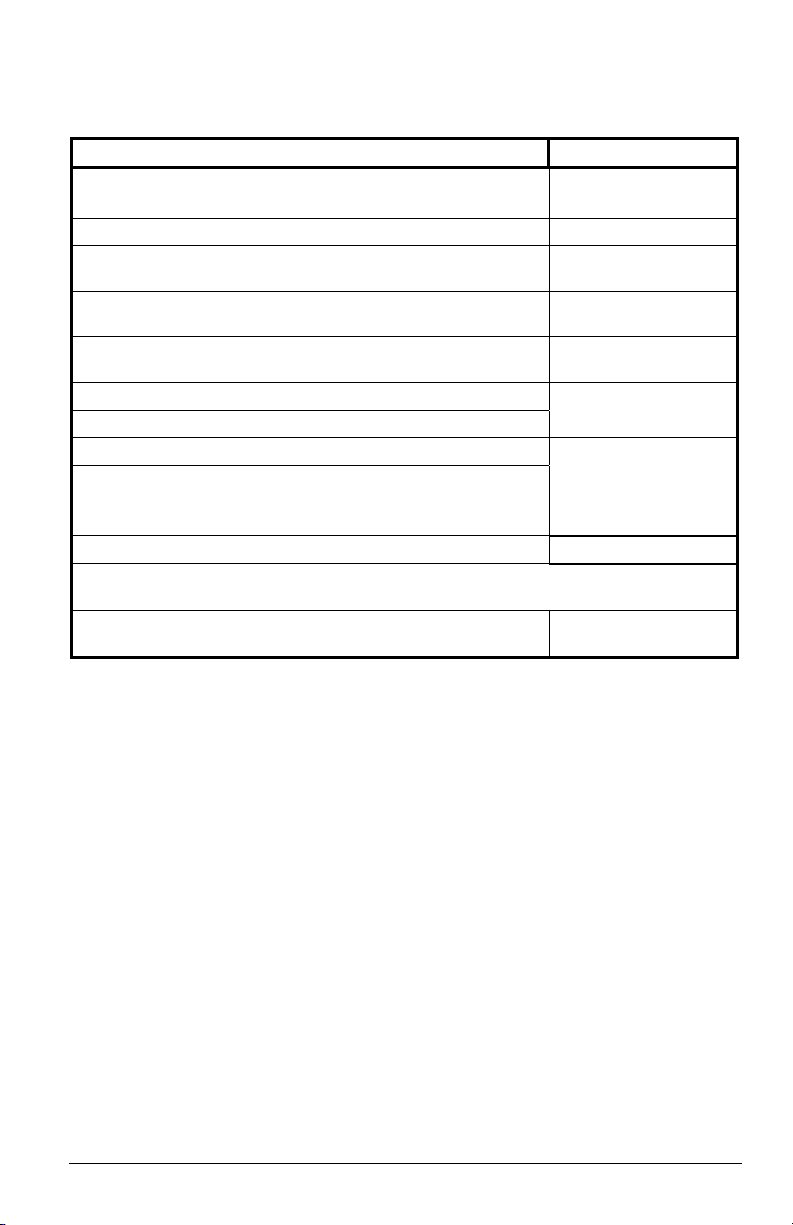
INGREDIENT VOLUME ADJUSTMENT
Follow the instructions below to change the ingredient volume settings.
STEP DISPLAY
1. On internal keypad, press PROG.
2. On external keypad, enter code 3333 (or current Manager code).
3. Press 0.
4. Press 0. The first product selection is displayed
5 To scroll to a different product selection press 2 or 8 repeatedly until the
desired product name is displayed.
6. Press 0. The first ingredient setting is displayed.
7. To scroll to a different ingredient, press 2 or 8 repeatedly.
8. Press 0. You are now ready to change the ingredient percentage value.
9. Press 4 (move cursor left) or 6 (move cursor right), or press 2 (increase)
or 8 (decrease).
NOTE: Value can only be changed in 5% increments up to plus or minus 25%.
10. Press 0 (enter) to accept the revised setting. OP: Sugar Mod 5%
11. To modify another ingredient in this product selection, repeat steps 7 through 10. To modify another
product selection, press # and repeat steps 5 through 10.
12. Press # three (3) times to exit the programming mode.
Note: 0% indicates the factory default value. Returning changed percentages to 0% will return items to factory
default values.
PLEASE ENTER
ACCESS CODE
INGREDIENT TIMES
DRINKS OF SIZE
REGULAR
SET TIMINGS FOR
COFFEE
OP: Sugar Mod 0%
OP: Sugar Mod Value=5%
SELECT DRINK
FROM MENU
GENEVA - HOT BEVERAGE MERCHANDISER • 3205 • 3206 • 4214803
13
Page 16
FLUSH HEATER TANK, BOWL & BREWER
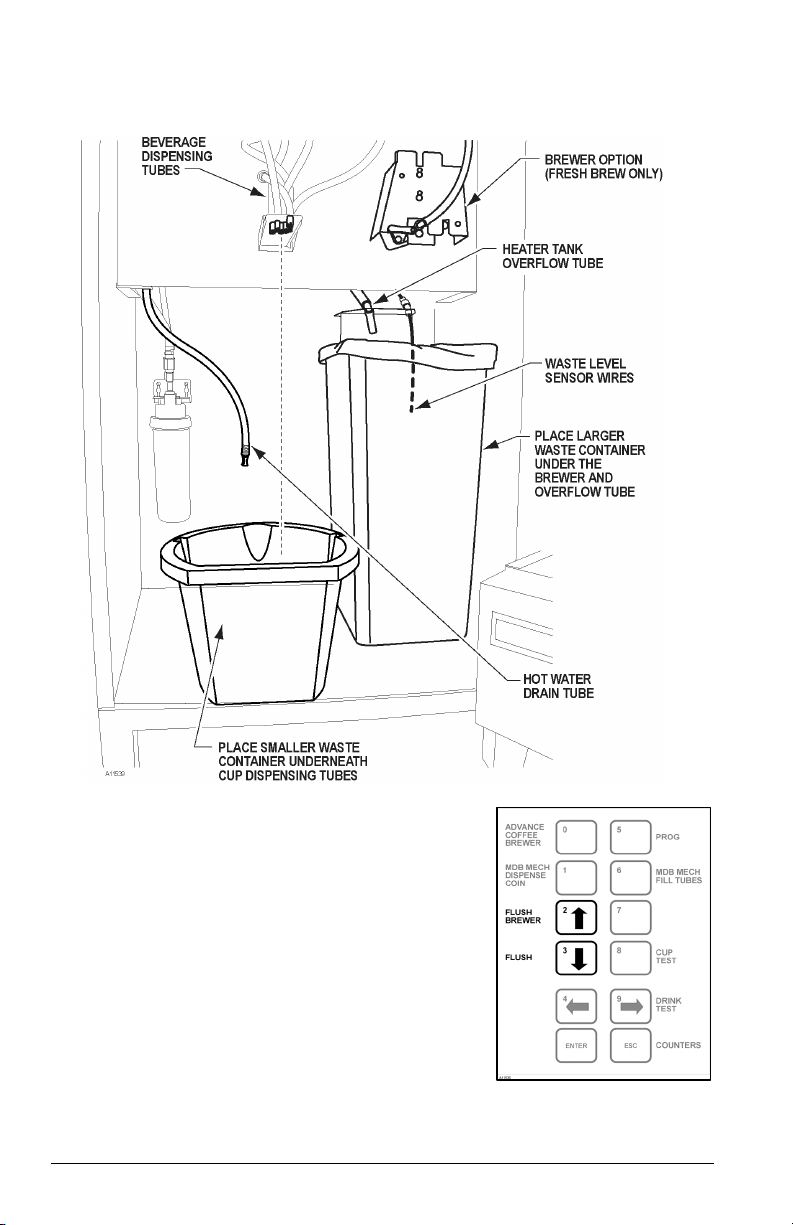
Figure 10a
INSTALL WASTE CONTAINERS
1. Place a trash liner (13 Gal) inside the large waste container. Place
the waste container under the heater tank overflow tube and the
brewer.
2. Place the small bucket under the cup dispensing tubes. See
Figure 10a
FLUSHING THE MACHINE
Ensure that the Mixing Bowls are flushed daily and each time after
refilling the canisters.
FLUSH MIXING BOWLS
1. Open Machine as instructed and ensure machine is switched ON.
14
GENEVA - HOT BEVERAGE MERCHANDISER • 3205 • 3206 • 4214803
Figure 10b
Page 17
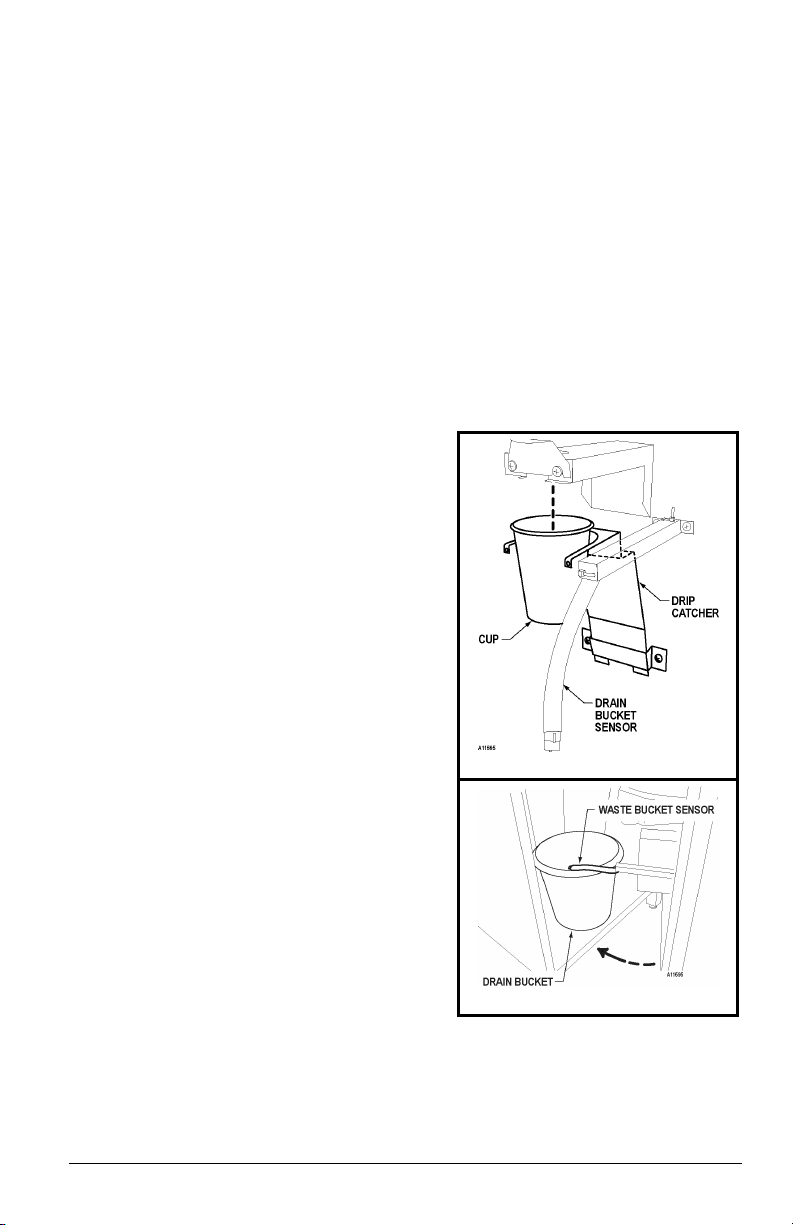
2. Press FLUSH button. See Figure 10b. The Machine will flush all the whipper and mixing bowls with
clean hot water.
3. Repeat as necessary.
4. Once flushing has ceased, the machine will be ready for use.
FLUSH COFFEE BREWER
1. Open Machine as instructed and ensure machine is switched ON.
2. Ensure that hands and loose clothing are clear of the brewer.
3. Press the BREWER FLUSH button. See Figure 10b. The Machine will flush the brewer(s) with clean
hot water.
4. Repeat if necessary.
5. Once flushing has ceased, the machine will be ready for use.
DRIP CATCHER
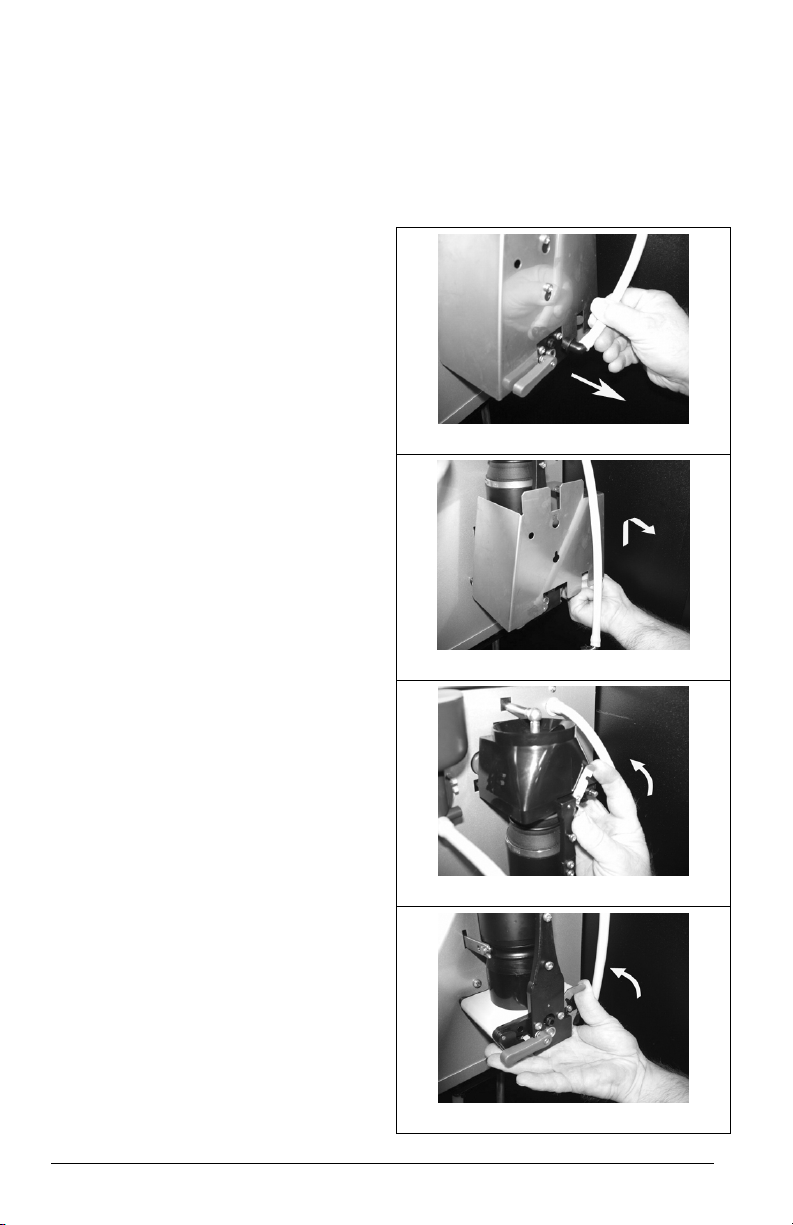
Place a cup on the Drip Catcher Holder to prevent any
remaining liquid in the base of the cup station from dripping
onto the floor when the door is opened during servicing.
1. The Drip Catcher is located on the inside of the door
below the Cup Station.
2. Place a 7 oz or 8.25 oz cup on the Drip Catcher Cup
Holder. See Figure 12a.
3. IMPORTANT: Place the Overflow Bucket Sensor inside
the drain bucket before closing the door. See
Figure 12b.
Figure 12a. Drip Catcher
Figure 12b. Waste Bucket Sensor
MERCHANDISER RECORD
A schedule sheet for cleaning and maintenance should be kept up to date at all times. A schedule sheet clip has
been provided for your convenience. It can be found beneath the internal keypad. The space is large enough for
an 8.5x11 sheet.
GENEVA - HOT BEVERAGE MERCHANDISER • 3205 • 3206 • 4214803
15
Page 18

CLEANING PROCEDURES
Care should be taken when cleaning the interior of the merchandiser as high temperatures
may be present on components and liquids.
Hygiene
A high standard of personal hygiene is essential for a coffee vending machine operative. Hair
& clothing must be neat & clean. Hands & finger nails must be washed thoroughly before any
work commences in the drink preparation areas. Jewellery should be kept to a minimum.
An operative who is suffering from cuts, sores or any form of illness must inform their
supervisor before commencing any work in the drink preparation area.
Safety
All cleaning tasks should be undertaken with the machine Switched OFF by means of the
switch located in the back left had corner of the cabinet above the ingredient canisters.
Recommended items required
Disposable non-linting clothes (‘contact’, ‘non-contact’ & ‘external’)
Clean disposable gloves
Plastic scraper
Spray bottle
Cleaning bucket
EXTERIOR:
Cleaning agent for removing stubborn stains
Glass cleaner or similar for cleaning the plastic screens
INTERIOR:
A sanitizer for cleaning & disinfecting
Some Do’s & Don’ts:
• Do not use metal scrapers
• Do not put any of the machine internal parts on the floor
• Do not take water for cleaning from a toilet area
• Always wear protective gloves when using cleaning agents
• Always use the correct cleaning agent for the application & follow the
manufacturer’s instructions
• Separate clothes should be used to clean specific areas of the machine parts.
These clothes should be kept separated in re-sealable bags
The ‘CONTACT’ cloth should be used on areas of the machine that come into contact with
drink preparation:
Whipper Station Parts Delivery Tubes
Coffee Brewer Unit Parts Delivery nozzles
Dispense Arm Ingredient Canister Shelf
Ingredient Canisters Cup Compartment
Cup Chute Cup Station
16
GENEVA - HOT BEVERAGE MERCHANDISER • 3205 • 3206 • 4214803
Page 19

The ‘NON-CONTACT’ cloth should be used on other internal areas of the machine:
Liquid Waste Bucket Coffee Grounds Waste Bucket
Cabinet Floor Coin Changer & Validator
Overflow Pipe All other internal surfaces
The ‘EXTERNAL’ cloth should be used on all external surfaces with exception of the cup
station
Daily/Weekly Routine
• After removing the ingredient canisters in order to fill them, always wipe down/clean
the shelf
• Half fill the cleaning vessel/bucket with clean hot water form the rinse hose and
add the recommended amount of sanitizer
• Remove all mixing bowls/chambers, delivery tubes & nozzles and place in cleaning
vessel/bucket
• Dismantle coffee brewer filter platform & chamber and place in cleaning
vessel/bucket (see below for detailed instructions)
• Remove all chutes from the ingredient canister outlets and place in cleaning
vessel/bucket
• Wipe down/clean internal surfaces of cabinet
• Clean/sanitize the parts in the cleaning vessel/bucket, rinse thoroughly with hot
water, and refit (ensure the canister chutes are dry!)
• Remove the drain tray/grill from the underside of the cup station and place in
cleaning vessel/bucket
• Remove the upper rinse funnel and place in cleaning vessel/bucket
• Spray some sanitizer on the cup chute and cup counter balance and clean surfaces
• Spray some sanitizer on the internal surfaces of the cup station and clean
• Clean & refit the rinse funnel & drain tray/grill
• Wipe down/clean internal surfaces of door
Monthly Routine
• Remove all ingredient canisters and remove the front stainless steel, place in
cleaning vessel/bucket
• Remove the stainless steel cup chute by slackening the 2 fixing screws and lifting
off keyhole slots, place in cleaning vessel/bucket
• Wipe down/clean the surface under the ingredient shelf
• Clean and refit parts.
• Refit the ingredient canisters
GENEVA - HOT BEVERAGE MERCHANDISER • 3205 • 3206 • 4214803
17
Page 20
DISMANTLING COFFEE BREWER UNIT
(Fresh Brew Model only)
WARNING – Keep hands/fingers and loose clothing clear of the brewer unit when it is in motion.
• Open the door of the machine and switch machine OFF using Main Switch
• Turn the Coffee Canister Dispense Chute upward to prevent ingredients being spilled onto the floor of
the machine.
• Figure 13a - Remove the Coffee Brewer
outlet spout.
Figure 13a
• Figure 13b - Remove the Brewer
splashguard by lifting the cover up and
toward you.
• Figure 13c & Figure 13d - Lift and release
both of the carriage locking catches.
18
Figure 13b
Figure 13c
Figure 13d
GENEVA - HOT BEVERAGE MERCHANDISER • 3205 • 3206 • 4214803
Page 21
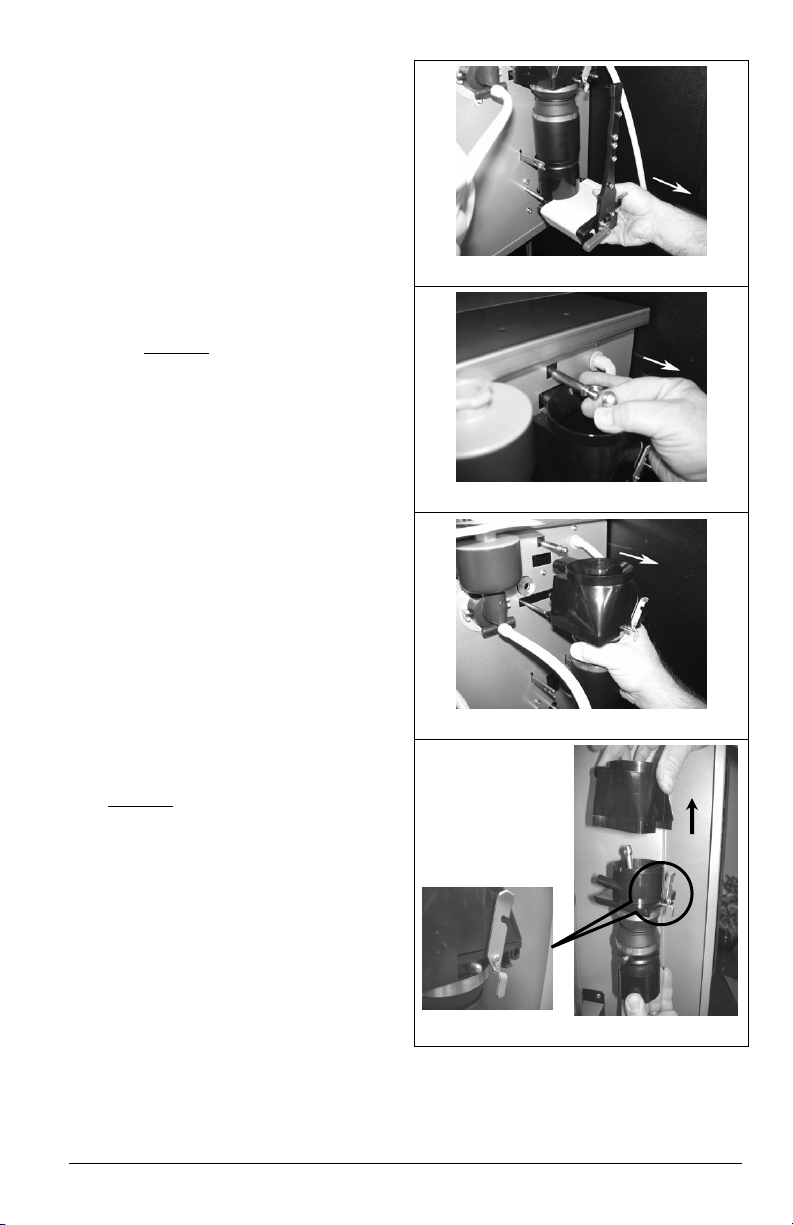
• Figure 13e - Remove the filter carriage by
sliding it towards you.
• Figure 13f - Unclip/Detach the Sealing Rod
Connector by pulling towards you.
Important:
When re-assembling do not forget to
reconnect the Sealing Rod
• Figure 13g - Holding the Brewing Chamber
as shown pull it gently towards you to
remove it
Figure 13e
Figure 13f
Figure 13g
• Figure 13h - Lift off he Steam Extractor
Hood
Important:
When replacing the Steam Extractor Hood
ensure it is located behind the release catch
and that it is sat-down properly as shown.
Figure 13h
• Use de-staining product to clean the Brewer, cylinder, steam trap and carriage assembly. Then
rinse all parts thoroughly with clean water.
GENEVA - HOT BEVERAGE MERCHANDISER • 3205 • 3206 • 4214803
19
Page 22
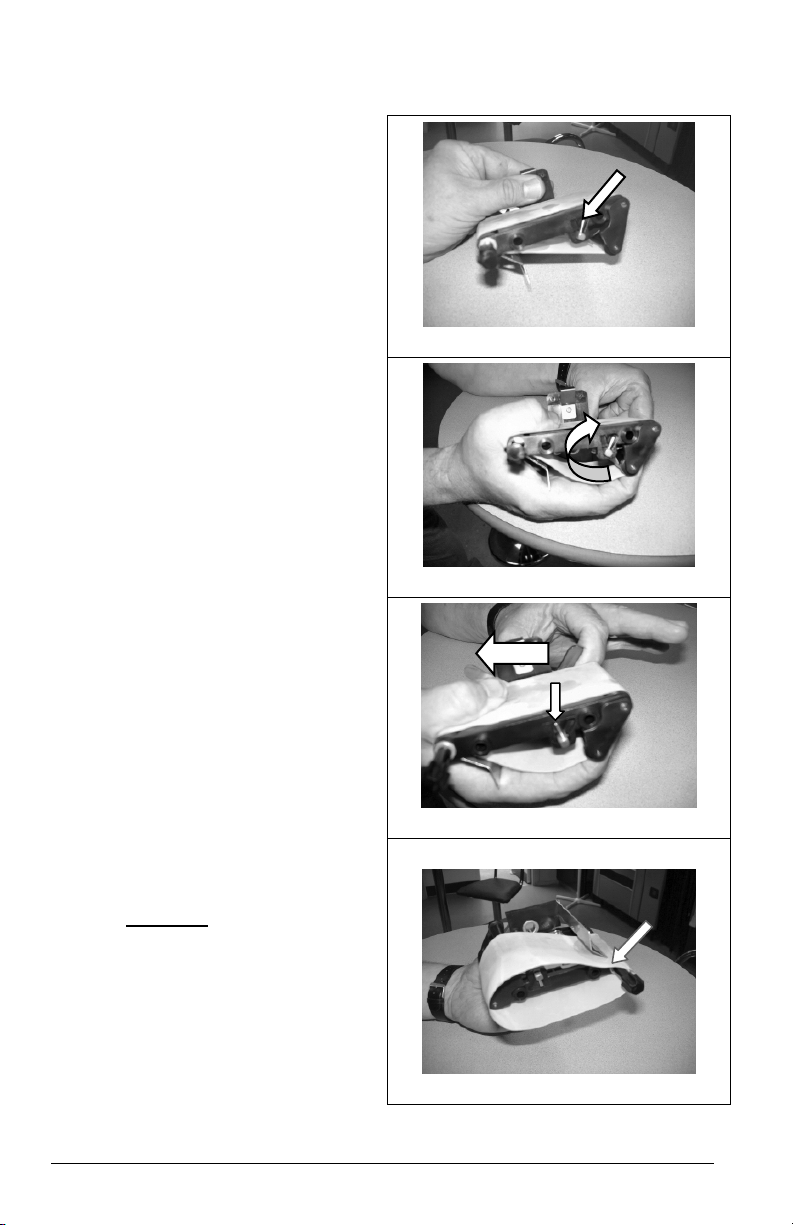
FILTER BELT REMOVAL & REPLACEMENT
•
Figure 14a - First note the Tension
Locking Bar in the ‘tensioned’ position
•
Figure 14b - Hold the carriage in your
hand as shown, using your fingers release
the tension on the filter belt by pulling back
the tension arm in the direction indicated
by the arrow, hold whilst moving to the
next step
•
Figure 14c - Push the Red release handle
forward and rotate in the direction of the
BIG arrow, when the spindle is in the
upright position as shown by the small
arrow, pull the red handle back to lock in
the ‘relaxed’ position
Figure 14a
Figure 14b
20
•
Figure 14d - The filter belt can now be
removed as shown
IMPORTANT:
II. When fitting the new belt, ensure
I. The Coffee Filter Belt can be
identified by its BLUE colored
stitching thread (part #
4215265.001).
the belt is passed under the
scraper plate indicated by the
arrow
Figure 14c
Figure 14d
GENEVA - HOT BEVERAGE MERCHANDISER • 3205 • 3206 • 4214803
Page 23

REFITTING THE COFFEEE BREWER
• Open the door of the machine and switch machine off using the main switch.
• Fit the Steam Extractor Hood (Fig 13h) back onto the brewer chamber, and refit the unit to the
machine.
• Re-attach the sealing rod (Fig 13f).
• Refit the carriage assembly (Fig 13e).
• Use the locking catches (Fig’s 13c & 13d) to lock the carriage in place
• Refit the splashguard (Fig 13b).
• Refit the outlet elbow (Fig 13a).
• Re-align the ingredient chutes into the brewer chamber.
• Ensure that hands and loose clothing are clear of the brewer(s).
• Switch machine back ON.
• Close and lock the machine.
• Once machine has reset, make a test of at least one coffee.
GENEVA - HOT BEVERAGE MERCHANDISER • 3205 • 3206 • 4214803
21
Page 24
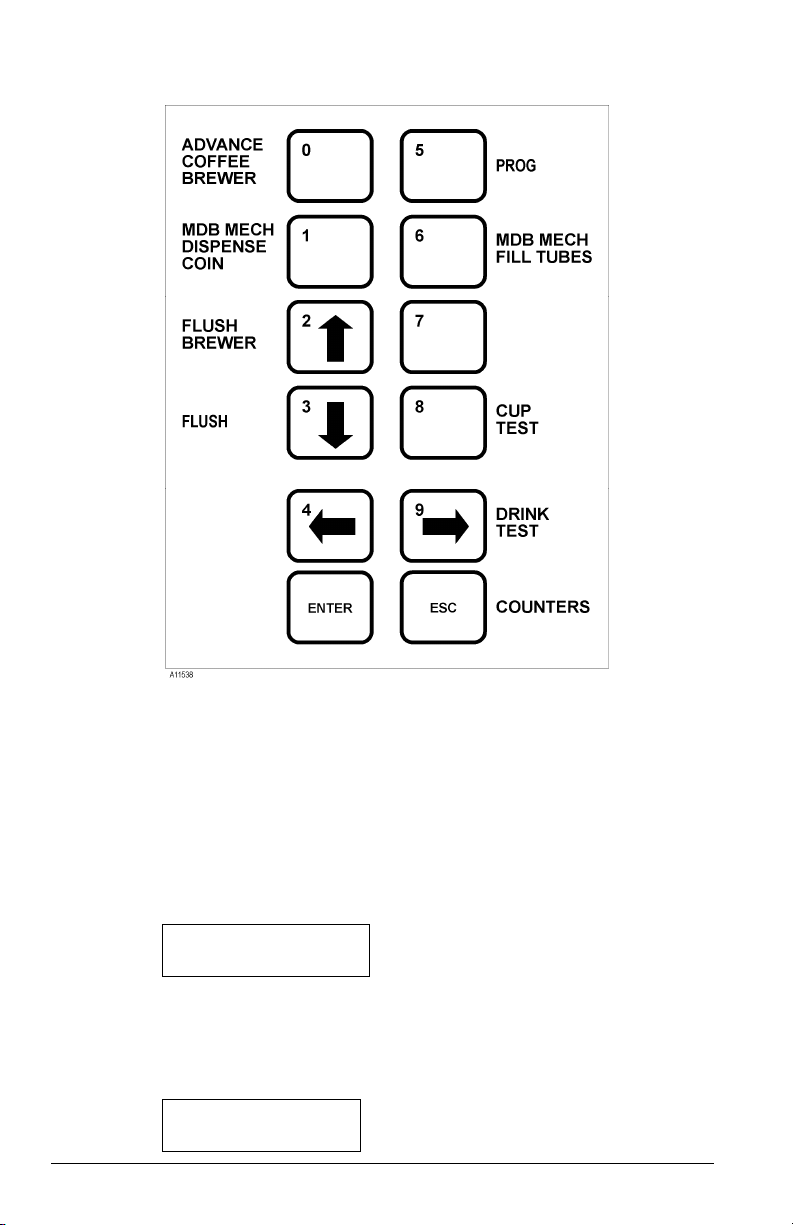
INTERNAL KEYPAD FUNCTIONS
Figure 15
The internal keypad is used to carry out a number of frequently required machine functions without entering
Program mode.
In most cases a single press of the key initiates the function associated with each button. If a further key press is
necessary to end the action it will be the ESC (escape) key.
The functions available from the internal keypad are:
a) ADVANCE COFFEE BREWER - If a coffee brewer is fitted, pressing this key one time will force the brewer
unit to index to its next position in the cycle. The purpose of this function is to allow the brewer to be locked
prior to a flush cycle so that cleaning agents can be added if desired.
b) MDB MECH DISPENSE COIN - This key provides a method of emptying the change tubes of an MDB coin
mechanism. On pressing the key the external display will change to:
EMPTY TUBE $0.05
Ç,È ENTER OR ESC
The currency value shown will be that of the lower value coin tube in the mechanism. The function of the
EXTERNAL keys will change as described in Section 3 to allow actions to be performed on either the
internal or external keypad. Pressing ENTER will dispense a coin from the selected tube. Pressing Ç or È
selects the next/previous coin tube. Pressing the ESC (escape) key ends the process.
c) MDB MECH FILL TUBES - If an MDB coin mechanism is fitted this function allows the change tubes to be
filled. On pressing the key the external display will change to:
INSERT FLOAT
$0.00
22
GENEVA - HOT BEVERAGE MERCHANDISER • 3205 • 3206 • 4214803
Page 25

As coins are inserted the value displayed will reflect the total value of the money inserted. Pressing ESC
(escape) will cause the machine to return to normal operation and zero the credit. (Water tank must be
heated to spec temperature before this command will function.)
d) BREWER FLUSH – (Fresh Brew model only.) Pressing this key initiates a flush cycle of all fresh brew units
fitted to the merchandiser simultaneously.
e) PROG – Pressing this key activates the code entry sequence required to access the protected levels of the
machine control programs. See Programming section
f) CUP TEST – Dispenses a cup via the cup drop mechanism. The cup spiral will not index unless a
selection is made or a Cup Test performed.
g) DRINK TEST - Allows the next selection to be taken as a free vend.
h) COUNTERS - Pressing the COUNTERS key places the machine in manual audit mode. Audit data is
accessed via a series of menus. The chart below shows the menu headings in bold text and the key presses
required to navigate the menu are shown in italics. While in this mode the functions of the external keypad
change to allow counter information to be accessed from the external (customer) keypad.
GENEVA - HOT BEVERAGE MERCHANDISER • 3205 • 3206 • 4214803
23
Page 26
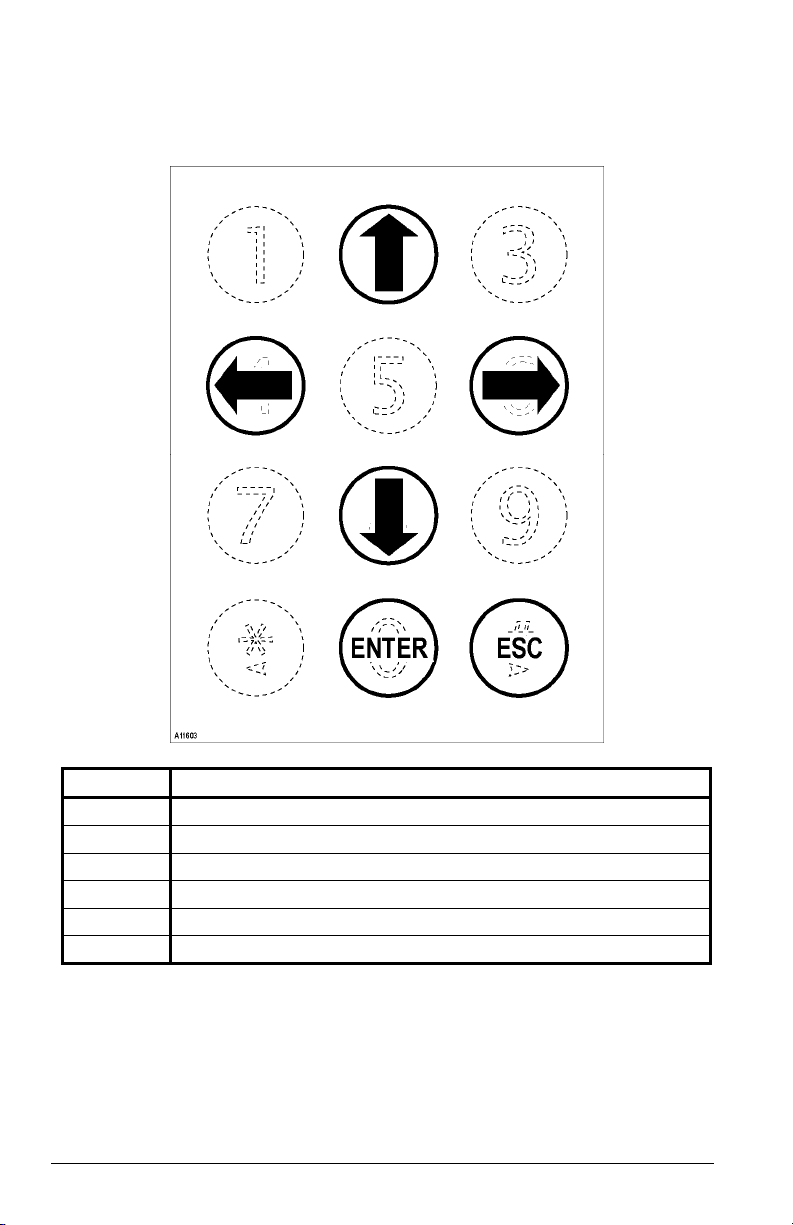
USER KEYPAD
When using SERVICE or COUNTERS mode the user keypad is used to navigate through the display menus, the
functions are as follows:
KEY FUNCTION
Ç
È
Å
Æ
ESC ESCAPE - move to previous menu option or reject values entered.
ENTER ENTER the menu option displayed or accept the changes made.
24
Move UP a list of menu options or increment a number.
Move DOWN a list of menu options or decrement a number.
Move the cursor LEFT.
Move the cursor RIGHT.
GENEVA - HOT BEVERAGE MERCHANDISER • 3205 • 3206 • 4214803
Page 27

TAKING A TEST VEND
Press the DRINK TEST key on the internal keypad once and then make a drink selection on the external keypad.
If more than one test vend is required, repeat the above procedure.
VIEWING COUNTER & EVENT RECORDS
Press the COUNTERS key on the internal keypad and using a combination of the display and the user keypad to
navigate (see USER KEYPAD above), the following records can be viewed:
Heading Menu’s List:
• DRINKS COUNTERS:
• TOTAL VEND COUNT:
• VENDED CUP COUNT:
• INGREDIENT COUNTERS:
• EVENT LOG:
• FINANCIAL AUDIT:
Available Sub-menu’s:
• DRINKS COUNTERS
• TOTAL VEND COUNT
• VENDED CUP COUNT
• INGREDIENT COUNTERS
• EVENT LOG
• FINANCIAL AUDIT
The total number of each primary drink selection
The grand total of all drinks vended (includes those
vends with use of ‘own’ cup)
The number of cups vended
The weight in grams of each primary ingredient
A diagnostic log of events, the description, time and date are recorded
A range of sub-menus giving monetary values
Upon pressing ENTER scroll down/up the list of each primary drink
selection
Upon pressing ENTER the grand total is displayed
Upon pressing ENTER the total number of cups dispensed is displayed
Upon pressing ENTER scroll down/up the list of each primary ingredient
throw weight (in grams): Note: This needs to be set-up in SERVICE MODE
to function.
Upon pressing ENTER scroll down/up the list recorded events for
diagnostic purposes (see table below or more details)
Upon pressing ENTER the following sub-menus are available:
PERMANENT COUNTERS – Giving PAID, TEST & FREE values
TUBE CONTENTS – Each change tube value can be viewed
RESETTABLE COUNTERS – Giving PAID, TEST & FREE values
GENEVA - HOT BEVERAGE MERCHANDISER • 3205 • 3206 • 4214803
25
Page 28
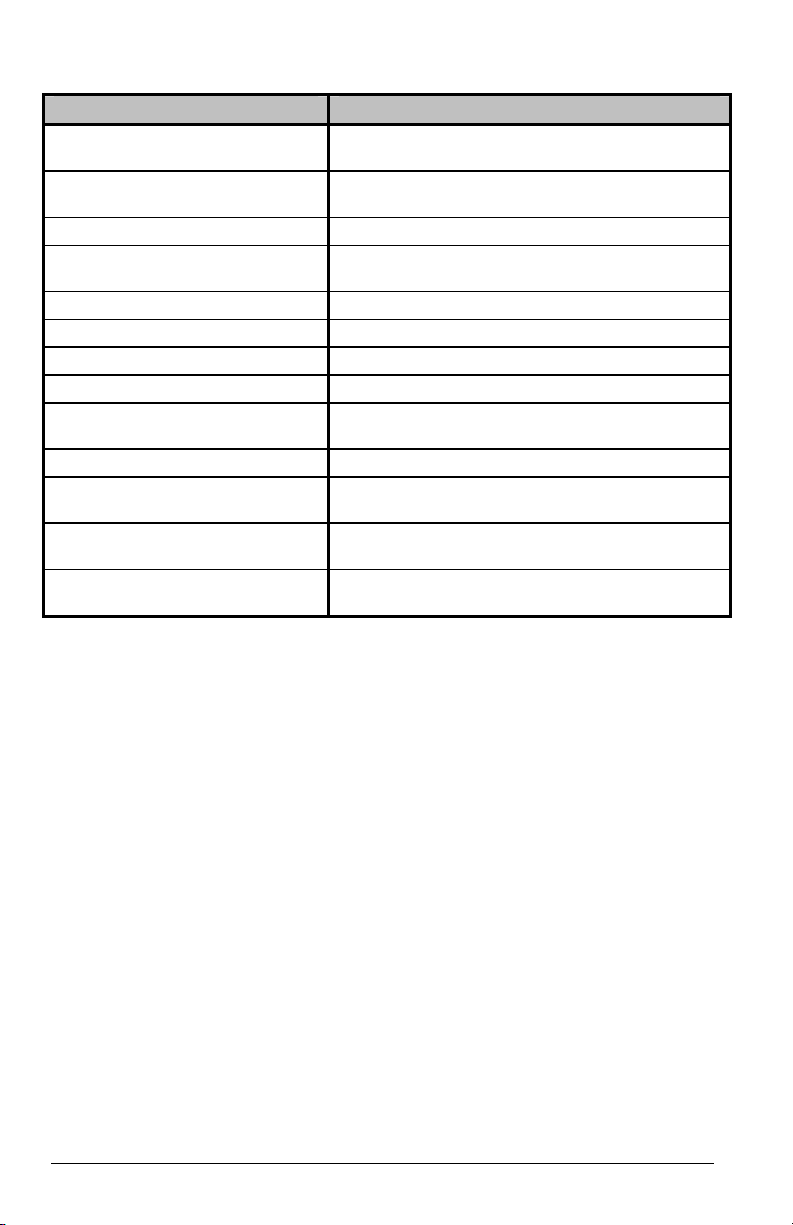
DIAGNOSTIC LOG
Displayed Message Explanation of Condition
KEY STUCK
WATER LEAKAGE
NO CUPS Comes into force after 2 unsuccessful attempts to drop a cup
ELECTRONICA
IO CONFIG ERR. Board has not been initialized using the ENG LINK
WASTE TRAY FULL Either the Liquid or Coffee ground waste bucket is full of water
HEATER INHIBITED The heater tank has not filled within the 3.5 minute time limit
PLACE OWN CUP Sold-out of cups
FILLING BOILER
C BREWER FAULT Brewer unit is not cycling correctly – a motor or cycle-switch fault
NEW FILTER REQD
FILTER BROKEN
DOOR FAULT
NOTES:
1) The event log will only record events that persist for two or more consecutive event log checks. Event
log checks take place once every 60s, so in the worst case scenario an event may have to be in force
for almost 120s before it is recorded.
2) The event log does not handle concurrent events. If two (or more) fault conditions are active, only the
first occurrence will be recorded.
A key on the user keypad has been closed continuously for >15
seconds
The hot inlet valve has had to be switched on > 30 times since
the last vend was taken
Internal serial communication failure between the control board
and the RIO board
Comes into force 15 seconds after starting to fill the heater tank
with water. Indication of a slow rate of fill
Filter belt warning (if activated) – comes into force after air
pressure seen to be present after 7 seconds
Brewer Fault – comes into force after air pressure has seen to be
present after 20 seconds during a vend
Cup door mechanism is not cycling correctly - a motor or cycleswitch fault
26
GENEVA - HOT BEVERAGE MERCHANDISER • 3205 • 3206 • 4214803
Page 29

Page 30
The contents of this publication are presented for informational purposes only, and while every effort has been made to ensure their accuracy, they are not to be construed as
warranties or guarantees, express or implied, regarding the products or services described herein or their use or applicability. We reserve the right to modify or improve the designs
or specifications of such products at any time without notice.
4214803C.DOC
Service
Parts
Email
Web Site
165 North 10th Street
Waukee, Iowa 50263
United States of America
USA & Canada International
(800) 833-4411
(888) 259-9965
VendNet™
(515) 274-3641
www.vendnetusa.com
 Loading...