

Page 1

2
Page 2
3
English
User Manual
Geneva Sound System
(Model M +CD)
Page 3
4
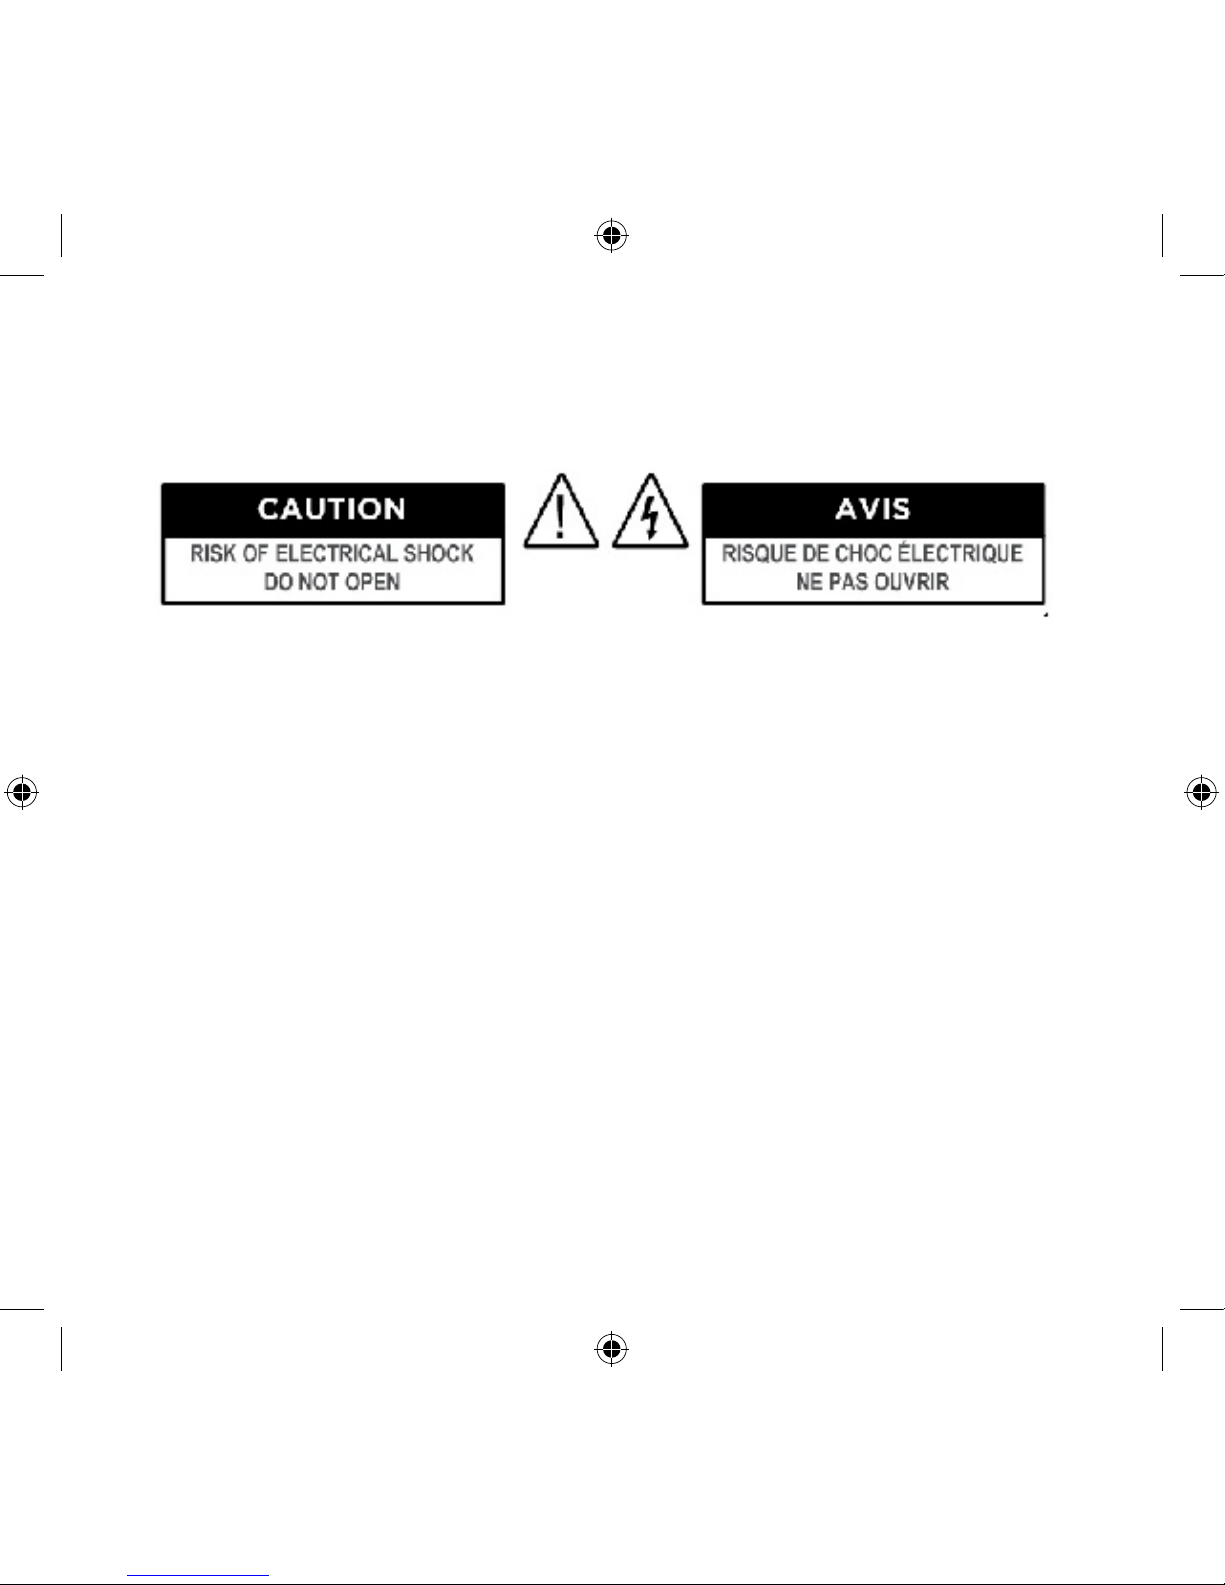
IMPORTANT SAFETY INSTRUCTIONS
1) Read these instructions.
2) Keep these instructions.
3) Heed all warnings.
4) Follow all instructions.
5) Do not use this apparatus near water.
6) Clean only with dry cloth.
7) Do not block any ventilation openings. Install in accordance with the manufacturer’s
instructions.
8) Do not install near any heat sources such as radiators, heat registers, stoves, or
other apparatus (including amplifiers) that produce heat.
9) Only use attachments/accessories specified by the manufacturer.
Page 4
5
English
10) Protect the power cord from being walked on or pinched particularly at plugs,
convenience receptacles, and the point where they exit from the apparatus.
11) Unplug this apparatus during lightning storms or when unused for long periods
of time.
12) Refer all servicing to qualified service personnel. Servicing is required when the
apparatus has been damaged in any way, such as power-supply cord or plug is damaged, liquid has been spilled or objects have fallen into the apparatus, the apparatus has
been exposed to rain or moisture, does not operate normally, or has been dropped.
13) This appliance shall not be exposed to dripping or splashing water and that no
object filled with liquids such as vases shall be placed on apparatus.
Caution: Use of controls or adjustments or performance of procedures other than herein
may result in hazardous radiation exposure or other unsafe operation.
Compact Disk Drive: The compact disk (CD) drive contains a laser. The laser radiates
visible and invisible laser radiation. Do not open optical housing. Avoid direct exposure
to the beam. The compact disc player should not be adjusted or repaired by anyone
except properly qualified service personnel.
Page 5
6
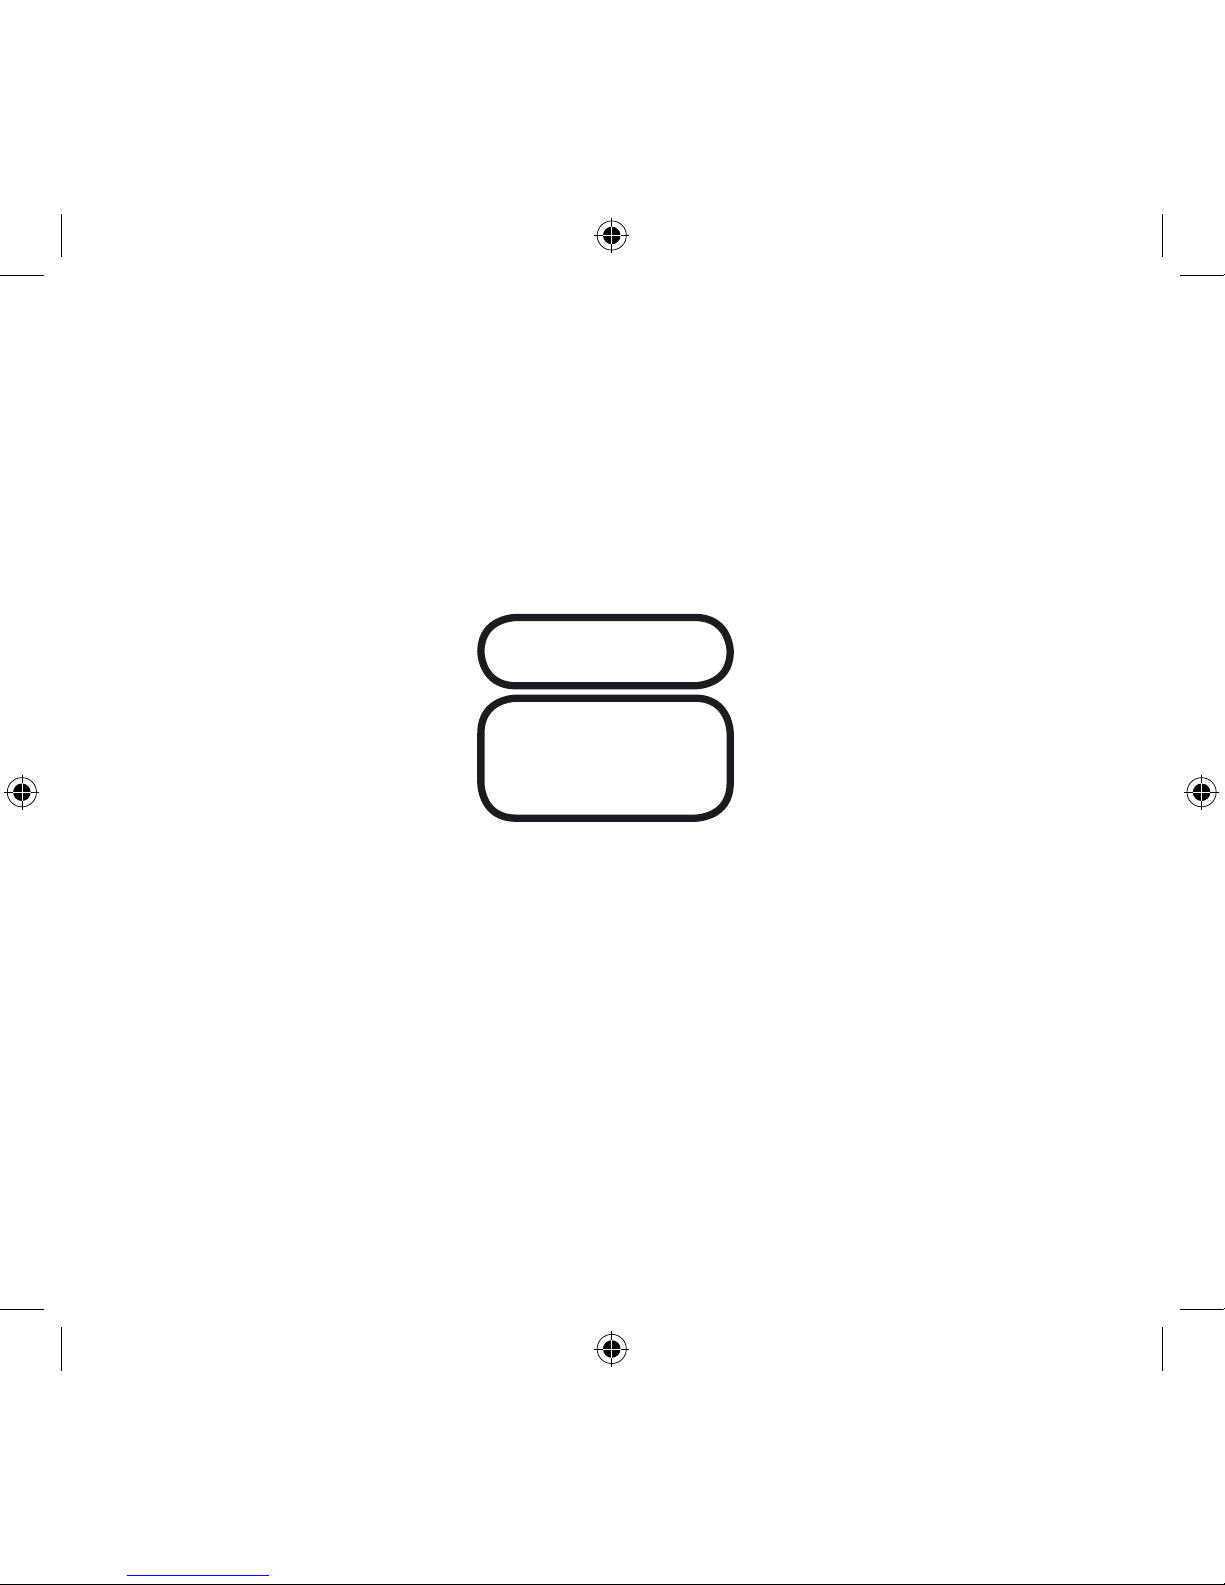
Class 1 laser product: This CD player is classified as a CLASS 1 LASER PRODUCT
according to EN 60825- 1:1994+A1+A2, IEC 60825-1:1993+A1+A2. The CLASS 1 LASER
PRODUCT label is located on the Back Panel of the product. This product complies
with 21 CFR Part 1040.10.
Technical details about the incorporated laser diode: Wavelength: 790 nm ± 15nm.
Max accessible radiant power (during service): 0.492 mW.
Ventilation: Do not block any ventilation openings on the back or under the Geneva
Sound System. To ensure reliable operation of the Geneva Sound System and to protect
it from overheating, put the System in a position and location that will not interfere with
its proper ventilation.For example, do not place the Geneva Sound System on a bed,
sofa, or similar surface that may block the ventilation openings. Do not put it in a built-in
position, such as in a bookcase or in a cabinet that may keep air from flowing through its
ventilation openings. Do not push objects of any kind through openings.
CLASS 1 LASER
PRODUCT
CAUTION
Visible and invisible
laser radiation when open.
Avoid exposure to beam.
Page 6
7
English
Cleaning: Please note we have included a cleaning cloth with your Geneva Sound
System, in the accessory bag. To avoid making scratches to the surface, we recom-
mend that you use the cleaning cloth included. Before cleaning, please unplug this
Geneva Sound System from the AC power outlet.
Overloading: To prevent risk of fire or electric shock, avoid overloading wall outlets or
extension cords.
Open fire: Keep this Geneva Sound System a safe distance away from any open flame
such as a lit candle. No open flame sources, such as lighted candles, should be placed
on the Geneva Sound System.
Operating Temperatures: The recommended operating temperature range for the
Geneva Sound System is 41 to 104 degrees Fahrenheit (5 to 40 degrees Celsius).
Front grille panel: Never remove front grille panel because the panel is non detachable
and will void the Limited Warranty.
Avoid Hearing Damage:
Playing very loud music for an extended period of time can
result in permanent hearing loss.
The mains plug or appliance coupler is used as the disconnect device, such disconnect
device shall remain readily operable.
Label location: The product labels and safety related markings are located on the Back
Panel of the Geneva Sound System.
Page 7

8
Unplugging while in operation: Do not remove the AC power cord out of the AC outlet if
music is playing or if the Geneva Sound System is turned on. The drivers can be damaged
by such an action.
Batteries in the remote control: Keep the remote control battery away from children.
It may cause a fire or chemical burn if mishandled. Do not recharge, disassemble, heat
above 212ºF (100ºC), or incinerate. Replace only with a battery of the correct type and
model number (CR2025 lithium coin cell battery, 3 V).
CAUTION: Danger explosion if battery is incorrectly replaced. Replace only with the same
or equivalent type.
Used batteries: Please dispose of used batteries properly, following any local regulations.
Do not incinerate.
Compact Disks (CD’s):
Do not insert smaller disks than 12 cm, such as a CD mini disk,
etc., which are not supported. Also, do not insert anything else than a CD, such as coins.
Outside Antenna: If an outside antenna or cable system is connected to this product, be
sure the antenna or cable system is grounded so as to provide some protection against
voltage surges and built-up static charges. Article 810 of the National Electric Code,
ANSI/NFP No. 70 information, Section 54 of the Canadian Electrical Code, with regard to
proper grounding of the mast and supporting structure, grounding of the lead-in wire to
an antenna discharge unit, size of grounding conductors, location of antenna/discharge
unit, connection to grounding electrodes, and requirements for the grounding electrode.
Modification: Unauthorized modification of the receiver or radio remote control could
void the user’s authority to operate this equipment.
Page 8
9
English
Note to CATV system installer: This reminder is provided to call the CATV system
installer’s attention to Article 820-40 of the NEC (of USA) that provides guidelines for
proper grounding. In particular, it specifies that the cable ground shall be connected to
the grounding system of the building, as close to the point of cable entry as is practical.
Removal of the Back Panel: By any unauthorized person also voids the Limited Warranty.
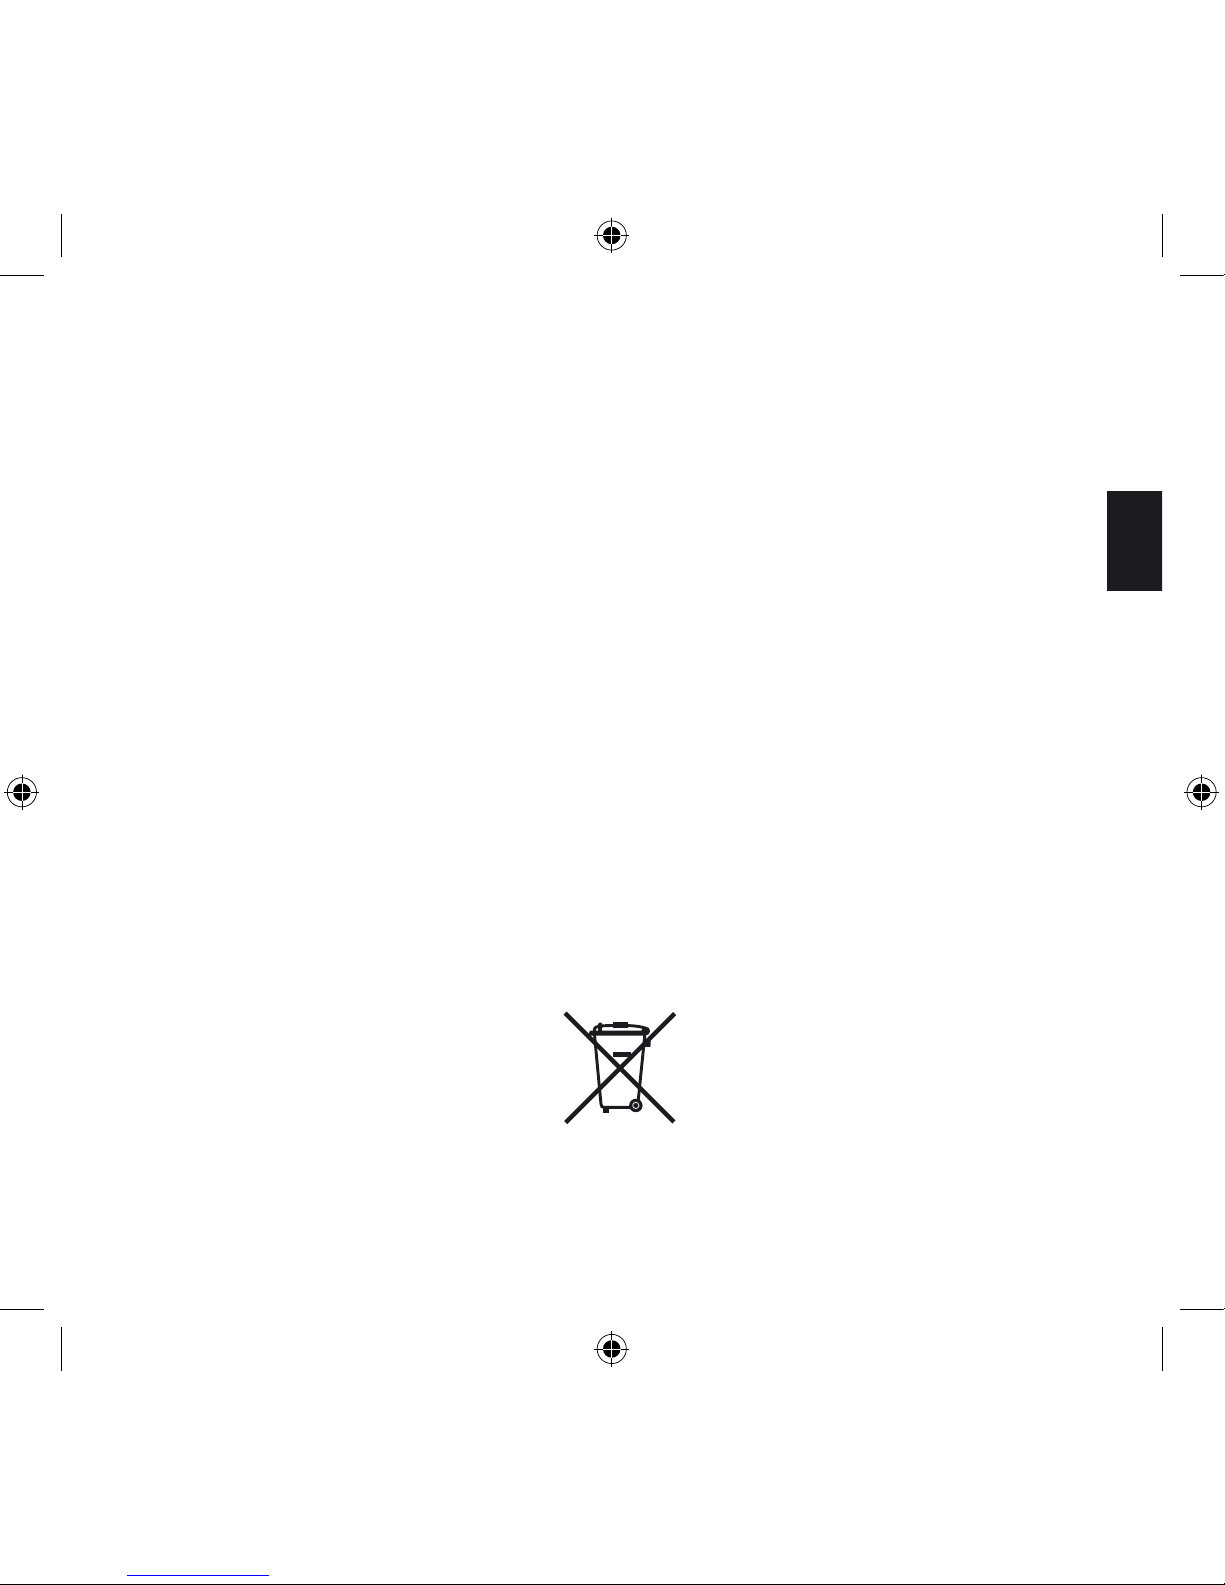
This product can be recycled. Products bearing this symbol must NOT be thrown away
with normal household waste. At the end of the product’s life, take it to a collection point
designated for recycling of electrical and electronic devices. Find out more about return
and collection points through your local authority.
The European Waste Electrical and Electronic Equipment (WEEE) Directive was imple
mented to dramatically reduce the amount of waste going to landfills, there by reducing
the environmental impact on the planet and on human health. Please act responsibly by
recycling used products. If this product is still usable, consider giving it away or selling it.
Page 9

10
Contents
Chapter 1
Getting Started
Unpacking and setting up
Quick Start
Listen to your iPod
Listen to a CD
Listen to the FM radio
12
12
14
16
18
18
Chapter 2
How To...
?
General:
How to turn the Geneva Sound System on?
How to adjust Volume and Sound?
How to verify that the remote control works?
How to clean the speaker?
What is the functionality of the AIR key on the remote control?
How to change battery in the remote control?
iPod:
How to select the right iPod Dock adapter for my iPod?
How to check the software version of your iPod?
How to upgrade your iPod?
How to insert or remove a Dock Adapter
How to control the iPod using the Geneva Sound System’s remote control?
CD:
How to control the CD player using the remote control?
How to play CD’s with MP3 and other formats?
How to play MP3 CD-R/W with several Albums?
19
19
19
19
20
20
20
21
22
22
22
22
23
23
23
Page 10
11
English
24
24
25
25
26
26
26
26
Chapter 3
Troubleshooting, Service and Support
Troubleshooting and Support
Service and Repair
Technical Support
Customer Service Telephone Number
Website
27
27
27
27
27
27
FM radio:
How to control the FM radio using the remote control?
How to select a FM radio station?
How to store your favorite FM radio station in a preset?
How to play a FM radio station that is stored in the presets?
How to erase or overwrite a preset?
How to connect the External FM radio antenna?
How to change FM stereo/mono settings?
Line in:
How to connect a TV, Computer, VCR, DVD player or a game console to
the Geneva Sound System using the “Line in” input?
Chapter 4
Made for iPod & Technology Partners
Made for iPod
Technology Partners
28
28
28
Chapter 5
Technical Specifications
29
Page 11
12
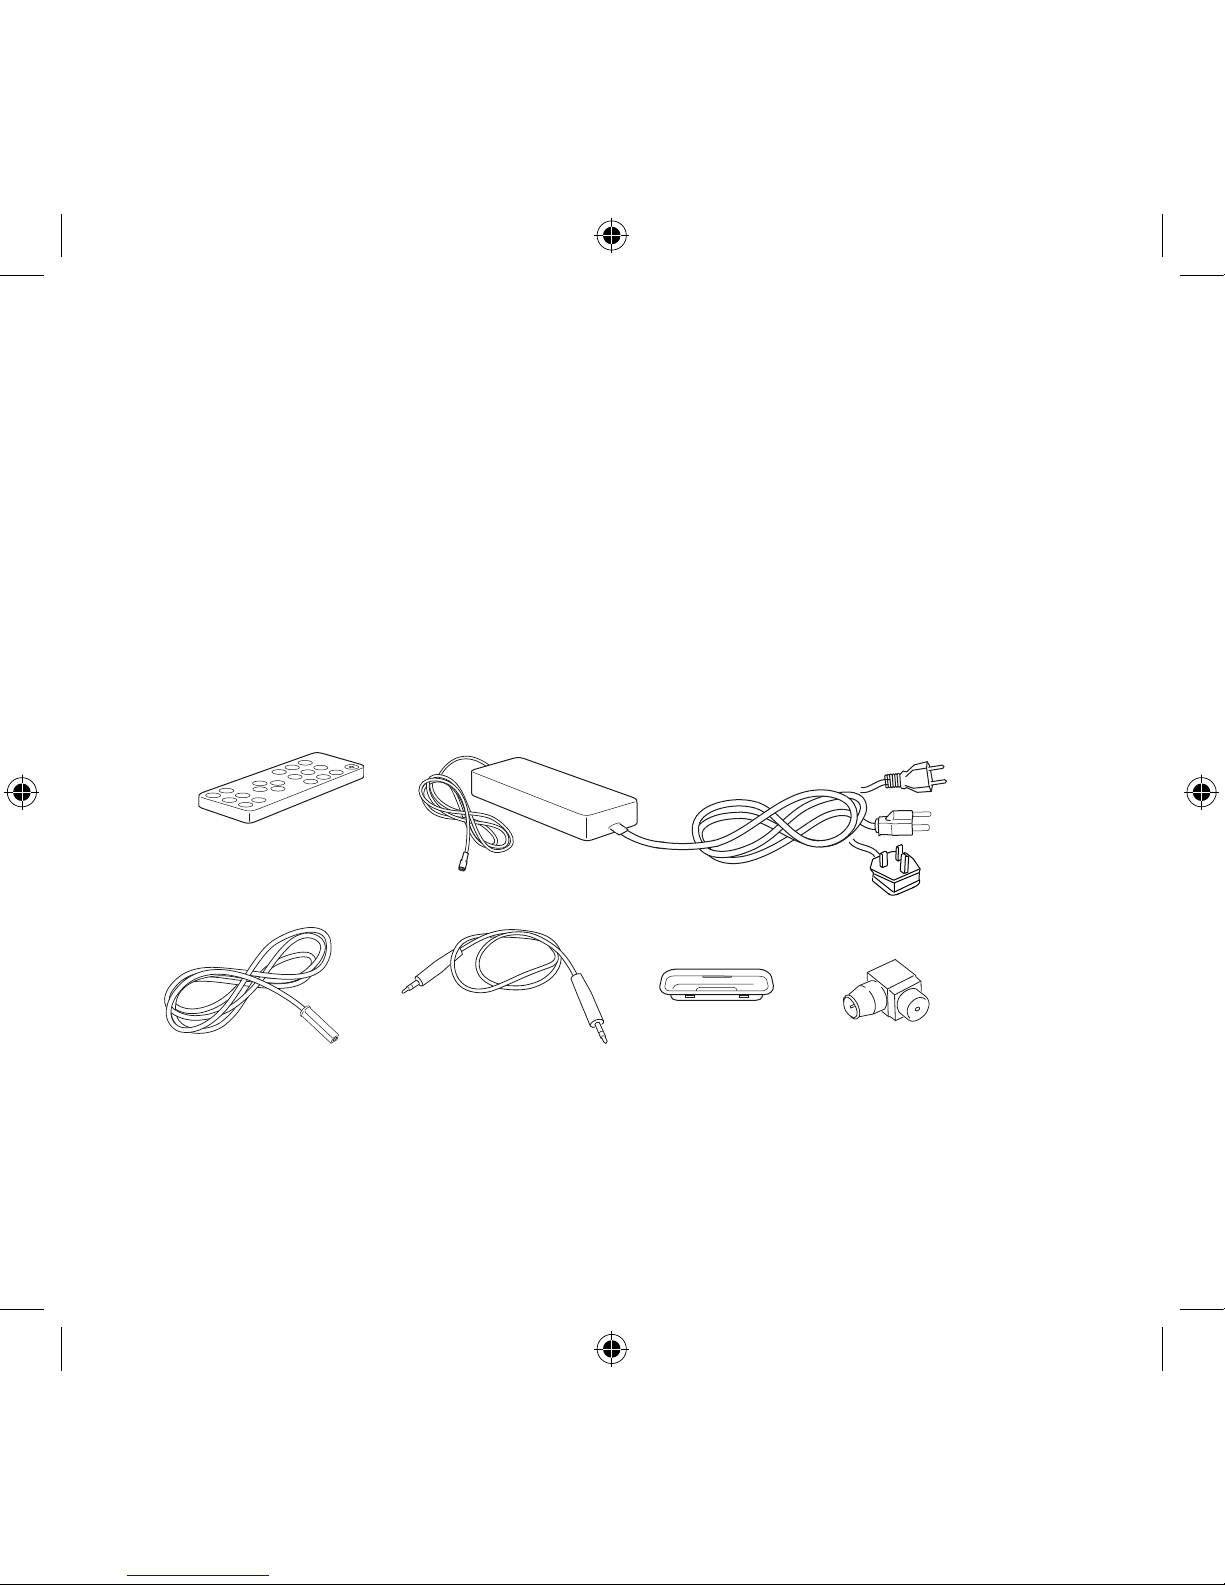
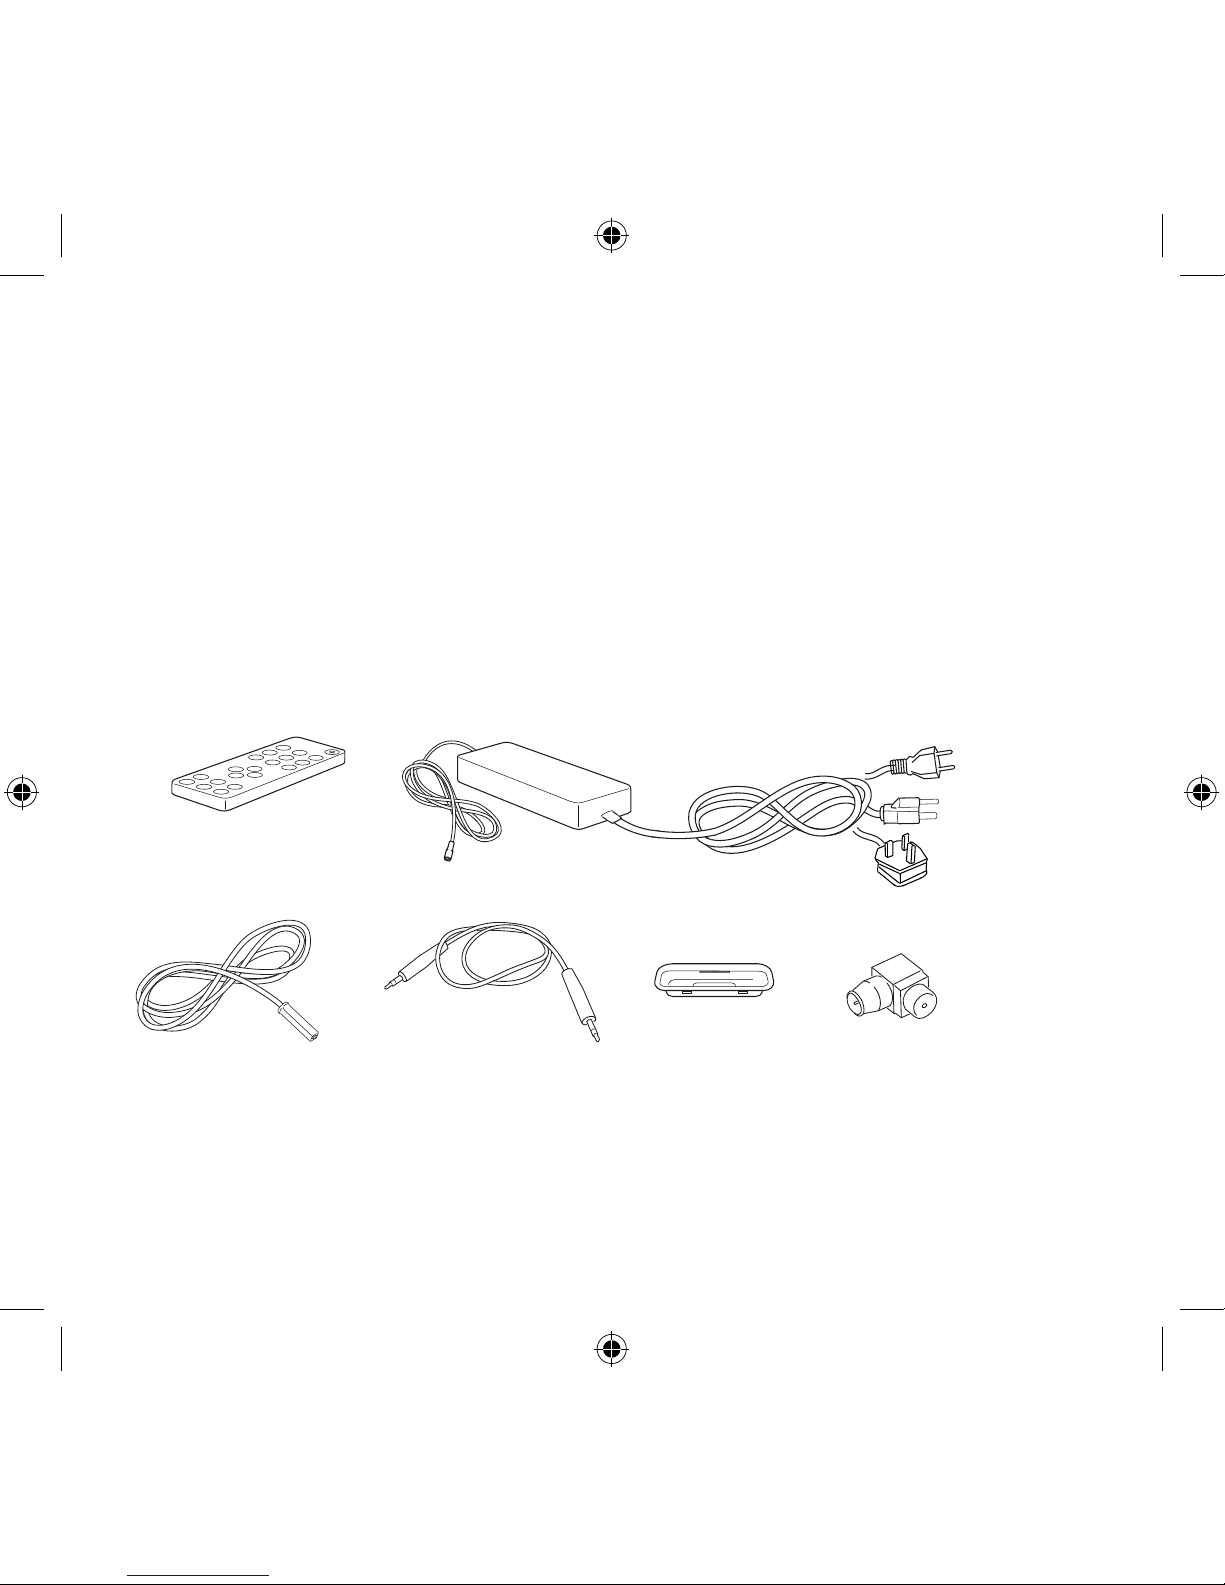
Remote control
External antenna
External power supply
Line in cable
iPod Dock Adapter
US only
US only
EU only
UK only
x7
Antenna adapter
1. Getting Started
Step 1: Unpack all components from the shipping box. Please save the original packaging
material in case you ever need to return the System since the Limited Warranty does not
cover shipping damages.
The shipping box should contain the following System components:
EU only
US only
US only
UK only
Page 12
13
English
FM
Step 2: Insert the batteries into the remote control (see page 20). There are batteries
included in the package.
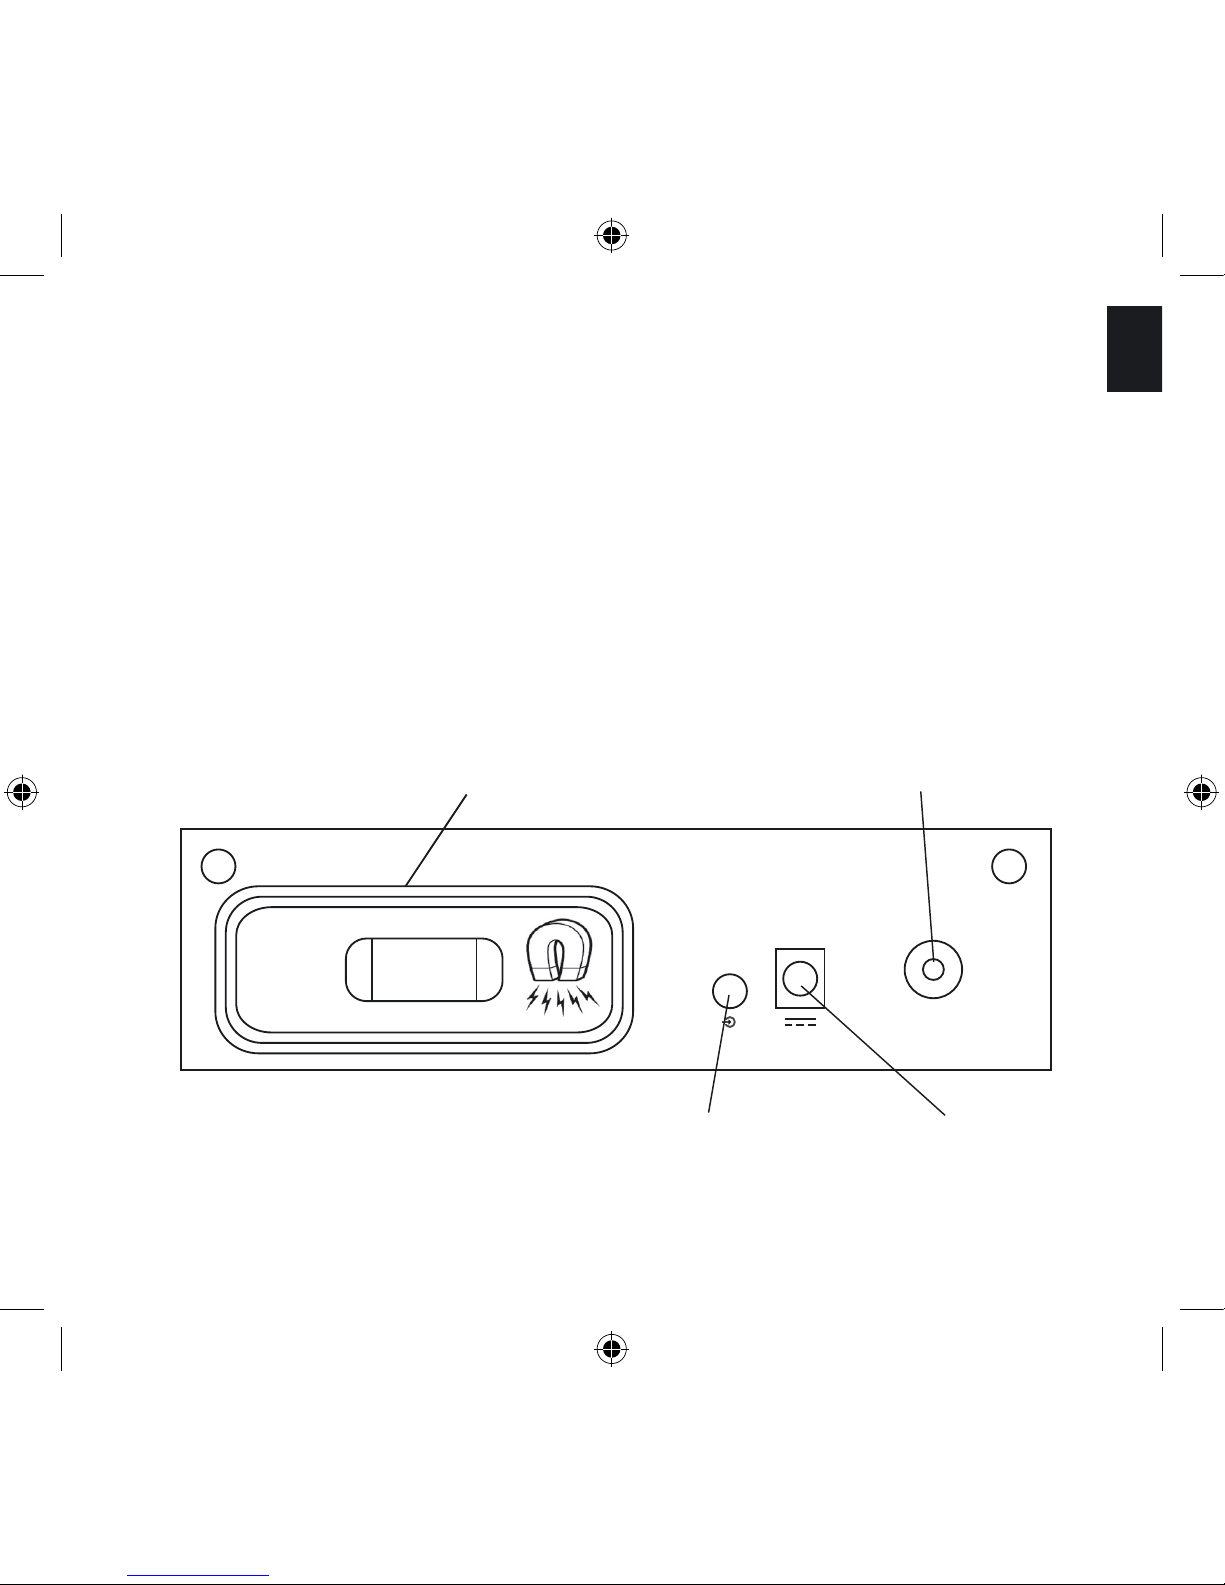
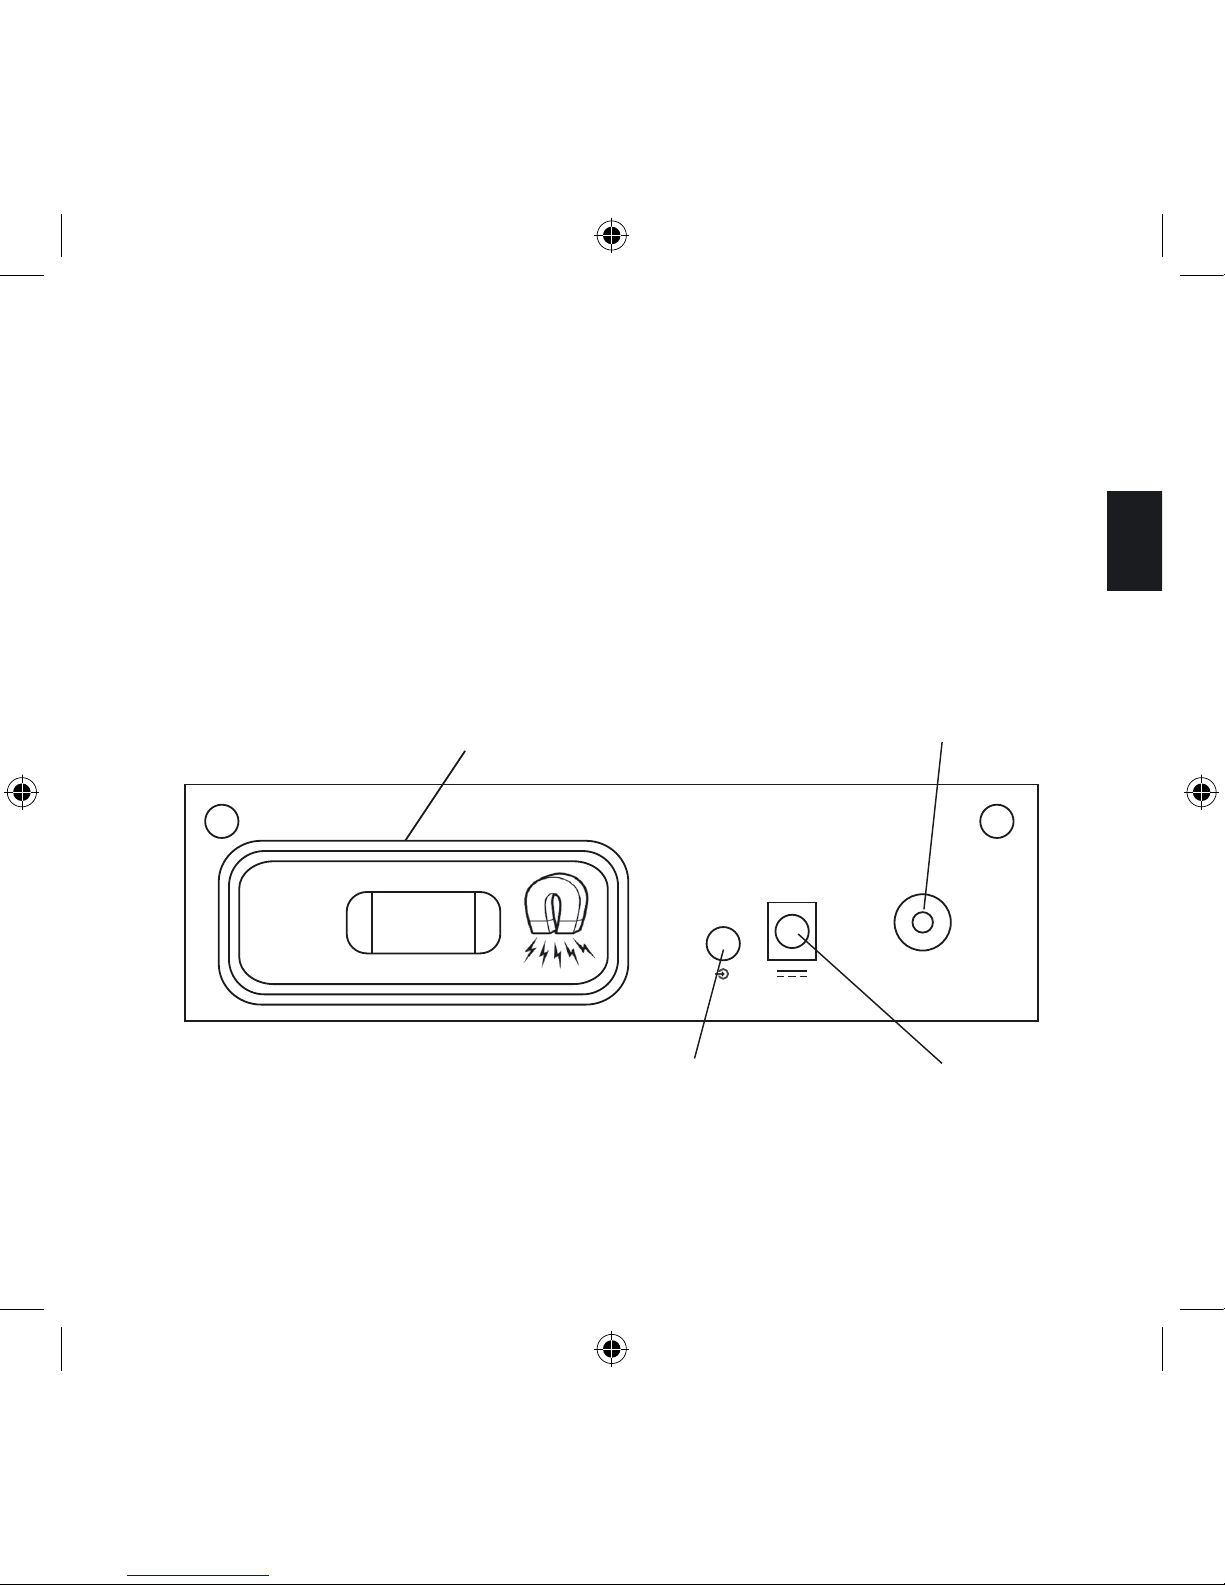
Step 3: Insert the DC Power cable (the thin cable) of the external power supply into the
DC Power Plug on the Back Panel (see picture below).
Then connect the AC Power cable of the external power supply to an AC outlet.
Back Panel:
Line in Jack DC Power Plug
while dock is used, put iPod lid here FM radio antenna plug
Page 13
14
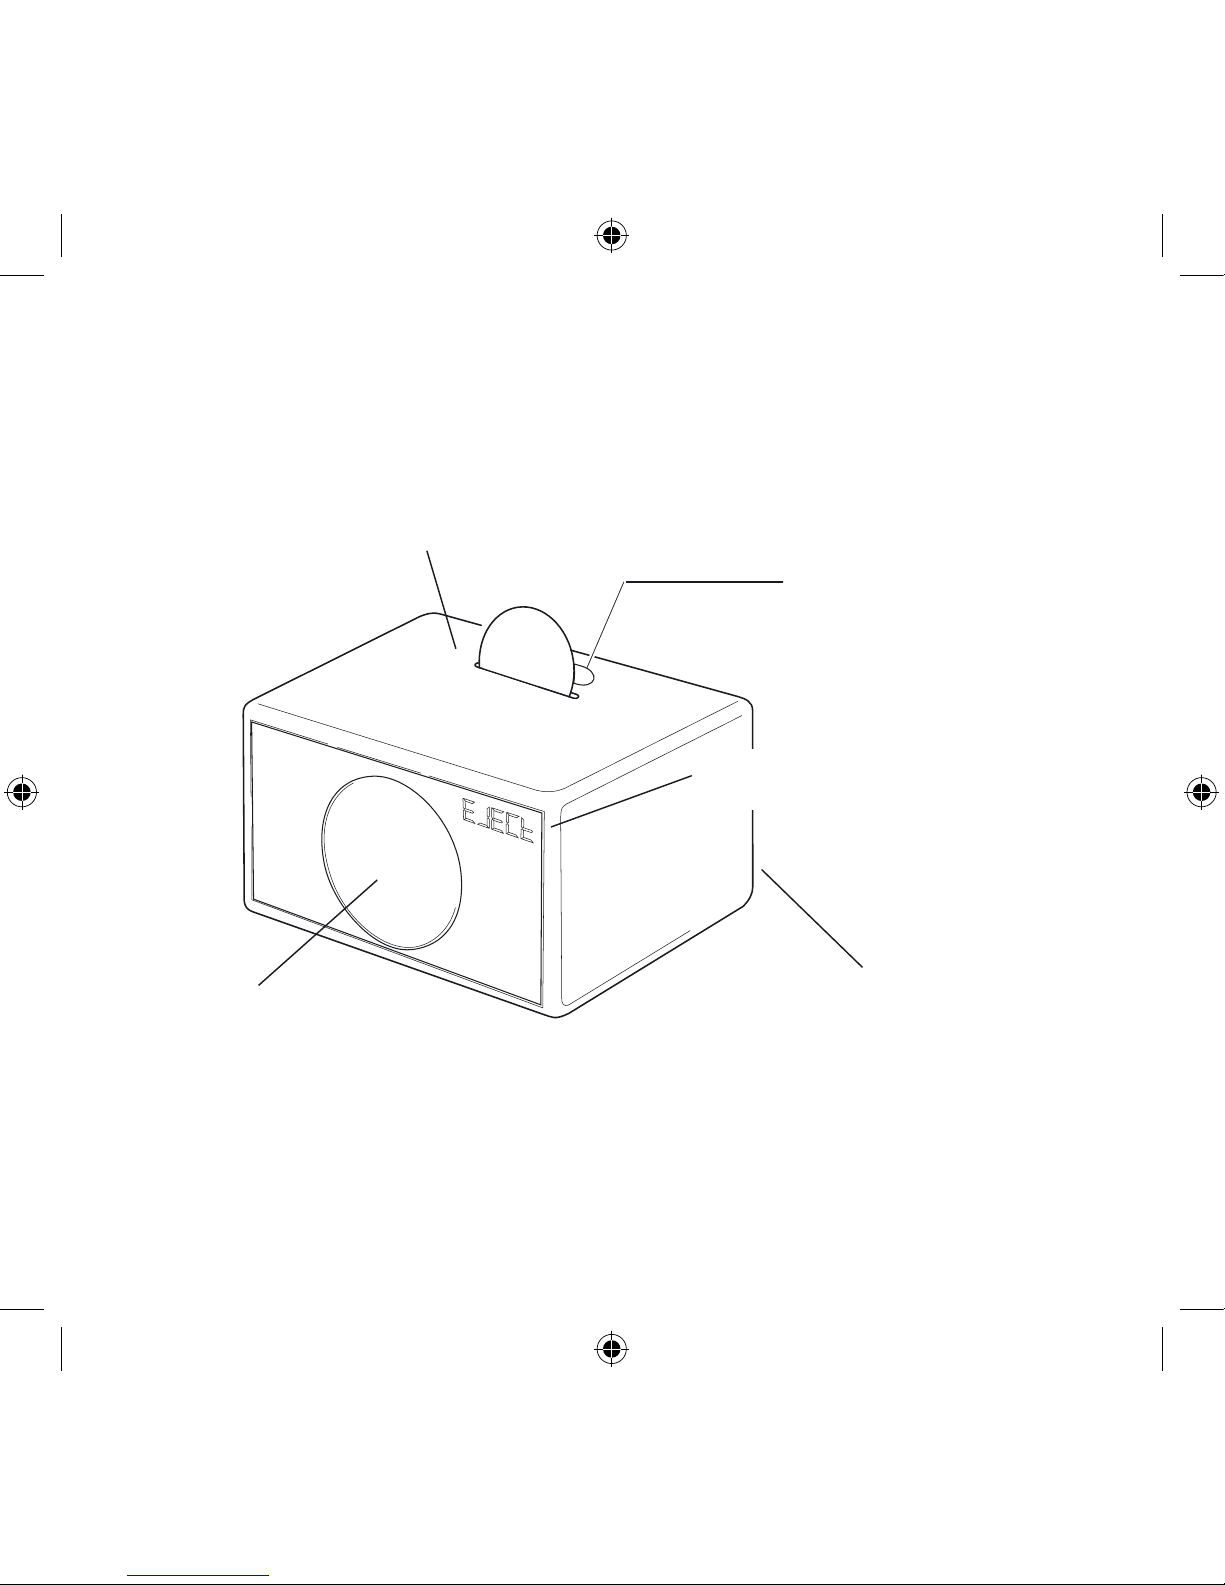
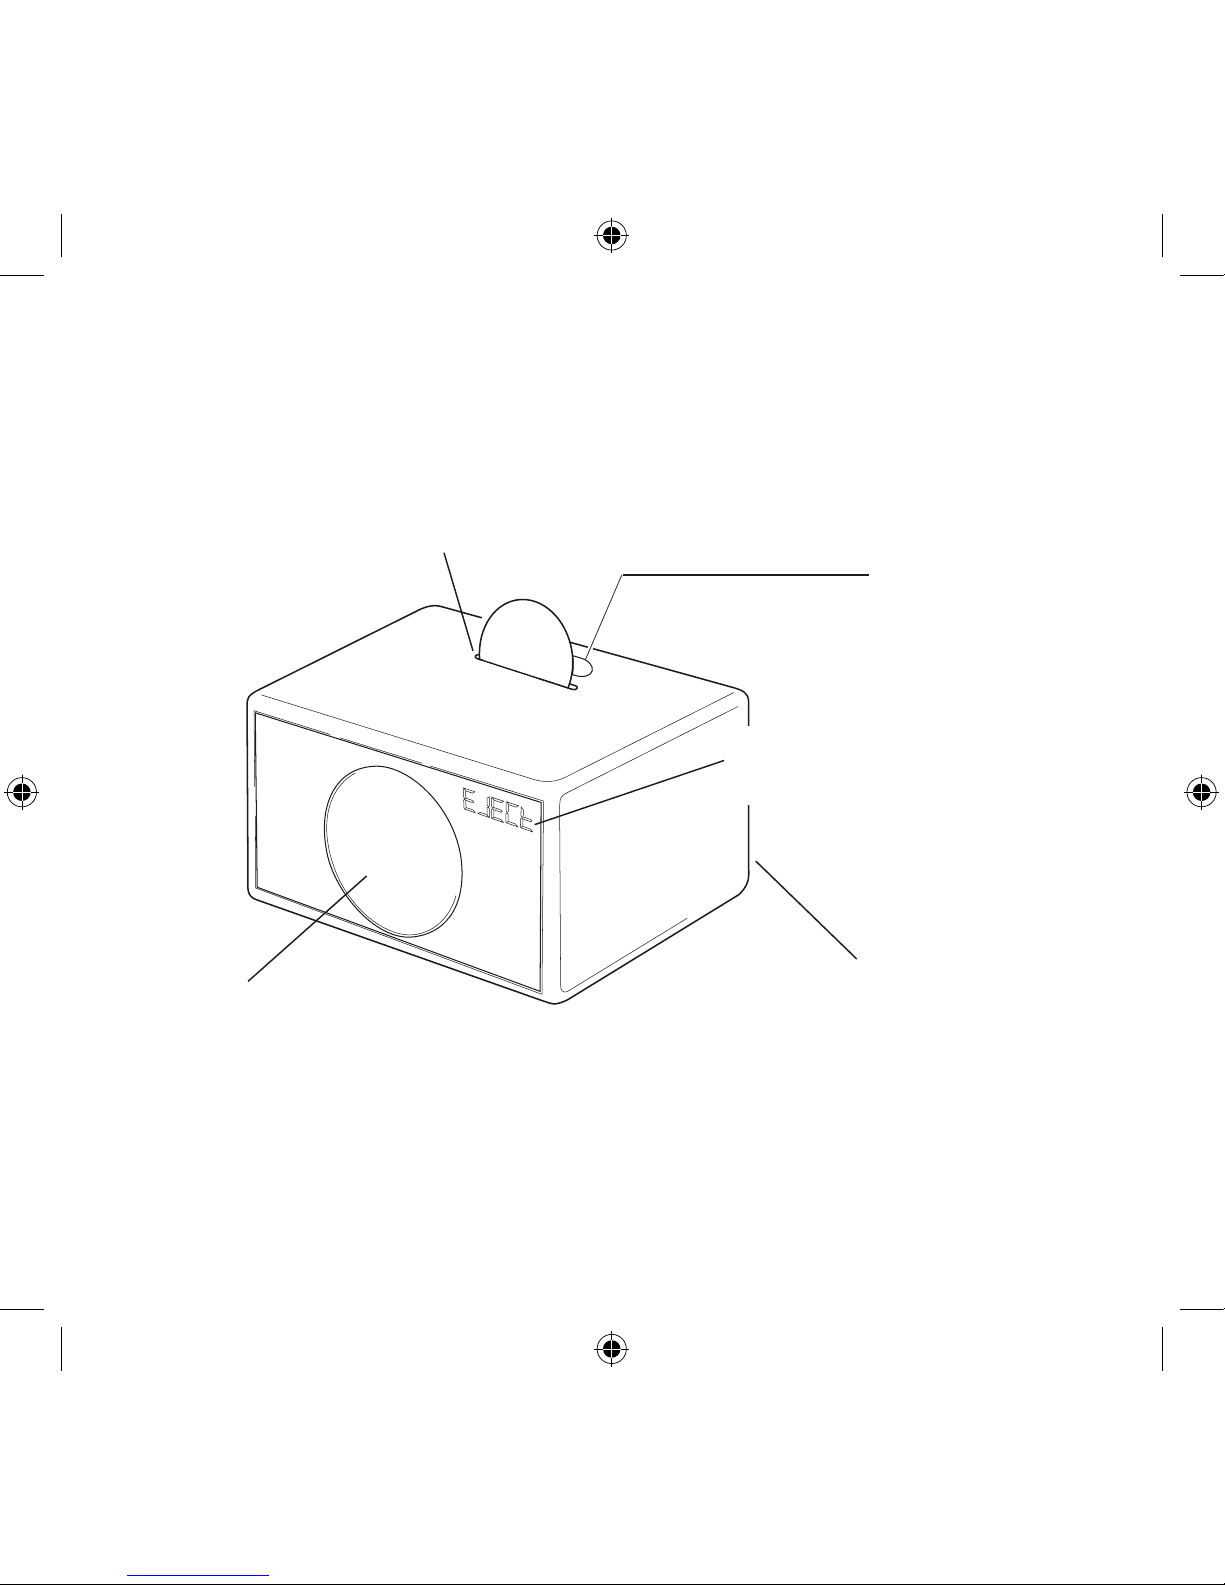
Quick start:
CD Player
Front Grille
LED Display showing system mode,
FM frequency, CD status, etc.
Back Panel
iPod universal dock
Page 14
15
English
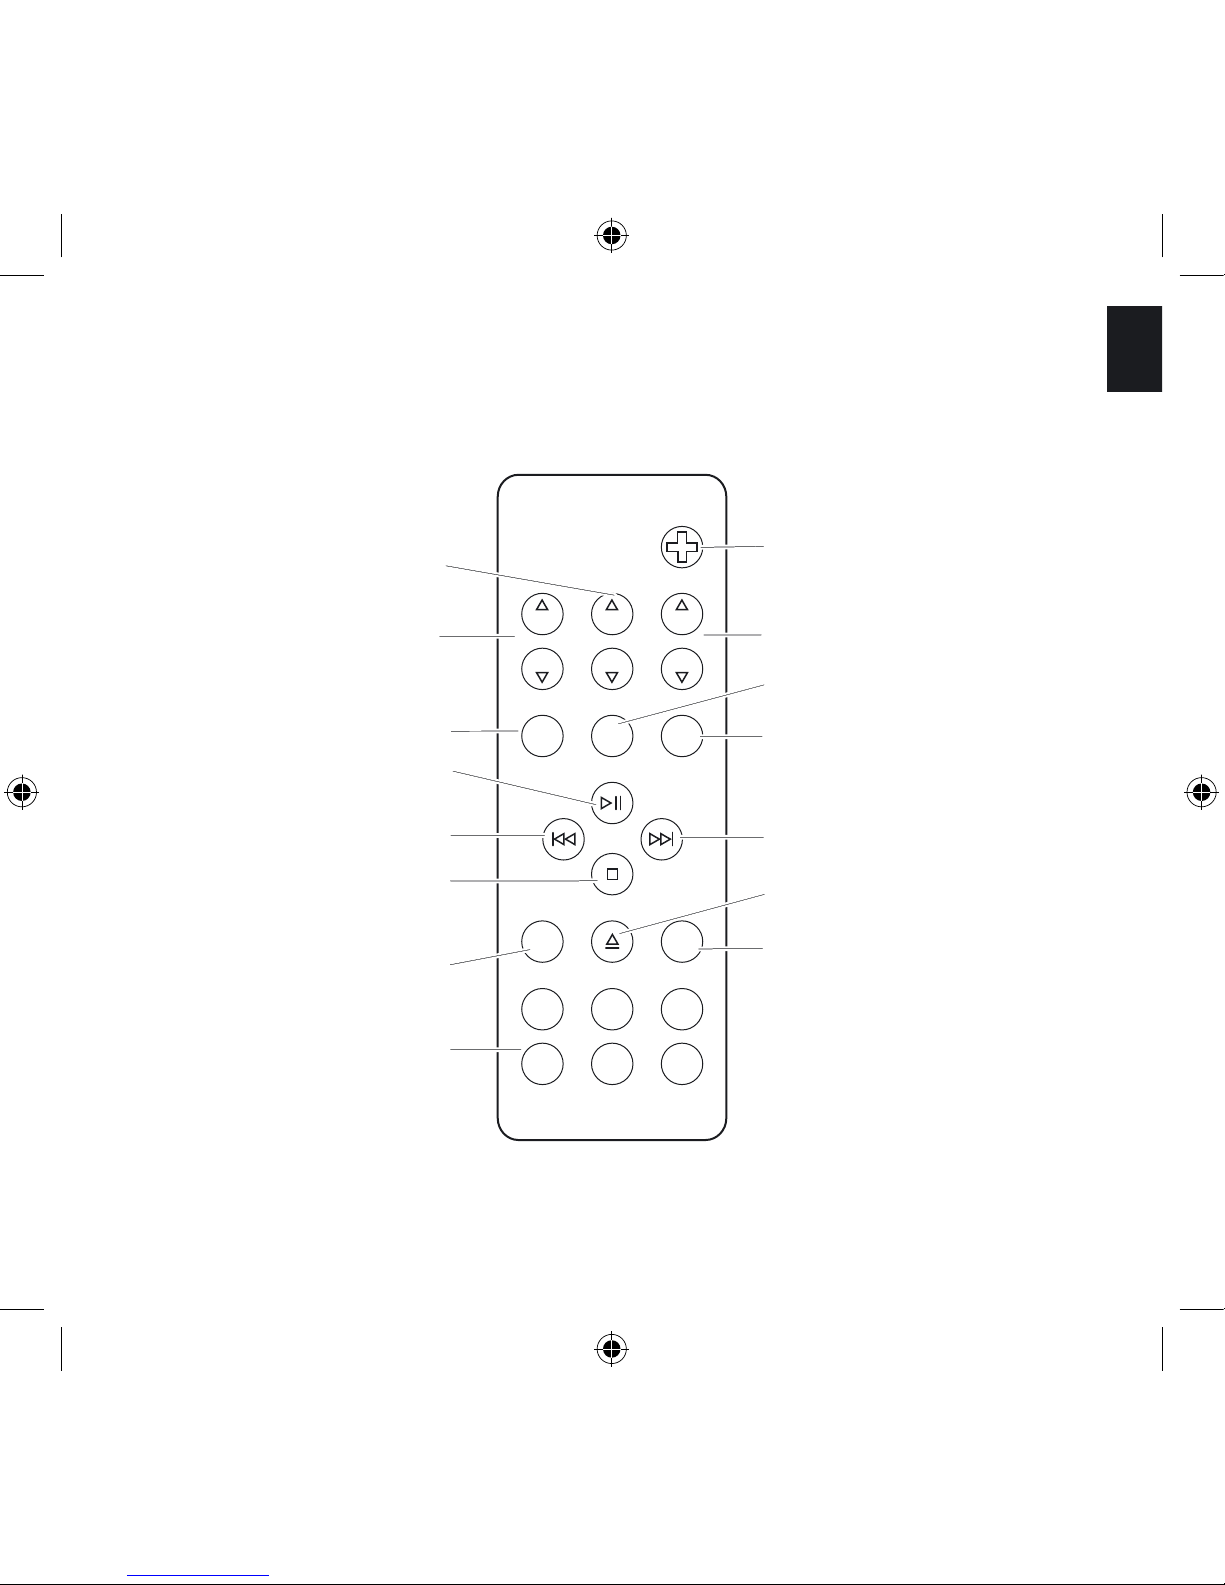
Remote control:
LINE IN
iPod
AIR
CD FM
ERP
TES
VOLBASS
TREBLE
VOLBASS
TREBLE
Power on/off
Volume
CD Player
FM radio
CD Eject
Fast forward/skip forward
Line in
FM radio Presets
AIR
(Function not supported)
Stop
Fast reverse/ skip back
Play/Pause
iPod
Bass
Treble
Page 15
16
Turn on the Geneva Sound System:
Press the power on/off key on the remote control.
Select source:
To switch between sources, press either iPod, CD, FM or Line In key on the remote control
to select which source to be controlled.
Listen to your iPod (more details on page 21):
Step 1. If you intend to use the System with an iPod, remove the lid on top of the cabinet
by using your finger nail or a soft tool. Do not use a knife or other sharp edged objects that
can damage the laquer. The wooden lid has a built-in magnet and can be attached to the
back panel (see page 13).
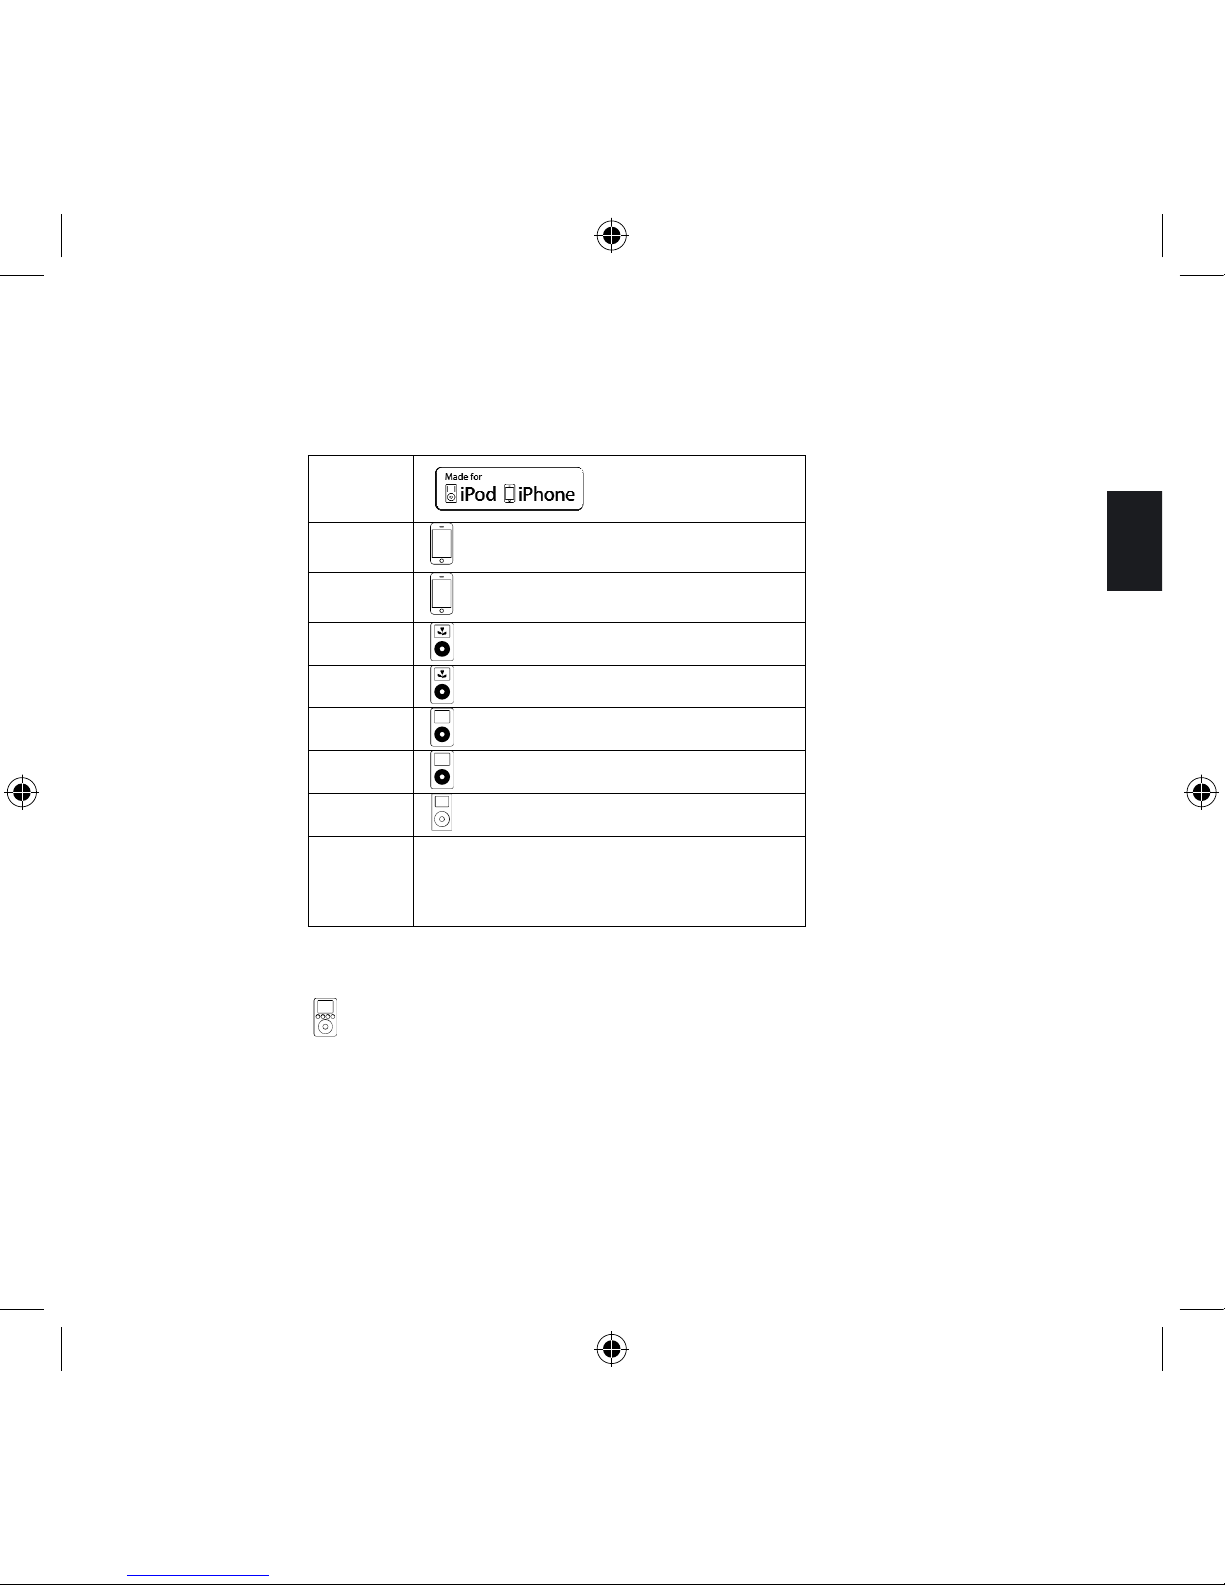
Select the right iPod Dock Adapters that fits with the iPod model you intend to dock by
following the table on page 21, or try the enclosed Dock Adapters until you find the one
that fits tightly with your iPod. Attach the Dock Adapter to the iPod Universal Dock by
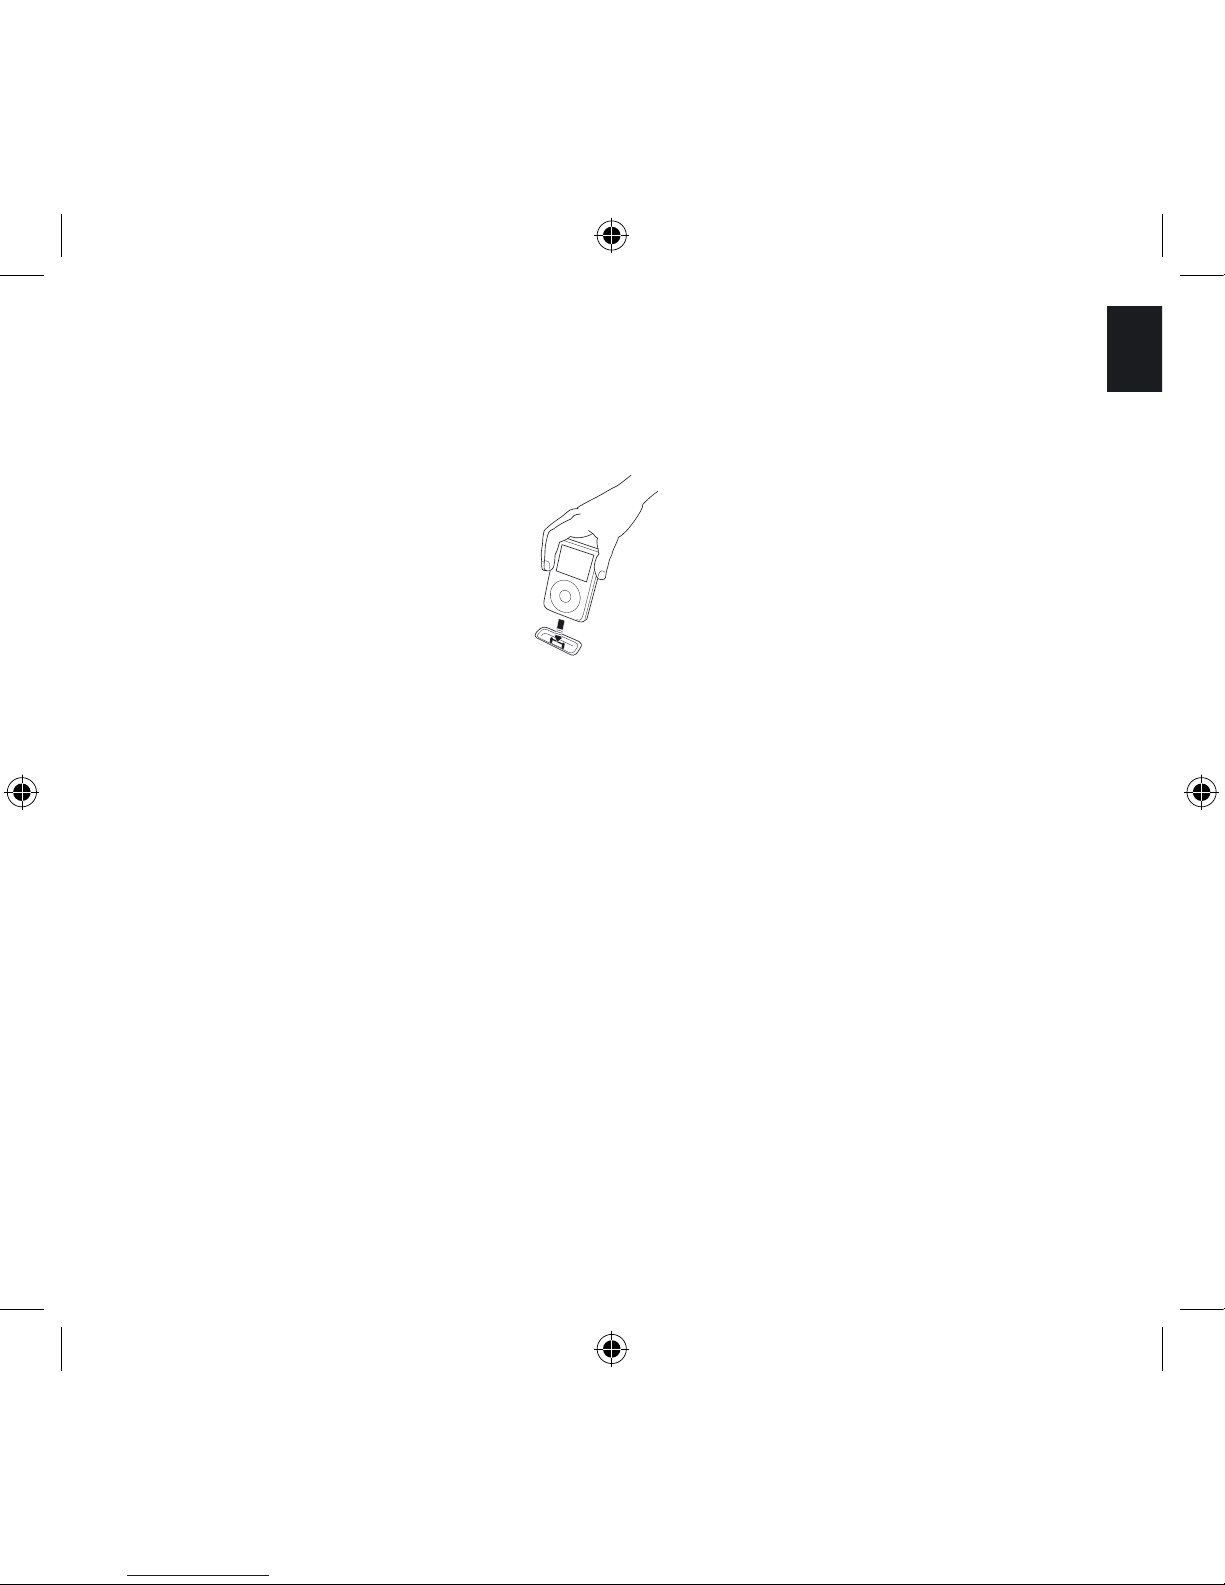
pressing lightly on the top of the Dock Adapter (see picture) and it will snap in.
Page 16
17
English
Step 2. Insert the iPod in the corresponding Dock Adapter in the iPod Universal Dock.
Step 3. Press the iPod key on the remote control and the LED Display under the grille
should display “iPod”. If the display does not lit up, check that the AC power cord is
correctly inserted in to functioning AC outlet.
Step 4. Press the Play key on the remote control. If you still cannot hear any sound check
that the volume is turned up by adjusting the “+” volume key.
Step 5. You can navigate your iPod using the Stop, Play/Pause, Skip/Fast Forward,
Skip/Fast Reverse keys on your remote control.
Charging: Your iPod is charging while the system is on.
Page 17
18
Listen to a CD (more details on page 23):
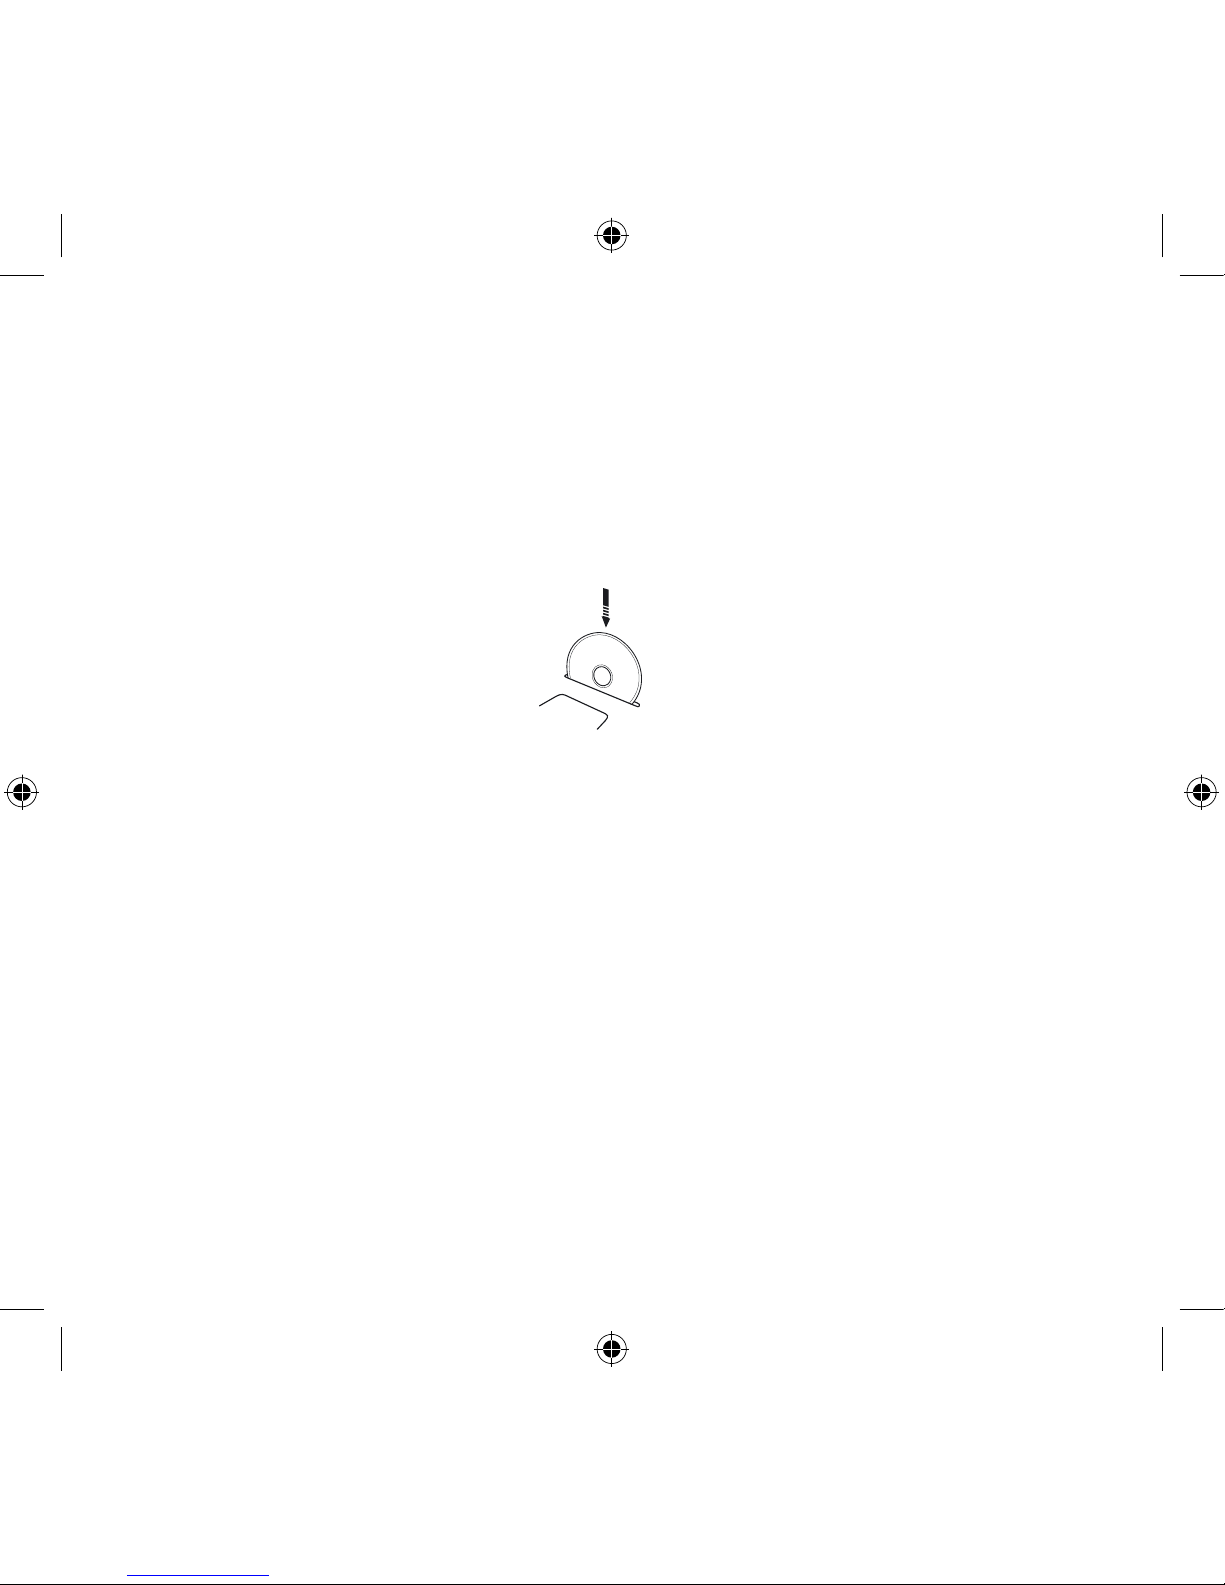
Step 1. Insert the CD into the slot – make sure the printed side of the CD is facing
the front of the Cabinet. The LED Display under the grille should display “CD” and the CD
should start playing automatically. If the display does not light up then check that the AC
power cord is correctly inserted in to functioning AC outlet. If you still cannot hear any
sound, check that the volume is turned up by adjusting the “+” volume key.
Step 2. You can navigate the CD player by using the Stop, Play/Pause, Skip/Fast Forward
and Skip/Fast Reverse keys on your remote control.
Step 3. To remove the CD, press the Eject key on the remote control.
Listen to the FM radio (more details on page 24):
Step 1. Connect the External antenna to the External FM antenna connector on the
Back Panel.
Step 2. Press the FM button on the remote control and the LED Display under the grille
should display an FM frequency, e.g. “103.2”. If the display does not light up, check that
the AC power cord is correctly inserted into a functioning AC outlet. If you still cannot
hear any sound, check that the volume is turned up by adjusting the “+” volume key.
Step 3. Select an FM station with the << and >> keys.
CD title
Page 18
19
English
2. How to...?
General:
How to turn the Geneva Sound System on?
- Pressing the FM, iPod, CD, or Line In keys on the remote control
- Pressing the on/off key on the remote control
How to turn the Geneva Sound System off?
By pressing the ON/OFF key on the remote control
. Now the system is in standby mode.
If you want the system completely disconnected from the power, you need to disconnect
the power cable.
How to adjust Volume and Sound?
1. Use the Volume, Bass and Treble keys on the remote control to adjust sound and
volume.
2. Volume: 0 means silence (no sound output), 100 means maximum output.
3. Treble and Bass: -6 means very little bass or treble, 0 means neutral , 6 means
maximum bass or treble.
4. If you turn the device off, the current values are stored. So if it is at a very high volume
when turned off, it will be at a very high volume when it is next turned on.
How to verify that the remote control works?
Every time a key is pressed on the remote control, a small red light on the LED Display
lights up quickly.
Page 19
20
How to clean the speaker?
Unplug this Geneva Sound System from the AC power outlet before cleaning. Clean only
with a cleaning cloth provided in the accessory bag. To avoid making scratches to the
surface, we recommend that you use the cleaning cloth included in the accessory bag.
Cleaning:
Clean only with a cleaning cloth provide in the accessory bag. Do not use cleaning alcohol, or other solvent fluids to clean the surface of the Cabinet as this can both damage
the lacquer and also cause electrical failures and fire if it enters the electronics in the
Geneva Sound System!
What is the functionality of the AIR key on the remote control?
This function is not valid on this system.
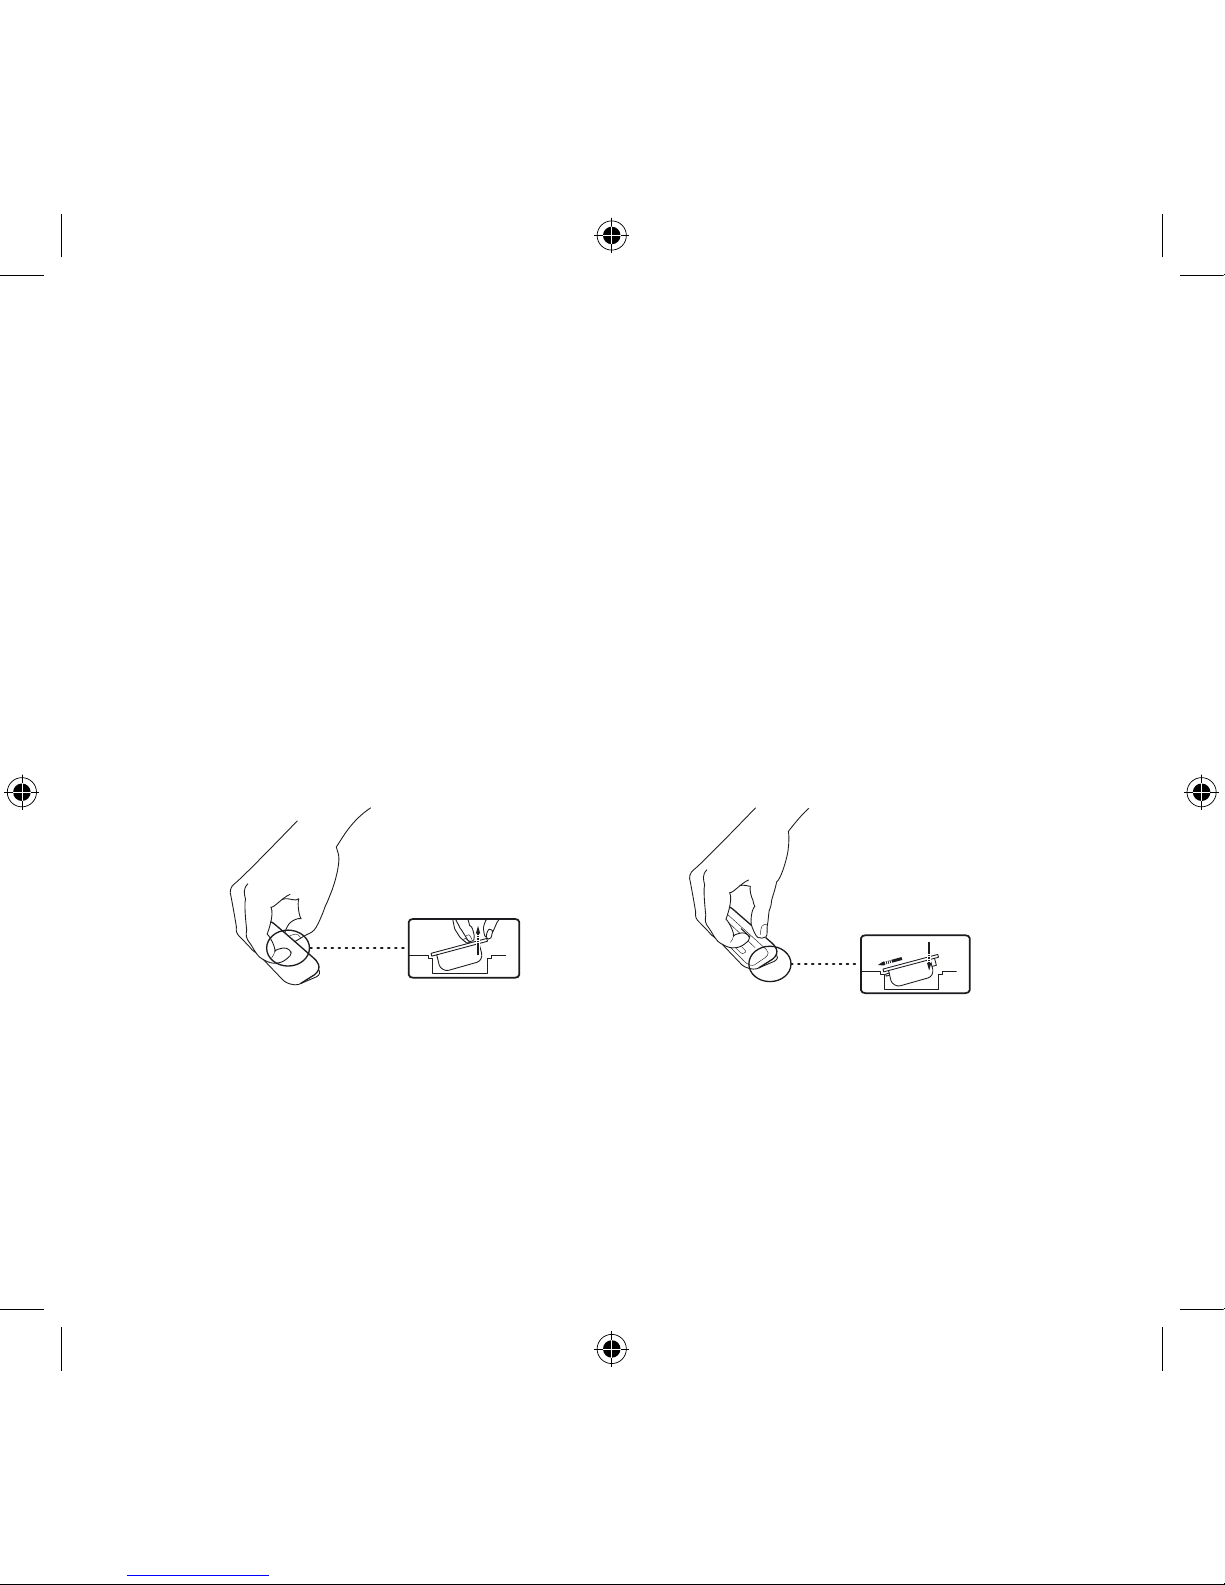
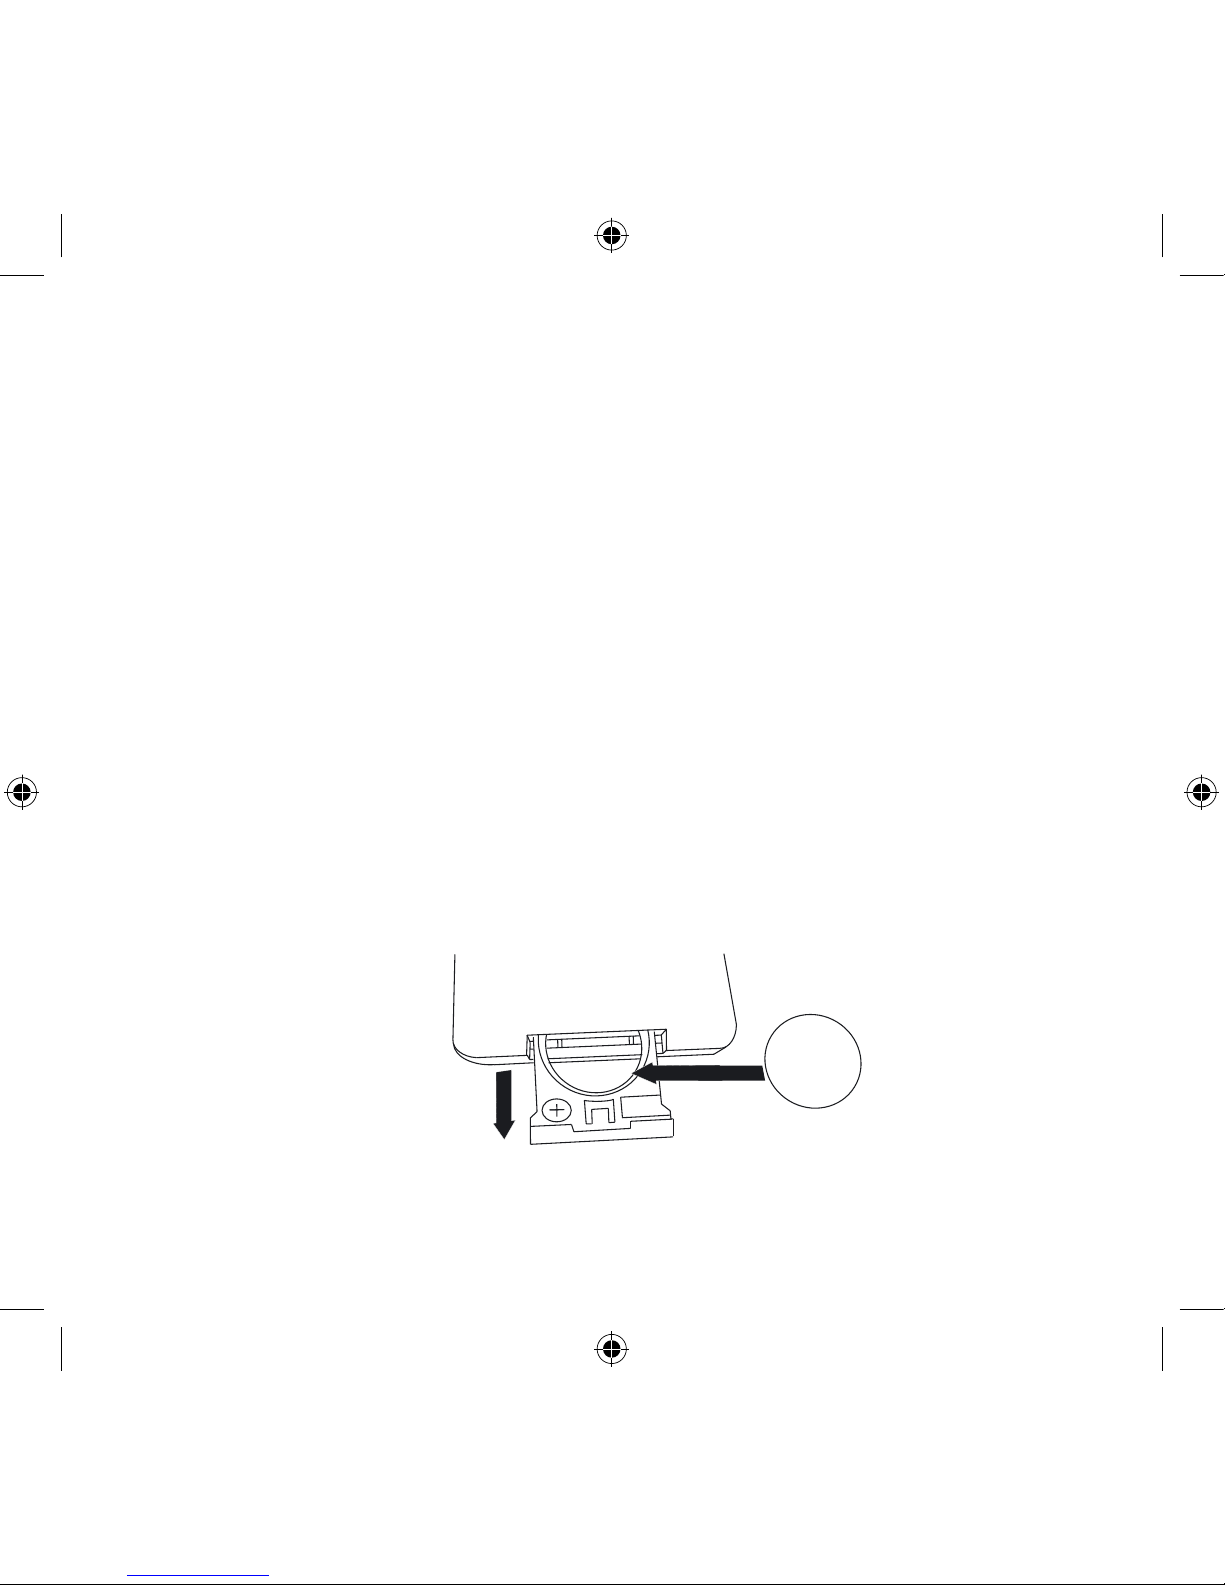
How to change battery in the remote control?
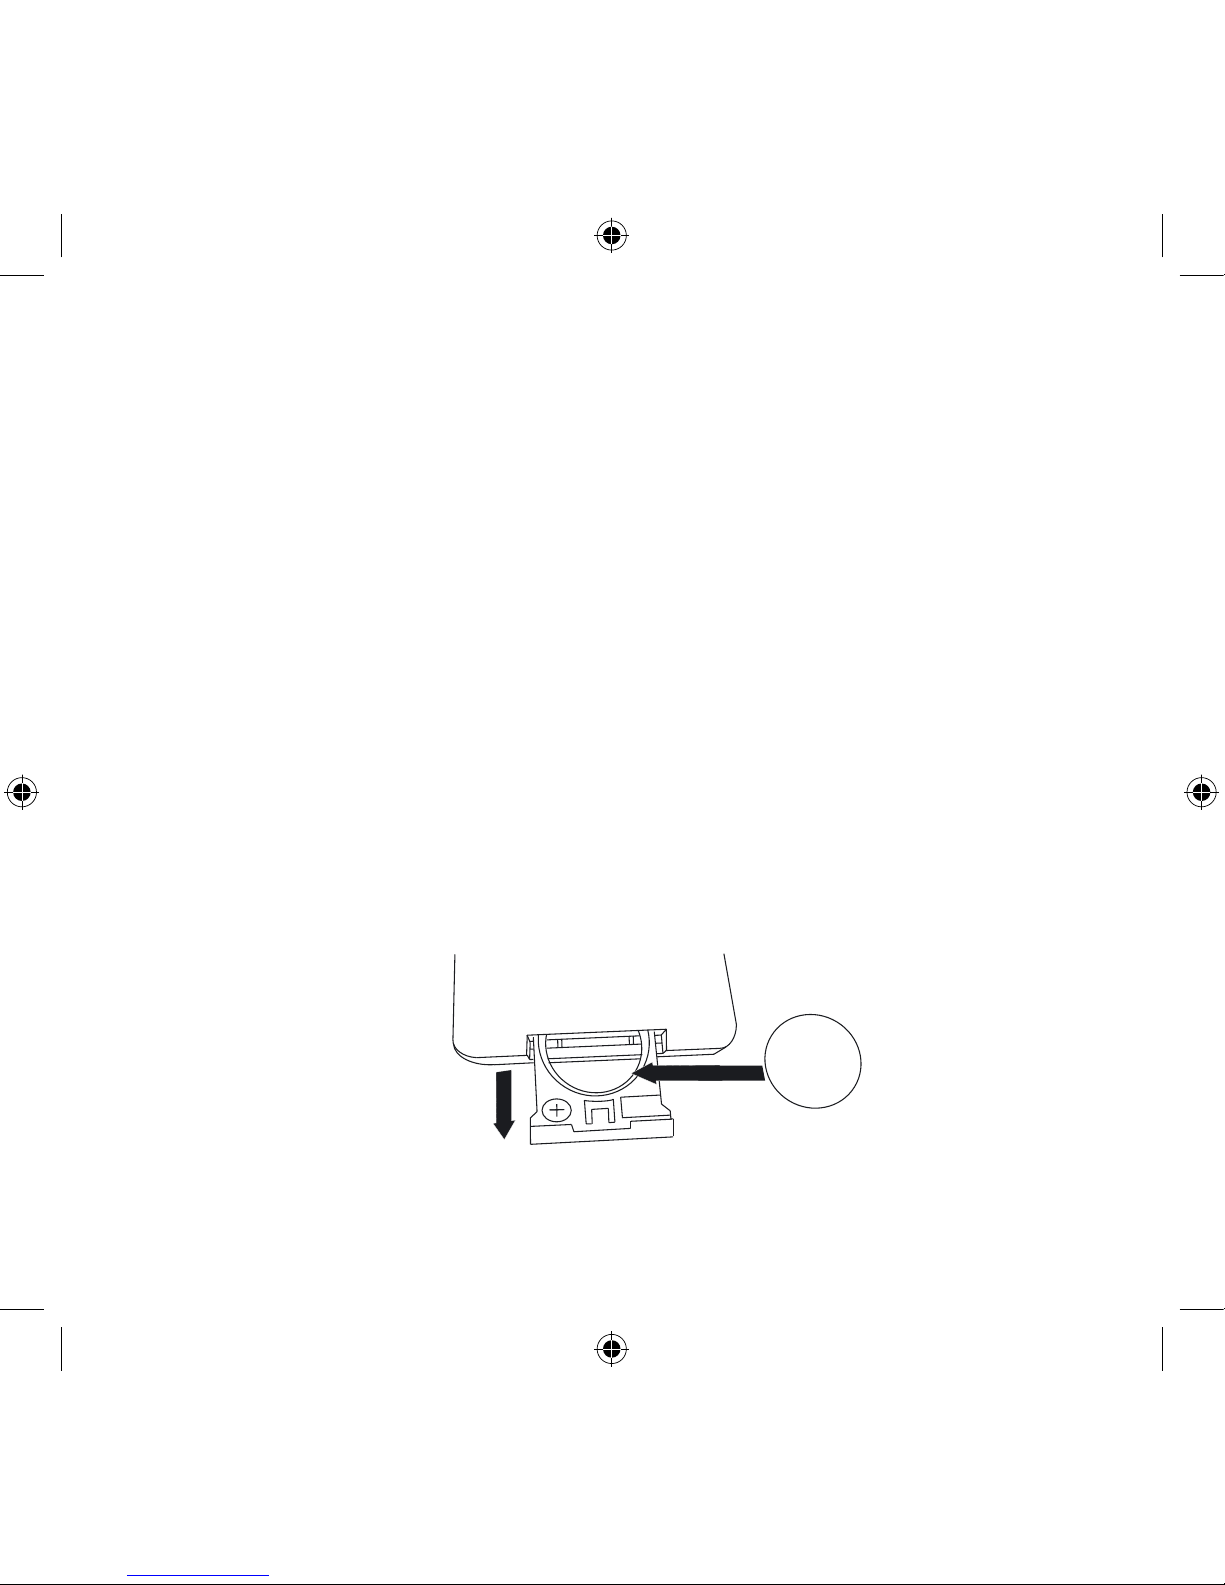
1. Open the battery lid that is on the backside of the remote control.
2. Remove the existing battery and replace it with a new lithium cell, 3 V battery
(CR2025 type).
3. Inside the battery compartment there are symbols showing in which direction the
batteries should be placed. Carefully follow these directions.
Step 1
Step 2 + 3
Page 20
21
English
Geneva
Dock Adapter Nr
15
Works with
iPhone 3G; iPhone 3G-S
12
Works with
iPhone 2G
(4GB, 8GB only)
7
Made for
iPod 4th generation (4G): iPod photo (iPod with color display)
(40GB, 60GB only)
6
Made for
iPod 4th generation (4G): iPod Photo, color U2 iPod
(20GB, 30GB only)
5
Made for
iPod 4th generation (4G)
(40GB only)
4
Made for
iPod 4th generation (4G iPod), U2 iPod
(20GB only)
3
Made for
iPod Mini
(4GB, 6GB only)
� *
Made for
iPod touch *
iPod nano 3rd generation (3G) *
iPod classic *
iPod nano 2nd generation (2G) *
iPod 5th Generation (video) *
iPod nano *
* Geneva Dock Adapter
Not included. All new iPod models already include the dock adapter in the original packaging.
Not supported
iPod 3rd generation (3G iPod)
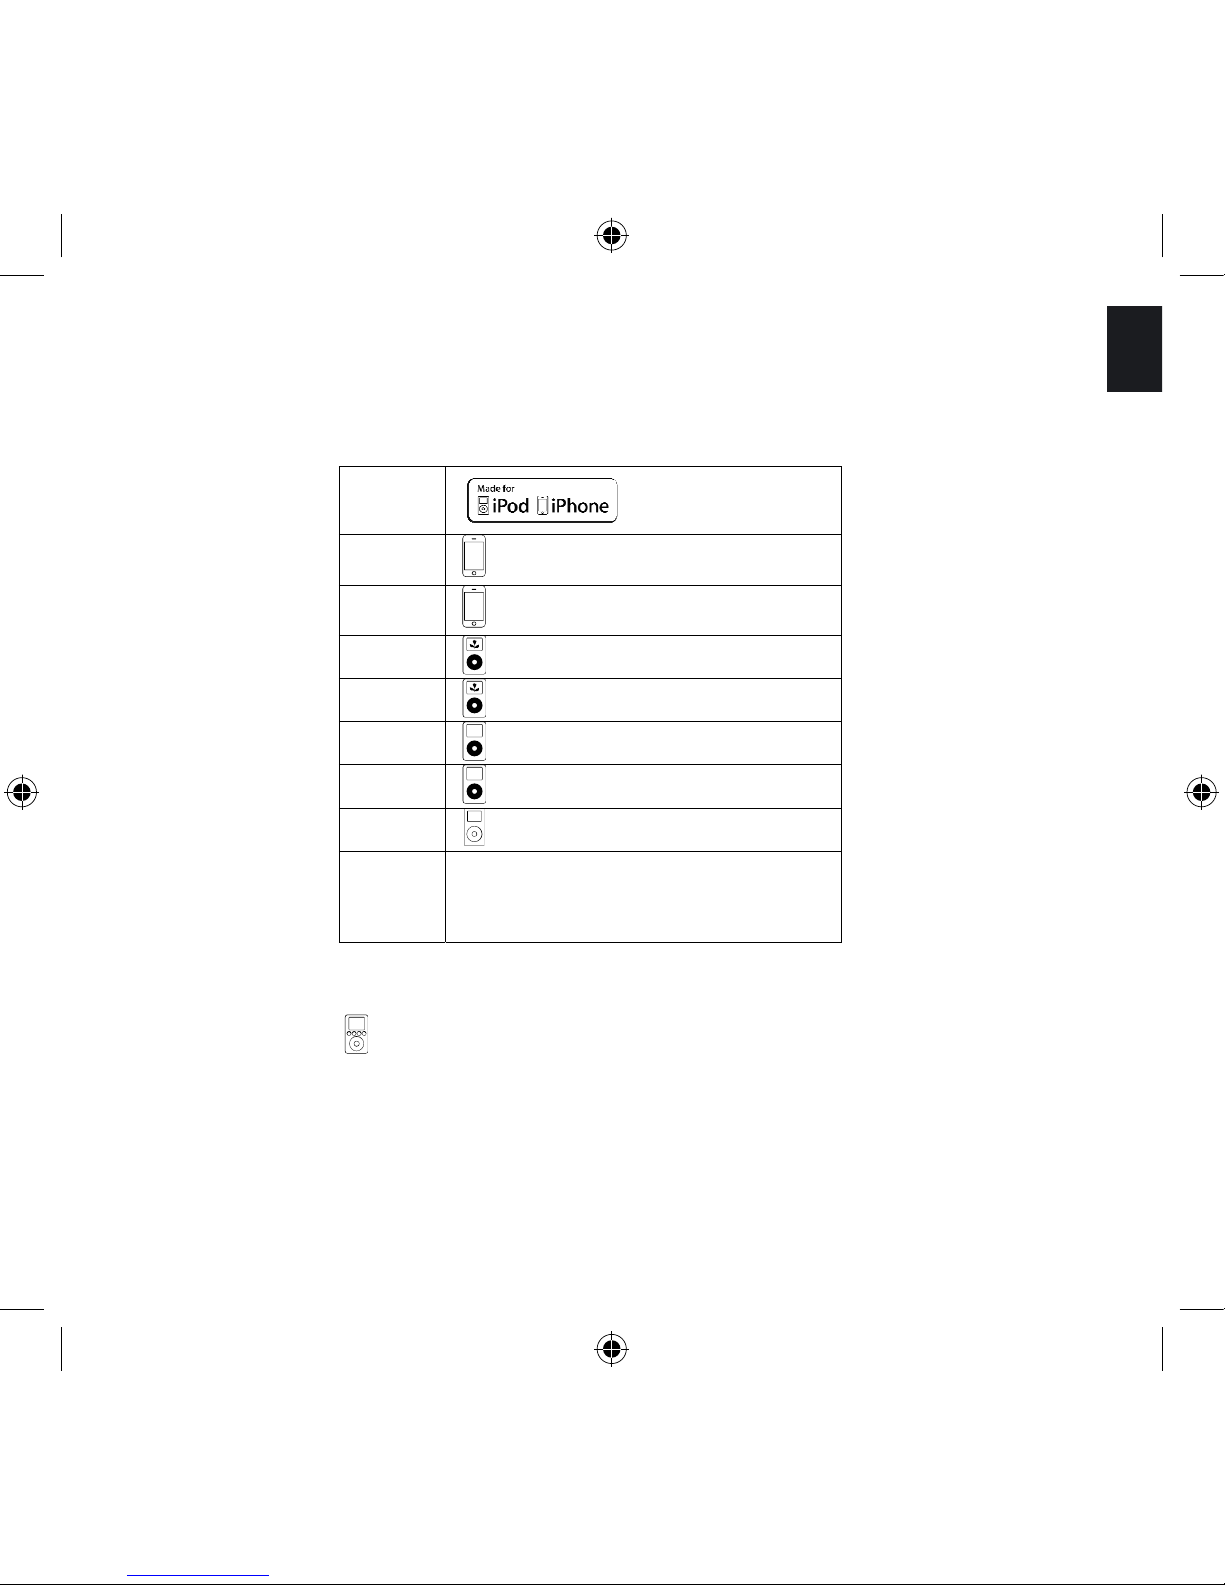
How to select the right iPod Adapter for my iPod?
„Geneva may enclose one or several dock adapters together with this product.
The actual versions of these and number of dock adapters may change from time to time, as we seek to enclose adapters to the latest
and most common Apple iPhone and iPod products. If the adapter to the iPod or iPhone product you wish to use with this Geneva
system is not enclosed in this package, it should be available as an original accessory from your Apple dealer.“
Page 21
22
iPod:
How to check the software version of your iPod?
On the iPod select “Settings”, “About”, “Version”. Always use the latest software version.
How to upgrade your iPod?
On the Apple iPod website you will find instructions on how to upgrade the software of
your iPod: www.apple.com/ipod/download/
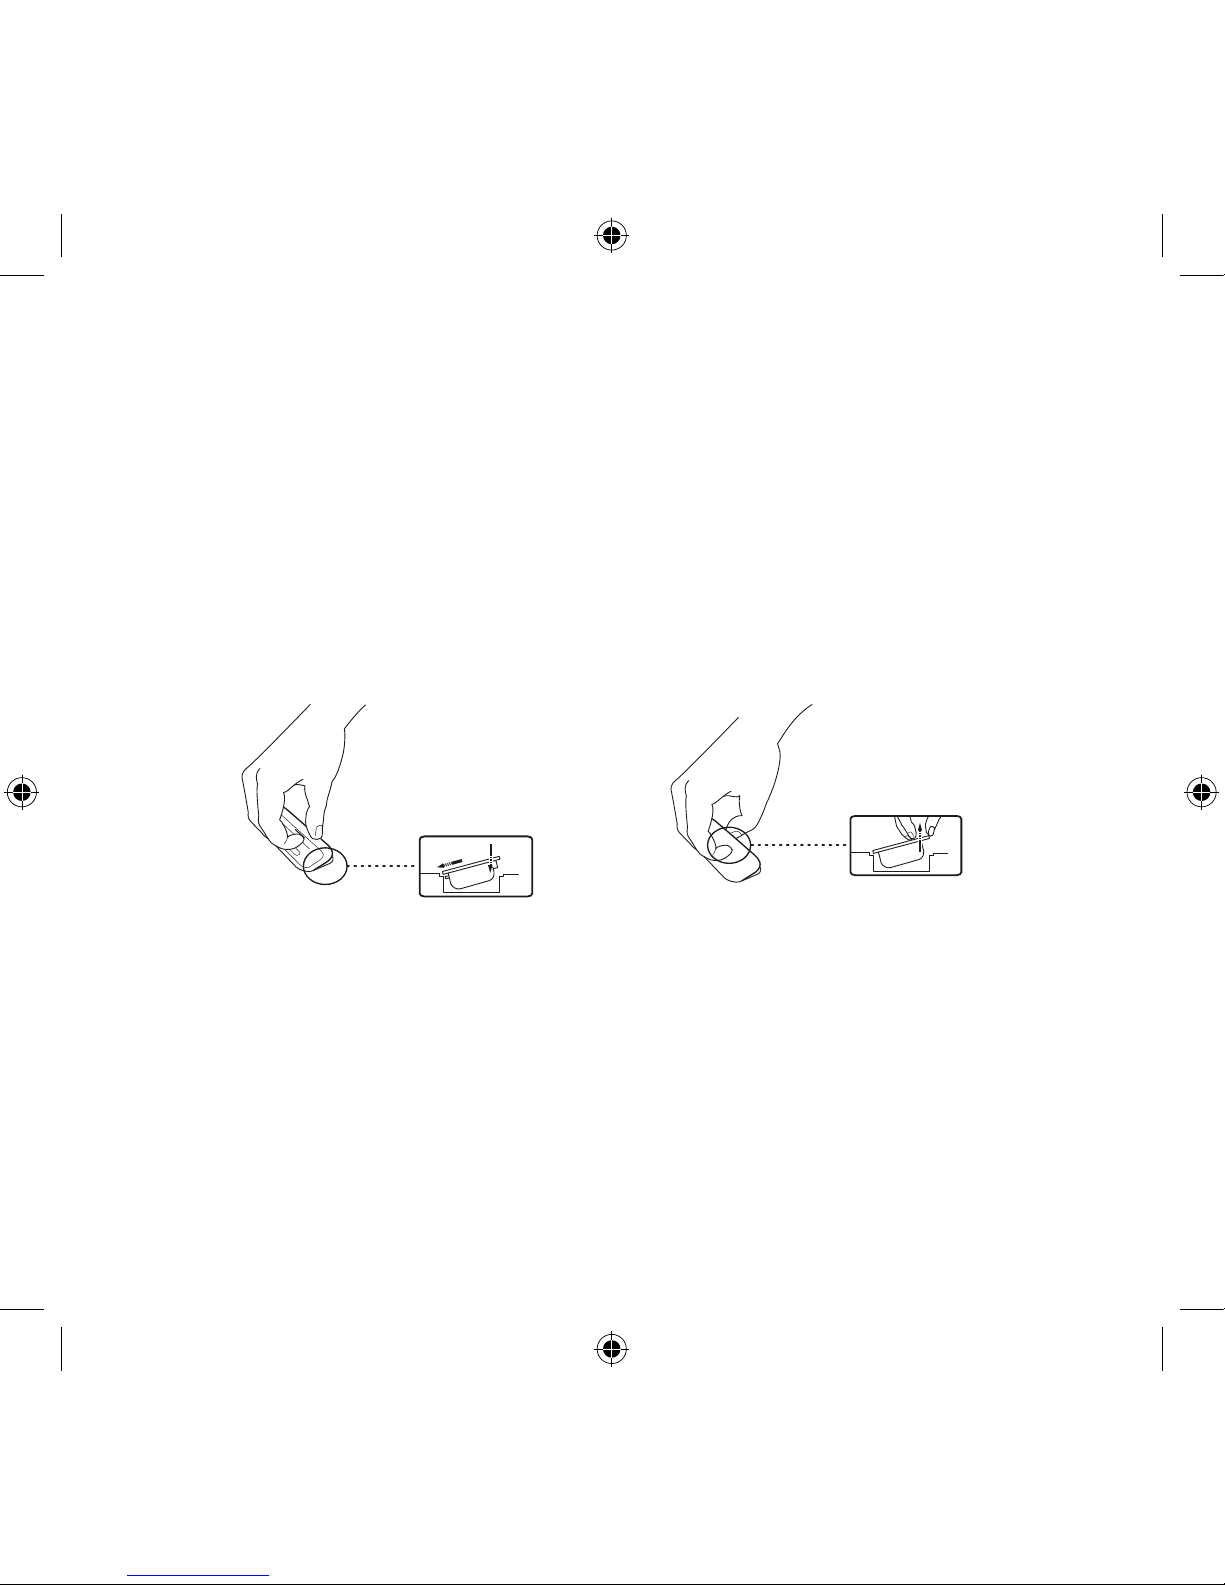
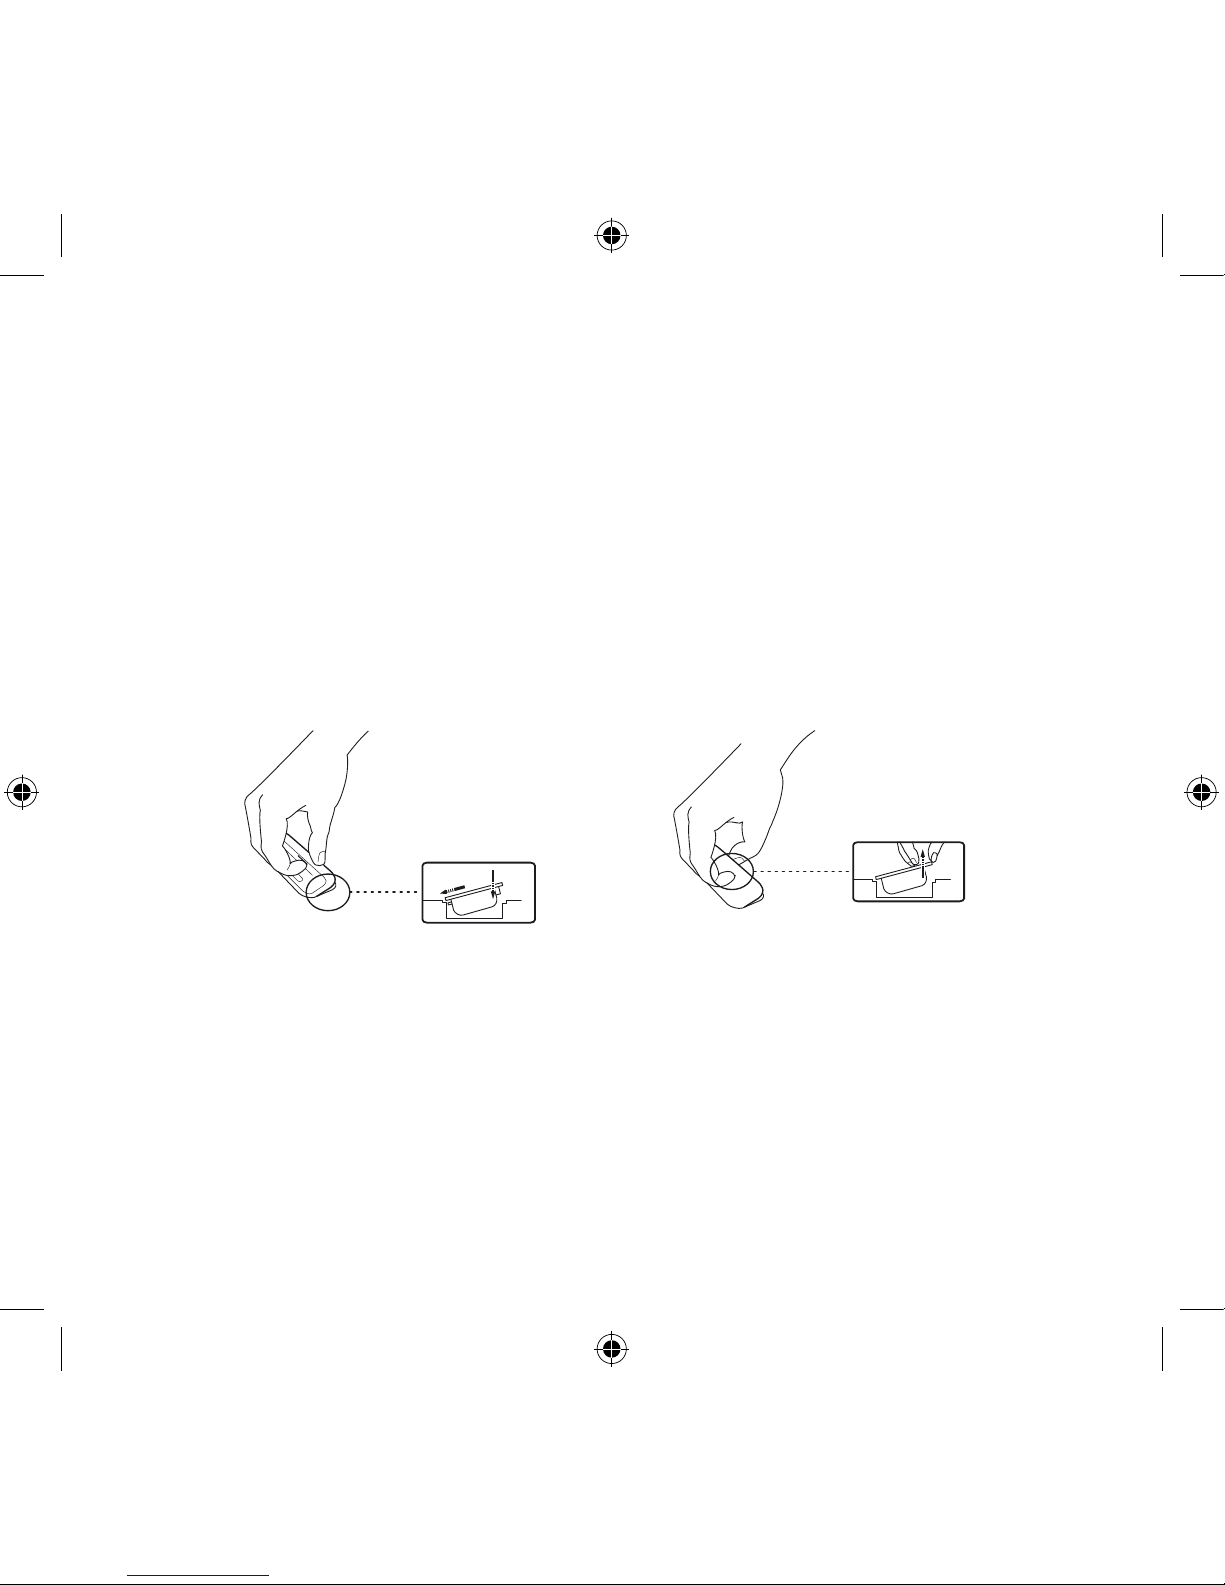
How to insert or remove a Dock
Adapter?
How to control the iPod using the Geneva Sound System’s remote control?
If you have connected an iPod to the speaker and turned the Geneva Sound System into
iPod mode, you can control the iPod using the remote control supplied with the Geneva
Sound System.
The figure on page 15 will give you an overview of the control functions.
Page 22
23
English
CD:
How to control the CD player using the remote control?
You can control the built-in CD player using the remote control supplied with the Geneva
Sound System.
The figure on page 15 will give you an overview of the control functions.
How to play CD’s with MP3 and other formats?
The built-in CD player supports CD-DA, CD-R, CD-RW, CD-ROM (both single and multi
session) and MP-3 formats. The CD player will play CD’s in these formats exactly as it
plays a regular audio CD.
How to play MP3 CD-R/W with several Albums?
It is possible to organize MP3 files with directories (folders) on a CD-R/W. The Geneva
Sound System will play such a hierarchy in a simplified way - all files are played as if
they would be in one large directory.
Can I play 8 cm CD’s?
No.
Page 23

24
FM radio:
How to control the FM radio using the remote control?
You can control the built-in FM radio using the remote control supplied with the Geneva
Sound System.
The figure on page 15 will give you an overview of the control functions.
How to select a FM radio station?
1. Press ‘FM’ on the remote control.
2. Use the << or >> keys to select a station: one click increases or decreases the
frequency.
3. The number on the LED display under the Grille indicates the current frequency in MHz
(e.g. “88.7“ on display means 88.7 MHz).
4. To scan through frequencies, hold down the << or the >> key for a few seconds and
the FM radio searches for the next station automatically. When a station has been
found, the automatic search stops. To keep scanning, repeat the action.
Page 24
25
English
How to store your favorite FM radio station in a preset?
1. Select your favorite radio station using the << or >> keys on the remote control.
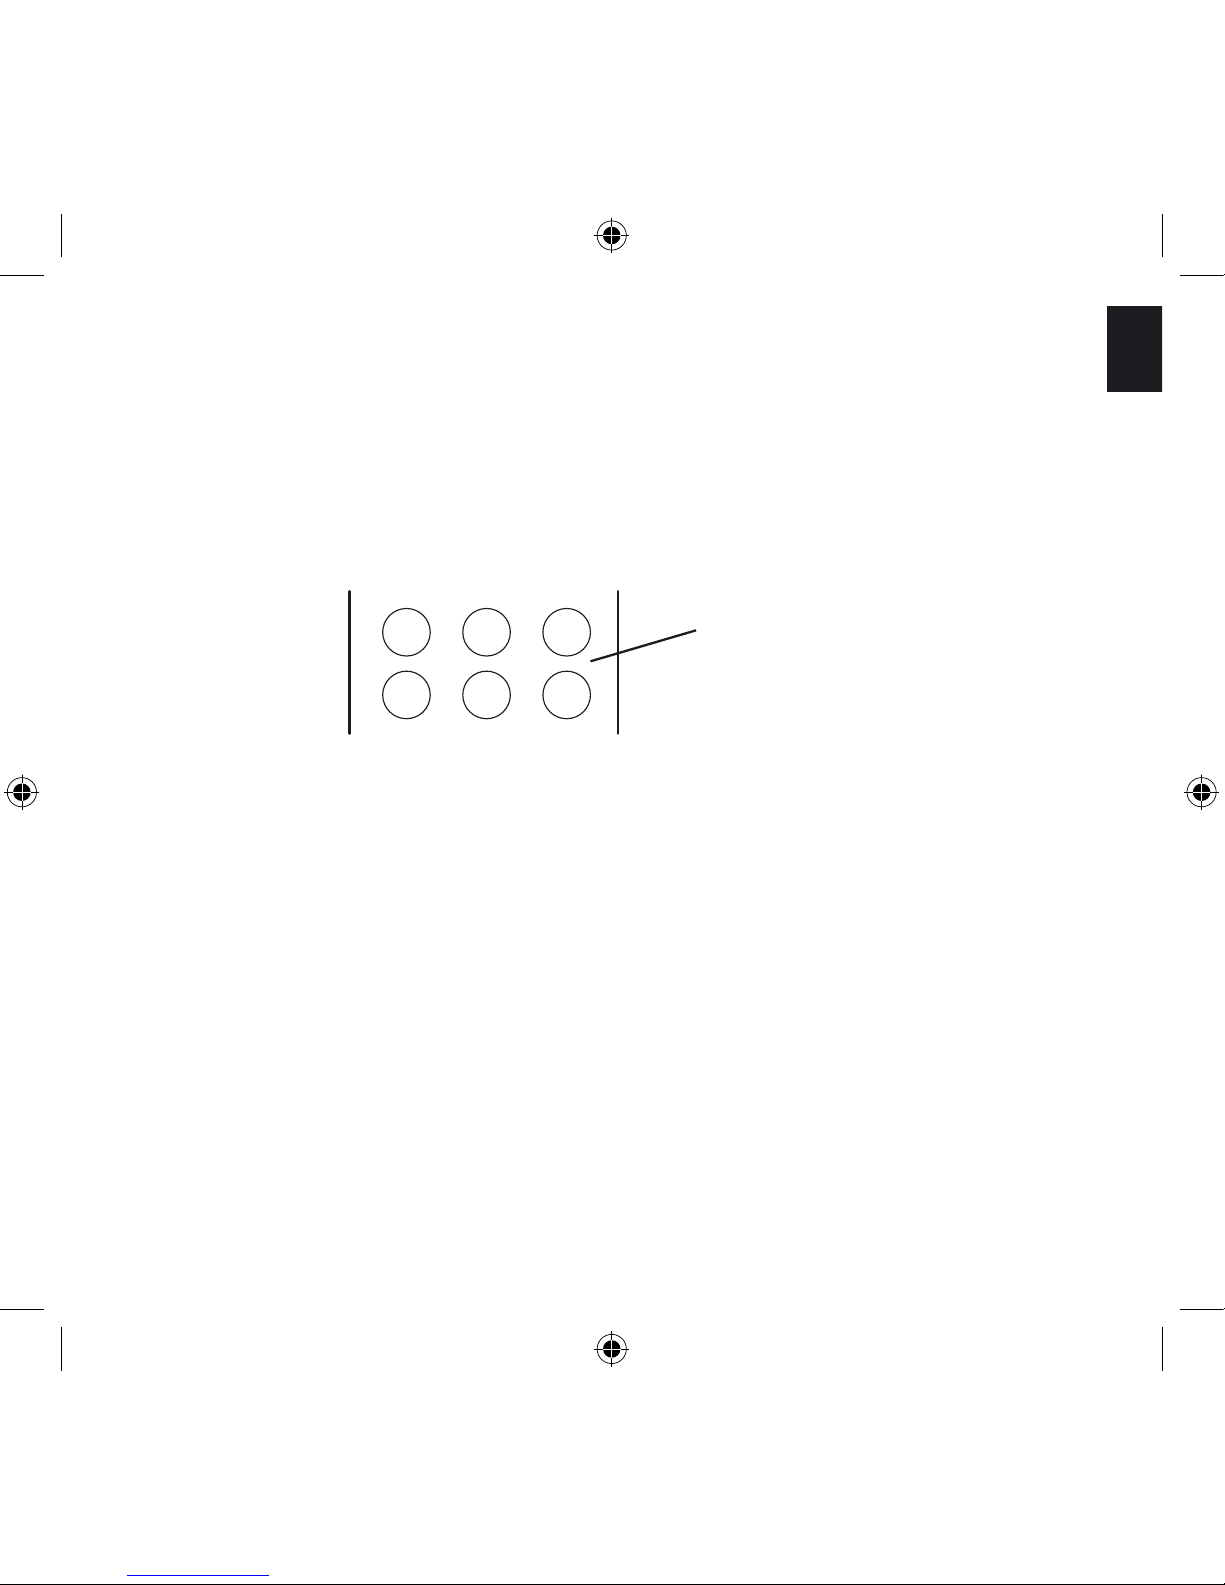
2. You have six presets (a preset memorizes the frequency of the station) available – these
are the following six keys on your remote control:
3. Select one of the 6 preset keys on the remote control, and hold it down until ‘store’
appears on the LED display in the Grille of the Geneva Sound System. The station has
now been stored and can be retrieved using the selected preset key.
How to play a FM radio station that is stored in the presets?
1. Press the FM key on the remote control.
2. Simply press one of the six preset keys once and the stored FM station will be
received.
ERP
TES
FM radio Presets
Page 25

26
How to erase or overwrite a preset?
Stored presets do not need to be erased - just use the previous steps to store a station in
a preset.
How to connect the FM radio antenna?
The Geneva Sound System is FM ready and it has a built-in FM tuner. To get radio reception you need to connect the External Antenna that is enclosed with the accessory bag.
You find the External Antenna Connector under the Geneva Sound System on the
Back Panel.
How to change FM stereo/mono settings?
Press the „Stop“ key to change between mono and stereo.
Line in:
How to connect a TV, Computer, VCR, DVD player or a game console to the
Geneva Sound System using the “Line In” input?
Use the enclosed Line In cable to connect the Geneva Sound System to any audio device
that has an audio out connector. First connect the Line In cable to the device you want
to connect with the Geneva Sound System, and then connect the cable to the Line In
connector located on the Back Panel. Press the Line In key on the remote control and
start playing the content of the device you have connected.
Note that you cannot control any such device using the Geneva Sound System remote
control, but instead use the controls available for the connected device.
Page 26
27
English
3. Troubleshooting, Service and Support
Troubleshooting and Support:
1.
2.
3.
Service and Repair:
If the product is damaged and needs repair, please contact Geneva Lab by phone or
email to be referred to an authorized service center. For repair under the Limited Warranty
Period, see terms on the web at www.genevalab.com and select support page or consult
your dealer.
Technical Support:
product
Customer Service Te
lephone Number:
see Geneva Lab Website www.genevalab.com and select support page for your local
support number.
Website
www.geneva
lab.com
If the system does not function as expected, first carefully read this manual to ensure
that it is being correctly operated.
If the problem persists, you can access our troubleshooting database available on the
web at www.genevalab.com and select support page.
If not successful, contact our customer support:
Page 27
28
D2Audio’s unique “Intelligent Digital Amplifi ers” have impressed professionals and
audiophiles for years. Our patented amplifi er technology constantly optimizes the audio
signal to deliver the best pure digital performance and the highest sound quality available.
“EmbracingSound™ is the technology for consumers and professionals alike to experience sound. As EmbracingSound™ is utilizing two very closely spaced speakers you
will experience what is really in the recording with better resolution and clarity than ever
before. Just sit back and experience all your music and you will most probably fi nd new
favorites as well as making excursions in to music genres that you where totally unfamiliar
with before. Just let the experience guide you!
More details can be found on the www.genevalab.com website.
4. Made for iPod & Technology Partners
The “Made for iPod and iPhone“ logo indicates that this product has been designed
specifi call to work with iPod and the iPhone.
The manufacturer certifi es that this accessory has been made in accordance with the high
standards of quality and performance that you expect from iPod and Apple.
Technology Partners:
Geneva Lab Corporation uses some of the world’s leading developers of audio
technologies to make the Geneva Sound System a very advanced product.
MPEG Layer-3 Audio Coding Technology licensed from Fraunhofer IIS and Thomson.
4. Made for iPod & Technology Partners
Page 28
29
English
5. Technical Specifications:
Fore detailed technical specifications for this product, please go to our website
www.genevalab.com and select support page, where you can download the detailed
technical specifications for any of our products.
© 2010 G-Lab GmbH. All rights reserved
Under the copyright laws, this manual may not be copied, in whole or in part,
without the written consent G-Lab GmbH.
Geneva® is a registered trademark of G-Lab GmbH.
D2Audio and D2A are registered trademarks, while the D2Audio Digital Amplifier logo
is a trademark of D2Audio Corporation.
iPod is a trademark of Apple Computer, Inc. registered in the U.S. and other countries.
The trademark EmbracingSound™ and the Embracing Sound Experience logo are
owned by Embracing Sound Experience AB.
Geneva Sound System, User Manual, Version v5.0-EU-E
Page 29

30
Page 30
31
Deutsch
Bedienungsanleitung
Geneva Sound System
(Model M +CD)
Page 31
32
WICHTIGE SICHERHEITSBESTIMMUNGEN
1) Lesen Sie die Bedienungsanleitung.
2) Halten Sie die Bedienungsanleitung griffbereit.
3) Beachten Sie alle Warnungen.
4) Folgen Sie allen Angaben.
WICHTIGE SICHERHEITSHINWEISE
VORSICHT - ELEKTROSCHOCKGEFAHR
RISK OF ELECTRICAL SHOCK
DO NOT OPEN
CAUTION
RISQUE DE CHOC ÉLÉCTRIQUE
NE PAS OUVRIR
AVIS
Page 32
33
Deutsch
5) Benützen Sie das Gerät nicht nah am Wasser.
6) Reinigen Sie das Gerät nur mit einem trockenen, weichen Tuch.
7) Verdecken Sie keine Ventilationsöffnungen. Installieren Sie das Gerät nach den
Vorgaben des Herstellers.
8) Stellen Sie das Gerät nicht neben Öfen und Heizkörpern oder anderen Geräten, die
Wärme ausstrahlen.
9) Benützen Sie ausschließlich Originalzubehör.
10) Verlegen Sie das Netzkabel zugfrei und so, dass man nicht darüber stolpern kann.
Stellen Sie keine Behälter auf das Kabel und achten Sie darauf, dass es nicht verklemmt
wird.
11) Ziehen Sie während eines Gewitters oder wenn Sie das Gerät über einen längeren
Zeitraum nicht benützen den Netzstecker aus der Steckdose.
12) Wenden sich bei allen Servicefragen an qualifiziertes Händlerpersonal. In folgen-
den Fällen sollte das Gerät repariert werden, und zwar ausschließlich von qualifizierten
Technikern: Schäden an Netzkabel oder -stecker; Beschädigung durch herabfallende Gegenstände, ausgelaufener Flüssigkeit oder Regen; Funktionsstörungen oder deutlich verändertes Betriebsverhalten; Beschädigung durch Herunterfallen; Schäden am Gehäuse.
13) Stellen Sie das Gerät nicht neben tropfendem oder spritzendem Wasser auf. Zudem
stellen Sie keine Vasen oder andere Behälter mit Flüssigkeiten auf das Gerät.
Page 33
34
Achtung: Beachten Sie, dass eine fehlerhafte Aufstellung oder eine falsche Bedienung zu
einem Leistungsverlust und gefährlichem Aussetzen des Gerätes führen kann.
CD-Laufwerk: Im Laufwerk befindet sich ein Laser. Um sich nicht direkt dem Laserstrahl
auszusetzen, sollten Sie keinesfalls das Gehäuse öffnen oder irgendwelche Schutzvorrichtungen entfernen, die zu Ihrer Sicherheit eingebaut sind. Schauen Sie nie direkt in den
Laserstrahl.
Sollte das Laufwerk fehlerhaft arbeiten, wenden Sie sich an das Servicepersonal.
Class 1 Laserprodukt:
Dieser CD Player ist eingestuft als Klasse 1 LASER PRODUKT
nach EN 60825- 1:1994+A1+A2, IEC 60825-1:1993+A1+A2. Das Klasse 1 LASER
PRODUKT-Siegel befindet sich auf der Rückplatte. Dieses Produkt entspricht der Norm
21 CFR Part 1040.10.
Technische Details über die eingebaute Laser-Diode: Wellenlänge: 790 nm ± 15nm.
Maximale Abstrahlungsleistung (während Service): 0.492 mW.
CLASS 1 LASER
PRODUCT
CAUTION
Visible and invisible
laser radiation when open.
Avoid exposure to beam.
Page 34
35
Deutsch
Luftzufuhr: Um einen sicheren Betrieb zu gewährleisten und das Gerät vor Überhitzung
zu schützen, verdecken Sie keine Ventilationsöffnungen auf der Geräteunterseite. Stellen
Sie das Gerät daher nicht auf ein Bett, Sofa, oder einen anderen weichen Untergrund.
Stellen Sie es zudem nicht in ein Regal oder stecken Kleinteile durch die Ventilationsöffnungen.
Reinigung: Bitte beachten Sie, dass dem Zubehörbeutel ein Staubtuch zur Reinigung des Gerätes beigepackt ist. Um Kratzer an der lackierten Oberfläche zu vermei-
den, empfehlen wir Ihnen, das beigepackte Putztuch zu verwenden. Bevor Sie das Gerät
reinigen, ziehen Sie den Netzstecker zu Ihrer eigenen Sicherheit.
Überlastung: Um die Feuergefahr und Belastung des Stromkreises zu minimieren, benützen Sie keine Verlängerungskabel und stark belastete Mehrfachsteckdosen.
Offenes Feuer: Stellen Sie das Gerät in einem sicheren Abstand von offenen Flammen,
wie Kerzen, auf. Stellen Sie niemals Kerzen, auch keine Teelichter, auf das Gerät.
Betriebstemperatur: Die empfohlene Raumtemperatur liegt zwischen 5-40°C.
Frontplatte: Versuchen Sie niemals die Frontplatte zu entfernen. Diese ist nicht abnehm-
bar. Sollte diese trotz allem abgelöst werden, geht jeglicher Garantieanspruch verloren.
Vermeiden Sie Gehörschäden! Immerwährendes lautes Musikhören kann zu ständigen
Hörproblemen führen. Hören Sie daher nur bei Zimmerlautstärke.
Der Netz- oder Gerätestecker wird als Trennvorrichtung verwendet; die Trennvorrichtung muss immer betriebsbereit sein.
Page 35

36
Ort des Produktetypenschildes: Das Produktsiegel und die Sicherheitssysmbole befinden sich auf der Rückplatte des Gerätes.
Ausstecken während des Betriebs: Ziehen Sie niemals den Netzstecker aus dem Gerät,
wenn es in Betrieb ist. Dies kann zu Beschädigungen am CD-Laufwerk und den Lautsprechern führen.
Batterien der Fernbedienung: Halten Sie Kinder von Batterien fern. Batterien können bei
unsachgemässer Behandlung einen Brand oder eine Explosion auslösen oder chemische Verbrennungen verursachen. Laden Sie diese nicht erneut, bauen Sie diese nicht
auseinander oder erhitzen diese auf mehr als 100°C. Ersetzen Sie Batterien mit denen des
gleichen Typs (CR2025 Lithiumionen-Knopfbatterie, 3 V).
ACHTUNG: Es besteht Explosionsgefahr, wenn die Batterie falsch eingesetzt wird. Tauschen Sie sie nur gegen denselben oder einen äquivalenten Typ aus.
Leere Batterien: Bitte entsorgen Sie diese in den bereitstehenden Behältern im Supermarkt oder Altsammelstelle. Verbrennen Sie Altbatterien nicht.
Compact Disk: Führen Sie niemals Münzen, Minidiscs, Mini- bzw. Form- CDs in das Laufwerk ein. Das Laufwerk arbeitet nur mit dem Standardformat (Durchmesser von 12cm).
Externe Antenne: Falls Sie eine externe Antenne (Hausantenne) benützen, so stellen Sie
sicher, dass diese geerdet ist, um Stromschläge und statische Aufladungen zu vermeiden.
Modifikation
: Durch einen nicht von unserem Serviceteam durchgeführten Service am
Gerät und / oder Fernbedienung verliert der Kunde des Gerätes jeglichen Anspruch auf
Garantie.
Page 36
37
Deutsch
Hinweis für CATV Servicetechniker: Bitte beachten Sie die Richtlinie 820-40 der NEC,
die Aussagen über eine korrekte Erdung von Antennen trifft. Insbesondere achten Sie
bitte darauf, dass das Erdkabel an das Massekabel des Hauses angeschlossen ist.
Abnahme der Rückplatte: Wenn die Abnahme der Rückplatte nicht von unserem Serviceteam erfolgt, so verliert der Kunde des Gerätes jeglichen Anspruch auf Garantie.
Entsorgung von Elektrogeräten durch Benutzer in privaten Haushalten in der EU:
Dieses Symbol auf dem Produkt oder dessen Verpackung gibt an, dass das Produkt nicht
zusammen mit dem Restmüll entsorgt werden darf. Es obliegt daher Ihrer Verantwortung,
das Gerät an einer entsprechenden Stelle für die Entsorgung oder Wiederverwertung von
Elektrogeräten aller Art abzugeben. (Bsp. Wertstoffhandel) Die separate Sammlung und
das Recyceln Ihrer alten Elektrogeräte zum Zeitpunkt Ihrer Entsorgung trägt zum Schutz
der Umwelt bei und gewährleistet, dass sie auf eine Art und Weise recycelt werden, die
keine Gefährdung für die Gesundheit des Menschen und der Umwelt darstellt.
Weitere Informationen darüber, wo Sie alte Elektrogeräte zum Recyceln abgeben können,
erhalten Sie bei den örtlichen Behörden, Wertstoffhöfen oder dort, wo Sie das Gerät
erworben haben.
Page 37

38
Inhalt
Kapitel 1
Kapitel 2
40
40
42
44
46
46
47
47
47
47
48
48
48
49
50
50
50
50
51
51
51
Erste Schritte
Auspacken und Aufstellen
Das Wichtigste in Kürze
iPod hören
CD hören
FM Radio hören
Wie kann ich...?
Haupteinstellungen:
Das Gerät einschalten?
Die Lautstärke & den Klang einstellen?
Die Fernbedienung auf Funktion überprüfen?
Den Lautsprecher reinigen?
Was ist die Funktion der AIR-Taste auf der Fernbedienung?
Die Batterien der Fernbedienung wechseln?
iPod:
Wie wähle ich den richtigen iPod Dock-Adapter für meinen iPod aus?
Die iPod Softwareversion meines iPod ermitteln?
Die Software updaten?
Wie wird der Dock-Adapter eingesetzt oder entfernt?
Mit der Fernbedienung meinen iPod steuern?
CD:
Mit der Fernbedienung den CD Player steuern?
Andere Formate wie MP3 und weitere Formate abspielen?
MP3 CDR / CDRW mit verschiedenen Alben abspielen?
Page 38
39
Deutsch
Kapitel 3
Kapitel 4
Kapitel 5
FM Radio:
Mit der Fernbedienung das FM Radio steuern?
Einen Radiosender auswählen?
Meine Lieblingssender abspeichern?
Meine gespeicherten Lieblingssender aufrufen?
Einen gespeicherten Sender löschen bzw. überschreiben?
Eine externe Antenne anschließen?
Wie werden die FM-Stereo-/Mono-Einstellungen verändert?
Line in:
Ein Gerät, wie z. B. ein TV, Computer, VCR, DVD-Spieler, Spielkonsole
über den LINE-IN Eingang anschließen?
Fehlerbehebung, Service und Support
Fehlerbehebung
Serviceteam
Technischer Support
Customer Service Telefonnummer
Website
Made for iPod & Technologiepartner
Made for iPod
Technologiepartner
Technische Daten
52
52
53
53
54
54
54
54
55
55
55
55
55
55
56
56
56
57
Page 39
40
1. Erste Schritte
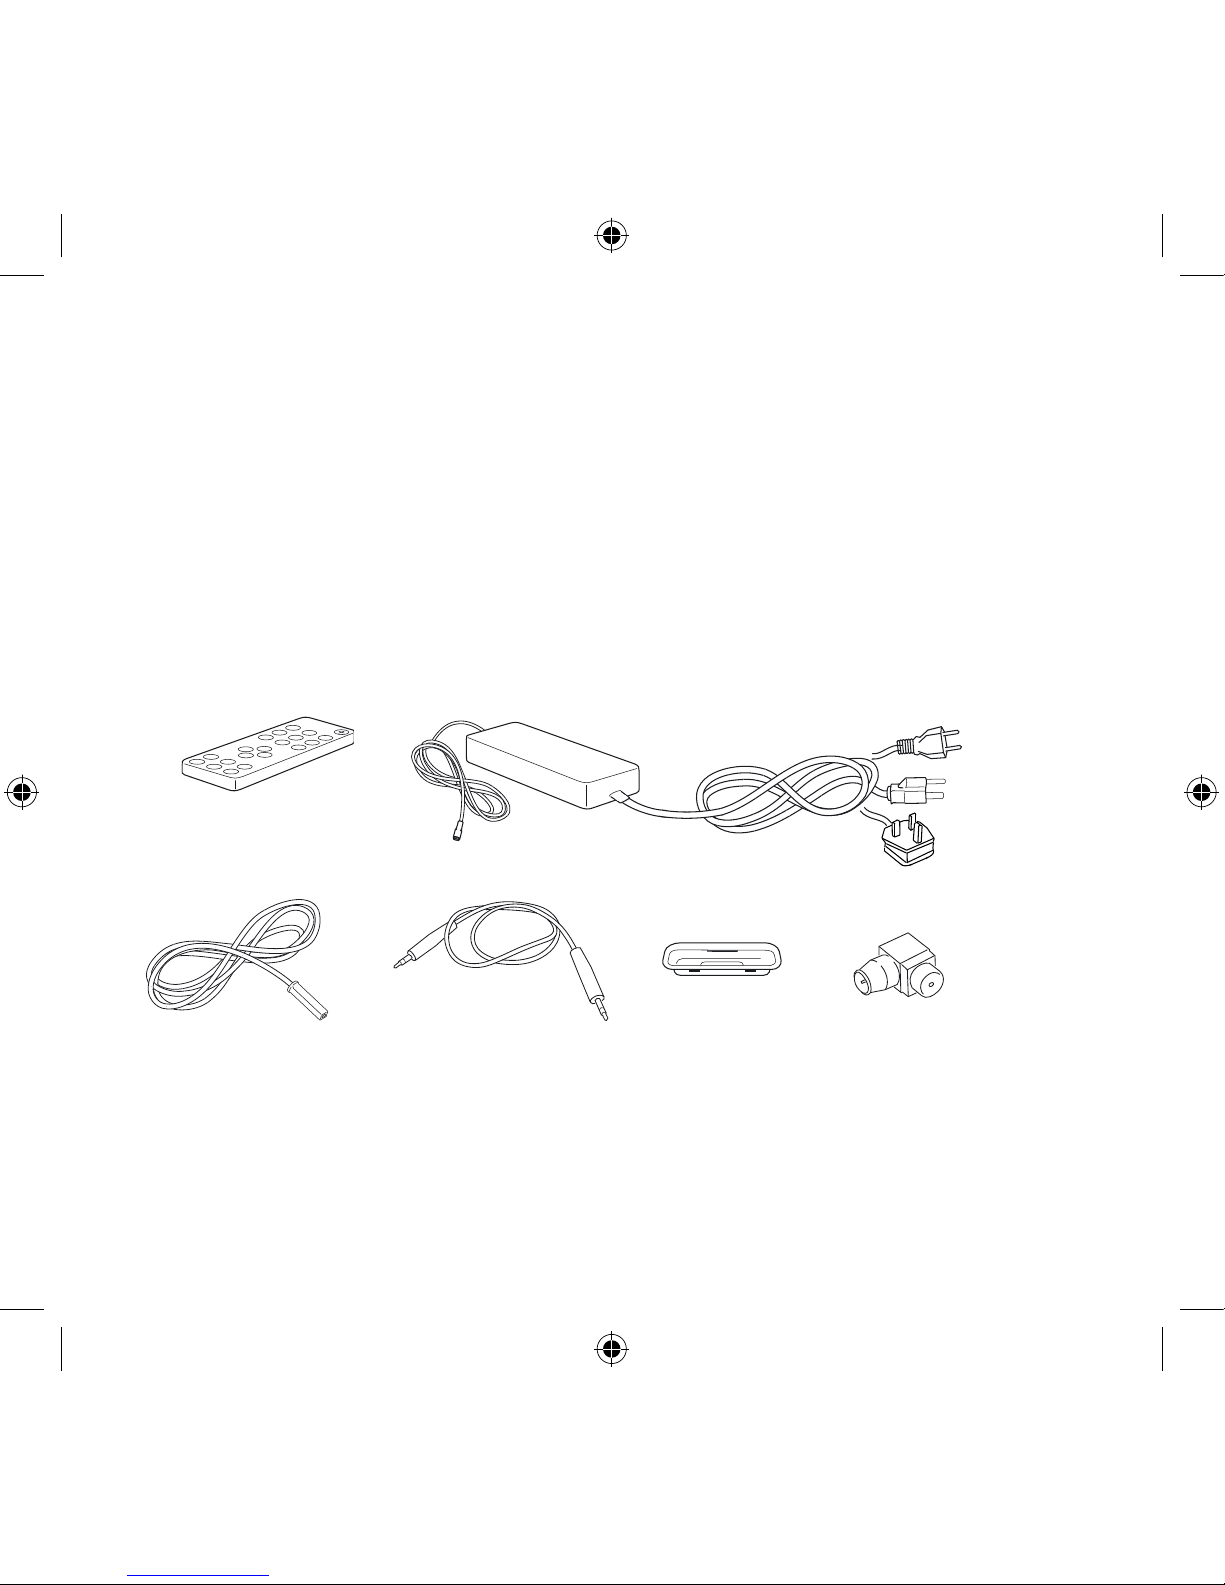
Schritt 1: Bitte nehmen Sie alle Lieferteile aus der Verpackung. Um im Servicefall weitere
Beschädigungen zu vermeiden, bitten wir Sie, die Verkaufsverpackung aufzuheben.
Die Verpackung enthält folgenden Lieferumfang:
US only
US only
EU only
UK only
x7
Remote control
External antenna
External power supply
Line in cable
Line in Kabel
Fernbedienung
Externe Antenne
iPod Dock Adapter
Externe Spannungsversorgung
Antennenadapter
nur EU
nur USA
nur GB
nur USA
Page 40
41
Deutsch
Schritt 2: Legen Sie die im Lieferumfang enthaltenen Batterien, wie auf Seite 48 angezeigt, in die Fernbedienung ein.
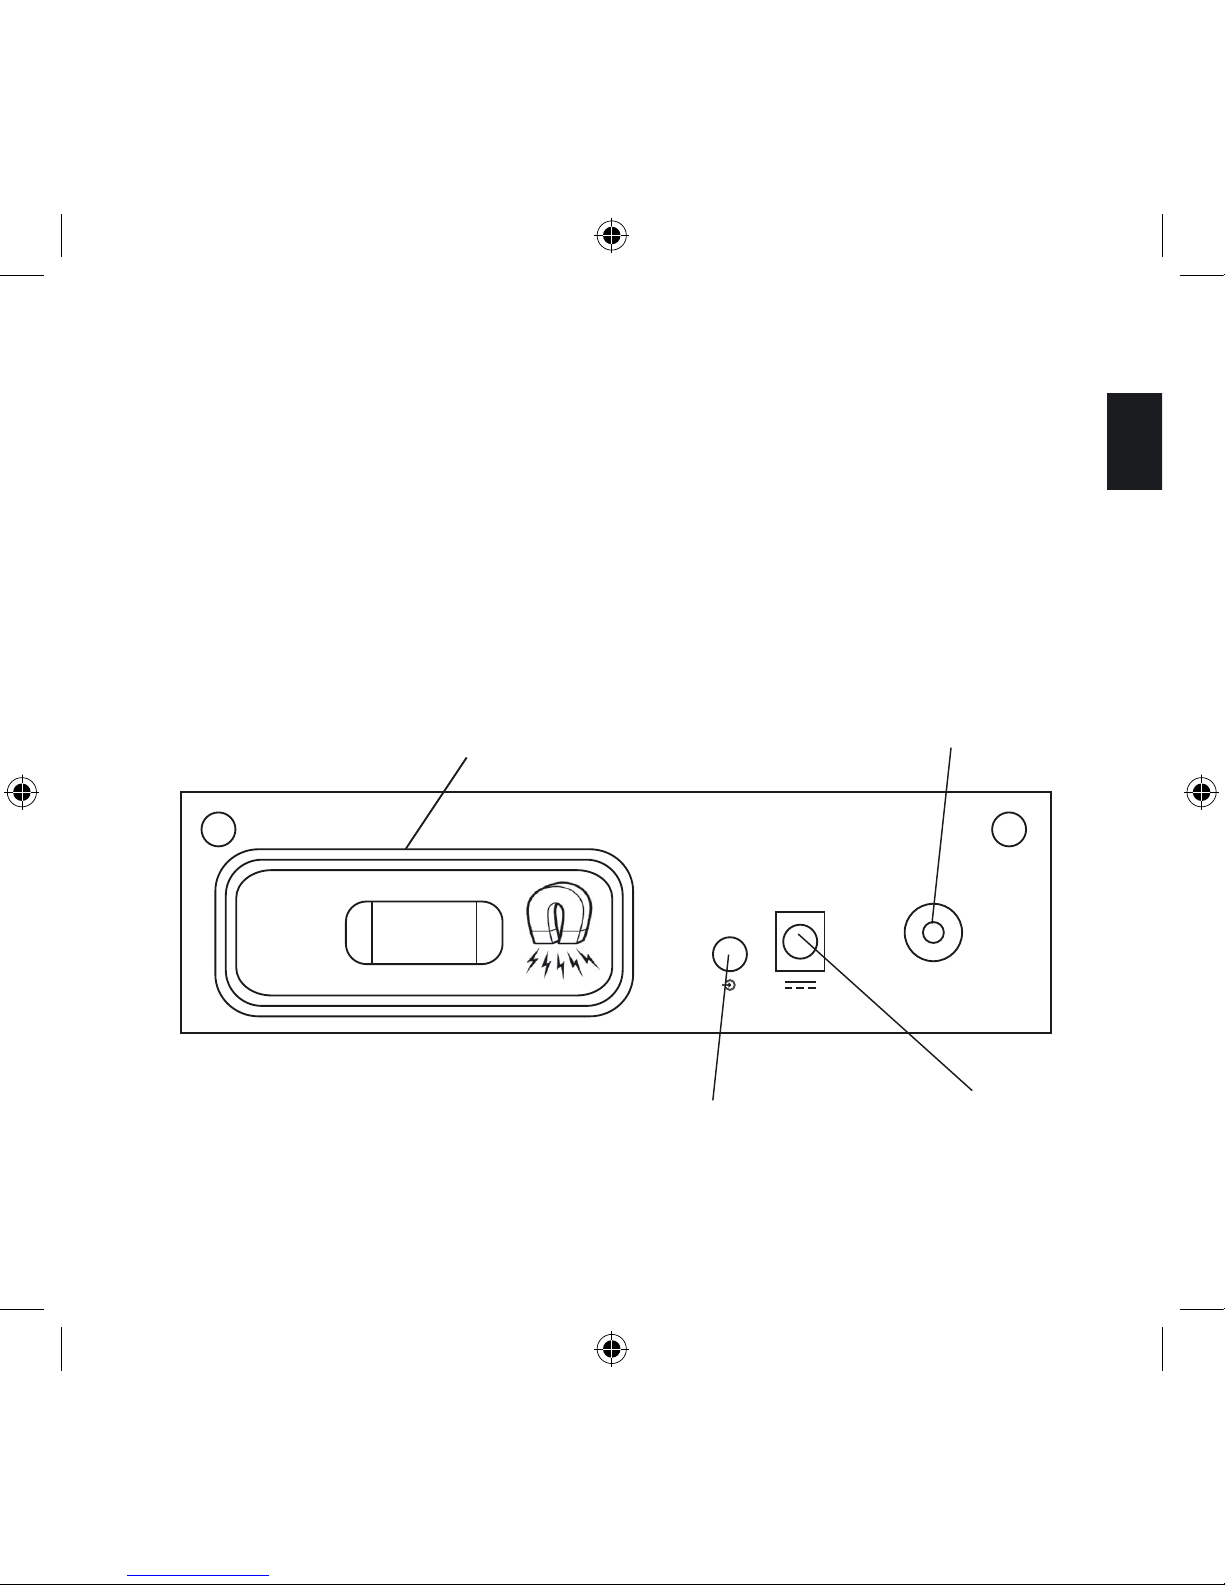
Schritt 3: Stecken Sie das DC-Netzkabel (dünnes Kabel) der externen Spannungsversorgung in die DC-Netzbuchse der Rückplatte (siehe Abbildung unten). Dann stecken Sie
das AC-Netzkabel der externen Spannungsversorgung in eine Steckdose.
Rückplatte:
FM
Line in Buchse DC Netzbuchse
FM Radio Antennenbuchse
Legen Sie die iPod-Abdeckung während
der Nutzung des Docks hierher
Page 41
42
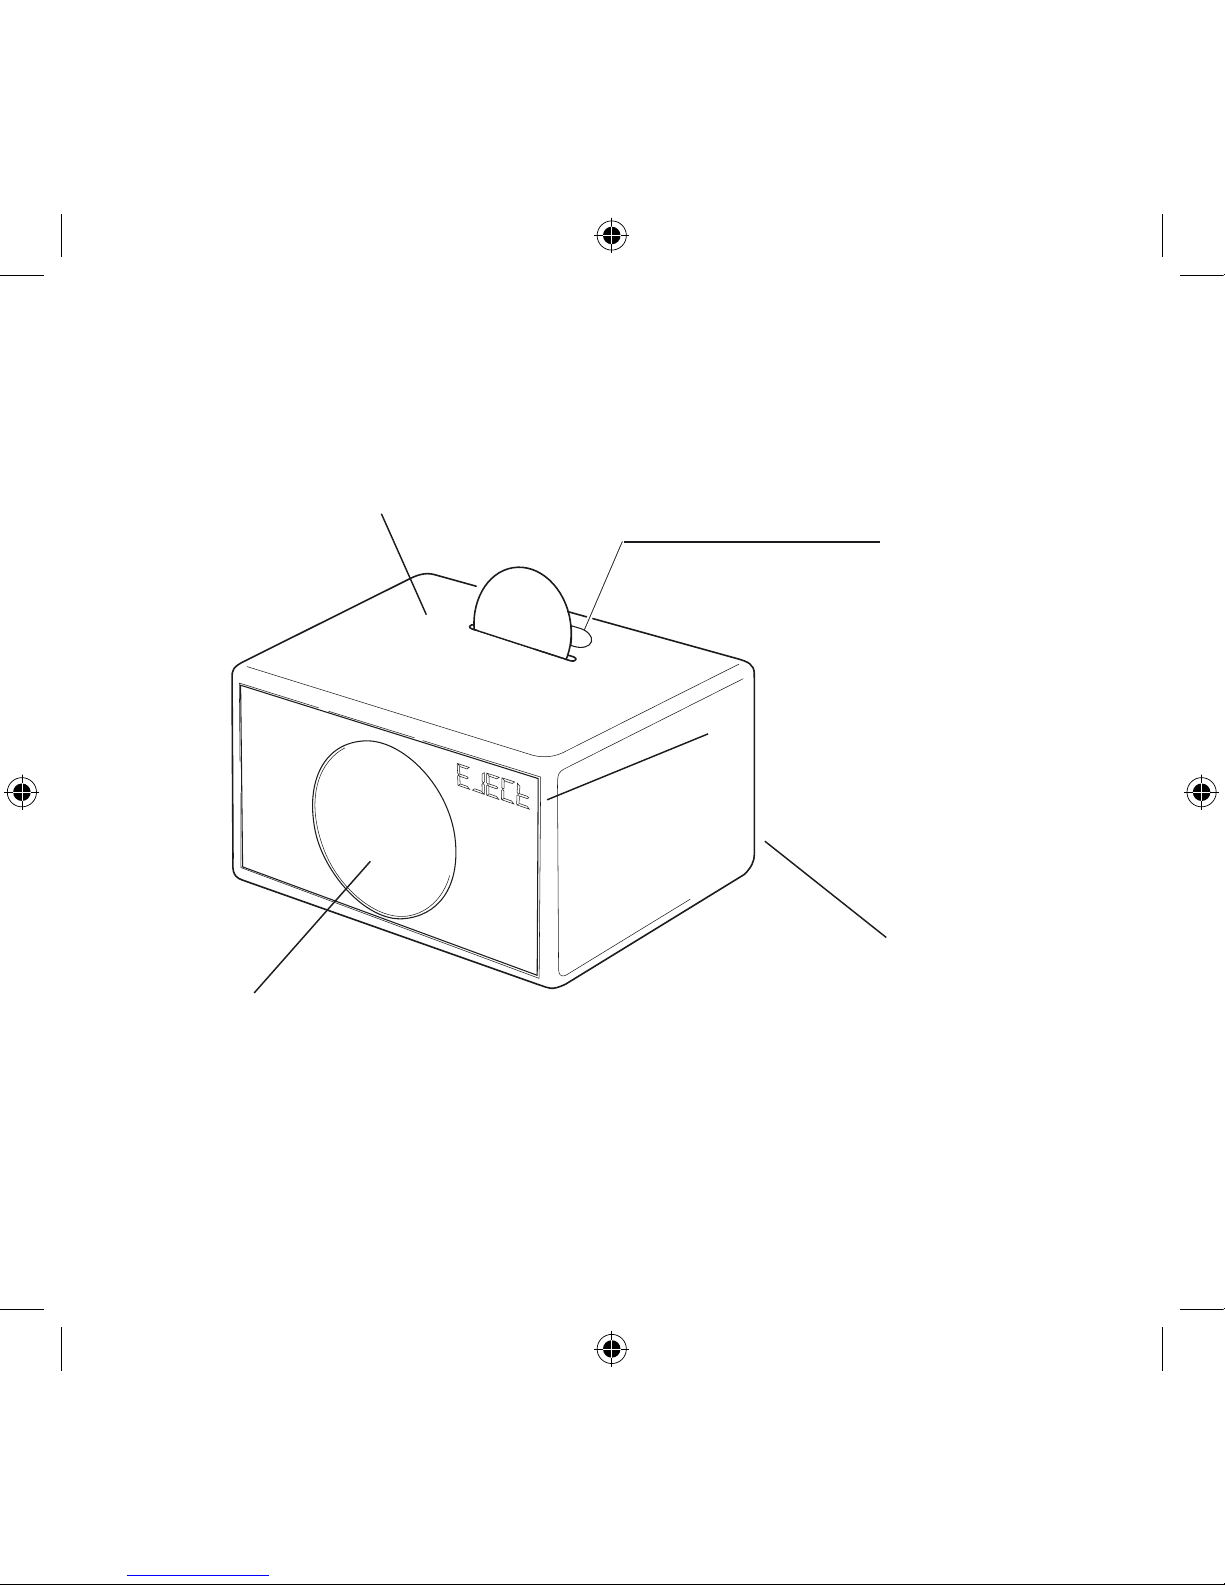
Das Wichtigste in Kürze:
Frontabdeckung
CD Player
LED Display zeigt geschaltete
Wiedergabequelle, UKW Frequenz,
CD Status, etc.
Rückplatte
iPod universal
dock
Page 42
43
Deutsch
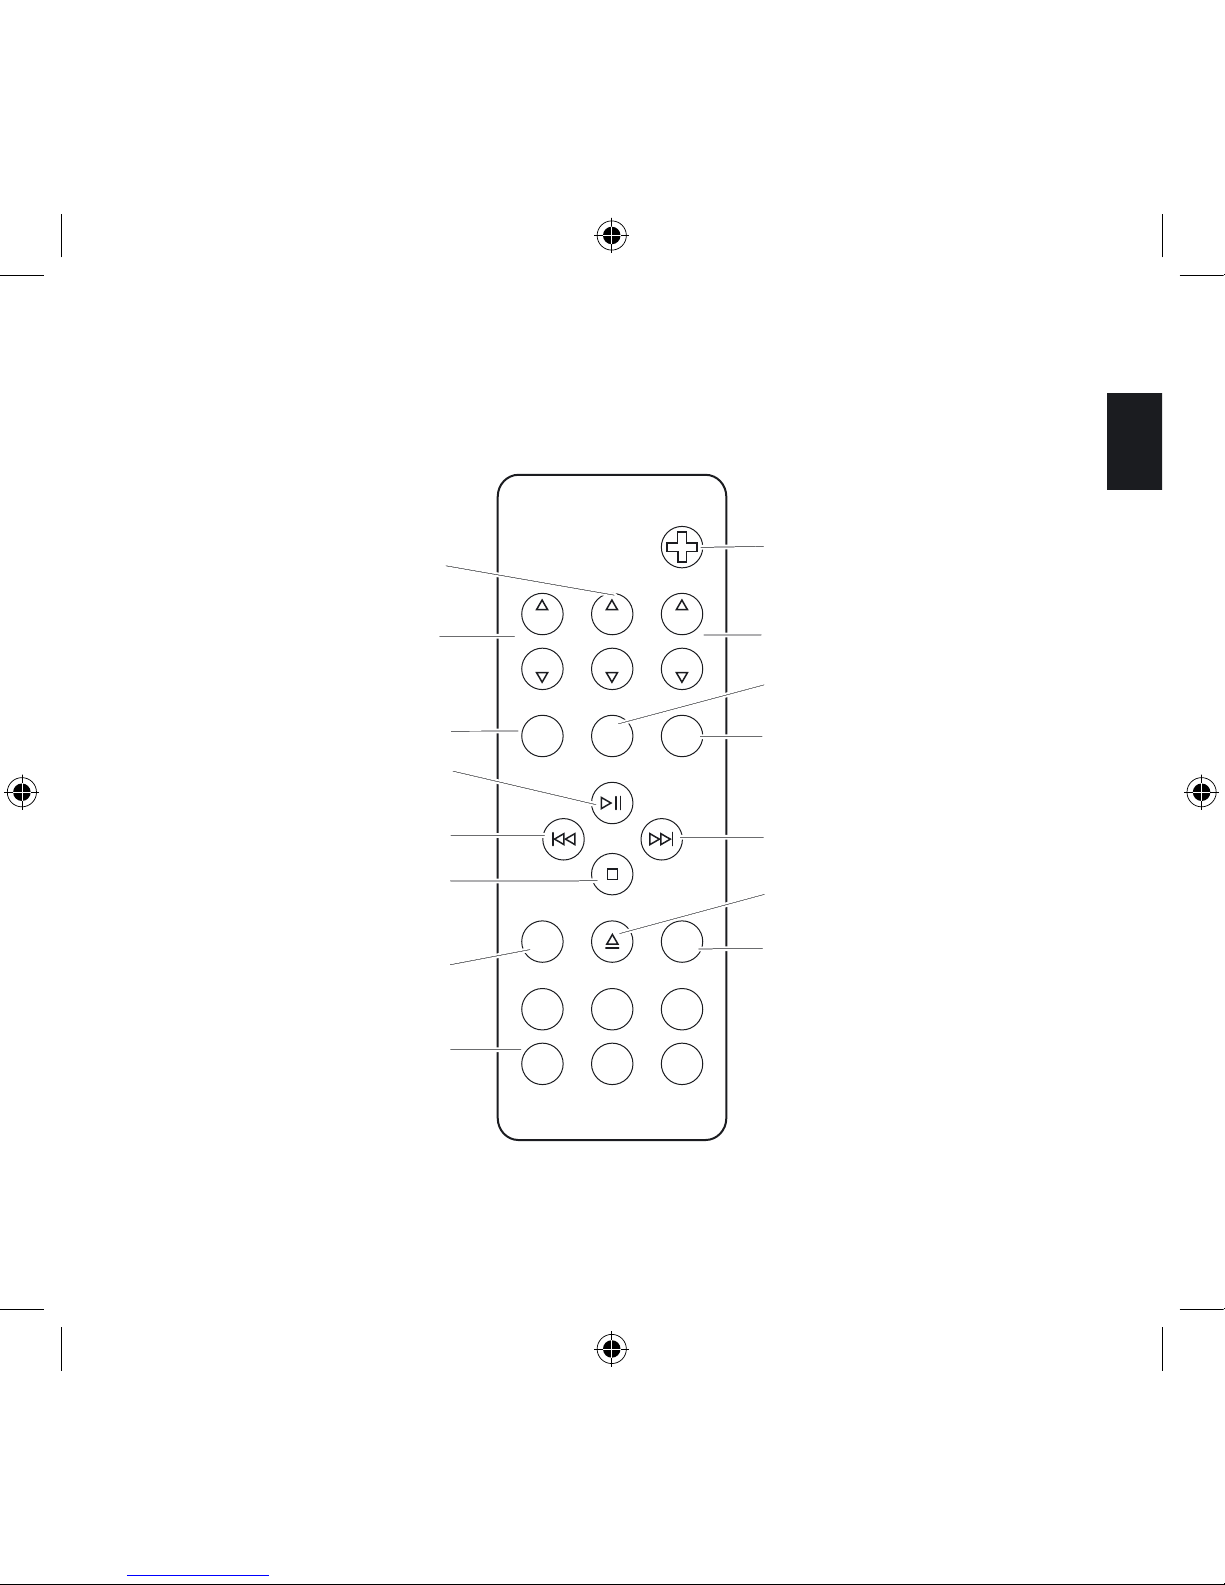
Fernbedienung:
LINE IN
iPod
AIR
CD FM
ERP
TES
VOLBASS
TREBLE
VOLBASS
TREBLE
Ein- & Ausschalten
Lautstärke
CD Player
FM Radio
CD Auswurf
Titelsprung/Suchlauf
vorwärts
Line in
FM Radio
Vorwahltasten
AIR
(nicht unterstützte
Funktion)
Stopp
Titelsprung/Suchlauf
rückwärts
Wiedergabe / Pause
iPod
Tiefen
Höhen
Page 43
44
Das Gerät einschalten:
Drücken Sie auf den “Ein & Ausschalten“-Knopf an der Fernbedienung.
Wiedergabequelle wählen:
Um zwischen den Wiedergabequellen zu wechseln, drücken Sie entweder iPod, CD, FM,
oder die LINE IN Taste auf Ihrer Fernbedienung.
iPod hören
(siehe auch Seite 49):
Schritt 1. Wenn Sie beabsichtigen, das System mit einem iPod zu benutzen, entfernen
Sie mit Ihrem Fingernagel oder einem weichen Hilfsmittel den Deckel auf der Oberseite
des Gehäuses. Benutzen Sie bitte kein Messer oder andere scharfkantige Gegenstände,
die den Lack beschädigen könnten. Der Holzdeckel verfügt über einen integrierten Magneten und kann dadurch an der Rückwand befestigt werden (siehe Seite 41).
Wählen Sie anhand der Tabelle auf Seite 49 den richtigen iPod Dock-Adapter aus, der zu
dem iPod-Modell passt, das Sie einsetzen möchten, oder probieren Sie die beiliegenden
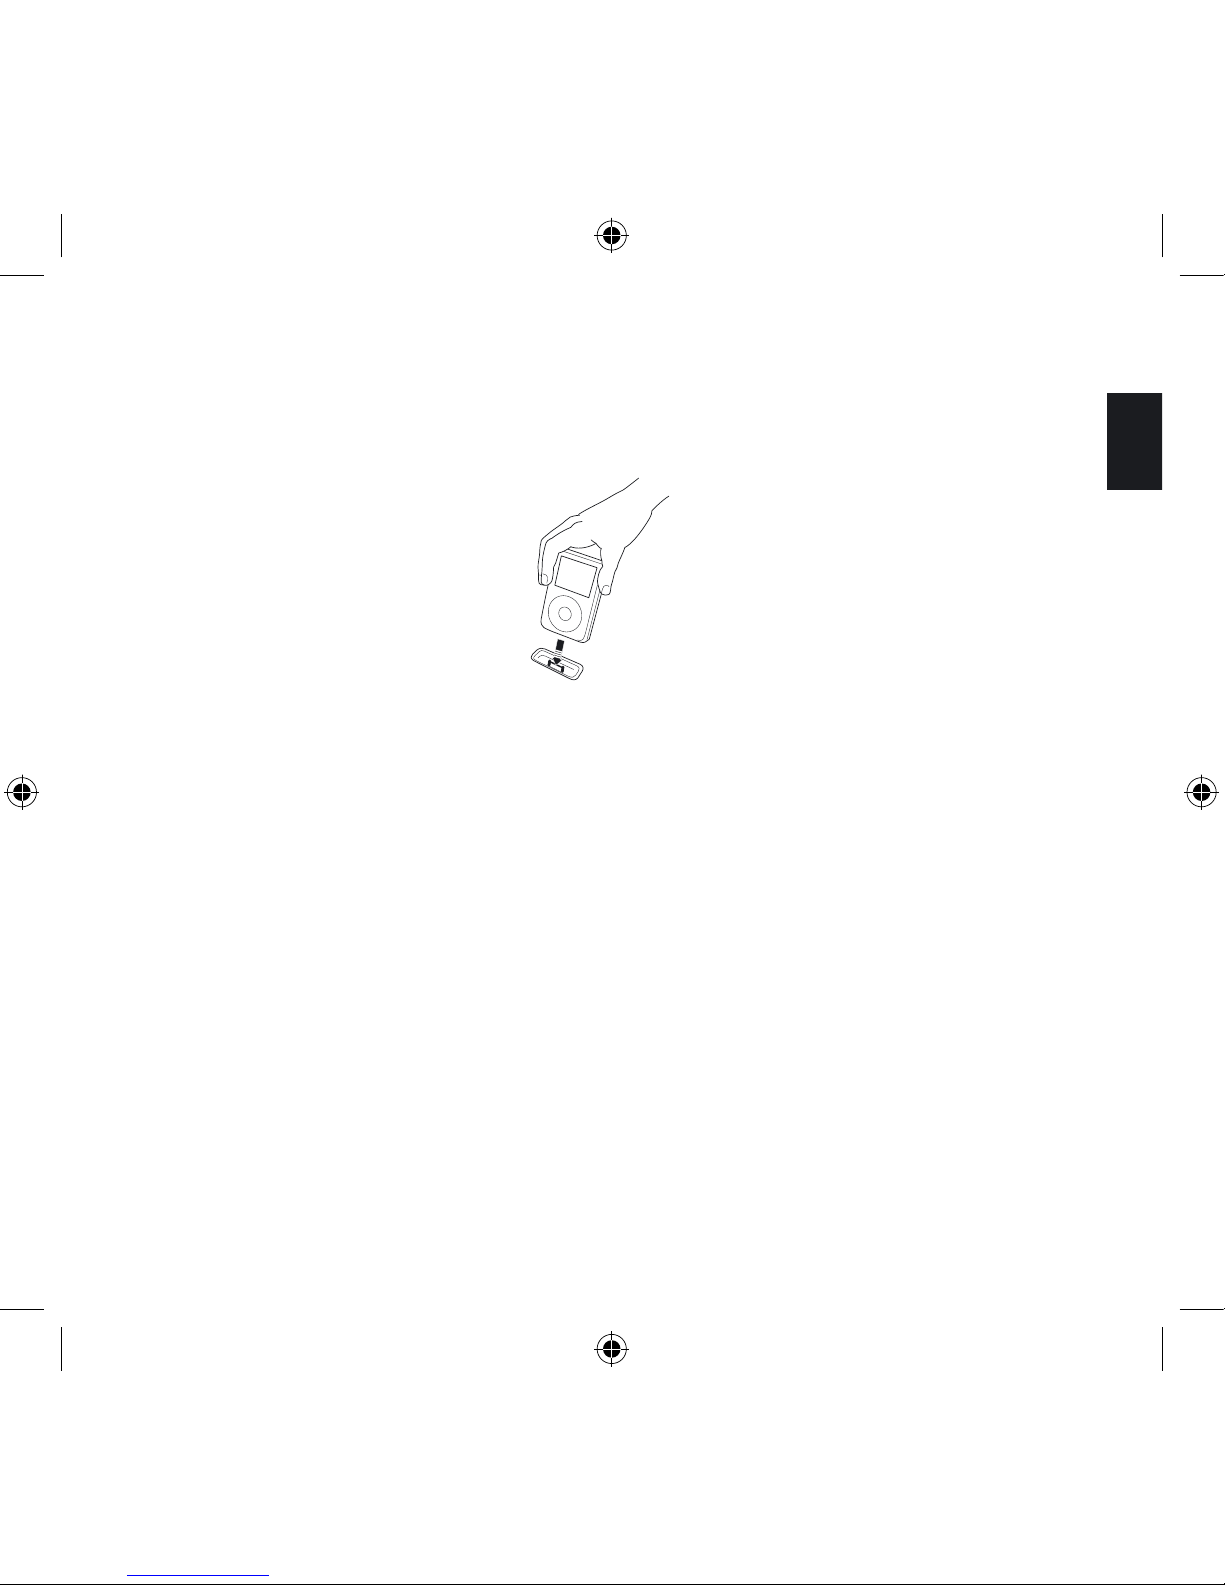
Dock-Adapter bis Sie den Adapter finden, der am besten zu Ihrem iPod passt. Befestigen
Sie den Dock-Adapter im iPod Universal-Dock, indem Sie von oben leichten Druck auf
den Dock-Adapter ausüben (siehe Abbildung), worauf er einrasten wird.
Page 44
45
Deutsch
Schritt 2. Stecken Sie den iPod in den zugehörigen Dock-Adapter im iPod Universal-Dock.
Schritt 3. Drücken Sie an Ihrer Fernbedienung den Knopf iPod. Dies wird Ihnen mit der
Anzeige „iPod“ bestätigt. Falls das Display nicht aufleuchtet, kontrollieren Sie die Kontakte
des Netzkabels.
Schritt 4. Drücken Sie die Wiedergabetaste auf Ihrer Fernbedienung. Sollten Sie keinen
Ton vernehmen, erhöhen Sie die Lautstärke mit dem „+“ Knopf auf der Fernbedienung oder
unter der Klappe auf der Oberseite des Gerätes.
Schritt 5. Sie können durch das Menu Ihres iPod über die Fernbedienungstasten Wiedergabe/Pause (Play/Pause), Titelsprung/Suchlauf vorwärts (Skip/ Fast Forward), Titelsprung/
Suchlauf rückwärts (Skip/Fast Reverse) navigieren.
iPod laden: Die Batterie Ihres iPods wird geladen, wenn das System eingschaltet ist.
Page 45
46
Eine CD hören (siehe auch Seite 51):
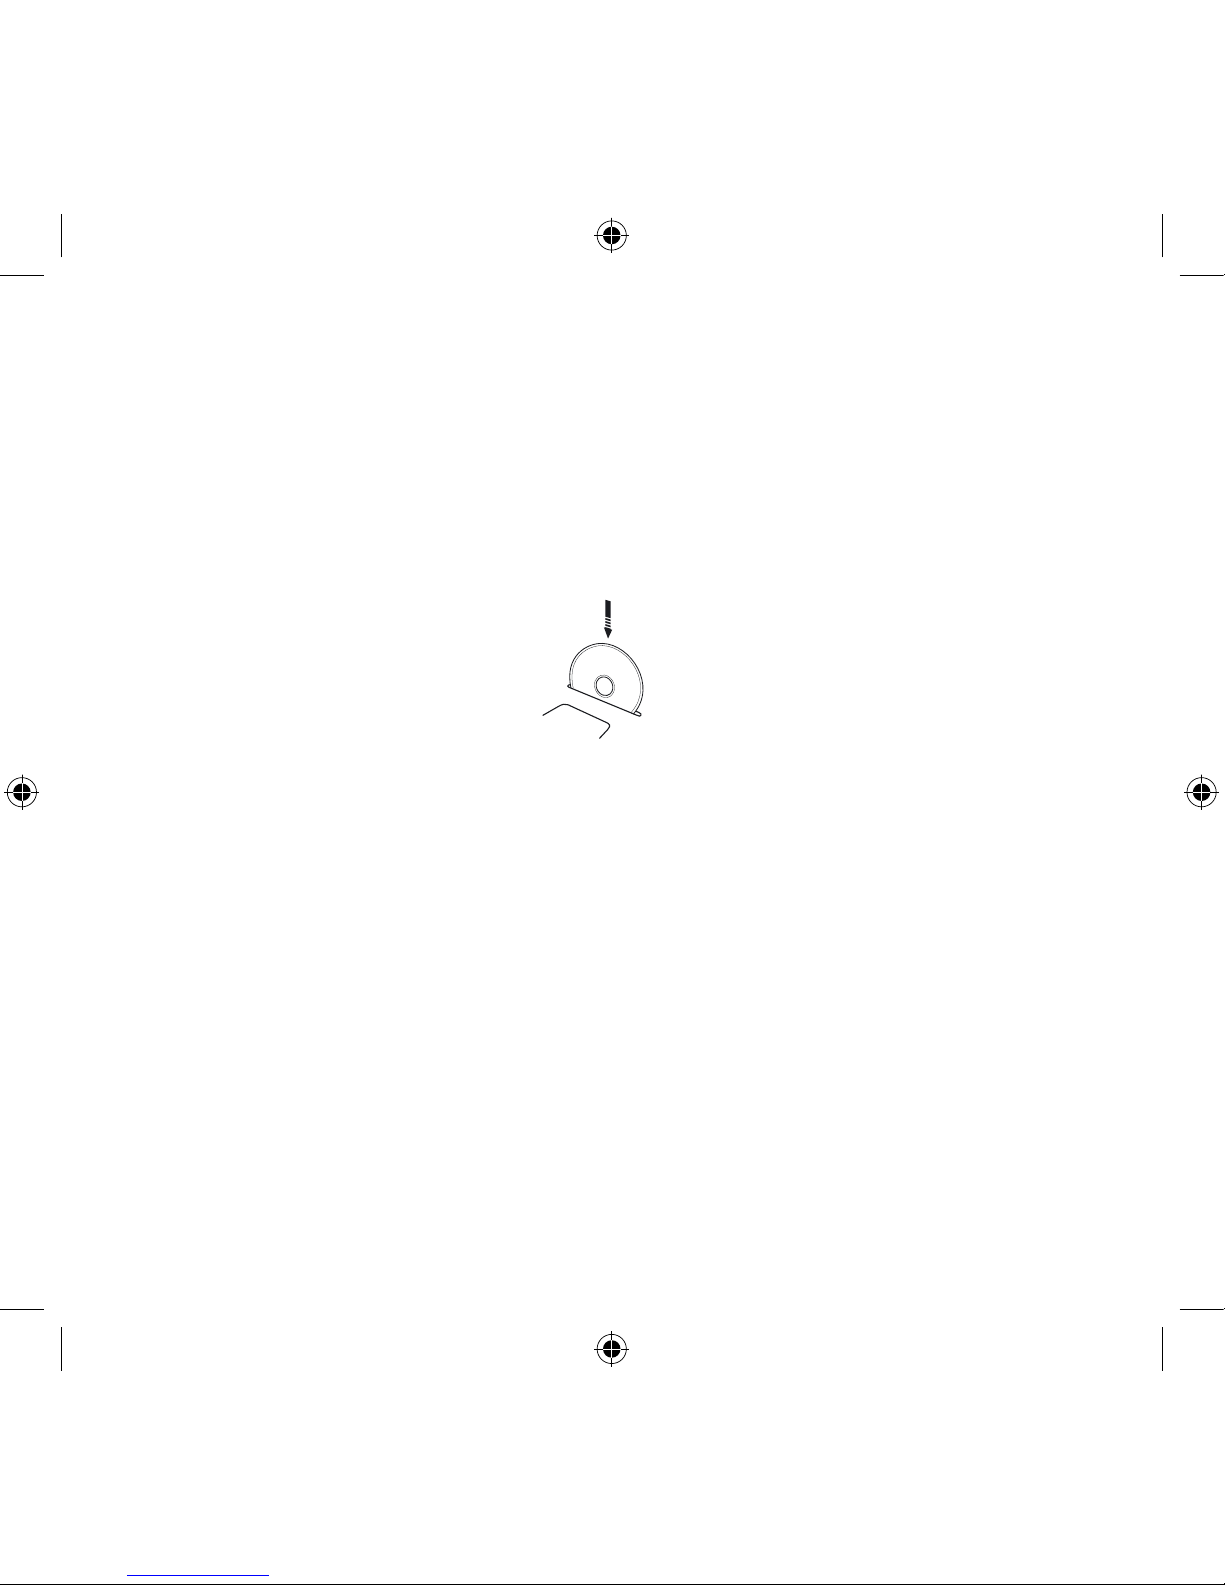
Schritt 1. Stecken Sie die CD mit der Front nach vorn in den Schlitz auf der Oberseite des
Gerätes. Dieses wird Ihnen im Display bestätigt und die Wiedergabe startet automatisch. Falls
das Display nicht aufleuchtet, kontrollieren Sie die Kontakte des Netzkabels. Sollten Sie keinen
Ton vernehmen, so erhöhen Sie die Lautstärke mit dem „+“ Knopf auf der Fernbedienung oder
unter der Klappe auf der Oberseite des Gerätes.
Schritt 2. Sie können sich durch das Titelverzeichnis der CD über die Fernbedienungstasten
Stop, Play/Pause, Skip/ Fast Forward, Skip/Fast Reverse bewegen.
Schritt 3. Um die CD wieder auszuwerfen, drücken Sie die EJECT Taste auf der Fernbedinung.
FM Radio hören (siehe auch Seite 52):
Schritt 1. Stecken Sie die externe Antenne in den Antennenanschluss an der Rückplatte.
Schritt 2. Drücken Sie an Ihrer Fernbedienung den Knopf FM bis Ihnen eine Frequenz,
beispielsweise “103,2“ am Gerätedisplay angezeigt wird. Falls das Display nicht aufleuchtet,
kontrollieren Sie die Kontakte des Netzkabels. Sollten Sie keinen Ton vernehmen, erhöhen
Sie die Lautstärke mit dem „+“ Knopf auf der Fernbedienung oder unter der Klappe auf der
Oberseite des Gerätes.
Schritt 3. Suchen Sie sich Ihren gewünschten FM Sender mit den Pfeiltasten auf der Fernbedienung.
CD title
Page 46
47
Deutsch
2. Wie kann ich...?
Haupteinstellungen:
Das Gerät einschalten?
- Drücken der iPod, CD, FM oder LINE IN Taste auf der Fernbedienung
- Drücken der “Ein & Ausschalten“-Taste auf der Fernbedienung
Das Gerät ausschalten?
Drücken der “Ein & Ausschalten“-Taste auf der Fernbedienung. Das Gerät ist nun im
Bereitschaftsmodus. Wenn Sie das Gerät vollständig ausschalten möchten, müssen Sie
den Netzstecker ziehen.
Die Lautstärke & den Klang einstellen?
1. Benützen Sie die Lautstärke (VOLUME), Tiefen (BASS) und Höhen (TREBLE) Taste auf
Ihrer Fernbedienung.
2. Volumen: Die Lautstärkeanzeige auf dem Display zeigt „0“ bei keiner Tonausgabe und
„100“ für die Maximallautstärke.
3. Bei Höhen und Tiefen meint „0“ keinen Bass- bzw. keine Höhenbetonung und „6“ die
maximale Bass- bzw. Höhenbetonung.
4. Wenn Sie das Gerät ausschalten, bleibt die aktuelle Lautstärkeeinstellung gespeichert.
Beachten Sie dies vor allem, wenn Sie das Gerät bei hoher Lautstärke ausschalten.
Die Fernbedienung auf Funktion überprüfen?
Jedes Mal wenn Sie eine Taste auf der Fernbedienung drücken, wird Ihnen dies am Gerä
-
tedisplay mit dem Aufblinken eines kleinen, roten Leuchtpunktes bestätigt.
Page 47
48
Den Lautsprecher reinigen?
Ziehen Sie zu Ihrer eigenen Sicherheit den Netzstecker, bevor Sie das Gerät reinigen.
Benützen Sie hierfür ausschließlich weiche, trockene Tücher. Um Kratzer in der lackierten
Oberfläche zu vermeiden, empfehlen wir Ihnen, das in der Verpackung beiliegende Tuch
zu verwenden.
Achtung!
Benützen Sie keinen Alkohol oder sonstige chemische Reinigungsmittel! Diese zerstören
die Lackoberfläche und können beim Eintreten in das Gehäuse zu Defekten und Flammenentwicklung führen.
Was ist die Funktion der AIR-Taste auf der Fer
nbedienung?
Diese Funktion wird von diesem Gerät nicht unterstützt.
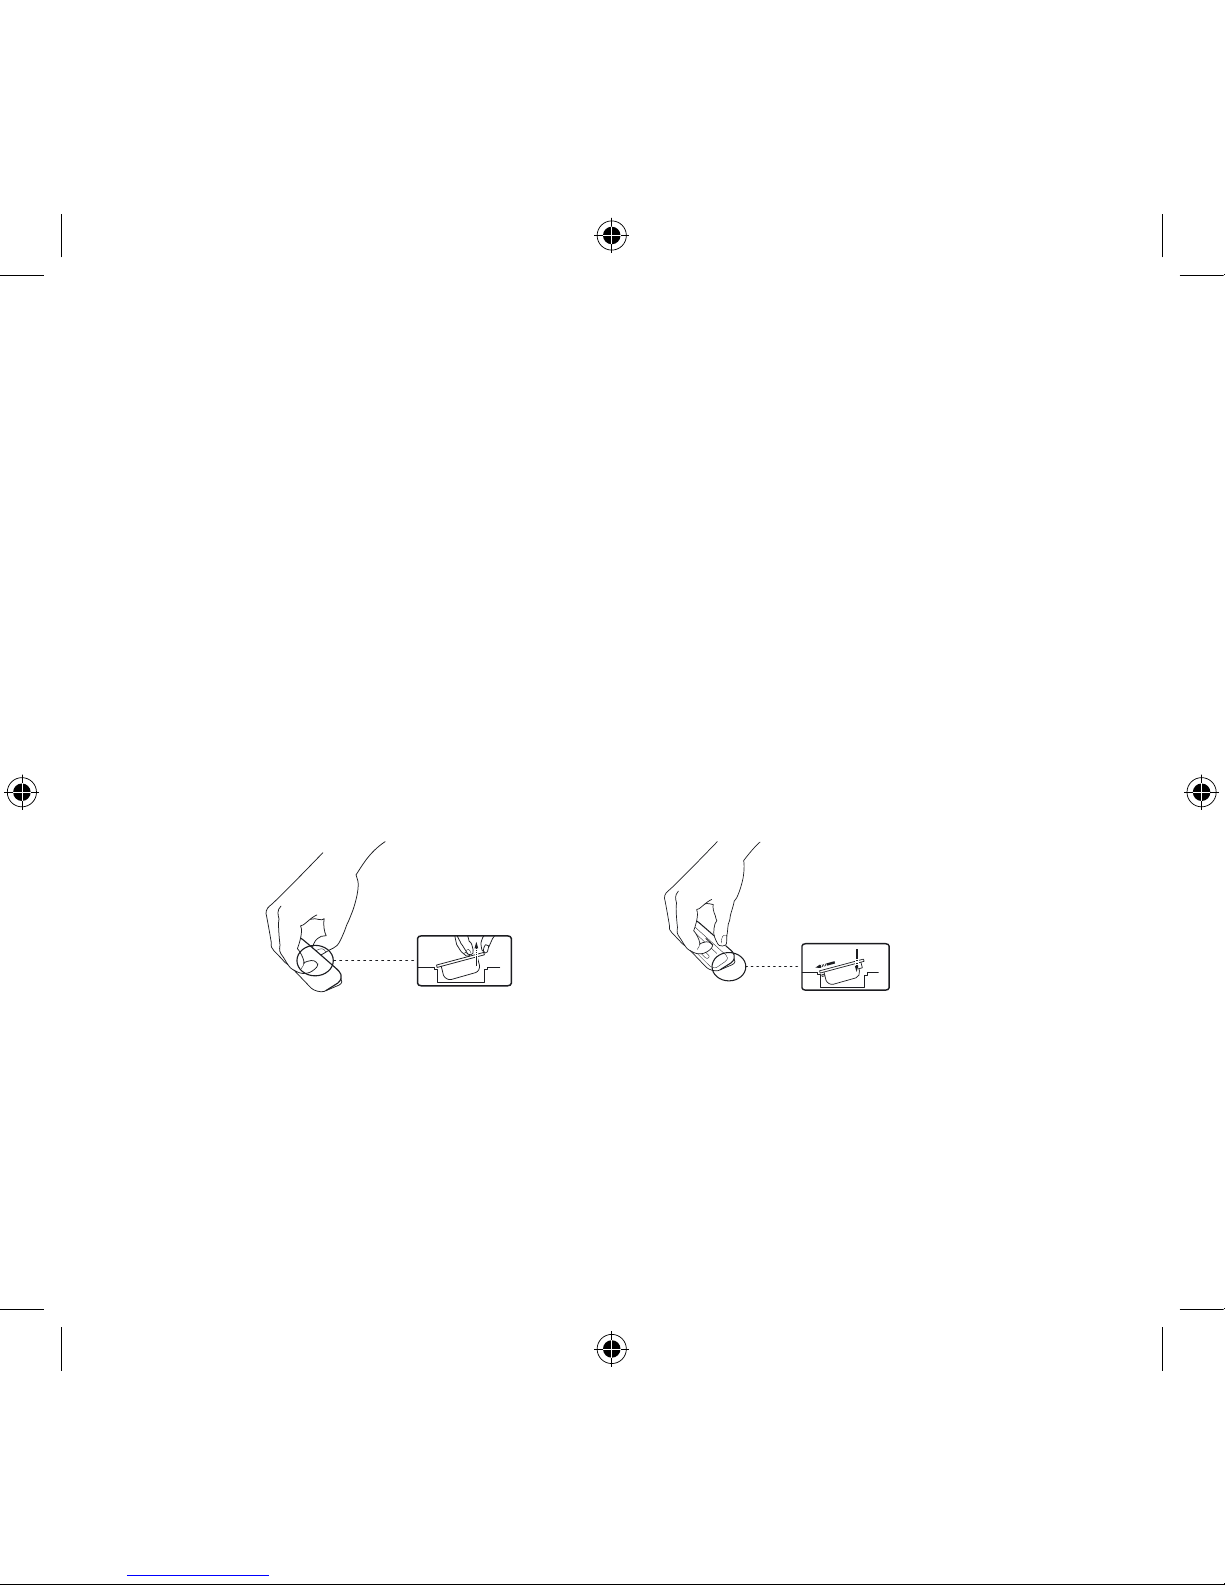
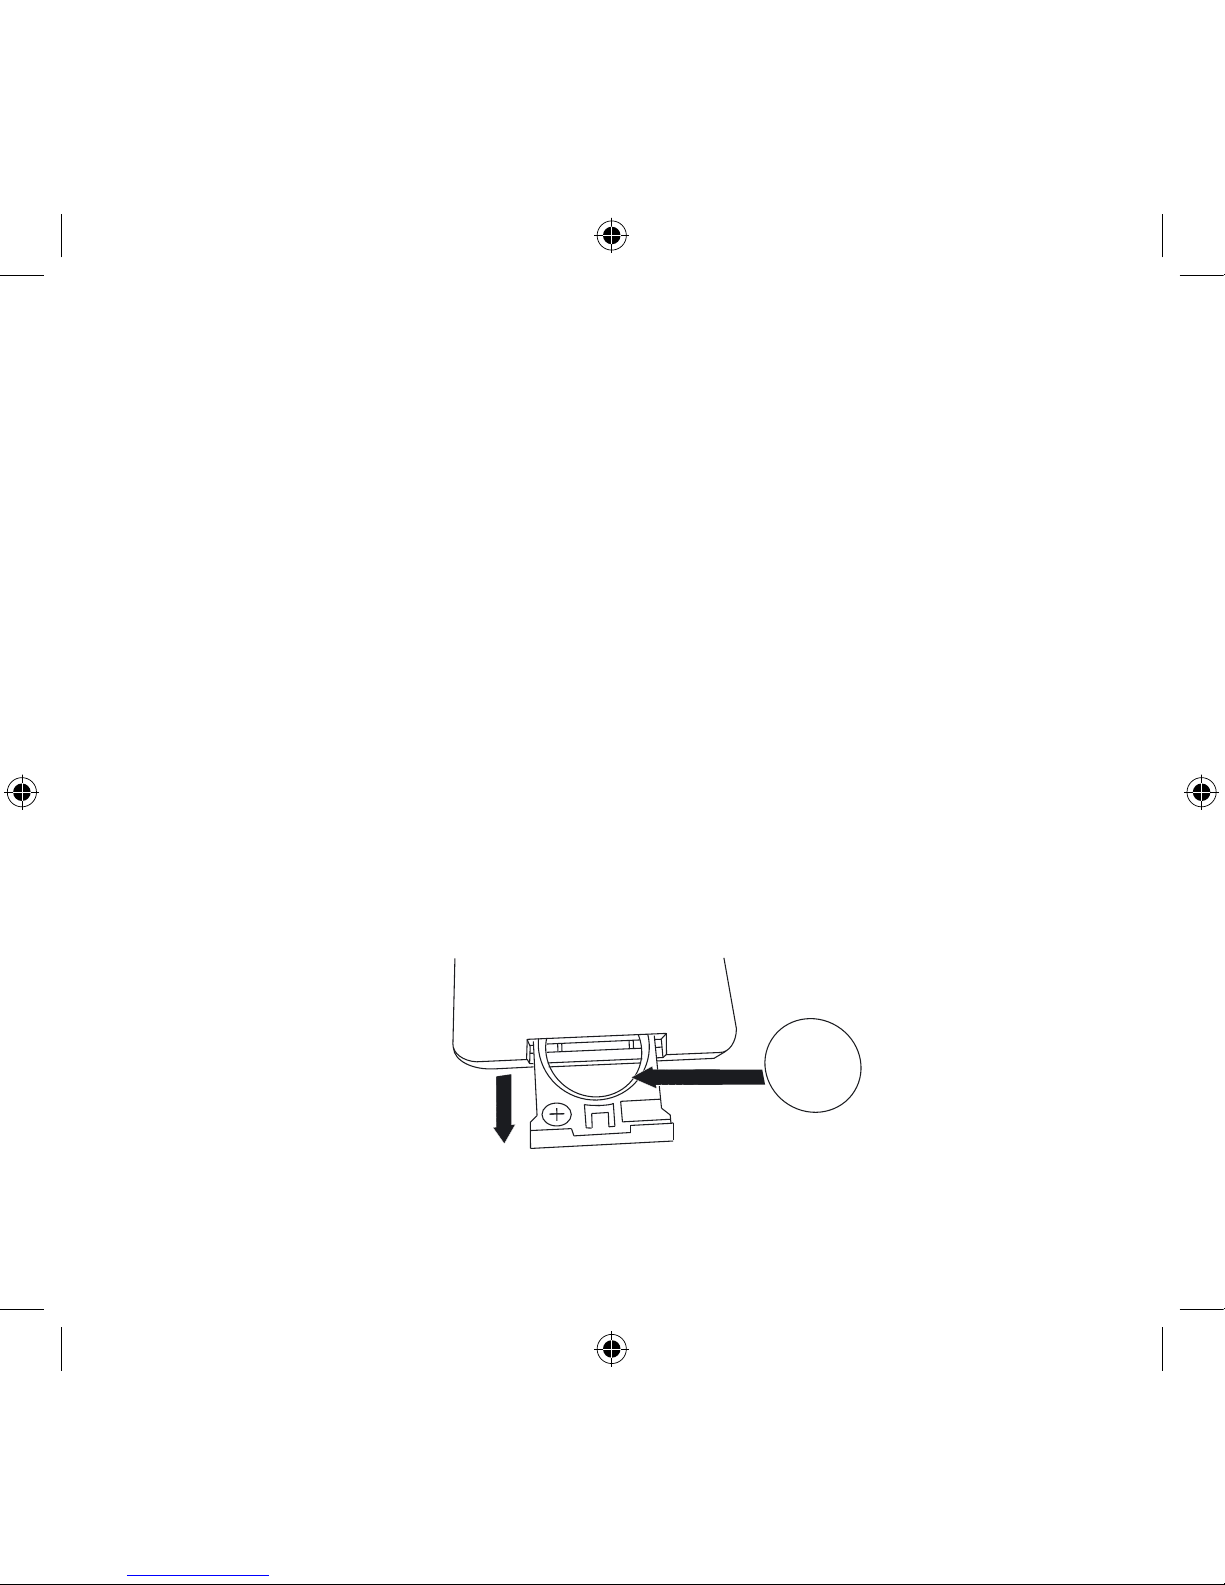
Die Batterien der Fernbedienung wechseln?
1. Öffnen Sie das Batteriefach auf der Unterseite der Fernbedienung.
2. Nehmen Sie die alten Batterien heraus und ersetzen diese mit einer neuen Lithiumionen-Knopfbatterie (Typ CR2025, 3 V).
3. Im Batteriefach wird Ihnen jeweils der Plus- und Minuspol angezeigt. Legen Sie die
Batterien nach dieser Grafik in die Fernbedienung ein.
Schritt 1
Schritt 2 + 3
Page 48
49
Deutsch
Geneva
Dock Adapter Nr
15
Works with
iPhone 3G; iPhone 3G-S
12
Works with
iPhone 2G
(4GB, 8GB only)
7
Made for
iPod 4th generation (4G): iPod photo (iPod with color display)
(40GB, 60GB only)
6
Made for
iPod 4th generation (4G): iPod Photo, color U2 iPod
(20GB, 30GB only)
5
Made for
iPod 4th generation (4G)
(40GB only)
4
Made for
iPod 4th generation (4G iPod), U2 iPod
(20GB only)
3
Made for
iPod Mini
(4GB, 6GB only)
� *
Made for
iPod touch *
iPod nano 3rd generation (3G) *
iPod classic *
iPod nano 2nd generation (2G) *
iPod 5th Generation (video) *
iPod nano *
* Geneva Dock Adapter
Not included. All new iPod models already include the dock adapter in the original packaging.
Not supported
iPod 3rd generation (3G iPod)
* Geneva Dock Adapter
Liegt nicht bei. Alle neuen iPod-Modelle haben den Dock Adapter
bereits in der Or
iginalverpackung beigefügt.
Der iPod classic 3G wird nicht unterstützt
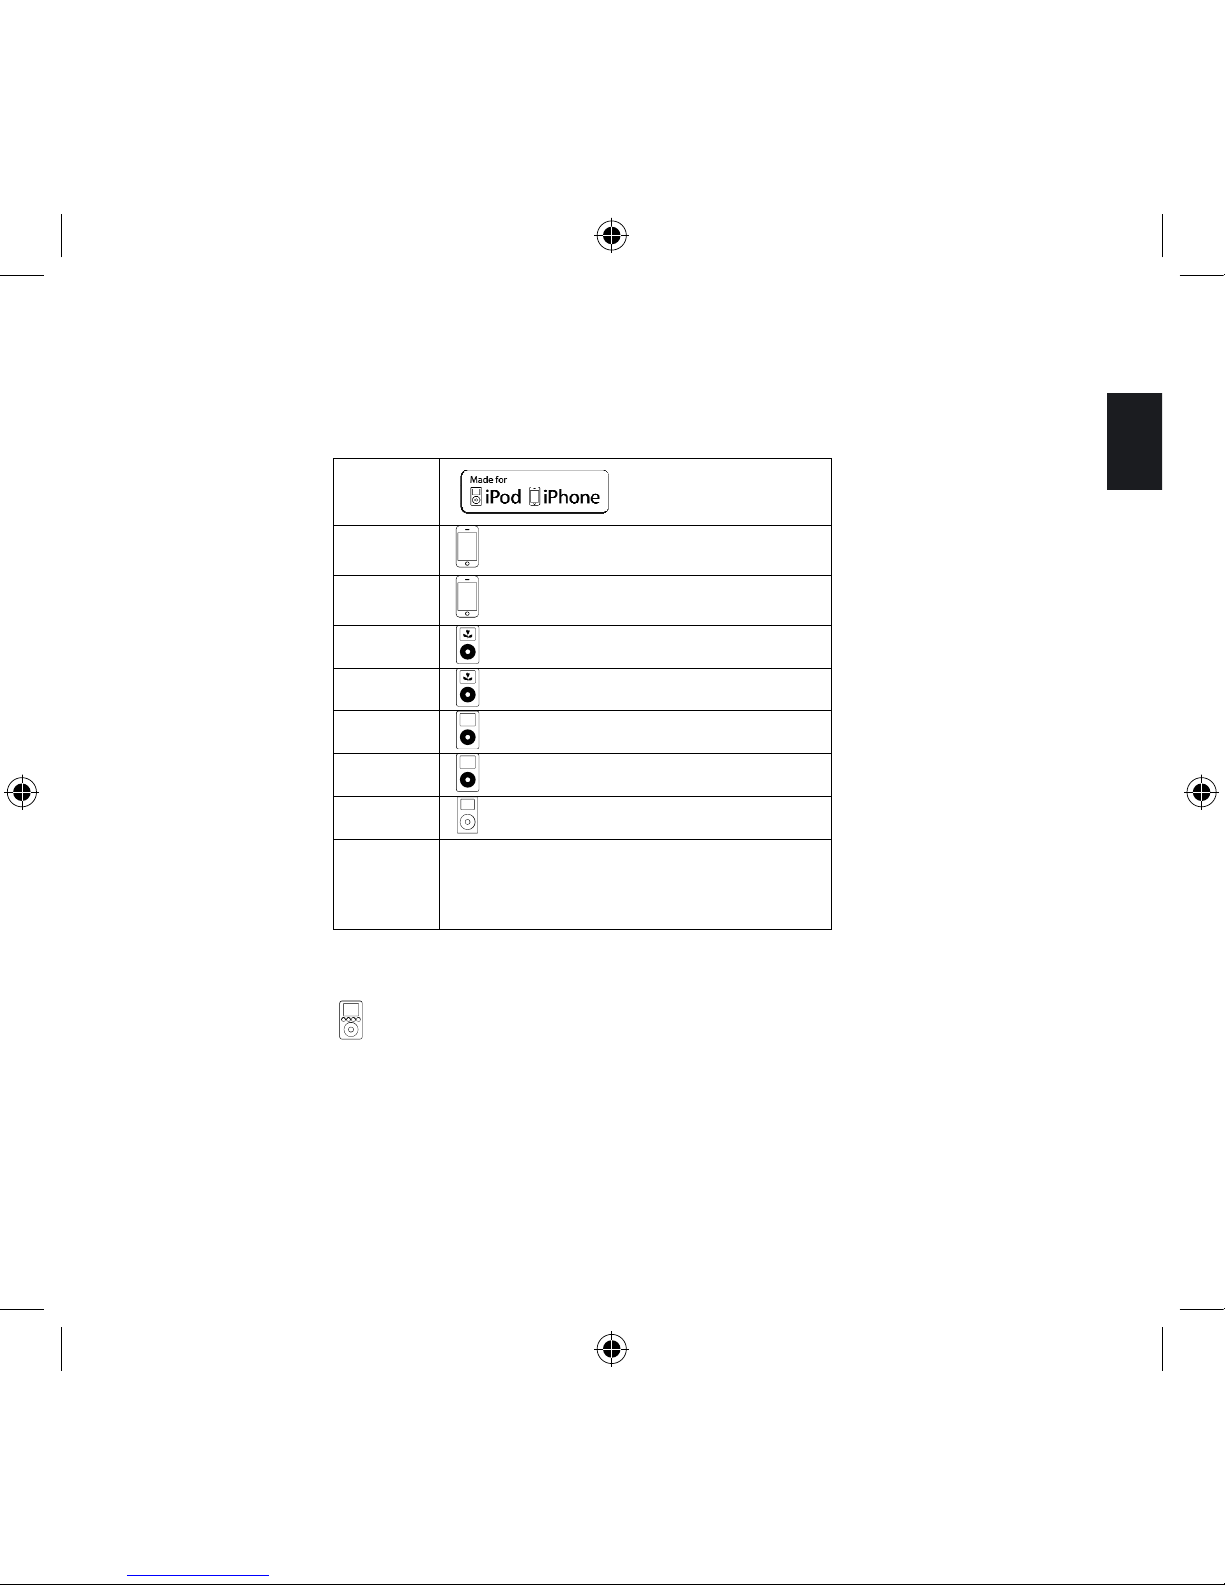
Wie wähle ich den richtigen iPod Adapter für meinen iPod aus?
„Geneva kann dieses Produkt mit einem oder mehreren Docking-Adaptern liefern.
Die Versionen und die Anzahl der Docking-Adapter können sich von Zeit zu Zeit ändern, da wir uns bemühen, Adapter für die neuesten
und meistverbreiteten iPhones und iPods von Apple mitzuliefern. Wenn der Adapter für den iPod oder das iPhone, das Sie mit dem
Geneva-System verwenden möchten, nicht im Paket enthalten ist, sollte er als Original-Zubehör bei Ihrem Apple-Händler erhältlich sein.“
Page 49
50
iPod:
Die iPod Softwareversion meines iPod ermitteln?
Wählen Sie auf Ihrem iPod nacheinander „Settings“, „About“, “Version”. Verwenden Sie
immer die neueste Software-Version.
Die iPod Software updaten?
Gehen Sie auf folgende Internetseite: www.apple.com/ipod/download/
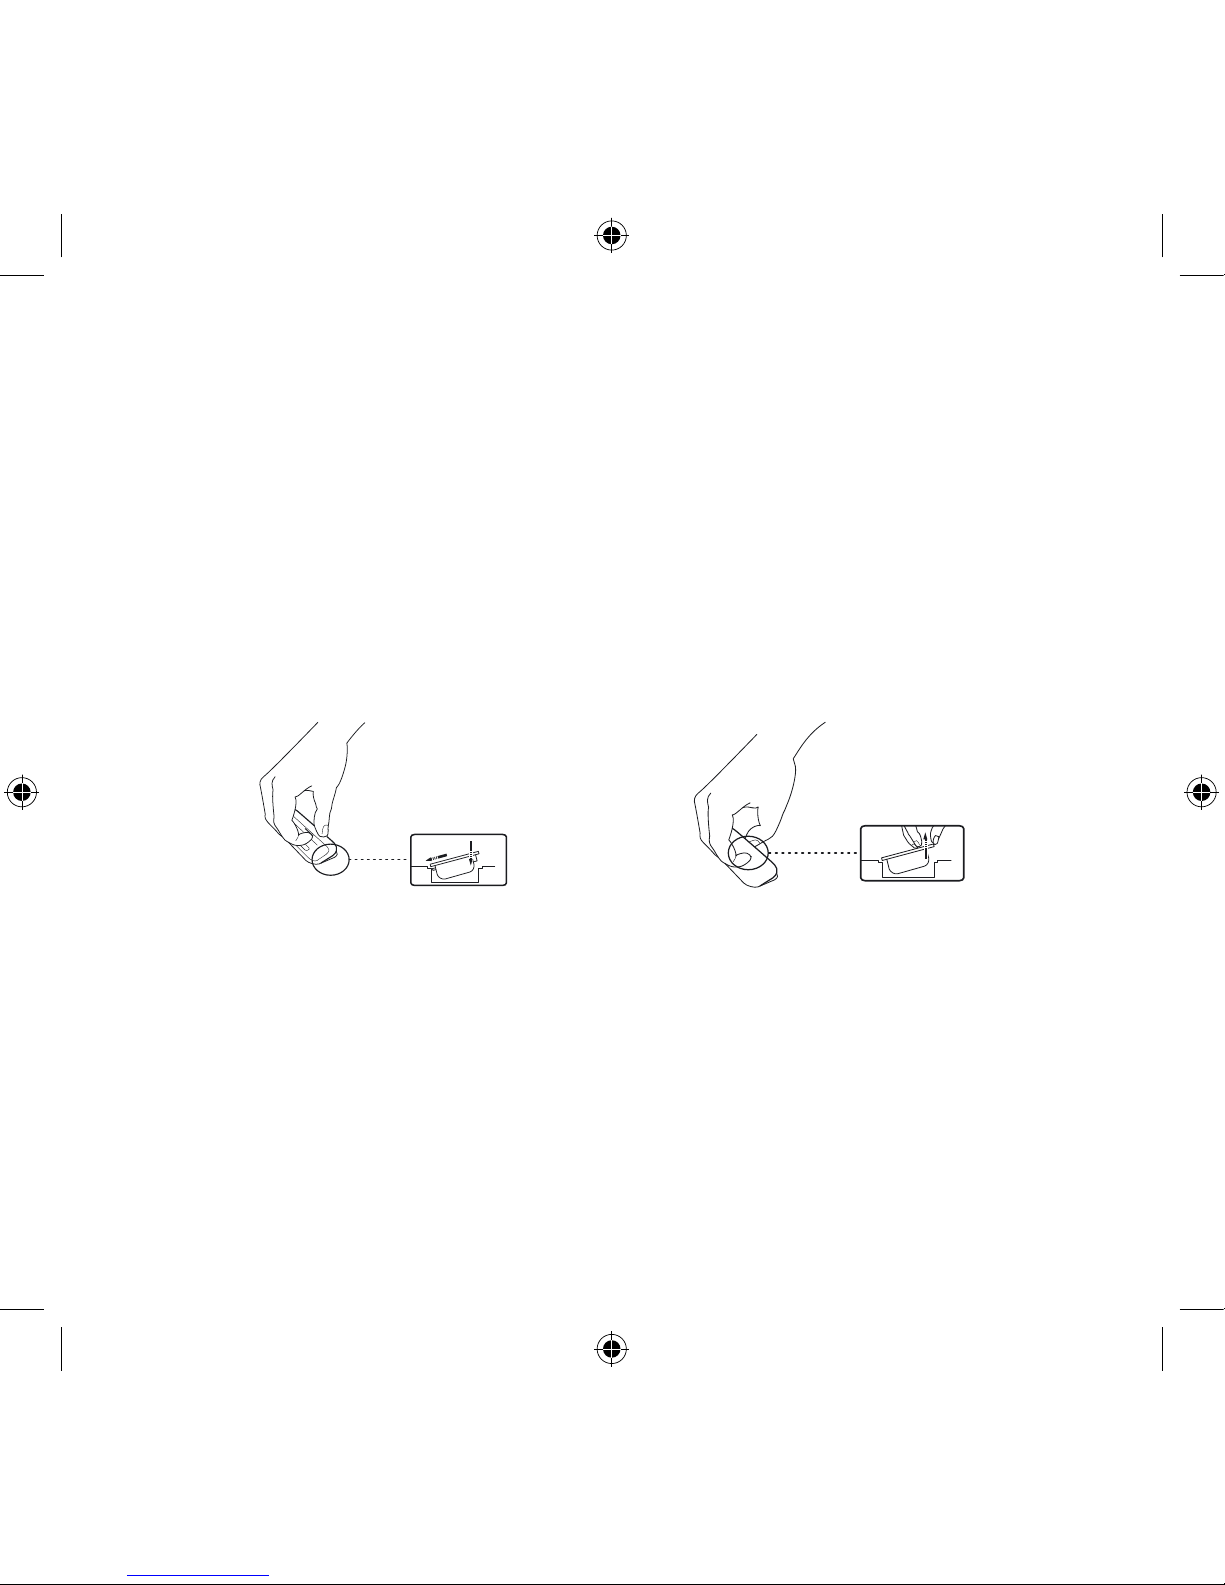
Wie wird der Dock-Adapter eingesetzt oder entfernt?
Mit der Fernbedienung meinen iPod steuern?
Nachdem Sie Ihren iPod mit der iPod-Buchse an der Rückplatte verbunden und das Ge
rät auf iPod Wiedergabe gesetzt haben, können Sie sich auf leichte Art und Weise mit der
zum Gerät gelieferten Fernbedienung durch das Menü des IPods bewegen.
Eine Übersicht der Funktionen finden Sie auf Seite 43.
Page 50
51
Deutsch
CD:
Mit der Fernbedienung den CD Player steuern?
Sie können sich auf leichte Art und Weise mit der zum Gerät gelieferten Fernbedienung
durch das das Titelverzeichnis der CD bewegen.
Eine Übersicht der Funktionen finden Sie auf Seite
43.
Andere Formate wie MP3 und weitere Formate abspielen?
Das eingebaute Laufwerk spielt folgende Discs ab: CD-DA, CD-R. CD-RW, CD-ROM
(auch Multisession) und MP3 Formate. Der CD-Player gibt alle Discs wie eine normale CD
wieder.
MP3 CDR / CDRW mit verschiedenen Alben abspielen
?
Es ist möglich verschiedene MP3 Daten auf einer CD-R/W zusammengestellt zu speichern. Das Gerät gibt diese Datenfolge wie in einem numerischen Titelverzeichnis wieder.
Kleine 8 cm CDs abspielen?
Nein.
Page 51

52
FM Radio:
Mit der Fernbedienung das FM Radio steuern?
Sie können sich auf leichte Art und Weise mit der zum Gerät gelieferten Fernbedienung
durch die vielen Funktionen des FM Empfängers bewegen.
Eine Übersicht der Funktionen finden Sie auf Seite
43.
Einen Radiosender auswählen?
1. Drücken Sie die FM Taste auf der Fernbedienung.
2. Benützen Sie die Pfeiltasten, um auf dem Frequenzband die Sender zu finden.
3. Die Frequenz des Radiosenders wird Ihnen im Gerätedisplay in MHz
angezeigt.
(zum Beispiel: “88.7“ steht für für 88,7 MHz).
4. Um automatisch nach Sendern zu suchen, halten Sie eine der Pfeiltasten für einige
Sekunden gedrückt. Wenn das Gerät einen empfangsstarken Sender gefunden hat,
wird dieser wiedergegeben und der automatische Suchlauf gestoppt. Wenn Ihnen
der Sender nicht gefällt, so wiederholen Sie diesen Schritt.
Page 52
53
Deutsch
Meine Lieblingssender speichern?
1. Suchen Sie Ihren gewünschten Sender, wie oben beschrieben, über die Pfeiltasten.
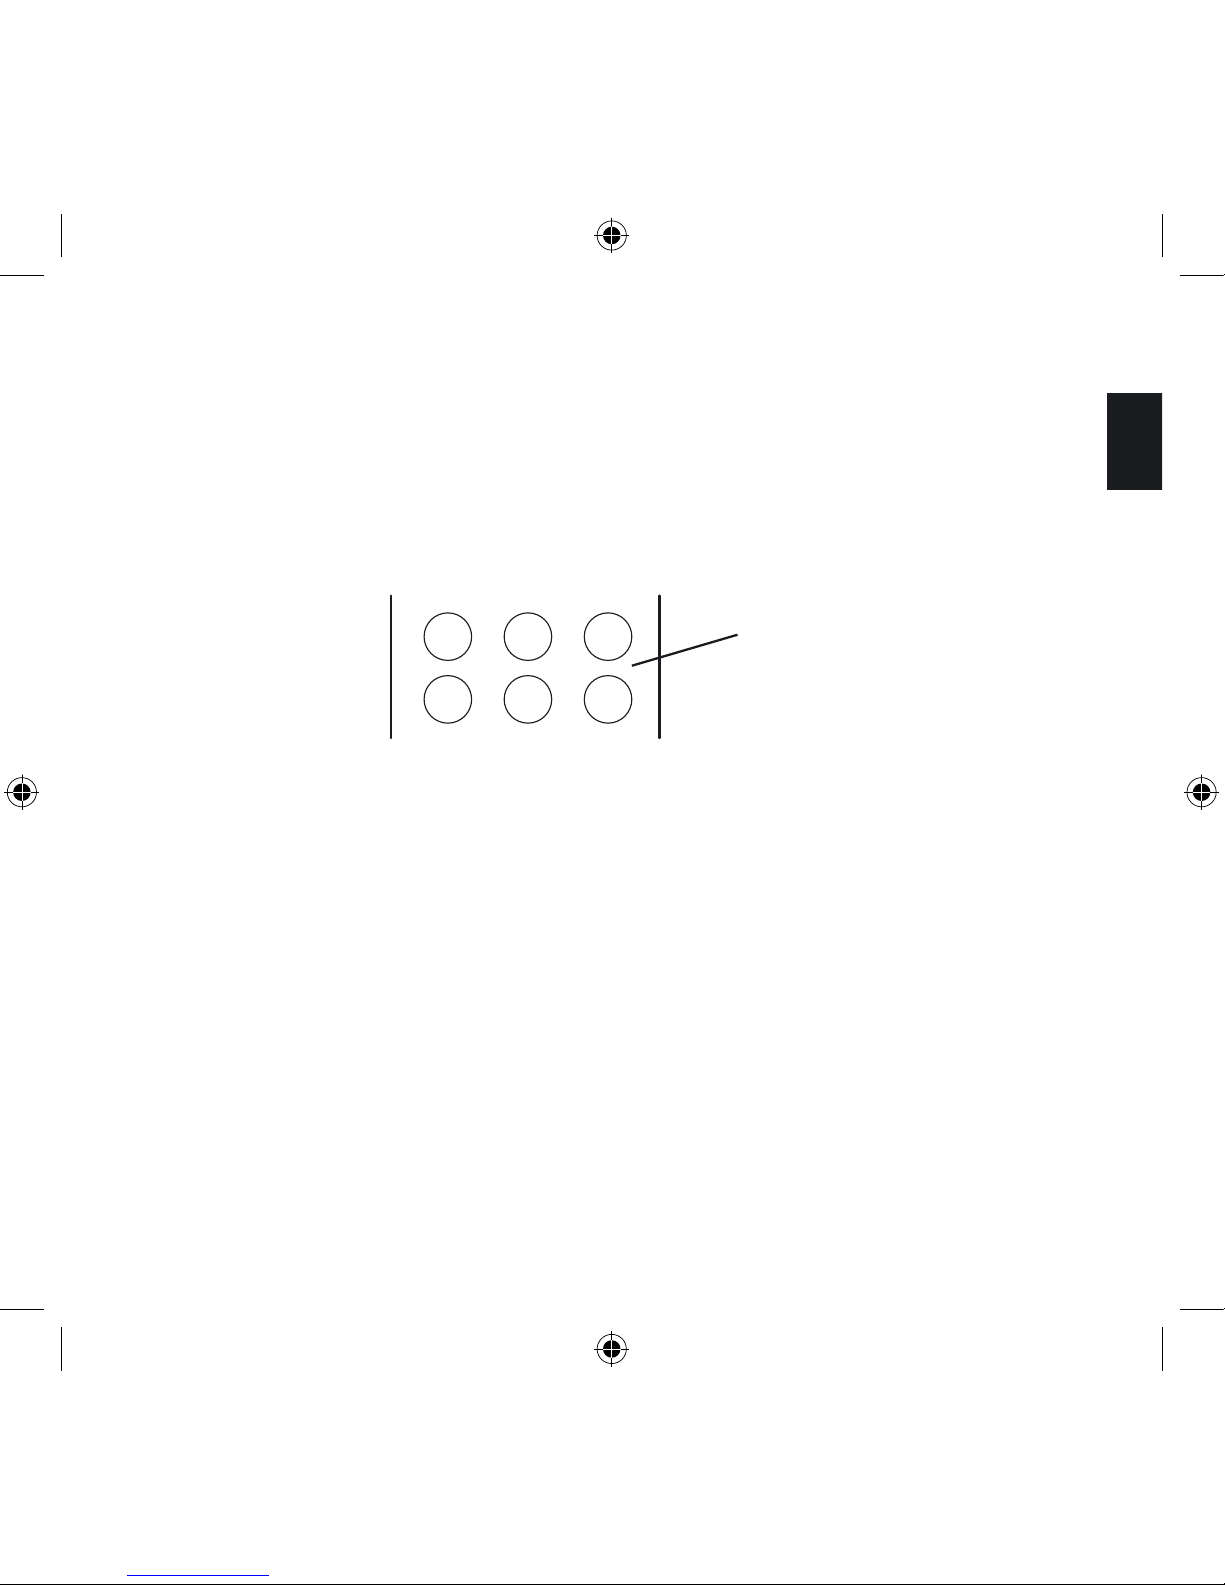
2. Diesen Sender können Sie nun unter einer der 6 Vorwahltasten speichern. Diese sind
auf der Fernbedienung mit P R E S E T gekennzeichnet.
3. Speichern Sie nun den Radiosender durch Drücken der gewünschten Vorwahltaste
bis auf dem Gerätedisplay „STORE“ erscheint. Nun ist der Radiosender gespeichert
und kann jederzeit durch Drücken dieser Taste aufgerufen werden.
Meine gespeicherten Lieblingssender aufrufen?
1. Drücken Sie die FM Taste auf Ihrer Fernbedienung.
2. Drücken Sie nun die Vorwaltaste, unter der Sie den gewünschten FM Sender
gespeichert haben.
ERP
TES
FM Stationstasten
Page 53

54
Einen gespeicherten Sender löschen bzw. überschreiben?
Die gespeicherten Radiosender können nicht gelöscht werden. Sie müssen nach den
Schritten „Wie kann ich einen Sender speichern?“ mit einem neuen FM Radiosender
überschrieben werden.
Eine externe Antenne anschlie
ßen?
Das Gerät ist für den Empfang von FM Signalen bereit und verfügt über einen externen
Antennenanschluss. Für den Radioempfang benötigen Sie das Antennenkabel, das im
Stoffbeutel beiliegt.
Das Anschlussterminal befindet sich an der Rückplatte.
Wie werden die FM-Stereo-/Mono-Einstellungen verändert?
Drücken Sie die „Stop“-Taste um zwischen Mono und Stereo zu wechseln.
Line in:
Ein Gerät, wie z. B. ein TV, Computer, VCR, DVD-Spieler, Spielkonsole über den
LINE-IN Eingang anschließen?
Benützen Sie das beiliegende Chinchkabel, um jede Art von Elektronik an das Gerät
anzuschließen, welche einen Chinchausgang besitzt. Stecken Sie hierzu zunächst das
eine Kabelende an den Chinchausgang der Quelle, die Sie anschließen möchten. Das
andere Kabelende können Sie nun an der Rückplatte einstecken. Drücken Sie nun die
LINE IN Taste auf der Gerätefernbedienung, um den Ton des externen Gerätes wiederzugeben. Beachten Sie, dass Sie mit der Gerätefernbedienung nur den LINE IN Hilfseingang
aktivieren können. Alle weiteren Funktionen müssen Sie an der externen Quelle direkt
steuern.
Page 54
55
Deutsch
3. Fehlerbehebung, Service und Support
Fehlerbehebung:
1. Falls das Gerät nicht korrekt funktioniert, lesen Sie bitte die gesamte Bedienungsanleitung in Ruhe durch.
2. Falls die Fragen nicht geklärt werden können, schauen Sie auf die Website
www.genevalab.com und klicken sie auf Support.
3. Falls sich das Problem nicht beheben lässt, treten Sie mit Ihrem Händler in Kontakt.
Serviceteam:
Sollte Ihr Produkt beschädigt sein und eine Reparatur benötigen, setzen Sie sich mit Ihrem
Händler bzw. dem jeweiligen Importeur in Kontakt, um an einen autorisierten Servicepartner in Ihrer näheren Umgebung zu gelangen.
Für alle Serviceleistungen innerhalb der Sachmängelgewährleistungsfrist kontaktieren Sie
die Website www.genevalab.com und klicken auf Support oder kontaktieren Ihren Händler.
Technischer Support:
productsupport@ge
nevalab.com
Customer Service Telefonnummer:
siehe Geneva Lab Website: www.genevalab.com und klicken auf Support für Ihre lokale
Support-Nummer.
Website
www.genevalab.com
Page 55
56
D2Audio’s einzigartige „Intelligent Digital Amplifi ers“ haben Profi s und Audiophile gleichermaßen über Jahre beeindruckt. Unsere patentierte Verstärkertechnologie optimiert
das Audiosignal, um Ihnen die bestmögliche Klangwiedergabe durch unübertroffene
digitale Verstärkung zu liefern.
4. Made for iPod & Technologiepartner
Das Logo “Made for iPod and iPhone“ gibt an, dass das Produkt speziell zur Verwendung mit
dem iPod und dem iPhone hergestellt wurde. Der Hersteller versichert, dass dieses Gerät mit
denselben Qualitätsstandards entwickelt und gefertigt wurde, wie Sie es von Ihrem iPod und
APPLE Produkten erwarten.
Technologiepartner:
G-Lab GmbH arbeitet mit den weltbesten Entwicklern der Unterhaltungselektronik zusammen,
um Ihnen eines der best entwickelten Geräte der HiFi Branche anzubieten.
MPEG Layer-3 Audio Coding Technology ist lizenziert von Fraunhofer IIS und Thomson.
“EmbracingSound“ ist eine Technologie für Konsumenten und Profi s, die Musik erfahren
und erleben möchten. Das „EmbracingSound“ Verfahren nutzt zwei dicht aneinander gesetzte Lautsprecher, um Ihnen ein bisher unerreichtes, größeres, hochaufgelöstes Klangbild
zu präsentieren. Lehnen Sie sich zurück und genießen Ihre Musik. Möglicherweise fi nden
Sie neue Favoriten in Ihrer „Plattensammlung“ oder unternehmen spannende Ausfl üge in
Musikgenres, die Sie vorher noch nicht kannten. Lassen Sie sich vom Erlebten leiten!
Mehr Informationen fi nden Sie auf der Homepage: www.tad-audiovertrieb.de/geneva
Page 56
57
Deutsch
5. Technische Daten:
Für detaillierte Technische Daten verweisen wir auf folgenden Link:
www.genevalab.com und klicken auf Support. Hier können Sie die gewünschten Daten
aller Modelle herunter laden.
© 2010 G-LAB GmbH, Alle Rechte vorbehalten
Aufgrund der Urheberrechte ist das Kopieren, Reproduzieren oder Duplizieren dieser
Bedienungsanleitung als Ganzes oder in Teilen ohne Erlaubnis der G-Lab GmbH nicht
gestattet.
Geneva® ist ein registriertes Handelszeichen von G-Lab GmbH.
D2Audio und D2A sind eingetragene Handelsmarken. Das D2Audio Digital Amplifier
Logo ist ein eingetragenes Warenzeichen der D2Audio Handelsmarke.
iPod ist eine Handelsmarke von APPLE Computer, registriert in den USA und anderen
Ländern.
Das Warenzeichen EmbracingSound™ und das EmbracingSound Logo sind Eigentum
der Embracing Sound Experience AB.
Geneva Sound System, Bedienungsanleitung, Version v5.0-EU-G
Page 57

58
Page 58
59
Français
Manuel d‘utilisateur
Geneva Sound System
(Model M +CD)
Page 59
60
AVERTISSEMENT
1) Lisez les instructions.
2) Conservez les instructions.
3) Respectez tous les avertissements.
4) Suivez toutes les instructions.
5) N’utilisez pas cet appareil à proximité d’un point d’eau.
6) Nettoyez uniquement l’appareil avec un linge sec.
7) Ne bloquez jamais les ouvertures de ventilation. Procédez à l’installation en respec-
tant les instructions du fabricant.
8) N’installez jamais l’appareil près d’une source de chaleur comme un radiateur, une
bouche d’air chaud, une cuisinière ou tout autre appareil (y compris un amplificateur) qui
génère de la chaleur.
9) Utilisez uniquement des fixations et accessoires recommandés par le fabricant.
RISK OF ELECTRICAL SHOCK
DO NOT OPEN
CAUTION
RISQUE DE CHOC ÉLÉCTRIQUE
NE PAS OUVRIR
AVIS
Page 60
61
Français
10) Protégez le cordon d’alimentation pour empêcher qu’on ne marche dessus ou qu’il
ne soit pincé, en particulier au niveau des fiches, des prises de courant et de son point de
sortie de l’appareil.
11) Débranchez cet appareil en cas d’orage avec des éclairs ou s’il n’est pas utilisé sur
une longue période.
12) Confiez toutes les réparations à un technicien qualifié. La réparation est nécessaire
lorsque l’appareil a été endommagé de quelque manière que ce soit, par exemple lorsque
le cordon d’alimentation ou la fiche est abîmé(e), lorsqu‘un liquide a été renversé dessus
ou que des objets sont tombés dans l’appareil, lorsqu’il a été exposé à la pluie ou à
l’humidité, lorsqu’il ne fonctionne pas normalement ou qu’il a chuté.
13) Cet appareil ne doit pas être exposé à des éclaboussures ou des gouttes d’eau
et aucun objet rempli de liquide comme un vase ne doit se trouver à proximité.
Mise en garde: L’utilisation ou le réglage des commandes, ou l’exécution de procédures
autres que celles qui sont spécifiées par le présent document peut provoquer une exposi
-
tion à des radiations dangereuses ou à un fonctionnement risqué.
Lecteur de disque compact: Le lecteur de disque compact (CD) contient un laser. Le
laser émet des radiations laser visibles et invisibles. N’ouvrez pas le boîtier optique. Évitez
toute exposition au rayon. Seul un technicien qualifié doit régler ou réparer le lecteur de
disque compact.
Page 61
62
Produit laser de classe 1: Ce lecteur CD appartient à la catégorie de PRODUI LASER DE CLASSE 1 conformément à la norme EN 60825- 1:1994+A1+A2, IEC 60825
1:1993+A1+A2. L’étiquette PRODUIT LASER DE CLASSE 1 se trouve à l’arrière du produit. Ce produit est conforme à la norme 21 CFR partie 1040.10.
Détails techniques sur la diode laser intégrée: longueur d’onde: 790 nm ± 15nm.
Puissance radiante maximale accessible (en cours de fonctionnement): 0.492 mW.
Ventilation: Ne bloquez pas les ouvertures de ventilation à l’arrière ou sous l’appareil
Geneva Sound System. Pour assurer un fonctionnement stable de l’appareil Geneva
Sound System et pour le protéger de la surchauffe, placez-le dans une position et un
emplacement qui ne perturberont pas sa ventilation. Par exemple, ne placez pas
l’appareil Geneva Sound System sur un lit, un sofa ou une surface semblable, pouvant
bloquer les ouvertures de ventilation. Ne l’intégrez pas dans un autre élément comme
dans une bibliothèque ou dans un meuble qui peut empêcher l’air de circuler par ses
ouvertures de ventilation. N’insérez aucun objet dans les ouvertures.
CLASS 1 LASER
PRODUCT
CAUTION
Visible and invisible
laser radiation when open.
Avoid exposure to beam.
Page 62
63
Français
Nettoyage: Notez que le sac d’accessoires de l’appareil Geneva Sound System
contient un linge de nettoyage. Pour éviter de rayer sa surface, nous vous recomman-
dons d’utiliser ce linge de nettoyage fourni. Avant de procéder au nettoyage, débranchez
l’appareil Geneva Sound System de la prise de courant alternatif.
Surcharge: Pour éviter tout risque d‘incendie ou de décharge électrique, ne surchargez
pas les prises de courant des murs ou les rallonges.
Feu ouvert: Maintenez cet appareil Geneva Sound System à une distance suffisamment
éloignée d’une flamme à l’air libre comme une bougie. Ne placez aucune source de
flamme, comme une bougie allumée, sur l’appareil Geneva Sound System.
Températures de fonctionnement: La plage de température recommandée pour
l’appareil Geneva Sound System est comprise entre 5 et 40 °C.
Panneau de la grille avant: Ne retirez pas le panneau de la grille avant car il est inamovible et annulera la garantie limitée.
Troubles auditifs:
Le fait d’écouter de la musique très fort sur une longue durée peut
provoquer une perte de l’audition.
La prise électrique ou le coupleur est utilisé(e) comme dispositif de débranchement qui
doit toujours être prêt(e) à fonctionner.
Etiquette de la marque: Les étiquettes du produit et les indications de sécurité sont
situées sur le panneau arrière de l‘appareil Geneva Sound System.
Page 63

64
Débranchement en cours de fonctionnement: Ne débranchez pas le cordon
d’alimentation en courant alternatif de la prise si la musique retentit ou si l’appareil
Geneva Sound System est allumé car vous risqueriez d’endommager les pilotes.
Piles de la télécommande: Conservez les piles hors de portée des enfants. Elles peuvent
provoquer un incendie ou une brûlure chimique si elles sont manipulées sans précaution.
Ne les rechargez pas, ne les démontez pas, ne les chauffez pas à plus de
100 ºC ou ne les incinérez pas. Remplacez uniquement une pile usagée par une pile de
type et de numéro de modèle identiques (Batterie lithium CR2025, 3 V).
ATTENTION
: Danger d‘explosion en cas de remplacement incorrect de la batterie. Lors du
remplacement, n‘utilisez que des batteries de type semblable ou équivalent.
Piles usagées: Ne jetez pas les piles usagées n’importe où, suivez toutes les réglementa-
tions locales. Ne les incinérez pas.
Disques compacts (CD): N’insérez jamais des disques inférieurs à 12 cm, comme des
minidisques CD, etc., que l’appareil ne prend pas en charge. De plus, insérez uniquement
des CD (par exemple des pièces de monnaie).
Antenne extérieure: Si une antenne extérieure ou un système de câble est relié(e) au
produit, assurez-vous qu’il/elle est mis(e) à la terre pour fournir une protection contre
les surtensions et les charges statiques établies conformément à l’article 810 du Code
électrique national (ANSI/NFP informations N°70, section 54 du Code électrique canadien), relatif à la mise à la terre correcte du mât et de la structure de support, à la mise à la
terre du fil d’entrée sur une unité de décharge d’antenne, à la taille des conducteurs de
terre, à l’emplacement de l’antenne/l’unité de décharge, au branchement des électrodes
de terre et les besoins en électrode de terre.
Modification: Toute modification non autorisée du récepteur ou de la télécommande radio
peut annuler l’autorisation de l’utilisateur à faire fonctionner cet appareil.
Page 64
65
Français
Remarque à l’installateur du système CATV: Ce rappel permet d’attirer l’attention de
l’installateur du système CATV sur l’article 820-40 du NEC (des États-Unis) qui fournit des
instructions sur une mise à la terre correcte. Il spécifie en particulier que la câble de terre
doit être relié au système de mise à la terre du bâtiment, aussi près que possible du point
d’entrée du câble.
Retrait du panneau arrière: Le retrait du panneau arrière par une personne non autorisée
annule également la garantie limitée.
Ce produit doit être recyclé. Les produits portant le symbole ci-dessous ne doivent PAS
être jetés avec les déchets ménagers courants. À la fin du cycle de vie du produit,
apportez-les dans un centre de collecte des déchets conçu pour le recyclage des disposi
tifs électriques et électroniques. Renseignez-vous sur les points de retour et de collecte de
votre commune.
La directive Déchets d‘équipements électriques et électroniques (DEEE) a été appliquée
pour réduire considérablement la quantité de déchets qui est enfouie, réduisant de ce
fait l’impact environnemental sur notre planète et notre santé. Agissez toujours de façon
responsable en recyclant les produits usagés. Si ce produit peut encore être utilisé,
envisagez de le donner ou de le vendre.
Page 65

66
Table des matières
Chapitre 1
Prise en main
Déballage et installation
Démarrage rapide
Écoutez votre iPod
Écoutez un CD
Écoutez la radio FM
68
68
70
72
74
74
Chapitre
2
Comment faire…
?
Généralités:
Comment mettre en marche l‘appareil Geneva Sound System?
Comment faire pour régler le volume et le son?
Comment faire pour vérifier que la télécommande fonctionne?
Comment faire pour nettoyer l‘enceinte?
A quoi sert la touche AIR de la télécommande?
Comment faire pour changer la pile de la télécommande?
iPod:
Comment sélectionner l’adaptateur dock iPod correct pour votre iPod ?
Comment vérifier la version logicielle de votre iPod?
Comment mettre à niveau votre iPod?
Comment insérer ou retirer un adaptateur dock?
Comment contrôler l’iPod qui utilise la télécommande du Geneva Sound
System?
CD:
Comment faire pour contrôler le lecteur CD à l’aide de la télécommande?
Comment faire pour lire des CD MP3 et en d’autres formats?
Comment faire pour lire des CD-R/W MP3 avec plusieurs albums?
75
75
75
75
76
76
76
77
78
78
78
78
79
79
79
Page 66
67
Français
80
80
81
81
82
82
82
82
Chapitre
3
Dépannage, entretien et support
Dépannage et support
Entretien et réparations
Support technique
Numéro de téléphone du service client
Site Web
83
83
83
83
83
83
radio FM:
Comment faire pour contrôler la radio FM à l’aide de la télécommande?
Comment faire pour sélectionner une station de radio FM?
Comment faire pour mémoriser votre station de radio FM préférée en
mode prédéfini?
Comment faire pour lire une station de radio FM qui est mémorisée dans
le mode prédéfini?
Comment faire pour effacer ou remplacer une station prédéfinie?
Comment faire pour brancher l’antenne de la radio FM extérieure?
Comment modifier les paramètres stéréo/mono de la FM?
Entrée de ligne:
Comment faire pour brancher une TV, ordinateur, magnétoscope, lecteur
DVD ou une console de jeu à l’appareil Geneva Sound System à l’aide de
„l’entrée de ligne“?
Chapitre 4
Compatibilité iPod et Partenaires technologiques
Compatible iPod
Partenaires technologiques
84
84
84
Chapitre
5 Spécifications techniques85
Page 67
68
US only
US only
EU only
UK only
x7
1. Prise en main
Étape 1: Déballez tous les composants. Veuillez conservez l’emballage original au cas où
vous devriez retourner l’appareil, étant donné que la garantie ne couvre pas les dommages
causés lors de l’expédition.
La boîte doit contenir les composants Geneva Sound System suivants:
Télécommande
Antenne extérieure
Alimentation externe
Câble d’entrée
de ligne
UE uniquement
États-Unis
uniquement
Royaume-Uni
uniquement
États-Unis
uniquement
Adapteur d‘antenne
l’adaptateur
dock iPod
Page 68
69
Français
Étape 2: Insérez les piles dans la télécommande (voir page 76). Les piles sont fournies
dans la boîte.
Étape 3: Insérez le câble d’alimentation (câble fin) de l’alimentation extérieure dans la
prise d’alimentation du panneau arrière (voir schéma ci-dessous).
Puis raccordez le cordon d‘alimentation AC à la prise AC.
Panneau arrière:
Jack de
ligne d’entrée
Fiche
d’alimentation DC
Connecteur antenne radio FM
FM
Lorsque la station d’accueil est utilisée,
placer le couvercle de l’iPod ici.
Page 69
70
Démarrage rapide:
Lecteur CD
Grille avant
Affichage DEL indiquant le mode
de l’appareil, la fréquence FM,
l’état du CD, etc.
Panneau arrière
dock universel iPod
Page 70
71
Français
Remote control:
LINE IN
iPod
AIR
CD FM
ERP
TES
VOLBASS
TREBLE
VOLBASS
TREBLE
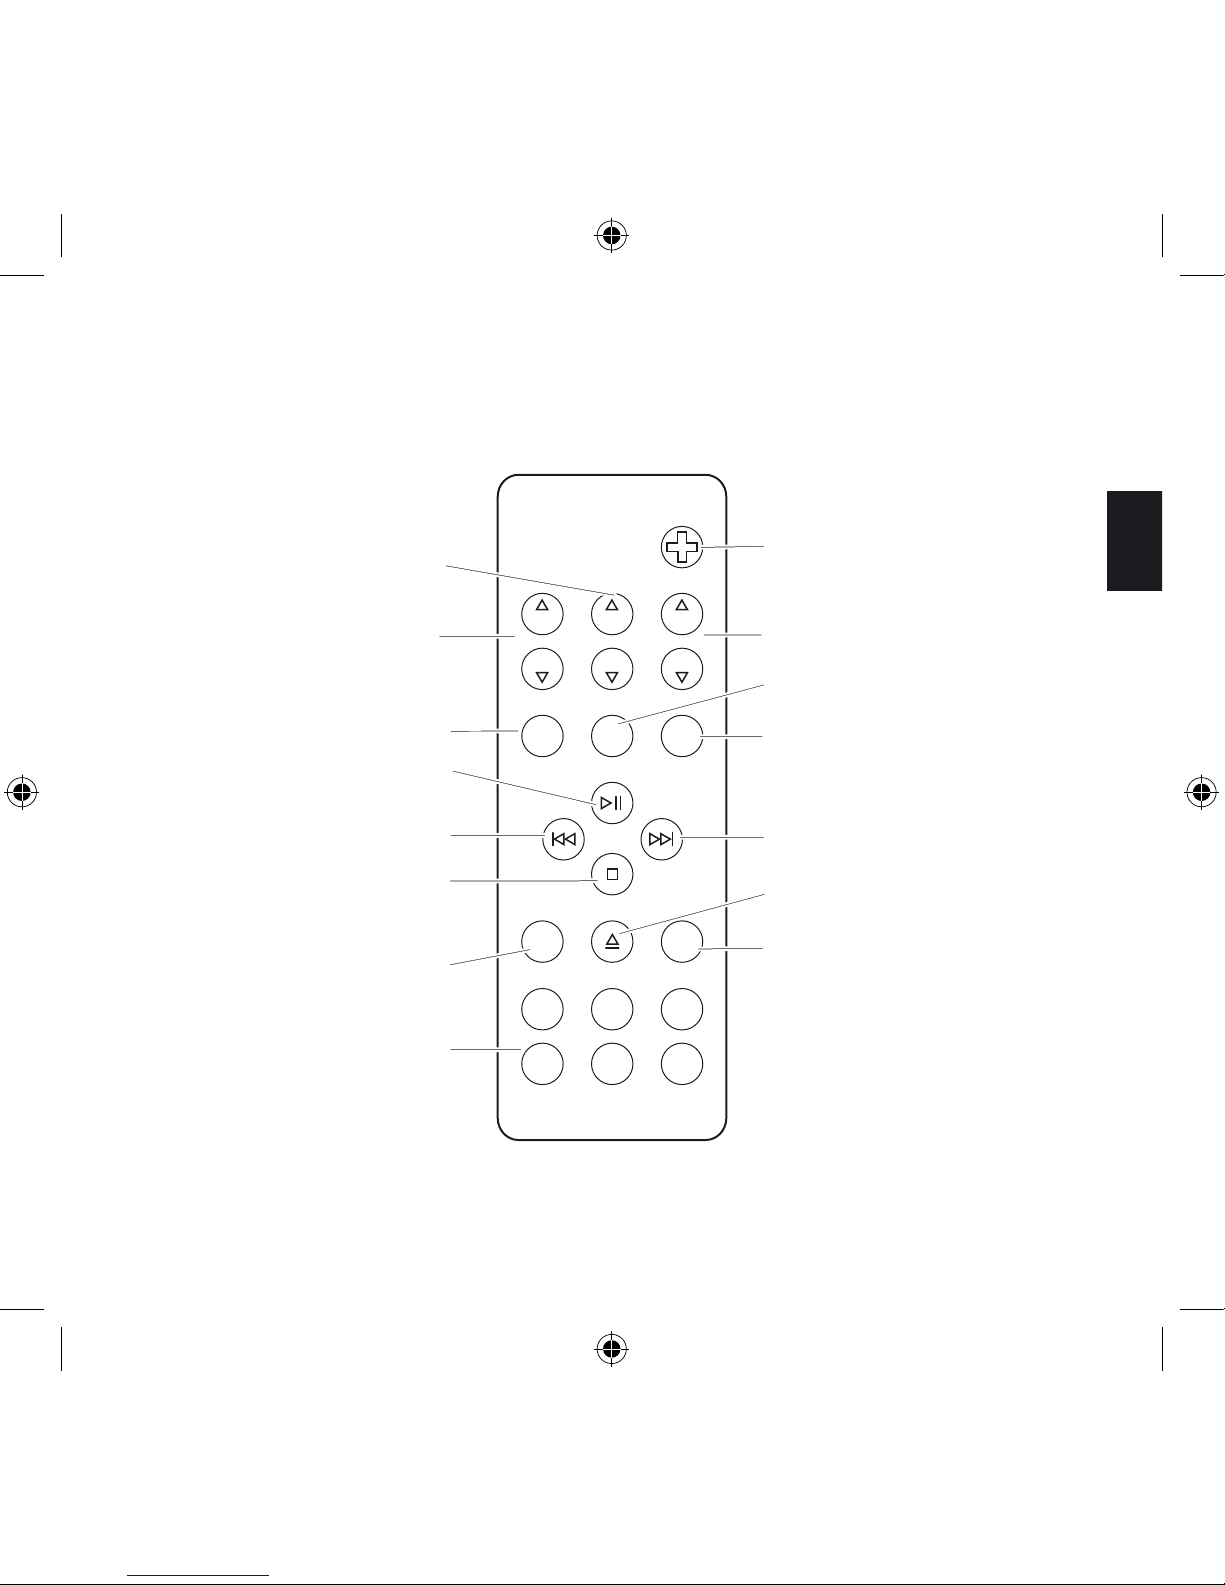
Mise en marche/Arrêt
Volume
Lecteur CD
radio FM
Éjection du CD
Avance rapide/Avance
d‘un morceau
Entrée de ligne
Stations radio FM
prédéfinies
AIR
(Fonction non présente)
Arrêt
Retour rapide/Retour
arrière
Lecture/Pause
iPod
Basse
Aigus
Page 71
72
Mise en marche de l’appareil Geneva Sound System:
Appuyez sur le bouton Marche/Arrêt de la télécommande.
Sélectionnez la source:
Pour passer d’une source à l’autre, appuyez sur la touche iPod, CD, FM ou ligne d’entrée
de la télécommande pour sélectionner la source à contrôler.
Écoutez votre iPod (plus de détails page 77):
Étape 1. Si vous voulez utiliser le système avec un iPod, retirez le couvercle situé sur
l’appareil à l’aide de votre ongle ou d’un outil souple. N’utilisez ni couteau, ni autre objet
pointu qui pourrait endommager la laque. Le couvercle en bois dispose d’un aimant intégré et peut être attaché au panneau arrière (Cf. page 69).
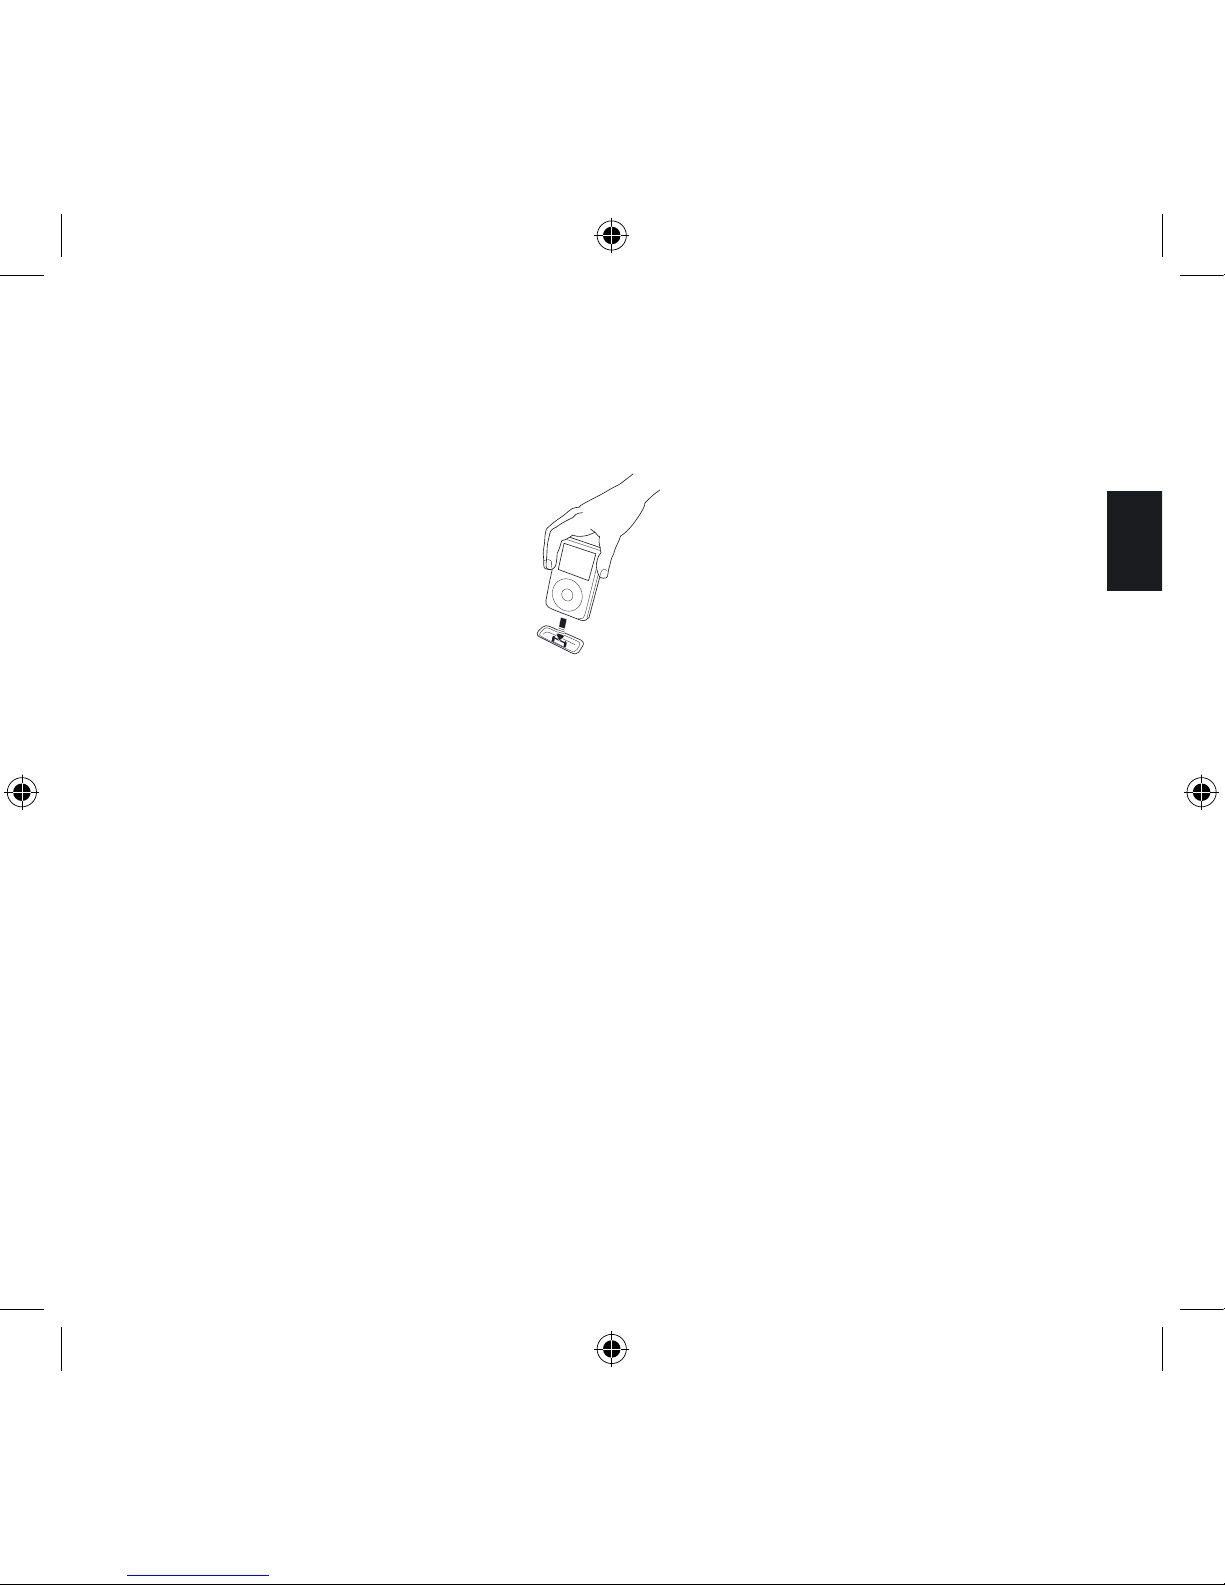
Sélectionnez les adaptateurs dock iPod corrects qui sont adaptés au modèle d’iPod que
vous voulez ancrer en suivant les instructions du tableau de la page 77, ou essayez les
adaptateurs dock fournis jusqu’à ce que vous trouviez celui qui est parfaitement adapté à
votre iPod. Reliez l’adaptateur dock au dock universel iPod en appuyant légèrement sur la
partie supérieure de l’adaptateur dock (Cf. l’image) pour l’ouvrir.
Page 72
73
Français
Étape 2. Insérez l’iPod dans l’adaptateur dock correspondant du dock universel iPod.
Étape 3. Appuyez sur la touche iPod de la télécommande. L’affichage DEL qui se trouve
sous la grille doit afficher „iPod“. Si l’écran ne s’éclaire pas, vérifiez que le cordon
d’alimentation CA est correctement inséré dans la prise électrique CA
Étape 4. Appuyez sur la touche Lecture de la télécommande. Si vous n’écoutez toujours
aucun son, vérifiez que le volume est activé en réglant la touche du volume “+“.
Étape 5. Vous pouvez commander votre iPod en utilisant les touches Stop, Marche/Pause,
Plage suivante/Avance rapide, Plage précédente/Retour rapide de votre télécommande.
Chargement: La batterie de votre iPod se charge lorsque l’appareil Geneva est en
marche.
Page 73
74
Écoutez un CD (plus de détails page 79):
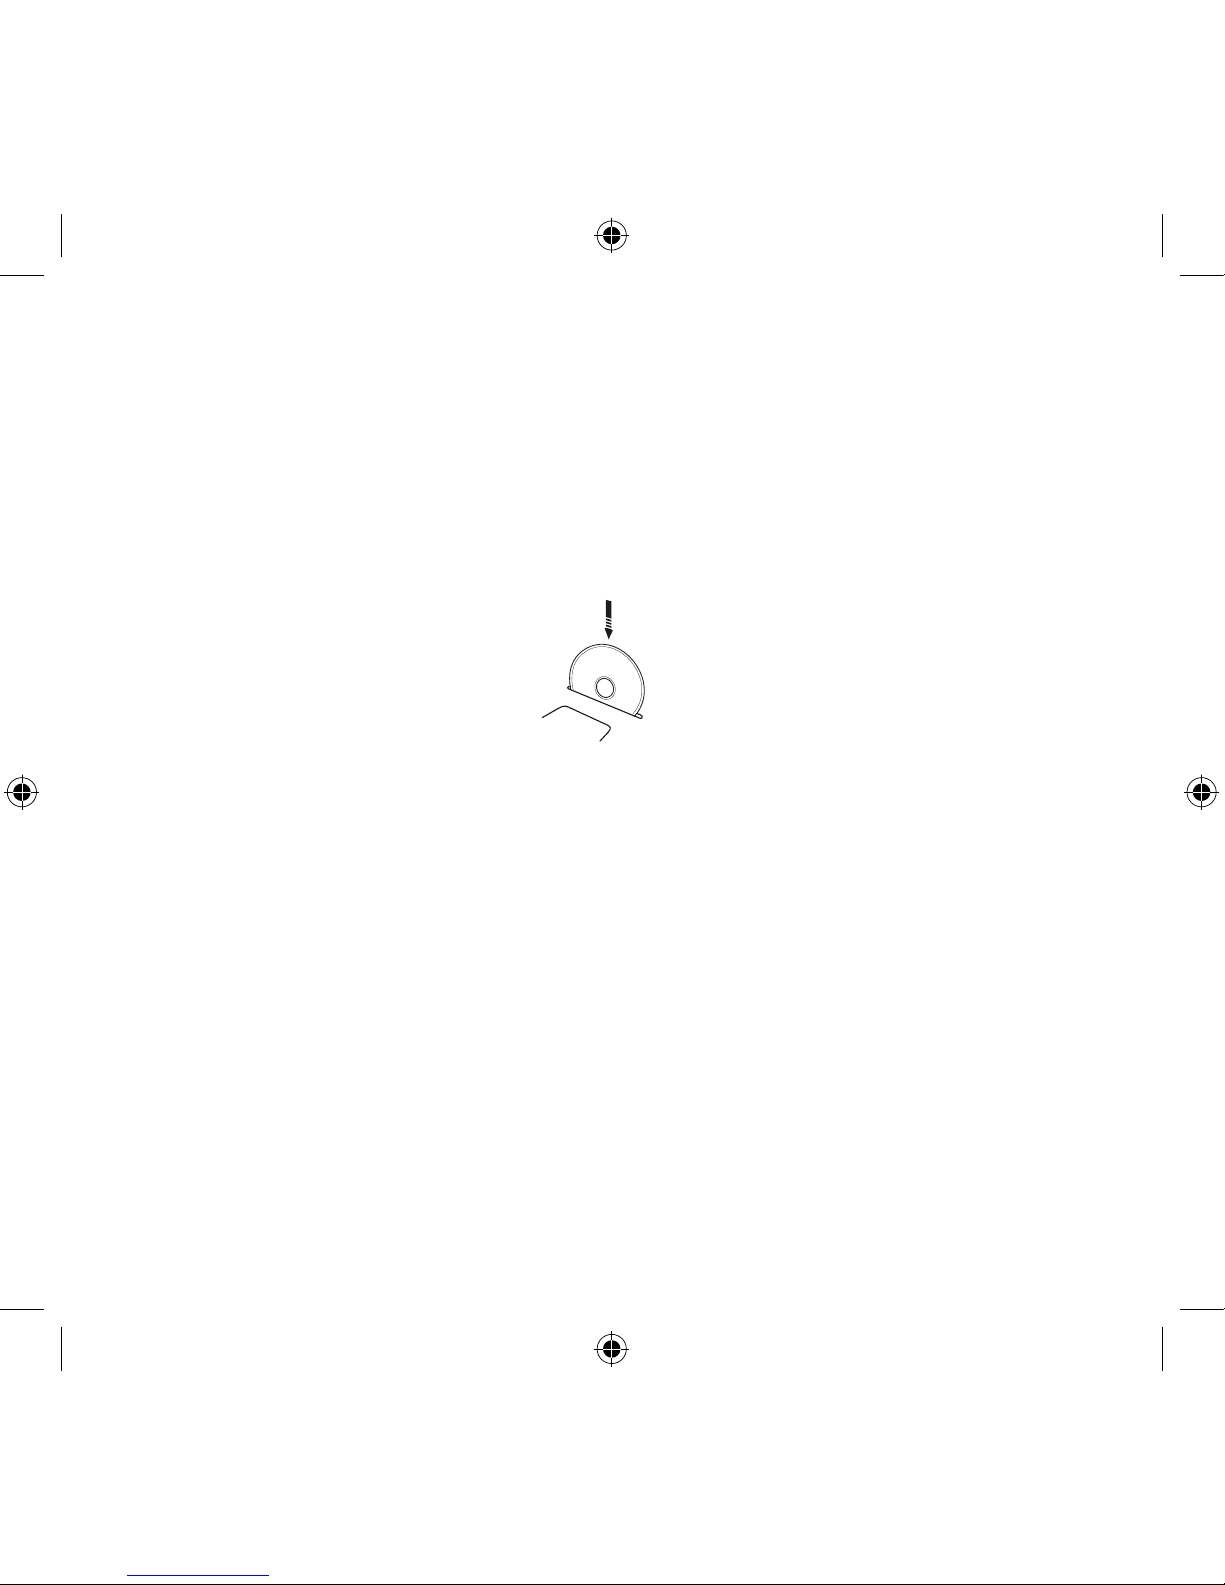
Étape 1. Insérer le CD dans l’emplacement prévu à cet effet. Assurez-vous que la face impri-
mée du CD soit placée sur le devant. L’affichage DEL situé sous la grille doit indiquer „CD“
et le CD doit se lancer automatiquement. Si l’écran ne s’éclaire pas, vérifiez que le cordon
d’alimentation CA est correctement inséré dans la prise électrique CA. Si vous n’écoutez
toujours aucun son, vérifiez que le volume est activé en réglant la touche du volume “+“.
Étape 2. Vous pouvez naviguer dans le lecteur CD à l’aide des touches Arrêt, Lecture/
Pause, Avance rapide/Avance d‘un morceau, Retour rapide/Retour arrière de votre télécommande.
Étape 3. Pour retirer le CD, appuyez sur la touche Ejecte de la télécommande.
Écoutez la radio FM (plus de détails page 80):
Étape 1. Connectez l’antenne externe à la prise d’antenne FM externe du panneau arrière.
Étape 2. Appuyez sur le bouton FM de la télécommande. L’affichage DEL qui se trouve sous
la grille doit indiquer une fréquence FM comme „103.2“. Si l’écran ne s’éclaire pas, vérifiez
que le cordon d’alimentation CA est correctement inséré dans la prise électrique CA. Si
vous n’écoutez toujours aucun son, vérifiez que le volume est activé en réglant la touche du
volume “+“.
Étape 3. Sélectionnez une station FM à l’aide des touches << et >>.
CD title
Page 74
75
Français
2. Comment faire...?
Généralités:
Comment mettre en marche l’appareil Geneva Sound System?
- En appuyant sur les touches FM, iPod, CD ou Entrée de ligne de la télécommande
- En appuyant sur la touche Marche/Arrêt de la télécommande
Comment éteindre l’appareil Geneva Sound System?
En appuyant sur la touche ON/OFF de la télécommande. L’appareil est alors en mode
veille. Si vous désirez éteindre complètement l’appareil, vous devez déconnecter le câble
d’alimentation.
Comment faire pour régler le volume et le son?
1. Utilisez les touches Volume, Basse et Aigus de la télécommande pour régler le son et
le volume.
2. Volume: 0 signifie silence (aucune sortie de son), 100 signifie sortie maximale.
3. Aigus et basse: -6 signifie très faible basse ou aigus, 0 signifie neutre et 6 signifie
basse ou aigus maximums.
4. Si vous désactivez l’appareil, les valeurs actuelles sont enregistrées. Si son volume est
très élevé lorsqu’il est désactivé, il le sera également dès qu’il sera réactivé.
Comment faire pour vérifier que la télécommande fonctionne?
Chaque fois que vous appuyez sur une touche de la télécommande, un petit voyant
rouge s’allume rapidement sur l’affichage DEL.
Page 75
76
Comment faire pour nettoyer l‘enceinte?
Veillez à toujours débrancher le câble d’alimentation avant de nettoyer l’appareil Geneva
Sound System. Utilisez uniquement le linge de nettoyage fourni. Avant d’éviter toute
rayure, nous vous recommandons d’utiliser le linge de nettoyage fourni.
Entretien:
Utilisez uniquement le linge de nettoyage fourni. N’utilisez ni alcool de nettoyage, ni
solvant pour nettoyer la surface de l’appareil car ils pourraient tous les deux endommager la laque et provoquer des pannes électriques et un incendie s’ils pénétraient dans
l’électronique de l’appareil Geneva Sound System!
A quoi sert la touche AIR de la télécommande?
Cette fonction n’est pas présente sur ce modèle.
Comment faire pour changer la pile de la télécommande?
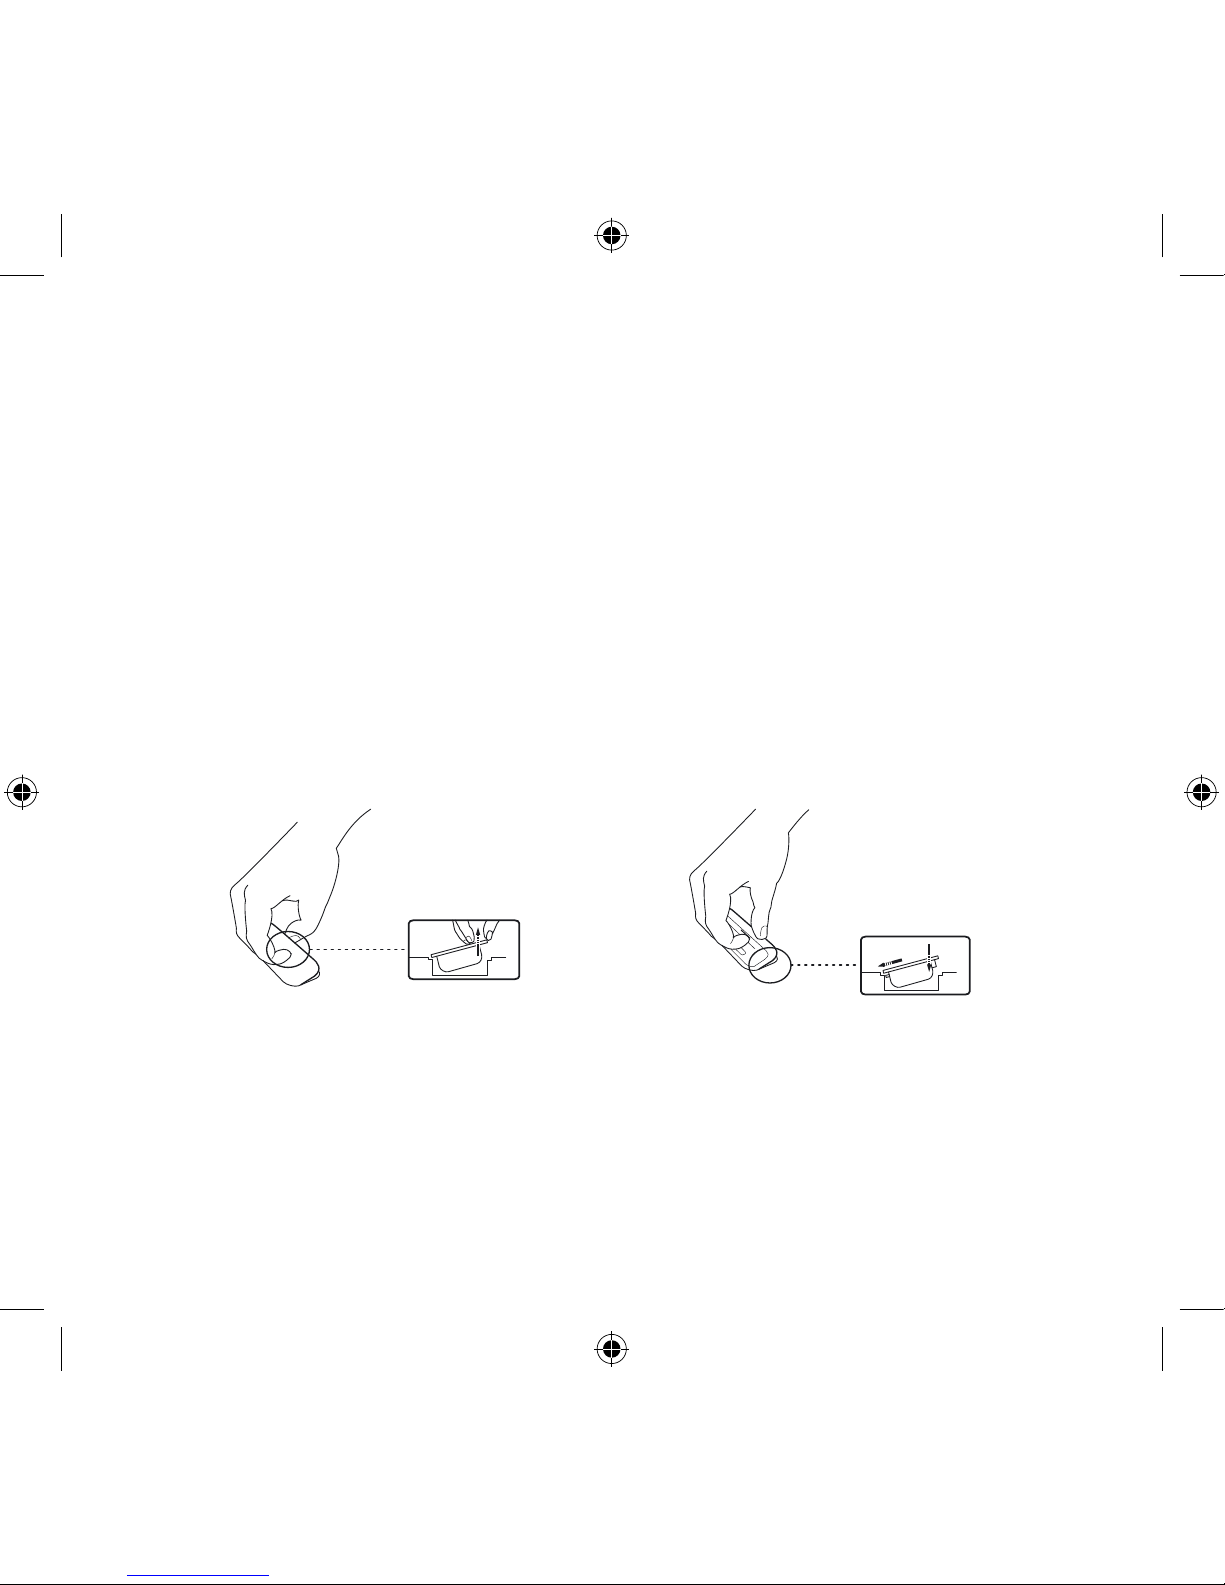
1. Ouvrez le couvercle du compartiment des piles qui se trouve à l’arrière de la télécommande.
2. Retirez la batterie existante, puis remplacez-la par une nouvelle batterie au lithium, 3 V
(type CR2025).
3. Le compartiment des piles contient des symboles qui indiquent le sens de la batterie.
Respectez ces indications.
Étape 1
Étape 2 + 3
Page 76
77
Français
Comment sélectionner l’adaptateur iPod correct pour votre iPod ?
Geneva
Dock Adapter Nr
15
Works with
iPhone 3G; iPhone 3G-S
12
Works with
iPhone 2G
(4GB, 8GB only)
7
Made for
iPod 4th generation (4G): iPod photo (iPod with color display)
(40GB, 60GB only)
6
Made for
iPod 4th generation (4G): iPod Photo, color U2 iPod
(20GB, 30GB only)
5
Made for
iPod 4th generation (4G)
(40GB only)
4
Made for
iPod 4th generation (4G iPod), U2 iPod
(20GB only)
3
Made for
iPod Mini
(4GB, 6GB only)
� *
Made for
iPod touch *
iPod nano 3rd generation (3G) *
iPod classic *
iPod nano 2nd generation (2G) *
iPod 5th Generation (video) *
iPod nano *
* Geneva Dock Adapter
Not included. All new iPod models already include the dock adapter in the original packaging.
Not supported
iPod 3rd generation (3G iPod)
* Adaptateur dock Geneva
Non fourni. Tous les nouveaux modèles iPod comprennent déjà
l’adaptateur dock dans leur emballage d’origine.
iPod classic 3G non pris en charge
„Geneva peut inclure un ou plusieurs adaptateurs de dock avec ce produit.
La version exacte et le nombre de ces adaptateurs peut varier dans le temps, car nous nous attachons à fournir des adaptateurs pour
les produits iPod ou iPhone d‘Apple les plus récents et les plus courants. Si l‘adaptateur pour le produit iPod ou iPhone que vous
souhaitez utiliser avec ce système Geneva n‘est pas inclus dans l‘emballage, il devrait être disponible en tant qu‘accessoire d‘origine
auprès de votre revendeur Apple.“
Page 77
78
iPod:
Comment faire pour vérifier la version logicielle de votre iPod?
Sur l’iPod, sélectionnez « Paramètres », « À propos de », « Version ». Utilisez toujours la
dernière version logicielle disponible.
Comment faire pour mettre à niveau votre iPod?
Sur le site Web d’Apple iPod, vous trouverez des instructions sur la procédure permettant
de mettre à niveau le logiciel de votre iPod: www.apple.com/ipod/download/
Comment insérer ou retirer un adaptateur dock?
Comment faire pour contrôler votre iPod à l’aide de la télécommande de l’appareil
Geneva Sound System?
Après avoir connecté un iPod aux haut-parleurs, et mis l’appareil Geneva Sound System
en mode iPod, vous pouvez commander votre iPod en utilisant la télécommande fournie
avec l’appareil Geneva Sound System.
Le schéma de la page 71 vous présente une vue d’ensemble des fonctions de contrôle.
Page 78
79
Français
CD:
Comment faire pour contrôler le lecteur CD à l’aide de la télécommande?
Vous pouvez contrôler le lecteur CD intégré à l’aide de la télécommande fournie avec
l’appareil Geneva Sound System.
Le schéma de la page 71 vous présente une vue d’ensemble des fonctions de contrôle.
Comment faire pour lire des CD en MP3 et d’autres formats?
Le lecteur CD intégré prend en charge les formats CD-DA, CD-R, CD-RW, CD-ROM
(session unique et multisession) et MP3. Le lecteur CD lit les CD dans ces formats
exactement comme il lit un CD audio classique.
Comment faire pour lire des CD-R/W MP3 avec plusieurs albums?
Vous pouvez organiser les fichiers MP3 en répertoires (dossiers) sur un CD-R/W.
L’appareil Geneva Sound System lit une telle hiérarchie de façon simplifiée: tous les
fichiers sont lus comme s‘ils se trouvaient dans un répertoire volumineux.
Puis-je lire des CD 8 cm?
Non.
Page 79

80
radio FM:
Comment faire pour contrôler la radio FM à l’aide de la télécommande?
Vous pouvez contrôler la radio FM CD intégrée à l’aide de la télécommande fournie avec
l’appareil Geneva Sound System.
Le schéma de la page 71 vous présente une vue d’ensemble des fonctions de contrôle.
Comment faire pour sélectionner une station de radio FM?
1. Appuyez sur „FM“ sur la télécommande.
2. Utilisez les touches << ou >> pour sélectionner une station: un clic augmente ou
diminue la fréquence.
3. Le numéro de l’affichage DEL sous la grille indique la fréquence actuelle en MHz
(par exemple, “88.7“ signifie 88.7 MHz).
4. Pour balayer les fréquences, maintenez enfoncée la touche << ou >> pendant quelques secondes et la radio FM recherche automatiquement la station suivante.
Lorsqu’une station a été détectée, la recherche automatique s’arrête. Pour cesser le
balayage, répétez cette action.
Page 80
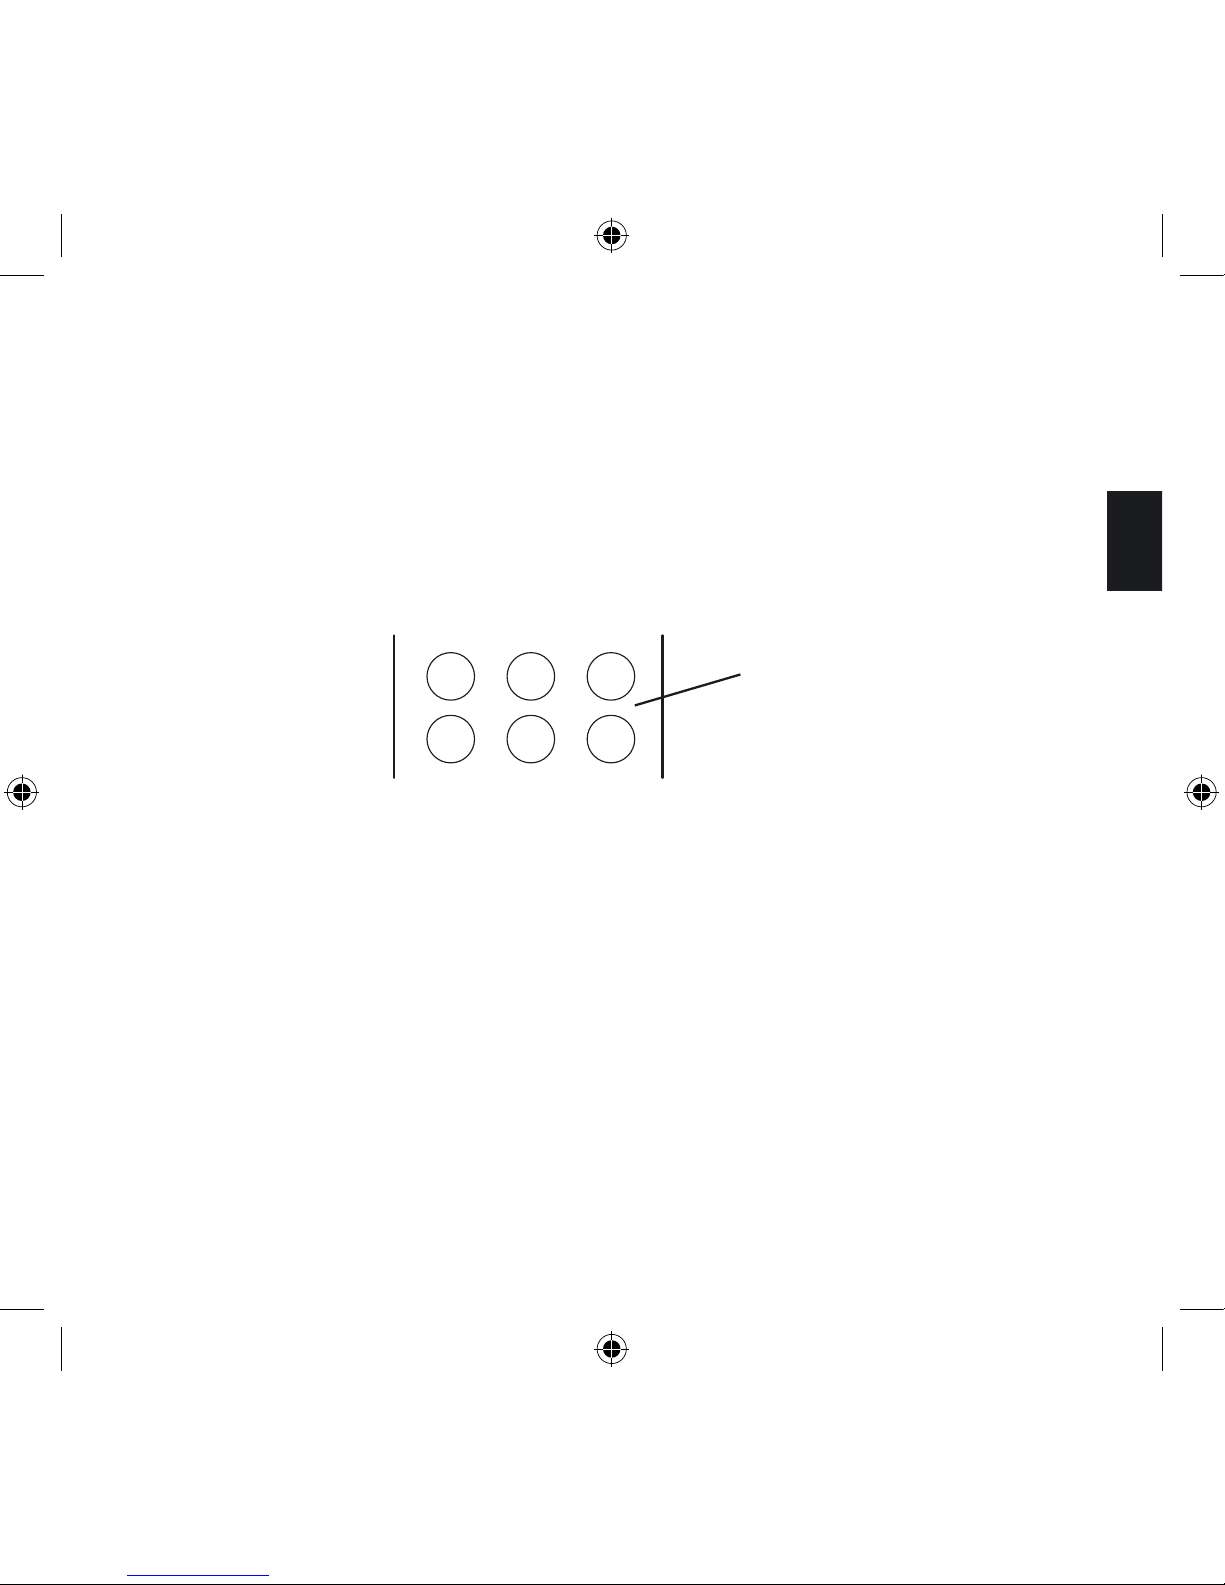
81
Français
Comment faire pour mémoriser votre station de radio FM préférée en mode
prédéfini?
1. Sélectionnez votre station radio préférée à l’aide de la touche << ou >> de la
télécommande.
2. Six stations prédéfinies (une prédéfinition mémorise la fréquence de la station) sont
disponibles, caractérisées par les six touches de votre télécommande:
3. Sélectionnez l’une des 6 touches PRESET de la télécommande, et maintenez-la
enfoncée jusqu’à ce que l‘affichage DEL indique „mémorisé“ dans la grille de
l’appareil Geneva Sound System. La station est maintenant mémorisée et vous
pouvez la trouver à l’aide de la touche prédéfinie sélectionnée.
Comment faire pour lire une station de radio FM qui est mémorisée dans le mode
prédéfini?
1. Appuyez sur la touche FM de la télécommande.
2. Appuyez sur l’une des six touches prédéfinies: la station FM mémorisée émettra.
ERP
TES
Stations radio FM
prédéfinies
Page 81

82
Comment faire pour effacer ou remplacer une station prédéfinie?
Les stations mémorisées en mode prédéfini ne doivent pas forcément être effacées. Suivez simplement les étapes précédentes pour mémoriser une station en mode prédéfini.
Comment faire pour brancher l’antenne de la radio FM extérieure?
L’appareil Geneva Sound System est conçu pour recevoir la FM et dispose d’un tuner FM
intégré. Pour capter la réception radio, vous devez brancher l’antenne extérieure qui est
fournie dans le sac d’accessoires.
Le connecteur de l’antenne extérieure se trouve dans le panneau arrière de l’appareil
Geneva Sound System.
Comment modifier les paramètres stéréo/mono de la FM?
Appuyez sur le bouton « Stop » pour passer de mono à stéréo.
Entrée de ligne:
Comment faire pour brancher
une TV, ordinateur, magnétoscope, lecteur DVD ou
une console de jeu à l’appareil Geneva Sound System à l’aide de „l’entrée de ligne“?
Utilisez la ligne fournie dans le câble pour relier l’appareil Geneva Sound System à tout
dispositif audio doté d’un connecteur de sortie audio. Branchez tout d’abord le câble de
la ligne d’entrée sur le dispositif que vous voulez connecter à l’appareil Geneva Sound
System, puis branchez le câble au connecteur de ligne situé sur le panneau arrière.
Appuyez sur la touche Ligne d’entrée de la télécommande pour commencer à lire le
contenu du dispositif que vous avez branché.
Notez que vous ne pouvez pas contrôler un tel dispositif à l’aide de la télécommande
de l’appareil Geneva Sound System mais uniquement à l’aide des commandes qui sont
disponibles pour le dispositif connecté.
Page 82
83
Français
3. Dépannage, entretien et support
Dépannage:
1. Si le système ne fonctionne pas comme prévu, prenez d’abord connaissance de ce
manuel pour vous assurer que vous l’utilisez correctement.
2. Si le problème persiste, vous pouvez accéder à notre base de données de dépannage
qui est disponible sur le site Web à l’adresse: www.genevalab.com et sélectionnez la
page aide.
3. Si le problème persiste encore, contactez notre service d’assistance client:
Entretien et réparations:
Si le produit est endommagé ou nécessite une réparation, veuillez contacter la société
Geneva Lab Corporation par courrier électronique pour être mis en rapport avec un
centre agréé.
Pour toute réparation au cours de la période de garantie, veuillez consulter
les conditions sur Internet, sur la page www.genevalab.com en sélectionnant la page
aide, ou contacter votre revendeur.
Support technique:
Numéro de téléphone du service client:
Consultez le site Web de Geneva Lab : www.genevalab.com et sélectionnez la page aide
pour trouver le numéro d’aide vous correspondant.
Site Web:
www.
genevalab.com
Page 83
84
Les „amplifi cateurs numériques intelligents“ uniques de D2Audio impressionnent depuis
des années les professionnels et les audiophiles. Notre technologie d’amplifi cateur brevetée optimise en permanence le signal audio afi n de fournir des performances numériques
et une qualité sonore parfaites.
La technologie EmbracingSound™ s’adresse à la fois aux consommateurs et aux professionnels qui veulent vivre une grande expérience sonore. Comme EmbracingSound™
utilise deux enceintes assez proches, vous vivrez une expérience d’enregistrement très
riche en termes de résolution et de précision comme jamais auparavant. Asseyez-vous et
vivez toute votre musique. Vous pourrez également découvrir des nouvelles musiques qui
vous plairont et vous visiterez des nouveaux genres musicaux que vous ne connaissiez
pas du tout avant. Laissez l’expérience vous guider!
Pour plus de détails, visitez le site Web à l’adresse: www.genevalab.com.
4. Compatibilité iPod et Partenaires technologiques
Le logo « Conçu pour iPod et iPhone » indique que ce produit a été spécifi quement
conçu pour être utilisé avec iPod et iPhone.
Le fabricant certifi e que cet accessoire a été créé conformément aux performances et
normes de qualité élevées que vous attendez d’iPod et d’Apple.
Partenaires technologiques:
Geneva Lab Corporation fait appel à certains des plus grands développeurs de technologies audio pour faire de l’appareil Geneva Sound System un produit d’exception.
MPEG Layer-3 Audio Coding Technology sous licence Fraunhofer IIS et Thomson.
C
ompatibilité iPod et
Page 84
85
Français
5. Spécifications techniques:
Pour en savoir plus sur les spécifications techniques détaillées de ce produit, visitez notre
site Web à l’adresse: www.genevalab.com en sélectionnant la page aide. Vous pourrez
télécharger les spécifications techniques détaillées de tous nos produits.
© 2010 G-Lab GmbH. Tous droits réservés
Conformément à la réglementation sur les droits d’auteur, le présent manuel ne peut
être copié, en tout ou partie, sans l’accord écrit de G-Lab GmbH.
Geneva® est une marque déposée de G-Lab GmbH.
D2Audio et D2A sont des marques déposées et le logo de l’amplificateur numérique
de D2Audio est une marque déposée de D2Audio Corporation.
iPod est une marque déposée de la société Apple Computer, Inc. enregistrée aux
États-Unis et dans d’autres pays.
La marque déposée EmbracingSound™ et le logo Embracing Sound Experience sont
la propriété d’Embracing Sound Experience AB.
Geneva Sound System, Manuel d’utilisateur, version v5.0-UE-FR
Page 85

86
Page 86
87
Italiano
Manuale dell‘utente
Geneva Sound System
(Model M +CD)
Page 87
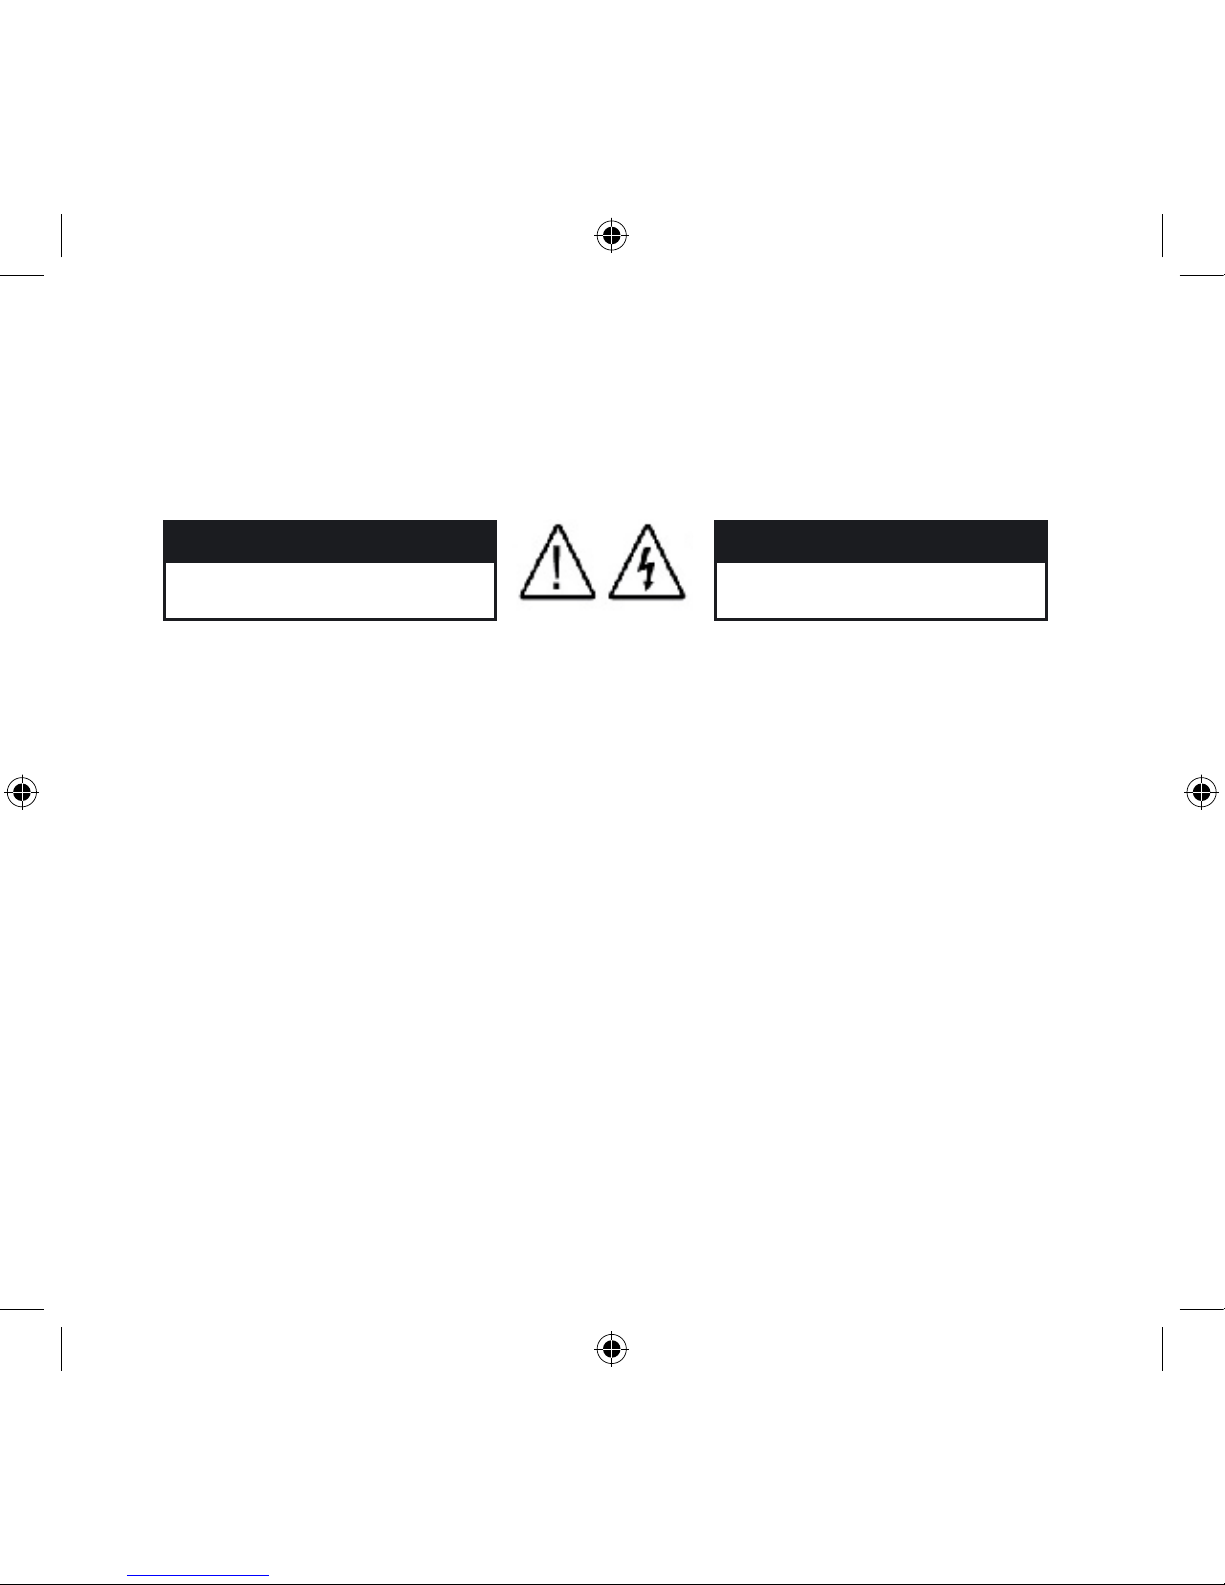
88
ATTENZIONE
1) Leggere le istruzioni.
2) Conservare le istruzioni.
3) Fare attenzione alle avvertenze.
4) Seguire le istruzioni.
5) Non utilizzare l’apparecchiatura vicino ad acqua.
6) Detergere esclusivamente con un panno asciutto.
7) Non bloccare nessuna apertura per la ventilazione. Installare in conformità con le
istruzioni del produttore.
8) Non collocare l’apparecchiatura vicino a fonti di calore, quali termosifoni, dispositivi
di calore, stufe o altre apparecchiature (amplificatori inclusi) che producano calore.
9) Utilizzare esclusivamente supporti e/o accessori consigliati dal produttore.
RISK OF ELECTRICAL SHOCK
DO NOT OPEN
CAUTION
RISQUE DE CHOC ÉLÉCTRIQUE
NE PAS OUVRIR
AVIS
Page 88
89
Italiano
10) Proteggere il cavo di alimentazione in modo che non venga calpestato o schiacciato, specialmente in prossimità della spina, degli alloggiamenti e dei punti di uscita
dall’apparecchiatura.
11) Scollegare l’apparecchiatura dalla rete elettrica durante i temporali o se viene lasciato inutilizzata per lunghi periodi di tempo.
12) Rivolgersi sempre a personale di assistenza qualificato. L’intervento di personale di assistenza qualificato è richiesto in presenza di qualsiasi tipo di danni
all’apparecchiatura. Per esempio in caso di danni al cavo o alla spina di alimentazione, qualora liquidi o oggetti siano stati versati o siano caduti sull’apparecchiatura, se
l’apparecchiatura è stata esposta a pioggia o umidità, o se mostra evidenti alterazioni di
rendimento o è caduta.
13) L’apparecchiatura non deve essere esposta a schizzi o perdite d’acqua, accertarsi che sull’apparecchiatura non siano collocati oggetti contenenti liquidi, quali ad esempio
vasi.
Attenzione: L’utilizzo di comandi, adattamenti, o procedure diversi da quelli indicati nel
presente manuale possono comportare il rischio di esposizione a radiazioni o altre operazioni pericolose.
Compact Disk Drive: Il presente lettore CD dispone di un raggio laser. Il laser irradia radi
azioni laser visibili ed invisibili. Non forzare il blocco ottico. Evitare il contatto diretto con il
fascio laser. Il lettore CD non deve essere modificato o riparato eccetto che da personale
di assistenza qualificato.
Page 89
90
Prodotto laser, classe 1: Il presente lettore CD è classificato come PRODOTTO
LASER, CLASSE 1 in conformità con le norme EN 60825-1:1994+A1+A2, IEC 608251:1993+A1+A2. L’etichetta PRODOTTO LASER, CLASSE 1 è situata sul posteriore del
prodotto. Il prodotto è conforme al 21 CFR parte 1040.10.
Specifiche tecniche riguardanti il diodo laser incorporato: lunghezza d’onda:
790 nm ± 15nm. Potenza accessibile massima irradiata (in esercizio): 0.492 mW.
Ventilazione: Non bloccare nessuna apertura per la ventilazione nella parte posteriore o
inferiore del Geneva Sound System. Per assicurare un perfetto funzionamento del Geneva
Sound System e prevenirne il surriscaldamento, collocarlo in un luogo ed in una posizione che non interferiscano con la ventilazione dell’apparecchiatura. Per esempio, non
collocare il Geneva Sound System su letti, divani o superfici simili, in quanto potrebbero
bloccare le aperture per la ventilazione. Non collocare l’apparecchiatura in una posizione
incassata, per esempio su uno scaffale o all’interno di un armadietto, dove l’aria potrebbe
non confluire nelle aperture per la ventilazione. Non inserire oggetti di nessun tipo nelle
aperture.
CLASS 1 LASER
PRODUCT
CAUTION
Visible and invisible
laser radiation when open.
Avoid exposure to beam.
Page 90
91
Italiano
Pulizia: Nella borsa accessori del suo Geneva Sound System troverà un panno per la
pulizia. Per evitare di graffiare la superficie, si raccomanda l’utilizzo del panno per la puli-
zia incluso nella confezione. Prima di effettuare qualsiasi operazione di pulizia, scollegare
il Geneva Sound System dalla presa della rete elettrica.
Sovraccarico: Per prevenire il pericolo di folgorazione evitare di sovraccaricare le prese a
muro o le prolunghe.
Fiamma: Mantenere il Geneva Sound System a distanza di sicurezza da qualsiasi fiamma
viva, quale una candela accesa. Nessuna fonte di fiamma viva, come candele accese,
deve essere collocata nelle vicinanze del Geneva Sound System.
Temperature di esercizio: La temperatura di esercizio raccomandata per il Geneva
Sound System va da un minimo di 41 ad un massimo di 104 gradi Fahrenheit (da 5 a 40
gradi Centigradi).
Griglia frontale: Non rimuovere la griglia frontale; quest’ultima non è rimuovibile e
renderà nulla la garanzia.
Evitare danni all’udito:
L’ascolto prolungato di musica ad alto volume può portare a
danni permanenti all’udito.
La presa di rete o l’accoppiatore vengono utilizzati come dispositivo di disinserimento,
devono poter essere rapidamente aperti.
Ubicazione delle etichette: Le etichette del prodotto e le avvertenza sulla sicurezza si
trovano sul pannello posteriore del Geneva Sound System.
Page 91

92
Scollegare l’apparecchiatura durante l’esercizio: Non rimuovere il cavo di alimentazione AC dalla presa della rete elettrica durante la riproduzione di musica o nel caso in cui il
Geneva Sound System sia acceso. Tale intervento potrebbe, infatti, danneggiare i lettori.
Pile del telecomando: Tenere la pila del telecomando fuori dalla portata dei bambini.
Se usata senza attenzione, queste ultime, potrebbero essere causa di ustioni da bruciatura
o chimiche. Non ricaricare, smontare, riscaldare a temperature superiori ai 212°F (100°C),
né gettare le pile nel fuoco. Utilizzare solamente pile del tipo e del numero di modello
corretti per la sostituzione (batteria bottone al litio CR2025, 3 V).
ATTENZIONE: Pericolo di esplosione se la batteria è sostituita in modo errato. Sostituire
solo con batteria dello stesso tipo o equivalente.
Pile scariche: Provvedere allo smaltimento delle pile scariche in modo appropriato, secondo quanto prescritto dalle leggi locali. Non gettare le pile nel fuoco.
Compact Disc (CD): Non inserire dischi inferiori a 12 cm, quali minidisc, ecc., poiché non
sono supportati. Inoltre, non inserire nient’altro al di fuori di CD (p.es. monete).
Antenna esterna: Se al prodotto è collegata un’antenna o un sistema di cablaggi esterni,
assicurarsi che sia messo a terra, al fine di proteggere l’apparecchiatura dalle onde di
tensione e dalle scariche elettrostatiche. L’Articolo 810 del Codice Elettrico Nazionale,
ANSI/NFP num. 70 informazione, Sezione 54 del Codice Elettrico canadese, fornisce
informazioni sulle modalità appropriate di messa a terra dell’asta di sostegno dell’antenna,
della struttura di supporto e del cavo di entrata di un’unità di scarico dell’antenna, nonché
sulle dimensione dei conduttori di messa a terra, ubicazione dell’antenna/unità di scarico,
collegamento agli elettrodi di terra e requisiti dell’elettrodo di messa a terra.
Modifiche: Le modifiche non autorizzate al ricevitore o al telecomando via radio possono
invalidare il diritto dell’utente all’utilizzo della presente apparecchiatura.
Page 92
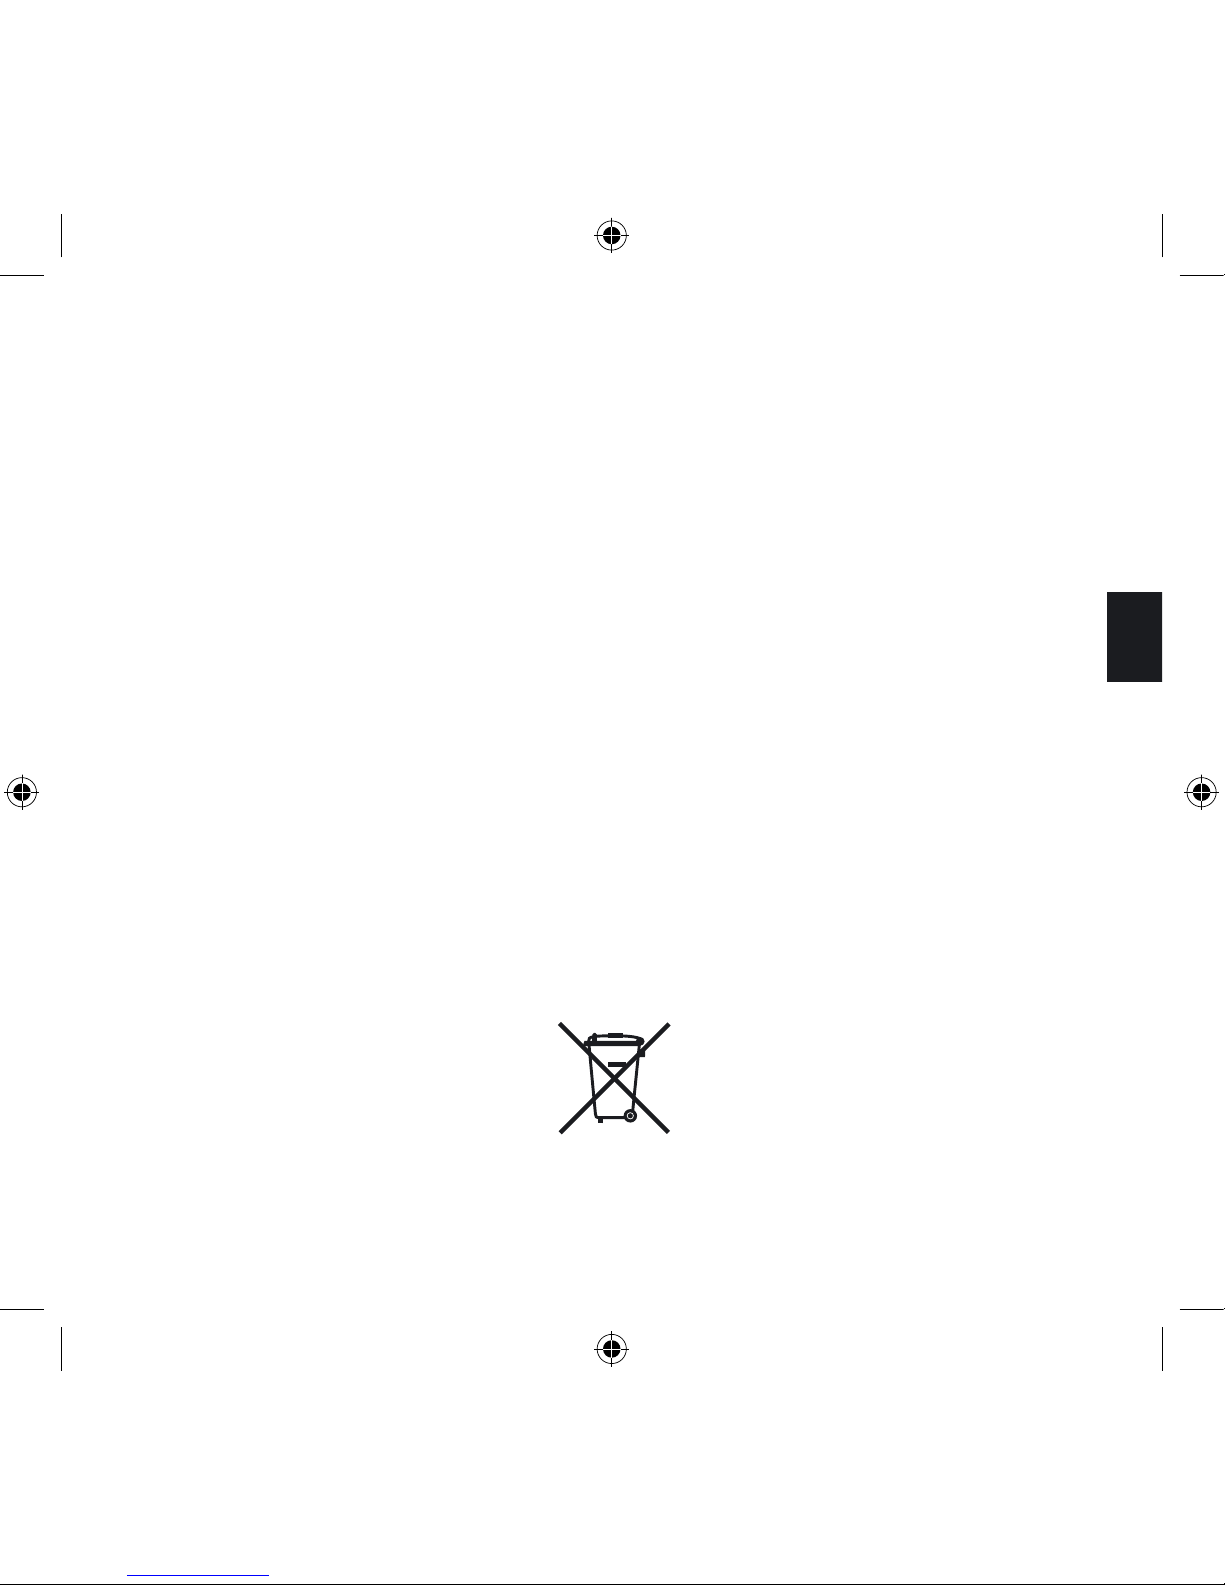
93
Italiano
Nota per l’installatore del sistema CATV: Questo promemoria intende richiamare
l’attenzione dell’installatore del sistema CATV (TV via cavo) sull’Articolo 820-40 del NEC
(Codice Elettrico Nazionale degli Stati Uniti), che fornisce indicazioni sulla corretta messa a
terra. Quest’ultimo specifica, in modo particolare, che il cavo di terra deve essere collegato
al sistema di messa a terra dell’edificio, il più vicino possibile al punto di ingresso del cavo.
La rimozione del pannello posteriore da parte di persone non autorizzate renderà nulla
la Garanzia.
Il presente prodotto deve essere riciclato. I prodotti recanti questo simbolo NON devo
no essere gettati assieme alla normale spazzatura. Alla fine del ciclo di vita del prodotto,
questo deve essere portato ad un centro di raccolta specificamente destinato al riciclaggio
di apparecchi elettrici ed elettronici. Le autorità locali sapranno senz’altro fornire maggiori
informazioni concernenti i punti di raccolta e restituzione.
La Direttiva europea sui Rifiuti di Apparecchiature Elettriche ed Elettroniche (Direttiva
RAEE) ha lo scopo di ridurre in modo considerevole la quantità di rifiuti destinata alle
discariche, riducendone, di conseguenza, l’impatto ambientale sul pianeta e sulla salute
umana. Agire in modo responsabile e provvedere al riciclaggio dei prodotti usati. Nel caso
in cui il prodotto sia ancora utilizzabile, valutare la possibilità di darlo via o venderlo.
Page 93

94
Indice
Capitolo 1
Introduzione
Disimballaggio e preparazione
Nozioni preliminari
Ascoltare l’iPod
Ascoltare un CD
Ascoltare la radio FM
96
96
98
100
102
102
Capitolo 2
Come si fa...?
Informazioni generali:
Come si accende il Geneva Sound System?
Come si regolano suono e volume?
Come si verifica che il telecomando funzioni correttamente?
Come si pulisce l’altoparlante?
Qual è la funzione del tasto AIR sul telecomando?
Come si sostituisce la pila del telecomando?
iPod:
Come scegliere il giusto Adattatore Dock per il mio iPod?
Come si verifica la versione del software del proprio iPod?
Come si aggiorna l‘ iPod?
Come inserire o rimuovere un Adattatore Dock?
Come controllare l’iPod utilizzando il telecomando del Geneva Sound System?
CD:
Come si controlla il lettore CD con il telecomando?
Come si ascoltano i CD in formato Mp3 o altri formati?
Come si ascoltano i CD-R/W contenenti numerosi album?
103
103
103
103
104
104
104
105
106
106
106
106
107
107
107
Page 94
95
Italiano
108
108
109
109
110
110
110
110
Capitolo 3
Guida alla risoluzione dei problemi, Servizi e Supporto
Guida alla risoluzione dei problemi e Supporto
Servizi e Riparazioni
Supporto tecnico
Numero di telefono del servizio clienti
Sito web
111
111
111
111
111
111
radio FM:
Come si controlla la radio FM con il telecomando?
Come si sintonizza una stazione radio FM?
Come si memorizza una stazione radio FM nella preselezione?
Come si ascolta una stazione radio FM memorizzata nella preselezione?
Come si cancella o si riscrivre una preselezione?
Come si collega l’antenna Radio FM esterna?
Come modificare le impostazioni FM stereo/mono?
Linea d‘entrata:
Come si collega un TV, Computer, videoregistratore, lettore DVD o console
per giochi al Geneva Sound System utilizzando l’ingresso “Line in” (linea
d’entrata)?
Capitolo 4
Accessori per iPod e Partner tecnologici
Accessori per iPod
Partner tecnologici
112
112
112
Capitolo 5 Specifiche tecniche113
Page 95
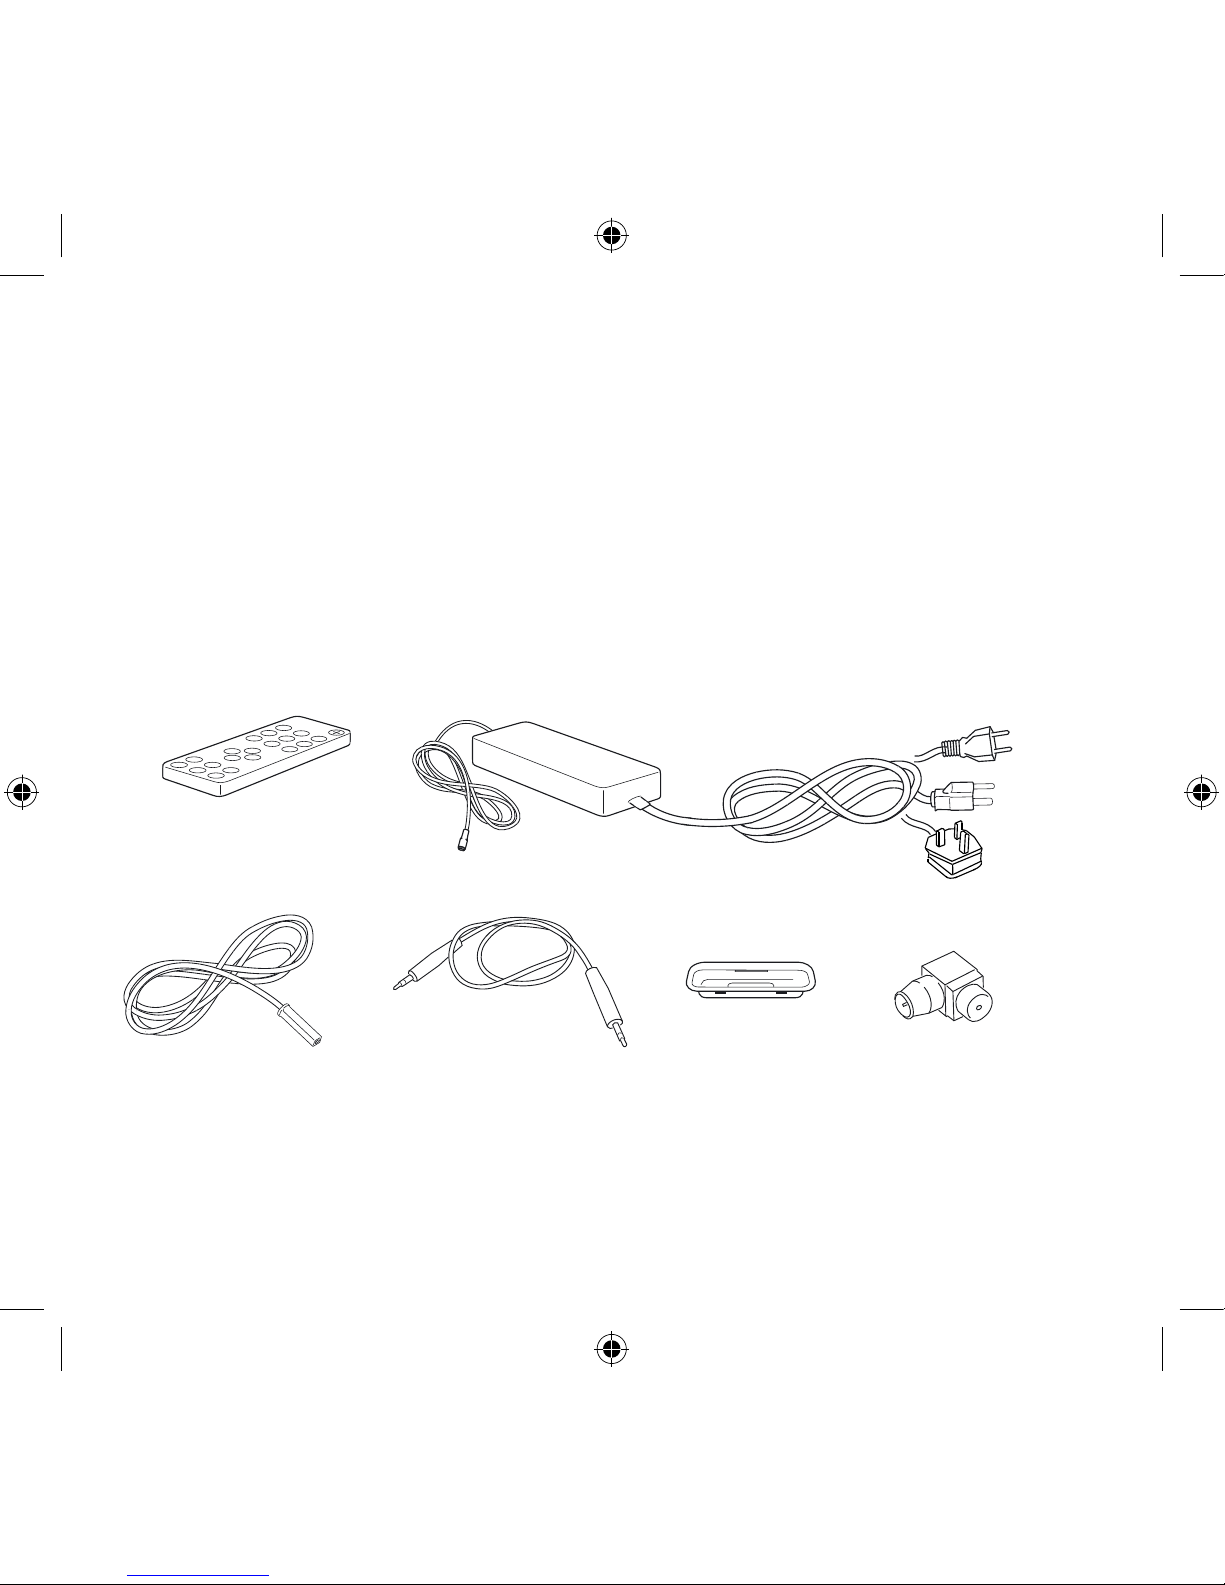
96
US only
US only
EU only
UK only
x7
1. Introduzione
Fase 1: Estrarre tutti i componenti dalla scatola di spedizione. Conservare il materiale
della confezione originale nel caso in cui sia necessario restituire il Geneva Sound System
poiché la Garanzia Limitata non copre i danni di spedizione.
La confezione di spedizione deve contenere le seguenti componenti del sistema:
Telecomando
Antenna esterna
Adattatore Dock iPod
Alimentazione esterna
Cavo per linea
d’entrata
Solo per UE
Solo per USA
Solo per
Regno Unito
Solo per USA
Adattatore antenna
x7
Page 96
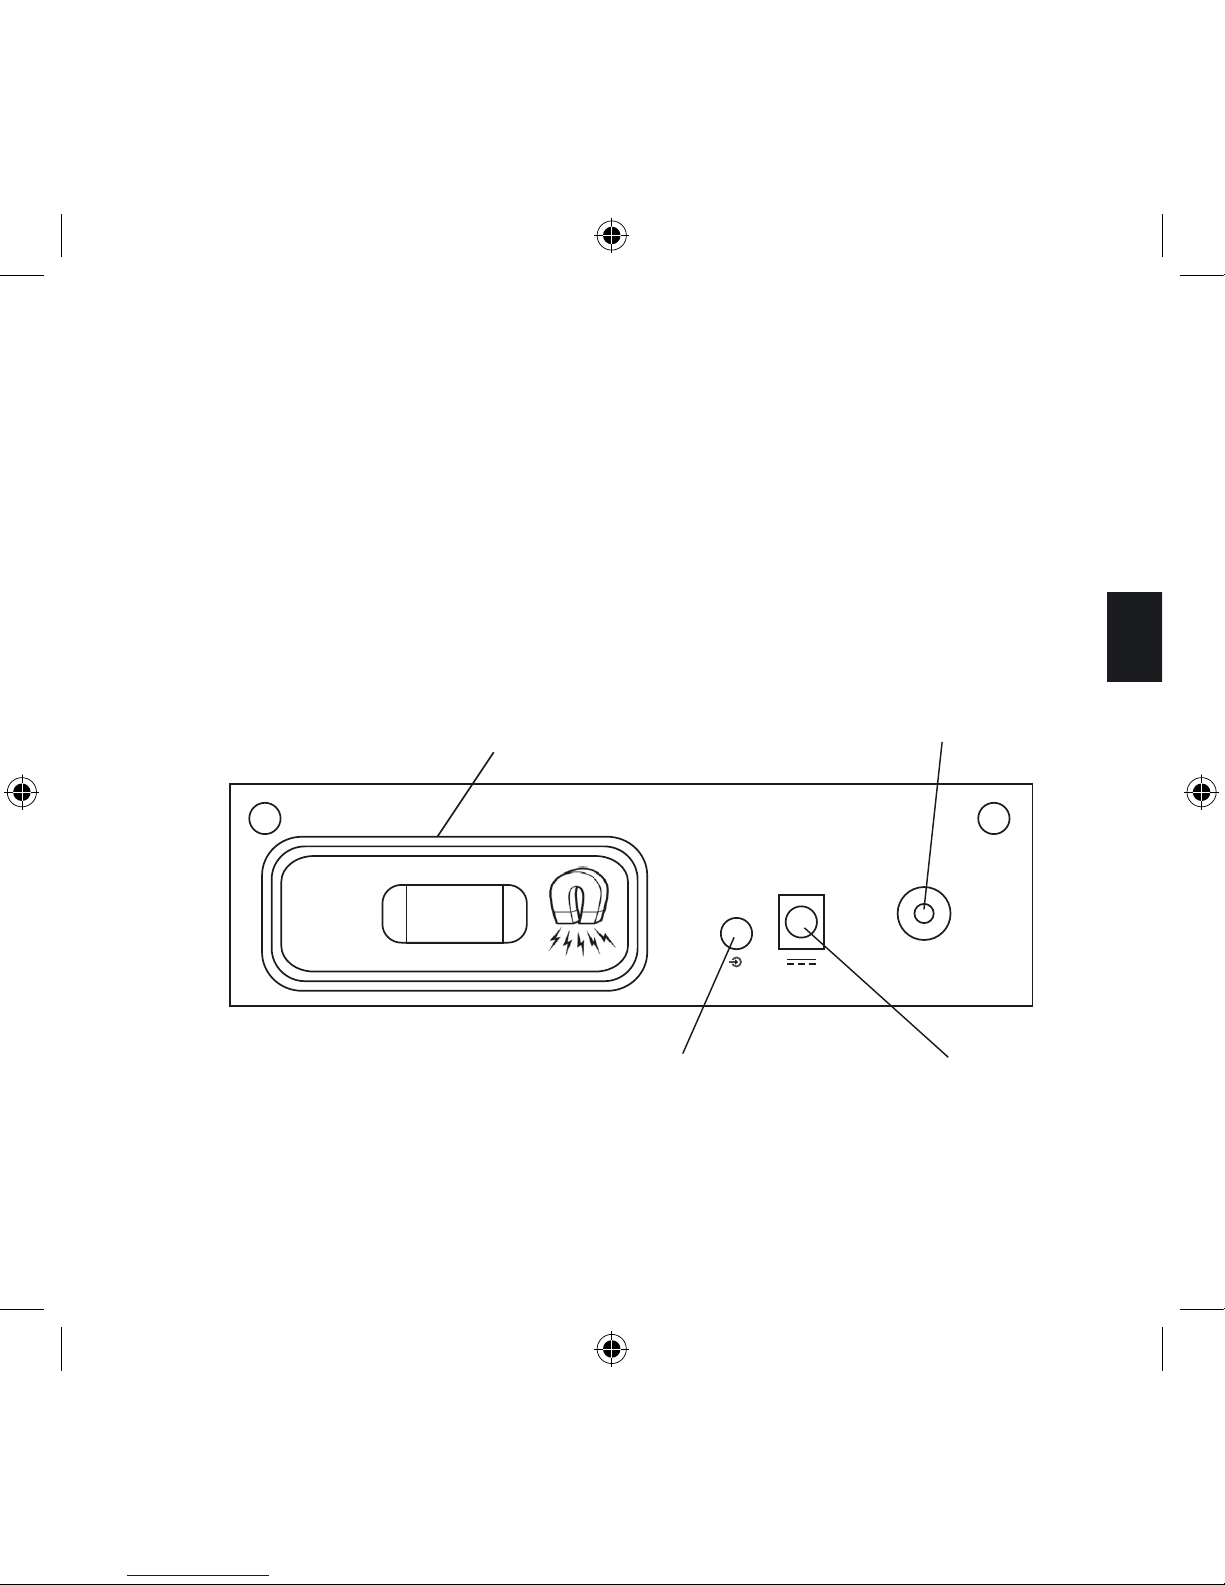
97
Italiano
Fase 2: Inserire le pile nel telecomando (vedere pagina 104). Pile incluse nella confezione.
Fase 3: Inserire il cavo di alimentazione elettrica CC (il cavo sottile) della corrente esterna
nella presa CC sul pannello posteriore (vedi illustrazione in basso).
Quindi collegare il cavo d’alimentazione CA per l’alimentazione esterna alla presa CA.
Pannello posteriore
Jack d’entrata:
Spina di
alimentazione CC
Presa per antenna FM
FM
Quando si utilizza il dock, sistemare
qui il supporto dell‘iPod
Page 97
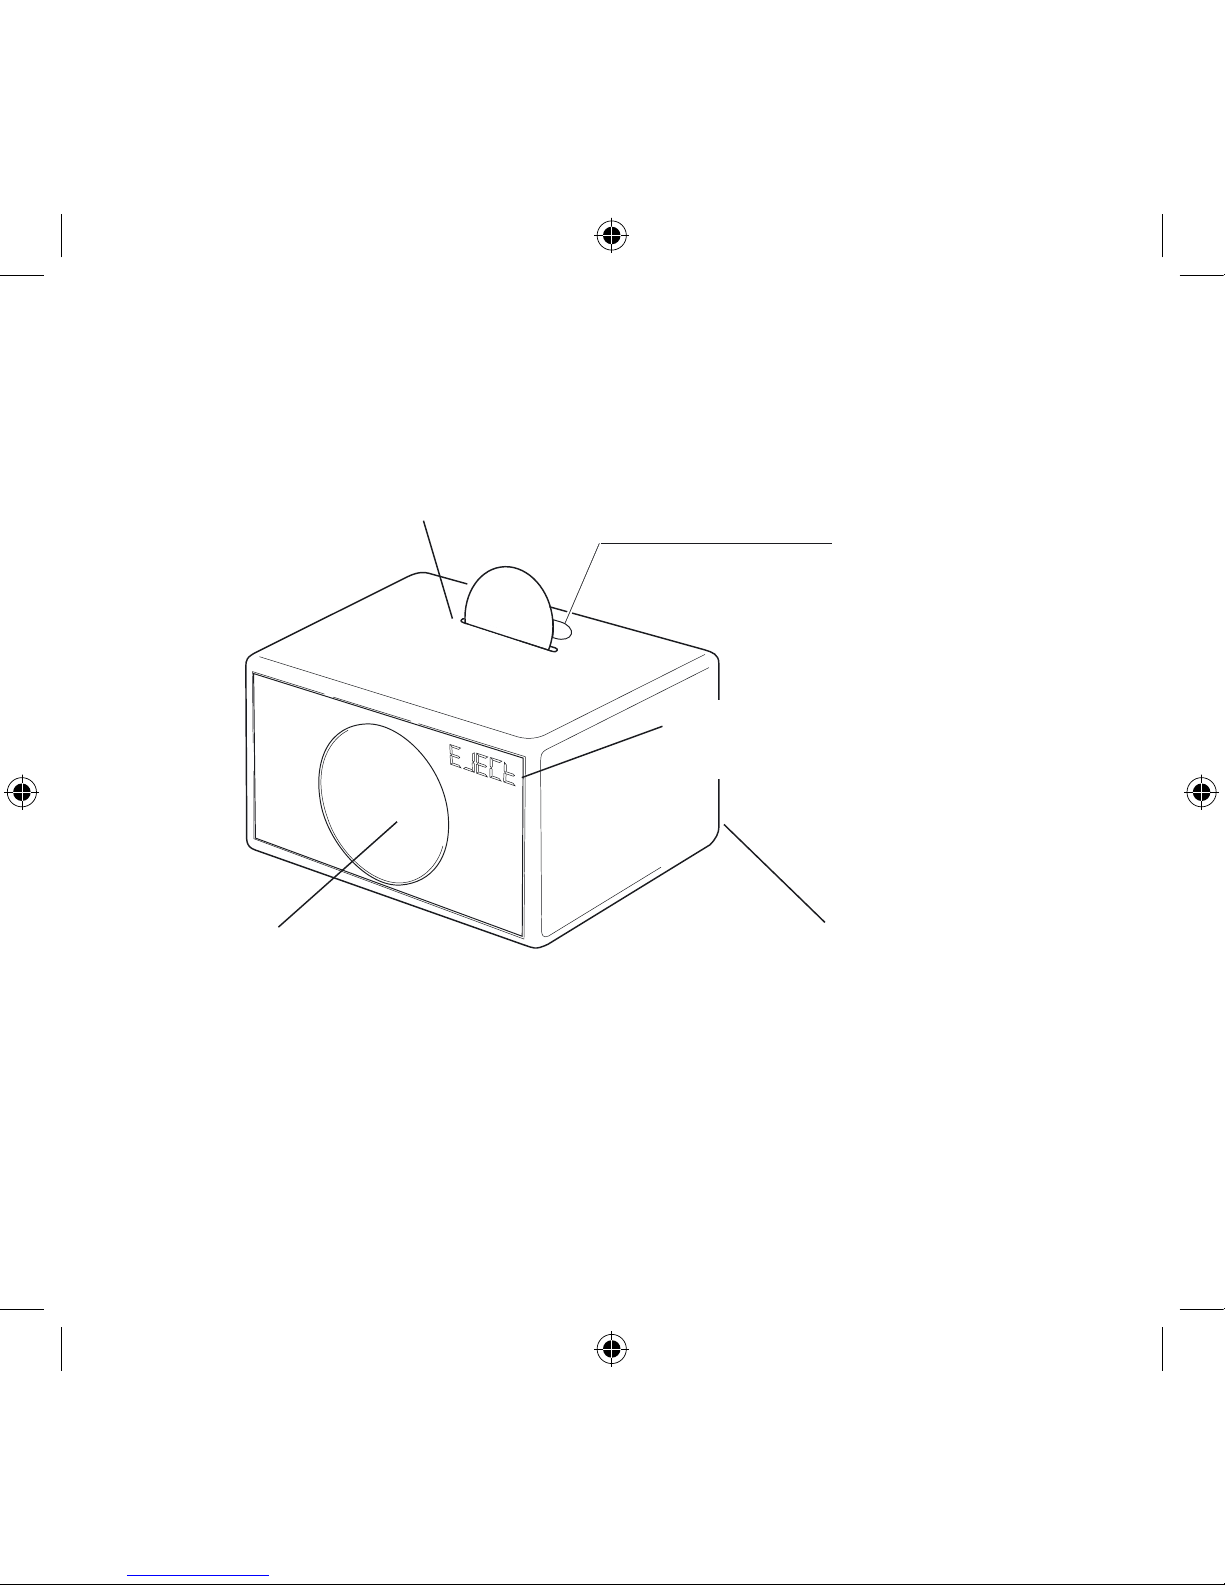
98
Nozioni preliminari:
Lettore CD
Griglia frontale
Display a LED indicante modalità di
sistema, Frequenza FM, status del
CD, ecc.
Pannello posteriore
l’Adattatore al
Dock Universale
Page 98
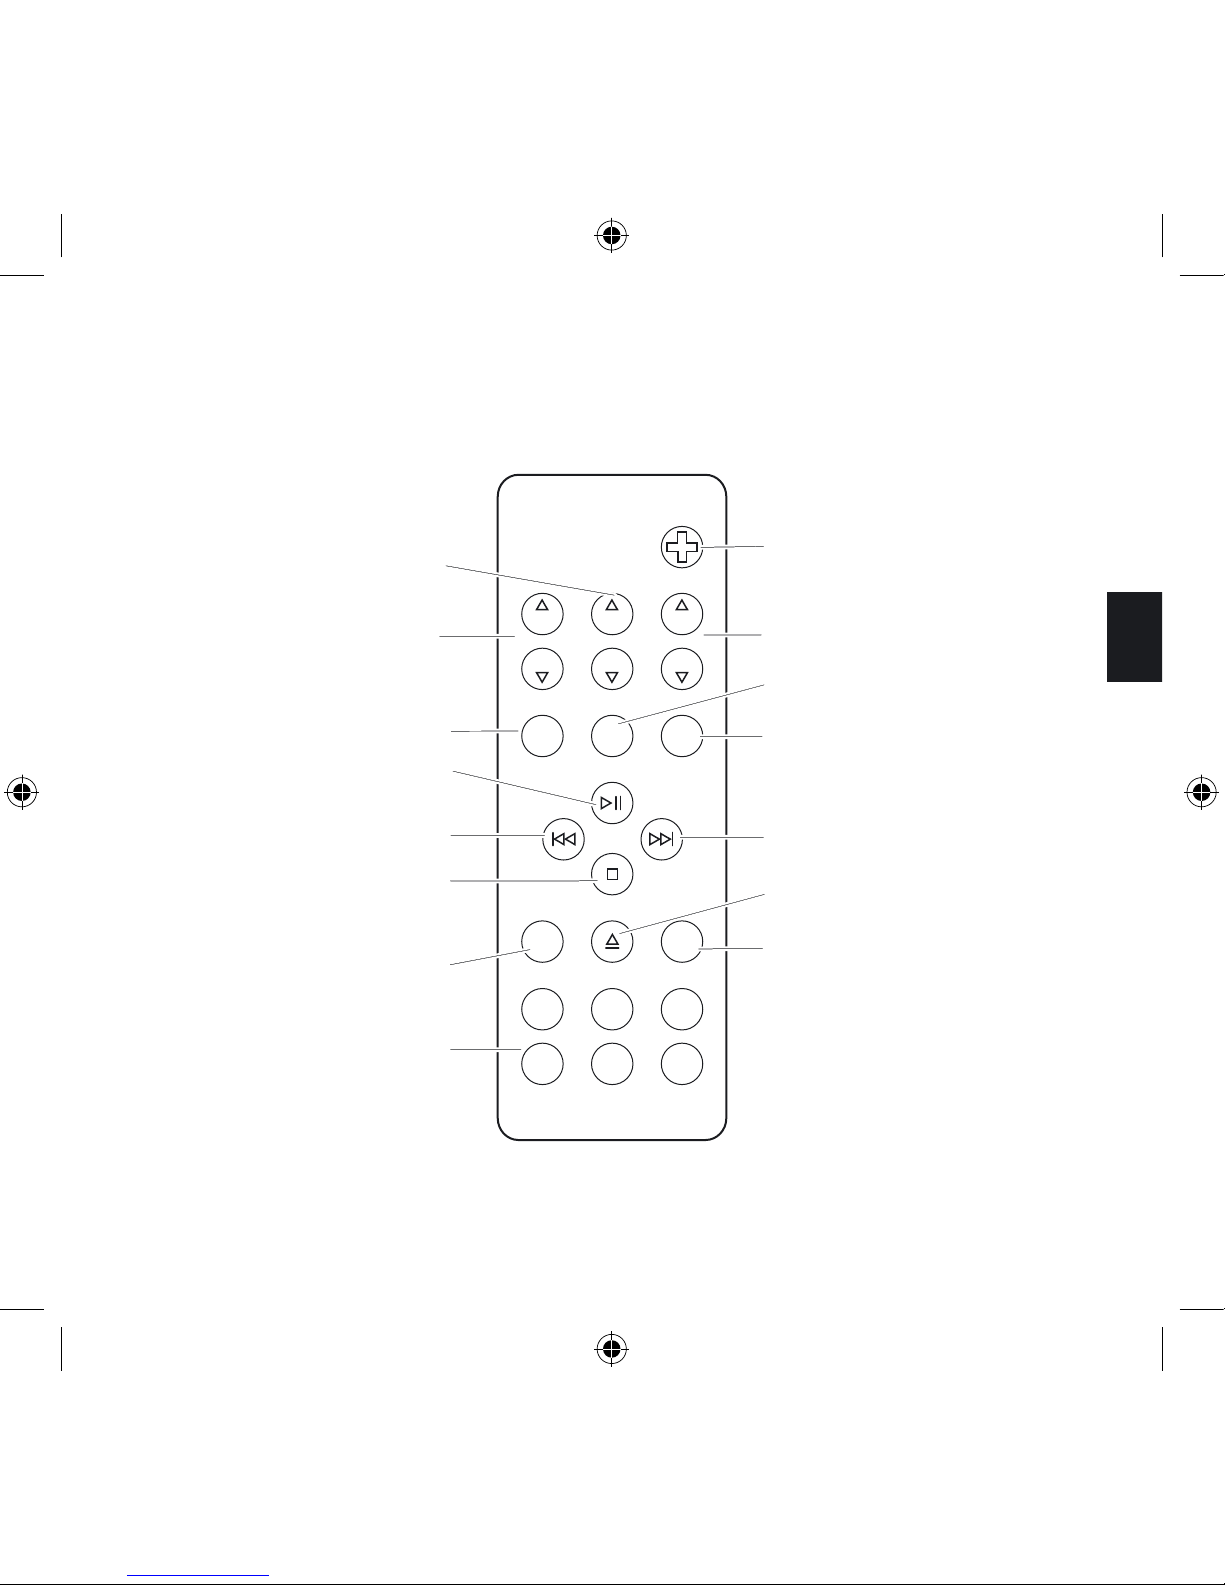
99
Italiano
Telecomando:
LINE IN
iPod
AIR
CD FM
ERP
TES
VOLBASS
TREBLE
VOLBASS
TREBLE
Acceso/Spento
Volume
Acceso/Spento
radio FM
Espulsione CD
Avanti veloce/Salta
Linea d’entrata
Preselezioni radio FM
AIR
(Funzione non supportata)
Stop
Indietro veloce/Salta
indietro
Play/Pausa
iPod
Bassi
Acuti
Page 99
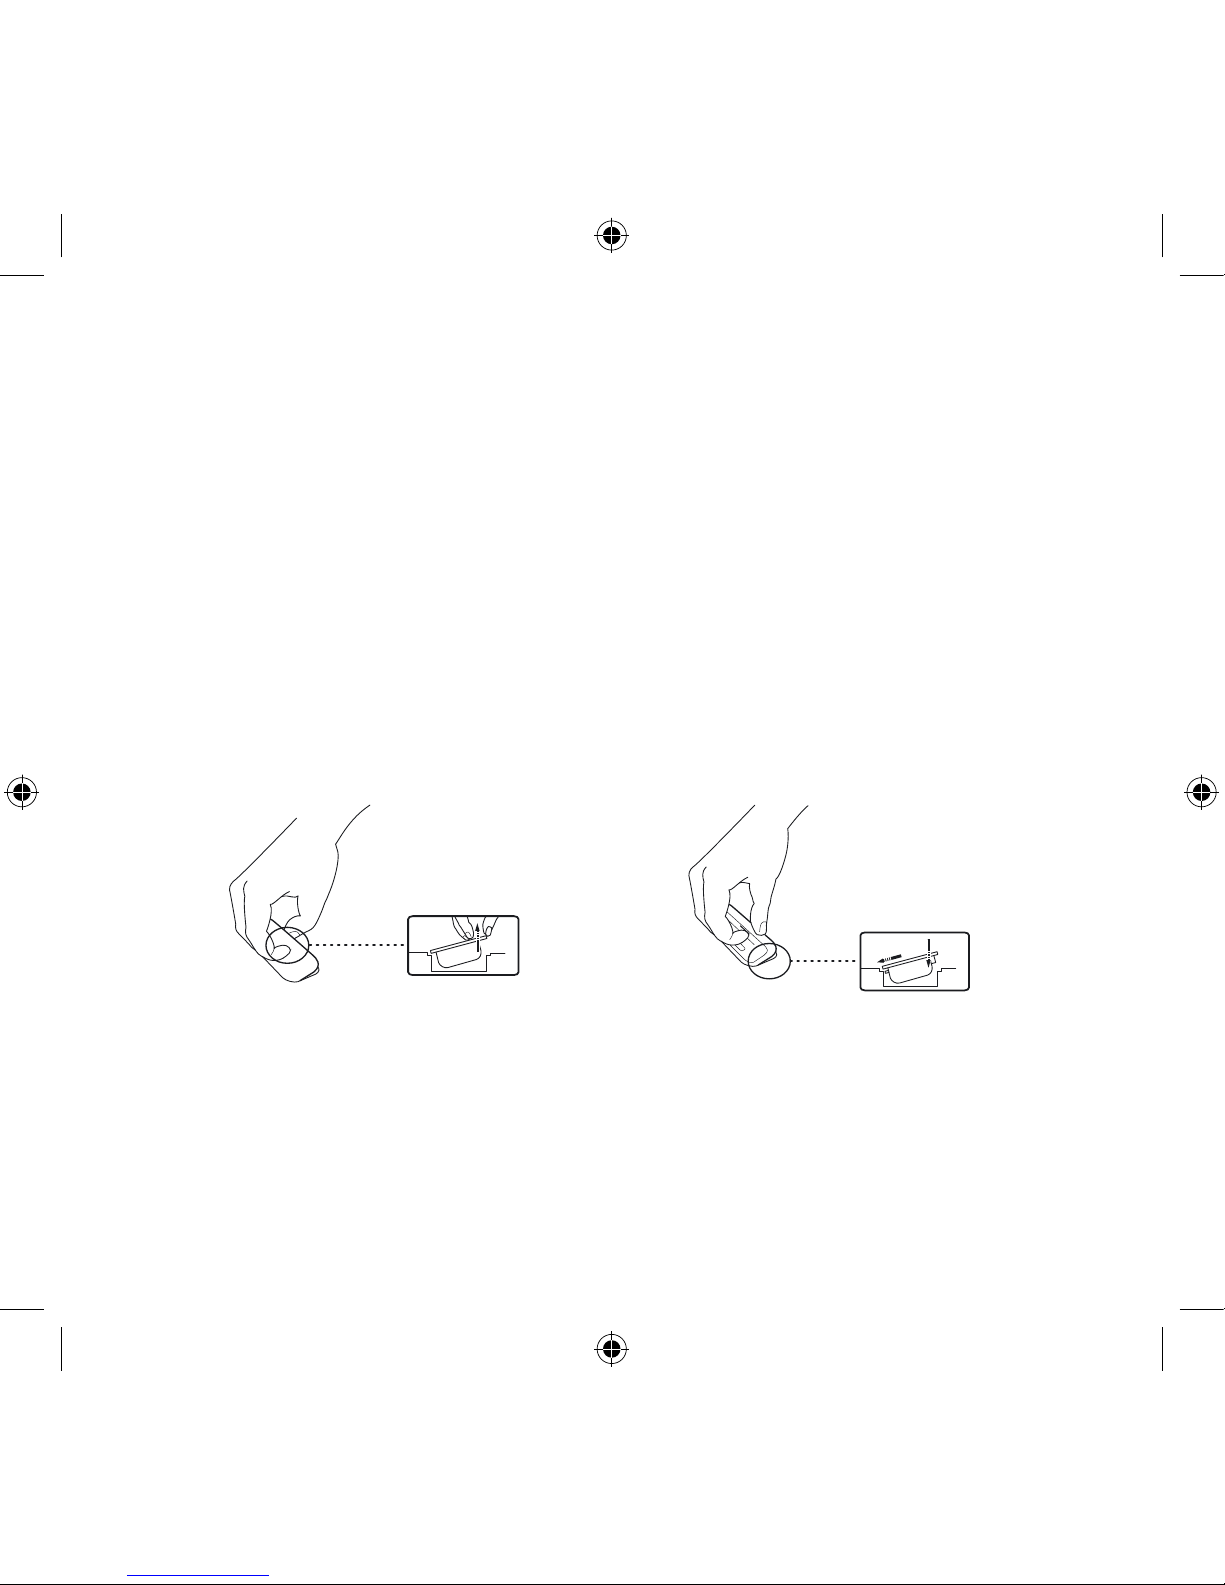
100
Accendere il Geneva Sound System:
Premere il tasto Acceso/Spento sul telecomando o il tasto Acceso/Spento.
Selezionare fonte:
Per passare da una fonte all’altra premere I tasti iPod, CD, FM o Line In sul telecomando,
per selezionare la fonte da controllare.
Ascoltare l’iPod (maggiori dettagli a pagina 105):
Fase 1. Se desiderate utilizzare il Sistema con un iPod, rimuovere il coperchio dalla parte
superiore del contenitore, utilizzando le unghie o un utensile leggero. Non utilizzare un coltello o altri oggetti acuminati che possono intaccare la vernice. Il coperchio di legno ha un
magnete al suo interno e si può attaccare alla parte posteriore del pannello (vedi pagina 97).
Scegliere gli Adattatori Dock per l’iPod a seconda del modello di iPod che intendete collegare, seguendo le indicazioni della tabella a pagina 105, oppure provare con gli Adattatori
Dock inclusi finché non ne trovate uno che si adatta perfettamente al vostro iPod. Collegate
l’Adattatore Dock al Dock Universale per iPod esercitando una leggera pressione sulla parte
superiore del Adattatore Dock (vedere la figura), finché non si aggancerà.
Page 100
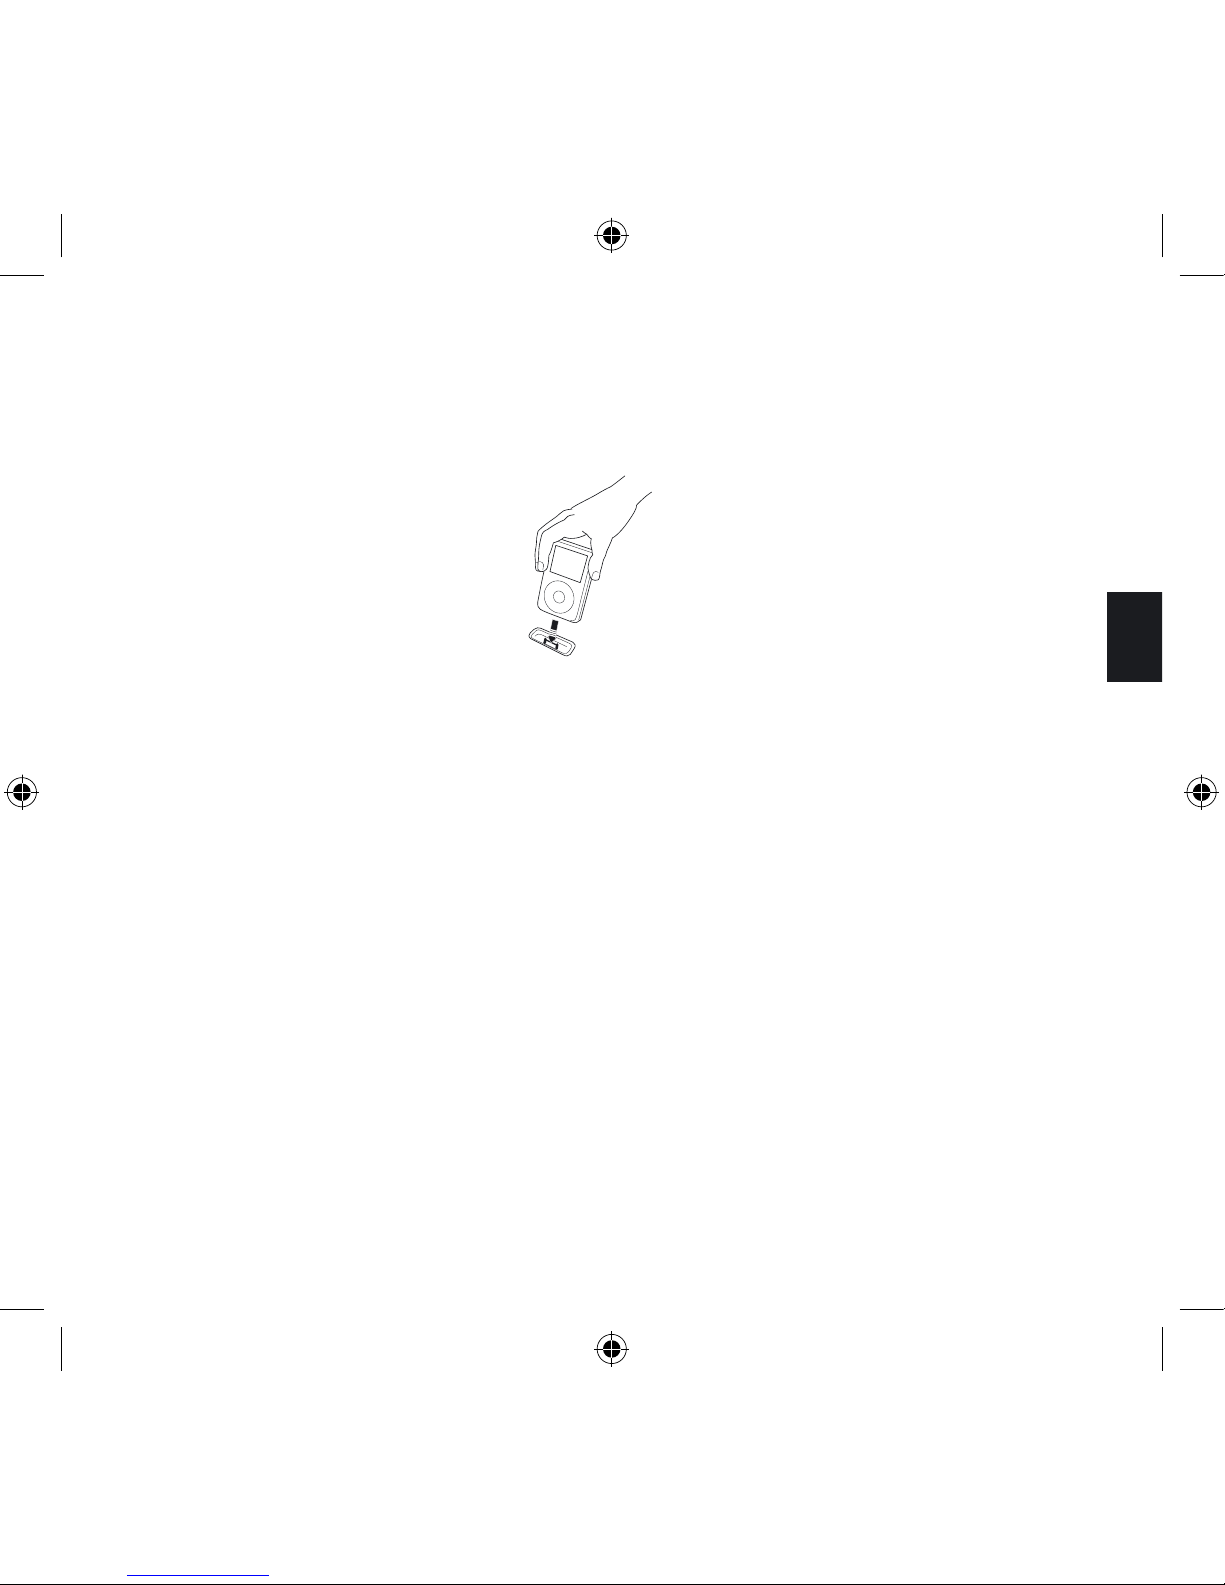
101
Italiano
Fase 2. Inserire l’iPod nell’Adattatore Dock corrispondente o nel Dock Universale per iPod.
Fase 3. Premere il tasto iPod sul telecomando ed il Display a LED sotto la griglia dovrebbe
indicare “iPod”. Se il display non dovesse illuminarsi, verificare che il cavo di alimentazione
AC sia inserito correttamente in una presa AC funzionante.
Fase 4. Premere il tasto Play sul telecomando. Se non si dovesse udire nessun suono,
controllare che il volume sia alzato, regolando il tasto “+” del volume.
Fase 5. È possibile navigare l’iPod usando i tasti Stop (Arresto), Play/Pause (Riproduzione/
Pausa), Skip/Fast Forward (Salta/Avanzamento rapido), Skip/Fast Reverse (Salta/Indietro
rapido) sul telecomando.
Carica: L’iPod si carica mentre il sistema è acceso.
 Loading...