

Page 1

ClonePix
TM
FL
Quick Set-Up Instructions
Software Release: 1.2.13.971
07MAN1055.A2
Effective Date: 01-Jun-10
Page 2

GENETIX > CLONEPIX FL QUICK INSTRUCTIONS > CONTENTS
2
Contents
What are Quick Set Up Instructions?...............................................................3
Starting up ClonePix FL ....................................................................................3
Loading plates....................................................................................................4
Preparing for a Pick Run ...................................................................................5
The Pick Run ......................................................................................................6
Imaging Settings.................................................................................................................... 7
Picking Settings ..................................................................................................................... 8
Sanitize Pin Options .............................................................................................................. 9
Start Pick Run........................................................................................................................ 9
Preview................................................................................................................................ 10
Select Wells......................................................................................................................... 12
Summary ............................................................................................................................. 12
Imaging................................................................................................................................ 12
Results................................................................................................................................. 12
Select Groups...................................................................................................................... 13
Picking ................................................................................................................................. 14
Finish ................................................................................................................................... 14
Powering down ClonePix FL...........................................................................14
Contact Details.................................................................................................15
Page 3

GENETIX > CLONEPIX FL QUICK INSTRUCTIONS > WHAT ARE QUICK SET-UP INSTRUCTIONS?
3
What are Quick Set-Up Instructions?
These instructions are designed to enable a new user to undertake a simple picking run on
ClonePix™ FL. The following instructions offer guidelines only. No attempt should be made to
use ClonePix FL before the system has been fully installed by a Genetix Approved Engineer.
For full information please read the ClonePix FL Robot Manual and Software Applications
Manual. Please refer to the Genetix website for the latest reagents & supplies, replacement
parts and optional extras www.genetix.com
Starting up ClonePix FL
•
Ensure robot and compressor are plugged in.
•
Ensure compressed air gauge is set to 80 psi (5.5 bar).
•
Ensure Emergency Stop button is not pressed in.
•
Switch on ClonePix FL. The HEPA filtration system works all the time that ClonePix FL is on.
•
Press Reset button at the front of ClonePix FL.
•
Initiate ClonePix FL software.
•
Wipe out ClonePix FL bed with 70% ethanol or fresh Genetix Sterilizing Agent (K8080)
using lint-free cloth.
•
Fill the ethanol feed bottle with 70% ethanol and empty the ethanol waste bottle.
•
Make sure that the correct Picking Pins are installed for the type of cells to be picked.
o
F1 Picking Pins (400µm internal diameter; X4961) for suspension cell picking from
semi-solid medium.
o
F2 Picking Pins (700µm internal diameter; X4962) for adherent cell picking from
liquid medium.
Picking Pins should be cleaned by sonication in aQuClean (K2505) and autoclaved. It is
advisable to autoclave the Picking Pin Removal Key (X4948) at the same time. See
General Maintenance section of the Robot Manual for instructions.
If the Picking Pins need to be changed remove the Picking Head and swap the pins. To
do this, click on the Picking Head Management icon, then the Replace Head icon and
follow the on-screen instructions. Refer to the General Maintenance section of the Robot
Manual for guidance on how to remove and replace the head and the pins.
Page 4
GENETIX > CLONEPIX FL QUICK INSTRUCTIONS > LOADING PLATES
4
Loading plates
It is important to know how to load plates into ClonePix FL correctly.
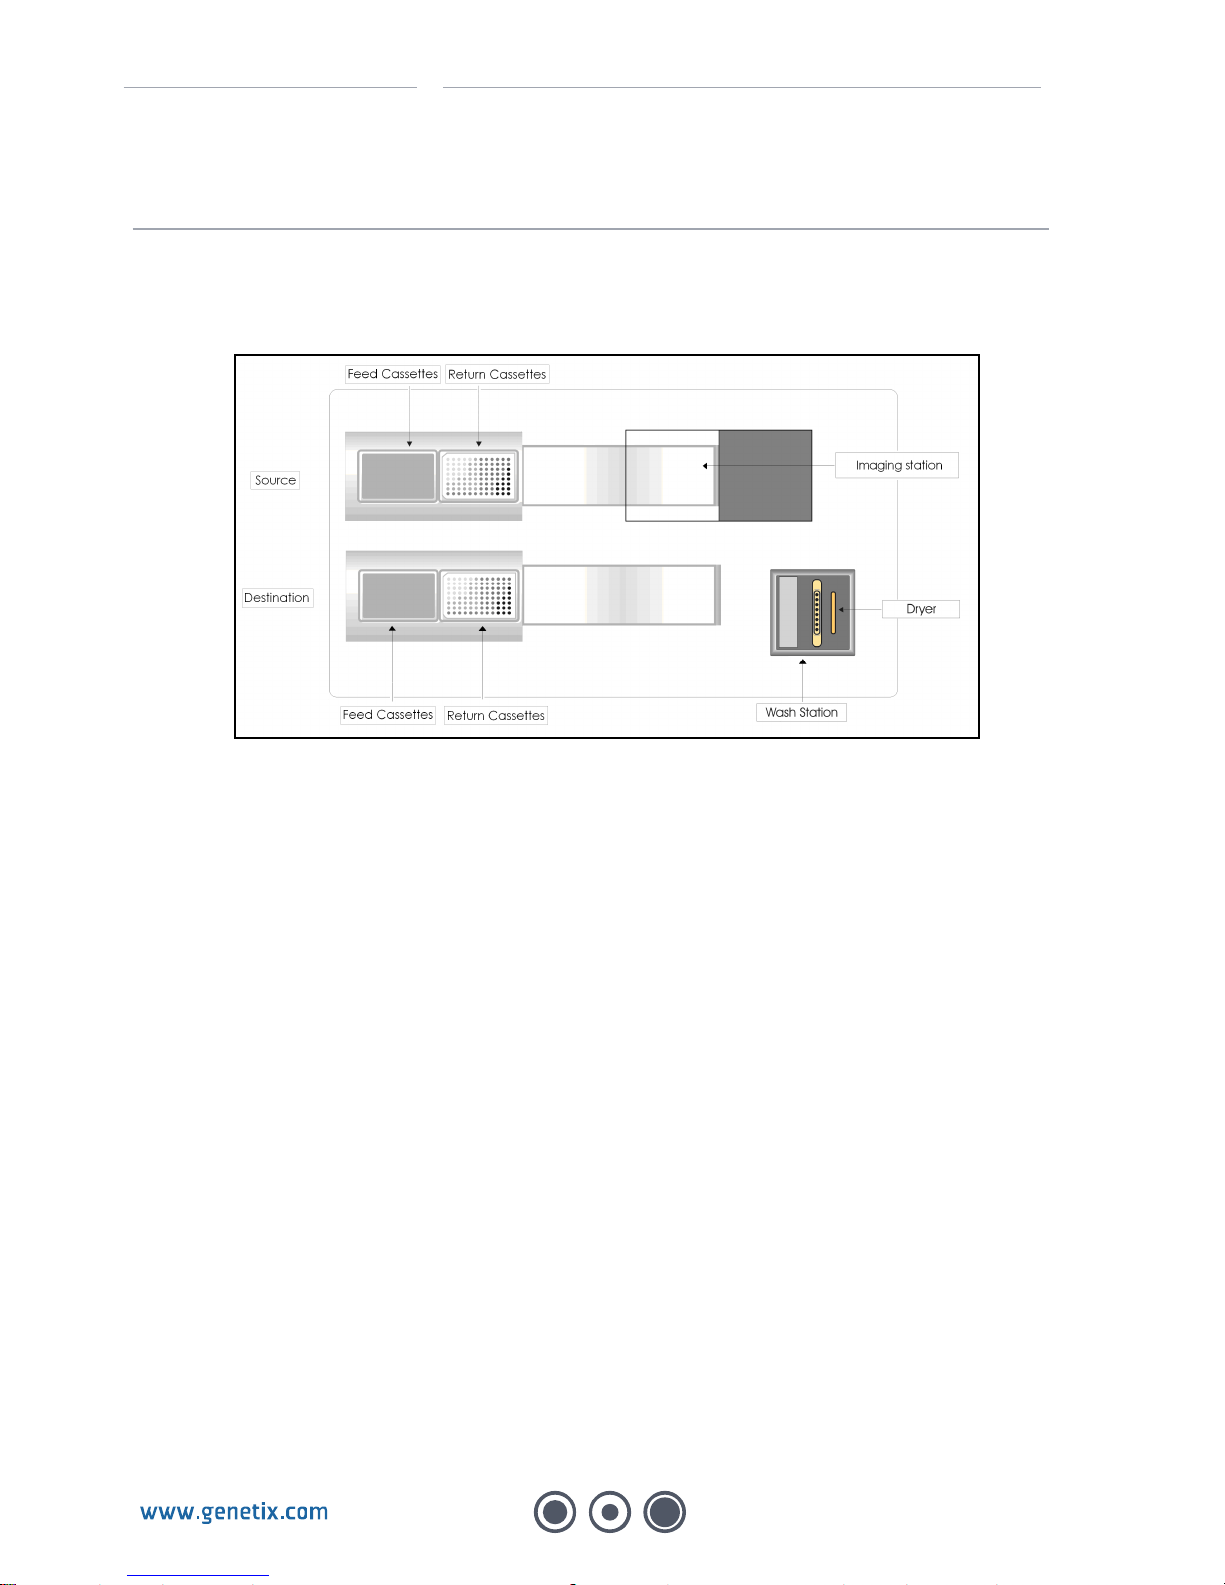
A ClonePix FL bed layout is as shown below.
The Source plate stacker system is located at the rear of the machine, and the Destination
plate stacker system is at the front. Both the Source and Destination stackers have 1
removable Feed cassette (left hand side) and 1 removable Return cassette (right hand side).
Each cassette can accommodate up to 10 standard microplates or 12 Genetix microplates. The
plates are fed individually from the Feed cassette onto the bed, with automatic lid removal as the
plate passes the Return cassette position. On completion of colony picking, the de-lidded plate is
then transferred to the Return cassette where the lid is replaced.
Important notes:
•
Plates loaded into a Feed cassette must be of the same type and must match the plate type
selected by the user in the software. Loading of a plate type different from that selected in
the software is likely to damage the plate and the instrument.
•
When the Return cassettes are placed in the source and destination stackers, they must be
held firmly in place by use of the Return cassette locking bolt on the right hand side of the
stacker systems. Failure to lock down a Return cassette will cause a malfunction in the
return of the microplates.
•
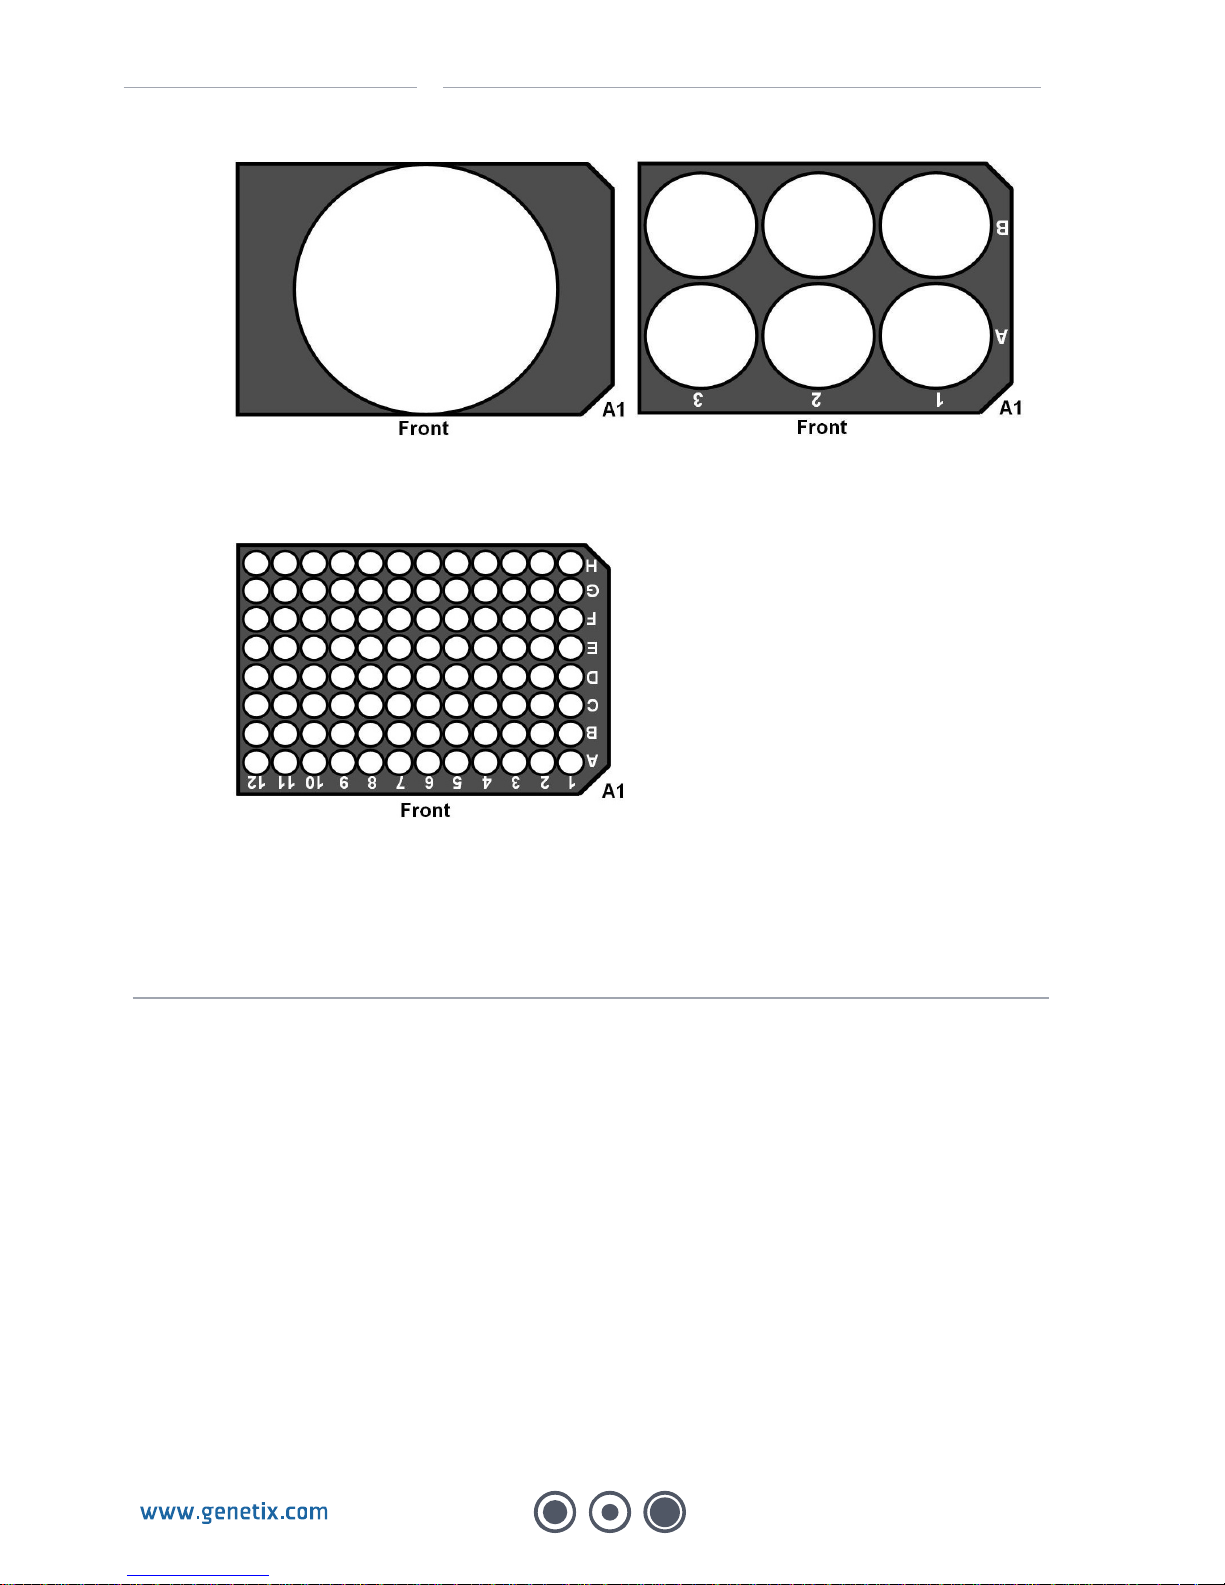
Source and destination plates must be loaded into the Feed cassettes with lids on and well
A1 in the front right-hand corner as shown below:
Page 5
GENETIX > CLONEPIX FL QUICK INSTRUCTIONS > PREPARING FOR A PICK RUN
5
Orientation of source plates in ClonePix FL
Orientation of destination plates in ClonePix FL
Preparing for a Pick Run
Prior to carrying out a picking run, it is important to make sure that ClonePix FL is set up
correctly. The Prepare for Pick Run process is designed for this purpose. This process helps
the user to validate that 1) the pins are firing correctly, 2) the camera, pins and microplates are
aligned, and 3) the fluid system is sterile and ready for use.
•
Click on the Prepare for Pick Run icon and follow the on-screen instructions.
When asked to load a source plate, it is recommended that you use a blank Genetix PetriWell-6
plate. However, the use of any configured plate (those present in the drop-down list) should
work. Once aligned using a configured plate type, ClonePix FL is then ready for use with any
configured plate type.
The Prepare for Pick Run process does not need to be carried out prior to every picking run. It
must be carried out every time that ClonePix FL is first powered up.
•
Click Close Process to return to the Main Menu.
Page 6
GENETIX > CLONEPIX FL QUICK INSTRUCTIONS > THE PICK RUN
6
The Pick Run
The Pick Run process is designed to aid new users through their first picking run. Use of the
default parameters provided should facilitate successful imaging, colony selection and picking.
The description below assumes that you have plates of cell colonies with fluorescent halos of
secreted protein.
•
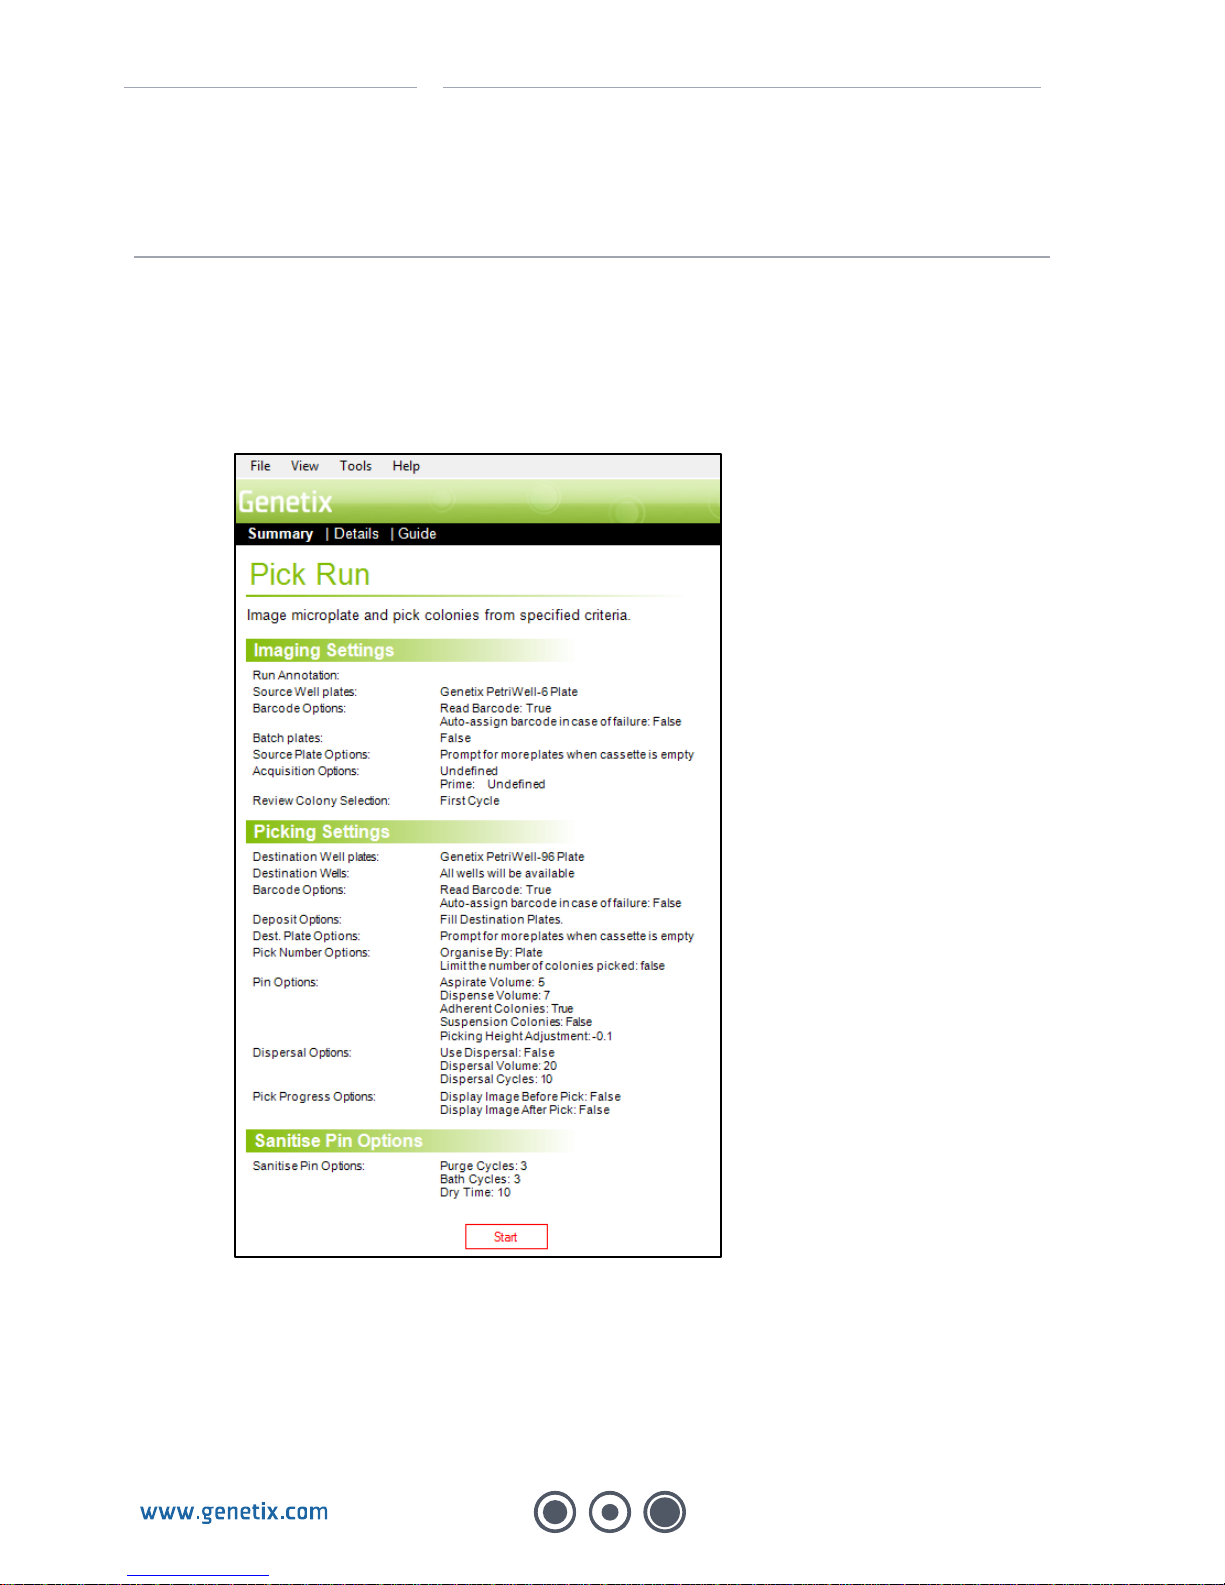
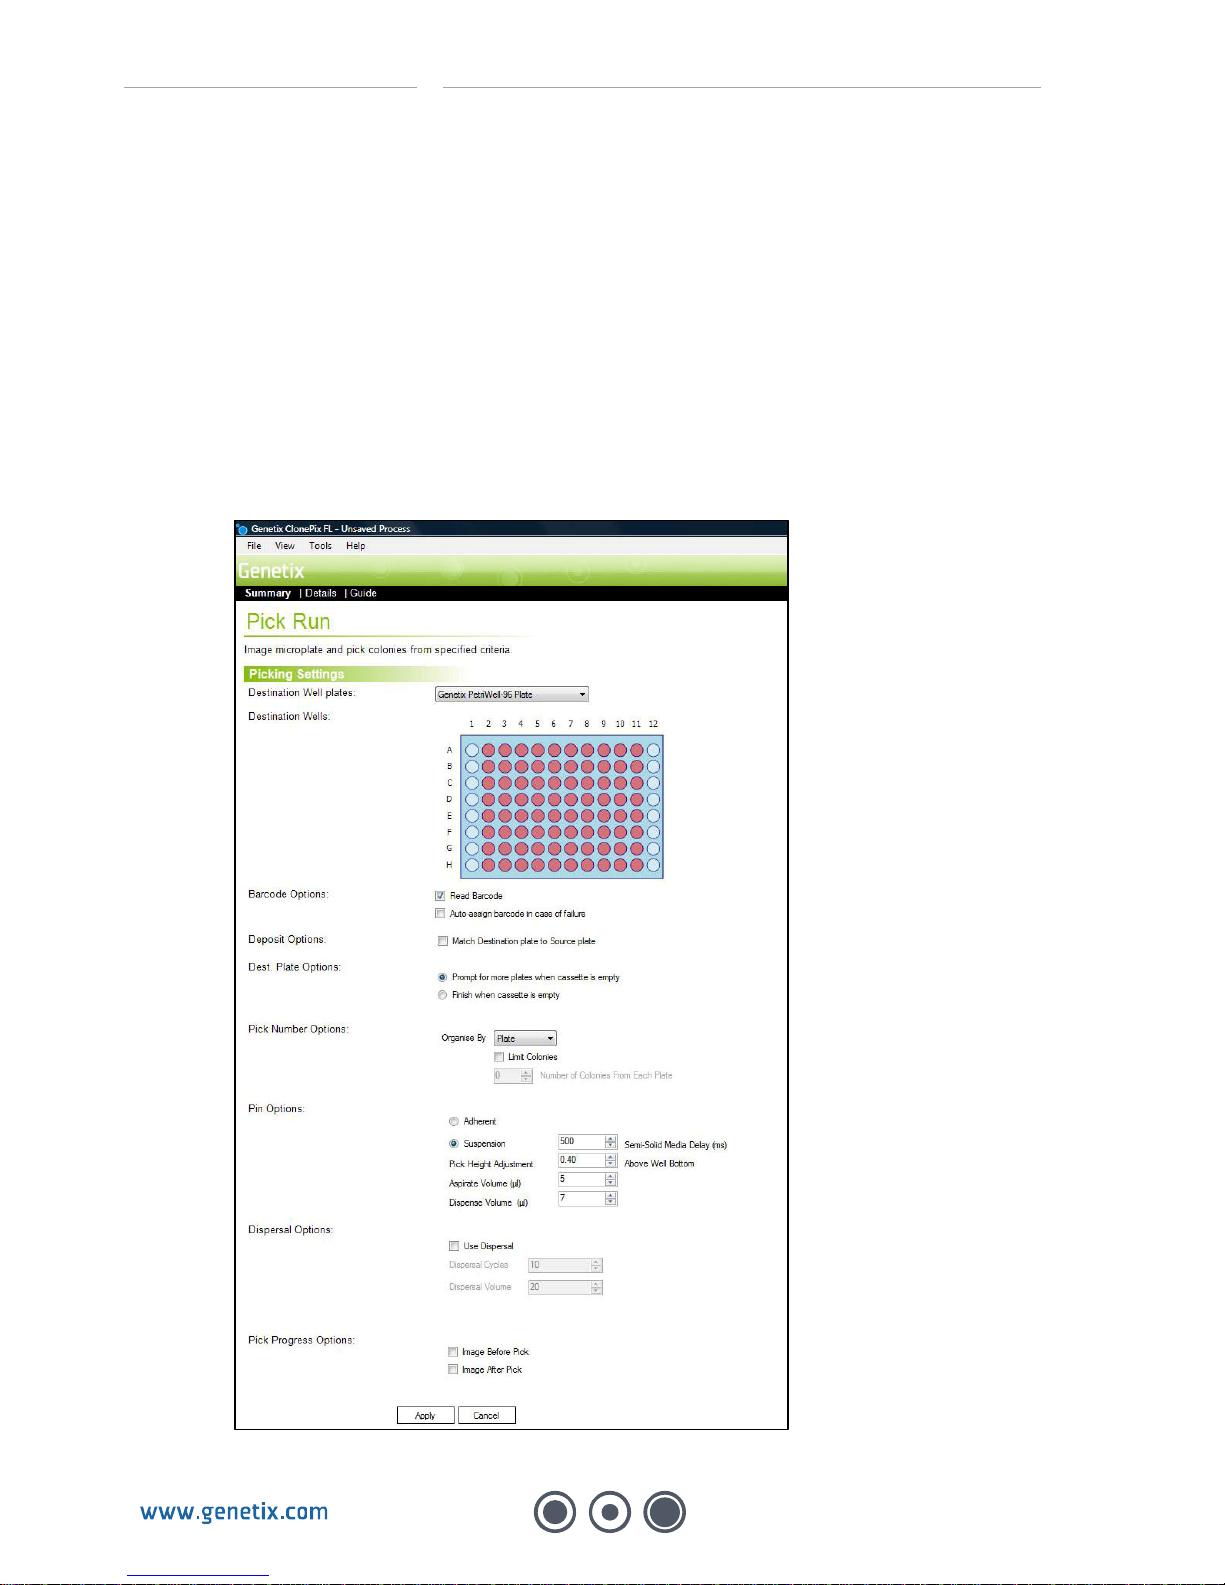
Click on the Pick Run icon to open the following screen:
The settings can be edited by clicking once on the green section headings.
Page 7
GENETIX > CLONEPIX FL QUICK INSTRUCTIONS > THE PICK RUN
7
Imaging Settings
•
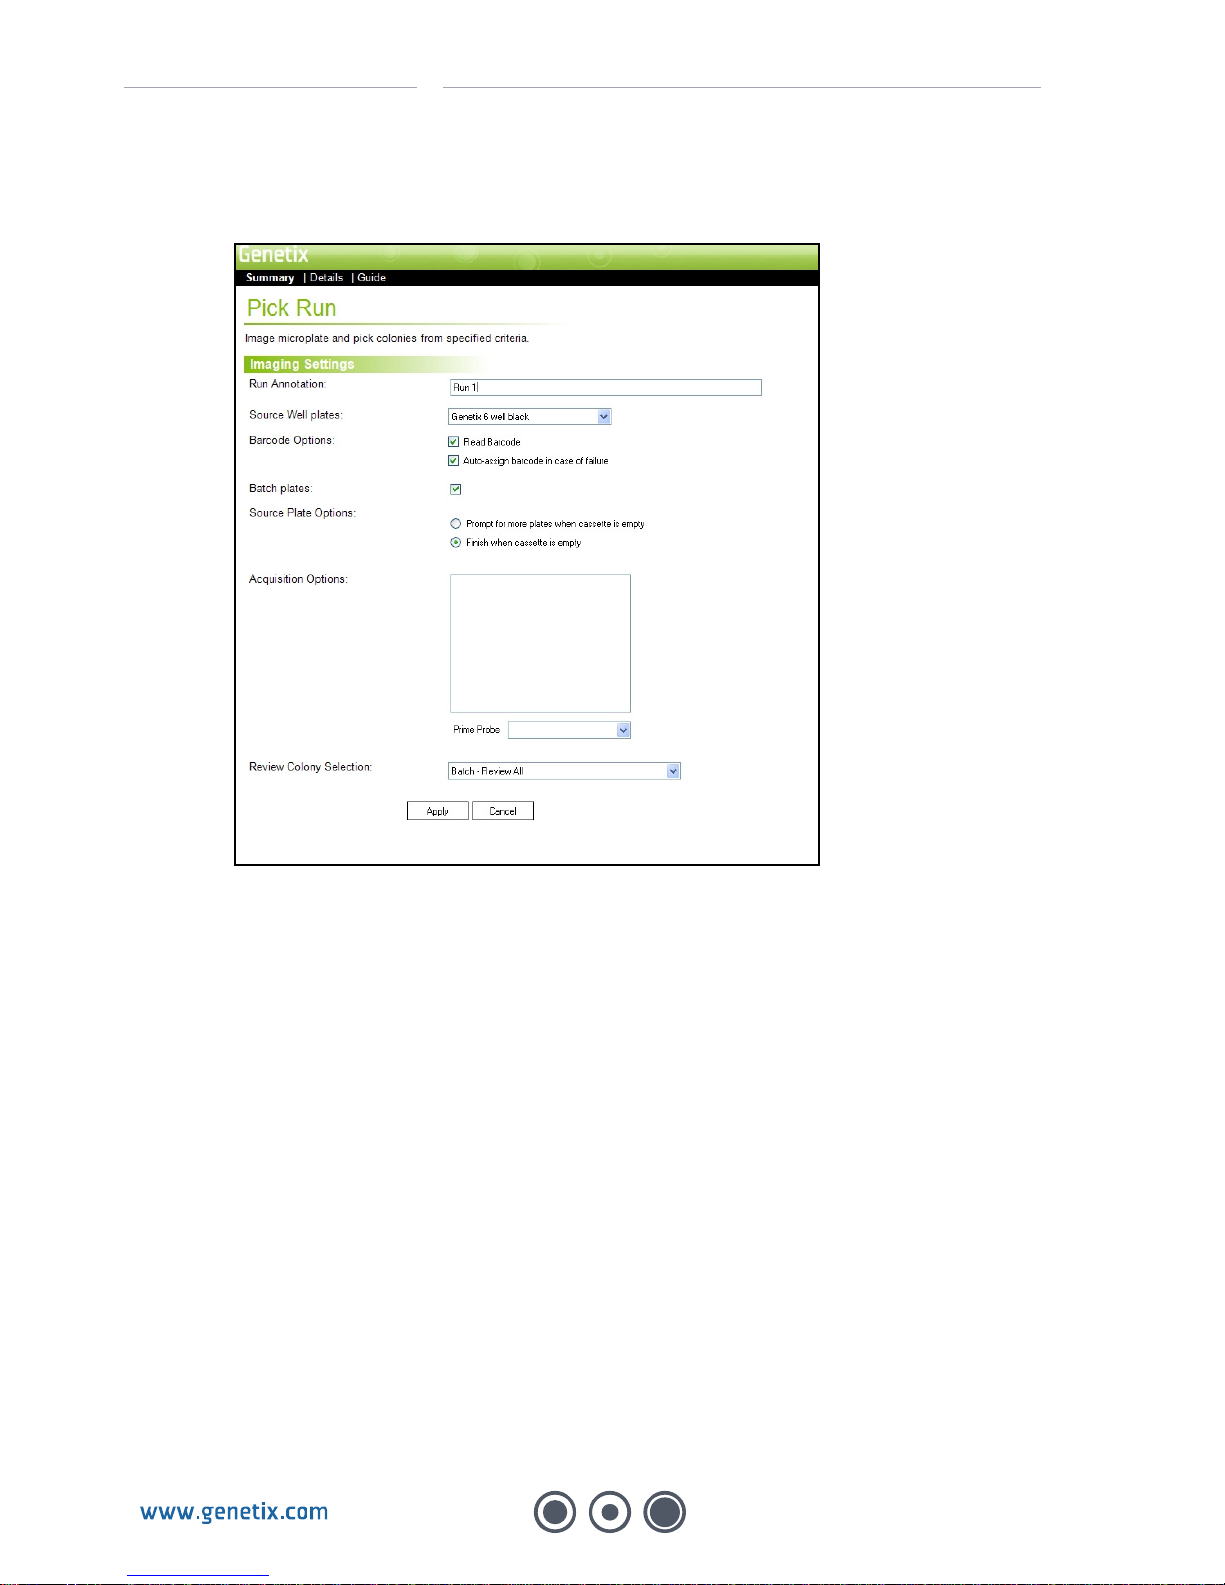
Click on the Imaging Settings title to open the following screen:
Fill in the following information:
•
Run Annotation
Enter a name to identify this run.
•
Source Well Plates
Enter the source plate type that you will use for this run.
•
Barcode Options
-
Select Read Barcode.
-
Select Auto-assign barcode in case of failure.
If you don’t have barcodes on your plates, ClonePix FL will automatically assign a code.
•
Batch plates
Select this option. This assumes that you are loading multiple plates that contain the same
sample and that you want them to be processed as a single experiment.
•
Source Plate Options
Select Finish when cassette is empty.
•
Acquisition Options
This option enables you to choose the images that you wish to capture. If you see
appropriate Image Acquisition options select them here. If not, the acquisition options can
Page 8
GENETIX > CLONEPIX FL QUICK INSTRUCTIONS > THE PICK RUN
8
be created later in Preview (see below). Most users select one white light and one
fluorescent option.
•
Prime Probe
The Prime Probe is the acquisition option to be used for colony detection. Select the white
light option if available.
•
Review Colony Selection
Select Batch – Review All.
•
Click Apply.
Picking Settings
•
Click on the Picking Settings title to open the following screen:
Page 9

GENETIX > CLONEPIX FL QUICK INSTRUCTIONS > THE PICK RUN
9
Fill in the following information:
•
Destination Well Plates
Enter the plate type that you will use for this run.
•
Destination Well Plates
Specify the wells into which you want to deposit. Right click on the mouse to select wells,
and left click to de-select wells. All destination plates will be filled using this template.
•
Barcode Options
-
Select Read Barcode.
-
Select Auto-assign barcode in case of failure.
If you don’t have barcodes on your plates, ClonePix FL will automatically assign a code.
•
Deposit Options
-
Select Match Destination Plate to Source Plate if you want to start a new destination
plate each time a new source plate is fed in.
•
Destination Plate Options
Select Finish when cassette is empty.
•
Pick Number Options
Leave as default = Organise by Plate.
•
Pin Options
-
Select the type of colonies that you wish to pick: suspension or adherent.
-
Pick Height Adjustment: Leave as default.
-
Aspirate Volume: Leave as default = 5µl.
-
Dispense Volume: Leave as default = 7µl.
•
Dispersal Options
-
Use dispersal: Select if you want to spread out colony cells after picking.
-
Dispersal cycles: Use 3-6 for CHO cells and 6-10 for hybridomas.
-
Dispersal volume: Leave as default = 20µl.
•
Pick Progress Options
-
Leave as default = unselected.
•
Click Apply.
Sanitize Pin Options
Leave as default – no changes required.
Start Pick Run
•
Click Start to begin the Process.
•
When prompted, load your cell colony plates into the Source Feed cassette.
Page 10
GENETIX > CLONEPIX FL QUICK INSTRUCTIONS > THE PICK RUN
10
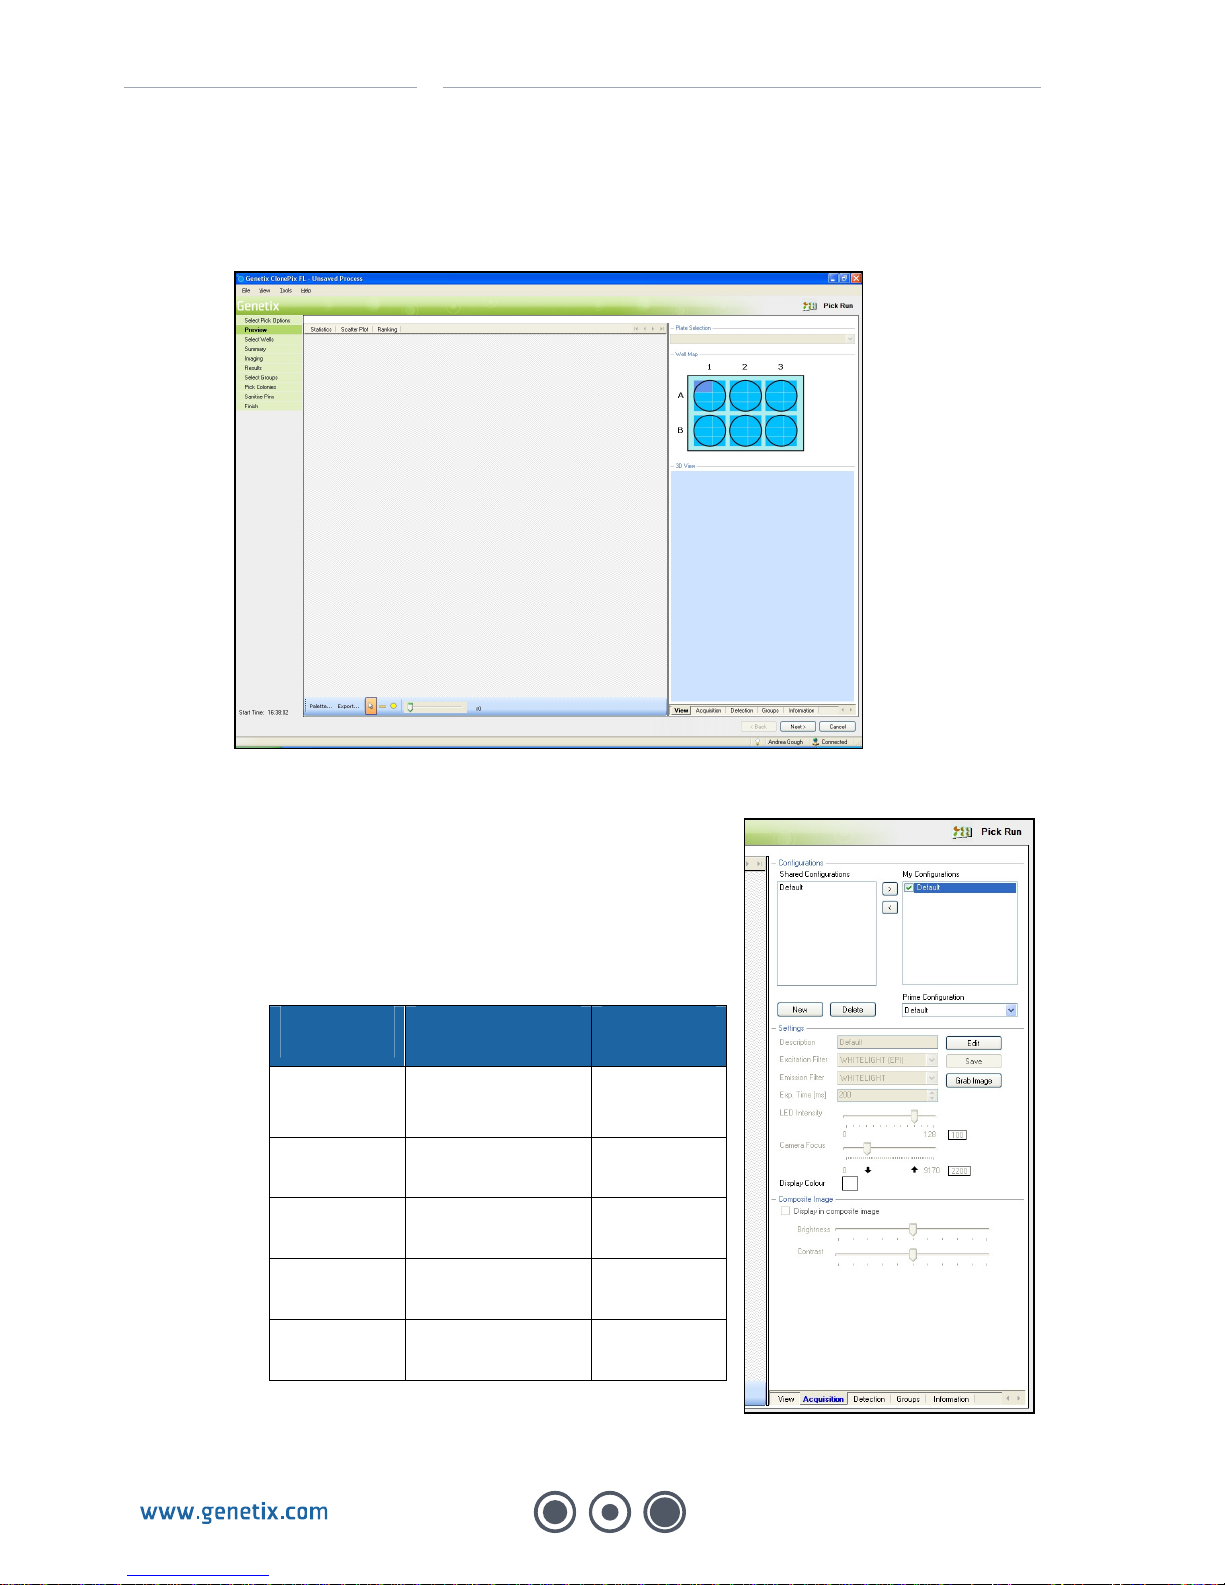
Preview
This is where you set up your Image Acquisition and Colony Detection settings. The screen
should look like this:
Step 1: Set up Image Acquisition settings
•
Click on the Acquisition tab.
•
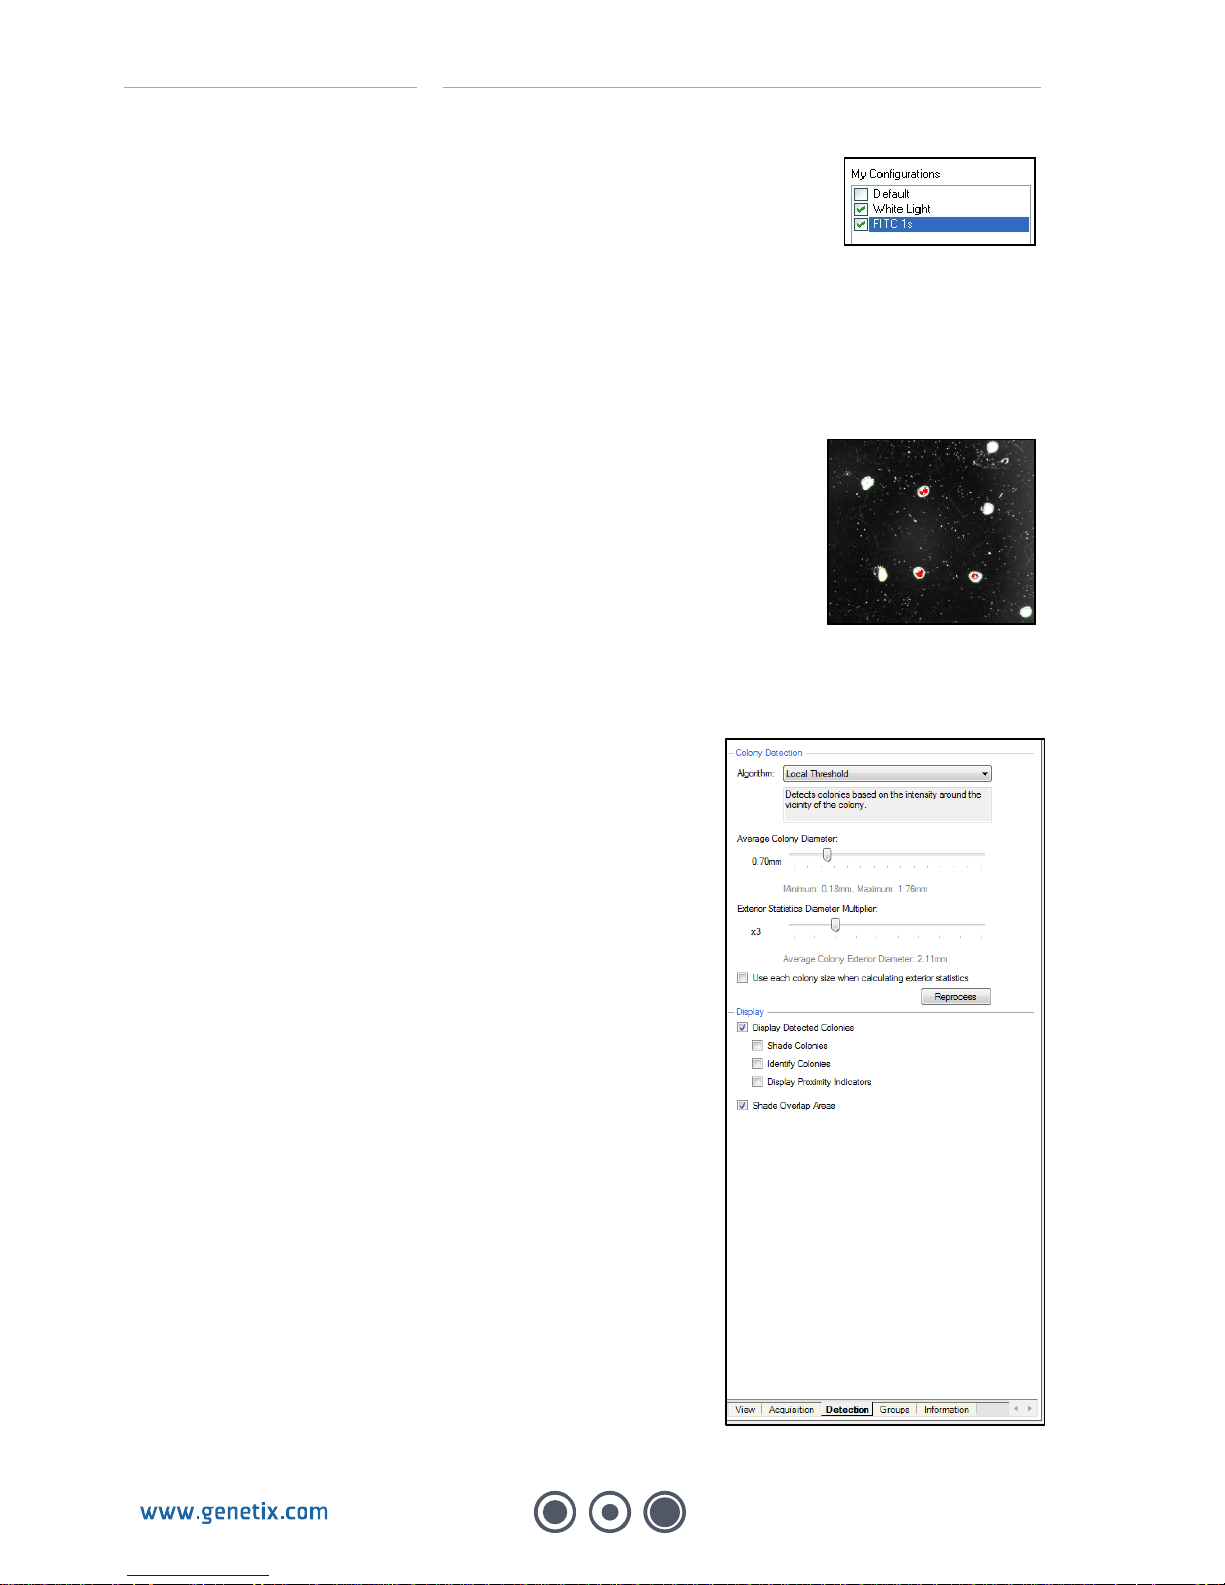
If the My Configurations box is only populated with
Default (see screenshot on right), you will need to set
up white light and fluorescent Image Acquisition
options.
•
Click New and then click Edit. The following settings
should work for most scenarios:
Description White Light FITC 1s
Excitation Filter
WHITELIGHT (TRANS) EGFP/FITC
Exp. Time (ms)
150 1000
LED Intensity
3 128
Camera Focus
2200 2200
Display Color
White Green
•
Click Save to store each option.
Page 11
GENETIX > CLONEPIX FL QUICK INSTRUCTIONS > THE PICK RUN
11
•
You should now have 3 options under My Configurations: Default,
White Light and FITC 1s. Insure that White Light and FITC 1s
options are selected and that Default is deselected. Do not delete
the Default option – it is required for other ClonePix FL functions.
•
Set the Prime Configuration to White Light. This is critical for correct colony detection.
•
To capture your images either click Grab Image which will capture images for the area
currently highlighted in the View tab, or go to the View tab and click on the area that you
wish to image.
•
You should now see an image with two new tabs above it named White Light and FITC 1s.
Toggle between the tabs to inspect the images.
•
Red pixels on the image indicate that it is overexposed. In this
case, lower either the exposure time or LED Intensity and Grab
Image again. Adjust until there are no red pixels.
Step 2: Set up Detection settings
•
Click on the Detection tab.
•
Set Algorithm to Local Threshold.
•
Using the image under the White Light tab, set the
Average Colony Diameter to a size that best
detects your colonies. This will probably be between
0.25 and 0.70mm depending on the size of your
colonies. You will need to click Reprocess after
moving the slide bar.
•
Leave Exterior Diameter Multiplier at the default
setting (x3).
•
Deselect Use each colony size when calculating
exterior statistics.
•
Leave Display settings as default (only Display
Detected Colonies and Shade Overlap Areas
selected).
•
Click Next to proceed.
Page 12
GENETIX > CLONEPIX FL QUICK INSTRUCTIONS > THE PICK RUN
12
Select Wells
Selected wells are shown as red.
•
Click Next to proceed.
Summary
•
Click Next to proceed.
Imaging
ClonePix FL will now automatically image the source plates, detect the colonies and generate
combined data for all plates.
•
While ClonePix FL is imaging, pre-fill one or more 96-well destination plates with liquid
medium (150µl recommended) and place in an incubator to equilibrate.
Results
Imaging results are displayed in the Results screen:
•
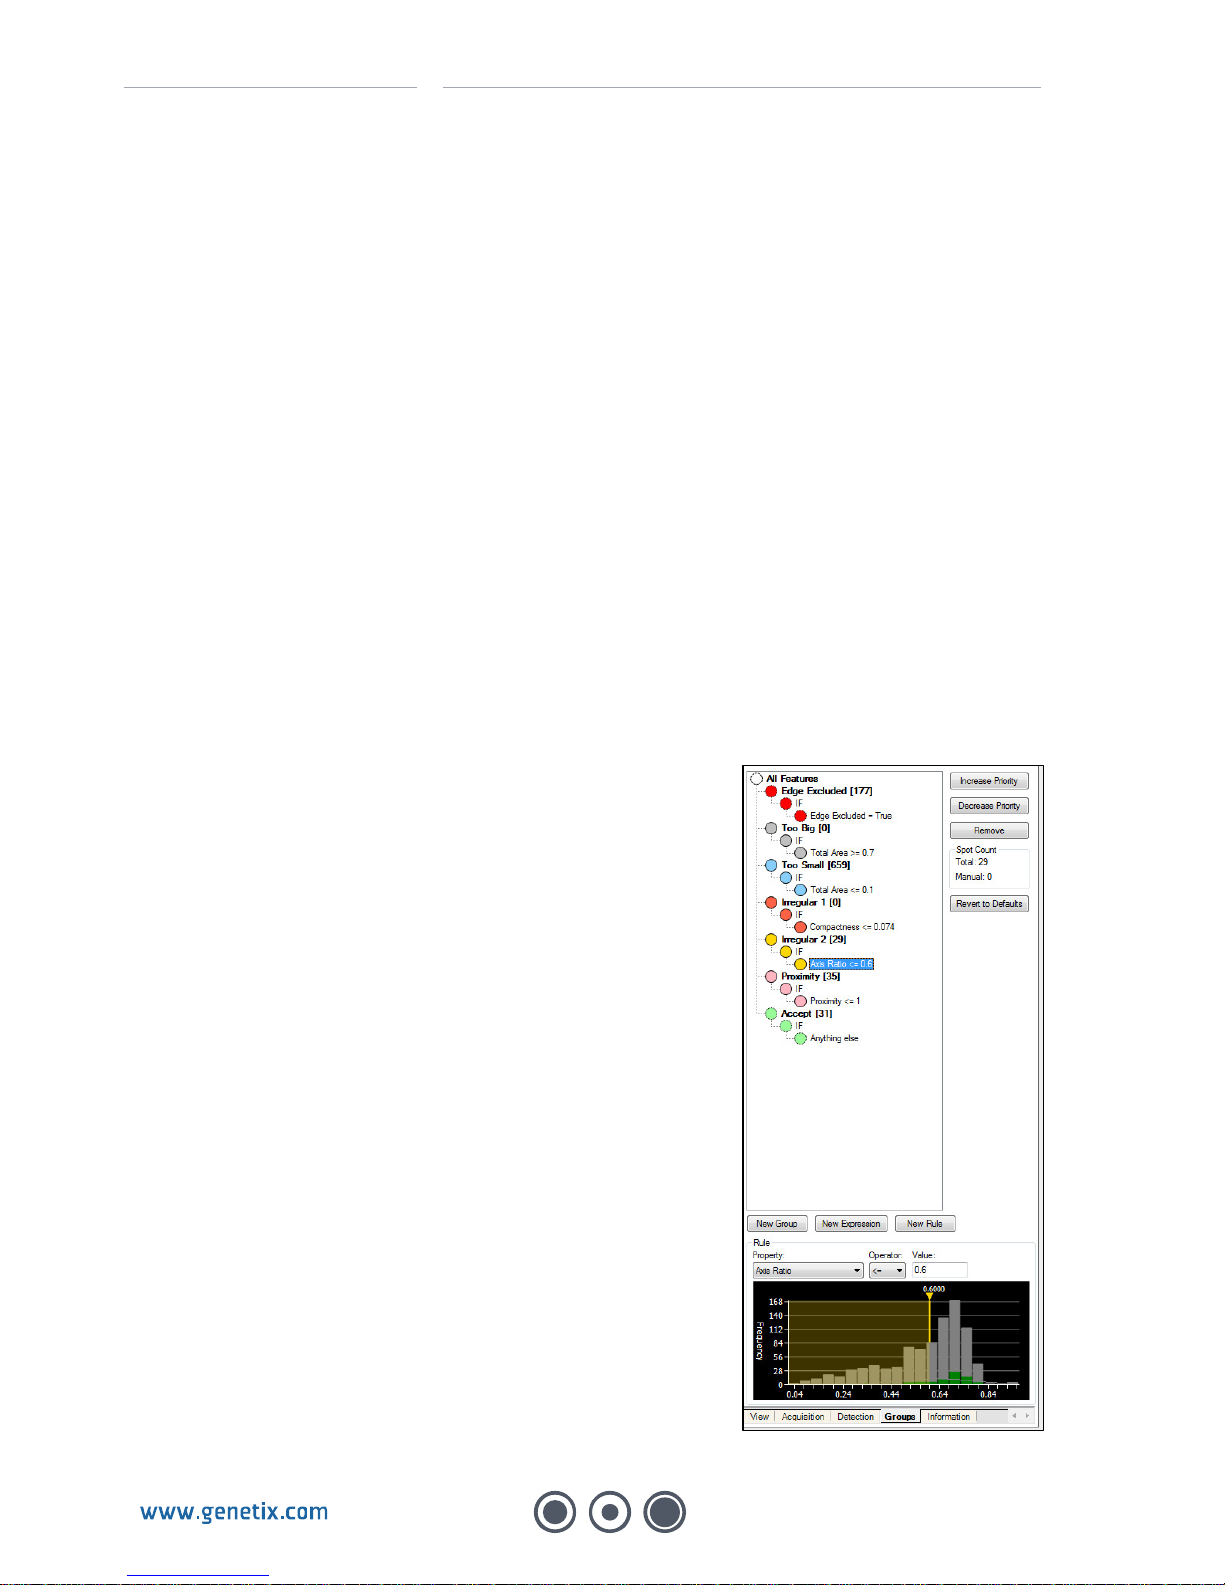
Click on the Groups tab.
•
This shows which colonies are excluded by which
parameter. The Too Small group cut-off point can be
reduced by clicking on the bottom line (reads Total
Area <=0.1 by default) and then dragging the slide bar
on the histogram at the bottom of the screen to 0.05.
•
Irregular and Proximity group cut-off points can be
reduced but this may compromise clonality.
•
Colonies in the Accept group are those that have
good shape and distance from other colonies.
•
Click on All Features to see the total number of
detected features and the total number of pickable
colonies (shown in the Spot Count box).
Page 13
GENETIX > CLONEPIX FL QUICK INSTRUCTIONS > THE PICK RUN
13
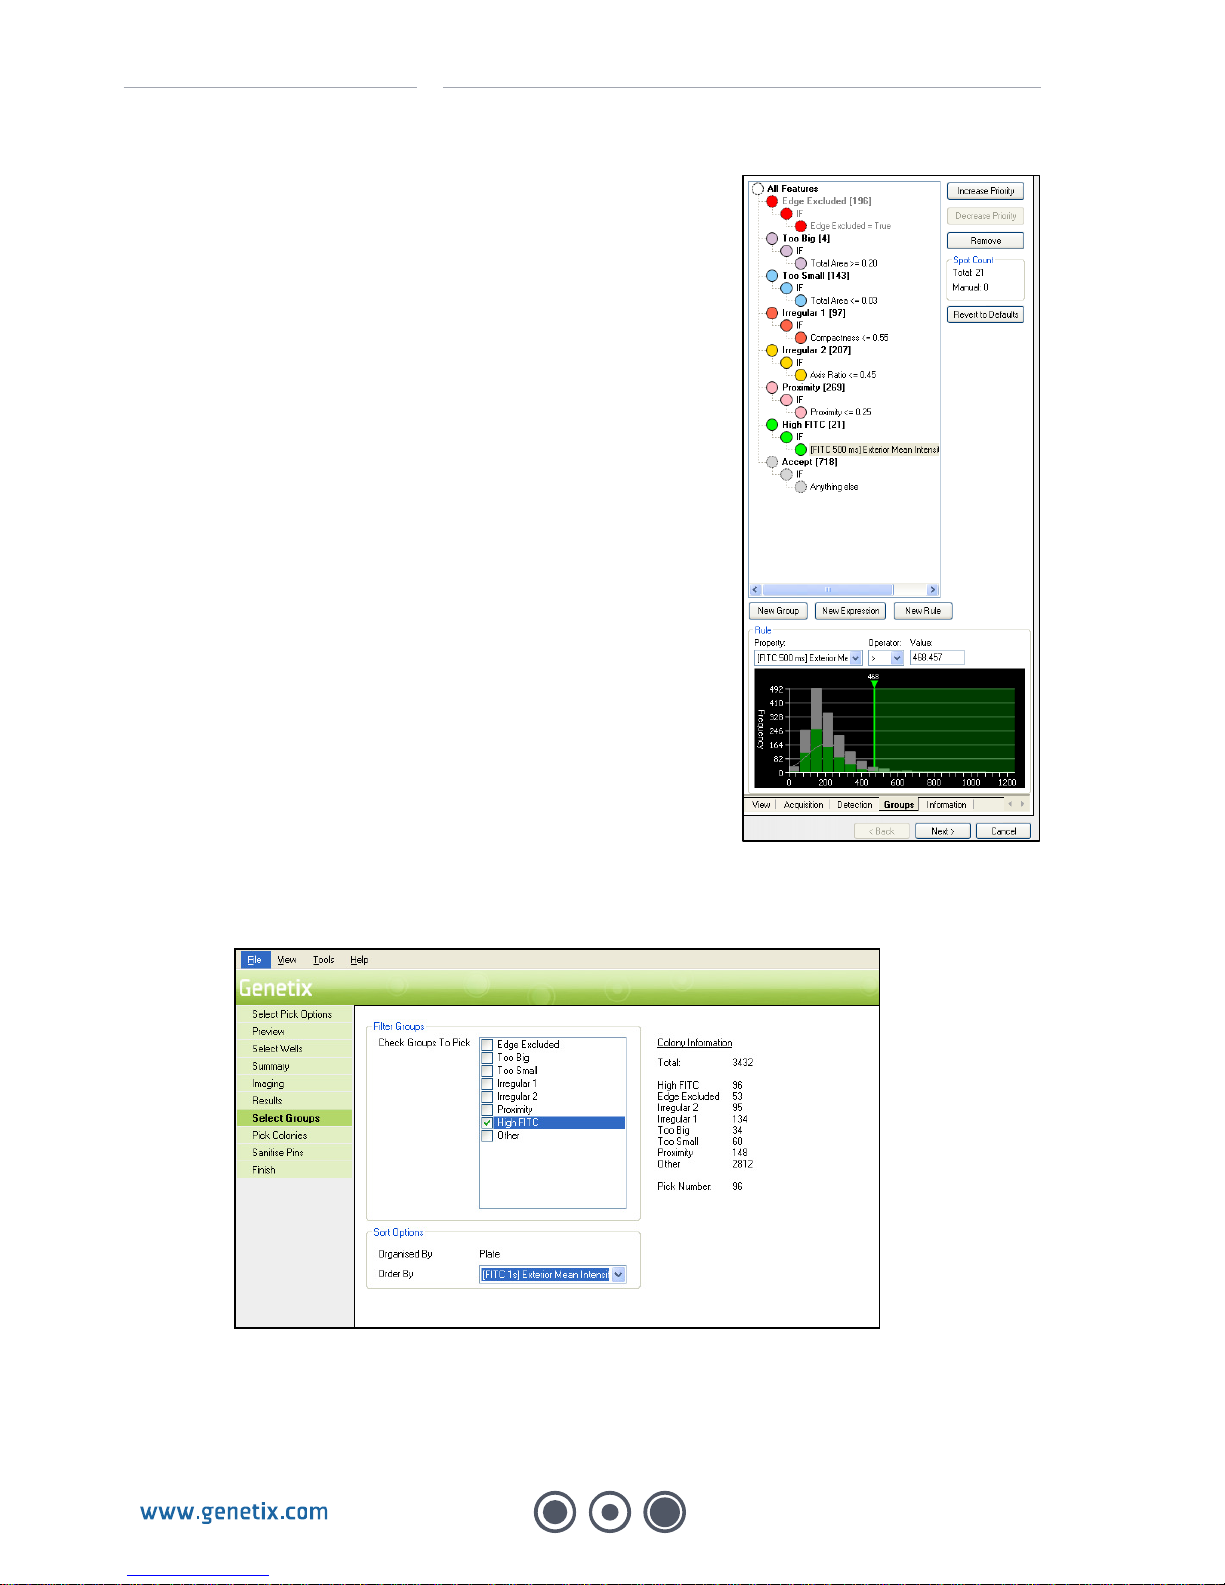
•
To further isolate only those in the Accept group that
have highest associated FITC fluorescence, click New
Group. This will bring up a new group at the top.
•
Click on the newly-created group (top line) to select it
and click Decrease Priority multiple times so that it
sits just above the Accept group.
•
Re-name the group by typing ‘High FITC’ in the box at
the bottom of the pane. Press Enter to save it.
•
Click the Colour button and choose an appropriate
color.
•
Click on the bottom line for this group (reads ID = “” by
default) to bring up a blank histogram box at the
bottom of the pane.
•
In the ‘Property’ drop-down list, select [FITC] Exterior
Mean Intensity. In the Operator drop-down list, select
‘>’ and then use the vertical slide bar to select a group
of high FITC colonies.
•
Click Next to proceed.
Select Groups
•
In the Select Groups window, select only the High FITC group:
•
Under Sort Options, select Order By [FITC 1s] Exterior Mean Intensity.
•
Click Next to proceed.
Page 14

GENETIX > CLONEPIX FL QUICK INSTRUCTIONS > POWERING DOWN CLONEPIX FL
14
Picking
•
Before picking can commence, you will be prompted to swap the source cassettes. Remove
the empty Feed cassette (it can be placed at the back of the ClonePix FL bed). Next, unlock
the Return cassette and carefully transfer it to the left side of the source stacker. There is no
need to re-arrange the plates in the cassette. Finally, place the empty cassette into the right
side of the stacker and lock it in place. Failure to lock down the Return cassette will cause a
malfunction in the return of the microplates.
•
Switch on the ethanol wash pump at the front of ClonePix FL. Check that the ethanol bath
has filled with ethanol.
•
When prompted, load the destination plate(s) into the Destination Feed cassette.
•
Click Next to proceed.
•
The picking step will proceed automatically until all colonies in the selected group have
been collected.
Finish
•
Click Finish to return to the Pick Run Process top page.
•
Click Close Process to return to the Main Menu. If you have not saved your Process
settings, you will be prompted to do so.
•
To view the results of the picking run, click on the Review Results icon.
Powering down ClonePix FL
•
Switch off the ethanol wash pump.
•
Shut down ClonePix FL software.
•
Shut down the computer and wait for it to switch off.
•
Power down ClonePix FL.
Page 15

GENETIX > CLONEPIX FL QUICK INSTRUCTIONS > CONTACT DETAILS
15
Contact Details
Corporate Headquarters
Genetix Ltd
Queensway, New Milton
Hampshire BH25 5NN, UK
Tel: +44 (0) 1425 624 600
Fax: +44 (0) 1425 624 700
Visit www.genetix.com for contact details of your nearest Genetix sales and support office.
Trademarks:
CellReporter, ClonePix and CloneSelect are trademarks of Genetix Ltd., UK.
Notice
ClonePix FL and its related applications are covered by US Patent No 7,310,147 and pending patent applications filed by
Genetix. The purchase of this product conveys to the purchaser the limited, non-exclusive and non-transferable right
under these patent rights to use the screening method as claimed for research purposes only in conjunction with
ClonePix FL. No other licence is granted to the purchaser whether expressly, by implication, by estoppel or otherwise. In
particular, the purchase of this product does not include nor carry any right or license to use, develop, or otherwise
exploit this product commercially, and no rights are conveyed to the purchaser to use the product, its components or the
method for any other purposes, including without limitation, provision of services to a third party or generation of
commercial databases. For information concerning the availability of licences for other uses, please contact Genetix
Limited Queensway, New Milton, Hants BH25 5NN T: +44 (0) 1425 624600 – F: +44 (0) 1425 624700
Copyright © 2010Genetix Ltd
All rights reserved. No part of this publication may be reproduced, stored in a retrieval system, or transmitted,
in any form by any means, electronic, mechanical, by photocopying, recording, or otherwise, without the prior
written permission of Genetix Ltd.
Information furnished by Genetix Ltd is believed to be accurate and reliable; however, no responsibility is assumed
by Genetix Ltd, for its use; nor for any infringements of patents or other rights of third parties which may result from
its use. No license is granted by implication or otherwise under any patent rights of Genetix Ltd.
Revised: 17 June 2010
 Loading...