

Page 1

2jr
Page 2

absolute fid e l i t y®
Owners Manual and Set-up Guide
Genesis 2.2 Junior Loudspeaker
Contents
SET-UP GUIDE 1
PLANNING THE PLACEMENT 1
UNPACKING 1
LOUDSPEAKER CONNECTIONS 2
LOUDSPEAKER CONTROLS 3
SERVO-CONTROLLED BASS AMPLIFIER PROTECTION 4
A WORD ABOUT FINISH 4
TUNING THE SYSTEM 5
MIDRANGE AND TWEETER CONTROLS 5
BEGIN WITH BASS TUNING 5
IMAGING AND SOUNDSTAGE 7
THE REFINEMENT STAGE 9
MAKE ONE CHANGE AT A TIME 9
DEFINING THE SOUNDSTAGE 10
APPROPRIATE MID-BASS/LOW-BASS BALANCE 10
ROOM TREATMENT 11
MASTERING THE REFINEMENTS OF THE SYSTEM 12
THE TECHNOLOGY 14
DESIGN PHILOSOPHY 14
THE GENESIS RIBBON TWEETER 16
48INCH MIDRANGE RIBBON 16
THE SERVO-BASS ADVANTAGE 17
THE SERVO-CONTROLLED WOOFERS 18
SERVO-CONTROLLED BASS AMPLIFIER 19
THE ACOUSTIC SUSPENSION 19
SPECIFICATIONS 21
Ver 1.0 Sep 2011 i
Page 3

abs o l u t e fid e l i t y®
A Message from Genesis
Congratulations! And Thank You!
You are now the owner of one of the finest loudspeakers in the
world! The Genesis 2.2 junior (or G2jr) is the result of technologies
developed and refined over the past 40 years in constant
production.
The G2jr loudspeaker is designed to reproduce music (and film) at
live listening levels with virtually no restrictions on dynamic range,
frequency response, or imaging capabilities in a medium to large
room. This is absolute fidelity® the ability to reproduce the musical
event faithfully, as was intended by the performer or filmmaker.
However, the G2jr is not meant to reproduce music at ear-splitting
levels. If you are looking for just LOUD, this is the wrong
loudspeaker. A Ferrari and a Caterpillar may have the same price
and horsepower, but they are very different vehicles and you
wouldn’t use your Ferrari to move a load of gravel.
While other loudspeakers are designed to reproduce music
perfectly for one listener at one precisely located sweet-spot, the
G2jr is designed to deliver music to a larger audience, seated or
standing. In a typical listening room, the listening sweet-spot
extends in width to a couch or loveseat. Vertically, it encompasses
any height from approximately 26” (70cm) to 68” (1.7m).
Please read this Owners Manual and Set-up Guide to get the
maximum enjoyment out of your purchase. Also, please check
back at our website at www.genesisloudspeakers.com. We will put
the latest updates, tips and tricks, and support for our owners on
our website and in our newsletter.
Ver 1.0 Sep 2011 ii
Page 4
abs o l u t e fid e l i t y®
Please write the purchase details of your Genesis 2.2 Junior
here for future reference. Remember, send in your registration
card to extend the limited warranty on your loudspeakers.
Bought from: ____________________________
____________________________
Date: ___________________________________
Serial Numbers:
Warranty Statement and Extended Registration Card
should be placed here.
Please check with Genesis should they be missing.
Remember – the warranty on your Genesis loudspeakers is
only for 90 days unless the Extended Registration Card
is sent directly to Genesis.
Ver 1.0 Sep 2011 iii
Page 5

abs o l u t e fid e l i t y®
Set-up Guide
Now that you have your new Genesis 2 junior loudspeaker, we
realize that you can’t wait to hook it up and start the music!
However, we want you to set it up correctly to derive the greatest
enjoyment from your purchase.
So, please read this set up guide (even if your dealer is setting it up
for you!) before you proceed.
Planning the Placement
Before you even have the loudspeakers delivered, it would be a
good idea to make a plan of where you will place them. You will
not need a very large room, but at an absolute minimum the room
should be about 15 feet (4.5m) wide where the speakers will be
placed.
You should have a minimum of at least 18 inches (0.45m) of space
behind the speakers. The listening position should be a minimum of
11 feet (3.3m) from the front of the midrange ribbon to allow for
proper integration of the drivers. Since the loudspeakers
themselves are 28 inches (0.7m) deep, the room has to have a
minimum length of about 18 feet (5.5m) to allow for some space
behind the head of the listener.
In a typical placement, the midrange/tweeter wings will be placed
so that the two columns of tweeters are on the inside, and between
about seven feet to nine feet (2m to 2.7m) apart measured from the
centre of the line of tweeters to the centre of the other line of
tweeters. The speakers fire straight ahead with no toe-in.
As the room will greatly influence the sound of your system, finetuning adjustments in placement will be necessary. Every room will
be different, with doorways, furniture, closets, wall construction and
covering, etc. all making a significant impact on the sound.
Unpacking
The Genesis 2.2 junior will arrive in a two large wooden shipping
crates. As the speaker weighs well over 200 lbs each (much more
with the shipping crates), we suggest that you enlist the help of a
couple of strong friends, or hire some help. We are not liable for
Ver 1.0 Sep 2011 1
Page 6

abs o l u t e fid e l i t y®
damage (to either the speakers or your backs!) during unpacking
and setting up.
As the speaker tilts up and out of the crate, and it is extremely
heavy, we suggest that you position the crate approximately at the
final position where you want the loudspeaker to be.
The top, front and one side forms a 3-sided lid to the crate. Once
this is removed, the speaker can be easily tilted up and out of the
crate.
The box containing the crossover, the servo-bass amplifier and the
woofers are decoupled from the midrange/tweeter panel and the
base of the loudspeaker with shock absorbing rubber de-couplers.
There will be three shipping bolts that secure the woofer box during
its journey to your home. Remove these bolts before tilting the
loudspeaker out of its crate.
There are also foam wedges securing the woofer box for shipping.
These foam wedges should also be removed at this time.
After unpacking, we strongly suggest that the crates be dismantled,
flattened and safely stored away in a cool, dry place. It is expensive
to custom build crates strong enough to transport these
loudspeakers without damage should you need to relocate or
move.
Loudspeaker Connections
Once you have the G2jrs close to where you think they will
ultimately be, connect the loudspeaker to your power amplifier
using a pair of high quality loudspeaker cables (not supplied) to the
5-way binding posts. We have designed a “Loudspeaker Interface
Cable” specifically for Genesis loudspeakers for this critical job.
More information can be found from the Genesis website or from
your dealer. However, any well-designed loudspeaker cable can be
used.
A power cord is also needed to power the built-in servo-bass
amplifier. A “starter cord” is provided with the loudspeaker, however
the bass will improve with a higher-quality power cord. As the G2jr
contains two 400W bass amplifier modules per side, make sure
that any power cord you use is up to this job. An “Amplifier Power
Interface Cable” is also available from Genesis for this.
Ver 1.0 Sep 2011 2
Page 7
abs o l u t e fid e l i t y®
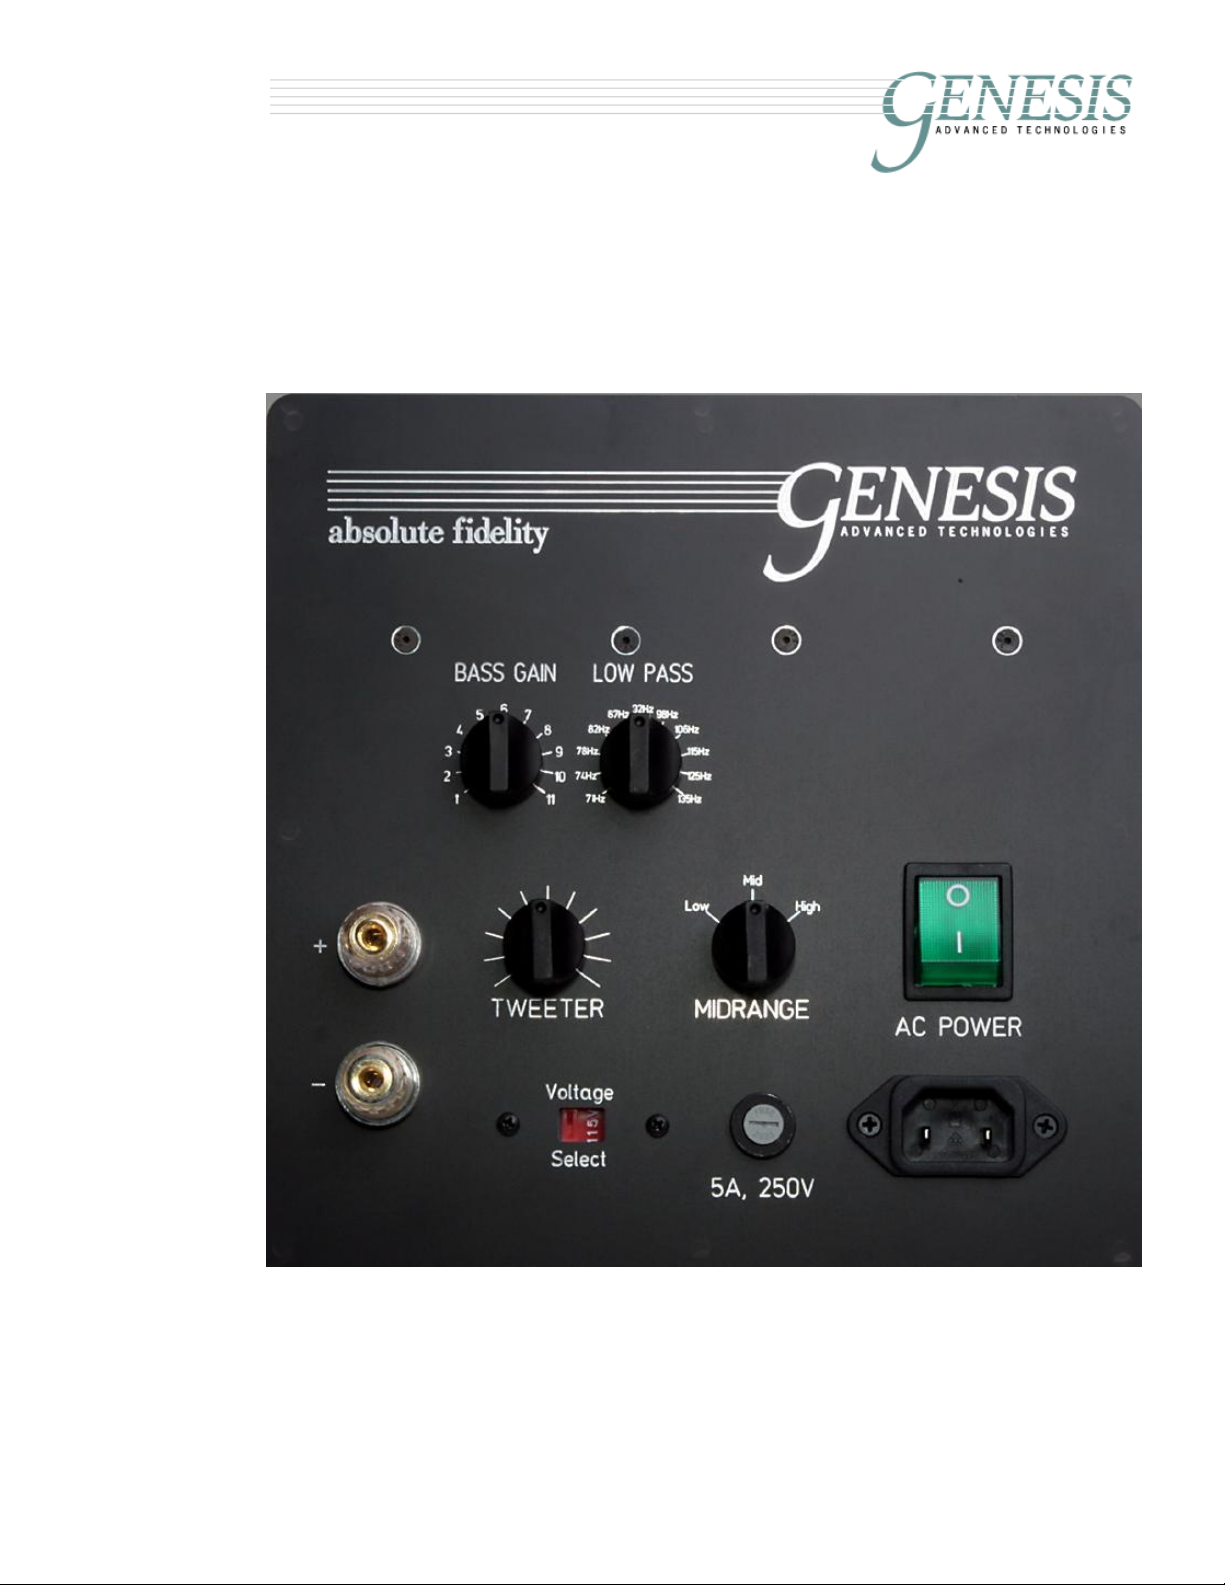
Loudspeaker Controls
You will notice four control knobs on the back of the G2jr. These
are labelled “BASS GAIN”, “LOW PASS”, “TWEETER” and “MIDRANGE”.
Ver 1.0 Sep 2011 3
Set them initially pointing straight up – the 12 o’clock position. This
is the nominal flat position and will work for the majority of
installations. For a minimum-sized room, the bass gain should be
set at 3 (the 9 o’clock position).
Page 8

abs o l u t e fid e l i t y®
Servo-Controlled Bass Amplifier Protection
The servo-bass amplifier has numerous protection circuits built in to
protect both the amplifier and the woofers. If you over-drive the
amplifier, it will self-protect and you will hear clicking or snapping
sounds. This is caused by the amplifier limiting current to the
woofers (much like the over-rev fuel-cut off in car engines).
If that happens, turn down the volume of your system to protect
your hearing and your speakers. The amplifier is designed to be
current-limited to 20amps – this is more than enough to supply over
1600W transients to each of the 12” woofers. However, the servosystem in the G2 is not compression or dynamic limited. Hence, it
is possible to play the system too loud, and damage the woofers
(and also possibly blow out your ribbons).
The amplifier, although it is very efficient, also has a thermal cut-off
to protect against over-heating. Should the bass amplifiers turn off
and the back plate is very hot to the touch, turn the system off until
it cools down again. Additional ventilation might be needed at the
back of the speakers should this happen too often.
A Word about Finish
The midrange/tweeter baffle of the G2jr is constructed out of solid
high-gloss cast acrylic. Acrylic was picked for its sonic properties as
well as its beauty. However, acrylic is a soft material that can
scratch easily.
Every G2jr is delivered with a 3-stage acrylic polish system by
Novus, and fine micro-fibre polishing cloths. Do not use other
cleaners or polish on your G2jr. In particular, DO NOT use paper
towels to wipe the surface of your loudspeakers. Paper fibres are
extremely abrasive and can introduce fine scratches on the surface
that will “cloud” the finish. If dusting is necessary, we recommend a
soft feather duster, or a can of compressed air.
Ver 1.0 Sep 2011 4
Page 9

abs o l u t e fid e l i t y®
Tuning the system
Music is the best way to begin to fine-tune your setup. We suggest
that video sources be used only after you have setup the system to
properly reproduce music. While we deliver the G2jr after at least
50 hours of running-in, further fine-tuning of your system may be
necessary after 800 hours or so. As the loudspeaker system
breaks in, it will sound better and better.
A comprehensive Genesis Loudspeaker Set-up Procedure with
music suggestions is included with this owner’s manual, or the
latest version can be downloaded from the Genesis website at
www.genesisloudspeakers.com.
Midrange and Tweeter Controls
The knob marked TWEETER controls the output of the three rear-
firing tweeters. If there is not enough space behind your
loudspeaker, the rear tweeter control can be turned down (counterclockwise or to the left). In large rooms, the tweeter control can be
turned up. Use this control if you need a bit more treble or to
increase the apparent space of the soundstage. Start with this
control at the 12 o'clock position.
The MIDRANGE control on the right side is a three-position switch
used to adjust the midrange. Start the midrange control at position
two (also the 12 o’clock position). Position one will sound fuller in
the lower midrange while position three will sound leaner and have
more upper midrange.
The less obvious effect (more obvious to some people!!) of the
midrange control is to make the soundstage sound more forward,
and change the perceived height and position of the performance.
Position two gives you a soundstage perspective of about the
middle of the concert hall (in the stalls). Position three is more like
the orchestra seats, and position one may be more like the circle
seats.
Begin with Bass Tuning
The first thing that needs to be understood is that the G2jr is an
unusual loudspeaker with a line-source midrange/tweeter and a
point-source woofer. There are great advantages to having a line
source (explained in the Technology section). One of the
Ver 1.0 Sep 2011 5
Page 10

abs o l u t e fid e l i t y®
advantages is that the sound pressure level does not fall as fast
with respect to distance as it does for a point source.
Because a line source radiates sound in a cylinder and a point
source radiates sound in a cone, with a doubling of distance from
the loudspeaker, a line source attenuates by 3dB whereas a point
source attenuates by 6dB. Since the midrange and tweeters are a
line source, and the bass is a point source, when the distance
doubles, you have to increase the bass volume by 3dB.
The G2jr is designed for a listening distance of approximately 12
feet (3.65m) and the BASS GAIN when set at level 3 (9 o’clock
position). If the listening position is closer than 12 feet, the BASS
GAIN should be reduced and if the listening position is greater than
12 feet, the BASS GAIN should be increased. (The minimum listening
distance should really be about 11 feet.) Since there could also be
room gain in the bass, this is not a simple linear relationship.
Otherwise, we could put a distance scale on the BASS GAIN control.
Once this relationship between BASS GAIN, listening position and
the room is understood, setting the correct bass level should be
relatively straightforward.
Start with a single vocal (not a soprano) with simple instrumental
accompaniment because the sound of the human voice is more
easily recognizable than many instruments and is the least
complex sound to deal with.
Leave the LOW PASS control alone for the moment, as it should
remain set at 92Hz (12 o’clock position). This control will be
addressed later. Turn the BASS GAIN up or down until the voice
sounds correct. Whatever controls you use, turn them up and down
only a little at a time. It is easy to turn it up or down too much.
Concentrate on the mid bass regions (as opposed to the very low
bass in your recording) to achieve a natural blend. The voice and
the music accompaniment should sound as if it were cut from one
cloth, not separate.
If the voice sounds “thin” or does not have enough “chest” to its
sound, turn the BASS GAIN up till it does. If you find that turning the
gain up creates too much low bass, then it is time to decrease the
LOW PASS. The BASS GAIN only changes the bass by -3dB/+12dB.
Ver 1.0 Sep 2011 6
Page 11

abs o l u t e fid e l i t y®
The low-pass control will raise or lower the frequency cutoff point of
the woofer (not the crossover frequency between the bass and
midrange). Turning the low pass filter up to a higher number will
extend the upper bass regions into the midrange without affecting
the low bass level. Some rooms may require that you set the lowpass filter to 115Hz or more. Do not be afraid to increase this
control to give the sound more body.
In general, you will find that the BASS GAIN and the LOW PASS are
adjusted in opposite directions. When you turn the gain up, the low
pass should go down, and vice versa (but with different amounts).
Next, set the woofers using more than just a voice. Select some
music that you know to have good deep bass. Adjust the gain of
the woofers for a natural and powerful bass sound. Use a
symphonic piece of music if you can, or use a natural bass
instrument like a stand-up bass for your guide. Try to make it sound
real. You may have to return to the vocal to make sure you have
not gone too far in one direction.
If, at this point, it does not have enough mid bass, turn the low pass
up to a higher position or, alternately, position the speakers closer
together in order to achieve better lower midrange coupling
between the main speakers. If it sounds too “fat” turn the low pass
control down or adjust the gain down. At this point it is suggested to
use the low pass filter control until you get to the refinement stage.
Imaging and Soundstage
While imaging and soundstage are controversial subjects (how do
you ever know that the soundstage is recorded correctly in the first
place??), it is vitally important to our enjoyment of a recorded
musical event. The G2jr is able to deliver a realistic soundstage
only if the recording contains such realism.
If your vocal selection is a well-recorded audiophile CD or LP, the
performer (assuming that he or she is not very close miked) should
appear to come from between and behind the loudspeakers and be
at the appropriate height and size for a standing person. If it is not,
there are several remedies that will address this.
Assuming that the vocal recording is accurate, if the vocalist
appears to be larger than life, you should first check the system
volume. Is it a volume that would be appropriate for someone
Ver 1.0 Sep 2011 7
Page 12

abs o l u t e fid e l i t y®
actually singing in your room? If there is too much volume the
artist will appear too big and the opposite is true for too little
volume. If the volume is set correctly and the image is still too big,
toe the speakers in a very slight amount or place them closer
together and re-listen. Repeat this process till you have it right.
If the voice is too low in height, turn the midrange control to the
next highest position and the image of the voice will move upward.
There are many solo vocal recordings where the singer is recorded
using a microphone hung above head height. In this case, it is
correct for the system to portray a singer that seems to be singing
from a pit in between your loudspeakers.
If you have the speakers too close the front wall, and you are not
getting enough front to back depth (the singer not appearing behind
the speaker enough) pull the midrange tweeter panels away from
the front wall a little bit at a time. If you do not have them pulled far
enough away, you may not have enough front to back depth. If
you get the speakers much beyond 1/3 of the way into the room,
it is unlikely that pulling them further away is reasonable.
Too much absorption on the wall behind the speakers will also
result in less depth in the soundstage. The G2jr requires a
relatively “live” front wall.
Find the best compromise for your room, your tastes and your
space requirements. If the speakers are too far apart you will lose
the side image and the image density in the middle of the
soundstage will be too diffuse. If the speakers are too close
together you will have too small a center stage, and you may find
that the edges of the soundstage collapse inwards.
We recommend you begin somewhere between six to seven feet
apart as measured from centreline of tweeter to tweeter. And then
move the speakers apart small increments at a time as you tune
the system. They seldom work well closer than six feet apart or
much more than nine feet apart.
If you are not getting proper focus of the soundstage, you may
angle the midrange panels from 1 to 3 degrees (but no more)
inwards towards your seating position until you have a properly
defined soundstage image. The usual reason that you will want to
do this is that you have a “W” soundstage. The sound images are
most dense (or focussed) in the middle, and then dense around
Ver 1.0 Sep 2011 8
Page 13

abs o l u t e fid e l i t y®
where the speakers are, but less dense between the center and
the speaker.
When properly set up very little sound should appear to come
directly from the speaker, instead, the sound stage should extend
far beyond the left and right edge of the loudspeakers and they
should have tremendous front to back depth. When the recording is
close miked (when the instrument or performer is very close to the
recording microphone) the music may appear to come directly
from the loudspeaker or projected forward of the loudspeakers.
This is normal. Typically, however, the sound should appear to be
detached from the loudspeakers.
A simple rule of thumb to follow is that focus will be achieved by
placing the speakers closer together or farther apart, and front to
back depth can be adjusted by the distance from the front wall and
treatment (or lack of) of the front wall. Further, as the system
“breaks in”, the depth and width of the soundstage will increase,
and so will the “smoothness” of the sound.
Ultimately, it is all about balance. You have a number of controls
at hand with which to adjust the bass response, the low-pass filter
frequency and woofer volume. You can also move the speakers
closer together (for better coupling) or further apart.
The Refinement stage
After following the rough setup guide above, you may not be
completely satisfied with the results. We share with you here some
of our observations in setting up these loudspeakers.
Make One Change At A Time
One rule of thumb you should always keep in mind. Make one
change at a time! Do not, for instance, change position of the
speakers and make an adjustment to the amplifier all at once.
Make each of these changes separately and note the difference by listening - with each adjustment, then make the next change.
Each adjustment, in positioning, and in control adjustment will
result in a subtle sonic change. Even when you are moving the
midrange/tweeter panels further apart, or closer together, move
one panel, listen, and then move the other panel. You may also
Ver 1.0 Sep 2011 9
Page 14

abs o l u t e fid e l i t y®
find an asymmetric placement in-room more accurate and
pleasing.
Defining the Soundstage
A common problem we find with many set-ups is a tendency to
separate the speakers too far from each other. This gives an
unnaturally stretched soundstage between the two speakers, and
creates problems with focus. The key problem is a lack of
soundstage information beyond the left and right sides of the
speakers.
If you find that the sound is not spacious enough or you are not
getting enough front to back depth, pull the speaker away from the
front wall. This is typically preferable to separating the two
speakers too far, and will almost always give you better depth and
soundstage information. A word of caution though: if you move the
speakers too far from the front wall you may lose the focus of the
image.
A problem with the soundstage could also be caused by the
recording. Try another recording if you cannot achieve what you
are trying to do. The recordings in the Genesis Loudspeaker Set-up
Procedure have all been carefully chosen, so those will be the fallback recordings to use for system set-up.
Appropriate Mid-bass/Low-bass Balance
Yet another problem is a lack of mid bass energy. In order for the
appropriate amount of mid bass energy to be present, the speakers
should be close enough together to achieve proper "coupling" of the
midrange ribbon driver. Coupling is desirable in the lower
frequencies from the mid-bass on down. This simply means that the
left and right drivers "work together" as opposed to working
separately.
If you find there isn't enough deep bass, your first remedy is the
BASS GAIN on the woofers. This has several limitations. First, turned
up too high, you may get some distortion on very low frequencies
or you may drive the amplifier into protection. Because of the high
efficiency of the amplifier, it is unlikely to overheat.
Ver 1.0 Sep 2011 10
You may need to trade-off soundstage depth for deep bass by
pushing speakers back towards the front wall. This will increase the
coupling of the woofers to the room. Do this procedure in small
Page 15

abs o l u t e fid e l i t y®
increments (approximately half an inch at a time) and return often
to the recordings you have used to adjust the front to back depth
and soundstage properties of your system. It is easy, yet
unproductive, to go too far as you will create a boominess in the
sound.
Secondly, you may make the mid bass produced by the top of the
woofer out of proportion with the mid bass produced by the bottom
of the midrange ribbon. This would tend to sound bloated or thick in
the mid bass regions.
Another good rule of thumb is to set the BASS GAIN for proper
midbass rather than low bass. The theory is that if the midbass is
correct, then the low bass should be very close to correct. If the
midbass is proper and the low bass is still not right, here are some
other suggestions.
A good balance between proper low bass extension and a deep
and spacious soundstage needs to be established to optimize your
new speaker's performance. This is because large space
ambience information is largely in the lowest frequencies. The
wavelength of a 20Hz soundwave is approximately 52 feet (16m),
so if you want to recreate the soundspace of a cathedral, you will
need to go lower than even 20Hz.
In order to achieve what the speaker is capable of we suggest you
focus your efforts on a proper balance of soundstage elements that
includes information beyond the left and right sides of the
speakers, front to back depth well behind the speaker, excellent
focus of instruments and voices with proper vertical information and
mid bass fill.
A Genesis loudspeaker system correctly set up, can and should
provide a soundstage that will “melt the walls” and with pinpoint
focus, the speakers disappearing completely on a recording
containing such information.
Room Treatment
No room is perfect. To optimize your sonic presentation it may be
helpful to treat your room. Here are some guidelines:
1. Front walls. This loudspeaker is a dipole and therefore
there is sound coming from both the front and the back of
the speaker. How the front wall is treated or not treated is
Ver 1.0 Sep 2011 11
Page 16

abs o l u t e fid e l i t y®
important. Generally speaking, the Genesis loudspeakers
prefer a live front wall.
By these terms we mean the amount of reflection of sound.
A typical wall of glass or, brick, cement or drywall material is
a reflective surface. A heavily curtained or sound proofed
wall would be considered a "dead wall" or a non-reflective
wall. A normal thin curtain across a window causes only a
small amount of absorption.
2. Sidewalls. Because the speaker is a dipole it is less
sensitive to the sidewalls. However, as a rule of thumb, it is
a good idea to keep the speaker as far away from the
sidewalls as is practical. With this in mind, it may be helpful to
add some damping material or diffuser panels to the point of
first reflection. This is a point on the sidewalls between the
listener and the loudspeaker. It is where the sound from the
loudspeaker first hits the sidewall, then bounces to the
listener. This reflection is undesirable because it is slightly
delayed from the original sound. This point on the sidewall
can be easily determined with the help of a second person
and a mirror.
Sitting in your listening position have an assistant hold a
mirror up on the sidewall. Move the mirror until you can see
the tweeter. This is the point of first reflection. A diffuser (see
your dealer), an absorptive material or even a CD rack can
help break up this point of first reflection.
Ver 1.0 Sep 2011 12
3. Rear wall. In many cases it will be unnecessary to do
anything with the wall behind your listening position.
However, you may want to experiment with diffusers or
absorbers behind you for best sound. Absorption behind the
listener is usually beneficial.
Mastering the Refinements of the system
Fine tuning an audio system is an art that will take time and
patience. It can be one of the more rewarding learning experiences
you will have in the pursuit of music and its enjoyment.
One of the best pieces of advice we can offer is that you take
advantage of the ear's ability to identify similarities in sound. This
ability is useful in fine tuning your system because if every recording
Page 17

abs o l u t e fid e l i t y®
you listen to has a similarity of sound (too much or too little of a
certain frequency for instance) then you can be fairly certain that you
have yet to perfect your set-up. Keep at it and remember to enjoy
your music as you work on perfecting your set-up.
During the design stage of Genesis loudspeakers, we rely on
hundreds and hundreds of hours of critical listening. There are
changes we can make to the crossover that we can measure, but can
hardly hear the difference. And then there are the changes that we
make that we can easily hear, but cannot measure. It is an art form as
much as a science! Setting up the audio system is the same.
If you have any questions, feel free to contact us at Genesis. Our
website is the first place that you should look to for more
information, but you are welcome to either send us an email, or just
give us a call!
Ver 1.0 Sep 2011 13
Page 18

abs o l u t e fid e l i t y®
John William Strutt Lord Rayleigh (1842 – 1919)
The Technology
The Genesis 2.2 junior loudspeaker integrates a line-source
midrange/tweeter with point-source bass. Each speaker is over 6
feet tall, and the cabinet structured is designed to manage
vibrations and resonance. The tweeters and midrange ribbon are
mounted on a 1.5-inch slab of high-molecular weight cast acrylic,
and are isolated from the box containing two horizontally opposed
12” woofers.
Design Philosophy
Nothing has changed in theoretical acoustics since Lord Rayleigh’s
original book on acoustics published in 1877. There are still only
two proper ways for a transducer to propagate sound in a room: a
point source and a line source. Anything else, or everything in
between, is a compromise.
In order for all frequencies of
sound from the loudspeaker to
reach the listener at exactly the
same time, a coherent wave front
is important - not just “time-
alignment” of drivers. The ideal is
either an infinitely small pulsating
point or a pulsating line with a size
on the order of the room
dimension.
the ideal, and in doing so, provide sufficient radiating area for
dynamically and spatially realistic sound reproduction.
The G2jr is a line-source that is 4 feet long (nearly the half the
room’s entire height) from 120Hz upwards. Very importantly, the
line source has no vertical dispersion at any frequency. Hence,
there is no sound bouncing from either the floor or the ceiling. No
deleterious interference from these surfaces is created (as in
virtually all other kinds of speakers).
Ver 1.0 Sep 2011 14
Obviously, a line-source is much
easier to mechanize than the ideal
point source. The line-source (if
large enough), can approximate
Page 19

abs o l u t e fid e l i t y®
A second great advantage of the line source is that the vertical
spectral content of music is virtually the same throughout the length
of the line source. Hence, the seating height does not matter with
this speaker; unlike point source speakers where it is important for
the ears to be aligned in relationship with the tweeter.
The third important advantage of a line source is that it attenuates
at –3dB with a doubling of distance whereas a point source
attenuates at –6dB with a doubling of distance.
For example, with a sensitivity of 91dB/watt at 1m, the G2jr is about
average for large loudspeakers. At 2m, the G2jr line source can
deliver 89dB/watt, at 4m 86dB/watt, and at 8m 83dB/watt. For the
equivalent point source loudspeaker, it will be 85dB/watt at 2m,
79dB/watt at 4m, and 73dB/watt at 8m. (And for this reason, the
BASS GAIN for the G2jr has a control range of -3dB/+12dB)
Hence, for a listening distance of 5m (about 15ft) the line source
will appear to be more than twice as loud as a point source
loudspeaker. This is the great advantage that a line source
loudspeaker will have over a point source loudspeaker in a large
room.
As a result the change in loudness of the line source is much less
over a small change in distance. Hence, it results in a much larger
sweet spot as small side-to-side changes in seating position result
in less of a sonic change than with the point source loudspeaker.
The G2jr is also a dipole radiator. The midrange and tweeter
drivers are mounted on a rigid acrylic panel with no enclosure. This
has two advantages: firstly, it eliminates any enclosure or boxy
colorations caused by cabinet vibrations or resonance.
Secondly, the dipole creates a cardioid radiation pattern (like a
figure-eight), which has its maximum output at the listening position
and behind the speaker itself, and minimum output to the sides in
the plane of the loudspeakers. This very effectively minimizes the
bounce from the sidewalls.
Hence, in conjunction with the line source, the G2jr has no first
reflection from the floor, ceiling or sidewalls. The net result is that
there are far fewer detail-robbing room reflections from the room
than other types of loudspeakers. With fewer spurious reflections to
Ver 1.0 Sep 2011 15
Page 20

abs o l u t e fid e l i t y®
confuse your hearing, the program source emerges more clearly.
Imaging is deeper, yet more focused.
This results in a loudspeaker system that is virtually roomindependent. Also, because there are no phase and frequency
distorting reflections created, one can be transported into the
audience of the actual concert hall where the music was recorded.
The Genesis Ribbon Tweeter
Reviewers in the Audiophile press have often remarked that the
Genesis circular ribbon tweeter is the world’s best. It is a one inch
circular planar ribbon design crafted from an extremely thin
membrane of Kapton with a photo-etched aluminium “voice coil”
that is a mere 0.0005 inch thick. The entire radiating structure has
less mass than the air in front of it! That is why it will accurately
reproduce frequencies to 40 kHz.
The result of this design is a driver that has a rapid and
uniform response to high frequencies, and has the speed of
the best ribbon/electrostatic designs without the high
distortion and poor dispersion that is typically associated
with them.
The G2jr uses twelve of these tweeters configured as a
vertical line source. Because the output is distributed over
many drivers, each works at very low-stress. This
dramatically lowers the distortions in the high frequencies.
The G2jr also use three rear-firing tweeters per channel wired to
the crossover out of phase to the front tweeters creating a dipole.
48inch midrange ribbon
We sometimes say that the midrange is a window into the mind of
a composer or a singer. And indeed, the midrange is where the
“magic” is in a well-recorded musical event. This is why the G2jr
loudspeaker system uses a single 48inch-long ribbon per channel
as a dipolar line-source to reproduce these critical frequencies.
The midrange ribbon used in the G2jr is manufactured to Genesis’
exacting specifications. The ribbon itself is made of a very thin layer
of aluminium laminated to a substrate of mylar that is 0.001inch
thick. The ribbon is then suspended in the magnetic field created
by over 24 feet of barium ferrite magnets.
Ver 1.0 Sep 2011 16
Page 21

abs o l u t e fid e l i t y®
This result in a perfect line-source ribbon generating a continuous
and perfectly coupled wave front. The benefit of this to the listener
is a wide and even horizontal dispersion yielding a large and highly
stable sweet spot.
As a line-source dipole, the midrange ribbon has a vertical
dispersion pattern identical to that of the line array of tweeters.
Thus further insulating the listener from the room’s negative effects,
and enhancing the sense of spaciousness and depth.
The Servo-bass Advantage
Very few loudspeakers use servo drive, either because most
designers think that it is too difficult to design, too expensive, or
because of the extraordinary demands a servo system makes on
the amplifier and the transducer. The history of the Genesis servosystem started from the first introduced in the legendary Infinity
Servo Statik One in 1968(!) – so we know how to design and build
servo systems. The technology has been constantly updated and
refined over the past 40 years.
The concept of our servo bass system is an easy one to
understand: It employs an accelerometer as a sensor to constantly
monitor the movement of the woofer cone and continuously
compares it to the input signal. This comparison circuit instantly
identifies any deviation from the input and applies a corrective
signal to compensate for any deviation, resulting in the virtual
elimination of the inherent distortion of the woofer.
As an example, when you have a high-impact, low-bass signal that
starts and stops suddenly (for example a tympani), the inertia of the
woofer cone makes it slow to start moving, and then after it has
started moving, the momentum of the cone makes it continue to
move after the signal has stopped. The sonic result is softness,
overhang, and bloat in the bass. This results in a perceived lack of
tautness and definition, and a blurring of dynamic impact.
With the servo system, the circuit senses that the woofer is not
moving as fast as it should, and it instantaneously applies much
more current to make it move faster. When the signal stops, it
senses that the woofer is continuing to move when it shouldn’t be
moving and applies a counter-signal to stop the woofer faster and
more effectively than an open loop woofer could possibly respond.
Ver 1.0 Sep 2011 17
Page 22

abs o l u t e fid e l i t y®
Thus, the servo-drive reduces distortion and improves transient
response by making the woofer appear to be massless. Typical
non-servo woofer systems have distortion levels that exceed 10%
at even moderate levels. The Genesis servo bass system reduces
this distortion to below one percent at almost any output level. The
system also drives the woofer to constant acceleration, which
makes the frequency response of the woofer anechoically flat to
the lowest frequencies.
The Servo-controlled Woofers
The transducer used in a servo system must be strong enough to
withstand the high current approach of the servo, and yet delicate
and light enough to react extremely quickly. The G2jr features two
side-firing 12-inch woofers per channel.
While the servo system is able to ensure that the driver works
linearly as a perfect piston, it is unable to correct for distortion
caused by cone wobble, bending, and break-up. Hence, the drivers
were designed to minimize these non-linear distortions.
The woofers are a uniquely designed metal cone driver made for
the Genesis servo system. Made with a cone of solid aluminium,
the suspension and voicecoil have been maximized for long
distortion-free excursion so as to increase dynamic range. Our
aluminium cones are a magnitude stiffer than any plastic cone on
the market, and virtually eliminate the problems caused by cone
bending and break-up.
The lowest break-up mode in the woofer (where there can be any
chance of distortion at all) is at 4,000Hz – far above the 16Hz to
120Hz frequency range that these drivers operate at. Therefore,
the driver is a perfect piston within the frequencies used. Thus,
extremely low cone break-up distortion is inherent in the driver that
is designed for the Genesis servo-bass system.
A pair of matched woofers is horizontally mounted on a cabinet that
is de-coupled from the rest of the structure of the loudspeaker. This
ensures that any vibration generated by the woofers are not
transmitted to the midrange and tweeters. The woofers are also
horizontally opposed and in phase with one another. This means
that the vibrations generated by one woofer cancels out the
vibrations generated by the other woofer – further reducing any
image-distorting vibrations in the loudspeaker.
Ver 1.0 Sep 2011 18
Page 23

abs o l u t e fid e l i t y®
The isolation, plus vibration-cancellation results in a stable, solid
image even when there is heavy bass content in the music.
Servo-controlled Bass Amplifier
One problem, however, of metal cones, is that of greater mass –
even ones as light as the ones used by Genesis. To over come
this, we had to build an amplification system of great power, and
high damping factor. The servo-system also places extraordinary
demands on the amplifier because the system uses enormous
amounts of current to make the woofer follow the input signal. This
means that the amplifier used must efficiently deliver extraordinarily
large amounts of clean power into low impedances.
The servo-controlled bass is a holistic system of woofers,
acceleration sensors, servo-feedback circuits, crossover circuitry
and amplifiers. Two separate Class D amplifier modules are used
in each of the left and right loudspeakers (a total of four!).
Specially designed and tuned Dynamic Power Delivery System
(DPDS) power supplies are used – one for each speaker with two
channels – to deliver balanced dynamics which are critical to bass
accuracy. This improves the power factor of the power supply in
delivering the bass frequencies, resulting in “floorshakingly musical”
bass to power the servo woofers.
One side benefit of this powered woofer system is that almost “any”
sized amplifier can be used to drive the mid/tweeter section of the
Genesis 2 junior. No longer must one choose between having an
amplifier with enough power to drive the woofers, and a smaller
amplifier having better spatial and tonal characters. Nevertheless,
we do recommend no less than 100 watts as a minimum for the
midrange/tweeter sections.
The Acoustic Suspension
The suspension for each loudspeaker comprises three elements:
1) The neoprene vibration absorbers are tuned to isolate and
decouple the loudspeaker cabinet for optimal imaging and
bass response no matter what surface the loudspeaker sits
on. More neoprene vibration absorbers are tuned to isolate
the woofer cabinet from the rest of the loudspeaker
structure.
Ver 1.0 Sep 2011 19
Page 24

abs o l u t e fid e l i t y®
2) The skeletal frame acts as a tuned absorber. Made of an
inch of solid acrylic, no two parts of the frame will resonate at
the same frequencies. This ensures that all midrange
frequencies are “dumped” below the base of the cabinet so
that floor-borne vibrations do not affect the imaging and
soundstage of the loudspeaker.
3) The spikes rigidly couple the suspension system to the floor.
If you have hardwood floors and do not want to make holes
in the wood, use a copper penny (instead of expensive
“spike cups”) under the spike.
A pin-point suspension system is designed to pass all
frequencies. Using a spike cup under the spike will defeat
this system. The spike passes all frequencies to the spike
cup, and then depending on the diameter of the spike cup, it
passes only frequencies below a particular frequency.
A copper penny gets deformed – the spike making an
indentation where it meets the penny, and a little “nipple” on
the other side. This still performs the same function as a pinpoint suspension system, but at the same time protects your
hardwood floor.
Nevertheless, despite the acoustic suspension, if you have a
extremely light and resonant floorboards, the acoustic suspension
may still transmit sufficient vibrations to make your floor resonate
and hence muddy up the bass and the imaging. In that case, it may
be necessary to place heavy marble, slate, or granite slabs (at
least 200lbs per slab) under the speakers. This slab serves as a
foundation on which the acoustic suspension will work.
Ver 1.0 Sep 2011 20
Page 25

abs o l u t e fid e l i t y®
Specifications
Dimensions: H 75” x W 22” x D 28”
Weight: 220 lbs (100kg) each
Frequency Response: 16Hz to 40kHz, +/- 3dB
Controls: Rear Tweeters (+/- 1.5 dB)
Midrange (+/- 0.75 dB)
Bass Gain (+12dB/-3dB)
Low Pass (71Hz to 135Hz)
Input Impedance: 4 ohms (nominal)
Sensitivity: 91 dB/watt @ 1 meter
Amplifier Power Rating: 400W X 2 each
Inputs: 5-way binding posts
Finish: High Gloss Black Acrylic
with Matt black base
Ver 1.0 Sep 2011 21
 Loading...