

Page 1

USER’S MANUAL
TM
PLASMA THAWING WATER BATH SYSTEM
GENESIS 2002
GENESIS 2006
TM
65 Commerce Way
Hackensack, NJ 07601 U.S.A.
Tel: 201-708-1400
866-712-5663
Fax: 201-704-1104
www.genesisbps.com
0609
GenesisBPS, LLC
Page 2
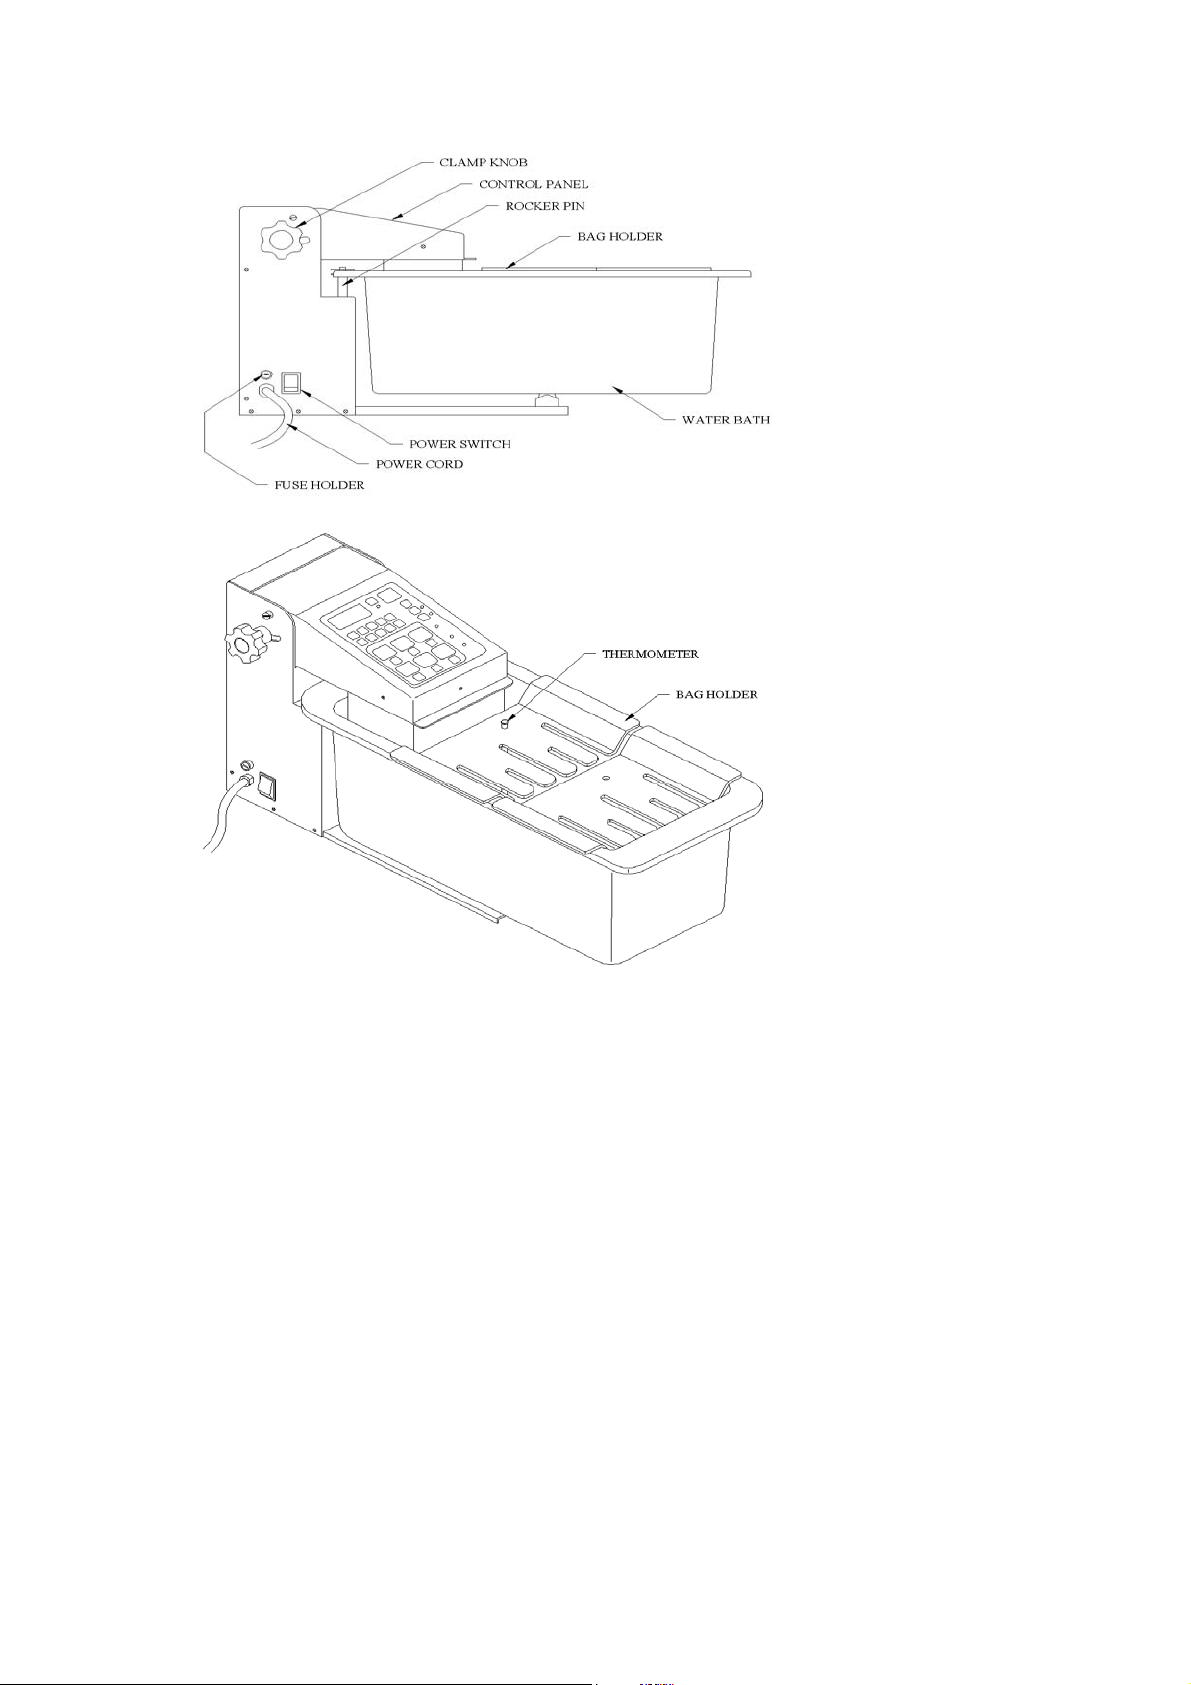
GENESIS 2006 SHOWN
2
Page 3

To assure proper record keeping, please retain this information
for future use.
DATE PURCHASED ____________________________
SERIAL # _____________________________________
DISTRIBUTOR NAME __________________________
PHONE NUMBER ______________________________
CITY, STATE __________________________________
The GENESIS THAWING SYSTEMS incorporate water bath
technology with the latest engineering to enable the machine to
provide plasma thawing in a minimum of time. The unique,
water resistant electronic key pad permits the operator to easily
monitor and control the thawing activity.
The compact design of the GENESIS 2002/2006 saves
precious bench top space. It is easy to operate, keep clean and
maintain. The GENESIS 2002/2006 sets up in minutes and
is ready to use. The GENESIS 2002/2006 comes with 1000
plasma thawing bags, thawing bag dispenser, bag holder(s),
LABath CLEAN
TM
, reference thermometer, and two special
plasma thawing bag weights. Optional accessories are also
available.
We are certain that you will be pleased with your new
GENESIS 2002/2006 plasma thawing water bath system. If
you have any questions, please call :
GenesisBPS, LLC
at
866-712-5663
3
Page 4

CONTENTS
1. UNPACKING ........................................................ 5
2. TO THAW BLOOD PRODUCTS ........................ 5
3. TO REMOVE A THAWED BAG ........................ 9
4. TO MAINTAIN THE DEVICE IN THE
READY TO THAW STATUS .............................. 9
5. TO CLEAN THE BATH OR TO ADD WATER .. 10
6. CONTROL PANEL AND INDICATORS ............ 12
7. TROUBLESHOOTING GUIDE ........................... 15
8. SPECIAL FEATURES .......................................... 18
9. UNIQUE SAFEGUARDS ..................................... 18
10. SPECIFICATIONS ............................................... 19
11. ORDERING/RETURN INFORMATION ............ 20
12. WARRANTY ....................................................... 22
4
page
Page 5

1. UNPACKING
1.1 The following is supplied with your GENESIS 2002/2006
unit.
Control Unit
Water Bath
Thawing Bag Dispenser
Plasma Overwrap Thawing Bags (1000/Box)
Plasma Bag Holder
TM
LABath CLEAN
Reference Thermometer
Thawing Bag Weights
User's Manual
Optional Accessories :
Additional Bag Weights
The above items may be purchased from :
GenesisBPS, LLC
866-712-5663
2. TO THAW BLOOD PRODUCTS
2.1 Place the unit on a flat, sturdy surface.
2.2 Fill bath with water up to the slotted line on the front of the
stainless steel shroud. This level will ensure proper thawing
operation. No bags should be in the bath and the unit should
be placed in the down position when filling the bath.
Check water level daily. If the water level is too low, the
GENESIS 2002/2006 low water level sensing switch will
make the unit inoperable (when the unit is plugged into the
power supply). An alarm will sound and the ADD WATER
5
Page 6

indicator will light. To correct this situation, fill bath with
water as explained above.
TM
Add 2 ml of LABath CLEAN
each time the water is
changed to control bacterial and algae growth. The bath
cleaning agent also helps to prevent the formation of turbidity
and odor.
2.3 Plug the device into a 115 volt AC outlet. For GENESIS
2002, a dedicated 10 Ampere outlet is needed. For the
GENESIS 2006, a dedicated 15 Ampere outlet is needed.
The outlet must be properly grounded.
IMPORTANT : DO NOT use sharp instruments (pen,
pencil, etc.) on the key pad area - it will cause damage
to the instrument.
2.4 Turn on the POWER SWITCH on the left panel.
2.5 Start the unit by pressing the POWER key located on the
control panel.
a. The default SET TEMP is 37 °C. When switching on the unit
this temperature will be displayed in the SET TEMP window,
as the desired temperature, along with the actual WATER
TEMP of the bath. The bag timers will display zeros.
b. If the water temperature is less than the set temperature
(37 °C) then heating of the water will begin automatically the HEAT indicator will light. In addition, the HEATING
indicator will light, indicating the heater is drawing power.
When the bath water reaches the set temperature, HEATING
indicator will go off. When the bath water cools, HEATING
indicator will go on again, indicating water is being heated.
This cycle continues, ensuring accurate water temperature.
6
Page 7

c. To change the default SET TEMP : You can adjust this
temperature within the range of ambient to + 56 °C, in one
degree increments. To adjust, press the SET TEMP key - then
press the numeric key pad to indicate the temperature desired.
All keys must be pressed within 5 seconds of each other. The
display should now show the new SET TEMP.
When the SET TEMP is same as the WATER TEMP, the
bath is ready to be used for thawing.
d. Place the frozen product in slot marked 1 on the Plasma Bag
Holder.
It is recommended that frozen plasma be placed into a plasma
overwrap thawing bag. This should prevent plasma from
getting into the bath, should the bag be cracked or damaged
and protect the device from damage. After placing frozen
plasma into the plasma thawing bag, eliminate all air from
bag, twist top of the bag and loop it through the Plasma Bag
Holder so it is secure.
For additional overwrap thawing bags, call
GenesisBPS, LLC.
It is important to remove the excess air. Place the
weight(s) provided into the plasma bag(s) to ensure that the
frozen plasma remains submerged in the water.
e. Press the START/CHANGE key for the selected bag location.
The timer will start it’s count down while the unit is thawing
the plasma. Default timing is 14 minutes for the GENESIS
2002 and 18 minutes for the GENESIS 2006. After this
time has elapsed an alarm will sound, signaling that the
frozen product should now be thawed.
Depending on volume of plasma, the thickness of the plasma
thawing bag and storage temperature of product to be thawed,
7
Page 8

thawing time may vary. The amount of air left in the plasma
thawing bag during thawing will also affect thawing time.
The laboratory personnel can set the desired thawing time for
each unit to be thawed. They do not have to all be set for the
same thaw time.
f. To change the default TIMER :
Press the START/CHANGE key for the selected bag location,
then press the numeric key pad for the desired minutes. All
keys must be pressed within 5 seconds of each other. Minutes
must be between 1 and 99.
g. To start rocking motion of the bath, press the ROCK key.
Rock indicator will light. Pressing the ROCK key at any time
will stop the rocking motion.
NOTE : If the water spills over the top of the bath when
rocking motion begins, stop the bath from rocking and
remove a small amount of water.
h. To thaw an additional bag, place it in slot 2, 3, etc. Adjust
the timer as required, follow instructions in Section 2.5-f
above.
The product should be thawed when an audible signal is
heard and the respective BAG TIMER is at zero. Remove the
product from that slot location, check the bag contents to
ensure that it is completely thawed. If additional thawing is
required, return the bag to the holder and set timer for the
desired thaw time.
8
Page 9

3. TO REMOVE A THAWED BAG
3.1 Press the ROCK key to stop the rocking motion.
a. Remove the thawed bag (and any weights used) from the
Plasma Bag Holder. Discard plasma thawing overwrap bag
after each use, as they are designed for single use only.
b. If there is another bag being thawed, press the ROCK key to
resume the rocking motion for the remaining bag.
4. TO MAINTAIN THE DEVICE IN THE READY-TO-
THAW STATUS
4.1 Always keep the HEAT indicator illuminated.
4.2 Always keep the SET TEMP to the desired setting. (37 °C or
other desired temperature). If a desired temperature of 50
°C or greater is needed, limit the time the unit is in the ready
to use state. At higher temperatures, greater evaporation
occurs.
4.3 Always keep the ROCK indicator off (not illuminated) when
not thawing plasma or other products.
9
Page 10

5. TO CLEAN THE BATH OR TO ADD WATER
SAFETY
: NEVER ADD WATER OR MOVE
THE BATH IF THE POWER SWITCH (ON
THE LEFT SIDE PANEL) IS TURNED ON.
RECOMMENDATION
: FOR MAXIMUM
SAFETY, UNPLUG THE UNITS POWER
CORD FROM THE ELECTRICAL OUTLET.
5.1 TURN THE POWER SWITCH (ON THE LEFT SIDE
PANEL) TO OFF POSITION TO TURN THE UNIT
POWER OFF.
BEFORE REMOVING THE BATH FILLED WITH
WATER, UNPLUG THE UNIT FROM THE
ELECTRICAL OUTLET.
5.2 Depending on usage, the water should be changed daily but
not less than once per week.
5.3 Remove the Plasma Bag Holder.
5.4 Tilt the unit to the up position by lifting the handle in front of
the control panel. With unit in up position, tighten the clamp
knob located on the top left-hand side of the device (turn the
knob clockwise.) DO NOT OVER TIGHTEN.
The unit will now be held in the up position.
It will be helpful at this point to have a cloth towel ready to
cleanup dripping water. Or, by waiting a few minutes, the
pump and heater area can drain into the water bath.
5.5 GENESIS 2002
: Carefully remove the water bath from the
device. The bath weighs approximately twenty (20) pounds
10
Page 11

when filled with water. Do not drop the bath on a hard
surface.
GENESIS 2006
: Remove all, or part of the water. The bath
weighs approximately thirty (30) pounds when filled with
water. Carefully remove the water bath from the device.
5.6 DO NOT USE BLEACH OR HARSH CLEANERS.
Depending on mineral content of water used, the bath may
discolor. Proper cleansing should keep this to a minimum.
TM
Use LABath CLEAN
and turbidity. To order additional LABath CLEAN
regularly to control bacteria, algae
TM
, call
GenesisBPS, LLC at 866-712-5663.
5.7 Fill the bath. The maximum water level should be
approximately two inches from the top of the water bath.
This level will ensure that the water level will be at the
slotted line on the unit when the bath is repositioned.
DON'T OVERFILL THE BATH. Add 2 ml of LABath
CLEAN
DON'T USE BLEACH OR HARSH CLEANERS as this may
scratch and discolor bath.
5.8 To replace bath: GENTLY place the bath onto the ROCKER
PIN, ensure the pin head is located in the slot of the bath.
Ensure that the center of bath is positioned onto the white
roller on the base plate. Hold the handle firmly on the front of
the control panel. Release the clamp knob by turning it
counterclockwise. Lower the unit slowly into the water.
TM
each time water is changed.
11
Page 12
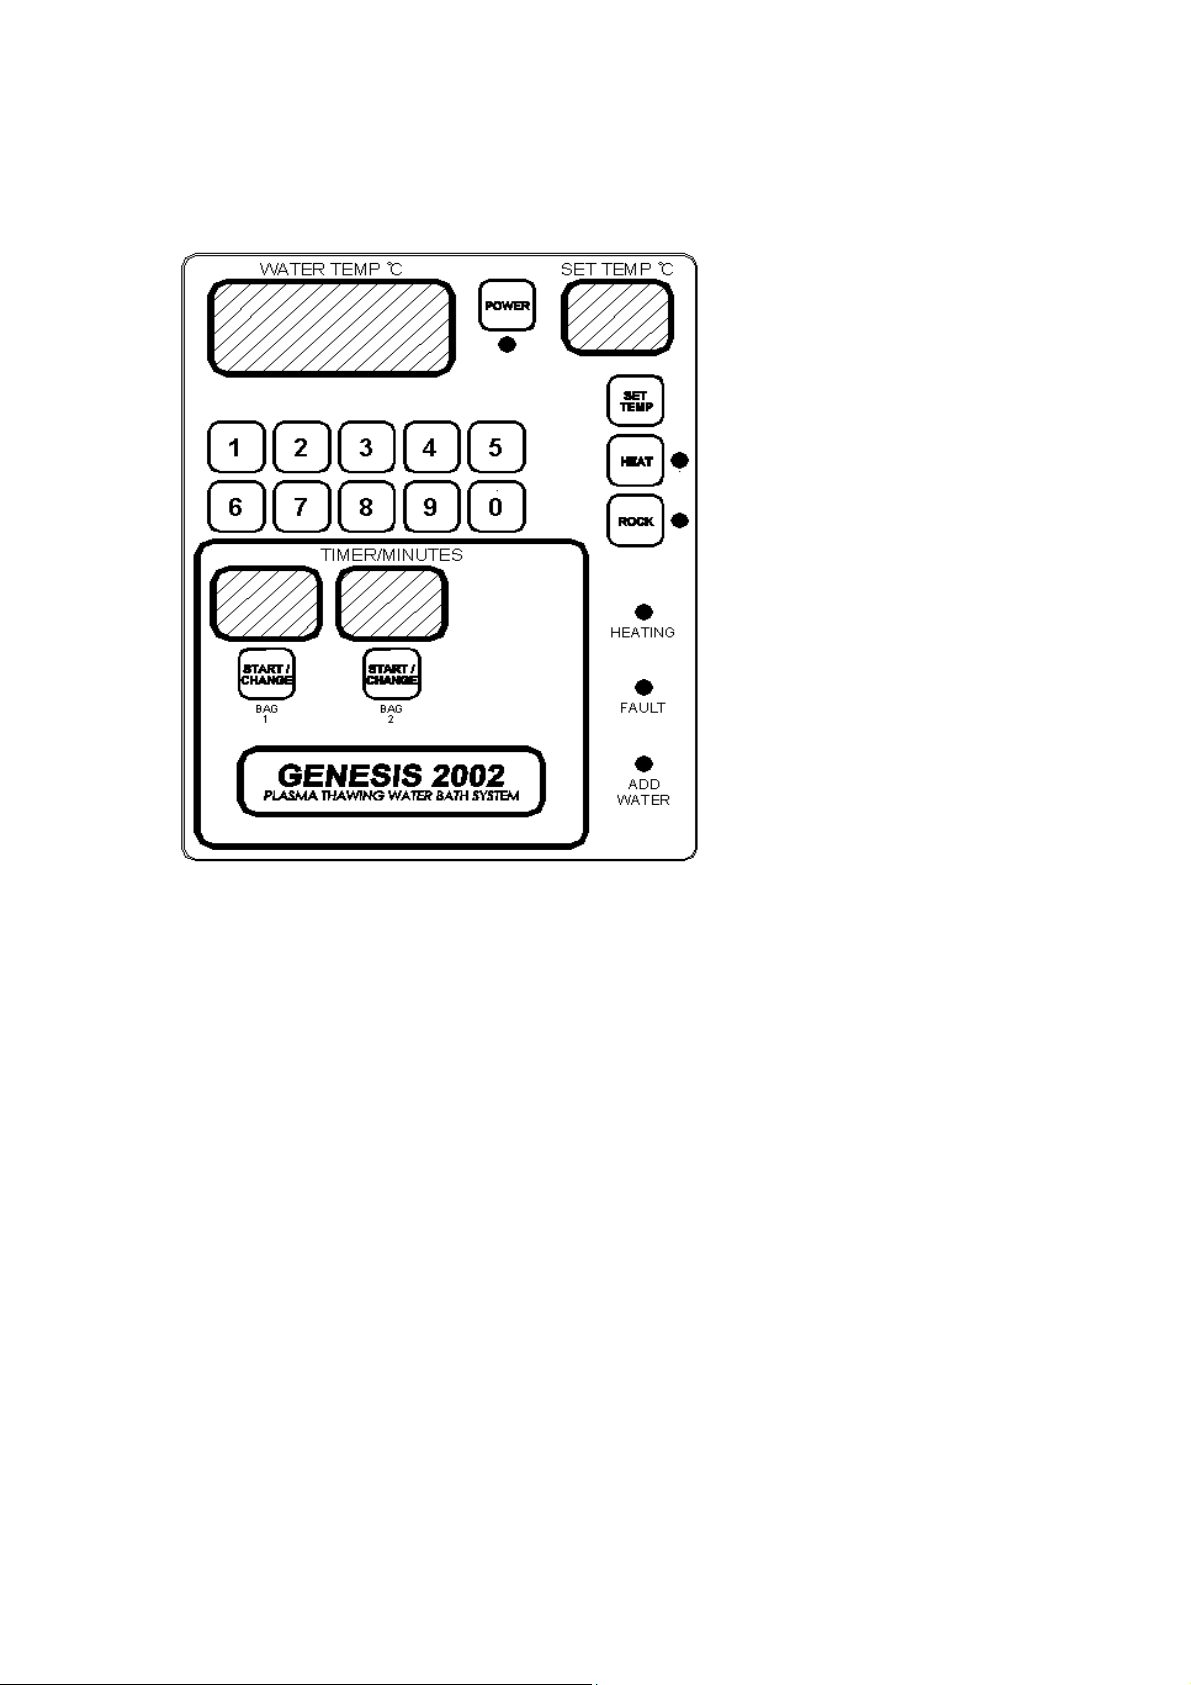
6. CONTROL PANEL AND INDICATORS
GENESIS 2002
TM
CONTROL PANEL
12
Page 13
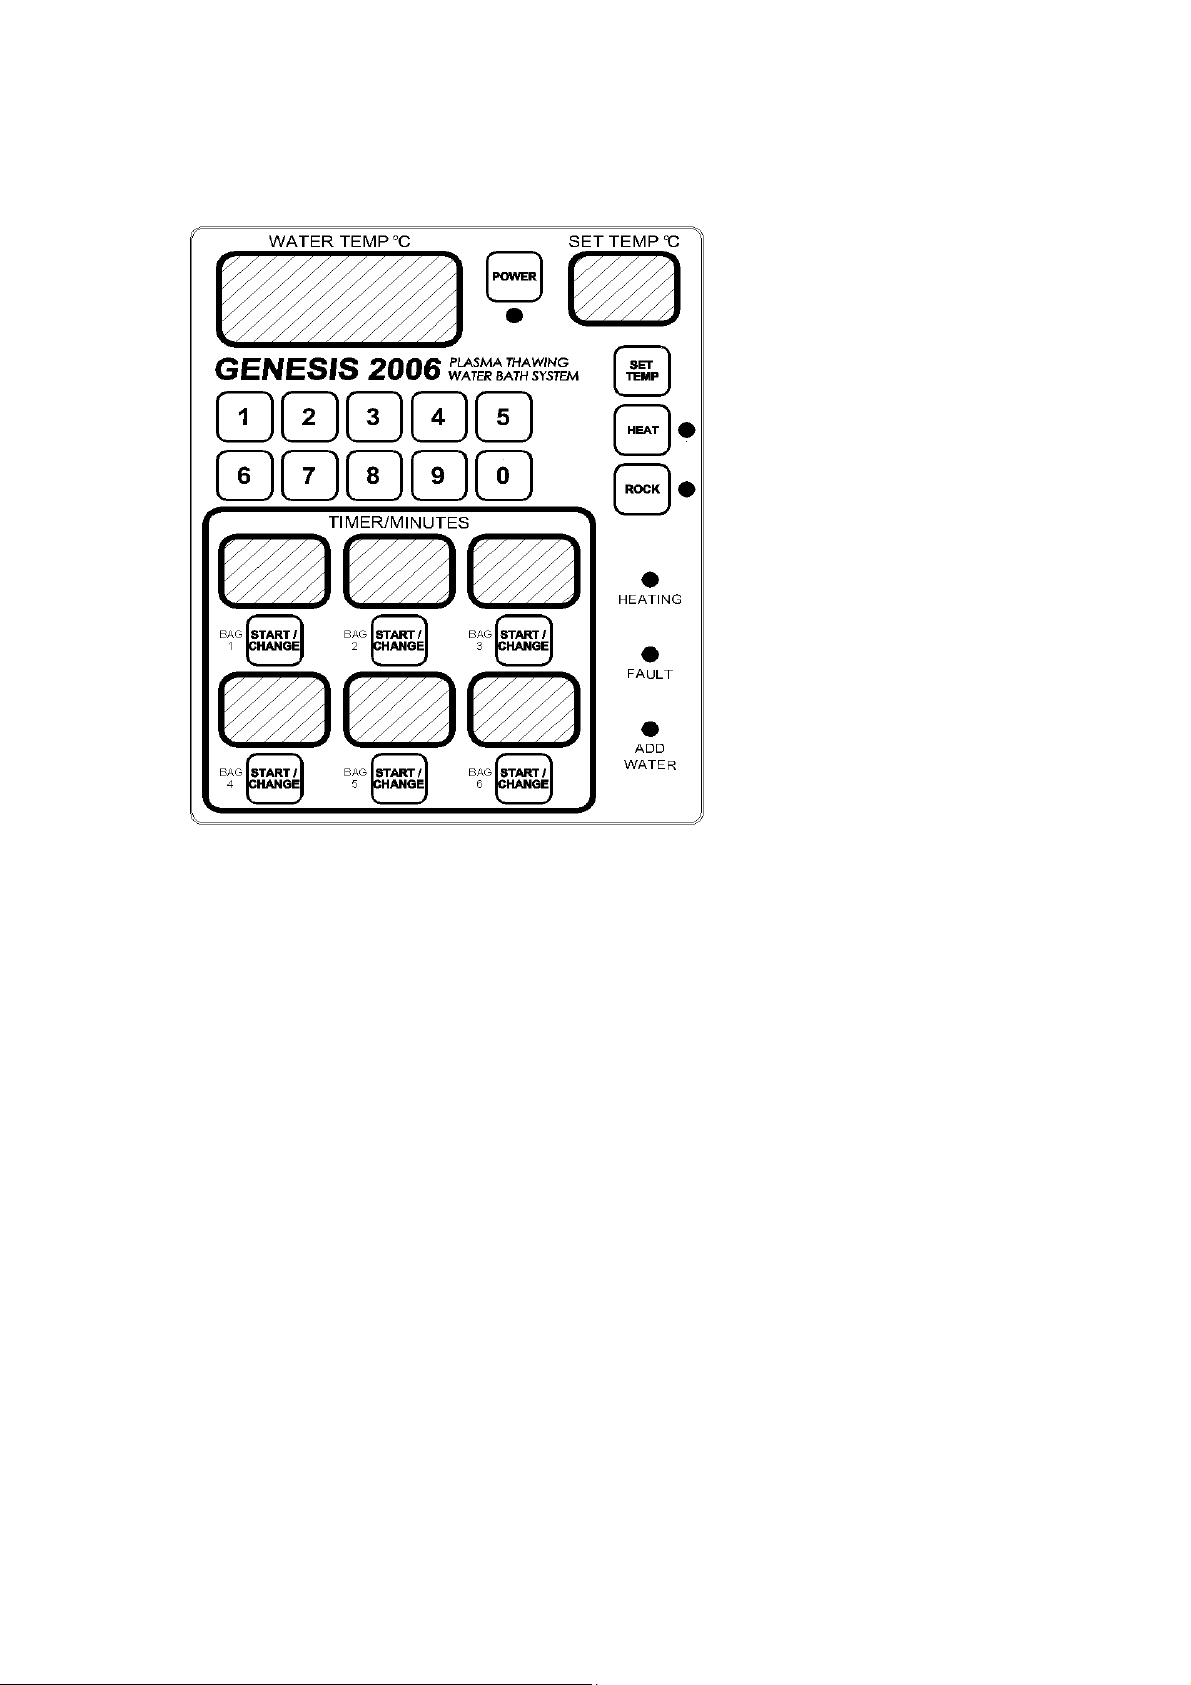
TM
GENESIS 2006
CONTROL PANEL
13
Page 14

CONTROL KEYS
POWER .......... This key turns the unit on and off when
the POWER SWITCH on the left panel is turned ON.
The POWER SWITCH on the left panel is a master
on/off switch to remove electrical power completely
from all circuits in the unit.
SET TEMP ..... With this key switch you can adjust water
o
temperature within the range of ambient to + 56
C.
Numeric keys must be pressed within 5 seconds of each
other, otherwise display returns to the original figure.
HEAT .............. This key turns the heater and water pump
on and off. An indicator to its right indicates its status.
Even if this key is turned on, the HEATING indicator
light shuts off when water temperature reaches set
temperature.
ROCK ..............This key makes the tub rock. An indicator
to its right indicates its status. Pressing this key at any
time will stop the rocking motion.
NUMERIC KEYS (0 - 9) ... These keys are used to enter a
new value when the SET TEMP key or START/CHANGE
key is pressed first.
START/CHANGE ....This key has dual function. When
this key is pressed, the timer display starts countdown
from the default or preset timing, 14 minutes for the
GENESIS 2002
TM
and 18 minutes for GENESIS 2006
TM
.
If a numeric key entry is made within 5 seconds, a new
time is set and displayed, and counts down.
14
Page 15

INDICATORS
HEATING ....... This red indicator is lit when the heating
element is actually drawing current from the circuit and
heating the water. When it reaches set temperature, the
heating indicator light shuts off.
FAULT ............ If the water temperature exceeds 58 °C,
an alarm will sound and the red fault light will be
illuminated. This may indicate a unit malfunction.
ADD WATER .... This red indicator will light if there is
insufficient water in the bath. The unit will not operate.
Add water to correct this condition. This indicator will
light also when the shroud unit is lifted in up position.
7. TROUBLESHOOTING GUIDE
PROBLEM and ACTION
1) The indicator lights and displays do not come on when
the POWER key is pressed.
• Check the POWER SWITCH on the left-hand side.
• Check the outlet for 110/120 VAC 60 Hz.
• Check the fuse in the unit. Replace the fuse if necessary.
• Ensure that the POWER key is pressed for at least one
second.
• Check that there is sufficient water in the bath and that
the ADD WATER light is off.
• Check that the FAULT light is off.
15
Page 16

2) The ADD WATER light is on and there is sufficient
water in the bath.
• With the unit unplugged and raised out of the water, check
that there is no obstruction around the float switch in the
shroud unit. The float should move freely up and down the
stem approximately half-inch.
3) The FAULT light is on.
• Check the water temperature. If the water temperature is
above 58 °C, the FAULT light will light and the unit will
not be operable.
• If this temperature is reached, it may indicate a unit
malfunction.
Contact
4) Unit does not heat. HEATING light is on but actual
water temperature is not increasing.
• Remove rear cover and check the heating element for
continuity. Replace if necessary. This maintenance should
only be performed by a trained technician or
GenesisBPS, LLC for further assistance.
GenesisBPS,
LLC. Contact it or your Biomedical Department.
5) Unit does not rock
• Check that the ADD WATER or FAULT lights are not
illuminated.
6) Bath moves to side when rocking or the rocking motion is
not smooth.
• Ensure that the bath is positioned on the white roller.
• The unit must be operated on a smooth and level surface.
Check the level of the work surface and make adjustments
if necessary.
16
Page 17

7) Pump does not circulate the water.
• Debris may be in the pump impeller housing. Raise the
shroud unit and lock in the up position. Inspect pump for
debris and remove with tweezers or similar instrument.
8) HEATING light is flashing.
• This is normal operation. At approximately one degree
below the set temperature, the microprocessor begins to
reduce the amount of heat generated and the HEATING
light begins to flash.
9) Temperature display at WATER TEMP deviates from
thermometer reading.
• Run the unit for more than 30 minutes.
• Read thermometer temperature while the thermometer
remains in water. Remember the temperature reading.
• Press the POWER key to turn the unit power off.
• Press the SET TEMP key and the POWER key at the
same time. Power is turned on again but the WATER
TEMP display shows an arbitrary number.
• Each time the [5] key is pressed, the number displayed
in WATER TEMP window increases by 0.1. Each time
the [0] key is pressed, it decreases by 0.1.
Press either the [5] key or the [0] key until the WATER
TEMP shows same number as the thermometer reading.
This adjustment should be done in one minute from
when you have read the thermometer.
• Press the POWER key to turn power off.
• Press the POWER key to turn power on again and
check calibration has been done correctly.
17
Page 18

8. SPECIAL FEATURES
• Thaws multiple plasma units simultaneously
• Thaws standard size plasma as well as cryoprecipitate
• Individual time setting for each bag location
• Forced water circulation with gentle rocking motion
• Compact size - saves valuable bench space
• Quick heating
• Simple to operate - easy to read LED display
• Light weight - easy to carry
• Audio completion signal
• Complies with AABB standards for plasma thawing
• One year limited warranty
9. UNIQUE SAFEGUARDS
• Float switch prevents operation without water
• Water resistant membrane control panel
• Error code display
• Separate electronic circuit prevents overheating of water
• Alarm sounds for all fault conditions
18
Page 19

10. SPECIFICATIONS
External Dimension
Interior Bath Dimension
Bath Volume
Controlled Temp Range
Displayed Temp Accuracy +/- 0.3 oC +/- 0.3 oC
Thawing Time
Heating Power
Voltage Requirements
Current Rating
Protection
Shipping Weight
GENESIS 2002TM GENESIS 2006TM
21.6” L x 8.3” Wide
x 13.2” High
13.0” L x 7.0” Wide
x 7.5” Deep
2.5 US gallons 3.7 US gallons
Ambient to 56 oC Ambient to 56 oC
14 Minutes (*) 18 Minutes (*)
750 WATTS 1250 WATTS
110-120/220-240VAC
50/60 Hz
7.0 Amps Maximum 11.5 Amps Maximum
10 Amp Fast Acting Fuse 15 Amp Fast Acting Fuse
20 lbs 23 lbs
(**)
26.6” L x 9.6” Wide
x 13.2” High
18.0” L x 8.0” Wide
x 7.5” Deep
110-120/220-240VAC
50/60 Hz (**)
(*) This time may vary slightly depending on bag content volume,
overwrap wrap material, storage temperature and air trapped.
(**) This machine is dependent on the frequency of AC mains.
Operating frequency is marked on the rear panel.
Note: Due to product improvements, the above specifications
are subject to change.
19
Page 20

11. ORDERING/RETURN INFORMATION
ORDERING INFORMATION :
To place an order for a part or an accessory, please call :
GenesisBPS, LLC
65 Commerce Way
Hackensack, NJ 07601 U.S.A.
Tel: 201-708-1400
866-712-5663
Fax: 201-704-1104
www.genesisbps.com
RETURN INFORMATION :
Same as above.
1. Obtain a Return Goods Authorization number.
2. Ensure all water is removed from the unit (including
inside the pump). This can be done by lowering the
control panel and tilting the unit forward.
3. Towel dry the unit, especially around the pump and
heater, before packing.
4. Place water bath over the control panel and pack
GENESIS 2002/2006 securely in a box with clean
packing materials (no use polystyrene peanuts or chips as
packaging material).
Check with
if water bath should be returned - usually only the
control panel is required.
5. Please provide a brief description of difficulty experienced
or reason for return along with the following information :
GenesisBPS, LLC to determine
20
Page 21

Hospital/Account Name
Department and shipping address
Name and telephone number of contact
Date GENESIS 2002/2006 was purchased
Serial #
RGA # (Return Goods Authorization #)
6. Mark outside of box clearly, with your return address, and
send to
GenesisBPS, LLC. (as above)
21
Page 22

GENESIS 2002
GENESIS 2006
PLASMA THAWING WATER BATH SYSTEM
WARRANTY
The GENESIS 2002/2006, Plasma Thawing Water
Bath System is warranted against defects in materials
and workmanship for a period of one year from the
date of purchase. The warranty applies only to
products that have not been tampered with, used for
purposes other than those specified, or damaged
through misuse, accident, dropping, neglect or other
conditions beyond the control of the manufacturer. All
defective material parts will be repaired or replaced at
no charge during the warranty period. To have the
machine serviced, ship it, prepaid, to :
GenesisBPS, LLC
65 COMMERCE WAY
HACKENSACK, NJ
DO NOT SHIP MACHINE PRIOR TO CALLING
CUSTOMER SERVICE DEPARTMENT
at (866) 712-5663 or (201) 708-1400.
GenesisBPS, LLC
07601
No merchandise can be returned without prior authorization.
22
 Loading...