

Page 1
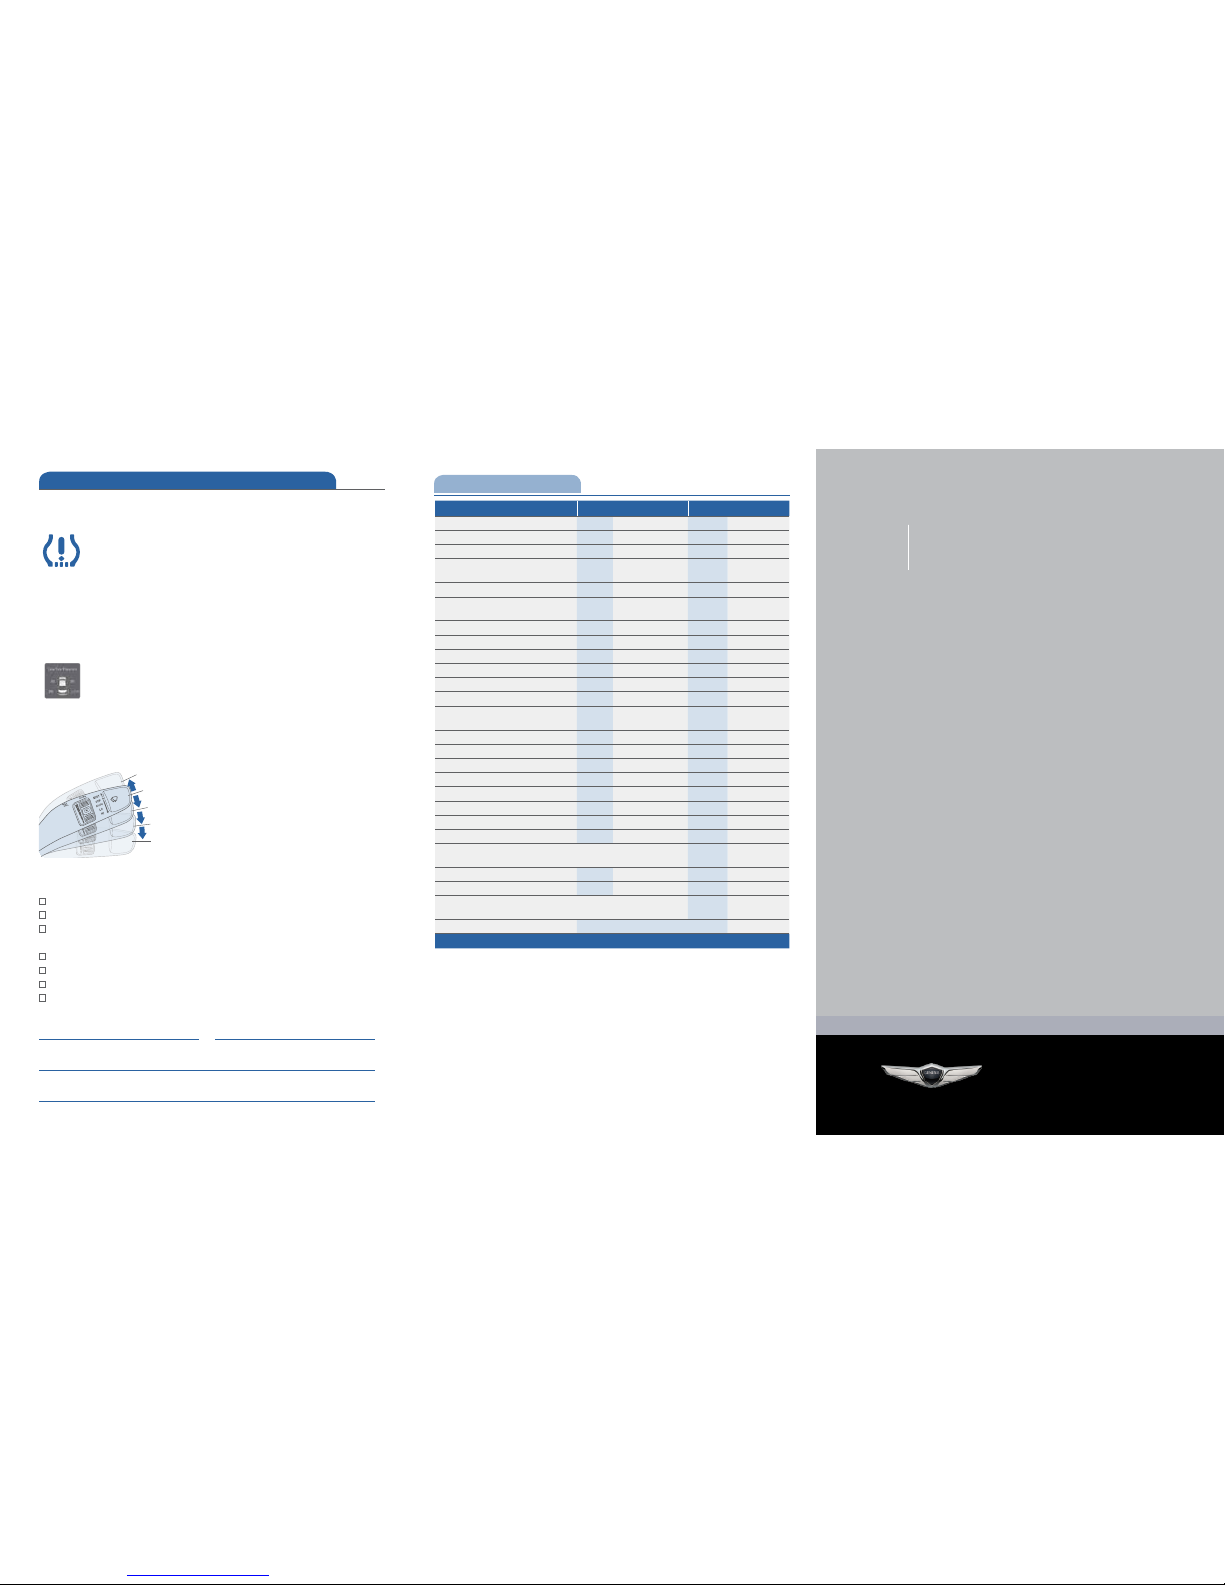
Scheduled Maintenance Normal Usage Severe Usage*
Engine Oil & Filter (5.0 GDI) Replace 7,500 or 12 mos. Replace 3,750 or 6 mos.
Engine Oil & Filter (3.3 T-GDI) Replace 6,000 or 6 mos. Replace 3,000 or 6 mos.
Tire Rotation Perform 7,500 Perform 7,500
Air Cleaner Filter
Inspect
Replace
7,500
30,000
Replace More Frequently
Vacuum Hose Inspect 7,500 Inspect Same As Normal
Climate Control Air Filter
(For Evaporator and Blower Unit)
Replace 15,000 Replace More Frequently
Air Conditioning Refrigerant Inspect 15,000 Inspect Same As Normal
Brake Hoses & Lines Inspect 15,000 Inspect Same As Normal
Drive Shafts & Boots Inspect 15,000 Inspect 7,500
Exhaust Pipe & Mufer Inspect 15,000 Inspect Same As Normal
Front Disc Brake/Pads, Calipers & Rotors Inspect 15,000 Inspect More Frequently
Propeller Shaft Inspect 15,000 Inspect 7,500 or 6 mos.
Steering Gear Box, Linkage & Boots,
Lower Arm Ball Joint, Upper Arm Ball Joint
Inspect 15,000 Inspect More Frequently
Suspension Mounting Bolts Inspect 15,000 Inspect Same As Normal
Brake Fluid Inspect 30,000 Inspect Same As Normal
Fuel Filter Inspect 30,000 Inspect Same As Normal
Fuel Lines, Fuel Hoses & Connections Inspect 30,000 Inspect Same As Normal
Fuel Tank Air Filter Inspect 30,000 Inspect Same As Normal
Rear Disc Brake/Pads, Parking Brake Inspect 30,000 Inspect More Frequently
Vapor Hose, Fuel Tank & Fuel Filler Cap Inspect 30,000 Inspect Same As Normal
Valve Clearance (3.3 T-GDI) Inspect 60,000 or 72 mos. Inspect Same As Normal
Drive Belts (Alt, A/C)
1st 60,000 or 72 mos.
Addl. Inspect 15,000 or 24 mos.
Inspect Same As Normal
Spark Plugs (5.0 GDI) Replace 105,000 Replace More Frequently
Spark Plugs (3.3 T-GDI) Replace 45,000 Replace More Frequently
Coolant
1st Replace 120,000 or 120 mos.
Addl. Replace 30,000 or 24 mos.
Replace Same As Normal
Automatic Transmission Fluid No check, No service required Replace 60,000
*See Owner’s Manual for details.
MAINTENANCE
NP150-N2014
(Rev 05/22/13)
Printing 05/28/13
Looking for more detailed information? This Quick Reference Guide does not replace your vehicle’s Owner’s
Manual. If you require additional information or are unsure of a specific item, you should always refer to the
vehicle’s Owner’s Manual or contact your authorized Dealer of Genesis Brand Products.
The information contained in this Quick Reference Guide was correct at the time of printing; however,
specifications and equipment can change without notice. No warranty or guarantee is being extended in this
Quick Reference Guide, and Genesis Motors USA reserves the right to change product specifications and
equipment at any time without incurring obligations. Some vehicles are shown with optional equipment.
Specifications apply to U.S. vehicles only. Please contact your Dealer of Genesis Brand Products for current
vehicle specifications.
G90
Quick Reference Guide
www.genesismotorsusa.com
GENESIS
Roadside Assistance: 1-800-243-7766
Consumer Affairs: 1-800-633-5151
XM®Radio: 1-800-967-2346
Blue Link: 1-855-2BLUELINK
(1-855-225-8354)
G90 CUSTOMER DELIVERY CHECK LIST (continued)
Sales Consultant Date Sales Manager Date
Customer Date
Email
@
Tire Pressure Monitoring System (TPMS)
- Page 33
LOW TIRE PRESSURE INDICATOR: Illuminates if one or more of your
tires is significantly under-inflated. Safely park the vehicle and check
your tires as soon as possible, and inflate them to proper pressure.
NOTE: Tire pressure may vary in colder temperatures causing the
low tire pressure light to illuminate. Inflate tires according to the tire
pressure label located on the driver’s side door pillar.
TPMS MALFUNCTION INDICATOR: Illuminates when there is a
malfunction with the TPMS system. Have the system checked by an
authorized Dealer of Genesis Brand Products as soon as possible.
LOW TIRE PRESSURE POSITION INDICATOR:
lndicates which tire is
significantly under-inflated by illuminating the corresponding position.
NOTE: TPMS is not a substitute for proper tire maintenance. It is the
driver’s responsibility to maintain correct tire pressure, even if underinflation has not reached the level to trigger illumination of the low tire
pressure indicator. Refer to the Owner’s Manual for further information.
DURING DELIVERY
DEMONSTRATE AUDIO SYSTEM OPERATION, INCLUDING PRESETS
DEMONSTRATE HOW TO SET THE CLOCK
EXPLAIN FIRST SERVICE PROCEDURE – PROVIDE SERVICE
– DEMONSTRATE AND SET SERVICE INTERVAL
SCHEDULE FIRST APPOINTMENT USING BLUE LINK
DEMONSTRATE AND PAIR CUSTOMER’S PHONE
REVIEW AMERICA’S BEST WARRANTY
ASK IF CUSTOMER HAS ANY QUESTIONS
Wiper / Washer
- Page 09
MIST
OFF
AUTO
LO
HI
Slower
Faster
• To activate wipers move the switch down
to one of three positions (AUTO, LO, HI)
• To adjust “AUTO” speed rotate dial
• To spray washer fluid, pull lever toward you
• Push lever up for a single wiper pass
Page 2
12
6
39
AIRBAG
GENESIS
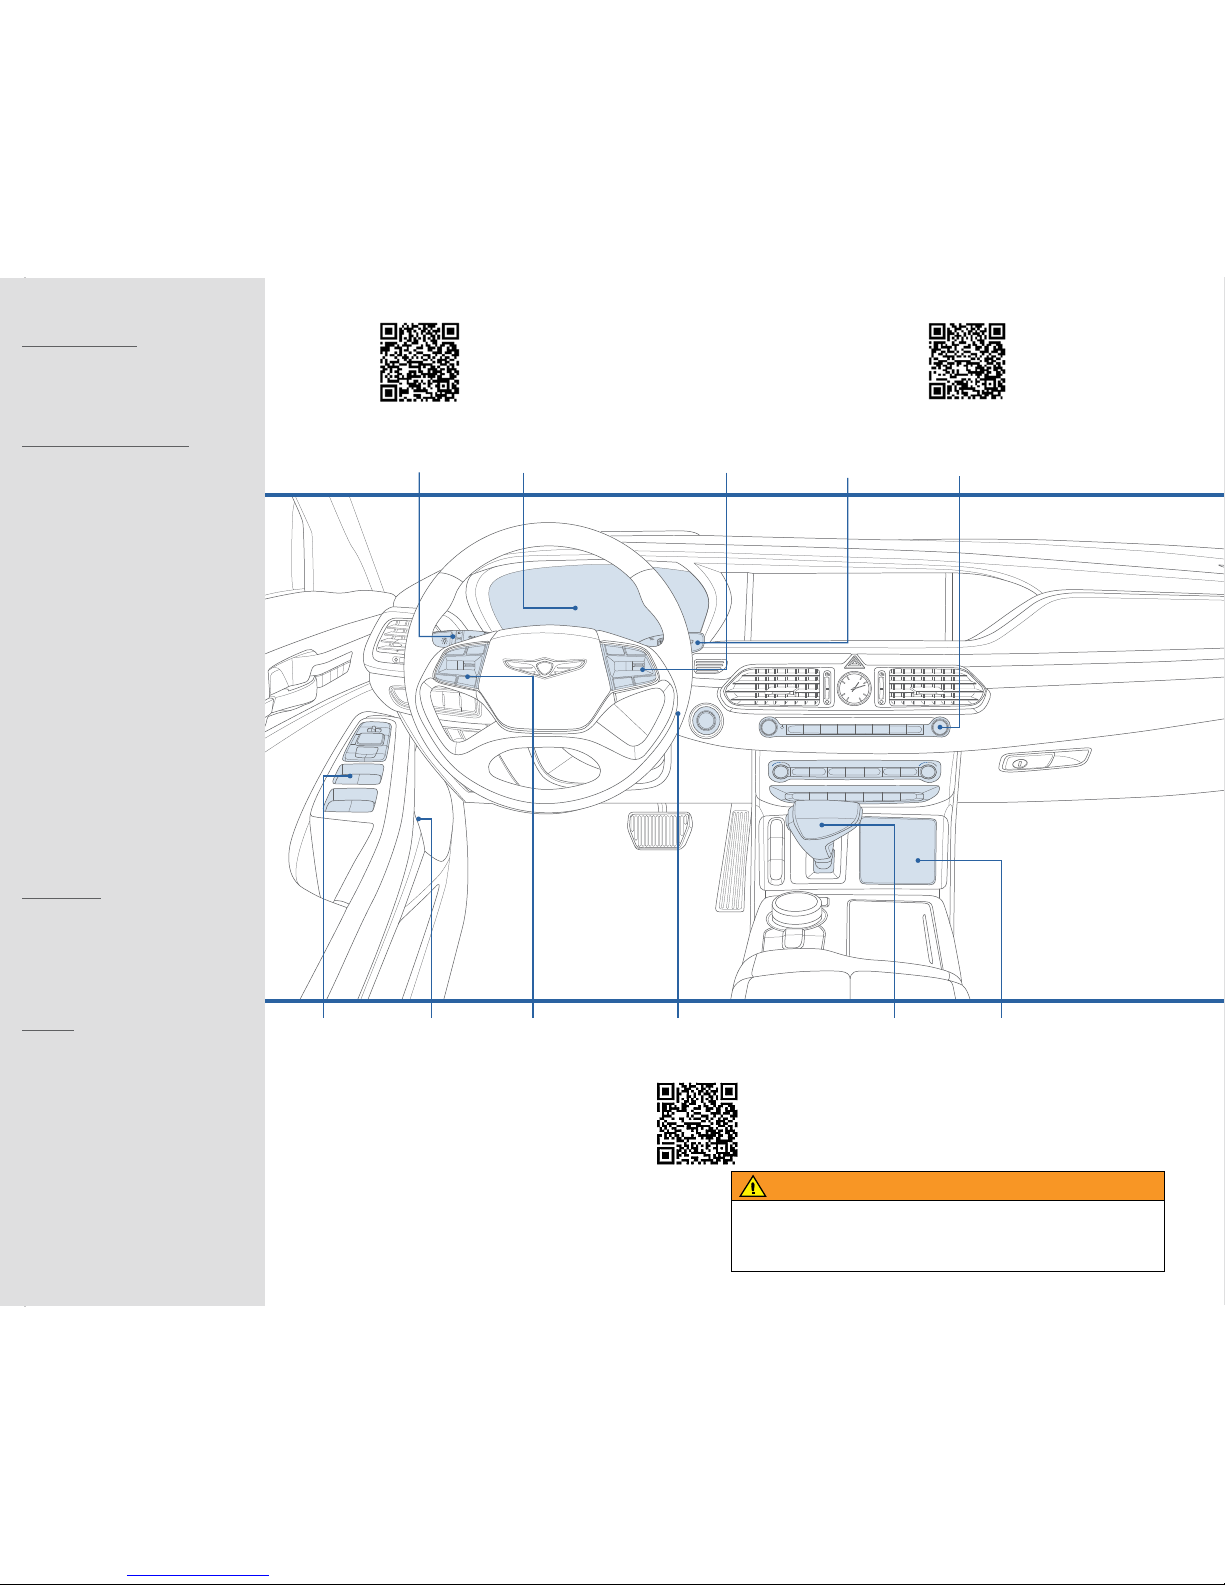
GETTING STARTED
Driver position memory system 03
Front seat adjustment 04
Headrest 05
Seat belt adjustment 02
Smart key 02
FEATURES AND CONTROLS
Adaptive front lighting system (AFLS) 09
Automatic climate control 20-21
Child-protector rear door lock 15
Driver’s main controls 07
Fuel filler door 06
Head-up display 19
Headlights 08
Heated steering wheel 06
Honmelink wireless control system 15
Instrument cluster 16 -17
Instrument panel illumination 17
Interior lights 11
LCD display control 18
LCD display modes 18
Multi-view camera system 22
Non-powered trunk 13
Parking assist system (PAS) 23
Power trunk 12
Rear door window curtain 07
Rearview camera 22
Rear window curtain 07
Seat warmer and cooler 14
Smart trunk 14
Steering wheel adjustments 06
Sunroof 10
Trunk lid control button 13
Wiper and washer 09
MULTIMEDIA
Genesis connected service (Blue Link) 27-28
Bluetooth operational tips 24
Bluetooth phone operation 26
Bluetooth phone pairing 26
Navigation 30-31
Steering wheel audio control 24
Voice recognition tips 25
DRIVING
Advanced smart cruise control system 39
Audio mode 30
Auto hold 32
Automatic transmission 34
Autonomous emergency braking (AEB) 35
Aux, USB, and iPod
®
port 31
Blind spot detection system (BSD) 38
Drive mode integrated control system 37
Driver attention alert system 36
Electric parking brake (EPB) 32
Electronic stability control (ESC) 36
Lane departure warning system (LDWS) 38
Paddle shifter 35
Tire pressure monitoring system (TPMS) 33
Headlights
Page 08
Steering wheel
adjustments
Page 06
Wiper and
washer
Page 09
Advanced smart
cruise control system
Page 39
Automatic
climate control
Pages 20-21
Instrument
cluster
Pages 16-17
* Some vehicles may not be equipped with
all the listed features.
Use this Quick Reference Guide to
learn about the features that will
enhance your enjoyment of your
Genesis Brand. More detailed
information about these features is
available in your Owner’s Manual.
Steering wheel
audio control
Page 24
Fuel filler door
Page 06
Automatic
transmission
Page 34
AUX, USB,
and iPod®
port
Page 31
Driver’s main
controls
Page 07
Table of contents
WARNING!
To reduce the risk of serious injury to yourself and others,
read and understand the important SAFETY INFORMATION
in your Owner’s Manual.
Page 3
gETTINg sTArTEd
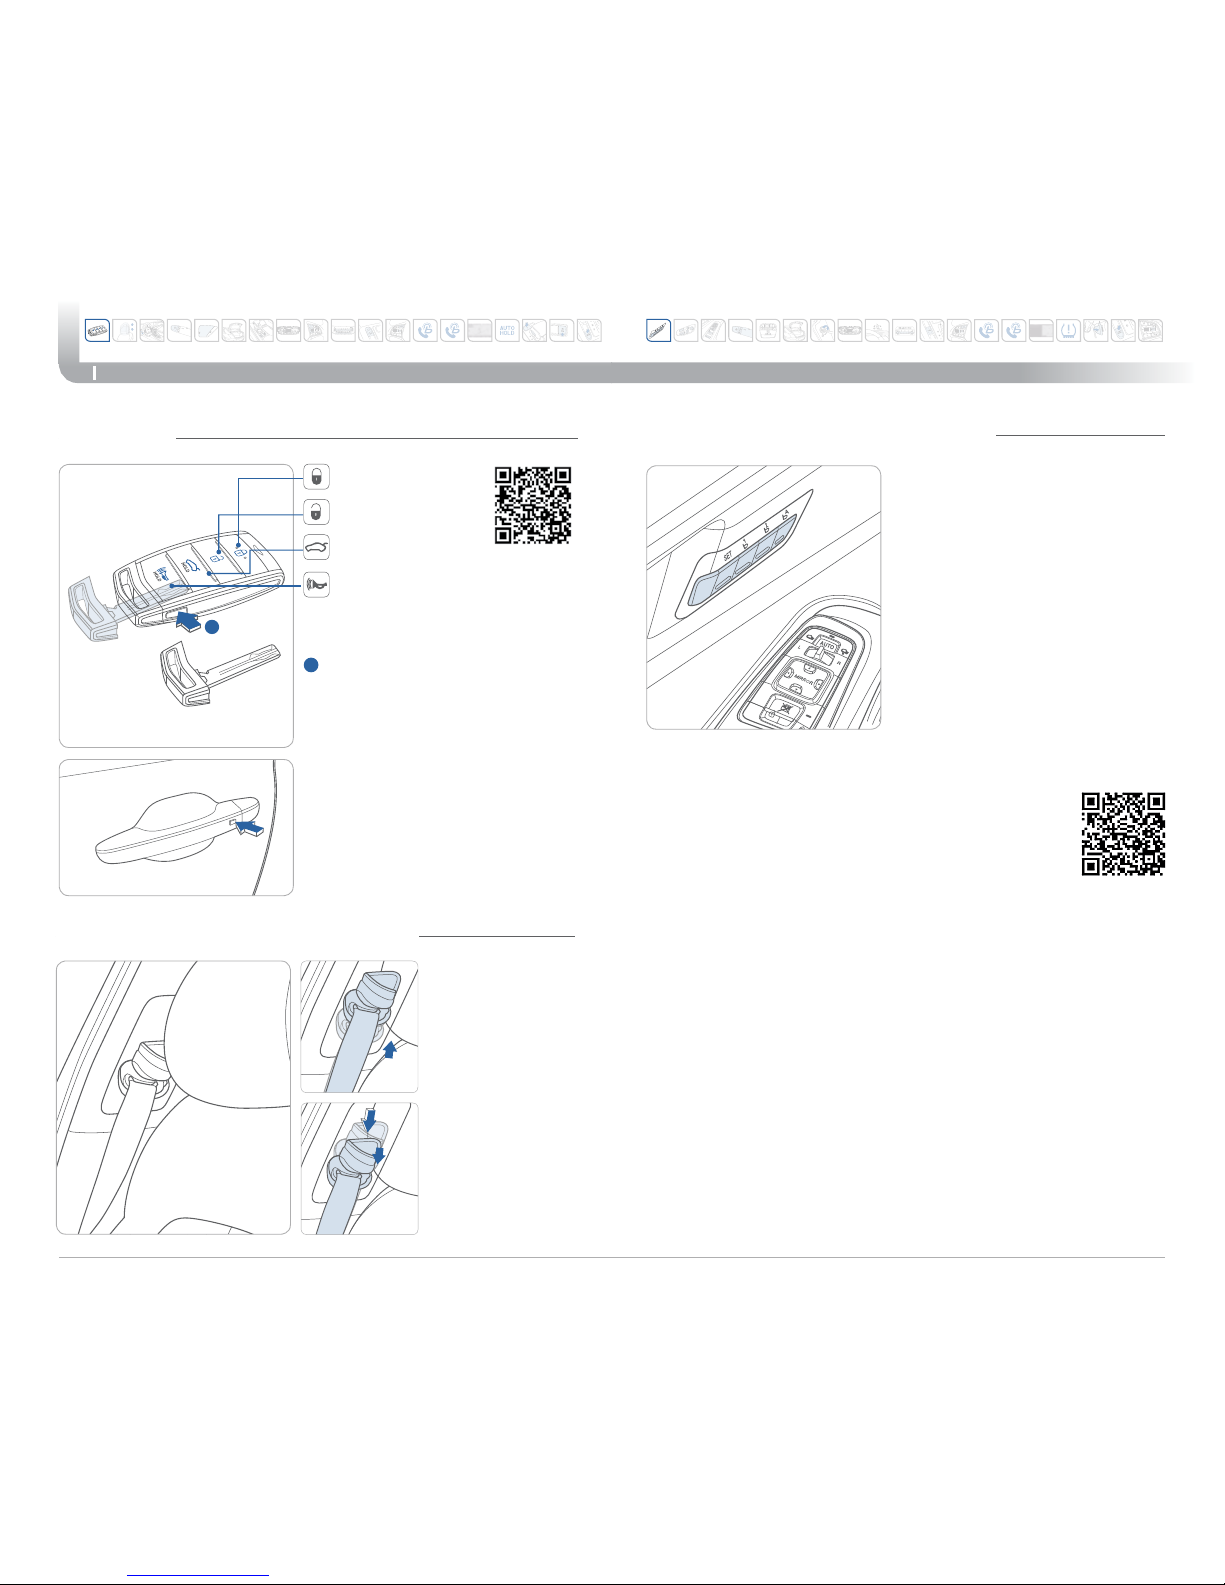
SMART KEY
Lock
Unlock
Trunk Open
Panic
Mechanical key
Press and hold the release button
A
and remove the key.
NOTE:
User-selectable option; see the
Owner’s Manual for more details.
A
Vehicle must be in Park.
Storing seat position
1. Adjust the position of the driver’s
seat, outer side view mirror,
steering wheel, instrument panel
illumination and head-up display.
2. Press the SET button.
The system will beep once.
3. Press one of the memory buttons
(1 or 2) within 4 seconds.
Recalling
Press the desired memory button
(1 or 2). The system will beep once.
DRIVER POSITION MEMORY SYSTEM
Quick Reference Guide I 3
2 I Quick Reference Guide
Genesis Brand
Driver’s door Lock/Unlock
Smart key must be within range.
Press: Once – Unlock driver’s door
Twice – Unlock all doors
Third – Lock all doors
SEAT BELT ADJUSTMENT (Front seat)
Pull up to raise.
Press button and
push down to
lower.
G90
GENESIS
GENESIS
GENESIS
GENESIS
GENESIS
GENESIS
GENESIS
GENESIS
GENESIS
GENESIS
GENESIS
GENESIS
GENESIS
GENESIS
GENESIS
GENESIS
GENESIS
GENESIS
GENESIS
GENESIS
GENESIS
GENESIS
GENESIS
GENESIS
Page 4
gETTINg sTArTEd
Quick Reference Guide I 5
4 I Quick Reference Guide
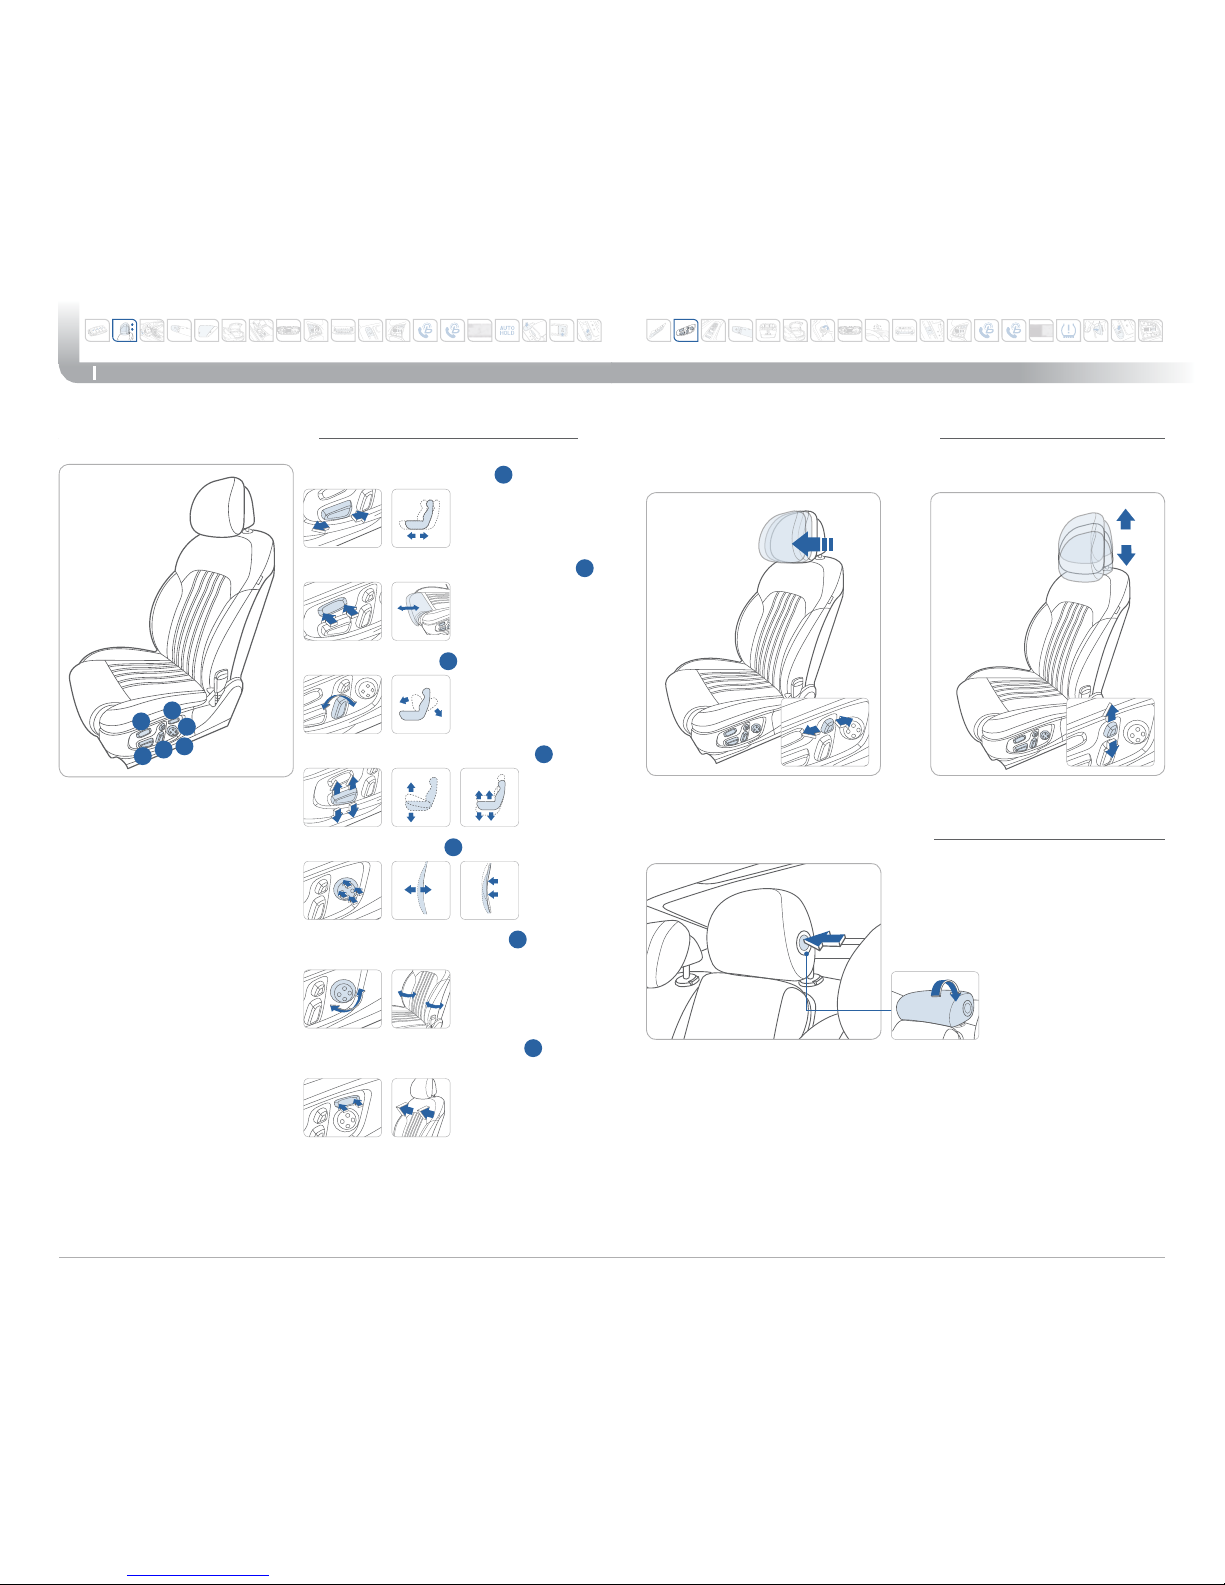
FRONT SEAT ADJUSTMENT
Forward and rearward
1
Seat cushion length
(for driver's seat)
2
Seatback angle
3
Seat cushion height and tilt
1
Lumbar support
4
Seat bolster adjustment
5
(for driver's seat, if equipped)
Seat shoulder adjustment
6
(for driver's seat, if equipped)
HEAD RESTRAINTS (Front seat)
HEAD RESTRAINTS (Rear seat)
Forward and rearward adjustment
Up and down adjustment
G90
1
2
3
4
6
5
Folding the center head restraint (if equipped)
To fold the center head restraint:
• When the rear-center head restraint is not used, manually fold
back the rear-center head restraint while pressing the button (1)
on the side. To use the rear-center head restraint again, manually
pull up the rear-center head restraint, until it is securely latched.
• You can remove the rear-center head restraint by manually pulling
up the rear-center head restraint, while pressing the release
button.
Genesis Brand
GENESIS
GENESIS
GENESIS
GENESIS
GENESIS
GENESIS
GENESIS
GENESIS
GENESIS
GENESIS
GENESIS
GENESIS
GENESIS
GENESIS
GENESIS
GENESIS
GENESIS
GENESIS
GENESIS
GENESIS
GENESIS
GENESIS
GENESIS
GENESIS
Page 5
fEATurEs ANd CoNTrols
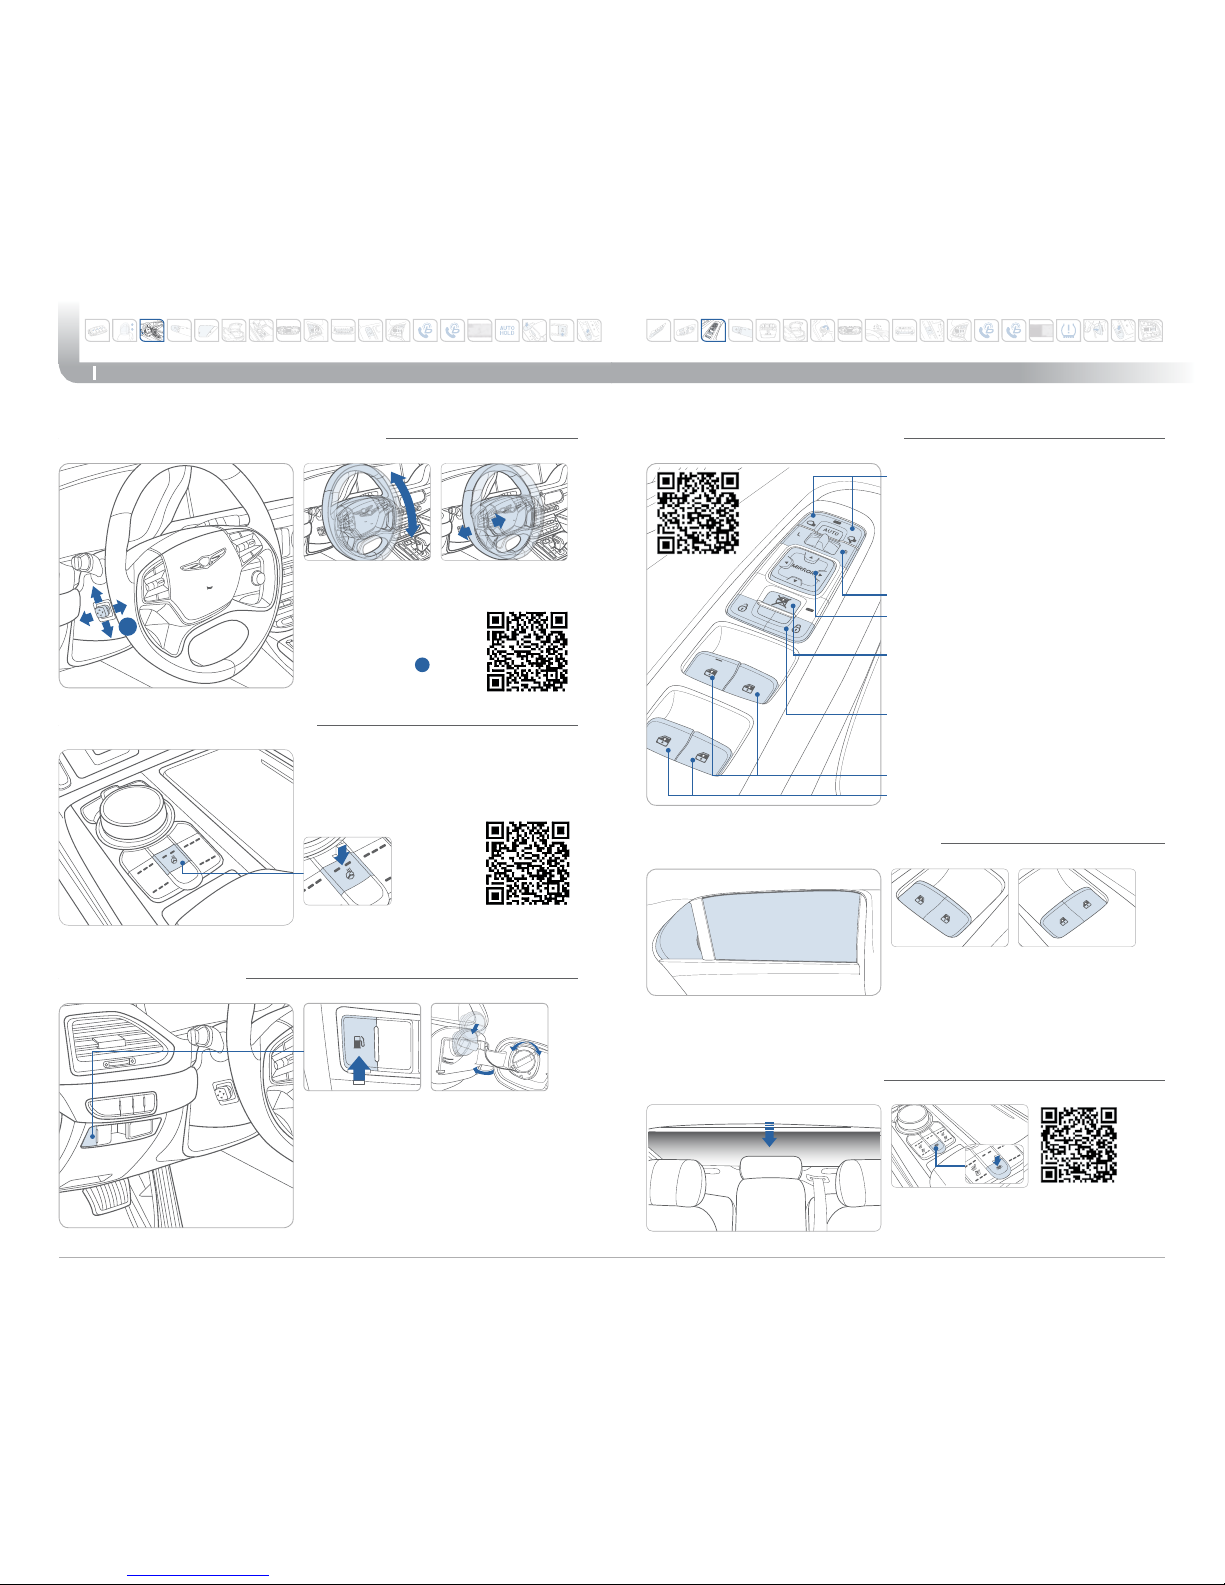
HEATED STEERING WHEEL
FUEL FILLER DOOR
NOTE:
After adding fuel, always reinstall
the fuel cap onto the ller neck
by rotating it clockwise until it
clicks one time.
Heated steering wheel button.
Pressing the heated steering
wheel button warms the steering
wheel. The indicator on the button
is illuminated.
STEERING WHEEL ADJUSTMENTS
Tilt
NOTE:
Do not adjust while
driving.
Toggle switch
A
to
adjust steering wheel.
Telescope
A
Quick Reference Guide I 7
6 I Quick Reference Guide
Folding outside mirrors
Press to fold/unfold mirrors.
Press the lock or unlock button on
the smart key, and the mirrors will be
folded or unfolded.
Outer side view mirror
• Press the L or R button.
• Adjust the mirror by using the
directional switch.
Power window lock switch
Disables the power window switches
on the passenger doors.
Door lock
Locks/unlocks all doors.
Window switches
• Front doors power window switches.
• Rear doors power window switches.
DRIVER’S MAIN CONTROLS
With windows closed, pull up to
raise or push down to lower the
rear door window curtain.
(Driver’s door) (Rear doors)
REAR DOOR WINDOW CURTAIN
Press the button to lower.
Press the button again to raise.
REAR WINDOW CURTAIN
G90Genesis Brand
GENESIS
GENESIS
GENESIS
GENESIS
GENESIS
GENESIS
GENESIS
GENESIS
GENESIS
GENESIS
GENESIS
GENESIS
GENESIS
GENESIS
GENESIS
GENESIS
GENESIS
GENESIS
GENESIS
GENESIS
GENESIS
GENESIS
GENESIS
GENESIS
Page 6
fEATurEs ANd CoNTrols
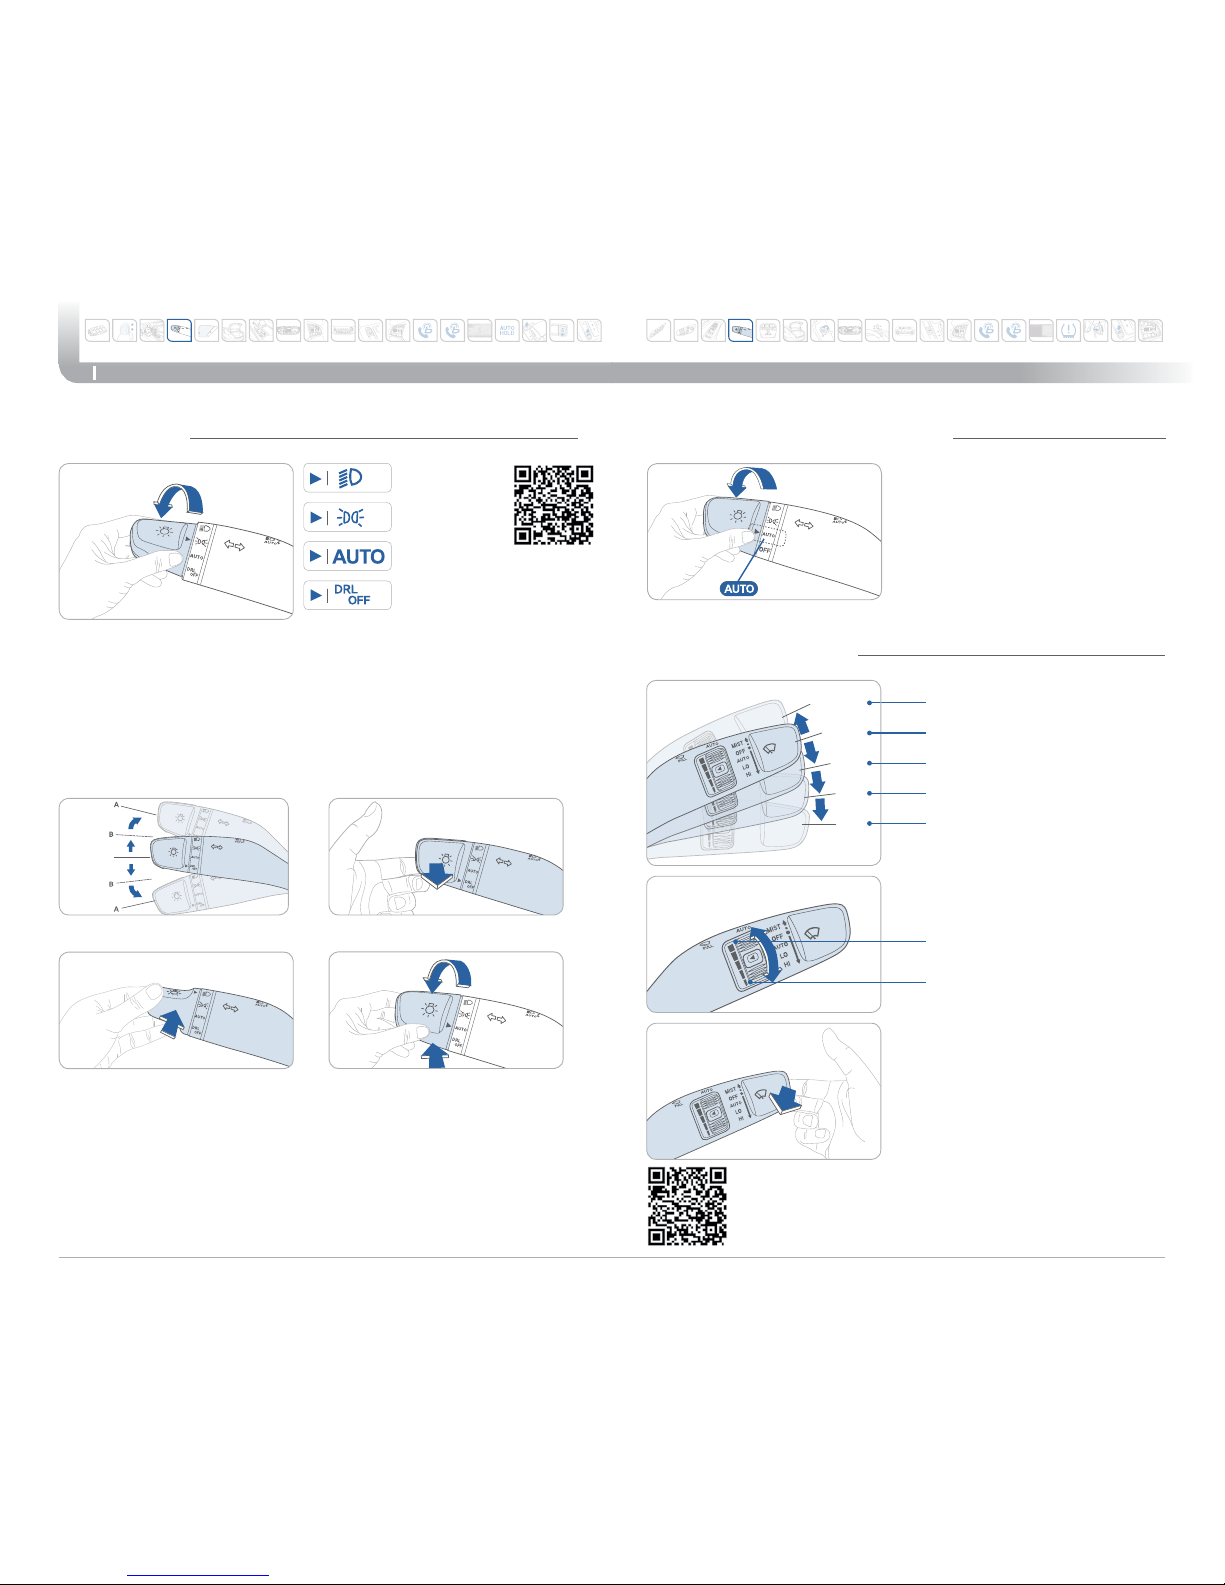
Headlight delay
Headlights may stay on for 15 seconds after exiting and locking up
the vehicle. Press the remote lock button twice to turn the
headlights off. Please refer to your Owner’s Manual for further
information.
Auto headlights on
Headlights on
Parking
lights on
Quick Reference Guide I 9
8 I Quick Reference Guide
HEADLIGHTS
DBL uses the steering angle and
vehicle speed to help keep your
field of vision wide by swiveling and
leveling the headlamp.
• To turn DBL on, turn the knob
to the AUTO position.
• To turn DBL off, turn the knob
back to the former position.
DYNAMIC BENDING LIGHT (DBL)
WIPER AND WASHER
DRL off
Auto control wipe interval
adjustment
Fast wiper speed
Slow wiper speed
MIST - Single wipe
OFF
INT
- Intermittent wipe
LO - Low wiper speed
HI - High wiper speed
MIST
OFF
INT
LO
HI
Front windshield wash
with brief wipes
Pull
Turn signals and lane change signals
Flashing headlights
Smart high beamHigh beam
Push
Pull
NOTE:
To turn off the high beam,
pull the lever towards you.
Smart high beam function
1. Select the AUTO position on
stalk.
2. Push the lever forward to
engage the Auto high beam.
3. Push the lever forward again
to disengage.
G90Genesis Brand
GENESIS
GENESIS
GENESIS
GENESIS
GENESIS
GENESIS
GENESIS
GENESIS
GENESIS
GENESIS
GENESIS
GENESIS
GENESIS
GENESIS
GENESIS
GENESIS
GENESIS
GENESIS
GENESIS
GENESIS
GENESIS
GENESIS
GENESIS
GENESIS
Page 7
fEATurEs ANd CoNTrols
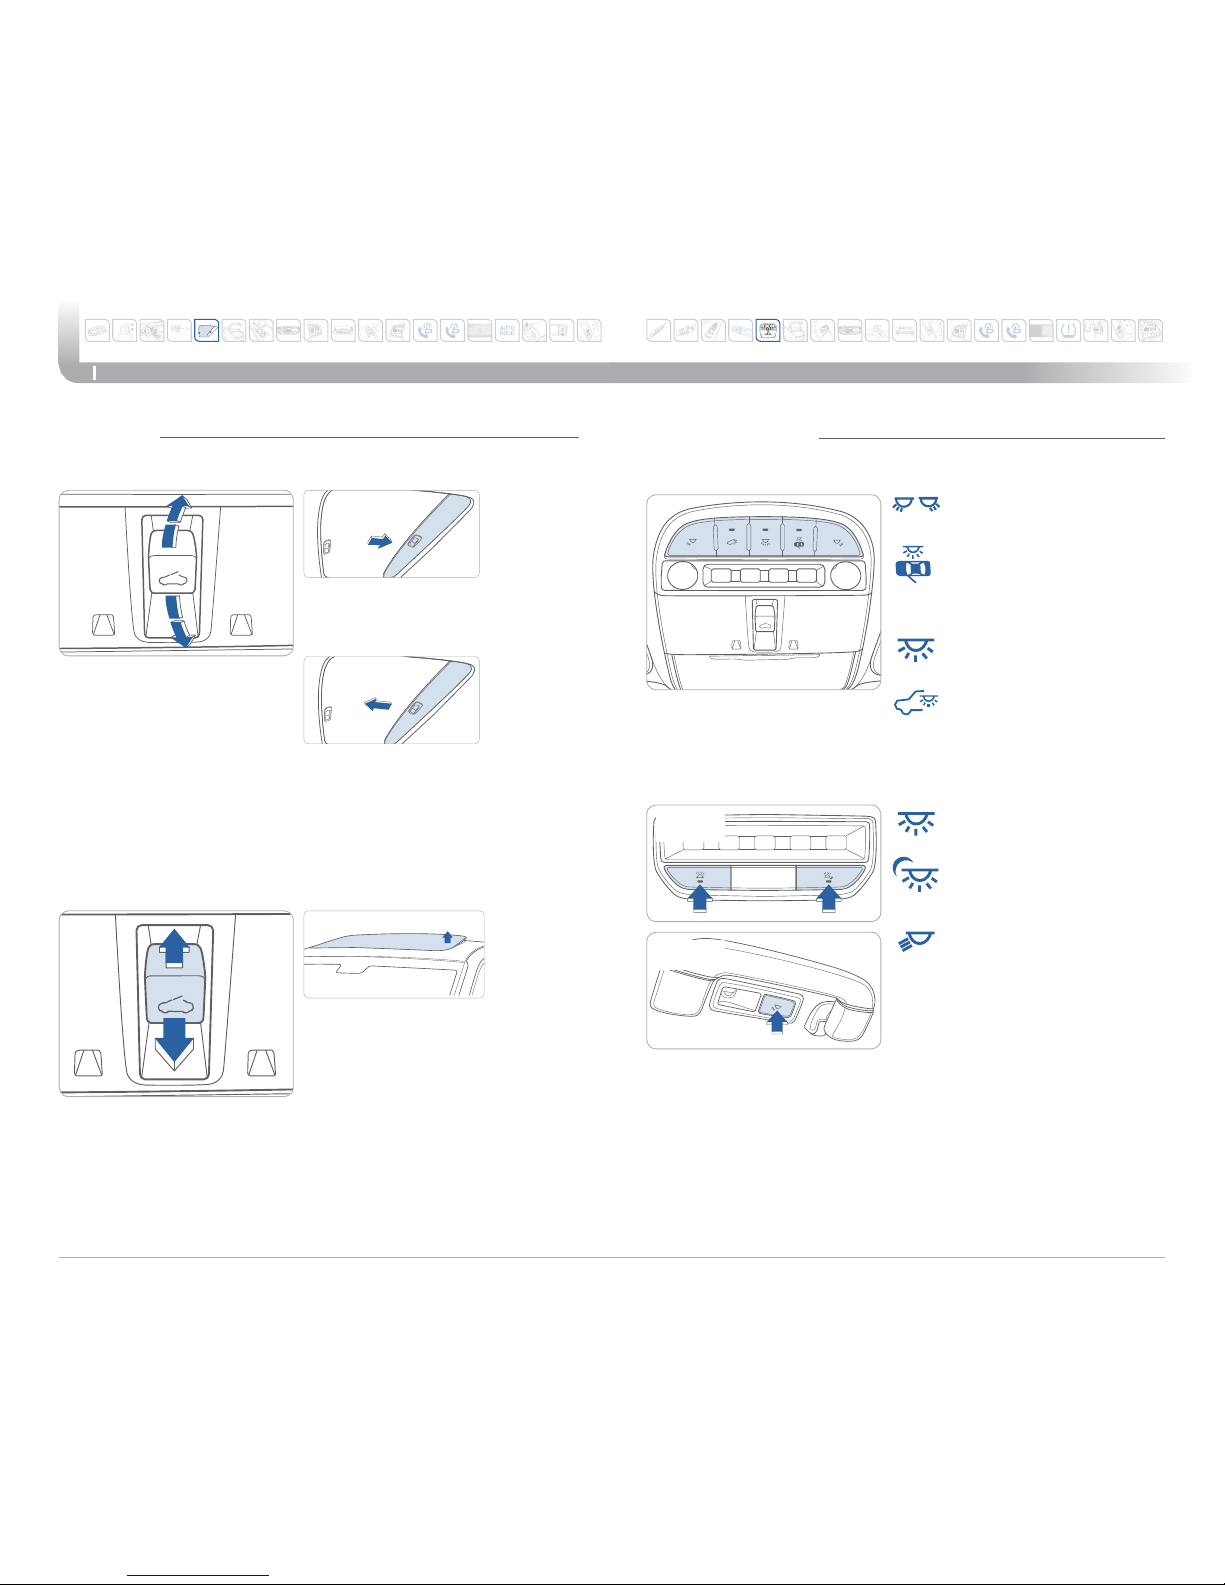
SUNROOF
To tilt
Press the switch up.
To close
Pull the switch forward.
Tilting the sunroof
Sliding the sunroof
To open
Press the switch backward past
the detent to open completely.
Quick Reference Guide I 11
10 I Quick Reference Guide
Front lamps
Rear lamps
Turns the map lamp
on or off
Turns the room lamp
on or off
Turns all front lamps
on or off
The front or rear room lamp
will illuminate when the
doors are open or unlocked
with the smart key.
INTERIOR LIGHTS
G90
Turns the rear room lamps
on or off
Turns the rear map lamp
and the door handle
lamps on or off
Press to dim the rear map
lamp. Re-press to turn off
the rear map lamp.
Type A
Type B
To close
Press the switch forward past
the detent to close completely.
Genesis Brand
GENESIS
GENESIS
GENESIS
GENESIS
GENESIS
GENESIS
GENESIS
GENESIS
GENESIS
GENESIS
GENESIS
GENESIS
GENESIS
GENESIS
GENESIS
GENESIS
GENESIS
GENESIS
GENESIS
GENESIS
GENESIS
GENESIS
GENESIS
GENESIS
Page 8
fEATurEs ANd CoNTrols
Quick Reference Guide I 13
12 I Quick Reference Guide
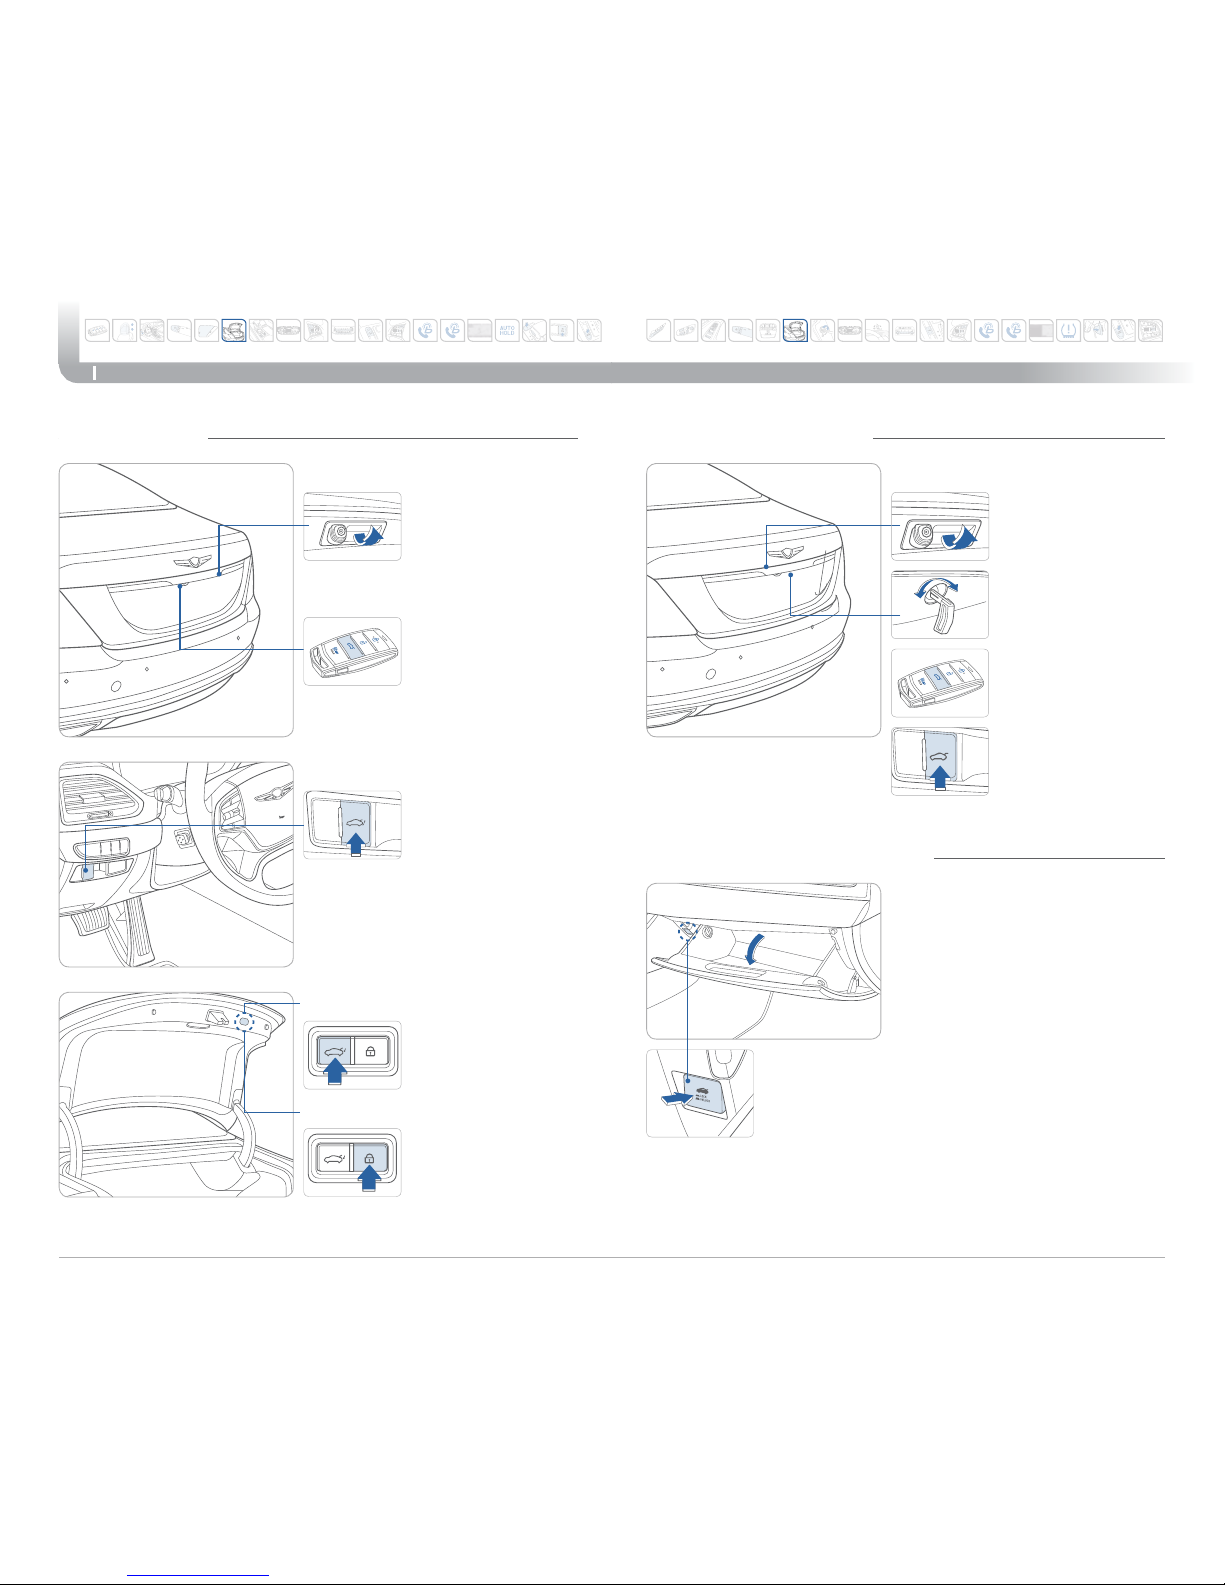
The trunk lid control button is used
to prevent unauthorized access to
the trunk.
1. Open the glove box.
2. Press the trunk lid control button.
In this LOCK position, the trunk
can only be opened with the
mechanical key.
3. Close and lock the glove box with
the mechanical key.
NOTE:
Without the mechanical key,
the smart key can only start the
engine and operate door locks.
Press to open.
Smart key needs to
be within range.
Use the mechanical
key.
Press and hold.
Press the release
button in the vehicle.
Unlock
Press to open.
Smart key needs to
be within the range.
Power trunk open button
Press to open.
Press and hold to close.
Power trunk main control button
Press to close.
Power trunk close button
Press to lock the trunk
and all doors will lock.
Smart key needs to be
within range.
Power trunk lock button
Press and hold.
Power trunk open button on
the smart key
POWER TRUNK NON-POWERED TRUNK
TRUNK LID CONTROL BUTTON
G90Genesis Brand
GENESIS
GENESIS
GENESIS
GENESIS
GENESIS
GENESIS
GENESIS
GENESIS
GENESIS
GENESIS
GENESIS
GENESIS
GENESIS
GENESIS
GENESIS
GENESIS
GENESIS
GENESIS
GENESIS
GENESIS
GENESIS
GENESIS
GENESIS
GENESIS
Page 9
fEATurEs ANd CoNTrols
Quick Reference Guide I 15
14 I Quick Reference Guide
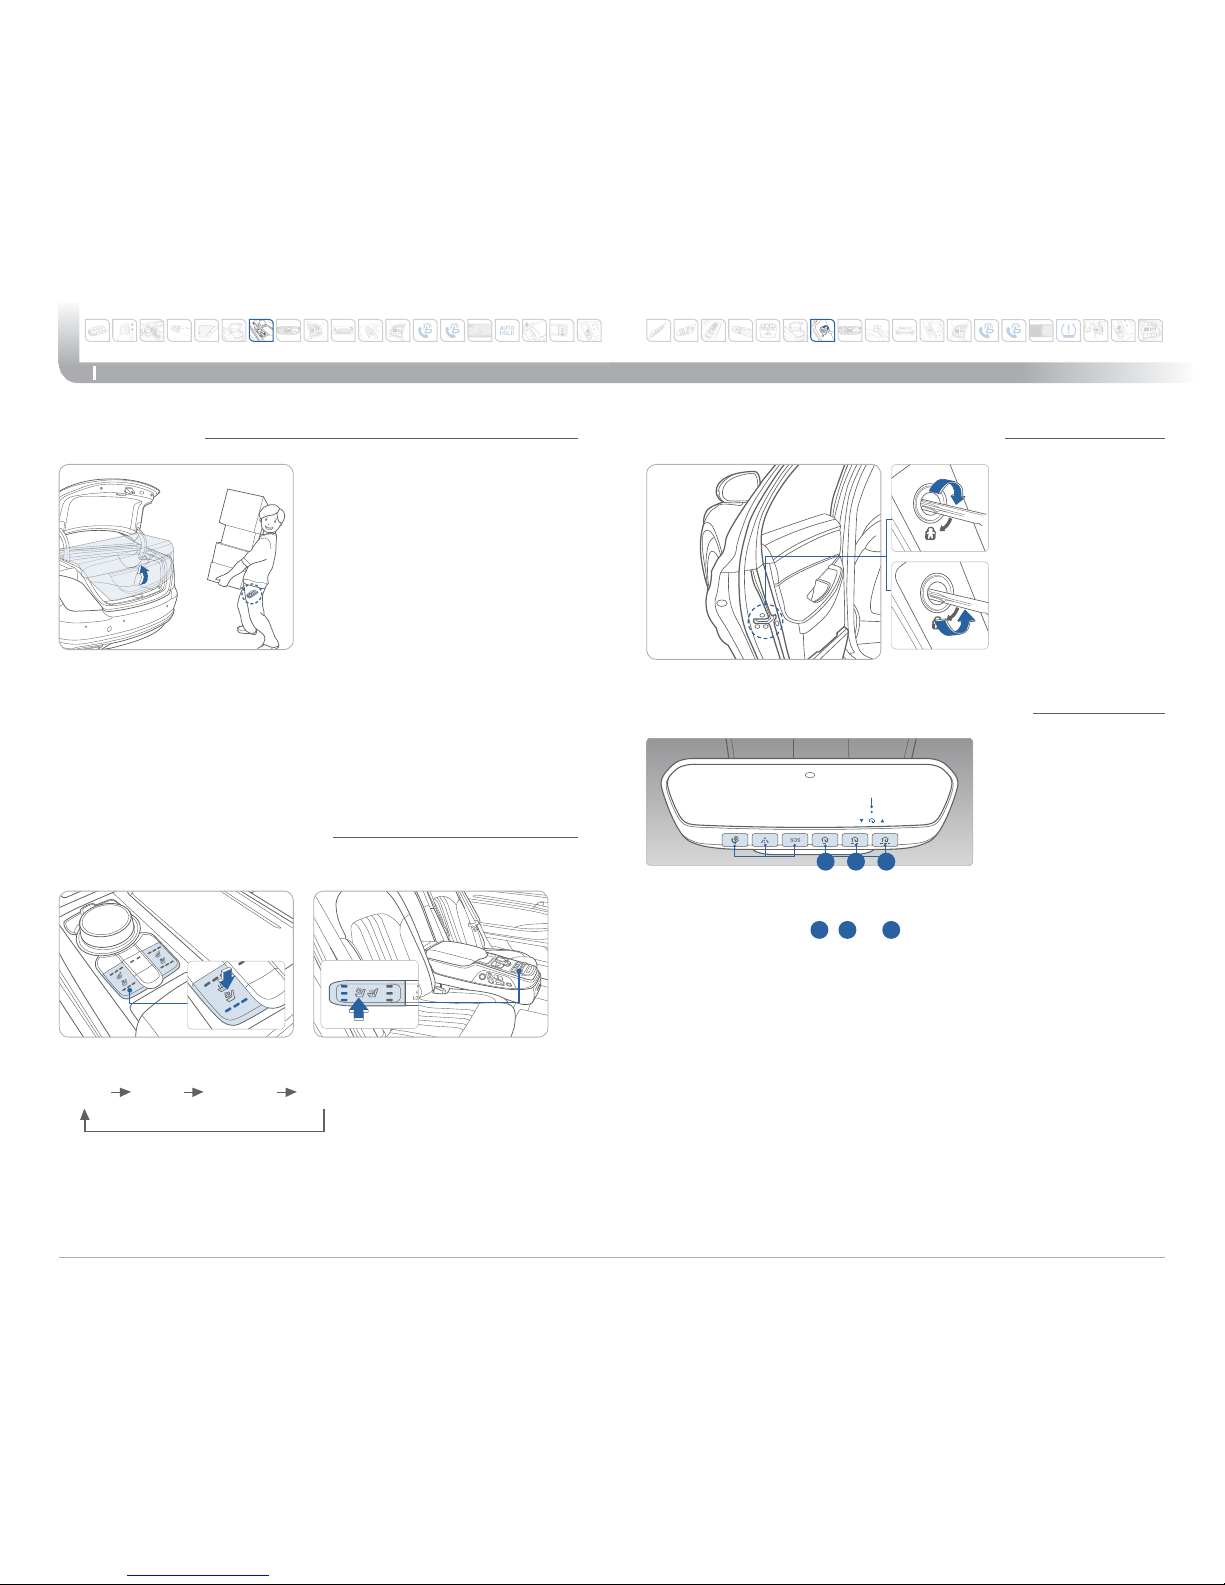
Smart Trunk
Trunk will open automatically when
detecting smart key within the range
near the trunk for over 3 seconds.
To enable Smart Trunk function:
Vehicle must be in P (Park) to adjust
the settings in the User Settings
mode.
1. Select “Door” in the User
Settings in the instrument cluster.
2. Check “Smart Trunk”.
NOTE:
Function is active after 15 seconds when all doors are closed and
locked. The vehicle will also provide an audible and visual alarm
while activating. Please refer to your Owner’s Manual for further
information.
SMART TRUNK
Front seat
The climate control system seat defaults to the OFF position.
Push desired switch to warm or cool the seat.
OFF
HIGH MEDIUM LOW
SEAT WARMER AND COOLER
Lock
Insert a screwdriver
into the hole and turn
it to the lock position.
Unlock
Insert a screwdriver
into the hole and turn
it counterclockwise to
the unlock position.
CHILD-PROTECTOR REAR DOOR LOCK
G90
Rear seat
Standard Programming
To program most devices, follow these instructions:
1. Press and release
1, 2
or 3 button.
• If the indicator is turned ON in Orange, go to Step 3 since it is
a new programming.
• If the indicator is continuously turned ON or ashes in Green
rapidly several times, go to Step 2 since it is a programmed
button.
2. Press and hold the button you wish to program about 15-25
seconds until the LED ashes in Orange for several times.
3. Hold the Garage Door Opener Original Transmitter (OT) near the
HomeLink Mirror.
4. Press the Original Transmitter (OT) button until the indicator is
turned continuously ON or ashes in Green for approximately
10 seconds and it indicates the programming is completed.
For detailed instructions, please refer to your Owner’s Manual.
HOMELINK WIRELESS CONTROL SYSTEM
HomeLink button
HomeLink indicator
Telematics button
Genesis Brand
1 2 3
GENESIS
GENESIS
GENESIS
GENESIS
GENESIS
GENESIS
GENESIS
GENESIS
GENESIS
GENESIS
GENESIS
GENESIS
GENESIS
GENESIS
GENESIS
GENESIS
GENESIS
GENESIS
GENESIS
GENESIS
GENESIS
GENESIS
GENESIS
GENESIS
Page 10
fEATurEs ANd CoNTrols
Quick Reference Guide I 17
16 I Quick Reference Guide
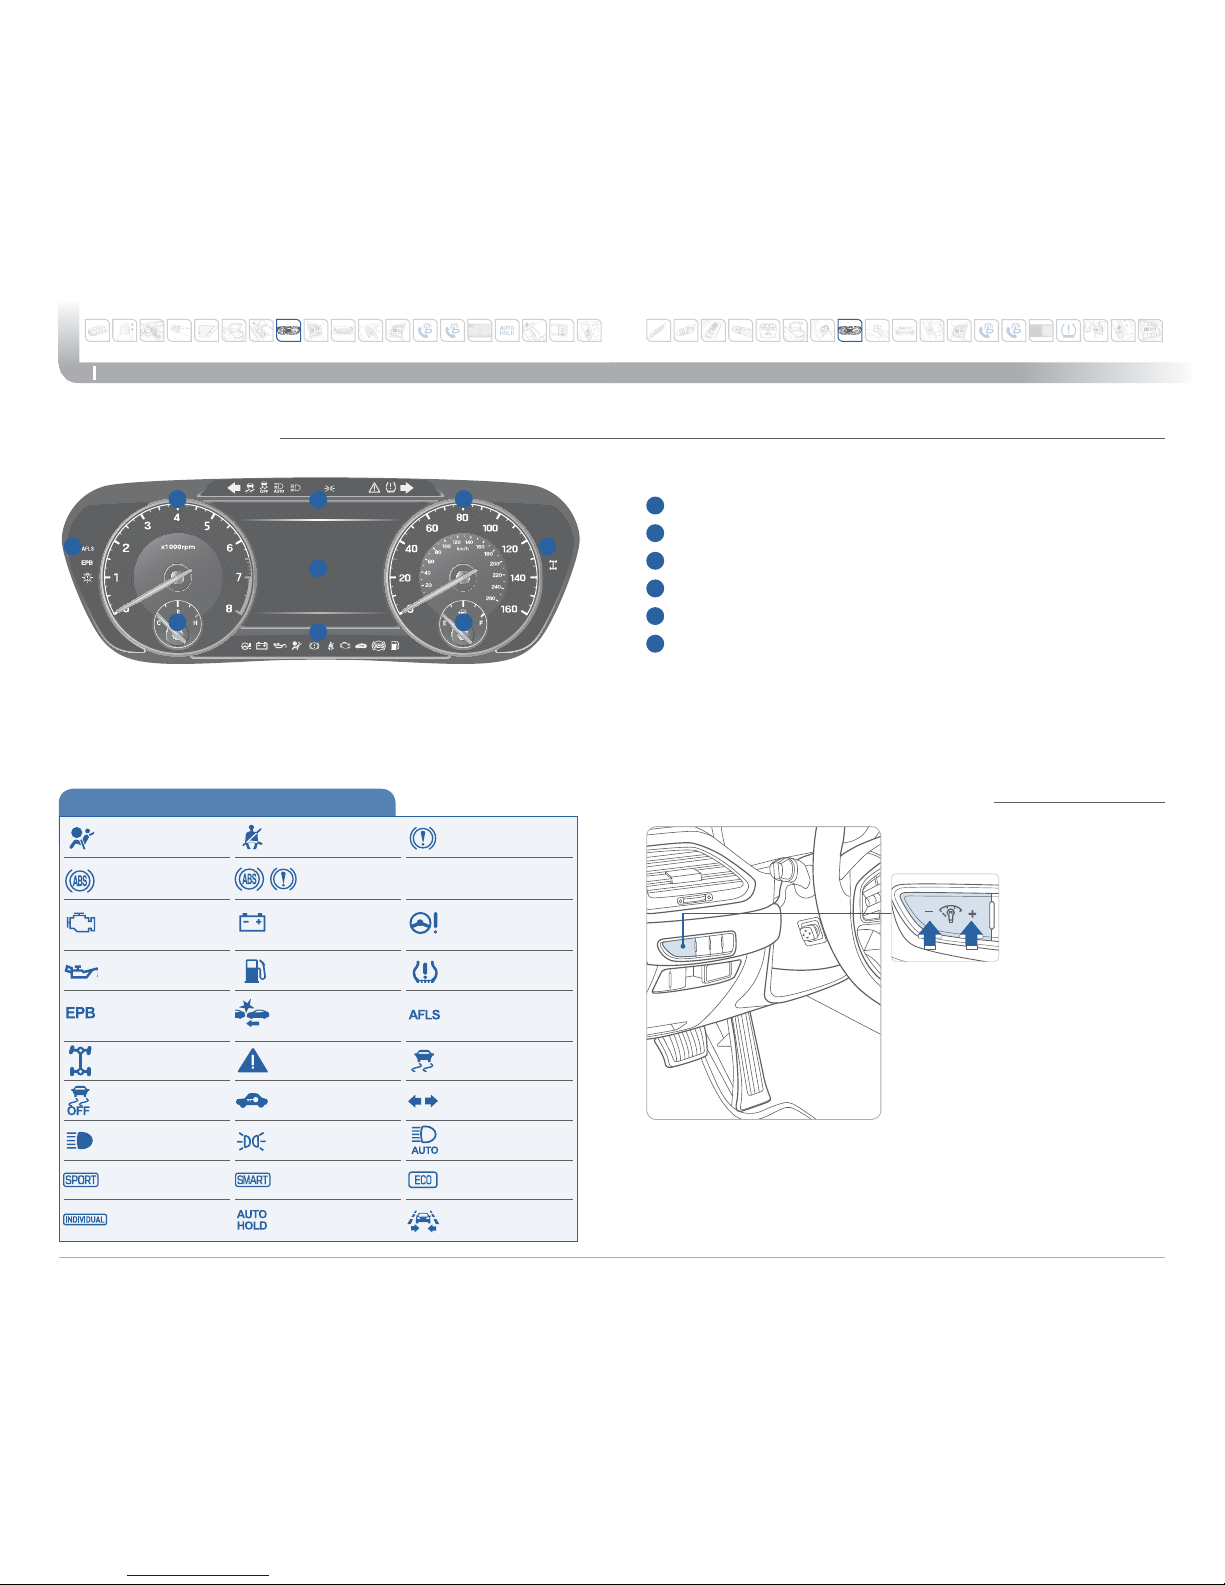
INSTRUMENT CLUSTER
1
Tachometer
2
Speedometer
3
Engine coolant temperature gauge
4
Fuel gauge
5
Warning and indicator lights
6
LCD display (including trip computer)
1 2
3 4
55
6
5
5
INSTRUMENT PANEL ILLUMINATION
Press the illumination control button
to adjust the brightness.
G90
WARNINGS AND INDICATORS
Light ON indicator
Seat belt warning light
Charging system
warning light
Electronic Brake Force Distribution (EBD)
System warning light
High beam indicator
SPORT mode
indicator
SMART mode
indicator
ECO mode indicator
Smart high beam
indicator
Electronic Stability
Control (ESC) indicator
Master warning light
Adaptive Front Lighting
System (AFLS)
warning light
Motor-Driven Power
Steering (MDPS)
warning light
Immobilizer indicator
Air bag warning light
ABS warning light
Low Tire Pressure
warning light
Engine oil pressure
warning light
Low fuel level
warning light
Malfunction Indicator
Lamp (MIL)
Turn signal indicator
Electronic Stability Control
(ESC) OFF indicator
Electric Parking Brake
(EPB) warning light
Automatic Emergency
Braking (AEB) warning
light
All Wheel Drive (AWD)
warning light
INDIVIDUAL mode
indicator
AUTO HOLD indicator
Lane Keeping Assist
System (LKAS) indicator
Parking brake & brake
fluid warning light
Genesis Brand
GENESIS
GENESIS
GENESIS
GENESIS
GENESIS
GENESIS
GENESIS
GENESIS
GENESIS
GENESIS
GENESIS
GENESIS
GENESIS
GENESIS
GENESIS
GENESIS
GENESIS
GENESIS
GENESIS
GENESIS
GENESIS
GENESIS
GENESIS
GENESIS
Page 11
fEATurEs ANd CoNTrols
Quick Reference Guide I 19
18 I Quick Reference Guide
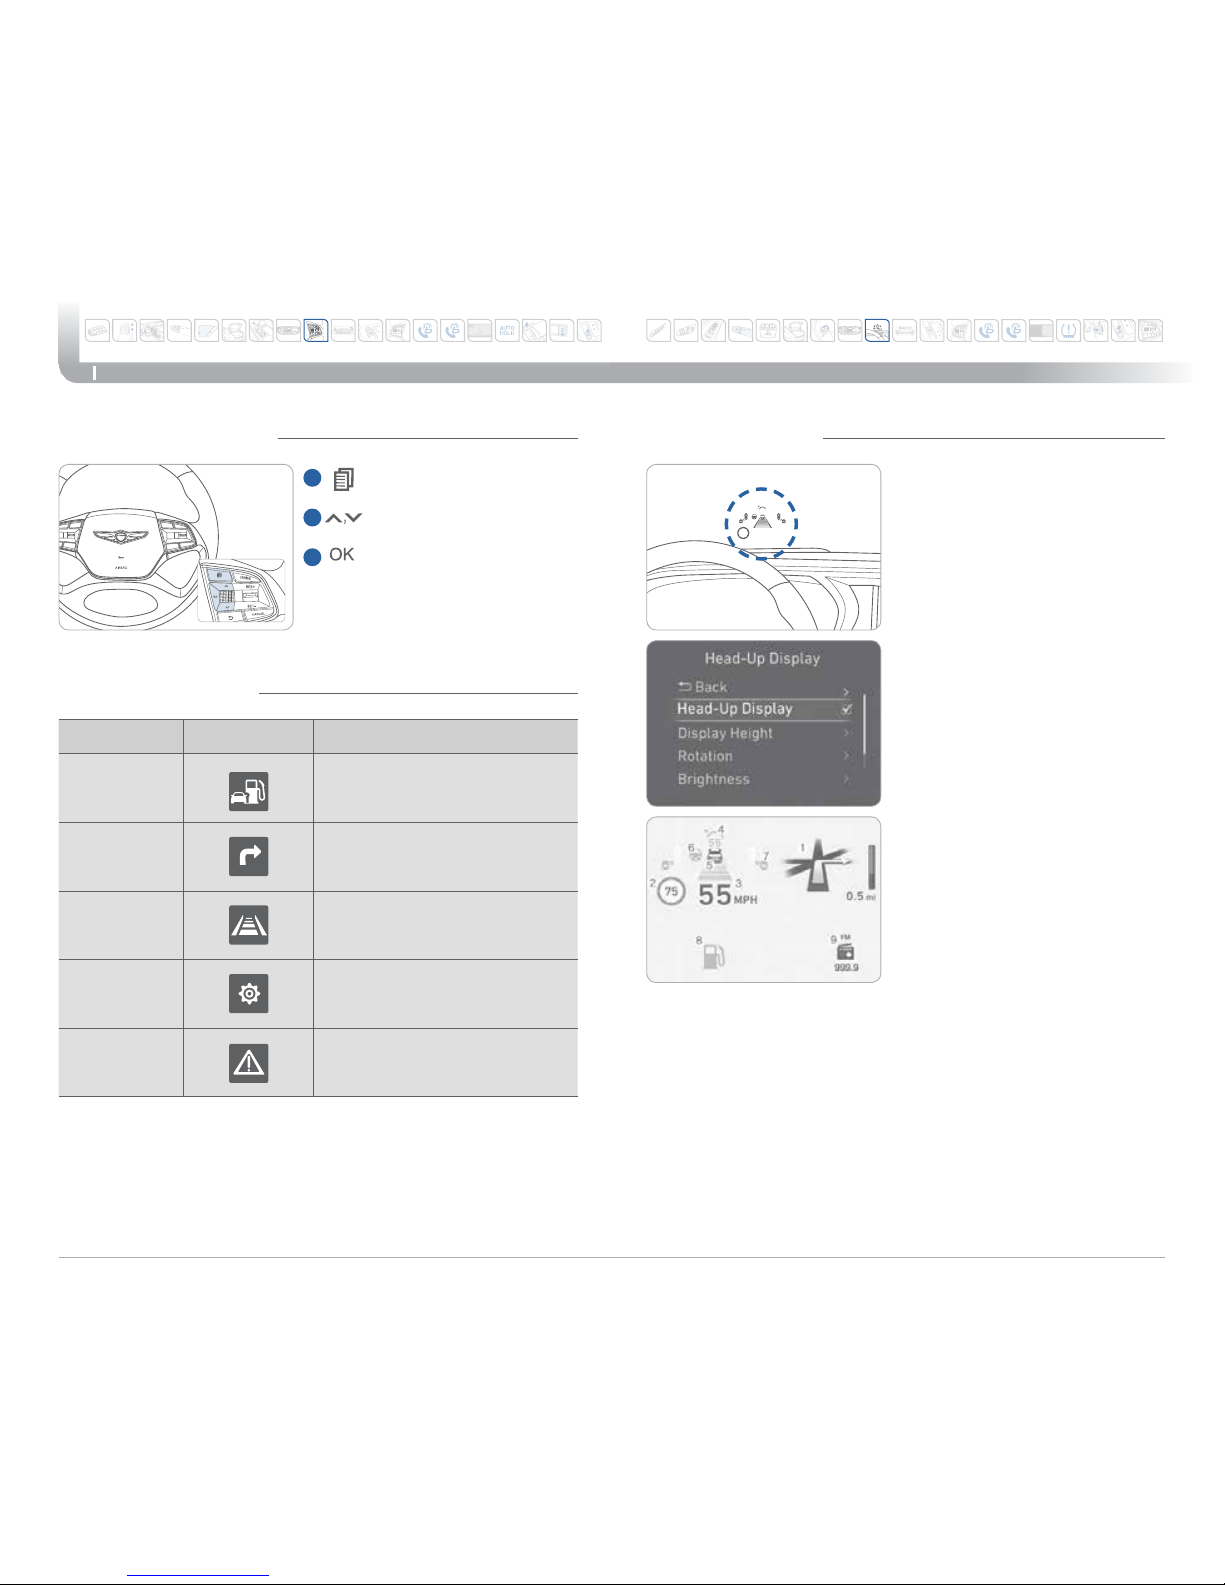
Modes Symbol Description
Trip Computer
This mode displays driving information
such as tripmeter, fuel economy, etc.
Turn By Turn
(TBT)
(if equipped)
This mode displays the state of the
navigation.
Assist
This mode displays the state of the
Smart Cruise Control (SCC) and Lane
Keeping Assist System (LKAS).
User Settings Changes settings.
Warning Displays warning messages.
LCD DISPLAY MODES
1
: MODE button for changing
modes
2
: MOVE switch for changing
items
3
: SELECT / RESET button for
setting or resetting the
selected item
LCD DISPLAY CONTROL
HEAD-UP DISPLAY
55
75
55
MPH
The Head-Up Display is a transparent
display which projects a shadow of
information of the instrument cluster
and navigation on the windshield
glass.
To activate the head-up display, select
“Head-Up Display” on the User Settings
mode in the cluster.
Head-Up Display information
1. Turn-by-turn (TBT) navigation
information
2. Road information
3. Driving speed information
4. Cruise system set speed information
5. Advanced smart cruise information
6. Lane Keeping Assist System (LKAS)
information
7. Blind spot detection warnings
8. Warning lights
9. AV information
G90Genesis Brand
GENESIS
GENESIS
GENESIS
GENESIS
GENESIS
GENESIS
GENESIS
GENESIS
GENESIS
GENESIS
GENESIS
GENESIS
GENESIS
GENESIS
GENESIS
GENESIS
GENESIS
GENESIS
GENESIS
GENESIS
GENESIS
GENESIS
GENESIS
GENESIS
Page 12
fEATurEs ANd CoNTrols
Quick Reference Guide I 21
20 I Quick Reference Guide
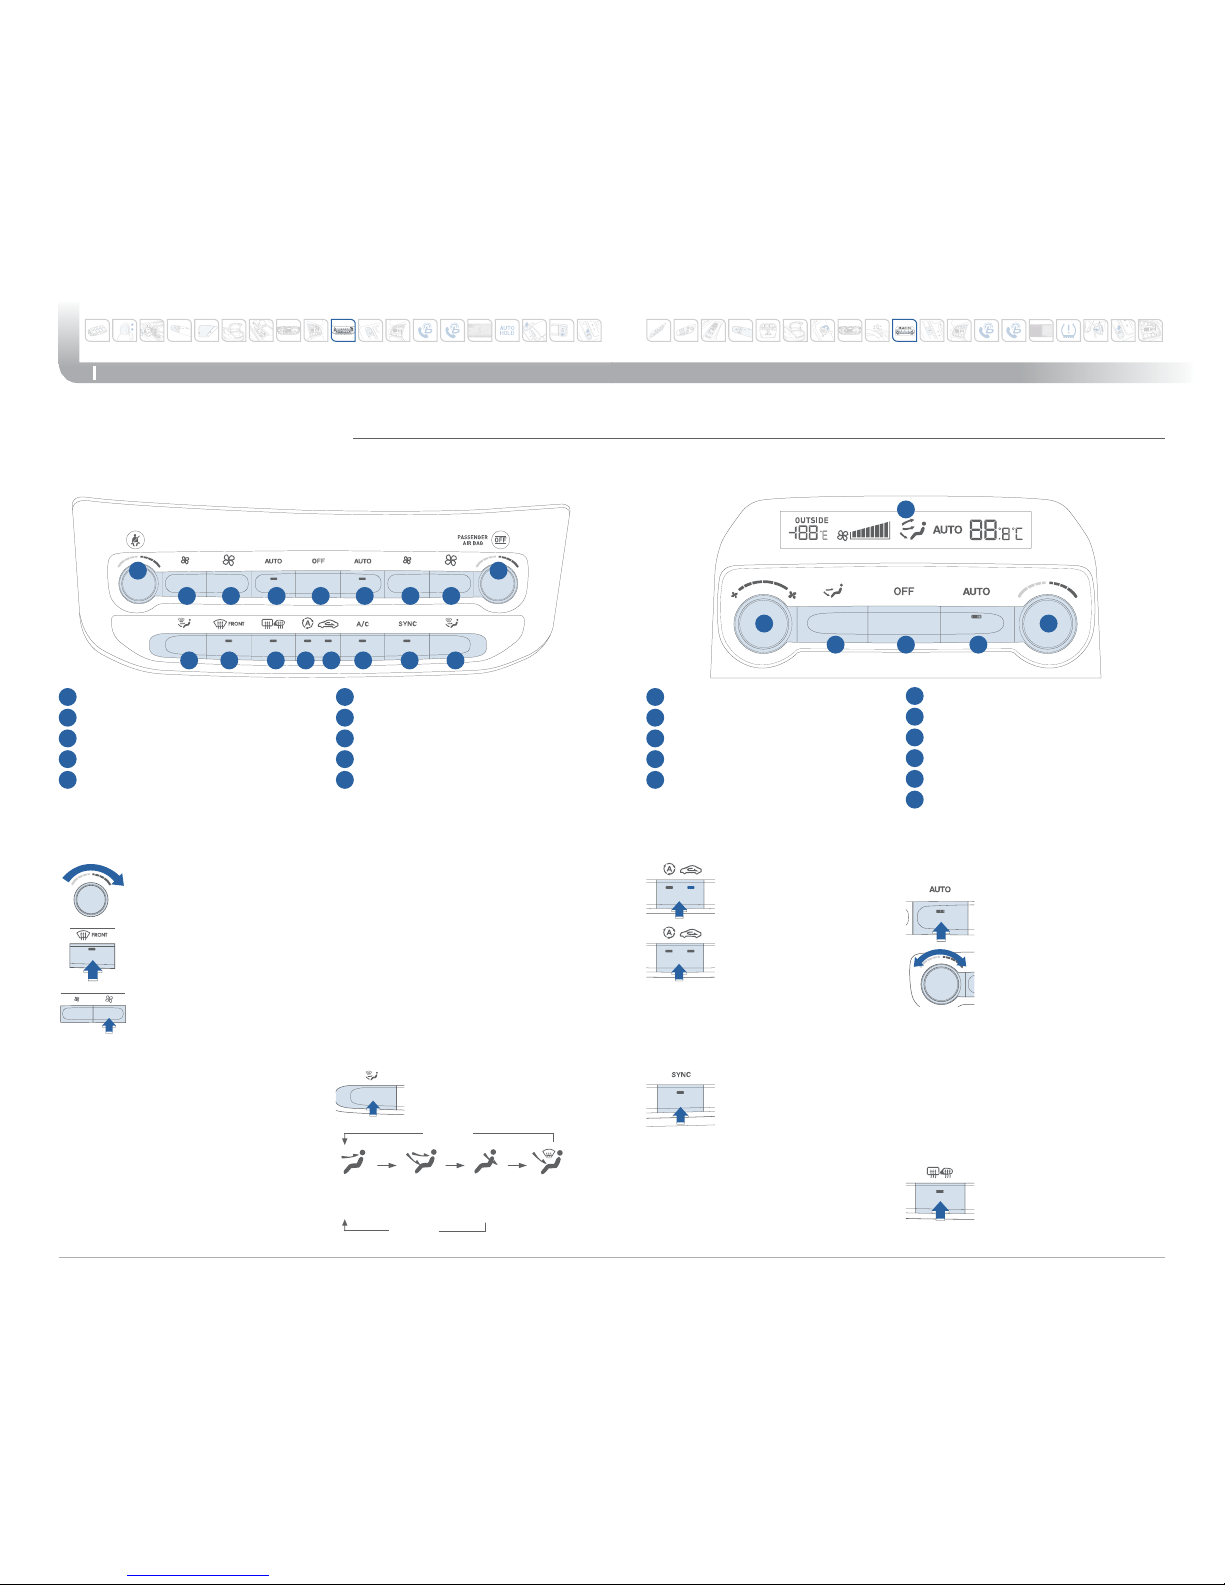
AUTOMATIC CLIMATE CONTROL
1
Driver’s temperature control knob
2
Driver’s fan speed control button
3
Driver’s AUTO button
4
Driver’s mode selection button
5
Passenger’s temperature control knob
11
AQS (Air quality system) button
12
Air intake control button
13
Air conditioning button
14
SYNC button
15
OFF button
6
Passenger’s fan speed control button
7
Passenger’s AUTO button
8
Passenger’s mode selection button
9
Front windshield defroster button
10
Rear window defroster button
16
Rear fan speed control knob
17
Rear mode selection button
18
Rear OFF button
19
Rear AUTO button
20
Rear temperature control knob
21
LCD display
1
16
2 2 3 15 7 6
4 9 101711181221131914 8
5
20
6
Front Rear
SYSTEM OFF
Pressing the OFF button will
place the system to the OFF
mode.
• Blower will turn off.
• Outside (fresh) air position will
be selected.
• Vented air will be at last set
temperature.
NOTE:
To reduce the tendency of the
glass fogging and also to improve
visibility, keep the interior surface
of the windshield clean by wiping
it with a clean cloth and glass
cleaner. In addition, select air
intake control to the outside (fresh)
air position whenever possible
while operating the vehicle.
DEFOGGING / DEFROSTING
1. Set the temperature
control to the
desired setting.
2. Press the front
windshield defrost
button.
3. Set the fan speed to
the highest setting.
AIR INTAKE CONTROL
Recirculated
air position
Outside (fresh)
air position
SYNC BUTTON
Press the SYNC
button to adjust the
driver and front/rear
passenger side
temperature and air
flow direction equally.
REAR WINDOW DEFROSTER
Press to activate/
deactivate the rear
window defroster.
1. Press the AUTO
button.
2. Set the temeprature
control to the
desired setting.
The modes, fan speeds, air
intakes, and air-conditioning will
be controlled automatically
according to the temperature
setting.
AUTOMATIC HEATING /
AIR CONDITIONING
G90
MODE SELECTION
Changes the
direction of air flow.
Face
Level
Floor
Level
Floor &
Defrost
Rear
Front
BiLevel
Genesis Brand
GENESIS
GENESIS
GENESIS
GENESIS
GENESIS
GENESIS
GENESIS
GENESIS
GENESIS
GENESIS
GENESIS
GENESIS
GENESIS
GENESIS
GENESIS
GENESIS
GENESIS
GENESIS
GENESIS
GENESIS
GENESIS
GENESIS
GENESIS
GENESIS
Page 13
fEATurEs ANd CoNTrols
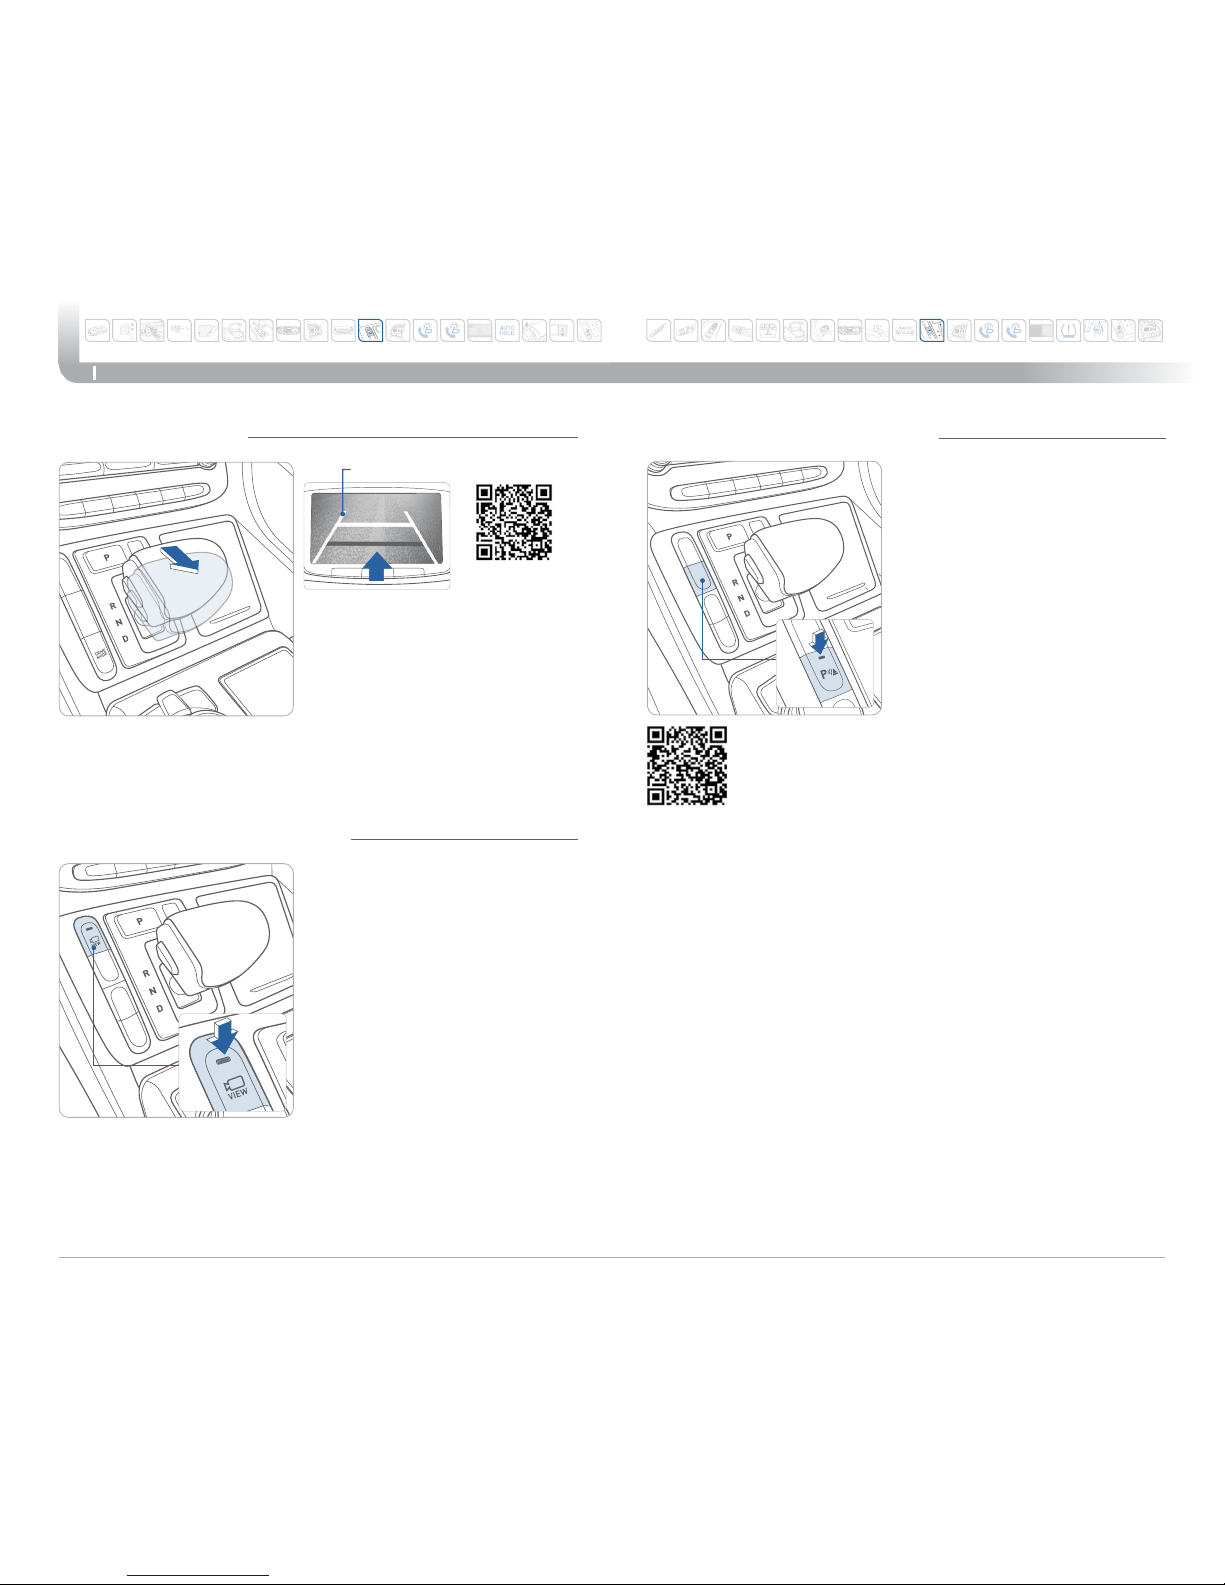
REARVIEW CAMERA
Quick Reference Guide I 23
22 I Quick Reference Guide
G90
The rearview camera will activate
when the engine is running and the
shift lever is in the R (Reverse)
position.
Rearview display
This parking support system displays
an all-around view of the vehicle
when parking. Press the switch to
activate/deactivate the system.
Operating conditions
The shift lever is in D, N, or R
position with the Engine Start/Stop
button in the ON position.
The vehicle speed is less than 9 mph.
MULTI-VIEW CAMERA SYSTEM
PARKING ASSIST SYSTEM (PAS)
The parking assist system assists
the driver during movement of the
vehicle by chiming if any object is
sensed within the distance of 100
cm in front and 120 cm behind the
vehicle.
PAS ON/OFF
To turn the PAS off, press the ON/
OFF button. To turn the PAS on,
press it again.
If you move the shift lever to R with
the engine start/stop button in ON
and the parking assist system in
OFF, the parking assist system will
operate automatically.
NOTE:
The parking assist system will turn
off automatically after vehicle speed
exceeds 12 mph.
Genesis Brand
GENESIS
GENESIS
GENESIS
GENESIS
GENESIS
GENESIS
GENESIS
GENESIS
GENESIS
GENESIS
GENESIS
GENESIS
GENESIS
GENESIS
GENESIS
GENESIS
GENESIS
GENESIS
GENESIS
GENESIS
GENESIS
GENESIS
GENESIS
GENESIS
Page 14
MulTIMEdIA
Making a call using voice recognition:
The menu tree identies available voice recognition Bluetooth
®
functions.
Calling by Name:
1. Press
button.
2. Say the following command:
• “Call <John>”: Connects the call to John.
• “ Call <John> on <Mobile/Home/Ofce>:
Connects the call to John’s Mobile, Home, or Ofce phone
number.
Dialing by Number:
1. Press the
button.
2. Say “Dial Number”.
3. Say the desired phone numbers.
For complete list of commands, please refer to your Owner’s Manual.
Quick Reference Guide I 25
24 I Quick Reference Guide
G90
GENESIS
GENESIS
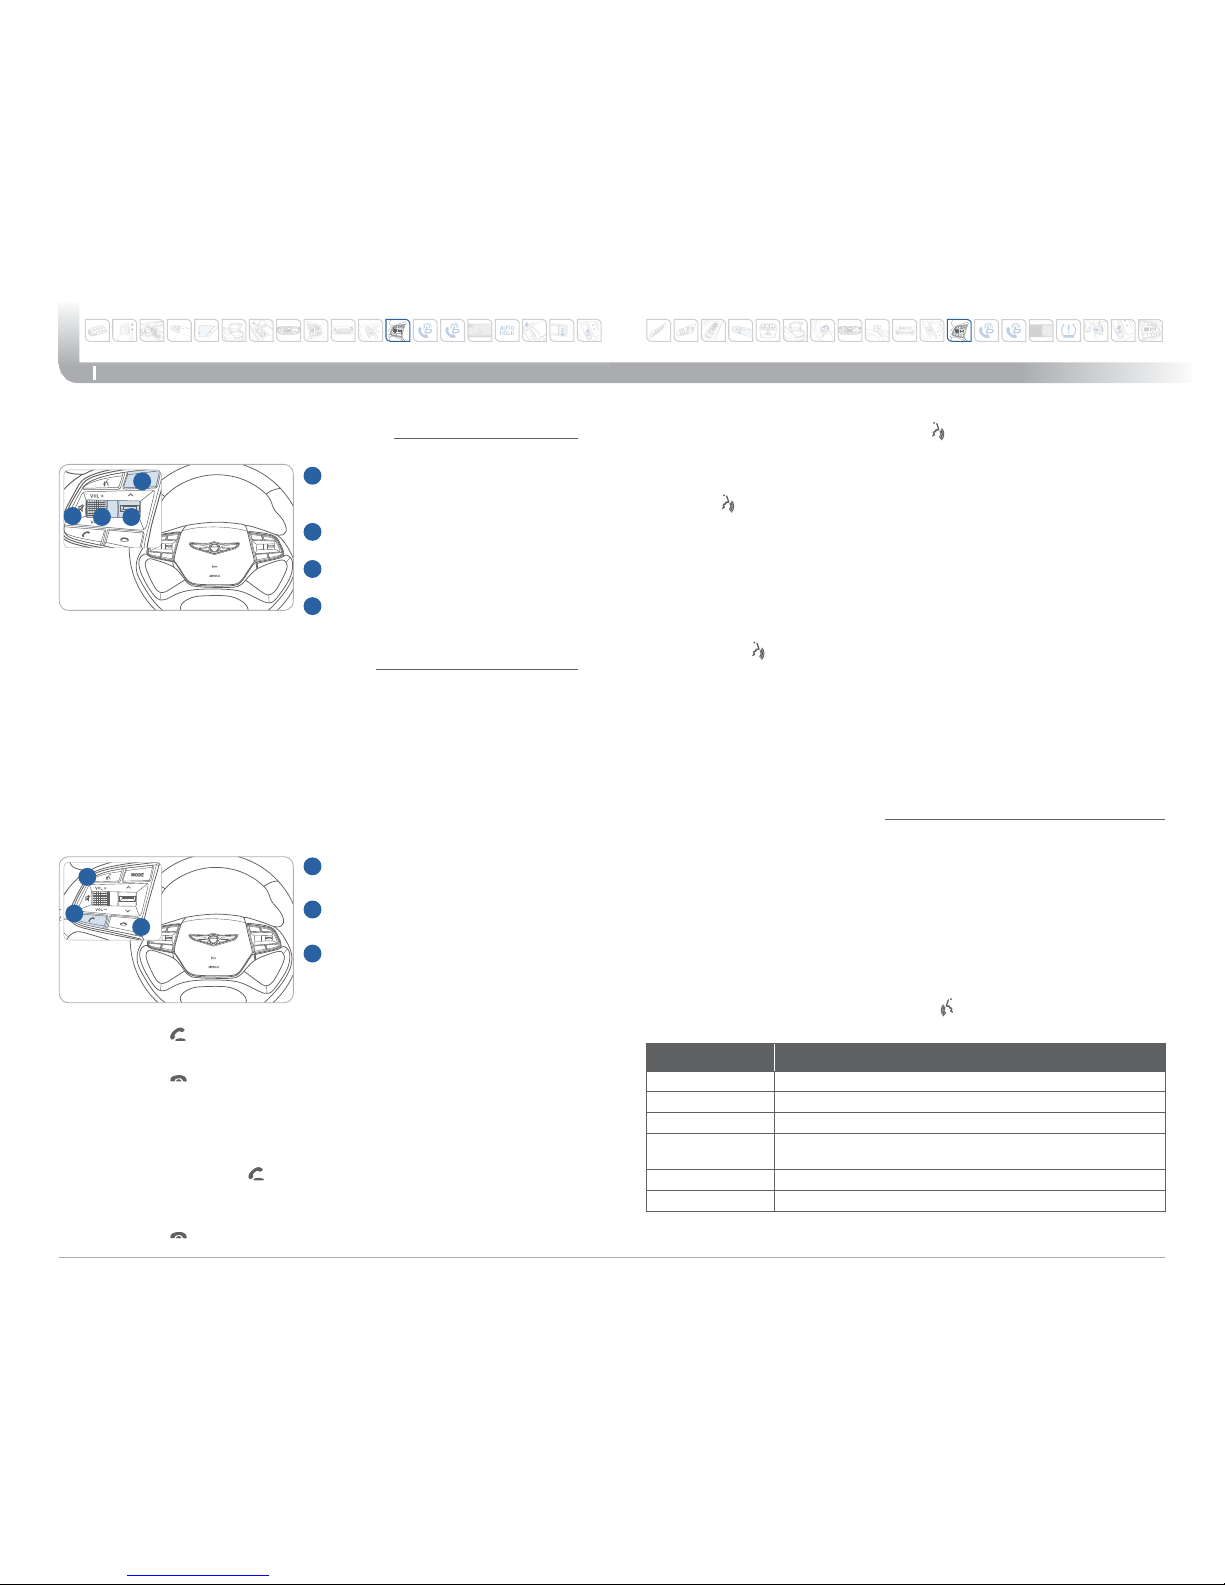
1
VOLUME
Raises or lowers the speaker
volume.
2
SEEK / PRESET
Changes station.
3
MODE
Changes the audio source.
4
MUTE
Press to mute or activate the
sound.
231
4
GENESIS
GENESIS
2
3
1
STEERING WHEEL AUDIO CONTROL
Command Function
Call Displays downloaded Contacts.
Calls <Name> Calls <Name> saved in Contacts.
Dial Number Displays a screen when you can say a phone number to dial.
Dial
<Phone number>
You can directly say the number to call.
ex) Dial 111 555 1234
Redial Directly calls at the number that you have last dialed.
Call History Displays your Call History.
Your vehicle is equipped with Voice Recognition technology which
allows drivers to operate their phones without having to take their
eyes off the road to minimize distractions.
Voice recognition performance may be affected if driving with
windows and sun roof open; when the heating-cooling system
is on; when passing in a tunnel or when driving on rugged and
uneven roads.
To start a voice command, press the
button, the following
commands are available:
VOICE RECOGNITION TIPS
To Answer a Call:
• Press the
button on the steering wheel.
To Reject a Call:
• Press the
button on the steering wheel.
To Adjust Ring Volume:
• Use the VOLUME buttons on the steering wheel.
To Transfer a Call to the Phone
(Private call on handset – do not use while driving):
• Press and hold the
button on the steering wheel until
the audio system transfers a call to the phone.
To Finish a Call:
• Press the
button on the steering wheel.
In the following situations you or the other party may have difficulty
hearing each other:
1. When the Bluetooth
®
volume is too high. High level volume may
result in distortion and echo.
2. When driving on a rough road, high speeds and / or with the window open.
3. When the air conditioning vents are facing the microphone and /
or when the air conditioning fan is at the max speed.
Steering wheel Bluetooth® control
1
TALK
Activates voice recognition.
2
CALL
Places and transfers calls.
3
END
Ends calls or cancels functions.
BLUETOOTH® OPERATIONAL TIPS
Genesis Brand
GENESIS
GENESIS
GENESIS
GENESIS
GENESIS
GENESIS
GENESIS
GENESIS
GENESIS
GENESIS
GENESIS
GENESIS
GENESIS
GENESIS
GENESIS
GENESIS
GENESIS
GENESIS
GENESIS
GENESIS
GENESIS
GENESIS
GENESIS
GENESIS
Page 15
MulTIMEdIA
Quick Reference Guide I 27
26 I Quick Reference Guide
G90
BLUETOOTH® PHONE PAIRING
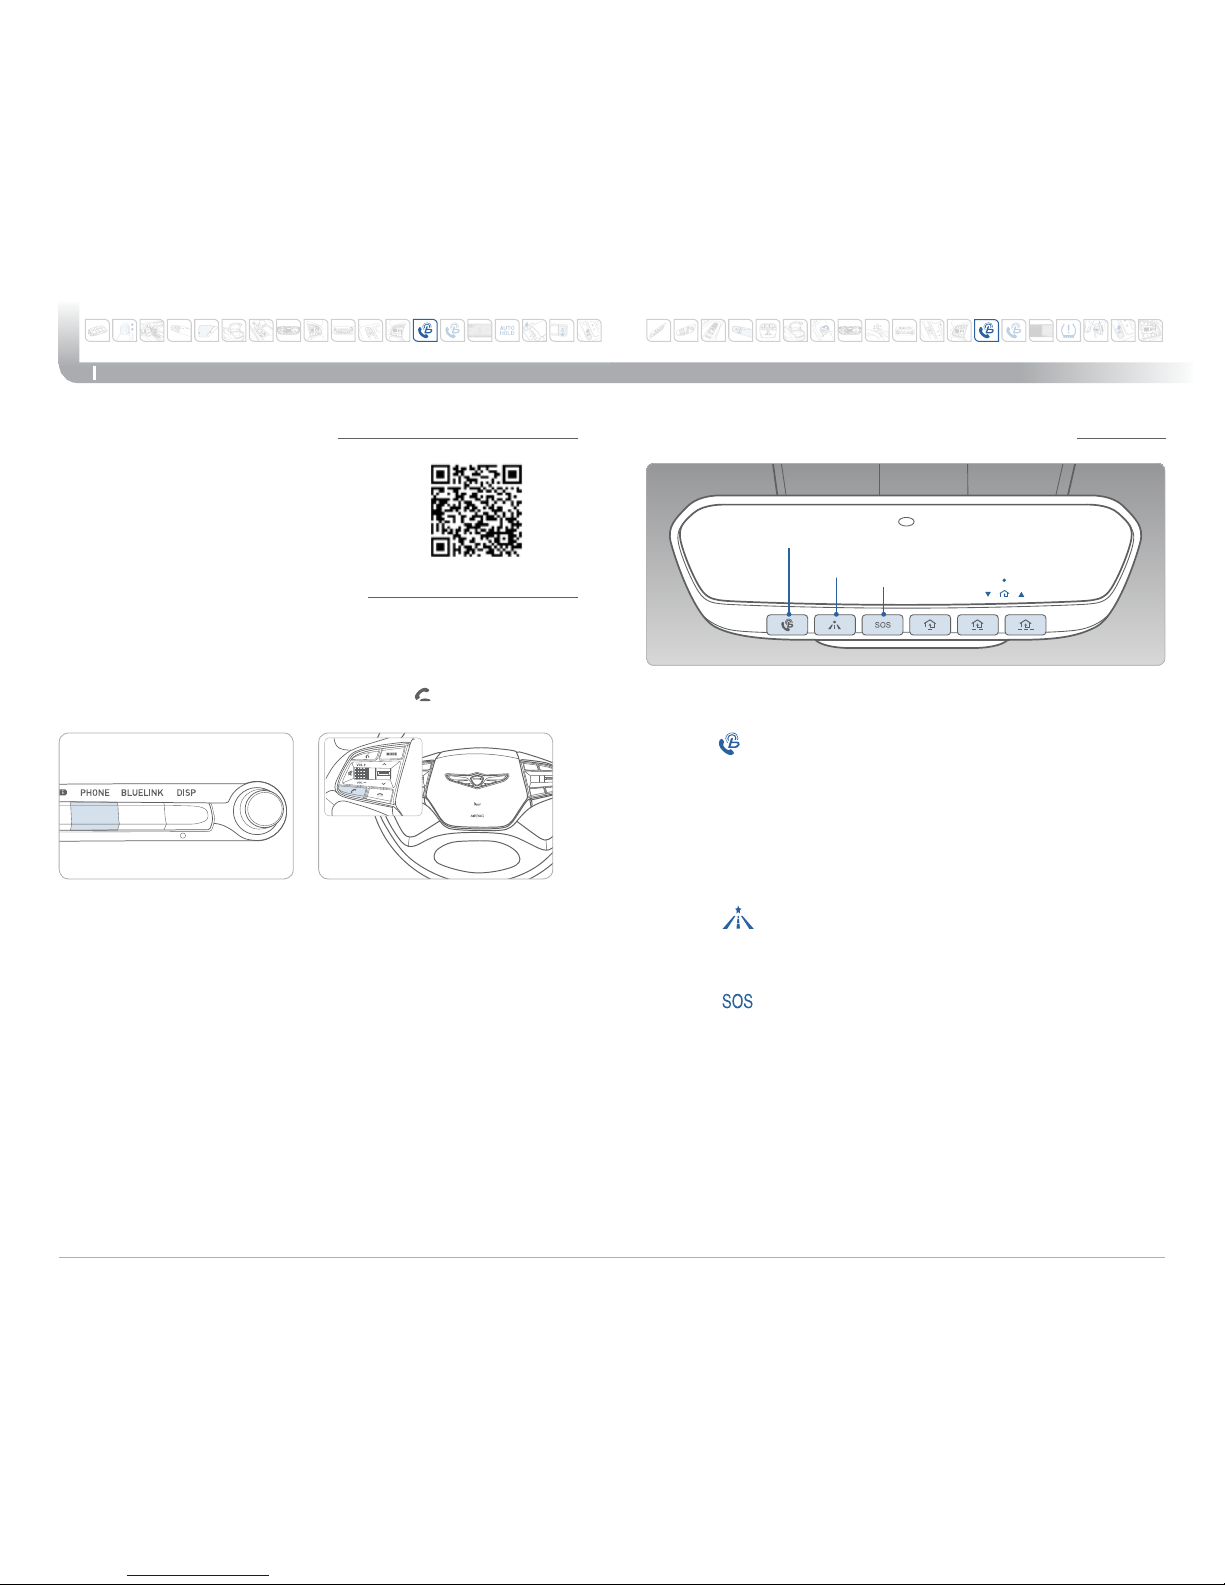
HomeLink button
Blue Link
®
SOS
Navigation
service
Telematics button
GENESIS CONNECTED SERVICE (BLUE LINK ®)
Genesis connected service (Blue Link®) subscription is required. To
enroll, please visit your dealership or MyHyundai.com.
Press the button for access to the voice-response menu of services.
- You can say:
Service Link
Roadside Assistance
Blue Link Account Services
Help
Cancel
Press the
button for Destination Search Powered by GoogleTM.
- For vehicle equipped with factory-installed navigation systems.
Press the
button for SOS Emergency Assistance.
Visit HyundaiBlueLink.com for more information or refer to your
Genesis connected service (Blue Link
®
) User's Manual for detailed
information on system operation.
For immediate assistance with subscription services, please call
1-855-2BLUELINK (1-855-225-8354).
Google
TM
is a registered trademark of Google, Inc.
Pairing tutorials, phone compatibility and
operational tips can be found through the
Smart QR code using the QR reader
application on your Smartphone.
BLUETOOTH® PHONE OPERATION
NOTE: Vehicle must be parked to complete the pairing process.
1. Press the PHONE button in the head unit or
button in the
steering wheel remote controller.
2. Once the Bluetooth
®
Connection screen is displayed,
press [Add New Device].
3. Within the Bluetooth
®
pairing screen in your Bluetooth® device,
search and select the vehicle name.
The default vehicle name is “GENESIS G90”.
4. Verify the passkey and proceed with pairing from your
Bluetooth
®
device.
The default passkey is “0000”.
5. Connect Bluetooth
®
.
Phone Setup (Pairing Phone) with Navigation
GENESIS
GENESIS
Genesis Brand
GENESIS
GENESIS
GENESIS
GENESIS
GENESIS
GENESIS
GENESIS
GENESIS
GENESIS
GENESIS
GENESIS
GENESIS
GENESIS
GENESIS
GENESIS
GENESIS
GENESIS
GENESIS
GENESIS
GENESIS
GENESIS
GENESIS
GENESIS
GENESIS
Page 16
MulTIMEdIA
Quick Reference Guide I 29
28 I Quick Reference Guide
G90
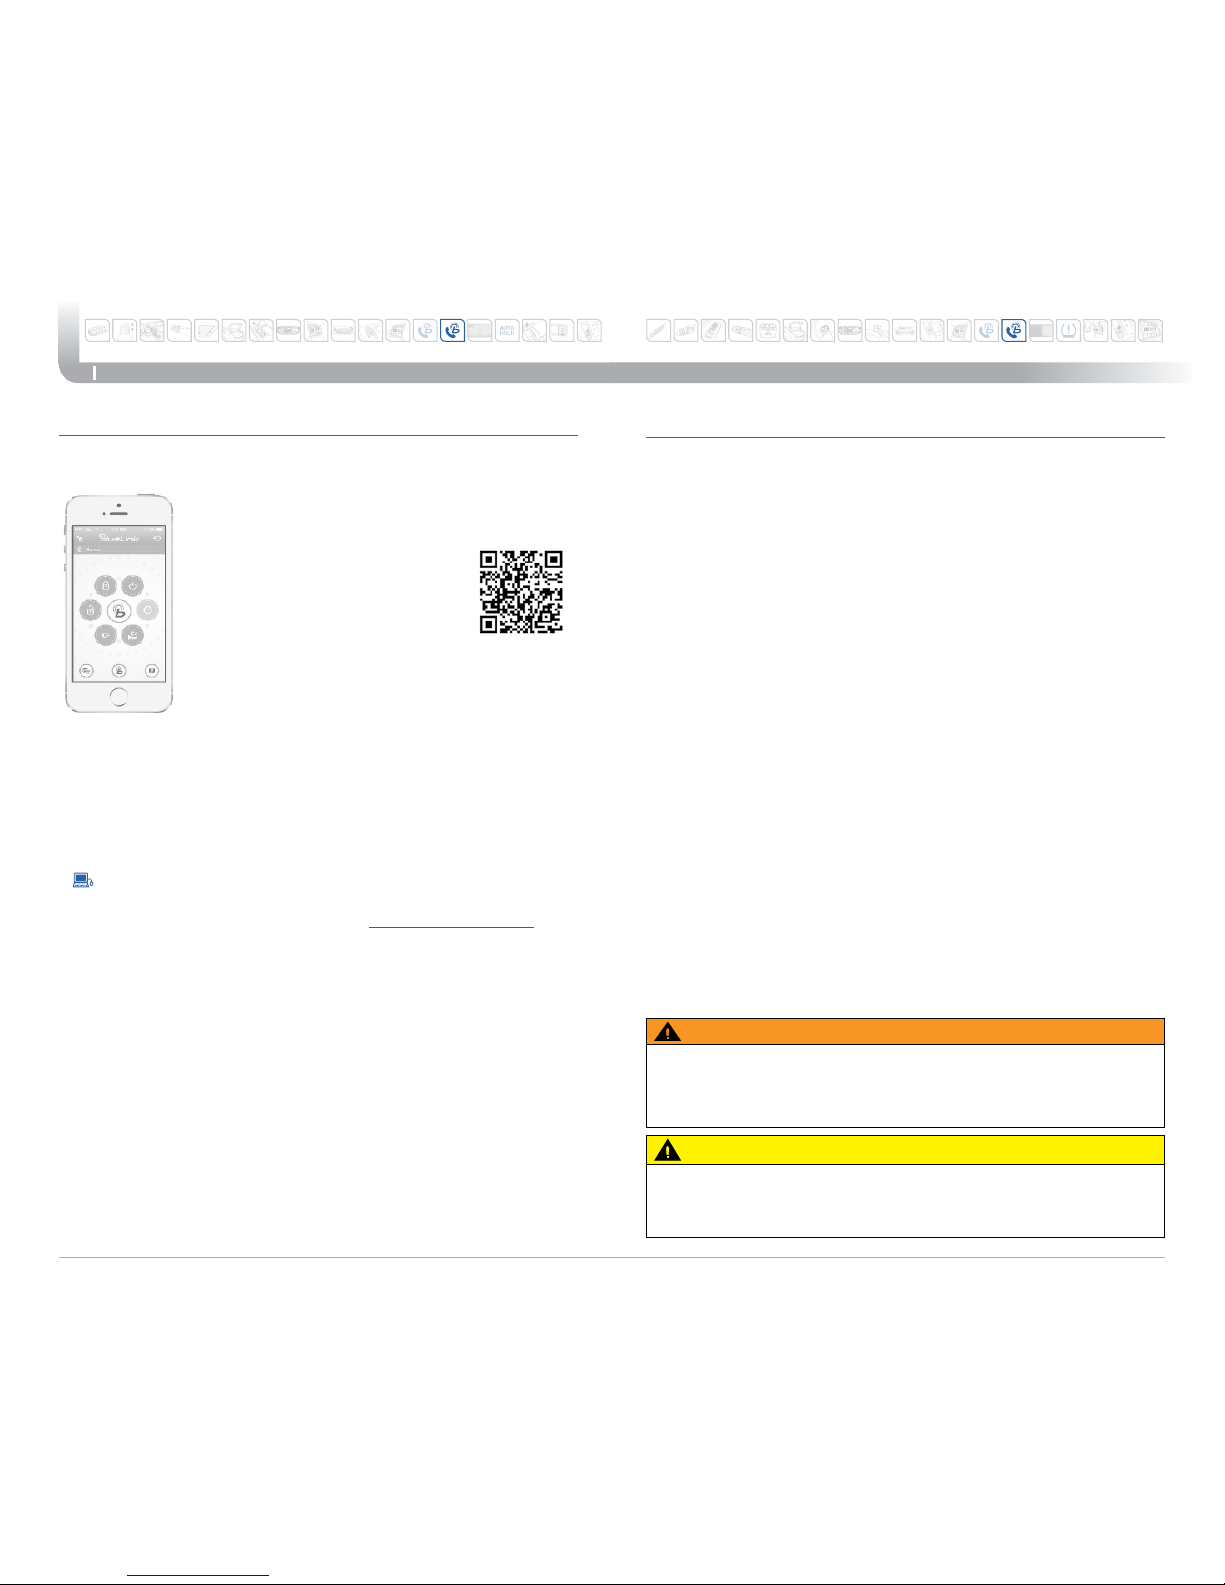
You can download the Genesis connected service
(Blue Link®) mobile app to your compatible smart
phone from the following sites:
• iPhone® — Apple® App Store
• Android™ — Google Play
™
Remote Start
Genesis connected service (Blue Link
®
) Mobile App
• Remote Start will automatically shut off after 10 minutes or after
selected engine timer runs out in navigation vehicles.
• While this feature is active, the parking lights will blink until the
vehicle is turned off or when vehicle is in operation.
• To continue to operate the vehicle, the proximity key must be
inside the vehicle with the driver, prior to pressing the brake and
being able to move the gearshift from the P (Park) position.
Remember:
Scan to see list of
compatible devices
and to download
the app.
Visit HyundaiBlueLink.com FAQs
to see a list of compatible devices.
NOTE: Remote Start is not available on all models. Remote Start is
only available for Push Start equipped vehicle with an Automatic
Transmission. Remote Start with Climate Control additionally
requires Fully Automatic Temperature Control.
Preconditions:
• Ignition is OFF
• Alarm is armed (i.e., vehicle locked by key fob Remote Door Lock)
• Gearshift level is in the P (Park) position
• Brake pedal is not depressed
• Engine hood is securely closed
• All the doors are closed and locked
• The tailgate or trunk lid is closed
• The security / panic system is not activated
• The proximity key is not inside the vehicle
• The battery power is not low
• Vehicle is located in an open area
• It has been less than 4 days since last vehicle ignition off
• Vehicle located in area with good cell reception
Remote Start will terminate:
• After 10 minutes or after selected engine timer runs out in
navigation vehicles
• Brake is pressed without the proximity key inside the vehicle
• Alarm is triggered without the proximity key inside the vehicle
• Door / trunk is opened from inside the vehicle
Notice: Laws in some communities may restrict the use of the
features that remotely start the engine. For example, some laws may
require a person using the remote start feature to have the vehicle in
view when doing so, or limit the length of time a vehicle engine may
idle. Please check local and state regulations for any requirements
and restrictions on remote starting of vehicles and engine idling time.
WARNING!
Do not remote start vehicle in an enclosed environment (i.e., closed garage). Prolonged operation
of a motor vehicle in an enclosed environment can cause a harmful build-up of carbon monoxide.
Carbon monoxide is harmful to your health. Exposure to high levels of carbon monoxide can
cause headaches, dizziness or in extreme cases unconsciousness and / or death. Do not leave
children or animals unattended in a vehicle while using the remote start function.
CAUTION!
If the vehicle’s windshield wipers are left on when the vehicle was last driven, then the wipers will
turn on if the remote start function is activated. To avoid damage to the wiper blades (i.e., due to
heavy ice or snow accumulated on the windshield), please always turn the vehicle’s windshield
wipers off when parking the vehicle.
Remote Start enables you to remotely start your vehicle virtually
from anywhere. For vehicles equipped with full-automatic
temperature control, you can also enable climate control remotely
and turn on the front window defroster, ensuring a warm or cool
car is ready to go when you are.
•
To use this feature, you must have a Genesis connected
service (Blue Link
®
) Personal Identification Number (PIN).
To create or change your PIN, log in to www.MyHyundai.com.
Genesis Brand
GENESIS
GENESIS
GENESIS
GENESIS
GENESIS
GENESIS
GENESIS
GENESIS
GENESIS
GENESIS
GENESIS
GENESIS
GENESIS
GENESIS
GENESIS
GENESIS
GENESIS
GENESIS
GENESIS
GENESIS
GENESIS
GENESIS
GENESIS
GENESIS
Page 17
MulTIMEdIA
Quick Reference Guide I 31
30 I Quick Reference Guide
G90
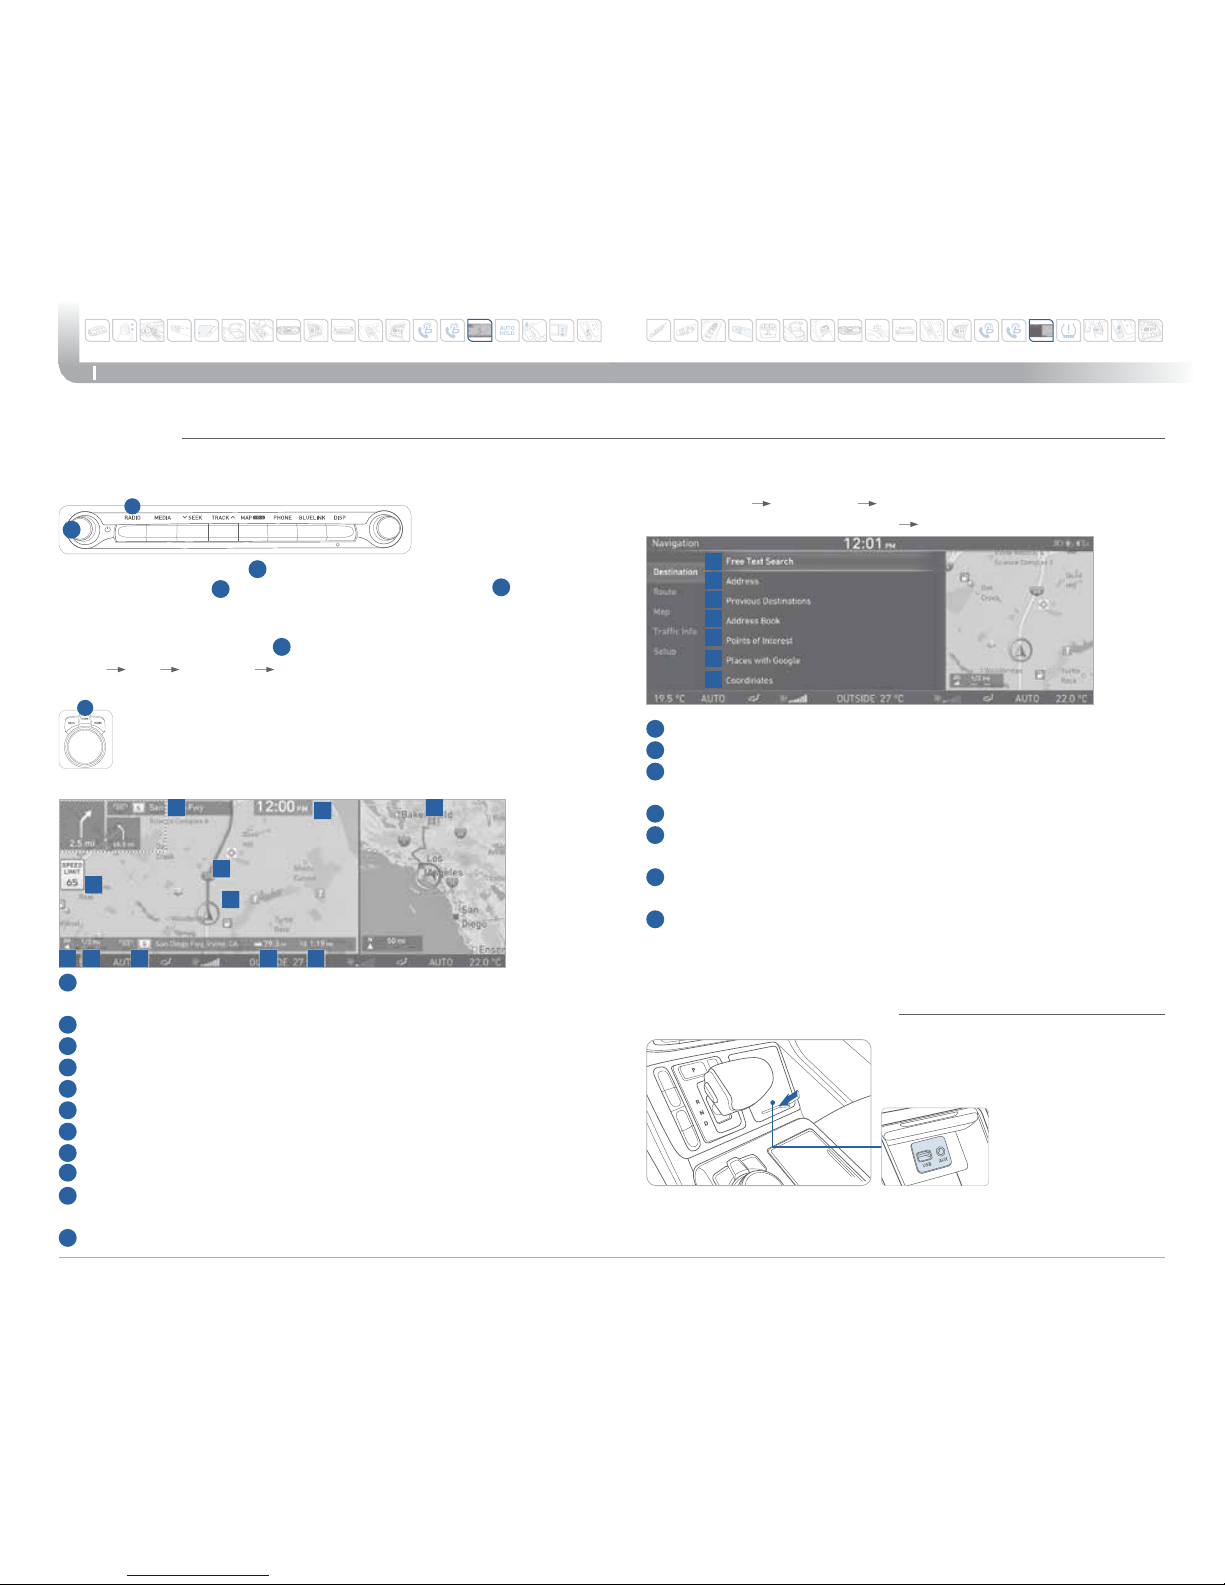
NAVIGATION
Destination search screen
1
Free Text Search : Uses keywords to search for destinations.
2
Address : Uses addresses to search for destinations.
3
Previous Destinations : Uses previous destinations (recent searches,
recent destinations) for use as destinations.
4
Address Book : Searches for destinations within the Address Book.
5
Points of Interest : Searches POIs by keyword, Along the Route,
Near Destination, In a Different City, or category for use as destinations.
6
Places with Google : Searches for places to set as destinations.
(available only when Blue Link is activated)
7
Coordinates : Uses coordinates to search for destinations.
Press
“
HOME” [Navigation] [Destination].
Or in the map screen, press “MENU” [Destination].
Basic features on the map screen
1
Preliminary guidance : Provides distance, direction guidance at turn points
and directions within the set route.
2
Speed limit information : Provides speed limit information for the current route.
3
Current time : Displays the current time.
4
Route : Displays the route from the current position to the set destination.
5
Car position mark : Displays the current car position and traveling direction.
6
Map screen mode : Displays the current map screen mode.
7
Map scale : Adjusts the map scale.
8
Current location : Displays the address or name of the current location.
9
Remaining distance : Displays the remaining distance to reach the destination.
10
ETA/Remaining time : Displays the ETA (estimated time of arrival) or the
remaining time to reach the destination.
11
Assistant window : Displays map, intersection zoom and turn list information.
1
0
111
3
9876
2
4
5
1
3
7
6
2
4
5
Use the jack to connect an external
audio device and listen to it through
the audio speakers in your vehicle.
AUX, USB AND iPod® PORT
1. Press POWER button
A
t
o turn on the radio.
2. Press the RADIO
B
on the head unit. Or press HOME
C
on the
controller then, select [Radio]. The most recently played
channel will start.
3. Each press of the RADIO
B
will change the mode in order of
FM
AM
SiriusXM
FM.
4. Select the channel you wish to listen to.
NOTE: A clear view of the southern sky is recommended
to ensure XM® radio reception.
A
B
C
AUDIO MODE
Genesis Brand
GENESIS
GENESIS
GENESIS
GENESIS
GENESIS
GENESIS
GENESIS
GENESIS
GENESIS
GENESIS
GENESIS
GENESIS
GENESIS
GENESIS
GENESIS
GENESIS
GENESIS
GENESIS
GENESIS
GENESIS
GENESIS
GENESIS
GENESIS
GENESIS
Page 18
drIVINg
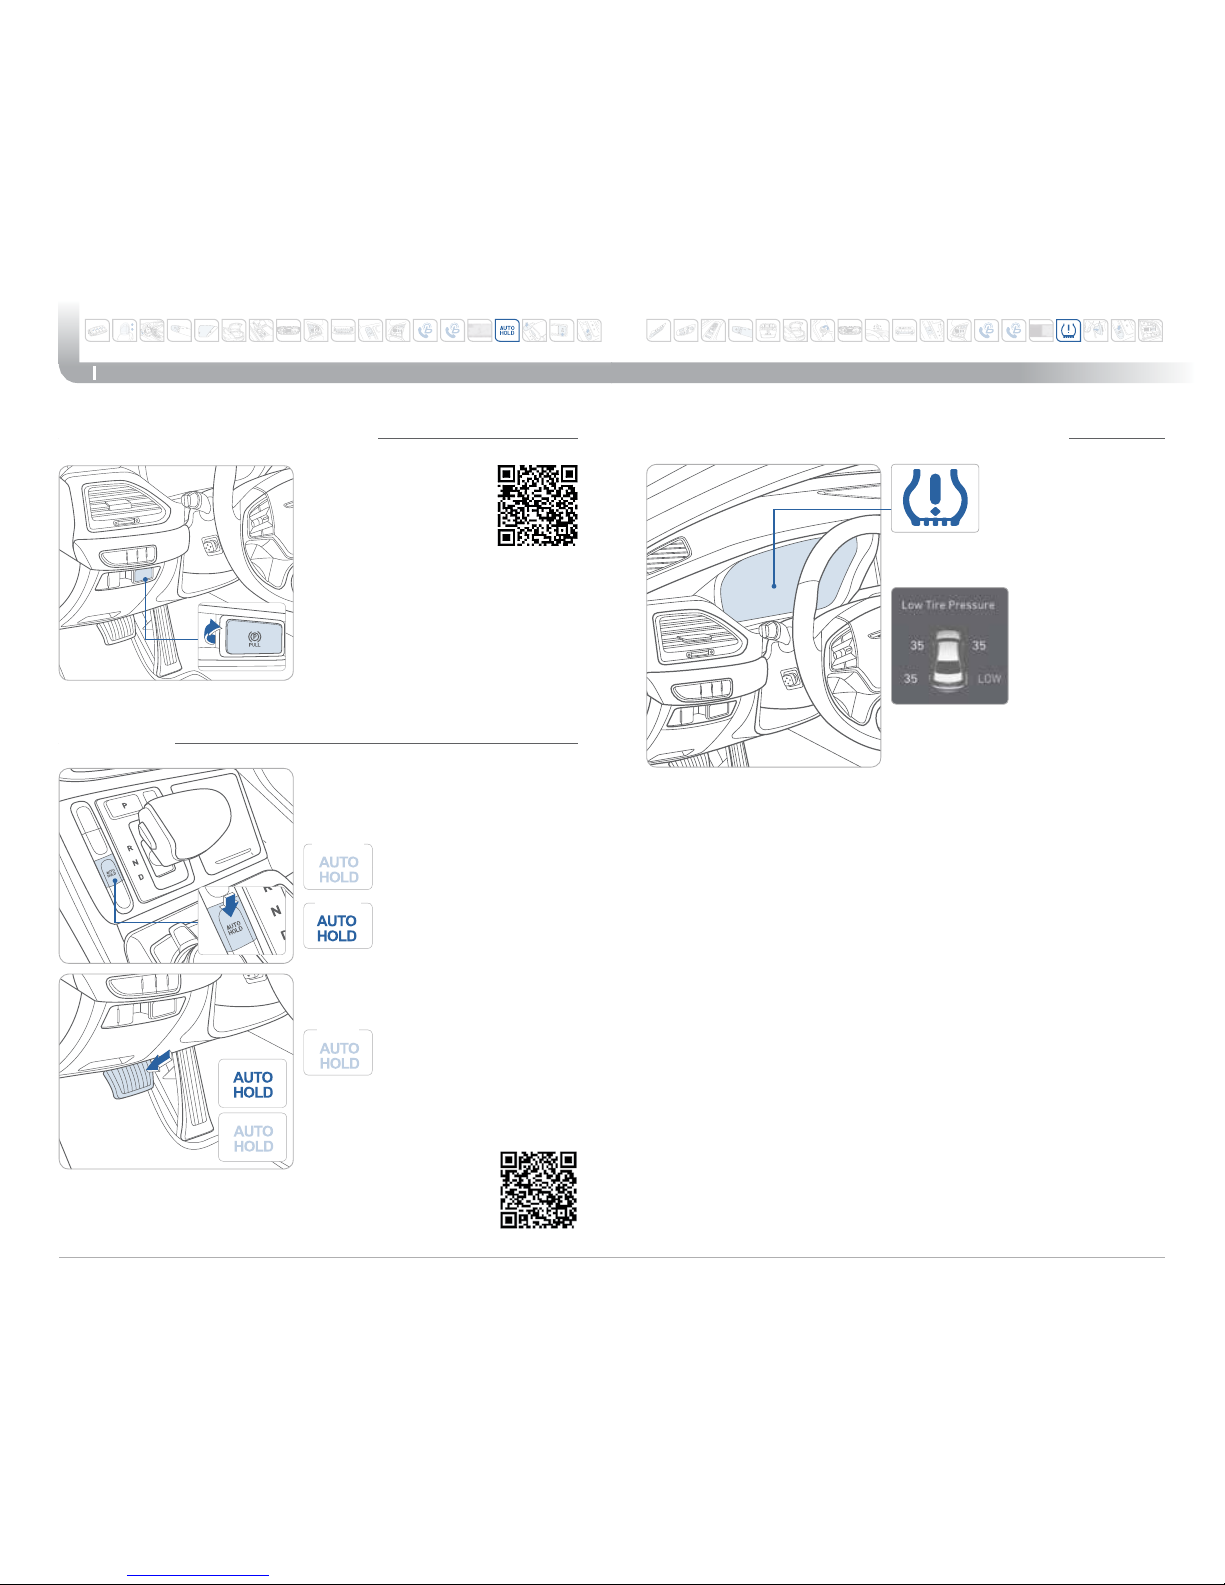
LOW TIRE PRESSURE INDICATOR
Illuminates if one or more of your tires is signicantly under-inated.
TPMS MALFUNCTION INDICATOR
Blinks for approximately one minute, then remains illuminated when
there is a malfunction with the TPMS. Inspect all tires and adjust
tire pressure to specication. If the lamp remains illuminated, have
the system checked by an authorized Dealer of Genesis Brand
Products as soon as possible.
LOW TIRE PRESSURE POSITION TELLTALE AND
TIRE PRESSURE TELLTALE (LCD DISPLAY)
Tire pressures will display after driving a short distance. If a tire
pressure drops lower than predetermined specication the Low Tire
Pressure Indicator will illuminate and the LCD display will indicate
tire(s) requiring air.
Low Tire Pressure Indicator /
TPMS Malfunction Indicator
Low Tire Pressure / Tire Pressure Monitor
/ TPMS Malfunction Display (shown on
the cluster LCD display)
TIRE PRESSURE MONITORING SYSTEM (TPMS)
Quick Reference Guide I 33
32 I Quick Reference Guide
G90
To cancel the
AUTO HOLD operation,
press the switch again
with the brake pedal
depressed.
The Auto Hold feature assists in hill
areas. It applies the brake until the
accelerator pedal is pressed.
1. Press the AUTO HOLD
switch.
WHITE
2. Stop the vehicle by
pressing the brake
pedal. The brake will
remain engaged even if
the brake pedal is
released.
GREEN
3. The AUTO HOLD will
be released when the
accelerator pedal is
pressed with the shift
lever in D (Drive) or R
(Reverse).
WHITE
Applying
Depress the brake pedal
and then pull the EPB
switch.
Releasing
Press and hold the EPB switch with
the brake pedal depressed or shift
the shift lever from P to R or D.
ELECTRIC PARKING BRAKE (EPB)
AUTO HOLD
Genesis Brand
GENESIS
GENESIS
GENESIS
GENESIS
GENESIS
GENESIS
GENESIS
GENESIS
GENESIS
GENESIS
GENESIS
GENESIS
GENESIS
GENESIS
GENESIS
GENESIS
GENESIS
GENESIS
GENESIS
GENESIS
GENESIS
GENESIS
GENESIS
GENESIS
Page 19
drIVINg
Quick Reference Guide I 35
34 I Quick Reference Guide
G90
AIRBAG
GENESIS
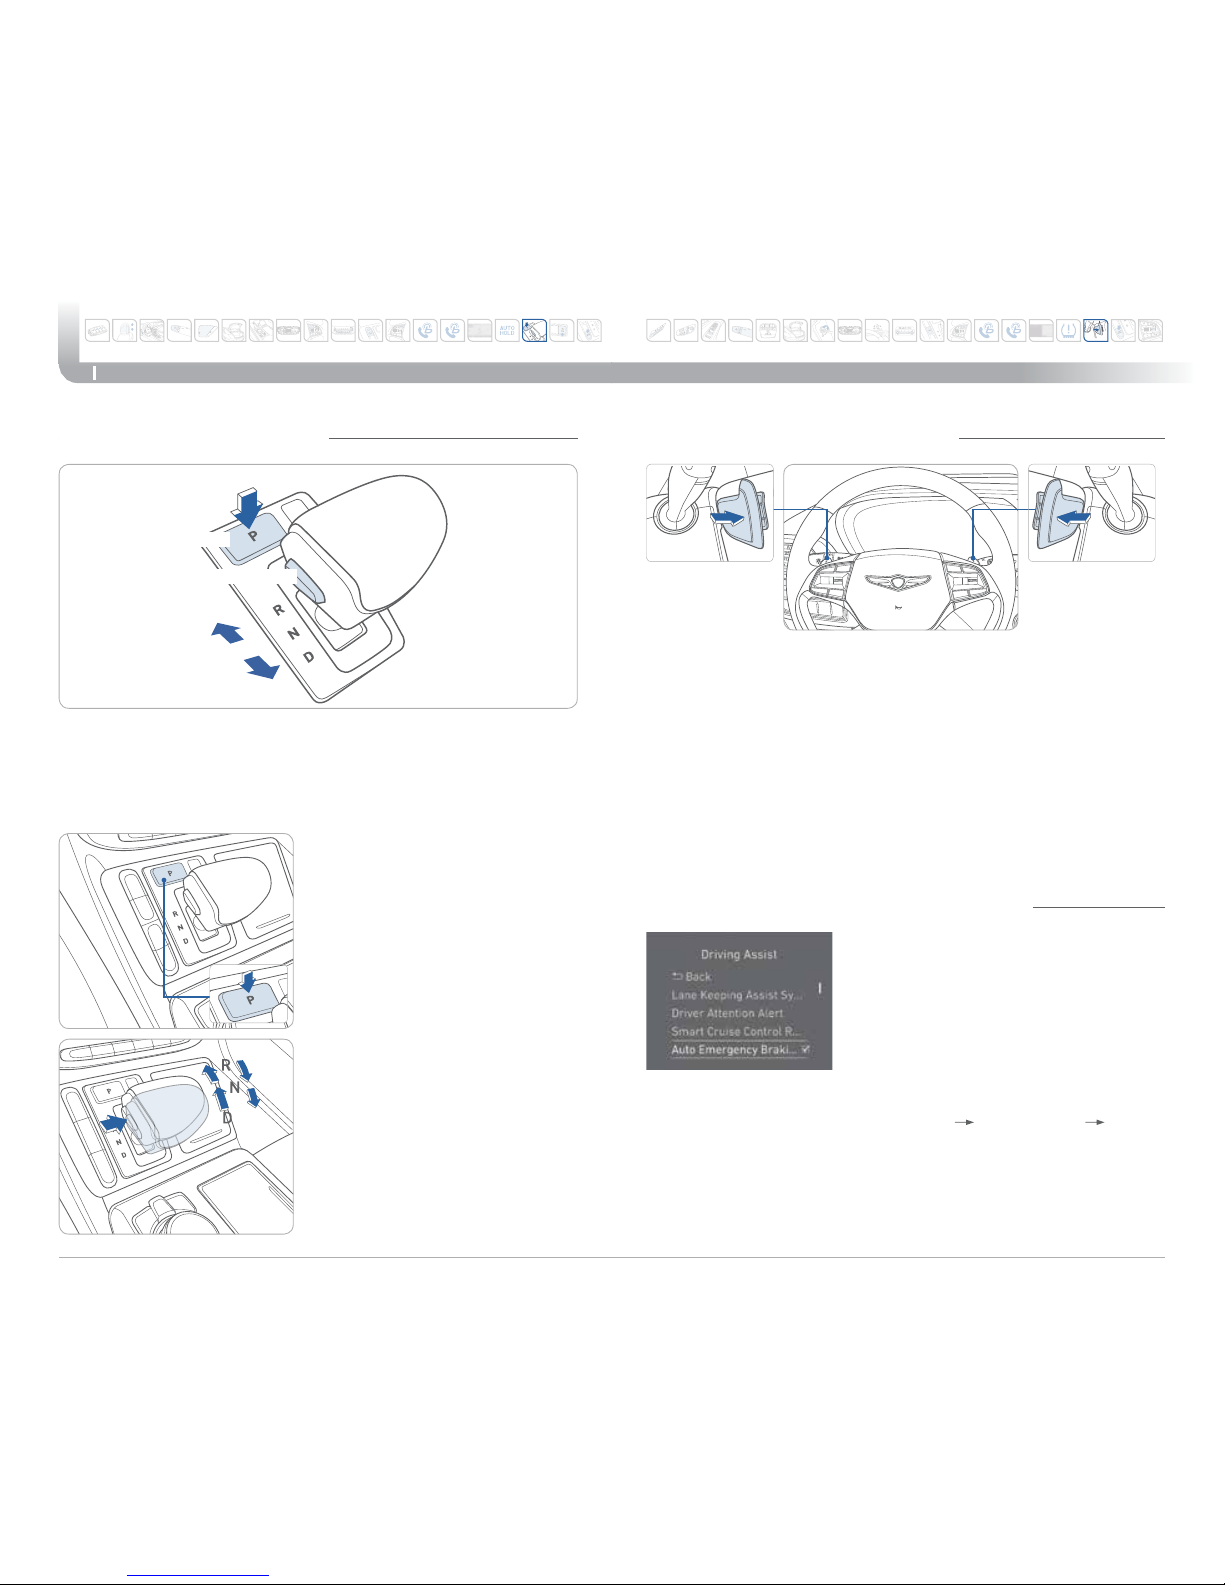
P Button
UNLOCK Button
PADDLE SHIFTER (Manual Mode)AUTOMATIC TRANSMISSION
When you move the shift lever, depress the brake pedal while
pressing the UNLOCK button.
The automatic transmission has eight forward speeds and one
reverse speed. The individual speeds are selected automatically in
the D (Drive) position.
P (Park)
Always stop completely before
shifting into P (Park). To shift the
gear from R (Rear), N (Neutral),
D (Drive) or Manual mode to
P(Park), press the [P] button while
depressing the brake pedal.
R (Reverse) / N (Neutral) / D (Drive)
To make a shift, press the [UNLOCK]
button while depressing the brake
pedal and then move the shift lever
forward (R side) or backward (D side).
The Automatic Emergency Braking (AEB)
system is designed to help detect and
monitor the vehicle ahead or detect a
pedestrian in the roadway through radar
signals and camera recognition to warn
the driver that a collision is imminent, and
if necessary, apply emergency braking.
To activate the system, select
‘User Settings
Driving Assist
Auto Emergency Braking‘ on the LCD
display. The system deactivates, when
the system setting is cancelled.
The paddle shifter is available
when the shift lever is in the D
(Drive) position.
Pull the [+] or [-] paddle shifter
once to shift up or down one
gear.
Press (-) to
downshift
Press (+) to
upshift
AUTOMATIC EMERGENCY BRAKING (AEB)
Genesis Brand
GENESIS
GENESIS
GENESIS
GENESIS
GENESIS
GENESIS
GENESIS
GENESIS
GENESIS
GENESIS
GENESIS
GENESIS
GENESIS
GENESIS
GENESIS
GENESIS
GENESIS
GENESIS
GENESIS
GENESIS
GENESIS
GENESIS
GENESIS
GENESIS
Page 20
drIVINg
Quick Reference Guide I 37
36 I Quick Reference Guide
G90
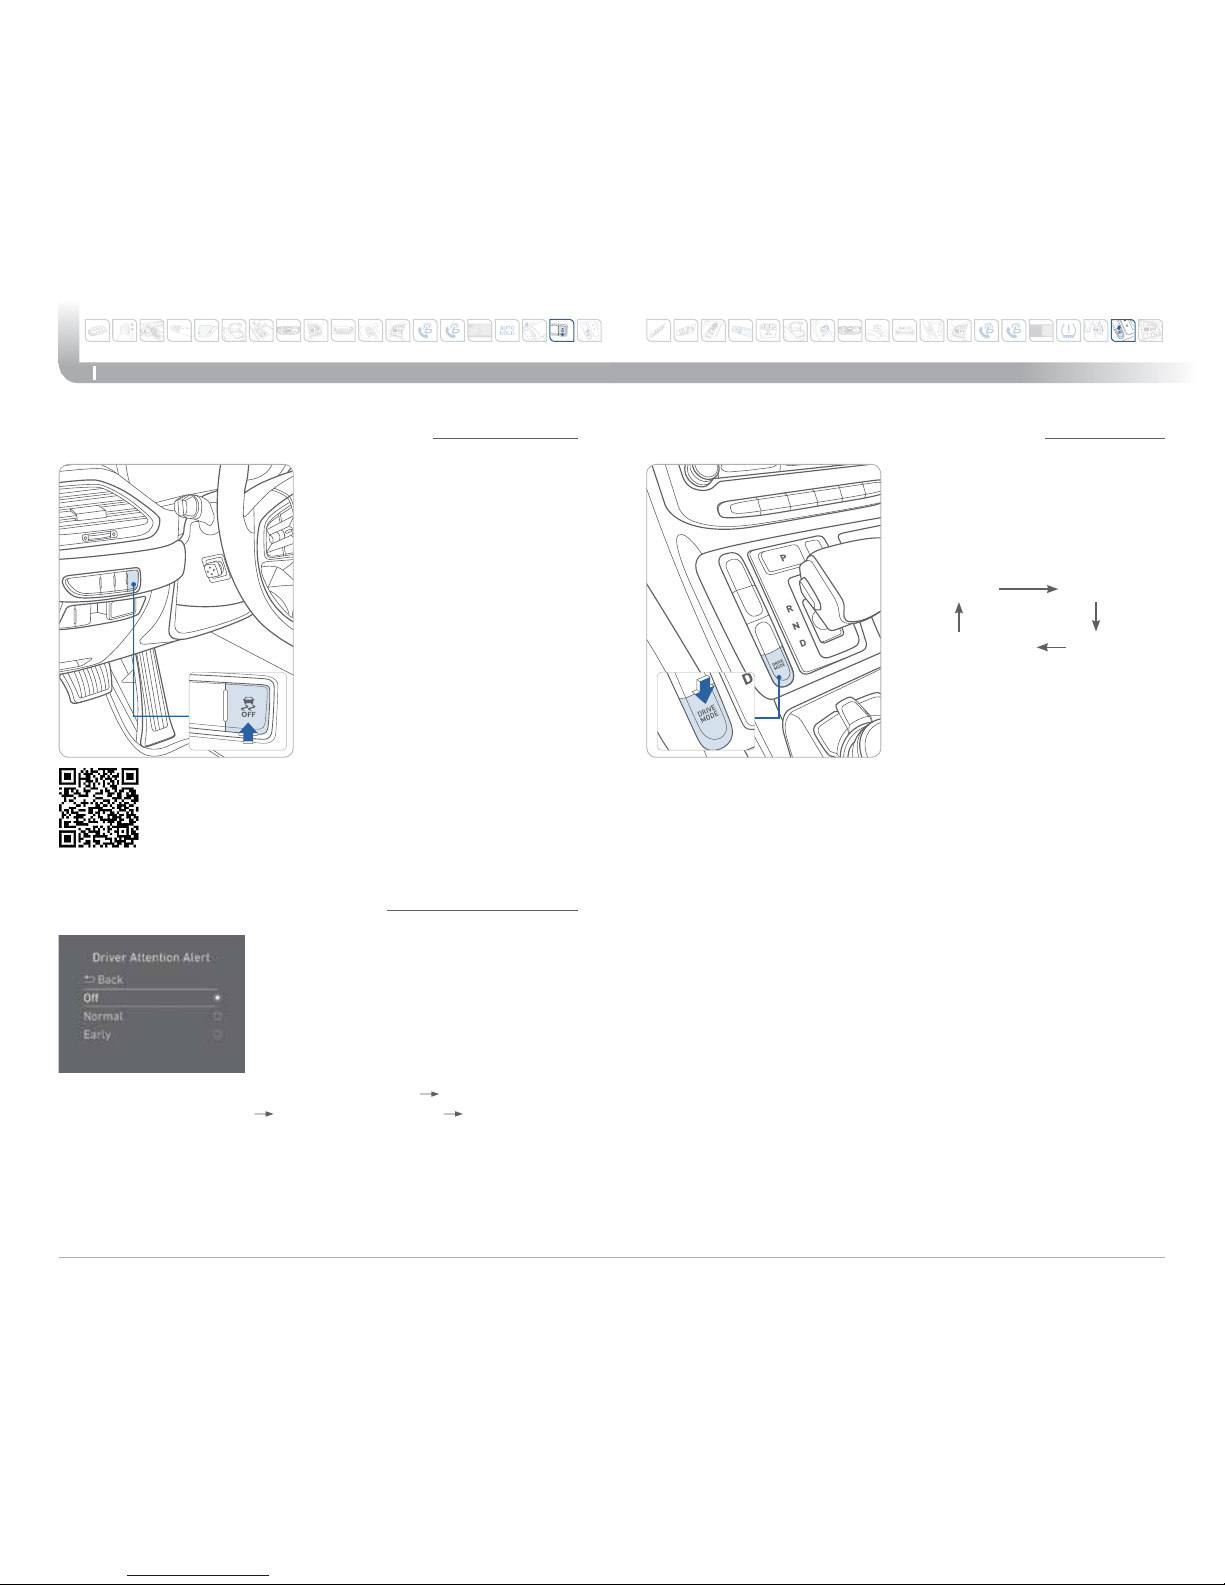
ELECTRONIC STABILITY CONTROL (ESC)
DRIVER ATTENTION ALERT SYSTEM
The ESC system is an electronic
system designed to help the driver
maintain vehicle control under
adverse conditions.
ESC automatically selects the
ON position when the engine is
started.
To turn off the Traction Control
Press the ESC OFF button shortly.
To turn off the Traction and
Stability Control
Press and hold the ESC OFF
button for more than 3 seconds.
The Driver Attention Alert (DAA), system
is to warn the driver with any hazardous
driving situations upon detecting the
driver’s fatigue level or inattentive driving
practices.
To turn ON the Driver Attention Alert
system, turn on the engine, and then
select ‘User Settings
Driving Assist
Driver Attention Alert Normal /
Early’ on the LCD Display.
The Driver Attention Alert system is
operable, when driving speed is between
40 mph and 110 mph.
DRIVE MODE INTEGRATED CONTROL SYSTEM
Press the DRIVE MODE switch to
select the preferred drive mode.
The mode displayed on the
instrument cluster changes as
below.
SMART mode
Automatically adjusts the driving
mode in accordance with the
driver’s driving habits.
SPORT mode
Focuses on dynamic driving
by automatically controlling the
steering wheel, engines, and
transmission systems.
ECO mode
Improves fuel efciency for
eco-friendly driving.
INDIVIDUAL mode
The driver can seperately adjust
modes of each driving system.
SPORTSMART
ECOINDIVIDUAL
Genesis Brand
GENESIS
GENESIS
GENESIS
GENESIS
GENESIS
GENESIS
GENESIS
GENESIS
GENESIS
GENESIS
GENESIS
GENESIS
GENESIS
GENESIS
GENESIS
GENESIS
GENESIS
GENESIS
GENESIS
GENESIS
GENESIS
GENESIS
GENESIS
GENESIS
Page 21
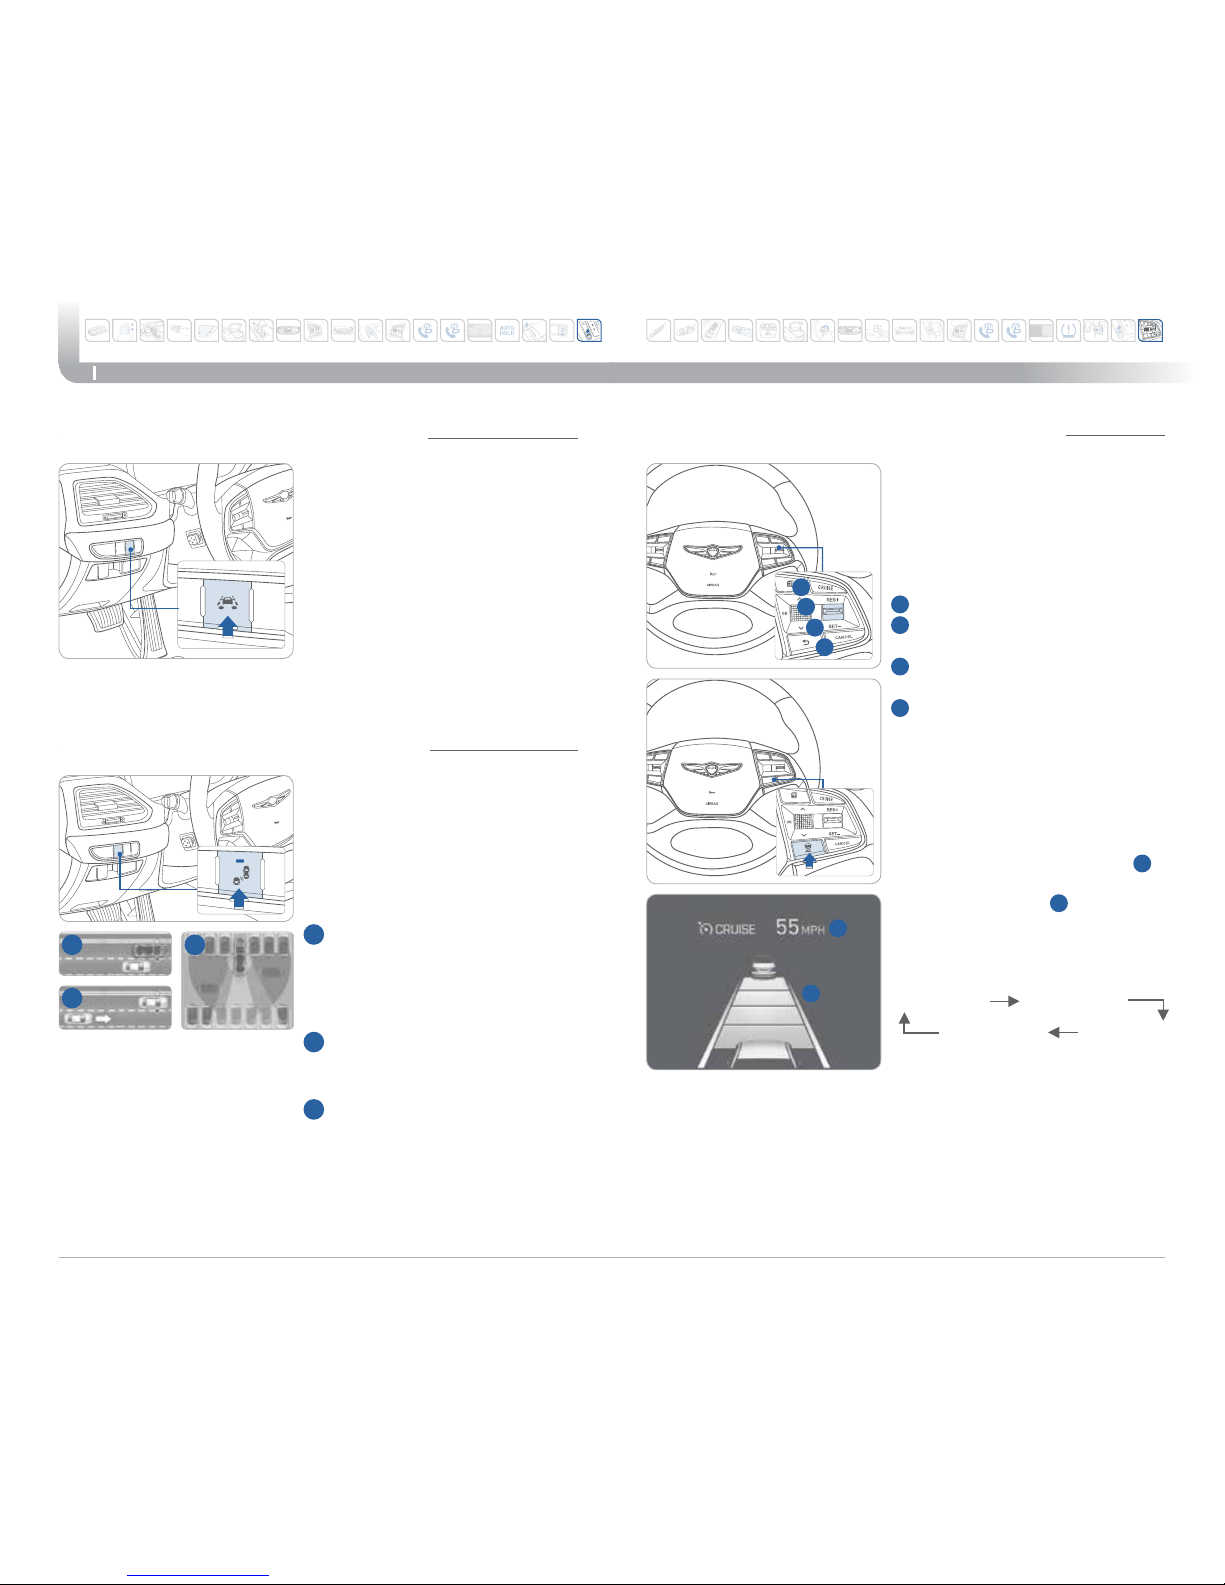
drIVINg
Quick Reference Guide I 39
38 I Quick Reference Guide
G90
The Lane Keeping Assist System
detects lane markers on the road,
and assists the driver's steering to
help keep the vehicle between the
lanes.
To activate, press the LKAS button
with the Engine Start/Stop button in
the ON position.
LKAS operates only when the
vehicle speed is between 40 mph
and 110 mph.
LANE KEEPING ASSIST SYSTEM (LKAS)
The BSD system monitors the rear
area of the vehicle and provides
information to the driver.
Press the BSD switch. If vehicle
speed exceeds 20 mph the system
will activate. Press the switch again
to deactivate the system.
A
BSD
(Blind Spot Detection)
Warning range is dependent on
your vehicle speed. If your vehicle
speed is much faster than other
vehicles, the warning is not active.
B
LCA
(Lane Change Assist)
When the vehicle is approaching at
high speed, the warning is active.
C
RCTA
(Rear Cross-Traffic Alert)
When your vehicle moves (below
6 mph) in Reverse, the sensor
detects the approaching vehicles
and the warning is active.
A
B
C
BLIND SPOT DETECTION SYSTEM (BSD)
1
To turn On/Off the Cruise Control.
2
To Resume or Increase the
Cruise Control speed.
3
To Set or Decrease the Cruise
Control speed.
4
To Cancel the Cruise Control.
Setting vehicle distance
Press the button to set and
maintain the vehicle-to-vehicle
distance without pressing the
accelerator or brake pedal.
The vehicle-to-vehicle distance
1
will automatically activate when you
set the cruise speed
2
.
Each time the button is pressed,
the vehicle-to-vehicle distance
changes as follows:
The Advanced Smart Cruise Control
System allows you to program the
vehicle to maintain constant speed
and distance detecting the vehicle
ahead without depressing the
accelerator/brake pedal.
ADVANCED SMART CRUISE CONTROL SYSTEM
2
3
4
1
2
1
Distance 2
Distance 3Distance 4
Distance 1
Genesis Brand
GENESIS
GENESIS
GENESIS
GENESIS
GENESIS
GENESIS
GENESIS
GENESIS
GENESIS
GENESIS
GENESIS
GENESIS
GENESIS
GENESIS
GENESIS
GENESIS
GENESIS
GENESIS
GENESIS
GENESIS
GENESIS
GENESIS
GENESIS
GENESIS
Page 22

g90 AT Your sErVICE ProgrAM TErMs ANd CoNdITIoNs
Program Coverage Summary
AtYourServiceProgramisincludedforthefirst5years
or60,000miles,whichevercomesfirst.
Complimentary
Services
Valet
Services
Complimentary
RentalVehicle
Maintenance
Wear
Items
G90 Original
Owner or Lessee
Yes Yes Yes Yes
G90 Subsequent
Owner or Lessee
Warranty
Only
Warranty
Only
No No
We come to you and provide you with alternative transportation. While your vehicle
is being serviced under this program, qualified drivers will be provided a courtesy
replacement Hyundai Genesis at no additional cost. You must be at least 25 years
of age (in most states) with a valid driver
’
s license to drive a replacement vehicle.
Please provide your Service Advocate with the following information:
• Insurance company name, policy number, and expiration date
• Driver
’
s license number, state, expiration and birth date
• Credit card number and expiration date
(standard requirement for rental car use)
• The above information for any additional drivers
Vehicle Eligibility
For original retail owners of the G90, we (Hyundai Motor America)
cover all factory-recommended scheduled maintenance and normal wear
parts replacement for the first 5 years or 60,000 miles, whichever comes first.
The At Your Service Program is applicable to all 2016 model year Hyundai G90
United States specification vehicles purchased in the United States from
Authorized G90 Dealerships. The program is not in effect outside of the
United States.
• Vehicle coverage begins on the date of first retail sale. Fleet vehicles are
excluded from this program.
• If the vehicle becomes damaged (such as by accident, fire, act of nature, etc.)
and is subsequently titled salvaged, flooded, or reconstructed, it is no longer
eligible for the benefits of the G90 at Your Service Program.
Guidelines for Scheduling Maintenance
The At Your Service Program covers normal factory-recommended scheduled
maintenance for the first 5 years or 60,000 miles, whichever comes first. Severe
use maintenance intervals are not covered by this program. Covered maintenance
costs include all labor and parts necessary to complete the factory recommended
service. Having your vehicle serviced at the specified time/mile intervals is critical in
maintaining long-term durability. Failure to have your vehicle serviced at the
specified interval may invalidate the warranty under certain circumstances.
If for any reason a service is missed, the Authorized G90 Dealership will perform the
next or missed major service.
Some owners may wish to have their oil changed more frequently. The customer
must pay for any additional services performed on the vehicle. Service procedures
not specifically referenced in the G90 Customer Care Quick Reference Guide must
be preauthorized by a Hyundai District Service Manager.
See below for program terms and conditions.
Quick Reference Guide I 41
40 I Quick Reference Guide
G90
COMPLIMENTARY RENTAL VEHICLE
FREE MAINTENANCE AND WEAR COVERAGE
Valet service is available while your vehicle is receiving At Your Service free
maintenance, wear items, or warranty repairs by an Authorized G90 Dealer. Simply
contact your Authorized G90 Dealership's Service Advocate or
contact the G90 Customer Connect Center at (877) 378-8727 to make
your appointment. The dealership will work with you to arrange your pickup
and delivery time and location.
• Valet appointments must be made at least 2 business days in advance.
• Valet area of coverage is valid only within an estimated 1 hour drive time
distance (based on traffic, weather, and road conditions) from the participating
dealership location to the pickup/delivery location.
• Valet pickup and delivery must occur during normal business hours.
After-hours pickup and delivery are at the discretion of your participating
dealership.
• You must notify your G90 Service Advocate 1 business day in advance if
location or time of valet services changes. If a change or cancellation is not
made at least 1 business day in advance, you may be charged a fee, or valet
service may be cancelled.
• You will be charged a fee if you elect to extend the use of the courtesy
replacement vehicle or delay the delivery of your vehicle.
• Prior to or at the time of pickup, you will need to provide your valet with the
following information if a courtesy replacement vehicle is needed:
Insurance company name, policy number, and expiration date
Driver’s license number, state, expiration, and birth date
Credit card number and expiration date
(standard requirement for rental car use)
The above information for any additional drivers
G90 owner must provide the valet with G90 that is currently registered in
compliance with local and state laws. Road tolls incurred during the valet service
may be charged to the vehicle owner.
VALET SERVICE
Genesis Brand
Page 23

Guidelines for Normal Wear
The Hyundai G90 Maintenance Program includes coverage for specific items that
may wear out under normal use (see below) for the first 5 years or 60,000 miles,
whichever comes first. To qualify for replacement, the wear limit must be
at or below the minimum service limits as specified by Hyundai Motor America
technical reference manuals. Tires are excluded from this program.
Items covered under normal wear include:
• Front and rear brake pads
• Front and rear brake discs
• W indshield wiper blade inserts
• Battery
Exclusions from Coverage
The following items, without limitation, are not covered by the
At Your Service Program:
• Gasoline and gasoline additives
• State inspections
• Wear and tear of soft trim, including seats, carpets, door casings,
wood veneer, headliner, and all chrome trim
• Wear and tear or damage to exterior body panels, trim, and glass
• Damage due to poor fuel quality, misuse, abuse, neglect, fire, accident,
flood, or installation of unapproved parts and accessories
• Vehicles used in competitive events
• Vehicles with an unreadable/tampered VIN, or where true mileage
cannot be determined
• Repairs and maintenance not performed at an Authorized G90 Dealership
• Repairs covered under the Hyundai New Vehicle Limited Warranty
• Required maintenance and covered wear parts replacement on
United States specification vehicles operating outside the United States
Transfer of Coverage
The described coverage only applies to the original retail purchaser or original
lessee of a Hyundai G90. The coverage is not transferable to subsequent owners,
with the exception of immediate family members. Immediate family members
include the following:
• Spouses or registered domestic partners
• Parents
• Children or stepchildren
Dealerships will verify that the owner/customer is the original owner/lessee. Certain
limitations and exclusions apply to this program. Please refer to your
New Vehicle Limited Warranty for warranty details.
FREE MAINTENANCE AND WEAR COVERAGE (continued)
Customer Date
KEY WEBSITES
Hyundai website - www.hyundai.com
Hyundai owner website - www.myhyundai.com
Bluetooth phone compatibility - www.hyundaiusa.com/bluetooth
g90 AT Your sErVICE ProgrAM TErMs ANd CoNdITIoNs
G90 CUSTOMER DELIVERY CHECK LIST (continued)
HYUNDAI OWNER DEALERSHIP NAME
SALES CONSULTANT DATE
VIN PREVIOUS VEHICLE
Automatic climate control - Pages 20 – 21
WALK THE CUSTOMER THROUGH EACH OF
THE FOLLOWING KEY DELIVERY FEATURES
How to operate Defrost
1
Press the front defrost button.
2
Set to warmest temperature setting.
3 Set to highest fan speed.
BEFORE DELIVERY
CONFIRM “GOOD BATTERY” USING GR8, AND STAPLE TEST TICKET HERE
SET TIRE PRESSURE TO PLACARD LF_______ RF _______ RR _______ LR _______
VERIFY VEHICLE IS CLEAN, IN GOOD CONDITION, FREE OF PAINT CHIPS AND
SCRATCHES; CLEAN WINDSHIELD AND BACK WINDOW
ENSURE FLOORMATS ARE SNAPPED INTO PLACE
 Loading...