

Page 1

DIS NAVIGATION SYSTEM / QUICK REFERENCE GUIDE
ENGLISH
FRANÇAIS
ESPAÑOL
KOREAN
P/N:MBM66364293
Page 2

GENESIS BRANDED VEHICLE OWNER PRIVACY POLICY
Your Genesis Branded Vehicle may be equipped with technologies and services that use information collected,
generated, recorded or stored by the vehicle. Genesis Branded Vehicle has created a Vehicle Owner Privacy
Policy to explain how these technologies and services collect use and share this information.
You may read our Vehicle Owner Privacy Policy on the genesismotorsusa.com website at:
https://www.genesismotorsusa.com/privacy-policy.html
If you would like to receive a hard copy of our Vehicle Owner Privacy Policy, please contact our Genesis
Customer Care at:
Genesis Customer Care
PO Box 20850
Fountain Valley, CA 92728
844-340-9741
customercare@genesismotorsusa.com
Genesis Customer Care representatives are available Monday through Friday, between the hours of 5:00 AM
and 7:00 PM PST and Saturday and Sunday between 6:30 AM and 3:00 PM PST (English).
For Genesis Customer Care assistance in Spanish or Korean, representatives are available Monday through
Friday between 6:30 AM and 3:00 PM PST.
2
Page 3

Thank you for purchasing this DIS Navigation system.
This user’s manual explains how to use the GENESIS DIS Navigation system.
Before using the product, read the contents of this user’s manual carefully and use this product safely.
• The screens shown in this manual may di er with the actual screens of the product.
• The design and speci cation of this product may change without prior noti cation for product improvement.
• When transferring the vehicle to another individual, include this user’s manual so that the next driver can
continue its use.
All Map Database cannot be copied without permission.
Important Notice: This is protected by U.S. copyright laws. All rights not expressly granted are reserved.
You may not otherwise reproduce, modify, and distribute the content without Hyundai MnSoft, Inc’s prior written consent.
3
Page 4
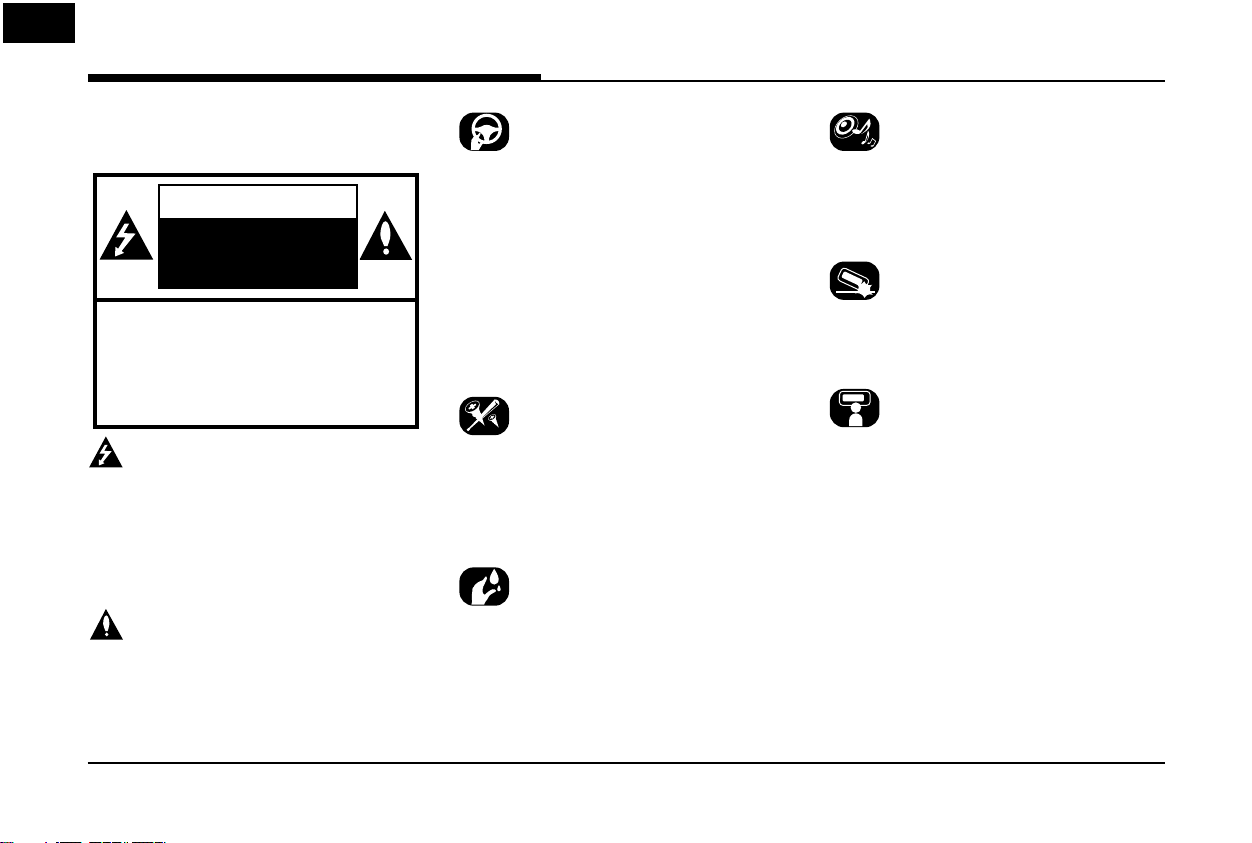
Precautions for Safety
Notations used within this
User's Manual
CAUTION
RISK OF ELECTRIC
SHOCK
DO NOT OPEN
CAUTION: TO REDUCE THE RISK OF
ELECTRIC SHOCK, DO NOT REMOVE THE
COVER (OR BACK). NO USER SERVICEABLE
PARTS INSIDE. REFER SERVICING TO
QUALIFIED SERVICE PERSONNEL.
Always operate the vehicle in a safe manner.
Do not become distracted by the vehicle while
driving and always be fully aware of all driving
conditions. Do not change settings or any
functions.
Pull over in a safe and legal manner before
attempting such operations.
To promote safety, certain functions are
disabled unless the parking brake is on.
When driving your vehicle, be sure to keep the
volume of the unit low enough to allow you to
hear sounds coming from the outside.
Do not drop it and avoid heavy impacts at
anytime.
The lightning ash with the arrowhead symbol
within an equilateral triangle is intended
to alert the user about the presence of
uninsulated dangerous voltage within the
product’s enclosure that may be of su cient
magnitude to constitute a risk of electric shock.
The exclamation point within an equilateral
triangle is intended to alert the user to
the presence of important operating and
maintenance (servicing) instructions in the
literature accompanying the appliance.
To reduce the risk of electric shock, do not
remove the cover or back of this product.
There are no user-serviceable parts inside.
Refer servicing to quali ed service personnel.
To reduce the risk of re or electric shock,
do not expose this product to dripping or
splashing water, rain, or moisture.
4
The driver should not watch the monitor while
driving. If the driver watches the monitor while
driving, it may lead to carelessness and cause
an accident.
Page 5

Precautions for Safety
CAUTION:
This product uses a Laser System.
To ensure proper use of this product, please
read this owner’s manual carefully and retain
it for future reference. Should the unit require
maintenance, contact an authorized service
center. Performing controls, adjustments, or
carrying out procedures other than those
speci ed herein may result in hazardous
radiation exposure.
To prevent direct exposure to laser beam, do
not try to open the enclosure.
Visible laser radiation when open. DO NOT
STARE INTO BEAM.
WARNING:
• Don’t use a cellular phone when you are
driving. You must stop at a safe place to use
a cellular phone.
• The use of the navigation radio by no means
relieves the driver of his/her responsibilities.
The highway code must always be observed.
Always observe the current tra c situation.
• The applicable tra c regulations and the
prevailing tra c situation always take
precedence over the instructions issued by
the navigation system if they contradict one
another.
• For tra c safety reasons, use the navigation
system menus only before starting a journey
or when the vehicle is stationary.
• In certain areas, one-way streets and turn
o and entry prohibitions (e.g. pedestrian
zones) are not recorded. In areas such as
these the navigation system will issue a
warning. Pay particular attention to one-way
streets and turn o and entry restrictions.
• The navigation system does not take the
relative safety of the suggested routes into
consideration.
Road blocks, building sites, height or weight
restrictions, tra c or weather conditions
or other in uences which a ect the route
safety or travel time are not taken into
consideration for the suggested routes. Use
your own discretion in order to decide on
the suitability of the suggested routes.
• The current legal road tra c speed limit
always takes priority over the values saved
on the data. It is impossible to provide an
assurance that the speed values of the
navigation system will always match those
of the current tra c regulations in every
situation.
• Always observe the applicable legal speed
limits the tra c regulations. The vehicle
speedometer must always be given priority
for display of the vehicle speed.
• Do not rely exclusively on the navigation
system when attempting to locate an
emergency service (hospital, re service
etc.). It cannot be guaranteed that all
available emergency services in your vicinity
are saved in the database. Use your own
discretion and abilities to secure help in
such situations.
5
Page 6
Precautions for Safety
CAUTION:
• Do not keep the navigation system running
with the engine stopped. Doing so may
discharge the vehicle battery. When you
use the navigation system, always keep the
engine running.
• When the driver wants to operate the
navigation system, rst park the vehicle in
a safe location and set the parking brake.
Operating the system while driving can
distract the driver and may result in a serious
accident.
• Do not disassemble or modify this system.
If you do, it may result in accidents, re, or
electrical shock.
• Some states/provinces may have laws
limiting the use of video screens while
driving. Use the system only where it is legal
to do so.
• Do not use your phone in private mode
when you are driving. You must stop at a
safe location to use it.
FCC Warning
This equipment has been tested and found
to comply with the limits for a Class B digital
device, pursuant to part 15 of the FCC
Rules. These limits are designed to provide
reasonable protection against harmful
interference in a residential installation.
This equipment generates, uses and can
radiate radio frequency energy and, if not
installed and used in accordance with the
instructions, may cause harmful interference
to radio communications. However, there is
no guarantee that interference will not occur
in a particular installation. If this equipment
does cause harmful interference to radio or
television reception, which can be determined
by turning the equipment o and on, the user
is encouraged to try to correct the interference
by one or more of the following measures:
• Reorient or relocate the receiving antenna.
• Increase the separation between the
equipment and receiver.
• Connect the equipment into an outlet on
a circuit di erent from that to which the
receiver is connected.
• Consult the dealer or an experienced radio/
TV technician for help.
CAUTION: This device complies with part 15
of the FCC Rules. Operation is subject to the
following two conditions:
(1) This device may not cause harmful
interference, and
(2) this device must accept any interference
received, including interference that may
cause undesired operation.
Changes or modi cations not expressly
approved by the manufacturer (or party
responsible) for compliance could void the
user’s authority to operate the equipment.
This equipment complies with FCC radiation
exposure limits set forth for an uncontrolled
environment. This equipment should be
installed and operated with minimum distance
20 cm between the radiator & your body.
End user must follow the speci c operating
instructions for satisfying RF exposure
compliance. This transmitter must not be co-
located or operating in conjunction with any
other antenna or transmitter.
IC Warning
“This device complies with Industry Canada
licence-exempt RSS standard(s).”
Operation is subject to the following
conditions: (1) this device may not cause
interference, and (2) this device must accept
any interference, including interference that
may cause undesired operation of the device.
6
Page 7

Table of Contents
Precautions for Safety 4
Notations used within this User's Manual . . .4
FCC Warning . . . . . . . . . . . . . . . . . . . . . . . . . .6
IC Warning . . . . . . . . . . . . . . . . . . . . . . . . . . .6
Table of Contents 7
Name of Each Component 11
Head unit . . . . . . . . . . . . . . . . . . . . . . . . . . . . 11
Driver Information System (DIS) Control
(USA Only) . . . . . . . . . . . . . . . . . . . . . . . . . . 13
Driver Information System (DIS) Control
(CANADA Only) . . . . . . . . . . . . . . . . . . . . . . 14
Steering wheel remote control . . . . . . . . . . . 15
Radio Operation (FM/AM) 16
Listening to FM/AM radio. . . . . . . . . . . . . . . 16
Listening to HD Radio™ Stations
(USA Only) . . . . . . . . . . . . . . . . . . . . . . . . . . 16
HD Radio screen ............................................ 16
HD Radio™ Reception On/Off
(USA Only) ....................................................... 17
Tag (USA Only) .............................................. 17
Radio Operation (SiriusXM™) 18
SiriusXM™ screen . . . . . . . . . . . . . . . . . . . . . 18
Listening to SiriusXM™ radio . . . . . . . . . . . . 19
Selecting SiriusXM™ broadcast channel . . . 19
Selecting a channel through manual
search ................................................................19
Selecting with channel up/down ............... 19
Selecting a channel through preset .........19
Selecting channel through channel/
category list . . . . . . . . . . . . . . . . . . . . . . . . . . 19
Audio CD/MP3 CD Operation 20
Playing an Audio CD/MP3 CD . . . . . . . . . . 20
Pause ...............................................................20
Skip ...................................................................20
Search ..............................................................20
Seek ...................................................................21
List ..................................................................... 21
Shuffle ............................................................... 21
Repeat .............................................................. 22
Scan .................................................................. 22
DVD/VCD Operation 23
Playing a DVD/VCD . . . . . . . . . . . . . . . . . . 23
Switching to Menu display or Full
Screen Display ...............................................23
Pause ...............................................................23
Skip ................................................................... 23
7
Search .............................................................. 24
Seek ..................................................................24
Jukebox Operation 25
Playing Jukebox Music . . . . . . . . . . . . . . . . 25
Pause ...............................................................25
Skip ................................................................... 25
Search ..............................................................25
Seek ..................................................................25
Cover Flow View ............................................25
List ....................................................................26
Shuffle .............................................................. 26
Scan .................................................................. 26
Repeat .............................................................. 26
Playing Jukebox Video . . . . . . . . . . . . . . . . .27
Switching to Menu display or Full
Screen Display ............................................... 27
Pause ............................................................... 27
Skip ................................................................... 27
Search .............................................................. 27
Seek .................................................................. 27
List .................................................................... 27
Shuffle .............................................................. 27
Repeat .............................................................. 27
Viewing Jukebox Image . . . . . . . . . . . . . . . 28
Switching to Menu display or Full
Screen Display ...............................................28
Skip ...................................................................28
Zoom in/out ................................................... 28
Page 8

Table of Contents
Slideshow ........................................................29
List ....................................................................29
Slideshow Settings ....................................... 29
USB Operation 30
Playing USB Music . . . . . . . . . . . . . . . . . . . 30
Pause ...............................................................30
Skip ...................................................................30
Search ..............................................................30
Seek ..................................................................30
Cover Flow View ............................................30
List ..................................................................... 31
Shuffle ............................................................... 31
Repeat ............................................................... 31
Hide Current File ............................................ 31
Copying the USB music file to Jukebox
Scan ................................................................... 31
Playing USB Video . . . . . . . . . . . . . . . . . . . 32
Switching to Menu display or Full
Screen Display ...............................................32
Pause ...............................................................32
Skip ................................................................... 32
Search ..............................................................32
Seek ..................................................................32
List ....................................................................33
Shuffle .............................................................. 33
Repeat .............................................................. 33
Copying the USB video file to Jukebox
.. 31
.. 33
Viewing USB Image . . . . . . . . . . . . . . . . . . 34
Switching to Menu display or Full
Screen Display ...............................................34
Skip ................................................................... 34
Zoom in/out ................................................... 34
Slideshow ........................................................34
List ....................................................................34
Slideshow Settings .......................................34
Copying the USB image file to Jukebox
..34
iPod® Operation 35
Playing iPod® . . . . . . . . . . . . . . . . . . . . . . . . 35
Pause ...............................................................35
Skip ................................................................... 35
Search ..............................................................35
Seek ..................................................................35
List ....................................................................35
Shuffle .............................................................. 35
Repeat .............................................................. 35
Scan .................................................................. 35
Auxiliary Device Operation 36
Playing an AUX source . . . . . . . . . . . . . . . . 36
Bluetooth® Audio 37
Playing Bluetooth® Audio . . . . . . . . . . . . . . .37
Before playing the Bluetooth® Audio ...... 37
Starting the Bluetooth® Audio................... 37
Pause ............................................................... 37
Skip ................................................................... 37
Shuffle .............................................................. 37
Repeat .............................................................. 37
Getting Started with Navigation
Operating Navigation Screen . . . . . . . . . . . 38
Map screen .....................................................38
38
Searching for Destination of
Navigation 41
Search . . . . . . . . . . . . . . . . . . . . . . . . . . . . . . 41
Address Search . . . . . . . . . . . . . . . . . . . . . . 42
Previous Destinations . . . . . . . . . . . . . . . . . 43
Address Book . . . . . . . . . . . . . . . . . . . . . . . 43
Adding to Address Book ............................44
Deleting Address Book ............................... 44
Editing Address Book .................................. 44
POI . . . . . . . . . . . . . . . . . . . . . . . . . . . . . . . 45
Searching for POI by category ..................45
Searching for POI by phone number ......45
Emergency . . . . . . . . . . . . . . . . . . . . . . . . . 45
Online Search (USA Only) . . . . . . . . . . . . . 46
8
Page 9

Table of Contents
Intersection . . . . . . . . . . . . . . . . . . . . . . . . . 46
Freeway Exit / Enter . . . . . . . . . . . . . . . . . . 46
Coordinates . . . . . . . . . . . . . . . . . . . . . . . . . .47
Home / Work . . . . . . . . . . . . . . . . . . . . . . . . .47
Registering Home or Work ........................ 47
Finding your Home or Work ..................... 47
Using the Route Menu 48
Route menu overview . . . . . . . . . . . . . . . . . 48
Cancel Route . . . . . . . . . . . . . . . . . . . . . . . . 48
Route Options . . . . . . . . . . . . . . . . . . . . . . . 48
Edit Route . . . . . . . . . . . . . . . . . . . . . . . . . . .49
Route Info / Avoid . . . . . . . . . . . . . . . . . . . 50
Route Overview . . . . . . . . . . . . . . . . . . . . . . 50
Route Preview . . . . . . . . . . . . . . . . . . . . . . . 50
Bluetooth® Wireless Technology 51
Before Using the Bluetooth Handsfree . . . . 51
What is Bluetooth Wireless Technology?
Precautions for Safe Driving ....................... 51
Cautions upon Connecting Bluetooth
Phone ................................................................ 51
Pairing and connecting the unit and a
Bluetooth phone . . . . . . . . . . . . . . . . . . . . . . 51
When no phones have been paired ........52
When a phone is already paired ..............53
Change Device . . . . . . . . . . . . . . . . . . . . . . 54
Disconnecting the connected phone ...... 54
... 51
Deleting Bluetooth Devices ........................ 54
Making a call by entering phone number . 55
Making a call by redialing . . . . . . . . . . . . . . 55
Making a call with speed dial numbers . . . 55
Answering/Rejecting a call . . . . . . . . . . . . . 55
Responding with messages . . . . . . . . . . . . 56
Switching call to the mobile phone . . . . . . 56
Ending a call . . . . . . . . . . . . . . . . . . . . . . . . 56
Using the menu during a phone call . . . . . 56
Call history . . . . . . . . . . . . . . . . . . . . . . . . . .57
Making a call from call history .................. 57
Downloading call history ............................. 57
Contacts . . . . . . . . . . . . . . . . . . . . . . . . . . . .57
Downloading mobile phone contacts .....58
Searching for contacts ................................58
Favorites . . . . . . . . . . . . . . . . . . . . . . . . . . . 58
Calling Favorites ............................................ 58
Editing Favorites ............................................ 59
Deleting Favorites ..........................................59
Messages . . . . . . . . . . . . . . . . . . . . . . . . . . . .59
Checking new messages ............................59
Checking new message contents ............60
Voice Recognition System 61
What is voice recognition? . . . . . . . . . . . . . . 61
Voice recognition features by language . . . . 61
Operating voice command . . . . . . . . . . . . . . 61
Condition for voice command system .....61
Starting voice recognition............................ 61
Skipping prompt messages .......................62
Re-starting voice recognition .................... 62
Ending voice recognition ............................ 62
Adjusting voice recognition volume ........ 62
Voice recognition quick start
(Manual Control) . . . . . . . . . . . . . . . . . . . . . 62
About voice command “Help” . . . . . . . . . . 62
Siri® 63
Operating Siri® command . . . . . . . . . . . . . . 63
What is Siri®? ................................................. 63
Starting Siri® ...................................................63
Re-starting Siri® ............................................. 63
Ending Siri® ..................................................... 63
Adjusting Siri® volume ................................. 63
SiriusXM™ Data 64
About SiriusXM™ Data . . . . . . . . . . . . . . . . 64
Accessing SiriusXM™ Data . . . . . . . . . . . . . 64
SiriusXM™ Weather Information
(USA Only) . . . . . . . . . . . . . . . . . . . . . . . . . 64
Current weather information
(USA Only) ......................................................64
Weather forecast (USA Only) .................... 64
Weather information in other region
(USA Only) ...................................................... 65
Weather information at ski resorts
(USA Only) ...................................................... 65
9
Page 10

Table of Contents
Searching for other region or ski resort
(USA Only) ...................................................... 66
Favorites (USA Only) .................................... 66
Weather & Security Alerts (USA Only) ... 67
Weather Map (USA Only) ...........................68
SiriusXM Traffic Information . . . . . . . . . . . . 68
SiriusXM™ Fuel Prices Information
(USA Only) . . . . . . . . . . . . . . . . . . . . . . . . . 68
Finding gas station (USA Only) ................68
Searching for gas station (USA Only).....69
Favorites (USA Only) .................................... 69
SiriusXM™ Stocks Information . . . . . . . . . . . 71
Favorites ............................................................ 71
SiriusXM™ Sports Information . . . . . . . . . . .72
Favorites ........................................................... 73
SiriusXM™ Movie Times Information
(USA Only) . . . . . . . . . . . . . . . . . . . . . . . . . . 74
Finding theater by searching for movie
(USA Only) ...................................................... 74
Viewing movie list by searching for
theater (USA Only) ....................................... 75
Favorites (USA Only) .................................... 76
Android Auto/Apple CarPlay 77
What is Android Auto/Apple CarPlay? . . . . . 77
Cautions ...........................................................77
Using Android Auto or Apple CarPlay . . . . .78
NOTICE ............................................................ 78
NOTICE-Android Auto ................................ 78
NOTICE-Apple CarPlay ............................... 78
Connected Services (USA Only) 79
Before using Connected Services . . . . . . . .79
What is Connected Services? ................... 79
What Is Telematics? ..................................... 79
About Transmission and Reception of
Radio Waves ................................................... 79
Using the Rear View Mirror Key . . . . . . . . . .79
Connected Services Safety and Security . . 80
Auto Crash Notification...............................80
SOS ..................................................................80
Stolen Vehicle Recovery ..............................80
Vehicle Slowdown..........................................80
Vehicle Immobilization ................................80
Getting Started with Connected Services . . 81
Driving Info . . . . . . . . . . . . . . . . . . . . . . . . . . 81
Send to Car with Google . . . . . . . . . . . . . . 82
Vehicle Diagnostics . . . . . . . . . . . . . . . . . . . 82
Apps . . . . . . . . . . . . . . . . . . . . . . . . . . . . . . 83
Download Center .........................................83
Apps Settings ................................................84
Connected Settings . . . . . . . . . . . . . . . . . . 85
Modem Information .....................................85
Wi-Fi Settings ................................................85
Service Activation ......................................... 87
10
Page 11

Name of Each Component
Head unit
The image of this product may be di erent from the actual product.
1
2
3
4
5
1. Disc slot
Insert a disc into the disc slot.
2. DISC IN indicator light (DISC-IN)
When a disc is inserted, the indicator is
illuminated.
B
3. Disc eject (
Press to insert or eject disc
) button
/ SXM
6
4. • PWR PUSH button
Press this button in power OFF status.
Press and hold this button in power ON
• Volume control knob (VOL)
Turn left/right to control volume.
• AV on/o button
Press this button to turn AV on or o in
power on status.
7
-Power on
-Power o
status.
11
5. FM/AM Button
Selects the FM/AM band.
6. SXM Button
Selects the SiriusXM band.
7. MEDIA button
Press this button to move to the [Media]
menu in media playing screen. Press this
button again to display the media playing
screen.
Page 12

Name of Each Component
/ SXM
13
12
11
8. SD map card slot
Insert the SD card into the slot.
9. MAP/VOICE button
• Press to display the map screen of the
current location.
• Press to repeat the voice guidance.
8
W
10. S SEEK/TRACK
When pressed momentarily (less than 0.8
sec.)
• FM/AM/SiriusXM mode: plays previous/
next station.
• MEDIA mode: changes the track, le, or
chapter.
- When pressed and held (0.8 sec. or longer)
• FM/AM/SiriusXM mode: changes the
station until the button is released.
• MEDIA mode: rewinds or fast forwards
the track, le, or chapter.
button
9
12
10
11. TUNE/FILE button
- FM/AM/SiriusXM mode: Turn to change
the station.
-
CD/DVD/VCD/Jukebox/USB/iPod mode: Turn
to search for the desired track, le or chapter.
12. DISP button
- Press to turn the screen on or o .
- Press and hold to move to the [Display]
menu screen.
13. RESET hole
Press to reset the unit.
Page 13

Name of Each Component
Driver Information System (DIS) Control (USA Only)
The image of this product may be di erent from the actual product.
1
2
3
4
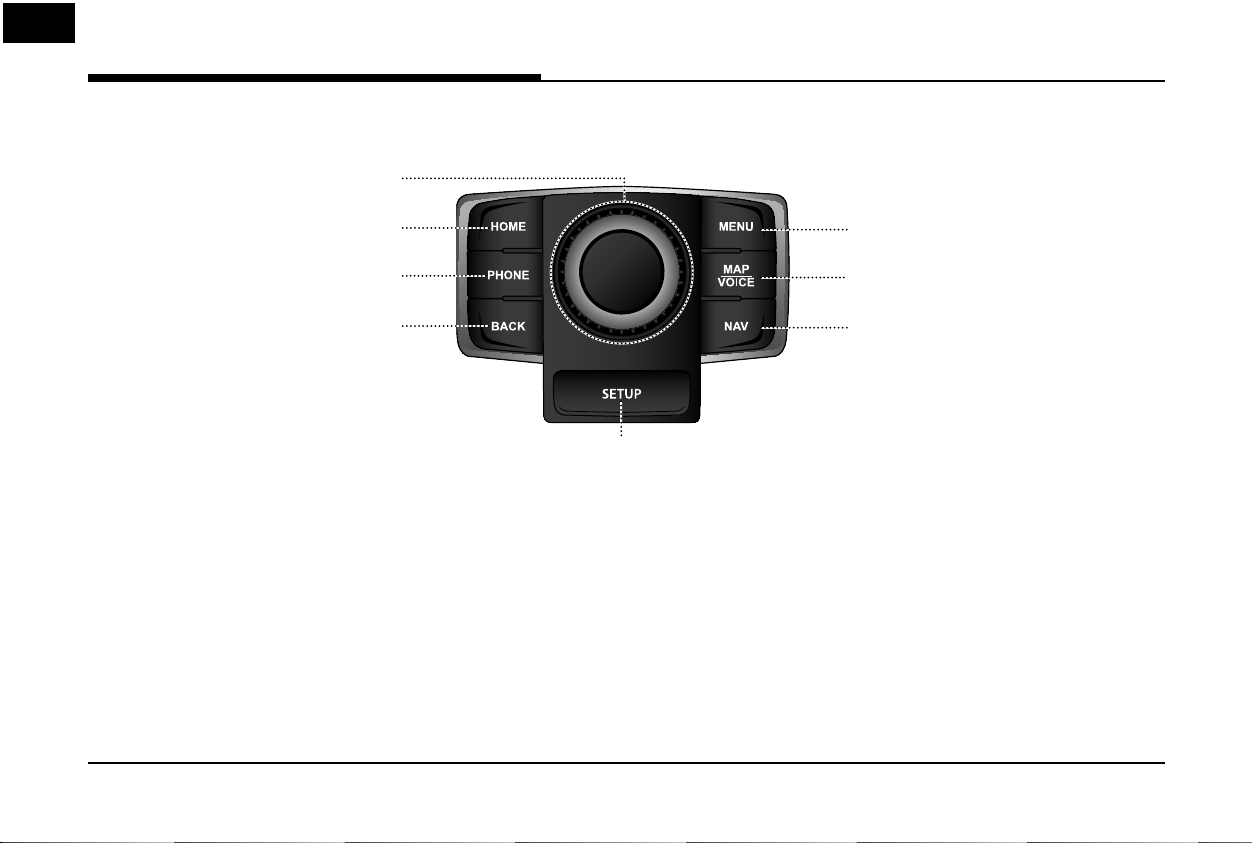
1. Controller
Tap or rotate to navigate through the menu
screens.
2. HOME button
Press to move to the [HOME] menu screen.
3. PHONE button
Press to move to the Phone menu screen.
5
4. BACK button
Press to move to the previous screen.
5. CONNECT button
Press to move to the [Connected Services]
menu screen.
6. NAV button
Press to move to the [Navigation] menu
screen.
13
8
7
6
7. MAP/VOICE button
• Press to display the map screen of the
current location.
• Press to repeat the voice guidance.
8. MENU button
Press to move to the pop-up menu in each
mode.
Page 14
Name of Each Component
Driver Information System (DIS) Control (CANADA Only)
The image of this product may be di erent from the actual product.
1
2
3
4
1. Controller
Tap or rotate to navigate through the menu
screens.
2. HOME button
Press to move to the [HOME] menu screen.
3. PHONE button
Press to move to the Phone menu screen.
5
4. BACK button
Press to move to the previous screen.
5. SETUP button
Press to move to the [Setup] menu screen.
6. NAV button
Press to move to the [Navigation] menu
screen.
14
8
7
6
7. MAP/VOICE button
• Press to display the map screen of the
current location.
• Press to repeat the voice guidance.
8. MENU button
Press to move to the pop-up menu in each
mode.
Page 15

Name of Each Component
Steering wheel remote control
The image of this product may be di erent from the actual product.
1
2
3
4
5
6
1. MODE button
• Each time this button is pressed, the
mode is changed. You can select the
accessible media manually from [Steering
Mode button] menu. Only active/available
media can be accessed.
• If no media or disc is inserted, the mode
will be skipped.
• Press and hold the button (over 0.8
seconds) to turn the AV on/o .
• When power is o , press the button to
turn power back on.
2. button
• Press the button (under 0.8 seconds) to
activate voice recognition mode.
• Press and hold the button (over 0.8
seconds) to cancel voice recognition.
Press and hold the button (over 0.8
•
seconds) to activate or end the Siri function
if an iPhone is paired to the system.
3. Volume (VOL+/VOL-) button
Increases or decreases the volume level.
button
Press to mute the sound.
4. Seek up/down (W/S) button
- When pressed momentarily (less than
0.8 sec.)
• FM/AM/SiriusXM mode: plays
previous/next preset station.
• MEDIA mode: changes the track, le,
or chapter.
- When pressed and held (0.8 sec. or
longer)
• FM/AM/SiriusXM mode: changes the
station until the button is released.
• MEDIA mode: rewinds or fast forwards
the track, le, or chapter.
5.
button
Press to operate Bluetooth Hands-Free
function.
• Press to accept a call.
• Press to make a call from last calls.
• Press and hold for redialing.
button
6.
Press to hang up a call.
15
Page 16

Radio Operation (FM/AM)
Listening to FM/AM radio
1. Press [FM/AM] on the head unit. Or press
[HOME] > [FM/AM].
2. Press [FM] or [AM] on the screen.
The FM/AM screen of the most recent
listened station is displayed.
3. Auto tuning:
S
SEEK/TRACK W] on the head unit.
Press [
When a station is received, searching stops.
-
Manual tuning:
Turn [TUNE/FILE] on the head unit in
clockwise or counter-clockwise direction.
-The stations move up and down step by
step.
Preset tuning:
From the 12 presets, select the station you
want to listen to.
Listening to HD Radio™
Stations (USA Only)
The HD Radio function is not supported for
vehicles purchased in Canada.
You can turn HD Radio reception on from the
menu and listen to HD Radio Broadcasts.
The HD Radio screen is displayed only when a
HD Radio broadcast is being received.
HD Radio screen
A
B
D
A
HD Radio Reception & Channel buttons
Displays main HD Radio channels and used
to directly select the currently available
local channels.
C
16
Page 17

Radio Operation (FM/AM)
B
HD Channel Number
• HD Channel number saved in preset.
• Preset tuning: From the 12 presets, select
the HD Channel you want to listen to.
C
Broadcast Information
Displays detailed information about the
current broadcast. (Album Cover Art,
Artist name, Song title, HD Radio channel,
Frequency, PTY, etc...)
D
Frequency controller
When controller is focused, it moves to
center of screen. Turn the controller to
search for frequency and move the red
line.
Note
,
HD Radio reception is included when the
vehicle is in Radio mode. Methods used to
reorder between channels, save preset stations,
or other methods of searching frequencies
used for standard radios are identical for HD
Radio receivers. The HD Radio icon will be
displayed when the vehicle is within regions
where HD Radio signals can be received.
HD Radio™ Reception On/Off
(USA Only)
1. Select the band (FM, AM) you want.
If an HD Radio broadcast is received,
the radio mode will switch from analog
broadcast to HD Radio broadcast.
Press [Menu] > [HD Radio] on the screen.
The HD Radio receiver will be off and
switch to analog broadcast.
Note
,
• The default setting of [HD Radio] is set to on.
• HD Radio Technology is a digital radio
technology used by FM and AM radio stations
to transmit audio and data via a digital signal
in conjunction with their analog signals.
• While listening to the radio, the HD Radio
icon will become displayed if receiving an
HD Radio broadcast.
Tag (USA Only)
If the HD Radio broadcast includes Tag
information, then the tag information is
displayed on the screen.
1. Press [Tag] on the HD Radio screen.
Note
,
When HD Radio reception is o , the [Tag]
button is deactivated.
17
Page 18
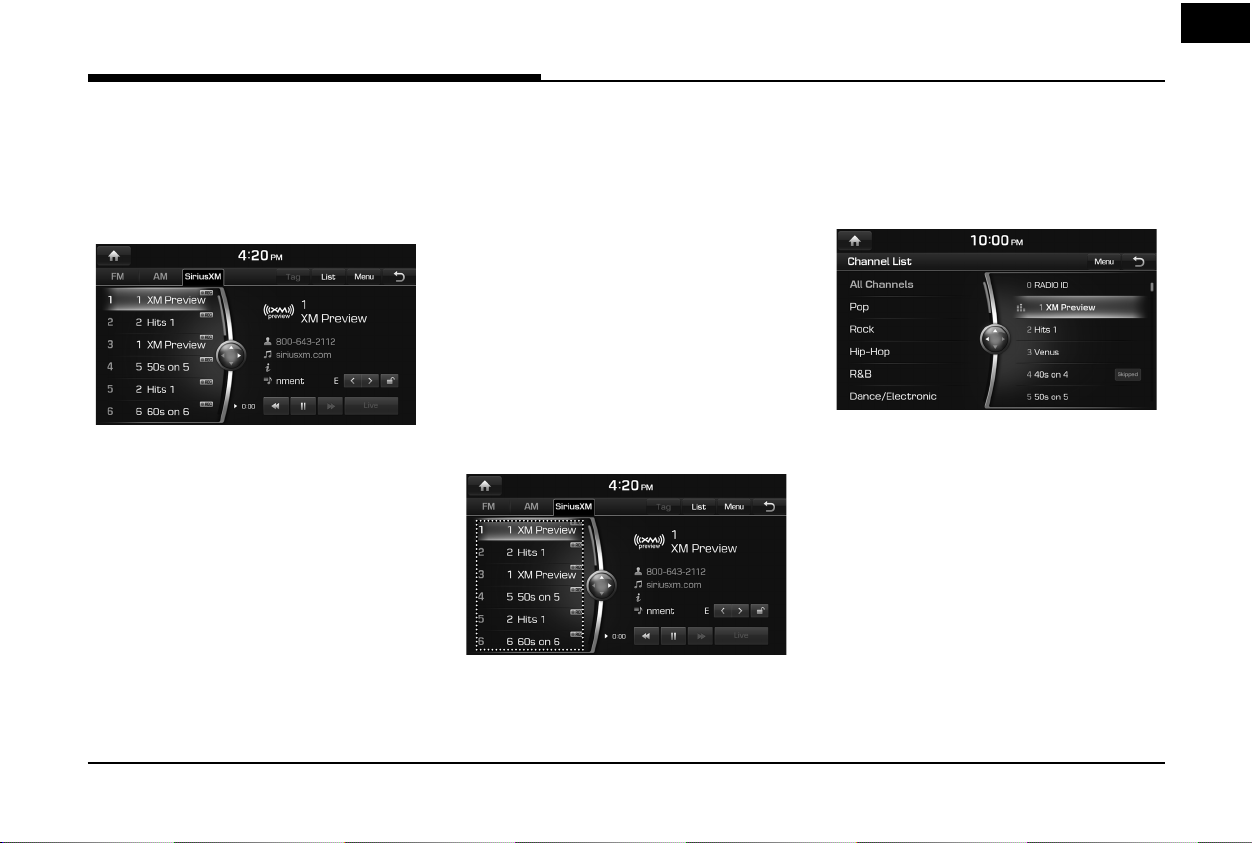
Radio Operation (SiriusXM™)
SiriusXM™ screen
3
1. Category Info
Displays the category currently playing.
2. Channel Logo
Displays the logo of the channel currently
playing.
3. Preset list
Displays the channels saved in the Preset list.
Smart Favorites ( )
SXM supports 6 smart favorites. It is
buffered 1 hour for the currently tuned
channel (Instant Replay) and at least 1/2
hour for each of the 6 smart favorites.
21
4
5
6
7
11
10
9
8
4. Channel Info
Displays the current channel number and
5. Contents Info
Displays the artist, title and other
6.
If the Category Lock is Off, you can change
12
name.
information about the song currently
playing.
(Category Lock)
or search all channels. If the Category Lock
is On, you can change or search only the
channels of the currently active category.
7. Live
Changes to the Live Broadcast mode.
8.
Displays the time difference between the
song playing and the Live broadcast.
9.
c
Repeats the previously broadcasted
program.
• When it is pressed shortly (less than 0.8
sec.): Moves to the previous item.
• When it is pressed and held (0.8 sec. or
longer): Searches backwards until the
button is released.
d
/M (Play/Pause)
10.
Plays/Pauses the currently broadcasting
program.
11.
v
• When it is pressed shortly (less than 0.8
sec.): Moves to the next item.
• When it is pressed and held (0.8 sec.
or longer): Searches forward until the
button is released.
12.
This feature is used to select the Previous/
Next category.
(Time difference)
/ (Category Selection Buttons)
18
Page 19
Radio Operation (SiriusXM™)
Listening to SiriusXM™ radio
1. Press [SXM] on the head unit. Or press
[HOME] > [SiriusXM].
The SiriusXM radio screen of the most
recent listened channel will be displayed.
2. Select the desired broadcast channel.
For more details, Refer to "Selecting
SiriusXM broadcast channel".
Selecting SiriusXM™ broadcast
channel
Selecting a channel through manual
search
Turn [TUNE/FILE] on the head unit clockwise
or counter-clockwise to display the previous or
next channel information.
Selecting with channel up/down
Press [S SEEK/TRACK W] on the head unit.
- The previous or next channel will be selected.
Selecting a channel through preset
Press the preset button of the desired channel.
Selecting channel through
channel/category list
1. Press [List] on the screen.
Or press [Menu] > [Channel List].
2. Select the desired category and channel.
Press [Menu] > [Now Listening] to return
to the current playing channel.
Press [Menu] > [Featured Favorites] to
move to the [Featured Favorites] menu.
If you want to skip a channel, press [Menu]
> [Skip]. After press the channel to skip,
press [g] to confirm your selection.
Note
,
The channel list may be di erent according to
the region.
19
Page 20
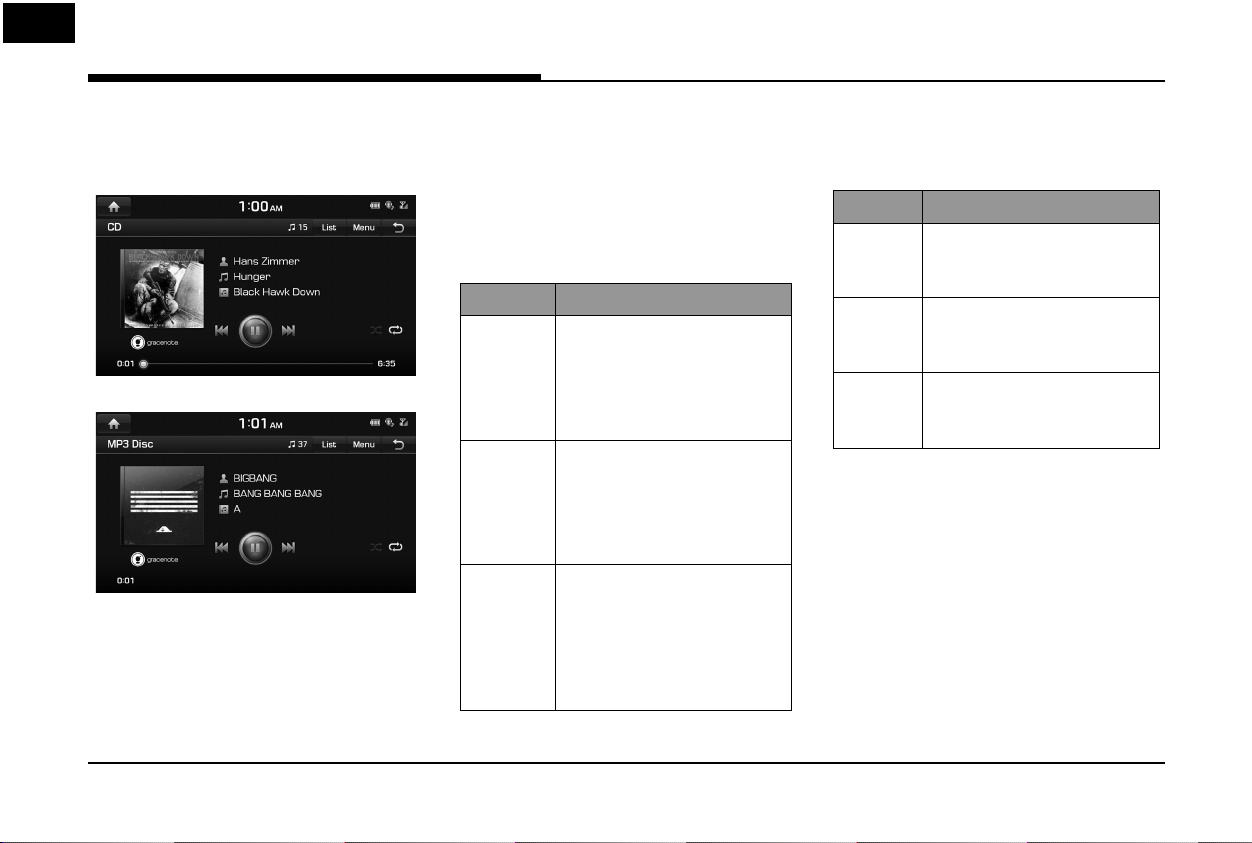
Audio CD/MP3 CD Operation
Playing an Audio CD/MP3 CD
Insert a disc into the disc slot and playback will
start automatically.
Audio CD
MP3 CD
Note
,
To play the Audio CD or MP3 CD while a
di erent source is playing, press [HOME] >
[Media] > [CD] or [MP3 Disc].
Pause
Press [M] on screen or with the controller.
d
Press [
] on screen or with the controller to
play it again.
Skip
You can play the previous or next track/ le.
Position Description
Screen • Press [
• Pressing [
Head unit • Press [
• Pressing [
Controller • Push the controller left or
• Push the controller left after
C/V
seconds of playback time
plays the current track/ le
from the beginning.
S
SEEK/TRACK W].
seconds of playback time
plays the current track/ le
from the beginning.
right.
3 seconds of playback time
plays the current track/ le
from the beginning.
].
] after 3
C
S
SEEK] after 3
Search
You can rewind/fast forward to a speci c point
of a track/ le.
Position Description
/
Screen Press and hold [
and then release at the point
you want.
Head unit Press and hold [
W
] and then release at the
point you want.
Controller Push and hold the controller
left or right and then release at
the point you want.
C
S
SEEK/TRACK
V
]
20
Page 21
Audio CD/MP3 CD Operation
Seek
You can play the track/ le directly by searching
for the desired music.
Position Description
Head unit Turn [ TUNE/FILE] to search
for a desired track/ le. If the
desired track/ le is displayed,
press the [TUNE/FILE] to play
the track/ le.
Controller Turn the controller to search
for a desired track/ le. If the
desired track/ le is displayed,
press the controller to play the
track/ le.
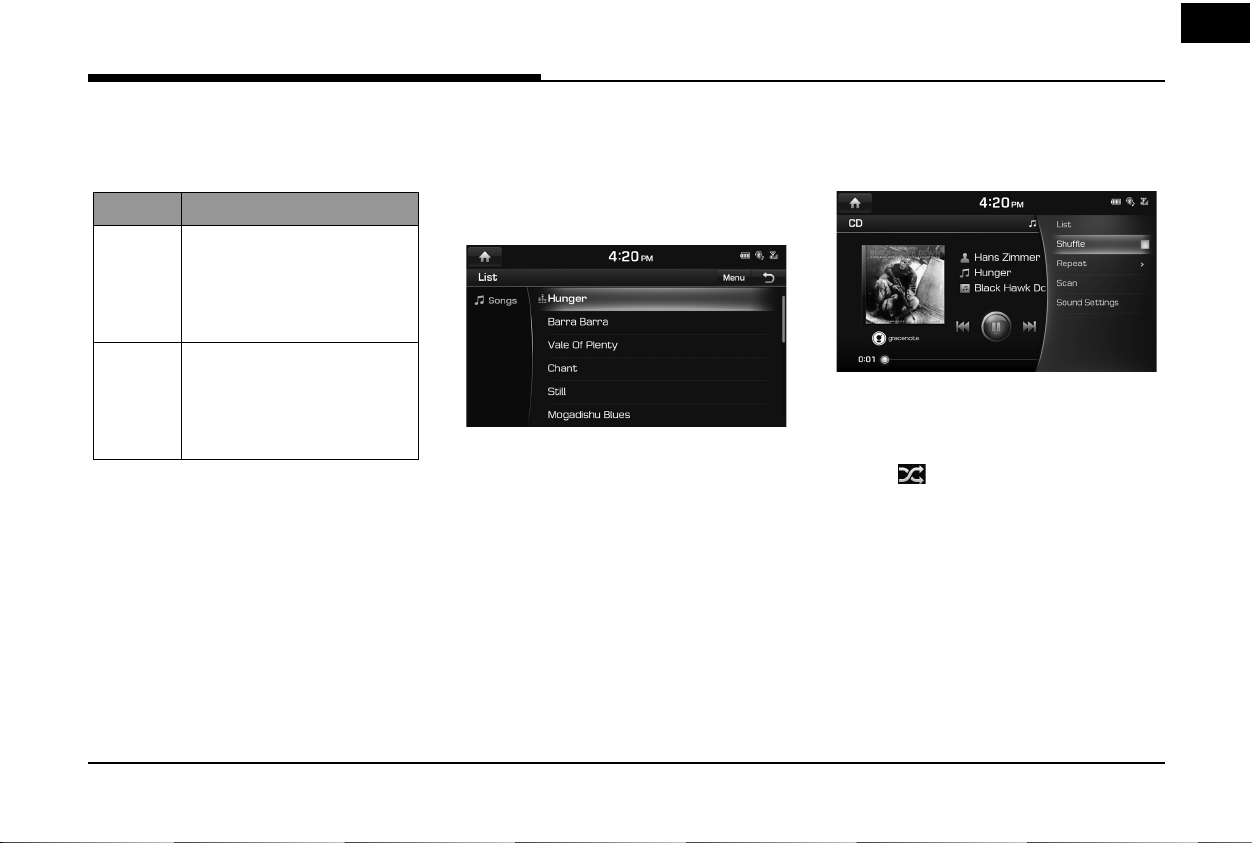
List
You can play the desired track/ le by searching
the track/ le list included in the disc.
1. Press [List].
Or press [Menu] > [List].
For example: Audio CD
• Press [Menu] > [Now Playing] to move to
the current playing screen.
2. Press the desired track/ le.
Shuffle
All tracks/ les can be played randomly.
Press [Menu] > [Shu e].
For example: Audio CD
Note
,
You can set or cancel the Shu e function by
pressing [
] on the playing screen.
21
Page 22
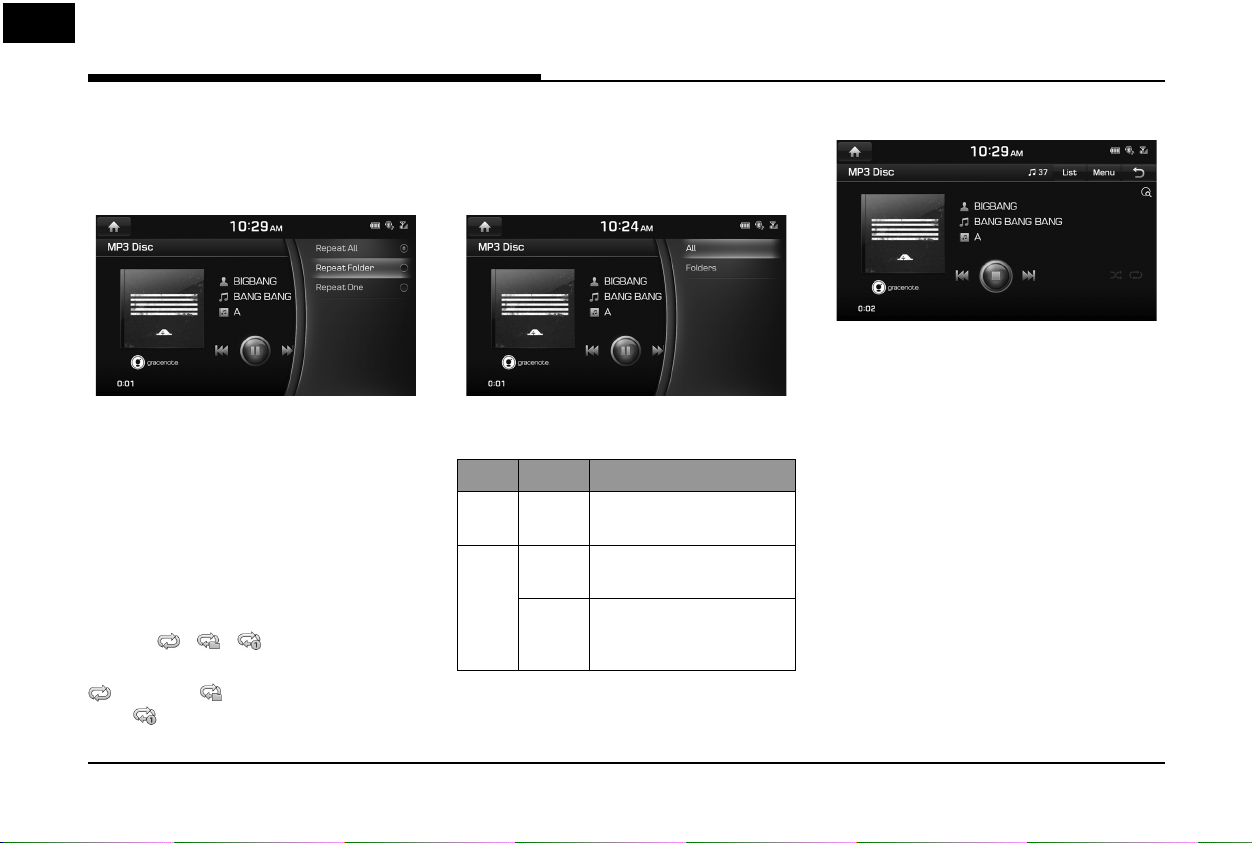
Audio CD/MP3 CD Operation
Repeat
The current playing track/ le or folder is played
repeatedly.
1. Press [Menu] > [Repeat].
For example: MP3 CD
2. Press the desired item.
• [Repeat All]: Repeats all tracks/files.
• [Repeat Folder]: Repeats all files within
the current folder. (MP3 CD Only)
• [Repeat One]: Repeats the current track/
file.
Note
,
You can change the Repeat function by
pressing
screen.
Only),
[ ]/[ ]/[ ]
: Repeat All, : Repeat Folder (MP3 CD
: Repeat One
on the playing
Scan
This function scans the beginning of each
track/ le for 10 seconds.
1. Press [Menu] > [Scan].
For example: MP3 CD
2. Press the desired item.
CD Menu Description
Audio CD- Scans the beginning of
each track for 10 seconds.
MP3 CDAll Scans the beginning of
each le for 10 seconds.
Folders Scans the beginning of
all les within the current
folder for 10 seconds.
3. Press [
] to cancel the Scan function.
Z
22
Page 23
DVD/VCD Operation
Playing a DVD/VCD
Insert a disc into the disc slot, with the label
facing up.
Playback will start automatically. In some cases,
the disc menu might appear.
Note
,
• To play the DVD or VCD while a di erent
source is playing, press [HOME] > [Media] >
[DVD] or [VCD].
• If a menu screen is displayed, select the
desired option by using the controller.
• Video is not available while driving.
(Because of tra c regulations, video is only
available while the vehicle is stopped.)
Switching to Menu display or Full
Screen Display
Position Description
Screen Press the screen.
Controller
,
Press [Menu] > [Full Screen Display] or wait 5
seconds to display full screen mode.
Push the controller up or down on
full screen display mode.
Note
Pause
Press [M] on screen or with the controller.
d
Press [
] on screen or with the controller to
play it again.
Skip
You can play the previous or next chapter/
track.
Position Description
Screen • Press [
• Pressing [
Head unit • Press [
• Pressing [
Controller • Push the controller left or
• Push the controller left after
C/V
of playback time plays the
current chapter/track from
the beginning.
S
SEEK/TRACK W].
seconds of playback time
plays the current chapter/
track from the beginning.
right.
3 seconds of playback time
plays the current chapter/
track from the beginning.
].
] after 3 seconds
C
S
SEEK] after 3
23
Page 24
DVD/VCD Operation
Search
You can rewind/fast forward to a speci c point
of a chapter/track.
Position Description
/
Screen Press and hold [
and then release at the point
you want.
Head unit Press and hold [
W
] and then release at the
point you want.
Controller Push and hold the controller
left or right and then release at
the point you want.
C
S
SEEK/TRACK
V
]
Seek
You can play the chapter/track directly by
searching for the desired chapter/track.
Position Description
Head unit Turn [TUNE/FILE] to search
for a desired chapter/track. If
the desired chapter/track is
displayed, press the [TUNE/
FILE] to play the chapter/track.
Controller Turn the controller to search
for a desired chapter/track. If
the desired chapter/track is
displayed, press the controller
to play the chapter/track.
24
Page 25

Jukebox Operation
Playing Jukebox Music
You can play music les saved in Jukebox.
If there is no music le in Jukebox, copy the
desired music le to Jukebox. For more details,
refer to “Copying the USB music le to Jukebox”
on page 31.
1. Press [HOME] > [Media].
2. Press [Jukebox Music].
Jukebox music automatically plays.
Note
,
If there are no songs, Jukebox music won’t be
available in [Media] menu screen.
Pause
You can pause the playing le.
For more details, refer to “Pause” on page 20.
Skip
You can play the previous or next le.
For more details, refer to “Skip” on page 20.
Search
You can rewind/fast forward to a speci c point
of a le.
For more details, refer to “Search” on page 20.
Seek
You can play the le directly by searching for
the desired le.
For more details, refer to “Seek” on page 21.
Cover Flow View
You can search and select the cover ow in
Jukebox.
1. Press [Menu] > [Cover Flow View].
2. Press the desired album.
• Press [Menu] > [View Default Player] to
move to the current playing screen.
• Press [Menu] > [List] to move to the list
menu.
• Press [Menu] > [Shu e] to set the Shu e
function.
• Press [Menu] > [Repeat] to set the Repeat
function.
• Press [Menu] > [Scan] to set the Scan
function.
• Press [Menu] > [Sound Settings] to set
the sound.
25
Page 26
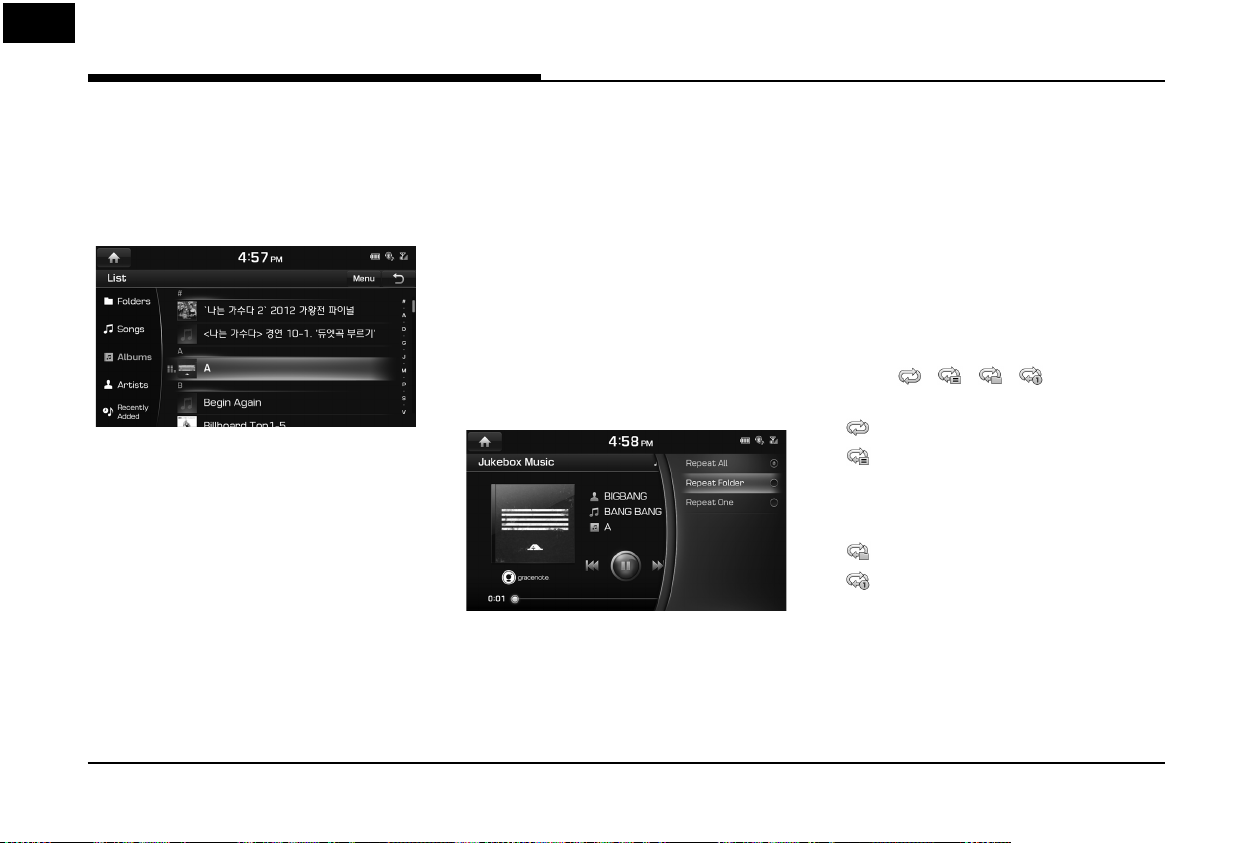
Jukebox Operation
List
You can play the desired le by searching the
le list included in Jukebox.
1. Press [List].
Or press [Menu] > [List].
For example: Jukebox music screen
2. Select the desired le.
• Press [Menu] > [Now Playing] to move to
the current playing screen.
• Press [Menu] > [Delete] to delete the
desired le.
• Press [Menu] > [Clear Jukebox] to delete
all les and playlists in Jukebox.
• Press [Menu] > [View Capacity] to check
the storage capacity saved in Jukebox.
Shuffle
All les can be played randomly.
For more details, refer to “ Shu e” on page 21.
Scan
This function scans the beginning of each le
for 10 seconds.
For more details, refer to MP3 CD operation of
“ Scan” on page 22.
Repeat
The current playing le is played repeatedly.
1. Press [Menu] > [Repeat].
2. Press the desired item.
• [Repeat All]: Repeats all files. Displayed as
[Repeat Album] or [Repeat Artist] during
playback from the [Albums] or [Artists]
category.
• [Repeat Folder]: Repeats all files within
current folder.
• [Repeat One]: Repeats the current file.
Note
,
You can change the Repeat function by
pressing
screen.
•
•
•
•
[ ]/[ ]/[ ]/[ ]
: Repeat All
: Repeat Album/Repeat Artist
(It is displayed when all les repeat during
playback from the [Albums] or [Artists]
category.)
: Repeat Folder
: Repeat One
on the playing
26
Page 27
Jukebox Operation
Playing Jukebox Video
You can play the video les saved in Jukebox.
If there is no video le in Jukebox, copy the
desired video to Jukebox. For more details,
refer to “Copying the USB video le to Jukebox”
on page 33.
1. Press [HOME] > [Media].
2. Press [Jukebox Video].
The Jukebox Video is played.
Note
,
• If there are no videos, Jukebox Video won’t
be available in the [Media] menu screen.
• Video is not available while driving.
(Because of tra c regulations, video is only
available while the vehicle is stopped.)
Switching to Menu display or Full
Screen Display
Position Description
Screen Press the screen.
Controller
,
Press [Menu] > [Full Screen Display] or wait 5
seconds to display full screen mode.
Push the controller up or down on
full screen display mode.
Note
Pause
You can pause the playing le.
For more details, refer to “Pause” on page 20.
Skip
You can play the previous or next le.
For more details, refer to “Skip” on page 20.
Search
You can rewind/fast forward to a speci c point
of a le.
For more details, refer to “Search” on page 20.
Seek
You can play the le directly by searching for
the desired le.
For more details, refer to “Seek” on page 21.
List
You can play the desired le by searching the
le list included in Jukebox.
For more details, refer to “List” on page 26.
Shuffle
All les can be played randomly.
For more details, refer to “ Shu e” on page 21.
Repeat
The current playing le is played repeatedly.
For more details, refer to “ Repeat” on page 26.
27
Page 28

Jukebox Operation
Viewing Jukebox Image
You can view the image les saved in Jukebox.
If there is no image le in Jukebox, copy the
desired image to Jukebox. For more details,
refer to “Copying the USB image le to
Jukebox” on page 34.
1. Press [HOME] > [Media].
2. Press [Jukebox Image].
The Jukebox Image is viewed.
Note
,
• If there are no images, Jukebox image won’t
be available in the [Media] menu screen.
• Image is not available while driving.
(Based on the tra c regulation, Image is
only available whenever vehicle is in stop
condition with parking gear.)
Switching to Menu display or Full
Screen Display
Position Description
Screen Press the screen.
Controller
,
Press [Menu] > [Full Screen Display] or wait 5
seconds to display full screen mode.
Push the controller up or down on
full screen display mode.
Note
Skip
You can view the previous or next image.
Position Description
Screen Press [
Controller Push the controller left or
C/V
right.
].
Zoom in/out
1. Turn the controller left or right.
2. Push the controller up, down, left or right
to move the image.
28
Page 29

Jukebox Operation
Slideshow
1. Press [Menu] > [Slideshow].
The slideshow is played.
2. Press the controller to stop the slideshow.
List
You can view the desired image by searching
the image list included in Jukebox.
1. Press [List].
Or press [Menu] > [List].
2. Press the desired image.
• Press [Menu] > [Now Playing] to move to
the current playing screen.
• Press [Menu] > [Delete] to delete the
desired le.
• Press [Menu] > [Clear Jukebox] to delete
all les and playlists in Jukebox.
• Press [Menu] > [View Capacity] to check
the storage capacity saved in Jukebox.
Slideshow Settings
You can set the slideshow interval. The
slideshow is played according to the time
interval.
1. Press [Menu] > [Slideshow Settings].
2. Press the desired slideshow interval.
29
Page 30

USB Operation
Playing USB Music
You can play music les saved in a USB
memory device.
Connect a USB device to the USB port.
Playback will start automatically.
Note
,
To play USB music while a di erent source is
playing, press [HOME] > [Media] > [USB Music].
Pause
You can pause the playing le.
For more details, refer to “Pause” on page 20.
Skip
You can play the previous or next le.
For more details, refer to “Skip” on page 20.
Search
You can rewind/fast forward to a speci c point
of a le.
For more details, refer to “Search” on page 20.
Seek
You can play the le directly by searching for
the desired le.
For more details, refer to “Seek” on page 21.
Cover Flow View
You can search and select the cover ow in
USB.
1. Press [Menu] > [Cover Flow View].
2. Press the desired album.
• Press [Menu] > [View Default Player] to
move to the current playing screen.
• Press [Menu] > [List] to move to the list
menu.
• Press [Menu] > [Shu e] to set the Shu e
function.
• Press [Menu] > [Repeat] to set the Repeat
function.
• Press [Menu] > [Hide Current File] to hide
the current playing le.
• Press [Menu] > [Copy to Jukebox] to copy
the desired les to Jukebox. For more
details, refer to “Copying the USB music
le to Jukebox” on page 31.
• Press [Menu] > [Scan] to set the Scan
function.
• Press [Menu] > [Sound Settings] to set
the sound.
30
Page 31

USB Operation
List
You can play the desired le by searching the
le list included in USB.
1. Press [List].
Or press [Menu] > [List].
2. Press the desired le after searching for
[Folders], [Songs], [Albums], [Artists], or
[Recently Added].
• Press [Menu] > [Now Playing] to move to
the current playing screen.
• Press [Menu] > [Copy to Jukebox] to copy
the desired les to Jukebox.
Shuffle
All les can be played randomly.
For more details, refer to “ Shu e” on page 21.
Repeat
The current playing le is played repeatedly.
For more details, refer to “ Repeat” on page 26.
Hide Current File
You can hide the current playing le.
Press [Menu] > [Hide Current File] from the
playing screen.
Copying the USB music file to Jukebox
You can copy the desired les to Jukebox.
1. Press [Menu] > [Copy to Jukebox].
2. Select the desired file, then press [Copy].
• [Copy]: Copies the selected file.
• [Copy All]: Copies all the files.
• [Unmark All]: Unmarks all the files.
• [Cancel]: Cancels the copy function.
Note
,
During le copy, the icon is displayed on the
top right side of the screen. When the copy is
completed, the icon disappears automatically.
Scan
This function scans the beginning of each le
for 10 seconds.
For more details, refer to MP3 CD operation of
“ Scan” on page 22.
31
Page 32

USB Operation
Playing USB Video
You can play video les saved in a USB memory
device.
Connect a USB device to the USB port and
playback starts automatically.
Note
,
• To play USB Video while a di erent source
is playing, press [HOME] > [Media] > [USB
Video].
• Video is not available while driving.
(Because of tra c regulations, video is only
available while the vehicle is stopped.)
Switching to Menu display or Full
Screen Display
Position Description
Screen Press the screen.
Controller
,
Press [Menu] > [Full Screen Display] or wait 5
seconds to display full screen mode.
Push the controller up or down on
full screen display mode.
Note
Pause
You can pause the playing le.
For more details, refer to “Pause” on page 20.
Skip
You can play the previous or next le.
For more details, refer to “Skip” on page 20.
Search
You can rewind/fast forward to a speci c point
of a le.
For more details, refer to “Search” on page 20.
Seek
You can play the le directly by searching for
the desired le.
For more details, refer to “Seek” on page 21.
32
Page 33

USB Operation
List
You can play the desired le by searching the
le list included in USB.
1. Press [List].
Or press [Menu] > [List].
2. Press the desired le.
• Press [Menu] > [Now Playing] to move to
the current playing screen.
• Press [Menu] > [Copy to Jukebox] to copy
the desired les to Jukebox.
Shuffle
All les can be played randomly.
For more details, refer to “ Shu e” on page 21.
Repeat
The current playing le is played repeatedly.
For more details, refer to “Repeat” on page 26.
Copying the USB video file to
Jukebox
You can copy the desired les to Jukebox.
1. Press [Menu] > [Copy to Jukebox].
2. Select the desired file, then press [Copy].
• [Copy]: Copies the selected file.
• [Copy All]: Copies all the files.
• [Unmark All]: Unmarks all the files.
• [Cancel]: Cancels the copy function.
Note
,
During le copy, the icon is displayed on the
top right side of the screen. When the copy is
completed, the icon disappears automatically.
33
Page 34

USB Operation
Viewing USB Image
You can play image les saved in a USB
memory device.
1. Connect a USB device to the USB port.
2. Press [HOME] > [Media] > [USB Image].
Note
,
Image is not available while driving. (Based on
the tra c regulation, Image is only available
whenever vehicle is in stop condition with
parking gear.)
Switching to Menu display or Full
Screen Display
Position Description
Screen Press the screen.
Controller
,
Press [Menu] > [Full Screen Display] or wait 5
seconds to display full screen mode.
Push the controller up or down on
full screen display mode.
Note
Skip
You can view the previous or next image.
For more details, refer to “Skip” on page 28.
Zoom in/out
Turn the controller left or right.
For more details, refer to “Zoom in/out” on
page 28.
Slideshow
You can set the slideshow.
For more details, refer to “Slideshow” on page
29.
List
You can view the desired image by searching
the image list included in USB.
For more details, refer to “List” on page 29.
Slideshow Settings
You can set the slideshow interval. The slideshow
is played according to the time interval.
For more details, refer to “Slideshow Settings”
on page 29.
Copying the USB image file to Jukebox
You can copy the desired les to Jukebox.
1. Press [Menu] > [Copy to Jukebox].
2. Select the desired file, then press [Copy].
• [Copy]: Copies the selected file.
• [Copy All]: Copies all the files.
• [Unmark All]: Unmarks all the files.
• [Cancel]: Cancels the copy function.
Note
,
During le copy, the icon is displayed on the
top right side of the screen. When the copy is
completed, the icon disappears automatically.
34
Page 35

iPod® Operation
Playing iPod®
1. Use iPod exclusive cable to connect iPod
to USB connector.
2. Press [HOME] > [Media] > [iPod].
It runs iPod mode.
Pause
You can pause the playing le. For more
details, refer to “Pause” on page 20.
Skip
You can play the previous or next le. For more
details, refer to “Skip” on page 20.
Search
You can rewind/fast forward to a speci c point
of a le. For more details, refer to “Search” on
page 20.
Seek
You can play the le directly by searching for
the desired le. For more details, refer to “Seek”
on page 21.
List
You can play the desired le by searching the
le list included in iPod.
1. Press [List].
Or press [Menu] > [List].
2. Press the desired le.
• Press [Menu] > [Now Playing] to move to
the current playing screen.
• Press [Menu] > [Edit Category] to edit the
category, then press the desired category.
After moving to the desired category by
turning the controller left or right, press
the controller.
Shuffle
All les can be played randomly.
For more details, refer to “ Shu e” on page 21.
Repeat
The current playing le is played repeatedly.
1. Press [Menu] > [Repeat].
2. Press the desired item.
• [Repeat All]: Repeats all files.
• [Repeat One]: Repeats the current file.
Note
,
You can change the Repeat function by
pressing
[ ]/[ ]
: Repeat All, : Repeat One
on the playing screen.
Scan
This function scans the beginning of each le
for 10 seconds. For more details, refer to MP3
CD operation of “ Scan” on page 22.
35
Page 36

Auxiliary Device Operation
Playing an AUX source
1. Connect an auxiliary device to the AUX
terminal.
2. Play the auxiliary device.
Note
,
If you want to play the auxiliary device when
playing other source, press [HOME] > [Media]
> [AUX].
36
Page 37

Bluetooth® Audio
Playing Bluetooth® Audio
Before playing the Bluetooth® Audio
• Music saved in the mobile phone can be
played in the car through Bluetooth audio
streaming.
• Bluetooth audio can be played only when
a Bluetooth phone has been connected.
To play Bluetooth audio, connect the
Bluetooth phone to the car system. For
more information on connecting Bluetooth,
please refer to user’s manual “Pairing and
connecting the unit and a Bluetooth phone”
on page 51.
• The audio streaming function may not be
supported in some mobile phones. Only
one function can be used at a time between
the Bluetooth handsfree or Bluetooth audio
function. For example, if you convert to the
Bluetooth handsfree while playing Bluetooth
audio, the music will be discontinued.
Starting the Bluetooth® Audio
1.
Press [HOME] > [Media] > [Bluetooth Audio].
2. The Bluetooth audio screen is displayed.
Pause
d
Press [
Press [
play it again.
This feature may not be supported on some
Bluetooth devices.
] on screen or with the controller.
M
d
] on screen or with the controller to
M
Note
,
Skip
You can play the previous or next le.
For more details, refer to “Skip” on page 20.
Note
,
This feature may not be supported on some
Bluetooth devices.
Shuffle
All les can be played randomly.
For more details, refer to “ Shu e” on page 21.
Note
,
This feature may not be supported on some
Bluetooth devices.
Repeat
The current playing le is played repeatedly.
1. Press [Menu] > [Repeat].
2. Press the desired item.
• [Repeat All]: Repeats all files.
• [Repeat One]: Repeats the current file.
• [Repeat O ]: Cancels the repeat function.
Note
,
• You can change the Repeat function by
pressing
screen.
• This feature may not be supported on some
Bluetooth devices.
[ ]/[ ]/[ ]
: Repeat All, : Repeat One,
: Repeat O
on the playing
37
Page 38

Getting Started with Navigation
Operating Navigation Screen
The navigation system displays various information on the screen.
Map screen
1
2
3
4
5
1. Clock display
Displays current time.
] button
2. [
Press [
3. Map display
• Displays the direction of the map.
• Press [
] to move to [HOME] menu screen.
], [ ] or [ ].
-
(Heading up (2D)): Displays
always shows the vehicle’s direction as
proceeding towards the top of the screen.
- (North up (2D)): Displays always has
north at the top of screen.
(3D) : Shows the map in 3 dimension.
-
GPS signal state display
Displays the state of GPS signal reception.
• Active - color : GPS reception is
satisfactory.
• Inactive - gray : GPS reception is
unsatisfactory.
38
4. Navigation voice guidance on/o
(
/ )
Sets the volume of voice guidance louder
than that of audio.
] button
5. [
Zoom in the map. Press [
] repeatedly.
Page 39

Getting Started with Navigation
14
9
6
7
8
6. Map scale display
• Displays the current map scale.
• Sets the zoom level automatically to the
guidance.
7. [ ] button
Zoom out the map. Press [
8. [MENU] button
Moves to quick menu screen.
] repeatedly.
11 1312
10
9. Route guidance
Displays the route guidance to the
destination when a route is set.
10. Vehicle position
Displays current vehicle position and
direction.
11. Current position
Displays the current position. Press to check
the destination information.
39
12. Remaining distance display/ Remaining
time
Displays the distance and time of arrival
to the destination or waypoint. Press and
check the information on destination.
13. Cancel Route
Cancels the route guidance to the
destination or waypoint.
14. [Route] button
Changes the route conditions when a route
is set.
Page 40

Getting Started with Navigation
15
16
17
18
19
20
15. [Destination] button
Moves to [Destination] menu.
16. [Nearby POI Search] button
Finds a POI (Point Of Interest) near current
position, destination or route.
17. [Save] button
Adds frequently used address to [Address
Book] menu.
18. [Tra c] button
Displays the traffic information.
40
19. [Guidance Volume] button
Adjusts the navigation volume.
20. [Settings] button
Moves to [Settings] menu.
Page 41

Searching for Destination of Navigation
Search
You can search your destination by name,
address or coordinates.
1. Press [MENU] or [NAV] > [Destination] >
[Search].
2. Enter the name of the location, address or
coordinates and press [OK] or [Menu] >
[Search].
You can change the state by pressing
[State] or [Menu] > [State].
3. Select a location on the map from the list
of your search results or filter your search
results by city or category.
• Press [Menu] > [Filter by City] to narrow
your search results by city.
• Press [Menu] > [Filter by Category] to
narrow your search results by category.
41
4. Select the location from the search results
to set as a destination.
• Press [Set as Destination] to set the
location as a destination.
• Press [Add Waypoint] to add the location
as a waypoint.
• Press [Save] to add the location to the
address book.
• Press [Nearby POI Search] to search the
area in your proximity.
• Press [Call] to make a call to the location.
Page 42

Searching for Destination of Navigation
Address Search
You can nd the destination by searching for
an address.
1. Press [MENU] or [NAV] > [Destination] >
[Address].
2. Enter the name of the State, House No.,
Street or City corresponding to the desired
destination.
3. Press [Set as Destination].
• If you want to add a waypoint when a
route is set, press [Add Waypoint].
• If you want to add the position to
[Address Book] menu, press [Save].
• If you want to find a POI (Point Of Interest)
near current position, destination, route,
scroll mark or city center, press [Nearby
POI Search].
Note
,
When you set the [Alternative Routes], follow
steps 4.
4. Press [Faster Time] or [Shorter Distance].
• [Faster Time]: Calculates the route based
on the fastest arrival time.
• [Shorter Distance]: Calculates the route
based on the shortest distance.
5. Press [Start Guidance].
• Press [Route Options] to set the route
option. For more details, refer to “Route
Options” on page 48.
• Press [Route Info / Avoid] to check
route information and set a route to be
avoided. For more details, refer to “Route
Info / Avoid” on page 50.
• Press [Edit Route] to edit the route. For more
details, refer to “Edit Route” on page 49.
• Press [Cancel Route] to cancel the route.
For more details, refer to “Cancel Route”
on page 48.
42
Page 43

Searching for Destination of Navigation
Note
,
The destination is saved in the [Prev.
Destinations] menu automatically. (Page 43)
Previous Destinations
You can nd the destination to a location that
you have previously set as the destination.
1. Press [MENU] or [NAV] > [Destination] >
[Prev. Destinations].
• [All]: Displays all previous destinations,
departing places, and searched places.
• [Previous Destinations]: Displays previous
destination places.
• [Previous Start Points]: Displays previous
departing places.
• [Freq. Visited Points]: Displays frequently
visited places.
• Press [Menu] > [Name] or [Date] to
arrange the list in name or date order.
• Press [Menu] > [Delete] to select and
delete items from various entries all at
once.
2. Press the preferred previous point from the
list.
3. Follow steps 3-5 of the " Address Search" on
page 42.
Address Book
You can nd the destination to a location
saved in the [Address Book] menu. To utilize
this function more e ectively, destinations that
you often travel to should be saved in advance.
First of all, store in the [Address Book] menu
through destination search function.
1. Press [MENU] or [NAV] > [Destination] >
[Address Book].
• Press [Menu] > [Date], [Name] or
[Category] to arrange the list in date,
name, or category order.
• Press [Menu] > [Add] to add a location
[Address Book] menu.
• Press [Menu] > [Delete] to select and
delete items from various entries all at
once.
• Press [Menu] > [Edit] to select and edit an
item among many items.
2. Press the desired item from the list.
3. Follow steps 3-5 of the " Address Search" on
page 42.
43
Page 44

Searching for Destination of Navigation
Adding to Address Book
1. Press [Menu] > [Add] in address book list.
2. Select a desired location through
destination search function.
3. Set the desired item.
• [Name]: Change the name.
• [Phone Number]: Enter the phone
number.
• [Sound Noti cation]: Set the sound
noti cation to [On]/[O ].
• [Symbol]: Set the symbol displayed on
the map screen.
• [Display on Map]: Press [Icon], [Icon &
Name] or [None] to display on the map
screen.
• [Favorites]: Select the address book type.
4. Press [Save] to save the setting.
Deleting Address Book
1. Press [Menu] > [Delete] in address book
list.
2. Select the desired item, then press [Delete].
• [Delete]: Deletes the selected items.
• [Delete All]: Deletes all items.
• [Unmark All]: Unmarks all items.
• [Cancel]: Exits delete screen.
Editing Address Book
1. Press [Menu] > [Edit] in address book list.
2. Select the item to edit.
3. Edit the desired item.
• [Name]: Change the name.
• [Phone Number]: Enter the phone
number.
• [Sound Noti cation]: Set the sound
noti cation to [On]/[O ].
• [Symbol]: Set the symbol displayed on
the map screen.
• [Display on Map]: Press [Icon], [Icon &
Name] or [None] to display on the map
screen.
• [Favorites]: Select the address book type.
4. Press [Save] to save the setting.
44
Page 45

Searching for Destination of Navigation
POI
You can nd a destination from various
categories.
There are 2 ways to set the destination through
POI search - by category, by phone number.
Searching for POI by category
1. Press [NAV] > [Destination] > [POI] > [POI
Categories].
If you want to search for the POI category
by name, press [Menu] > [Category
History] or [Category Search]. Input the
name, then press [OK] to finish.
2. Follow steps 3-5 of the " Address Search" on
page 42.
Searching for POI by phone number
If you know the phone number of the
destination, you may use this function to nd
the destination.
1. Press [NAV] > [Destination] > [POI] >
[Phone Number].
• Press [State] to change the state.
2. Input the desired phone number and press
[OK].
3. Press the desired POI.
4. Follow steps 3-5 of the " Address Search" on
page 42.
Emergency
You can nd a destination by searching for
a Police Stations, Hospitals, Dealerships or
Roadside Assistance in emergency situations.
1. Press [NAV] > [Destination] > [Emergency]
> [Police Stations], [Hospitals], [Hyundai
Dealerships] or [Roadside Assistance].
For example: Police Stations
• Press [Menu] > [Name] or [Distance] to
arrange the list in name or distance order.
2. Press the preferred item from the list.
3. Follow steps 3-5 of the " Address Search" on
page 42.
45
Page 46

Searching for Destination of Navigation
Online Search (USA Only)
Please join in Connected Services service to
use Online Search.
1. Press [NAV] or [MENU] > [Destination] >
[Online Search].
2. Enter the desired keywords and press [OK].
3. Select the desired item.
4. Follow steps 3-5 of the " Address Search" on
page 42.
Intersection
You can nd the destination by searching for
the intersection.
1. Press [NAV] > [Destination] > [Intersection].
• Press [State] to change the state.
2. Enter the name of the State, 1st Street or
2nd Street corresponding to the desired
destination.
3. Press [OK].
4. Follow steps 3-5 of the " Address Search" on
page 42.
Freeway Exit / Enter
You can nd the destination by searching for
the Freeway Exit/Enter.
1. Press [NAV] > [Destination] > [Freeway Exit
/ Enter].
2. Enter the freeway name and exit/enter.
3. Press [OK].
4. Follow steps 3-5 of the " Address Search" on
page 42.
46
Page 47

Searching for Destination of Navigation
Coordinates
You can nd a destination by inputting the
coordinates of latitude and longitude.
There are two ways to search by coordinates
(Deg. Min. Sec. or Decimal Degrees).
1. Press [NAV] > [Destination] > [Coordinates].
2. Press the latitude and longitude, then
input the desired coordinates.
3. Press [OK].
4. Follow steps 3-5 of the " Address Search" on
page 42.
Home / Work
If your home location and work location have
been already saved in the [Favorite] menu, it
can be easily retrieved to set the route to your
home location and work location.
First of all, store in the [Favorites] menu
through destination search function.
Registering Home or Work
1. Press [MENU] > [Destination] > [Add to
Home] or [Add to Work].
2. Select the desired position through
destination search function.
3. Press [OK] when the destination search
is complete. It is saved in the [Favorites]
menu automatically.
Note
,
Press [MENU] or [NAV] > [Destination] >
[Address Book] > [Favorites] on the map screen
to check items saved in the [Favorites] menu.
Finding your Home or Work
1. Press [MENU] > [Destination] > [Home] or
[Work].
2. Follow steps 4-5 of the “ Address Search" on
page 42.
47
Page 48

Using the Route Menu
Route menu overview
This allows you to change the route conditions
by using the route menu when the route is
activated.
Route menu
Cancel Route
Route Options
Edit Route
Route Overview
Route Info / Avoid
Route Preview
Cancel Route
If you want to stop the route guidance when
a route is active, press [MENU] > [Route] >
[Cancel Route] or press [NAV] > [Route] >
[Cancel Route].
Route Options
You can modify the route conditions or
con rm the route information. Set the
appropriate route condition according to your
purpose.
1. Press [NAV] or [MENU] > [Route] > [Route
Options].
2. Set the desired options.
• [Faster Time]: Calculates the route based
on the fastest arrival time.
• [Shorter Distance]: Calculates the route
based on the shortest distance.
• [Avoid Freeways]: Searches for a route
that minimizes or avoids the freeway.
• [Avoid Toll Roads]: Searches for a route
that minimizes or avoids toll roads.
• [Avoid Ferries]: Searches for a route that
avoids the use of ferries.
• [Avoid HOV/Carpool Lanes]: Searches
for a route that avoids the use of HOV/
Carpool Lanes.
• [Avoid Electronic Tolls]: Searches for a
route that avoids the use of Electronic
Toll.
• [Use Tra c Info]: Searches for a route
re ecting the real time Tra c Information.
• [Avoid Private/Gated Roads]: Searches
for a route that minimizes or avoids the
Private / Gated Roads.
3. Press [Recalculate].
Note
,
The Items set by user may not be reflected
depending on condition.
48
Page 49

Using the Route Menu
Edit Route
This feature allows you to travel through the
searched routes by editing the current route.
Waypoints can be added/deleted/edited and
the order can be changed.
Adding waypoints
1. Press [NAV] > [Route] > [Edit Route].
2. Press [Add Waypoint].
3. Add the waypoint through destination
search function.
4. If you want to add an waypoint, follow
steps 2~3.
5. Press [Done] > [Start Guidance].
Reordering Route
1. Press [NAV] > [Route] > [Edit Route].
2. Press the desired item from the list.
3. Move the selected item up and down. Or
Drag it to the desired position.
4. Press [Done] > [Start Guidance].
Deleting Route
1. Press [NAV] > [Route] > [Edit Route].
2. Press [Menu] > [Delete].
3. Select the desired item, then press [Delete].
• [Delete]: Deletes the selected items.
• [Delete All]: Cancels the route.
• [Unmark All]: Unmarks all items.
• [Cancel]: Exits delete screen.
49
Page 50

Using the Route Menu
Route Info / Avoid
This allows you to check the route information
and search for new route by avoiding the
selected street(s).
1. Press [NAV] > [Route] > [ Route Info /
Avoid].
2. Press [Avoid] to select he street(s) that you
want to avoid.
3. Press [Done] to plan new route.
Route Overview
You can check the entire route between your
current location and your destination.
1. Press [NAV] > [Route] > [Route Overview].
2. Press the desired item.
• [Start Guidance]: Starts the route
guidance.
• Press [Route Options] to set the route
option. For more details, refer to “Route
Options” on page 48.
• Press [Route Info / Avoid] to check
route information and set a route to be
avoided. For more details, refer to “Route
Info / Avoid” on page 50.
• Press [Edit Route] to edit the route. For more
details, refer to “Edit Route” on page 49.
• Press [Cancel Route] to cancel the route.
For more details, refer to “Cancel Route”
on page 48.
Route Preview
This allows you to check the detailed turn-byturn list.
1. Press [NAV] > [Route] > [Route Preview].
2. Press the desired item.
]: Move to the departure location.
• [
]: Move to the previous position.
• [
]: Move to the next position.
• [
]: Move to the destination location.
• [
• [
speci c position.
]: Close the route preview.
• [
]: Quick move to the
50
Page 51

Bluetooth® Wireless Technology
Before Using the Bluetooth
Handsfree
What is Bluetooth Wireless
Technology?
• Bluetooth Wireless Technology refers to a shortdistance wireless networking technology
which uses a 2.45GHz frequency to connect
various devices within a certain distance.
• Supported within PCs, external devices,
Bluetooth phones, PDAs, various electronic
devices, and automotive environments,
Bluetooth Wireless Technology to be
transmitted at high speeds without having to
use a connector cable.
• Bluetooth Handsfree refers to a device which
allows the user to conveniently make phone
calls with Bluetooth mobile phones through
the system.
• The Bluetooth Handsfree feature may not be
supported in some mobile phones.
Precautions for Safe Driving
• Bluetooth is a feature that enables drivers to
use handsfree while driving. Connecting the
head unit with a Bluetooth phone allows the
user to conveniently make calls, receive calls,
and manage the phone book. Before using
Bluetooth Wireless Technology, carefully
read the contents of this user’s manual.
• Excessive use or operations while driving
may lead to negligent driving practices and
be the cause of accidents. Do not operate
the device excessively while driving.
• Viewing the screen for prolonged periods
of time is dangerous and may lead to
accidents. When driving, view the screen
only for short periods of time.
Cautions upon Connecting Bluetooth
Phone
• Before connecting the head unit with the
mobile phone, check to see that the mobile
phone supports Bluetooth features.
• If you do not want automatic connection
with your Bluetooth device, turn the
Bluetooth feature o of the Bluetooth
device.
• Park the vehicle when pairing the head unit
with the mobile phone.
• Some Bluetooth features may occasionally
not operate properly depending on the
rmware version of your mobile phone.
If such features can be operated after
receiving a S/W upgrade from your mobile
phone manufacturer, unpair all devices and
pair again before use.
• When pairing and the head unit with the
iPhone for the rst time while your iPhone
is connected to the USB port with iPhone
cable, error message may be displayed on
your iPhone. But, this is intended operation.
You may ignore it if your iPhone has been
connected to the head unit.
Pairing and connecting the
unit and a Bluetooth phone
To use the Bluetooth feature, make sure the
Bluetooth on your phone is turned on. Refer to
your phone’s user guide.
51
Page 52

Bluetooth® Wireless Technology
When no phones have been paired
1. Press [PHONE] on the remote control for
head unit or [ ] on the steering wheel
remote control.
2. On your phone, initiate a search for
Bluetooth devices. (The default vehicle
name is GENESIS G80.)
3. 1) If the SSP (Secure Simple Pairing) is not
supported, input the passkey on your
Bluetooth device. (The default passkey
is 0000.)
2) If the SSP (Secure Simple Pairing) is
supported, press [Yes] on the pop-up
screen of the your Bluetooth device.
(The pop-up screen may di er from the
actual information of the Bluetooth
device.)
4. Press [Yes] to connect automatically to the
unit and a Bluetooth phone preferentially
after ignition switch is in ON position.
the mobile phone contacts and the latest
call list are downloaded.
5. When your phone is successfully
connected, the phone screen is displayed
on the screen. When the connection fails, a
failure message is displayed on the screen.
<Phone screen>
Once Bluetooth connection is successful,
the name of the connected mobile phone
will become displayed on the phone
screen and Bluetooth handsfree functions
will operate.
When you approve in the mobile phone,
52
Page 53

Bluetooth® Wireless Technology
When a phone is already paired
1. Press [HOME] > [Setup] > [Phone] >
[Bluetooth Connection].
2. 1) Select the device you want to connect.
2) If there is no device you want to
connect, press [Add New device].
3. On your phone, initiate a search for
Bluetooth devices. (The default vehicle
name is GENESIS G80.)
4. 1) If the SSP (Secure Simple Pairing) is not
supported, input the passkey on your
Bluetooth device. (The default passkey
is 0000.)
2) If the SSP (Secure Simple Pairing) is
supported, press [Yes] on the pop-up
screen of the your Bluetooth device.
(The pop-up screen may di er from
the actual information of the Bluetooth
device.)
5. Press [Yes] to connect automatically to the
unit and a Bluetooth phone preferentially
after ignition switch is in ON position.
When you approve in the mobile phone,
the mobile phone contacts and the latest
call list are downloaded.
6. When your phone is successfully
connected, the Bluetooth settings screen
is displayed on the screen. When the
connection fails, a failure message is
displayed on the screen.
53
<Bluetooth settings screen>
Page 54

Bluetooth® Wireless Technology
Note
,
• For safety reasons, pairing a Bluetooth
phone is not possible when the vehicle is in
motion. Park the vehicle in a safe location to
pair a Bluetooth phone. It is possible to pair
up to 5 mobile phones. In order to pair a
new phone when there are already 5 mobile
phones paired, you must rst delete one of
the previously paired phones.
• Some functions may not be supported due
to limited Bluetooth compatibility between
the car system and mobile phone.
• When a Bluetooth device is connected, a
new device cannot be paired. If you want
to pair a new phone, rst disconnect the
connected Bluetooth device.
Change Device
You can connect the head unit and another
Bluetooth device already paired.
1. Press [Menu] > [Change Device] on the
phone screen.
2. Press the desired Bluetooth device on the
pop-up.
Note
,
You can use the Change Device function by
pressing [
] on the screen.
Disconnecting the connected phone
1. Press [HOME] > [Setup] > [Phone] >
[Bluetooth Connection].
2. Select the connected phone.
Note
,
If you want to connect the disconnected
phone again, select the disconnected phone.
Deleting Bluetooth Devices
If you no longer need to use a phone, you
can delete the Bluetooth devices. Note that
deleting a Bluetooth device will delete all call
history and contact entries.
1. Press [HOME] > [Setup] > [Phone] >
[Bluetooth Connection].
2. Press [Menu] > [Delete] on the Bluetooth
settings screen.
3. Select the phone you want to delete and
press [Delete].
• [Delete]: Deletes the selected items.
• [Delete All]: Deletes all items.
• [Unmark All]: Unmarks all items.
• [Cancel]: Exits delete screen.
4. Press [Yes] on the pop-up screen.
54
Page 55

Bluetooth® Wireless Technology
Making a call by entering
phone number
Connect your unit and Bluetooth phone before
making a call.
1. Enter the phone number using the keypad
on the phone screen.
2. Press [
the steering wheel remote control.
,
If you press the wrong number, press [
to delete the inputted number one digit at a
time.
] on the phone screen or [ ] on
Note
]
Making a call by redialing
Press and hold [ ] on the phone screen or
] on the steering wheel remote control.
[
Note
,
Redialing is not possible when there is no
dialed call history.
Making a call with speed dial
numbers
Press and hold speed dial number using the
keypad on the phone screen.
Only speed dial numbers already saved on
the mobile phone can be used for speed dial
calls. Up to 3-digit speed dial numbers are
supported.
Note
,
For 3-digit speed dial numbers, press and hold
the 3rd digit to make a call to the speed dial
number.
Answering/Rejecting a call
1. If there is an incoming call, a popup
message will appear.
2. Press [Accept] to answer the call.
To reject a call, select [Reject].
Note
,
• If the Call-ID service is available, the caller’s
phone number is displayed.
• If caller’s phone number is saved in the
phone book, the caller’s name is displayed
on the unit.
• Upon receiving a call, the [Reject] function
may not be supported in some mobile
phones.
55
Page 56

Bluetooth® Wireless Technology
Responding with messages
1. If there is an incoming call, a popup
message will appear.
2. Press [Message] to respond with messages.
3. Select the desired message and press
[Send].
Note
,
Depending on the mobile phone model, the
[Message] function may not be supported.
Switching call to the mobile
phone
1. If you want to switch the call to the mobile
phone while talking on the car handsfree,
press [Use Private].
As shown below, the call is switched to the
mobile phone.
2. If you want to switch the call to the car
handsfree while talking on the mobile
phone, press [Use Handsfree].
The call is switched to the car handsfree.
Ending a call
1. To end a call, press [ End] on the phone
screen or [
remote control.
2. The call is ended.
] on the steering wheel
Using the menu during a phone
call
When making a call, you can use the following
menu items.
A
B
C
Position Description
Outgoing
A
volume
Mic On/
B
O
Keypad Moves to a screen for
C
Displays the Mic Volume
settings. You can adjust the
in-call volume that the other
party hears (level 1 - 5).
Turns the Mic On/Off.
entering ARS numbers.
56
Page 57

Bluetooth® Wireless Technology
Call history
Making a call from call history
1. Press [ ] on the phone screen.
2. Press [All], [Dialed Calls], [Received Calls], or
[Missed Calls].
• [All]: Displays entire call history list.
• [Dialed Calls]: Displays the outgoing call
history list.
• [Received Calls]: Displays the incoming
call history list.
• [Missed Calls]: Displays the missed call
history list.
3. Press the entry you want to call.
Note
,
The call history may not be saved in the call
history list in some mobile phones.
Downloading call history
You can download the call history information
from your mobile phone.
1. Press [
phone screen.
2. Press [Yes].
• Up to 50 received, dialed, and missed call
history lists can be downloaded.
• The download feature may not be
supported in some mobile phones. Check to
see that the Bluetooth device supports the
download feature.
] > [Menu] > [Download] on the
Note
,
Contacts
1. Press [ ] on the phone screen.
The contacts are displayed on the screen.
<Contacts screen>
2. Select the contact you want to call from
the list of contacts.
3. Press the phone number to make a call.
57
Page 58

Bluetooth® Wireless Technology
Downloading mobile phone contacts
Up to 5,000 mobile phone contacts can be
downloaded.
The phonebook download feature will only
download contacts transmitted via Bluetooth
(contacts saved on a Bluetooth device or on
the SIM card). Contacts saved in a third-party
app or contacts without a phone number will
not be downloaded.
1. Press [
phone screen.
2. Press [Yes].
] > [Menu] > [Download] on the
Note
,
• Upon downloading mobile phone contacts,
the previous data is deleted.
• This feature may not be supported on some
mobile phones.
Searching for contacts
1. Press [ ] > [Menu] > [Search Contacts] on
the phone screen.
2. Enter the name or phone number, press
].
[
Favorites
Calling Favorites
If the phone number has been already stored
in the Favorites, it can be easily called.
First of all, add the phone number in the
Favorites. Refer to “Editing Favorites”.
1. Press [
2. Select the desired Favorite.
] on the phone screen.
<Favorite screen>
The present phone book is deleted and phone
book of connected phone is duplicated.
3. Select the contact you want to call.
58
Page 59

Bluetooth® Wireless Technology
Editing Favorites
1. Press [ ] on the phone screen.
2. Press [Menu] > [Add New] on the Favorites
screen. Or Press [Menu] > [Edit] on the
Favorites screen.
3. After you select the contacts you want to
register, press [
in Favorites. If you want to delete them
which have already been registered, press
] after selecting the corresponding
[
them.
] > [ ] to register them
Deleting Favorites
1. Press [ ] on the phone screen.
2. Press [Menu] > [Delete] on the Favorites
screen.
3. Select the item you want to delete and
press [Delete].
• [Delete]: Deletes the selected items.
• [Delete All]: Deletes all items.
• [Unmark All]: Unmarks all items.
• [Cancel]: Exits delete screen.
Messages
You can check the text messages or send any
message on the screen. Depending on the
mobile phone model, some functions may not
be supported. The [Read] function of messages
may not be supported in some languages.
Checking new messages
1. When a message is received, the pop-up is
displayed on the screen.
2. Select a desired item.
• [View]: Moves to the message screen.
• [Read]: Supports the message contents
by voice.
• [Close]: Closes the message pop-up.
Note
,
Mark the [Message Noti cation] of [Message
Setitings] on the Bluetooth settings screen.
59
Page 60
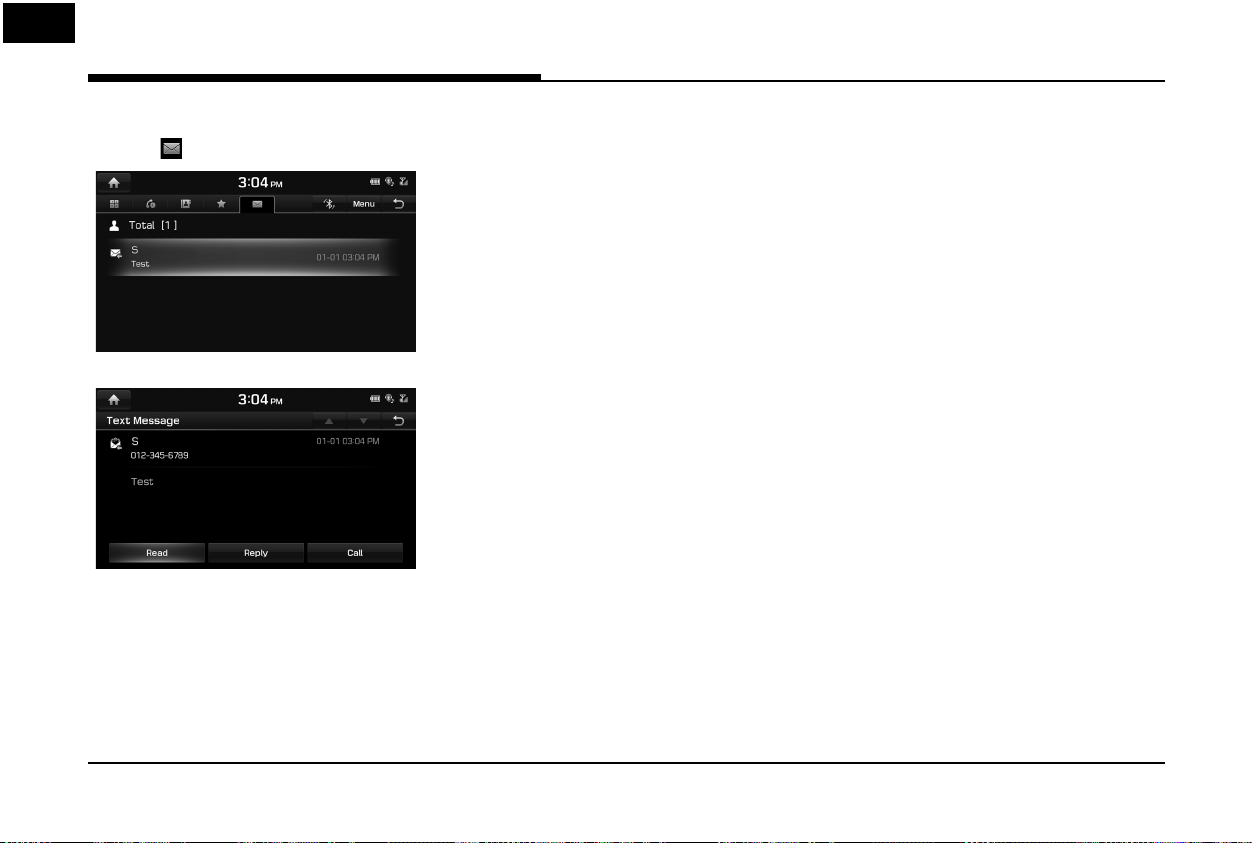
Bluetooth® Wireless Technology
Checking new message contents
1. Press [ ] on the phone screen.
2. Select a message.
3. Check the information on message.
• [Read]: Supports the message contents
by voice.
• [Reply]: Replys to the message.
• [Call]: Calls the message sender.
Note
,
Only the messages received after the Bluetooth
connection are speci ed in the list.
60
Page 61

Voice Recognition System
What is voice recognition?
Voice recognition technology runs the
system as ordered by recognizing your voice
command to help with the operation of
multimedia while you are driving the car.
Regretfully, not all possible voice commands
are recognized by the system due to
technological limitations. To make up for these
limitations, the system displays the voice
commands that are available for you to use.
There are errors in communication between
people. Likewise, voice recognition sometimes
misunderstands your voice command under
certain circumstances. If this happens, either
check the screen for the available options and
say the command again, or manually select
and press the button for the corresponding
command on the screen.
Voice recognition features by
language
Voice recognition support availability varies
according to the language set for the system.
Please verify the current language setting
before using the voice recognition.
• If you change the language set for the
system to Korean, voice recognition will not
be supported. Change the system language
to other language.
Operating voice command
Condition for voice command system
Most of the functions can be operated by
voice. Please follow the instructions below for
optimal voice recognition performance.
• To improve the voice recognition
performance, keep your car interior quiet by
closing all windows and the sunroof.
• Press the voice recognition button and say
the desired voice command after the beep
sound.
• The microphone is positioned above the
driver. Voice commands should be spoken
by driver practicing proper posture.
• Pronounce the voice commands naturally
and clearly as if in a normal conversation.
• Special symbols of Phonebook Name are
not considered in voice recognition.
Ex) James-Smith : “James Smith”
• House number or digits in Phonebook Name
should be spoken discretely.
Ex) S1234 : “South one two three four”
• Depending on the speci cations, some
commands may not be supported.
61
Starting voice recognition
1. Press [ ] on the steering wheel remote
control.
2. Say a command.
Note
,
• For proper recognition, please say the
command after the voice instruction and
beep sound.
• When starting voice recognition, the
voice command entry window with six
representative commands is displayed.
Page 62

Voice Recognition System
Skipping prompt messages
While a prompt is playing, press quickly on the
steering wheel remote control labeled with
[
]. The prompt is immediately ended and a
beep will sound. After the beep, please say the
voice command.
Re-starting voice recognition
While the system waits for input, press
quickly on the steering wheel remote control
labeled with [
indicating the system is listening for a new
input. Say a voice command.
]. The beep tone will sound,
Ending voice recognition
• While voice recognition is operating, press
and hold the control labeled [
steering wheel remote control, or say ‘Exit’.
• While using voice recognition, pressing
other button except on the steering wheel
remote control or a different button on head
unit will end voice recognition.
] on the
Adjusting voice recognition volume
While voice recognition is operating, turn
[VOL] knob on the head unit or press [VOL+/
VOL-] on the steering wheel remote control.
Basic operation for voice command
(Setting FM)
1. Press the control on the steering wheel
remote control labeled [
The system waits for your command and
displays a list of available commands on
the screen.
2. Once the icon changes into the
icon on the pop-up screen, a beep will
sound. Say ‘FM’.
].
Voice recognition quick start
(Manual Control)
The usual way of activating voice recognition is
waiting for the voice guide and then speaking
your command for a task. Since this method
requires that you wait a while for the voice guide,
you can select one of the commands shown on
the screen to speed up the process.
You might nd this feature useful when you do
62
not want to wait for the full voice guide or when
the system does not recognize your voice.
About voice command “Help”
1. Press the [ ] on the steering wheel
remote control.
2. Once the
icon on the pop-up screen with a beep
sound, say “Help”.
The available commands are displayed on
the screen.
3. Select or say the displayed command on
the screen.
icon changes into the
Page 63
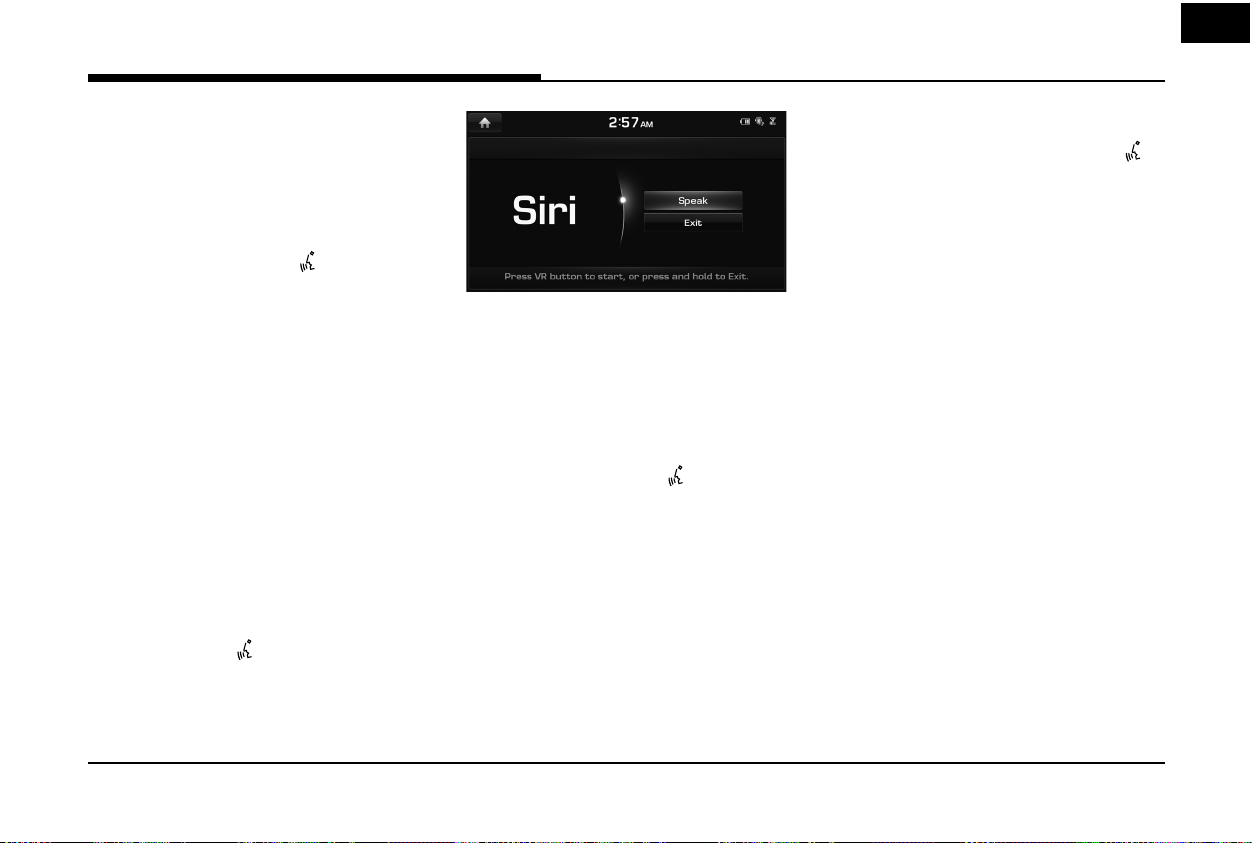
Siri®
Operating Siri® command
What is Siri®?
Apple wants to integrate the Siri to speci c
voice control system by working with car
manufacturers.
You can ask Siri through the [
on the steering wheel remote control while
driving.
The Apple device (iOS device) screen does not
light up to minimize impact on the driving.
If there is “Eyes-free” function, you can operate
the Siri feature. (Making phone calls, Playing
music, Listening to or writing a text message,
Finding the destination by using the map,
Looking for calendar information, etc)
Starting Siri®
1. Connect your Apple device (iOS device) to
AVN system through Bluetooth.
Please check whether your Apple device
(iOS device) supports Siri and turning Siri
On.
2. Press and hold [
remote control.
] on the steering wheel
] button
<Siri screen>
3. Say a command.
For proper recognition, please say the
command after the voice instruction and
Siri beep tone.
Re-starting Siri®
• While system waits, press [ ] on the
steering wheel remote control. The
command waiting condition is ended and
the beep tone will make sound. After the
“beep”, say the voice command.
• Press [Speak] on the Siri screen. The
command waiting condition is ended and
the beep tone will make sound. After the
“beep”, say the voice command.
Ending Siri®
• While Siri is operating, press and hold [ ]
on the steering wheel remote control or say
“Exit”.
• While using voice recognition, pressing
other button except on the steering wheel
remote control or a different button on head
unit will end Siri feature recognition.
• Press [Exit] on the Siri screen.
Adjusting Siri® volume
While Siri is operating, turn [VOL] knob on the
head unit or press [VOL+/VOL-] on the steering
wheel remote control.
Note
,
• Please see the AVN system only supports
“Music” and “Phone” related functions. Other
functions will be performed in the your
Apple device (iOS device).
• Eyes-Free mode would be activated
automatically while you are driving. If the
car is stopped (when the transmission
lever is put to P), Eyes-Free mode would be
deactivated automatically.
63
Page 64

SiriusXM™ Data
About SiriusXM™ Data
The SiriusXM Data Service is a paid
membership satellite radio service which
provides users with weather, traffic, fuel prices,
stocks, sports, and movie times information.
For information on registration or related
content, please visit the SiriusXM radio website
(www. siriusxm.com).
Accessing SiriusXM™ Data
1. Press [HOME] > [SiriusXM Data].
<SiriusXM Data screen>
2. If you want to subscribe to the SiriusXM
Data Service, press [Subscription] > [Call]
to enable Services.
SiriusXM™ Weather Information
(USA Only)
Current weather information (USA Only)
This service provides current weather
information in your region.
1. Press [HOME] > [SiriusXM Data].
This current weather information is
displayed on the screen.
<SiriusXM Data screen>
2. Press [Weather] to check the detail
information.
Weather forecast (USA Only)
This service provides weather forecasts for the
next ve days including today in your region.
1. Press [Weather] > [Menu] in SiriusXM Data
screen.
2. Press [Forecast].
• Press [Menu] > [Today] to move to
current weather information screen.
• Press [Menu] > [Location List] to move to
the Location List screen.
64
Page 65

SiriusXM™ Data
• Press [Menu] > [Weather & Security
Alerts] to move to the Weather & Security
Alerts screen.
• Press [Menu] > [Weather Map] to move
to the Radar Map screen.
Weather information in other region
(USA Only)
This service provides weather information in
other region.
1. Press [Weather] > [Menu] > [Location List]
> [Cities] in SiriusXM Data screen.
<Location List>
2. Select the desired region.
Note
,
If you want to display weather information in
your current location, press [
].
Weather information at ski resorts
(USA Only)
This service provides weather and facility
information at ski resorts.
1. Press [Weather] > [Menu] > [Location List]
> [Ski Resorts] in SiriusXM Data screen.
Note
,
If you want to check weather information in
your current location, press [
].
2. Select the desired ski resort.
65
Page 66

SiriusXM™ Data
Searching for other region or ski
resort (USA Only)
1. Press [Cities] or [Ski Resorts] > [Menu] >
[Search] on the Location List.
2. Enter the desired region or ski resort, press
].
[
3. Select the desired item.
4. If you want to add the selected item in the
Favorites, press [Add Favorite].
If you want to delete the item saved in the
Favorites, press [Delete Favorite].
Favorites (USA Only)
If the city or ski resort have already been stored
in the Favorites, it can be easily recalled.
Add the city or ski resort in the Favorites. Refer
to “Adding to Favorites” on page 66.
1. Press [Favorites] on the Location List.
2. Select the desired item.
66
Adding to Favorites (USA Only)
A maximum of 10 items can be added.
1. Press [Favorites] > [Menu] > [Add Favorite]
on the Location List.
2. Enter the desired location, press [
3. Select the desired item.
].
Page 67

SiriusXM™ Data
Reordering Favorites (USA Only)
The added items in Favorites can be reordered.
1. Press [Favorites] > [Menu] > [Reorder] in
Location List.
2. Press the desired item.
3. Move up and down and press the selected
item, or drag it to the desired position.
Deleting Favorites (USA Only)
1. Press [Favorites] > [Menu] > [Delete] in
Location List.
2. Select the item you want to delete and
press [Delete].
• [Delete All]: Deletes all items.
• [Unmark All]: Unmarks all items.
• [Cancel]: Exits delete screen.
Weather & Security Alerts (USA
Only)
Provides weather warnings and advisories,
such as Tornado, Storm, Flood, Winter, Wind
etc..
1. Press [Weather] > [Menu] > [Weather &
Security Alerts] in SiriusXM Data screen.
• Press [Menu] > [Prioritization Levels] >
[All], [Low], [High] or [Severe] to set the
prioritization levels.
• Press [Menu] > [Set Range] > [50 miles],
[100 miles], [200 miles] or [300 miles] to
set the distance range.
• Press [Menu] > [Marine/coastal] to set
whether to include regional information
of the Marine/coastal.
• Press [Menu] > [Show Popup] to set
whether or not to display alert pop-up.
67
Page 68

SiriusXM™ Data
2. Press the desired item.
Weather Map (USA Only)
Provides up-to-date weather information
across the country.
Zoom in to view more detailed information in
speci c regions.
1. Press [Weather] > [Menu] > [Weather Map]
in SiriusXM Data screen.
• Press [Menu] > [Full Screen] to hide the
[Menu] and [
] button.
• Press [Menu] > [Weather Front] to set
whether to display cold/warm air fronts.
• Press [Menu] > [Isobar] to set whether to
display the Isobar.
• Press [Menu] > [Pressure Center] to set
whether to display the Pressure center.
• Press [Menu] > [NOWRad] to set whether
to display the weather radar.
2. Press [+]/[-] to use the zoom in and out
features.
Push the controller up, down, left, or right
to move to the desired location.
SiriusXM Traffic Information
Press [Tra c] to enter the Tra c
Announcement mode in SiriusXM Data screen.
SiriusXM™ Fuel Prices
Information (USA Only)
Finding gas station (USA Only)
1. Press [Fuel Prices] in SiriusXM Data screen.
<Fuel Prices List>
• [All]: Displays all gas stations.
• [Brand]: Displays gas stations by brand.
• [Fuel Type]: Displays gas stations by fuel
type.
• [Favorites]: Moves to the [Favorites]
menu.
• Press [Menu] > [Sort by] > [Distance],
[Price], [A - Z] to sort in Distance, Price, or
Alphabetical order.
displays only gas stations when a route
is set, starting with nearest to current
location.
The [On Route] option
68
Page 69

SiriusXM™ Data
• Press [Menu] > [Search] to search for
the gas station. For more details, refer to
“Searching for gas station” on page 69.
2. Press [Go] > [Yes].
Note
,
Within 30 miles, a maximum of 65 items can
be displayed.
Searching for gas station (USA Only)
1. Press [Menu] > [Search] in Fuel Prices List.
2. Enter the desired gas station and press
].
[
3. To store the desired item as a favorite,
press [Add Favorite].
4. Press [Go] > [Yes].
Favorites (USA Only)
If the gas station has been already stored in
the Favorites, it can be easily recalled.
First of all, add the gas station in the Favorites.
Refer to “Adding to Favorites” on page 70.
1. Press [Favorites] in Fuel Prices List.
2. Press [Go] > [Yes].
69
Page 70

SiriusXM™ Data
Adding to Favorites (USA Only)
A maximum of 10 items can be added.
1. Press [Favorites] > [Menu] > [Add Favorite]
in Fuel Prices List.
2. Enter the desired gas station and press
].
[
3. Select the desired item.
Deleting Favorites (USA Only)
1. Press [Favorites] > [Menu] > [Delete] in Fuel
Prices List.
2. Select the item you want to delete and
press [Delete].
• [Delete All]: Deletes all items.
• [Unmark All]: Unmarks all items.
• [Cancel]: Exits delete screen.
70
Page 71

SiriusXM™ Data
SiriusXM™ Stocks Information
View real time information of the stock market.
Favorites
Press [Stocks] in SiriusXM Data screen.
Stocks added as favorites are displayed in the
main screen.
<Stocks main screen>
Note
,
When entering Stocks for the rst time, if
there are no favorites list, a [Search] screen is
displayed.
Adding to Favorites
A maximum of 100 items can be added.
1. Press [Menu] > [Add Favorite] in Stocks
main screen.
2. Enter the favorite stocks and press [
3. Select the desired item.
Reordering Favorites
The added items in Favorites can be reordered.
1. Press [Menu] > [Reorder] in Stocks main
screen.
].
2. Press the desired item.
3. Move up and down and press the selected
item, or drag it to the desired position.
71
Page 72

SiriusXM™ Data
Deleting Favorites
1. Press [Menu] > [Delete] in Stocks main
screen.
2. Select the item you want to delete and
press [Delete].
• [Delete All]: Deletes all items.
• [Unmark All]: Unmarks all items.
• [Cancel]: Exits delete screen.
Stock Search
1. Press [Search] in Stocks main screen.
2. Enter your favorite stocks and press [
3. Press [Add Favorite] to save them.
4. Added stocks will display in the Favorites
screen.
SiriusXM™ Sports Information
Provides real-time information on scores and
].
schedules all major sports.
1. Press [Sports] in SiriusXM™ Data screen.
<Sports main screen>
2. Press the desired item to view related
sports information.
72
Page 73

SiriusXM™ Data
• Press [Schedule] or [Menu] > [Schedule]
to display schedules for the next seven
days.
• Press [Score] or [Menu] > [Scores] to
display scores for 2 days from today.
• Press [Menu] > [SXM Radio Game Zone]
to tune into current games in Game Zone.
• Press [Menu] > [News] to check new
information for each sport.
Favorites
1. Press [Favorites] in Sports main screen.
Football, Baseball, Basketball and Ice
Hockey teams added as favorites will
display in the Favorites list.
2. Select the favorite team.
Note
,
If there are no favorites added, press [Search]
to nd and add your favorite teams.
Adding to Favorites
1. Press [Menu] > [Add Favorite] in Sports
main screen.
2. Enter the favorite teams and press [
3. Select the desired item.
].
73
Page 74

SiriusXM™ Data
Reordering Favorites
The added items in Favorites can be reordered.
1. Press [Menu] > [Reorder] in Sports main
screen.
2. Press the desired item.
3. Move up and down and press the selected
item, or drag it to the desired position.
Deleting Favorites
1. Press [Menu] > [Delete] in Sports main
screen.
2. Select the item you want to delete and
press [Delete].
• [Delete All]: Deletes all items.
• [Unmark All]: Unmarks all items.
• [Cancel]: Exits delete screen.
SiriusXM™ Movie Times
Information (USA Only)
You can check recent movies and nearby
theaters, and also register your favorite theater
locations.
Finding theater by searching for
movie (USA Only)
1. Press [Movie Times] > [Movies] in SiriusXM™
Data screen.
The movie list is displayed in alphabetical
order by default.
<Movies main screen>
• Press [Menu] > [Sort by] to sort the
movies by ratings. Any movies rated
higher will be ltered out.
• Press [
about that movie.
] to view more information
74
Page 75

SiriusXM™ Data
2. Press the desired theater.
The theater list is displayed on the screen.
• Press [Menu] > [Sort by] > [Distance]
or [Starting Time] to sort in Distance or
Starting Time order.
3. Press [Go] > [Yes].
Viewing movie list by searching for
theater (USA Only)
1. Press [Theaters] on the Movie Times main
screen.
The theater list is displayed on the screen.
• Press [Menu] > [Sort by] > [Distance] or
[A - Z] to sort in Distance or Alphabetical
order.
• Press [Menu] > [Search] to search for
the theater. For more details, refer to
“Searching for gas station” on page 69.
2. Press the desired theater.
The movie list is displayed on the screen.
• Press [Go] > [Yes] to nd the theater you
selected.
• Press [
• Press [
about that movie.
] to make a call to theater.
] to view more information
75
Page 76

SiriusXM™ Data
Favorites (USA Only)
1. Press [Favorites] on the Movies main
screen.
Favorites is displayed on the screen.
Favorites shows a list of theater added by
the user.
• Press [Menu] > [Add Favorite] to add the
desired theater to Favorites. For more
details, refer to “Adding to Favorites” on
page 76.
• Press [Menu] > [Delete] to delete the
Favorites. For more details, refer to
“Deleting Favorites” on page 76.
2. Press [Go] > [Yes].
Note
,
If there are no favorites added, press [Search]
to nd and add your favorite theaters.
Adding to Favorites (USA Only)
1. Press [Favorites] > [Menu] > [Add Favorite]
on the Movie Times main screen.
2. Enter the favorite theater, press [
3. Select the desired item.
].
Deleting Favorites (USA Only)
1. Press [Menu] > [Delete] on the Movie
Times main screen.
2. Select the item you want to delete and
press [Delete].
• [Delete All]: Deletes all items.
• [Unmark All]: Unmarks all items.
• [Cancel]: Exits delete screen.
76
Page 77

Android Auto/Apple CarPlay
What is Android Auto/Apple
CarPlay?
Securely access your smartphone while driving.
Various functions of your smartphone are
displayed on and operable from the screen of the
multimedia device (e.g. navigation, making a call,
listening to music etc.)
When connected, an Android Auto/Apple CarPlay
icon appears on the screen. Available functions
and operations may differ depending on the
company model.
For more information, visit the Google or Apple
website.
- Google: http://support.google.com/
androidauto/
- Apple: http://www.apple.com/ios/carplay/
Cautions
• Android Auto is a registered trademark of
Google Inc.
• Apple CarPlay is a registered trademark of
Apple Inc.
• Android Auto and Apple CarPlay are
unavailable if the phone OS is not the
latest version or if the phone cannot be
recognized due to a shutdown caused by a
failure or defect in the device itself.
• Your phone may not be recognised if its battery
is low. Charge your phone then try again.
• If your phone is shut down due to a defect in
the device itself, reset your phone and try again.
• If the USB cable of the Android Auto/ Apple
CarPlay device is repeatedly disconnected
and reconnected in a short period of time,
the phone may malfunction. This can also
cause a device failure.
• The device recognition time may di er
depending on the device type and
rmware/OS version.
• Using the USB cable that came with the
phone is recommended. (Using a nongenuine product may cause noise or
malfunction.)
• Normal operations cannot be guaranteed if
the phone is arbitrarily manipulated while
Android Auto/Apple CarPlay is active.
• Apple CarPlay cannot be run while making a
call vie Bluetooth.
• Android Auto or Apple CarPlay may not
operate normally due to mobile phone
issues.
• Carrier charges may apply when using
Android Auto or Apple CarPlay.
※ Some features may not operate normally
according to the version of iOS and
Android.
77
The following problems may occur due to
phone-related issues:
[Android Auto]
- Intermittent black screens appear when
entering Android Auto.
- Di erentiation of phones that support
Android Auto and those which do not,
may not be possible.
- Black screens appear in some areas of the
screen due to app errors.
[Apple CarPlay]
- Intermittent black screens appear when
entering Apple CarPlay.
- Black screens appear in some areas of the
screen due to app errors when navigating
between screens in Apple CarPlay.
- The audio volume is depending on the
volume status of the phone. If the phone
volume is set to 0, then no sound will be
hearable even if the multimedia system´s
volume is set to maximum.
- The sound output of a call may be cut
upon disconnecting Apple CarPlay during
a call via Apple CarPlay.
※ If services do not work properly due to
problems similar to the speci ed above, check
your phone, and if necessary, reconnect your
phone after restarting.
Page 78

Android Auto/Apple CarPlay
Using Android Auto or Apple
CarPlay
1. Make sure only genuine USB cables are
used that were provided by the mobile
phone´s manufacturer.
2. Enter [Android Auto] or [Apple CarPlay]
from the [HOME] screen.
3. Now the features such as navigation,
music and phone are ready to be used.
NOTICE
• Before connecting your mobile phone, check
whether Android Auto or Apple CarPlay is
activated in the [Phone Projection] menu.
• After connecting the mobile phone,
the phone has to be unlocked and the
disclaimers on the phone have to be
accepted in order to launch Android Auto or
Apple CarPlay.
• The screens and features displayed on
the multimedia system correspond to the
screens and features provided by Google
or Apple. They are subject to changes
according to the policy of the respective
company.
NOTICE-Android Auto
• Bluetooth media features will be disabled
when Android Auto is activated. After
removing the USB cable, these features will
be available again.
• If Android Auto is not activated even after a
successful connection, follow these steps:
- Check whether an error occurred on the
phone.
- Check whether Android Auto has been
closed on the phone.
- Check whether Android Auto is activated
in the [
Phone Projection
• If Android Auto does not work normally
even after a reconnection has been made,
visit the Google website http://support.
google.com/ androidauto.
• Please refer to the following websites
to check the available countries for the
[Android Auto].
https://www.android.com/auto
] menu.
NOTICE-Apple CarPlay
• Bluetooth phone/media features will be
disabled when Apple CarPlay is activated.
After removing the USB cable, these features
will be available again.
• If Apple CarPlay is not activated even after a
successful connection, follow these steps:
- Check whether Apple CarPlay is disabled
in the iPhone´s application settings.
- Check whether Apple CarPlay is activated
in the [
Phone Projection
• If Apple CarPlay does not work normally
even after a reconnection has been made,
visit the Apple website http://www.apple.
com/ios/carplay/
• Please refer to the following websites to
check the available countries for the [Apple
CarPlay].
http://www.apple.com/ios/feature-availability/
] menu.
78
Page 79
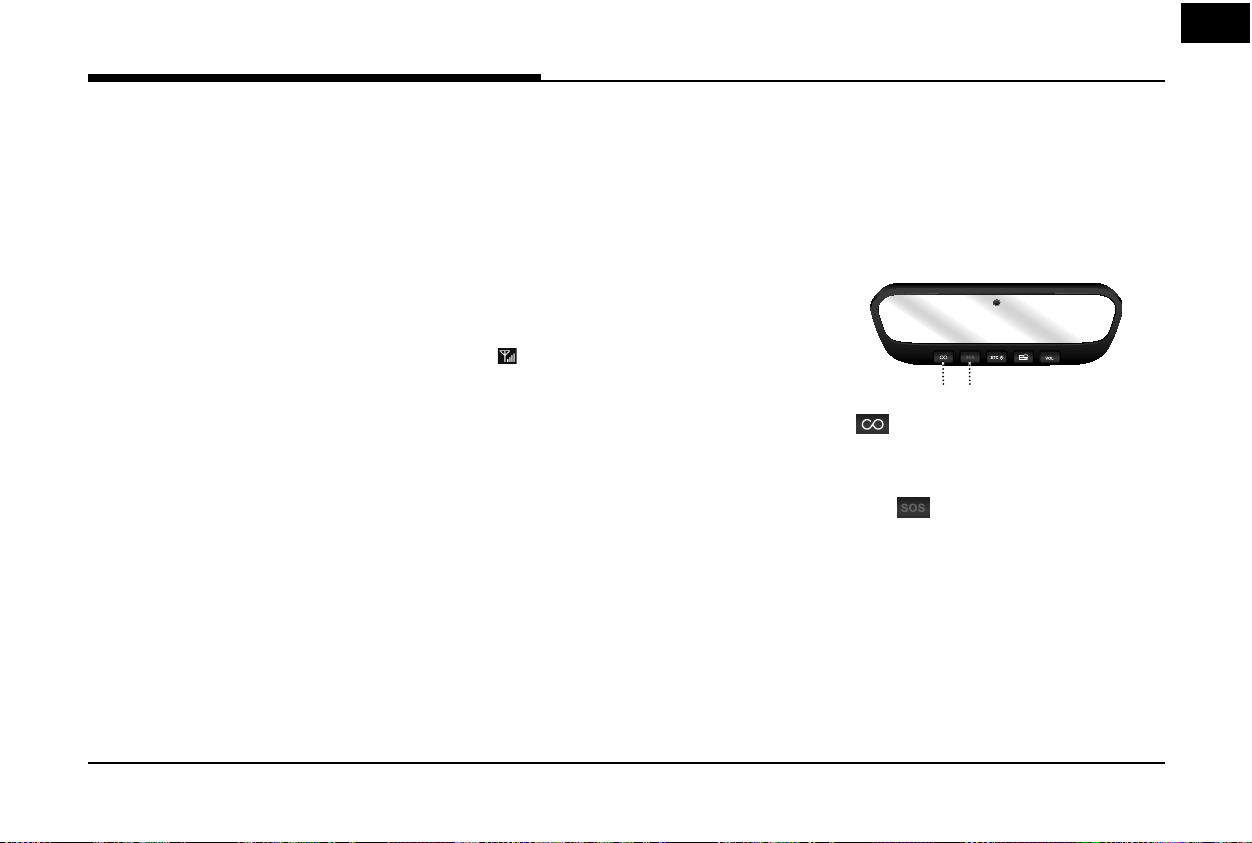
Connected Services (USA Only)
The Connected Services function is supported
for vehicles purchased in USA.
Before using Connected
Services
What is Connected Services?
This is a telematics service based on our
cutting-edge IT system that makes your driving
experience more convenient and fun and
features safety, security, vehicle diagnostics,
remote control and even smartphone
synchronization functions.
Enjoy a smarter driving style with Connected
Services.
What Is Telematics?
The word “Telematics” stems from the
combination of telecommunications and
informatics. It refers to an information system
that provides a variety of driving information
through the built-in terminal by analyzing
each symptom and driving state. This allows
for a much safer and more comfortable driving
experience.
About Transmission and Reception of
Radio Waves
Connection to the Connected Center or
wireless data transmission may be disrupted in
the following places.
For radio wave transmission/reception status,
refer to the status displayed on the Connected
Services screen.
It is recommended that you use the
Connected Services system when the antenna
) shows four bars or more.
icon (
Places where Connected Services may be
disrupted depending on the transmission/
reception status:
• Inside tunnels
• Mountainous areas or dense forest
• Roads close to cli edges
• Densely built-up areas
• On highways or roads underneath higher
interchange roads
• Inside buildings
Using the Rear View Mirror Key
Selecting the Rear View mirror key will allow
you to make service required inquiries, place
info searches, and emergency rescues by
connecting to the Connected Center. Such
features can be used only after subscribing to
the Connected Services service.
w
12
1. (Connected Services) button
Calls or ends the Connected Services call.
2. SOS (
Calls or ends SOS call.
) button
79
Page 80

Connected Services (USA Only)
Connected Services Safety and
Security
Auto Crash Notification
Provides immediate assistance when an
accident occurs and an airbag is deployed.
In this event, an ACN signal, containing
customer and location information, will
automatically be transmitted to the response
center. Upon receipt of the signal, a response
specialist will attempt to establish voice
communications with the vehicle occupants
and forward any pertinent information to
Connected Services emergency services.
SOS
Customers request emergency Connected
Services emergence services by pressing
the dedicated “SOS" button in the vehicle.
This action transmits vehicle information
and location to specially trained response
specialists, who assist in coordinating the
dispatch of appropriate emergency assistance
to the customer.
The response specialist remains on the line
with the customer until advised assistance has
arrived.
Stolen Vehicle Recovery
In the event a customer’s vehicle is reported
stolen (and a stolen vehicle report has been
led with the appropriate police department),
the response center can provide assistance to
the police in an attempt to recover the vehicle.
Vehicle Slowdown
Used with Stolen Vehicle Recovery, this
enables law enforcement to gradually reduce
the engine power of the vehicle, thus slowing
it down to safe levels. A warning shall be
transmitted to the driver prior to the slowdown
procedure.
Vehicle Immobilization
Used with Stolen Vehicle Recovery, this
enables law enforcement to send a signal to
the vehicle which immobilizes the engine
management system, thus preventing startup.
This capability is only valid when the ignition
is o , but can be saved for later immobilization
if the vehicle is on or in motion at the time of
signal transmission.
80
Page 81

Connected Services (USA Only)
Getting Started with Connected
Services
Use Connected Services features such as Driving Info
and Vehicle Diagnostics. Connected Services features
can be used after activating the service. A separate
fee may be charged for using Connected Services,
and features may di er according to your service plan.
1. Select [HOME] > [Connected Services].
• [Driving Info]: Displays information such
as Driving Time/Idle Time, Deceleration/
Acceleration Distribution, Driving Speed
and Driving Distance.
• [Send to Car with Google]: Displays
information about Places received via
Connected Services Voice Local Search.
• [Vehicle Diagnostics]: Inspects vehicle
malfunctions and provides diagnostics.
• [Apps]: Displays paid or free applications
with related information for installation.
• [Connected Settings]: Activates
Connected Services service, sets WiFi network, and displays modem
information.
81
Driving Info
This service can be used while your car is
stopped and the engine is on.
1. Select [HOME] > [Connected Services] >
[Driving Info].
2. Select [Menu] > [Update] to receive up-todate driving information.
Page 82

Connected Services (USA Only)
Send to Car with Google
You can check information about Places
received via Connected Services Voice Local
Search. To use the “Send to Car with Google”
function, rst you need to sign up to the
Connected Services.
1. Select [HOME] > [Connected Services] >
[Send to Car with Google].
2. Select the desired place.
C
A
B
Feature Description
Dial Displays the phone
A
View Map Displays the address of a
B
C a/d
(Previous/
Next)
number of a selected
place. Press the number to
make a call.
selected place. Press the
address to view map.
Displays the previous or
next place information.
Vehicle Diagnostics
You can have your vehicle inspected only after
stopping the vehicle because some control
units can’t be diagnosed while driving.
Vehicle Diagnostics will be canceled if you
switch to another screen while diagnosis is in
progress.
To receive result details, you need to rst sign
up to the Connected Services.
1. Select [HOME] > [Connected Services] >
[Vehicle Diagnostics].
2. Select the desired item.
A
Name Description
Connected
A
Center
Close Ends the Vehicle
B
B
Calls the Connected
Center to check for
vehicle problems
Diagnostics.
82
Page 83

Connected Services (USA Only)
Apps
Download Center
With Download Center, you can install
paid/free applications or check for related
information. Only Connected Center veri ed
applications can be installed. You can use
Download Center after agreeing to the terms
of service and use on the screen. (Only 1 time
for initial launch is required.)
Download Center and downloaded apps
require a network connection through Wi-Fi.
1. Select [HOME] > [Connected Services] >
[Apps].
2. 1) Select [Download Center].
B
C
A
D
2) Select [Download Center] > [Menu] >
[My Apps].
E
F
• [A]: Button state changes according to
the application state.
Name Description
Download Downloads free
applications.
Purchase Downloads paid
applications.
Re-download Downloads deleted
applications after
previously installing
them.
Retry Downloads the
applications that failed
to download due to
network or system
errors.
83
Page 84

Connected Services (USA Only)
• [
]: Shows more detailed information.
Run Runs installed
applications.
Cancel Cancels any
downloads and
updates.
]: Updates and refreshes the app list,
• [
B
and shows [My Apps] screen.
Name Description
Update After installation, it
Refresh Refreshes the app list
My Apps Moves to the My
• [
]: When the application list area
C
is pressed, it moves to the Detailed
Information screen.
shows applications
requiring updates.
The update screen
shows the [Update
All] button to update
all applications that
need updates.
status.
Apps screen.
D
Preview Displays application
Information Displays application
]: Button state changes according to
• [
E
the application state.
Re-download Downloads deleted
Update Shows when
Run Runs installed
]: Deletes the downloaded
• [
F
application.
Note
,
You can update applications already running
only after closing them.
Name Description
images.
information.
Name Description
applications after
previously installing
them.
applications require
updates.
applications.
84
Apps Settings
Displays the applications that were
downloaded through the Download Center.
Downloaded Apps
You can delete downloaded applications in
the Download Center. To recover a deleted
application, you can re-install the application
with the Re-download function in the
Download Center.
Select [HOME] > [Connected Services] > [Apps]
> [Apps Settings] > [Downloaded Apps].
Page 85

Connected Services (USA Only)
Storage
View the memory status of installed
applications and available storage space.
Select [HOME] > [Connected Services] > [Apps]
> [Apps Settings] > [Storage].
Connected Settings
Modem Information
This feature is used to show the MEID modem
information.
Select [HOME] > [Connected Services] >
[Connected Settings] > [Modem Information].
Wi-Fi Settings
This feature is used to set the Wi-Fi Application.
You can share a digital-device network with
the vehicle device through Wi-Fi.
1. Select [HOME] > [Connected Services] >
[Connected Settings] > [Wi-Fi Settings].
2. Select the desired item.
• [Wi-Fi On/O ]: Select [On] or [O ] to turn
the Wi-Fi on/o .
Displays the MAC address.
• [Wi-Fi Network]: Registers a network ID/
password to connect to a network AP
(Access Pont).
85
Page 86

Connected Services (USA Only)
A
B
Name Description
Searches available
A
B
C
The list of APs found is updated every 6
seconds when in Wi-Fi Settings. You can
also search for new APs by selecting
[ Refresh].
(Refresh)
Network
Name
Add Wi-Fi
Network
networks near the
vehicle.
Displays available
network AP (Access
Point) names.
Searches for hidden
APs to connect to.
C
3. Select a network AP name to connect (e.g.
Android_Hotspot).
• In case of a secured AP, you may be
required to enter a password.
•
If you cannot see the desired AP to connect
to in the list, select [Menu] > [Add Wi-Fi
Network]. (Up to ve APs can be added.)
D
E
86
Name Description
Network
D
SSID
Security The pre-con gured
E
4. Check the changed status of the Wi-Fi
icon and the text “Connected” under the
network AP name to ensure that the AP is
enabled.
• If you select the currently connected AP or
a previously connected AP from the list (up
to 30 APs can be saved), you can view the
following information.
The unique name of
the AP you want to
connect to. (SSID is
short for Service Set
Identifier.)
security type. (A
password is required
in the case of WEP and
WPA/WPA2-PSK.)
Page 87

Connected Services (USA Only)
Name Description
Disconnect
F
Disconnects the currently
connected AP.
F
G
Don't Save This option is
G
Note
,
If you connect to a Wi-Fi network after signing
up for Connected Services, then you will be
preferentially connected to a Wi-Fi network
whenever you use Download Center or any
downloaded apps.
only shown in the
information window
of an AP that you
have connected to at
least once. Selecting
this option deletes
the AP from the
saved AP list. (Note:
When you reconnect
to an unsaved AP,
you will have to
enter its connection
information again.
Service Activation
1. Select [HOME] > [Connected Services] >
[Connected Settings] > [Service Activation].
2. Select [Activation].
Note
,
• Activation may take up to ve minutes.
• Do not turn the engine o while activation
is in progress.
• If activation fails, contact the Connected
Center at 844-340-9741.
• During service activation, the hard keys in
the head unit do not work.
87
Page 88

P/N:MBM66364293
 Loading...