

Genesis G80 2019 Owner's Manual

DIS NAVIGATION SYSTEM / OWNER’S MANUAL
ENGLISH
FRANÇAIS
ESPAÑOL
KOREAN
P/N:MFL70408993

GENESIS BRANDED VEHICLE OWNER PRIVACY POLICY
Your Genesis Branded Vehicle may be equipped with technologies and services that use information collected,
generated, recorded or stored by the vehicle. Genesis Branded Vehicle has created a Vehicle Owner Privacy
Policy to explain how these technologies and services collect use and share this information.
You may read our Vehicle Owner Privacy Policy on the genesismotorsusa.com website at:
https://www.genesismotorsusa.com/privacy-policy.html
If you would like to receive a hard copy of our Vehicle Owner Privacy Policy, please contact our Genesis
Customer Care at:
Genesis Customer Care
PO Box 20850
Fountain Valley, CA 92728
844-340-9741
customercare@genesismotorsusa.com
Genesis Customer Care representatives are available Monday through Friday, between the hours of 5:00 AM
and 7:00 PM PST and Saturday and Sunday between 6:30 AM and 3:00 PM PST (English).
For Genesis Customer Care assistance in Spanish or Korean, representatives are available Monday through
Friday between 6:30 AM and 3:00 PM PST.
2

Thank you for purchasing this DIS Navigation system.
This user’s manual explains how to use the GENESIS DIS Navigation system.
Before using the product, read the contents of this user’s manual carefully and use this product safely.
• The screens shown in this manual may di er with the actual screens of the product.
• The design and speci cation of this product may change without prior noti cation for product improvement.
• When transferring the vehicle to another individual, include this user’s manual so that the next driver can
continue its use.
All Map Database cannot be copied without permission.
Important Notice: This is protected by U.S. copyright laws. All rights not expressly granted are reserved.
You may not otherwise reproduce, modify, and distribute the content without Hyundai MnSoft, Inc’s prior written consent.
3

Precautions for Safety
Notations used within this
User's Manual
CAUTION
RISK OF ELECTRIC
SHOCK
DO NOT OPEN
CAUTION: TO REDUCE THE RISK OF
ELECTRIC SHOCK, DO NOT REMOVE THE
COVER (OR BACK). NO USER SERVICEABLE
PARTS INSIDE. REFER SERVICING TO
QUALIFIED SERVICE PERSONNEL.
Always operate the vehicle in a safe manner.
Do not become distracted by the vehicle while
driving and always be fully aware of all driving
conditions. Do not change settings or any
functions.
Pull over in a safe and legal manner before
attempting such operations.
To promote safety, certain functions are
disabled unless the parking brake is on.
When driving your vehicle, be sure to keep the
volume of the unit low enough to allow you to
hear sounds coming from the outside.
Do not drop it and avoid heavy impacts at
anytime.
The lightning ash with the arrowhead symbol
within an equilateral triangle is intended
to alert the user about the presence of
uninsulated dangerous voltage within the
product’s enclosure that may be of su cient
magnitude to constitute a risk of electric shock.
The exclamation point within an equilateral
triangle is intended to alert the user to
the presence of important operating and
maintenance (servicing) instructions in the
literature accompanying the appliance.
To reduce the risk of electric shock, do not
remove the cover or back of this product.
There are no user-serviceable parts inside.
Refer servicing to quali ed service personnel.
To reduce the risk of re or electric shock,
do not expose this product to dripping or
splashing water, rain, or moisture.
4
The driver should not watch the monitor while
driving. If the driver watches the monitor while
driving, it may lead to carelessness and cause
an accident.

Precautions for Safety
CAUTION:
This product uses a Laser System.
To ensure proper use of this product, please
read this owner’s manual carefully and retain
it for future reference. Should the unit require
maintenance, contact an authorized service
center. Performing controls, adjustments, or
carrying out procedures other than those
speci ed herein may result in hazardous
radiation exposure.
To prevent direct exposure to laser beam, do
not try to open the enclosure.
Visible laser radiation when open. DO NOT
STARE INTO BEAM.
WARNING:
• Don’t use a cellular phone when you are
driving. You must stop at a safe place to use
a cellular phone.
• The use of the navigation radio by no means
relieves the driver of his/her responsibilities.
The highway code must always be observed.
Always observe the current tra c situation.
• The applicable tra c regulations and the
prevailing tra c situation always take
precedence over the instructions issued by
the navigation system if they contradict one
another.
• For tra c safety reasons, use the navigation
system menus only before starting a journey
or when the vehicle is stationary.
• In certain areas, one-way streets and turn
o and entry prohibitions (e.g. pedestrian
zones) are not recorded. In areas such as
these the navigation system will issue a
warning. Pay particular attention to one-way
streets and turn o and entry restrictions.
• The navigation system does not take the
relative safety of the suggested routes into
consideration.
Road blocks, building sites, height or weight
restrictions, tra c or weather conditions
or other in uences which a ect the route
safety or travel time are not taken into
consideration for the suggested routes. Use
your own discretion in order to decide on
the suitability of the suggested routes.
• The current legal road tra c speed limit
always takes priority over the values saved
on the data. It is impossible to provide an
assurance that the speed values of the
navigation system will always match those
of the current tra c regulations in every
situation.
• Always observe the applicable legal speed
limits the tra c regulations. The vehicle
speedometer must always be given priority
for display of the vehicle speed.
• Do not rely exclusively on the navigation
system when attempting to locate an
emergency service (hospital, re service
etc.). It cannot be guaranteed that all
available emergency services in your vicinity
are saved in the database. Use your own
discretion and abilities to secure help in
such situations.
5

Precautions for Safety
CAUTION:
• Do not keep the navigation system running
with the engine stopped. Doing so may
discharge the vehicle battery. When you
use the navigation system, always keep the
engine running.
• When the driver wants to operate the
navigation system, rst park the vehicle in
a safe location and set the parking brake.
Operating the system while driving can
distract the driver and may result in a serious
accident.
• Do not disassemble or modify this system.
If you do, it may result in accidents, re, or
electrical shock.
• Some states/provinces may have laws
limiting the use of video screens while
driving. Use the system only where it is legal
to do so.
• Do not use your phone in private mode
when you are driving. You must stop at a
safe location to use it.
FCC Warning
This equipment has been tested and found
to comply with the limits for a Class B digital
device, pursuant to part 15 of the FCC
Rules. These limits are designed to provide
reasonable protection against harmful
interference in a residential installation.
This equipment generates, uses and can
radiate radio frequency energy and, if not
installed and used in accordance with the
instructions, may cause harmful interference
to radio communications. However, there is
no guarantee that interference will not occur
in a particular installation. If this equipment
does cause harmful interference to radio or
television reception, which can be determined
by turning the equipment o and on, the user
is encouraged to try to correct the interference
by one or more of the following measures:
• Reorient or relocate the receiving antenna.
• Increase the separation between the
equipment and receiver.
• Connect the equipment into an outlet on
a circuit di erent from that to which the
receiver is connected.
• Consult the dealer or an experienced radio/
TV technician for help.
CAUTION: This device complies with part 15
of the FCC Rules. Operation is subject to the
following two conditions:
(1) This device may not cause harmful
interference, and
(2) this device must accept any interference
received, including interference that may
cause undesired operation.
Changes or modi cations not expressly
approved by the manufacturer (or party
responsible) for compliance could void the
user’s authority to operate the equipment.
This equipment complies with FCC radiation
exposure limits set forth for an uncontrolled
environment. This equipment should be
installed and operated with minimum distance
20 cm between the radiator & your body.
End user must follow the speci c operating
instructions for satisfying RF exposure
compliance. This transmitter must not be colocated or operating in conjunction with any
other antenna or transmitter.
IC Warning
“This device complies with Industry Canada
licence-exempt RSS standard(s).”
Operation is subject to the following
conditions: (1) this device may not cause
interference, and (2) this device must accept
any interference, including interference that
may cause undesired operation of the device.
6

Table of Contents
Precautions for Safety 4
Notations used within this User's Manual . . .4
FCC Warning . . . . . . . . . . . . . . . . . . . . . . . . . .6
IC Warning . . . . . . . . . . . . . . . . . . . . . . . . . . .6
Table of Contents 7
General Information 14
About Disc . . . . . . . . . . . . . . . . . . . . . . . . . . 14
Recommended Practices for Handling
Discs .................................................................. 14
Types of Playable Discs ................................ 14
COPYRIGHTS ................................................. 15
DVD Region Code ......................................... 15
PBC: Playback Control (Video CD Only)
If
symbol appears ................................. 15
“
About USB . . . . . . . . . . . . . . . . . . . . . . . . . . 15
MP3/WMA/FLAC file Information . . . . . . . . 16
Image file Information . . . . . . . . . . . . . . . . . 16
Video file Information . . . . . . . . . . . . . . . . . . 16
Using iPod® Devices . . . . . . . . . . . . . . . . . . . 17
Using SD Cards. . . . . . . . . . . . . . . . . . . . . . . 17
”
Precautions upon using iPod® ................... 17
Supported iPod® devices ............................. 17
Ejecting and Inserting SD Cards ............... 17
Usage of SD Cards ....................................... 17
.. 15
Name of Each Component 18
Head unit . . . . . . . . . . . . . . . . . . . . . . . . . . . . 18
Driver Information System (DIS) Control
(USA Only) . . . . . . . . . . . . . . . . . . . . . . . . . 20
Driver Information System (DIS) Control
(CANADA Only) . . . . . . . . . . . . . . . . . . . . . . 21
Steering wheel remote control . . . . . . . . . . 22
Basic Operation 23
Starting the system for the first time . . . . . 23
Turning the system off . . . . . . . . . . . . . . . . 23
AV OFF . . . . . . . . . . . . . . . . . . . . . . . . . . . . 23
AV ON . . . . . . . . . . . . . . . . . . . . . . . . . . . . . 23
Adjusting the volume . . . . . . . . . . . . . . . . . 23
Resetting the System . . . . . . . . . . . . . . . . . .24
Using the controller . . . . . . . . . . . . . . . . . . .24
Using the Touch screen . . . . . . . . . . . . . . . . .24
Radio Operation (FM/AM) 25
Listening to FM/AM radio. . . . . . . . . . . . . . 25
Listening to HD Radio™ Stations
(USA Only) . . . . . . . . . . . . . . . . . . . . . . . . . 25
HD Radio screen ...........................................25
HD Radio™ Reception On/Off
(USA Only) ...................................................... 26
Tag (USA Only) .............................................26
Saving FM/AM preset . . . . . . . . . . . . . . . . . .27
Scanning FM/AM broadcast station . . . . . . .27
7
Scanning preset stations ............................ 27
Scanning all stations .................................... 27
Reordering FM/AM preset . . . . . . . . . . . . . 28
Autostore . . . . . . . . . . . . . . . . . . . . . . . . . . . 28
Radio Text On/Off . . . . . . . . . . . . . . . . . . . . 28
Sound Settings . . . . . . . . . . . . . . . . . . . . . . 28
Radio Operation (SiriusXM™) 29
SiriusXM™ screen . . . . . . . . . . . . . . . . . . . . 29
Listening to SiriusXM™ radio . . . . . . . . . . . 30
Selecting SiriusXM™ broadcast channel . . 30
Selecting a channel through manual
search ...............................................................30
Selecting with channel up/down ..............30
Selecting a channel through preset ........30
Selecting channel through channel/
category list . . . . . . . . . . . . . . . . . . . . . . . . . 30
Adding to Favorites . . . . . . . . . . . . . . . . . . . . 31
Program Guide . . . . . . . . . . . . . . . . . . . . . . . 31
Scanning SiriusXM™ broadcast channel . . 32
Direct Tune . . . . . . . . . . . . . . . . . . . . . . . . . 32
Sound Settings . . . . . . . . . . . . . . . . . . . . . . 32
Featured Favorites . . . . . . . . . . . . . . . . . . . . 32
Favorites . . . . . . . . . . . . . . . . . . . . . . . . . . . 33
Viewing Active Alert ..................................... 33
Deleting the song or artist saved in
[Favorites] menu ...........................................33
Favorites Alert On/Off . . . . . . . . . . . . . . . . 34
Storing SiriusXM™ preset . . . . . . . . . . . . . . 34

Table of Contents
Reordering SiriusXM™ preset . . . . . . . . . . . 35
Game Zone . . . . . . . . . . . . . . . . . . . . . . . . . 35
Setting Team .................................................. 35
Viewing Active Alert ..................................... 36
Alert On/Off ................................................... 36
Subscription Status . . . . . . . . . . . . . . . . . . .37
Go to SiriusXM™ Data . . . . . . . . . . . . . . . . .37
Audio CD/MP3 CD Operation 38
Playing an Audio CD/MP3 CD . . . . . . . . . . 38
Pause ...............................................................38
Skip ...................................................................38
Search ..............................................................38
Seek .................................................................. 39
List ....................................................................39
Shuffle .............................................................. 39
Repeat ..............................................................40
Scan ..................................................................40
Sound Settings ..............................................40
DVD/VCD Operation 41
Playing a DVD/VCD . . . . . . . . . . . . . . . . . . . 41
Switching to Menu display or Full
Screen Display ................................................ 41
Pause ................................................................ 41
Skip .................................................................... 41
Search ..............................................................42
Seek .................................................................. 42
Title Menu/Disc Menu (DVD Only) .......... 42
Caption Language (DVD Only) ................. 43
Voice Language (DVD Only) ...................... 43
Angle (DVD Only) .........................................43
DVD Settings (DVD Only) ...........................44
Repeat (VCD Only) ....................................... 44
Shortcut (VCD Only) .................................... 44
PBC On/Off (VCD Only) .............................45
Display Settings .............................................45
Sound Settings .............................................. 45
DVD language code ..................................... 46
Jukebox Operation 48
Playing Jukebox Music . . . . . . . . . . . . . . . . 48
Pause ...............................................................48
Skip ...................................................................48
Search ..............................................................48
Seek ..................................................................48
Cover Flow View ............................................48
List ....................................................................49
Shuffle .............................................................. 49
Scan .................................................................. 49
Sound Settings .............................................. 49
Repeat ..............................................................49
Playing Jukebox Video . . . . . . . . . . . . . . . . 50
Switching to Menu display or Full
Screen Display ...............................................50
Pause ...............................................................50
Skip ...................................................................50
Search ..............................................................50
Seek ..................................................................50
List ....................................................................50
Shuffle ..............................................................50
Repeat ..............................................................50
Caption Settings ............................................ 51
Voice Settings ................................................. 51
Display Settings .............................................. 51
Sound Settings ............................................... 51
DivX® VOD ........................................................ 51
Viewing Jukebox Image . . . . . . . . . . . . . . . 52
Switching to Menu display or Full
Screen Display ...............................................52
Skip ................................................................... 52
Zoom in/out ................................................... 52
Slideshow ........................................................53
List ....................................................................53
Slideshow Settings ....................................... 53
Display Settings .............................................53
USB Operation 54
Playing USB Music . . . . . . . . . . . . . . . . . . . 54
Pause ...............................................................54
Skip ...................................................................54
Search ..............................................................54
Seek .................................................................. 54
Cover Flow View ............................................54
List ....................................................................55
Shuffle ..............................................................55
8

Table of Contents
Repeat ..............................................................55
Hide Current File ........................................... 55
Copying the USB music file to
Jukebox ...........................................................55
Scan ..................................................................55
Sound Settings .............................................. 55
Playing USB Video . . . . . . . . . . . . . . . . . . . 56
Switching to Menu display or Full
Screen Display ...............................................56
Pause ...............................................................56
Skip ................................................................... 56
Search ..............................................................56
Seek .................................................................. 56
List .................................................................... 57
Shuffle .............................................................. 57
Repeat .............................................................. 57
Copying the USB video file to Jukebox
Caption Settings ........................................... 57
Voice Settings ................................................ 57
DivX® VOD ....................................................... 57
Display Settings ............................................. 57
Sound Settings .............................................. 57
Viewing USB Image . . . . . . . . . . . . . . . . . . 58
Switching to Menu display or Full
Screen Display ...............................................58
Skip ...................................................................58
Zoom in/out ................................................... 58
Slideshow ........................................................58
List ....................................................................58
Slideshow Settings .......................................58
.. 57
Copying the USB image file to
Jukebox ...........................................................58
Display Settings .............................................58
iPod® Operation 59
Playing iPod® . . . . . . . . . . . . . . . . . . . . . . . . .59
Pause ...............................................................59
Skip ................................................................... 59
Search .............................................................. 59
Seek .................................................................. 59
List ....................................................................59
Shuffle .............................................................. 59
Repeat ..............................................................59
Scan .................................................................. 59
Sound Settings .............................................. 59
Auxiliary Device Operation 60
Playing an AUX source . . . . . . . . . . . . . . . . 60
Sound Settings ..............................................60
Bluetooth® Audio 61
Playing Bluetooth® Audio . . . . . . . . . . . . . . . 61
Before playing the Bluetooth® Audio ....... 61
Starting the Bluetooth® Audio....................61
Pause ................................................................ 61
Skip .................................................................... 61
Shuffle ............................................................... 61
9
Repeat ............................................................... 61
Change Device ..............................................62
Sound Settings .............................................. 62
Getting Started with Navigation
Navigation use restrictions . . . . . . . . . . . . . 63
What is GPS? . . . . . . . . . . . . . . . . . . . . . . . 63
About satellite signals . . . . . . . . . . . . . . . . . 63
Acquiring satellite signals . . . . . . . . . . . . . . 63
Operating Navigation Screen . . . . . . . . . . . 64
Map screen .....................................................64
Zoom In / Zoom Out................................... 67
Map scale ........................................................ 67
Changing the route conditions ................. 67
Searching for POI .........................................68
Adding the position to address book ..... 70
Scrolling map .................................................. 71
Traffic information list ................................... 71
Navigation volume ......................................... 71
Settings ........................................................... 72
Making a call to POI .................................... 72
Guidance to Previous Destinations .......... 72
General operations of quick menu . . . . . . . .73
General operations of [Navigation] menu . .73
63

Table of Contents
Searching for Destination of
Navigation 74
Search . . . . . . . . . . . . . . . . . . . . . . . . . . . . . .74
Address Search . . . . . . . . . . . . . . . . . . . . . . .75
Previous Destinations . . . . . . . . . . . . . . . . . .76
Address Book . . . . . . . . . . . . . . . . . . . . . . . .76
Adding to Address Book .............................77
Deleting Address Book ................................77
Editing Address Book ...................................77
POI . . . . . . . . . . . . . . . . . . . . . . . . . . . . . . . .78
Searching for POI by category .................. 78
Searching for POI by phone number ...... 78
Emergency . . . . . . . . . . . . . . . . . . . . . . . . . .78
Online Search (USA Only) . . . . . . . . . . . . . .79
Intersection . . . . . . . . . . . . . . . . . . . . . . . . . .79
Freeway Exit / Enter . . . . . . . . . . . . . . . . . . .79
Coordinates . . . . . . . . . . . . . . . . . . . . . . . . . 80
Home / Work . . . . . . . . . . . . . . . . . . . . . . . . 80
Registering Home or Work ........................80
Finding your Home or Work .....................80
Using the Route Menu 81
Route menu overview . . . . . . . . . . . . . . . . . . 81
Cancel Route . . . . . . . . . . . . . . . . . . . . . . . . . 81
Route Options . . . . . . . . . . . . . . . . . . . . . . . . 81
Edit Route . . . . . . . . . . . . . . . . . . . . . . . . . . 82
Route Info / Avoid . . . . . . . . . . . . . . . . . . . 83
Route Overview . . . . . . . . . . . . . . . . . . . . . . 83
Route Preview . . . . . . . . . . . . . . . . . . . . . . . 83
Bluetooth® Wireless Technology 94
Before Using the Bluetooth Handsfree . . . .94
What is Bluetooth Wireless Technology?
Precautions for Safe Driving ...................... 94
Cautions upon Connecting Bluetooth
Phone ............................................................... 94
Pairing and connecting the unit and a
Bluetooth phone . . . . . . . . . . . . . . . . . . . . . .94
When no phones have been paired ........ 95
When a phone is already paired .............. 96
Change Device . . . . . . . . . . . . . . . . . . . . . . . 97
Disconnecting the connected phone ...... 97
Deleting Bluetooth Devices ........................ 97
Making a call by entering phone number
Making a call by redialing . . . . . . . . . . . . . . 98
Making a call with speed dial numbers . . . 98
Answering/Rejecting a call . . . . . . . . . . . . . 98
Responding with messages . . . . . . . . . . . . .99
Switching call to the mobile phone . . . . . . .99
Ending a call . . . . . . . . . . . . . . . . . . . . . . . . .99
Using the menu during a phone call . . . . . .99
Call history . . . . . . . . . . . . . . . . . . . . . . . . .100
Making a call from call history ................ 100
Downloading call history ........................... 100
Contacts . . . . . . . . . . . . . . . . . . . . . . . . . . .100
Downloading mobile phone contacts .... 101
Searching for contacts ............................... 101
.. 94
. . 98
Favorites . . . . . . . . . . . . . . . . . . . . . . . . . . . 101
Calling Favorites ........................................... 101
Editing Favorites .......................................... 102
Deleting Favorites ........................................ 102
Messages . . . . . . . . . . . . . . . . . . . . . . . . . . . 102
Checking new messages .......................... 102
Checking new message contents .......... 103
Message Settings ....................................... 103
Privacy Mode . . . . . . . . . . . . . . . . . . . . . . . . 103
Change Device . . . . . . . . . . . . . . . . . . . . . . 103
Voice Recognition System 104
What is voice recognition? . . . . . . . . . . . . . 104
Voice recognition features by language . . .104
Operating voice command . . . . . . . . . . . . .104
Condition for voice command system .. 104
Starting voice recognition......................... 104
Skipping prompt messages ..................... 105
Re-starting voice recognition .................. 105
Ending voice recognition .......................... 105
Adjusting voice recognition volume ...... 105
Voice recognition quick start
(Manual Control) . . . . . . . . . . . . . . . . . . . . . 105
About voice command “Help” . . . . . . . . . . 105
Voice command list . . . . . . . . . . . . . . . . . . .106
Phone commands ...................................... 106
Radio commands ........................................107
Media commands ....................................... 108
Audio CD commands .............................. 109
10

Table of Contents
MP3 CD/ USB music/ Jukebox
music/ iPod® commands .......................... 110
Bluetooth audio/ AUX commands ........ 110
Navigation commands .................................111
Other Commands (Commands used
in List / Help/ etc.) ...................................... 114
List of Nearest Locations ........................... 115
Siri® 120
Operating Siri® command . . . . . . . . . . . . . .120
What is Siri®? ............................................... 120
Starting Siri® ................................................. 120
Re-starting Siri® ........................................... 120
Ending Siri® ................................................... 120
Adjusting Siri® volume ............................... 120
SiriusXM™ Data 121
About SiriusXM™ Data . . . . . . . . . . . . . . . . 121
Accessing SiriusXM™ Data . . . . . . . . . . . . . 121
SiriusXM™ Weather Information
(USA Only) . . . . . . . . . . . . . . . . . . . . . . . . . 121
Current weather information
(USA Only) ......................................................121
Weather forecast (USA Only) ....................121
Weather information in other region
(USA Only) .................................................... 122
Weather information at ski resorts
(USA Only) .................................................... 122
Searching for other region or ski resort
(USA Only) .................................................... 123
Favorites (USA Only) .................................. 123
Weather & Security Alerts (USA Only) ..124
Weather Map (USA Only) ......................... 125
SiriusXM Traffic Information . . . . . . . . . . . . 125
SiriusXM™ Fuel Prices Information
(USA Only) . . . . . . . . . . . . . . . . . . . . . . . . . 125
Finding gas station (USA Only) .............. 125
Searching for gas station (USA Only)... 126
Favorites (USA Only) .................................. 126
SiriusXM™ Stocks Information . . . . . . . . . . 128
Favorites ......................................................... 128
SiriusXM™ Sports Information . . . . . . . . . .129
Favorites ......................................................... 130
SiriusXM™ Movie Times Information
(USA Only) . . . . . . . . . . . . . . . . . . . . . . . . . 131
Finding theater by searching for movie
(USA Only) ......................................................131
Viewing movie list by searching for
theater (USA Only) ..................................... 132
Favorites (USA Only) .................................. 133
Android Auto/Apple CarPlay 134
What is Android Auto/Apple CarPlay? . . . . 134
Cautions ........................................................ 134
Using Android Auto or Apple CarPlay . . . . 135
NOTICE .......................................................... 135
NOTICE-Android Auto .............................. 135
NOTICE-Apple CarPlay ............................. 135
Settings 136
[Setup] menu overview . . . . . . . . . . . . . . . . 136
Navigation . . . . . . . . . . . . . . . . . . . . . . . . . . 136
General .......................................................... 136
Display ............................................................ 136
Guidance ........................................................137
Route ...............................................................137
Traffic ...............................................................137
Import/Export ............................................... 137
Sound . . . . . . . . . . . . . . . . . . . . . . . . . . . . . 138
Volume Ratio ................................................ 138
Navigation Volume ...................................... 138
Fade/Balance ............................................... 139
Treble/Midrange/Bass ............................... 139
Volume (System) ......................................... 139
Volume (Phone Projection) ...................... 139
Quantum Logic Surround ........................ 140
Clari-Fi ........................................................... 140
Speed Dependent Vol. .............................. 140
Active Sound Design ................................. 140
Beep .................................................................141
Default..............................................................141
Display . . . . . . . . . . . . . . . . . . . . . . . . . . . . . 141
Adjust ...............................................................141
Illumination(Daylight/Night) .......................141
Mode .............................................................. 142
Display Ratio ................................................ 142
11

Table of Contents
Default............................................................ 142
Phone . . . . . . . . . . . . . . . . . . . . . . . . . . . . . 143
Bluetooth Connection ................................ 143
Auto Connection Priority .......................... 143
Message Settings ....................................... 143
Bluetooth Voice Prompts .......................... 144
Device Information ..................................... 145
Privacy mode .............................................. 146
Customer Center (USA Only) ................. 146
Voice Recognition . . . . . . . . . . . . . . . . . . . . 147
Clock . . . . . . . . . . . . . . . . . . . . . . . . . . . . . . 147
GPS Time .......................................................147
Time Settings ................................................147
Daylight Savings Time ............................... 148
Time Zone.....................................................148
Time Format ................................................. 148
General . . . . . . . . . . . . . . . . . . . . . . . . . . . .148
Language ...................................................... 148
Keyboard ....................................................... 148
Return to Map Timer ................................. 149
Steering wheel Mode Button ................... 149
Media Change Notifications .................... 149
Distance Unit ............................................... 149
Screen Saver ................................................ 150
Phone Projection . . . . . . . . . . . . . . . . . . . . .150
E-Manual . . . . . . . . . . . . . . . . . . . . . . . . . . . 150
Skip .................................................................. 151
Zoom In/Out ................................................. 151
Search ............................................................. 151
Go To Page .................................................... 151
System Info . . . . . . . . . . . . . . . . . . . . . . . . . 151
Version ............................................................ 151
Jukebox Info ................................................ 152
Update ........................................................... 152
Default............................................................ 153
Using Rear Camera - Option 154
About Rear Camera . . . . . . . . . . . . . . . . . . 154
Turning on the rear camera ..................... 154
Backing Up & Using Camera . . . . . . . . . . .154
SVM (Surround View
Monitor) - Option 155
About SVM (Surround View Monitor) . . . .155
Operating front SVM . . . . . . . . . . . . . . . . .155
Operating rear SVM . . . . . . . . . . . . . . . . . . 155
SVM setting . . . . . . . . . . . . . . . . . . . . . . . .156
Warning display . . . . . . . . . . . . . . . . . . . . . . 156
Driver's door open indicator .................... 156
Front passenger's door open indicator
Trunk open indicator ................................. 156
Side mirror folding indicator .................... 156
.. 156
Climate Mode 157
Operating Climate Mode . . . . . . . . . . . . . . 157
12
Connected Services (USA Only)
Before using Connected Services . . . . . . .158
What is Connected Services? ................. 158
What Is Telematics? ................................... 158
About Transmission and Reception of
Radio Waves ................................................. 158
Using the Rear View Mirror Key . . . . . . . . .158
Connected Services Safety and Security . . 159
Auto Crash Notification............................. 159
SOS ................................................................ 159
Stolen Vehicle Recovery ............................ 159
Vehicle Slowdown........................................ 159
Vehicle Immobilization .............................. 159
Getting Started with Connected Services
Driving Info . . . . . . . . . . . . . . . . . . . . . . . . .160
Send to Car with Google . . . . . . . . . . . . . . 161
Vehicle Diagnostics . . . . . . . . . . . . . . . . . . . 161
Apps . . . . . . . . . . . . . . . . . . . . . . . . . . . . . . 162
Download Center ....................................... 162
Apps Settings .............................................. 163
Connected Settings . . . . . . . . . . . . . . . . . . 164
Modem Information ................................... 164
Wi-Fi Settings .............................................. 164
Service Activation ....................................... 166
158
. . 160
Before Thinking the Product
Has Malfunctioned 167

Table of Contents
Troubleshooting 170
Trademarks and Licenses 172
DivX® ................................................................172
iPod® ................................................................172
SiriusXM™ ......................................................172
DOLBY® ..........................................................172
DTS® ................................................................172
Bluetooth® Wireless Technology ..............172
Gracenote® .....................................................172
HD Radio™ Technology .............................. 173
Specification 174
AV/Navigation product specification . . . . . 174
Connected Services terminal product
specification . . . . . . . . . . . . . . . . . . . . . . . . 176
13

General Information
VIDEO CD
ReWritable
About Disc
Recommended Practices for Handling
Discs
• After using a disc, put the disc back in its original
case to prevent disc scratches.
• Do not use abnormally shaped discs (8cm, heartshaped, octagon-shaped) as such discs could
lead to malfunctions.
• Do not clean discs with chemical solutions,
such as record sprays, antistatic sprays, antistatic
liquids, benzene, or thinners.
• Do not expose the disc to direct sunlight or high
temperatures for prolonged periods of time.
Such exposure may lead to disc deformation.
• Upon playing a disc contaminated by dirt
or other substances, the sound quality may
deteriorate and result in skipping sounds. Writing
on either side of the disc could result in damage
to disc surfaces.
• Clean ngerprints and dust o the disc surface
(coated side) with a soft cloth.
• Copy-protected CDs, such as S-type CDs, may
not properly operate in the device. DATA CDs
cannot be played. (However, such discs may still
abnormally operate.)
• Skipping may occur when driving on bumpy
roads for prolonged periods of time or upon
severe shock, audio may not play properly.
• Do not attach sticker or label on the disc. Sticker
or label may fall o and damage the system.
• Do not insert two or more discs into the disc slot
simultaneously. It may damage the disc player.
• While disc is being inserted to the disc player by
its self-loading mechanism, do not hold the disc
or forcefully pull the disc. It may damage the disc
player and the disc.
• Non-genuine discs may cause defective
recognition or product disorder.
CAUTION : Servicing Compact Disc Player
• Do not disassemble the device. Contact a
designated service center in case of malfunction.
(Complete after service assistance will not be
provided if the user disassembles the device.)
CAUTION : Cleaning Compact Disc Player
• Do not use water to clean the device. Exposure
to water could lead to product malfunction.
• Do not introduce foreign substances into
the disc insert/eject slot. Introducing foreign
substances could damage the device interior.
• The device may fail to properly operate in
extremely hot or cold temperatures.
• Steam can become condensed on the beroptic lens due to rain, wet conditions, or upon
operating the heating system. In such cases,
discs may not be properly recognized. Remove
the disc and wait until the moisture dries.
Types of Playable Discs
DVD-VIDEO (12 cm disc)
Video CD (12 cm disc)
Audio CD (12 cm disc)
CD-R/RW
In addition, this unit can play a DVD±R,
DVD±RW, CD-R or CD-RW that contains
audio titles, MP3 or WMA les.
Depending on the conditions of the recording
equipment or the CD-R/RW (or DVD-RW,
DVD+RW) disc itself, some CD-R/RW (or DVDRW, DVD+RW) discs may not be played on the
unit.
14

General Information
COPYRIGHTS
It is forbidden by law to copy, broadcast, show,
broadcast via cable, play in public, or rent
copyrighted material without permission.
This product features the copy protection
function developed by Macrovision. Copy
protection signals are recorded on some discs.
When playing the pictures of these discs on
a unit, picture noise will appear. This product
incorporates copyright protection technology
that is protected by method claims of certain
U.S. patents and other intellectual property
rights owned by Macrovision Corporation
and other rights owners. Use of this copyright
protection technology must be authorized
by Macrovision Corporation, and is intended
for home and other limited viewing uses only
unless otherwise authorized by Macrovision
Corporation. Reverse engineering or
disassembly is prohibited.
DVD Region Code
This instrument is manufactured according
to the region code number recorded in the
DVD. If the DVD region code number does not
match the region number of this instrument,
DVD may not be played. Use the DVD
corresponding to your region.
PBC: Playback Control (Video CD
Only)
Playback control is available for Video CD
(VCD version 2.0 disc formats). PBC allows
you to interact with the system via menus,
search functions, or other typical computerlike operations. Moreover, still pictures of high
resolution can be played if they are included
in the disc. Video CDs not equipped with PBC
(Version 1.1) operate in the same way as audio
CDs.
If “ ” symbol appears
If “ ” symbol is displayed on the screen, the
current screen will not be operated during the
driving.
About USB
Connect the USB device after turning on the
engine. The USB device may become damaged
if it is already connected when the ignition is
turned on.
• Files that are not standard format les will
not be played.
• For MP3/WMA les, only music les with
compression rates between 8 Kbps ~ 320
Kbps can be played.
• For FLAC le, only music les with
compression rates between 8 Kbps ~ 1.6
Mbps can be played.
• Heed caution to static electricity when
connecting/disconnecting external USB
devices.
• Encoded MP3 Players will not be recognized
when connected as an external device.
• When connecting an external USB device,
the device may not properly recognize the
USB is in some states.
• Only USB devices formatted as FAT 12/16/32
are supported, and NTFS le system is not
supported.
• Some USB devices may not be supported
due to compatibility issues.
15

General Information
• Avoid contact between the USB connector
with bodily parts/foreign objects.
• Repeated connecting/disconnecting of USB
devices within short periods of time may
result in product malfunction.
• Insert USB device after starting the car. If the
car is started while USB device is inserted, it
may damage USB device.
• The amount of time required to recognize
the external USB device may di er
depending on the type, size, or le formats
stored on the USB. Such di erences
in required time are not indications of
malfunction.
• The device may not recognize the USB
device if separately purchased USB hubs and
extension cables are being used. Connect
the USB directly with the multimedia
terminal of the vehicle.
• When application programs are installed to
speci c USBs, les may not properly play.
• The device may not operate normally if MP3
Players, cellular phones, digital cameras,
or other electronic devices (USB devices
not recognized as portable disk drives) are
connected with the device.
• Charging through the USB may not work for
some mobile devices.
• The device may not support normal
operation when using a USB memory type
besides Metal Cover Type USB Memory.
• The device may not support normal
operation when using formats such as HDD
Type, CF, or SD Memory.
• The device will not support les locked by
DRM (Digital Rights Management).
• USB memory sticks used by connecting an
Adaptor (SD Type or CF Type) may not be
properly recognized.
MP3/WMA/FLAC file Information
• Sampling frequency: 8 ~ 48 KHz (MP3), 22.5
~ 48 KHz (WMA), 8 ~ 192 KHz (FLAC)
• Bit rate: 8 ~ 320 Kbps (MP3), 20 ~ 320 Kbps
(WMA), 8 Kbps ~ 1.6 Mbps (FLAC)
• Version: v2, v7, v8, v9.
• Playable le format: “.mp3”/ “.wma”/ “. ac”
Image file Information
• Playable le format: “.bmp”, “.jpg”, “.gif”, “.png”,
“.tif” (Max 5MB).
• It may not properly operate depending on
the storage type.
Video file Information
• Video Resolution: 720 x 576 pixels (DivX),
1280 x 720 pixels (except DivX).
• Playable le format: “.avi”, “.mpg”, “.mpeg”,
“.divx ”, “.mp4”.
• Subtitle format: “.smi”.
• Video Codec:
“DIVX3.11”, “DIVX4”, “DIVX5”, “DIVX6”.
• Audio Codec: “PCM”, “MP3”, “WMA”, “ WAV”.
• If video and caption le names are di erent,
caption may not be displayed.
• If DivX le format does not match main unit,
it may not be played properly.
16

General Information
Using iPod® Devices
Precautions upon using iPod®
• Some iPods with unsupported
communication protocols may not properly
operate with the system.
• If the iPod malfunctions due to an iPod device
defect, reset the iPod and try again. (To learn
more, refer to your iPod manual.)
• During ACC ON state, connecting the iPod
through the iPod cable (The cable that is
supplied when purchasing iPod/iPhone
product.) will charge the iPod through the
system.
• The use of genuine iPod cables supplied by
Apple is recommended. (The use of other
products may result in noise or abnormal
operation.)
• Within iPhones, streaming audio and iPod
control may occasionally con ict. If problems
persist, remove the iPhone and connect again.
• Use iPod with complete synchronization to
iTunes. Unauthorized song addition may cause
abnormal operation.
• If iPod and Bluetooth are connected
simultaneously with the same iPhone, you
cannot use Bluetooth audio function.
• If iPod touch or iPhone is used, iOS4.2 or
greater is recommended.
Supported iPod® devices
iPhone 7, iPhone 7 Plus
iPhone 6, iPhone 6S , iPhone 6S Plus
iPhone SE
iPhone5, iPhone5S, iPhone5C
iPhone4, iPhone4S
iPhone 3GS
iPod Touch (1st through 5th generation)
iPod Nano
Using SD Cards
Ejecting and Inserting SD Cards
• Ejecting and inserting SD cards while the
system is operating may result in SD Card
or System errors. To eject or insert the SD
card, rst turn o the system and the vehicle
ignition.
• Eject/insert SD cards only to update the
Map, Navi application and Navi S/W with a
new version.
• When an SD Card with the new version
is inserted, then the system will reboot
automatically.
Usage of SD Cards
• The SD Card is formatted to include only
Map and Navi S/W.
• The SD Card cannot be used to save and
play Music.
• Do not add, delete, or format les within the
SD Card.
17
Name of Each Component
Head unit
The image of this product may be di erent from the actual product.
1
2
3
4
5
1. Disc slot
Insert a disc into the disc slot.
2. DISC IN indicator light (DISC-IN)
When a disc is inserted, the indicator is
illuminated.
B
3. Disc eject (
Press to insert or eject disc
) button
/ SXM
6
4. • PWR PUSH button
Press this button in power OFF status.
Press and hold this button in power ON
• Volume control knob (VOL)
Turn left/right to control volume.
• AV on/o button
Press this button to turn AV on or o in
power on status.
7
-Power on
-Power o
status.
18
5. FM/AM Button
Selects the FM/AM band.
6. SXM Button
Selects the SiriusXM band.
7. MEDIA button
Press this button to move to the [Media]
menu in media playing screen. Press this
button again to display the media playing
screen.
Name of Each Component
/ SXM
13
12
11
8. SD map card slot
Insert the SD card into the slot.
9. MAP/VOICE button
• Press to display the map screen of the
current location.
• Press to repeat the voice guidance.
8
W
10. S SEEK/TRACK
When pressed momentarily (less than 0.8
sec.)
• FM/AM/SiriusXM mode: plays previous/
next station.
• MEDIA mode: changes the track, le, or
chapter.
- When pressed and held (0.8 sec. or longer)
• FM/AM/SiriusXM mode: changes the
station until the button is released.
• MEDIA mode: rewinds or fast forwards
the track, le, or chapter.
button
9
19
10
11. TUNE/FILE button
- FM/AM/SiriusXM mode: Turn to change
the station.
-
CD/DVD/VCD/Jukebox/USB/iPod mode: Turn
to search for the desired track, le or chapter.
12. DISP button
- Press to turn the screen on or o .
- Press and hold to move to the [Display]
menu screen.
13. RESET hole
Press to reset the unit.
Name of Each Component
Driver Information System (DIS) Control (USA Only)
The image of this product may be di erent from the actual product.
1
2
3
4
1. Controller
Tap or rotate to navigate through the menu
screens. For more details, refer to “Using the
controller” on page 24.
2. HOME button
Press to move to the [HOME] menu screen.
3. PHONE button
Press to move to the Phone menu screen.
5
4. BACK button
Press to move to the previous screen.
5. CONNECT button
Press to move to the [Connected Services]
menu screen.
6. NAV button
Press to move to the [Navigation] menu
screen.
20
8
7
6
7. MAP/VOICE button
• Press to display the map screen of the
current location.
• Press to repeat the voice guidance.
8. MENU button
Press to move to the pop-up menu in each
mode.
Name of Each Component
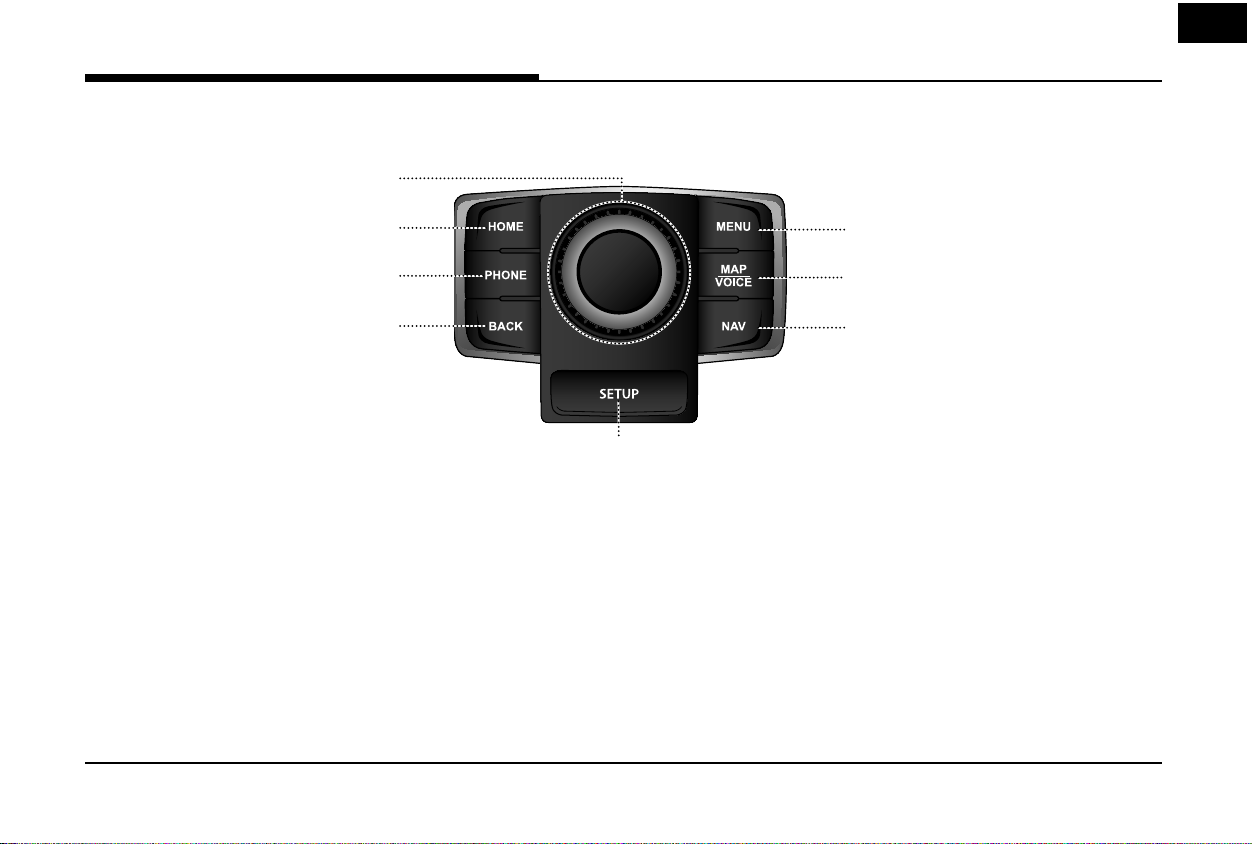
Driver Information System (DIS) Control (CANADA Only)
The image of this product may be di erent from the actual product.
1
2
3
4
1. Controller
Tap or rotate to navigate through the menu
screens. For more details, refer to “Using the
controller” on page 24.
2. HOME button
Press to move to the [HOME] menu screen.
3. PHONE button
Press to move to the Phone menu screen.
5
4. BACK button
Press to move to the previous screen.
5. SETUP button
Press to move to the [Setup] menu screen.
6. NAV button
Press to move to the [Navigation] menu
screen.
21
8
7
6
7. MAP/VOICE button
• Press to display the map screen of the
current location.
• Press to repeat the voice guidance.
8. MENU button
Press to move to the pop-up menu in each
mode.
Name of Each Component
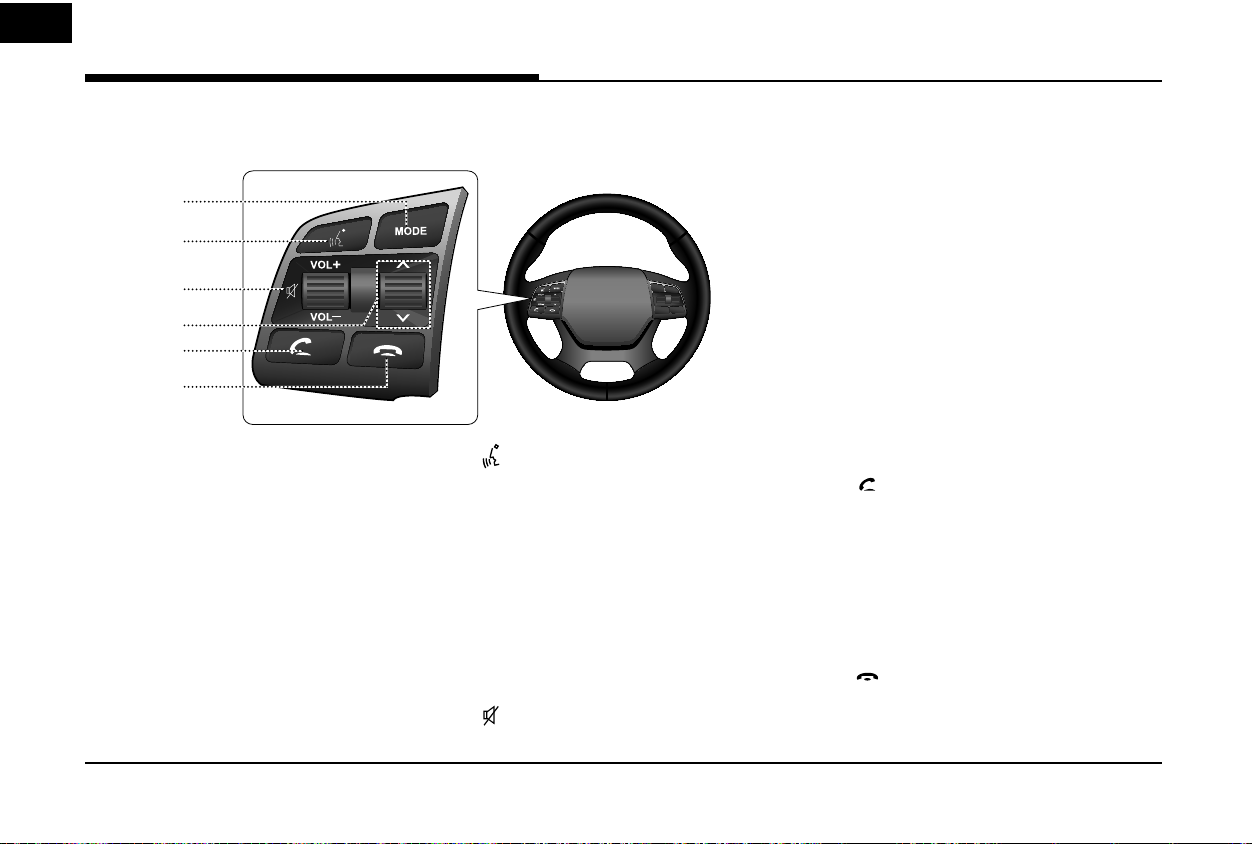
Steering wheel remote control
The image of this product may be di erent from the actual product.
1
2
3
4
5
6
1. MODE button
• Each time this button is pressed, the
mode is changed. You can select the
accessible media manually from [Steering
Mode button] menu. Only active/available
media can be accessed.
• If no media or disc is inserted, the mode
will be skipped.
• Press and hold the button (over 0.8
seconds) to turn the AV on/o .
• When power is o , press the button to
turn power back on.
2. button
• Press the button (under 0.8 seconds) to
activate voice recognition mode.
• Press and hold the button (over 0.8
seconds) to cancel voice recognition.
Press and hold the button (over 0.8
•
seconds) to activate or end the Siri function
if an iPhone is paired to the system.
3. Volume (VOL+/VOL-) button
Increases or decreases the volume level.
button
Press to mute the sound.
4. Seek up/down (W/S) button
- When pressed momentarily (less than
0.8 sec.)
• FM/AM/SiriusXM mode: plays
previous/next preset station.
• MEDIA mode: changes the track, le,
or chapter.
- When pressed and held (0.8 sec. or
longer)
• FM/AM/SiriusXM mode: changes the
station until the button is released.
• MEDIA mode: rewinds or fast forwards
the track, le, or chapter.
5.
button
Press to operate Bluetooth Hands-Free
function.
• Press to accept a call.
• Press to make a call from last calls.
• Press and hold for redialing.
button
6.
Press to hang up a call.
22

Basic Operation
Starting the system for the
first time
1. Press the engine start button.
Once the system is turned on, the booting
process will start and the safety warning
page is displayed.
2. Press [Confirm].
If you want to change the system
language, press [Language]. For more
details, refer to “Language” on page 148.
Note
,
• You cannot operate the system while it is
booting up. It may take some time for all of
features of the system boot up.
• The safety warning page is displayed every
time the ignition is turned on. The displayed
warnings are related to safety, please closely
read and comply with the safety warnings.
Turning the system off
Press and hold [PWR PUSH] on the head unit.
To turn the system on again, press [PWR PUSH]
on the head unit.
Note
,
Check the volume when turning on the
system. Before turning on the system, adjust
the volume to a reasonable level.
AV OFF
Press [PWR PUSH] on the head unit when the
AV is ON.
AV ON
Press [PWR PUSH] on the head unit when the
AV is OFF.
Adjusting the volume
Rotate the volume control knob [VOL] on the
head unit.
Note
,
When you turn the unit o , the current volume
level is automatically memorized. Whenever
you turn the system on, it operates at the
memorized volume level.
23
Basic Operation
Resetting the System
This feature is used to reset the system in the
occurrence of an unforeseen error or problem.
Press “RESET” button. (The use of a clip or pin is
recommended when resetting the system.)
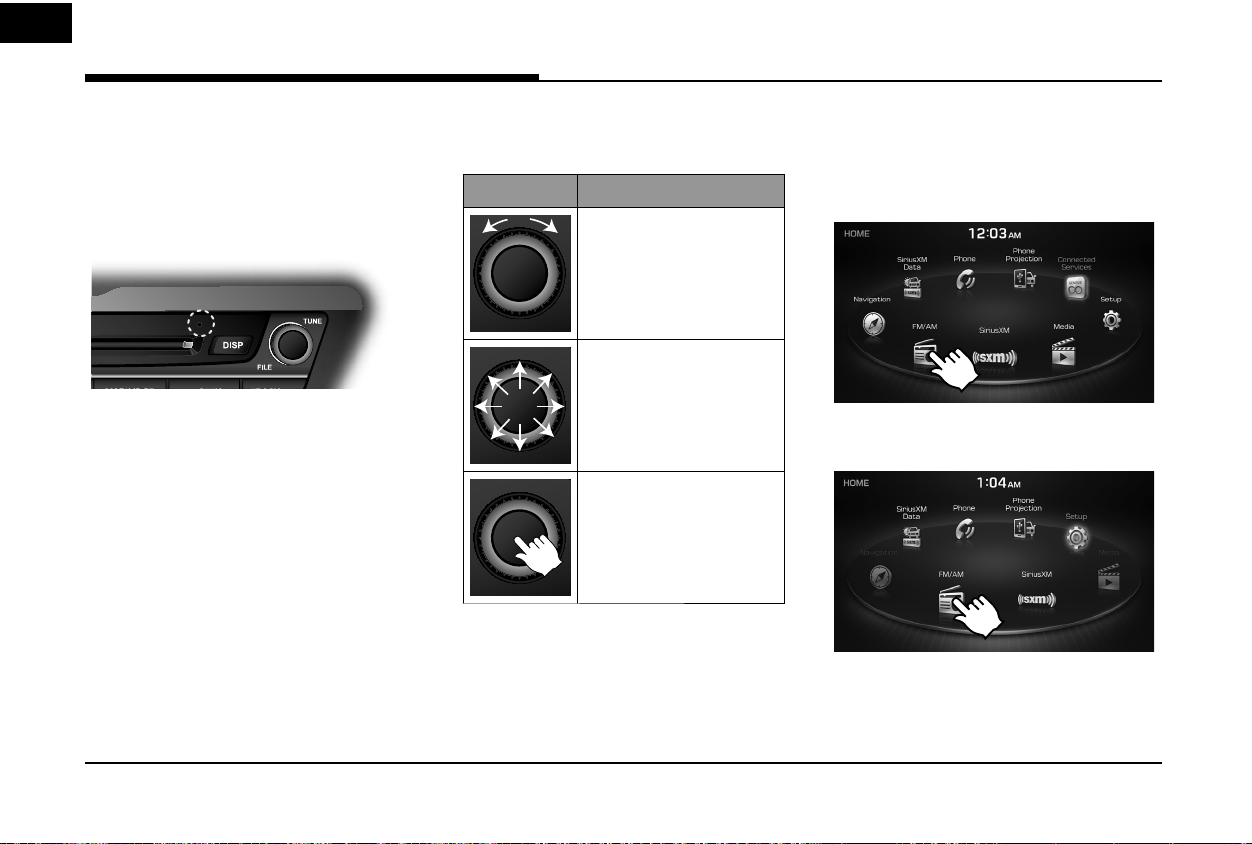
Using the controller
This control is used to move and select menus.
Controller Description
Move in the menu by
turning the controller left/
right.
Push the controller
up/down/left/right/
diagonally to move in the
menu.
Press the controller to
select menu.
Using the Touch screen
Press the desired menu on the screen to select
a menu.
- USA Only
- CANADA Only
24
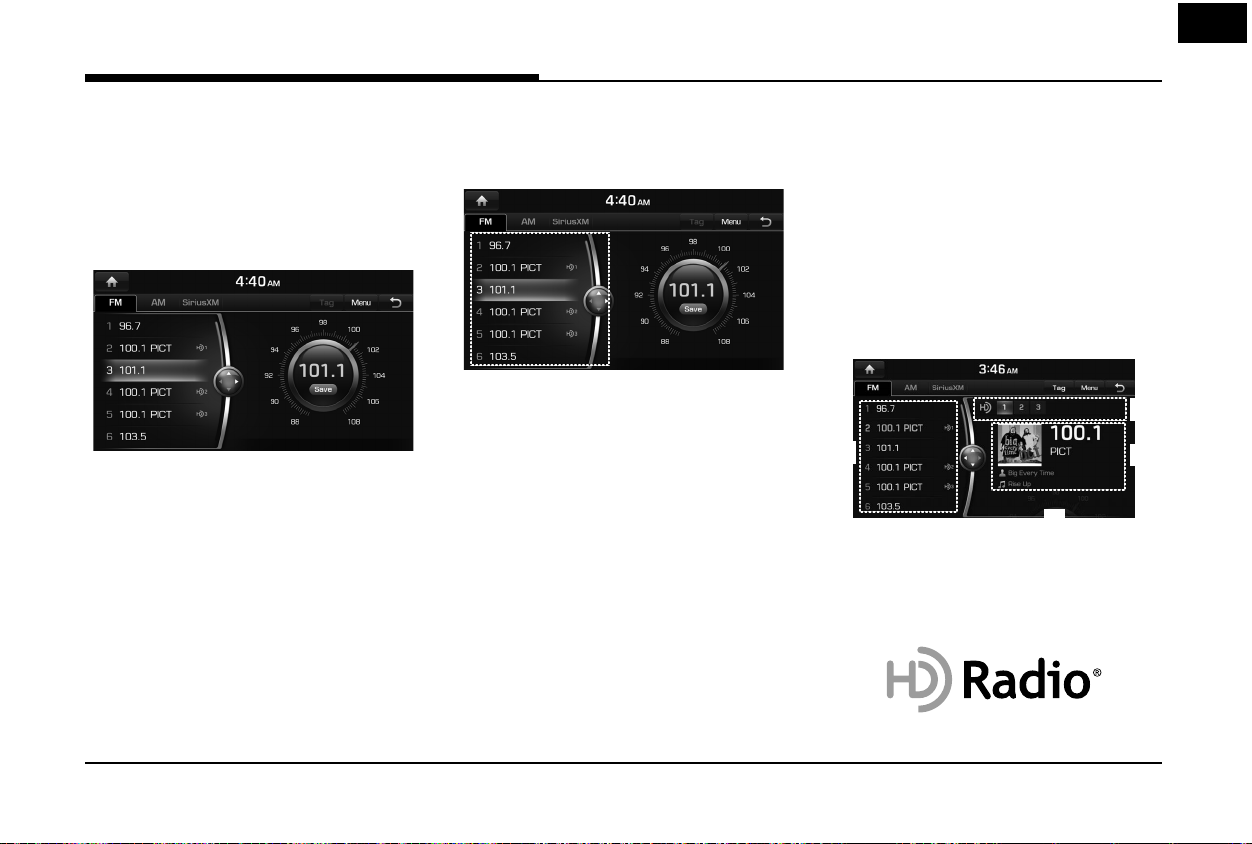
Radio Operation (FM/AM)
Listening to FM/AM radio
1. Press [FM/AM] on the head unit. Or press
[HOME] > [FM/AM].
2. Press [FM] or [AM] on the screen.
The FM/AM screen of the most recent
listened station is displayed.
3. Auto tuning:
S
SEEK/TRACK W] on the head unit.
Press [
When a station is received, searching stops.
Manual tuning:
Turn [TUNE/FILE] on the head unit in
clockwise or counter-clockwise direction.
-The stations move up and down step by
step.
Preset tuning:
From the 12 presets, select the station you
want to listen to.
Listening to HD Radio™
Stations (USA Only)
The HD Radio function is not supported for
vehicles purchased in Canada.
You can turn HD Radio reception on from the
menu and listen to HD Radio Broadcasts.
The HD Radio screen is displayed only when a
HD Radio broadcast is being received.
HD Radio screen
A
B
D
A
HD Radio Reception & Channel buttons
Displays main HD Radio channels and used
to directly select the currently available
local channels.
C
25
Radio Operation (FM/AM)
B
HD Channel Number
• HD Channel number saved in preset.
• Preset tuning: From the 12 presets, select
the HD Channel you want to listen to.
C
Broadcast Information
Displays detailed information about the
current broadcast. (Album Cover Art,
Artist name, Song title, HD Radio channel,
Frequency, PTY, etc...)
D
Frequency controller
When controller is focused, it moves to
center of screen. Turn the controller to
search for frequency and move the red
line.
Note
,
HD Radio reception is included when the
vehicle is in Radio mode. Methods used to
reorder between channels, save preset stations,
or other methods of searching frequencies
used for standard radios are identical for HD
Radio receivers. The HD Radio icon will be
displayed when the vehicle is within regions
where HD Radio signals can be received.
HD Radio™ Reception On/Off
(USA Only)
1. Select the band (FM, AM) you want.
If an HD Radio broadcast is received,
the radio mode will switch from analog
broadcast to HD Radio broadcast.
Press [Menu] > [HD Radio] on the screen.
The HD Radio receiver will be off and
switch to analog broadcast.
Note
,
• The default setting of [HD Radio] is set to on.
• HD Radio Technology is a digital radio
technology used by FM and AM radio stations
to transmit audio and data via a digital signal
in conjunction with their analog signals.
• While listening to the radio, the HD Radio
icon will become displayed if receiving an
HD Radio broadcast.
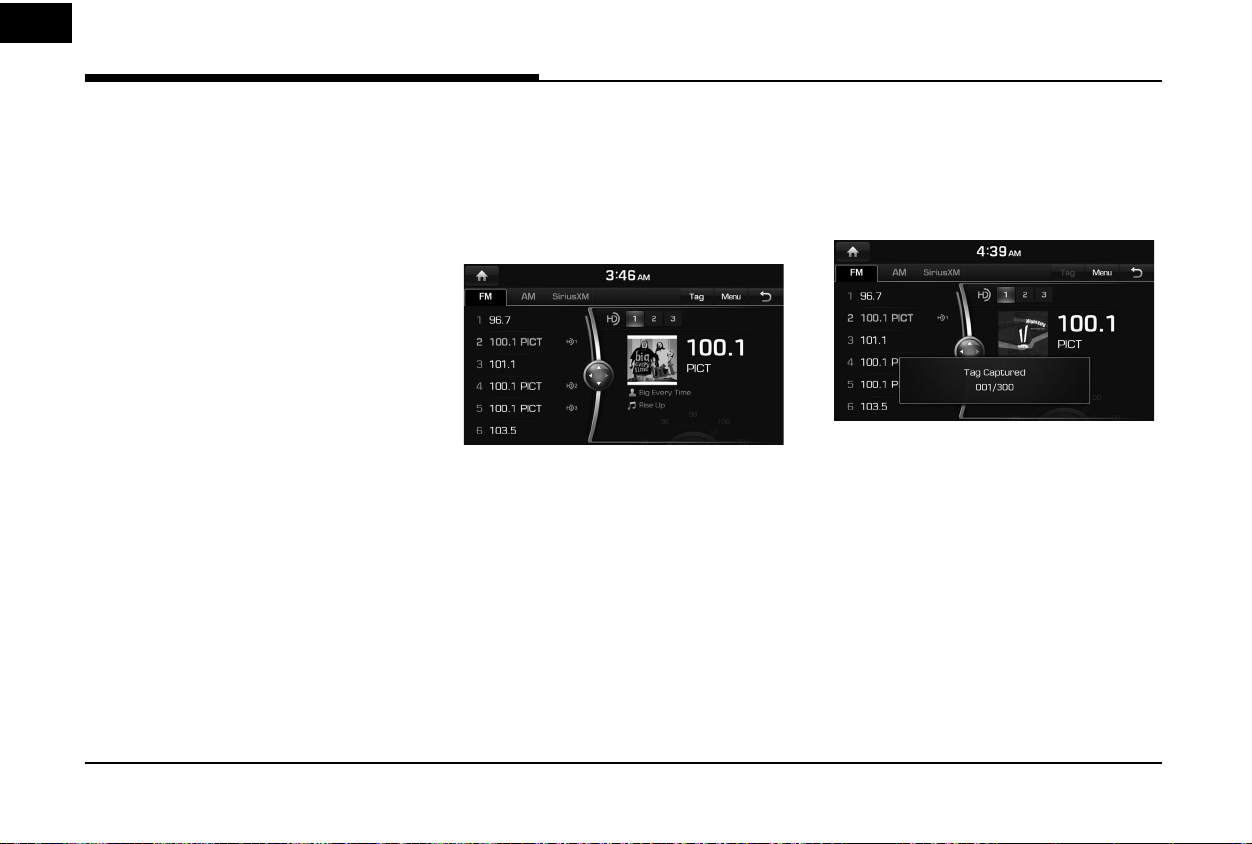
Tag (USA Only)
If the HD Radio broadcast includes Tag
information, then the tag information is
displayed on the screen.
1. Press [Tag] on the HD Radio screen.
Note
,
When HD Radio reception is o , the [Tag]
button is deactivated.
26
Radio Operation (FM/AM)
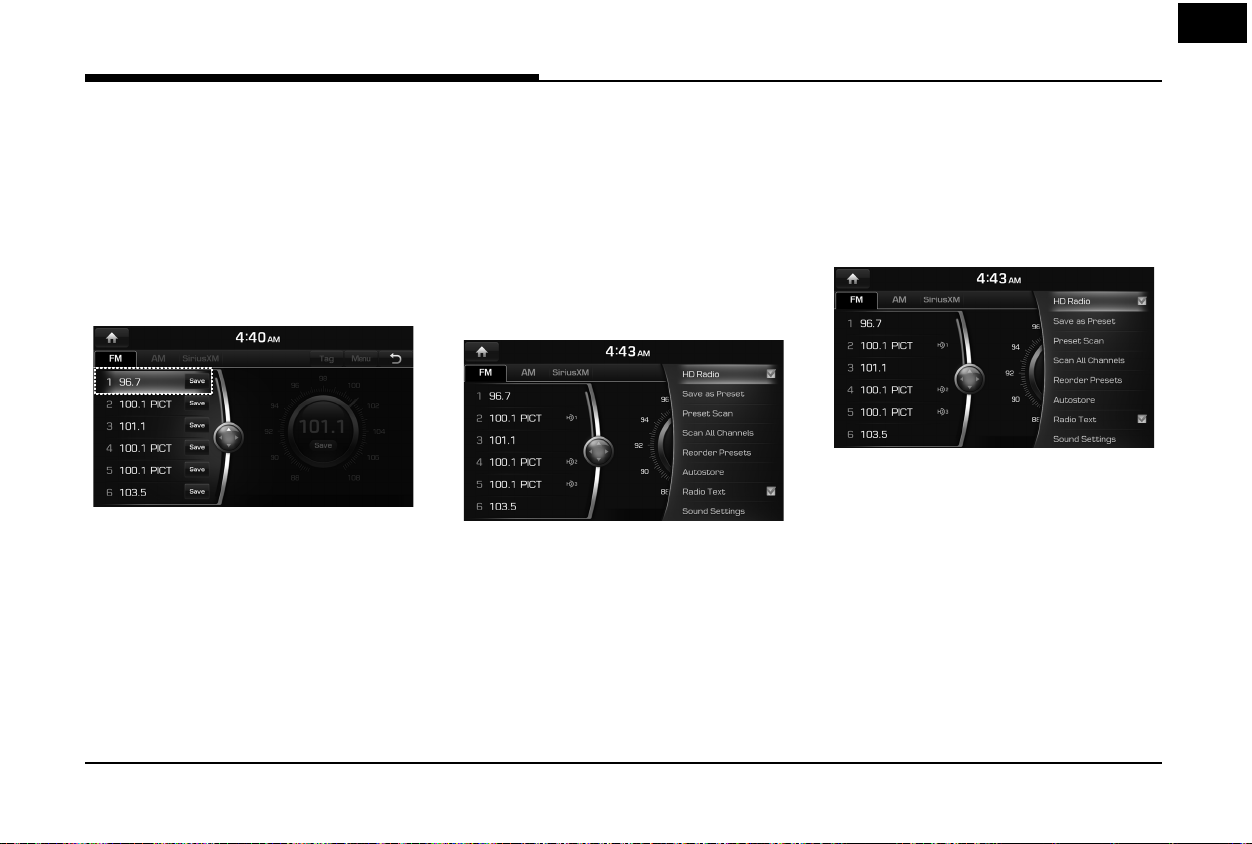
Saving FM/AM preset
12 preset stations each for FM/AM mode can
be saved manually.
1. Select the band (FM, AM) you want to store
a station into.
2. Select the desired station.
3. Press [Menu] > [Save as Preset].
4. Press the desired preset number.
The station is saved.
Note
,
When the station is saved on a number of
which another station has already been saved,
the previously saved station is erased.
Scanning FM/AM broadcast
station
Scanning preset stations
This function scans the 12 stations saved as
preset numbers in the current band for 10
seconds each.
1. Select the band (FM, AM) you want.
2. Press [Menu] > [Preset Scan].
Note
,
When the scan is operating, pressing the
controller will stop the function and remain on
the stopped station.
Scanning all stations
This function scans all stations and plays only
stations with superior reception for 5 seconds
each.
1. Select the band (FM, AM) you want.
2. Press [Menu] > [Scan All Channels].
Note
,
When the scan is operating, pressing the
controller will stop the function and remain on
the stopped station.
27
Radio Operation (FM/AM)
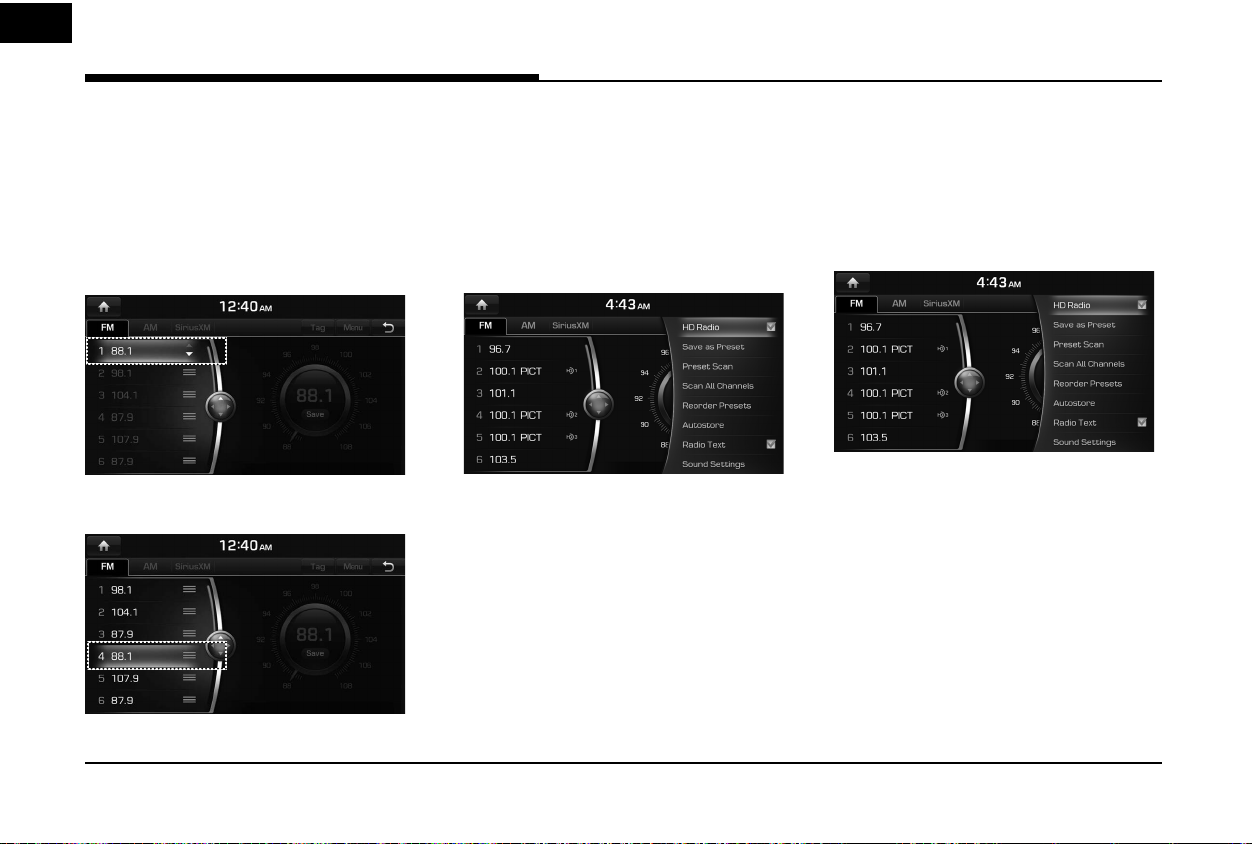
Reordering FM/AM preset
This function reorders the station saved to
presets.
1. Select the band (FM, AM) you want.
2. Press [Menu] > [Reorder Presets].
3. Press the desired preset from the list with
controller.
4. Move and press the selected preset up and
down.
Autostore
A total of 24 stations with twelve preset
stations each for FM/AM mode can be saved.
1. Select the band (FM, AM) you want.
2. Press [Menu] > [Autostore] to save
automatically receivable stations to Preset
list.
Note
,
While Autostore is operating, pressing
[Autostore] again will cancel the function and
play the previous frequency.
Radio Text On/Off
If current broadcast includes Radio Text
information, the text information is displayed
on the screen.
1. Select the band (FM, AM) you want.
2. Press [Menu] > [Radio Text].
Pressing the [Radio Text] again will cancel
the function.
Sound Settings
1. Press [Menu] > [Sound Settings] in the
radio screen.
2. For more details, refer to “Sound” on page
138.
28
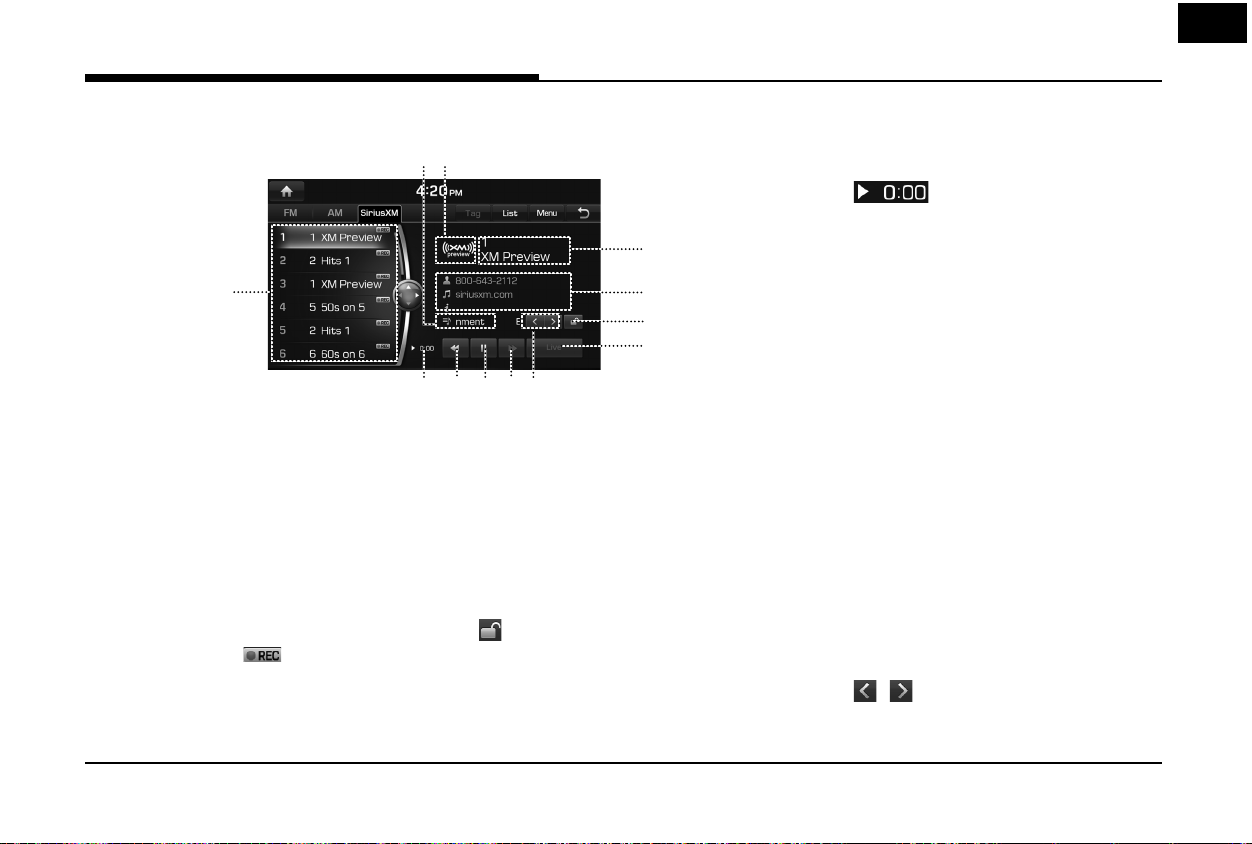
Radio Operation (SiriusXM™)
SiriusXM™ screen
3
1. Category Info
Displays the category currently playing.
2. Channel Logo
Displays the logo of the channel currently
playing.
3. Preset list
Displays the channels saved in the Preset list.
Smart Favorites ( )
SXM supports 6 smart favorites. It is
buffered 1 hour for the currently tuned
channel (Instant Replay) and at least 1/2
hour for each of the 6 smart favorites.
21
4
5
6
7
11
10
9
8
4. Channel Info
Displays the current channel number and
5. Contents Info
Displays the artist, title and other
6.
If the Category Lock is Off, you can change
12
name.
information about the song currently
playing.
(Category Lock)
or search all channels. If the Category Lock
is On, you can change or search only the
channels of the currently active category.
7. Live
Changes to the Live Broadcast mode.
8.
Displays the time difference between the
song playing and the Live broadcast.
9.
c
Repeats the previously broadcasted
program.
• When it is pressed shortly (less than 0.8
sec.): Moves to the previous item.
• When it is pressed and held (0.8 sec. or
longer): Searches backwards until the
button is released.
d
/M (Play/Pause)
10.
Plays/Pauses the currently broadcasting
program.
11.
v
• When it is pressed shortly (less than 0.8
sec.): Moves to the next item.
• When it is pressed and held (0.8 sec.
or longer): Searches forward until the
button is released.
12.
This feature is used to select the Previous/
Next category.
(Time difference)
/ (Category Selection Buttons)
29
Radio Operation (SiriusXM™)
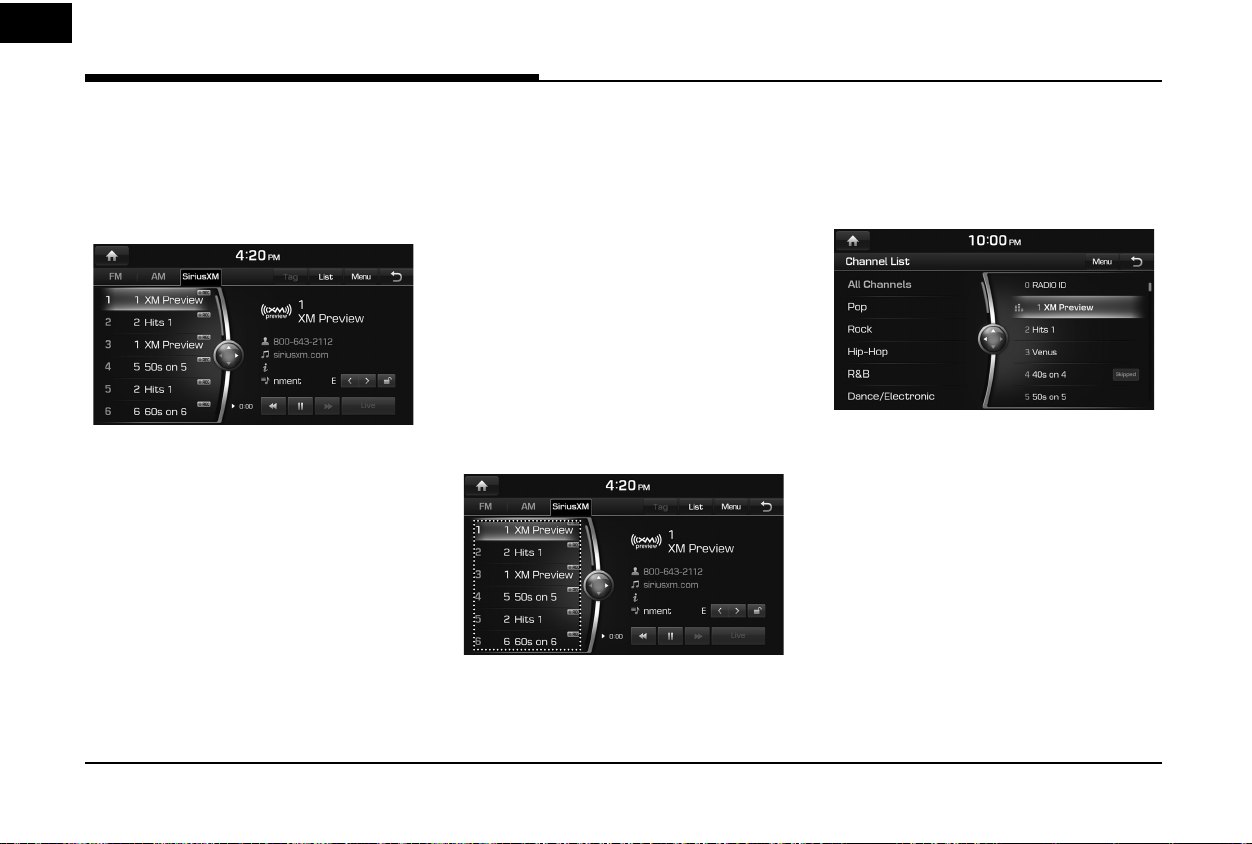
Listening to SiriusXM™ radio
1. Press [SXM] on the head unit. Or press
[HOME] > [SiriusXM].
The SiriusXM radio screen of the most
recent listened channel will be displayed.
2. Select the desired broadcast channel.
For more details, Refer to "Selecting
SiriusXM broadcast channel".
Selecting SiriusXM™ broadcast
channel
Selecting a channel through manual
search
Turn [TUNE/FILE] on the head unit clockwise
or counter-clockwise to display the previous or
next channel information.
Selecting with channel up/down
Press [S SEEK/TRACK W] on the head unit.
- The previous or next channel will be selected.
Selecting a channel through preset
Press the preset button of the desired channel.
Selecting channel through
channel/category list
1. Press [List] on the screen.
Or press [Menu] > [Channel List].
2. Select the desired category and channel.
Press [Menu] > [Now Listening] to return
to the current playing channel.
Press [Menu] > [Featured Favorites] to
move to the [Featured Favorites] menu.
If you want to skip a channel, press [Menu]
> [Skip]. After press the channel to skip,
press [g] to confirm your selection.
Note
,
The channel list may be di erent according to
the region.
30
 Loading...