

Page 1
GENERY
ISDN
DECT-GAP
TECHNOLOGY
Operating Manual
Page 2
1
Contents
Information for Users 3
Instructions for Proper Use 3
Health-Related Notes 3
Safety Notes 4
Introduction 5
1 Installation 7
1.1 Location 7
1.2 Connections 8
1.3 Inserting the Batteries 8
1.4 Connecting Accessories
(optional) 9
1.5 Recommended First Steps 9
2 Telephoning 11
2.1 Outgoing Calls 11
2.1.1 Dialling (after line seizure) 11
2.1.2 Pre-dialling 11
2.1.3 Linking Phone Numbers 12
2.1.4 Dialling Emergency Numbers 12
2.1.5 Redialling 12
2.1.6 Direct Calling 12
2.1.7 Internal Calls 12
2.1.8 Automatic Call Back when
busy 12
2.2 Incoming Calls 13
2.2.1 External Calls 13
2.2.2 Internal Calls 13
2.3 During a Call 14
2.3.1 Call Waiting 14
2.3.2 Toggling / Three-Party
Conference 14
2.3.3 Volume Setting 14
2.3.4 Open Listening 14
2.3.5 Switching the Microphone
on/off 15
2.3.6 Notebook 15
2.3.7 Internal Switching 15
2.3.8 External Switching (ECT) 15
2.4 Ending a Call 16
2.5 Further Features 16
2.5.1 Switching off the Handset 16
2.5.2 Paging 16
2.5.3 Key Lock 16
2.5.4 Telephoning with Blocking 16
3 Phone Number Memory 17
3.1 Call List 17
3.1.1 Displaying the Call List 17
3.1.2 Dialling from the Call List 17
3.1.3 Deleting Entries 17
3.2 Phonebook 17
3.2.1 Displaying the Phonebook 18
3.2.2 Saving a new Entry 18
3.2.3 Copying Entries 19
3.2.4 Changing Entries 19
3.2.5 Specifying Emergency
Numbers 19
3.2.6 Deleting Entries 20
3.3 Notebook 20
4 Special Features 21
4.1 Call Forwarding 21
4.1.1 …for Phone Number (MSN) 21
4.1.2 …for Particular Extension 21
4.1.3 …if no Radio Link 21
4.1.4 Cancel all Call Forwardings 21
4.2 Call Features 22
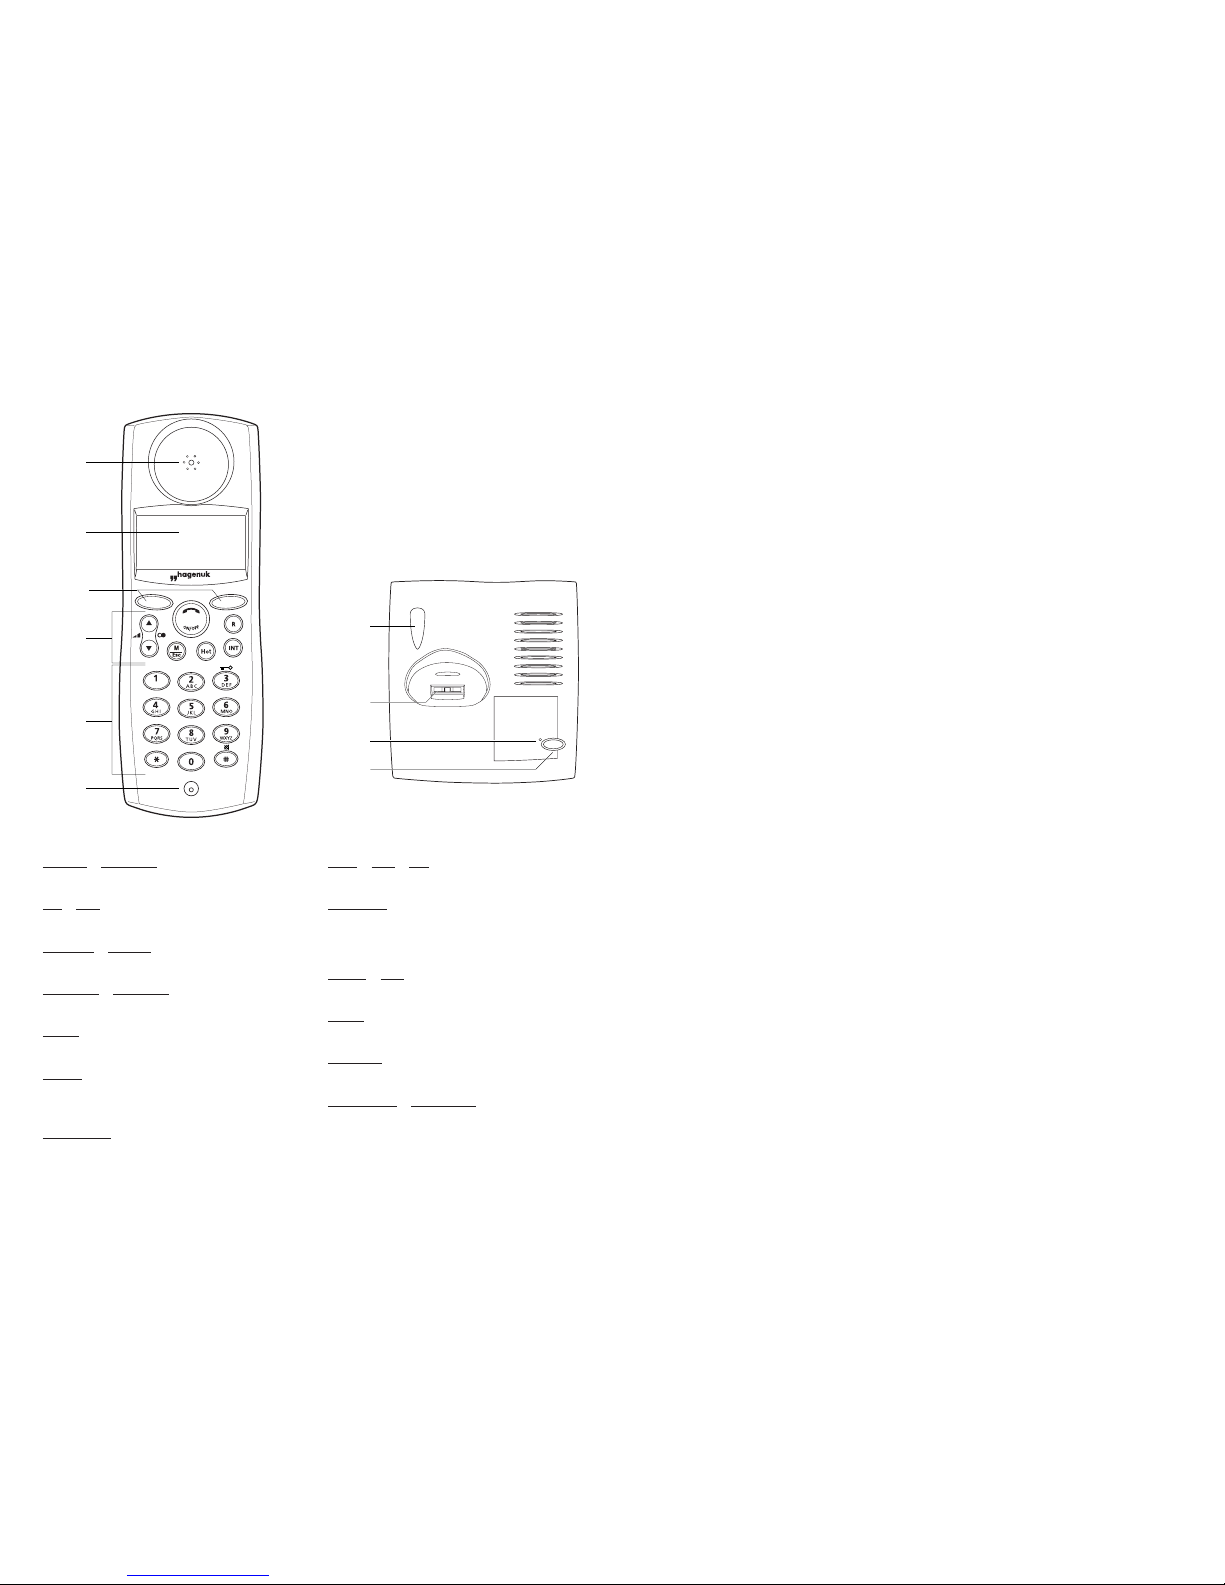
Earpiece
Display
Function keys
Softkeys
Keypad
Microphone
Paging key
Charging contacts
LED
Antenna
Softkeys
LOG IN / LOG OUT
Check in-/ out
ON / OFF
Switch a feature on / off
CAPITAL
/ SMALL
Upper- / lower-case letters
SPEAKER / SPK. OFF
Switch loudspeaker on / off
LIST…
Call list, phonebook / notebook
DIAL…
Dialling an external phone number
(MSN) / anonymous
EMRGCALL
Make emergency calls
OK… / YES / NO
Confirm, select
OPTION…
Features will be offered depending on
status
EDIT… / DEL
Edit
MUTE
Switch off ringing tone
RELEASE
Disconnect outgoing call, released call
MELODY… / VOLUME…
Melody / and volume setting
Page 3

2
3
Information for Users
Instructions for Proper Use
• The purpose of this telephone is to
transmit speech via telephone networks.
Any other form of use is impermissible
and not appropriate to the purpose.
• This telephone is intended for use in
an ISDN network which conforms to
the European TBR 3 standard (Euro
ISDN multi-terminal access). Only the
connecting cord provided may be used
for connection to the network termination (standard network termination).
• Only the provided SNG 10 W / SNG 10
WGB plug-in power supply may be
used.
Health-Related Notes
• This telephone functions according to
the DECT standard in the band frequency from 1880–1900 MHz. In the
DECT standard the maximum transmission power of DECT devices is limited
to 0.25 W. Owing to the time slot procedure, the average beam power of a
DECT telephone is 1/24 of the maximum transmission power, or a maximum of 10 mW. This in turn results in
maximum specific absorption rates
(SAR) of between 0.05 and 0.1 W/kg.
Thermal effects from DECT systems can
thus be virtually excluded.
• Users of hearing aids may possibly
experience background noise.
• Wearers of cardiac pacemakers are
recommended not to carry the telephone close to the device, e.g. in their
breast pocket.
4.2.1 Ringing groups 22
4.2.2 Call Waiting 22
4.3 Call Charges 22
4.3.1 Displaying 22
4.3.2 Resetting the Counter 22
4.4 Blocking 23
4.4.1 Switching on 23
4.4.2 Switching off 23
4.5 Direct Call 23
4.5.1 Entering a Phone Number 23
4.5.2 Switching on 23
4.5.3 Switching off 23
4.6 Babyphone 24
4.6.1 Entering a Phone Number 24
4.6.2 Adjusting Settings 24
4.6.3 Switching on 25
4.6.4 Switching off 25
4.7 Security 25
4.7.1 Edit PIN 25
4.7.2 Reset 26
4.8 Hotkey 26
5 Settings 27
5.1 General Procedures 27
5.2 Audio 27
5.2.1 Setting Ringing Tone Volume /
Melody 27
5.2.2 Setting Earphone Volume 28
5.2.3 Adjusting Tones 28
5.3 Switching Vibration Signal
on / off 28
5.4 Headset 28
5.4.1 Switching on / off 28
5.4.2 Automatic Answering 28
5.4.3 Setting Volume / Melody 29
5.5 Illumination 29
5.6 Selecting the Language 30
5.7 Configuration 30
5.7.1 Log in / Log off 30
5.7.2 Selecting the Country 30
5.7.3 Editing Local Area Code 31
5.7.4
Editing Phone Numbers (MSN)
31
5.7.5 Ringing Groups for Extension 31
5.7.6 System Operation 31
5.7.6.1 Specifying Trunk Code 32
5.7.6.2 Trunk Code Transmission 32
5.7.7 Specifying Call Charge Factor 32
5.7.8 Call Forwarding using Keypad 32
5.7.9 Remote Servicing 32
5.8 Entering a Name 32
5.9 Setting Battery Capacity 33
5.10 Selecting Base Station /
Log in 33
5.10.1 Selecting Base Station 33
5.10.2 Log in Handsets 33
5.11 Automatic End of Call 33
6 Appendix 35
6.1 General Notes 35
6.2 Controls and Displays 35
6.3 Package Contents 38
6.4 Condition on Delivery 38
6.5 Technical Data 39
6.6 Troubleshooting 40
6.7 Subject Index 42
6.8 Menu Structure 45
Page 4

4
5
Introduction
Dear Customer,
In purchasing this Genery telephone you
have opted for a high-performance cordless device. It incorporates the latest
technology and has a wide range of convenient features.
You can connect your new telephone to
an ISDN telephone outlet and make calls
straight away (plug + phone). However,
to gain the full benefits of your phone
you should read this manual completely.
We also recommend that you make the
basic settings before you use it for the
first time.
Please read the "Installation" chapter.
The Genery ISDN is a cordless telephone
conforming to the DECT-GAP standard.
It consists of a base station and one or
more (up to 5) handsets (accessories).
The base station serves as a charging station for the handset(s). Additional charging stations are available as accessories.
Speech is coded according to the form
anchored in the DECT standard. This provides effective protection against the tapping of radio conversations by third parties using broadband receivers (scanners).
The GAP standard enables you to use
your handset on another manufacturer’s
GAP base station and likewise to use
another manufacturer’s GAP handset on
your base. We strongly recommend you
to read the accompanying manufacturer’s
manual in each case.
Some of the features described here can
only be used if they are supported by the
respective network operator (e.g. clip, call
list, call charge registration, etc.). If you
should have any questions regarding this,
please contact your network operator.
Safety Notes
Use only the SNG 10 W / SNG 10
WGB plug-in power supply provided with your equipment.
• When inserting the batteries,
make sure they are of the same
type, the same capacity and
the correct polarity.
• Never use the handset with the
battery compartment open.
• Never place the handset in the
charging station / base station
with the battery compartment
open.
• Do not use alkaline batteries.
Please take defective or
used batteries to a special
collection point for batteries; never dispose of
them in the domestic
waste.
The Genery ISDN cannot be used
during a power failure due to lack
of a power supply to the base
station.
Since speech is transmitted between the handset and the base
station by radio and radio connections are strongly dependent on
environmental conditions, it is possible that a connection cannot be
set up in certain circumstances.
You should therefore never rely
completely on cordless phones
when communication is essential
(e.g. for medical emergencies).
The handset should never be put
in the base station when the
headset is connected.
The babyphone feature is only
intended as an auxiliary aid for
checking on your child. It should
never be considered a substitute
for essential medical monitoring
devices. Parents should continue
to look in on their child at regular
intervals.
Headset
Only use the specially approved
Hagenuk headset with your telephone. Each time you use the
headset, check to ensure that the
cord is intact. In the event of
damage (exposed metal parts /
visible wires) the headset should
not be used and must be replaced
by an intact one.
NI-CD
NI-MH
Page 5

6
7
Installation
1 Installation
1.1 Location
The following should be observed when
selecting a location for the base station
of the Genery ISDN:
• Avoid close proximity to CD players,
video recorders, TVs, computers and
microwave ovens. Your base station
should not be placed close to satellite
receivers or answering machines, as
these can cause interference.
• Avoid places exposed to heavy dust or
smoke, direct sunlight and high humidity or close proximity to heat sources.
• Try to place the base station as close
as possible to the centre of the zone in
which you wish to make calls. In a
house with several floors, you will most
likely achieve the greatest range if you
locate the base station near the stairs.
• Use a freely accessible 230 V~ (AC)
mains socket for the power pack. Use
only the type SNG 10 W / SNG 10
WGB plug-in power supply provided.
• Place the base and charging station
(accessories) on a non-slip surface so
that the plastic feet do not interact
with the lacquer coating of the furniture, leaving unsightly marks on the
surface.
• The recommended environmental conditions for operation of the base and
charging station (accessories) for the
cordless telephone are:
Ambient temperature: +5°C to +40°C
Relative humidity: 20% to 75%.
• The base / charging station should not
be operated in the open or in areas
exposed to frost.
Range
The equipment has a range of approx.
300 metres/1000 ft. in the open air. In
certain environmental and spatial/technical conditions the range may be less.
Inside buildings the range will be considerably less than in the open air. Dead
spots may occur due to the digital transmission in the frequency range used –
depending on the composition of structures even within the range. In such
cases the transmission quality may be
reduced by repeated brief interruptions to
the conversation. The usual reception
quality can be regained by moving out of
the dead spot. If the range is overshot
the connection will be severed after a
short while.
Page 6
9
Installation
8
1.4 Connecting Accessories (optional)
• By connecting a headset to the handset you can make a "hands-free” call.
• An add-on vibration signal can also be
used to indicate incoming calls. If desired, the ringing tone of your phone
can be disabled and people around you
will not be disturbed by incoming calls.
Information on the connection and use of
accessories is included with the devices.
1.5 Recommended First Steps
Although your telephone is ready for use
immediately after connecting the base
station and allowing the batteries in the
handset to charge, you should adapt it to
your own special requirements by adjusting a small number of settings.
The following steps are necessary, in
order to prepare your Genery ISDN for
your local requirements.
As the language preset of the handset is
German, the first thing to do after the
installation of cables and batteries has to
be the selection of the appropriate language:
1.Press the menu key
2.Scroll down to the menu item ‚Einstellungen‘
3.Press the OK key
4.Scroll down to the menu item ‚Sprache‘
5.Press the OK key
6.Select the desired language
7.Press the JA key
8.Leave the menu by pressing the menu
key
• After that you have to select the country preset for your country, in order to
determine the correct ISDN- and country code settings. (see chapter 5.7.2)
• In the next step you have to enter your
local area code. This is not necessary, if
your telephone network works with
closed user groups. (see chapter 5.7.3)
• Finally you have to program your ISDN
numbers (MSNs). (see chapter 5.7.4).
• For operation with a private telecommunications switching system (PABX)
see chapter 5.7.6
• For operation with several handsets see
chapter 5.10.2
• To specify a call charge factor see
chapter 5.7.7
• To change the PIN see chapter 4.7.1
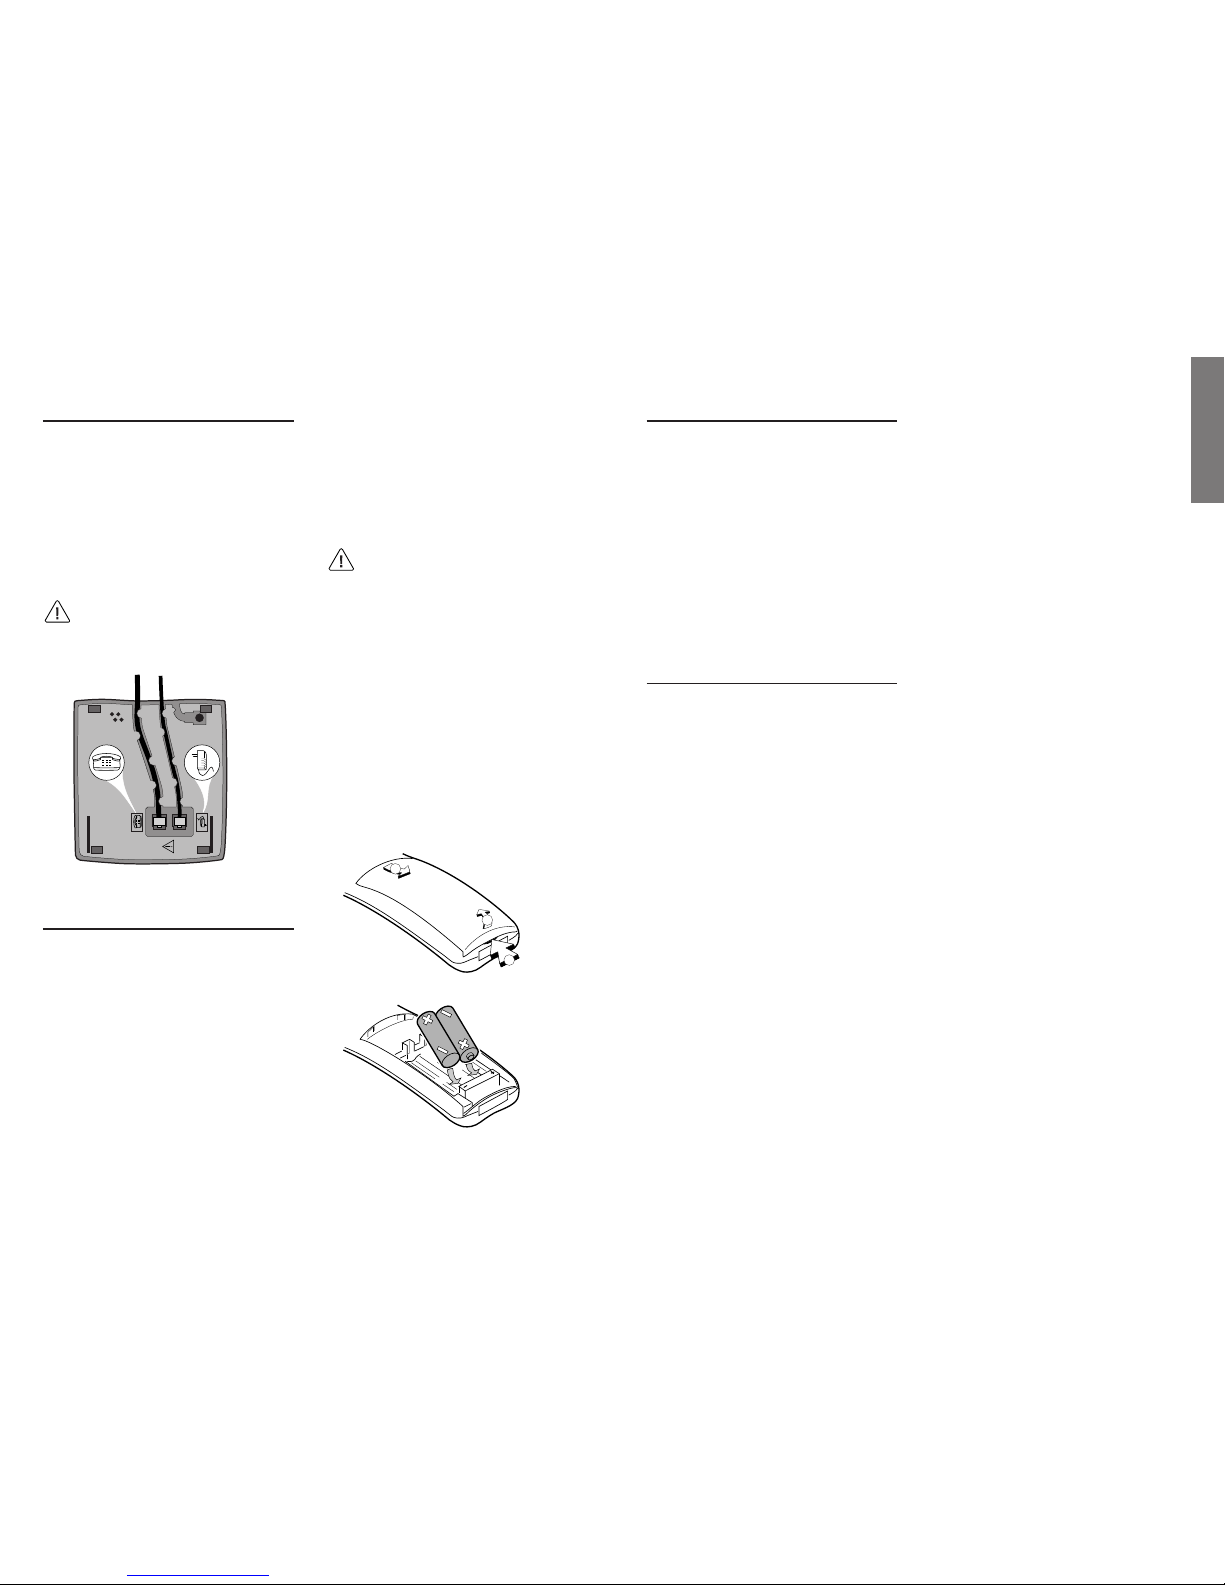
1.2 Connections
Connect the cables to the base station.
Plug the equipment end of the power
supply cable and the telephone cable
into the appropriate sockets on the
underside of the base station. Now insert
the other end of the telephone cable into
the phone jack and the plug-in power
supply into a wall socket.
Use only the SNG 10 W / SNG
10 WGB plug-in power supply
provided.
1.3 Inserting the Batteries
The battery compartment has a lid with a
snap catch.
Open the battery compartment on the
back of the handset by pressing the cover
at the point marked ➀. Then flip up the
lid ➁ and pull it in the direction of ➂.
Insert the batteries the right way round
(correct polarity) and close the battery
compartment again. To do this, push the
two lugs at the end of the lid into the
recesses in the housing and lower the lid
until it audibly snaps into place.
Place the handset onto the charging /
base station with the keypad facing
towards the front and allow sufficient
time for the batteries to charge up before
you use the telephone for the first time
or make a setting.
• Make sure you insert batteries
of the same type, the same
capacity and with the correct
polarity.
• Never use the handset with the
battery compartment open.
• Never place the handset in the
charging station / base with the
battery compartment open.
• Do not use alkaline batteries.
1
3
2
Page 7

10
11
Telephoning
2 Telephoning
2.1 Outgoing Calls
A call can be made with or without predialling. This is the entering of digits
prior to line seizure. With pre-dialling,
you have the option of editing the phone
number, since the dialling process has
not yet been completed.
The DIAL… softkey enables you to select
one of the programmed phone numbers
(MSN) via which the following call will
be "booked.” If no special selection is
made, you will be connected via the first
phone number (MSN) assigned to the
connection.
You can also specify whether this phone
number (MSN) is displayed on the other
party’s equipment by selecting DIAL… /
Anonymous – YES/NO. This setting will
remain active until the next time it is
changed.
If your extension is designed to control
telephone features using the keypad protocol, you can switch to this mode via
the softkey DIAL… / Keypad – YES/NO.
The setting only applies to the next outgoing call dialled.
2.1.1 Dialling (after line seizure)
g
key
Enter a phone number
If you wish to seize a line first and then
dial, you can initiate the dialling procedure by entering the digits manually or
retrieving a phone number from the
memory. It is then not possible to edit
the digits entered. To abort the dialling
procedure press the gkey once again.
2.1.2 Pre-dialling
Manual dialling
Enter phone number
g
key
Dialling a number from the call list
Softkey LIST…
Select Call list (+/-)
Softkey OK…
Select entry (+/-)
g
key
Dialling a number from the phonebook
Softkey LIST…
Select Phonebook (+/-)
Softkey OK…
Select entry (+/-)
g
key
Dialling a number from the notebook
Softkey LIST…
Select Notebook (+/-)
Softkey OK…
g
key
In many cases it is advantageous to enter
or collect phone numbers before seizing
a line. You then have the option of editing the number. The dialling process
itself does not begin until you press the
g
key.
Page 8

12
13
Telephoning
In the first step the callback is signalled
to you, as soon as the busy subscriber is
free again:
Display: Call Back
After picking up or switching on the
handset the connection to your Call Back
partner will be established in the second
step by the public exchange automatically.
This ISDN feature can only be used, if it
has been made available for the other
subscriber’s and your own basic access by
the network provider.
2.2 Incoming Calls
An incoming call is signalled with the
pre-set melody and volume on your
handset. If the caller’s phone number has
been transmitted (via CLIP) it will appear
on your display. This feature must be
supported by your network operator. In
the case of phone numbers with more
than 16 digits, the first 15 digits will be
displayed followed by a hyphen. This
hyphen indicates that other digits follow
but are not displayed.
If a name entry in the phonebook is
available to match the number, this name
will also be displayed.
Automatic answering
If the handset is on the base station or
the charging station when a call is received, the call will be answered automatically when you lift the handset. You do
not need to press a key. To prevent accidental disconnection of the call, the
g
key will be disabled for 3 seconds.
Switching off the ringing tone
If you wish to silence a handset, e.g. to
avoid being disturbed in a meeting, press
the MUTE softkey. The ringing tone is
now switched off. The caller still hears
the ringing tone and you can answer the
call as long as it still exists. The next call
is signalled again with the pre-set melody
and volume or vibration signal.
2.2.1 External Calls
To answer a call
Display: phone number or name
g
key
When the phone number is transmitted it
is added to the call list, regardless of
whether you have answered the call or
not.
2.2.2 Internal Calls
To answer a call
Display: internal number
g
key
2.1.3 Linking Phone Numbers
If you are at the pre-dialling stage you
can combine and/or manually change
phone numbers from various sources.
The following example shows the linking
of a phonebook entry (e.g. network operator call-by-call code) with a number
from the call list.
Softkey LIST…
Select Phonebook (+/-)
Softkey OK…
Select entry (+/-)
Softkey OK…
Softkey OPTION…
Select Copy entry from call list
Softkey OK…
Select entry (+/-)
Softkey OK…
g
key
2.1.4 Dialling Emergency Numbers
Softkey EMRGCALL
Select an emergency number (+/-)
g
key
Emergency numbers are entries in the
phonebook which can be dialled even if
the total lock (blocking), the babyphone
or direct calling is activated. In these
cases you only need to press the softkey
marked EMRGCALL for a call to be
made.
2.1.5 Redialling
The ten last-dialled external phone numbers are stored in the redial memory.
Once all the memory slots are occupied,
a new entry will replace the oldest stored
number. You can retrieve the redial
memory in stand-by mode by pressing
one of the two arrow keys. The last-dialled phone numbers can be viewed individually by pressing the +and -keys.
The memory consists of 10 memory slots,
each with a capacity of up to 30 digits.
2.1.6 Direct Calling
When direct calling is activated, only the
automatic dialling of a single phone
number is possible. Any key movement,
with the exception of the two softkeys,
initiates a call to the pre-programmed
direct-dial number. The right-hand softkey de-activates the direct calling feature.
The left-hand softkey activates the dialling of emergency numbers.
2.1.7 Internal Calls
i
key
Enter phone number (1…5)
If several handsets are registered on your
base station, you can make charge-free
internal calls. Two internal and one
external connection are possible simultaneously. An internal phone number (1 to
5) is assigned to each handset upon
registration.
2.1.8 Automatic Call Back when busy
When the subscriber you are calling is busy,
you can initiate an automatic Call Back
.
Display: Busy
Softkey OPTION…
Select Call Back (+/
-
Softkey YES
g
key
Page 9

14
15
Telephoning
2.3.5 Switching the Microphone on/off
Microphone off
Display: Call
˘
and #keys
Microphone on
Display: Microphone off
˘
and #keys
If during a call you wish to speak to
another person in the room without the
calling party hearing, switch off the
microphone (muting).
2.3.6 Notebook
During a call
Softkey OPTION…
Select Notebook (+/-)
Softkey OK…
In stand-by mode
Softkey LIST…
Submenu: Notebook
Softkey OK…
or Softkey EDIT…
or Softkey OK…
˘
key
You can enter a number, view a number
already entered or use a phonebook entry
at any time in any call mode.
2.3.7 Internal Switching
r
key (consultation hold)
i
key
Enter phone number (1 … 5)
Announce call, then press gkey
or
press gkey (without announcement)
If you have answered an external call
intended for another internal party, you
can forward it with or without an
announcement. If the handset to which a
call is forwarded without an announcement is not available, the call will be
redirected back to the "switcher” (recall).
2.3.8 External Switching (ECT)
r
key (consultation hold)
Enter external phone number
Announce call, then press gkey
or
press gkey (without announcement)
If you have answered an external call,
you can forward it to an external subscriber with or without announcement
(External Call Transfer).
If the external subscriber is not available,
a call transfered without announcement
will be redirected back to the "switcher".
This ISDN feature can only be used, if it
has been made available by the local
ISDN exchange of the telephone network.
2.3 During a Call
2.3.1 Call Waiting
An external call being received during an
internal call will be signalled by a callwaiting tone.
To interrupt an internal call
Display: call waiting
Softkey OPTION…
Select menu item Accept
or Reject (+/-)
Softkey YES
Reject
ignores the waiting call and the caller hears a busy signal, unless there is any
other telephone connected to the same
basic access and programmed to signal the
call for the same MSN.
Accept
will accept the waiting call and the
existing internal call will be interrupted.
To terminate an internal call
Display: Call waiting
g
key
Display: phone number or name
g
key
2.3.2 Toggling / Three-Party Conference
r
key (toggling)
or softkey OPTION…
Select Conference (+/-)
Softkey YES (three-party conference)
Toggling: Whilst talking to an external
party you set up a connection to an internal or external party, then switch from
one party to the other. You can only talk
to one party at a time and the two other
partners are unable to hear each other.
When the call originator puts his handset
back into the base station, the internal
party kept "on hold” (the "forgotten
party”) is connected to him/her by the
recall function.
3-party conference: A 3-party conference
is possible with two external parties. Let's
say you have answered a call from an
external subscriber. Another incoming
external call is registered on your phone
via the call-waiting feature. You accept
the call and then start the conference, or
during a call with an external subscriber,
you initiate a call to a further external
subscriber and then start the conference.
Only one of the external connections can
be initiated by you.
If you end the conference, all of the connections will be terminated. If one of the
other parties ends the call, the other parties remain connected to each other.
2.3.3 Volume Setting
Display: external
Function keys (+/-)
You can adjust the earphone or loudspeaker volume during a call when the "open
listening” feature is activated. A total of 6
levels may be set. The changes are saved
upon completion of the call and form the
basic setting unless changed again.
2.3.4 Open Listening
Softkey SPEAKER or SPK OFF…
If you wish other persons in the room to
join in the conversation you can activate
the "open listening” feature.
Depending on the basic setting during a
call (see 4.1) you will see SPEAKER or
SPK OFF… on the softkey. Press this softkey to turn the loudspeaker on the back
of your handset on or off.
Page 10

16
17
Phone Number Memory
3 Phone Number Memory
3.1 Call List
If the phone number of a caller is transmitted to your own number, it will be
stored in the call list, regardless of whether the call has been answered or not. If
there is a name entry in the phonebook
to match the transmitted phone number,
this name will be displayed.
The call list has space for 20 entries, each
with 30 digits.
3.1.1 Displaying the Call List
Softkey LIST…
Submenu: Call list
If the call list contains calls which were
not answered, in the stand-by mode a
message will appear in the display until
the call list is displayed for the first time.
The entries will show the number / name
of the caller and the number of calls
made from this number. If the number is
greater than 7, an asterisk (*) will appear.
A new incoming call will be stored at the
top of the call list. If all memory slots are
occupied, a further call will cause the
first-dialled entries to be deleted.
3.1.2 Dialling from the Call List
Softkey LIST…
Submenu: Call list
Softkey OK…
Select entry (+/-)
g
key
If you dial a number directly from the
call list, the number will be reset to "0";
the entries will not be automatically
deleted. The call list thus distinguishes
between dialled and unprocessed entries.
3.1.3 Deleting Entries
Softkey LIST…
Submenu: Call list
Softkey OK…
Select entry (+/-)
Softkey DEL
With this procedure you can delete each
entry in the call list separately. It is also
possible to delete all entries at once. This
procedure is described in more detail in
Chapter 5.10.
3.2 Phonebook
You can save external phone numbers
manually or adopt entries from the redial
memory, the call list or the notebook.
The phonebook has space for up to 90
entries (depending on length). It will
accept up to 14 character for each name
and 30 digits for the phone numbers.
If the phonebook memory is full, a further attempt to save a name/number will
cause a negative acknowledgement signal
to sound.
2.4 Ending a Call
g
key
After ending a call you have initiated, the
call time and – if available – the charges
incurred will be shown on the display for
three seconds.
You can also programme your handset so
that it automatically converts to stand-by
mode as soon as the other party clears
the line, i.e. replaces his or her handset.
This setting is particularly recommended
for operation with the headset (accessory)
(see chapter 5.11).
2.5 Further Features
2.5.1 Switching off the Handset
Press the gkey for approx. 2 secs.
You can switch off the handset completely. Its power consumption is then reduced to a minimum. In this mode you will
not be able to make calls and no incoming calls will be signalled and not be
stored in the call list. The display is completely blank.
Just briefly press the gkey to switch
the handset back on.
2.5.2 Paging
Should you misplace your handset, simply
press the paging key on the base station.
The ringing tone of all handsets registered on this base station will sound for
approx. 30 secs. The tone will stop if one
of the handsets is switched on (gkey).
Then all other handsets will be silent.
2.5.3 Key Lock
To switch on key lock
˘
and 3keys
Display: Keyboard lock active
To switch off key lock
˘
and 3keys
Display: blank
To avoid inadvertent pressing of keys,
e.g. while carrying the phone around, the
keypad can be locked. In this mode all
keys are disabled with the exception of
the ˘key. An incoming call will additionally re-enable the gkey and the
MUTE softkey (to switch off the ringing
tone for an incoming call). The key lock
will be deactivated for the duration of
the call, but will be automatically reactivated when the call has been terminated.
2.5.4 Telephoning with Blocking
Blocking active
g
key
Display: Enter PIN?
Enter PIN
Enter a phone number or
Softkey OPTION...
Select a phone number
Specified emergency numbers can be
dialled even if blocking is activated.
Ending a call
g
key
Display: Blocking active
To switch blocking on and off, see Chapter 4.4.
Page 11
18
19
Phone Number Memory
Upon entry you have the following editing options:
• Entering a name
Enter letters, digits, special characters
and spaces with the number keys as
shown in the table.
Change from upper- to lower-case letters
with the SMALL or CAPITAL softkeys.
• Use the arrow keys to alternate between the name and phone number
entry.
• Enter the phone number with the
number keys.
• Use the DEL softkey to delete the character/number to the left of the cursor.
• Save your entry with the OPTION… fol-
lowed by the softkey YES.
Directly after saving you can generate
further new entries by first pressing the
OPTION… softkey, then selecting the
"New entry” menu item.
3.2.3 Copying Entries
Softkey LIST…
Submenu: Phonebook
Softkey OK …
Softkey OPTION…
Menu item: Entry new
Softkey OK …
Enter name
Position the cursor in front of the number
Softkey OPTION…
Menu item: (e.g.):
Copy entry from call list
You can select the desired entry with the
aid of the arrow keys. Press the OPTION…
softkey and save with YES…
In addition you can also copy entries
from the redial memory and notebook.
To do this, instead of "Copy from call
list” select the respective menu item.
3.2.4 Changing Entries
Softkey LIST …
Submenu: Phonebook
Softkey OK …
Softkey OPTION…
Menu item: Entry modify
The same options are available for changing entries as described under 3.2.2.
3.2.5 Specifying Emergency Numbers
Softkey LIST …
Submenu: Phonebook
Softkey OK …
Softkey OPTION…
Menu item: Entry as Emergency No.
Once you have pressed the YES softkey and
entered the PIN, this entry is specified as an
emergency number. Emergency numbers
can be dialled even if the blocking, the
babyphone or the direct calling features are
activated.
Emergency numbers are preceded by a
"•” in the phonebook.
3.2.1 Displaying the Phonebook
Softkey LIST…
Submenu: Phonebook
Entries in the phonebook are automatically placed in alphabetical order according to the name. You can scroll through
the entries with the arrow buttons and
also go straight to a particular entry by
entering its initial letter using the number keys.
3.2.2 Saving a new Entry
Softkey LIST…
Submenu: Phonebook
Softkey OK …
Softkey OPTION…
Menu item: Entry new
Softkey OK …
If no entry has yet been made, press the
NEW… softkey directly after displaying
the phonebook.
Please use the following table for entering a name:
Keys
Default key assignment
Alphanumeric input (large / small)
1
Number 1 - . ? ! , :; 1 ‘ ”
2
Number 2 A B C 2 Ä Å Æ Ç a b c 2 ä å æ ç
3
Number 3 D E F 3 È É d e f 3 è é
4
Number 4 G H I 4 Í g h i 4 í
5
Number 5 J K L 5 j k l 5
6
Number 6 M N O 6 Ö Ò m n o 6 ö ò
7
Number 7 P Q R S 7 ß p q r s 7 ß
8
Number 8 T U V 8 Ü Ù t u v 8 ü ù
9
Number 9 W X Y Z9 w x y z 9
0
Number 0 + 0
*
Number * * ( ) < = > % @ &
#
Number # „Space“ #
Page 12

20
21
Special Functions
4 Special Features
4.1 Call Forwarding
You can select one of the following
alternative conditions for call forwarding:
• for phone number (MSN): always
on busy
delayed
(Calls are forwarded from the
switchboard)
• for extension
(Calls are forwarded from the base station / seizure of 2nd B-channel for call)
• if no radio link
(Calls are forwarded from the base station / seizure of 2nd B-channel for call)
4.1.1 …for Phone Number (MSN)
˘
key
Submenu: Call forwarding CF
Softkey OK...
Menu item: CF for phone No.
Softkey OK...
Select phone number (MSN)
Select condition (+/-)
- CF uncond.
–CF on busy
- CF no reply
Softkey EDIT...
Enter / change number as applicable
Softkey EDIT...
Select Save (+/-)
Softkey YES
Softkey ON or OFF
˘
key (approx. 2 secs.)
4.1.2 … for Particular Extension
˘
key
Submenu: Call forwarding CF
Softkey OK...
Menu item: CF for extension
Softkey OK...
Softkey EDIT...
Enter / change number as applicable
Softkey EDIT...
Select Save (+/-)
Softkey YES
Softkey ON or OFF
˘
key (approx. 2 secs.)
4.1.3 …if no Radio Link
˘
key
Submenu: Call forwarding CF
Softkey OK...
Menu item: CF if no radio link
Softkey OK...
Softkey EDIT...
Enter / change number as applicable
Softkey EDIT...
Select Save (+/-)
Softkey YES
Softkey ON or OFF
˘
key (approx. 2 secs.)
4.1.4 Cancel all Call Forwardings
˘
key
Submenu: Call forwarding CF
Softkey OK...
Menu item: Cancel all CFs
Softkey OFF
˘
key (approx. 2 secs.)
3.2.6 Deleting Entries
Softkey LIST…
Submenu: Phonebook
Softkey OK …
Select entry (+/-)
Softkey OK …
Softkey OPTION…
Menu item: Entry delete
Softkey YES
This allows you to delete individual entries in the phonebook. It is also possible
to delete all entries at once. This procedure is described in more detail in Chapter 4.7.2.
3.3 Notebook
The notebook is available during a call
via OPTION..., to enable you to make
"notes” during a call. Use this note like a
normal phonebook entry. In stand-by
mode you will find it under the menu
item: "Notebook" in the "LIST…” menu.
Page 13

22
23
Special Functions
4.4 Blocking
You can program your handset so that
outgoing calls can only be dialled if the
PIN is known. Emergency numbers are
excluded from this restriction.
4.4.1 Switching on
˘
key
Submenu: Blocking
Softkey ON
Enter PIN
Display: Blocking active
4.4.2 Switching off
Display: Blocking active
Softkey OFF
Enter PIN
4.5 Direct Call
4.5.1 Entering a Phone Number
˘
key
Submenu: Direct call
Softkey OK...
Enter PIN
Softkey EDIT…
Enter / change phone number
Softkey OPTION…
Select Save (+/-)
Softkey YES
˘
key (approx. 2 secs.)
4.5.2 Switching on
˘
key
Submenu: Direct call
Softkey OK…
Enter PIN
ON softkey
Display: Direct call active
If direct calling is activated, a pre-programmed phone number will be dialled
automatically if any key – with the
exception of the two softkeys – is touched. If no direct call number has been
programmed, it cannot be activated.
Incoming calls will be received as usual.
4.5.3 Switching off
Display: Direct call active
OFF softkey
Enter PIN
4.2 Call Features
4.2.1 Ringing groups
˘
key
Submenu: Call features
Menu item: Ringing groups
Softkey OK...
Select ringing group (+/- )
Softkey ON or OFF
˘
key (approx. 2 secs.)
Each phone number (MSN) is assigned to
a ringing group. At first all registered
devices are included in all ringing groups,
so that they all can receive calls for each
of the MSNs.
By means of this menu item each subscriber can determine the ringing group
he wants to leave or remain in.
4.2.2 Call Waiting
˘
key
Submenu: Call features
Menu item: Call Waiting
Softkey OK...
Softkey ON or OFF
˘
key (approx. 2 secs.)
OFF deactivates Call Waiting if you do
not wish a further call to disturb your
present call.
4.3 Call Charges
If the "Units transfer” feature is available
on your system and you have programmed a factor, the charges will be displayed
during and after the call. The display
remains visible for 3 seconds after the
end of the call.
If you wish, you can also view the charges for the last call or total charges.
To specify a charge factor, please see
Chapter 5.7.7.
4.3.1 Displaying
… last call
˘
key
Submenu: Charges
Softkey OK
Select Charge of last call (+/-)
Softkey YES
Display (e.g.): Last call 1.20
… Total call charges
˘
key
Submenu: Charges
Softkey OK
Select Total charges (+/-)
Softkey YES
Display (e.g.): Total 33.20
4.3.2 Resetting the Counter
… Total call charges
˘
key
Submenu: Charges
Softkey OK
Select Select Total charges (+/-)
Softkey YES
Display (e. g.): Total 39.36
Softkey DELETE
Page 14

24
25
Special Functions
• Sensitivity: 10 sensitivity levels may be
set for initiating a call. The more
blocks visible, the more sensitive the
microphone.
• Switching time: you can set the time
period over which the required sound
level must prevail before a call is initiated. The choice ranges from 1 to 10
seconds (default setting: 1 sec.).
• No. of calls: you can set the maximum
number of calls which may be initiated
within a period of 20 minutes (fixed
setting). The setting options range
from 2 to 10 calls or unlimited calls
(default setting: 5 calls).
• Call delay: Here you can set the mini-
mum time interval between two calls.
You can choose between "Immediately”
and intervals between 2 and 15 minutes (default setting: 3 minutes). This
time setting also dictates the delay
after switching on the babyphone; the
babyphone is not activated until this
time has expired.
4.6.3 Switching on
˘
key
Submenu: Babyphone
Softkey OK…
Enter PIN
Display: Babyphone No.,
e.g. 0642 881 881
ON softkey
Display: Babyphone active
4.6.4 Switching off
Display: Babyphone active
OFF softkey
Enter PIN
4.7 Security
4.7.1 Edit PIN
˘
key
Submenu: Security
Softkey OK…
Edit PIN
(+/-)
Softkey OK…
Enter old PIN
Enter new PIN
Enter new PIN once again to confirm
To ensure that special settings are not
changed, access to a number of features
is protected via a PIN (4-digit Personal
Identification Number). On delivery, this
is set at "0000." For security reasons you
should change this setting immediately
after installation. When you enter a new
PIN, please make a note of it; the default
PIN can only be restored by service personnel for a fee.
If an error is made during input you will
hear a negative acknowledgement signal.
The programming function will be aborted and the PIN will not be changed.
4.6 Babyphone
You can use your handset as a "babyphone." A room will then be continuously
monitored by the microphone of the
handset. If a pre-set sound threshold is
exceeded, a call is automatically initiated
to a pre-specified internal or external
phone number.
As long as it is used as a babyphone, no
calls will be signalled on the respective
handset. The handset can be kept in the
charging station while the babyphone
feature is active.
The handset will not react for 3 minutes
after the babyphone feature has been
switched on. This enables you to leave
the room without the risk of inadvertently initiating a call.
After terminating a connection at the
telephone that was called by the babyphone it takes the Genery ISDN 2 minutes to recognize the disconnection. The
monitoring function is then reactivated
after the pre-set delay time.
The babyphone feature is only
intended as an auxiliary aid for
checking on your child. It should
never be considered a substitute
for essential medical monitoring
devices. Parents should continue
to look in on their child at regular
intervals.
4.6.1 Entering a Phone Number
˘
key
Submenu: Babyphone
Softkey OK…
Enter PIN
Display:
Babyphone No. and programmed
number. If no number has been
programmed, <Number> will be
displayed.
Softkey OPTION…
Select babyphone No. (+/-)
Softkey OK…
Enter phone number from list
Copy and/or edit
Softkey OPTION…
Select Save (+/-)
Softkey YES
Softkey OPTION…
Further settings (+/-)
End: ˘key (approx. 2 secs.)
The babyphone feature can only be activated if a number has been programmed.
4.6.2 Adjusting Settings
˘
key
Submenu: Babyphone
Softkey OK…
Enter PIN
Softkey OPTION…
Select e.g. Sensitivity
Softkey OK…
Adjust settings (+/-)
Softkey YES
Select another menu item…, etc.
Done: ˘key (approx. 2 secs.)
The following setting options are available in the babyphone options menu:
Page 15

26
27
Settings
5 Settings
5.1 General Procedures
If the ˘key is pressed, the menu opens
at the top level. Use the +and
-
arrow keys to move within the menu.
The submenus are reached by pressing
the OK… softkey and further selection as
necessary using the arrow keys and the
OK… softkey.
Various options are available for certain
features. These can be selected with the
OPTION… softkey.
To save your settings press the softkey
YES at the end of each selection procedure (in some menus this is located
behind OPTION…). This key must always
be used for saving settings and is thus no
longer mentioned in the following.
In some menus, features are set without
this softkey; the ON softkey is used
instead. An active function is then denoted by a ✓. Features thus set are deactivated with the OFF softkey.
To leave the menu and go to a higher
level, briefly touch the ˘key. If the
˘
key is pressed longer (approx. 2 secs.),
the device will revert to the stand-by
mode.
To obtain an overview of the menu
structure, please consult the diagram on
the inside of the rear cover.
5.2 Audio
5.2.1 Setting Ring Tone Volume /
Melody
Menu: Settings
Submenu: Audio
Softkey OK...
Menu item: Ring tone
The volume can be set separately for
external and internal calls. You can use
the arrow keys to select any of 7 different levels or a dynamic ringer (increasing
volume), or to switch off the ringing
tone completely with OFF. Even if the
ringing tone is switched off, all calls will
still be shown on the display. You can
also set optical signalling options (see
Chapter 5.5):
Using the Softkey MELODY… you can set
the ringing tone melody for a particular
call type. The melody can also be set
individually for external and internal
calls. The following settings can be made
using the arrow keys:
Setting 1 for a one-time brief
signal
Setting 2 to 7 for various tone
sequences
Setting 8 to 10 for short tunes
4.7.2 Reset
˘
key
Submenu Security
Softkey OK…
Enter PIN
Select menu item Reset (+/-)
Softkey OK…
Select e. g. Call List
You can choose between the following
functions:
• Reset redial memory (deletes all entries)
• Reset phonebook (deletes all entries)
• Reset call list (deletes all entries)
• Restore handset default settings
• All (deletes user data, incl. all abovenamed items)
The PIN will not be returned to the original state!
4.8 Hotkey
Press Ó key
Press numeric key (1…0) or
select hotkey (+/-)
Your telephone has 10 hotkeys.
Hotkeys are activated by pressing the
Ó
key, followed by a digit.
The following functions are assigned to
hotkeys:
Ó
1: Call forwarding CF
CF for Phone No.
Ó
2: Call forwarding CF
CF for extension
Ó
3: Call features
Ringing groups
Ó
4: Call features
Call Waiting ON/OFF
Ó
5: Dialling
Anonymous ON/OFF
Ó
6: Dialling
Outgoing with (phone number)
Ó
7: Settings
Vibrator alarm ON/OFF
Ó
8: Settings
Headset ON/OFF
Ó
9: Settings
Automatic call end ON/OFF
Ó
0: Settings
Audio / Ring tone ON/OFF
Page 16

28
29
Settings
able to listen in if automatic call answering is forgotten!
You can only select this menu item when
the headset is switched on (see Chapter
5.4.1).
5.4.3 Setting Volume / Melody
Menu: Settings
Submenu: Headset
Select OPTION…
Menu item: Volume headset
Independent of the volume setting of the
handset, you can use the arrow keys to
adjust the volume for HS operation at 5
levels.
You can only open this menu item when
the headset is switched on (see Chapter
5.4.1).
Menu item: Melody headset
Independent of the melody setting of the
handset, you can use the arrow keys to
set the melody for HS operation:
Setting 1 for a one-time short
signal
Setting 2 to 7 for various tone
sequences
Setting 8 to 10 for short tunes
You can only open this menu item when
the headset is switched on (see Chapter
5.4.1).
5.5 Illumination
In addition to the red LED on the upper
side of the handset, the keypad and display can be illuminated in conjunction
with specific events. For the keypad and
display you can choose between illumination "on alert" and/or "on use."
The illumination of the red LED can be
regulated by the events "on alert" and/or
"during connection".
• On use – if a key is pressed; illumina-
tion goes off appr. 2 minutes after the
last action.
• On alert – if a call is received, the illu-
mination flashes.
• During connections – You will see an
optical display during an existing connection. This can be useful, for example, if the ringing tone is switched off
and the equipment is set for automatic
call answering.
Please bear in mind that if the illumination is switched on, the operating life is
shortened due to increased energy consumption.
5.2.2 Setting Earphone Volume
Menu: Settings
Submenu: Audio
Softkey OK...
Menu item: Volume speaker
You can use the arrow keys to set the
earphone volume at six different levels.
5.2.3 Adjusting Tones
Menu: Settings
Submenu: Audio
Softkey OK...
Menu item: Tones
You have the option of switching the
acoustic signal for the following events:
• Battery warning (if the batteries are
low)
• Key tone (a slight click will be heard
each time a key is pressed)
5.3 Switching Vibration Signal on / off
Menu: Settings
Submenu: Vibrator alarm
Your handset can be fitted with a vibration device to signal incoming calls. This
can be switched on or off as you wish.
If incoming calls are only to be signalled
by the vibration device, the internal or
external ringing tone volume must be set
to OFF (see Chapter 5.2.1).
5.4 Headset
5.4.1 Switching on / off
Menu: Settings
Submenu: Headset
Menu item: ON or OFF
You can purchase a headset as an accessory for your handset. The headset function can be switched on or off according
to the initial state. Additional options are
available for operation with headsets (see
Chapters 5.4.2 to 5.4.4).
5.4.2 Automatic Answering
Menu: Settings
Submenu: Headset
Select OPTION…
Menu item: Call reception
In addition to manual call answering you
can also use the arrow keys to set automatic call answering after 1, 5 or 10
seconds. Please note that if the HS is
activated with automatic call answering,
the other handsets may not be able to
answer incoming calls (depends on time
setting). Bear in mind that a caller will be
Page 17

30
31
Settings
country code (important for phone number entries), the ISDN settings specific to
that country will be made.
One of the following countries may be
chosen:
Österreich Belgique
Danmark Suomi
France Deutschland
Italia Luxembourg
Nederland Norge
Espana Sverige
Schweiz Great Britain.
Using the Softkey EDIT… you can change
the country code.
5.7.3 Editing Local Area Code
Menu: Settings
Submenu: Configuration
Menu item: Area code edit
Softkey OK...
Enter or change area code
It is important to enter the correct local
network code (area code) without leading
zero to ensure that the phone number of
a caller or callback from the call list is
correctly displayed.
5.7.4 Editing Phone Numbers (MSN)
Menu: Settings
Submenu: Configuration
Menu item: Phone No. edit
Softkey OK...
Select phone no (1 to 10)
Enter or edit phone no
Your network operator has notified you
of your phone numbers (MSN).
Each phone number (MSN) entered is
assigned to a ringing group. The ringing
group determines which handsets are called when the respective phone number
(MSN) is dialled; see Chapter 4.2.1 "ringing groups".
5.7.5 Ringing groups for Extension
˘
key
Menu: Settings
Submenu: Configuration
Menu item:
Ringing groups for extension
Softkey OK...
Select extension (1 … 5, +/-)
Softkey OK...
Select call group (1 … 10, +/-)
Softkey ON or OFF
˘
key (approx. 2 secs.)
Each phone number (MSN) is assigned to
a ringing group. After logging in all
registered devices are included in all ringing groups, so that they all can receive
calls for each of the MSNs.
By means of this menu item the system
manager (owner of the first extension
logged in) can determine which subscriber is supposed to be or not to be in a
ringing group. One extension has to
remain in a group.
5.7.6 System Operation
If your Genery ISDN is an extension of a
telecommunications system (PABX), it has
to dial the system‘s trunk code before the
external number, in order to initiate a
call in the public exchange.
This trunk code must always be dialled,
no matter if you dial manually or automatically from the phonebook or call list.
So the system’s trunk code has to be
programmed in the Genery ISDN and to
be included in all stored phone numbers,
e.g. in the phonebook.
The following example describes the settings: Illumination Display / Keypad "On"
upon operation.
The procedure is similar for other settings.
Example:
Menu: Settings
Submenu: Illumination
Softkey OK…
Menu item: Display and Keypad
Softkey OK…
Select: On use (+/-)or …
Softkey ON
Display: e.g. On use ✔
Done: ˘key (approx. 2 secs.)
5.6 Selecting the Language
Menu: Settings
Submenu: Language
Softkey OK…
Select: language depending on version
(+/-)
Softkey YES
Four language settings are available. All
text will be displayed in the selected
language.
5.7 Configuration
Access to submenu: configuration is
reserved for the system manager. System
management is possible from the handset
with the internal phone number 1.
5.7.1 Log in / Log off
Menu: Settings
Submenu Configuration
Menu item Terminal log in / log off
Softkey OK…
Select Log in or
Log off (
+/-
)
Softkey OK…
Select an internal number (2 ... 5)(+/-)
Softkey OK…
Display (only for Log in): Code-No: …
Softkey LOG IN or LOG OFF
Up to 5 handsets may be registered on
one base station. An internal phone
number must be selected for each handset before the log in procedure can be
carried out. Once you have prepared the
base station for the registration of a new
handset, the log in procedure must be
carried out on the new handset. See
chapter 5.10 Selecting base station / Log
in.
If the LED next to the paging key flashes
rapidly, this indicates that the base station
is ready for registering a new handset.
If a handset is no longer to be operated
on your base station, you can de-register
it after selecting the internal phone number.
5.7.2 Selecting the Country
Menu: Settings
Submenu: Configuration
Menu item: Country select
Softkey OK...
Select the country (+/-)
YES softkey
Select the country in which the equipment is to be operated. Besides the
Page 18

32
33
Settings
5.9 Setting Battery Capacity
Menu: Settings
Submenu: Battery capacity
Softkey OK...
Select: Automatic or
700 mAh or
1200 mAh (+/-)
Softkey YES
Optimum charging of a battery depends
on the detection of the battery capacity.
The handset attempts to calculate this
capacity as quickly as possible using the
data acquired from use. The programming described below serves to narrow
down the range of possible capacities
and to shorten the learning phase.
There is a choice of three settings: Auto-
matic
, 700 mAh and 1200 mAh. If the
battery type you are using does not have
one of the two available capacities, select
the next highest or "Automatic.” The
battery will not be damaged, even if the
setting is incorrect.
5.10 Selecting Base Station / Log in
5.10.1 Selecting Base Station
Menu: Base select
Softkey OK…
Select Base A (+/-)
Softkey YES
You can operate your handset on up to
four different base stations (A to D). To
do this it must first be registered on the
base station to be used. With the setting
"Automatic search” the handset registers
itself on the next available base station.
In most cases this will be the right one,
except if you are using the handset in
the radio coverage of several base stations, on which the handset is registered.
Then a selective search must be made.
5.10.2 Log in Handsets
Base station
Before starting the handset registration
procedure, you must make the base station ready for registration; see Chapter
5.7.1 for details.
Handset
Menu: Login
Select base station (+/-)
Softkey OK...
Enter code no.
Softkey LOG IN
The base station usually should be selected manually.
The code no. will be displayed on the system manager’s handset once you have
made the base station ready for registration.
5.11 Automatic End of Call
Menu: Settings
Submenu: Automatic call end
Softkey ON.
If "Automatic call end” is activated, your
handset will switch off automatically
after the other party has terminated the
connection.
5.7.6.1 Specifying the Trunk Code
Menu: Settings
Submenu: Configuration
Menu item: Trunk Code edit
Softkey OK...
Display e.g. "0”
Softkey EDIT…
5.7.6.2 Trunk Code Transmission
Menu: Settings
Submenu: Configuration
Menu item: Trunk Code edit
Select OPTION...
Trunk Code transmitting
Softkey ON or OFF
If your Genery ISDN is connected to a
PABX, it needs to know, wether the PABX
sends the caller identification number
including the trunk code in front of it. If
not so, the Genery ISDN has to insert the
trunk code (exchange code), in order to
be able to dial public exchange numbers
from the call list properly.
5.7.7 Specifying Call Charge Factor
Menu: Settings
Submenu: Configuration
Menu item: Charge factor
Softkey OK…
Display (e.g.): Charge factor xxx
Softkey EDIT…
Enter new charge factor
Softkey SAVE
If the reception of charge units is available to your ISDN access, you can enter
the factor for converting this information
into amounts of money. Using the softkey OPTION… you can change the currency to Euro.
5.7.8 Call Forwarding using Keypad
Menu: Settings
Submenu: Configuration
Menu item: CF with keypad
Softkey ON or OFF
If your extension is designed to control
call transfer using the keypad protocol,
you can set your system this way.
5.7.9 Remote Servicing
Menu: Settings
Submenu: Configuration
Menu item: Remote service
Softkey ON or OFF
You can specify whether or not remote
servicing (dial-in for troubleshooting /
configuration) is possible for your device.
5.8 Entering a Name
Menu: Settings
Submenu: Name enter
Softkey OK...
Enter name (details of entering
see "Phonebook / Save new entry”)
You can enter a name displayed in standby mode. A name which has already been
entered can be edited with this menu
item.
Page 19

34
35
Appendix
6 Appendix
6.1 General Notes
Battery charging and handling
The batteries of brand-new handsets or
devices which have been stored for long
periods must be charged before the
equipment can be operated. To do this,
place the handset on the base / charging
station.
If standard size AA batteries are used, it
is permissible for them to have different
capacities to those provided. When changing the batteries, always make sure you
use batteries of matching type and capacity (e.g. NiCd or NiMH / 650, 700 or
1200 mAh).
A special battery charging management
facility checks the battery capacity and
ensures that the batteries are always
optimally charged.
The special feature of this system is its
"intelligence.” During the "learning
phase” the battery indicator in the display may be slightly inaccurate – please
do not allow yourself to be confused.
You can shorten this "learning phase”: to
make a rough setting, you can tell the
system which battery type is being used.
There is a choice of three settings for
this: Automatic, 1200 mAh, 700 mAh. If
the batteries you use do not have one of
the two settable capacities, choose the
next higher setting or Auto.
The less you replace the handset on the
base or a charging station after calls, the
more chance the system has of achieving
optimum charging of the batteries. When
the battery capacity is almost exhausted
you will be notified by an acoustic warning signal.
The "learning process” mentioned above
starts again from the beginning after
removing or changing the batteries.
Cleaning and maintenance
Simply wipe the plastic parts with a
moist or antistatic cloth; please do not
use a dry cloth and avoid using cleaning
or scouring agents.
6.2 Controls and Displays
Keypad
Number keys 1…0, *,
#
– to enter phone numbers
Function keys
Í
2 softkeys (the respective function as assigned to the key, left
or right, is shown in the lower
display line)
g
Call set-up or disconnection
+ / -
In stand-by mode: displays and
scrolls through redial memory
In the connection mode: sets
volume of earphone or loudspeaker
During programming: selects
memory slots, programming
options, positions cursor
˘
– Opens and closes the menu
–
Navigation through the menu
(one level higher)
– Aborts (press for longer than
approx. 2 secs.)
r
Signal key
Ó
Hotkeys 1 to 0, allows you to
jump to a predefined menu item
i
Dialling of an internal phone
number (when several handsets
are operated on one base station)
Page 20

36
37
Appendix
The editor (digit and character input)
Whenever phone numbers or names are
entered or edited the following routine
must be observed. Fixed settings are
assigned to the lines in the display:
• If the flashing cursor is located in the
lower of the two displayed (numerical)
lines or when entering phone numbers,
only digits can be entered.
• If the flashing cursor is located in the
upper of the two displayed lines, the
keypad will automatically be set for
inputting letters and digits. The available characters (see Table 3.2.2) appear
at short intervals by repeatedly pressing
the buttons.
The cursor will jump automatically to the
next position when you press a further
button or pause before making the next
entry.
Upper- / lower-case letters
For alphanumeric input the left-hand
softkey (SMALL / CAPITAL) can be used
to alternate between upper- and lowercase letters.
Inserting spaces
Spaces between words or letters can be
inserted by pressing the # key.
Changing lines
At the end of a line the cursor automatically jumps to the next line. At the end
of a word a line change can be achieved
by pressing the down arrow key.
Positioning the cursor
Use the arrow keys (+/ -) to shift the
cursor to the left or right. If the end of
the line is reached, it will automatically
jump to the start of the next line.
Deleting characters
Characters are deleted by pressing the
DEL softkey. If the cursor is at the end of
a line, the character to the left of the
cursor will be deleted. If the cursor is
positioned in the middle of a line (the
respective character will flash), this character will be deleted. All characters to
the right of it will shift to the left.
Inserting characters
New characters can be inserted at the
point where the cursor is flashing. The
character already in this position and
those following will be shifted to the
right (insert – not overwrite).
Special functions
Markings on the housing above the respective keys::
s (
˘ 3
) Disables the keypad
(keypad protection)
m (
˘ #
) Muting
(Microphone off)
Display
Upper line: Displays status, during
programming displays
respective menus
Lines 2 and 3: Text lines; Information
on current connection
status or menu texts
Lower line: Displays function of the
two softkeys. Content
changes according to
mode.
Symbols in the upper line:
∫ Battery fully charged
∂ Battery ready for operation
™ Battery weak
™ flashing) battery almost empty,
additional warning signal
Ì Call status
Displaying menu and softkeys
You can display the menu in the standby mode with the aid of the ˘key. You
can then use the arrow keys to scroll
through the individual menu items. Some
of these are further sub-divided, as denoted by the dots, e.g. after the softkey
OK….
In stand-by mode the left softkey displays LIST…. You then have access to the
phonebook, call list and notebook.
The "OPTION” menu
At certain programming and operating
stages the left softkey will display
OPTION…. This enables you to select
options according to the situation (see
individual chapters) such as:
- Save
- Copy from phonebook
- Copy from redial memory
- Copy from call list
- Copy from notebook
- Entry as emergency No., etc.
The "LIST” menu
In the stand-by mode you can use the
LIST… softkey to open the menu where
the call list, phonebook and notebook are
located. Within this menu, which can be
retrieved by selecting with the arrow keys
and pressing the OK… softkey, you can
use the OPTION… softkey to select further options.
Page 21

38
39
Appendix
Tones
Acoustic signals when calling:
• You can hear the dialling tone when
you press the gkey
• The ringing tone is to be heard when
the number dialled is available.
• The engaged tone is to be heard when
the number dialled is unavailable (the
line is busy).
• The call-waiting tone during an internal call notifies you that an external
call is being received.
Acoustic signals when operating and
programming:
• The positive acknowledgement tone
confirms a correct entry.
• The negative acknowledgement tone
indicates that an error has been made.
6.3 Package Contents
1 Base station
1 Handset
1 Plug-in power supply
1 Telephone connecting cable
1 Shirt clip
1 Instruction manual (with card display-
ing accessories and further Hagenuk
CPS products)
6.4 Condition on Delivery
Your cordless Genery ISDN telephone has
the following factory settings:
Phonebook No entry
Last number redial No entry
Ringing tone melody 3 internal/
2 external
Ringing tone volume 5 internal/
5 external
Earphone volume 3 (medium)
Key tones On
Battery warning On
Illumination
when key is pressed On
Incoming call LED red on
Key lock Off
Total lock On
Battery type Auto
Notebook No entry
PIN 0 0 0 0
Call list No entry
Anonymous No
Phone number (MSN) No entry
Local area code No entry
Country (depending on
version)
Language (depending on
version)
Cost factor No entry
Exchange code No entry
Exch. code sent On
Automatic end of
conversation On
The supplied handset is registered on
base A as internal subscriber no. 1.
Standard:
Send / receive frequency:
Range:
Power supply:
Batteries:
Operating life
(with fully charged batteries,
2 x 1200 mAh):
Charging time:
(with empty batteries 1200 mAh)
Recommended environmental
conditions:
Dimensions: Base station
Handset
Weight: Base station
Handset
Length of connecting cable:
Connecting plug: phone line
Power cable
Storage temperature:
DECT GAP
1880 – 1900 MHz
up to 300 m / 1000 ft
(in buildings up to 50 m)
base 230 V~ / 50 Hz, 11 VA
(SNG 010 W / SNG 10 WGB plug-in
power supply)
2 x NiCd / NiMH (2AA)
700 – 1200 mAh
in stand-by mode: up to 200 hrs. (typ.)
during call: up to 12 hrs. (typ.)
approx. 9 hrs.
+5° C to +40° C / 20% to 75% rel.
humidity
BxHxD = approx. 131 x 65 x 140 mm
BxHxD = approx. 58 x 160 x 33 mm
approx. 220 g
approx. 160 g (incl. batteries)
power cable for base station 2 m
telephone connecting cable 3 m
Western - Western (ISDN)
plug-in power supply with Euro mains
connector
Miniwestern RJ11 equipment side
0° C to +55° C
6.5 Technical Data
Ringing tone
Busy tone
Positive acknowledgement tone
Negative acknowledgement tone
Call waiting tone
(repeated)
(repeated)
0,5
0,6
0,2
0,2
0,6
0,2
0,2
0,5
0,6
0,50,5 0,50,5 0,50,5 0,5
0,3
0,3
0,3
0,3
0,3
0,3
0,3
0,3
0,3
0,3
3
3,5
0.1 each
411
Dial tone
Page 22

40
41
Appendix
Symptom
No display
No radio link to the base
station ("no base”)
No line connection, no
dialling tone
Handset does not ring
Only for phone systems:
No or false connection to
number dialled from
memory
Causes
Handset not switched on
Batteries empty
Batteries inserted incorrectly
Handset not registered
Plug on mains power supply not properly inserted
Incorrect base selection
Plug on connecting cord
not properly inserted
Ringing tone is switched
off or set too low
Trunk code not entered
Remedy
Press
g
Recharge handset or batteries.
Insert batteries correctly.
Register handset.
Check plug connections.
Select right base.
Check plug connections.
Set ringing tone volume.
Enter trunk code.
Not every failure should be attributed to a defect in your telephone. You may save time
and money if you attempt to remedy simple failures yourself. The following tips should
help you.
6.6 Troubleshooting Space for your own notes
Page 23

42
43
Appendix
I
Illumination 29
Incoming calls 13
Inserting characters 37
Installation 7
Internal calls 12
K
Key lock 16
Key tones 28
Keypad 35
L
Language 30
Linking phone numbers 12
Local area code 31
Location, choice of 7
Locking keypad 16
Log in / Log off 30
Lower-case letters 19, 37
M
Melody 27, 29
Menu structure 45
Menu, displaying 36
Microphone on/off 15
Mute mode 15
N
Name, entering a 32
Notebook 15, 20
O
Open listening 14
Outgoing call 11
P
Package contents 38
Paging 16
Phone number memory 17
Phone numbers, combining 12
Phonebook 17
PIN, edit 25
Point of installation 7
Power supply 8
Pre-dialling 11
R
Range 7
Redial 12
Remote servicing 32
Reset 26
Ringing groups 22
Ringing tone 38
Ringing tone, on/off 13
Ringing tone volume / melody 27
S
Security 25
Sensitivity 24
Settings 27
Softkeys 36
Special functions 36
Switching time 25
Switching 15
Symbols 36
System Operation 31
T
Technical data 39
Telephoning 11
Three-party conference 14
Toggling 14
Tones 28, 38
Troubleshooting 40
Trunk Code 32
U
Upper-case letters 19, 37
V
Vibration signal 28
Volume 14, 29
A
Accessories 9
Acknowledgement tone 38
Appendix 35
Area code 31
Audio 27
Automatic call answering 13
Automatic Call Back 12
Automatic end of call 33
B
Babyphone 24
Batteries, inserting 8
Battery capacity 33
Battery charging 35
Battery handling 35
Battery warning 28
Blocking 16, 23
C
Cable connections 8
Call, during a 14
Call answering 13, 28
Call charge factor 32
Call charges 22
Call delay 25
Call features 22
Call forwarding 21
Call list 17
Call transfer 15
Call waiting 14, 22
Calls, number of 25
Call waiting tone 38
Cleaning and maintenance 35
Changing lines 37
Configuration 30
Connections 8
Controls and displays 35
Copying entries 19
Country selection 30
Cursor 37
D
Defects 40
Deleting characters 37
Deleting entries 20
Delivery condition 26, 38
Dialling tone 38
Dialling 11
Direct calling 12, 23
Display 35, 36
E
Earphone volume 14, 28
Editor 37
Emergency numbers 12
Emergency numbers, specifying 19
Ending a call 16
Engaged tone 38
Entering a name 19
Entering characters 37
Environmental conditions 7
Exchange code 32
External calls 13
External switching 15
F
First steps 9
Function keys 35
Further features 16
G
GAP standard 5
General notes 35
H
Handset on/off 16
Handsets, log in 33
Headset 28
Hotkeys 26
6.7 Subject Index
Page 24

44
45
Appendix
Audio
Ring tone
Internal call (volume / melody)
External call (volume / melody)
Volume speaker
Tones
Low battery
Key tone
Vibrator alarm
Headset
Call reception (automatic / manual)
Volume headset
Melody headset
Illumination
Display and keypad (on alert / on use)
LED red (on alert / on calls)
Language
Depending on version
Configuration (only system manager)
Terminal Log in / Log out
Country select
Area code edit
Phone No. edit
Ringing group for terminal
Trunk code edit
Trunk code transmitting
Charge factor edit
Charge factror in Euro
CF with Keypad
Remote service
Name enter
Bat. Capacity
Auto
700 mAh
1200 mAh
Base select / Log in
Automatic call end
LIST…
CALL LIST
PHONEBOOK
Entry modify
Entry new
Entry delete
Entry as emergency No.
NOTEBOOK
CALL FORWARDING CF
CF for Phone No.
CF uncond.
CF on busy
CF no reply
CF for extension
CF if no radio link
All CF off
CALL FEATURES
Ringing groups
Call waiting
CHARGES
Charge of last call
Total charges
BLOCKING
DIRECT CALL
Direct call No.
BABYPHONE
Babyphone No.
Sensitivity
Switching time
No. of calls
Call delay
SETTINGS
SECURITY
Edit PIN
Reset
Settings reset
Call list reset
Phonebook reset
Redial memory reset
All reset
6.8 Menu StructureSpace for your own notes
Page 25

Subject to technical changes
Operating manual
Hagenuk CPS GmbH Genery ISDN
Westring 431 Mat.–Nr. 3301.141
D 24118 Kiel Edition 05.03.2001
This equipment satisfies the requirements
set forth in the EU directive 1999/05/EG.
In evidence of this the equipment carries the CE symbol.
 Loading...