

Page 1

Phone support available Mon-Sat 9am-5pm EST @ 1 (844) 382-8549
Version
2
www.generixllc.com/pages/body-camera
PROMNICO ®
Body Camera User Manual
Page 2
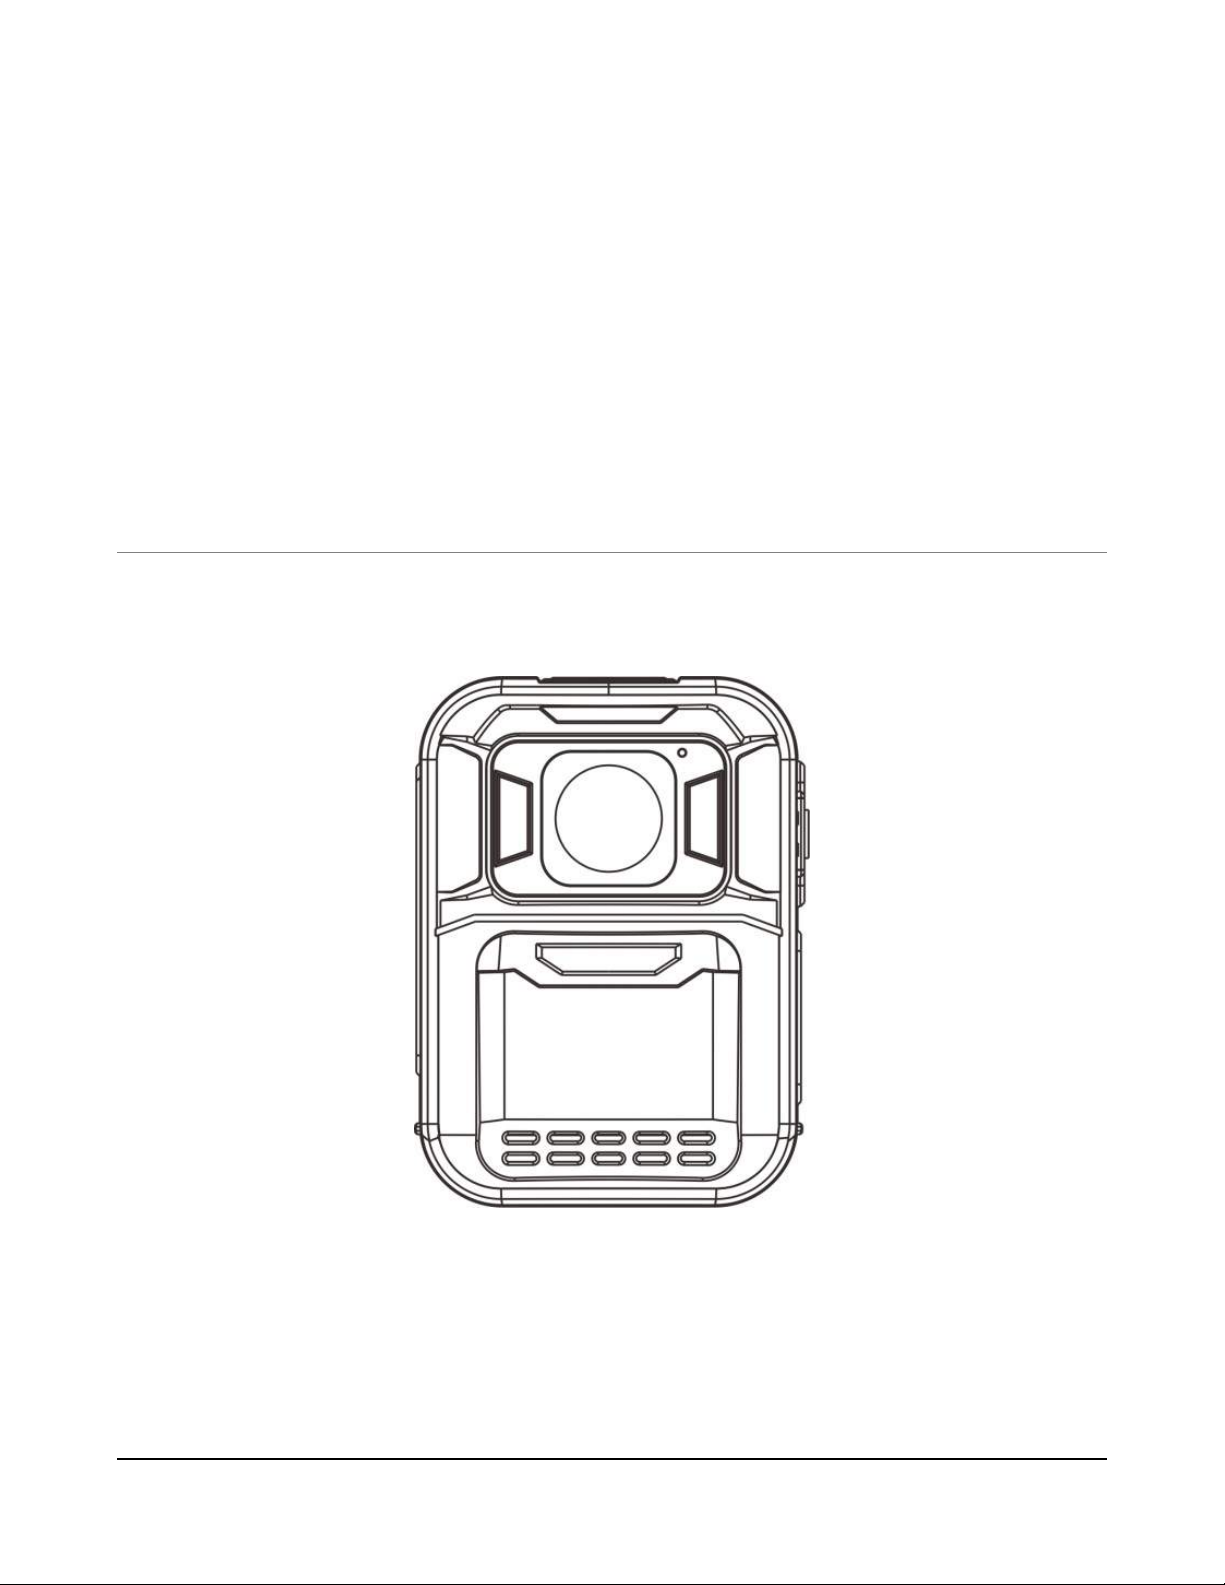
POLICE BODY CAMERA FOR LAW ENFORCEMENT
By PROMNICO® -- a registered trademark
of Generix, LLC
ã Generix, LLC
1609 West McClain Avenue • Suite 507
Scottsburg, IN 47170
Phone 1.844.382.8549 • Fax 812.752.2791
Page 3

Table of Contents
Product Overview .................................................................... 1
Box Contents .......................................................................... 3
Downloading and Deleting Video ............................................ 4
Downloading/Deleting on Windows ........................................ 5
Downloading/Deleting on Mac ................................................ 7
Body Camera Part Diagram .................................................. 11
LCD Display Overview .......................................................... 15
Entering the Menu ................................................................. 16
Navigating the Menu ............................................................. 16
Menu Options and Descriptions ............................................ 17
Power On/Off ........................................................................ 22
Power Saving Mode .............................................................. 23
Reset ..................................................................................... 23
Infrared Night Vision ............................................................. 23
Taking Photos ....................................................................... 24
Burst Photo Mode ................................................................. 24
Snapshots ............................................................................. 25
Video Recording ................................................................... 25
Splitting Video Footage ......................................................... 25
Pre-recording ........................................................................ 25
Post-recording ....................................................................... 26
Disabling “Recording Started” Audio Prompt ........................ 26
Recording Audio Only ........................................................... 26
One-button Video Recording ................................................ 27
One-Button Resolution Switch .............................................. 27
Photo Timer .......................................................................... 27
Device and User ID ............................................................... 27
Time Setting .......................................................................... 28
One-button Audio Recording Switch ..................................... 28
One-button Playback ............................................................ 28
Playback ............................................................................... 28
Digitally Zooming in and Out ................................................. 29
Charging ............................................................................... 29
Page 4

Product Overview
Phone support available Mon-Sat 9am-5pm EST @ 1 (844) 382-8549
The Promnico body camera is a next generation body camera. With a
rugged over-molding design and longer battery life, it is ideal for on-duty
police officers, private security officers, bouncers, cyclists, and bike
messengers commuting in heavy traffic. This camera captures video at
1440p resolution along with audio to collect crucial evidence of events the
user is involved in.
1
Page 5

2
Features
• Night Vision: IR lights give camera the ability to record clear
images/videos in low-light conditions
• HEVC (H.265 coding): saves up to 40% storage space vs. competitors
• GPS tagging (optional): GPS tagging enables officers to record
specific location information along with body camera footage
• Multiple recording resolutions
• 140-degree wide viewing angle
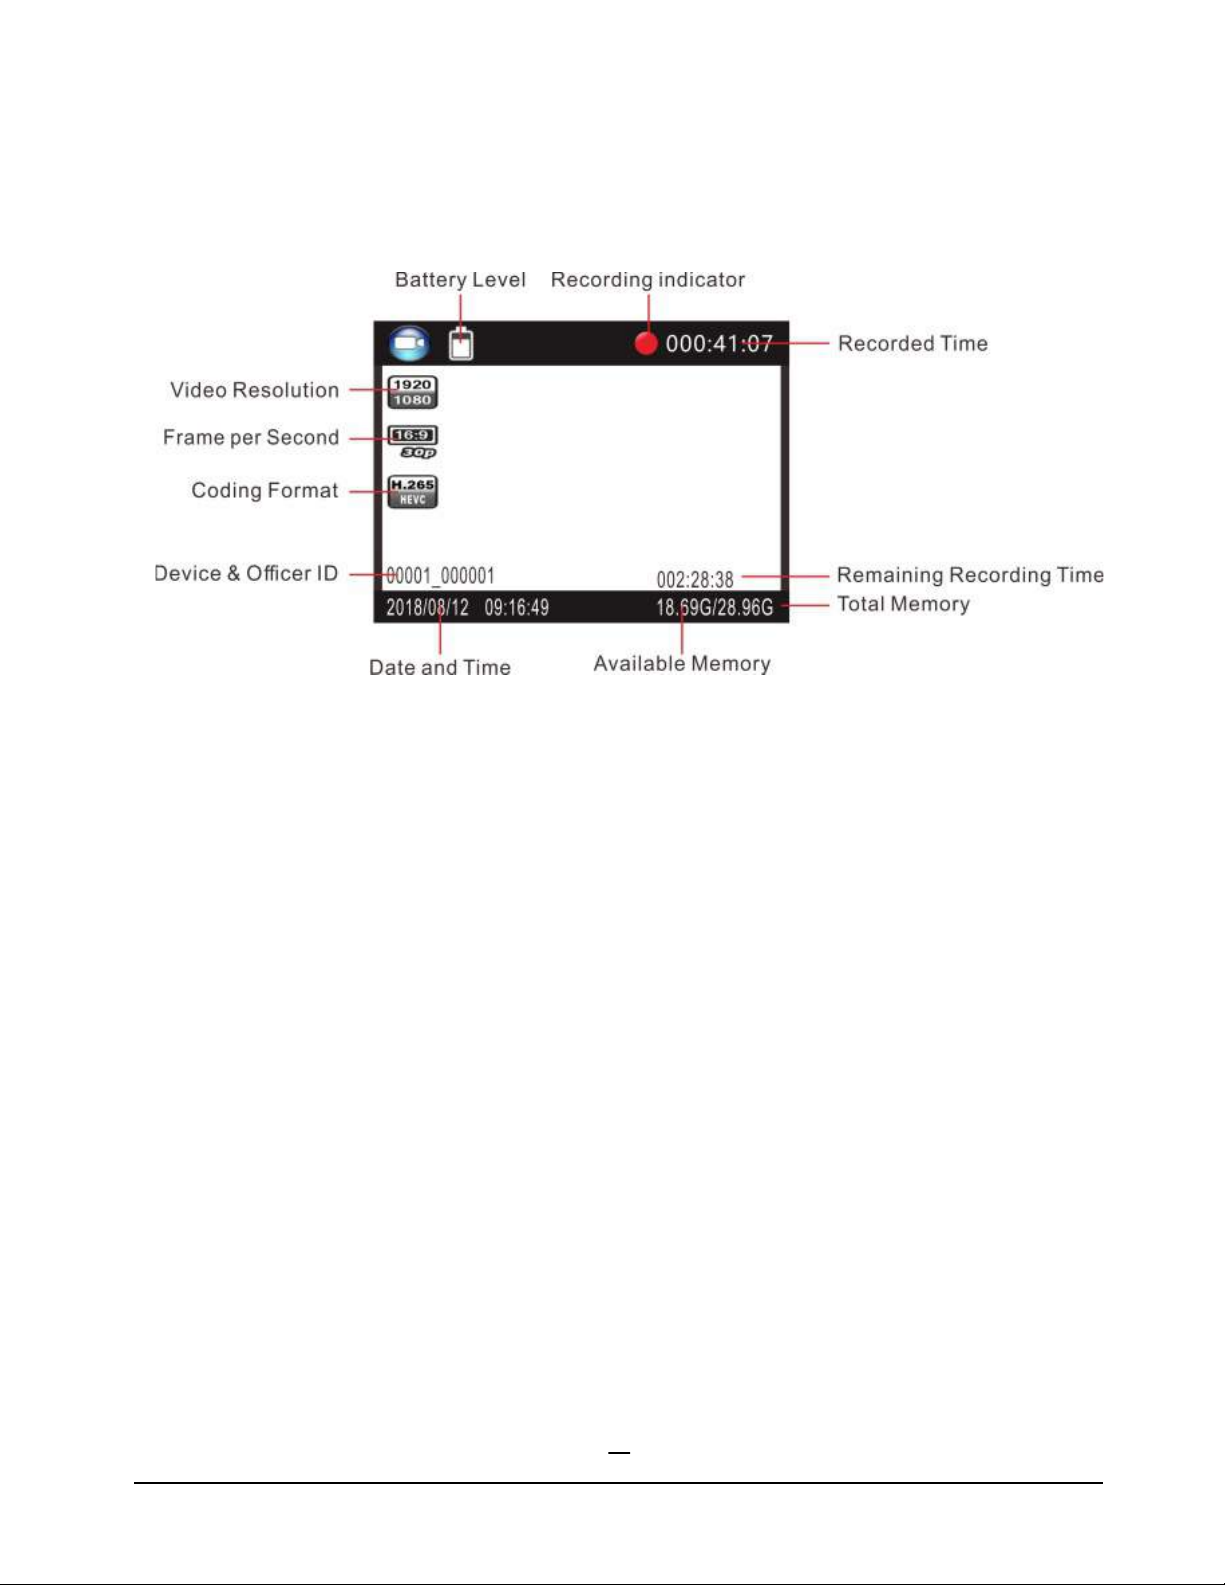
• On-screen display showing time, date, memory, resolution, battery
life, and recording space available
• Audio alarms: on/off, recording started, recording stopped, low
battery, and low memory
• Waterproof IP65
• Visual LED indicating the current status
• Tamper-proof/password protection prevents all video from being
deleted or overwritten
• FCC, RoHS, and CE certifications
Page 6

3
Box Contents
• Body Camera
• Charging Dock
• USB Cable
• Wall Charger
• Epaulette Clip
• Rotatable Crocodile Clip
• User Manual
Page 7
4
Downloading and Deleting Video
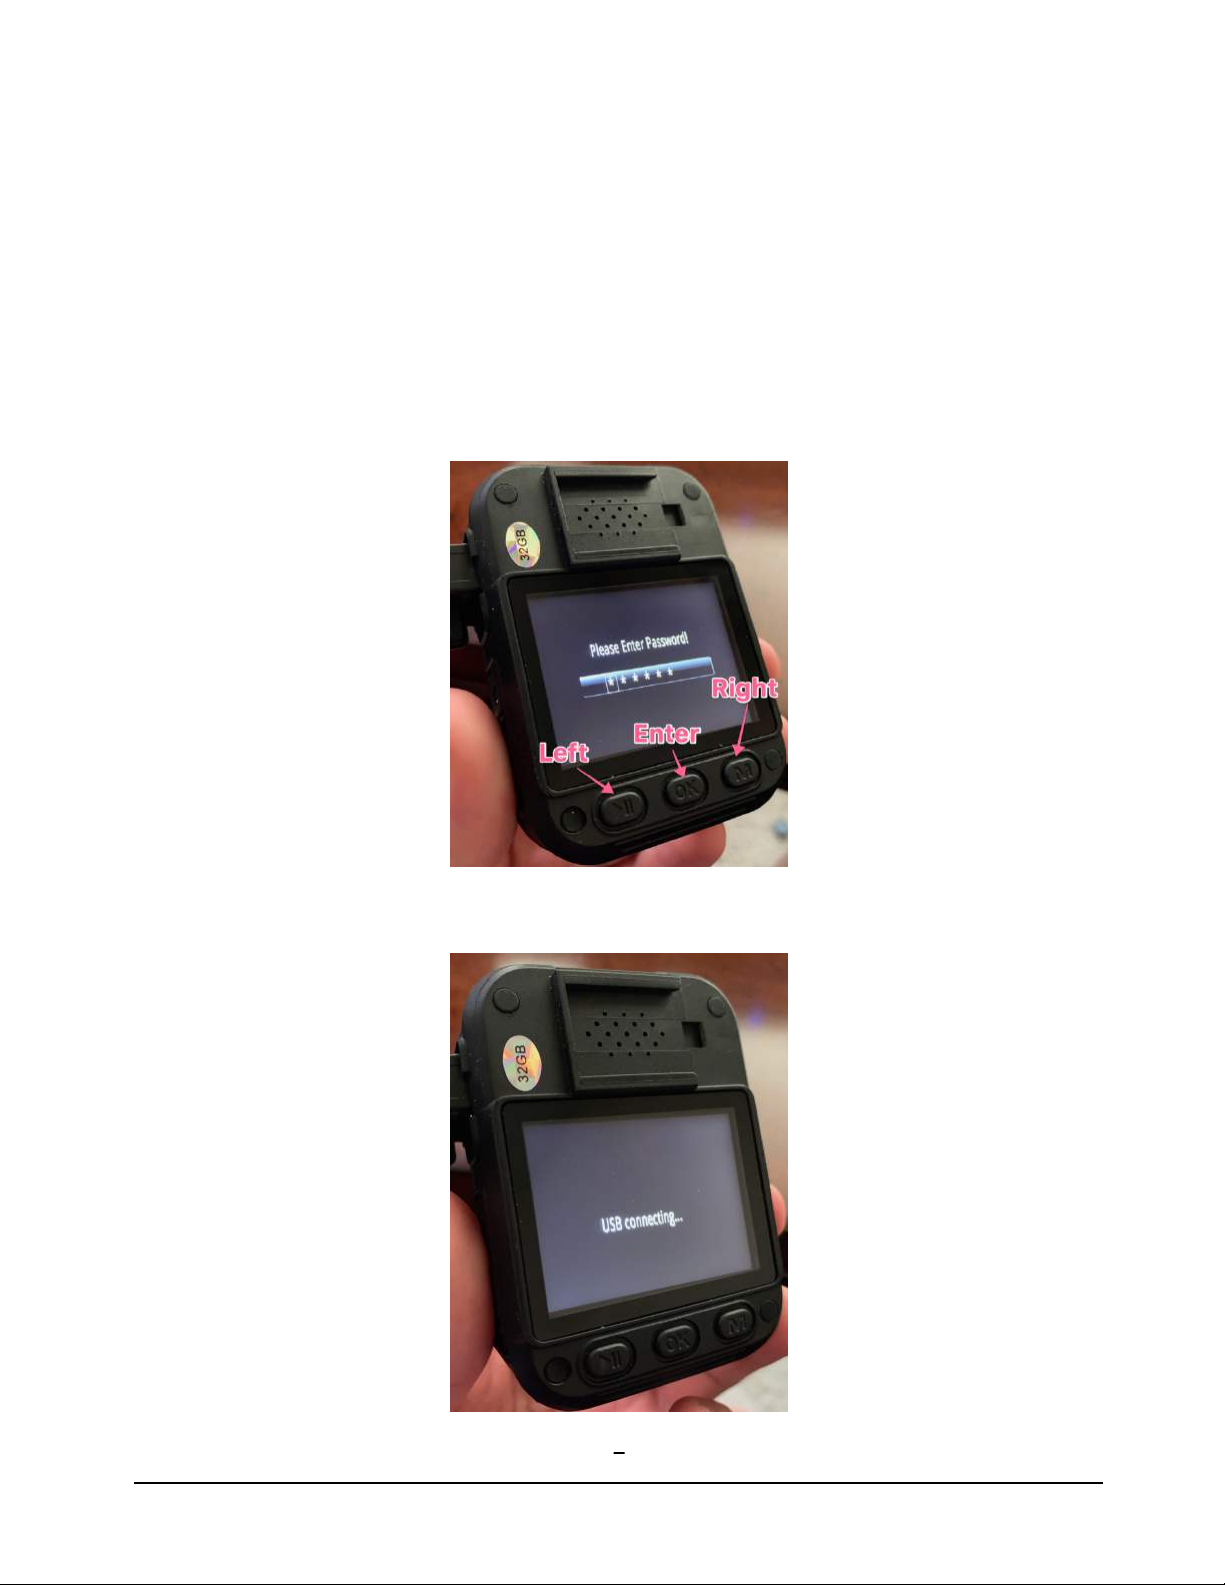
1) Turn camera on by holding down the power button
2) Plug the camera into your computer (PC or Mac)
3) Enter the device password (default is 000000)
4) Make sure you see the following screen before continuing
Page 8
5
Downloading/Deleting on Windows
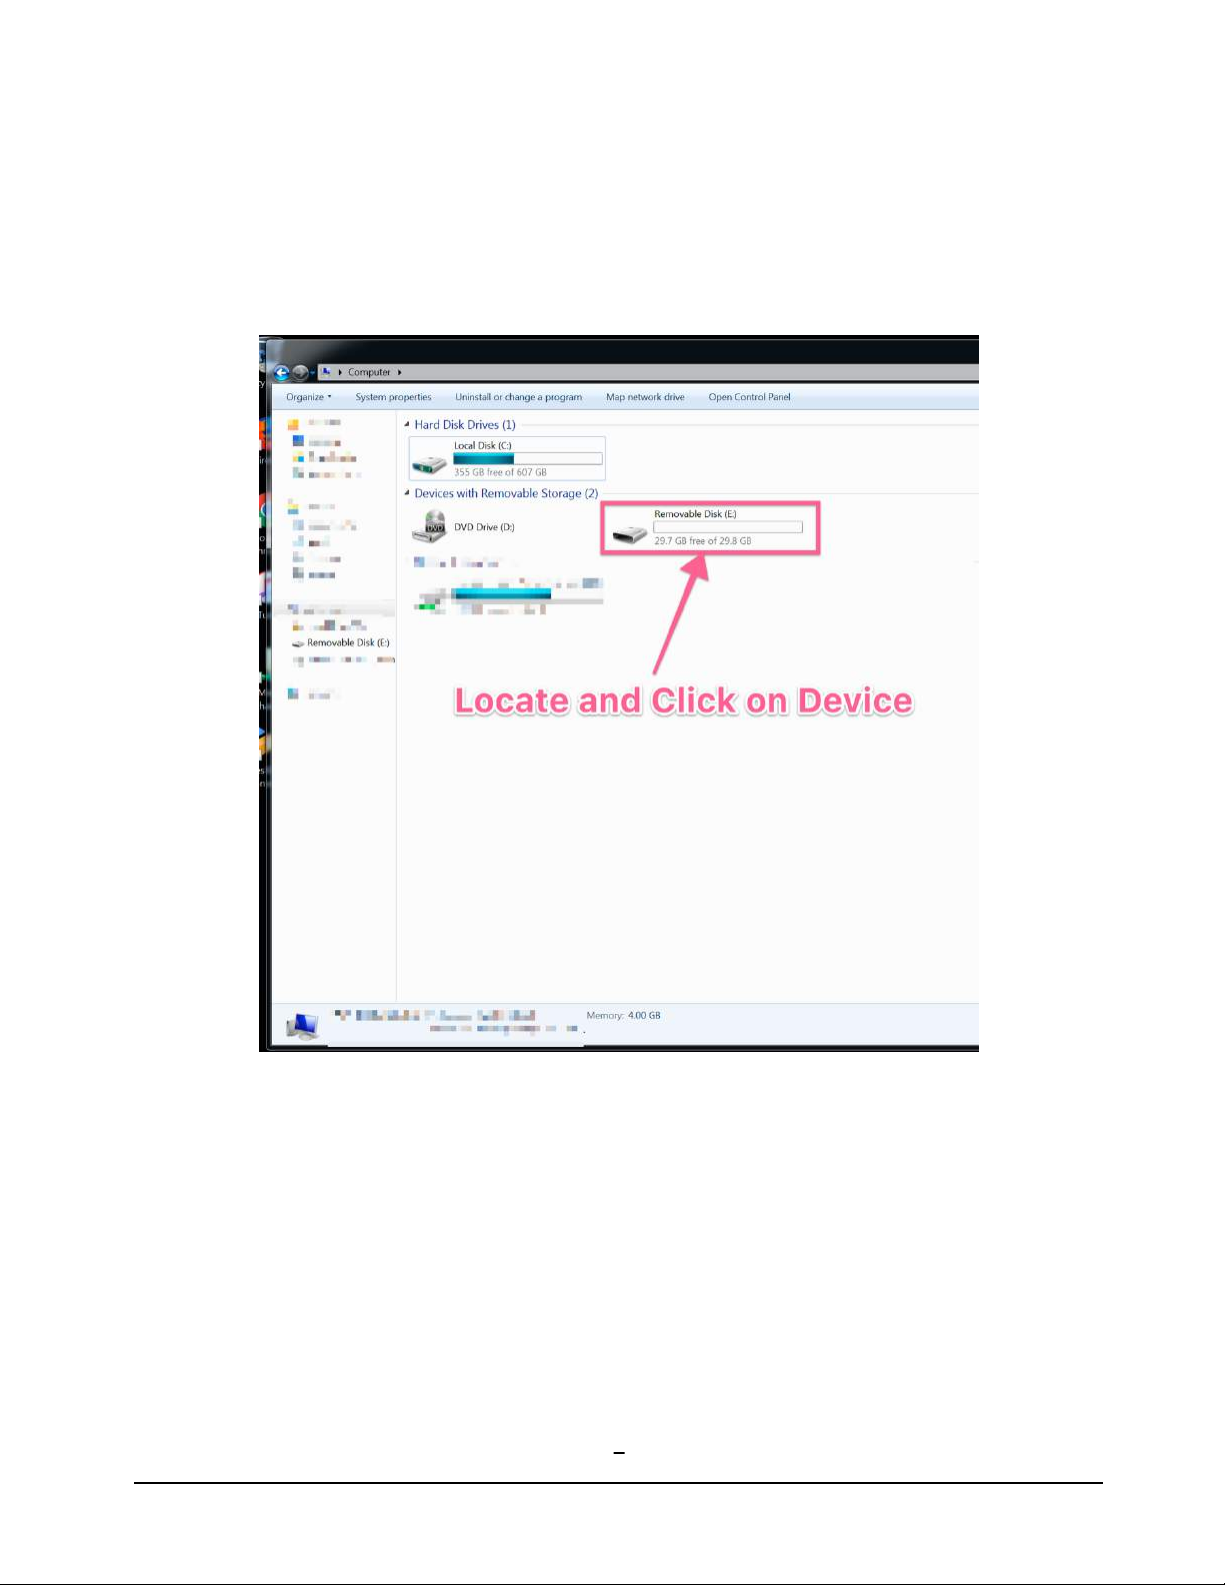
1) Once connected, open my computer to locate your device
Page 9
6
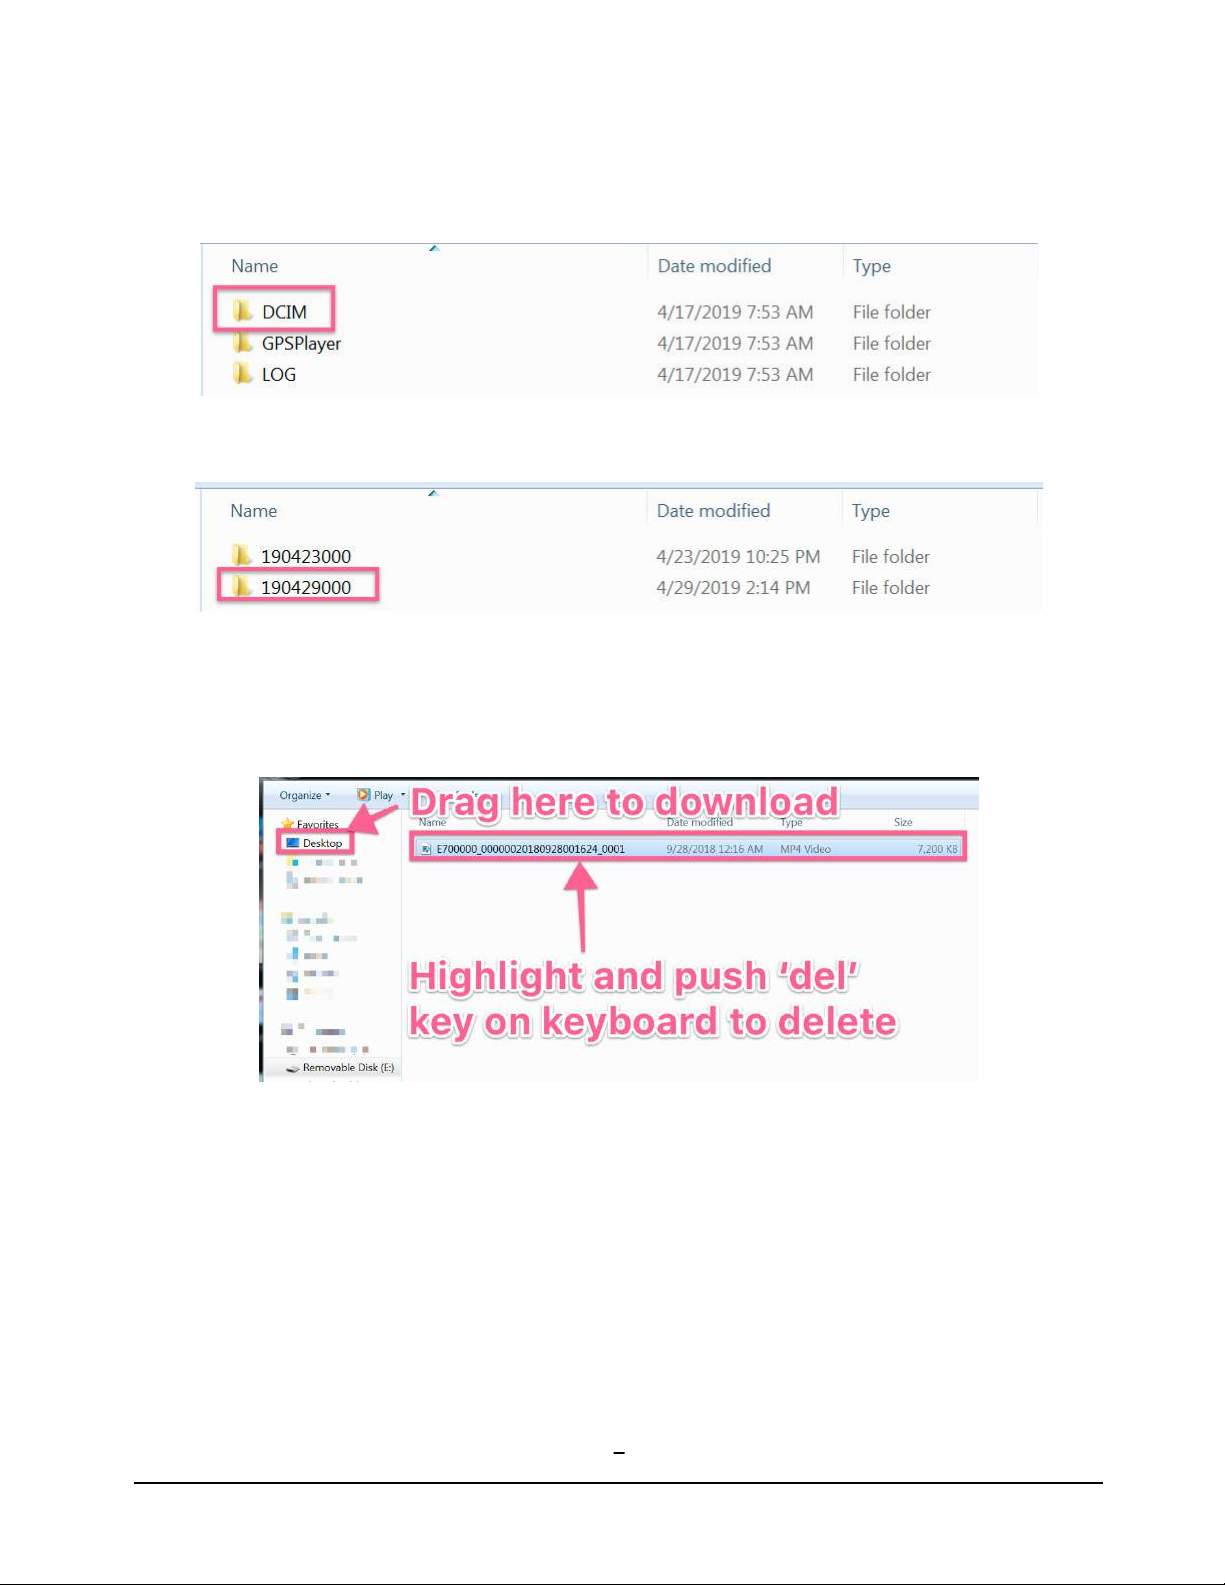
2) Locate and click on the folder ‘DCIM’
3) Locate and click on the folder with the date you are interested in
4) Locate files you want to download/delete. To download, drag it to
your desktop. To delete, highlight and push the ‘del’ key on your
keyboard.
Page 10
7
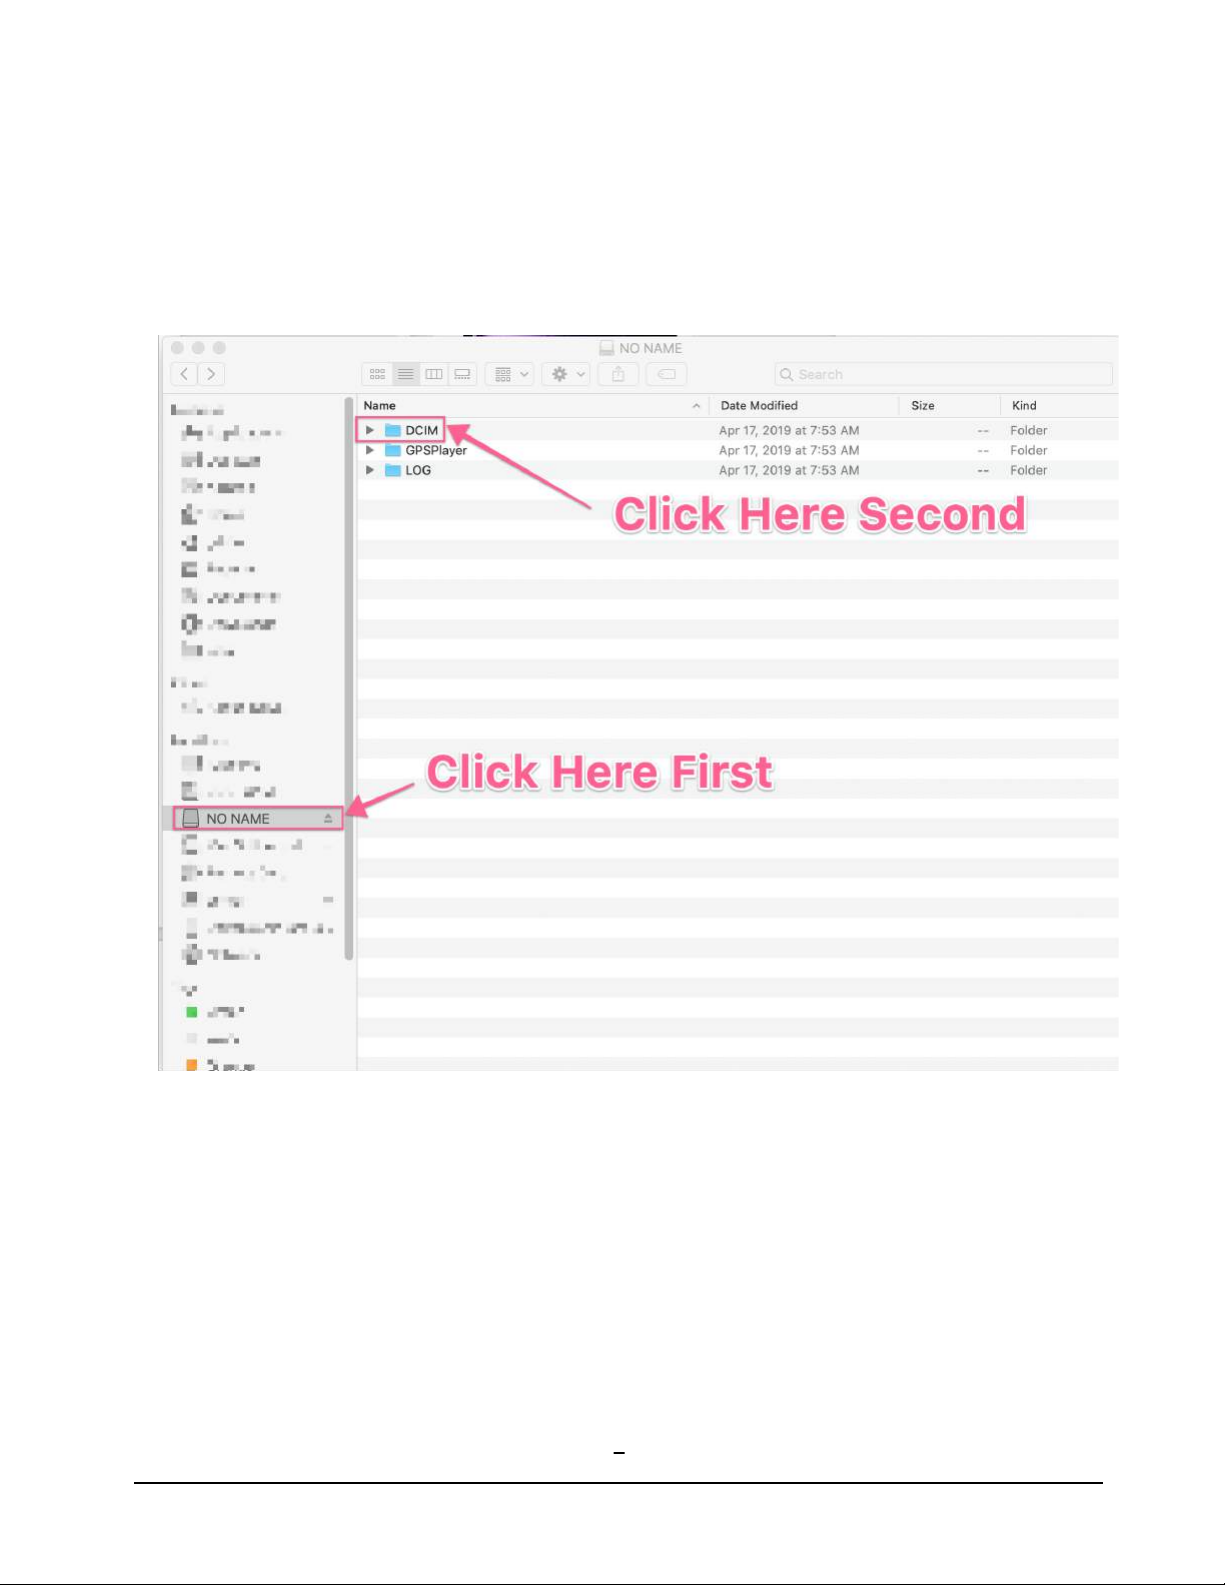
Downloading/Deleting on Mac
1) Once connected, open finder and locate your device
Page 11
8
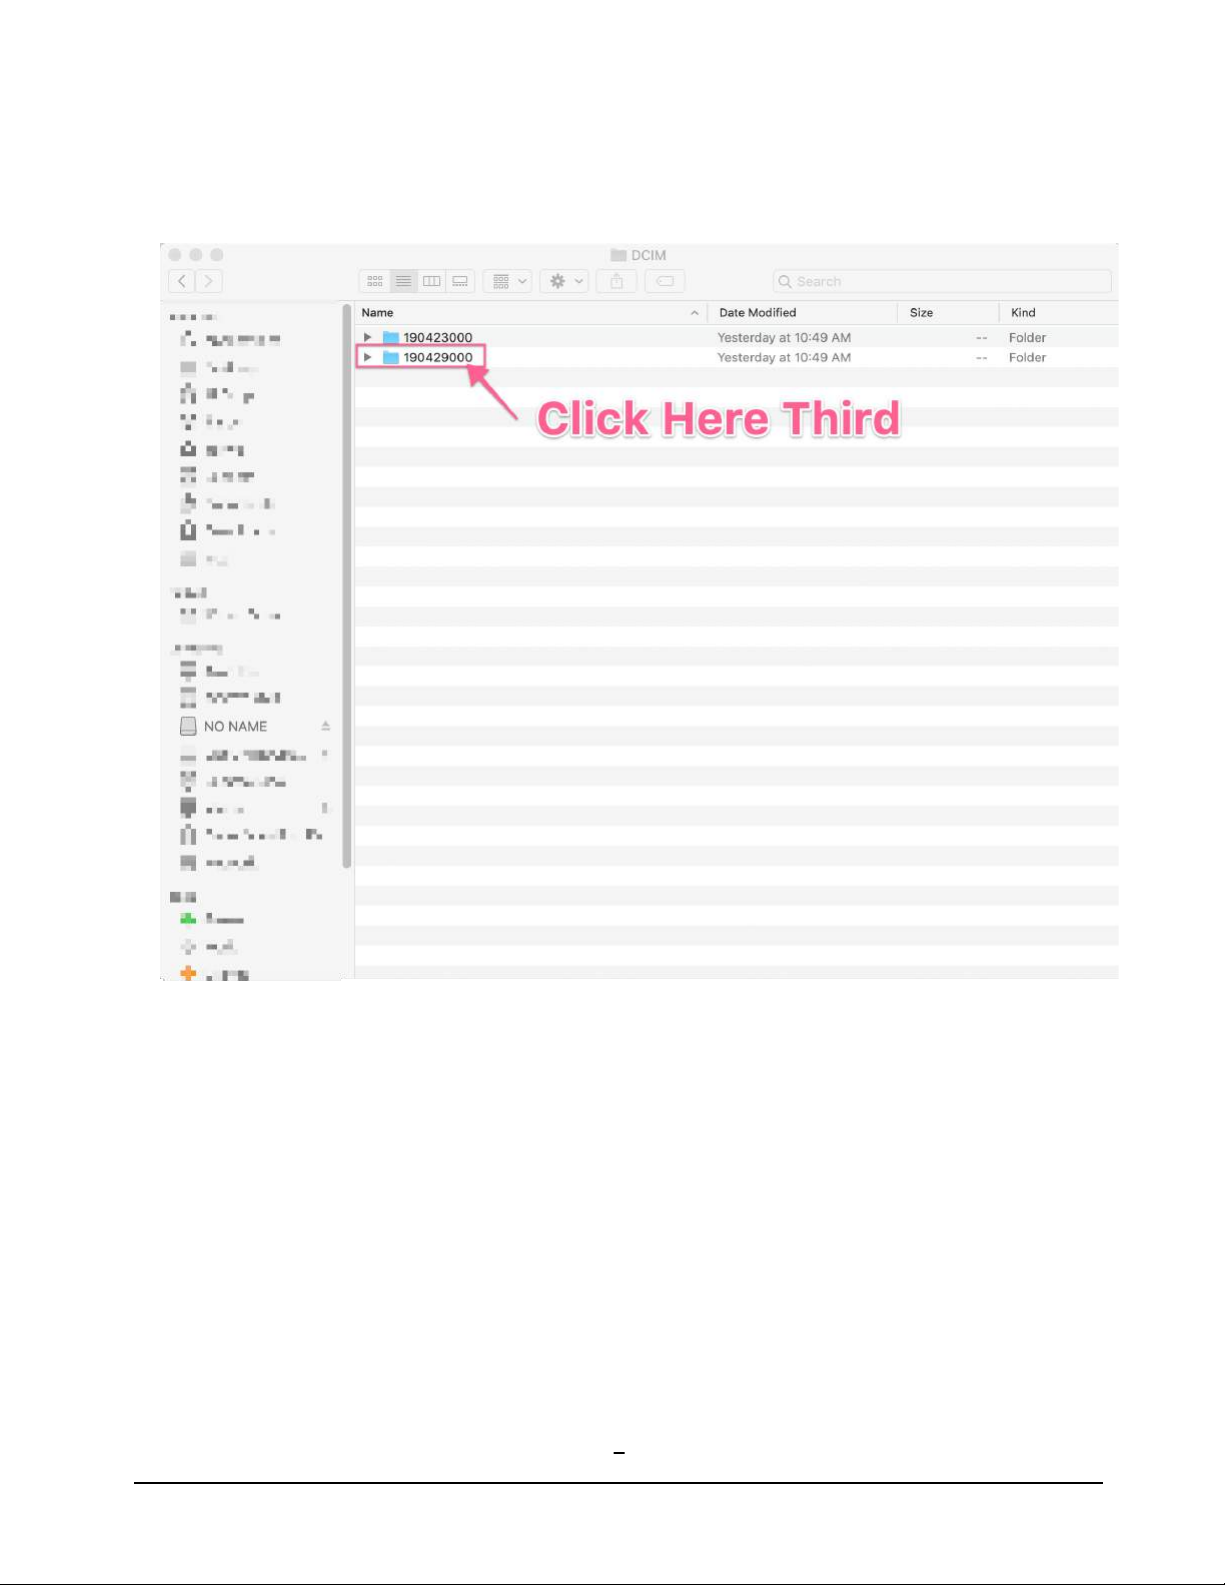
2) Locate and click on the folder with the date you are interested in
Page 12
9
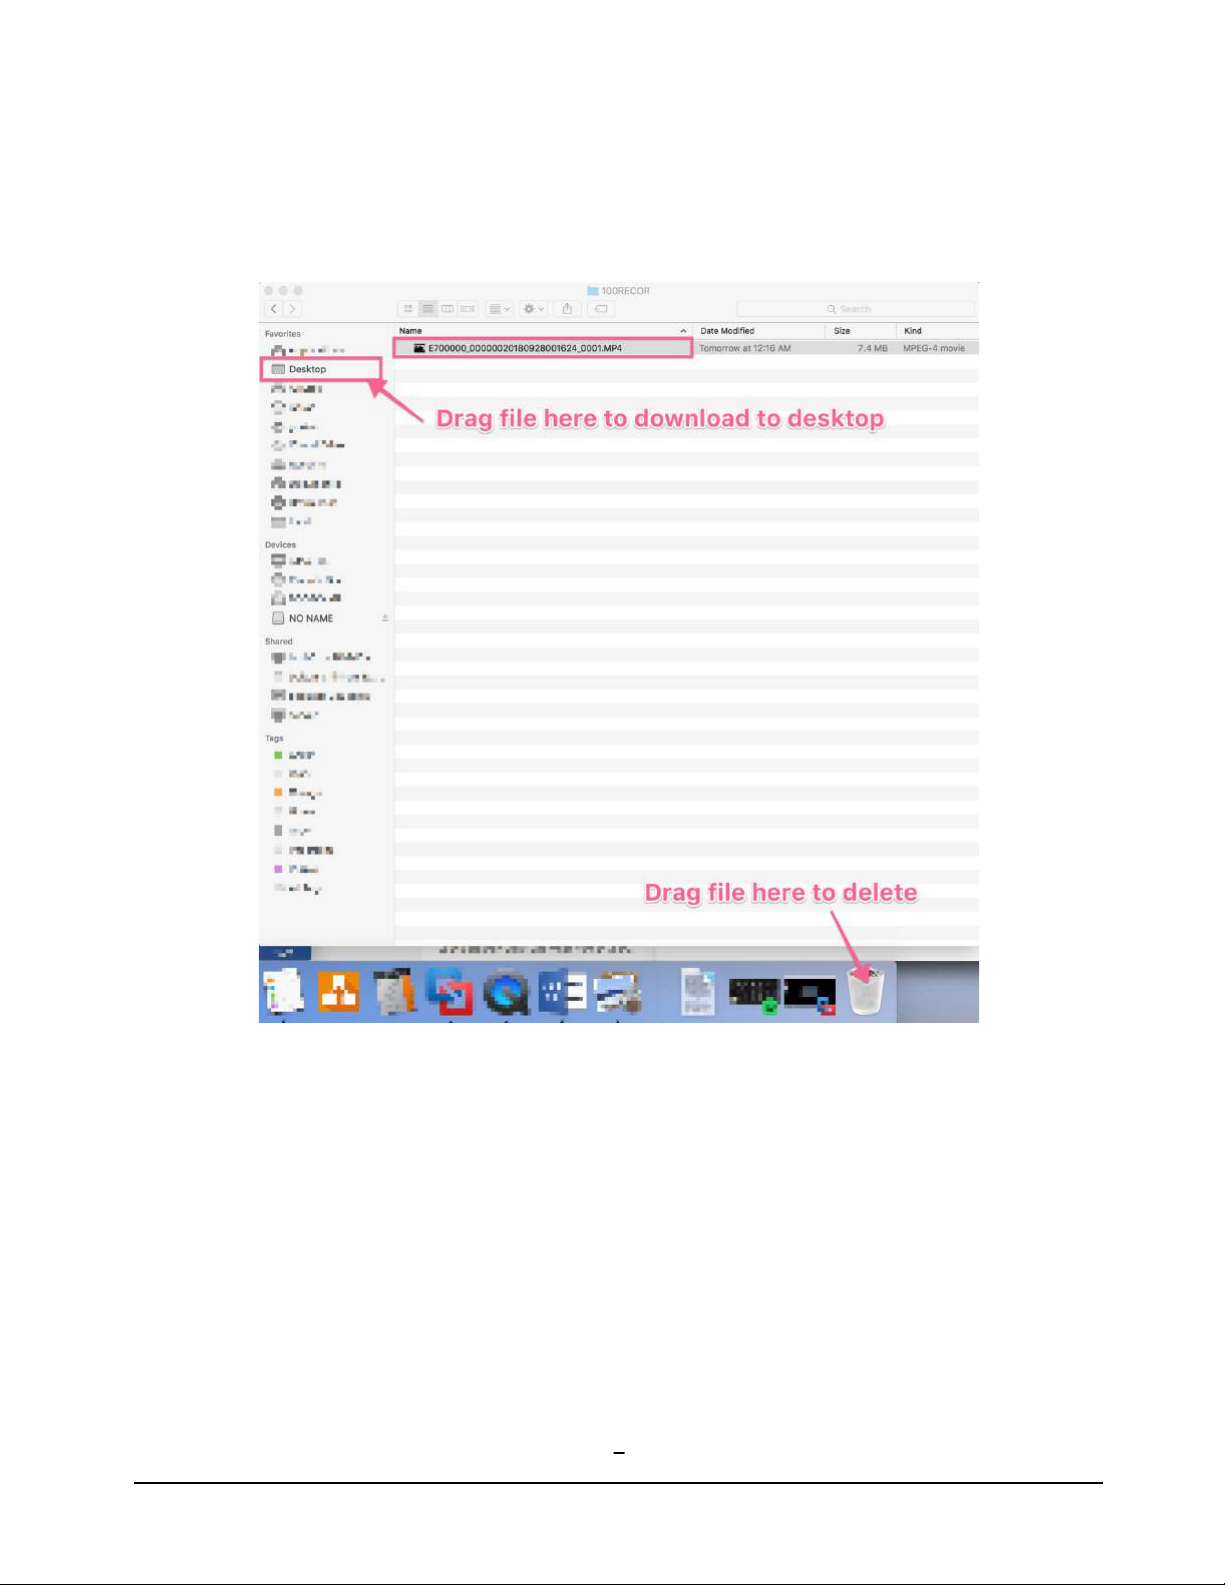
3) Locate the file you are interested in, drag it to your desktop to
download it, or drag to the trashcan to delete it
Page 13
10
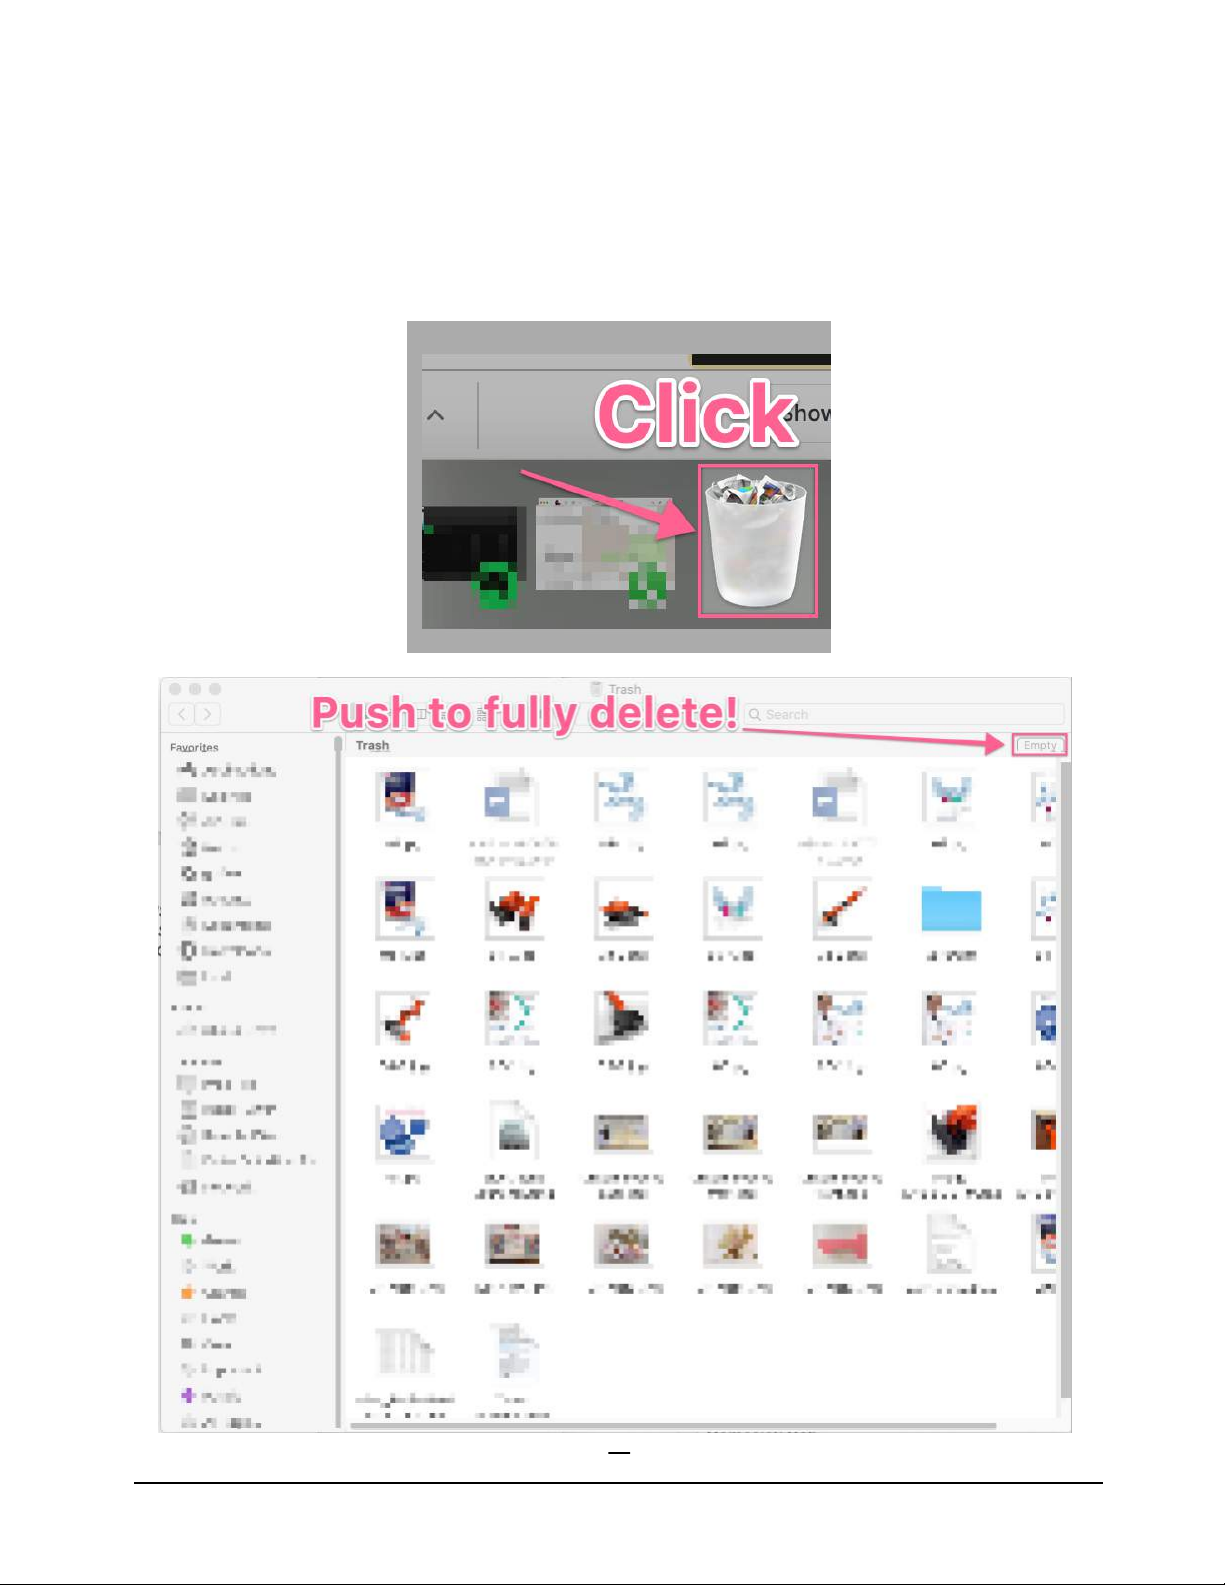
4) VERY IMPORTANT – WHEN YOU ARE DONE, YOU MUST CLICK ON
THE TRASH ICON, AND PUSH THE ‘EMPTY’ BUTTON, OR ELSE THE FILES
WILL NOT BE FULLY DELETED AND STILL USE SPACE
Page 14
11
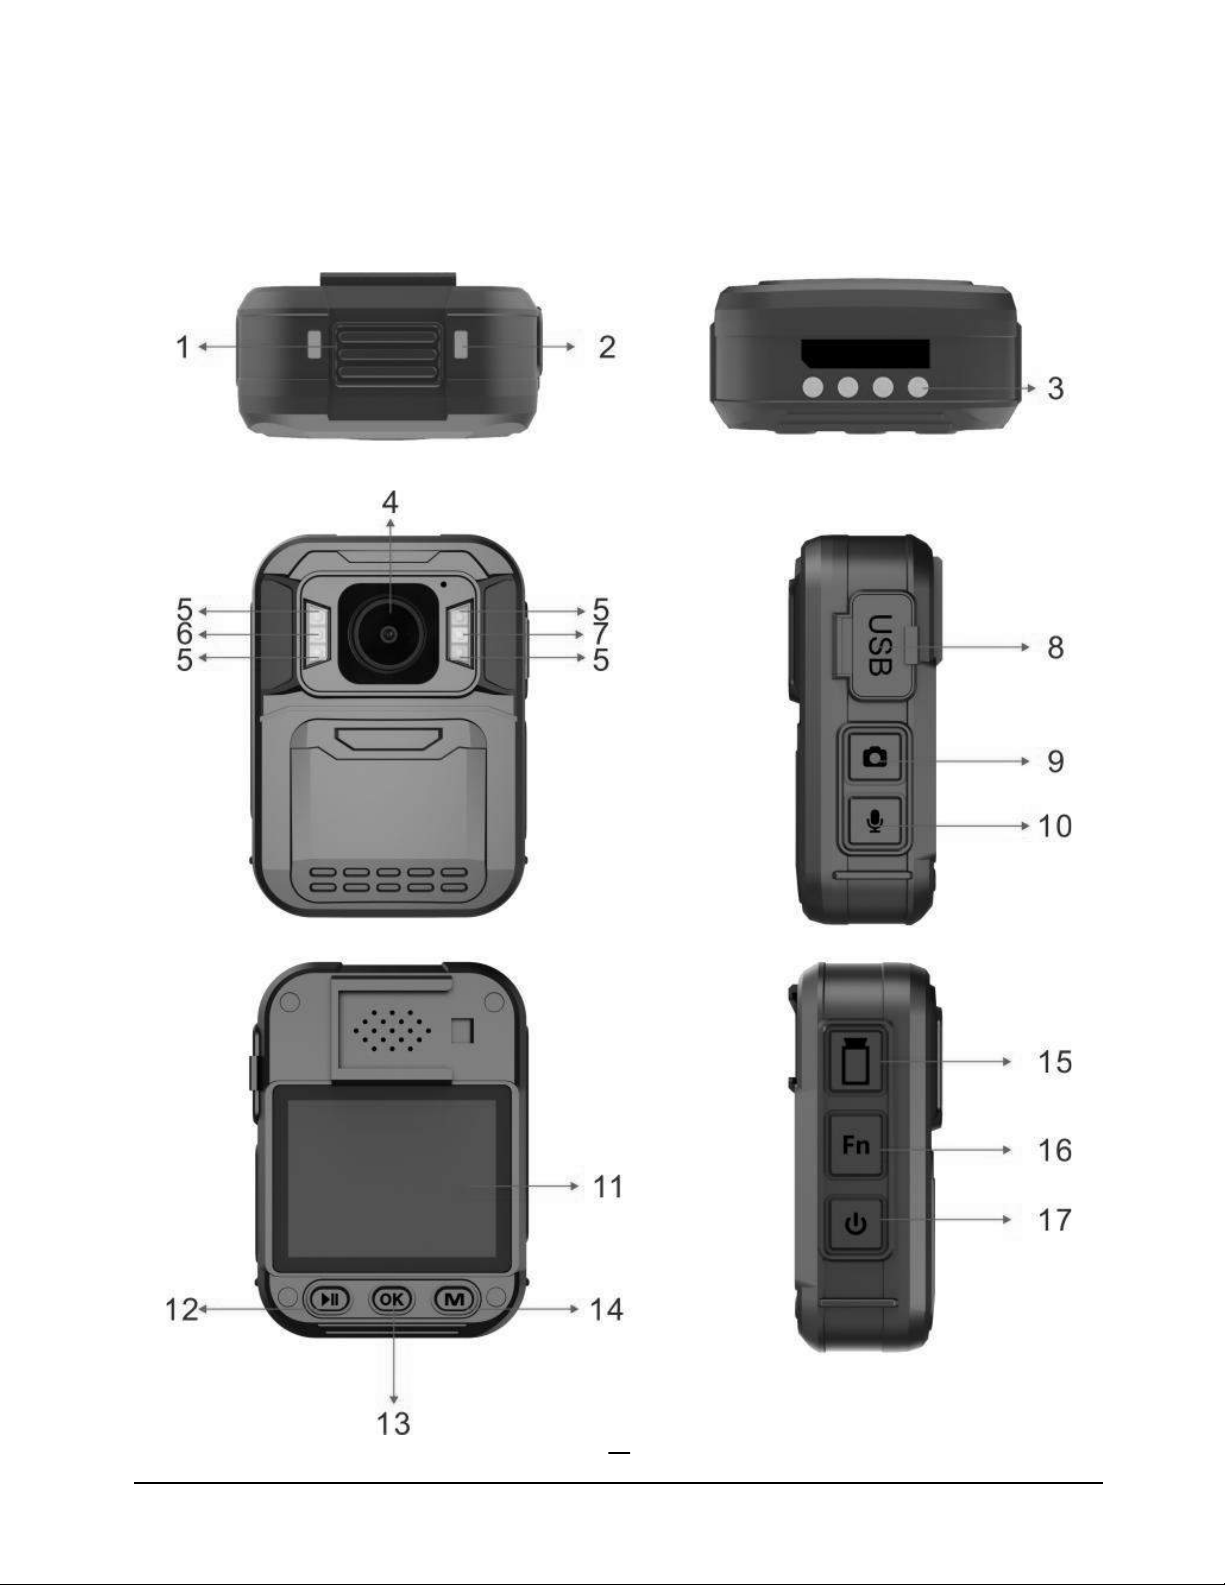
Body Camera Part Diagram
Page 15

12
Item
Description
1. Status Indicator
LED
Green: camera is in standby mode (Power
on but not recording)
Still Red: camera is in pre-record mode
Flashing Red: camera is recording video
Flashing Red once: camera is taking photo
Flashing Yellow: camera is recording audio
only
2. Charging
Indicator LED
Blue: Charging Status
White: Camera is fully charged
3. Pogo Pin
Connection port to charging dock
4. Lens
Capture high resolution images/videos
5. Infrared LED
Providing infrared light compensation in
low light conditions, to help camera record
good quality video
6. Flashlight
Hold Fn button to turn on/off flash light
7. Light Sensor
Detect changes of light and turn on/off IR
for low-light recording automatically
8. USB Port
For charging or connection to PC
PS: connects to external camera, optional
9. Snapshot Button
a) Press to take photo in standby mode
b) Press to take a snapshot while camera is
in video recording mode
Page 16

13
c) Press to switch among video, audio &
photo files when playing back files on
camera.
10. Audio
Recording/Mute/
Change Resolution
Button
a) Press to record audio when camera is in
standby mode
b) Press to enable/disable video mute
when camera is in video recording mode
c) Hold 3 seconds to switch resolution
between 1080P and 720P
11. LCD Screen
View camera status and playback recorded
files
12. Playback &
Scroll Up Button
a) Press to scroll up in menu mode
b) In standby or video recording mode,
hold to zoom out
c) In standby mode, press to review files
d) In playback mode, press to rewind video
13. OK Button
a) Press to make a selection in menu mode
b) In playback mode, press to
pause/resume video or audio playback
14. Menu & Scroll
Down Button
a) Press to enter into menu mode
b) Press to scroll down in menu mode
c) In standby or video recording mode,
hold to zoom in
d) In playback mode, press to fast forward
video
Page 17

14
15. Video Recording
Button
a) Press to start/stop recording
b) When camera is powered off, hold to
power on and start video recording
16. Fn Button
a) Press to turn IR LED on/off when IR
mode is manual
b) Hold to turn on/off flashlight
17. Power Button
a) Hold 3 seconds to turn on/off camera
b) Press to turn LCD off, press again to
wake up the screen when camera is in
video standby or recording mode
c) Press to exit to previous interface when
navigating setting or playing back files
Page 18
15
LCD Display Overview
Page 19
16
Entering the Menu
1. Press Menu button and then enter the password (default password
is 000000).
2. Enter the password by the following commands:
l Press Scroll Up button to change the character to the previous
letter or number.
l Press Menu button to change the character to the next letter or
number.
l Press OK button to confirm and move to the next character
PS: The default password is 000000.
3. After selecting the last character, press OK button to enter the setting
menu.
Navigating the Menu
Ø Press Menu button to select next setting or option.
Ø Press Scroll Up button to select the previous setting or option.
Ø Press OK button to move to confirm your selection or enter the sub-
menu.
Ø Press Power button to return to the previous menu.
Page 20

17
Setting
Description
Options
(default settings
are bold)
Resolution
The video resolution
2560×1440 30P
2304×1296 30P
1920×1080 30P
1280×720 30P
848×480 30P
Megapixels
The photo resolution
30M
25M
20M
12M
8M
5M
Burst
The number of images
captured in a row when you
take a photo.
Off, 2, 3, 5, 7, 10,
15, 20, 30
Self-Timer
The time camera waits until
taking a photo after you
press Snapshot button.
Off, 5 sec, 10 sec,
20 sec, 30 sec, 1
min
Menu Options and Descriptions
Following is a list of the available settings and options. The bold option are
the default options.
Page 21

18
Quality
The quality of the video.
S. Fine, Fine,
Normal
Pre-record
When on, a certain time
(depend on video
resolution) will be combined
into the recorded video
before record button is
pressed to start recording;
When off, video start until
the Record button is pressed
to start recording.
Off, On
Post Record
The amount of the time the
camera waits to stop
recording video after you
press the Record button.
Off, 5 sec, 1
minute, 10
minutes, 20
minutes, 35
minutes
CarDV Mode
When on, camera will power
up automatically and start
video recording when it is
charged. Camera will power
off as it normally does when
it is disconnected from the
power source.
Off, On
Loop
Recording
When on, camera will
overwrite the oldest video
file with the latest video file
once its memory is full. This
Off, On
Page 22

19
setting can be selected only
when car DVR mode is on.
Split Time
While recording video, the
camera will automatically
split its recording into files of
this length.
1 min, 3min, 5 min,
10 min, 15 min, 30
min,
45 min
Slides Show
When on, viewing photo file
will start a slideshow where
each photo will be shown
for around 5 seconds.
Off, On
Infrared
When set to manual, you
will need to hold Snapshot
button to turn IR LEDs
on/off. When set to Auto,
these lights will activate
automatically based on the
light sensor's reading.
Manual, Auto
Record
Warning
When on, you will hear a
voice confirmation when
you start recording. When
off, voice confirmation is
disabled.
Off, On
Global
Positioning
When GPS is on, position of
video will be recorded and
can be reviewed by GPS
player. GPS player
application can be found in
the “GPSPlayer” folder in the
Off, On
Page 23

20
body cameras files
[Windows only].
Time Zone
Adopt local time in real time
zone
-12 to +12
Default 0
Language
The language of the text in
camera interface
Englsih, 简体中文
,Pусский,
Korean,
Portuguese
Screen Saver
The amount of the time the
camera can be idle before
deactivating the display to
conserve power.
Off, 30 sec, 1 min,
3 min, 5 min
LCD
Brightness
Screen lighting to view
High, Medium, Low
Auto Power
off
The amount of the time the
camera can be idle before
powering off.
Off, 30 sec, 1 min,
3 min, 5 min
LED Light
When on, indicator LED
will tell the status of the
camera; When off, camera is
entering covert mode
On, Off
Key Tone
When on, camera will play a
tone each time you press a
button. When off, tone is
disabled.
On, Off
Page 24

21
Volume
The volume of camera
speaker. This affects the
loudness of video playback,
audio playback, the key
tone, record warning, and
any other sounds played by
camera. This doesn't affect
the volume of the recorded
video or audio files
themselves.
0-12
Default 12
Coding
format
The coding format of video
files
H.264, H.265
Time Setup
Adjust time to real location
yyyy/mm/dd
hh/mm
ID setting
User can set Device SN and
Person SN
Alphanumeric
characters
Password
If password is on, user needs
to enter password to get
access to setting and
connection to PC
On, Off
Change
Password
Password can be set or
changed
Alphanumeric
characters
Default
setting
Use this to return camera to
its original settings. This
does not erase the memory
O (Yes), X (No)
FW Name
H22_yyyymmdd_V
Page 25

22
Power On/Off
Power on: When the camera is off, press and hold the button for 3
seconds and the camera will enter standby mode.
Power on operation order:
1. Boot image appears
2. Working status LED indicator turns green
3. Boot up music plays
4. Camera vibrates
Power off: Press and hold the button for 2 seconds to turn off the
camera.
Power off operation order:
1. Any video/audio files are saved before powering off
2. Working status indicator turns off
3. Power off image
4. Power off music
5. Camera vibrates
Page 26
23
Power Saving Mode
Turning the screen on/off: In order to save power, you can turn off the
screen during operation. To do so, when the camera is powered on, press
the button to turn the screen off while the camera is still working. To
turn it back on, simply press the button again.
Reset
Press the reset button (inside the USB port) to have the camera reset if it
is working abnormally. Please note: Do not press this button unless
abnormalities have been observed, as you may lose your settings.
Infrared Night Vision
While in low-light situations, the built-in infrared LED’s will help record
clear video and pictures.
In standby mode, press the button to navigate into the settings (default
device passcode is 000000). Find the option [Infrared] using the and
buttons, then press to enter the sub-menu. You will be presented
with two options: Manual or Auto. Each option is detailed below.
1) Auto infrared mode: In low light situations, the IR LED will automatically
be turned on and the camera will switch on the infrared filter lens,
which will turn the image black and white. Otherwise, when the
brightness is at satisfactory levels, the IR LED turns off and the infrared
filter lens will be removed, restoring full color video quality.
Page 27
24
2) Manual infrared mode: This is the default setting, and you can activate
the IR LEDs and lens by holding the button for 1 second. Once
activated, you will see the IR LED turn on and hear the lens activate. To
turn off the IR LED, simply hold the button again for 1 second.
Taking Photos
In standby mode, press the button to take a snapshot. You will hear a
‘click’ noise and the LED working status indicator will flash red once,
meaning the photo has been stored. The photo resolution and quality can
be changed in the settings.
Burst Photo Mode
To take burst photos instead of single standalone photos, go into the
settings menu by pressing (default passcode is 000000) and finding the
[Burst] option. Make a selection of 2, 3, 5, 7, 10, 15, 20, or 30. Now, when
you press , the camera will take photos according to the quantity of
bursts selected.
Page 28
25
Snapshots
While the camera is recording, at any time you can press the button to
take a snapshot. The LCD screen will show a flashing green square, which
indicates that the snapshot is generating.
Video Recording
In standby mode, the user may start video recording by pressing the
button. Recording will initiate the LED working status indicator, audio
prompt, LCD indicators, and vibration. Press the button again to stop
the recording and switch back to standby mode. Camera’s audio, visual,
and vibration prompts will occur again when recording is stopped.
Splitting Video Footage
Go into the settings menu by pressing (default passcode is 000000),
find the [Split Time] option, and press the button to select the video
segment duration. Once selected, video footage will be divided into
segments based upon your selection.
Pre-recording
Pre-recording will record up to 5 seconds before the button is pressed.
We recommend turning this option on for users that will not be recording
all of the time to make sure that everything going on is captured.
However, this feature will use extra battery power. To turn this feature on
Page 29
26
or off, go into the settings menu by pressing (default passcode is
000000) and select [Pre-record] option. Press the button to select ON
or OFF.
Post-recording
Delay recording works very similar to pre-recording, only this option will
continue recording for a set number of seconds after the button has
been pressed. To turn this feature on or off, go into the settings menu by
pressing (default passcode is 000000) and select [Post record] option.
Press the button to make a selection.
Disabling “Recording Started” Audio Prompt
Go into the settings menu by pressing (default passcode is 000000) and
select the [Record Warning] option. Press the button to select ON or
OFF.
Recording Audio Only
In standby mode, press the button at any time to start audio recording.
Audio recording will initiate a “beep” noise along with a vibration and an
LED indicator. Simply press the button again to stop audio recording
at any time.
Page 30
27
One-button Video Recording
Whenever the camera is powered off, hold the button for 2 seconds
to immediately turn on the camera and begin recording.
One-Button Resolution Switch
Hold the button until you feel a vibration. Doing this will allow you to
switch the video resolution quickly between 1280*720 @30fps and
1920*1080 @ 30fps. 1280*720 @30fps will provide lower quality video,
but a longer battery life and less memory used per video.
Photo Timer
You can set the timer for photos by going into the settings menu by
pressing (default passcode is 000000) and selecting the [Timer] or [Self
timer] option. Doing so will provide a delay before the photo is taken
when pressing the button.
Device and User ID
Go into the settings menu by pressing (default passcode is 000000) and
selecting the [ID setting], then pressing . You can enter up to 5
characters for the device ID and up to 6 characters for the user ID. Use the
and buttons to make selections. Press to select. When done,
Page 31
28
press to save and exit. Device ID and user ID will be watermarked at
the bottom right of all video taken, along with the date and time.
Time Setting
Go into the settings menu by pressing (default passcode is 000000) and
selecting the option displaying the currently set time. Use the and
buttons to make selections. Press to save and exit.
One-button Audio Recording Switch
1) When audio is recording, you can press the button at any time to
stop and save the audio file and immediately begin video recording.
One-button Playback
In standby mode, hold the button to playback the latest stored file
(audio/video/or photo)
Playback
1) Enter the playback mode by pressing the button. In the playback
mode, press the and use the and to select the media you
are interested in playing back. Press button to play normally. You
can fast forward and rewind 2x, 4x, 8x, 16x, 32x, 64x or 128x times.
Page 32

29
2) To switch between video, photos, and audio, use the button
3) In the playback mode for photo files, press button to open the
picture, and use the and buttons to navigate left and right
through the photos.
4) Exiting: To exit the playback mode, press the button repeatedly
until you are back in standby mode.
Digitally Zooming in and Out
In standby mode, hold the button to zoom out, and hold the to
zoom in.
Charging
This product uses a polymer lithium battery, which allows charging by USB
cable included. After a full charge, the indicator (blue light) will be OFF.
You can charge the camera by three different methods:
1) USB cable connected to a powered-on computer
2) USB cable connected to a USB power adapter
3) Dock the camera to the included docking bay. Use a USB cable to
connect the docking bay to one of the following: A USB port on your
computer, or the included USB power adapter.
It will take approximately 4 hours to get the camera charged fully.
 Loading...