

Page 1

USER
MANUAL
EHTHaE-
h---
Page 2
CONTENTS
Operation
of
lgnition
Switch....... ,................ 5
6. lmportant Points and
Cautions
for
Starting
Engine .........
9
The
Control of Throttle Valve Handle.,,.,. ...... ........ ....,,1O
B.
lnspection
and
Maintenance
before Riding..,..... .....,.......1O
Inspection and Replenishment of Engine
Oil
.............. ............,,.... 11
Inspection of Fuel Leve|.........
.,...............,..
11
Transmission Oillnspection. ................,......12
lnspection
and
Adjustment
of Brake Free Play ..........12
Disc Brake Inspection
[Depending
on Models].......,.,,.,. . ..,........'13
Throttle Valve Handle
Clearance Adjustment.,.....,.,........ ..,..........14
Inspection
and
Maintenance
of Battery. ......,...........,..14
Steering Handle Front
Shock
Absorbers lnspection
..,.,...,...,.,
.....................,16
Checking and Changing Fuses ............. .16
Checking the Turn
Signal
Lights
and Horn ................17
Checking the
Front
and Rear Lights .............,,.,........17
Checking the
Brake Light ........
.................11
Checking for Fuel Leakage
,..,.,...,,.,..........17
Checking the Lubrication of Body's Various Mechanisms
.....,.,,,,.,,.
...........11
Checking the Spark Plug ,,....18
Checking the
Air
Cleaner ..,...18
9.
When
there is an Abnormal
Condition or a
Trouble ... . ..............,.19
Diagnosis when Engine
does
not
Start
........ ............'19
10, Periodical Maintenance
Schedule
.........
...............,..
.....2O
Page 3
1,
BEFORE
RIDING
This manual
describes
the correct
usage of this motorcycle
including
safety riding,
simple inspection
methods
and so on
For a more
comfortable
and safety riding, please
read
this manual
carefully.
Thank
you
very much
for
your
trust in
our
product
In
order
to maximize
your
motorcycle's performance,
a
periodical
inspection
and maintenance
should
be completely
carried out. We
recommend
that after riding
youf
new motorcycle
for the first
5OO kilometres, you
should take
your
motorcycle
to the
original dealer for
an
initial inspection,
Please
notice
that
you
loose
the warranty rights if you
miss
the
inspections.
a
In
case the motorcycle's
specifications
and
construction
are modified
and different from the
photos
and diagrams
on the owner's
manual/catalogues,
the
specifications
and construction of
the actual
motorcycle
shall
prevail.
2,
SAFE
RIDING
It
is very important
to
be
relaxed
and
clothe
properly
when
driving,
observe traffic
rush,
always drive
carefully and relaxed,
Usually, most
people
would ride
their newly bought
motorcycle
very carefully,
but
familiar with
their motorcycles,
they
tended to become
reckless
which may result in
regulations,
do
not
after they became
an accident,
d*
To remind you:
o
Please wear
a safety helmet,
and
properly
tighten
the chin
belt
when riding
a motorcycle.
o
Clothes with
open or loose
cuffs may be
blown by wind
and cause
the cuffs to
get
caught on the
steering handle
and thus
affects riding safety
So,
put
on clothes with tight
sleeves.
o
Hold
the steering
handle by both
hands when riding.
Never
ride with only
one hand.
o
Observe the
soeed limit.
o
Perform
periodical
maintenance
and inspection in
accordance
with the
schedule,
WARNINGII
o
To avoid
getting
burned
by exhaust
put
his/her
feet
on the
pedals.
.
After running,
the exhaust
pipe
is
pipe
when
taking
a
passenger.
Make sure
your
passenger
has
very hot,
be careful
not
to
get
burned when
conducting an
inspection
or maintenance.
a
After running,
the
exhaust
pipe
is very hot;
select
a suitable location
to
park
your
motorcycle
to
avoid others
getting
burned
by the exhaust
pipe.
,/"
::;_._f
.
.":..,1e
.
.;;"
..
-
--:
; K$:'i;al-i.
:.:fi*i-iFiltr'|
:
'
i-"":'!rt:r:ri":
il':
i':i''l '"'
L
I
'-":-
y1.
ii;;;1..1,;"1r
l
t
'
tlt-'€
"-:ii:''l
:
4
'
':'i')
i-
!:
ti
-j
'-{i:
'3
I
i
':':l?-
::i-ti{
i:'"ri:rLf
L: -lia
,'
'.-.
I
.-:'r:*":*
---*-:_
: :
L-:tl
l1*r
Page 4

CAUTION:
Modified
motorcycle
will
affect
its
structure
or
performance,
anc
cause
poor
engrne
operation
or
exhaust
noise,
which
will result
in
shortening
the
motorcycle's
service
life.
Besides,
modification
rs
illegal
and
does not
conform
to
the
oriqinal
design
and
specifications.
A modified
motorcycle
will
not
be
covered
by warranty,
Therefore,
do-not
modify
your
motorcycte
at
will
3.
RIDING
TIPS
o
Keep
the related
parts
of
your
body
such
as arms,
palms,
lumbar,
and toes
relax
and ride
with
the most
comfortable posture
in
order
to
be able
to
react quickly
whenever
it is necessary,
.
Rider's postufes
will
great
influent
riding
safety.
As for
the riding position,
please
alwayd
keep
your
body's
gravity
on
the
centre
of seat,
lf your
body's gravity
is
placed
on
the rear
of seat,
the
front
wheel
load
will
be reduced;
this
can
cause
steering
handles
shaking.
Riding
in
this way
is
cangerous.
r
lt will
be
much easier
to
make
a turn
if rider
inclines
his
body
inward
when
iurning.
On the
other
hand,
the rider
willfeel
unstable
if
his
body
and
the
motorcycle
do not
incline,
.
On bumpy,
unlevelled
and
slope
road,
the
road
condition
may
change
very
often.
Driving
on
these
roads
may
become
very
unstable.
To
drive
safely
and
smoothly,
rcnow your
road
condition
before
hand,
slow
down,
and hold
the handle
firmly
with
aid
of
your
shoulder
o
Suggestion:
Do
not
load
objects
on
the front
pedals
unnecessarily,
to avoid
affecting
the riding
safety
and the
operation
of steerinq
handle.
CAUTION:
Feeling
on the
handle
is
different
when
the vehicle
is
with
load
or without
load.
Overload
will make
steering
handle
swing
and
then influent
riding
safety.
Thus, please
be
ware
of load
weight,
CAUTION:
o
Please
do not load
cargo
or luggage
on
places
where
are not
designed
for loading
to
prevent
danger
and
damage.
a
Do not place
rags
or similar
objects
between
ihe
storage
compartment
and
engine
to avoid
engine
seizure
because
of inadequate
engine
oil
supply.
SUGGESTION
To
maximize
the
motorcycle's
performance
and
prolong
its
service
life:
The
flrst
month
or
first
5OOkm
is
the wear-
in
period
foi
ttre
engine
and
components.
Avoid
rapid
acceleration
and top
speed
on
a long
distance.
Page 5
4. USE
GENUINE
SPARE
PARTS
In
order
to maintain
the motorcycle's
best
performance,
each
part's
quality,
material,
and machined
precision
must
conform
to
the design
requirements.
"GENERIC
Spare
parts"
were
made from
the
same high quality
materials
used for
the original
motorcycle.
No
parts
would
be sold
to the market
until
they
could
meet
the
designed
specifications
through
sophisticated
engineering
and
stringent
quality
control,
Therefore,
it
is necessary
to
purchase
"GENERIC
Spare Parts" from
iGENERIC
Authorized
Dealers"
when
replacing
spare
parts.
lf
you
buy cheap
or fake
substitute
parts
from
the marker, no
guarantee
can be
provided
either
for
the
quality
or durabllity,
Also,
it may result
in
unexpected
troubles
and
lower
the motorcycle's performance.
o
Always
use
GENERIC
Spare Parts
to keep your
motorcycles
pure
blood
and
to ensure its long
service
life.
5,
USE
OF EACH
COMPONENT
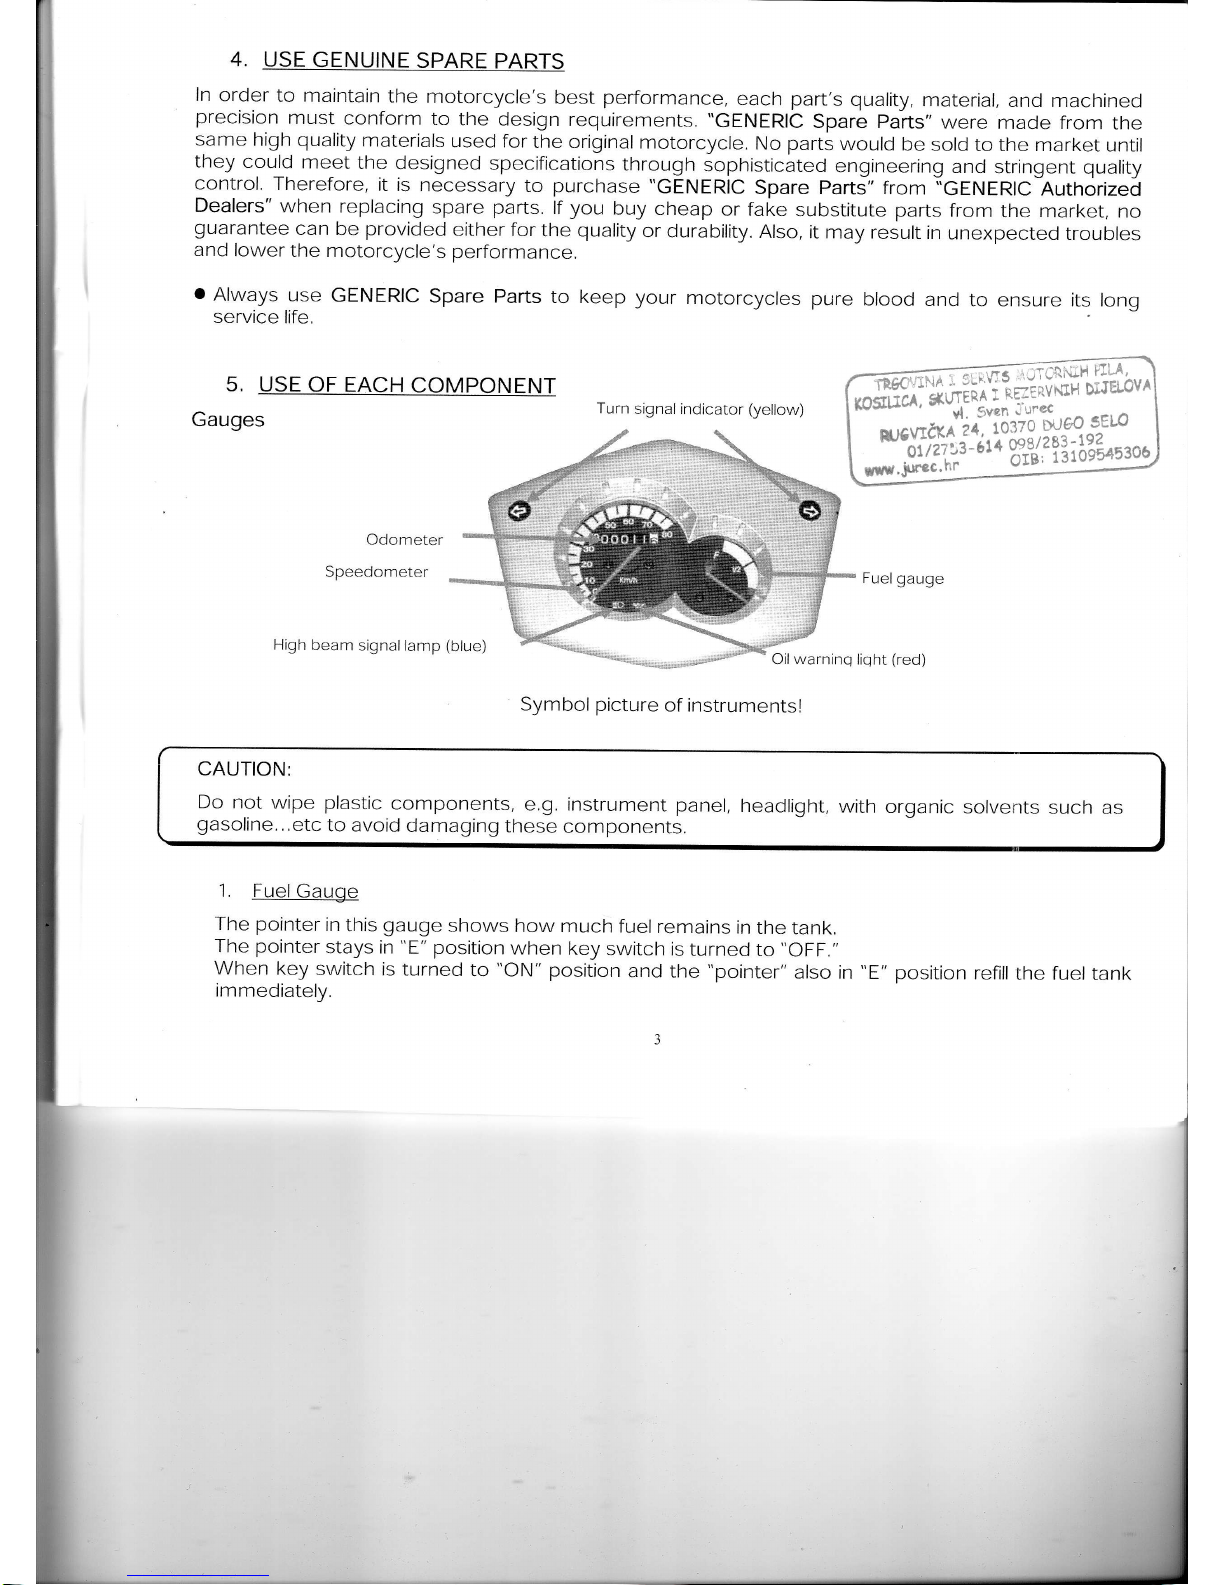
Gauqes
Turn
signal indicaaor
(yellow)
Odometer
Snoarinm ator
Fuel gauge
High
Sssrn
signal lamp
(blue)
Oil
warninq
liqht
(red)
Symbol
picture
of instrumentsl
.1.
FuelGauge
The pointer
in
this
gauge
shows
how
much fuel
remains
in
the
tank.
The pointer
stays in
"E"
position
when
key
switch is
turned
to
"OFF,"
When
key
switch
is turned
to
"ON"
position
and
the
"pointer"
also in
"E"
position
reflll
the fuel tank
immediately.
CAUTION:
Do not
wipe
plastic
components,
e.g,
gasoline.,.etc
to avoid
damaging
these
!nstrument
panel,
components.
headlight,
with
organic
solvents
such
as
Page 6
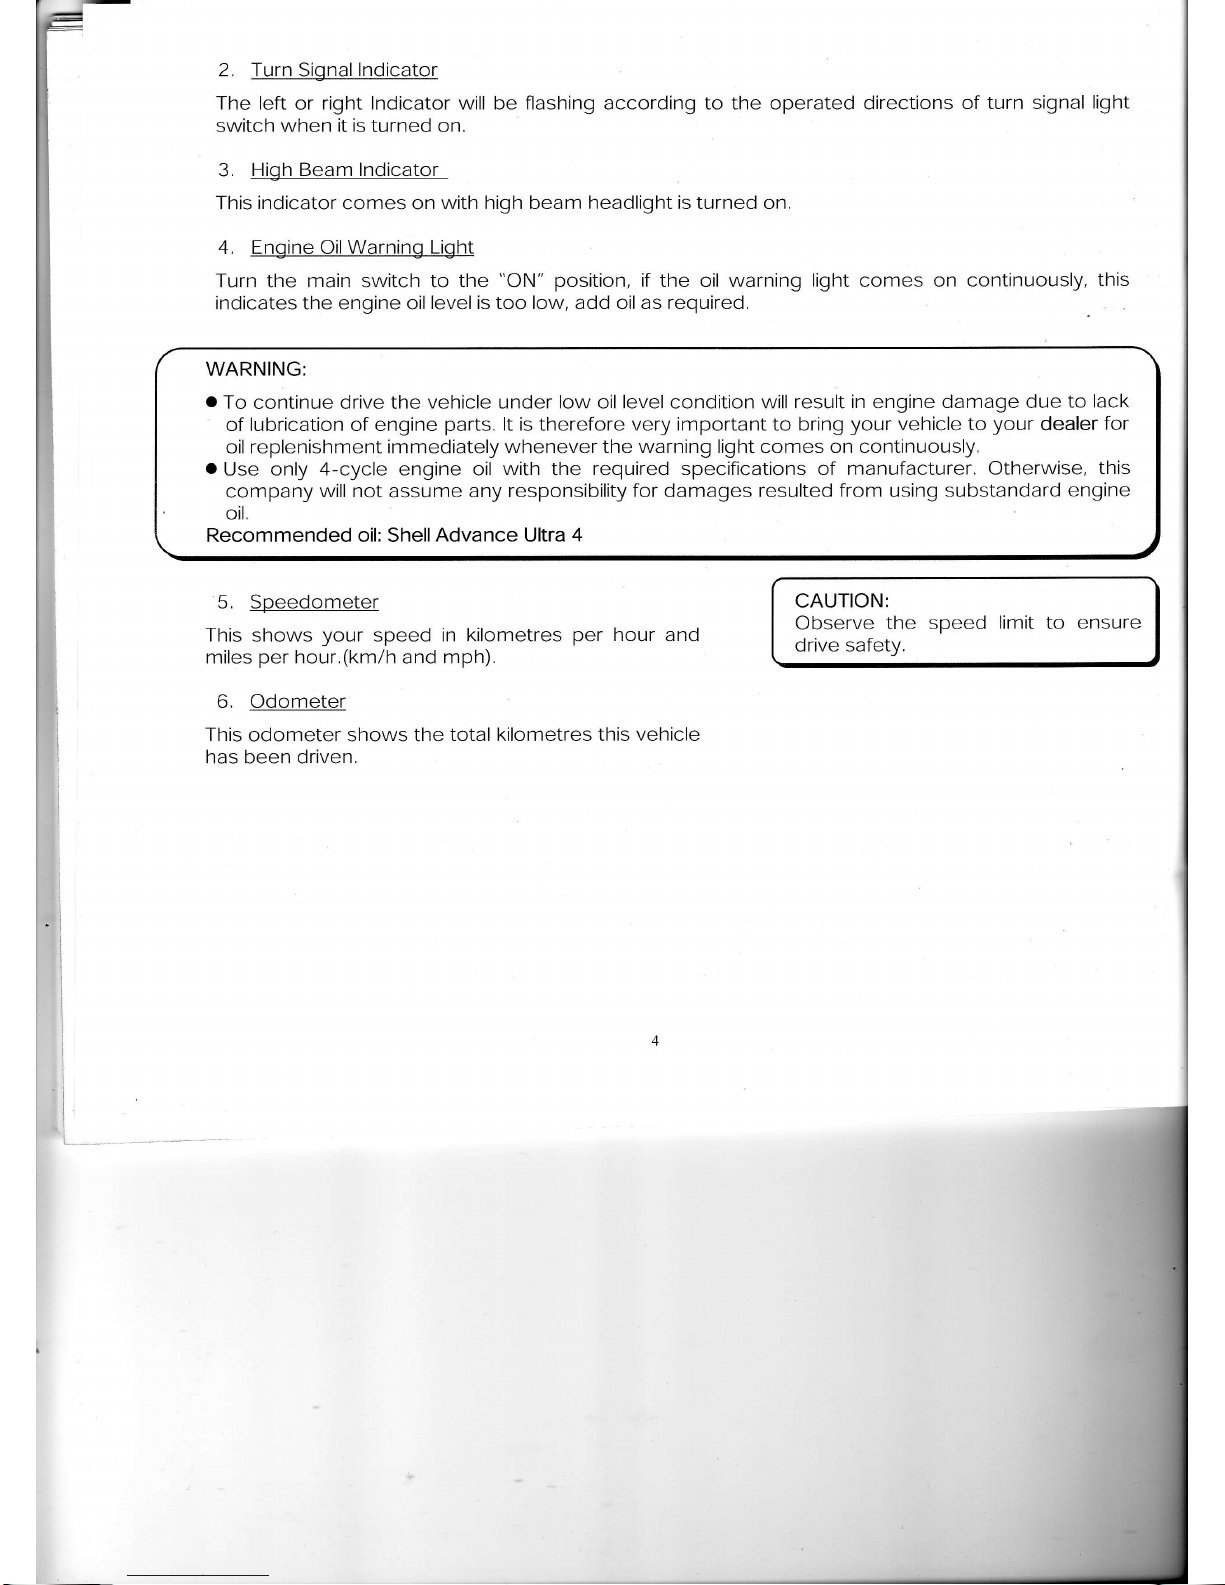
2. Turn Signal lndicator
The left
or
right Indicator will be flashing according to the operated directions
of turn signal
light
switch
when it is
turned on.
3.
High Beam Indicator
This
indicator
comes on
with high beam headlight is turned on.
4. Engine OilWarning Light
Turn the main switch to the
"ON"
position,
if the oil warning light comes on continuously,
this
indicates the engine oil
level is
too
low, add oil as required.
WARNING:
.
To continue drive the
vehicle under low oil level condition
will result in
engine damage
due to
lack
of lubrication of engine
parts.
lt is
therefore
very important
to
bring
your
vehicle to
your
dealer
for
oil
replenishment immediately whenever
the warning light
comes
on continuously.
o
Use only
4-cycle engine oil with the
required
specifications
of manufacturer. Otherwise,
this
company will
not
assume any
responsibility for damages resulted
from
using
substandard
engine
oil.
Recommended oil: ShellAdvance Ultra
4
CAUTION:
Observe
the speed limit to
ensure
drive
safetv.
5. Speedometer
This
shows
your
speed in kilometres
per
hour
and
miles
per
hour.(km/h and mph).
6. Odometer
This
odometer shows the
total kilometres this
vehicle
has been driven.
*l
&.,
Page 7
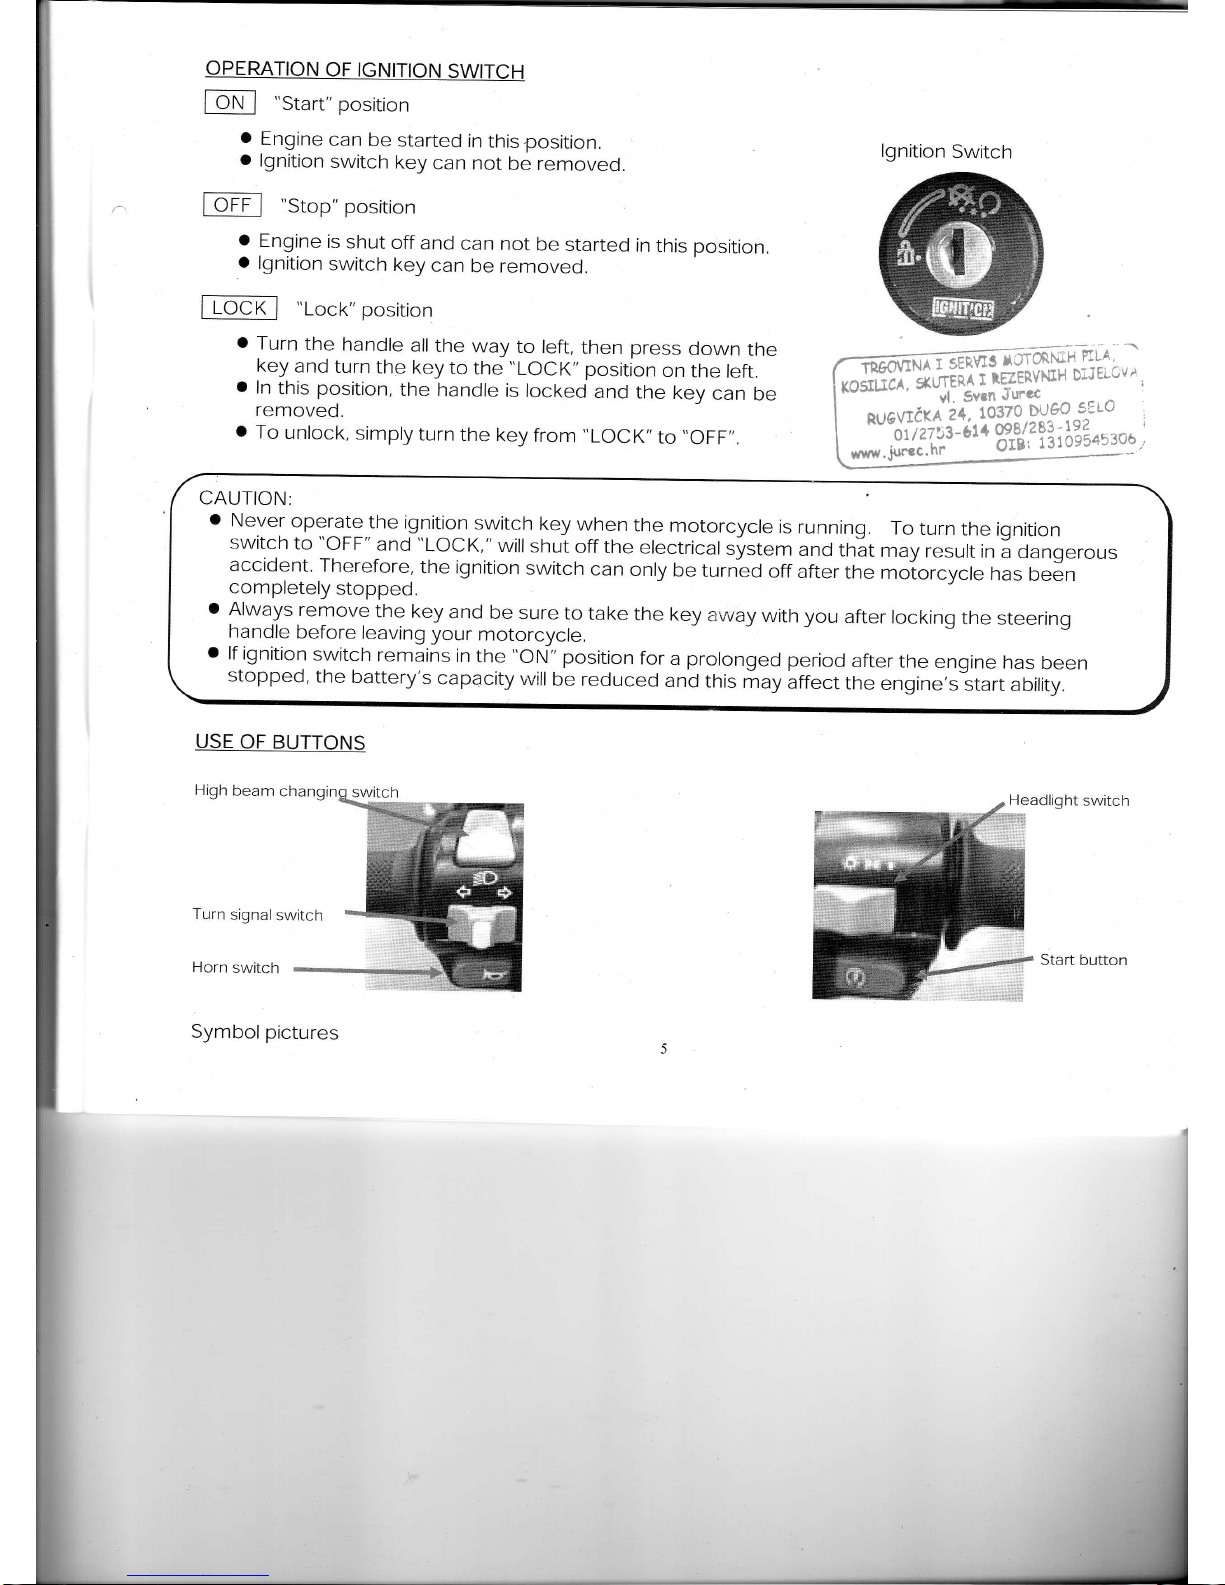
OPERATION
OF IGNITION
SWITCH
toN
l
"srart"
posilion
o
Fngine
can
be
started
in
this
position
o
lgnition
switch
key
can not
be removed.
foFF-l
"Srop"
position
o
Engine
is
shut
off
and
can
not
be
started
in
this
position
o
lgnition
switch
key
can
be removed.
o
Turn
the
handle
all
the
way
to left,
then
press
down
the
key
and
turn
the
key
to
the
"LOCK"
position
on
the
left.
o
In
this position,
the
handle
is
locked
and
the
kev
can
be
removed.
I
To
unlock,
simply
turn
the
key from
"LOCK"
to
',OFF,,.
CAUTION:
o
Never
operate
the ignition
switch
key
when
the
motorcycle
is running.
To
turn
the ignition
switch
io
"OFF"
and
"LOCK,"
will
shut
off
the
electrical
system
and
thit
may
result
in
i dangerous
accident.
Therefore,
the
ignition
switch
can
only
be turn"ed
off
afier
the
moiorcycte
has
been
completely
stopped.
'
Always
remove
the key
and
be
sure
to take
the key
avuay
with you
after
locking
the
steering
handle
before
leaving
your
motorcycle.
t
lf ignition
switch
remains
in
the
"O
N
"
position
for a prolonged
period
after
the
engine
has
been
stopped,
the
battery's
capacity
will
be reduced
and
this
may
affect
the
engine'sltart
ability.
[OCn
"Lock"
posirion
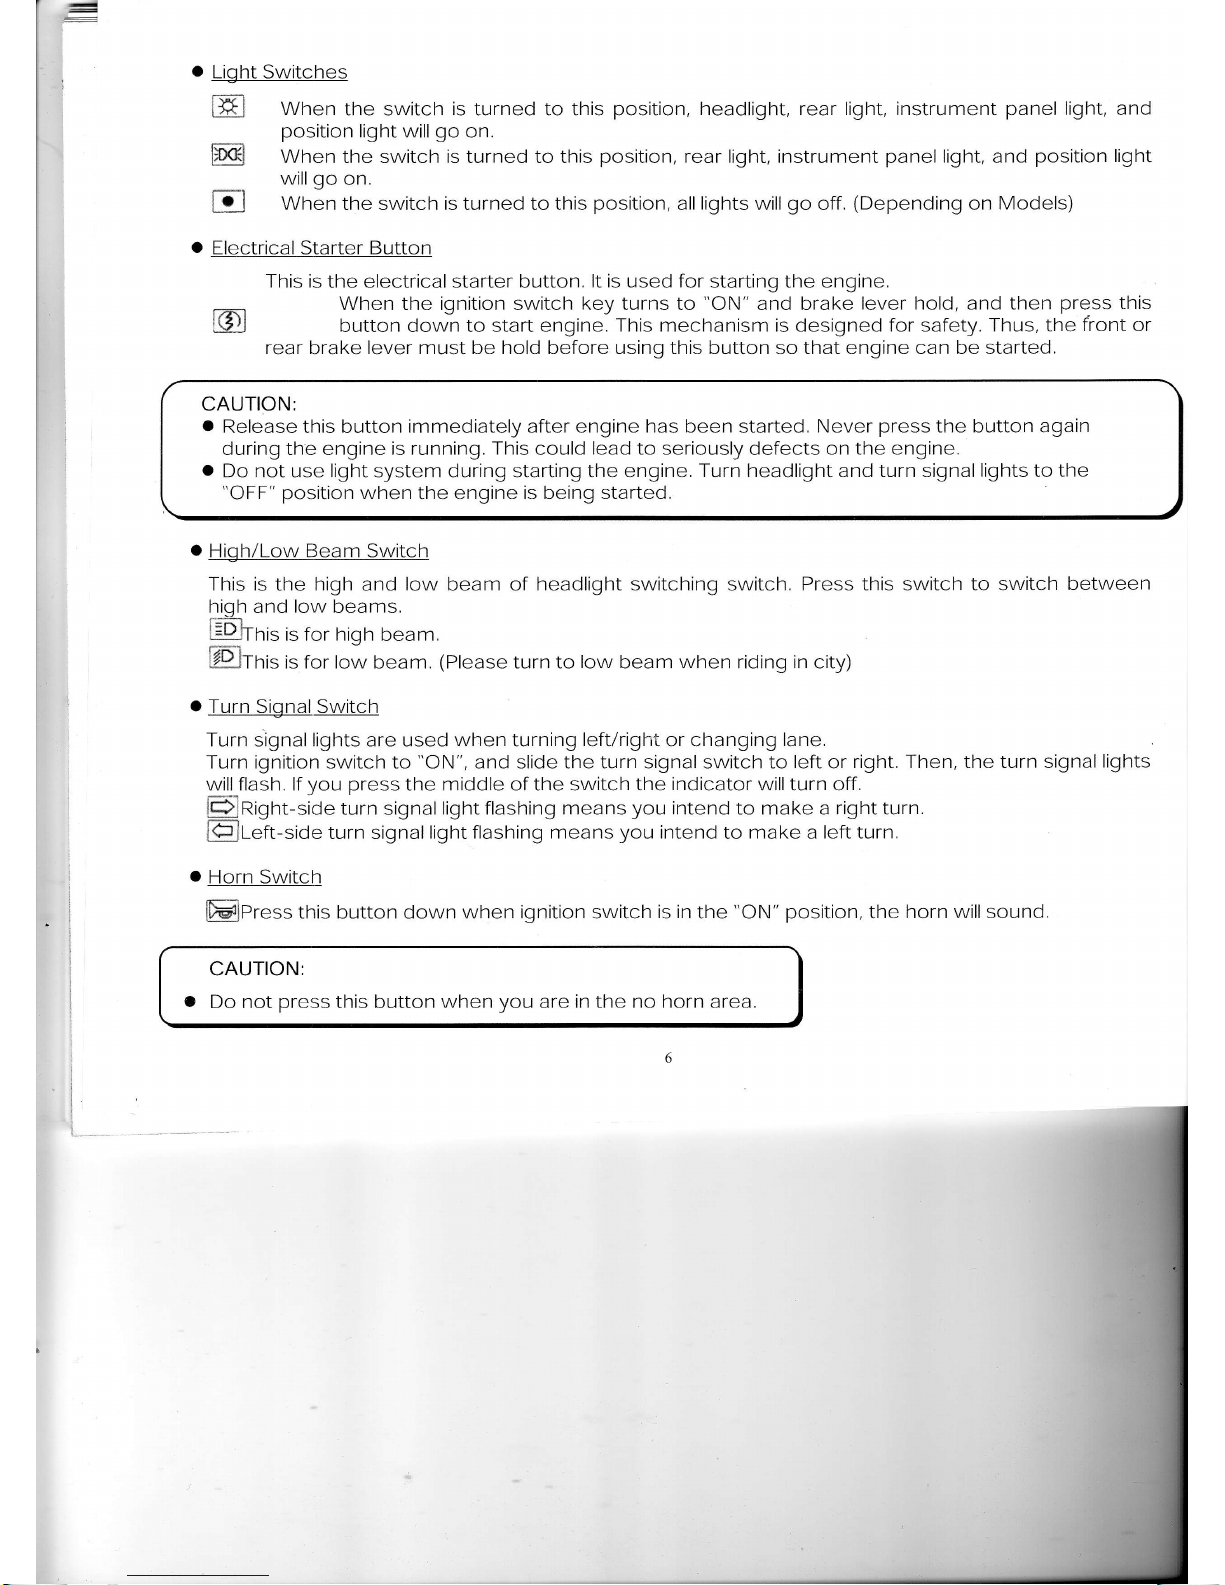
USE
OF
BUTTONS
High
beam
ch
Turn
signal
switch
Horn
switch
Symbol pictures
Headlight
switch
Start
button
lgnition
Switch
Page 8
J
*
Light Switches
m
When
the switch is turned to this
position,
headlight,
rear light, instrument
panel
light, and
position
light will
go
on.
W
When the switch is turned to this
position,
rear light, instrument
panel
light,
and
position light
willgo
on.
When the switch is turned to this
position,
all
lights
will
go
off.
(Depending
on
Models)
o
Electrical
starter
Button
This is the electrical starter button.
lt is
used
for
startinc the enaine.
When the ignition switch key turns to
"ON"
and brake
lever hold,
and
then
press
this
button down to start engine.
This mechanism is
designed
for safety, Thus, the
front or
rear
brake
lever must be hold before usinq this button so that enqine can be started.
CAUTION:
a
Release this button immediately after engine
has
been started.
Never
press
the button again
during the engine is running.
This
could
lead to
seriously defects
on the engine.
a
Do not use light system during starting the engine.
Turn
headlight and turn
signal lights to the
"OFF"
position
when
the
engine is being started,
o
High/Low Beam Switch
This is the
high
and low beam of
headlight switching
switch,
Press this switch to switch
between
hioh and
low
beams.
l!Dlrnis
is for hich beam.
@]rhi=
is for loir
beam.
(Please
turn to
low
beam when riding in city)
o
Turn
Signal
Switch
Turn signal lights are used when turning
left/right
or changing
lane.
Turn ignition switch to
"ON",
and slide the turn signal switch to
left
or
right. Then, the turn signal
lights
willflash. lf
you
press
the middle of the
switch the
indicator
willturn off.
1*]Right-side
turn signal
light flashing means
you
intend to make a right turn.
l{?lleft-siOe
turn signal
light flashing means
you
intend
to
make a left turn,
o
Horn Switch
lffilPress
this button
down
when ignition switch is
in
the
"ON"
position,
the
horn willsound.
o
CAUTION;
Do not
press
this button
when you
are
in
the
no horn
area.
m
t*--
Page 9
SADDLE
LOCK
o
unlock:
Insert ignition switch
key into the
lock on the
lower left
of the saddle,
and turn the
key to the
right. Then, the
saddle can
be lifted uo.
o
Lock:
Press the
saddle down
and it
will be loeked
automatically.
CAUTION:
o
Please do
not
put
the
key
into the
storage
compartment
after saddle
is
unlocked
to
prevent
the
key
from
being
locked
inside and can
not
be
removed
when the
saddle
is locked.
o
Be sure
to
remove the
key after
the
saddle
has
been
locked,
STORAGE
BOX
a
This
box
is located under
the saddle,
o
Maximum
load
capacity:
5kg.
o
Do not store valuables
in the box.
o
Please
make sure that seat
cushion
had been
locked completely
after it
was down.
o
Take out
valuables before
washing
to avoid
wetting these
objects,
a
Do
not
place
thermal
sensitive
objects
in the
box because
of engine's
heat and
high
temperature
inside.
FUEL TANK CAP
1. Insert ignition
switch key
into the
cao can be
removed.
lock
on the fueltank
cap, and lurn
the key
to the
right, then
the
2. Do not fill above
the fuel upper
limit when
refuelling.
3
To lock the
fuel tank
please
specially
take
care that the
mark on the cap
fits to
the
mark on the
vehicle and
press
down the cap
in
parallel
until a
"click"
sound
is
heard. That
means the
cap
is
locked
(the
ignition key
now turns back
to the
left
slightly).
To
remove the ignition
key,
simply
turn
the key to
the left and then
remove
it.
WARNING:
o
Main stand
should be
put
down on
the
ground,
engine
should
be shut off
and flames
should
be
strictly
prohibited
to ensure
safety
when refueling.
o
Do not fill above
fuel upper
limit when
refueling. Otherwise,
fuelwill
flow out through
a
hole on the
nan r-har- ma' r'rarp6ge
the body'S
painfing,
in SeriOUS CaSeS,
it may CaUSe
a
fire
to
burn down
the
L-dP Lr rdL
| | rdy udl
motorcycle.
.
Make sure
the cap has been
tightened
properly.
Page 10
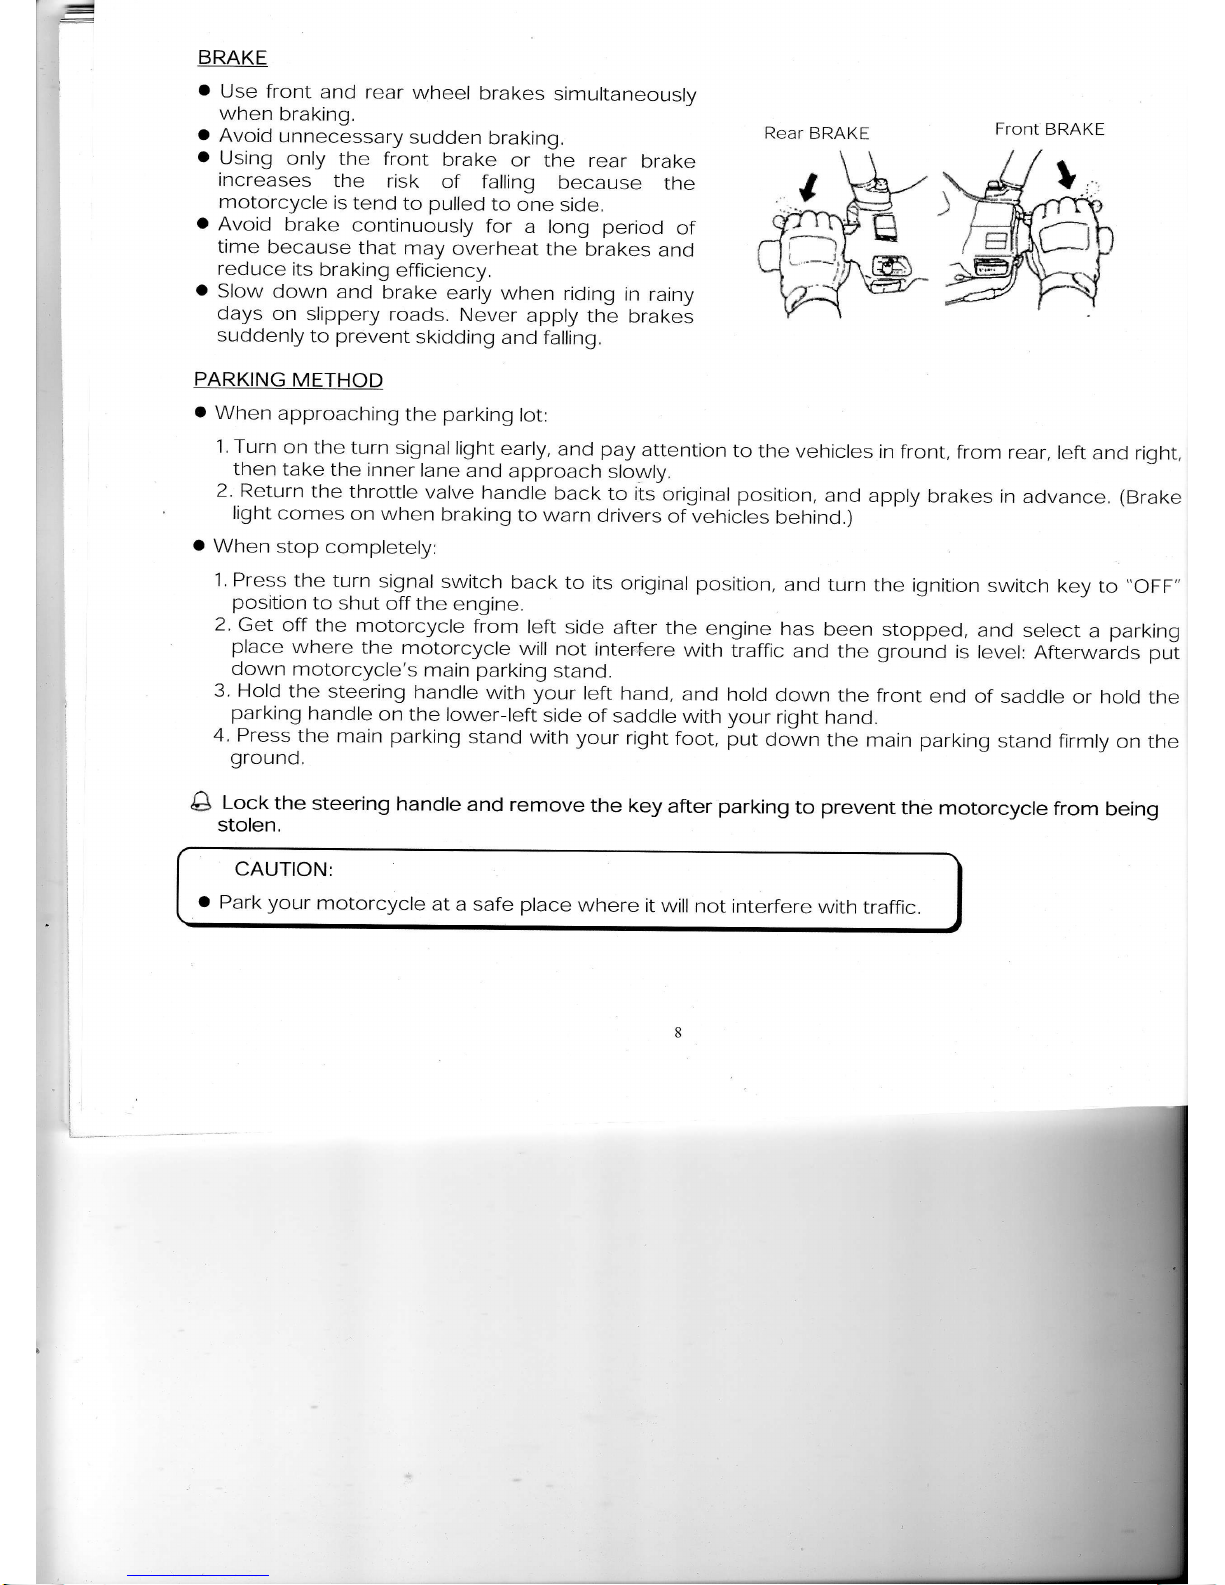
BRAKE
a
Use front
and
rear
wheel
brakes
simultaneously
when
braking.
a
Avoid
unnecessary
sudden
braking.
a
Using
only
the front
brake
or
the rear
brake
increases
the risk
of falling
because
the
motorcycle
is
tend
to
pulled
to one
side.
a
Avoid
brake
continuously
for
a long period
of
time
because
that may
overheat
the
brakes
and
reduce
its
braking
efficiency.
o
Slow down
and brake
early when
riding
in
rainy
days
on
slippery
roads.
Never
apply
the brakes
suddenly
to
prevent
skidding
and falling.
PARKING
METHOD
o
When
approaching
the
parking
lot:
1. Turn
on
the turn
signal
light
early,
and
pay
attention
FTont
BRAKE
to the vehicles
in front,
from rear.
left
and right,
(Brake
then take
the inner
lane
and approach
slowly,
2.
Return
the
throttle
valve
handle
back to its
original
position,
and apply
brakes
in advance.
light
comes
on when
braking
to warn
drivers
of
vehicles
behind.)
.
when
stop completely:
1. Press
the
turn
signal
switch
back
to its
original position,
and
turn
the ignition
switch
key
to
"OFF"
position
to
shut
off the
engine.
2'
Get
off the
motorcycle
from
left
side after
the
engine
has been
stopped,
and select
a
parking
place
where
the motorcycle
will not
interfure
with
traffic
and
the
ground
is
level: Afterwards pu-t
down
motorcycle's
main
parking
stand.
3. Hold
the
steering
handle
with your
left hand,
and
hold
down
the front
end
of saddle
or hold
the
parking
handle
on
the lower-left
side
of saddle
with
vour
riqht hand.
4. Press
the main
parking
stand with your
right
foot,
put
odwn
the main
parking
stand
firmly
on the
ground.
&
Loct
the
steering
handle
and remove
the key
after
parking
to
prevent
the motorcycle
from
being
stolen,
CAUTION:
o
Park your
motorcycle
at
a safe
place
where
it
will not
interfere
with
traffic.
"i
I
t_
Rear
BRAKF
Page 11
CAUTION:
o
please
check
if the engine
oil
and
fuel
volume
are
adequate
or
not,
before
saarting
engine.
o
To start
engine
the
miin
parking stand
must be
firmly
on
the
ground and
the
brake
is applied
on
the
rear
wheelto
prevent
the
motorcycle
from
moving
forward
suddenly'
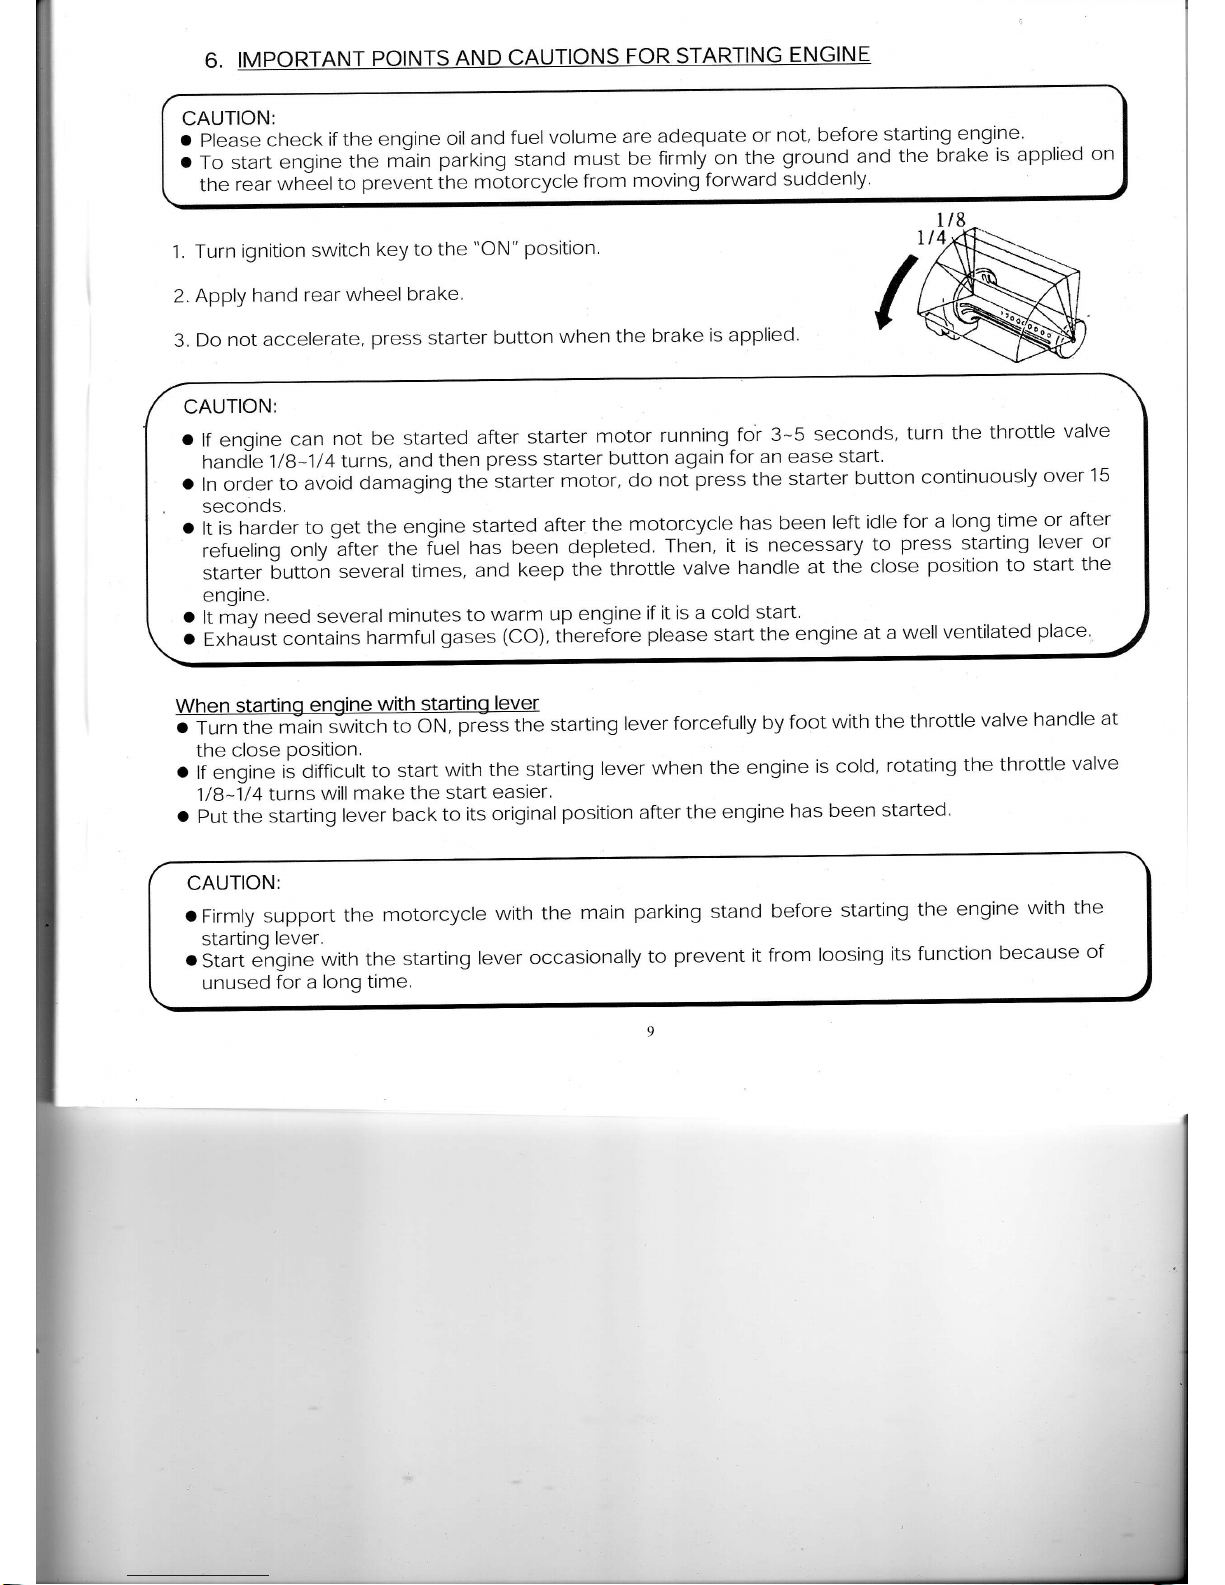
1.
Turn
ignition
switch
key to
the
"ON"
position
2.
Apply
hand
rear
wheel
brake,
3.
Do
not accelerate,
press
starter
button
when
the
brake
is applied.
CAUTION:
o
lf engine
can
not be
started
after
starter
motor
running-for
3-5
seconds,
turn
the
throttle
valve
handle
1/B-1/4
turns,
and
then
press
starter
button
again
for an ease
start,
o
ln order
to
avoid
damaging
the
starter
motor,
do
not
press the
starter
button
continuously
over
15
seconds.
o
lt
is harder
to
get the
engine
started
after
the
motorcycle
has
been
left
idle
for a
long
time
or after
refueling
ontyifter
the
iuel
has
been
depleted.
Then,
it is
necessary
to
press
starting
lever
or
starter
button
several
times,
and
keep
the
throttle
valve
handle
at
the
close
position to
start
tne
englne,
r
lt may
need
several
minutes
to
warm
up
engine
if it is a
cold
start.
o
Exhaust
contains
harmful
gases
(CO),
therefore
please start
the
engine
at
a
well
ventilated
place.
When
starting
engine
with
starting
lever
o
Turn
the
main switct,
to Otrt,
pr5.s the
starting
lever forcefully
by
foot
with
the
throttle
valve
handle
at
the
close
position
o
lf engine
is
difficult
to
start
with
the
starting
lever
when
the engine
is
cold,
rotating
the
throttle
valve
1/B-1/4
turns
will
make
the
start
easier'
o
put
the starting
lever
back
to
its original
position after
the engine
has
been
started.
II
CAUTION:
o
Firmly
support
the
motorcycle
with
the
main
parking
stand
before
starting
the
engine
with
the
starting
lever,
a
start
e"ngine
with
the
starting
lever
occasionally
to
prevent it from
loosing
its function
because
of
unused
for a
lonq
time.
9
Page 12
7.
THE BEST WAY TO DRIVE OFF
o
Turn on the turn
signal
light
before
moving,
and make
sure no vehicle is coming from
behind.
Then,
drive off.
o
During driving, attention
should be
paid
to
vehicles
ahead
and behind and keep highly alert at all times.
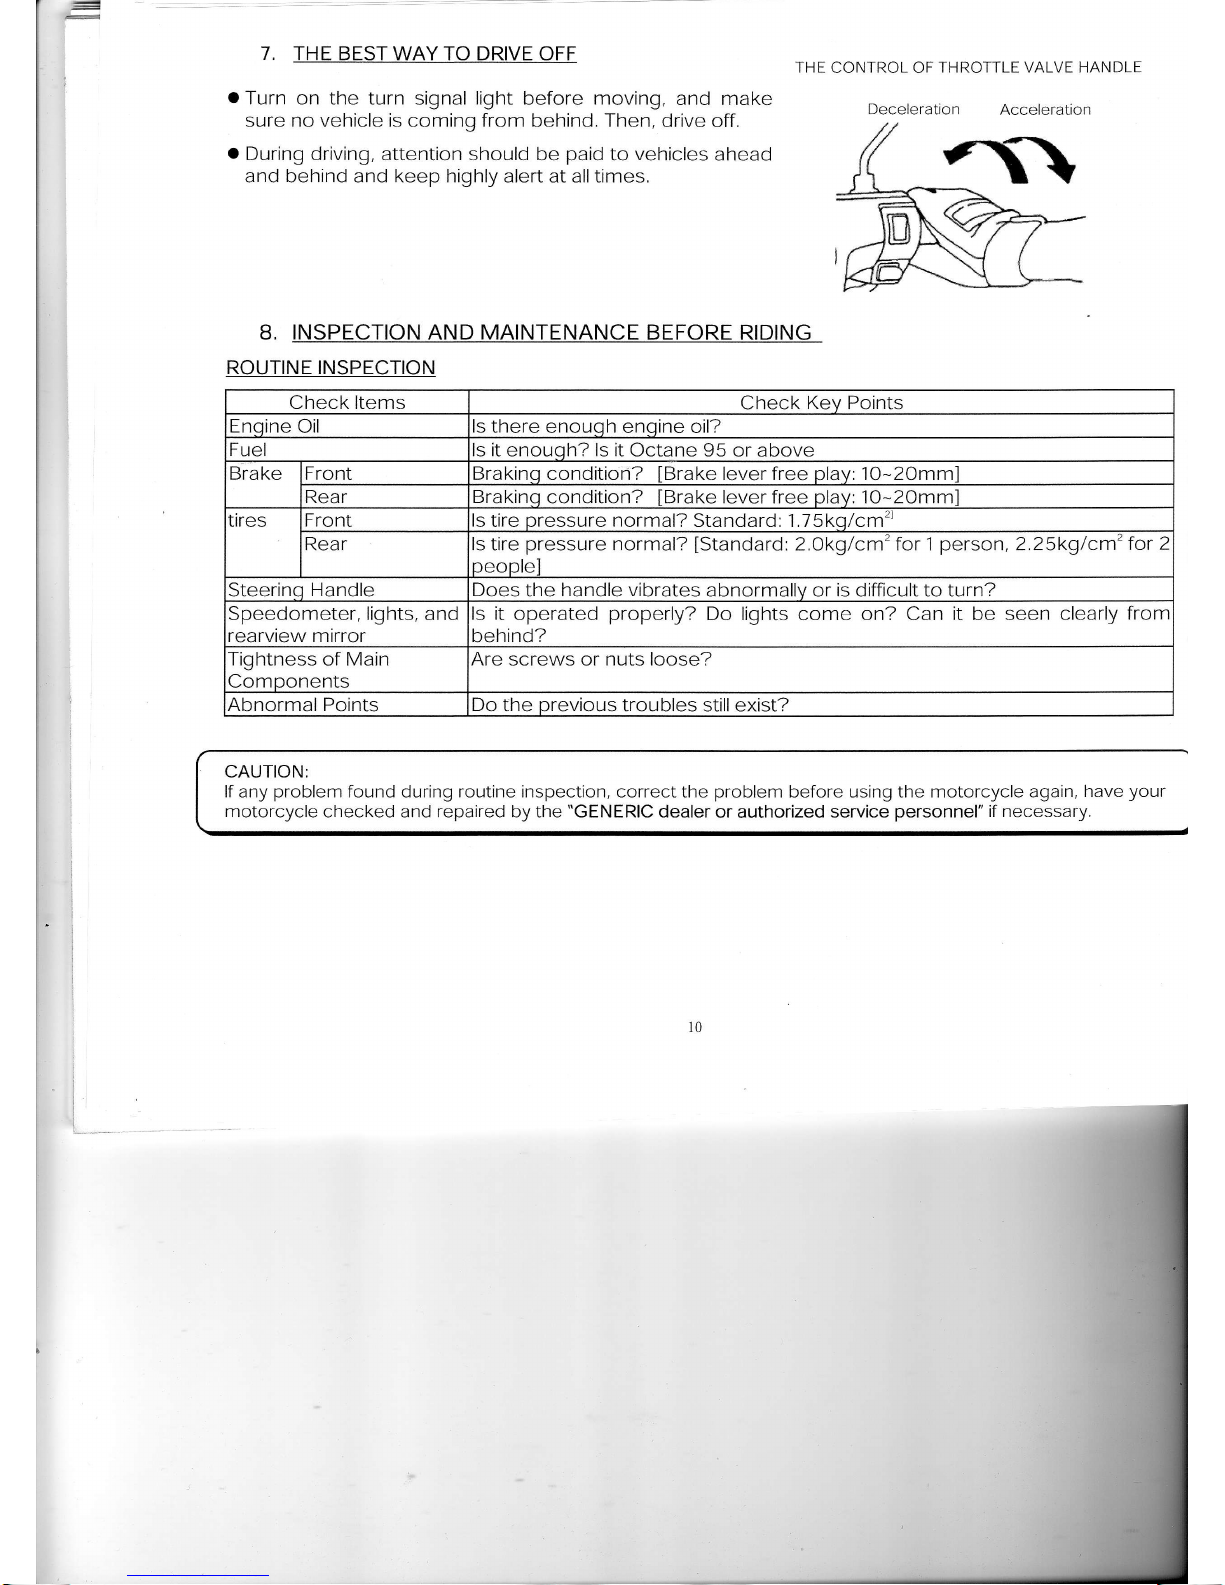
THF
CONTROL OF
THROTTLE VALVE HANDLE
Deceleration
Acceleration
B. INSPECTION AND MAINTENANCE BEFORE RIDING
ROUTINE INSPECTION
CAUTION:
lf any
problem
found during foutine inspection, correct the
problem
before using the motorcycle again,
have
your
motorcycle
checked and
repaired
by the
"GENERIC
dealer
or authorized
service
personnel"
if necessary.
Check ltems
Check
Kev Points
Encine
Oil
ls there
enouoh encine oil"
r, ,^l
I UEI
ls
it
enouch?
ls
it Octane 95 or
above
Brake Front Brakinc cond tion?
IBrake
lever free
olav:
1O-2Omml
Rear Brakinc
cond
tion?
[Brake
lever free
olav:
1O-2Omml
0res
Front ls
tire oressure
normal?
Standard : 1.-/ 5kcs/cm'
Rear ls tire
pressure
normal?
[Standard:2.Okglcm'for
1 person,2.25kg/cm'for 2
oeonlel
Steerinq
Handle Does
the
handle vibrates
abnormallv or
is
difficult to turn?
Speedometer,
lights,
and
rearview mirror
is it
operated
properly?
Do lights come on? Can it be seen clearly
from
behind?
Tightness
of
Main
Components
Are
screws or
nuts loose?
Abnormal Points Do the
Drevious
troubles still exist?
Page 13
utper limit
ldwe.limlt
WARNING:
'
To
continue
drive
the
vehicle
under
low
oil level
condition
will
result
in
engine
damage
due
to
lack
of
lubrication
of engine
parts
lt is
therefore
very
important
to
bring your
vehicle
to
your
clealer
for
oil
replenishment
immediately
whenever
the
warning
light
comes
on
continuously.
o
use
only
4-cycle
engine
oil meeting
the
speciiicJtions.
otherwise,
this
company
will
not
assume
any
responsibility
for
damages
resulted
from
using
substandard
engine
oil,
Recommended
oil:
ShellAdvance
Ultra 4
INSPECTION
AND
REPLENISHMENT
OF
ENGINE
OIL
INSPECTION:
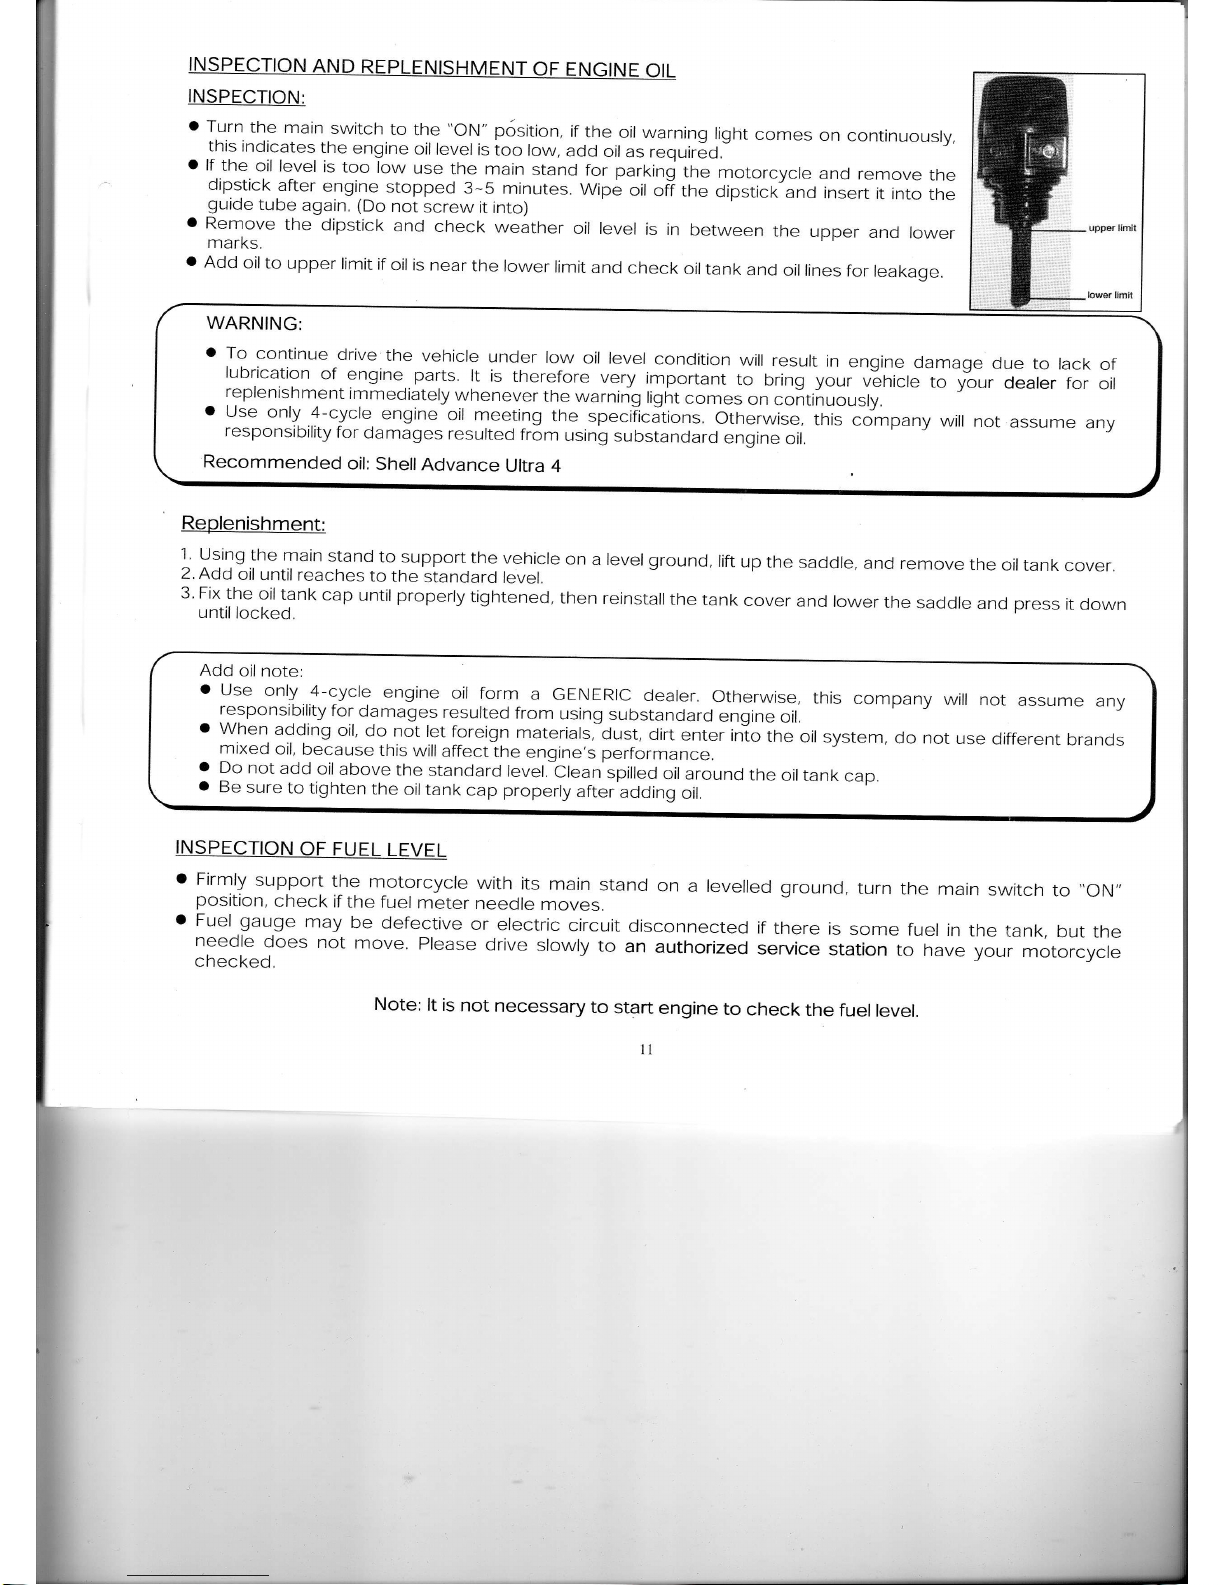
o
Turn
the main
switch.to
the
"oN"
position,
if
the
oil warning
light
comes
on
continuousty,
this indicates
the
engine
oir
lever
is
too row,
add
oir
as recuir6d.-
o
lf
the
oil level
is
too
low
use
the
main
stand
for parking
the
motorcycle
and
remove
the
dipstick
after
engine
stopped
3-5
minutes.
Wipe
oil
ofi the
dipstick"and
insert
it
into
the
guide
tube
again.
(Do
not
screw
it into)
o
Remove
the
dipstick
and
check
weather
oil level
is in
between
tne
upper
and
lower
marks.
'
Add
oil
to upper
limit if
oil is near
the lower
limit
and
check
oil
tank
and
oil lines
for
leakaqe.
Replenishment:
1.
Using
the
main
stand
to
support
the vehicle
on
a
2. Add
oil until
reaches
to
the
standard
level,
3. Fix
the
oil
tank
cap
until properly
tightened,
then
until
locked.
level
ground,
lift
up
the
saddle,
and remove
the
oil
tank
cover.
relnstall
the
tank
cover
and
lower
the
saddle
and
press
it
down
Add
oil
note:
o
use
only
4-cycle
engine
oil
form
a
GENERIG
dealer.
otherwise,
this
company
will not
assume
any
responsibility
for
damages
resulted
from
using
substandard
engine
oil.
'
when
adding
oil,
do not
let
foreign
materials,
dust,
dirt
enter
into
the
oil
system,
do not
use
different
brands
mixed
oil,
because
this
will
affect
the
engine,s performance.
'
Do
not
add
oil
above
the
standard
level.-clean
spilled
oil around
the
oil
tank
cap.
o
Be
sure
to tighten
the
oil tank
cap properly
after
adding
oil,
INSPECTION
OF FUEL
LEVEL
o
Firmly
support
the
motorcycle
with
its
main
stand
on
a levelled
ground,
turn
the
main
switch
to
.,oN,,
position,
check
if
the
fuel
meter
needle
moves.
'
Fuel gauge
may
be
defective
or
electric
circuit
disconnected
if
there
is
some
fuel
in
the tank,
but
the
needle
does
not
move.
Please
drive
slowly
to
an
authorized
service
station
to
have your
motorcycle
checked.
Note:
lt is
not
necessary
to
start
engine
to
check
the
fuel
level.
11
Page 14
-
TRANSMISSION
OIL
INSPECTION
AND CHANGE
INSPECTION:
a
The
transmission
oil
levelcan
only
be checked
by
an authorized
Dealer'
.
lf the Oil
will be
chanqed
O,1L
must
be
filled
in the
transmission.
OIL
CHANGE:
o
Never
change
the Oil
by
your own.
Let
your dealer
do
each
modification
and
service.
lf
you do any
change
by
your own
you will
loose
allyour
assurance
Recommended
Oil: ShellAdvance
Transmission
BOW
90
INSPECTION
AND ADJUSTMENT
OF
BRAKE
FREE
PLAY
INSPECTION:
(Brake
lever
free
play
must
be
checked
with
the engine
shut
off
)
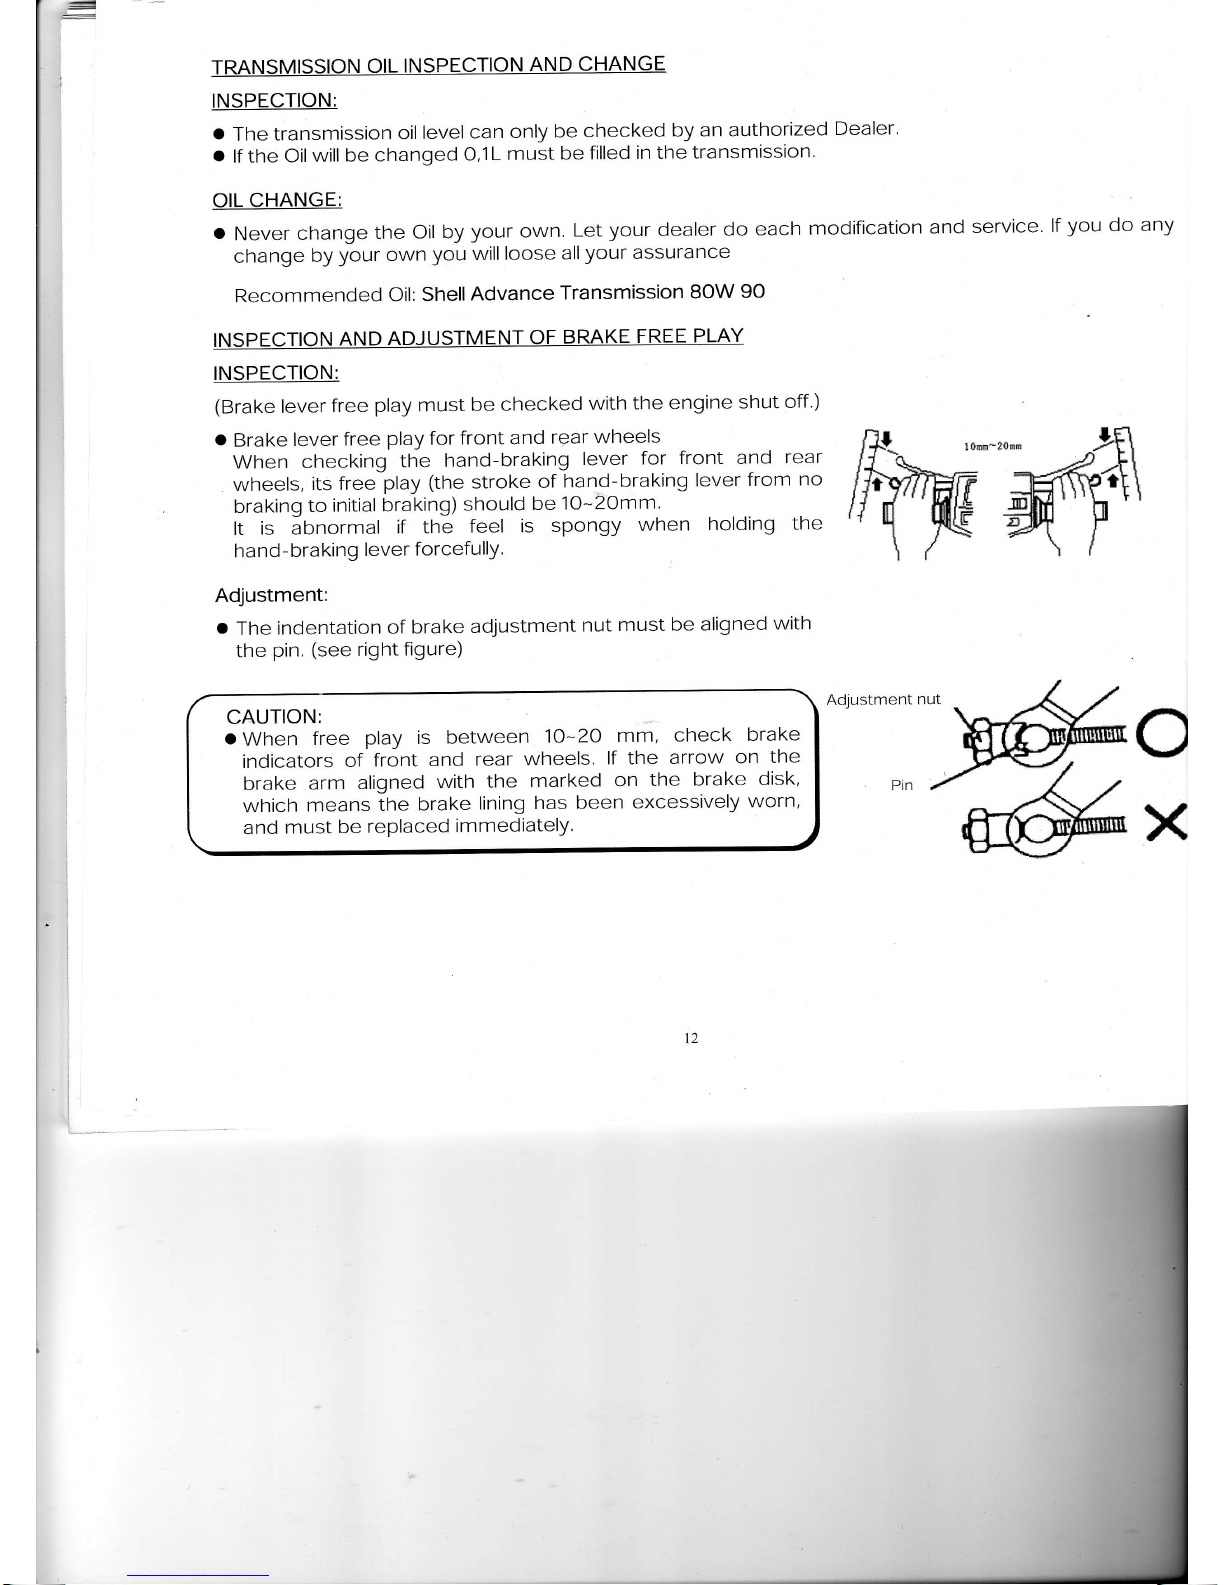
o
Brake
lever
free
play
for front
and
rear
wheels
When
checking
the
hand-braking
lever
for
front and
rear
wheels,
its free
play
(the
stroke
of
hand-braking
lever
from
no
braking
to
initial braking)
should
be
1O-2omm.
It
is abnormal
if the
feel is
spongy
when
holding
the
hand
-
bra
king
lever
forcefullY.
Adjustment:
o
The
indentation
of brake
adjustment
nut
must be
aligned
with
the
pin.
(see
right
figure)
CAUTION:
o
When
free
play
is between
1O-2O
mm, check
brake
indicators
of
front
and
rear
wheels.
lf the
arrow
on
the
brake
arm
aligned
with the
marked
on
the
brake
disk,
which
means
the
brake
lining
has
been
excessively
worn,
and
must be
replaced
immediatelY'
WW
Adjustment
nut
C
X
Page 15
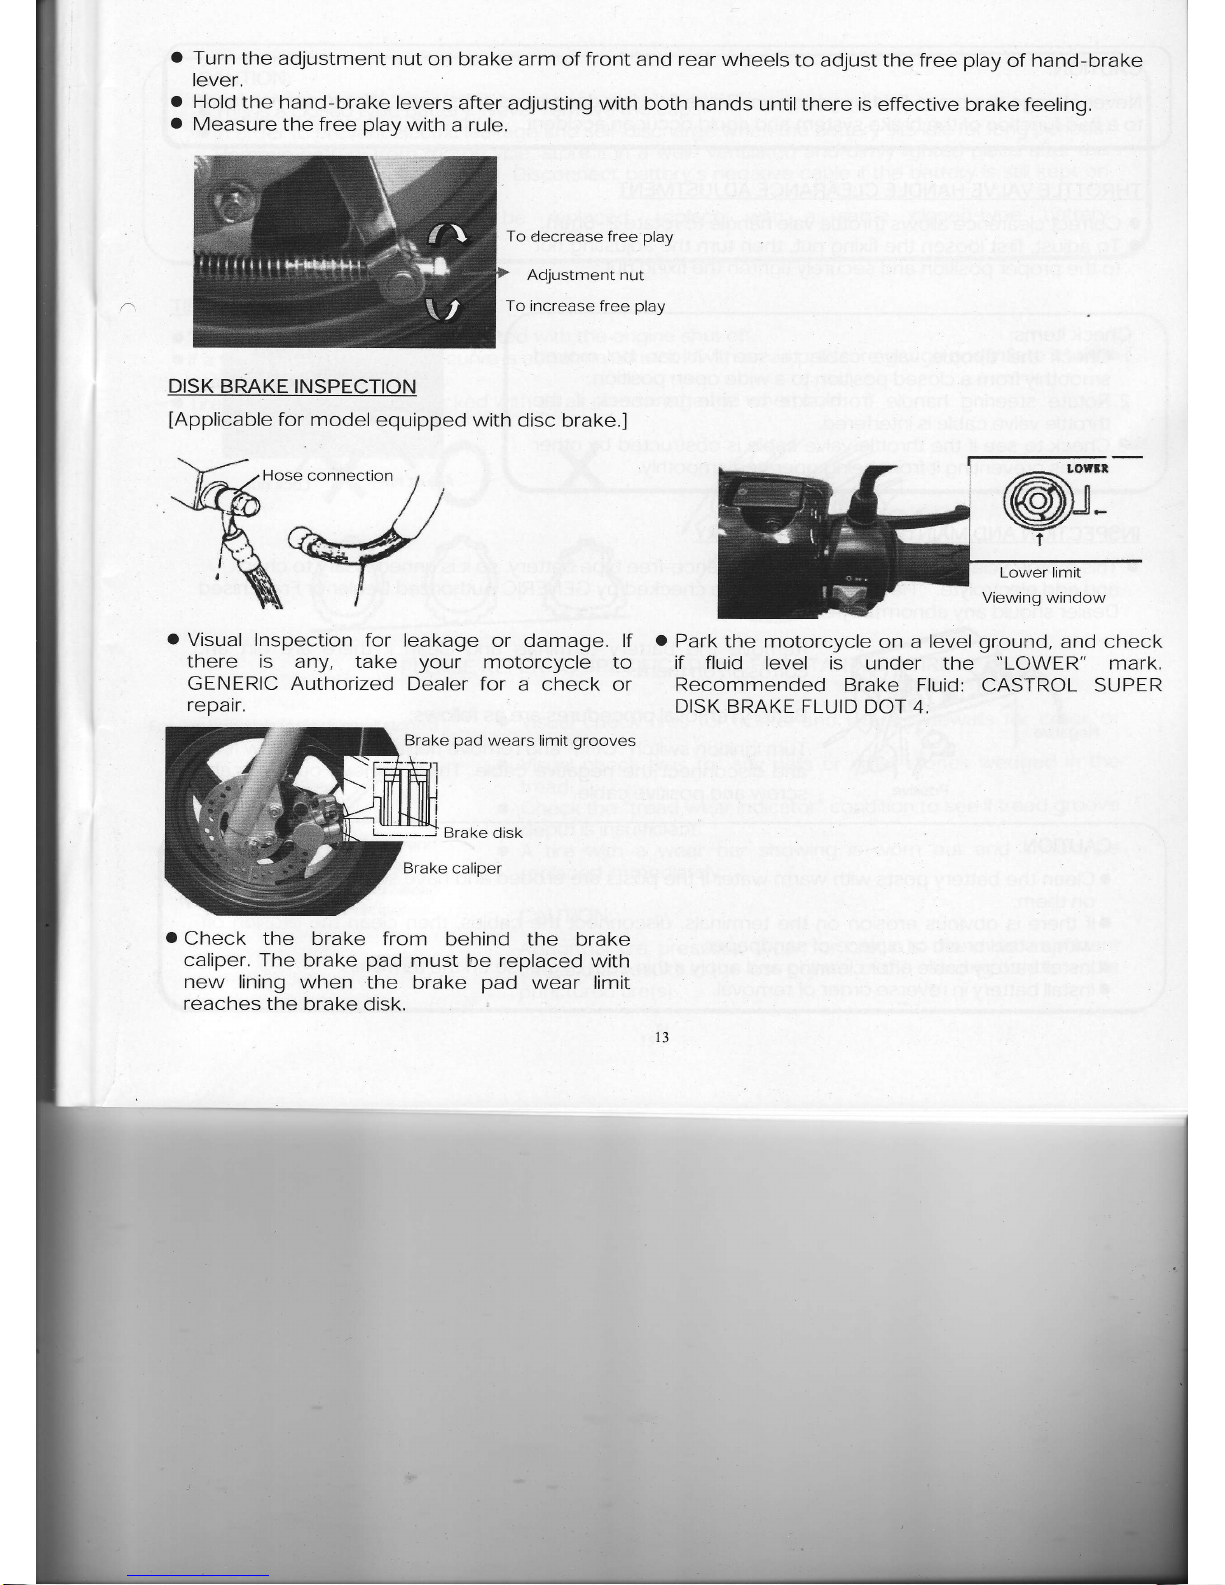
a
a
Turn
the adjustment nut
on brake
arm of front
and
rear
wheels
to adiust
tever,
Hold
the hand-brake
levers
after adjusting with
both hands
untilthere is
Measure
the free
play
with
a rule.
the
free
play
of
hand-brake
effective brake feeling.
To decrease free play
Adjustment nut
To increase
free
play
DrsK
BRAKE TNSPECTION
[Applicable
for model
equipped with
dlsc brake.]
leakage
or damage. lf
your
motorcycle
to
Dealer for
a check or
o
Park
the motorcycle
on a
level
if fluld
level is under
the
Recommended
Brake Fluid:
DISK BRAKE FLUID
DOT 4.
ground,
and check
"LOWER"
mark.
CASTROL SUPER
W"ose
connecti""
,/ 7
\Y
o
Visual Inspection
for
there is
any, take
GENERIC Authorized
repair,
Brake
oad
wears
limit orooves
L-.-.-i
Brake disk
Brake caliper
o
Check the brake
from behind
the brake
caliper, The brake
pad
must be replaced
with
new
lining when
the brake
pad
wear
limit
reaches the
brake disk,
@N:
t
d.:l
Page 16
CAUTION;
Never
change
the
brake
fluid
by
your own
Brake
fluid
to a
bad
function
of the
brake
system
and
could
occur
is a dangerous
substance.
Wrong
service
an
accident.
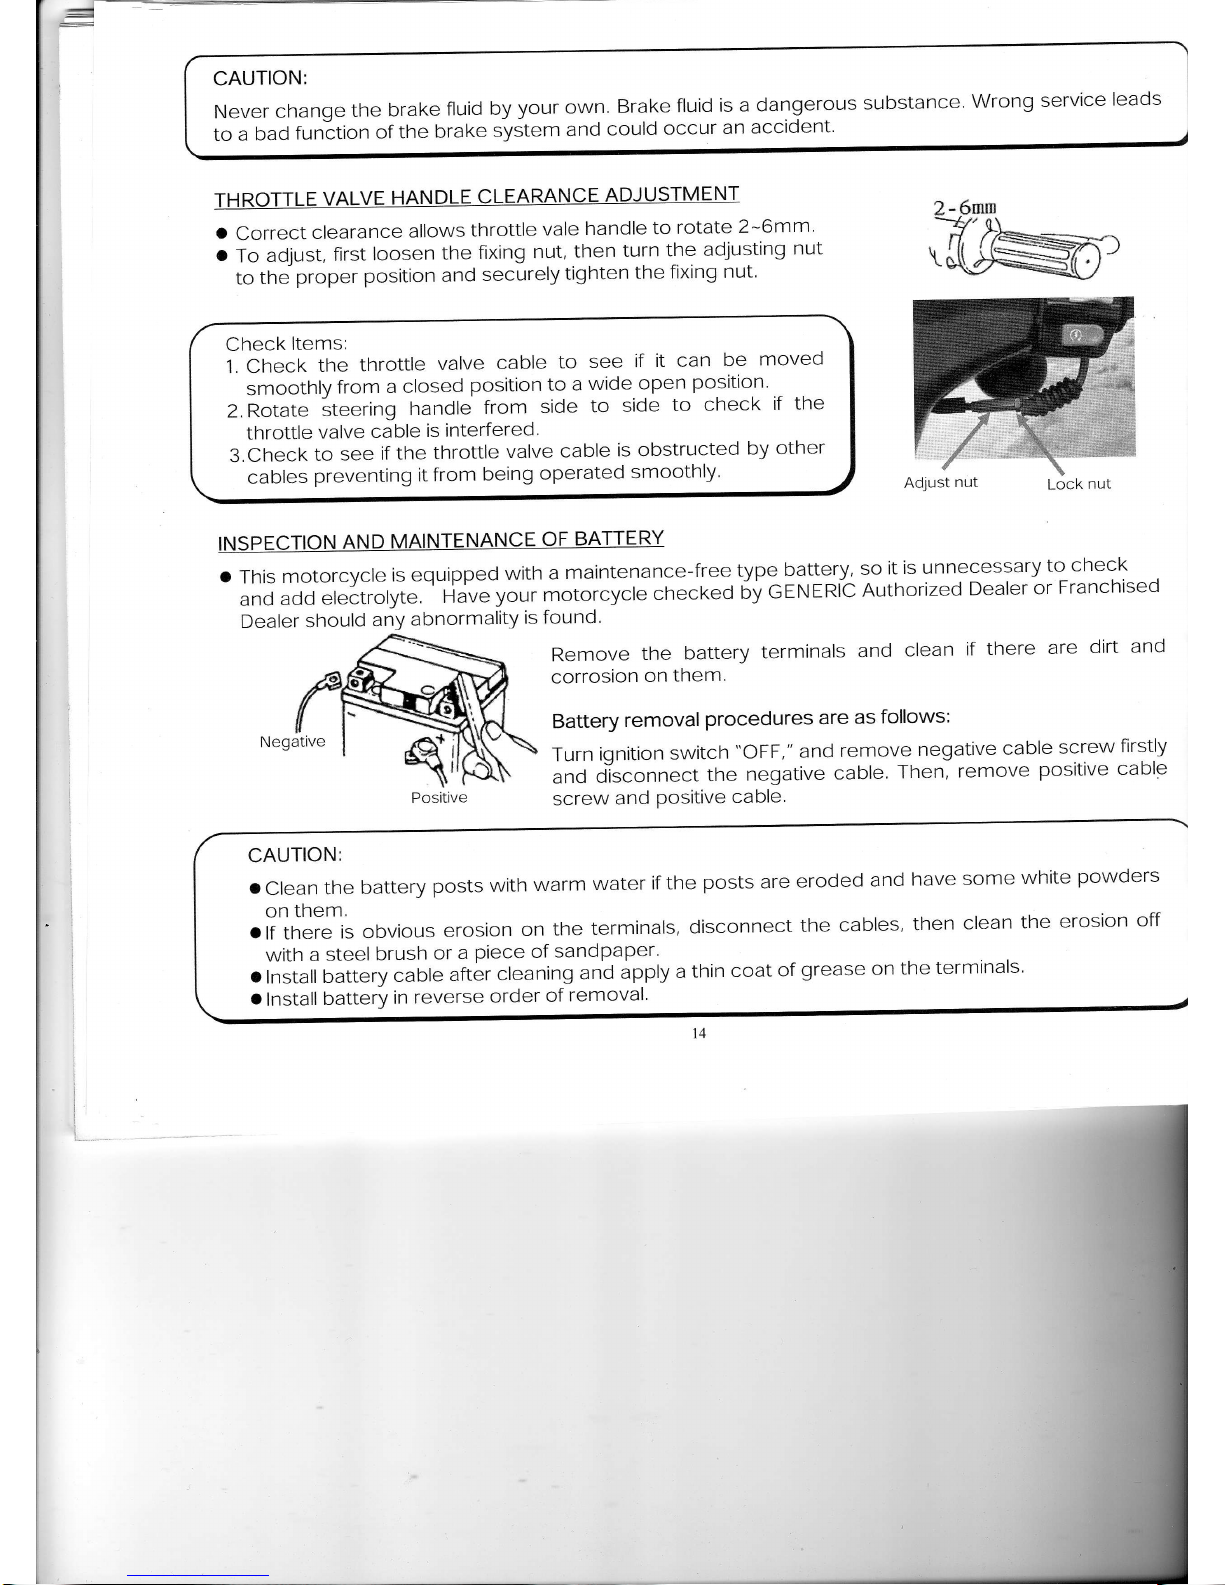
Adjust
nut
Lock
nut
leads
a
correct
clearance
allows
throttle
vale
handle
to rotate
2-6mm.
o
To
adjust,
first
loosen
the
fixing
nut,
then
turn
the
adjusting
nut
to
the
proper
position and
securely
tighten
the
fixing
nut'
Check
ltems:
1. Check
the
throttle
valve
cable
to
see
if it can
be
moved
smoothly
from
a closed
position
to
a
wide
open
position'
2. Rotate
steering
handle
from
side
to
side
to
check
if the
throttle
valve
cable
is
interfered.
3.Check
to
see
if
the
throttle
valve
cable
is obstructed
by
otner
cables
preventing
it from
being
operated
smoothly'
r
This
motorcycle
is equipped
with
a
maintenance-free
type
battery'
and
add
ele-trolyte,
'
Have
your motorcycle
checked
by
GENERIC
Dealer
should
any
abnormality
is found
Remove
the
battery
terminals
corrosion
on
them,
so
it
is unnecessary
to
check
Authorized
Dealer
or
Franchised
and
clean
if
there
are
dirt
and
Battery
removal
procedures
are
as
follows:
Turn
ignition
switch
"oFF,"
and
remove
negatlve
cable
screw
firstly
and
disconnect
the
negative
cable.
Then,
femove
positive
cable
screw
and
Positive
cable.
CAUTION:
o
clean
the
battery
posts with
warm
water
if the
posts are
eroded
and
have
some
white
powders
on
tnem.
a
lf there
is
obvious
erosion
on
the
terminals,
disconnect
the
cables,
then
clean
the
erosion
off
with
a steel
brush
or
a
piece of
sandpaper'
a
lnstall
batterv
cable
after
cleaning
and
apply
a
thin
coat
of
grease on
the
terminals'
o
Install
battery
in
reverse
order
of
removal
{r
Page 17
CAUTION:
a
This is
a closed
type
battery.
Never
remove
the caps.
o
In order
to
prevent electric
leakage
and self-discharge
when the
battery
sits
idle
for long
periods
Remove
battery
from
motorcycle,
store
it in a well-
ventilated
and
dimly
lighted
place
after
the
battery
has been
fully charged,
Disconnect
battery's
negative
cable
if the
battery
is still
kept
on
the
motorcycle.
o
lf the
battery
needs
to be
replaced,
replace
with
a
same
closed-type
battery
(Maintena
nce
- Free)
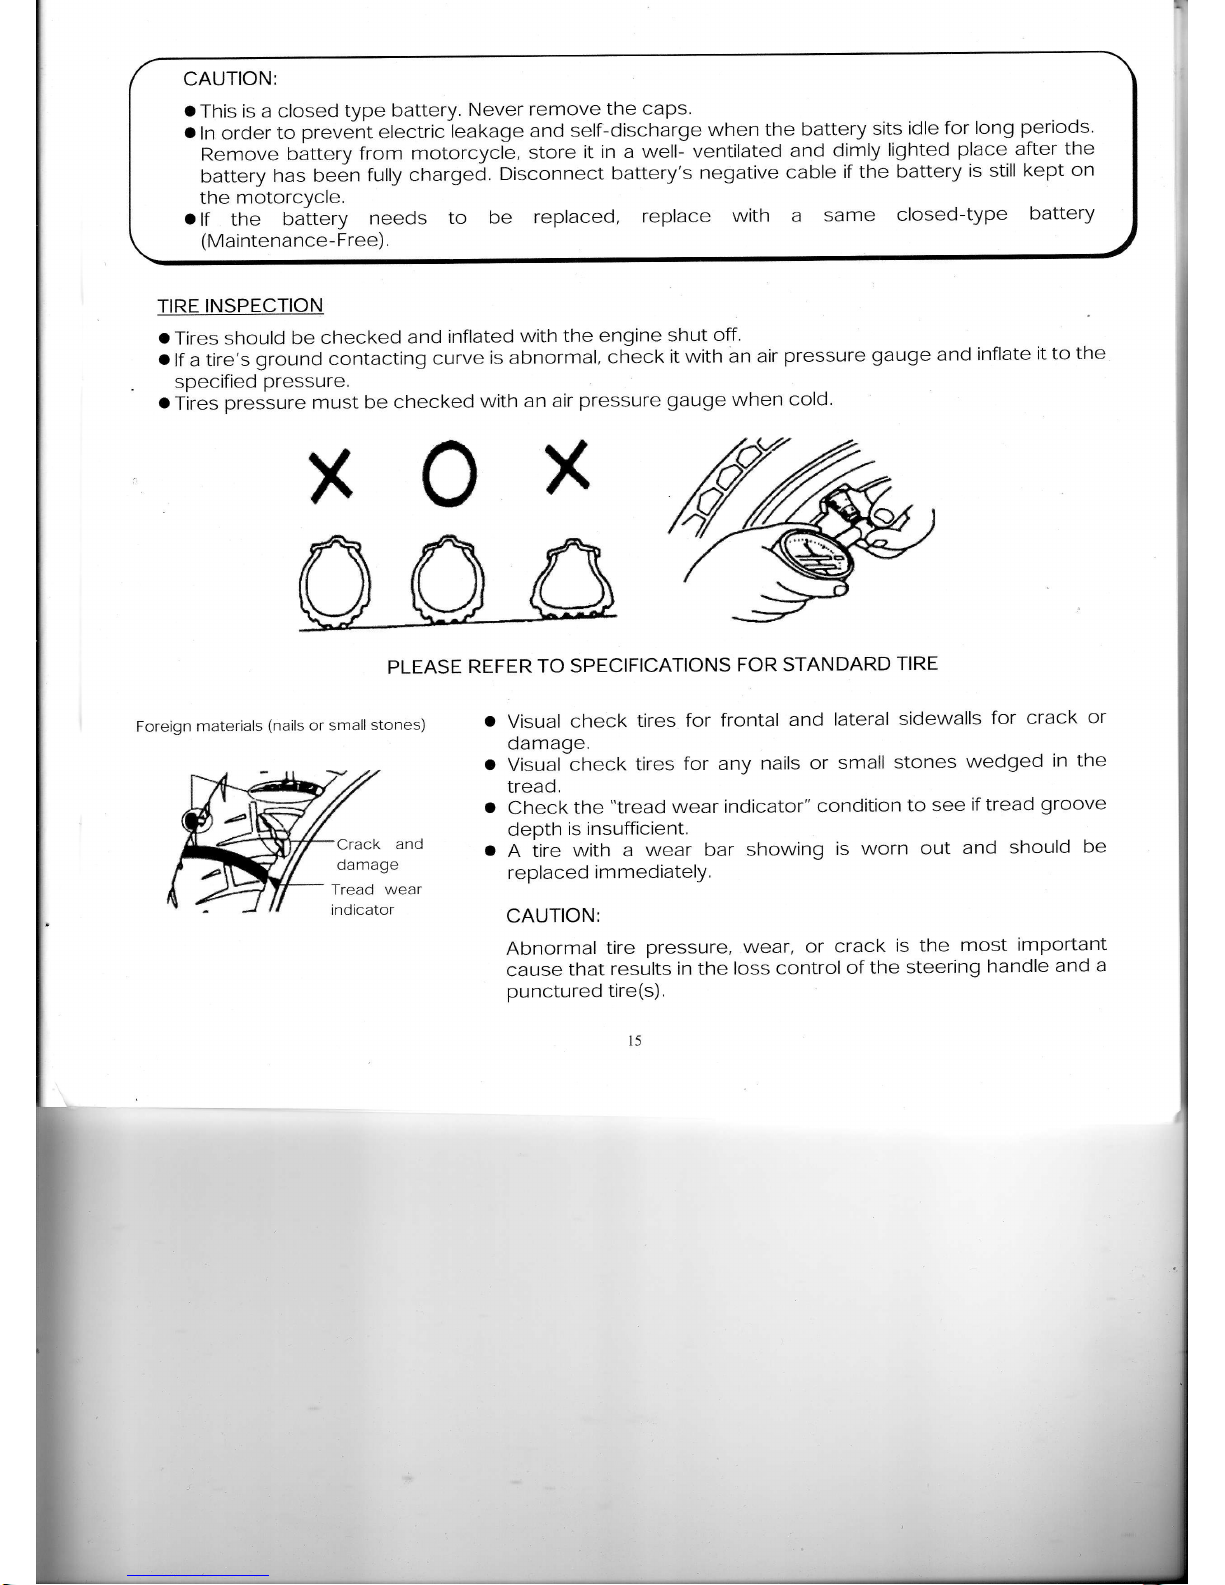
TIRE
INSPECTION
o
Tires should
be
checked
and
inflated
with
the engine
shut
off'
a
lf a tire's
ground contacting
curve
is abnormal,
check
it
with an air
pressure
gauge and
inflate
it to
specified
pressure,
o
Tires
pressure
must
be checked
with
an air
pressure
gauge when
cold.
PLEASE
REFER
TO SPECIFICATIONS
FOR STANDARD
TIRE
the
Foreian materials
(nails
or small
stones)
Crack
and
Tread wear
indicator
a
visual check
tires
for frontal
and
lateral
sidewalls
for crack
or
damage.
Visual
check
tires
for any
nails or
small
stones
wedged
in the
tread,
Check
the
"tread
wear indicator"
condition
to see
if
tread
groove
depth
is insufficient,
A tire
with a
wear bar
showing
is worn
out
and
should
be
replaced
immediately.
CAUTION:
Abnormal
tire
pressure,
wear,
or crack
is the
most
important
cause
that
results
in
the
loss
control
of the
steering
handle
and
a
punctured
tire(s).
t5
Page 18
o
o
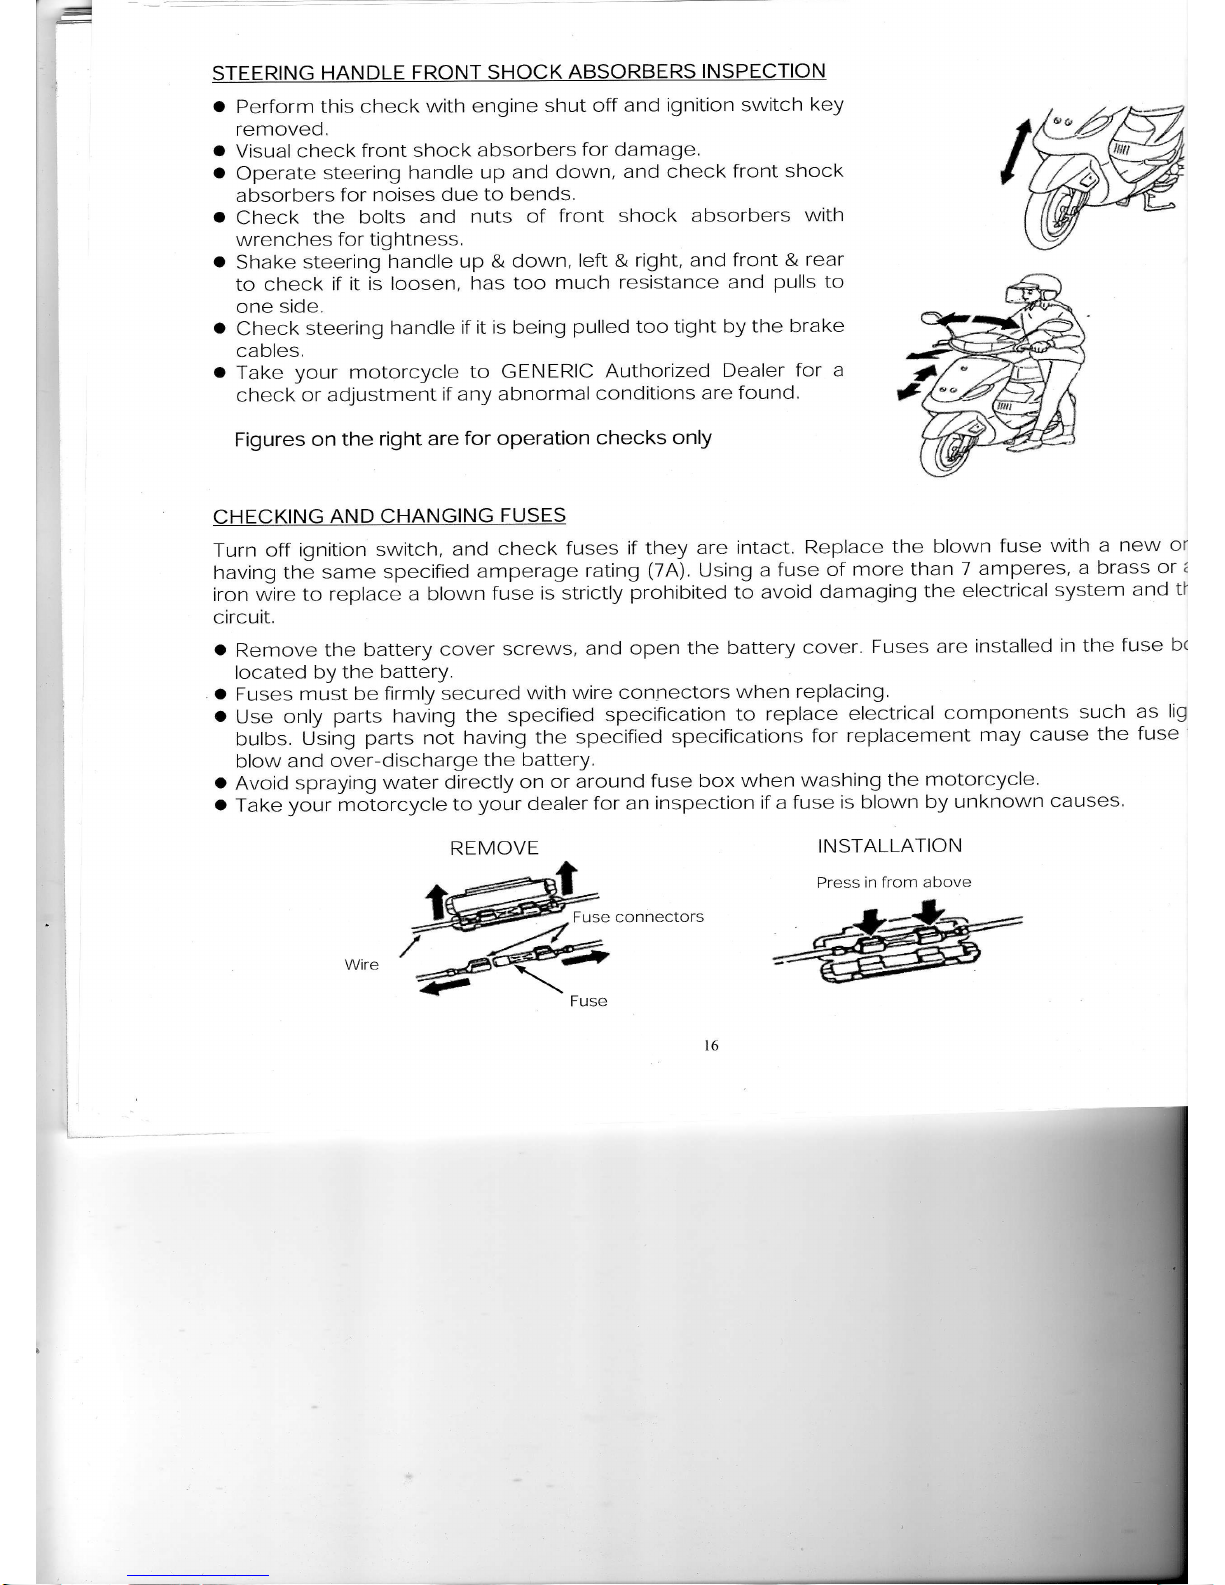
STEERING
HANDLE
FRONT SHOCK
ABSORBERS
INSPECTION
t
Perform this check
with engine
shut off and
ignition switch
key
removed.
Visual check
front shock
absorbers
for damage,
Operate
steering
handle up
and down,
and check
front shock
absorbers
for noises
due to
bends.
Check
the
bolts and
nuts
of
front shock absorbers
with
wrenches
for tightness,
o
Shake
steering
handle up
& down,
left
to check
if it
is loosen,
has too
much
one side.
o
Check
steering
handle
if
it is being
pulled
too tight
by the
brake
cables.
.
Take
your
motorcycle
to GENERIC
Authorized
Dealer
for a
check
or adjustment
if any abnormal
conditions
are
found.
Figures
on the
right are
for operation
checks
only
CHECKING
AND CHANGING
FUSES
Turn
off ignition
switch,
and check
fuses if they
are intact.
Replace
the
blown
fuse
with
a new
or
having the
same specifled
amperage
rating
(7A),
Using
a fuse
of
more than
7 amperes,
a brass
or
z
iron wre to
replace
a blown
fuse
is strictly
prohibited
to
avoid
damaging
the
electrical
system
and ti
circuit.
a
Remove
the
battery cover
screws,
and
open the battery
cover.
Fuses are
installed
in lhe
fuse bc
located
by the
battery
a
Fuses must
be firmly
secured
with
wire connectors
when replacing'
a
Use only
parts
having
the specified
specification
to
replace electrical
components
such
as
lig
bulbs.
Using
parts
not
having
the specified
specifications
for
replacement
may
cause
the
fuse
blow and
over-discharge
the battery,
a
Avoid
spraying
water directly
on
or around
fuse box
when
washing
the
motorcycle,
o
Take
your motorcycle
to
your dealer
for an
inspection
if a fuse
is blown
by unknown
causes.
INSTALLATION
Press
in from above
Fuse connectors
o
&
right, and front
&
rear
resistance and
pulls
to
REMOVE
Page 19
CHECKING THE TURN
SIGNAL LIGHTS AND HORN
.
Turn
the
ignition
switch key to
"ON"
position.
a
Turn
on the turn signal light switch, and make
sure that the front & rear and left & right signal lights
flashes and also
check
if
the
warning
buzzer sounds.
.
Check lurn signal light covers if
they are dirty, crack, or loosen,
o
Press
horn button to check if it works
CAUTION:
o
Specified
specification
bulbs should be used for turn
signal
lights.
Otherwise, the normal operation
ol
turn
signallights will be affected,
o
Turn on the
turn signal light before turning or switching lane
to warn driver of
vehicles
behind.
o
Turn
off the
lurn
signal light immediately by
pressing
its
button down after using. Otherwise,
the
flashing
of twin signal lights may confuse the drivers
of
vehicles
behind.
CHECKING THE FRONT AND REAR
LIGHTS
.
Turn the ignition switch key
to
"ON"
position,
Check if front and rear lights
come on,
o
Check the brightness and direction of front
start the engine and then turn on the front light switch.
light
.by
projecting
the light on the wall to see
if it is
correct.
o
Check the front light
cover, if
it is
dirty, crack, or loosen.
CHECKING
THE
BRAKE LIGHT
a
Turn
the
ignition
switch key to
"ON"
position,
hold the hand-braking levers for front
and
rear wheels.
Check
if the
brake
lights
come on.
o
Check
the
brake
light
cover,
if it is
dirty, crack, or
loosen.
CAUTION:
.
Use only specified bulbs, do not use bulbs with different
specifications to avoid damaging electrical
system, burning out bulbs, and discharging
the
battery.
a
Do not modify
or add other elec[rical components
to
prevent
over load or short circuit which
may
result in a fire
and burn down the motorcvcle in serious
cases.
CHECKING
FOR FUEL
LEAKAGT
o
Check
fueltank, fuel
hoses, and carburettor..,etc. for leakage.
CHECING
THT
LUBRICATION OF BODY'S VARIOUS MECHANISM
o
Check
the body's
pivot
points
if they have enough lubrication.
(For
example, the
pivot points
on the main stand, the side stand,
and the brake
lever,.,etc.)
1'7
Page 20
CHECKING THE
SPARK
PLUG
a
Remove
the cap of high
tension cable.
(Use
a
plug
wrench in tool box to remove
the
spark
plug
turning it counterclockwise,)
a
Check the electrode if it is
dirty or fouled
by carbon
deposits.
o
Remove
the carbon
deposits on the
electrode with
steel
wire,
and clean the spark
plug
w
gasoline,
then, wipe
dry with a rag.
o
Check the electrode,
and adjust its
gap
to
O,6-0.7mm.
(Check
it with a feeler
gauge)
o
Hand tight
the spark
plug
as far
as
it
can
go
and
then tighten it
another
1/2-3/4
turns
with a wrencl
WARNING:
The
engine is very hot
after running, Pay
attention not
to
get
burned,
Use only
spark
plugs
suitable for
the engine
specifications of this motorcycle recommended by tl
manufacturer.
(Refer
to specifications.)
CHECKING THE AIR
CLEANER
DISASSEMBLE
PRCEDURE
1. Remove
the screw of air cleaner
cover.
2, Remove
the air cleaner
cover and then the.cleaner's
element.
3.
Clean or
replace
the element.
(For
checking interval
please
refer to maintenance
schedule,)
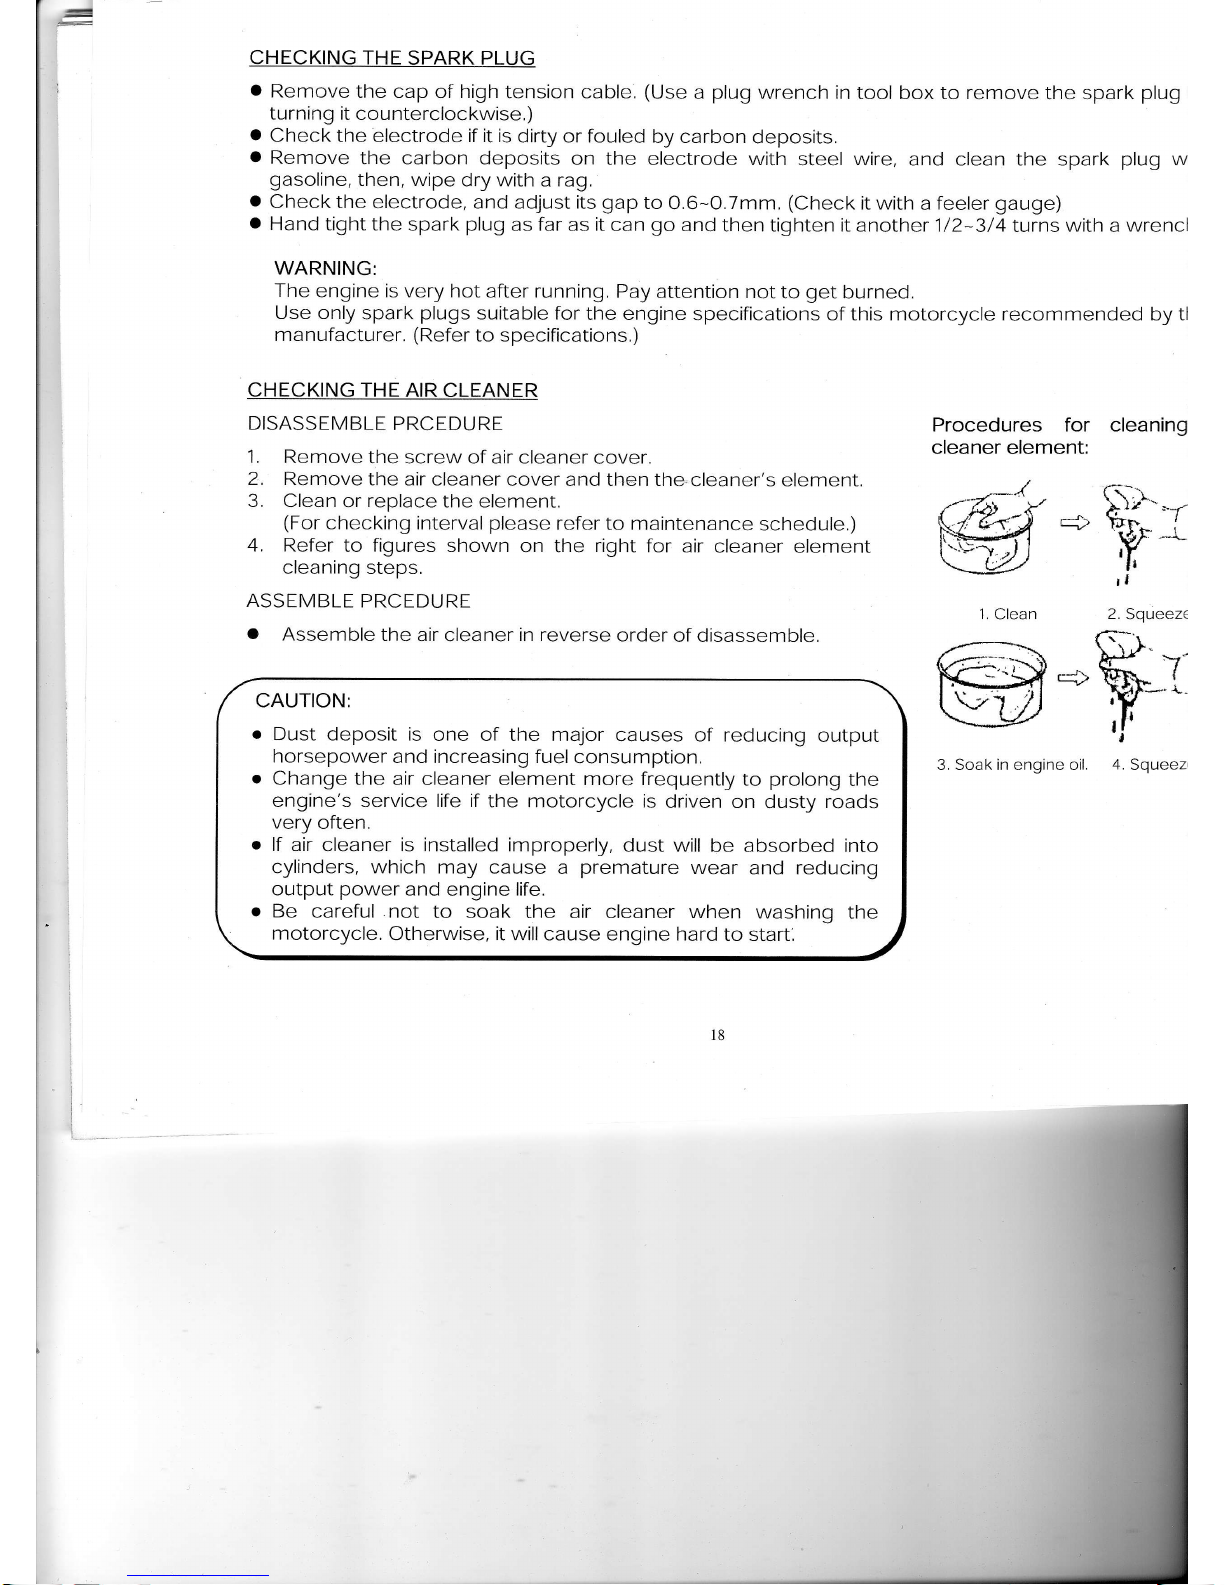
4, Refer
to
figures
shown
on the
right
for air
cleaner element
cleaning steps.
ASSEMBLE
PRCEDURT
o
Assemble
the air
cleaner
in reverse
order
of disassemble.
CAUTION;
o
Dust
deposit is
one of the major
causes of reducing
outpui
horsepower
and increasing fuel
consumption.
o
Change the
air cleaner element more frequently
to
prolong
the
engine's service life if
the motorcycle is
driven on
dusty
roads
very
often,
o
lf air
cleaner is installed improperly,
dust will
be absorbed into
cylinders, which may
cause a
premature
wear
and reducing
output
power
and
engine
life.
o
Be
careful not
to soak the air cleaner when
washinq
the
motorcycle.
Otherwise,
it
will cause engine hard
to start,
Procedures for cleaninq
cleaner element:
4_\.
i\ \
-!
l"
-
*-r
ci>
\'ir"'
t
-
\pF.-L
rF
tl
tt
2.
Squeeze
1.
CIean
{
3. Soak in engine oil.
4.
Squeez
l8
Page 21
9.
WHEN THERE IS
AN ABNORMAL CONDITION OR A TROUBLE
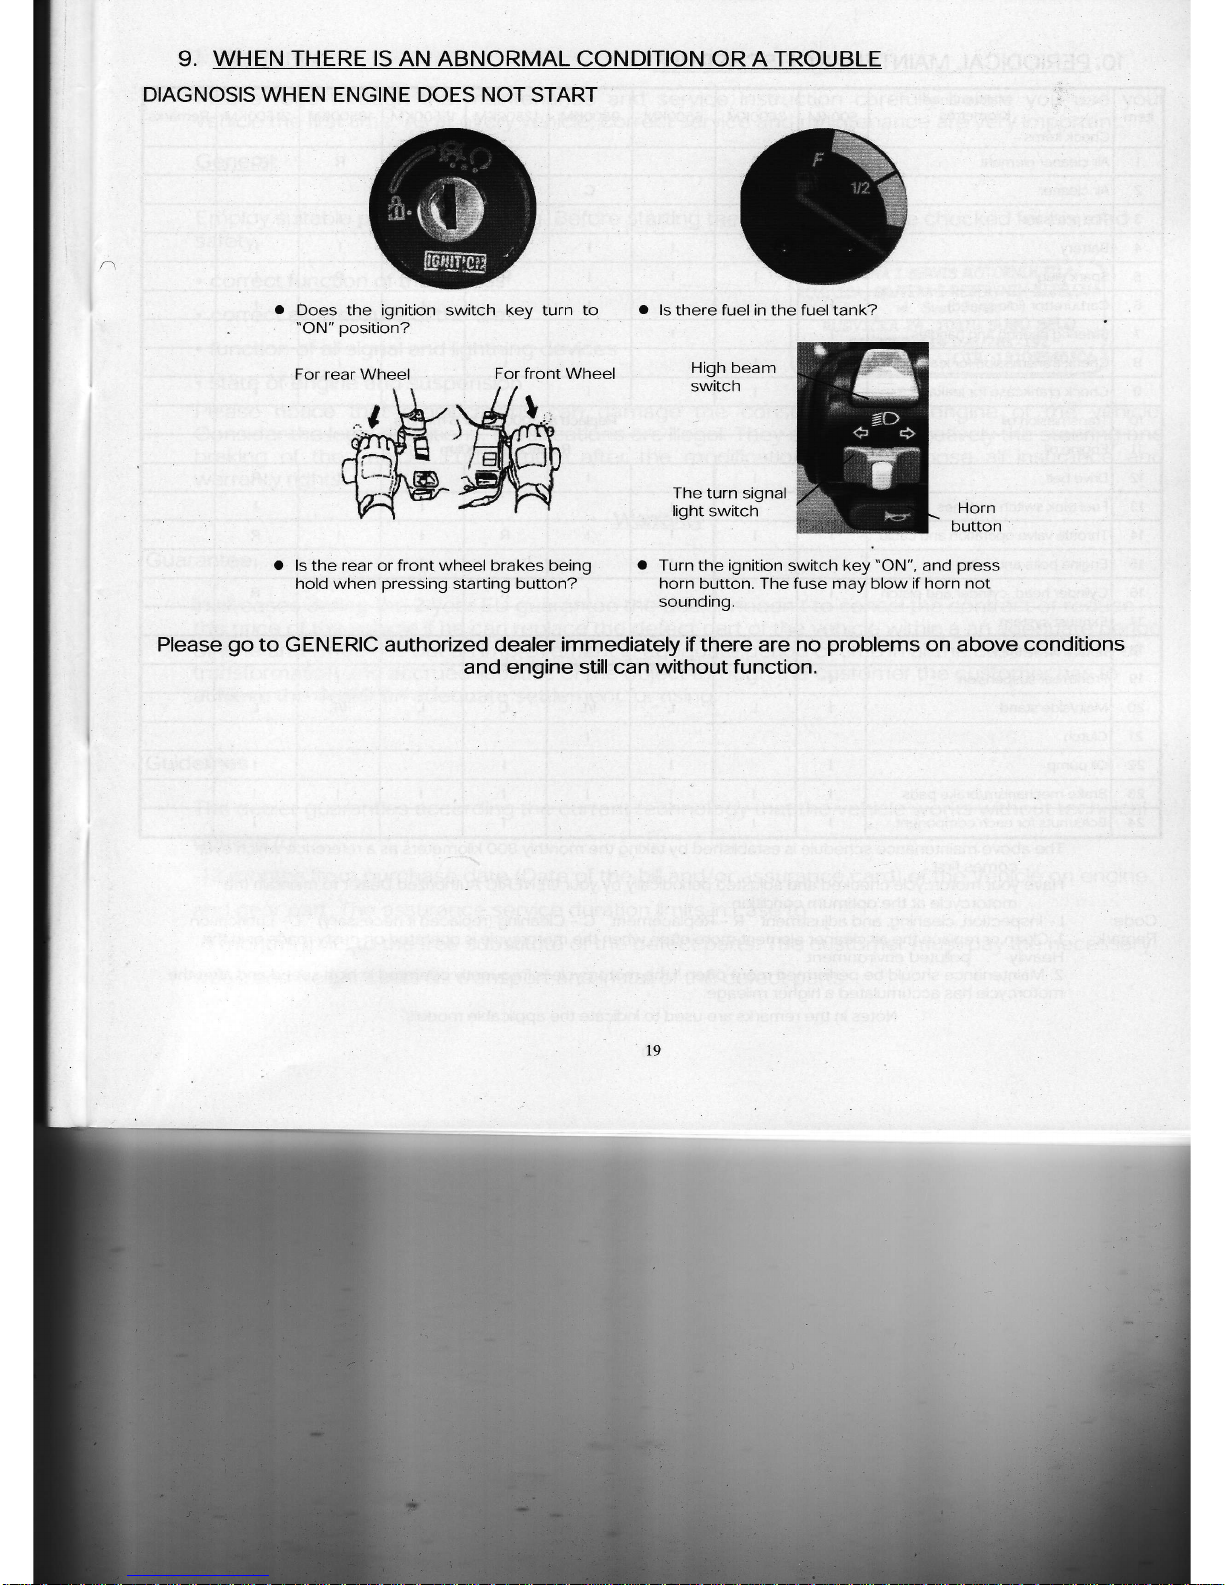
DIAGNOSIS
WHEN ENGINE DOES NOT START
Does the
ignition
switch
key
turn to
"ON"
position?
For rear Wheel
For front Wheel
wffi
o
ls
the
rear
or
front wheel
brakes being
hold when
pressing
starting button?
a
ls
there fuel in the fuel tank?
High beam
switch
The turn signal
light
switch
Hoan
button
o
Turn the ignition
switch
key
"ON",
and
press
horn
button. The fuse
mav
blow
if horn not
sounding.
Please
go
to GENERIC authorized dealer immediately if there are no
problems
on above
conditions
and engine still can
without function.
t9
Page 22
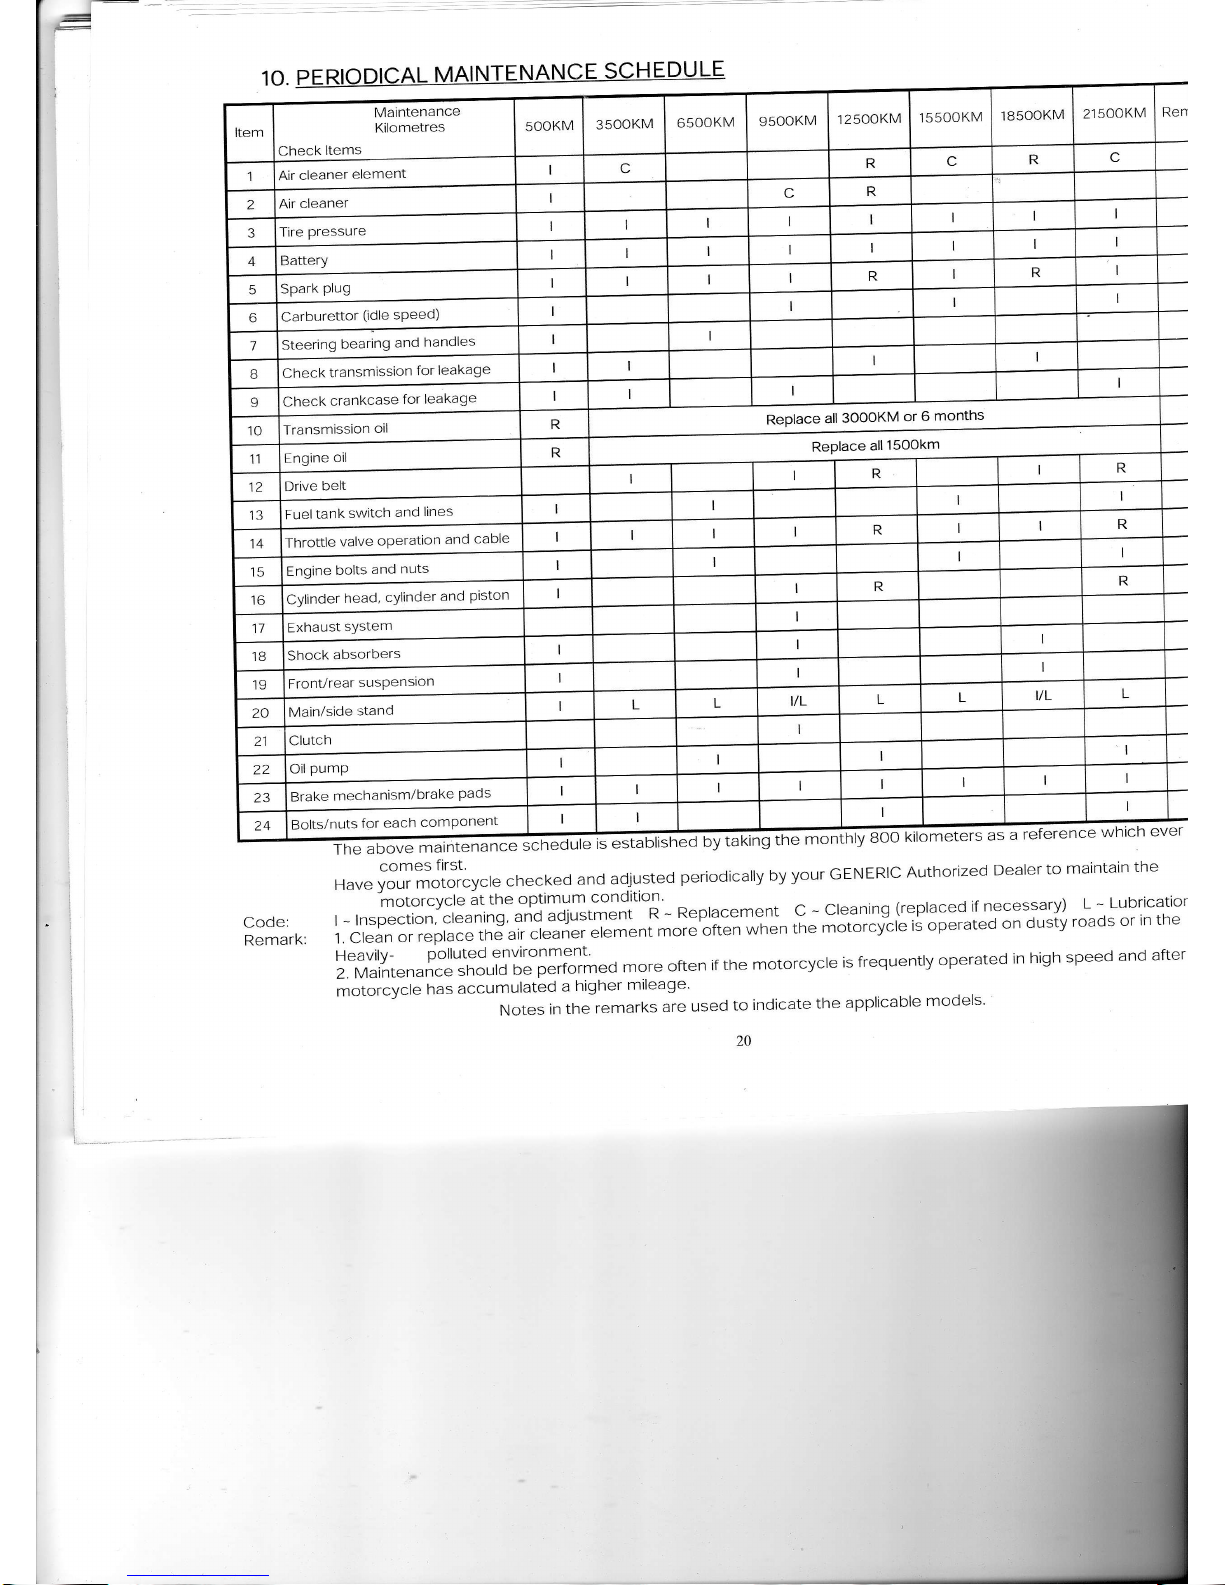
1O.
PERIODICAL
MAINTENANCE
SCHEDULE
lished
bY
taking
the
monthly
"""-;;#";j[Lycle
checked
and
adjusred
periodically
by
your
cENERlc
Authorized
Dealer
to
maintain
the
code:
,_,"=s?ilJil:5*.ii[:;f.t*j,:,H::itT
-
n"pru..*.,r.
c
-
creanins
(repraced
if necessarv)
L -
Lubricatior
Remark:
j,
crean
or
replace
the
air
creaner
erement
more
often
when
the
motorcyLle
is
operated
on
dusty
roads
or
in
the
!",fl'"1t";..r,f."J:TSrt,Jir;Ir?i".0
more
often
if
rhe
mororcycte
is
frequenrlv
operated
in hish
speed
and
after
motorcycle
has
accumulatecl
a
higher
mileage
Notesintheremarksareusedtoindicatetheapplicab|emodels.
20
18500KM
21500KM
Ren
Item
Maintenance
Kilometres
Check
ltems
5OOKM
3500KM
6500KM
9500KM
12500KM
5500KM
R
R
-l
element
2
Air
cleanel
3
Tire
pressure
I
I
4
Battery
I
R
R
I
5
Spark
plug
6
Carburettor
(idle
I
7
Steering
bearing
and
handles
B
Check
lransmrssron
for
leakage
I
I
I
Check
crankcase
for leakage
Replace
all
3OOOKM
or
6
months
10
Transmission
oil
t't
Engine
oll
R
Replace
all
R
R
12
Drive
belt
I
13
Fuel
tank
switch
and
lines
I
14
Throltle \/alve oDeration
and
callle
I
I
I
R
R
Engine
bolts
and
nuts
R
R
16
Cylinder
head.
cyllnder
and
piston
11
Exhaust
sYStem
1B
Shock
absorDers
19
Front/rear
susPension
l/L
L
L
VL
L
20
Main/side
stand
I
L
I
21
Clutch
22
Oil
pump
I
I
23
Brake
mechanism/brake
Pads
I
lq
Bolts/nuts
lor
each
comPonent
BOO
ki
ometers
Page 23

11. Warranty:
Please
read through
the maintenance
and
service instruction
carefully
before
you
use
your
vehicle the
first
time.
As at every
vehicle, correct
service and
maintenance
are
very important.
General:
Employ suitable
protective
clothing.
Before starting the
vehicle it
must be checked
for his road
safety.
.
correct
function of the
brakes
.
correct air
pressure
of
the tires
.
function of all
signal and
lightning devices
.
state of
engine and suspension
-
rt-#,:i
ri,',li"'-:
:,
l,'
ii'.-
;'=-
{*5IU ;i,
s"i"r'f
f
:lr, :"
tr.i::
Frriiir'lr-
i
il
-..r
i-"
{r,
-v:.li
.rr'i;,
-J.
.
,.
..-
.':,.
i
.d'
j,{.
i,r:,!.]l
j::il
:
.'i
:.:;
{;-'
l::.:
:,
:;i ::
i.
:.:':
!',')'.-:l;
i
\.:*:":::
Please
notice that
modifications
can damage
the construction
and
engine
of the
vehicle.
Consider
the
legal definitions,
modifications
are
illegal. They can affect
negatively the steering
and
braking
of the
vehicle,
Furthermore
after the
modifications
you
will
loose all
insurance
and
warranty
rights.
Warranty
Guarantee
In all cases
during
the 2
year
EU
guarantee
the dealer
needn't to cancel
the
contract
or reduce
the
price
of the
vehicle if he can
replace
the defect
part
of
the vehicle
within a
an adequate
period
of
time and/or
carries out an
improvement
in
adequate
period
of
time
in all the cases,
In case of
transformation
and accrued
liabilities
of the object
through the
customer
the customer
has
to
achieve
the dealer an
adequate
settlement
for using.
Guidelines
The dealer
guaranties
according
the
current technology
that the
vehicle
works
without technical
defects
for:
-12
months
from
purchase
date
(Date
of the bill and/or
assurance
card) of the
Vehicle
on engine
^^n
anar
^-rr.
The assurance
service
duration
limits in case to
drru \_lcdr
PdrL
-6
months limits to the
free substitute
of the
defect
parts.
The customer
must
pay
tne
necessary
wage and
freight costs
for transport
and
install of the defect
parts,
Page 24

Warranty
claims
are considered
only
if
the
defects
were examined
by an
authorized dealer
immediately
after they appeared.
The assurance
claim
expires,
if the customer
does not
care about
the rules of the
processing
o
the vehicle
(Service,
maintenance
and
periodical
maintenance
schedule)
according to the
operating instruction,
in
particular
the service
schedule,
Further
on wear
appearances
as well as
substitute
of consumption
materials
are, as well
as
batteries,
tires
and hoses,
clutches,
brakes,
bulbs
and
protections
are not included in
warrantv.
Naturalwear
or defects
because
of carelessness,
inappropriate processing,
storage and
disconnection
or average,
as well
as inappropriate
transportation
are not included
in assurance
and the
guarantee.
The
warranty
is cancelled
immediately
as
soon as
the vehicle was
changed from
a not authoriz(
workshop
or through
mounting
of
parts
not
originalfrom
the manufacturer.
No assurance
and
guarantee
exists
at
vehicles
which have
been for free.
Changes,
sentence
and
pressure
mistake
reserve.
22
Page 25

12. Service
plan
IMPORTANT:
The warranty
can only
be
given
maintenance
plan.
if the
vehicle
was inspected
regular as
described
in the
5OO
KM
Stamo/Date
6500 KM
Stamo/Date
12500 KM
Stamo/Date
18500
KM
Stamoe/Date
3500
KM
Stamo/Date
9500
KM
Stamo/Date
15500 KM
Stamn/Date
21500 KM
Stamoe/Date
ZJ
Page 26

INDEX:
Description
Paqe
A
adiustment of brake
free
plav
tz
air cleaner
't8
B
battery 14
before
ridinq 1
brake
6
brake lioht check 17
check for fuel leakaqe
17
tt
D
disc brake insoection 13
drive off 10
E
electrical start button
o
enqine oil warninq liqht
A
F
fuel
qauoe
fuel level 11
fuel tank cap
7
fuses to
H
hioh beam indicator 4
hiqh/low beam switch
o
horn switch
o
iqnition switch
inspection
and
reolenishment
of enqine oil
11
inspection before ridinq 10
L
liqht function 17
liqht switches
lubrication
of bodv and mechanism
17
M
maintenance
schedule
20
malfunction 19
Page 27

Page 28

INHALTSVERZEICHNIS
5if:i11'j
INDEX
.....25
Page 29

1. FAHRVORBEREITUNGEN
Diese Bedienungsanleitung beschreibt den
korrekten
Gebrauch
lhres Fahrzeuges, inklusive
Sicherheitshinweisen, einfache lnspektionshinweisen und
vielem
mehr.
Wir
empfehlen
lhnen, fur
ein
noch sicheres Fahren diese Bedienungsanlertung
genau
durchzulesen.
Vielen Dank fUr lhr Vertrauen in unser
Produkt
Um eine langjahrige Lebensdauer lhres Fahrzeuges zu
garantieren,
mussen
Sie
unbedingt
die
regelmaBigen Serviceintervalle einhalten.
Es ist unbedingt erforderlich nach der Einfahrtsperiode
ein
"5OO
km Service" von einer autorisierten Werkstatt durchfUhren zu lassen. Sonst
hat
das
den Verlust
der
Garantie
zur Folge. Danach
sollten
Sie, wie in der Servicetabelle vorgeschrieben, regelmaBig
lhr Fahrzeug
warten lassen
o
2.
Bitte beachten Sie, dass das von
Fotos in diesem
Heft
geringfugig
SICHERES FAHREN
Tranon
Sie
rnrAhreqd
des
Fahrens
Schutzkleidung
und fahren
Sie
immer nur im entspannten
Zustand,
""Y"'
Beachten
Sie
immer
gultige
Verkehrsregeln und
fahren
Sie
mit Rucksichr
gegenUber anderen
Verkehrsleilnehmern.
Aus der Vergangenheit
haben wir die Erfahrung
gemacht,
dass Besitzer
eines neuen Fahrzeuges
grundsatzlich
sehr vorsichtig damit
umgehen. Bitte fahren
Sie
auch dann noch vorsichtig,
wenn Sie
das
Fahrzeug bereits
gut
beherrschen,
und fahren Sie niemals Uber lhre Verhaltnisse.
Eine Uberbeanspruchung
des Fahrzeuces.
hat
den
Verlust
der
Garantie zur Folqe.
t
Zur Erinnerung:
a
Bitte fahren
Sie
nie
ohne
Helm, Vergessen Sie
niemals
auch den
Riemen
beim
Helm zu schlieBen,
.
Tragen Sie immer eine Schutzkleidung.
o
Verwenden
Sie
immer
beide
Hdnde zum Lenken.
o
Achten Sie
immer
auf
lhre
Armatouren.
.
Warten
Sie
lhr Fahrzeug, laut beiliegendem Wartungsplan, regelmiiBig.
WARNUNG:
a
Um
Verbrennungen
des
Beifahrers zu vermeiden, achten Sie bitte
immer
darauf,
dass auch
der
Beifahrer die Beine auf den dafur
vorgesehenen FuBrastern hat.
o
Der Auspuff ist nach dem Betrieb sehr
heiB. Bitte
achten Sie darauf,
wenn Sie Wartunqs-
oder
Kontrollarbeiten durchfU hren,
.
Decken
Sie
lhr Fahrzeuq nach dem Betrieb nicht am heiBen Auspuff mit einer Plane ab,
lhnen
gekaufte
Fahrzeug von
den
Abbildungen, Zeichnungen
und
abweichen kann, da diese nur als Beispiel anqefuhrt sind,
Page 30

WARNUNG:
Modifizieren
oder
tunen
verandert
das
Fahrverhalten
des
Fahrzeuges,
und
verschlechtert
c
Leistungsfahigkeit
und/oder
die
Gerduschentwicklung,
was wiederum
zu
einer
Verkurzung
d
Lebensbauer
fuhrt.
Modifizieren
oder
verdndern
Sie
lhr
Fahrzeug
nicht
ohne
Genehmigung
I
Herstellers
bzw.
einer
autorisierten
Fachwerkstatte.
Modifikationen
sind
illegal und
nicht
konform
mit dem
ursprunglichen
Design
des
Fahrzeuges
E
modifiziertes
Fahrzeuq
verliert
samtliche
Garantieanspruche.
Darum,
vermeiden
Sie
es,
lhr
Fahrzeug
verandern.
FAHRTIPS
Strecken
Sie
niemals
die
Beine
wahrend
der
Fahrt
uber
den
Fahrzeugrand.
Nehmen
Sie
e
komfoftable
Sitzposition
ein,
so dass
Sie
jederzeit
in der
Lage sind
schnell
zu reagieren.
Die Sitzposition
beeinflusst
maBgebend
die Sicherheit
beim
Fahren.
Achten
Sie
immer
darauf,
dass
t
Korpergewicht
Uber
der
Mitte
des Sitzes
liegt.
Wenn der
Schwerpunkt
zu
weit
hinten
liegt,
verring
dies
den
Druck auf
das
Vorderrad,
was zu einer
unstabilen
Lenkung
fuhrt.
Bitte beachten
Sie,
di
dieser
Fahrzustand
gefahrlich
ist.
Das
Fahren einer
Kurve
wird einfacher,
wenn
man sich
leicht
zum
Kurvenmittelpunkt
hin,
in die
Ku
hineinlehnt.
Tasten Sie
sich
langsam
an
die optimale
Kurvenposition
heran,
Das
Fahrzeug
ist sehr
schwierig
auf
unebenen
und
nicht
asphaltierten
Strassen
zu
f ahren,
deshalb
es
vernunftig
immer
vorausschauend
zu fahren.
o
Hinweis:
Beladen
Sie
das
Trittbrett
nicht unndtig,
um
eine
Veriinderung
des
Fahrverhaltens
vermeiden,
3.
o
o
o
a
WARNUNG:
Das
FahrgefUhl
verandert
sich,
Fahrsicherheit
beeintrachugt
wird,
Ladung,
wenn
lhr
Fahrzeug
beladen
ist.
Eine
Uberladung
bedeutet,
di
Achten
Sie
immer
auf den
richtigen
Reifendruck
und
Gewicht
d(
WARNUNG:
o
Das Fahrzeug
darf
nur
an dafur
vorgesehenen
Bereichen
beladen
werden,
um
vermeiden,
a
Klemmen
Sie
keine
Tucher
oder
Zihnliches
zwischen
dem
Aufbewahrungsfach
um
Schaden
durch
Uberhitzung
des
Fahrzeuges
zu
verhindern'
HINWEIS:
Um
die Leistung
zu optimieren,
mussen
Sie
die regelmaBigen
Serviceintervalle
Die ersten
SOO
km sollten
ausschlieBlich
zum Einfahren
genutzt werden.
Beschleunigen
und
Vollgasfahrten
uber
eine
langere
Distanz.
Beschadigungen
z
und
dem
Motor
eit
unbedingt
einhalten:
Vermeiden
Sie
zu rasc
Page 31

4, VERWENDUNG VCN
ORIGINAL
ERATZTTILEN
I lrn r-lio I oic,fr rnn rloc. F;rhrzor lrloq. i-
^^*r-^t^^
7'
^t '
.:,
--*
*,..*--:r*-
.r
, upLri rrdrur I ru:r-dfld zu
erhallen, sollLen
nur
"Originalersatzteile"
verwendet werden. l\ur-
"Originalersatzteile"
haben
die
gleich
hohe
Qualitdt
wie clie Originalteile.
"Originalersatzteile"
durchiaufen einen strengen Frozess
der
Produktions
/ und
Qualitatskontrolle,
und
srnd
nur
bei einem
autorisierten
i-landler
oder
in
einer
Fachwerkstafte"
erhaltlich.
Falls
Sie billige
oder
gefZilschte
Ersatzteile verwenden
sollten, ubernimmt der Hersteller keine
Garantien.
Dies konnte zu unerwarteten
Problemen fuhren,
und die
Lebensdauer
des
Fahrzeuqes kann
verkurzt werden.
o
Verwenden Sie nur
Originalersatzteile
und
bringen Sie
ihn
regelmaBig zum Servlce.
Nur so konnen
wir
lhnen
eine
lange
Lebenserwartung
lhres Fahrzeuges
versprechen.
5. BEDIENUNG IM DETAIL
I-Bi"k.t9tt9f!9[
p"G.-t
]
llft,
",l "t.rta
f-lkrrl
.ra::::i
:,,"'.';.,,i,,,,-l
lKr"ft.t"ff".".iG
chwindiqkeitsa
ffi
wp
ernlichtkontrolllamoe
(blau
Amaturen
HINWEIS:
Bitte
bei den
Kunststoffteilen
wie
z.B.: Instrumentenanzeige,
Scheinwerfer,
keine
aggressiven
Putzmittel
venuvencien,
auch nicht mit Benzin
putzen,
weildies zu Beschadigungen fuhren kann.
Kraftsloffa
nzeige:
Die Anzeige zeigt
an wie
viel Kraftstoff
sich
ln
der Stellung
"OFF",
steht die
Anzeige in
'
ln
der Stellung
"ON"
zeigt der Zeiger den
Zerqer im roten Bereich
befindet.
ntrolllam
noch im
Tank befindet.
E"- Position.
Fullstand
an.
Tanken
Sie
das Fahrzeuq,
wenn
sich
der
Page 32

Blin
kerkontrollla
m
pe:
Die Kontrollleuchte
blinkt
wenn
der
Blinker eingeschaltet
ist.
Fernlichtanzeige:
Die Anzeige
leuchtet,
wenn
das Fernlicht
eingeschaltet
ist.
Olkontrolllampe:
Sobald
bei
laufendem
Motor
die Olkontrolllampe
leuchtet,
mussen umqehend
2Takt Ol
nachfullen.
ist
der Olstand
zu
niedrig
und
WARNUNG:
o
Wenn Sie
lhr
Fahrzeug
mit
zuwenig
Ol
fahren,
kann es
zu einem
Motorschaden
kommen
Falls
c
Olkontrolllampe
nicht
mehr erloschen
sollte,
suchen
Sie
sofort
die
nachste
autorisierte
Werkstatte
a
die das
Schmiersystem
kontrolliert.
a
Verwenden
Sie
hur
ein
vom
Hersteller
freigegebenes
2-Takt-Motorol.
Sollte
falsches
Motorc
verwendel
worden
sein,
kann das
zum
Verlust
der Garantie
fuhren,
)Empfohlenes
OL:
CASTROL
Formula
TTS
tr
J.
6,
Tachometer
Dieser
zeigt
an,
wie schnell
Sie
fahren
(km/h
und
mph).
Kilometerzahler
Dieser
zeigt
an,
wie viel
Kilometer
mit dem
Fahrzeug
schon
gefahren wurden.
Geschwindigkeit.
Eine
zu
ht
Geschwindigkeit
ist oft
die
Ursa'
fur einen
schweren
Unfall
HINWEIS:
Beachten
Sie
immer
l
Page 33

ZUNDSCHLOSS
a
o
o
FN'
"start"
Position
Motor
kann
bei
gezogener
Bremse
gestartel
werden.
ZundschlUssel
kann
nicht
abgezogen
werden.
Zundschloss
loFFI
"stop"
Position
o
Motor
ist ausgeschaltet
und
kann
nicht
gesta{et wefden.
o
Zundschlussel
kann abgezogen
werden.
focKl
"Lock"
Position
Drehen
Sie
den
Lenker
nach
links,
pressen
Sie
den Schlussel
nach
unten
und
drehen
Sie
diesen
in die
"LOCK"
Position
In
dieser
Position
wrrd
der
Lenker
gesperrt und der
ZundschlUssel
kann
abgezogen
werden.
Um
Oie
Lenkersperre
aufzuheben,
drehen
Sie den
Schlussel
von
"LOCK"
nach
"OFF"
oder
"ON"
WARNUNG:
a
Versuchen
Sie
niemals
den
Zundschlussel
abzuziehen,
wahrend
der
Motor
lauft,
Wenn
Sie
den
Z1ndschlussel
von
"ON"
zu
"OFF"
drehen,
schaltet
sich
das
elektrische
System
ab
Der
ZundschlUssel
kann
erst
abgezogen
werden,
wenn der
Motor
abgestellt
wurde
a
Stellen
Sie
das
Fahrzeug
aO
unC
vergewissern
Sie
sich, dass
es
versperrt
und
der
Schlussel
abgezogen
ist.
o
Wenn der
Zundschlussel
zu
lange
in der
"ON"-
Position
steht,
ohne
dass
der
Motor
lauft,
kann
sich
die
Batterie
entladen,
was
zu einem
verschlechterten
Startverhalten
fuhren
kann.
SCHALTER
l;;i.-h,il]
t::i_t:::i_t::t
lBfr.ke;l
Page 34

o
Licht:
lxl
w"nn
sich
der
Schalter
in
dieser
Position
befindet,
leuchtet
der
Scheinwerfer,
das
RUcklicht'
c
Instrumentenanzeige
und
das
Begrenzungslicht'
1&lW.nn
sich
der
Schalter
in dieser
Position
befindet,
leuchtet
das
Rucklicht,
die
Instrumentenanzei(
und
das
Begrenzungslicht,
[{]w.nn
sich
der
Schatter
in dieser
position
befindet,
sind
alle
Lichter
ausgeschalten,
(Modellabhangil
a
Elektrostarter
l€]
ni"="r
Elektrostartknopf
wird
betatigt
um
den.Motor
zu
starten.
Drehen
Sie
den
Zundschlussel
auf""ON"
und
ziehen
Sie
den
Bremshebel,
dann
drucken
Sie
d
Elektrostarter
und
der
Motor
startet
automatisch'
Zu
lhrer
Sicherheit:
Der
Motor
kann
nur
gestartet
werden,
wenn
der
vordere
oder
hintere
Bremshebel
gezogen
ist
HINWEIS:
a
Den
Flektrostartknopf
sofort
loslassen'
vvenn
der
laufendem
Motor
betatigen,
um
eventuelle
Schiiden
o
Um
die
Batterie
zu
SChonen
beachten
Sie
bitte'
Lichtschalter
in
der
"OFF"
Position
befinden'
Motor
lZiuft
ist'
Niemals
zu
vermeiden.
dass
sich
wiihrend
des
den
StartknoPf
Startvorganges
D
^t
ol
.
Auf-lAbblendlichtschalter
Drucken
Sie
diesen
Knopf
um
zwischen
Fern-
l€E
nrru"ndlicht
@]
nnOt"ndlicht
(Fahrlicht
fur den
StraBenverkehr)
a
Blinker:
Sie
verwenden
den
Blinker
entweder
fUr
das
Drehen
Sie
den
ZundschlUssel
auf
"ON",
und
und
Abblendlicht
zu
wechseln.
Abbiegen
oder
fur
das
Wechseln
der
Fahrspur'
schieb"en
Sie
den
Knopf
nach
links
oder
nach
recl
lQ
stinker
rechts
f€l
gtinL.r
links
Wenn
Sie
auf
den
o
Hupe:
lffi
Oie
Hupe
funktioniert
Knopf
in
der
Mitte
des
schalters
drucken
schalten
Sie
den
Blinker
aus'
nur
bei
eingeschalteter
Zundung'
HINWEIS:
BetatigenSiedieHupenichtinGegenden,indenendasHupenUntersagtist'
Page 35

SITZSCHLOSS
o
Offen:
Den
ZUndschlussel
in
das
SchloB
auf
der
linken
Seite
unterhalb
des
Sitzes
stecken
und nach
rechts
drehen.
Der
Sitz
kann geOffnet
werden,
o
Versperrt:
Den
Sitz
nach
unten
drucken,
dieser
verperrt
sich
a utomatisch,
HELMFACH
.
Das
Helmfach
befindet
sich
unter
dem
Sitz.
.
Maxrmale
Beladung:
'lOkg.
a
Bilte
bewahren
Sie keine
Wertgegenstande
darin
auf
o
Verstchern
Sie sich,
dass
das
Sitzschloss
richtig
ejngerastet
ist.
HINWEIS:
o
Den
Zundschlussel
nie
in
das
Helmfach
legenl
a
Versichern
Sie
sich,
dass
das
Sitzschloss
richtig
eingerastet
ist.
o
Ein
nicht
eingerastetes
Sitzschloss
beeintrachtiqt
die
Fahrsicherheit.
o
Beim
Waschen
kann
Wasser
in
das Helmfach
gelangen,
Entfernen
Sie bitte
vorher
alle
Gegenstande.
o
Durch
die
Warme
des Motors
erhoht
sich
wahrend
der
Fahrt
die Temperatur
im
Helmfach.
Transportieren
Sie
keine
wdrmeempfindlichen
Gegenstande
darin,
TANKVERSCHLUSS
1.
Stecken
Sie den
Zundschlussel
in
den
Tankverschluss,
und
drehen
Sie
diesen
nach
recnts,
dann
konnen
Sie den
Verschluss
abnehmen.
2.
Vermeiden
Sie
es
uber
die max.
Markierunq
zu
tanken.
3.
Beim
VerschlieBen
drucken
Sie den
Decke'ihinunter
bis
Sie
ein
"Klick"
Gerausch
horen.
Dies
bedeutet,
dass
der Tankdeckel
verschlossen
ist.
(Der
ZUndschlussel
bewegt
sich langsam
nach links).
Um den
Zundschlussel
entfernen
zu konnen,
drehen
Sie den
Schlussel
leicit
nach
links
und
ziehen
Sie ihn
ab
WARNUNG:
'
Vor
dem
Tanken
stellen
Sie
das
Fahrzeug
auf
den
Hauptstander
und
stellen
Sie den
Motor
aD,
Hantieren
sie nicht
mit
offenem
Feuer
wahrend
des
Tankens,
t
Vermeiden
Sie es
uber
die
Markierung
zu
tanken.
Andernfalls
lauft
der Kraftstoft
uber
den
Uberlauf
aus.
Es
kann
zu
Beschadigungen
am
Fahrzeug
kommen.
o
Versichern
Sie sich,
daB
der Tankdeckel
crut verschlossen
ist.
Page 36

BREMSEN
a
Benutzen
Sie
gleichzeitig
die
vordere
und
hintere
Bremse.
o
Vermeiden
Sie
pldtzliches
Bremsen'
a Vermeiden
Sie
UbermaBiges
Bremsen'
den
die
Bremsen
konnten
sich
dadurch
erhitzen
und
stark
abnUtzen.
a
Fahren
Sie
langsam
und
bremsen
Sie
rechtzeitig
bei
schlechten
StraBenv6rhaftnlssen'
Verhindern
Sie
ein
..Blockieren"
der
Rader
um
nicht
zu
sturzen'
PARKEN
a
Annaherung
an
einen
ParkPlatz:
1.
Setzen
Sie
den
Blinker
rechtzeitig'
nehmen
Sie
Rucksicht
auf
die
Fahrzeuge
die
vor'
rechts'
ltnks
o
und
ziehen
Sie
das
Fahrzeug
Uber
um
einen
Diebstahlzu
verhindern'
hinter
lhnen
sind
2.
Nehmen
Sie
Gas
weg
und
ziehen
Sie
die
Bremse,
wenn
es
notwendig
ist
(Bremslicht
leuchtet
auf'
Jut
Fahrzeug
hinter
ihnen
zu
warnen')
Parken:
o
Brinker
ausscharten,
den
Zundschrusserin
"oFF"-
posrtion
drehen
um
den
Motor
abzustellen'
o
Steigen
sie
vom
Fahrzeug
auf
lig
iinG
s.i,.
ao,
nac.oern
si.
den
Motor
abgestellt
haben'
Suc
Sie
sich
einen
parkplatz,
wo
lhr
ran;eug
den
restliche.n
Verkehr
nicht
behindert'
o Harten
Sie
den
Lenker
mit
rhrer'nken
tiano
uno
nehmen
sie
den
parkgriff
unterhalb
des
Sitzes
lhrer
Rechten.
a
Drucken
Sie
den
HauptstZinder
mit
dem
rechten
FuB
hinunter
Hau
ptstZinderschwerpunkt
nach
hinten'
I
Zur
Erinnerung:
Versperren
Sie
den
Lenker
nach
dem
Parken'
Hinterreifen
Page 37

HINWEIS:
.
Kontrollieren
Sie
ol-
und
Kraftsioffvorrat
bevor
Sie lhr
Fahrzeuc
in
a
Um
das
Fahrzeug
starten
zu
konnen,
stellen
Sie
es
auf
d6n
Bremshebel,
um
ein
plotzliches
Wegfahren
zu verhindern.
Betr;eb
nehmen,
Hauptstander
und
ziehen
Sie einen
U8
Drehen
Sie
den
Zundschlussel
auf
"ON
.
Ziehen
Sie
einen
Bremshebel.
Drucken
Sie den
Startknopf,
wenn
die Bremse
angezogen
ist.
Starten
mit
dem
Kickstarter
.
Drehen
Sie
den
Zundschlussel
auf
oN,
drucken
Sie
kraftic
mit
geschlossenem
Gasgrrff.
a
Falls
der Motor
kalt ist
und
sich
die
Maschine
nur
schwer
starten
lasst,
1/B-1/4
Drehung,
und
das
starten
wird
wesentlich
einfacher
sein.
o
Nach
dem
Starten
des
Motors,
den
Kickstarter
wieder
zuruckklappen,
dem
FuB
den
drehen
Sie den
Kickstarter
bei
Gasgriff
um
eine
HINWEIS:
'
Sclite
der
Mo[or
nach
3-5
Sekunden
nicht
anspringen,
drehen
Sie
den
Gashebel
um
eine 1/B-1/4
Drehung
und
drUcken
Sie den
Startknopf
nochmals.
o
Den
Anlasser
sollte
man
nie
leinger
als 6
Sekunden
betatigen
um
eine
Uberhitzung
des
Anlassers
zu
vermeiden,
o
Der
Motor
kann
schwer
zu
starten
sein,
falls
das
Fahrzeug
langere
Zeit gestanden
und/oder
der
Kraftstoff
abgestanden
ist.
Dann
ist
es notwendig
den
Siartt<iopf
dfters
zu
drucken,
oder
den
Kraftstoff
zu
wechseln,
o
Beieinem
Kaltstart
benotigt
die
Maschine
mehrere
Minuren
um warm
zu
werden.
Aufgrund
der Abgase,
den Moior
nie in geschlossenen
R6umen
starten.
HINWEIS:
a
Das
Fahrzeug
muss
am Hauptstander
stehen,
wenn
der Kickstarter
o
starten
Sie
das Fahrzeug
ab und
zu
mit
dem
Kickstarter,
um
oessen
erfialten.
betailgt
wird.
Fu
nktion
einwandfrei
a,
ufrecht
ZU
Page 38

GASGRIFF
Geschwindigkeitsreduktion
Beschleunigur'
7.
STCHERES
WEGFAHREN
Bevor
Sie
wegfahren'
sollten
Sie
de1
Blinker
einschalten
und
sich
u.rgu*,,=J'n,
Outt
sich
kein
Fahrzeug
nahert'
Wahrend
des
Fanrens
sollten
Sie
immer
aufmerKsam
fahren
und
besonders
auf
Fahrzeuge
Acht
geben'
die
vor
oder
hinter
lhnen
srno'
ROUTINEKONTROLLE
L
l
I
l0
KontrollPunkte
Befindetljeh
genLr
im
OlnenatterZ
Kontrollteile
Bremszustand?
[Bremshe
iel:
'1O-2Omm
Bremsen
R-ifendruck
'1,7
5bar
%tionierendie
Arbeitet
alles
normz
Lichter
ei
[Ehter?
Kann
man
di
ffihometd
Lichter,
RucksPiegel
Sili
sew.hnriche
XnJ"trnq"n
am
Fahrze;g
aufqefM
Weitere
PunKte
HINWEIS:
o
Falls
Sie
irgendwelche
Schiiden
wahrend
der
t.*".i
ii."d"=
Fahrzeug
in
?elrl*:ehmen'
Routinekontrolle
finden
sollten'
bitte
korrigieren
Sie
d5
oder
lassen
Sle
rnli"hrz"ug
bei
einem
"Hiindler
oct
Iut|'orisierten
Servicepartner"
reparleren
Page 39

MAIlr,,olxorurnollE
u |r o w
INSPE-r':!-lCN:
.
Drehen Sie den Zundschlussel auf die
"ON"
Position, falls die
Olstandskontrolllampe
nicht
mehr
erli.'ccht, ist der Olstand zu
gering
und Sie mussen umgehend Ol
nachfUllen.
o
Bei zu
geringem
Olstand stellen Sie lhr Fahrzeug auf den
Hauptstander
und
Kontrollieren Sie
den Olstand am Olmesstab nachdem der
Motor vor
ca 3 bis 5
Minulen
abgestellt
wurde.
W scnen
Sle das Ol vom Olmessstab und stecken
Sie diesen wieder in die Offnunq.
!!Schrauben
S e den
Olmessstab nicht wieder festll
o
Zreren Sie den Olmessstab wieder heraus und kontrollieren Sie ob das Ol
zwischen Minimum
r.-i
rlaxrmum
Markierung
liegt.
o
3= z-:
r.venig
Ol konirollieren Sie den Mctor auf Olausiritt und
fUllen
Sie Ol
nach bis sich dieses
z.'.
s:hen
Min
und
Max
Markierunq befinCet.
MAX
MIN
t
f
WARNL:r:l:
o
i,'.renr
:,i.; lhr Fahrzeug mit zu wcnig Ol
fahren, kann
es
wegen Mangel an Schmierung de!"
Motorteile zu
einem
,.icicrschaden
kommen. Falls
die
Olkontrollampe nicht mehr erloschen sollte,
bringen Sie das
Fahrzeug
ri.--lgehencl zi: lhrem H;indler, dei das Schmiersystem
kontrolliert.
|
\.rer'..r,;s1lsn
Sie nurein 2-Takt-Motor*l,
lautden europaischen Standardanforderungen.
Sollte kein oderfalsches
',,,icicTol
iyer,weneJet
worden sein, ubrrrnimmt der
Hersteller keine Verantwortung fur irgendwelche
Schaden,
Emofohlenes Ol; Sfi*ll Advance Scootr.:r 2.
AuffUllen:
.l
.
Sie
nrussen
das
Fahr zeug
auf seinen
Hauptstander stellen und den Motor abstellen.
Offnen Sie den
Sitz und
enr'e'
rcr-
Sie den
OlLankverschiuss.
2. Drehen
Sie den Oltankverschlt-iss
nach links um ihn zu entfernen, Fullen Sie Ol bis
zur Markierung nach,
3.VerschlieBen Sie den Tankverschluss
wieder und lassen Sie die Sitzbankwieder einrasten,
indem Sie diese
hinunter
d rucKen.
Bemerkung:
.
Wenn Sie
Ol
nachfullen, achten Sie biite darauf, dass
kein Schmutz und
keine Fremdteilchen
hineinfallen
Verwenden
Sie
immer
die
gleich
Olmarl<e, um Schaden
zu vermeiden.
.
Fltllen Sie das Ol bis zur Markierung und nicht
hoher
auf,
[ntfernen Sie ausgelaufenes Ol um den
Einfullstutzen,
a
Versichern Sie sich, dass Sie den Oltankdeckel
nach
dem
Nachfullen
qut
verschlossen haben.
KQN-IRQII=E
DER TAN KFU LLM
.
St.:iien
Sie
lhr Fahrzeug auf sernen Hauptstander und drehen Sie den
Zundschlussel auf
"ON".
Kontrollieren Sie, ob
..lc;il
Cie Trrnknadel bewegt.
e
'::all:,
der
l:,:nk aufqefullt
(kann
auch nur teilweise
voll
sein) ist und sich
dle Tanknadel
nicht bewegt, kann die
'fankatrzeiEe
r.jefeki
oder cler Stromkreis
unterbrochen sein. Fahren Sie
langsam zu einer authorisierten
Fachwerksticte und iassen
Sie
dort
lhr Fahrzeug instandsetzen.
Anmerkung:
Es ist nicht notwendig, lhr Fahrzeug zu starten, um die Tankfullmenge
kontrollieren
zu konnen.
l1
Page 40

INSPEKTION:
oDenGetriebeo|standkannnureineautorisierteWerkstamekontro|lieren
o
Die
Olmenge
b'etrAgt
O'1L
nach
einem
Wechsel'
otwrcusrt:
.FuhrenSieniese|bstandigeineno|wechse|durch,LassenSietechnische
immer
von
*in",
Autoiisierten
-fu.f-,*.rkstatte
durchfuhren'
Sollten
durchgefUnrt
weiOen
erlischt
immer
die
Garantie
Empfohlenes
OL:
ShellAdvance
Transmission
BOW
90
oder
mechanische
Arb€
selbststiindig
Anderun
INSPEKTION:
(Bremshebelspiel
muss
kontrolliert
weroen'
wenn
der
Motor
ausgeschaltet
ist')
l0m-?0&$
.
Bremshebelspielfur
die
Vorder-
und
Hinterrad
Wenn
Sie
den
er;mshebel
fur
den
Vorder
und
Htnterreifen
kontrollleren,
,of[u
Ou=
Freispiel
(der
Beretch
vom
N
ichtbremsen
Oi
J')u
m
leichten
Brem
sen)
1 O
-
29
1I1,!e-tra9en'
Die
Bremse
dart
nicht
schwammiE
sein'
wenn
man
sie
zieht'
Einstellung:
o
Das
Anziehen
der
Bremseinsterungsmutter
wird
mit
diesem
Borzen
eingerichtet
(siehe
rechte
Seite)
''n"""'"n=--{bffic
Bcrzen-ffi7
12
5'ilrYri,lt'r'.n
das
Freispiel
zwischen
1o-2o
mm
berindet'
kontrollieren
Sie
die
Bremseinstellung
der
Vorder-und
Hinterbremse'
sti*'it"
Cer
-pfeit
Oes
Biemsarmes
mit
der
Markierung
cer
Trommelbremse
uberein
heiBt
das'
dass
die
Bremsbelag.
uofJ;utzi
sino
und
diese
umgehend
erneuerr
werden
mussen.
Page 41

a
Drehen
Sie die Einstellungsmutter
am Bremsarm
des
Hinterreifens,
um das Spiel der Handbremse
einzustellen,
Halten
Sie den Bremshebel
mit beiden Handen
gezogen,
bis Sie
einen
Widerstand
spuren.
Um das
Spiel
zu
vergr6Bern
Einstellschra
u be
Um das Spiel zu verkleinern
teres Limit
Schauglas
a
Stellen
Sie
lhr Fahrzeug
auf eine ebene
Flache, und
kontrollieren
Sie ob der Flussigkeitsstand unter
der
"
LOWt R"Marke ist. E m
pfohlene
Bremsflussigkeit:
CASTROL
SUPER
DISK BRAKE FLUID DOT 4,
Bremsbelag
-
Kontrolle
Scheibenbremse
Bremszange
Schauen Sie von hinten
auf den Bremssattel.
Die
Bremsbelage mussen
erneuert werden,
wenn diese abcefahren
sind.
L9tln
{trs}u_
l
o
Visuelle lnspektion
ob Schaden aufgetreten
sind. Falls
etwas nicht in
Ordnung sein sollte,
bringen Sie lhr Fahrzeug
zu einer
autorisierten
Werkstatt.
Page 42

HINWEIS:
-
--.^^^nir--i^r,^ir
p.rornc.fliissicrkeit
ist
eine
qetahrllcne
>uD:
wechseln
Sie
niemals
selbststandig
die
Bremsflussigkeit.
Bremsflussigkeit
ist
eine
gefahrliche
Substanz
;
"il;
;";
lin
et
r
u c
rtwerkstatte
g ewec
h selt
werd
e
n
EINSTELLUNG
DES
GASGRIFFSPIELS
.EinekorrekteEinstel|unger|aubteinGasgriffspielvon2-^6mm.
o
Lockern
Sie
die
Sicherungsmllt.i:
und
siellen
sie
mittels
der
Einstellmutter
das
Gasgriffspiet
"jn]S|Cnlfn
Sie
diese
wreder,
wenn
Sie
fertig
sind
2-6rrun
Einstellmutter
SicherungsmL
es
nicht
notwendig
diese
sollten,
bringen
Sie
lhr
.
lhr
Fahrzeus
ist
mit
einer
wartungsfr:::i^B::t^::i:,:::g."'T.?::::i:HtiJt"'
'J:
l"T
f,
:*?;'.
;";''l;
;";
#
;i
;,:l
[ig
:l9y
e I c
h e
S
to
r u
n
s
e
n
a
u
rtr
ete
n
;
;;:";;
;;;ner
a
uthorisierte
Fachwerkstatte
Entfernen
Sie
die
BatterieanschlUsse
um
diese
von
Schmutz
t
Korrosion
zu
befreien'
Entfernen
der
Batterie:
Drehen
Sie
den
Zffdschlussel
auf
"OFF"'
Entfernen
Sie
zuers
Schraube
vom
Negaw[of
unO
klemmen
dann
das
Negativkab€
Dasselbe
machen
Sie
am
positiven
Pol'
HINWEIS:
.
Saubern
sie
den
Batterieansatz
mit
warmem
wasser,
fa's
die
pore
korrodrert
sind
oder
fats
Sle
v
. F:,',:t:T
H::Ji,3f;:
^orrosion
sehen,
enrfernen
sie
die
Kaber
und
saubern
Sie
die
Kontaktste
die
Kontaktstellen
mit
etwas
Pol-
Fet
einem
ReinigungssPraY'
o
Montieren
Sie
di'e
Batt6riekabeln
wieder
und
schmieren
Sie
.
Montieren
Sie
oi!
Auiitti"
in
umgekehrter
Reihenfolge'
wie
Sie
diese
demontiert
haben'
14
Kontrolle:
1,
Kontrollieren
Sie
das
Gasseil'
ob
man
es
von
einer
geschlossenen
zu
einer
offenen
Positlon
drehen
Kann'
2.
Drehen
Sie
den
Lenkerkopf
hin
und
her
und
kontrollteren
Sie'
oll
das
Kabel
nicht
st6rt'
3.
Kontrollreren
Sl'e"
oO
das
. .Seil
nicht
behindert
wird'
um
Funkttonsstorungen
zu
vermeiden'
Sr
Page 43

o
o
HINWEIS:
Es ist
eine
geschlossene
Batterie. Entfernen Sie den Deckel niemals,
Bitte
beachten Sie folgenden Hinweis: wenn
Sie
lhr Fahrzeug
fur langere Zeit
nicht in Betrieb nehmen
werden,
entfernen Sie die Batterie vom Fahrzeug
und
lagern
Sie diese
in
einem
gut
belufteten
und
warmen Raum, nachdem
Sie diese
voll
aufgeladen haben, um eine Entladung bzw, ZerstOrung
der
Batterie zu vermeiden,
Trennen Sie das Nlassekabel von der Batierie, falls
diese
im Fahrzeuq bleiben
soll.
Falis
Sie eine neue Batterie brauchen, verwenclen Sie unbedingt den
gleichen
Typ wieder
(wartungsfrei).
o
REIFENKONTROLLT
o
Das Profil
und der
Reifendruck
sollten
kontfolliert werden,
wenn
der
Motor abgestellt
ist.
o
Kontrollieren
Sie, ob die Reifen den vorgeschriebenen Luftdruck
aufweisen.
Falls nicht, lullen Sie die
Reifen auf den vorgeschriebenen Luftdruck
aui.
(siehe
Punkt B)
o
Der Reifendruck
sollte mit einem Luftdruckmessqerat kontrolliert werden, wenn die Reifen kalt sind.
BEACHTEN
SIE
DEN VORGESCHR
BTNTN LUFTDRUCK
Schmutz
(Nagel
oder kleine Steine)
a
Visuelle Kontrolle
der Reifen an
Seiten-
und Laufflache, ob
lhnen
irgendwelche SchSden auffallen.
a
Visuelle Kontrolle der Reifen, ob
sich
Nagel
oder
kleine Sterne eingefahren
haben.
o
Kontrollieren
Sie den
Profiltiefenindikator,
ob die Reifen noch
funktionstuchtiq
srnd.
o
Sollten die
Reifen verschlissen
sein, mussen Sie sofort ausgetauscht
werden,
HiNWEIS:
Abnormaler Reifendruck, verschlissene
oder brUchige
Reifen
konnen
platzen
und zum Sturz
fUhren,
Risse und
Sprunge
mrnd.
Profiltiefe
Page 44

o
a
O
a
Fuhren
Sie
diese
Kontrolle
aus'
wenn
der
Motor
Zundschlussel
entfernt
ist'
abgestellt
und
der
Visue|leKontro|ledervorderenStoBd2impferaufirgendwelche
Schaden
und
Olaustritt'
Bitte
uberprufen
Sie,
dass
das
Bremskabel
die
Lenkung
nicht
beeintrachtigt.
BringenSie|hrFahrzeugineinederautorisiertenFachwerkstaten,fa||S
It
""-n
irgendwelcne
Scnaden
auffallen
sollten'
rlvl ILI\vlrvvYf
E-'
Ziehen
Sie
den
Zundschlussel
ab
und
kontro"i:1?i?1";,"R,:'3i.1^',::'iln':
[:{ffiS3"i"':i,r;=.?ti:[
ii:iTff
i#"',i.:t:ru',"1i:'ffi
J;:il"''*::]:i',***:lr*ff
ffi
::j:lig:,X:fr'J:3i:
:5iT:iE:$?H:Jff::if;#i5'T"ffJ5'.H:1'^"_1[""'*;T::;JAH'3iJi'l;:1,:?g';1'*'
3"J$?J,::T"1S:::!:'il'il|:?i':iil'J::il?;?:'il*
'no
onnun
Sie
diese
Die
Sicherungen
berinc
sich
in
der
Sicherungsbox
beider
Batterle'
sich
in
der
Sicherungsbox
bel
der
salLelre
.-^^
^^^-inrnn
Rorrinrrrnnen erfullen,
Falls
Sie
and'
Bhte
verwenden
sle
nur
Eratzteile'
q9
,
ditt:^:?.:fl::^??**:n':?ol-,"rorund
entstehen.
.
pi,::J$y;:,T:JS"
#,i,#
i';;;
ii.!i.n.'*g
d'urchbrennen
oder
ein
Kaberbrand
.rac
FahrzFl rcres nass
wercen.
i
:=,*'J,:
:'""3
:::
:
:="
I
:3
tX
t
ft
.i'
L
"
i.
w
a
s
ch
e
n
d
e
s
F
a
h r
z e
u
s
e
s
n a
s
s
w
e
r
d e
n
tzciari falls clie Sicherunq
ohne
ersichtlicl
:
x:illf?LliT;
ESii#;s1,;;;i',t.n-u,to'.i,ierren
werkstart,
fails
die
sicheruns
Grund
durchgebrannt
ist'
INSTALLIEREN
Elektrokabel
Sicheru
ng
sstecker
Sicherung
t6
ENTFERNEN
Von
oben
hineindrucken
Page 45

KONTROLLE
DFR
BLINKLICHTER
UND DER
HUPE
.
Drehen
Sie den ZUndschlusselin
die
"ON"
position.
.
Schalten
Sie
den Blinker
ein und kontrollieren
Sie,
ob alle Blinker
(hinten
und vorne)
funktionieren.
Kontrollieren
Sie
auch,
ob
die Anzeige
in
den Armatouren
richtig
funktioniert.
o
Konlrol,ieren
Sie,
ob
die Blinker
nicht
verschmutzt
oder
beschaoigt
sinc
.
Drucken
Sie die Hupe
und kontrollieren
Sie
ob diese
richtiq
funktioniert.
HINWEIS:
o
Beachten
Sie beim
Wechsel,
ob Sie
die richtige
Gluhbirne
fur
die Blinker verwenden.
Ansonsten
Kann
es
passieren,
dass die
Elektrik
einen
Schaden
erleidet.
o
Schalten
Sie die Blinker
ein,
bevor
Sie die
Spur wechseln
oder
abbiegen
um Andere
zu warnen
o
Schalten
Sie
den Blinker
wieder
aus, nachdem
Sie den
Voreanq
beendet haben.
KONTROLLE
DER
FRONT-UND
RUCKSCHEINWERFER
Starten
Sie den
Motor
und
schalten
Sie
die Scheinwerfer
ein, Kontrollieren
Sie, ob
die Lampen
leuchten,
Kontrollieren
Sie die Helligkelt
und
die Einstellung
des Frontscheinwerfers
an
einer Wand.
Kontrollieren
Sie den
Scheinwerfer,
ob
dieser verschmutzt
oder
beschadiqt ist.
KONTROLLE
DES BREMSLICHTES
Drehen
Sie den
Zundschlussel
in
"ON"
Position,
ziehen
Sie
den Bremshebel
abwechselnd
fur cas
Vorder-
und Hinterrad
und
kontrollieren
Sie, ob das
Bremslicht
leuchtet,
Kontrollieren
Sie, ob
das Rucklicht
verschmutzt
oder
beschadiqt
ist.
HIN\I/EIS:
o
Verwenden
Sie nur
die vorgeschriebenen
Gluhbirnen.
Ansonsten
kann
es
passieren,
dass cas
elektrische
System
einen
Schaden
erleidet
oder
die Gluhbirnen
durchbrennen.
.
Verandern
Sie nie
die
elektrischen
Komponenten,
da es
sonst
zu einem
Kurzschluss
oder Kabelbrand
kommen
kann.
KONTROLLE
DER
BENZINLEITUNG
o
Kontrollieren
Sie
den Tank,
den Kraftstoffschlauch,
und
den Verqaser +
Motor
auf Undichtheiten.
KONTROLLE
DER
SCHMIERUNG
VON
ANBAUTEILEN
o
Fetten
Sie
gelegentlich
die Lagerstellen.
Zum
Beispiel:
die Lagerbolzen
vom
Hauptstander,
vom
Seitenstander
und vom
Bremshebel...erc
a
a
a
a
Page 46

WARNUNG:
Nach
dem
Fahren
ist der
MQtor
sehr
heiB'
Verwenden
Sie
nur
original
Zundkerzen,
die
vom
Empfehlungen.
NGK
-
BRTES)
KONTROLLE
DES
LUFTFILTERS
AUSBAU
1.
Entfernen
Sie
die
Schrauben
von
der
Luftfilterabdeckung
und
nehmen
Sie
diese
ab.
Danach
entfernen
sie
die
Montageschrauben
von
der
Schutzabdeckung.
Z.
Entfernen
Sie
die
Abdelkung
des
Luftfilters
und
losen
Sie
die
Schrauben
des
Luftfilterelements'
3.
Nehmen
Sie
das
Element
heraus,
saubern
oder
ersetzen
sie
es,
wenn
notig.
(beachten
Sie
den
Wartungsplan)
4.
Siehe
rechte
Seite:
Reinigungstips
EINBAU
o
Bauen
Sie
den
Luftfilter
in
umgekehrter
Reihenfolge
(Schritt 3-1)
wieder
ein.
KONTROLLE
DER
ZU
N
DKERZE
a
Entfernen
sie
den
zijndkerzenstecker
(entfernen sie
die
Zundkerze
mit
Hilfe
des
Zundkerzenschlussr
.
Kontrollieren
Sie
die
Elektrode,
ob
diese
verschmutzt
oder
abgebrannt
ist'
o
Entfernen
Sie
die
RuB
Ablagerungen
an
der
Elektrode
mit
einJm
Reinigungsspray,
oder
reinigen
Sie
c
zindkerze
mtt
Benzin,
undlrocknen
Sie
diese
mit
einem
Tuch,
o
Kontrollieren
Sie
die
Elektrode.
wenn
der
Elektrodenabstand
nicht
mehr
stimmt,
erneuern
Sie
die
Zundkerze.
(Kontrollieren
Sie
dies
mit
einer
Schublehre.
o,6-o,7mm)
a
Befestigen
die
Oie
Z1ndkerze
wieder
und
ziehen
Sie
diese
fest.
Vorsicht
Verbrennu
ngsgefahrl
!
Hersteller
empfohlen
werden
(Beachten
Sie
<
Anleitung
zur
Reiniqung
de
Luftfilterelements:
-._
/
w
t:i/
1,
Reinigen
ffi
kl/
3,
Eintauchen
in
4. Auswlnoen
Motorol
HINWEIS:
o
Schmutz
ist
eines
der
meisten
Ursachen
von
Leistungsverlust
und
einem
erhdhtem
Verbrauch
Kraftstoff
.
.
Wechseln
Sie
den
Luftfilter
regelmaBig,
falls
Sie
Ofters
auf
staubigen
StraBen
fahren,
um
den
Motor
schonen,
a
lst
der
Luftfilter
unsachgemaB
montiert,
kann
der
Staub
in
den
Brennraum
gelangen'
Dies
kann
zu
etl
vorzeitigen
Abnutzung-und
einer
dauerhaften
Beschiidigung
fuhren.'
..
:
.
Achten
sie
beim
waschen
darauf,
dass
der
Luftfilter
il.t-'i
nust
bleibt.
Ein
nasser
Luftfilter
kann
Startschwierigkeiten
fUhren.
I
Page 47

9.
FEHLERSUCHE
.
Steht
auf"ON"
Frlr
der
ZUndschlussel
Position?
lst
genugend
Treibstoff
Tank?
Fernlichtschalter
Blinkerschalter
tm
FUr
""..*ffixffiderrad
o
Haben
Sie
die
Vorder-oder
Hinterradbremse
gezogen,
wahrend
des
Startens?
Bringen
Sie lhr
Fahrzeug
zu
lhrem
Handler
oder
gibt.
Hupe
a
Drehen
Sie
den
ZUndschlussel
auf
"ON",
und
drucken
Sie
die Hupe.
Horen
Sie
keinen
Laut,
ist
wahrscheinlich
die
Sicherunq
durchgebrannt
oder
die
Batteri5
leer.
zu
einer
authorisiertern
Fachwerkstatte,
falls
es
prombleme
t9
Page 48

10,
WARTUNGSPLAN
Bemerr
Lenkerverhalten
und
Griffe
Austausch
alle
3OOOKM
oder
6
Monate
Gasgriff
und
Gasseilzug
Schrauben
und
Muttern
(Motor)
/.nin.lar TvlinderkoPt'
Kolben
Federung
vorne/hinten
Bremse
und
Bremsleltung
Schrauben
unci
Muttern {alle)
eterleistung
von
Boo
Kilometer
pro
Monat'
Lassen
sie
rhr
Fahrzeus
resermziBis
beieinem
autorisierten
-::::'":::t^f
i[:::::"ff
T"",T:ff:;T-t::;ff::rzeus
in
sutem
zustand
breii
:::::''
i'i
ilT:';::ru;ffi
;;
;
;
:
;usta
u
sch
*
-
*'
:ln " 1.::::: :T :^:::ff; J;"'#*'
"
Bemerkung:l.ReinigenodertauSChenSieIhrenLuftfi|termehrmals'fallssieoftersaUfstaubigenstraBenfahren,
2.
sorten
sie
regermaBig
Ho,chstgeschwindigkeitfahren
und
das
Fahrzeug
einen
hohen
Kirometerstand
erreicht
haben'
rassen
sie
ofr
PIan
ang"egeben
ein
Service
macner'
20
Page 49

11,
Garantierichtlinien:
Vor Inbetriebnahme lesen
Sie bitte die Wartungs- und
Bedienungsanleitung
grUndlich
durch. Wie bei
jedem
Fahrzeug, zahlt
sich
korrekte
Bedienung und Wartung
aus.
Allgemeines
Verwenden
Sie eine
geeignete
Schutzkleidung. VorAntrittder
Fahrt muss das Fahrzeug auf seine
Verkehrssicherheit
u berpruft werden :
.
Korrekte Funktion der Bremsen
.
Vorgeschriebener
Luftdruck
der
Reifen
.
Funktion
aller Signal- und Beleuchtungseinrichtungen
.
Zustand von
Motor und Fahrwerk
\/arAnrlorr Innan
am Fahrzeug konnen
die Konstruktion und Leistung
des
Fahrzeugs
beeintrachtigen,
""Y"'
Beachten
Sie die
gesetzlichen
Bestimmungen.
Umbauten sind
gesetzwidrig,
sie k6nnen sich negativ
auf die Fahrbereitschaft
und die Lebensdauer
des Fahrzeugs auswirken, Zudem erlischt die
allgemeine
Betriebserlaubnis,
der
Versicherungsschutz
und die
Garantie.
Curunti"
Gewiihrleistung
In
allen
Fallen
der 2
jahrigen
EU-Gewahrleistung kann
sich derVerkaufervon den AnsprUchen auf
Aufhebung
des Vertrages
oder
auf Preisminderung
dadurch befreien, dass er in angemessener Frist
die
mangelhafte
Sache
gegen
eine
mangelfreie
austauscht, bzw. in
angemessener
Frist in
einer
fur
den Kaufer zumutbaren Weise
eine
Verbesserung
durchfuhrt oder das Fehlende nachtragt. lm Falle
der Wandlung und der dadurch
bedingten
Ruckstellung
des Kaufgegenstandes durch den Kaufer, hat
dieser
dem
Verk2iufer
eine angemessene Abgeltung fur
die
BenUtzung
zu
leisten,
Gara
ntiebestirn
m u ngen
Der Verkaufer
leistet bei Neugeraten, im Rahmen
der vom Lieferwerk
geleisteten
Garantie
fur eine
dem
jeweiligen
Stand der Technik entsprechende Fehlerfreiheit
des Kaufgegenstandes in Werkstoff
und
Werkarbeit
wahrend der Dauer von
-12
Monaten
ab Kaufdatum
(Datum
der Rechnung bzw.
Garantiemeldekarte) des Kaufgegenstandes
auf Motor
und Getriebeteile, wobei sich die
Garantieleistungsdauer von
-6
Monaten
auf den
kostenlosen
Ersatz der fehlerhaften Teile
beschrankt, die
hierzu notwendiqen
Lohn-
und
Frachtkosten
jedoch
vom Kaufer zu
tragen sind.
Die
Garantie und Gewahrleistung wird ausgeschlossen, wenn
der Kaufgegenstand Uberbeansprucht
wuroe.
Garantie- und
Gewdhrleistungsanspruche werden nur
dann berucksichtigt,
wenn
sie
nach
Feststellung des Mangels
unverzuglich beim Verkaufer oder
einer autorisierten
Werkstatte
schriftlich
erhoben werden.
Page 50

=-:]--:::-
Der
Garantreanspruch
errischt,
wenn
der
Kunde
die
V_orschriften
der
Behandrung
des
Fahrzeuges
(Bedienuns,
wartuns
u1{
nfJeoel
.n,rErJ)]..';;;;;t';"ititotlniti*ns'
insbesondere
der
{uit..int"tvalle
nicht
einhalt'
-nrrria
Frsatz von
Verbrauchsmaterialien.oder-::::::::'
Ebenso
sind
VerscnreiBerscneinungen
sowie
Ersatz
von
Verbrauchsmaterialien
oder
Betriebsmitteln'
sowie
Bauerien,
n"ii""
,no
Schlauche,
X"ppr'"gen'
erem;en
Gluhbirntn
'nd
Sicherungen
von
den
H"iii"lr"rgarantien
ausgenommen'
Narurricher
VerschreiB
und
Besch-.1g:ns.n,
die
auf
Fahrlbslek*'
"it^1t-19:,il:i:rFf*311,*?
r'"0
Lagerung
und
Aost-e'l-luin
gott
[ll?$'
;"*"
'nsachgemiiBen
Transport
zu
von
der
Garantte
unl
0""'
Gew2ihrleistung
ausgeschlossen'
Die
Garantie
errischt
soforr,
sobard
der
Kaufgeg:n=.^T:-yon
dritter.s:lt11Y:th
eine
nicht
autQrisierte
werkstatte,
oder
durch
Einbau
von
nictri
orilin-aten
oo",
u-om
uersteter
emfohlenen
Teilen
verandert
wurde,
insbesondli"
o"i
leistungsverandernden
MaBnahmen'
Keine
Garantie
und
Gewiihrreistung
besteht
bei
Fahrzeugen,
Ersatzteiren
oder
Zubehor
das
kostenlos
zur
Verfugung
gestellt
wuroe'
Anderungen,
Satz-
und
Druckfehler
vorbehalten'
Page 51

1.
AVANT
L'IJTILISATION
Ce
manuel
decrit
.l,utilisation
appropriee
de
Illl"_1"^:.
simpres
de
revision
et'ainsi
de
suire.
;;;;;
ce
scooter
:
mesures
de
securite,
Pour
une
utilisation
confortable
et
en
Au
cas
ou
les
caracteristiques
et
la
conception
du
scooter
seraient
modifiees
et
differeraient
des
photos
"i;;;;s
pr6sent€s
dans
re
manuer;I;=
cararogues
du
;:J"t"T;-nnaire'
les
caracteristiqr"=
et
Ia
composition
du
scoorer
reer
doivent
2.
MESURES
DE
SECURITE
ll
est
tres
important
d'6tre
d.tendu
et
habire
de^^f3rgn
appropriee
rorsque
vous
[illF1,"f'::,'::?="J:?.[in"*::r
JT5?::il
:":"nse,a
rou,e
et
ne
ru,,,o,i
D'habitude
la
oluoart
des
gens
tont,.or
pruoenis
au
guioon
de
reur
nouveau
scooter,
'ffi:,"1";.,i1,";,,i"":?:::5ffj.T:"Xy".'iil,iJ,"-,,'
";a
;iance
a
devenir
ATTENTION
!!
;::*"Jf
::
:,'"
: :,,ll,i'
"j,?y:,:
p,
f :,-o _
:
c
h
a p p
em
e
n r
ro
rs q
u
e
Rff;3Yi?,,i=,::i,yi::*
u,t
*i{L=-piJ;!;,1:;:1,""1=,:J,"
vous
transportez
un
3?:T
ji%'ff
?:.,*::*::
j:i:i-1"ff;;:,il:-"'.:f
i,iJ:":haud
faites
attention
i,ff"?':J;:;::i',"j::,:j':i"1?ffi
;;#':ffi
l''":1",ilJ?,?J5l
y.?
I
5
ffi'.1'5
ffii:
A.'.""'^
:3*j
;
ffi
#J
I
5'l':To:Jo:':
"#i,?'
;
I
"
o
"..
o
n
n
e
n
e
s
e
brole
avec
le
pot
d,echuppJ-""t
Merci
de
votre
suivi
Afin
de
maximiser
res
performances
de
votre
scooter,
ir
est
necessaire
entretien
et
des
v_erifi&tion.
p".i"oiques.
lror=
,rous
recommandons
votre
scooter
chez
votre
concessionnaire
p;;;
un"
p.._idre
revision
parcouru
res
500
premiers
kitomctres.
nti".,tion',
vous
perdez
tous
tez
pas
le
calendrier
d,entretien.
de
faire
un
d'emmener
apres
avoir
droits
a
la.
A
nnppgr_
-
Portez
un
casque
et
ajustez
correctement
la
jugulaire.
- Evitez
de porter
ot=
olo's*;;;".
les
manc-he1
amptes
pour
n,eges
ne
se
coincent
pas
dans
re
quidon,
ce
qui
affecterait
tes
conoitio-n's'oe
securite.
- F:#J::::h
f*:ryn:ii5's,ioon,
";J;;;;=
conduire
d,une
seure
main
;EXt:",At:.5;t:;Irtt
reviser
votre
scooter
de
raEon
r*su,ere
seton
te
Page 52

PRtJDENCE:.Tt^..auScooterpeuVentaffecterSa:I,Til;::;?
[:=;"#$t:""1'-5#$,:i;'3:;r.::m="i::*::.3,::':].hft
*l;6;i"q
ft"""T3gETT:":;
;l:
^'^::i"";t;:
'
ra
concep''"'
;;;;iu"ti"
Ne
modiriez
donc
Un
scoote,
*".t'l:-:+:fi,.",.-u'et'"
'o'uert
par
auc
4-.-;
;;=;";oter
a
votre
suise'
1
;:.1:'iiqqrk%1"t:H#:itdifi[
i:=fi
=jli:"*..""?T*h["TyJ::i
jsd#:?:d1*,'G'#;;;.;irainer
Dosition,
consel
prace
a
rarriere
ou
sieie'
t"
ryi9:::':"';ff";;;",t
devenir
o"'.n?::ls
'interieur
un
erret
oe
suroJriJsJ
c"i9y:",3:""::T"t3:."J[;;;;"
??l :Tl,incrine
pas
son
,,';;i'ptu=
='i-ple
de
tourner-lol?1;;rr",.-"
=.
sentira
pas
stable
s
tt
I
iJ
tttge'
D'autre.
?3tt
lt
conclucteLrr | 'u
. ,^- nnnrtitioFls
de
conduite
:il:'"g'"'j;
::T:-""";":;;"teuses
ou
e:1--!ente'
res
:TdI':'l'=
"*
FifuE
-
Sur
les
routes
Deuvent
"nu.s"i-tiJt
=o'u"""-
"!"o'i
p"ut
ull:'j':;'
ffif;="'3i'te!"
ialentissez
;'ir*:i$fiTj:giil*'[,f
*i*ftttt*r*"*r'nc"nne-"n']
-
Suggestion
:.afrn'oe:-":';:;;;ts
sur
les
cale
pieOs
avarrL
I'rur"vr"-
guidon,
ne
cnargez
Pas
d'objets
,rente
se]9
n
.1Y :
1,"
scooter
=:-,:l
t:3",
:::::
"iJ
L.'=".="a:T,-=tit
lr"
-pivoter
te
gurooi-r
et
attectera
donc
la
securtte
itrl':%
ffi:"
j'7:
="i"
"-'
"
pRIJDENCE
:
, - L^^a^a. arx
endroits
qui
ne
sont
pas
conqus
pour
Ne
charge
z
pas.g"
9:g:?:::*:"Qrr
u'L)
,^
^^rrrp
sous
la
selle
et
le
Ne
charsez
pas
'q#t1tffi;:"1*;:.,,..=
simiraires
entre
le
corf19,;^o:=.
':.ffiX?uil.'"
xi.*#*+,,ffi"'iiTT,ji*[s"",i/?';.''fr
FL?ilIE"i-tt".""""""
Tu"ortTtoN.'
,^-
^arr^rins.lces
et
la
duree
d'utilisation
de
vo
Arin
de
max,m,ser
res
perrorTT:?;
;tn"t'H=""=;;l;;eiioo"
9"";:[?n"t5;J'=;.
oremier
mois
ou-'fes
tbOO
p'"-iers
kilometres
=o'[tu={u"s
et
de
r
scooter
et
ses
t";t;tt";;'
-ruit"t
les
acc6leratlons
l"
tongu"s
distances'
Page 53

Cliqnotants
4.
UTILISATION DES PIECES DETACHEES
D'ORIGINE
Afin de
conserver
les meilleures
performances
de
votre
scooter,
la
qualite
des
materiaux
et de
chaque
composant
doit €tre conforme aux exigences de
la
conceptiondu v6hicule. Les
pidces
ddtachees
GENERICont 6t6
conques avec
la
m6me
qualite que
les materiaux
utilis6s
pour
les
pieces
d'origine du scooter.
Aucune
piece
ne sera mise en vente avant
qu'elle
ne
soit integralement conforme aux
caracteristiques
de la societe
gr6ce
a une ingenierie
sophistiqu6e
et a un contrOle de
qualite
rigoureux. ll
est donc
n6cessaire
d'acheter /es
pidces
d6tachdes
GENERIC chez les revendeurs
agrdes GENERIC lorsque vous devez changer
une
pi6ce.
Si
vous
achetez des
pidces
de
substitution ou des
pieces
bon
marche,
nous
ne
pourrons
vous fournir aucune
garantie pour
la
qualite
ou
la
duree d'utilisation
de la
piece.
Ceci
peut
egalement engendrer
des
problemes
inattendus et
diminuer
les
performances
de votre scooter.
Utilisez toujours des
pr-dces
ddtachdes
GENERIC si
vous voulez conserver
l'efficacit6 d'origine
de
votre
scooter et
lui
assurer une lonque duree d'utilisation.
5. MODE D',EMPLOt DE
CHAQUE COMPOSANT
Jauges
Odometre
Compleur de
VITESSC
Jauce a essence
Voyant de
plein phare
Vovant d'huile
PRUDENCE
:
Afin
d'eviter des
d6g6ts,
n'essuyez
pas
les
composants en
plastique,
comme
le
tableau de
bord ou les
phares
avec des solvants biologiques.
1
-
Jauge d'essence :
L'aiguille sur
cette
jauge
indique
le niveau de carburant
qu'il
reste dans le reservoir.
L'aiguille
reste sur la
position
E lorsque le
demarreur est sur OFF. Lorsqu'il est sur
ON et
que
l'aiguille
est en
position
E veuillez reapprovisionner votre
scooter
en
essence
Page 54

2-
CtifflQlary
^rrection
zl
gauche
ou
a
droite
clignotera
lorsque
vous
aurez
indiqu6
L'indicateur
de
oll
votre
direction'
3-
voyants
de
pl-e-i!9+-Lr3fqs-tus
attumez
les
pleins
phares
Ce
voYant
s'allume
l(rr
svur
4
v"y..I
ruf=:yt3:::J%ftv";?Ht:;*:i
d"
lY:1:d'hune
":1
6e1?i1:
en
continu
cera
Tournez
le
d6mar
signifie
que
le
nrveau
d'huile
"t..,L?il;='
raloute)atit"iO'r't"ile
que
n6cessatre
#J[.["XY:#?J'""'ii;qg
:-"-:,,""',"!"Jf;"0;;ll:#;l;:-';;#" "n
'on'in'
'-"
ffi
{?,r#yT,:Tri*,lll=*=.'i"%'H:['ii":.J;';;;"t':d^';ili'.':i;'?T="oi:
';,%""?#:;il"*,#i?;1i",*'lir;;1=H;t""x3"ii^"i;?5':?':x?"
y'vv'v"-""
-
nrnl'\f\/lf\/IANIDEE
"
Snell
n"""-
-ATTENTTON
:
,.n nirr^2, d'huile
trop
bas
peut
provoqY"t,'n,'
Eonlinr"r
?r
rouler
avec
un
niY"?'-":
du
au
manque
de
-r-ubrirrca:"'.:;:r:j,'"t':."
t'?;"n
5:#l:'=1:l*,.:"
i*:jt;
s-
c"mptgi,rle*';t3t;?fi=se
en
kilomdrres
par
heures
((km/h)
ll
vous
indique
vot
o-
Odomdtre
:
cet
odomctre
vous
indique
le
nombre
totar
de
kiromotres
effectues
par
ce
v6hicule'
Po:yliJ"tiis
rimites
de
viresses
pour
assurer
une
conduite
en
toute
securite
Page 55

FONCTIONNEMENT
DU
CONTACTEUR
A
CLE
IOM
Postrion
demarrage
contacteur
a
cl6
.
Dans
cette position
vous pouvez
demaner
le
moteur.
-_:
Vous
ne
pouvez
pas
enlever
la
cle
de
contact.
IOFFI
Position
arr€r
'
Le
moteur
est
arrote
et ne peut
pas
6tre
demarre
dans
cette position.
,
.
,
Vous pouvez
enlever
la
cl6
de
contact.
ILOCKI
Position
verrouillage
o
Tournez
le
guidon
a fond
a
gauche,
enfoncezla
cle
et
tournez
la
cl6
en
but6e
sur
la gauche
sur
la
position
verrouillage.
'
Dans
cette position
le
guidon
est
verrouille
et
vous pouvez
enlever
la
cle.
.
Pour
deverrouiller,
tournez
simplement
la
cle
jusqu,a
la
position
oFF.
PRUDENCE
:
Ne
jamais
tourner
la
cle
de
contact
quand
contact
vers
OFF
ou
vers
LOCK
arrOtera
les
grave
accident.
Vous
ne
pouvez
donc
completement
arrete
votre
scooter.
Avant
de
quitter
votre
scooter,
enlevez
systematiquement
la
cl6
et gardez
la
avec
vous
apres
avoir
verrouille
le
quidon.
Si
le
contact
reste,
sur
oN
"trop
longtemps
apres
que
le
moteur
ait
ete
arr6te,
la
batterie
peut
se
decharger
et
ceci peut'affecter
les
capacites
de
demarrage
du
moteur.
le
scooter
est
en
marche.
Tourner
le
systemes
6lectriques
et
peut
causer
un
eteindre
le
contact
qu'aprds
avoir
UTILISATION
DES
BOUTONS
Bouton
de
plein phare
lcrg
nota
nt
Bouton
de
phare
demarreur
klaxon
Switch
Page 56

VoYants
lYmineux
|tJt-orsque|eVoyantestSurcetteposition,lesphares,|efeuarridre,le
ffi
n:*,5";*;iil"":,:*".=Ji."J;::l,1ltri=",*a,..icre,retab'|eaudebord
gT:lff
Ji"'ffi
;!?::i
-i#
::""
position,
toutes
res
ru
m
ieres
s'
6tei
nd
ront
Giter"nt
selon
les
modeles)
NOTE
:
feu
de
position
.:','u
fuu
peut
indiquer
!"'!::t"nce
du
vahicule
brsque
iJ
'Z--pt
est
ptuvieux'
brumeux
ou
sombre'
o
D6marreur
6lectrique
:
.
-
Ceciest|eboutondud6marreurelectrique,].?".tird6marrerlemoteur.
rx-,
euand
ru
.rJJ"
.ontact
.r.
,'il
rl'"p"iiJ"r
9l
3itL;R;g'.de
de
frein
gauche
!\7lt
serr6e,
appuyez
sur
t".,oo'lion
-pou'
raire
iimuit"'
i"
moteur'
c'est
un
mecanism"
l;
s6curit6.
rr
raut-ioi].
ou"
|a
;ft;"
o"
frein
soit
actionn6e
avant
d'aPPuYer
sur
le
oo"on'Poil'qi
pRIJDENGE
:
.-^^
-r>!e
nr rA \/ous
avez
d6marr6
le
scooter.
Ne.
jamais
re
appuyer
o L6chez
te
bouton
dds,q':-y:::,^
aqt an march"l
.".ip"urrait
causer
de
graves
:l:?:ifu;T#.;;
rl?r.,Lrre
est
en
marche,
cecr
pou'
drl
vquJ"
legats
a
votre:-.."::?:.*.,'e
vous
d6marrez
te
scooter.
Mettez
les
phares
et
les
.
N'Jtlumez
aucun
feu
lorsque
clignotants
en
Position
off'
ffi::::::?:;:-ent'
(2r
utiriser
rorsque
vous
circurez
envirre)
o
Clignotants
droite
ou
-r
gauche..
A
utifiser
lorsque
vous
crrangez
de
file
ou
tournez
a
Lorsque
vous
*".6..n*i
rJ"rignli.i.l"
iignaf
lumineux
s'eclaire'
ffir,encrencher
zr
droite
rorsque
uou=
soutraitez
effectuer
un
virage
a
droite
l€lt,enctencher
2r
gauche
lorsquevous
souhaitez
eriectuer
un
virage
a
gauche
.
FEUX
o
KLAXON
. _.^^r^h nhaz to klaxon.
ffiinppuyez
sur
t"
Oouton'o"qut
oout
tot
e
klaxon
ATTENTION:
N'utilisez
le
klaxon
que
lorsque
cela
est
Permts'
Page 57

O
VERROUILLAGE
DE LA
SELLE
.
D6verrouiller
: inserez
la cl6
de contact
dans le verrou
en bas
-r
gauche
de la
selle,
et tournez
la cl6 sur la
droite,
ensuite la
selle
peut
Otre
soulev6e.
r
Verrouiller
:
la selle
se
verrouille
automatiquement
lorsque
vous la rabaissez
PRUDENCE
: ne
mettez
pas
la cle dans
l'espace
de rangement
apres
que
la
selle ait
ete verrouillee
afin
d'6viter
que
la cle ne reste
enfermee
a I'interieur
car on ne
peut
pas
la recuperer quand
la
selle est verrouillee.
Assurez
vous
d'avoir
enleve la cle
apres avoir verrouille
la
selle
COFFRE
DE RANGEMENT
-
Ce coffre est
situe sous la
selle.
-
Charge
maximale : 5 kg
-
Ne
pas y
ranger
d'objets de valeur.
-
Assurez
vous
que
la selle
ait bien ete verrouillee
apres l'avoir rebaissee.
-
Sortez les
objets
de valeur avant
de laver le
scooter
pour
ne
pas
mouiller
ces objets.
-
Ne
placez
pas
d'objets
sensibles a la
chaleur
dans le coffre
d cause de la
chaleur
degagee
par
le moteur.
BOUCHON
DU
RESERVOIR
D'ESSENCE
1. Inserez
la
cle de contact
dans le verrou
du reservoir
d'essence.
et tournez la
cl6 sur la
droite, vous
pouvez
alors
enlever le
bouchon.
2. Ne remplissez pas
a ras
bord, lorsque vous
faites le
plein
d'essence.
3. Alignez
le symbole
du
bouchon avec Ie
m6me
symbole de la
carrosserie et
appuyez
sur le bouchon
jusqu'a
ce
que
vous
entendiez
un clic. Ce
clic signifie
que
le bouchon
est ferme
(la
cle
de contact
tourne alors
doucement vers la
gauche).
Pour
enlever la
cle de contact,
tournez la
simplement
sur la
gauche
et
enlevez la.
ATTENTION
r
La
bequille
principale
doit
etre
posee
sur le sol,
le moteur doit
6tre eteint et les
flammes
sont
strictement interdites pour
securiser le remplissage
du reservoir
d'essence.
.
Ne
pas
remplir
au dela de la limite
d'essence,
sinon le
carburant va couler
par
e
reniflard
present
sur le
bouchon,
ce
qui
peut
endommager la
peinture
de
la
:=-i-osserie,
dans
certains
cas
plus
graves
un incendie
peut
se
produire.
|
-.:--ez
vous
que
le
bouchon
ait 6t6 resserre
correctement.
Page 58

,-t'--
FREIN
AVANT
.
N'utilisez
que
le
frein
arridre
ou
que
lt^f:"1:^1Yant
augmente
les
risques
Oe
Lfrutes
car
le
scooter
a
tendance
2t
d6raper
.
E;TS:TE'rr"in.r
en
conrinu
sur
une
tongue
dur6e
car
cela
pourrait
faire
'lulfrauffer
tes
freins
ei
reduire
ainsi
leur
efficacitd r,^r,e nnnartisez
.
Ralentissez
et
anticip
ez
le.freinage
lors'que
vous
conduise:
sur
des
routes
glissante=
l";l;;fi
oe
prdie'
oN'apptlyeziamiissurlesfreinsbrusquementetSoudainementpourempecher
un
deraPage
ou
une
chute'
COMMENT
SE
GARER
A
I'approche
du
parking
:
-
l'avance,
faites
attention
a
tous
les
^'
;:"t?t:",1"',""'iyff.:T#::;'-'";?':no;,3,
oroite
,
ptacez',*'
a
'interieur
de
ra
z
rk:u:i:"i:a*:"i:3:n[?J:i:d":JTi';:se"
d'orisine'
e'[
rreinez
(
'e
voyanr
o"=
rili,-,-r
s'attum-e-;;;;;
.ror=
tiJit'=-pour
preve"nir
les
conducteurs
de-s
v6hicules
derriere
vous)
t".i:"EJ:y:,"1:=.,:r"#ri""fT:tt;ffi::a
cr6
de
contact
jusqu'Zr
ra
posirion
oFF
pour
arrCter
le
v6hicule'
2'Descendezduscooterpar|agq,.l."apr:S=-"1^1'|^"tcomp|et,choisissez
ensuite
un
empracement
LJ
r.
v6]hicure
ne
genera
pas
la
circulation
et
ou
le
sol
3
;:H'1,"i*r.xffi:";'.?iHll1"{i&:r3"5;
maintenez
t,,arriere
de
,a
se"e
ou
tenez
la
f,oign6e
de
maintien
piacee
t'.i't"
tote
gauche
en
bas
de
la
selle
avec
votre
main
droite'
> !,^:x,
d
droit
et
posez
la
4.
abaissez
la
b6quille
principale
a
I'aide
de
votre
ple
fermement
sur
le
sol'
LES
FREINS
_'_::-^
^r
,us souhaitez
freiner'
--":'
:ldruy;*:i3;g*E;ffi5;fi:"J"
et
avant
rorsque
vou>
1E;]il;nnrEaE
&Verrouillez
le
guidon
et
6ventuel
vol.
enlevez
ra
cle
aprcs
vous
etre
gar6
pour
prevenir
d'ur
PRUDENC
E
'-
garez
votre
scooter
en
lieu
s0r
et
la
ou
il
ne
g€nera
pas
la
circulation
Page 59

MOTEUR
PRUDENCE
:
Avant
de
demarrer
le moteur
verifiez
si
les
niveaux
d'huile
et
de
carbura'nt
sont
suffisants.
pour
demarrer.
la
bequille
doit
Otre
posee correctement
sur
le sol
et
le
frein
doit
€tra
serr6
a
l'arridre
pour
ne
pas
que le scooter
avance
soudainement.
I /6
Tournez
la
cle de
contact
en
position < ON
>.
Serrez
le frein
arridre.
3.
Ne
pas
acc6lerer,
appuyez
sur
le
d6marreur
lorsque
le
frein
est
serr6.
PRUDENCE
:
o
Si
vous
ne
pouvez
pas d6marrer
le
v6hicule
aprCs
que le demarreur
ait
tourn6
pendant 3
a 5
secondes,
effectuez
une
rotation
de
la
poignee
d'acceleration
entre
iua
"t
/+
de
tour,
relachez
la et
appuyez
a
nouveau
sur
le d6marreur
pour
un
demarrage
Plus
facile.
r
pour
ne
pas
abimer
le
demarreur
n'appuyez
pas
dessus
plus
de
15 secondes
en
continu.
r
ll est
plus difficile
de
faire
demarrer
un
moteur
qui
est
reste
a
I'arret
pendant
un
long
moment
ou
apres
avoir
rempli
le
r6servoir
d'essence
alors
qu'il 6tait
qrJ=i-"nt
vide.
ll
est
ensuite
n€cessaire
d'appuyer
sur
le
levier
de
d6marrage
ou
sur
le demarreur
plusieurs
fois
et
de
ne
pas
acc6l6rer
pour d6marrer
le vehicule'
r
Vous
pourrez avoir
besoin
de
plusieurs
minutes
pour faire
chauffer
le
moteur
si
c'est
un
demarrage
a
froid.
o
Les
fum@es
O'eCnappement
contiennent
des
gaz dangereux
(CO
),
ddmarrez
votre
scooter
dans
un
endroit
bien
a6re.
Demarrer
le moteLJr
avec
la
pedale
de
kick
:
Tournez
le demarreur
principal sur
ON,
appuyez
sur
la
pedale
de
kick
fermement
avec
le
pied et sans
acc€lerer.
Si
le
v6hicule
est
difficile
d demarrer
avec
la
pedale de
kick
lorsque
le vehicule
est
froid.
effectuez
une
rotation
d'1l8
it
/+
de
tour
pour
et
relachez
la
poign6e
pour
faciliter le
d6marrage.
l.'-ryrettre la
pedale
de
kick
dans
sa
position
initiale
apres
que
l'engin
ait
demarr6'
:
--.=nez
fermement
le
scooter
sur
la b6quille
avant
de
demarrer
le
moteur
avec
--.
e
veihicule avec
la
p'dale de
kick
de
temps
en
ten'rps
pour
ne
pas
perdre de
--
:.: :tui
peut
etre
reduite
si ce
systdme
n'est
pas
utilisd
r5gulidrement'
1.
2.
Page 60

D6c6l6ration
Accel€ration
Ava
nt
d
e
tou
rner,l:ll:'^
^":ff
,":J: ;:13
:1,..1L
#t7t
:::
Avant
de
tollrner
melrez
vvl'v
.lprir
arrelez
allez
y'
;
;:;
;.
;"-
"
i
r'
i
"
t''''
u
[;1:.o :"X"il5l
u
u
*
v
e
h
i c
u
I
e
s
d
ev
a
n
orlur.un
vehicule.
n'arrive
oe
uer'.'='
*;;;';ehicules
devant
et
illiJani
la
conduit?'
ru':?
:tt-tl,l,?1.o..n,.Pendant
la
c.,l'""'t;t;iait"nt
u
tout
moment'
derridre
et
restez
r
INT.
tnusenoN
VERIFICATION
DE
BASE
ells:XH::'
Si
vous
rencontrl
no-ru"*
votre
scooter
et
faites
le
vet
pl"r.=r,"ilnels
agr6es.
8.
ilr
uleez
i-'hq!ej1
ELEM----s
A
vERIFIER
Arfiratrt
Possdde
assez?
Le
conE
it-ion
s
d
e
f rei
n
a
g e
'^
^
Zomm
ieu
du
tretn
lu
cI
/
Conditions
de
frein
du
frein
10
a
20m!'n
ndard
:
1.7Skglcm2
Est
ce
que
la
pression
est'
norm-ale
?
Standard
:
n.,, r r u
ne
o"rton
"
J'-'l),?
*d!T49"#
* 3 X
2.Okg/cmZ
Pneus
avant
Arridre
Hffi
qie-6s"idon
vibre
ffidifficilezt
ffiement?
'";;i;;
otre
vu
de
derriergi-
' -
@entils?
ComPteur
de
vitesse'
voYants,
et
retroviseur
crous
?
6--
PrinciPaux
Page 61

VERIFICATION ET REMISE
A NIVEAU DE L'HUILE DE
MOTEUR
VERIFICATION :
. Placez le demarreur
principal
sur
la
position
ON, si le voyant
d'huile
s'allume en continu
cela signifie
que
le niveau
d'huile
est trop bas,
rajoutez en autant
que
necessaire.
.
Si
le niveau d'huile est trop
bas, utilisez la bequille
principale
pour
garer
votre vdhicule et retirez la
jauge
apres
avoir 6teint
le moteur
depuis au moins trois
minutes. Rincez l'huile
qu'il y
a sur
la
jauge
et
r6inserez la dans
le
tube.
(
ne
pas
trop l'enfoncer)
uppe.limit
lower
leit
. Retirez a nouveau
entre les limites.
. Ajoutez de
l'huile
eventuelles
fuites,
la
jauge
et
v6rifiez si le niveau d'huile se situe
bien
si
le niveau est trop bas et
verifiez le r6servoir d'huile
et
les
ATTENTION :
Continuer
a rouler alors
que
le niveau d'huile est trop bas
provoquera I'arr6t du
moteur du a un manque
de lubrification de certaines
parties
du
moteur. ll est
donc
tres
important
d'amener
votre vehicule chez
votre revendeur
pour
faire rajouter
de
I'huile
aussitOt
que
le voyant s'allume
en continu.
Utilisez seulement de
l'huile de moteur
qui
soit conforme
aux exigences
du v6hicule.
Sinon cette soci6te
n'assumera aucune
responsabilite
pour
les
deg6ts
occasionn6s
par
I'utilisation d'une
huile
de
qualit6
inferieure
.
Huile
recommand6e : Shell Advance Ultra
4
REMISE A
NIVEAU DE L'HUILE DE
MOTEUR
1. Utilisez
la
bequille
principale
pour
stabiliser
le vehicule sur un sol
plat,
relevez
la
selle et enlevez la
protection
du
reservoir d'huile.
Ajoutez
de I'huile
jusqu'au
niveau indique.
Resserrez le bouchon du
reservoir d'huile et r6installez
la
protection
sur
le
-eservoir
puis
rabaissez la selle
jusqu'a
ce
qu'elle
soit
verrouillee.
Page 62

ffintaires
rr
un
revendeur
GENERIC'
sinon
:"iffi
:=";"55i'"-:;.'."=iry:a,ii#:#".,f#,,luul;':";;":*:".X"
cette
soclere
',:;:;;;;;i.
O"
qualit6
inf6rieure.
. ,--^.::r^c 6rranoares,
comme
la
.
ffiUif;.ii:1.#l#li:iii:"'Jl:::T:s
de
ma'iieres
.trans
poussiere
ou
la-'Jalet"
"T:'::':.t;;
il
=v=te-"
,.f
ii'L'
*i
oit't-"'jentes
marques
. fl
i
.,f=T,ff
Hfu
,f,1i
r
y,
t
q'i=F
f:
f
*;
n*:;=.
3
:.
J;i
:"'
;"'l
5
H
3i
u
"'
u'l
c
o
u
e
autour
ou
ooucX;;Ju
*=:::::'",1"1,?r"n"n
du
r6servoir
aprrds
avoir
rajoute
de
aUtOUf
OU
utruutrv'!
-.)f
le
bOUChOn
OU
re)vtvvt'
--'
-
r Assurez
vous
de
bien
resserrer
le
t-luuv'
Y'Z|:::*X::
i"i^:,:^Y:ifrT:tl"i':u'*"*,o:
'|a
bequi'|re
pl''1:lpu'"'
tournez
re
dcimarreu,
prin.ipul
jusqu'd
,.
"p3='O"n
Oftf
"t''t'Jitilt
si
l'aiguille
du
niveau
d'essence
bouqe'
':".'3:??s,";;.Tff =',:1'"8'?:;';:::"ffi'"g3:J?:Lq'ii':Iildf
:"#'i:t#
vous
alors
O"rJ"*"nt
2r
la
ta.iton"ul"'i"e
ta
plus
proche
pour
ra
scooter'
^^r
rr v6rifier
le
niveau
NOTE
:
vous
n'ctes
pas
obliges
de
d6marrer
le
moteur
pour
v
d'essence
vERtFtcATIoN
,^ n2r un concessionnaire
Le
niveau
d'huile
de
transmission
ne
peut
6tre
verifi6
que
par
un
(
aqr6e.
Sit't'tuit"
doit
Otre
changee'
O'1L
doivent
etre
dans
la
transmission'
CHANGEMENT
DE
L'HUILE
nnaire
effectuer
$J.r
ifl
:il
:
I,i
:
5i
tr..,
;."5
"}:
"1:
",:i
:
T;",'""j'
;
?31'i?Ji..;.
J
.
*
u
=
m
c
m
e
nous
ne
pourro"!'"ptu="g"rantir
votre
vehicule'
HUILE
RECOMMANDEE
:
Shell
advance
Transmission
8O
W
90
T2
Page 63

@W
le
levier
de
maniere
avec
l'6crou
PRUDENCE
:
Lorsque
fa
garde
se
situe
entre
10
et
20
mm,
verifiez
res
temoins
d'usure
des
freins
avant
et
arriere.
si ta
ftdche
sur
la
tige
de
freins
.est
arign'e
avec
re
symbore
inscrit
sur
le
disque
de freins'
ceta
signifie
gr.
i.t
ptaquettes
de
freins
sont
excessiu-meht
useies
et
doivent
€tre
remplac6es
immddiatement
Tournez
l'ecrou
d'ajustement
de
la
tige
de
frein
arriere
la
poignee
de
frein.
Freinez
des
deux
freins
apres
les
avoir
ajuste
jusqu,a
de
freinage.
Mesurez
la
garde
a I'aide
d'une
regle.
doit
€tre
alignee
d'ajustement
VERIFICATION
ET
REGLAGE
DE
LA
GARDE
DES
FREINS
vERtFlcATloN
(
ra garde
des
freins
doit
6tre
verifiee
rorsque
re
moteur
est
6teint)
.
Jeu
du
frein
pour
les
roues
arri€re
et
avant
Lorsque
vous
verifiez
les
reviers
de
freins
avant
et
arriere,
la
garde
(la
course
entre
Ie
debut
du
freinage
et
ra position
normale
de
la poignee
de
frein)
doit
€tre
de 1O
d
2Omm
ll
est
anormar
d'avoir
un
toucher
erastique
rorsqu.on
sert
forte.
La partie
concave
de
i,ecrou
d,ajustement
du
frein
cylindrique
(voir
schema
de
droite
ecrou
()
X
a
a
pour
ajuster
la
garde
de
ressentir
une
sensation
Pour
diminuer
le
jeu
Ecrou
d'ajustement
Pour
augmenter
te
jeu
l-l
Page 64

disques)
(valable
Pour
les
moddles
equiPes
de
freins
Zt
limite
basse
/
ecran
temoin
V6rification
visuelle
en
cas
de
dommage
ou
de
fuite-
S,it
y
a
de=.9:9jo
ou
une
fuite'
amenezvotre
verricule
chezrn
,."u"lxlui
ug*"
rxpr-on.R
pour
une
v.rification
ou
une
reparulign'
r-
q,
,r ,n sot
ptat
et
v6rifiez
si
le
nivea-u
,1",]':Y:::" ffiIii
R;-Nii
bors)
GarezLe
v6hicure
sur
un
sor
prat
et
v6rifiez
si
re
niveau
de
riquide
es.t
en
dessous
de
la
marque
*
LoWER],]'Lil;'d;
["
r,"..7".I.--"'o6
:
hui|e
de
frein
WEL
Durite
jm'-rte?'
"t
t
r"
A
es
Pla
q u ette
s
.
Verifiez
les
I'etrier.
Les
Plaquettes
lorsque
la
limite
freins
freins
dePuis
I'arridre
de
doivent
€tre
remPlac6e
d';;;;
utt"int
le
disque
de
k
\-r-
IF
PRUDENCE
:
r:-..,-r^ aa froin vous
m€me
Ne
chan
gez
jamats
le
liquide
de
frein
vous
substanc*
Oung*'"'se'
.Une
m,auvaise
operation
peut
mauvais
fonctionnement
Ot''
syiieme
de
frein
et
peut
car
c'est
une
conduire
2r
un
engendrer
un
Page 65

REGLAGE
DU
JEU DE LA POIGNEE
D'ACCELERATIOI
Un bon
jeu
permet
a la
poignee
d'acceleration
de
pivoter
de 2 5 6mm.
Pour l'ajuster,
desserrez
d'abord I'ecrou
de fixation puis
tournez l'ecrou
de reglage
jusqu'a
la
bonne
posilion
et
resserrez
bien I'ecrou
de
fixation.
6crou d'ajustement
6crou de verrouillage
POINTS
A VERIFIER
:
1.
Verifiez le
cdble
de la
poignee
d'acceleration pour
voir si vous
pouvez
le bouger
doucement
d'une
position
fermee
a une
position
ouverte.
2, Faites
pivoter
le
guidon
d'un cOte a I'autre pour
verifier
si
le
cAble d'acceleration
en
est affecte.
3.
Verifiez pour
voir
si
le
cable de
direction
est obstru6
par
d'autres c6bles
ce
qui peut
I'emp6cher
de fonctionner
normalement.
VERIFICATION
ET ENTRETIEN
DE LA
BATTERIE
Ce vehicule
est
equipe d'un
type
de batterie
sans entretien
,
il n'est
donc
pas
necessaire
de verifier
et de rajouter
du liquide
electrolyte.
En
cas d'anomalie, faites
verifier votre
scooter par
un
revendeur
agree
GENERIC
ou un concessionnaire.
Enlevez
les
cosses
de la batterie
et nettovez
les
si elles sont
sales ou corrodees.
Negatif
Comment retirer
la
batterie :
Tournez
le
contact
sur OFF
et
retirez
l'6crou
de la cosse
-en
premier
et deconnectez
la
;
puis
retirez l'ecrou
de la
cosse
+
et enlevez la.
positif
PRUDENCE
:
\.lettoyez
les cosses
de la
batterie a l'eau
tiede
si elles sont
corrodees
(
ou apparition
une
sorte
de
pate
blanche).S'il y
a une
corrosion
evidente sur les
terminaux,
ronnectez
les
cables
et enlevez la
corrosion
a l'aide d'une
brosse metallique
ou
:
du papier
de verre.
Installez
les c6bles
de la'batterie
apres les
avoir nettove et
rez
une fine
couche
de
graisse
sur
les
bornes.
:
--r
l?
batterie
en appliquant
le mode
operatoire
inverse
du demontage.
Page 66

PRUDENCE:
clest
un
type
de
batterie
ferm6,
n'enlevez
jamais les
capuchons.
Pour
eviter
les
pertes
de
charge
ou
la
d6charge
de
la
batterie
si
elle
est
inutilis6e
pendant
une
Iongue
ouree,
retii=ez
la
du
scooter,
rangez
la
dans,un
endroit
bien
a6r6
et
peu 6claire
uple.
l'avoir
comptetement
charge'
DJconnectez
le
c6ble
negatif
de
la
baiterie
si
elle
est
reste
sur
le
v6hicule'
Si
la
batterie
a
oesoin
o'etre
remplacee,
remplacezla
par une
batterie
du
meme
type
(sans
entretien
vE
Rt
FtcATloN
DES
PN
E
lits
Les
pneus
doivenietre
verifi6s
et
gonfles
lorsque
le
moteur
est
6teint'
Si|acourbedupneuestanormale,verifiez.|aavecunmanometrede
g"niltt
le
pneu
jusqu'a obtellf
la
pression
exigee'
Lapressiondespneusdoit6treverifieeavecunmanomctre|orsqueles
froids.
pression
et
pneus
sont
Veuil|ezVoUsrdfererauxcaracteristiquespour|es
Mat6riaux
6trangers
(clous
ou Petits
cailloux)
pneus
standard.
.
V6rifiez
visuellement
que
les
flans
frontaux
et
lateraux
ne
sont
pas endommag6s
ou
craqueles'
.
V6rification
visuelle
pour
reperer
l'6ventuelle
presence
de
petits cailloux
ou
de
clous
coinc6s
dans
la
chape
du
pneu.
.
Verifie
z
si
la
profondeur
des
rainures
est
suffisante
avec
le
temoin
d'usure
de
la
bande
de
roulement'
r
Un
pneu
dont
I'usure
est
visible
par
le
temoin
doit
immediatement
€tre
remPlace'
craquelures
/
indicateur
d'usure
ATTENTION
: une
pression
anormale
du
pneu,
une
usure
ou
une
craquelure
sont
les
causes
les
plus
frequentes
de
perte
de
controle
de
la
direction
ou
d'une
crevaison'
16
Page 67

VERIFICATION
DU
JEU
DE
DIRECTION
Effectuez
cette
verification
lorsque
le
moteur
est
6teint
et
la cle
de
contact
retiree'
Effectuez
une
verification
visuelle
des
amortisseurs
pour reperer
les dommages'
'Bougez
le
guidon
de
haut
en
bas
et
verifiez
si les
amortisseurs
font
du bruit
lorsqu'on
les comprime'
Verifiez
avec
des
cles
si
les
boulons
et
les €crous
des
amortisseurs
sont
bien
serr6s.
Secouez
le
guidon de
haut
en
bas,
de
gauche a
droite
et
d'avant
en
arriEre
pour v6rifier
s'il
est
trop
mou
ou
trop
dur
ou
s'il
penche
d'un
cOte.
V6rifiez
si
les
c6bles
de
frein
ne
g€nent
pas
trop
sur
la
manipulation
du
guidon.
.
Amenez
votre
vehicule
chez
un
concesslonnalre
GENERIC
ou
chez
un
revendeur
agree
pour
une
verification
ou
un
reglage
si
vous
rencontrez
un
probl6me.
(Les
sch6mas
de
droite
sont
valables
uniquement
pour
les
op6rations
de
v6rification')
VERIFICATION
ET
CHANGEMENT
DES
FUSIBLES
r
Eteignez
le
contact
et
verifiez
si
les
fusibles
sont
intacts.
Remplacez
les
fusibles
casses
par des
nouveaux
qui
ont
la m€me
intensite
de
courant
(7
amperes).
Utilisez
des
fusibles
dont
l'intensit6
depasse
les
7 amperes
ou
un
fil
de
laiton
ou
de
fer
pour remplacer
un
fusible
est
formellement
interdit
pour
eviter
d'endommager
le circuit
et
le systeme
electrique.
"
Enlevez
les
vis
du couvercle
de
la batterie
et
retirez
le couvercle'
Les
fusibles
sont
installes
dans
la
boite
Zr
fusibles
situ6e
sur
la batterie.
.
Les
fusibles
doivent
etre
bien
fix6s
aux
connecteurs
lorsque
vous
les
remplacez
o
N'utilisez
que
des
pieces
qui ont
les
memes
caract6ristiques
pour remplacer
des
composants
electriques
comme
les
ampoules.
L'utilisation
de
pibces
qui
n,ont
pas les
m6mes
caractdristiques
peut
griller
le fusible
ou
d6charger
la
3atterie
Plus
vite.
.
-,rit-ez
de
vaporiser
de
I'eau
directement
sur
ou
autour
de
la boite
a
fusibles
':que
vous
lavez
votre
scooter.
,
-rrenez
votre
vehicule
chez
votre
concessionnaire
si
un
fusible
L]
Page 68

INSTALLATION
connecteurs
VERIFICATION
DES
CLIGNOTANTS
ET
DU KLAXON
.
Placez
la cle de
contact
sur
la
position
ON.
e
Mettez
votre
clignotant
et assurez
vous
que les voyants
arri'bre
et
avant,
et
gauches
et
droits
clignotent
et
v6rifiez 6galement
que le bruiteur
de
clignotant
fonctionne.
.
Verifiez si
les
protections sur
les
clignotants
sont
sales,
craquelees
ou abimees'
o
Appuyez
sur
le
klaxon
pour
voir s'il
fonctionne'
ATTENTION
:
.
Des
ampoules
specifiques
doivent
etre
utilisees
pour
les
clignotants.
Sinon
le
fonctionnement
du
clignotant
sera affecte.
.
Utilisez
votre
cllgnotant
avant
de tourner
ou
de changer
de
voie
pour
prevenir
les conducteurs
des
v6hicules
derridre
vous'
.
Enlevez
votre
clignotant
imm6diatement
en
poussant le bouton
en bas'
Sinon
le clignotant
peut
tromper
les conducteurs
des
vehicules
derriere
vous.
VERIFICATION
DES
FEUX
AVANT
ET ARRIERE
r
Tournezla
cle
de contact
sur ON,
d6marrez
le moteur
puis
eclairez
votre
feu
avant.
v6rifiez
si
vos feux
s'allument
5 I'avant
et a
I'arriere.
r
Verifiez
la luminosite
et
la
port6e
du
feu avant
en
le
proietant
sur
un
mur.
.
Verifiez
I'optique
pour
voir si
elle est
craquelee,
sale ou
abimee.
VERIFICATION
DU
FEU
DE STOP
r
Tournezla
cle
de contact
sur ON.
serrez
les
poign6es
de
frein
avant
et
arridre
puis verifiez
si le
feu de
stop
s'allume.
.
V6rifiez
si le
feu de
stop
est sale,
craquele
ou
abime.
L'ENLEVER
18
Page 69

ATTENTION
:
r
N'utilisez
que
des
ampoules
specifiques,
n'utilisez
pas
d'ampoules
differentes
pour
eviter
d'endommager
le'systeme
electrique,
de griller
les
ampoules
ou
de
decharger
la
batterie.
r
Ne
rajoutez
pas
ou
ne
modifiez
pas
res
composants
erectriques
pour
:T?:::?::i:".:,::.,T:s^"^::^yi
.:uri
circuit
ce qui
peur
provoquer
un
d6but
d'incendie
et
brorer
votre
scoorer
oani
r;.
;;=l;#lr5
=!?,Ilil
'
Verifiez
le reservoir
d'essence,
les
durites
d'essence.
le
carburateur
etc..
pour
reperer
une
eventuelle
fuite.
Verifiez
si
les
exemple.
l'axe
...etc.)
parties
articulees
du
de
la
bequille
centrale,
vehicule
sont
assez
graissees.
(par
de
la
bequille
laterale.
le
levier
du
frein
'
Enlevez
le
capuchon
de
I'anti-parasite
(utilisez
la
cle
a
bouqie
de
la
boite
a
;Tn
fl.,"#,iJ'"ver
la
bousie
en
la
tournant
oun=
r.
=.nrIIJJr="
des
aiguires
'
Verifiez
si
rerectrode
est
sare
ou
obstru6e
par
des
depots
de
caroone.
o
Enlevez
les
depots
de
carbone
avec
un
fil
en
acier
et
netto
yez
la
bougie
avec
de
l'essence
puis
essuyez
la
avec
un
chiffon.
o
Verifiez
que
l'ecart
entre
les
deux
electrodes
se
situe
entre
o.6
et
o.7mm
(verifiez
le
avec
un
outil
approprie)
'
Serrez
la
bougie
a
la
main
aussi
loin
que
possibre
puis
redonnez
un
yz
ou
3/q
de
tour
de
cle.
::J:{r{l:ra'l.'
apres
utirisation,
re
moteur
esr
tros
chaud,
faires
arrenrion
a
ne pas
N'utilisez
que
des
bougies
qui
soient
conformes
aux
caracteristiques
du
vehicule
recommandees
par
le
fabricant.
(referez
vous
aux
caracteristiques)
l9
Page 70

Prac^dure
de
d6montage
1
Enlevez
la
vis
de
la
protection-du.filtre
Zr
air
2
Enlevezte
couverlfL'Ju
fiftr""
a
air
puis
la
mousse
du
filtre
i
J"""1
lt":
r,
:i,
:
il:
ff
:ii:,[3i'
1i;
"
u
s
r
ef
6
r e
r
a
u
p
I a
n
n
i
n
s
d'
e
n
t
r e
ti
e
n
)
4
Referezuou=
.,
lir]e-u
ci
contre
pour
tes
6tapes
du
nettoyage
du
filtre'
Proc6dure
de
remontage
Effectuezlesmomesoperationsmaisdanslesensinversedudemontage'
jS
L)Pel
d|-lur
rJ
|
|
rsrJ
ee"-
/<*.
F)'-r
=+'rutri
@*W
tl
3
laissez
tremper
4
Essorez
ATTENTI)N
:
r^
^^r.ccihra
a,..
;ipales
causes
de
la
reduction
de
.
Les
d6pots
de
poussibre
sont
l'une
des
prtnc
:
S?*
;il::f
i1i
:t:'ff,niS
:
6[T;ilSff*i
pffi,=n"ii!
",'
n."rva'e
d
e
r6vision
du
moteur
si
le
vehicule
est
=Luu"ni
utilis6
sur
des
routes
Poussiereuses'
osilefi|treaalrestmalinstal|e,|apoussidrepeut^s,infi|trerdans|escy|indres'ce
quipeut.urr"iun"r=u."prematureeetr6duirelapuissancedumoteur'
o
Faites
attention
zr
ne
pas
mouitte?
tl.d:;^
*::;o"i"
vous
tavez
votre
scooter'
1
NettoYez
2
€ssorez
.
!ilL="-€
;il;;
p"*lu
6tre
plus
difficite
a
d6marrer.
z0
Page 71

9.
Diagnostic
lorsque
le
moteur
ne
demarre
pas.
La
cle
de
contact
tourne
t'elle
jusqu,a
la position
ON
?
dans
la
reservoir
?
Y
a-t-il
de
l'essence
Pour
la
roue
arriere
Pour
la
roue
avant
Bouton
de
clignotant
Avez-vous
maintenu
la poign6e
de
frein
en appuyant
sur
le
demarreur
Tournez
la
cle
cle
contact
sur
ON
?
enclenchez
le
klaxon
Le
fusible
peut
avoir
qrille
si le
klaxon
ne
fonctionne-pas.
euillez
vous
rendre
chez
un
revendeur
agree
GENERIC
si
le
ou
les problemes
ne
:nnent
pas
de
la
et
si le
moteur
ne
demarfo
tou.lourc
pur.
et
Page 72

1.
CALENDRIER
D'ENTRETIEN
6rant
que le
conducteur
Parcourt
b
-^mnlanamoni
pa
i:;;;iil;;";,
,'"ttoyus"
ou
reslase
=
remplacement
C
=
nettoYage
(rempta-ement
si n6cessaire)
L
=
lubrification
Remarques
, n"rroy"i
tu
remplacez
plus souvent
le
filtre
a
air
si
vous
roulez
souvent
sur
des
routes
ffi"=i?:?,:'""=J,T
:l;"Jl:"=i'r?
3lJy"=:="""rt
si
vous
routez
souvenr
vite
er
aprds
que
re
.v6hicure
ait-
u?
ki|ometrageplus6lev6.Lesnoteso..=""',"marquessontuti|is6espourindiquer|esmodd|esconcern6s'
22
12500KM
'15500KM
18500KM
2',I500KM
Item
Kilometres
Prs de
contaole
5OOKM
3500KM
6500KM
9500KM
R
c
R
C
1
Element
du
filtre
a air
I
C
C
R
z
Filtre
a
air
I
Pression
des
Pneus
I
I
I
I
I
I
I
I
I
I
I
I
I
^
Baitefle
I
I
Bougie
I
I
I
I
R
R
I
I
I
6
Carburateur
(ralenti)
I
7 Guidon
et
Poignees
I
I
8
Verification
des
fuites
de
transmission
I
I
I
I
I
I
V€rifications
des
fuites
de
carter
I
I
s
tes
6
mois
ou
3oookms
'to
Huile
de transmission
R
KeInPIac
11
Huile
de
moteur
R
Remplacer
tous
les
7ba)UKIT'
I
R
12
Drive
belt
I
I
R
12
Fuel
tank
switch
and
lines
I
I
I
I
R
I
I
R
14
Cable
et
volet
d'accelerateur
I
lI
I
t
Vis
et 6crou
du
moteur
I
to
Tete
Ce
cylindre,
cylindre
et
Diston
I
R
R
tt
Systeme
d'6chaPPemenr
I
18
amortisseurs
I
,_
I
19
Suspension
avanl
/ arridre
I
20
Bequilles
laterale
et
PrinciPale
L
L
t/L
L
L
t/L
L
I
21
embrayage
zz
Pompe
a huile
I
I I
I
23
M6canisme
des
freins,
nlaol rettes
I
I
I
I
I
24
Elrous
et
boulons
de
chaque
composant
I
I
I
I
SOOkms Par
mols
 Loading...