

Page 1

-1-
USER GUIDE
IP ROUTER
IP ROUTER
NAT·DHCP·FIREWALL·10/100Mbp SWITCH
Version 1.0
2003.11
Page 2

-2-
Preface
This document is user’s manual for IP Router .
This manual consists of IP Router components, installation guide, settings, and
information on how to use IP Router and its functions.
It is recommended that you have a clear understanding of this manual before you
start using the IP Router.
Before you start…
First, read Chapter 4, Installation section for installation information before you
install the IP Router.
Second, read Chapter 6. IP Router Setup section to setup the IP Router to best
fit your Internet environment.
Page 3

-3-
TABLE OF CONTENTS
1.WARNING…………………………………………………………………………5
2.PACKAGE CONTENTS……………………………………………………………6
3.SPECIFICATION…………………………………………………………………7
4.INSTALLATION……………………………………………….………………11
4.1 Before Installation………….………………..………………………………11
4.2 Installation……………………………………………………………………11
4.3 Network Sketch Map…………………………………………………………13
5.LOCAL COMPUTER SETUP..……………………………………………………15
5.1 Windows 95/98/ME Setup……………………………………………………15
5.2 Windows 2000 Setup……………………………………………………………20
5.3 Windows XP Setup……………………………………………………………24
6.IP ROUTER SETUP…………………………………………………………………29
6.1 Start Internet Explorer to Login………………………………………………29
6.2 PPPoE User Setup……………………………………………………………30
6.3 Dynamic IP User (Cable Modem...) Setup……………………………………33
6.4 Static IP User Setup.…………. ……………….….……..……….……………36
6.5 Status……………………………………………………………………………37
6.6 LAN Setup………………………………………………………………………39
6.7 Routing Table……………………………………………………………………40
6.8 Virtual Server.…………………. ……………….….……..……….……………41
6.9 Port Triggering…………………………………………………………………44
6.10 Firewall…………………………………………………………………………46
6.11 DDNS…………………………………………………………………………46
6.12 Misc Setup……………………………………………………………………47
7. Error Report and advise………………………………………………………50
Appendix A. UTP Cable specification…………………………………………51
Page 4

-4-
Page 5

-5-
1.WARNING
1. Use only the power adapter provided with the IP Router for power
connection. Using other power adapter may cause an error or damage to the
IP Router.
2. Do not drop or give a physical shock to the IP Router. It may affect internal
circuit.
3. Do not disassemble the IP Router without sufficient understanding of your
action.
4. Avoid direct exposure to the sun.
5. Do not leave the IP Router near moist or fire.
Page 6
-6-
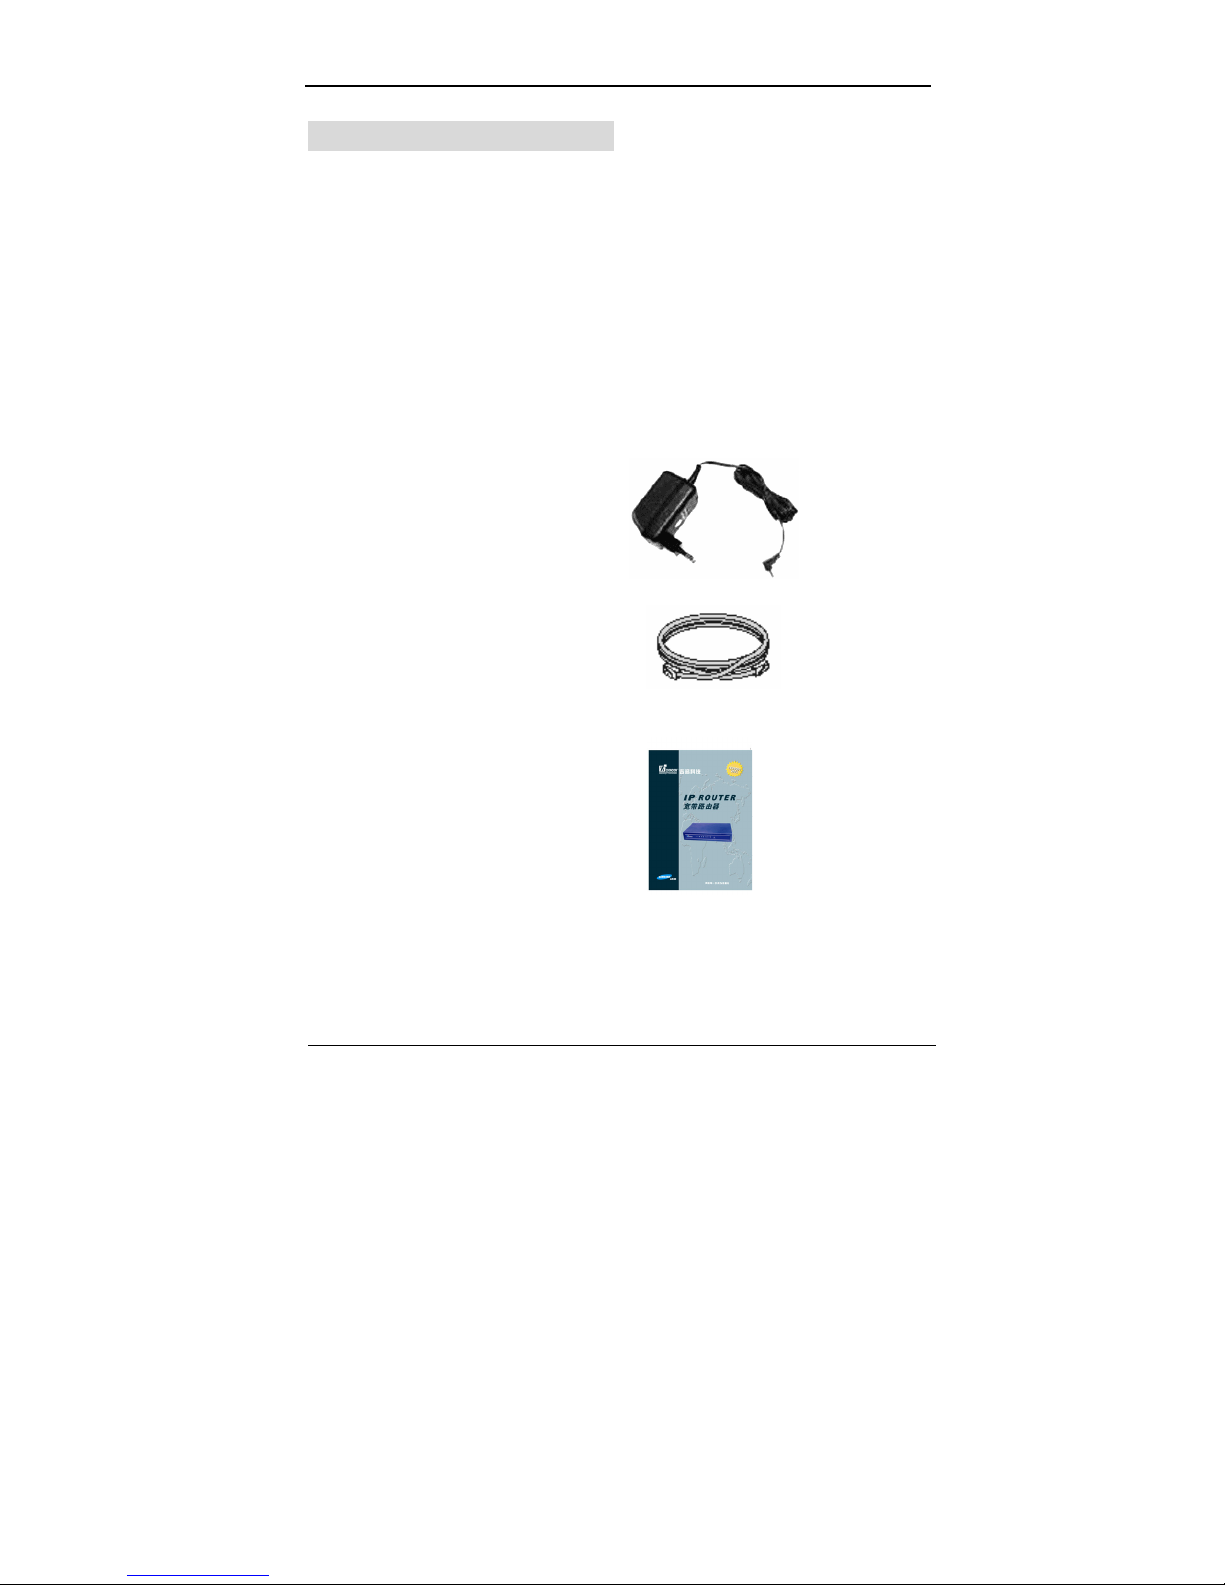
2.PACKAGE CONTENTS
Package contents of IP Router IP ROUTER are as follows;
2.2 IP ROUTER
2.3 Switch DC Power Adapter (5V, 1000mA)
2.4 Ethernet Cable
2.5 UserGuide
Page 7

-7-
3. SPECIFICATION
This IP Router is a highly integrated IP Router with many functions such as
Gateway, Switch, DHCP Server, Firewall etc:
Network Address Transform (NAT)
:With providing Internet application
this IP Router can allow more than one user to connect with Internet at the
same time by sharing one public IP address; It supports many connection
ways:xDSL、Cable Modem、LAN/ Leased Line and so on.
4 Ports 10/100M Switch
:It has 4 Network 10/100M switch ports,port
support MDI/MDIX automatic identification function, Switch port can
connect to other switches, so that can support over hundred computers to
go to Internet at the same time.
Support VPN Pass-through
: Supports VPN Pass-through PPTP
dialogue,and also supports users to configure VPN Server and Client in
LAN.
PPPoE(ADSL) Automatic Disconnection/Connection : Users can
optionally choose automatic disconnection in idle time and connection in
access time to save internet access cost.
Firewall:Users can randomly refuse or allow data from Internet;
DHCP Server
:All computers which connects to Internet can get TCP/IP
configuration information from IP Router automatically, so that it can make
sure easy user management.
Management Based on Web Page:Both network configuration and
system configuration are based on inside Web Server. The user interface
is clear and usage is easy. By this interface users can also update
software to enhance the system stability and expansibility.
Internet Access Control
: Different administration can be setup for
different users.
Virtual Server
:Allow other users from Internet access WWW, FTP server
or other servers in LAN.
Page 8

-8-
DMZ Server
:Allow one computer to be totally open to Internet to make
sure special application.
Remote Management
:Users can totally manage office or home network
wherever they are.
DDNS
:By this function users can set up their own web station.
Detailed Specification
ITEM IP ROUTER
Standard
IEEE 802.3, IEEE 802.3u, IEEE 802.x, IEEE Fast
Ethernet,
Protocol
TCP/IP, NAT, DHCP ,UDP, FTP, PPPoE, PPTP,
L2TP,HTTP,DNS, IPSec/VPN Pass-through…
WAN
One 10/100Mbps RJ-45 port, automatic
sense cross cable
External
Port
LAN
Four 10/100Mbps speed Ethernet switch
port, auto sense cross cable
Cable
100Base-T:UTP/STP 5 or above standard
ical parameter
Control
interface
Based on Web application
Page 9

-9-
Inside
function
10/100Mbps switch
LAN/WAN port auto sense cross cable
WAN port static/dynamic IP flexible setting up
PPPoE dial-up and connection time setting up
PPPoE dial-up and automatic/manual connection
Support VPN Pass-through
DHCP Service
DNS relaying
DMZ Server
Connection setting up and stat.
Firewall
Remote control
DDNS
Gateway
Virtual Server
Data forward
NAT,NAPT and PAT
CPU KENDIN KS8695(ARM9)
FLASH 2MB Flash
Memory 8MB SDRAM
LAN
connection
Static or dynamic IP address
WAN
connection
xDSL, Cable Modem, Special cable, LAN
Power supply DC 5V/1A switch power adapter
Size
XXX x XXX x XXX Cm
Weight
XXX KG(without transformer)
Temperature
0 ~ 60 ℃
Product spcification
Humidity` 10 ~ 85%
Page 10

-10-
Compatible OS:
Windows 95/98/ME/NT/2000/XP
Mac OS Linux or other UNIX system
* If the specification and functions of IP Router have been changed, it will not be
informed. The users please take care of it by themselves.
4. INSTALLATION
4.1 BEFORE INSTALLATION:
4.1.1. Firstly please confirm your computer OS (Windows 95,98,NT,ME,2000,
XP, Linux, Mac) and Web browser (Internet Explorer 4.0 with JavaScript function、
Netscape Navigator 4.0 or above version)。
4.1.2. Make sure there is LAN Card which has been correctly installed in your
computer.
4.1.3. If you are xDSL user, please remember your user ID and password.
4.1.4. If you connect Internet by LAN or MAN , please get the following
information from your network administrator: IP address is static or dynamic, DNS,
default gateway, account and so on.
*If your computer has installed ADSL PPPoE dial-up software before the
installation of IP Router, please backup your installation software and uninstall your
ADSL PPPoE dial-up software by Start->control panel->Add or Remove Programs.
4.2 INSTALLATION
4.2.1. Setup WAN connection: connect broadband cable (xDSL, Cable Modem
or LAN/ Leased cable) with WAN port of IP Router.
Page 11
-11-
4.2.2. Setup LAN connection: connect your computer LAN card’s port or your
switch UPLINK port with one LAN port of IP Router by a common network cable.
Note: All LAN ports of IP Router can automatically sense cross cable, so
you can either use through cable or cross cable to connect LAN card or
switch.
4.2.3. Turn on the power : connect and the power supply, turn on it. Then IP
Router comes to self-detect state. During the self-detect: PWR LED will be long
light, RUN LED will slow flash after correct startup, other four LAN LED and WAN
LED will flash only twice rapidly, then the system will come to normal work state.
4.2.4. Start computer
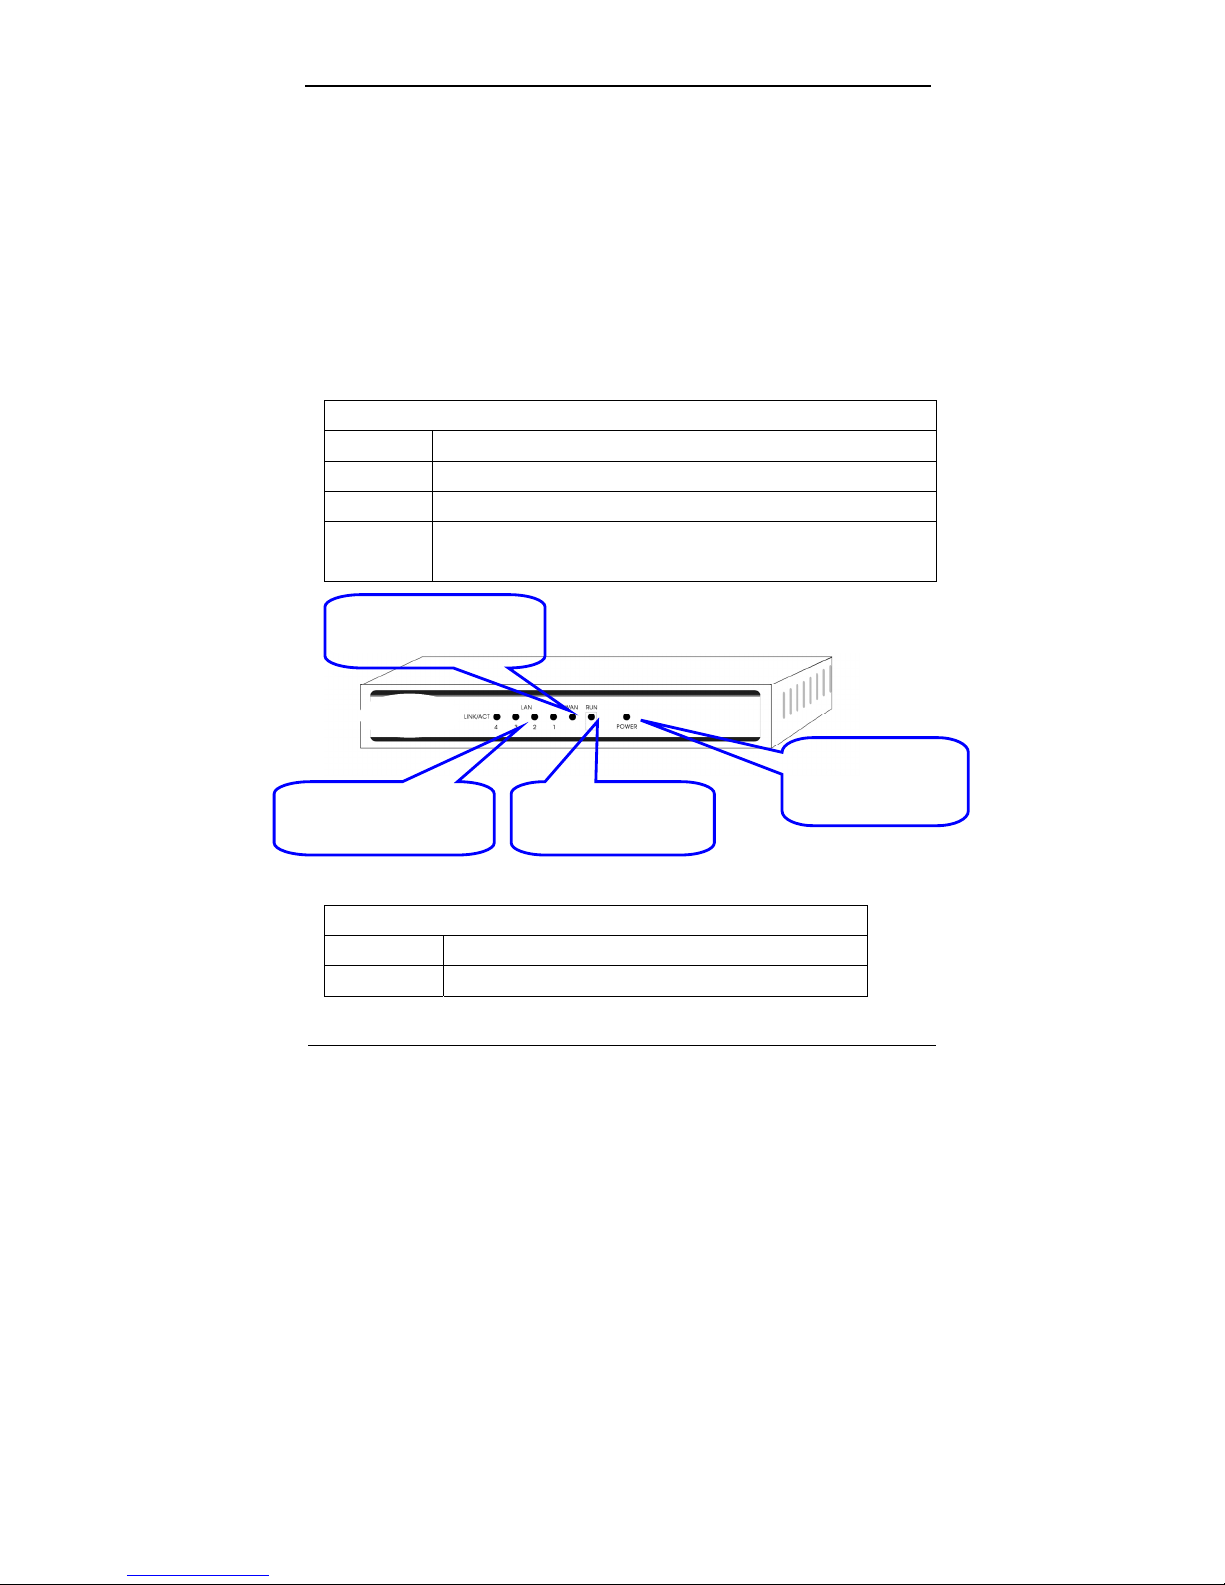
LED explanation
RUN System status LED, slow flash after correct startup.
POWER Power LED, long light
WAN WAN port connection LED, flashing refers to data transformation
LAN LAN port connection LED (1,2,3,4), flashing refers to data
transformation
Port explanation
WAN port Connect xDSL/Cable Modem or Special cable
LAN port Connect personal computer or hub, switch and so on
POWER (red): power
connection state
RUN: system running
state
WAN (green): WAN port
connection state
LAN (green): LAN port
connection status
Page 12
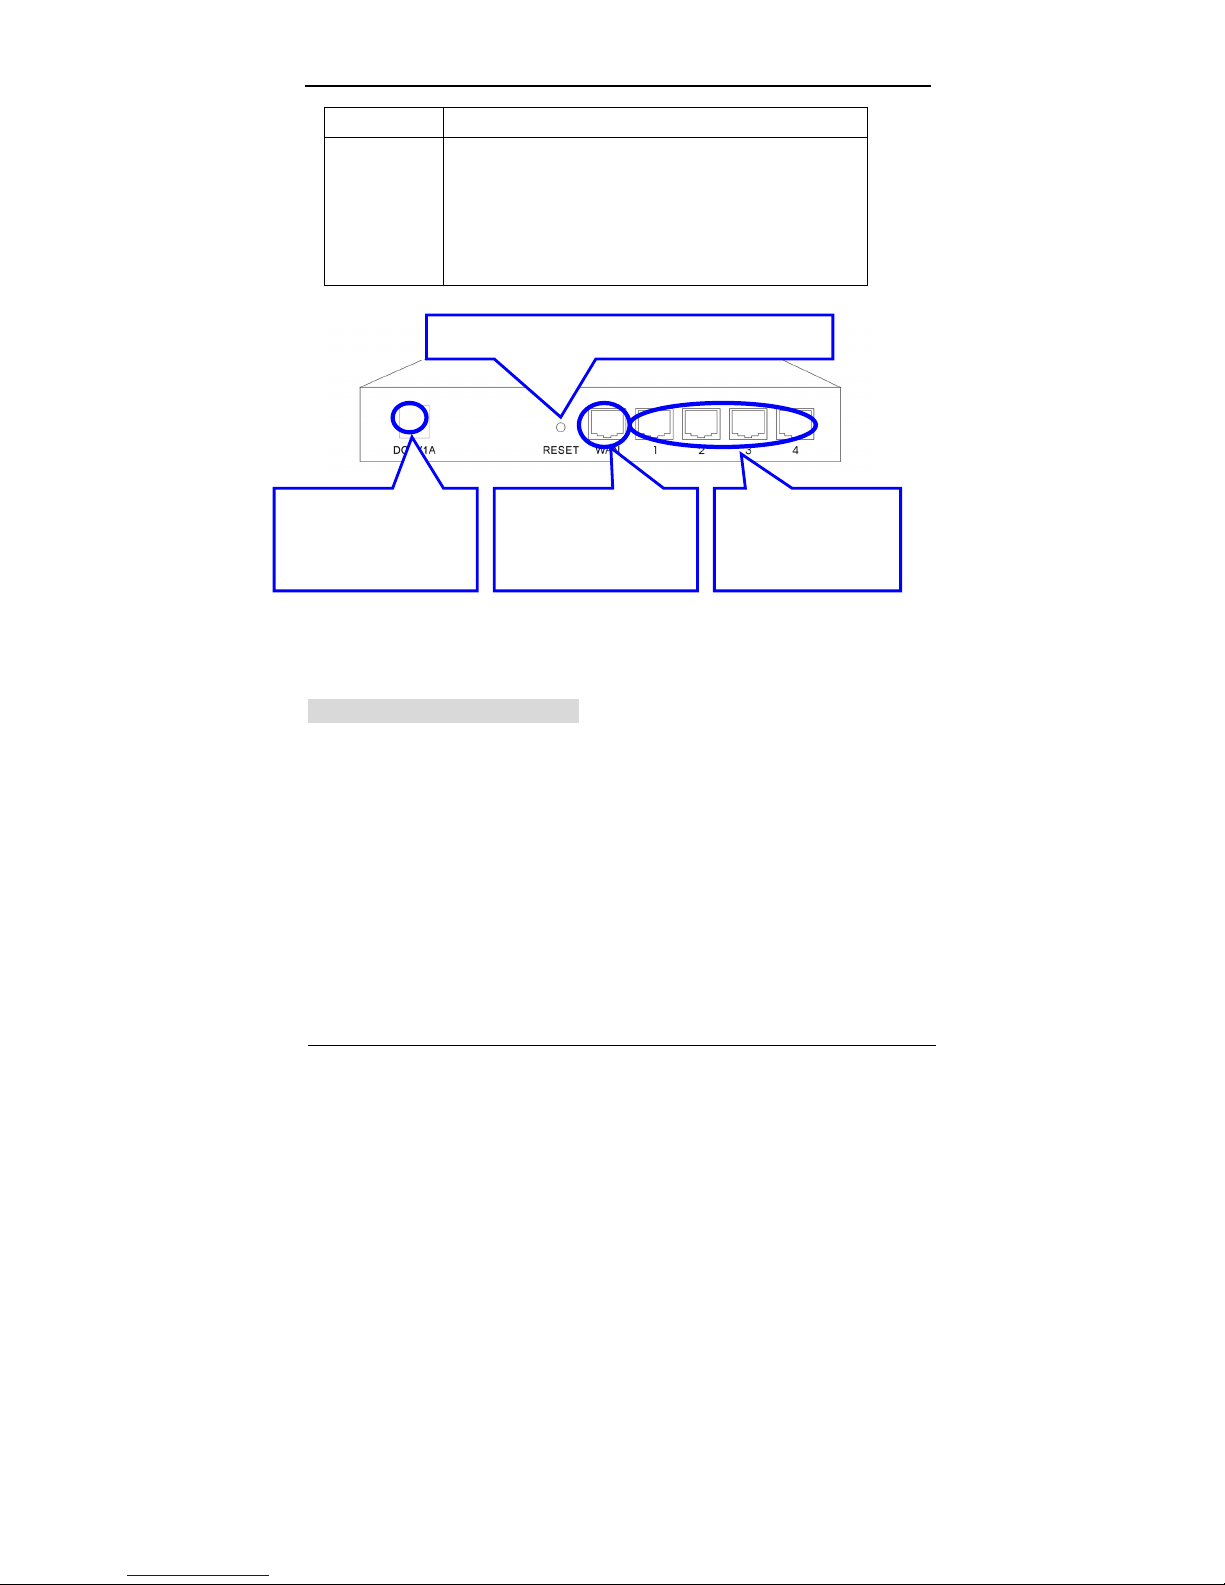
-12-
Power jack Connect power adapter (5V/1A)
Reset
Press Reset button. Switch the power off/on. After
switching the power on, about 5 seconds later RUN
LED will flash rapidly, then release the button. After
IP Router startup, all configuration will
restore to
default configuration.
NOTE:After switch or hub expand, IP Router can connect at most 253 client
computers in LAN .
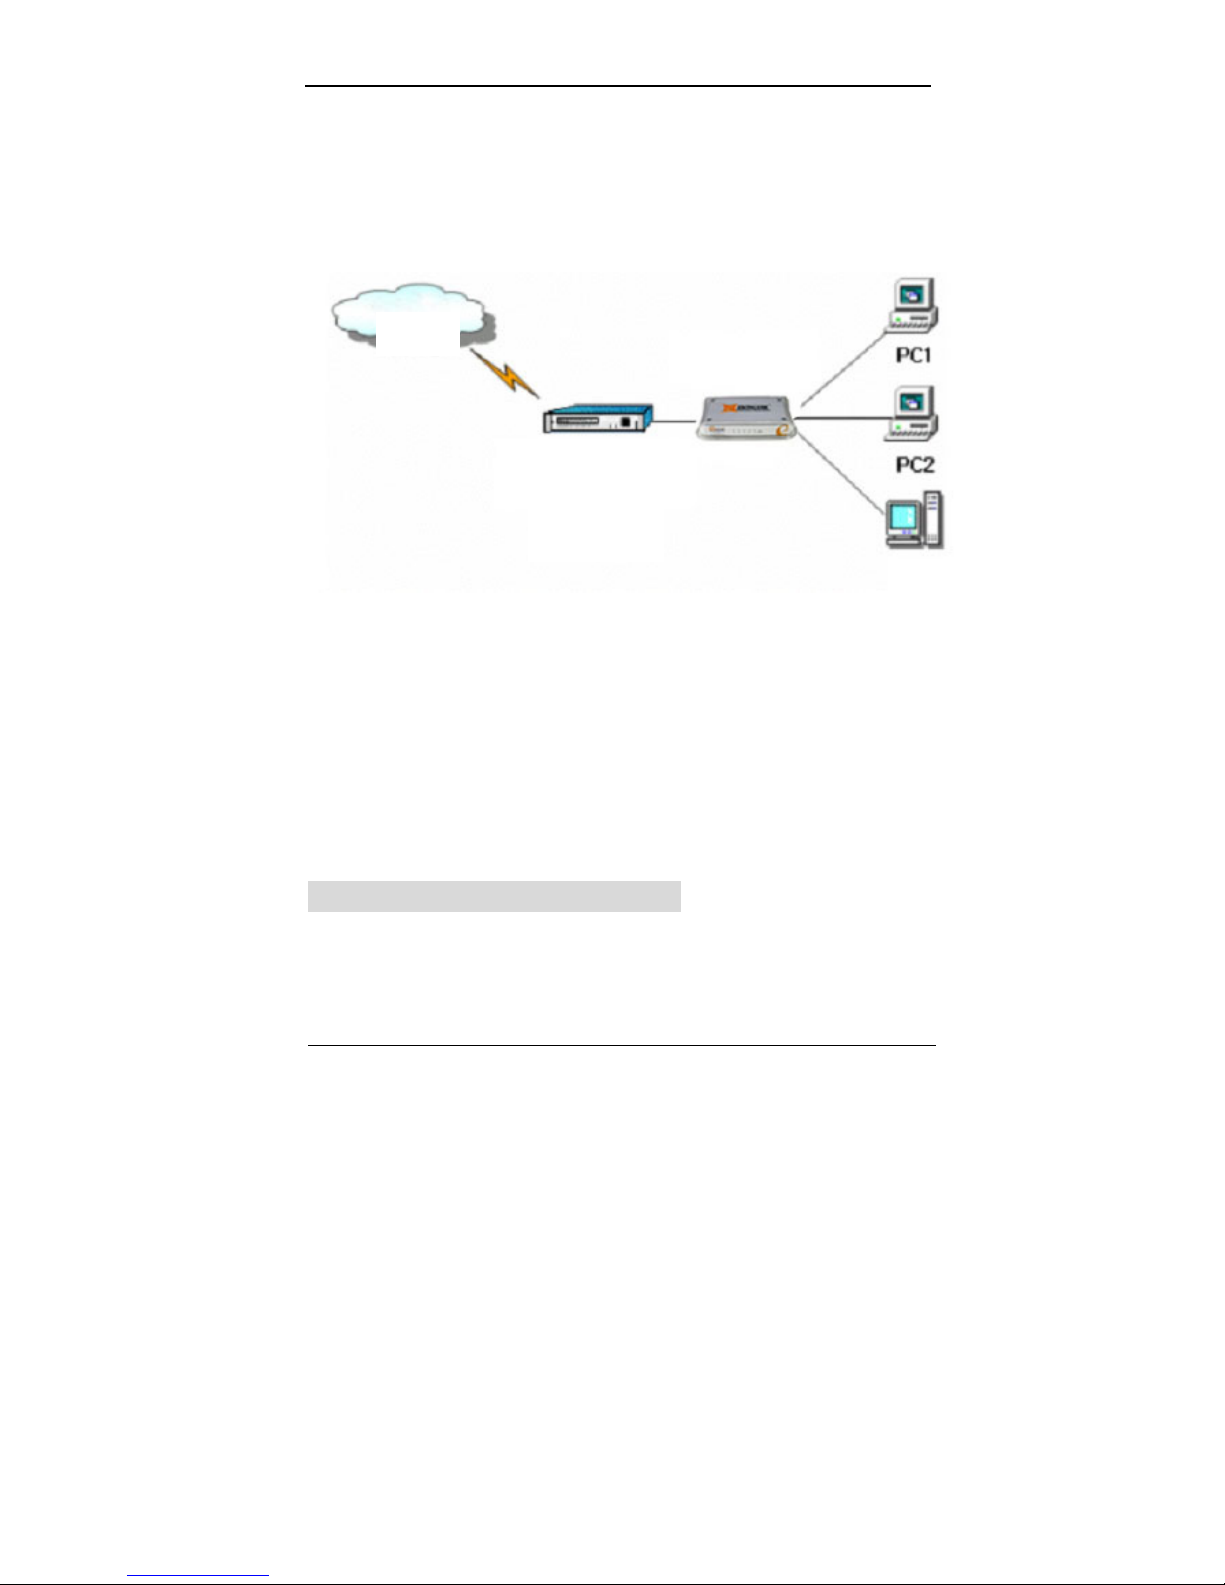
4.3 NETWORK SKETCH MAP
WAN PORT : connects
xDSL/Cable Modem or
Special cable
LAN PORT : connects
personal computer or
hub, switch and so on.
POWER jack : connects
power adapter
(DC 5V/1A)
RESET BUTTON:restore to default configuration
Page 13
-13-
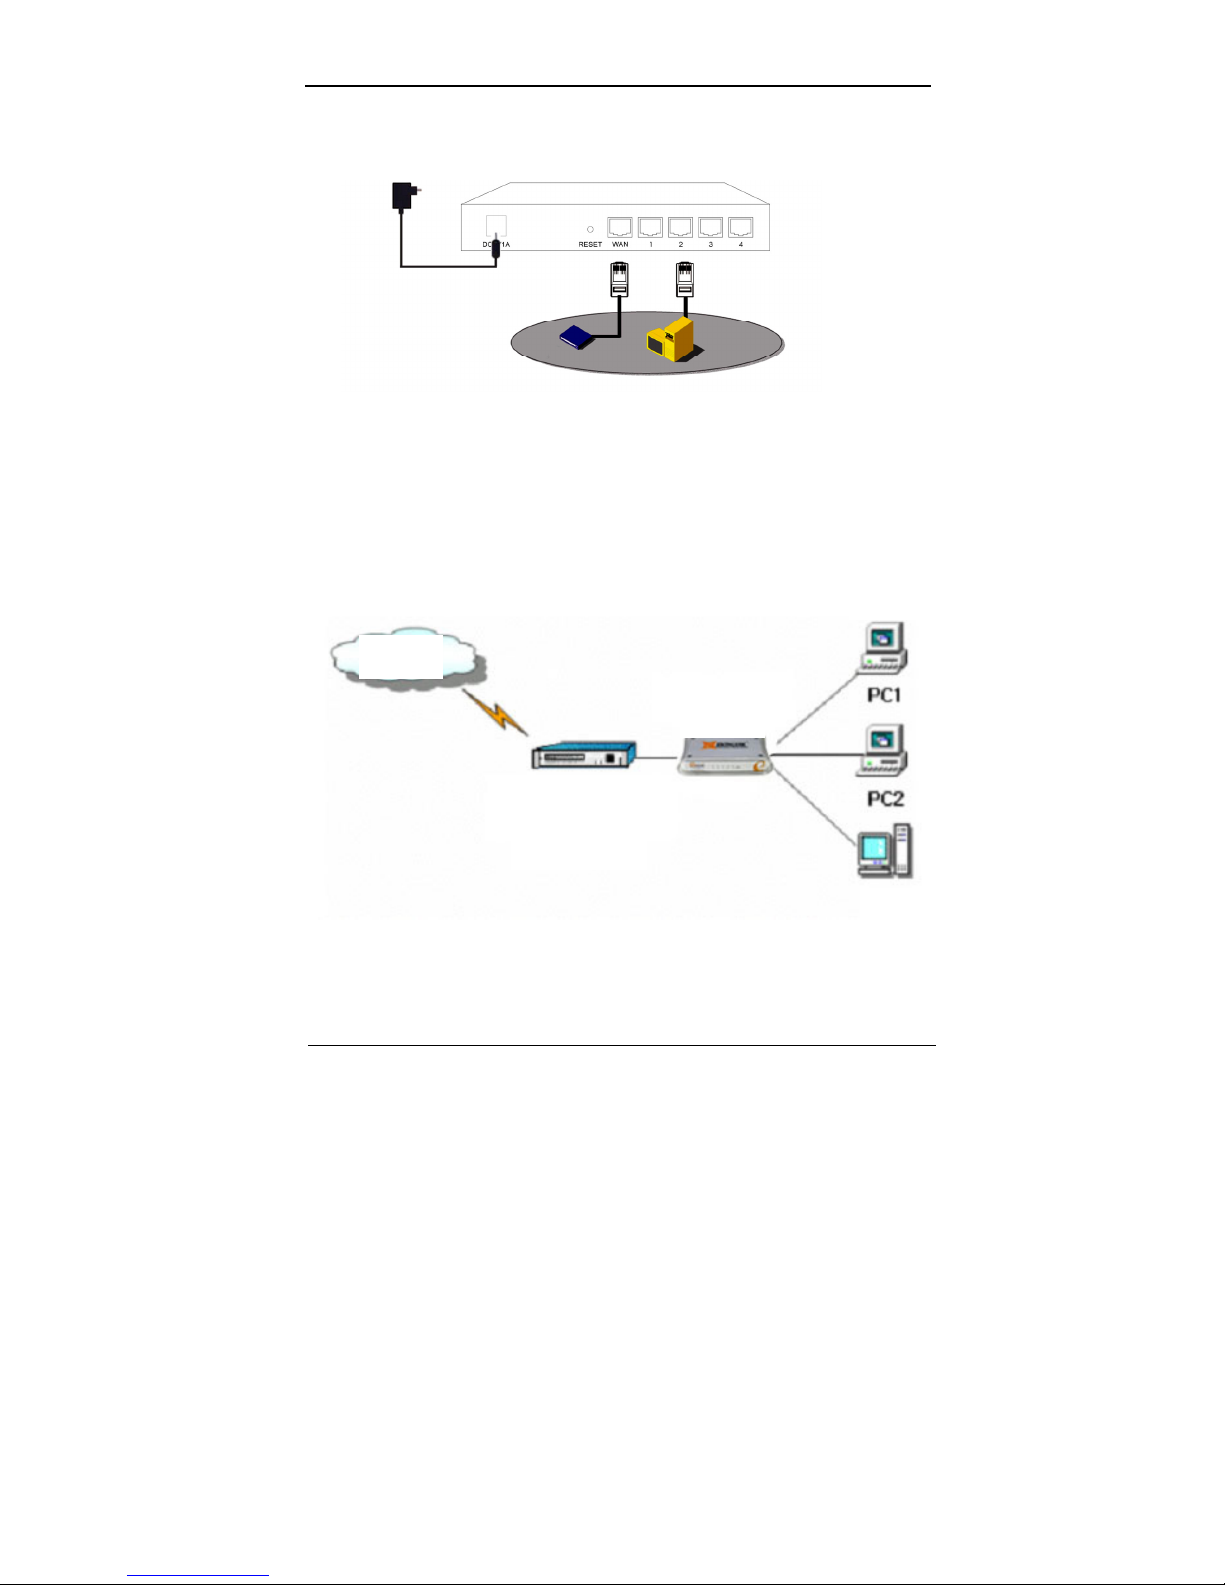
EXAMPLE 1.
DC Adapter: 5V/1A
3. connects with
power adapter
1. connects with
xDsl Modem
Modem
PC
2. connects with PC
Interne
Cable/xDSL
Modem
Router
Server
Page 14
-14-
EXAMPLE 2.
Note:During the usage, the sequence of turn on is:firstly turn on Modem’s
power supply ,1 minute after Modem startup turn on IP Router power supply ,
then turn on the computer .
5. LOCAL COMPUTER SETUP
Users should configure local network to access Internet by IP Router.
Users should know the default configuration of IP Router before installation.
Interne
Cable/xDSL
Modem
Router
Server
Server
Page 15
-15-
Users must connect with IP Router again After configure computer’s local
network. Please make sure your computer setting is as follows, Otherwise IP
Router can not be correctly connected (Linux and Mac users please setup as
follows by relative conference).
The default configuration of IP Router is:
— IP address:192.168.10.1
— Subnet Masks:255.255.255.0
Users can setup static or dynamic IP configuration.
5.1 Windows 95/98/ME SETUP
(1) Install IP Router.
(2) Start computer with Windows-95/98/ME, and check the LAN LED is on
or off. If off, please confirm the connection between your computer and
IP Router.
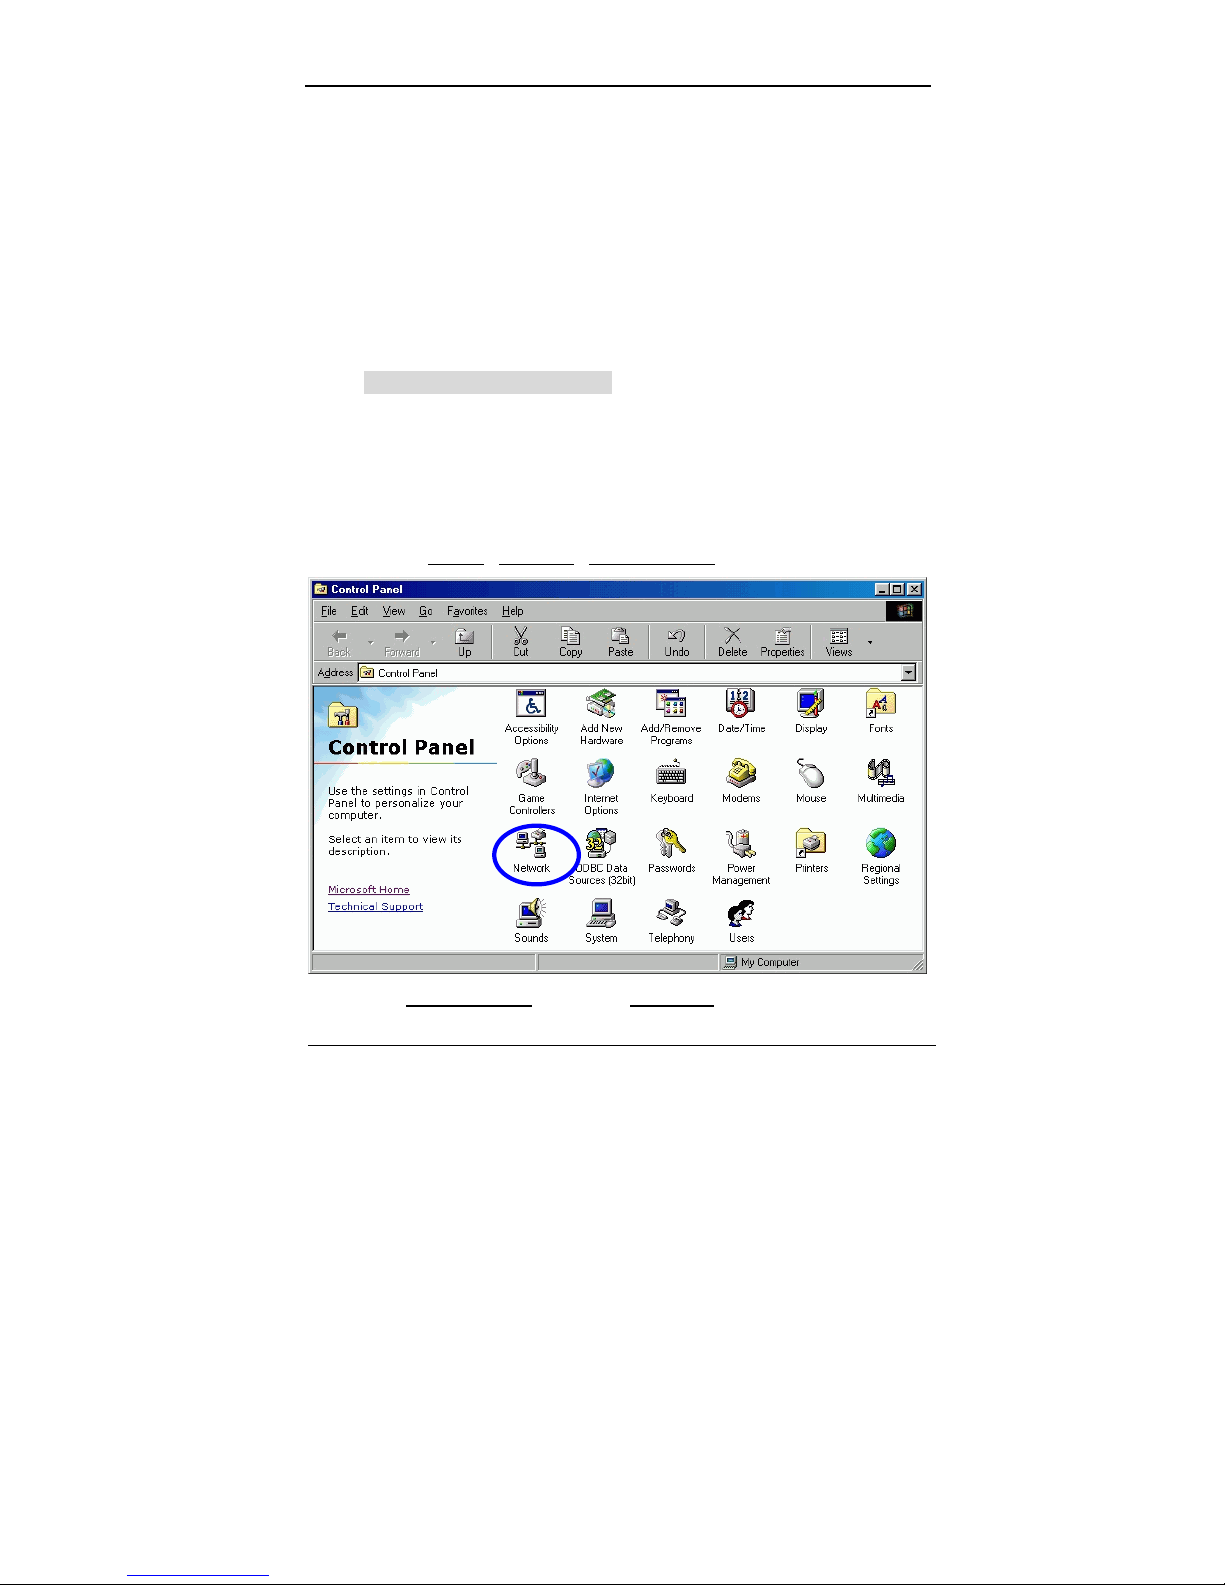
(3) Click “Start”
->“Setting”->“Control panel”.
(4) In “Control panel” double click “Network” .
Page 16
-16-
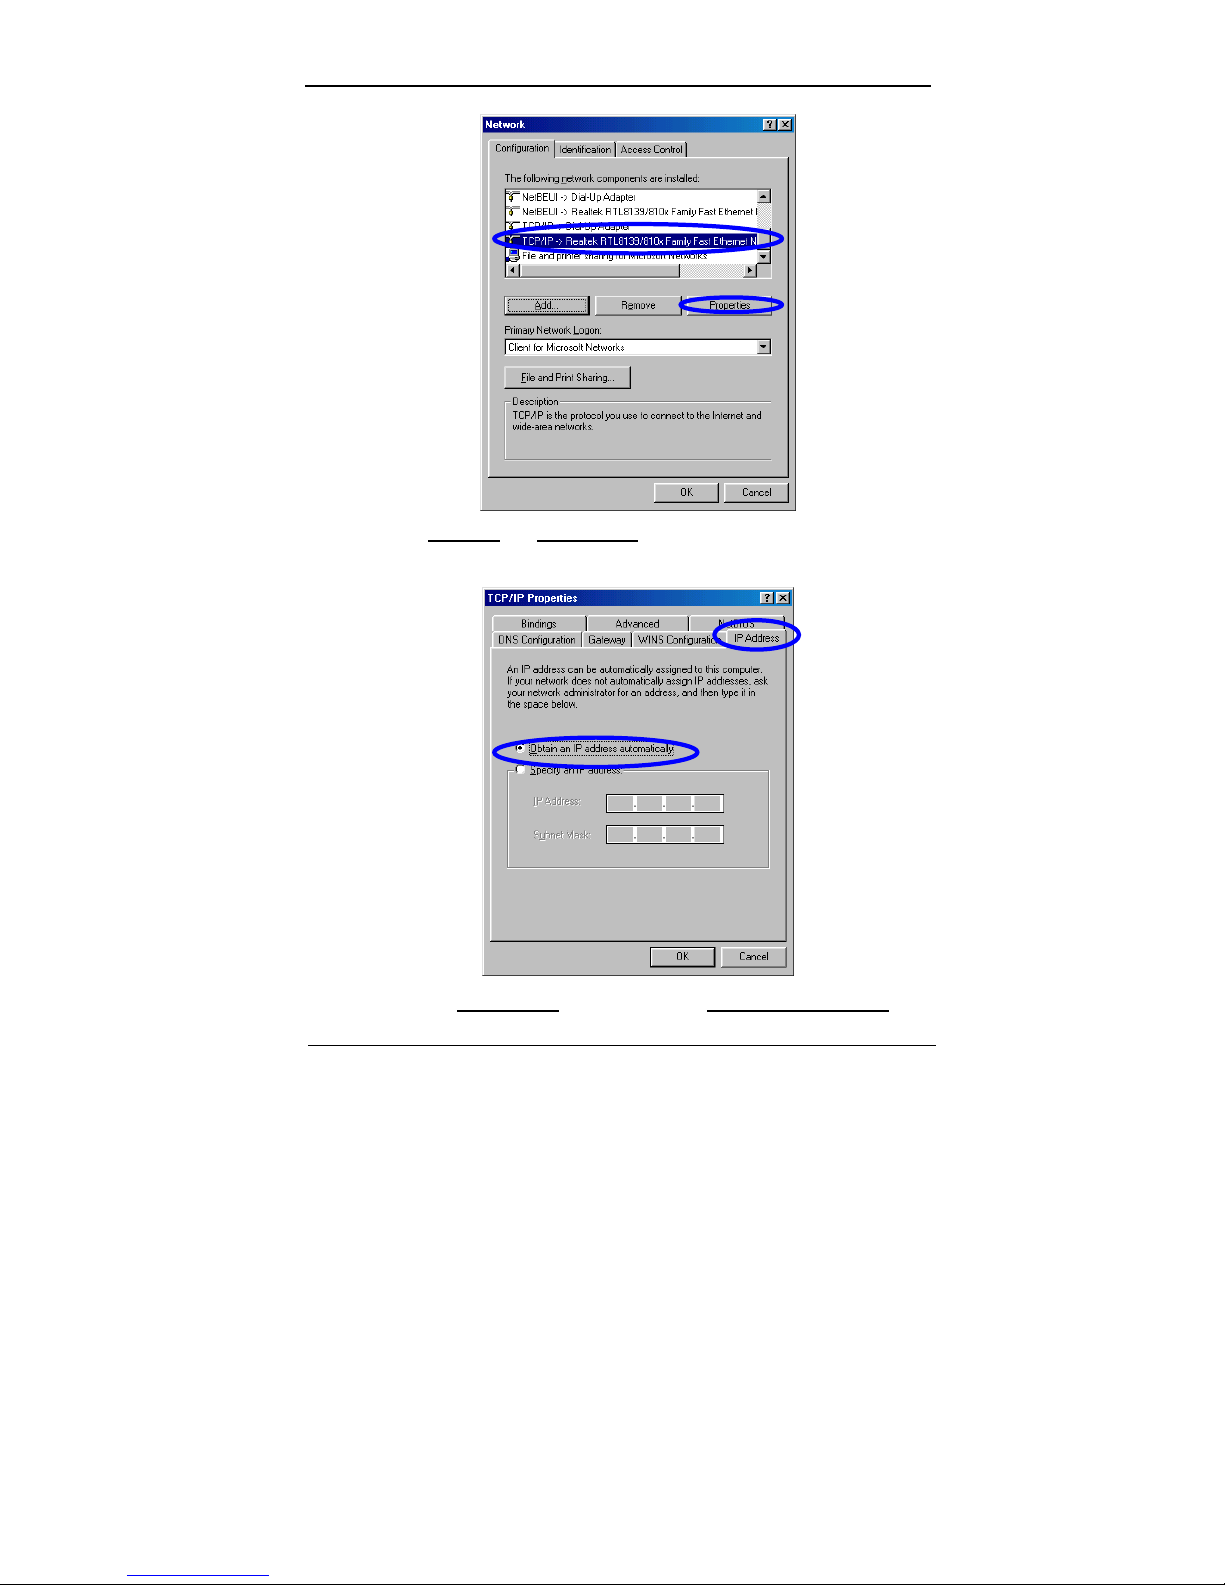
(5) Click “TCP/IP”
and “Properties”.
(6) Click “IP address”
option and choose “Obtain an IP address
Page 17

-17-
automatically”
.
(7) Click “Gateway”
menu and make sure “Installed gateways” is blank.
(8) Click the “DNS Configuration”
and select “Disable DNS”, then Click
“OK”
.
(9) During the TCP/IP installation process there will ask you to insert
Window installation CD. After inserting it then click “OK”
.
(10) After TCP/IP configuration has completed, the window of “System
Setting Chang” will pop-up, select “Yes”, then restart computer.
Page 18

-18-
(11) After restart, click “start”
->“run”.
(12) Input command
,then click “OK”。
(13) Input “ipconfig” in pop-up command window, then “Enter”.
(14) Please make sure your IP is the same with below. If same then your
configuration is successful , or please redo the above steps and restart
your computer.
z The IP address is between 192.168.10.2 and
192.168.10.254
z The subnet mask is 255.255.255.0
z The default gateway is 192.168.10.1
Page 19

-19-
(15) Input “ping 192.168.10.1 ”
then “Enter”.
(16) If you can see “Reply from 192.168.10.1 : bytes=32 time=2ms TTL=64”,the
connection between your computer and IP Router is completed.
Page 20

-20-
5.2 Windows 2000 SETUP
(1) Install IP Router.
(2) Start Windows 2000 and check LAN LED is on or off. If off, please
confirm the connection of your computer with IP Router.
(3) Click “start”
->“Setting”->“Panel Control”.
(4) Double click the “Network and Dial-up Connection”
in “control
panel”.
Page 21

-21-
(5) Click “Local area connection”
->“Properties”->“Internet protocol
(TCP/IP)”and “Properties”.
(6) Click “General ”
bar ,Select “Obtain an IP address automatically” and
“Obtain DNS server address automatically”
(7) Click “OK”
.
Page 22

-22-
(8) Click ”Start”
->“Run”.
(9) Input ”cmd”
,then click “OK”.
(10) Input “ipconfig”
in Pop-up Command window.
(9) Please make sure your IP is the same with below. If same then your
configuration is successful, or please redo the above steps and restart your
computer.
z The IP address is between 192.168.10.2 and
192.168.10.254
Page 23

-23-
z The subnet mask is 255.255.255.0
z The default gateway is 192.168.10.1
(10) Input “ping 192.168.10.1 ”
, then “Enter”.
(11) If you can see “Reply from 192.168.10.1 : bytes=32 time=2ms TTL=64”,then
the connection between your computer and IP Router is completed.
Page 24

-24-
5.3 Windows XP SETUP
(1) Install IP Router.
(2) Start Windows XP and check LAN LED is on or off. If off, please confirm
the connection of your computer with IP Router.
(3) Click “Start”
->“Setting”->“Panel Control”
(4) Double click the “Network and Internet Connections”
in “control
panel”.
(5) Click “Network connection”
->“local area
connection”->“properties”-> “Internet protocol(TCP/IP)” and
“Properties”.
(6) Click “General ”
,Select “Obtain an IP address automatically” and
“Obtain DNS server address automatically”
(7) Click “OK”
Page 25

-25-
Page 26

-26-
Page 27

-27-
(8) Click “Start”
->“Run”
Page 28

-28-
(9) Input “cmd “
, Click “OK”
(10) Input “ipconfig”
in the pop-up command window.
(11) Please make sure your IP is the same with below. If same then your
configuration is successful, or please redo the above steps and restart
your computer.
z The IP address is between 192.168.10.2 and
192.168.10.254
z The subnet mask is 255.255.255.0
z The default gateway is 192.168.10.1
(12) Input “ping 192.168.10.1 ”
, then “Enter”.
(13) If you can see “Reply from 192.168.10.1 : bytes=32 time=2ms
TTL=64”,then the connection between your computer and IP router is
completed.
Page 29

-29-
6. IP ROUTER SETUP
6.1 START INTERNET EXPLORRE TO LOGIN
¾ Run Internet Explorer( ) , and click the “Stop( )“ button
in Internet Explorer’s toolbar.
¾ Input http://192.168.10.1 in Internet Explorer’s address bar.
192.168.10.1 is Default IP address of Router.
¾ You may see the following login web page. Click “Login” button and
make relative configuration..
You can login directly without account & password confirmation
because there is no account information required by factory default
Page 30

-30-
configuration.
6.2 PPPoE(ADSL) USER SETUP
This connection way is suitable for virtual dial-up Internet connection.
¾ Open external ADSL Modem and check the WAN LED of IP ROUTER.
If WAN LED is off, check the network cable between external modem
and WAN port.
¾ Click “WAN setup “
-> “PPPoE User (ADSL)”, as follows:
Page 31

-31-
¾ Input the “User ID”
and “Password” provided by your Internet service
provider.
¾ Click the “Apply”
button.
¾ Confirm the WAN connection status: If WAN connection is successfully
established, then by clicking “Status”
you can enter status web page.
Page 32

-32-
Connection Type should be PPPoE (ADSL)( Successfully
connected )
Physical Address
is shows Router WAN port MAC Address.
WAN IP Address, Subnet mask, Default Gateway, Primary DNS
server and Secondary DNS server can be different from the
following values. (These addresses are provided by your ISP)
“Disconnect” is manual disconnection button. If you click then the
system will disconnect with Internet
“Connect”
is manual connection button. By clicking it the
system can be connected to Internet again.
¾ Click “Save Configuration”
to save current configuration.
¾ Restart all PCs connect with IP Router.
Notes: Please save IP Router Configuration after completion, otherwise
configuration will lose when power off or restart.
Page 33

-33-
Other Configuartion:
MTU
: Input MTU value of data package ,default value is 1454. Normally
please do not change it.
Static DNS
:Allow user manual setup the DNS server.
Static IP
: Allow user setup the static IP.
Disconnect PPP session if idle time is longer than Min
: If you
choose this option and set up the time T, then the IP router
automatically disconnects from Internet after T idle time.
Connect On Demand: IP Router can automatically connect with
Internet if there is Internet access after disconnection. Note: during
usage if there is disconnection due to external causes, then the IP
Router will try to connect with Internet at once until successful
connection. This function is the IP Router inner function and does
nothing with Connect On Demand
function. Connect On Demand is
only effective to Disconnect PPP session if idle time is longer than
Min.
Connect Manually:
By this option users have to connect with Internet
manually after disconnection. This option is only effective to Disconnect
PPP session if idle time is longer than Min.
6.3 DYNAMIC IP USER (Cable/Modem…) SETUP
By this connection way IP Router can get IP address automatically from
ISP (such as: CHINA TELCOM). It is suitable for connection ways such as
Cable Modem, LAN and so on.
¾ Turn on the external Cable Modem and check the WAN LED of IP
Router.
If WAN LED is off, please re-confirm the network cable between
external Modem and WAN port.
¾ Click “WAN Setup”
->“Dynamic IP User (Cable Modem…)” as diagram:
Page 34

-34-
¾ Click Apply
to complete.
¾ Check the WAN Connection Status: click “Status
” to enter status page.
¾ If WAN connection is successfully established, you can see the following.
Page 35

-35-
Connection Type should be “DHCP( Cable Modem,
VDSL, ..)( Successfully connected )”
Physical Address
is shows Router WAN port MAC Address.
Lease Time:IP adderss lease time.
WAN IP Address
, Subnet mask, Default Gateway, Primary DNS
server and Secondary DNS server in your computer may be different
from the following value (These addresses are provided by your ISP).
Disconnect
button as follows is manual WAN port IP address release
function button. If click it IP Router will release WAN port IP address
and disconnect with Internet.
“Connect” button is manual WAN port IP address refresh function
button. If click it WAN port will re-get dynamic IP address and
connect with Internet.
¾ Click “Save Configuration
” button to save current configuration, then
restart all PCs connected with IP Router
Note:
After completed setup , please save IP Router configuration, otherwise
the configuration will be lost when IP Router is power off or restarts.
Other configuration:
Physical address Clone
:If you want to change WAN port MAC
address you can choose this option; If this option is un-chosen the
WAN MAC address is default value; By this option the displayed MAC
address is your current MAC address; You can also manually add the
Page 36

-36-
WAN port MAC address; without the option WAN port MAC address
will restore to default value.
Static DNS:Allow user manual setup the DNS server.
Allow private ip to be accepted
:Allow WAN port assigned private IP
adderss.
6.4 STATIC IP USER SETUP
If you have static IP address provided by ISP, you can choose this option.
¾ Turn on the external modem and check the WAN LED of IP Router
If the WAN LED is off, please check the network cable between
external modem and the WAN port.
¾ Click WAN Setup
-> Static IP User as following diagram:
¾ Input WAN IP address
, Subnet mask, Default Gateway, Primary DNS
Server and Secondary DNS Server provided by ISP.
¾ Click Apply
to complete.
Page 37

-37-
¾ Check WAN connection status: click “Status
” to enter status page.
¾ If WAN connection is successfully established, you can see the
following.
Connection Type should be “Static IP ( Successfully
connected )”
Physical Address
is shows Router WAN port MAC
Address.
Confirm WAN IP Address, Subnet mask, Default Gateway,
Primary DNS server
and Backup DNS server is same with
the values provided by ISP or not.
¾ Click the “Save Configuration”
button to keep current configuration, then
restart computers in LAN to re-get IP relative information.
Note: After completion please save the configuration, otherwise
configuration will be lost when IP Router is power off or restarts.
6.5 Status
Click “Status” as following:
Page 38

-38-
WAN Status:
This page shows current Internet connection status (WAN port), including
Connection Type
, Connection Status,WAN IP address, Subnet mask, Default
Gateway and DNS server. If it is dynamic IP way, “Disconnect” button or
“Connect
” button will be shown above. Click“Disconnect” button to release
current WAN Port IP Address, then click “Connect
” button to refresh WAN IP
address ; If it is PPPoE way, then “Connect
” or “Disconnect” button will be
shown above. Click “Connect
” button to connect with internet, click “Disconnect”
button to disconnect with internet.
LAN Status:
¾ Physical address
:The MAC address of Router’s LAN port.
¾ LAN IP Address : The IP address of Router’s LAN port.
¾ Subnet Mask:
The Subnet Mask of Router’s LAN port.
¾ DHCP Server:
DHCP Server current statu and DHCP IP lease range.
LAN IP Lease Info:
Page 39

-39-
IP address which has been allocated to clients by DHCP server.
¾ Help
:Current page function setup detail. All of the following web pages
will have this button with the same function.
¾ Save Configuration
:Save IP Router current configuration. All of the
following web pages will have this button with the same function.
6.6 LAN Setup
Click ”LAN Setup” as following:
LAN port basic parameter and DHCP server parameter can be set up in this
web page.
¾ System IP Setup
:If you want to change IP Router LAN port address, you
can set up as follows:
System IP address
:IP address in LAN. This IP address is factory
default value 192.168.10.1
, and you can change it.
TCP/IP protocol configuration includes IP address, subnet mask,
Page 40

-40-
Gateway and DNS server and so on. It is not easy to configure TCP/IP
protocol correctly in all computers in LAN, but it is lucky that –DHCP Server
has provided this function. If you choose the DHCP function, you can let
DHCP Server configure TCP/IP protocol in all computers in LAN
automatically.
¾ DHCP Setup
: If you want to able or disable DHCP Server, change DHCP
address range, you can choose the following options:
DHCP Server Operation:Start and Stop DHCP Server. The default
value is Start DHCP Server.
DHCP IP Pool
:IP address range automatically allocated by DHCP
Server is address pool.
Notes:
In order to use DHCP function of the IP Router, TCP/IP protocol
of computers in LAN must be configured as “automatically get IP
address”.
After completion please click “Apply”
to make the configuration
valid. Please save the configuration, otherwise configuration will be
lost when IP Router is power off or restarts.
6.7 Routing Table
Static routes can be added if you require specific routes ,Click “Routing
Table” as follows:
Page 41

-41-
¾ Type
:Routing Type.Have two option:NET/Host.
¾ Target: Enter in the IP of the specified network or host that you
want to access using the static route
¾
Mask: Enter in the subnet mask to be used for the specified network,
¾ Gateway: Enter in the gateway IP address to the specified network.
For Complete Setup ,Please click “Add”
button to add a Routing rule.
6.8 Virtual Server
Click “Virtual Server” as follows:
Page 42

-42-
Because there is Firewall function in the IP Router, if computers in WAN try to
access servers in LAN through the IP Router, under default configuration the
firewall protection will not allow the access, then conflict occurs – at the same time
IP Router has to protect computers in LAN from WAN, at the other time it has to
allow access of valid users in WAN.
Here the IP Router provides you “Vitual Server”
function to solve the conflict.
Virtual Server provides one service port. All service requests to this port will be
relocated to the servers whose IP address has been appointed in LAN.
Function
:
After been setup the IP Router can allow some services, such as DNS、
SMTP、POP3、HTTP、NEWS、FTP、Telnet、PPTP in LAN, to be open to Internet.
Then users from Internet can access servers in your LAN; Or by setting up DMZ
Page 43

-43-
Server you can allow all application services and ports of one Server in your LAN to
be open to Internet.
Setup Method
:
1. Please confirm the LAN services which you wan to be open to Internet
according to the following list:
Protocol Server
DNS DNS (Domain Name Server)
SMTP
SMTP (Simple Message Transfer
Protocol)
POP3 POP3(Post Office Protocol)
HTTP Web Server
News News Server
FTP FTP File Transfer Server
Telnet Telnet Server
PPTP VPN(Virtual Private Network)
2. Choose the Server which you want to be open to Internet, then input
Server IP address. Click “Add” button to make current setup valid. Note:
All open protocol port should be standard port, otherwise IP Router can
not transfer the data package from the invalid port which you have
configured; You can change external port number. But other users who
want to access the services which you have setup have to setup the port
number before successful access.
3. If you want to setup “DMZ Host”
please choose “DMZ ” option, then
input the internal Server’s IP address which you want to be open to
Page 44

-44-
Internet. IP Router will transfer all received data packages except those
which have been setup in “Virtual Server”
to DMZ Server, and will allow
the unlimited dual communication between DMZ Server and outside
Internet. If you are using a new network application but IP Router can not
transfer data package without knowing the Port of this application, then
you can setup all DMZ ports to be open. After DMZ service being effective,
firewall protection of this computer will be invalid, please notice the safety.
NOTE
:
1. If you want to save all values after IP Router power off or restart, please
click “Save Configuration”
button which is in right-above to save
current values.
2. If you use “Virtual Server”
, we recommend you to static IP address in
client computer in order to manage it easily.
6.9 Port Triggering
Click “Port Triggering” as follows:
Page 45

-45-
Function:
If application program is connected form forward ports. All in trigger ports will
be opened to prepare for connection.
Port Triggering:
¾ Port trigger module dynamically register virtural server rules when any IP
host generate the packet from the specified trigger protocol and port.
¾ Port trigger module use forward protocol type and port number and use
the IP address of host which generates the trigger packet when it registers
a rule.
¾ Press "Add"
button after fill the rule parameters to add the rule.
¾ Press "Del"
button to delete a rule after select a rule.
Save Configuration:
¾ To save changes, press the "Save Configuration"
button on the left side
menu.
¾ The unsaved changes will be lost if you turn OFF the power.
Page 46

-46-
6.10 Firewall
Click “Firewall” as follows:
Connection Filtering:
¾ The specified IP host traffic can be blocked by using firewall.
¾ Enter the IP address to block in Source IP Address
field.
¾ Enter the Net Mask
field to block the subenet traffic in net mask field.
¾ Don't enter the net mask field if you want to block just one IP host.
¾ Chose protocol type (TCP/UDP
) and enter the port number to block.
¾ Chose "any"
to block the whole traffic.
Save Configuration:
¾ To save changes, press the "Save Configuration"
button on the left side
menu.
¾ The unsaved changes will be lost if you turn OFF the power.
6.11 DDNS
Click “DDNS” as follows:
Page 47

-47-
With Internet connections ways such as ADSL or Cable Modem, normally ISP
will allocate a dynamic IP address. Dynamic domain name service is a method of
keeping a domain name linked to dynamic IP address get from ISP. But dynamic
domain name service depends on dynamic domain name service system. This
function can allow you to use registered dynamic domain name service no matter
how IP address changes.
Before use DDNS, an account provided by DDNS provider is needed.
Choose Dynamic DNS to be Stat
, input valid “User ID” and “Password” that
got from DDNS provider. Fill your registered domain name in “Host Name”
. Click
“Apply”
button to effect current configuration.
¾ DynDNS Operation
:DDNS “Start/Stop”。
¾ User ID
:The valid ID which you get from DDNS provider.
¾ Password
:The valid password which you get from DDNS provider.
¾ Host Name
:The valid domain name which you get from DDNS provider.。
6.12 Misc Setup
Page 48

-48-
Click “Misc Setup”
as follows:
Login ID & Password Setup:
Input new password and confirm new password to change login password.
Note:
According to the safety, we strongly recommend you to change the initial
administrator username and password. If you forget your system
password please change them to factory default values by Reset button.
Remote Mgmt:
This function to setup IP Router’s remote management and WEB management
ports. After start Remote Management, users can remote manage the IP Router by
“http://WAN port IP address: Your setup Port (between is colon)”; If you want
to start remote management, please setup “Management port”
then click
“Apply”
.
Restore Default/ Restart System:
Click “Restore default
” button to restore all configuration of IP Router to
factory default values.
Page 49

-49-
¾ Default username:Admin
¾ Default password:none
¾ Default IP address:192.168.10.1
¾ Default subnet mask:255.255.255.0
After restore to factory default values, IP Router will restart automatically.
Click “System Reload
” button, IP Router will restart.
Firmware Upgrade:
By updating the IP Router software, you can get new functions or
performance.
Software update steps:
1) Login our company homepage: www.globalzio.com
, download
new version software to your local hard disk.
* Please notice production and software type.
2) Click “Browse
” button to choose you downloaded file.
Page 50

-50-
3) Click “Upgrade”
button to Upgrade system software.
4) After update, IP Router will restart automatically.
5) Please check you firmware version.
Note:
Update phase is about 60 seconds. During the update progress
please do not turn the power off otherwise the IP Router will be damaged.
7. ERROR REPORT AND ADVISE
If you find any error of the IP Router or If you have any advise, please send it to us.
Address:
Web:
E-Mail :
Tel:
Fax:
Company Address:
Page 51

-51-
Appendix A UTP Cable specification
Twisted pair Category-5 straight-through cable
Twisted pair Category-5 Cross over cable
Straight-through Cable Cross over Cable
 Loading...