

Page 1
IRT203
USER’S MANUAL
Infrared Thermometer
with Laser
IRT203 Manual-FINALrev-001208 2/12/08 3:36 PM Pag
Page 2
The thermometer is a non-contact infrared thermometer. Simply aim
the thermometer at the target and press the ‘Scan key’ to display the
surface temperature.
LASER INFORMATION:
(FOR MODELS WITH LASER ONLY)
By partially pressing the ‘Scan key’, the device will begin to measure
the temperature of the target. When the ‘Scan key’ is completely
depressed, the laser will operate.
C
AUTION!
1. WHEN DEVICE IS IN USE, DO NOT LOOK DIRECTLY INTO THE
LASER BEAM–PERMANENT EYE DAMAGE MAY RESULT.
2. USE EXTREME CAUTION WHEN OPERATING THE LASER.
3. NEVER POINT THE DEVICE TOWARDS ANYONE’S EYES.
4. KEEP OUT OF REACH OF ALL CHILDREN.
°C OR °F MODE
To change the thermometer from ‘°C’ to ‘°F’ or from ‘°F’ to ‘°C’, firstly
turn the instrument on by pressing the ‘Scan key’, then press the
‘Mode key’ four times, the ‘°C’ or ‘°F’ symbol will flash, press the
‘Scan key’ to change to scale.
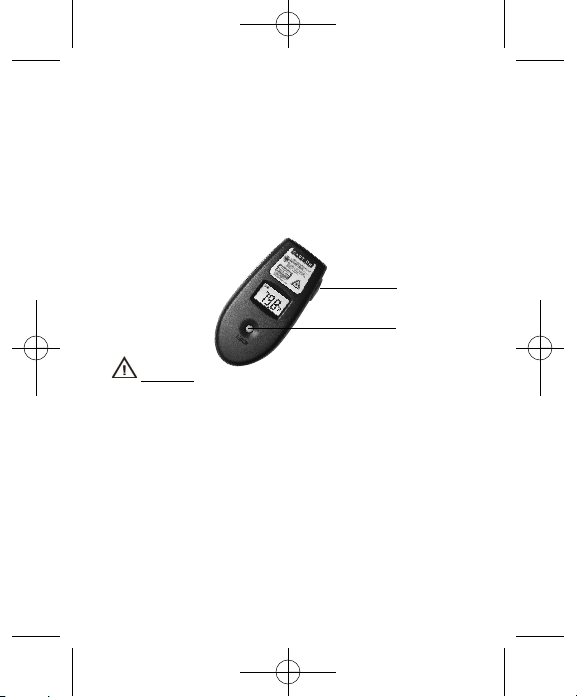
‘Scan’ Button
‘Mode’ Button
IRT203 Manual-FINALrev-001208 2/12/08 3:36 PM Pag
Page 3
MINIMUM OR MAXIMUM MODE
To utilize the thermometer’s minimum or maximum mode, firstly turn
the instrument on by pressing the ‘Scan key’, then press the ‘Mode
key’ once for minimum or twice for maximum function. The ‘MIN’ or
‘MAX’ icon will flash, then press the ‘Scan key’ to confirm the
minimum or maximum mode. The thermometer will display the
minimum or maximum reading only.
LOCK MODE
The lock mode is particularly useful for continuous monitoring of
temperatures.
To utilize the thermometer’s LOCK mode, firstly turn the instrument on
by pressing the ‘Scan key’, then press the ‘Mode key’ three times for
the lock mode function. The lock icon will flash, then press the ‘Scan
key’ to confirm the lock mode. The thermometer will continuously
display the temperature for up to 60 minutes or until the ‘Scan key’ is
pressed again.
EMISSIVITY RANGE
The infrared thermometer is supplied with a default emissivity of 0.95.
The emissivity of the thermometer can be changed from 0.05 (5E) to
1.00 (100E). Changes should only be carried out by experienced
personnel. To change the emissivity firstly turn the instrument on by
pressing the ‘Scan key’, then press the ‘Mode key’ five times for
emissivity function. The 95E will flash on the LCD screen, then press
the ‘Scan key’ to adjust the emissivity value,press the ‘Mode key’
again to exit the set up screen. For information relating to the
emissivity of specific materials, please contact the nearest retailer.
NOTE: non-contact infrared thermometers are not recommended for
use in measuring the temperature of shiny or polished metals.
IRT203 Manual-FINALrev-001208 2/12/08 3:36 PM Pag
Page 4
LCD ERROR MESSAGES
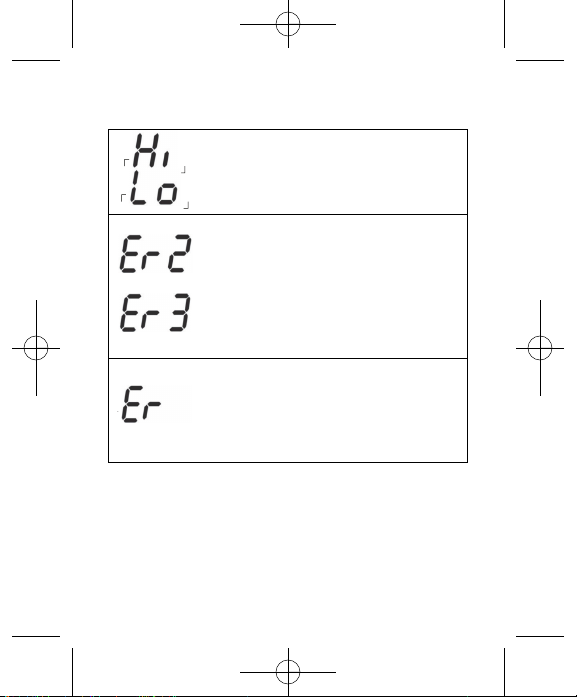
The thermometer incorporates visual diagnostic messages as follows:
‘Hi’ or ’Lo’ is displayed when the temperature being
measured is outside of the range of the instrument,
‘Hi’ when higher than +250°C (482°F) and ‘Lo’
when lower than –55°C (-67°F).
‘Er2’ is displayed when the thermometer is
exposed to rapid changes in the ambient
temperature. ‘Er3’ is displayed when the ambient
temperature of the thermometer EXCEEDS 0°C
(32°F) OR +50°C (122°F). In both cases you should
allow plenty of time (minimum 30 minutes) for the
thermometer to stabilize to the working/room
temperature.
For all other error messages it is necessary to reset
the thermometer. To reset it, turn the instrument
off, remove the battery and wait for a minimum of
one minute, reinsert the battery and turn on. If the
error message remains please contact the Service
Department for further assistance.
BATTERIES
The thermometer has two separate batteries. The battery closer to the
side of the laser beam output is for laser operation only. The other
battery is designated for temperature measurements. The
thermometer can still measure temperature properly, even without the
laser battery.
IRT203 Manual-FINALrev-001208 2/12/08 3:36 PM Pag
Page 5
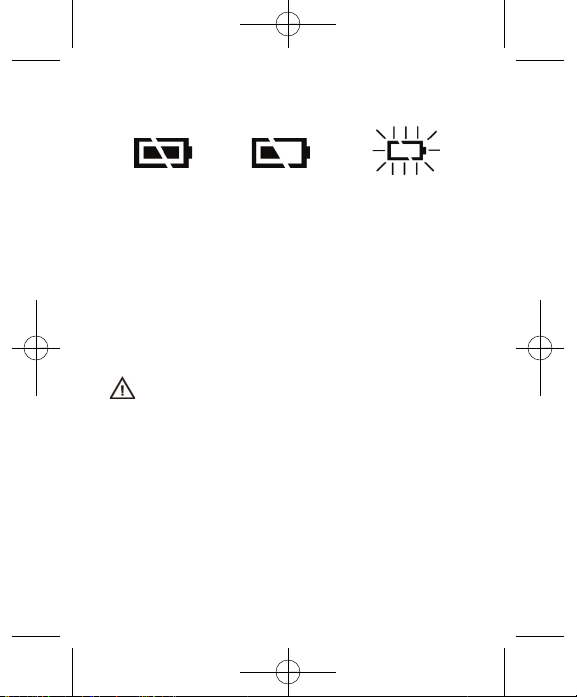
The thermometer incorporates visual low battery indication (for the
lower battery) as follows:
BATTERY REPLACEMENT
When the ‘Low Battery’ icon indicates the battery is low, the battery
should be replaced immediately with a CR2032 lithium cell. The
battery is located under the twist cover at the rear of the
thermometer. Please note: It is important to turn the instrument off
before replacing the battery otherwise the thermometer may
malfunction.
Dispose of used battery properly and keep away from children.
STORAGE & CLEANING
The sensor lens is the most delicate part of the thermometer. The lens
should be kept clean at all times, care should be taken when cleaning
the lens using only a soft cloth or cotton swab with water or medical
alcohol, allowing the lens to fully dry before using it, do not submerge
any part of the thermometer. The thermometer should be stored at
room temperature between -20 to +65°C (-4 to +149°F).
‘Battery OK’:
measurements
are possible
‘Battery Low’: battery
needs to be replaced,
measurements
are possible
‘Battery Exhausted’:
measurements
are not possible
IRT203 Manual-FINALrev-001208 2/12/08 3:36 PM Pag
Page 6

SPECIFICATIONS
Measurement Range: -67º to 482°F (-55° to 250°C)
Operating Range: 32° to 122°F (0° to 50°C)
Accuracy (Tobj=15-35°C,Tamb=25°C): +/-1.0°C (1.8°F)
Accuracy (Tobj=-33~250ºC, Tamb=23±3ºC):
±2% of reading or 2°C (4°F) whichever is greater
Resolution (-9.9º~199.9°C): 0.1°C / 0.1°F (switchable)
Response Time (90%): 1 second
Distance Spot: 6:1 optics ratio
Emissivity Range: 0.95 default – adjustable 0.05 to 1.00 emissivity
Battery Life: Typ. 40hr, min 30hr (auto power off after 15 seconds)
Power Source: CR2032 (for Laser, 2pcs required)
Dimensions: 22.5 x 50 x 103mm (0.9 x 2.0 x 4.0 inch)
Weight: 65 grams (2.29 oz) including batteries
EMC/RFI
Readings may be affected if the unit is operated within radio
frequency electromagnetic field strength of approximately 3 volts per
meter, but the performance of the instrument will not be permanently
affected.
IRT203 Manual-FINALrev-001208 2/12/08 3:36 PM Pag
Page 7

IRT203
MODE D’EMPLOI
Thermomètre infrarouge
à laser
Ce thermomètre est un appareil infrarouge sans contact. Il suffit de
pointer le thermomètre sur la cible et d'appuyer sur le bouton « Scan
» pour afficher la température de la surface.
INFORMATION CONCERNANT LE LASER :
(MODÈLES À LASER UNIQUEMENT)
Lorsque le bouton « Scan » est partiellement enfoncé, l'appareil
mesure la température de la cible. Enfoncer complètement le bouton «
Scan » pour faire fonctionner le laser.
A
TTENTION !
1. DURANT LA MARCHE DE L'APPAREIL, NE PAS REGARDER
DIRECTEMENT DANS LE FAISCEAU LASER – CECI PEUT
PROVOQUER DES LÉSIONS OCULAIRES IRRÉVERSIBLES.
2. FAIRE PREUVE DE TRÈS GRANDE PRÉCAUTION POUR UTILISER
LE LASER.
3. NE JAMAIS POINTER L'APPAREIL VERS LES YEUX D'AUTRES
PERSONNES.
4. GARDER HORS DE LA PORTÉE DES ENFANTS.
Bouton « Scan »
Bouton « Mode »
IRT203 Manual-FINALrev-001208 2/12/08 3:36 PM Pag
Page 8

MODE °C OU °F
Pour passer de °C à °F ou de °F à °C, appuyer d'abord sur le bouton «
Scan » pour mettre l'appareil en marche, puis quatre fois sur le bouton
« Mode » pour faire clignoter le symbole °C ou °F et appuyer sur le
bouton « Scan » pour changer l'unité.
MODE MINIMUM OU MAXIMUM
Pour utiliser mode minimum ou maximum du thermomètre, appuyer
d'abord sur le bouton « Scan » pour mettre l'appareil en marche, puis
une fois sur le bouton « Mode » pour la fonction minimum ou deux fois
pour le maximum. L'icône « MIN » ou « MAX » clignote, appuyer alors
sur le bouton « Scan » pour confirmer le mode minimum ou maximum.
Le thermomètre affiche alors uniquement la mesure minimum ou
maximum.
MODE VERROUILLÉ
Le mode verrouillé est particulièrement utile pour le contrôle de
températures en continu.
Pour utiliser le mode VERROUILLÉ du thermomètre, appuyer d'abord
sur le bouton « Scan » pour mettre l'appareil en marche, puis trois fois
sur le bouton « Mode » pour accéder au mode verrouillé. L'icône de
verrouillage clignote, appuyer alors sur le bouton « Scan » pour
confirmer le mode verrouillé. Le thermomètre affiche la température
en continu pendant 60 minutes ou jusqu'à ce que le bouton « Scan »
soit enfoncé une nouvelle fois.
PLAGE D'ÉMISSIVITÉ
Le thermomètre infrarouge est fourni avec une émissivité par défaut
de 0,95. L'émissivité du thermomètre est réglable de 0,05 (5E) à 1,00
(100E). Les modifications doivent être confiées exclusivement à des
personnes compétentes. Pour modifier l'émissivité, appuyer d'abord
sur le bouton « Scan » pour mettre l'appareil en marche, puis cinq fois
IRT203 Manual-FINALrev-001208 2/12/08 3:36 PM Pag
Page 9

sur le bouton « Mode » pour accéder à la fonction d'émissivité. 95E
clignote à l'écran, appuyer alors sur le bouton « Scan » pour régler la
valeur d'émissivité, puis sur le bouton « Mode » pour quitter l'écran de
réglage. Pour de plus amples renseignements sur l'émissivité de
matériaux particuliers, contacter le revendeur le plus proche.
Remarque : il est déconseillé d'utiliser un thermomètre infrarouge sans
contact pour mesurer la température de métaux brillants ou polis.
MESSAGES D'ERREUR AFFICHÉS
Le thermomètre peut afficher les messages de diagnostic suivants :
« Hi » ou « Lo » s'affiche si la température mesurée
est hors de la plage de l'appareil, « Hi » si elle est
au-dessus de +250°C (482°F) et « Lo » en dessous
de –55°C (-67°F).
« Er2 » s'affiche si le thermomètre est exposé à des
variations rapides de la température ambiante.
« Er3 » s'affiche si la température ambiante du
thermomètre est EN-DEHORS de la plage 0°C (32°F)
OU +50°C (122°F). Dans les deux cas, laisser
suffisamment de temps (30 minutes au minimum)
au thermomètre pour se stabiliser à la température
d'exploitation/ ambiante.
En présence de tout autre message d'erreur, le
thermomètre doit être réinitialisé. Pour le
réinitialiser, éteindre l'appareil, sortir les piles et
attendre au moins une minute, puis remettre les
piles en place et mettre en marche. Si le message
d'erreur persiste, contacter le Service après-vente
pour assistance.
IRT203 Manual-FINALrev-001208 2/12/08 3:36 PM Pag
Page 10

PILES
Le thermomètre comporte deux piles distinctes. La pile du côté de la
sortie du faisceau laser sert uniquement au fonctionnement du laser.
L'autre pile est utilisée pour les mesures de température. Le
thermomètre est capable de mesurer correctement la température,
même sans la pile laser.
Le thermomètre comporte des indications visuelles de décharge de
pile (pour la pile la plus déchargée) comme suit :
CHANGER LES PILES
Lorsque l'icône « Pile faible » s'affiche, la pile doit être remplacée
immédiatement par une pile bouton au lithium CR2032 neuve. La pile
se trouve sous un couvercle tournant, au dos du thermomètre.
Remarque : veiller à bien éteindre l'appareil avant de changer la pile
afin d'éviter un mauvais fonctionnement du thermomètre.
Éliminer la pile comme il se doit et la tenir hors de portée des
enfants.
ENTREPOSAGE ET NETTOYAGE
La lentille de capteur est la pièce la plus délicate du thermomètre. La
lentille doit toujours être gardée propre. Nettoyer la lentille avec
précaution avec un chiffon doux ou un coton-tige imbibé d'eau ou
d'alcool médical et la laisser sécher complètement avant de l'utiliser.
N'immerger aucune partie du thermomètre. Le thermomètre doit être
entreposé à une température ambiante de -20 à +65°C (-4 à+149°F).
Pile OK : les
mesures sont
possibles
Pile faible : la pile doit
être changée, les
mesures sont possibles
Pile déchargée :
les mesures ne sont
pas possibles
IRT203 Manual-FINALrev-001208 2/12/08 3:36 PM Pag
Page 11

CARACTÉRISTIQUES TECHNIQUES
Plage de mesure : -55º à 250°C (-67º à 482°F)
Plage d'exploitation : 0º à 50°C (32º à 122°F)
Précision (Tobj=15-35°C,Tamb=25°C) : +/-1,0°C (1,8°F)
Précision (Tobj=-33~250ºC, Tamb=23±3ºC) :
±2% de la mesure ou, au minimum, 2°C (4°F)
Résolution (-9,9º~199,9°C) : 0,1°C / 0,1°F (commutable)
Temps de réponse (90%) : 1 s
Distance : tache : Rapport optique 6:1
Plage d'émissivité : 0,95 par défaut – émissivité réglable de
0,05 à 1,00
Autonomie des piles : Typ. 40 h, mini. 30 h
(arrêt auto au bout de 15 s)
Source d’alimentation : CR2032 (pour Laser, 2 piles requises)
Dimensions : 22,5 x 50 x 103 mm (0,9 x 2,0 x 4,0 pouces)
Poids : 65 g (2,29 oz) piles comprises
CEM/BROUILLAGE RADIOÉLECTRIQUE
Les mesures peuvent être perturbées si l'appareil est utilisé à
l'intérieur d'un champ électromagnétique de radiofréquences d'une
intensité de 3 V/m environ, mais les performances ne sont pas
altérées de façon irréversible.
IRT203 Manual-FINALrev-001208 2/12/08 3:36 PM Pag
Page 12

IRT203
MANUAL DEL PROPIETARIO
Termómetro infrarrojo con láser
Este termómetro infrarrojo mide temperaturas sin contacto.
Simplemente apunte el termómetro al objetivo y oprima la tecla ‘Scan’
para indicar la temperatura superficial.
INFORMACIÓN SOBRE EL LÁSER:
(SOLAMENTE PARA MODELOS CON LÁSER)
Al oprimir la tecla ‘Scan’ parcialmente, el dispositivo comenzará a
medir la temperatura del objetivo. El láser entrará en funcionamiento
al oprimir la tecla ‘Scan’ completamente.
¡PRECAUCIÓN!
1. AL USAR EL DISPOSITIVO, NO MIRE DIRECTAMENTE AL RAYO
LÁSER: PUEDE CAUSAR LESIONES OCULARES PERMANENTES.
2. SE DEBE OPERAR EL LÁSER CON SUMO CUIDADO.
3. NUNCA APUNTE EL DISPOSITIVO HACIA LOS OJOS DE ALGUIEN.
4. MANTÉNGASE FUERA DEL ALCANCE DE LOS NIÑOS.
MODO °C O °F
Para cambiar el termómetro de ‘°C’ a ‘°F’ o de ‘°F’ a ‘°C’, primero
encienda el instrumento oprimiendo la tecla ‘Scan’, y luego oprima la
tecla ‘Mode’ cuatro veces. El símbolo ‘°C’ o ‘°F’ destellará de manera
intermitente. Oprima la tecla ‘Scan’ para cambiar la escala.
Tecla “Scan”
Tecla “Mode”
IRT203 Manual-FINALrev-001208 2/12/08 3:36 PM Pag
Page 13

MODO MÍNIMO O MÁXIMO
Para utilizar los modos mínimo o máximo del termómetro, primero
encienda el instrumento oprimiendo la tecla ‘Scan’, y luego oprima la
tecla ‘Mode’ una vez para mínimo o dos veces para máximo. El icono
‘MIN’ o ‘MAX’ destellará de manera intermitente. Oprima la tecla
‘Scan’ para confirmar el modo mínimo o máximo. El termómetro
indicará solamente la lectura mínima o máxima.
MODO CERRADO
El modo cerrado es particularmente útil para el monitoreo continuo de
temperaturas.
Para utilizar el modo CERRADO del termómetro, primero encienda el
instrumento oprimiendo la tecla ‘Scan’, y luego oprima la tecla ‘Mode’
tres veces para la función del modo cerrado. El icono del candado
destellará de manera intermitente. Oprima la tecla ‘Scan’ para
confirmar el modo cerrado. El termómetro indicará la temperatura de
manera continua para hasta 60 minutos o hasta que se oprima la
tecla ‘Scan’ de nuevo.
GRADO DE EMISIÓN
El termómetro infrarrojo se entrega con un grado de emisión de
fábrica de 0,95. Se puede cambiar el grado de emisión del
termómetro desde 0,05 (5E) hasta 1,00 (100E). Dichos cambios sólo
los debe llevar a cabo personal experimentado. Para cambiar el grado
de emisión, primero encienda el instrumento oprimiendo la tecla
‘Scan’, y luego oprima la tecla ‘Mode’ cinco veces para la función del
grado de emisión. ‘95E’ destellará en la pantalla LCD; luego oprima la
‘Scan’ para ajustar el valor del grado de emisión y oprima la tecla
‘Mode’ de nuevo para salir de la pantalla de configuración. Para
información relacionada con el grado de emisión de materiales
específicos, póngase en contacto con el vendedor local.
NOTA: No se recomiendan los termómetros infrarrojos sin contacto
para la medición de la temperatura de metales brillantes o pulidos.
IRT203 Manual-FINALrev-001208 2/12/08 3:36 PM Pag
Page 14

MENSAJES DE ERROR LCD
El termómetro emplea los siguientes mensajes de diagnóstico visual:
Indica ‘Hi’ o ’Lo’ cuando la temperatura medida
queda fuera del rango del instrumento; ‘Hi’ cuando
sea mayor a +250°C (482°F) y ‘Lo’ cuando sea
menor a –55°C (-67°F).
Indica ‘Er2’ cuando el termómetro se expone a
cambios rápidos de temperatura ambiente. Indica
‘Er3’ cuando el temperatura ambiente del
termómetro SOBREPASE 0°C (32°F) O +50°C
(122°F). En ambos casos, debe dejar suficiente
tiempo (mínimo de 30 minutos) para que el
termómetro se estabilice a la temperatura de
trabajo/ambiente.
En caso de cualquier otro mensaje de error, es
necesario reconfigurar el termómetro. Para
reconfigurarlo, apague el instrumento, quite la pila,
y espere un mínimo de un minuto. Vuelva a instalar
la pila y encienda el instrumento. Si sigue con el
mensaje de error, póngase en contacto con el
Departamento de servicio para ayuda adicional.
PILAS
El termómetro tiene dos pilas separadas. La pila más cercana al lado
de la salida del rayo láser es para la operación del láser solamente. La
otra pila es la designada para las mediciones de temperatura. Aún sin
la batería del láser, el termómetro puede medir la temperatura
correctamente.
IRT203 Manual-FINALrev-001208 2/12/08 3:36 PM Pag
Page 15

El termómetro incorpora una indicación visual de pila baja (para la pila
con menos carga) según se indica a continuación:
CAMBIO DE PILAS
Cuando el icono de ‘Pila baja’ aparece, se debe reemplazar la pila
inmediatamente con una pila de litio CR2032. La pila se ubica debajo
de la tapa con rosca en la parte posterior del termómetro. Nota: es
importante apagar el instrumento antes de reemplazar la pila. En caso
contrario, el termómetro puede funcionar mal.
Deseche la pila usada de manera apropiada y manténgase fuera
del alcance de los niños.
ALMACENAJE Y LIMPIEZA
La lente del sensor es la parte más delicada del termómetro. La lente
debe mantenerse limpia en todo momento. Al limpiar la lente,se debe
usar solamente un paño suave o un algodón con agua o alcohol
médico, permitiendo que la lente se seque completamente antes de
usarlo. No se debe sumergir ninguna parte del termómetro. El
termómetro debe almacenarse a temperatura ambiente entre -20 y
+65°C (-4 y +149°F).
ESPECIFICACIONES
Rango de medición: -55° a 250°C (-67º a 482°F)
Rango de operación: 0° a 50°C (32° a 122°F)
Precisión (Tobj=15-35°C, Tamb=25°C): +/-1,0°C (1,8°F)
Precisión (Tobj=-33~250 ºC, Tamb=23±3 ºC):
±2% del valor de medición o 2°C (4°F) (la que sea mayor
‘Pila cargada’:
Se pueden
hacer medidas
‘Pila baja’: Hay que
reemplazar la pila; se
pueden hacer medidas
‘Pila descargada’:
No se pueden
hacer medidas
IRT203 Manual-FINALrev-001208 2/12/08 3:36 PM Pag
Page 16

Resolución (-9,9º~199,9°C): 0,1°C / 0,1°F (cambiable)
Tiempo de respuesta (90%): 1 segundo
Relación óptica distancia: tamaño: 6:1
Grado de emisión: 0,95 de fábrica – ajustable de 0,05 a 1,00
Vida útil de la pila: Típica: 40hr, mínima 30hr
(se apaga automáticamente después de 15 segundos)
Fuente de alimentación: CR2032 (para el láser, se requieren 2 piezas)
Dimensiones: 22,5 x 50 x 103mm (0,9 x 2,0 x 4,0 pulgada)
Peso: 65 gramos (2,29 onzas) pilas incluidas
CEM/IRF
Las lecturas podrán verse afectadas si la unidad se opera dentro de
un campo electromagnético o de radiofrecuencia de aproximadamente
3 voltios por metro, pero el rendimiento del instrumento no sufrirá
averías permanentes.
GENERAL TOOLS & INSTRUMENTS
™
80 White Street, New York, NY 10013-3567
PHONE (212) 431-6100
FAX (212) 431-6499
TOLL FREE (800) 697-8665
e-mail: sales@generaltools.com
www.generaltools.com
IRT203 User’s Manual
Specifications subject to change without notice
©2008 GENERAL TOOLS & INSTRUMENTS
™
NOTICE - WE ARE NOT RESPONSIBLE FOR TYPOGRAPHICAL ERRORS.
MAN#IRT203 2/08
IRT203 Manual-FINALrev-001208 2/12/08 3:36 PM Pag
 Loading...