

Page 1
TorchScope
VIDEO RECORDING FLASHLIGHT
USER’S MANUAL
DCF1
Test Equipment Depot - 800.517.8431 - 99 Washington Street Melrose, MA 02176
TestEquipmentDepot.com
Page 2

TABLE OF CONTENTS
Introduction . . . . . . . . . . . . . . . . . . . . . . . . . . . . . . . . . . . . . . . . . . . . . . . . . . . . . 2
Key Features . . . . . . . . . . . . . . . . . . . . . . . . . . . . . . . . . . . . . . . . . . . . . . . . . . . . 3
Safety Instructions . . . . . . . . . . . . . . . . . . . . . . . . . . . . . . . . . . . . . . . . . . . . . . . . 3
What’s in the Package . . . . . . . . . . . . . . . . . . . . . . . . . . . . . . . . . . . . . . . . . . . . . 3
Product Overview . . . . . . . . . . . . . . . . . . . . . . . . . . . . . . . . . . . . . . . . . . . . . . . . 4
Setup Instructions . . . . . . . . . . . . . . . . . . . . . . . . . . . . . . . . . . . . . . . . . . . . . 4 –8
Install & Charge Battery . . . . . . . . . . . . . . . . . . . . . . . . . . . . . . . . . . . 4 –5
Install Memory Card . . . . . . . . . . . . . . . . . . . . . . . . . . . . . . . . . . . . . . 5 –6
Set Date, Time & Language . . . . . . . . . . . . . . . . . . . . . . . . . . . . . . . . . 6 –7
Set Recording Parameters . . . . . . . . . . . . . . . . . . . . . . . . . . . . . . . . . 7 –8
Operating Instructions . . . . . . . . . . . . . . . . . . . . . . . . . . . . . . . . . . . . . . . . . 8 – 10
Using the Flashlight . . . . . . . . . . . . . . . . . . . . . . . . . . . . . . . . . . . . . . . . . 8
Recording Video Clips and Taking Photos . . . . . . . . . . . . . . . . . . . . . . 8 –9
Loop Recording . . . . . . . . . . . . . . . . . . . . . . . . . . . . . . . . . . . . . . . . . 9
Viewing Saved Files . . . . . . . . . . . . . . . . . . . . . . . . . . . . . . . . . . . . . 9 – 10
Specifications . . . . . . . . . . . . . . . . . . . . . . . . . . . . . . . . . . . . . . . . . . . . . . . . . . 10
Operating & Maintenance Tips . . . . . . . . . . . . . . . . . . . . . . . . . . . . . . . . . . . . . . 11
Warranty Information . . . . . . . . . . . . . . . . . . . . . . . . . . . . . . . . . . . . . . . . . . . . . 12
Return for Repair Policy . . . . . . . . . . . . . . . . . . . . . . . . . . . . . . . . . . . . . . . . . . . 12
INTRODUCTION
The DCF1 TorchScope Video Recording Flashlight is ideal for making inspections of equipment
and areas that are open enough to not require the maneuverability of a flexible borescope
camera probe. Lighting for the TorchScope’s line-of-sight camera is provided by a powerful LED
flashlight that can be used independently. One obvious application for the TorchScope is
documenting—with high-definition, date- and time-stamped video and photos—the rounds of
security guards.
2
Page 3

KEY FEATURES
2
3
4
1
• Combines a powerful LED flashlight with a high-definition video recording camera that also
takes photos
• Saves photos and date- and time-stamped video clips with or without voice annotation to
MicroSD card (4GB card included). Saved media can be viewed on LCD viewfinder or on a
PC, either by removing and inserting the card or using the included USB cable to connect
the flashlight to the PC.
• LED flashlight can be used separately or to illuminate camera’s field of view. Brightness and
illumination modes (including fast strobe and “S-O-S” transmission in Morse code) are
controllable from front panel.
• Entire unit is IP68 waterproof, making it operable under up to 10m (33 ft.) of water
• 1m (3.3 ft.) drop-resistant
• 1 to 4X zoom control on front panel. Zoom can be applied to photos and to video clips “on
the fly” during recording.
• Familiar hierarchical menu for adjusting video and photo resolution, turning date/time
stamps on and off, and choosing from among 11 on-screen languages
• Anodized military-grade aerospace aluminum housing, with knurled non-slip grip and
rubber overmold
SAFETY INSTRUCTIONS
The flashlight section of the TorchScope uses three 2-watt LED lights that are powerful enough to
disorient or cause short-term vision problems for anyone looking directly at them. Avoid staring
at those lights—especially when the flashlight is operated in full power or fast strobe mode.
Keep the TorchScope out of the hands of children.
WHAT’S IN THE PACKAGE
The TorchScope comes in a custom hard plastic carrying case along with a rechargeable
Lithium-ion battery, a 4GB MicroSD card, a USB charging/interface cable and this user’s manual.
1. TorchScope recording video flashlight
2. Rechargeable Lithium-ion battery
3. USB charging/interface cable
4. 4GB MicroSD card
3
Page 4
PRODUCT OVERVIEW
16
5
9
6
7
17
8
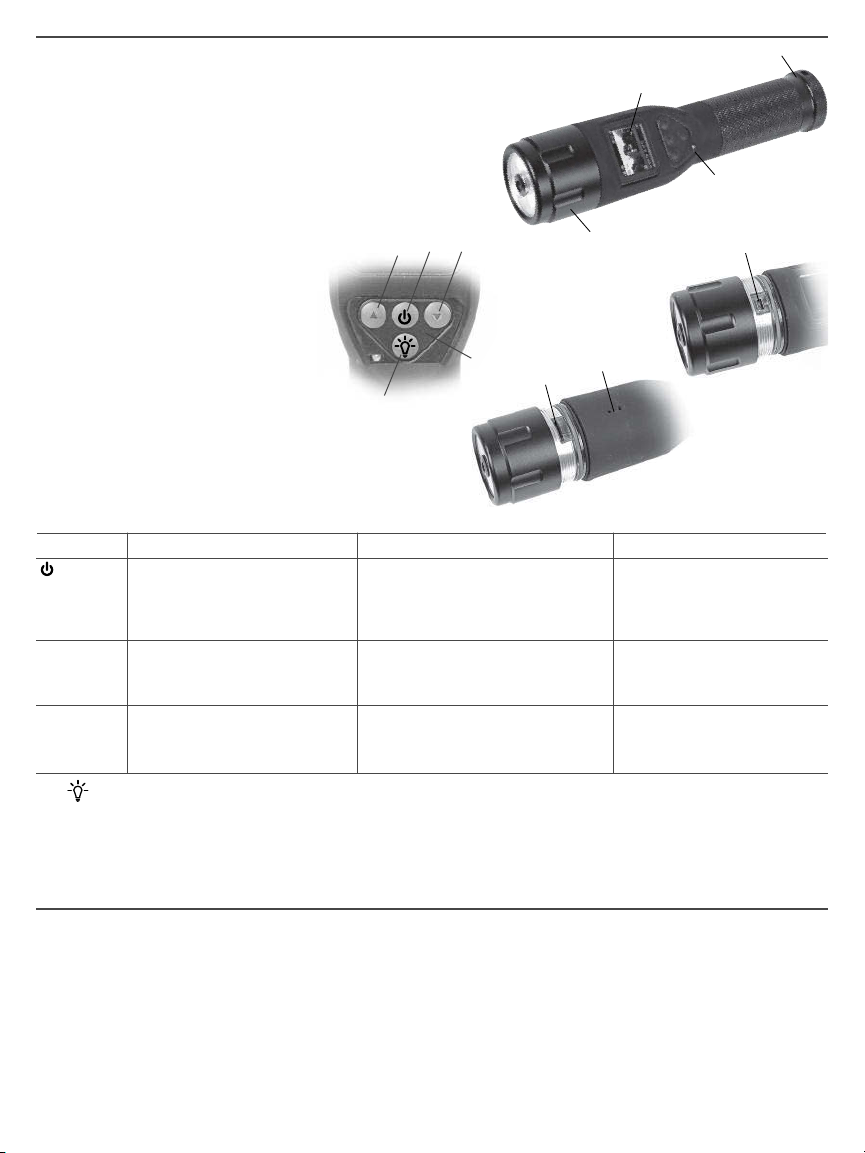
The figure at right shows all of the
controls, indicators and structures
of the TorchScope. Familiarize
yourself with the position and
function of all controls and
components before proceeding to
the Setup Instructions and
Operating Instructions.
5. Color LCD viewfinder
6. Status light
7. Removable flashlight/
camera head cover
8. Microphone
9. Battery compartment cover
10. Control panel
Camera control button functions by mode
Video mode Menu mode Playback mode
button Pressed and held, powers
(Callout 11) camera on and off
Pressed briefly, opens
Setup menu
button Pressed briefly, takes photo
(Callout 12) Pressed and held, activates
zoom
button Pressed briefly, starts/stops
(Callout 13) recording video clip
11
12
14
Pressed briefly, saves
selection or setting
Pressed and held, powers
camera on and off
Pressed briefly, scrolls up
and highlights one menu item
above
Pressed briefly, scrolls down
and highlights one menu item
below
13
10
Pressed and held, powers
camera on and off
Pressed briefly, displays
next-oldest photo or video
clip
Pressed briefly, displays
next-newest photo or
video clip
14. button. Turns on flashlight and selects illumination mode (50%, 75% or 100% power,
fast strobe, or S-O-S (in Morse code).
15. Mini USB jack
16. MicroSD card slot
SETUP INSTRUCTIONS
INSTALL & CHARGE BATTERY
To install the rechargeable Li-ion battery, first unscrew and remove the battery compartment
cover (Callout 9). Then slide the battery into the compartment anode (+ side) first. Secure the
cover as tightly as possible because it provides a waterproof seal.
During charging, the TorchScope can be used as a flashlight, but not as a video camera. Charging
may take up to eight hours.
4
Page 5

To charge the battery:
1. Power off the TorchScope by pressing and holding
the and buttons (Callouts 11 and 14 on pg. 4).
2. Unscrew and remove the flashlight/camera head
cover (Callout 15).
3. Insert the Mini USB plug end of the included USB
cable into the jack exposed by unscrewing the head,
and the full-size (standard-A) USB plug at the other
end into a USB port of your computer or a socket of
a USB AC power adapter.
If you do not already own a USB power adapter, you can
purchase one on-line or at many retail stores for less than
$5. Be aware that “trickle” charging the TorchScope
through a USB port of your computer will take much longer
than charging it from an AC outlet.
4. During charging, the status light (Callout 6) will
glow red.
5. When the battery is fully charged the status light will extinguish.
6. DO NOT replace the flashlight/camera head cover at this time unless a MicroSD card is
already installed in the TorchScope. Replace and tighten the cover only if a card is already
installed. Secure the cover as tightly as possible because it provides a waterproof seal.
INSTALL MEMORY CARD
The TorchScope cannot record video clips or capture photos until a MicroSD card has been
installed.
1. If the TorchScope is not already off, with its front end open, power the unit off and unscrew
and remove the flashlight/camera head cover (Callout 15).
2. Insert the included 4GB MicroSD card (or another card of up to 32GB capacity) in the slot
(Callout 16) opposite the Mini USB jack. Be sure that the card’s copper lands are facing
front. After positioning the card in the slot, push it firmly with a fingertip or fingernail until
you feel and hear a click. If you do not need to connect the TorchScope to your computer at
this time, replace and tighten the flashlight/camera head cover. Secure the cover as tightly
as possible because it provides a waterproof seal.
To remove the memory card later, push it firmly with a
fingertip or fingernail until the card pops out far enough to
be grabbed by two fingers.
If the MicroSD card that you installed has never been used,
it must be formatted while inserted in the instrument to
enable it to store data. Be aware that formatting a used
memory card erases all data stored on it.
5
Page 6

To format a MicroSD card, begin by powering on the TorchScope by pressing the button. The
Status light (Callout 6) will glow green and live video will appear on the LCD viewfinder. Briefly
press the button to call up the Setup menu with the top (Exit) line highlighted in blue. Briefly
press the button once to navigate to and highlight the Format line. Then briefly press the
button again. When the Format screen appears with Cancel highlighted in blue, briefly press the
button once again to scroll up to and highlight the OK line. To format the card and resume
showing live video on the LCD, briefly press the button.
SET DATE, TIME & LANGUAGE
The TorchScope’s internal clock/calendar and default language must be set before using the
instrument for the first time, and also when the battery has been removed from the device for
more than a few minutes. You can reset the date, time and language whenever you wish.
Before setting the date and time, you should choose a date format and whether to superimpose
the time and date on real-time video. Begin by pressing the button to power on the unit in
video mode.
If you are not prompted to set the date and time, briefly press the button to call up the Setup
menu. The top (Exit) line will be highlighted in blue.
1. With the Setup menu on-screen, press the button seven times to scroll down to the Date
line. Then press the button to open the Date menu.
2. With the Date menu on-screen, you can choose whether to have the date and time
superimposed on live video at the bottom of the viewfinder. To do so, use the and
buttons to navigate to and highlight the On (default) or Off line. Then press the button to
save your highlighted selection and return to viewing live video.
3. With live video on-screen, briefly press the button to call up the Setup menu again.
4. With the Setup menu on-screen, press the button seven times to scroll down to the Date
line. Then briefly press the button to open the Date menu again.
5. With the Date menu on-screen, you can also choose the date format. To do so, press the
button three times to navigate to and highlight the Date Style line. Then briefly press the
button again to open the Date Style menu.
6. The Date Style menu offers three options for the date format: YYYY/MM/DD (European
style—the default), MM/DD/YYYY (American style) and DD/MM/YYYY. Use the and
buttons to navigate to and highlight one of the three options. Then briefly press the
button to save your highlighted selection and return to viewing live video.
7. With live video on-screen, briefly press the button to call up the Setup menu again. With
the Setup menu on-screen, press the button seven times to scroll down to the Date line.
Then briefly press the button to open the Date menu again.
8. With the Date sub-menu on-screen, press the button twice to navigate to and highlight
the Set Date line. Then briefly press the button again to open the Set Date menu.
9. The initial Set Date menu (see photo on next page) will show the currently set year (YY) in
yellow at the upper left, next to up and down arrows. If necessary, use the and buttons
to change the displayed value to match the current year. Whether or not you have made a
change, briefly press the button to save the currently set value.
6
Page 7

10. Note that pressing the button shifted the yellowhighlighted value and arrows to the MM field. Using the
and buttons, adjust the value shown until it
matches the number of the current month. (Tip: To
make large changes quickly, press and hold either
button).Then briefly press the button to save the
selection.
11. After noting that pressing the button shifted the
yellow-highlighted value and arrows to the DD field,
repeat the process (adjusting the displayed value to
match the current value, and then briefly pressing the
button to save the selection) for the DD, hr, min and
sec fields. If you do not need to change the value of a
field, briefly press the button to save the selection
and move on to the next field.
12. When you have saved a value in the sec field, press and
hold the button to save that last selection. Doing so
automatically switches operation from menu mode to video mode. Pressing and holding the
button produces the same result with any field highlighted, enabling a quick exit from both
the Date and Setup menus whenever no more fields need to be reset.
To change the language of menu items and on-screen prompts from the default (English), with
live video on-screen briefly press the button to call up the Setup menu. The top (Exit) line will
be highlighted in blue. Briefly press the button three times to navigate to and highlight the
Format line. Then briefly press the button again to call up the Language menu. Using the
and buttons for navigation, scroll down to and highlight your preferred language. To save your
selection and return to video mode, press the button.
SET RECORDING PARAMETERS
The TorchScope can record video clips and capture still photos of the camera’s field of view.
By default, video clips record at HD (1280 x 720 pixel) resolution, and photos are captured and
saved at 5M (5 megapixel, or 2592 x 1944 pixel) resolution.
To decrease the default video resolution to VGA (640 x 480 pixels), briefly press the button
to open the Setup menu. Then press the button five times to scroll down to and highlight the
Video Resolution line and briefly press the button again. The VGA line should be highlighted.
To switch to VGA resolution, briefly press the button. Press the button again to save the
selection and return to video mode.
The only reason to reduce video resolution is to extend the capacity of the TorchScope’s internal
memory. A 3-minute video clip recorded at HD resolution will consume about 200 Mbytes of
memory. A clip of the same length recorded at VGA resolution will consume only 154 Mbytes.
To decrease the size (resolution) of photo files, briefly press the button to open the Setup
menu. Then press the button four times to scroll down to and highlight the Image Size line
and briefly press the button again.
7
Page 8
The Image Size menu presents four options—5M, 3M, 1M and VGA. Using the and
buttons for navigation, scroll down to and highlight the photo resolution you wish to use. To save
your selection and return to video mode, press the button.
The Setup menu also lets you choose whether or not to add voice annotation to video clips as
they record. The default setting is On (voice is added). To record video clips without voice
annotation, open the Setup menu by briefly pressing the button. Then press the button to
scroll down to and highlight the Microphone line. Briefly press the button again. On the
Microphone screen that appears, press the button to highlight Off instead of On. Finally, briefly
press the button to save the selection and return to video mode.
OPERATING INSTRUCTIONS
USING THE FLASHLIGHT
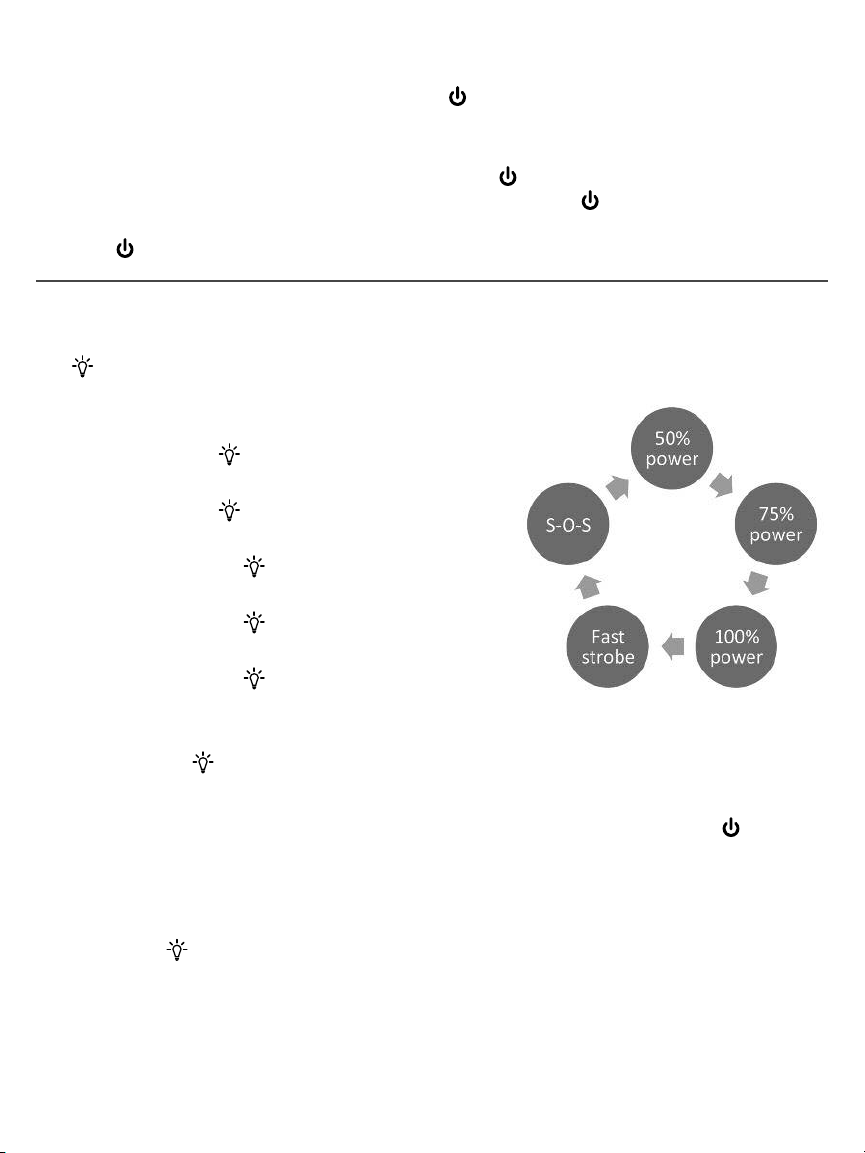
The button controls the TorchScope’s flashlight:
• To turn on the flashlight at a 50% power level,
briefly press the button once.
• Briefly press the again to raise the power level
to 75%.
• Briefly press the button again to raise the power
level to 100%.
• Briefly pressing the button again switches
the flashlight to fast strobe mode.
• Briefly pressing the button again causes
the flashlight to signal S-O-S in Morse code.
• Briefly pressing the button again returns
the flashlight to a 50% power level.
The flashlight’s operating mode is
press and hold the button.
not indicated on the viewfinder. To turn off the flashlight,
RECORDING VIDEO CLIPS & TAKING PHOTOS
To view live video, and prepare to record video clips or take photos, briefly press the button to
power on the TorchScope’s video camera. To begin recording a video clip, point the flashlight at
an area or target of interest and press the button. The Status light will begin flashing green
and an orange circle will begin flashing on the top line of the viewfinder. To increase the
brightness of the scene shown on the viewfinder, power on and adjust the output of the flashlight
by pressing the button once, twice or three times (for a 50%, 75% or 100% power level) until
the scene is neither too bright nor too dim.
To take a photo of the field of view, press the button. The viewfinder will confirm that a
picture was taken by going dark for a split-second, and then briefly displaying the field of view
alone (with no icons or metadata) before resuming operation in video mode.
8
Page 9

During video recording and picture taking, you can zoom in on the scene in the viewfinder and
the effect will be applied to the video clip or photo “on the fly”. To zoom in, press and hold the
button. A vertical bar graph with a slider indicating the zoom level will appear overlaid on live
video at the right side of the viewfinder.
The TorchScope provides 20 discrete zoom levels over a range of 1 to 4X, so each step increase
in zoom produced by continuing to press and hold the button increases the level by 0.2.
Release the button when the area or target of interest just “fills the frame.”
When the maximum zoom level of 4X is reached, continuing to press and hold the button
begins lowering the bar graph slider by up to twenty steps—at 0.2 less magnification per step—
until video is no longer zoomed.
To stop recording a video clip, press the button. The green Status light will stop flashing and
the flashing orange circle will disappear.
Loop Recording
Because video clips consume so much memory (50 Mbytes/per minute or more), allowing the
TorchScope to continuously record video may create huge files that are hard to manage. Using
Loop Recording mode eliminates that possibility. In this mode, the camera records a video clip
until its file reaches a size of about 200 Mbytes (after about three minutes of recording). At that
point, the TorchScope stops recording the original file and starts recording another 3-minute file.
In Loop Recording mode, if recording is ongoing when the MicroSD card becomes full, the
TorchScope will continue recording by freeing up occupied memory space. Using a technique
called overwriting, new 200-Mbyte (3-minute) video clips are recorded to replace the oldest
stored
3-minute clips one at a time. Depending on the application, the upside of Loop Recording
(recording will never be interrupted by a full memory) may or may not be outweighed by its
downside (some older clips may be overwritten, erasing their information).
To use Loop Recording mode for all video recording, open the Setup menu, scroll down two
items to the Loop Recording line, and briefly press the button. After using the or button
to highlight the On line, press the button again to save the selection and resume showing live
video on the viewfinder.
A final recording option is designed for underwater inspection applications. Choosing the menu
setting Underwater optimizes several recording parameters—including sensitivity to light and
motion—for underwater conditions.
VIEWING SAVED FILES
To view saved video clips and photos on the TorchScope’s LCD viewfinder:
Enter Playback mode by briefly pressing the button to open the Setup menu, scrolling down
one item to the Playback line, and then pressing the button again to choose Playback Mode
on the screen that appears.
Briefly press the button again to begin retrieving all files on the MicroSD card in reverse
chronological order. The first file to be retrieved will be the newest saved photo or video clip. Its
relative age (for example, 87/87 for the newest file, and 1/87 for the oldest file) will be shown in
the upper right corner of the LCD. To retrieve and view the next-oldest file, press the button.
9
Page 10

To retrieve and view the next-newest file, press the button.
When selected, a video clip will begin playing automatically and play to its conclusion. Playback
of video clips cannot be paused or resumed.
To exit playback mode and resume showing real-time video on the LCD, briefly press the
button. On the screen that appears next, highlight Video Mode and briefly press the button.
Because the viewfinder measures just 1.5 in. (38mm) diagonal, you will probably prefer to view
your saved video clips and photos on a larger screen, such as a laptop or PC monitor. The other
advantage of this approach is that it provides random—rather than sequential—access to all
saved files.
Saved files can be delivered to your PC for viewing (and storage) either by:
1) Removing the MicroSD card from the TorchScope, inserting it in a MicroSD-to-SD card
adapter, and then plugging the adapter into a slot of your laptop (if so equipped)
2) Using the included USB cable to interface the TorchScope—with the MicroSD card inside
it—to your PC.
In both cases, the TorchScope must be powered off before setting up the transfer because the
flashlight/camera head cover (Callout 7) must be removed to provide access to the memory card
(Callout 16) or Mini USB jack (Callout 15).
After unscrewing and removing the cover, either 1) Remove the memory card by pressing it with
the tip of your finger until it pops out, or 2) Insert the Mini USB plug end of the included cable into
the Mini USB jack of the TorchScope and the full-size USB plug at the other end of the cable into
a USB port of your PC. Then power on the TorchScope by pressing and holding the button.
Doing so will cause the Status light to glow green and red simultaneously, and the viewfinder to
show icons of a USB plug and an SD card—rather than the live video normally seen with the
flashlight/camera head cover securely sealed.
Tethering the powered-on TorchScope to your PC automatically begins an Internet search for
driver software for the interface. When a driver compatible with your PC’s operating system is
found, it will be downloaded automatically. When a screen advises that the interface is “Ready to
use”, click Close to continue.
Files saved on the TorchScope’s memory card are represented in the same fashion on your PC
whether the files are delivered directly from a plugged-in memory card or through the USB cable.
In both cases, your PC will treat the memory card as a Removable Disk by generating an
AutoPlay screen with the option to “Open folder to view files.” Selecting this option will cause a
folder named <DCIM0000> to appear. Double-clicking the folder icon reveals that the contents of
the MicroSD card are organized by date. Opening any of these dated folders displays all of the
photo (.jpg) and video clip (.avi) files saved on that date.
10
Page 11

SPECIFICATIONS
Camera Lighting: Three 2-watt LEDs delivering 100, 500 and 1,000 lumens at 50%, 75% and
100% power
Camera Field of View/Depth of Field: 60°/2.4 in. (60mm) to infinity
Video Recording Resolution: HD (1280 x 720 pixels) or VGA (640 x 480 pixels)
Photo Recording Resolution: 5M (2592 x 1944 pixels), 3M (2048 x 1536 pixels),
1M (1280 x 720 pixels) or VGA (640 x 480 pixels)
Display Size/Resolution: 1.5 in. (38mm) diagonal/QVGA (480 x 240 pixels)
MicroSD Memory Card Capacity: 32GB max (4GB card included)
Water/Dust Ingress Protection Level: IP68 (waterproof at up to 10m (33 ft.) depth)
Languages Supported: English, Spanish, Portuguese, French, German, Italian, Dutch, Polish,
Traditional Chinese, Simplified Chinese, Japanese
Operating Temperature: 32° to 104°F (0° to 40°C)
Dimensions: 8.88 (L) x 2.2 (Diam.) in. (225 x 55mm)
Weight: 15.3 oz. (435g)
Power Source: 3.7V, 4400mAh rechargeable Li-ion battery (included)
Battery Life: 2 hours @ 1,000 lumens, 3 hours @ 500 lumens while recording, 5 hours recording
only
OPERATING & MAINTENANCE TIPS
When the green battery icon at the lower right of the viewfinder indicates that the battery is
becoming low on charge, charge the battery by connecting the TorchScope to a power source,
using the “Charge Battery” Setup instructions on page 5 as a guide.
The TorchScope is not equipped with an Auto Power Off (APO) feature that would automatically
power off the unit after a fixed period of inactivity. To avoid having to recharge the battery often,
remember to power off both the camera and the flashlight when you are finished using them.
The TorchScope will be unable to meet the IP68 specification for waterproof underwater
operation unless both the flashlight/camera head cover and battery compartment cover are
securely fastened. Before immersing the unit in water, give both covers a final tightening.
After using the TorchScope in seawater, rinse the entire unit in fresh water and allow the exterior
to dry before using the unit again.
When left in the TorchScope for an extended period of time, the Lithium-ion battery may corrode
and release toxic chemicals capable of permanently damaging the unit. Remove the battery
when preparing the TorchScope for long-term storage, and also when you do not intend to use it
for weeks or months.
Use an anti-static microfiber cloth to clean the TorchScope housing and other structures. Never
use abrasive or chemical cleaning agents.
11
Page 12

12
Specifications subject to change without notice
DCF1 User’s Manual
©2015 GENERAL TOOLS & INSTRUMENTS
NOTICE - WE ARE NOT RESPONSIBLE FOR TYPOGRAPHICAL ERRORS.
MAN# DCF1
3/27/15
 Loading...