

Page 1
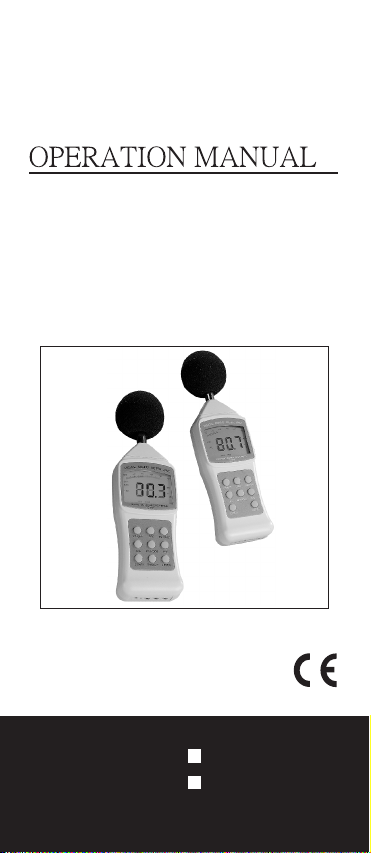
Digital Sound Level Meter
Model: 8921
8922
Page 2

INTRODUCTION
Your digital sound level meter provides
automatic or manual ranging in six
meas-urement ranges from 30 to 130dB.
The unit meets ANSI S1.4 and IEC 651
Type 2 standards, and features 0.1dB
resolution.
A background noise absorber permits
you to measure sound levels accurately
even in the presence of high background
noise.
The meter allows you to select between
fast and slow response times and A and
C weighting. A maximum hold function
is provided.
Jacks on the meter provide both AC and
DC analog output, while an RS-232
interface allows you to use an optional
cable to capture sound level data on a
PC.
FUNCTIONS:
1. Selecting A & C weighting.
2. Selecting the response time.
3. Freezing the maximum sound
level reading.
4. Recording the maximum and
minimum measurements.
5. Using the backgound noise
absorber.
6. Selecting Automatic and manual
ranging.
7. Automatic shut off.
8. Easy to replace battery.
Page 3

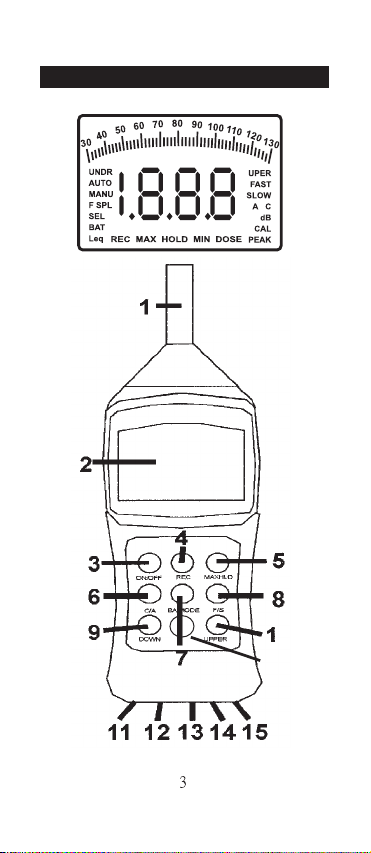
FRONT PANEL DESCRIPTION
1 MICROPHONE
2 LCD DISPLAY
3 ON/OFF
4 REC
5 MAXHLD
6 C/A
7 BA MODE
8 F/S
9 DOWN
10 UPPER
11 DC 9V
12 CAL
13 AC OUT
14 DC OUT
15 RS232
16 BACKLIT
The meter will display all segments
when it is first turned on. Though you
might seen SEL, Leq, DOSE, PEAK....
These are not available for the meter
you purchased, please contact the
store or the place you purchased for
further models with these additional
functions.
- Power button
- Records sound level
readings
- Freezes the maximum
sound level digital
reading
- A/C frequency
weighting selector
- Background noise
absorber
- Fast/Slow response
selector
- Adjusts the
measurement range
- Adjusts the
measurement range
- DC adapter jack
- Calibration screw
- AC analog output jack
- DC analog output jack
- RS-232 output jack
- Back light
(Model 8922 only)
Page 4
FRONT PANEL DIAGRAM
16
0
Page 5
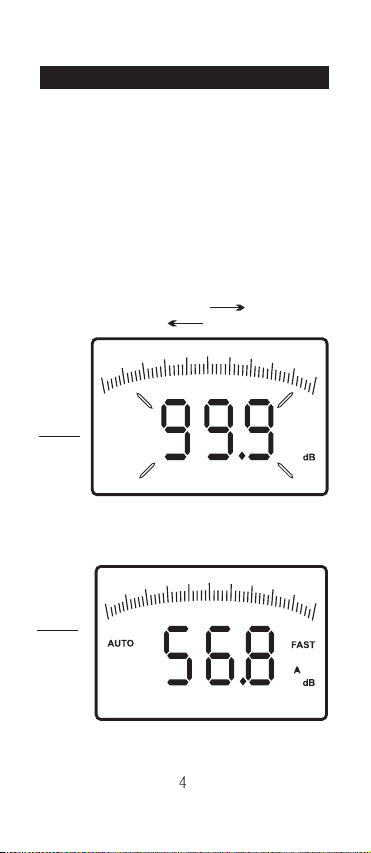
MEASURING SOUND LEVELS
Sound levels are displayed both digitally
and in a bar graph. The digital display
is updated every 160ms, while the bar
graph is updated every 40ms.
Press the ON/OFF key to turn the
meter on. The unit will first display
the full screen and then count down
to zero.(See Fig. 1)
90dB
50dB
90
+1
0
2
+
0
+40
+
+30
Fig.1
The meter will now begin measuring
the current sound levels.(See Fig.2)
+30
+20
0
+1
50
+4
0
+50
Fig.2
50
SPL
Point the microphone toward the source
of the sound to be measured.
Page 6

SELECTING A AND C WEIGHTING
When you turn the meter on, it will be in
A weighting mode.
A weighting enables the meter to
respond in the same manner as the
human ear, which increases and
decreases amplitude over the
frequency spectrum.
Applications for A weighting include
OSHA regulatory testing, environmental measurement, workplace
design, and law enforcement.
C weighting is suitable for flat response
measurements with no increase or
decrease of amplitude over the
frequency spectrum. Applications for
C weighting include the sound level
analysis of engines and machinery.
Press the C/A key to toggle between A
and C weighting. A small A or C will be
displayed on the right side of the screen
to indicate the current mode.
+10
40
Fig.3
SPL
Page 7

SELECTING THE RESPONSE TIME
You can select fast or slow response time
to suit different applications and standards.
For example, most OSHA-related testing is
done using slow response time and A
weighting. When you turn the meter on, it
will be in FAST response mode. Press the
F/S key to toggle between FAST and
SLOW response. A small SLOW will be
displayed on the right side of the screen to
indicate the current mode.(See Fig.4)
+10
40
Fig.4
SPL
FREEZING THE MAXIMUM SOUND
LEVEL READING
1 Press the ON/OFF key to turn the
meter on.
2 When measuring sound levels, press
the MAXHLD key to freeze the
maximum reading. MAX HOLD will be
displayed. (See Fig.5) The digital
display will remain unchanged until a
higher reading is detected. Note that
the bar graph will continue to record
the current reading.
3 Press the MAXHLD key again to exit
maximum hold mode.
Page 8

60
Fig.5
FAST
A
RECORDING THE MAXIMUM AND
MINIMUM MEASUREMENTS
1 Press the ON/OFF key to turn the
meter on.
2 Press the REC key. REC will be
displayed on the bottom of the
screen(See Fig.6) . The meter will
begin tracking the maximum and
minimum sound level
measurements.
+10
40
Fig.6
SPL
3 Press the REC key again. MIN will
appear on the bottom of the screen
(See Fig.7) and the mini. sound level
measurement will be displayed. The
unit isn't recording at this time, but the
bar graph will continue to show the
current reading.
+10
40
Fig.7
SPL
Page 9

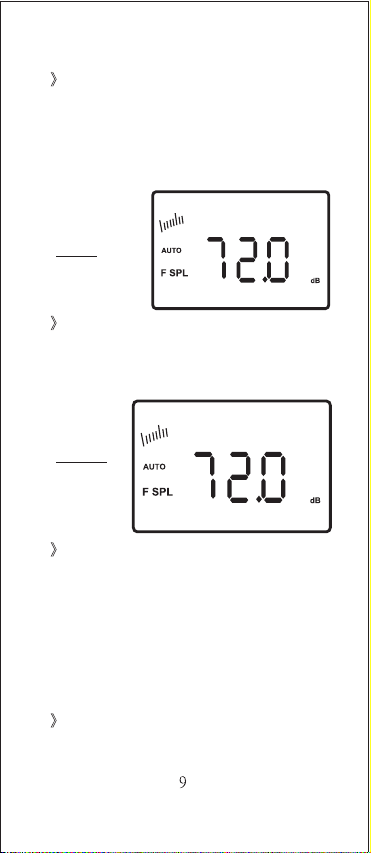
4 Press the REC key again. MAX will
appear on the bottom of the screen
and the maximum sound level
measurement will be displayed.
The unit is not recording at this
time,but the bar graph will continue
to show the current reading.
+10
40
Fig.8
SPL
5 Press the REC key again to resume
recording and repeat the process.
6 Press and hold the REC key until
the REC indicator disappears to
exit recording mode.
USING THE BACKGROUND NOISE
ABSORBER
This feature allows you to measure
equipment noise accurately, even in
the presence of high background
noise.
1 Press the ON/OFF key to turn the
meter on.
2 Press the MAXHLD key. MAX HOLD
will be displayed.(See Fig.5)
Page 10
3 Press the BA MODE key. F will be
displayed to the left of the SPL
(sound pressure level) icon. The
digital display will show the
background noise level.MAX HOLD
will be disappeared now. (See Fig.9)
+10
60
Fig.9
UNDR
FAST
A
4 Press the MAXHLD key again and
MAXHOLD will be displayed. (See
Fig.10) The meter is now ready to
measure the actual machine noise.
+10
60
Fig.10
UNDR
FAST
A
MAX HOLD
5 Turn on the machine you want to
measure and note the new sound
level reading. This number represents
the sound level of the device without
the background noise. If there is no
change in the reading, the
background noise is greater than the
noise of the device.
6 Press the MAXHLD key and then the
BA MODE key to exit background
noise absorber mode.
Page 11

BACKLIT KEY (8922 only)
Offer a light for approximate 5 seconds
to make it easier to see the display in
the dark.
SELECTING AUTOMATIC AND
MANUAL RANGING
The meter features six measurement
ranges in 10dB steps:
30~80dB, 40~90dB, 50~100dB,
60~110dB, 70~120dB, 80~130dB.
When you turn the meter on, it will be in
automatic range mode and a small AUTO
will be displayed on the left side of the
screen (See Fig.11) . In this mode, the
meter will adjust the measurement range
automatically for accuracy. The two digit
number to the left of the bar graph on
the LCD will show the low end of the
current range.
You can also set the range manually. This
is helpful when you know the measurement
range in advance. The meter will be able to
take readings more quickly, because the
unit does not need to first establish the
range before displaying the measurement.
SPLSPL
+10
Fig.11
+10
SPLSPL
Fig.12
Page 12

TO ADJUST THE RANGE MANUALLY:
1 When measuring sound levels,press
the DOWN and UPPER keys as
needed to adjust the measurement
range. MANU will appear on the
display (See Fig.12) .Note that the
two digit number to the left of the
bar graph will change to reflect the
low of the newly selected range.
If the meter is operating in manual
range and UNDR is displayed (See
Fig.13) , the sound is too low or the
range. If UPER is displayed (See
Fig.14) ,the sound is too loud.
In either case, you must adjust the
measurement range or your readings
will be incaccurate.
+10
UNDR
SPLSPL
Fig.13
+10
UPER
SPLSPL
Fig.14
2 Press and hold the DOWN or UPPER
key to switch back to automatic
ranging.(See Fig.11)
AUTOMATIC SHUTOFF
The meter will turn off automatically
after 20 minutes to preserve the
battery.
Page 13

To override the Auto Shut Off feature:
1 Make sure the unit is turned off.
2 Press the ON/OFF and MAXHLD
buttons simultaneously.
3 When the full display appears,
release the MAXHLD button first.
"n" will appear on the screen in
one second (See Fig.15) , then
enter the power on mode ; i.e.
count down from:
99.9 88.8 77.7 66.6 55.5
44.4 33.3 22.2 11.1 00.0
and then a current sound level
measurement is started.
Fig.15
4 Release the ON/OFF key. The meter
will remain on until the ON/OFF
button is pressed again.
The automatic shutoff feature will
resume the next time the meter is
turned on.
REPLACING THE BATTERY
When the entire display flashes, the
9V battery has fallen to a critically low
voltage level and should be replaced
as soon as possible. Use a screwdriver
to unscrew the back battery compartment cover. Insert a fresh 9V battery
and replace the cover.
Page 14

SPECIFICATIONS
Applicable
Standards
Measurement
Frequency Range
Accuracy
Measurement
Level A
Weighting
Measurement
Level C
Weighting
Measurement
Level Range
Automatic Range
Time Weighting
Segment Range
Digital Display
Quasi-Analog
BarIndicator
Microphone
Analog Output
Size
Weight
Operating
Temperature
Storage
Temperauture
Battery
IEC 651 Type 2, ANSI
S1.4 Type 2
31.5Hz~8KHz
1.5dB(Under reference
conditions)
30dB~130dB
35dB~130dB
6 ranges in 10dB steps:
30~80dB, 40~90dB,
50~100dB, 60~110dB,
70~120dB, 80~130dB
30~130dB
Fast and slow
50dB
3 1/2 digit LCD, 0.1dB
resolution updated
every 0.5 seconds
1dB display steps,
50dB display range,
updated every 50ms
6mm diameter Electret
condenser microphone
AC: 0.707Vrms (at full
scale), DC: 10mvDC/dB
80mm x 256mm x 38mm
(3" x 11" x 1.5")
240g(10.3oz)
o
4~50 C, 10~90%
Relative Humidity
o
-20~60 C
9V Battery
Page 15

RS232 OUTPUT:
The meter can link with personal
computer to capture on-line datas ,
display presure records with real-time
output, you can retrieve file, save the
datas for operating data analysis,
records statistic, multi-files display in
the screen,....versatile functions for
your choice.
Connection procedures:
1. Plug the optional accessory RS232
cable onto the DC jack port ( at the
right side of the meter)
2. Instert the D-sub 9P type connector
onto computer's Com.1 or 2 port or....
3. Start to set up RS232 software by
inserting the CD-ROM or Floppy
diskette.
4. When installing the RS232 software,
please follow the operation manual
procedure in the software package.
Page 16

MATERIAL SUPPLIED
This standard package contains:
1. The meter x 1
2. Battery x 1 (9.0 volt)
3. Operation manual x 1
4. Buffer x 1
5. Hard Carrying case x 1
Optional accessory:
a) RS232 software CD-R.
b) D-sub connector.
CE CERTIFICATION
The meter conforms to the following
standards:
EN 50081-1/1992 : EN 55022
EN 50082-1/1997 :
(EN 61000-4-2/-3/-8,ENV 50204)
The meter complies with the essential
protection requirements of Council
Directive 89/336/EEC on the approxi mation of the laws of the Member
States relating to electromagnetic
compatibility.
RETURN AUTHORIZATION
Authorization must be obtained from
the supplier before returning items for
any reason . When requiring a RA (
Return Authorization) , please include
data regarding the defective reason,
the meters are to be returned along
with good packing to prevent any
damage in shipment and insured
against possible damage or loss .
 Loading...