

Page 1
Operation Manual
DREF/UP320 (DR303) Portable Digital Refractometer
The Brix concentration, Refractive index or other parameters are always needed in lab or our life. Optical
refractometer is very popular used to measure these parameters. The Digital refractometer with a digital
readout and LCD display will eliminate uncertainties and is more convenient to use. Just about 0.3ml-0.5ml
sample was needed. All our digital refractometers have the following characters:
z Automatic Temperature Compensation
z Automatic Shut Off after 3 minutes
z Conversion between Centigrade and Fahrenheit Degree
z Alarm of Low Voltage & Low power consumption
z Temperature Measurement Range:0℃-40℃(32℉-104℉)
z Precision of Measurement temperature:±0.1℃(2℉)
z Measurement temperature Resolution:0.1℃(2℉)
z Operation Temperature:0℃-40℃(32℉-104℉)
z Storage temperature:-10℃-50℃ (14℉-122℉)
z Dimension :185×59×45mm
z Weight:230g
z Power Supply:1battery(9v)
z Operating Time:More than 1500 times per battery
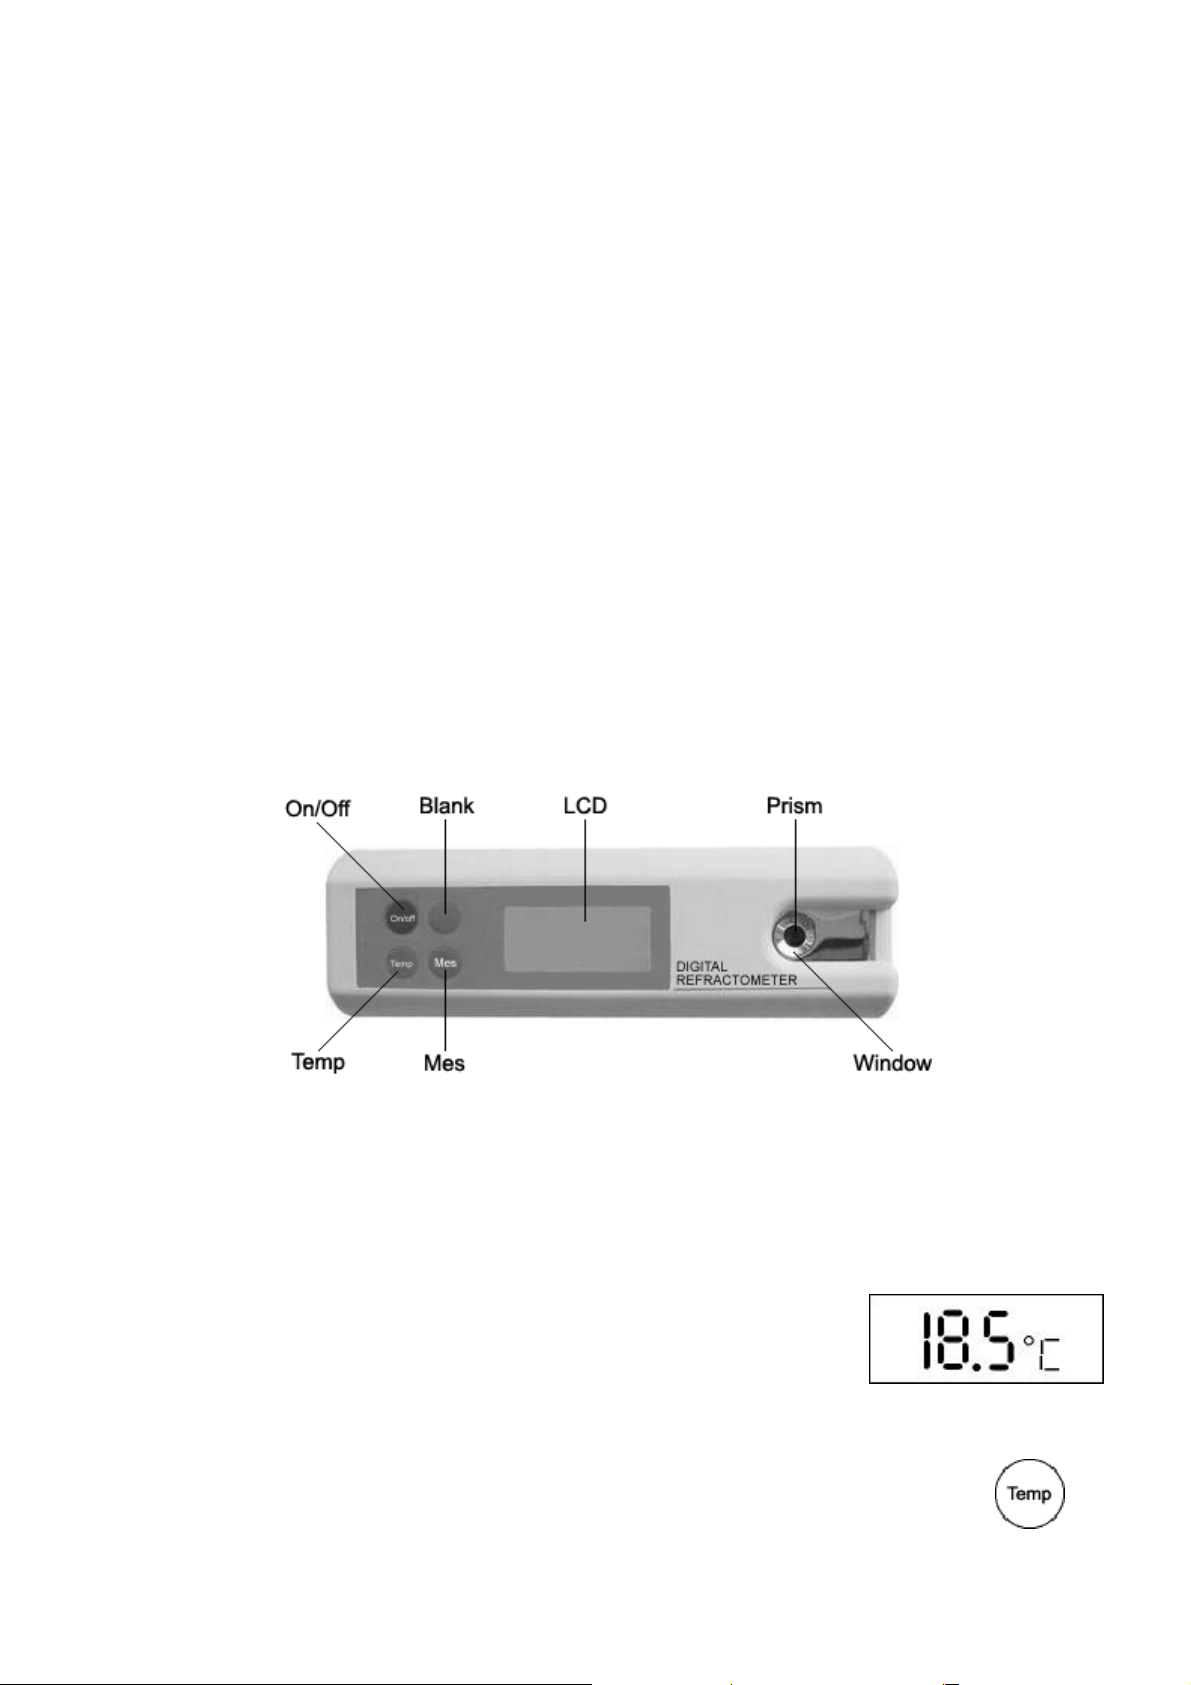
ⅠParts:
Ⅱ Installation Battery:
In the case of no battery or low battery with alert of “(((“ on the upper left of LCD, you should install or
replace the battery. Open the battery cover on the back of the instrument, install a battery or replace the old
battery with a new one.
Ⅲ Power On and Off:
Press the “On/Off” button to turn it on or off. Temperature in Centigrade will
display when power on. The instrument will turn off automatically if there is no
any operation in three minutes.
Ⅳ Measurement of Temperature:
Temperature can be displayed at any time by press the “Temp” button during measurement.
The conversion between Fahrenheit and Centigrade can be made by pressing “Temp” button.
Page 1 of 4
Page 2
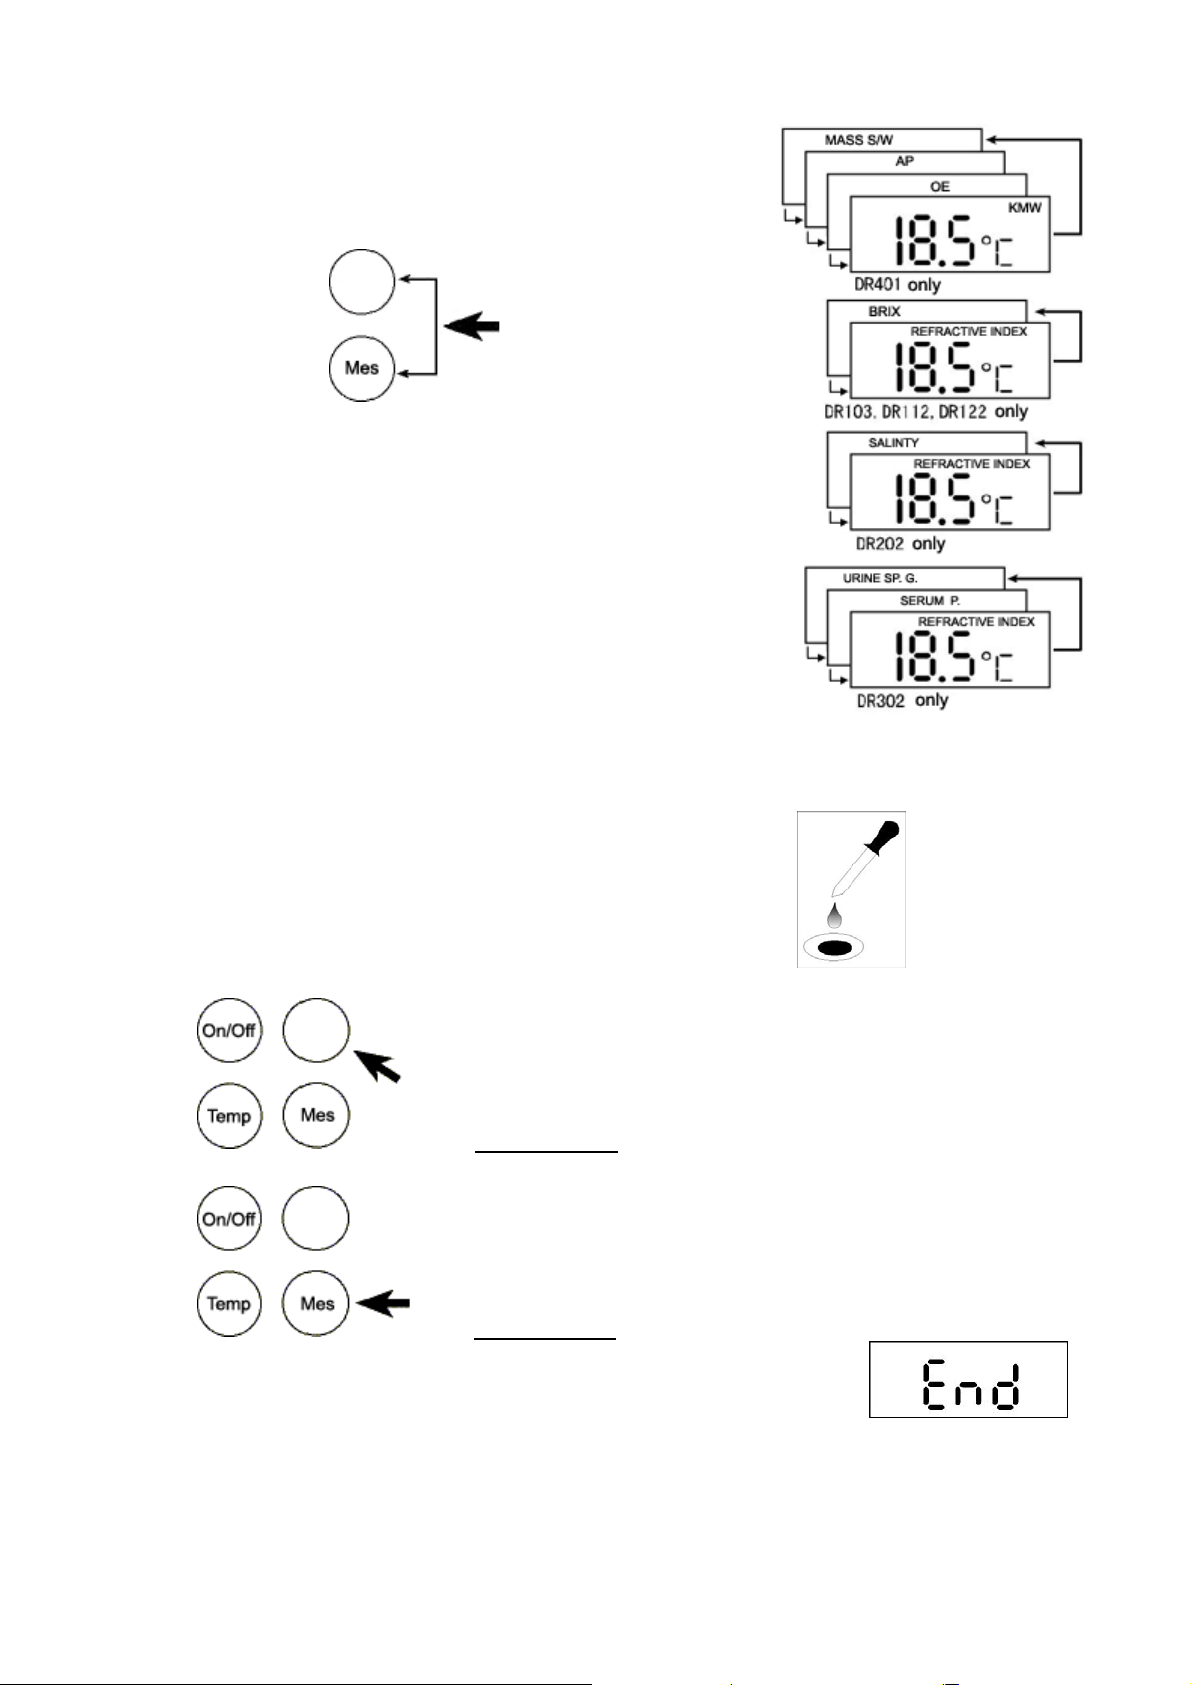
ⅤConversion of Status of Scales:
1. Turn it of f: Press the “On/Off” button to turn refractometer OFF.
2. Synchronously hold “Blank” button and “Mes” button.
3. Turn it on: Press the “On/Off” button to turn refractometer ON.
4. Repeat step 1-3 to set other scale.
Please be NOTICED: The chosen status of scale will be stored no matter if power off.
Ⅵ Original Point Setting:
1. Completely clear prism window
2. Drop standard solution to fill the prism window
3. Hold “Blank” button for Five seconds till it twinkles “rEF” on LCD
Hold 5 seconds
4. Within 10 second after display “rEF”, press “Mes” button and hold it for Five seconds.
5. The instrument start to set Original Point. After Original Point, Setting is
finished. “End” will be displayed on LCD.
Please be NOTICED: Be sure power of battery is sufficient and environment temperature is between 10-30
Centigrade degree. 18-22 Centigrade degree is better to get high zero precision after Original Point Setting.
Original Point setting can be operated under any scale status. Please find Original Point List in last page.
Page 2 of 4
Hold 5 seconds
Page 3

Ⅶ Zero Checking: (This function is not available for DR101/201/301.)
1. Completely clear prism window.
2. Drop standard solution, which temperature is same as the tested solution, to fill
the prism window.
3. Press “Blank” button for Zero Checking. “zero check” will be displayed on middle right side of LCD.
Please be NOTICED: If the test result exceeds the rang of accuracy, glint will be showed on LCD. Press
any key to exit status of zero-checking.
Ⅷ Measurement Procedure:
1 Completely clear prism window.
2 Drop one or two drops of solution which we want to measure to fill the prism
window.
3 Press “Mes” button.
Ⅸ Precaution:
1) Don’t expose the instrument to low, high temperature and sunlight for long time, to avoid LCD losing
effectiveness.
2) Because the instrument is very precise, it prohibited from violent shock.
3) To avoid damage, don’t disassemble and assemble the instrument or change the inner circuit and
parts.
4) Zero-setting should be implemented strictly according to instrument.
5) Be sure to clean the prism surface and window of stage before and after every measurement.
6) To avoid that accuracy is affected by evaporation, be sure to implement measurement immediately
after dripping solution on window of stage.
7) It can cause worry result if keep measuring under low voltage.
8) Don’t use it under the strong light (as sunlight, lamp etc.) and don’t use the instrument in the humid and
corrosive environment.
9) Prevent from liquid into battery house.
Page 3 of 4
Page 4

ⅩModel List:
MODEL SCALES RANGE DIVISIONS ACCURACY Original
DR103
DR103L
DR112
DR122
DR203
DR303
DR401
DR501
DR701
DR702
BRIX 0-35% 0.1 ±0.1 0.0
REFRACTIVE INDEX 1.3330-1.3900 0.0001 0.0003 1.3330
BRIX 0-45% 0.1 ±0.1 0.0
REFRACTIVE INDEX 1.3330-1.4098 0.0001 0.0003 1.3330
BRIX 28-65% 0.1 ±0.1 30.0
REFRACTIVE INDEX 1.3800-1.4535 0.0001 0.0003 1.3812
BRIX 60-92% 0.1 ±0.1 60.0
REFRACTIVE INDEX 1.4400-1.5230 0.0001 0.0003 1.4419
SALINITY 0-28% 0.1 ±0.1 0.0
REFRACTIVE INDEX 1.3330-1.3900 0.0001 0.0003 1.3330
URINE SP.G 1.000-1.050 0.001 ±0.001 1.000
SERUMP. 0-12 0.1 ±0.1 -0.9
nD 1.3330-1.3900 0.0001 0.0003 1.000
MASS S/W 0-35% 0.1 ±0.1 0.0
AP 0-22 0.1 ±0.1 0.0
Oe 0-150 1 ±1 3
KMW 0-25 0.1 ±0.1 0.0
SALINITY 0-28% 0.1 ±0.1 0.0
BRIX 0-35% 0.1 ±0.1 0.0
REFRACTIVE INDEX 1.3330-1.3900
Propylene Glycol
Ethylene Glycol
Battery Acid 1.10 ~ 1.30sg 0.1 ±0.01 1.10
Cleaner
Propylene Glycol
Ethylene Glycol
Battery Acid 1.10 ~ 1.40sg 0.01 ±0.01 1.10
Cleaner
32 (-50)℉
32 (-50) ℉
14 (-40) ℉
0 (-50) ℃
0 (-50) ℃
14 (-40) ℃
0.1
0.1 ±0.5
0.01 ±0.5
0.1 ±0.5
0.1 ±0.2 0.0
0.1 ±0.2 0.0
0.1 ±0.2 0.0
0.0003 1.3330
32℉
32℉
32℉
Page 4 of 4
 Loading...