

Page 1
Page 2

TABLE OF CONTENTS
.
.
.
.
g
.
.
1. FEATURES................................................................ 1
2. SPECIFICATIONS......................................................2
2-1 General Specifications......................................... 2
2-2 Electrical Specifications.......................................
A. Air velocity....................................................... 3
B. Temperature.................................................... 3
3
3. FRONT PANEL DESCRIPTION....................................
3-1 Display............................................................... 4
3-2 Power Button.....................................................
3-3 Hold Button........................................................ 4
3-4 Record ( Max/Min ) Button.................................. 4
3-5 Unit button......................................................... 4
3-6 蚓/蚌 button.......................................................4
3-7 RS-232 Output Terminal.....................................
3-8 Probe Input Socket............................................. 4
3-9 Battery Compartment/Cover................................ 4
3-10 Stand............................................................... 4
3-11 Vane Probe Head.............................................. 4
3-12 Probe Handle.................................................... 4
3-13 Probe Plu
4. MEASURING PROCEDURE.........................................
4-1 Air velocity/Temperature measurement................ 5
4-2 Data Hold, Date Record......................................
5. AUTO POWER OFF DISABLE......................................7
6. RS232 PC SERIAL INTERFACE.................................. 7
7. BATTERY REPLACEMENT............................................. 9
........................................................4
4
4
4
5
5
Page 3

1. FEATURES
* Microprocessor circuit assures maximum possible
accuracy, provides special functions and features.
* The portable anemometer provides fast, accurate
readings, with digital readability and the convenience of
a remote vane probe separately.
* Multi display units for air velocity measurement :
m/s, km/h, ft/min, knots. mile/h.
* Dual temperature display unit : 蚓 and 蚌.
* Low-friction ball vane wheels is accurate in both high
& low velocity.
* Thermistor sensor for Temp. measurement, fast response
time.
* Large LCD, show the air velocity and the temperature
value at the same time.
* Records Maximum and Minimum reading with recall.
* Data hold.
* Auto shut off saves battery life.
* RS 232 PC serial interface.
* Operates from 006P DC 9V battery.
* Used the durable, long-lasting components, including a
strong, light weight ABS-plastic housing case.
* Wide applications: use this anemometer to check air
conditioning & heating systems, measure air velocities,
wind speeds, temperature...etc.
1
Page 4

2. SPECIFICATIONS
2-1 General Specifications
Display * 51 mm x 32 mm supper large
LCD display.
* Dual function meter's display.
Measurement m/s ( meters per second ),
km/h ( kilometers per hour ),
ft/min ( feet/per minute ),
knots ( nautical miles per hour ),
mph ( mile/h, miles per hour ),
Temp.- 蚓, 蚌.,
Data hold.
Sensor
Structure Conventional twisted van arm and low
Air velocity sensor :
friction ball bearing design.
Temperature sensor :
Precision thermistor.
Circuit Custom one-chip microprocessor LSI
circuit.
Memory Records Maximum and Minimum
Recall readings with recall.
Power off Manual off by push button or Auto shut off
after 10 minutes ( Not activated during
memory record function ).
Data Output RS 232 PC serial interface.
Over load Indicated by "- - - -".
indication
Operating 0 蚓 to 50 蚓 ( 32 蚌 to 122 蚌 ).
Temperature
2
Page 5

Operating Max. 80% RH.
g
g
:
Humidity
Power Supply Heavy duty type DC 9V battery,
006P, MN1604(PP3) or equvalent.
Power Current Approx. DC 8.3 mA.
Weight 220 g/0.48 LB.
Size
Main instrument:
200 x 68 x 30 mm ( 7.9 x 2.7 x 1.2 inch ).
Vane Probe Head:
Round, 72 mm Dia.
Accessories Instruction manual...................... 1 PC.
Vane probe............................... 1 PC.
Carryin
case, CA-06................... 1 PC.
2-2 Electrical Specifications
A. Air velocity
Measurement Ran
m/s 0.4 - 25.0 m/s 0.1 m/s 2%+0.2m/s)
km/h 1.4 - 90.0 km/h 0.1 km/h 2%+0.8km/h)
mph 0.9 - 55.9 mile/h 0.1 mile/h 2%+0.4mile/h)
knots 0.8 - 48.8 knots 0.1 knots 2%+0.4knots)
ft/min 80 - 4930 ft/min 1 ft/min 2%+40 ft/min)
Note:
m/s - meters per second km/h - kilometers per hour
ft/min - feet/per minute knots - nautical miles per hour
mph - miles per hour (international knot)
e Resolution Accuracy
0.01m/s,<10m/s
B. Temperature
Measuring Range 0 蚓 to 50 蚓/32 蚌 to 122 蚌
Resolution 0.1 蚓/0.1 蚌
Accuracy 0.8 蚓/1.5 蚌
Remark
Above specification are tested under the environment RF Field
Strength less than 3 V/M & frequency less than the 30 MHz only.
3
Page 6

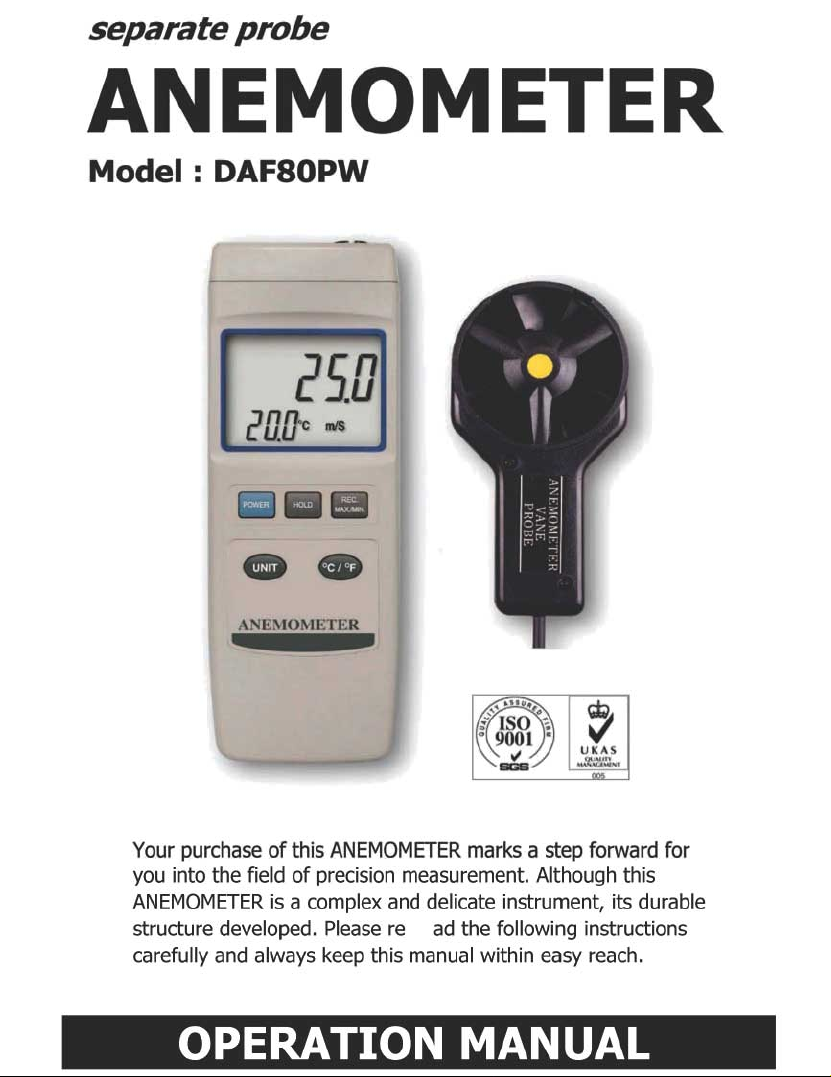
3. FRONT PANEL DESCRIPTION
4
Fig. 1
3-1 Display 3-8 Probe Input Socket
3-2 Power Button 3-9 Battery Compartment/Cover
3-3 Hold Button 3-10 Stand
3-4 Record ( Max/Min ) Button 3-11 Vane Probe Head
3-5 Unit button 3-12 Probe Handle
3-6 蚓/蚌 button 3-13 Probe Plug
3-7 RS-232 Output Terminal
Page 7

4. MEASURING PROCEDURE
4-1 Air velocity/Temperature measurement
1 )Install the " Probe Plug " ( 3-13, Fig. 1 ) into the
" Input Socket " ( 3-8, Fig. 1 ).
2) Power ON the meter by pressing the " Power Button "
( 3-2, fig. 1 ).
3) a. Select the desired air velocity unit ( m/s, km/h, mph,
knots, ft/min ) by pusing the " unit Button " ( 3-5, fig. 1 ).
b. Select the desired temperature units by pusing the " 蚓/蚌
Button " ( 3-6, fig. 1 ).
4) Use the hand to hold the " Probe Handle " ( 3-12, Fig. 1 ),
face the " Vane Probe Head " ( 3-11, Fig. 1 ) to the
measured wind. In the same time the air velocity and the
temp. value will show on the LCD display.
Measuring Consideration :
The yellow dot mark on the sensor head indicates the
" yellow dot mark " need to face against the direction of
air flow.
4-2 Data Hold, Date Record
1) Data Hold
a. During the measurement, pushing the " Data Hold
Button " ( 3-3, Fig. 1 ) will hold the measured value &
the LCD will indicate " HOLD " symbol.
b. Push the " Data Hold Button " again to release the
data hold function.
2) Data Record ( Max., Min. reading )
a. The data record function records the maximum and
minimum readings. Press the " REC. Button " ( 3-4,
Fig. 1 ) to start the Data Record function and there
will be a " REC " symbol on the display.
5
Page 8

b. With the " REC " symbol on the display :
* Press the " REC Button " ( 3-4, Fig. 1 ) once, the
" REC Max " symbol along with the maximum value
will appear on the display.
Note :
If intend to delete the maximum value, just press the
" Hold Button " ( 3-3, Fig. 1 ) for a while, and then
the display will show the " REC " symbol only &
execute the memory function continuously.
* Press the " REC. Button " ( 3-4, Fig. 1 ) again, the
" REC Min " symbol along with the minimum value
will appear on the display.
Note :
If intend to delete the minimum value, just press the
" Hold Button " ( 3-3, Fig. 1 ) for a while, and then
the display will show the " REC " symbol only &
execute the memory function continuously.
c. To exit the memory record function, just press the
" REC " button for 2 seconds at least. The display will
revert to the current reading.
5. AUTO POWER OFF DISABLE
The instrument has " Auto Power Off " function in order to
prolong battery life. The meter will shut off automatically if
none of the buttons are pressed in approx. 10 min.
To disable this function, Select the memory record function
during the measurement by pressing the " REC. Button "
3-4, Fig. 1 ).
6
Page 9

6. RS232 PC SERIAL INTERFACE
The instrument has RS232 PC serial interface via a 3.5 mm
terminal ( 3-7, Fig. 1 ).
The data output is a 16 digit stream which can be utilized
for user's specific application.
A RS232 lead with the following connection will be required
to link the instrument with the PC serial port.
Meter PC
(3.5 mm jack plug) (9W 'D" Connector)
Center Pin.............................Pin 4
Ground/shield.......................... Pin 2
2.2 K
resistor
Pin 5
RS232 CABLE : UPCB-02
The 16 digits data stream will be displayed in the
following format :
D15 D14 D13 D12 D11 D10 D9 D8 D7 D6 D5 D4 D3 D2 D1 D0
7
Page 10

Each digit indicates the following status :
g
:
4
g
蚓
蚌
D0 End Word
D1 & D8 Display reading, D1 = LSD, D8 = MSD
For example :
If the display readin
is 1234, then D8 to D1 is
0000123
D9 Decimal Point(DP), position from right to the left
0 = No DP, 1= 1 DP, 2 = 2 DP, 3 = 3 DP `
D10 Polarity
0 = Positive 1 = Ne
D11 & D12 Annunciator for Display
= 01
Km/h = 10 ft/min = 11 mile/h = 12
knot = 09
D13 When send the upper display data = 1
When send the lower display data = 2
D14 4
D15 Start Word
ative
= 02 m/s = 08
RS232 FORMAT : 9600, N, 8, 1
7. BATTERY REPLACEMENT
1) When the left corner of LCD display show " ", it
is necessary to replace the battery. However, in-spec.
measurement may still be made for several hours after
low battery indicator appears.
2) Slide the " Battery Cover " ( 3-9, Fig. 1 ) away from the
instrument and remove the battery.
3) Replace with 9V battery ( Alkaline or Heavy duty type )
and reinstate the cover.
4) Make sure the battery cover is secured after changing the
battery.
8
0512-DAF80PW
 Loading...