

Page 1

Altimeter / Barometer
Weather Forecasts and Clock / Calendar
TABLE OF CONTENTS
INTRODUCTION --------------------------------------------- 2
DESCRIPTION OF PARTS ---------------------------- 2
INSTALLING AND REPLACING BATTERIES -- 3
GENERAL OPERATION OF THE ALTIMETER 4
• Altitude Calibration ----------------------------------------- 6
• Units of Measurement for Altitude ---------------------- 6
• About The Altitude Change Graph ---------------------- 6
• Altitude History Display ----------------------------------- 7
• About Altitude Change Memory ------------------------- 7
• Clearing Altitude Memory, Max / Min Altitude
Memory, and Vertical Ascent / Decent Memory ----- 7
• The Altitude Alarm ------------------------------------------ 8
• Altitude Sampling Rate ------------------------------------- 8
• Notes On Altimeter Functions ---------------------------- 9
GENERAL OPERATION OF BAROMETER
AND WEATHER FORECAST FUNCTIONS ------- 9
GB
with
Model: DA833
User’s Manual
• Barometric Calibrations ------------------------------------ 10
• Units of Measure for Barometric Pressure ------------- 10
• About The Pressure Change Graph ---------------------- 11
• Pressure History Display ----------------------------------- 11
• Notes On Barometer Functions --------------------------- 11
GENERAL OPERATION OF TIMR AND
DATE FUNCTIONS --------------------------------------- 11
• The Time and Date ------------------------------------------- 12
• The Daily Alarm ---------------------------------------------- 13
• Deactivating The Alarm ------------------------------------- 14
• The Count-Up Timer ----------------------------------------- 14
• Temperature Display ----------------------------------------- 1 4
RESETTING THE UNIT --------------------------------- 14
MAINTENANCE ---------------------------------------------- 15
SPECIFICATIONS -------------------------------------------- 15
1
Page 2
GB
INTRODUCTION
Thank you for your purchase of the Altimeter / Barometer .
Designed to be durable, this unit is constructed for rugged outdoor
use.
The DA833 has three primary functions.
1. An Altimeter
- Functions related to altitude measurement.
2. A Barometer and Weather Forecast Device
- Functions related to weather forecasts and atmospheric
pressure.
3. Clock, Current Date Calendar, and Count-Up Timer
- Functions related to time, date, and time measurement.
An altimeter, the DA833 will measure and display current altitude
readings, changes between two elevations, and maximum and
minimum altitudes. The unit stores altitude data and can indicate
changes in altitude for a 12-hour period or calculates the total
accumulation of elevation ascents over a given period of time. In
addition, the user can set an altitude alarm that will activate when
specified elevations are reached.
The DA833 is also a barometer. It measures and displays current
pressure readings, and provides a barometric history and a bar
graph showing barometric changes over a 12-hour period.
A weather forecast device, the DA833 uses barometric information
to make forecasts as sunny, slightly cloudy, cloudy, and rainy. It
also has a built-in thermometer.
As a timepiece, this unit functions as a clock / calendar, daily
alarm, and count-up timer.
To optimize the usefulness of this device, be sure to read this
instruction manual carefully before use, and keep it handy for
future reference.
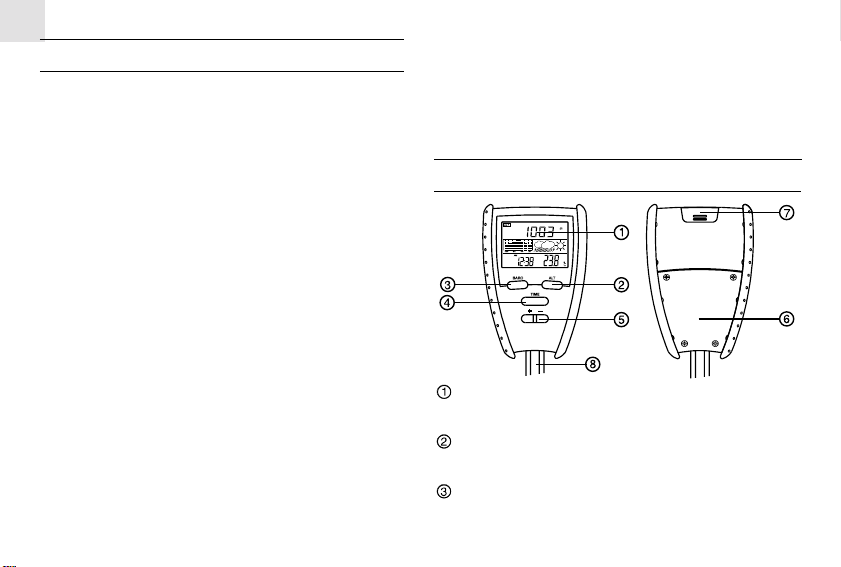
DESCRIPTION OF PARTS
Liquid Crystal Display (LCD)
- Large easy-to-read 3-line LCD
[ALT] Altimeter Button
- Alternates between Altimeter displays
[BARO] Barometer Button
- Alternates between Barometric displays
2
Page 3
TIME Button
- Alternates between Time displays
[+ -] Button
- Changes the value of a setting
- Clears memories
- Activates / deactivates alarm
- Selects units of measure
- Switches from fast to slow sampling rate
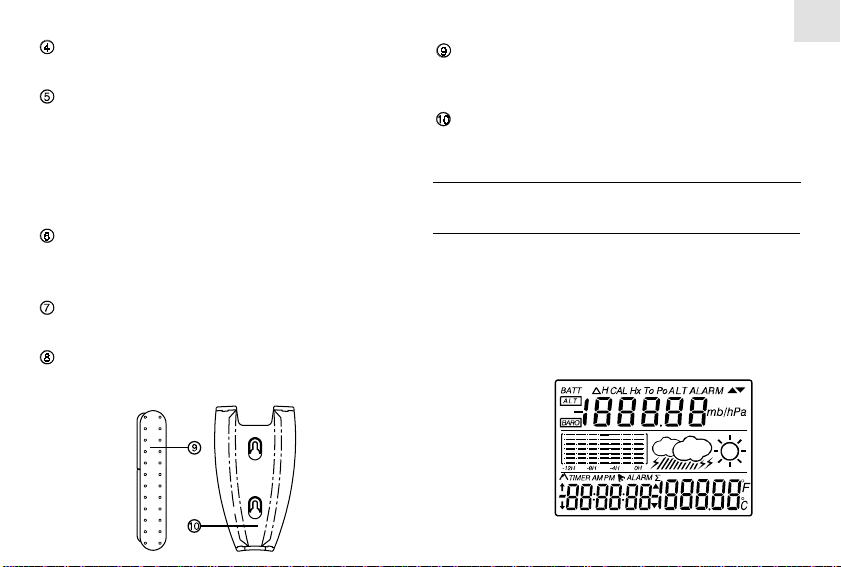
Battery Compartment
- Houses 2 (two) CR-2032 batteries
- RESET Button
Sensor Vents
- Openings for atmospheric sensitive sensors
Neck Cord
- Facilitates carrying around the neck or attached to
a rucksack or belt
GB
Hand Grips
- Rubberized grips that prevent the unit from being
accidentally dropped
Wall-Mount Bracket
- to mount unit to wall or vertical surfice
INSTALLING AND REPLACING OF
BATTERY
The DA833 operates with 2 (two) CR-2032 Lithium batteries that
are included with all new units. During initial packaging, the
batteries were insulated with a red tape so as to maximize the shelf
life of the product. Before use, remove the insulation tape by
gently pulling.
Upon removal, the display will show a full-segment display for 3
seconds; it will then enter the Normal Altitude Display.
3
FULL SEGMENT DISPLAY
Page 4
GB
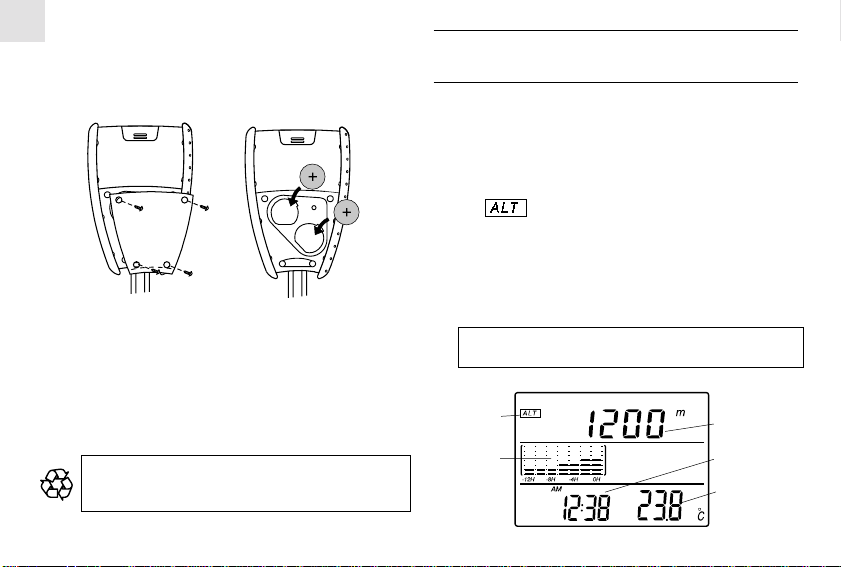
Follow these steps to install or replace batteries:
1. Open battery cover located at the back of the unit by removing
screws.
2. Insert 2 (two) new CR-2032 Lithium batteries.
3. Replace the battery cover.
A battery-low indicate [
BATT
] will show on the display when the
batteries require changing.
It is recommended that when the user is stationary at one elevation,
that the unit is placed in Barometer Mode. The Altimeter Mode
may shorten battery life. Stored altitude related data is not affected
by having the unit in Barometer Mode for extended periods of
time.
Note: Disposed of improperly, batteries can be harmful.
Protect the environment by taking exhausted batteries to
authorized disposal stations.
GENERAL OPERATION OF THE
ALTIMETER
In Altimeter Mode, by detecting changes in air pressure, the
DA833 determines a given altitude level. Subsequently, the unit
can be set to show changes in altitude and maximum / minimum
elevations. It can store altitude-related data and display elevation
trends over a 12-hour period of time. The unit can also display the
net total of accumulative ascents.
A small
and that the displays are altitude related.
To view display sequences in Altimeter Mode:
1. Press [ALT] to move between various Altimeter Mode displays.
Normal Altitude Display
The first display in Altimeter Mode.
Note: If the unit is being used for the first time, it will
automatically enter the Normal Altimeter Display.
Display shows:
Altitude
icon
Altitude
trend
graph
icon indicates that the unit is in Altimeter Mode
Current Altitude
Current Time
Current Temperature
4
NORMAL ALTITUDE DISPLAY
Page 5
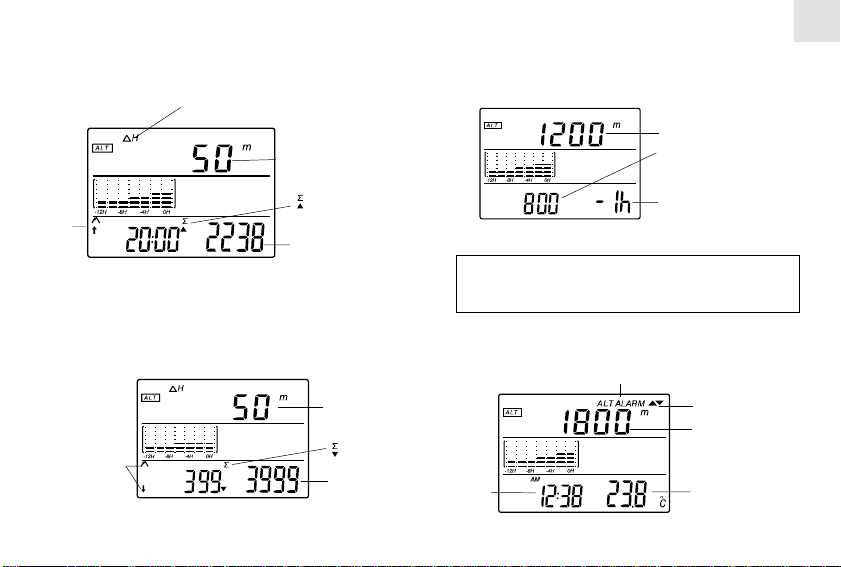
2. Press [ALT] to view the Altitude Max Memory Display.
Display shows:
Altitude change indicator
Change in altitude
4. Press [ALT] again, Altitude History Display.
Display show:
Current altitude
Corresponding altitude level
at the indicated time
GB
Maximum
altitude
reached
ALTITUDE MAX MEMORY DISPLAY
Accumulative vertical
ascent icon
The accumulative vertical
ascent memory
3. Press [ALT] again, to view the Altitude Min Memory Display.
Display shows:
Change in altitude
Minimum altitude
reached
ALTITUDE MIN MEMORY DISPLAY
Accumulative
vertical decent icon
Accumulative
vertical decent
memory
One hour previous*
ALTITUDE HISTORY DISPLAY
* Previous altitude levels can be displayed for up to 12-
hours. Press [+] or [-] to display previous altitude levels
at one-hour intervals for the past 12-hours.
5. Press [ALT] again to view the Altitude Alarm Display.
Display shows:
Alarm display indicator
Altitude level where the
alarm will activate
Current Time
ALTITUDE ALARM DISPLAY
Current Temperature
5
Alarm On/Off Indicator
Page 6
GB
6. Press [ALT] again, the unit will return to the Normal
Altitude display.
Altitude Calibration
If the altitude on the display is different from the actual current
altitude, the unit can be manually calibrated to reflect the true
altitude level.
To calibrate the altitude:
1. In Normal Altitude Display.
2. Press and hold [ALT] and [TIME] simultaneously for about 2
seconds. The CAL Hx indicator shows on the display and the
current altitude digits start flashing.
3. Press [+] or [-] to adjust the altitude reading by 1 m. For rapid
acceleration of measurement adjustments, press and hold.
4. Press [ALT] to confirm and return to the Altitude Display.
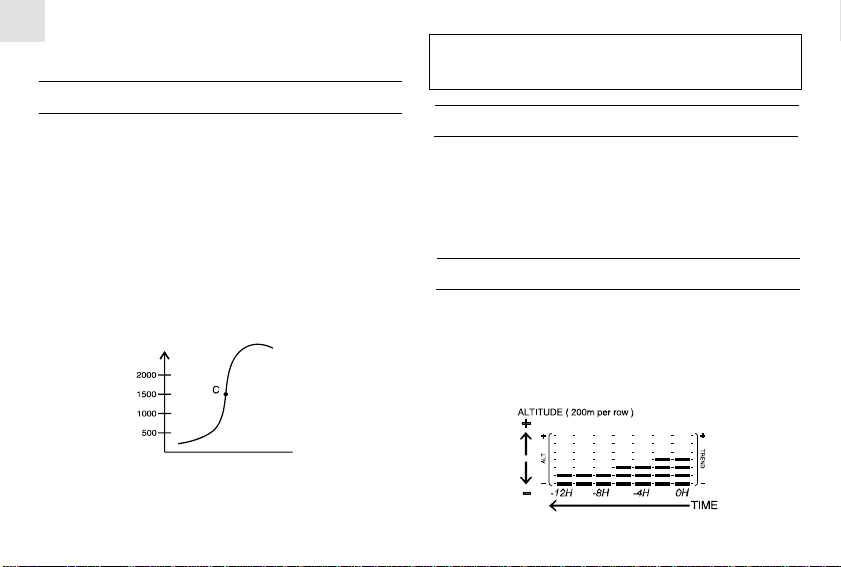
Example:
Point C: A point where the altitude, as indicated by a marking
stone or post, is 1500 m. At this point set the current
altitude to 1500 m.
Note: The unit will return to Normal Altimeter Display if no
buttons are pressed for one-minute during the calibration
sequence.
Units of Measurement for Altitude
Altitude measurements can be displayed in feet (ft) or meters (m).
To change the altitude units of measure:
1. In Normal Altitude Display.
2. Simultaneously, press and hold the [+] and [-] to select
between meters or feet.
About The Altitude Change Graph
In Normal Altitude Display, the DA833 graphically display
altitude levels at 2-hour time intervals for the past 12 hours. Each
vertical bar on the altitude graph represents a 2-hour time period.
Each horizontal line represents pressure changes equal to + /200-meters.
( 2 hours per column )
6
Page 7
The Altitude Change Graph is viewed in all the Altimeter Mode
displays.
Altitude History Display
In addition to having altitude information displayed as a graph,
altitude history can also be displayed numerically.
To numerically display previous altitude levels:
1. Enter the Altitude History Display
2. Press [+] or [-] to display the corresponding altitude history
for a specified time period up to –12 hours.
About Altitude Change Memory
The DA833 can monitors the change in altitude between two
points. The unit displays the net vertical difference between
points of a descent / ascent. Upon clearing the altitude memory,
the current altitude reading is used as a base from which the unit
starts recording changes.
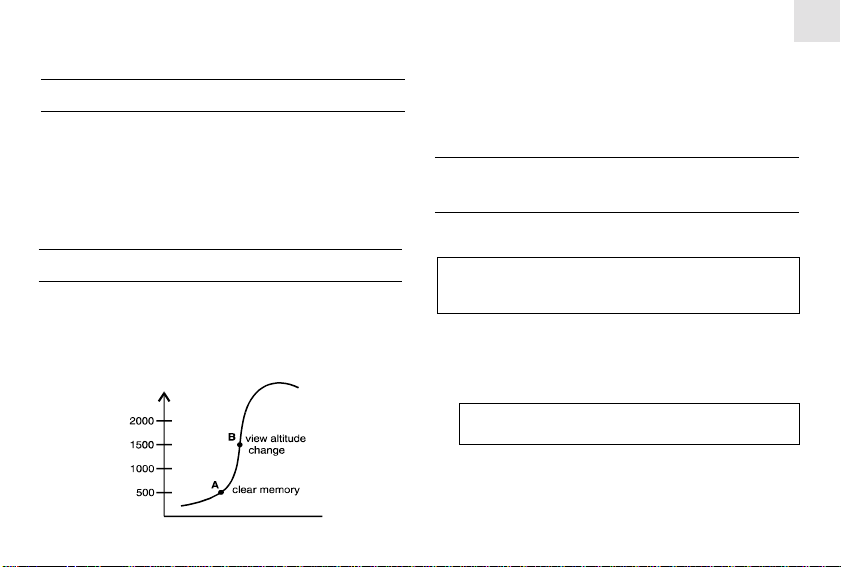
Point A: At this point, reset the Altitude Change Memory to 0 m.
GB
/ ft. The DA833 will immediately start recording new
changes in altitude.
Point B: At this point, check the Altitude Change Memory. The
unit will display the net vertical difference between
point A and point B.
Clearing Altitude Memory, Max / Min Altitude
Memory, and Vertical Ascent / Decent Memory
Altitude related memories are cleared sequentially. During the
sequence, correct information can be bypassed by pressing [ALT].
Note: To clear the maximum altitude reached memory, first
enter MAX Altitude Display. Alternately, enter MIN Altitude
Display to clear the minimum altitude reached memory.
To clear Altitude Mode Memories:
1. Enter Altitude Max (or Altitude Min) Display.
2. Press and hold [ALT] for about 2 seconds, the change-inaltitude digit flash.
Note: To bypass any section without making changes to the
memory, press [ALT].
3. Press [+] or [-], the change-in-altitude digits will reset to 0
m./ft.
4. Press [ALT], and proceed to the maximum (orminimum)
7
Page 8

GB
height reached memory. The subsequent maximum (or
minimum) altitude digits flash.
5. Press [+] or [-], the memory resets to the current actual
altitude.
6. Press [ALT], and proceed to the accumulative vertical ascent
/ decent memory. The subsequent accumulative vertical
ascent / decent digits flash.
7. Press [+] or [-], the vertical ascent / decent memory resets to
0 m. / ft.
8. Press [ALT] a last time and the unit returns to the Altitude
Max (or Min) Memory Display.
Note: The DA833 will return to Altitude Max/Min Memory
Display if no buttons are pressed for 1 minute.
The Altitude Alarm
The Altitude Alarm can be set to activate when a specific
altitude is reached.
To set the altitude alarm:
1. Enter Altitude Alarm Display.
2. Press and hold [ALT] for above 2 seconds. The
indicator will display.
3. Press the [+] and [-] to increase / decrease the altitude
reading. Press and hold for 100 m acceleration of
increments.
4. Press [ALT]
5. Press [+] or [-] to deactivate the alarm (the indicator
disappears) or [+] or [-] to activate the alarm (
indicator appears).
6. Press [ALT], the
The
at the specified elevation.
7. Press [ALT] again and the Altimeter exits the setting
sequence. If the alarm is set to activate at a specified
altitude, the
Note: The unit will return to the Altimeter Display if no
buttons are pressed for 2 minutes.
The altitude alarm setting ranges is between –500m and 7000m.
ALTALARM
indicator will appear and the alarm will activate
will be displayed.
indicator stops flashing.
Altitude Sampling Rate
The DA833 automatically samples altitude level at a rate of 2
seconds or 15 minutes.
When detecting a significant change in altitude, the unit will
automatically increase the Altitude Sampling Rate to 2-second
intervals.
When maintained at the same elevation for 10 minutes or longer,
the device will automatically decrease the rate at which altitude
samples are taken.
To manually force a change in the frequency at which altitude
samples are taken:
1. In Normal Altimeter Display.
8
Page 9
2. Press and hold (+) for about 2 seconds. The Altitude
Sampling Rate will increase to 2-second intervals.
3. Press and hold (-) for about 2 seconds. The Altitude
Sampling Rate will decrease to 15-minute intervals.
Notes On The Altimeter Functions
Altitude readings may be affected by air pressure change. Sudden
changes in pressure, temperature and weather may cause an
inaccurate altitude reading.
The unit cannot distinguish between change of air pressure caused
by a weather change or by an altitude change. However, accurate
functioning of the unit can be maintained by following a few
simple steps.
To ensure that accurate altitude readings are maintained:
- At the start of a journey, switch the unit to the Altimeter
Display Mode. The last barometric pressure will remain
stored until the unit is switched back to the Barometer
Display Mode.
- When a journey is completed, or if the unit is maintained at
the same altitude for extended periods, it is recommended to
switch to the Barometer Display Mode.
- If a journey is particularly long or extended over a long
distance of varying altitudes, occasionally compare the unit’s
displayed altitude against known actual altitudes. If
necessary, manually calibrate the altitude to maintain correct
altitude readings.
GENERAL OPERATION OF THE
BAROMETER AND WEATHER
FORECAST FUNCTIONS
In Barometric Mode, by detecting changes in air pressure, this
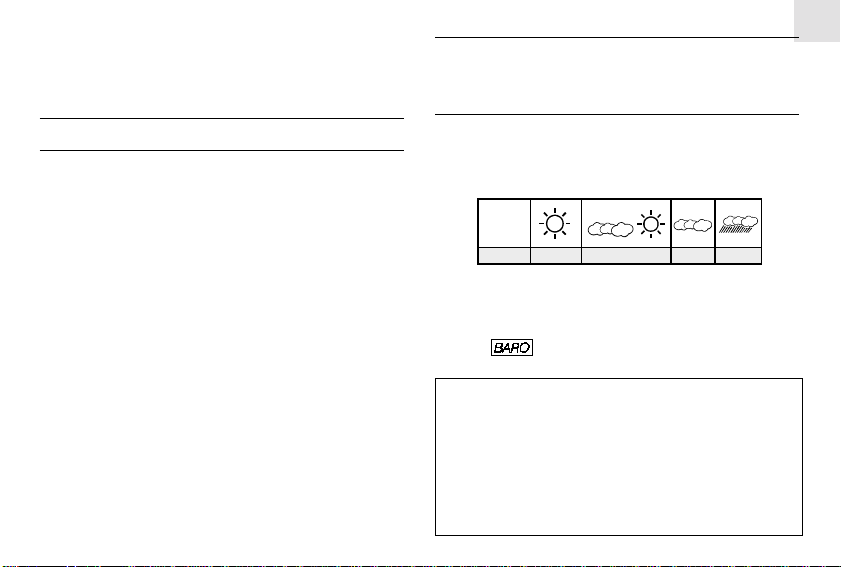
unit makes weather predictions. Illustrated weather forecasts
symbols indicate forecasts as sunny, slightly cloudy, cloudy,
and rainy.
LCD
displays
on the
unit
Forecast Slightly Cloudy
Displayed forecast symbols are intended indicate weather forecasts
for the coming 12 to 24 hours. The radius of the forecast is
approximately 30 to 50 km.
A small
icon indicates that the unit is in Barometric
Mode and that the displays are barometer related.
Note:
1. The accuracy of weather forecasts, when only using
atmospheric pressure trends, are approximately 70 to 75
percent.
2. The weather forecasts from this unit are predictions that
cover the next 12 to 24 hours. It may not necessarily reflect
the current situation.
3. The "Sunny" icon, as applies to nighttime, implies clear
weather.
9
Cloudy RainySunny
GB
Page 10

GB
To View Different Displays in Barometric Mode:
1. Press [BARO] to move between barometric functions.
Normal Barometric Display
The first display in Barometric Display Mode.
Note: The unit will automatically enter Normal Barometric
Display when first entering the Barometric Mode.
Display shows:
Pressure change
trend graph
Current Time
BARO icon
NORMAL BAROMETRIC DISPLAY
Current pressure
Weather forecast
indicators
Current Temperature
2. Press [BARO] again to view the Barometric Pressure History
Display
Display shows:
Corresponding
barometric pressure
level at the
indicated time
BAROMETRIC HISTORY DISPLAY
One hour previous*
* Previous barometric levels can be displayed for up to 12
hours. Press [+} or [-] to display previous barometric
levels at one hour intervals for the past 12 hours.
3. Press [BARO] again, to return to the Normal Barometer
Display.
Barometric Calibrations
At sea level or near a reliable source like a weather station, the
barometer can be calibrated.
To calibrate the barometric function:
1. Enter the Normal Barometric Display .
2. Simultaneously press and hold [BARO] and [TIME] for about
2 seconds. The “CAL Po” will be displayed and the current
barometric digits will flash.
3. Press [+] or [-] to adjust barometric readings.
4. Press [BARO] to return to the Barometric Display Mode.
Units of Measure for Barometric Pressure
Barometric units of measurement can be displayed as mb, hpa,
and inHg.
To change the units of measurement:
1. Enter Normal Barometric Display.
2. Simultaneously press and hold [+] and [-] for about 2 seconds.
3. Simultaneously press again until the desired units have
been selected.
10
Page 11
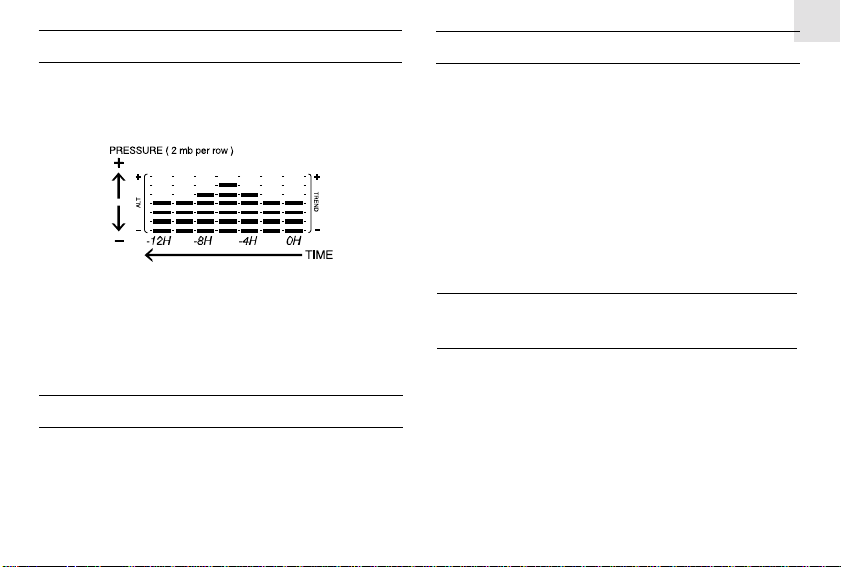
About The Pressure Change Graph
The DA833 can display barometric pressure levels at intervals for
the past 12 hours. Each vertical bar on the Pressure Change Graph
represents a 2-hour time period. Each horizontal line represents
pressure change equal to + / - 2 mb/hPa.
( 2 hours per column )
An upward or downward direction of the vertical bars may illustrate
a changing pressure trend. Subsequently, this may indicate
changes in weather conditions. However, as stated previously,
caution needs to be taken when attempting to predict weather
forecasts.
Pressure History Display
Barometric pressure readings can also be displayed numerically.
To numerically display previous barometric pressure levels:
1. Enter the Barometric History Display
2. Press [+] or [-] to display the corresponding barometric
pressure for the specified time period.
GB
Notes On The Barometer Functions
Barometer readings may be affected by a change in altitude.
The unit cannot distinguish between a change in air pressure
caused by weather patterns or by a change in altitude. However,
accurate functioning of the unit can be maintained by following
a few simple steps.
To ensure that accurate barometric readings are maintained:
When the unit is stationed at the same elevation for extended
periods, it is advised to keep theunit in Barometer Mode.
In addition to maximizing the weather forecasting capabilities
the unit requires less power to function. Subsequently battery
life may be extended.
GENERAL OPERATION OF THE TIME
AND DATE FUNCTIONS
The DA833 has a Time and Date Mode. This mode also includes a
count-up timer and daily wakeup alarm.
The Time and Date Mode only affects the third line of the LCD.
To View Different Time and Date Mode displays:
1. Enter Normal Altimeter Display or Normal Barometer Display
to view current time.
11
Page 12

GB
Normal Time Display
The first display in Time and Date Mode.
Note:
- Normal Time Display is the third line of either the Normal
Altitude Display or Normal Barometer Display.
- Only the third line of the LCD will change in Time Date
Mode.
Display shows:
Current Time
Current
Temperature
NORMAL TIME DISPLAY
2. Press [TIME] to view the Current Date / Month Display.
Display shows:
Current Date / Month
Current
Temperature
DATE MONTH DISPLAY
3. Press [TIME] again to view the Alarm Time Display
Display shows:
Alarm Time
Current
Temperature
ALARM TIME DISPLAY
4. Press [TIME] again to view the Timer Display
Display shows:
Count-Up Time
Current
Temperature
TIMER DISPLAY
The Time and Date
The current time and date can be set sequentially.
To Set the Current Date and Time:
1. Enter Normal Altitude Display or Normal Barometer Display.
2. Press and hold [TIME] for 2 seconds, the EU or US indicator
starts flashing.
12
Page 13

3. Press [+] or [-] to select US for US format shown as month /
date or EU for European format shown as date / month.
4. Press [TIME] again, the current month flashes.
5. Press [+] or [-] to increase / decrease the month digits. For
rapid acceleration of the digits, press and hold.
6. Press [TIME] again, the current date flashes.
7. Press [+] or [-] to increase / decrease the date digit.
8. Press [TIME] again, the 12-hour or 24-hour indicator starts
flashing.
9. Press [+] or [-] to select between 12-hour or 24-hour time
format.
10. Press [TIME] again, the hour digit starts flashing.
11. Press [+] or [-] to increase / decrease the hour digit.
12. Press [TIME] again, minute digits start flashing.
13. Press [+] or [-] to increase / decrease the minute digits.
14. Pressing [TIME] a last time to exit.
Note: The unit will return to Normal Barometer Display or
Altitude Display if no buttons are pressed for 1 minutes during
setting sequence.
The Daily Alarm
The DA833 has a daily alarm that can be programmed to activate
at the same time each day.
To Set the Alarm Time:
1. Enter Alarm Time Display
2. Press and hold [TIME] for 2 seconds, the [
displayed and the [ALARM] indicator and the hour digits
start flashing.
3. Press [+] or [-] to increase / decrease the hour digits.
4. Press [TIME] again, the minute digits flash.
5. Press [+] or [-] to increase / decrease the minute digit.
6. Press [TIME] again to set and activate / deactivated the alarm.
7. Press [+] or [-] to select between and Activate. The alarm icon
will only appear when the alarm is set.
8. Pressing [TIME] a last time to exit. The ALARM indicator
stops flashing.
13
] icon will be
GB
Page 14

GB
Note: If no buttons are pressed for 2 minutes during setting
sequence, the unit will return to Alarm Time Display.
Deactivating The Alarm
When the alarm time is reached the alarm will sound for 1 minute.
To stop the alarm:
Pressing any button can stop the alarm sound.
The Count-Up Timer
The unit comes with a count-up timer and can count up to 99
hours 59 minutes and 59 seconds.
To start, stop, and reset the timer:
1. Enter Timer Display.
2. Press [+] the timer starts counting.
3. Press [+] again, the timer stops. To start the timer again
without clearing the elapsed time, press [+].
4. To reset the timer to 0, press [+] to stop the timer and then
press [-].
Temperature Display
The current temperature is displayed in all three display modes.
The temperature can be displayed as Celsius (°C) and Fahrenheit
(°F).
To select the units of measure for the temperature display:
1. Enter Date/Month Mode.
2. Press and hold [+] or [-] for about 2 seconds to change the
units of measure.
RESETTING THE UNIT
Located inside the battery compartment is a RESET Button.
Using a blunt object such as a paper clip, press RESET to return all
settings to the factory values.
The button is required only when the unit is not operating in a
favorable way, such as in the rare case of a malfunction.
Note: After resetting the unit all memories and data will be
cleared.
14
Page 15

MAINTENANCE
When handled properly, this unit is engineered to
give you years of satisfactory service. Here are a few
product care instructions:
1. Do not immerse the unit in water. If the unit comes
in contact with water, dry it immediately with a soft
lint-free cloth.
2. Do not clean the unit with abrasive or corrosive
materials. Abrasive cleaning agents may scratch the
plastic parts and corrode the electronic circuit.
3. Do not subject the unit to excessive: force, shock,
dust, temperature, or humidity. Such treatment
may result in malfunction, a shorter electronic life
span, damaged batteries, or distorted parts.
4. Do not tamper with the unit’s internal components.
Doing so will terminate the unit’s warranty and may
cause damage. The unit contains no user-serviceable
parts.
5. Only use new batteries as specified in this instruction
manual. Do not mix new and old batteries as the old
batteries may leak.
GB
SPECIFICATIONS
Operating Temperature : -10°C to 60°C
Range (-14°F to 140°F)
Altimeter Functions
Range : -500 m to +7000 m
Resolution : 1 m / 1 ft
Sampling rate : 2 sec ( normal mode )15min
(sleep mode: same level for
more than 15 min.)
Range : 60,957 m / 1 99,999 f t
Units of measure : m or ft
Barometer Functions
Range : 400 mb/hPa to 1070 mb/hPa
Resolution : 1mb/hPa (0.03inHg)
Sampling rate : 15 minutes
Units of measure : mb/hpa or inHg
Thermometer Functions
Range : -40°C to 70°C
( -40°F to 158°F )
15
Page 16

GB
Resolution : 0.1°C ( 0.2°F )
Sampling rate : 10 seconds
Units of measure : °C or °F
Calendar Clock Functions
Calendar : Date/month (European
format) or month/Date
( US format )
Clock time : 12-hour AM /PM format or
24-hours format
Time resolution : 1 second
Timer Functions
Range : counts up to 99 hours,
59 minutes, 59 seconds
Resolution : 1 second
CAUTION
- The content of this manual is subject to change without
further notice.
- Due to printing limitation, the displays shown in this
manual may differ from the actual displays.
- The manufacturer and its supplies holds no responsibilitis
to you or any other person for any damages expenses, lost
profits, or any other damages arise by using this Altimeter.
- The contents of this manual may not be reproduced without
the permission of the manufacturer.
16
 Loading...