

Page 1
V
ANE ANEMOMETE
R
R
BAROMETE
HUMIDITY/TEMP.
Model : ABH-4225
Page 2

TABLE OF CONTENTS
.
.
3-4 Hold ( ) Button, Unit Button.........................
.
.
.
.
1.FEATURES.................................................................1
2.SPECIFICATIONS......................................................
2-1 General Specifications..........................................2
2-2 Electrical Specifications........................................3
3. FRONT PANEL DESCRIPTION..................................... 5
3-1 Vane...................................................................5
3-2 Humidity/Temp. Sensor.......................................
3-3 Power ( ) Button.............................................▲ 5
3-5 REC ( ) Button, Mode Button............................▼ 5
3-6 LCD Display........................................................
3-7 Battery Compartment/Cover.................................5
4.MEASURING PROCEDURE.......................................... 6
4-1 Mode ( Function ) selection..................................6
4-2 Unit selection...................................................... 7
4-3 Anemometer measurement..................................8
4-4 Barometer measurement.....................................
4-5 Humidity measurement........................................9
4-6 Dew point measurement......................................9
4-7 Data Hold...........................................................
4-8 Data Record ( Max., Min. reading ).......................10
4-9 Auto power off management................................11
2
5
5
5
9
10
5.BATTERY REPLACEMENT...........................................
6.OPTIONAL CARRYING CASE.......................................11
11
Page 3

1. FEATURES
* Anemometer, Barometer, Humidity, Temperature
meter, 4 in one, professional.
* Anemometer unit : m/S, Km/h, FPM, mph, Knot.
* Barometer unit : hPa, mmHg, inHg.
* Humidity with Dew point measurement
* Temperature measurement with , unit.℃℉
* Vane anemometer, available for wind speed
measurement, high reliability.
* Fast response time for humidity measurement.
* Atmosphere measurement with high accuracy.
* Two display can select the six mode ( function ) :
Humidity/Temp., Humidity/Dew point,
Anemometer/Temp., Barometer/Temp.
Barometer/Humidity, Barometer/Anemometer,
* Bright LCD display.
* Microprocessor circuit ensures high accuracy and
provides special functions and features.
* Records Maximum and Minimum readings with recall.
* Auto power off saves battery life.
* Operates from DC 1.5V ( UM4/AAA ) x 4 PCs batteries.
* Low-friction ball vane wheels is accurate in both high
and low velocities.
* Durable, long-lasting components, enclosed in strong,
compact ABS-plastic housing.
1
Page 4
2. SPECIFICATIONS
2-1 General Specifications
Display LCD size : 28 mm x 19 mm.
Anemometer m/S (meters per second)
Unit Km/h ( kilometers per hour )
FPM ( feet per minute )
mph ( miles per hour )
Knot ( nautical miles per hour )
Temp. unit , ℃℉
Barometer unit :hPa, mmHg, inHg.
Humidity unit %RH
Dew point , ℃℉
Circuit Custom one-chip of microprocessor LSI
circuit.
Sensor Anemometer Van probe with low friction
Structure ball bearing design.
Barometer Semiconductor
Humidity Capacitance humidity
sensor, semiconductor
Temperature Semiconductor
Data Hold Freeze the display reading.
Memory Recall Maximum & Minimum value.
Sampling Time Approx. 1 second.
Power off Auto shut off saves battery life or
manual off ( REC function ).
Operating 0 to 50 .℃
Temperature
Operating Less than 80% R.H.
Humidity
2
Page 5

Power Supply DC 1.5 V battery ( UM4/AAA ) x 4 PCs,
Power Current Approx. DC 5.2 mA
Weight 182 g/ 0.4 LB.
@ Battery is included.
Dimension 205 x 48 x 40 mm (8.1" x 1.9" x 1.6")
Accessories Instruction manual......................1 PC
Included
Optional Soft carrying case with sash
Accessory ( 210 x 80 x 50 mm ), Model : CA-52A
2-2 Electrical Specifications (23±5 )℃
Anemometer ( Air velocity )
Measurement Range Resolution Accuracy
m/S 0.4 to 30.0 m/s 0.1 m/S 20 m/s : ≦
Km/h 1.4 to 108.0 km/h 0.1 Km/h ± 3% F.S.
FPM 80 to 5910 ft/min 1 Ft/min > 20 m/s :
mph 0.9 to 67.0 mile/h 0.1 Mile/h ± 4% F.S.
Knot 0.8 to 58.3 knots 0.1 Knots
Note :
m/S (meters per second) mph ( miles per hour )
Km/h ( kilometers per hour ) Knot ( nautical miles per hour )
FPM ( feet per minute )
Temperature
Measuring Range 0 to 50 /32 to 122 ℃℃℉ ℉
Resolution 0.1 /0.1 ℃℉
Accuracy ± 0.8 /1.5 ℃℉
3
Page 6
Humidity / Dew point
*
3
V
a. Humidity
Range 10 % to 95 % R.H.
Resolution 0.1 % R.H.
Accuracy 70% RH ≧
± (3% reading + 1% RH).
< 70% RH - 3% RH.
±3% RH.
b. Dew point
℃ Range -25.3 to 48.9 ℃℃
Resolution 0.01 ℃
℉ Range -13.5 to 120.1 .℉℉
Resolution 0.01 .℉
Remark :
* Dew Point display value is calculated from the
Humidity/Temp. measurement automatically.
* The Dew Point accuracy is sum accuracy value of
Humidity & Temperature measurement..
Barometer
Measurement Range Resolution Accuracy
hPa 10.0 to 999.9 0.1 ± 1.5 hPa
1000 to 1100 1 ± 2 hPa
mmHg 7.5 to 825.0 0.1 ± 1.2 mmHg
inHg. 0.29 to 32.48 0.01 ± 0.05 inHg
Above specification tests under the environment RF Field Strength less than
/M & frequency less than 30 MHz only.
4
@ reading
Page 7

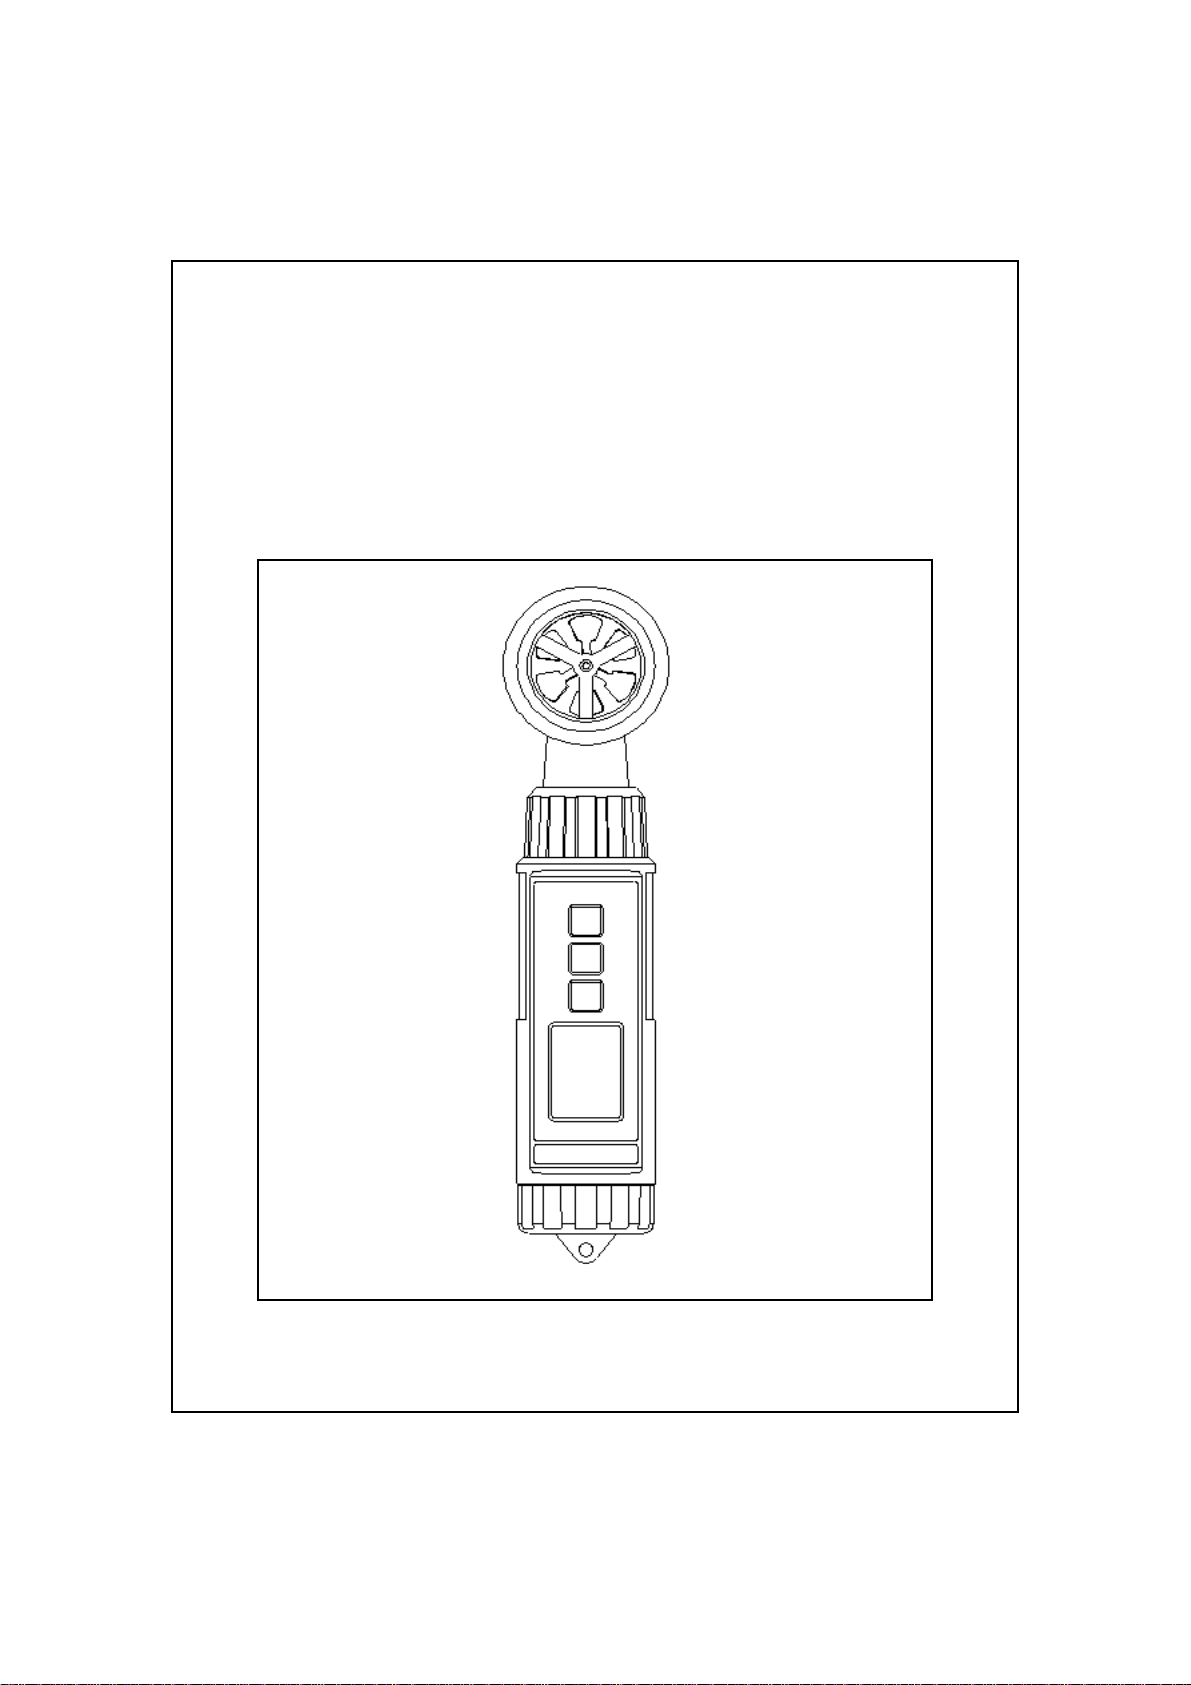
3. FRONT PANEL DESCRIPTION
3-4 Hold ( ) Button, Unit Button
Fig. 1
3-1 Vane
3-2 Humidity/Temp. Sensor
3-3 Power ( ) Button▲
3-5 REC ( ) Button, Mode Button▼
3-6 LCD Display
3-7 Battery Compartment/Cover
5
Page 8

4. MEASURING PROCEDURE
a, b, c, d, e, f, then press " Button " ( 3-4,
4-1 Mode ( Function ) selection
1)Turn on the meter by pressing the " Power Button "
( 3-3, Fig. 1 ) momentarily.
*
Pressing the " Power Button " ( 3-3, Fig. 1 )
momentarily again will turn off the meter.
2)The meter can select 6 kind mode ( function ) as :
a.Humidity/Temp.
b.Humidity/Dew point
c.Anemometer/Temp.
d.Barometer/Temp.
e.Barometer/Humidity
f. Barometer/Anemometer
Pressing the " Mode Button " ( 3-5, Fig. 1 )
continuously at least 2 seconds, both upper and the
lower display value will be flashed, use the " ▲
Button " ( 3-3, Fig. 1 ) or " Button " ( 3-5, Fig. 1 )▼
to select the one kind mode ( function ) of above
Fig. 1 ) to entry the selecting mode.
6
Page 9

%RH
unit, then press " Button " ( 3-4, Fig. 1 )
60.9 Value Flashing
Value Flashing
*
After the mode ( function ) is selected, it will be
memorized into the memory circuit .
If power off and on again will present the
existing selection mode ( function ).
4-2 Unit selection
1)Turn on the meter by pressing the " Power Button "
( 3-3, Fig. 1 ) momentarily.
*
Pressing the " Power Button " ( 3-3, Fig. 1 )
momentarily again will turn off the meter.
2)Pressing the " Unit Button " ( 3-4, Fig. 1 )
continuously at least 2 seconds, both upper and the
lower unit will be flashed, use the " Button " ( 3-3,▲
Fig. 1 ) to select the upper display's unit, use the " ▼
Button " ( 3-5, Fig. 1 ) to select the lower display's
25.9 ℃
to entry the selecting unit.
7
Page 10

Unit Flashing %RH
60.9
25.9 ℃ Unit Flashing
The measuring unit for different mode
( function ) are :
Anemometer unit
Temp. unit m/S, Km/h, FPM, mph, Knot
Barometer unit , ℃℉
Humidity unit hPa, mmHg, inHg.
Dew point %RH
, ℃℉
*
After the unit is selected, it will be memorized into
the memory circuit. If power off and on again will
present the existing selection unit.
4-3 Anemometer measurement
1)Turn on the meter by pressing the " Power Button "
( 3-3, Fig. 1 ) momentarily.
2)For the above 4-1 mode ( function ) selection, please
set to :
c.Anemometer/Temp.
( Upper display show air velocity value, lower
display show Temp. value )
f. Barometer/Anemometer
( Upper display show atmosphere value , lower
display show air velocity value )
8
Page 11

4-4 Barometer measurement
1)Turn on the meter by pressing the " Power Button "
( 3-3, Fig. 1 ) momentarily.
2)For the above 4-1 mode ( function ) selection, please
set to :
d.Barometer/Temp.
( Upper display show atmosphere value , lower
display show Temp. value )
e.Barometer/Humidity
( Upper display show atmosphere value , lower
display show humidity value )
f. Barometer/Anemometer
( Upper display show atmosphere value , lower
display show air velocity value )
4-5 Humidity measurement
1)Turn on the meter by pressing the " Power Button "
( 3-3, Fig. 1 ) momentarily.
2)For the above 4-1 mode ( function ) selection, please
set to :
a.Humidity/Temp.
( Upper display show humidity value , lower
display show Temp. value )
e.Barometer/Humidity
( Upper display show atmosphere value , lower
display show humidity value )
4-6 Dew point measurement
1)Turn on the meter by pressing the " Power Button "
( 3-3, Fig. 1 ) momentarily.
2)For the above 4-1 mode ( function ) selection, please
set to :
9
Page 12

b.Humidity/Dew point
( Upper display show humidity value , lower
display show dew point value )
4-7 Data Hold
* During the measurement, press the " Hold Button "
( 3-4, Fig. 1 ) momentarily to hold the measured
value. The LCD will show a " HOLD " symbol.
* Press the" Hold Button " once again to release the
data hold function.
4-8 Data Record ( Max., Min. reading )
1)The data record function records the maximum and
minimum readings. Press the " REC Button " ( 3-5, Fig.
1 ) momentarily to start the Data Record function,
shows " REC " on the display.
2)With the " REC " symbol on the display.
a)Press the " REC Button " ( 3-5, Fig. 1 ) momentarily,
the " REC MAX " symbol along with the maximum
value will appear on the display.
b)Press the " REC Button " ( 3-5, Fig. 1 ) momentarily
again, the " REC MIN " symbol along with the
minimum value will appear on the display.
* When display shows " REC MAX " or " REC MIN ",
press the " Hold Button " ( 3-4, Fig. 1 )
momentarily will delete the max. ( min. ) value,
the display will show the " REC. " only and
execute the memory function continuously.
c)To exit the memory record function, press the
" REC " button for 2 seconds at least. The display will
revert to the current reading, not show " REC "
10
Page 13

4-9 Auto power off management
displays the low battery icon " ", using 4 fresh
1)The instrument has built-in "Auto Power Shut-off "
function in order to prolong battery life. The meter will
switch off automatically if none of the buttons are
pressed within 10 min.
2)To de-activate this feature, Select the memory record
function during measurement, by pressing the
" REC Button " ( 3-5, Fig. 1 ).
5. BATTERY REPLACEMENT
*Replace the batteries when the left corner of the LCD
1.5 V ( UM4, AAA ) batteries.
*To change the batteries, open ( rotate clockwise direction )
the " Battery Cover " ( 3-7, Fig. 1 ).
*Make sure the " Battery cover " (3-7, Fig 1) is secured
after changing the batteries.
6. OPTIONAL CARRYING CASE
Soft carrying case with sash.
Size : 210 x 80 x 50 mm
Model : CA-52A
11
0612-ABH4225
 Loading...